SC5 - Steam cleaner KARCHER - Free user manual and instructions
Find the device manual for free SC5 KARCHER in PDF.
| Product type | Steam cleaner |
| Brand | KARCHER |
| Model | SC5 |
| Dimensions (L × W × H) | 439 × 301 × 304 mm |
| Weight (without accessories) | 6.0 kg |
| Electrical supply | 220-240 V ~ 50 Hz |
| Heating power | 2200 W |
| Iron power | 700 W |
| Maximum operating pressure | 0.42 MPa |
| Heat-up time | 3 minutes |
| Continuous steam output | 60 g/min |
| Maximum steam output | 150 g/min |
| Vapohydro output | 250 g/min |
| Water tank capacity | 1.5 L |
| Boiler capacity | 0.5 L |
| Main functions | Steam cleaning, steam ironing (iron accessory), Vapohydro function for stubborn dirt |
| Safety devices | Pressure regulator, boiler thermostat, safety thermostat, maintenance closure (pressure relief valve) |
| Maintenance and cleaning | Rinse the boiler after 8 fills; descale according to water hardness (every 50 to 100 fills) |
| Spare parts and repairability | Use only KARCHER spare parts; list at the end of the manual |
| Included accessories | Steam gun, steam hose, pencil jet nozzle, round brush, manual nozzle with cover, two extension tubes, floor nozzle with microfiber mop, descaling rod |
| Optional accessories | Steam iron, microfiber cloth kit, turbo steam brush, wallpaper stripper, etc. |
| Warranty | According to retailer conditions; free repair in case of material or manufacturing defects |
Frequently Asked Questions - SC5 KARCHER
User questions about SC5 KARCHER
0 question about this device. Answer the ones you know or ask your own.
Ask a new question about this device
Download the instructions for your Steam cleaner in PDF format for free! Find your manual SC5 - KARCHER and take your electronic device back in hand. On this page are published all the documents necessary for the use of your device. SC5 by KARCHER.
USER MANUAL SC5 KARCHER
Description of the Appliance EN 6
Quick Reference EN 6
Operation. EN 6
How to Use the Accessories EN 7
Care and maintenance EN 9
Troubleshooting EN 9
Technical specifications. EN 10
Special accessories. EN 10
General information

Please read these original operating instructions and the enclosed safety in
structions prior to the initial use of your device. Proceed accordingly. Keep both booklets for future reference or subsequent owners.
Proper use
Use the steam cleaner only for private households. The appliance is intended to be used with steam and can be used with the appropriate accessories as described in these operating instructions. You will not need any detergent. Please adhere to the safety instructions.
Symbols on the machine

CAUTION - Please read the operating instructions!

Steam
CAUTION - Danger of scalding
Environmental protection

The packaging material can be recycled. Please do not place the packaging into the ordinary refuse for disposal, but arrange for the proper recycling.

Old appliances contain valuable materials that can be recycled. Please arrange for the proper recycling of old appliances. Please dispose your old appliances using appropriate collection systems.
Electrical and electronic devices often contain components which could potentially pose a danger to human health and the environment if handled or disposed of incorrectly. However, these components are necessary for the proper operation of the device. Devices marked with this symbol must not be disposed of with regular household rubbish.
Notes about the ingredients (REACH)
You will find current information about the ingredients at:
www.kaercher.com/REACH
Scope of delivery
The scope of delivery of your appliance is illustrated on the packaging. Check the contents of the appliance for completeness when unpacking.
In the event of missing accessories or any transport damage, please contact your dealer.
Warranty
The warranty terms published by the relevant sales company are applicable in each country. We will repair potential failures of your appliance within the warranty period free of charge, provided that such failure is caused by faulty material or defects in manufacturing. In the event of a warranty claim please contact your dealer or the nearest authorized Customer Service centre.
Please submit the proof of purchase.
(See address on the reverse)
Spare parts
Use only original KÄRCHER spare parts. You will find a list of spare parts at the end of these operating instructions.
Safety Devices
CAUTION
Safety devices protect the user and must not be modified or bypassed.
Pressure controller
The pressure controller keeps the boiler pressure during the operation as constant as possible. The heating is turned off if the maximum operating pressure of 4 bar is reached in the boiler and is reactivated in case of a pressure drop in the boiler due to steam tapping.
Boiler thermostat
If, in case of a malfunction, there is no water in the boiler, the temperature in the boiler rises. The boiler thermostat turns off the heating. Once the boiler is filled, normal operation can continue.
Safety thermostat
The safety thermostat turns off the appliance if the boiler thermostat and the pressure controller fails and the appliance overheats in case of a malfunction.
Please contact your local KARCHER customer service to arrange for the reset of the safety thermostat.
Maintenance lock
The maintenance lock acts as a pressure control valve at the same time. It seals the boiler against the steam pressure that builds up in the boiler.
If the pressure controller is defect and the steam pressure in the boiler rises, the pressure control valve, and steam is emitted through the maintenance lock to the outside.
Please contact your local KARCHER customer service before you put the appliance into operation again.
Description of the Appliance
These operating instructions describe the maximum equipment. Depending on the model, there are differences in the scopes of delivery (see packaging).
Illustrations on fold-out page!

A1 Appliance connector with cover
A2 Water reservoir
A3 Carry handle for water reservoir
A4 Selector switch
A5 Operating panel
a Display - OFF position
b Display - water shortage (RED)
c Display - heater (GREEN)
d Min. steam level
e Selection range of steam level
f Max. steam level
g Steam level Vapohydro function
A6 Locking door for accessories compartment
A7 Maintenance lock
A8 Carrying handle
A9 Holder for accessories
A10 Accessories storage
A11 Storage for mains connection cable
A12 Storage holder for floor nozzle
A13 Mains cable with mains plug
A14 Running wheels (2 ea.)
A15 Steering roller
B1 Steam gun
B2 Steam lever
B3 Unlocking button
B4 Child lock
B5 Steam hose
B6 Steam plug
C1 Detail nozzle
C2 Round brush
D1 Hand nozzle
D2 Terry cloth cover
E1 Extension tubes (two tubes)
E2 Unlocking button
F1 Floor nozzle
F2 Side-flaps
F3 Microfibre floor cloth
G1 Decalcifying sticks
Option
H1 Steam pressure iron
H2 Upper steam button
H3 Display - heater (ORANGE)
H4 Lower steam button
H5 Steam lock
H6 Temperature controller
H7 Steam plug
Quick Reference
Illustrations on Page 2
Illustration 1
Fill the water reservoir up to the "MAX" marking.
Illustration 2
Insert the steam plug into the appliance connector.
Illustration 3
Plug in the mains plug.
Switch on the appliance by turning the selector switch.
Illustration 4
Indicator lamp "heating on" is blinking (green) Once the indicator lamp (heater) lights up permanently, the steam cleaner is ready to use.
Illustration 5
Connect the accessories to the steam gun.
Operatesteam lever.
Operation
Illustrations on fold-out page!

Attaching the Accessories
Illustration 2
Open the cover of the appliance socket.
Tightly insert the steam plug into the appliance connector. The plug must click into place audibly. To disconnect:
Press the cover of the appliance connector down and disconnect the steam plug from the appliance connector.
Illustration A - B
Connect the required accessories (see Chapter "How to use the accessories") to the steam gun. Insert the open end of the accessory on the steam gun and push onto the steam gun until the unlocking button of the steam gun locks into place.
Illustration C
Use the extension tubes if necessary. To do so, connect one or both extension tubes to the steam gun. Insert the required accessories on the free end of the extension tube.
Removing the Accessories
Move the child protection unit toward the back (steam lever locked).
Illustration D
To detach the accessory parts, press the unlocking button and pull the items apart.
Filling the Water Reservoir
Illustration 1
The water reservoir may be refilled at any time.
ATTENTION
Do not use condensation water from the drier!
Do not fill with detergent or other additives (for example fragrances)!
Do not use pure distilled water! Max. 50% distilled water and 50% tap water.
Do not use collected rain water!
You can remove the water reservoir to fill it or you can fill it directly on the appliance.
Take off water reservoir
Pull the water reservoir straight up.
Fill the water reservoir up to the "MAX" marking while positioned vertically under the water tap.
Insert the water reservoir and press downwards until it arrests.
Directly on the appliance
Pour water from a container into the funnel inlet. Fill up to the "MAX" marking.
Turning on the Appliance
Place the unit securely on a firm surface.
Insert the mains plug into a socket.
Rotate the selector switch to steam level selection range from the OFF position. Display - heater blinks green.
Wait until the heater display lights up permanently. The steam cleaner is ready to use.
Notes
If there is no or not enough water in the steam boiler, the water pump starts and supplies water from the reservoir into the steam boiler. The filling process may take several minutes.
The appliance briefly closes the valve every 60 seconds. This will prevent the valve from sticking. There will be a slight audible click. The steam delivery is not impaired by this.
Refilling Water
In case of water shortage, the water shortage display lights up red and a signal can be heard.
Fill the water reservoir up to the "MAX" marking.
Notes
Every time there is not enough water in the steam boiler, the pump automatically supplies water from the water reservoir into the steam boiler. If the water reservoir is empty, the water pump is not able to fill the steam boiler and the steam tapping is blocked.
The water pump tries to fill the steam boiler in short intervals. If the filling process is successful, the red indicator lamp goes off.
Adjusting the Steam Quantity
The emerging steam is regulated by a selector switch. Depending on the type of contamination and its severity, this selector switch offers adjustment possibilities from the minimum steam level (slight contamination) to the max. steam level (severe contamination).
For severe contamination located in difficult to access areas, there is the vapohydro function.
Adjusting the steam quantity
Set selector switch to the required steam volume.
While operating the steam switch, always direct the steam gun at a separate piece of cloth until the steam is emitted evenly.
Turning Off the Appliance
Illustration G
Rotate the switch to the OFF position to turn off the appliance.
Disconnect the mains plug from the socket.
Illustration H
Push the steam switch until steam discharge stops. Now, the boiler of the appliance is unpressurized.
Move the child protection unit toward the back (steam lever locked).
Press the cover of the appliance connector to the bottom and disconnect the steam plug from the appliance connector.
Empty the residual water from the water reservoir.
Storing the Appliance
Illustration F
Illustration I
Store the round brush in the accessory compartment.
Insert the manual nozzle onto each extension pipe.
Put the extension pipes into the large acessory holders.
Insert the point stream nozzle into the accessory storage compartment.
Hook the floor nozzle into the parking position.
Wrap the steam hose around the extension pipes and insert the steam pistol into the floor nozzle.
Stow away the mains cable in the accessory holder for the mains cable.
How to Use the Accessories
Important application instructions
Cleaning floor surfaces
It is recommended to sweep or vacuum the floor prior to using the steam cleaner. This way, the floor is already cleared of dirt/loose particles prior to the wet cleaning.
Refreshing textiles
Prior to treatment with the steam cleaner, always check the reaction of the textiles in an inconspicuous location: Steam at first, then let dry and then check for colour or shape changes.
Cleaning of Coated or Lacquered Surfaces
When cleaning painted or plastic-coated surfaces, as found on kitchen and living room furniture, doors, parquet; wax, furniture polish, plastic surfaces or paint can come loose or stains can be created. When cleaning these surfaces, briefly steam a cloth and wipe the surfaces with it.
ATTENTION
Never direct the steam jet at glued edges as the edge band may loosen. Do not use the steam cleaner on unsealed wooden or parquet floors.
Cleaning of Glass
In case of low outside temperatures, especially in the winter, warm up the window pane by slightly steaming the entire glass surface. This will prevent tensions on the surface which might lead to glass breakage.
Then clean the window surface with the hand nozzle and attachment. Use a squeezegee to remove the water or wipe the surfaces dry.
ATTENTION
Do not direct steam onto the sealed locations of the window frame to prevent damage.
Steam gun
You can use the steam gun without any additional accessories, e.g.:
to remove light wrinkles from hanging clothes by steaming them at a distance of 10 to 20~cm
to remove dust from plants. Here, keep a distance of 20 - 40cm
for moist dusting, by briefly steaming the cloth and wiping the furniture with it.
Detail nozzle
Illustration A
Install detail nozzle on the steam gun.
The closer this nozzle is to the contaminated area, the higher the cleaning effect, as the temperature and the steam are highest at the nozzle output. Especially suited for cleaning difficult access locations, joints, fittings, drains, sinks, toilets, blinds and heaters. Heavy lime scale can be drenched in vinegar prior to steam-cleaning. Let the vinegar penetrate for about 5 minutes.
Round brush
Illustration 3
Attach the round brush to the detail nozzle.
The round brush can be installed onto the detail nozzle as an accessory. Attached brushes can therefore be used to remove heavy soiling.
ATTENTION
Not suitable for cleaning sensitive surfaces.
Hand nozzle
Illustration C
Install hand nozzle on steam gun.
Pull the cloth cover over the hand nozzle. Especially well-suited for small washable areas, shower stalls and mirrors.
Floor nozzle
Suited for all washable walls and floor coverings, e.g. stone floors, tiles and PVC floors. Work slowly on very dirty surfaces to allow the steam to act on the dirt for a longer period of time.
Note
Detergent residue or care emulsions that are still present on the surface to be cleaned can lead to streaks during steam cleaning. However, these will disappear with repeated cleaning procedures.
Illustration C
Connect the extension tubes with the steam gun.
Connect the floor nozzle to the extension tubes. Illustration
Attach the floor cloth to the floor nozzle.
Tip extension tube far forward until it is perpendicular, thereby the side flaps of the floor nozzle fold up down.
- Place the floor nozzle on top of the floor cloth, allow the side flaps to slide into the two tabs of the floor cloth.
Tip the extension tube back again, thereby the side flaps lock and the cloth firmly at the floor nozzle.
Parking the floor nozzle
Illustration F
During work breaks, hook the floor nozzle into the parking holder.
Steam pressure iron
Notes
We recommend using the Karcher ironing table with active steam extraction. This ironing table has been designed to match your new steam cleaner. It facilitates and, thus, accelerates the ironing process substantially. In any case, you should use an ironing table which is covered with a mesh-type underlay allowing the steam to pass through.
Please do not select the VapoHydro function while the steam pressure iron is plugged in to prevent the laundry to be ironed from getting wet.
Make sure that there is fresh tap water in the boiler of the steam cleaner.
Tightly insert the steam plug of the iron into the appliance connector. The plug must click into place audibly.
Display - iron will light up green permanently
Start-up the steam cleaner according to the description.
Recommended steam levels:
| Level | Textiles |
| Min. steam level | Slightly wrinkled clothes |
| Max. steam level | Jeans |
Wait until the steam cleaner is ready to use.
Steam ironing
All fabrics can be steam ironed. Delicate imprints or fabrics should be ironed on the reverse or according to the manufacturer's specifications.
Note
For these sensitive textiles, we recommend using the KARCHER non-stick ironing sole BE 6006.
Adjust the temperature control of the steam iron within the notched range ( /MAX)
As soon as the indicator lamp of the heater of the iron switches off, you can start ironing.
Note
The sole plate must be hot to prevent the steam from condensing on the sole plate and dripping onto the garment to be ironed.
Use the top or bottom steam switch.
- Steaming at intervals: Press the steam switch.
Steam will be emitted while the switch is pressed.
- Continuous steaming: Pull the latch for the steam switch toward the rear until it locks in. Steam will escape continuously. To unlock, push the lock forward.
Direct the first burst of steam at the start of the ironing process or after ironing breaks at a separate piece of cloth until the steam is emitted evenly.
You can hold the iron in an upright position to apply steam to curtains, dresses, etc.
Dry ironing
ATTENTION
Even if you iron without steam, there must be water in the boiler.
Adjust the temperature of the iron according to the garment you want to iron.
Synthetics
Wool, silk
Cotton, linen
ATTENTION
Please observe the ironing and washing instructions in your garment.
As soon as the indicator lamp of the heater of the iron switches off, you can start ironing.
Care and maintenance
Rinsing the steam boiler
Rinse the steam cleaner boiler at the latest after 8 boiler fillings.
Disconnect the mains plug from the socket.
Allow the steam cleaner to cool down.
Empty the water reservoir or remove it from the appliance.
Remove the accessories from the accessory compartments.
Illustration J
Open the locking door of the accessory compartment.
Remove the accessories from the accessory compartment.
Open the maintenance lock. For this, place the open end of an extension pipe onto the maintenance lock, lock it into the guide and unscrew it.
Fill the boiler with water and swing it strongly. This dissolves lime scaling residing on the boiler bottom. Illustration K
Completely empty the steam boiler to remove existing water.
Dscaling the Steam Boiler
As limescale builds up on the boiler walls, we recommend to de scale the boiler in the following intervals (RF = reservoir fillings):
| Degree of hardness | ° dH | mmol/l | TF | |
| I | soft | 0-7 | 0-1,3 | 100 |
| II | medium | 7-14 | 1,3-2,5 | 90 |
| III | hard | 14-21 | 2,5-3,8 | 75 |
| IV | very hard | >21 | >3,8 | 50 |
Note
The hardness of the tap water can be inquired at your water management office or the municipal utilities.
Disconnect the mains plug from the socket.
Allow the steam cleaner to cool down.
Empty the water reservoir or remove it from the appliance.
Remove the accessories from the accessory compartments.
Illustration J
Open the locking door of the accessory compartment.
Remove the accessories from the accessory compartment.
Open the maintenance lock. For this, place the open end of an extension pipe onto the maintenance lock, lock it into the guide and unscrew it.
Illustration K
Completely empty the steam boiler to remove existing water.
Use KARCHER descaler sticks for descending. Please follow the dosing instructions on the packaging when preparing the descaler.
Pour the descending solution into the boiler and allow it to react for approximately 8 hours.
Completely empty the descending solution after 8 hours. A small amount of the solution will remain in the boiler. Therefore, you should rinse the boiler two to three times with cold water to remove any residues of the descaler.
Illustration K
Completely empty the steam boiler to remove existing water.
Screw the maintenance lock in using the extension pipe.
Fill the water reservoir
The steam cleaner is ready to use.
Care of the Accessories
Note
The floor cleaning cloth and the cloth cover have been pre-washed and can be used immediately for working with the steam cleaner.
You can wash dirty floorcloths and cloth covers in the washing machine at 60^ . Do not use a liquid softener as this would affect the ability of the cloths to pick up dirt. You may tumble dry the terry cloths. The microfiber cloths are not suitable for the tumble.
Troubleshooting
Often, failures have simple causes and you can do the troubleshooting yourself using the following overview. If you are in doubt or if the failure is not listed here please contact the authorized customer service.
Long heating-up time
Steam boiler is decalcified
Descale the steam boiler.
No steam
Display - water shortage blinks red and signal is emitted.
No water in the water reservoir.
Fill the water reservoir up to the "MAX" marking.
Display - water shortage lights up red.
No water in the steam boiler. Overheating protection of the pump was triggered.
Turn off the appliance.
Fill the water reservoir up to the "MAX" marking.
Turn on the appliance.
Water reservoir has not been inserted properly or is calcified.
Remove the water reservoir and rinse it.
Insert the water reservoir and press downwards until it arrests.
Steam lever cannot be pressed anymore
Steam switch is secured with the lock / child-proof lock.
Move the child protection unit forward.
Steam iron "spits out" water!
Set the thermostat to level ...
Rinse or decalcify the boiler of the steam cleaner.
Steam level VapoHydro selected
Turn the selector switch to the steam level selection range.
After ironing breaks, water drops come out of the steam pressure iron
During longer breaks from ironing, the steam in the steam line can condense.
Direct the first burst of steam at a separate piece of cloth.
High water output
Steam boiler is decalcified
Descale the steam boiler.
Technical specifications
Power connection
| Voltage | 220-240 V 1~50 Hz |
| Protection class | IPX4 |
| Protective class | I |
| Performance data | |
| Heating output | 2200 W |
| Heating output steam iron | 700 W |
| Operating pressure max. | 0,42 MPa |
| Heating time | 3 Minutes |
| Steam volume | |
| Continuous steaming | 60 g/min |
| Steam push max. | 150 g/min |
| Vapohydro | 250 g/min |
| Filling quantity | |
| Water reservoir | 1,5 I |
| Boiler capacity | 0,5 I |
| Dimensions | |
| Weight (without accessories) | 6,0 kg |
| Length | 439 mm |
| Width | 301 mm |
| Height | 304 mm |
Subject to technical modifications!
Special accessories
| Order number | |
| Microfibre cloth kit for floor nozzle | 2.863-020 |
| Comfort Plus | |
| 2 soft cloth kit made of high quality microfibre. | |
| Microfibre cloth set, soft cover | 2.863-174 |
| 2 soft covers made of high quality microfibre. | |
| Terry-cloth covers | 6.370-990 |
| 5 covers made of cotton | |
| Round brush kit | 2.863-058 |
| 4 round brushes for the detail nozzle | |
| Round brush kit with brass bristles | 2.863-061 |
| Removal of especially stubborn dirt ideal for insensi- tive surfaces. | |
| Round brush with scraper | 2.863-140 |
| Round brush with two rows of heat-resistant bristles and a scraper. Not suitable for sensitive surfaces. | |
| Big round brush | 2.863-022 |
| Because of large cleaning surface it provides more ap- plication possibilities, especially for larger areas. | |
| Power nozzle and extension | 2.884-282 |
| For the cleaning of difficult to access areas (such as corners) with increased cleaning power. | |
| Turbo steam brush | 2.863-159 |
| For cleaning tasks where you would usually have to scrub. | |
| Textile care nozzle | 4.130-390 |
| For freshening up clothes and textiles. | |
| Wallpaper remover | 2.863-062 |
| To remove wallpaper and glue residue. | |
| Decalcifying sticks (9 pieces) | 6.295-206 |
| Steam pressure iron | 2.863-209 |
| Non-stick ironing sole | 2.860-142 |
| Suitable for ironing sensitive materials. | |
| Active ironing board AB 1000 | 2.884-993 |
| For excellent ironing results with substantial time-sav- ing (only for 230 V). |
Contenu
Consignes generales. FR 5
www.kaercher.com/REACH
www.kaercher.com/REACH
Fornitura
www.kaercher.com/REACH
Leveringsomvang
Geen water in de watertank.
Watertank vullen tot marking "MAX".
www.kaercher.com/REACH
Acessórios especials. PT 11
Instruções gerais

www.kaercher.com/REACH
A4 Interruptor selector
www.kaercher.com/REACH
Leveringsomfang
Fyld违法犯罪 Fyld盗窃, theft, and other crimes (see also thefts) Fyld rengöringsmidler (see also tilsætningsstoffer) (f.eks. duft)!
Tm kedlen helt for vand.
www.kaercher.com/REACH
Leveringsomfang
Leveringsomfang for apparatet er vist på emballasjen. Kontroller at innholdet i pakken er fullstendig, när du pakker ut.
Ved manglende tilbehör eller ved transportskader, vennligst informer forhandleren.
Garanti
Stille inn dampmengde
Still inn valgbryeren pa onsket dampmengde.
Trykk damphendelen, rrett alltid forst damppistolen mot et tystykke, til dampen kommt ut i en jevn strom.
Slå maskinen av
Figur G
www.kaercher.com/REACH
www.kaercher.com/REACH
Toimitus
www.kaercher.com/REACH
Zuokexuaogia
To tapadoTe uIko Tns OuaKEuNG aTEIKOVcTai OTn OuaKEuaia. Kata tyn antoaukeuaia eEyTe To TneipExOJEuTn oC tsPOcTv nAnpOtna.
A15 TpoxiaKos ohynns
B1 Iiotóla atou
B2 MoXloC aTou
www.kaercher.com/REACH
Teslimat kapsami
KpaTkoe pyKOBOdCTBO RU 6
3Kcnnyataua RU 6
IcnoJIb3OBAHHe npHaadnEJXHocTei .RU 8
YxOД n TeXnueckoe obcnykBaHne. RU 9
TmoBb Cnyae HenoJaok RU 10
Texnueckne daHHbIe RU 11
CneuaJIbHbIe npHaadJeKHoCTn RU 11
O6zne yka3aHn


Ipeed npBbIM npImeHneM yctpoiCTBa npOHTaTe 3Ty opINHaJIbHyIO IN-H
ctpykunio no 3Kcnnyataunn n npnlaraaemble yka3aHnnno TeXNHe6e2o3NaOCHTe. DeiCTbYte B COOTBeTCTBm C HMM. CoxpaHanite 6 bOpObyI dna DaNbHeJwero NOJIb3OBAHNu IIN dna cneDuOnyewo BuaJeBtuca.
IcnoJIb3OBaHHe no Ha3NaYeHHIO
IcnoJb3yIte np6op dIy OUHCTKn napOM NCKHOnHTeJIbHO BDOMaUMHEM XO3AICTBE.
Pnp60 npnHa3NaueH nI npoBeEHHa ONUCTKn naPOM.OUCTKYMOxHO pOBODHTb CpIMeHEHMe NDxOJAAuX INPAHnAeNkHOCTe, ONHCANBHX BpyKOBOCTBe NO 3KcPnYatauM. MoUzne cpeCTBa He Tpe6yOTc.CleSyET COBLODaTb HcHcTpyKuNnNo TeXnHke 6e3OnaCHOCTN
CnmboJIbHa annpaTe

BHIMAHHE-O3nakombTebc CnHcTpyKuMe no 3Knjyaataun!

Nap
BHIMAHHE - onachoctb oxora
3aunTa Okpykaiooey cpebl

YnakoobuHbI MaTePnaJIbI npiroDhbI IINB TBOpNCHOIBo6BaOTKII. PO3OMy He BblOpacbIAaHTe YnakoBky Bmecte C DoMaUHIMN OTXODAMN, a CdaJIte ee B ODNH N3 NyHKTOB nPneMa BTOPHUHOcBiPBJ.

Cstpare npnbopbl coedepkaT ceHHbIe nepepaBabBaemble MaepnAbI, noDneJaxaune nepeDaue B nyKbTI pIneMkn BtopnHoro cbpIy. Po3OTMy yTINN3NpyTe Cstpare npnbopbl Pee3 COOTBeTCTByUOJIe CNCTeMbI npNEMKo OTXODB.
3NeKtpnueckne n 3NeKtpoHbIe npn6Opby qacto Co-dePkAT KOMNoHEtbl, KOToBpe npn HnepaBnHbOM oBpaUeHNn HeAaNLaMeaey yTnIn3aunnpedctabJLHOT NTOEHnAaBHyO anaCHOCT dnn IIOJeN iEKOJIIN. Tem He MeHee daHbIe KOMNoHEtbl Heo6XoDmbld nIpnaBnHbO np6ToBt npn6Opa. Pn6Opby, 06O3HaehHbIe 3TIM CmBONlOM, 3AnpeSeHo yTnIn3nIpOBaTb BMece c 6bItobbIMn OTXDAMn.
www.kaercher.com/REACH
KoMnJIeK TNoCTaBKn
Komnlektaun npmbopa yka3aHa ha ynakobke. PnpacnakOBKe npmbopa npoBepntb kOMnlektaun. Pnp6hapyHexnn HeocStaOnuXn PnHAdneKHOCTe nn NpovBXdenn, nOyueHHbX Bo Bpemr TpaHcnpotnOBkN, cNeJeT YBeDMtB TropBOU opraHmuaIO, npodawuyu npmbop.
TapaTna
BkaJdoCTpahe DeIeCTbYIOCTCOBTBCTBeHNO rapaTnHbYe UcnoBn, n3daHnHbYe yNoHNOmOeHNO opraHn3aueMe C6bTa NaHeJe npOdyKuNN B daHHoN CTpAne. Bo3MOxNHbHe NcnpabNHOCTn pInbOpBa TteHne raPantnHOrO cspKaMbY ctpaHReM 6ecnPaHnHa 3aknUoaeTcB DaepKtax MaTePnaNoB INOn OUn6kax pInn I3rOToBNeHn. B cnyae Bo3NoKnHOBeHn npTeH3N B TeueHne rapaHTnHorO cspKa npoc6ba 6obpaatbc, IMer npi Ce6e Yek O POKynke, B ToproByo opraHn3auno, npodawyBo Bam npinbOp nIN B6nnKaJMyO yNoHOMoHEnHy cny6by cepBncHoro 06cnyXBAHN.
ДаТа Выlnуca OTo6paKaJaETcHa 3aBoDcKoTаБичkeВЗakoДирОванHOM BIne.
Pn3OMOTdIbHbIeUΦpblNMeHOT cIeDyIOoee 3NaHeHne::
Плимер: 30190
3 roBvInycka
0 cToJeTHe BbInycka
1 DecTINETNE BbInycka
9 BTOPAIuPpaMecaaBbInycka
0 nepBra zpa Mecaa BbInycka
Takim 6pb30m, B daHHOM npIMpe KoD 30190 03HaaeT DaTy BbInycka 09/(2)013.
3anachbIe yactn
Icnpb3yte ToIbKO OpiuHnAaHbIe 3anaChbte aactiФmpMbKARCHER.ОncanHe 3anaChbIX cachTe haoDNTB B KOHJIe DaHHo INHCTpyKIMn NO 3KcPnYATAuM.
3aunthbyeyctpoiCtBa
OCTOPOXHO
3aummbhe ycmpoocma cnykam dnn 3aummbi nonb3oamene. Budouzmehenue 3aummbhix ycmpoome unu npene6pexehenue umu he donyckaemc.
PerylTop daBneHn
PerynTop daBneHnyepKnaeT daBneHne B napOBom KOTNE BO BVpeMa paBO3MOXHOCTNa HoCTOHHOM YPOBE. PtN DoCTNKeHN MAKCIMAnbHOro paOohero daBneHny B napOBom KOtNe NOdORpeB OTKIOyaeTcN CHOBA BKIOyaeTc Np NaDeHN daBneHry B KOTNE B pe3ynTaTe OT60pa napa.
Tepmocat Kotna
Korda npn NORBHeHm OOnbKn B KOTne HET BOdBi, To TEmnepatya B Hem Bo3paCTaet. TePmoCTat KOTna OTKIOuHaet HarpeBaHHe. HopMaIbHbI pexM ChOBA 03MOKeH, ECIN KOTen HAnOpJHeN.
AbaPnHbI TepMoCTaT
Ecnn npn noBHeHm Oun6Kn peryIaT op daBHeHn I TepMOCTAT KOTJb BbIXOaIT N3 CTPOR N yCTPOINCTBO NepepeBaTc,TO 3aUHTbI TepMOCTaT BbIKIOaET yCTPOINCTBO.
Длсбраза abarinHOro tepmoctata cneyet obapTbCBAynHOMOeHnyCnykby cepBnCHO O6cnyKxBaHINaФpinMbI KARCHER.
3anop mHcneKuOHnO oTbePCTna
3Anop HNCNEKIOHNOIOTBepCTN OJHOBpeMeHHO RAJIeTc KNAHOM ORpAHnueHn DaBHeHn. OHaKYnpBaET KOTEN OT B03NHkauoJero DAJBNeHn napa
Ecnn perynTOp daBneHnO k0a3anCnHeNCnpaBEn H daBneHne napa B KOJIe BO3pCNO, KNAHn ORpaHnueHn daBneHnO tKpbBaIEcTn I np BbIXoNt HApyXepe 3anOp IHcNeKUHOHORO TOBepCTN.
Ppeed NOBTopbHM BBODom pnpobar 3kcnpyataunio
6paTInTeCB y npONHOHmOeHny cnyk6y cepBnCHO
ocNynXBaHnA thiMk KARCHER.
Oncanhe npnbopa
B daHOM pykoBODCTBe No 3KcPnPyatauN daHO onuaHne pni6opac MaksimalbHoi KOMpIeKtaUeH. KomPnIeKtaUeOTIINaueAeTcB 3aBNCIMOCTN OT ModeJI (CM.ynakokBu).

→ 1306paXeHnCm. Ha pa3BOpOte!
A1 Po3eTka npi6bopa c KpbIshkoJ
A2 Pe3epByap nIЯ BOdBi
A3 Puyka pe3epByapa nIЯ BObl
A4 IpekeKIOUaTeIb
A5 NaheIb ynpabLeHnIa
a IHHdkaTop "PtooJxHeHne BblKJI"
b INHdkaTop "HeoctaTOK BObl" (KPACHbI)
c IHHdkaTop "HarpeB" (3EJIeHbI)
d MmH. KOJIInueCTBO npapa
e Bb6op dnaana3oHa paXoHa npa
f MaKc. KOJIuYeCTBO npa
g KoiuueCTBO npa, yHKua Vapohydro
A6 3amok yuiknka dny npnaHndneXhOCTeY
A7 Ipo6ka IЯ TeXHnueCKOrO 06cIyKuBaHaNIA
A8 pykoTka dIra HOseHnI np60pa
A9 DéprkataelbДЯ npnaHdneJxHocTei
A10 XpaheHne npHaadnEkoCTe
A11 MecTo xpaHEnIe CeTeBOrO uHypa
A12 NapkoBouHoe KpeIeHne HacAnn Ipa nla
A13 CTeB0 KabeB co UTeNceBHO BnIKoI
A14 Pa6oue KoIeca (2 uTkyu)
A15 Haprablaiooyno polnk
B1 Napoboi nictolet
B2 Pbyar noaun npaa
B3 KhoNka De6JIOKINPOBKN
B4 3aunta ot deTei
B5 ⅢJIaHr nOaun npap
B6 ⅢTeKepe npaun npap
C1 ΦopcyHka ToueHNo CTpyN
C2 Kpyrnaa 电
D1 Puyna fopcyhka
D2 YexoJI n3 maxpoBoi TkaHn
E1 YdnnHnteNbHbIe Tpy6k (2 wT.)
E2 KhoNka De6JokpObKn
F1 ΦopcsKa dny nCTkn noa
F2 BoKOBbIe OTKnIDhIe KpbIuIKN
F3 TkaHb IJnMbITbI NOIa I3 MmKpOBoNOKOH
G1 CpeCTBO DnYydaeneHn3BecTn
TapaMeTp
H1 Ythor dIra rnaKeHn npom nD daBneHnem
H2 BbIKNIOUaTeIb npa (HHKHN)
H3 INndikaTop "HarpeB" (OPAHXKEBbI)
H4 BbIKHouateIb npa (BepxHn)
H5 BnoknpOBKa BbIKNoUaTeI npa
H6 PerynjTOp TemnepaTypbI
H7 ⅢTekep noaun napa
KpaTKoe pyKOBOdCTBO
I3o6paXeHnI np6opa cm. Ha cTp. 2
PcVHOK 1
3anolHnTb pe3epByap IINBAIOI0OTMeTKN MAX"
PNCVHOK 2
BcTaBbTe ⅢTeKepe npaun npa Bpa3bEm npn6opa.
PNCYHOK 3
BCTaBbTe 1TencceJbHyIO BnIKy B3neKtpopo3eTKy.
BkIIOuHTb yCTpoiCTBO NOBepHyB nepeKIOUaTeIb.
PcCHyok 4
→KoHmPonbHaJa lamna "HaapeB" - Muaem 3ene- HbIM ueMOM.
KAK ToIbKO KOHTpOJIbHJa lamMaHaN HaRpeBaHnIa CBeTNTcnoTOrAHHo, NapooOHCTInTeB rOTOB K3KcNpyaTuIN.
PcVHOK 5
www.kaercher.com/REACH
Szallitasi tétel
A futes jerzolampa zolden villog.
www.kaercher.com/REACH
Obsah dodávky
www.kaercher.com/REACH
Dobavni obseg
Obseg dobave Vaše napravje prikazan na embalazi. Pri jemanju stroja iz embalaje preverite popolnost vsebine.
Pri manjkajocem priboru ali transportnih skodah obvestite Vasega prodajalca.
Garancija
www.kaercher.com/REACH
Zakres dostawy
www.kaercher.com/REACH
Articole livrate
www.kaercher.com/REACH
Rozsah dodávky
Rozsah dováky vášho zariadenia je zobrażeny na obale. Pri vybałovani skontrolujte uplnost obsahu balezia.
Ak niedtoré diely chybaju, alebo ak zistite skody vznikuté pri preprave, informujte prosim o tom predajcu.
Záruka
www.kaercher.com/REACH
Opseg isporuke
H6 Regulator temperature
H7 Parni utikač
Kratke upute
Slike pogledajte na stranici 2
Slika 1
Spremnik za vodu napunite do oznake "MAX".
Slika 2
Parni utikač utaknite u uticnicu uredaja.
Sika 3
Utaknite strujni utikač.
Poseban pribor SR 10
Opste napomene


Pre prve upotrebe Vašeg urežaja
procitajte ovo originalno uputstvo za rad i
prilozene sigurnosne napomene i postupajte prema njima. Sačuvajte obe sveske za kasniju upotrebu ili za sledeceg vlasnika.
Namensko korišćenje
Parocistač upotrebljavite iskjučivo u privatnom domacinstvu.
Ure'daj previden za ciiscenje parom i moze se koristiti uz odgovarajuci pribor kako je opisano u ovom uputsvu za rad. Nije potebno koristiti deterdente. Pritom posebnu paznju obratite na sigurnesne napomene.
Simboli na aparatu


PAZNJA - procitajte upstvo za rad!

Para
PAZNJA - Opasnost od opekotina
Zastita zivotne sredine

Ambalaža se moze ponovo preraditi. Molimo Vas da ambalažu ne bacate u kucne otpatke nego da je dostavite na odgovarajuca mesta za ponovnu preradu.

Stari ureddaji sadrze vredne materijale sa sosobnošću reciklaranja i treba ih dostaviti za pohonnu preradu. Stoga stare ureddaje odstranjut
www.kaercher.com/REACH
Obim isporuke
Sadrzaj isporuke Vaseg uredaja je prikazan na ambalaiz. Pre vadenja ureda iz ambalaze proverite da li je sadrzaj potpun.
Ako pribor nedostaje ili je došlo do oštečenja prilikom transporte, molimo da o tome obavestite svog prodavca.
Garancija
U svakoj zemlji vaze garantni uslovi koje je izdala naša nadležna distributivna organizacija. Eventualne smetnej na urežaju za vreme trajanja garancije uklanjamo besplatno, ukoliko je uzrok greška u materijalu ili proizvodnji. U slčaju koji podlěze garanciji obratite se sa potvrdom o kupovini Vašem prodavcu ili najblžoj ovlášćenoj servisnoj sluzbi. (Adresu cete naci na poledini)
Rezervni delovi
Upotreblavajte samo originalne rezervne delove firme KARCHER. Pregledrezervnih delova naci cete na kraju ovog uputstva za rad.
Sigurnosni elementi
OPREZ
Sigurnosni elementi sluze za zašitu korisnika i ne smeju se ni menjati niti zaobilaziti.
Regulator pritiska
Regulator pritiska tokom rada održava što je moguce ujednačeni pritisak u kotlu. Grejanje se iskjučije kod postignutog maksimalnog radnog pritiska u kotlu i ponovo uključije pri padu pritiska u kotlu usled trošenja pare.
Termostat kotla
H6 Regulator temperature
H7 Parni utikač
Kratko uputstvo
Slike pogledajte na stranici 2
Slika 1
Rezervoor za vodu napunite do oznake "MAX".
Slika 2
Parni utikač utaknite u uticnicu uredaja.
Sika 3
Utaknite strujni utikač.
Ukljucite uredjakretanjem izbomog prekidaça.
Slika 4
Indikator grejaca treperi zeleno.
Ako indicator grejaca neprekidno svetli, to znaci da je parocista spreman za rad.
Slika 5
www.kaercher.com/REACH
OsemHaIOcTaBkaTa
O6embT Ha octabKa Ha ypea e n3o6pa3eH ha onakobkata. Pn paonakokBaHe npOBepete daHn cbdbpXaHHeto e pblNO.
PnI IINCBaun npInHaNdxHcOHT nI IN pI rTaHcNoPT- Hn UeTN MoJyBeDomTe BaunrTbproBeu.
Tapaanua
Bb BcKa CtpaHa BaxaT rapaHIOHHTe yCNOBnA, nB6nKByaHn OT opMaPAnaHT O Hac DnCTpMBytopc KaFmA. EBeHTyAHN NobPeDn Ha Baunu YpeD ueOTCTpaHIM B pAMKHe NT ha rapaHIOHNCH cPOk 6e3NlATHO, aKO ce KAcae 3a DeEeKT B MaTePnaJIte NIn npi npoM3BOdTBo. B rapaHIOHEn cnyaIe Ce o6bPheTe KbM dTrpObyTopa Nn Hau-6n3KmO TOpN3pAnCepBn3, KATO npedctabnte KcOABata 6eJekka. (AdpcTe nce HamepeNt Ha 3adHaTc TpaHua)
Pe3epBn yactn
H3n0n3BaIte cAmo opunHauHHpe3epBHN qactHn HA KARCHER.CmcbKHe pae3bpHHTe qactn ue HamepHTe B kpar hnaTocOTo YbTBaHE 3a paobTa.
PpeDna3Hn npncnoc6JeHna
PPEI4A3JIINBOCT
IpeDn3Hume npucno6bneHna cnyam 3a 3auima Ha nompe6umena u He mpr8ea da ce rpomeHm unu 3ao6kuaam.
PerylaTop 3a HajraHaTeO
IIO Bpeme Ha paBota peryIaTOpbT 3a HnIraHHeTo NOI-dPbXa MAKCImaJIHO NOCTOIRHO HnIraHHeTO B KOTeA. IpiNoDcTIHa He MAKCImaJIHOTo paOToHO HnIraHBe B KOTeHa HarpaBaHcTo CnIPA, a pNt NoIHJXaBaHe Ha HnIraHReTo B KOTeHa BCNEdCTBHe HA OTdJIeHHeTo Ha npata OTHOBc BEKNIUOVA.
KoTeJIeH TepMoCTaT
Korato B cnuyaHa Na nobpeBa B KOTeHa NMa Boda, Temnepatypata B Hero ce Nobuaba. KOTEnHrT PeTmocTAT N3KnUbA HarpBaHaTe. HopMaHnTa EKcnloaTaIaZuE bVb3MOxHa OTHoB, KOrato CE HaNbHIn KOTenblT.
IpeDna3eH TepMoCTaT
Ako perynatopb t ha nahraheTo IO koteHnHT TePMoCTAT OKtakc B cnyau h napeuka u yepdt nperee, ToRaba npdna3HnT TePMoCTAT NkHNUBa yepda.
3a BpbIaHne B INXOIO NOIOXKeHHe NaIpeIaN3HnI TepMOCTat Ce ObphTe KbM OTOpN3IpaHnCepBn3Ha KARCHER.
Pebu3noHNO kanaue
PebuHNOHOTO Kanapee cIbueBpeMeHHo N BeHTIN 3a CbpxHnIrahe. To 3aTbapKa KOTena cpeU nobuBaHa He HaNpIraHeTO Ha npata.
Ako perynatopbT 3a HaIraHTo ce NOBpeN HHaIraHHeTo HA napata B KOTena CE NOKaU, BEHTnTbT 3a CBpXHaIraHae CE OTBaPn I npapa CE OTBXJa HABh npe3 peBnIOHOTo Kanaue.
Ipei Da IycheTe OTHOBO ypeJa ce ObpHete KbM OTOpN3mpaH cepBn3 Ha KARCHER.
OnncanHe na ypeDa
B Ta3n IHCTpykUZa 3y uNtOpe6a oONCAHO MAKcHmAnHO O6bOpBaHe. B O6ema Ha DCtOBKa IMa pa3Nkn B 3ABcIMOCST OMDeJa (BIXTe ONAKOBKA).
BnxTe cxemnte Ha pa3bHaTaTa cTpaHnca!

A1 KohtaKaT Ha ypeDa c Kanak
A2 Boiden pe3epBoap
A3 Дрьхka 3a Нoche 3a BODня pe3epBoap
A4 IpeKbCBAu 3a n36op
A5 06cnykBaio noile
a INHdkauia - I03nua OFF
b IHHnkaun- Heoctn Ha BOda (HEPBEHA)
c INndkaun-3aqrbahe(3ENEHA)
d MnH. napHa cTepeH
e 3oHa 3a n3bOp Ha cnIaTa Ha npaTa
f MaKc.napHa cTeNeH
g Iapna cTepeH FyHKnVapohydro
A6 Kanaye 3a YekMeJxKeTo 3a npHaJnxKHOCTN
A7 PeBn3IOHNO kanaue
A8 Ipbkkka 3a HocHe
A9 Дрьжka 3a npHnAdneKHOCTN
A10 CbxaheHne Ha npHaadJeXHoCTnTe
A11 MrcTo 3a CbXpaHene Ha 3axpaHbauin Ka6eI
A12 Hocau 3a napKnpahe 3a nooBaTa Ioo3a
A13 MpekOBn 3axpaHbau kaben c uencen
A14 Xoobn kOeNa (26poa)
A15 Bodeua poJka
B1 NapoctpyuH nctolet
B2 JIoct 3a npa
B3 BytOn 3a De6nKupaHe
B4 3aunta 3a deca
B5 NapoctpyeH mapkyu
B6 Iapoctpyuen uencen
C1 CtpyHaIIO3a
C2 Kpbrrna qetka
D1 PbHaIIO3a
D2 XabnneHO nokpnbano
E1 YdIbIkaaun Tpb6n (26po8)
MOnTnpaHe Ha npHaJdxKHOCTnTe
→ Φúrypa 2
OTbopeTe kanaka Ha KOthakTa Ha ypea.
→ NapocstpyuHnAT uenceIe Ce noctabra B KOHTaTaHa ypeJa. PnTo ToBa TpAba Da ce Cyue FnkCupaHeTo Ha ukeepa.
3a da pa3denume:
HaTnCHeTe KaNaka Ha KOHTaTa Ha ypeDa NaDonyu nI3BaTe nepoCTpyHmIy IeONCeI OT KOHTaTa.
→ Φίγρα A - B
Cbprhe Heo6xoDMNte pInHaNDexKHOCTn (BmK rnaBa, N3on3BaHe Na pInHaNDexKHOCTne) C npoctpyHnna NICTOnet. 3a ceta TOBpOeHn Kpa H npHaNDexKHOCTTa ce Noctabra BByxp NaPoctpyHnna NICTOnet n Ce n3bYtBA, DOKATO CE qHKcnpa De6loKpauaunr8byTOH Ha npoctpyHnna NICTOnet.
→ Φίγρα
Pn Heo6xOaIMOCI HIOIN3BaIeYbIIXNHTHE TpB. 3a ZetaTcBpXeTe CnapocTpHnna NtCtoNET eJHATA pecn. DBeTe YbIIXNTEHNI TpB.
Heobxodmata pinnadncknoct da Ce noctabuHa cboobnna kpa na ydbjnxnteHata Tpbba.
DemOHtnpaHHe Ha npHaadnExHoCTHte
Noctabete 3aunitata 3a deca haoIy (IOCT 3a napa 6nokupaH).
→ Φuγpa D
3aДа demontiptape prinHadJeXHOCHTe,HaTINCHETe DeBokupaunbbyToH nOTdeneTe YactnteEinaO TDPyra.
NoCTBaHe Ha noOBoN NOBbpxHOCTN
PnpopbYBa ce npdei n3noI3BaHe ha na-pongTuHnna ypeD noBt Da ce n3MeTe nnIm3cMcye. Taka oue npede BnAaXHOTo NoOpCTBaHe noBt Ce OCbo6OxJaDa o MTbCOTN/A CBO6OHNa CTuaNIn.
OCbexaBaHe Ha TEKCTnJ
PpeDn TpeTnpaHe C npocctpyHnna ypeD MoJN BnHaHn Da I npoBepBaTe YCTOuHbOCTa Ha TEKCTMHNTE TbKaHn HA cKpnto MeCTo: PbPo BOseIte C npa, CneD ToBA OCTaBe Da n3cbXhe N hakpar npoBepTe 3a N3MeHEHn HA zBeta nΦOpMaTa.
IounCTBaHHe NaOBbpxHOCTN C NOKpHTne IJI NaK
При почимвае на лakрани плпokрту с пл actma ca NOBbpxHoctN, KaTO HApN. KUxHeHcN N CTaHn Me6eIIN, BpATN, NapkET, MORAT DA CE OTDeJIYBOCbK, Me6eIEN JAK, ИЗКУСТБЕНИ NOKpTNUЯ ИЛN 6Ои DA ce OБра3yBaT netHa. При почимвае на� Te3N NOBbpxHocTIn HANOte EнDA Крna Cnapa IN 3bPwTe NOBbpxHOCTNeC HeR.
BHIMAHNE
He hacoueaume napama kmb 3aenehu pbooe, mbu Kamo nenunomo moxe da ce omdenu. He 3unon3ae ume yedda 3a noucmeahe na he 3aneyamahu dbpeehu nodoee unu napkem.
NouchBaHe Ha CTbKNO
ПиMuHcN BbHsHn TEmpepaTpy 3aToPnIeTe CbKnIATA na HpO3OpUrTe, NpeDi BCNtHo PNe3 3mIATA, KATO JekO NaHpBcKaTe cnapa Ynata CbKnHe NaobpXHOCT. ToTOu HauNCH eN3bRbAT NaHpEKeHHa NOBbPxHOCTa, KOITMO MOrat d a DOBeDat DcYunBaHe Ha CbKnIOTo. HApKra NocHTeTe NObPbXHOCTTa Ha npO3OpEuca c pBuHaTa dIO3a nOKpRbAnoTO. 3a N3terJnHe Ha BoDaTa N30nI3BaIte npCtABkA 3a npO3OpU nIN n3bPbUeTe NOBbPxHOCTTa Do cyXo.
BHUMAHNE
He hacooyaume npama KbM 3aneyamahume Meema ha pamkama Ha npo3opeza, 3a da He zu nopeedume.
NapoctpyuHnctoIeT
Bne moKe da n3noI3BaTe napoctpyHnHn pInCToJet n6e3 npHaadNexKHOCTn, HapnMep:
3aOTCTpAHHBAHe Ha JIeKn TbHKn OT Okaehn DpeXn, KaTo rHa HApBckate C npapa ot pa3ctOHN To 10-20 cm.
3a NOUcTbaHe Ha npax No ZbTe. Pn TOBa cna3BaIte pa3ctOarHne ot 20-40 cm.
3a BnAaxHO NocHCTBaHe Ha npax, KaTO HAnOHTe KbPnata 3a KpaTko Cnapa nCneT OTo h3bPwTe Me6enITE C HeN.
CtpynHaI03a
Φnrypa A
→ MoHTnpaJIte ToUcKOBA CtpyHa DIO3a Ha napoc-tpyHnI NICTOJET.
KoNkoTIO NO-6Hn3O e TЯ da 3aMbpcEHO MRCTO, TOnKOBA NO-BvCCK e OeKETbT OT NocHTBaHETo, TbI KATO TEMnepaTypata nnapa ta Ca HauBvCOKu HA n3XoDa Ha JIo3ota. OocboHo npaktnuHO 3a NoCTBaHe Ha TpyNDooCTbHN MeCTa, FyTN, apMaTyPi, KaHAn, yMnBaHNu, ToaJIeTHN, UoPII IIN paDuaTOpN. PpEniNoCTBaHe C npA CNHInTE BapOBKOBt ONIarAHn MoRat Da 6bNd HApNbckAn C oet, OCTabete da NoJeCTBa5 MNHyTu, cIed TOBA 60neIte C npa.
Kpbrgna yetka
#
3akpenete Kpbflata Yetka KbM TOnKOBaTa ctpyHa dIO3a.
Kpbrrata Yetka Moke da ce MOHTnpa KaTo DonbHHe Hne KbM ToKOBATA CTpyHa dIO3a. Taka 6IanoJapEnHe Na YcETKe TOMaT JeCHO da 6bDaT OCTpaHHe N yOpNTnTE 3aMbpcBaHHa.
BHIMAHNE
He e noxdoxodya 3a noucmeane Ha yuecmumenu noebpxhocmu.
PbUHaIIO3a
Phiypa C
→ MoNTIpaIte pTuHa NIO3a Na npocTpyHnna nCt- tonet.
Ntternete npknBanoTO bpyx pynatha IIO3a. Oc0eHo nOdoXoJua 3a MaJIK MNEUc ce nobbpxHOCTN, dyuKabHmN orneJana.
Ipooba IIO3a
IpoXoJa7a 3a Mneu Cc CTHeHn N noOBoN nokpntna. hanp. KamHeHHN NOOBe, NIOOKn N NOOBe OT PVC.CINHO 3AmBpcHNeTne NobPbXHOCTNO pbAoBtBaTe bABHo, 3a Da Bb3dEeCTBa Napata No-dBfIro BPEme.
Yka3aHne
OctaBcHte OT NOuchCTBaU pnenapatn IIN NIOdIbPkaUe EMyCNs, KOINT OUI CE HAMIPAT Na ONUCTBAHATA NOBbpxHCT, PNIO NOUCHTBeC napa MOrat da DOBeDat IO HeOBAHomeHPeN MeCTA, KOINT Ooache N3ue3-BAT PNMI HMOrOKpATHO PnIPOXHeHne.
#
→ CbpxKeTe yIbIKNITeHNITe TpBn c npoctpynH NII CTIOJET.
3akpenete noobata nIO3a KbM yIbJNKeTnHaTa Tpb6a.
Dnrypa E
3akpenete nooBaTa Kbpna Ha IIO3aTa 3a noi.
-ObpHene ydJInxTeIHaTata Tpb6a Iupoko Ha-npei,doKaTO 3aCTaHe OTBeCHO,NO TO3n HauHH CTpaHnHTe KIaII NaIObObATA DIO3a ce Oobp- qat HADony.
- Poctabete noobata Tio3a Bbpyx Kbpnata 3a nouCTBaHa ne IoN, Taka ce TcpanHnTe knann da HabJra3B dBeTe nlaHKnHa KbPnata.
- OTHOBOObbPeneYdIbIeNteHnHataTp6BaHa3aD, nTO3nHaHHCTpAHNHTHeKAnCeΦHKcnpaT IN KbPATA3actaba HenoDBVHXHO NaOBDTaIIO3a.
PnK3a npHaDnExHOctTe
Yka3aHne
Kbprnata 3a noi, nokpiBaNATO ca npedBaprTeHNO i3npaHn u morat Behdara da bldat nIIOJIbAHN 3a paOta c napocTpyuH ype.
→ Pēpète 3aMbpcEHNTe NIOOBN KbprNn NOKpnBana B nepaIŋha ππ TEmpepaTpya 60°C. He nIPONa-BAIte OMEKOTHTEN, 3a Da MÖKE KbprHNTe DoBpe da NOEmat MPbCOTNA. XAbJIneHNTe KbprNn ca NODXoJn 3a cyUeNE B cyUeHNH. MmKpOΦbPrHNTe KbprNn He ca NODxOJaUN 3a cyUeNE B cyUeHNH.
Pomou npn Heu3npaBHOCTN
Mhoro yecto npnunHnte 3a noBpeDa ca enementapnH n C nomoUta Ha cneDnHTe Yka3aHnma MoKe che camn da rN oTcTaPAnHe. Ako He cte cnrgpHnn iNn nobPeDnTe He ca onCaHn TYK, O6bPheTe ce KbM OTOpnIpaHnepCepBn3.
YdbjxbaVe Ha BpeMeTo 3a 3arpaBaHe
IapoctpyHnT KOTeI cBdbpKa BapOBuK
→ Πоистbahe Ha BapOBnka BnapoctpyHnKOTeJ.
JincaHa napa
Индикади - HeodoctnHa BODa Mna YepBeno nCe CByBa CnHaNen ToH.
JInca Ha BOda BBB BOHNpe3epBoap.
→ Bɔdɪnɪr pɛsɪpəboap da ce hʌnɪbɪnɪ do mɑpɪnɒpəkata „MAX".
Hnkaun Heoctn Ha BODa CBetu cepBeHo.
Jinca Ha Boda B napoctpyHnna KOTen. 3auneta oT nperebahe Ha nomnata e n3KJIouyeHa.
→ N3KJIIOUeTe ypea.
→ Bovnryt pe3epboaop da ce nabJIHn do MapknpoB-kata ,MAX".
→ Da ce BkIIOUypea.
BoDNHrT p3eepBOaP He nOCTaBEn npabINHO nIIMa KOTJIEN KAMbK.
→ CbaIeTe BOdHnpe3epBoAp nTo n3nPaKHeTe.
NocTaBeTe BODHnpe3epBoap HaTNCHeTe HaOJy,doKaTo ce pKcnpa.
JocTa 3a npapaTa He MoXe da Ce BKJIIOUH
IocbT 3a napata e ocunpyeh C 6noknpobkata / 3aun-tata OT deua.
NocTabete 3aunitata 3a deua Hnpei.
Paphata Iotna, nIIOe Boda!
→ ΠοctaBeTe TepMoperynataTopa Ha CTeneH …
N3πλακHεte KOTεna Ha napoctpyHnγ ypei nIro nouchTeTe OT BapOBnK.
Napha ctenenVapohydro hactpoeHa
3aBpTepeKcbcay3aH36OpHa30HaTa3aH3-6OpHaCnIataHa napata.
Cnei nay3n B rJaJeHeTo OT IOTyra T c napHo HanaRaHe N3JIn3aT KaKn Boda.
Pnno-npOdbIbnKTeHnN nay3n B IpaHeTo npaTa MoKeJa KOHdEHNbA BnapOpNoBa.
Hacouete nbpbaT a napHa ctpya KbM OTdeJHa KbPna.
Bucoko n3nyckaHe Ha Boda
NapoctpyHnT KoteI cBDbpXa BapOBuK
www.kaercher.com/REACH
Tarnekomplekt
Selle seadme tamekomplekt on kujutadukendil.
Kontrollige lahti pakkides paki sisu.
Lisavarustuse monteerimine
Joonis 2
Avage seadme pistikupesa kate.
www.kaercher.com/REACH
Piegades komplekts
Jusu aparata piegades komplektis ir attelots uz iekopojuma. Izsainojot pbaraudiet, vai satsir piligs.
Ja trukst pigeonumi vai transportesanas laika radusies bojumi, ludzu, informejiet tirgotaju.
Garantija
Katra valsti ir spekma uznemuma atbildtgas sabiedribas izdotie garantijas nosacijumi. Garantijas terima ietvaros iespejamos Jusu ikartas darbibras trucejumus mses noversism bez maksas, ja to celonis ir materiala vai rao sanas defekts. Garantijas remonta nepieci samicbas gadjumar pirkumu apiecino so dokumentu griezieties tie pirtogata ja vutvakaj palvarotaja klienta apkalposanas dienesta.
(Adresi skatit aizmugure)
Rezerves dalas
Izmantojet tikai originalas KARCHER reserves dalas. Parskatu pār reserves dalam Jus varat atrast šs lieto-sanas pamacibas beigās.
Drosibasiekartas
UZMANIBU
www.kaercher.com/REACH
Komplektacija
Vandens bake nera vanders.
Iki zymes, MAX" pripildy kite vandens baka.
Vandens trukumo indicatorius ziba raudonai.
www.kaercher.com/REACH
KOMJIeKT NOCTaHaHHa
Komnlektaig npinctpoio 3a3haene ha ynaokobci. Pn p03nkybaHH npncTPOIO nepebiNTK OMnlektaio. U pazl hectaui doataKOBOO oBnaHAnHna a6o yukoJKeNb, OTPMaHN iN dac TpaHcnpOTyBaHNN, cnid nobiDomTe npce b ToproBebHy opraniauio, rka npodaI ana anapat.
Tapahtia
YKOxHII KpaiHII DiIOb YMOBn rapaHTII, HadaHOI BIDNoBIDHOO fipMOO-npoAduBem. HenoJAMKn BPOOT npICrPOMQ M yCyBaEM 63KoTHoTBOH pnoTOrGM TepMHy DII rapaHTII, JAKUO BOHN BVKNIKAHI 6paKom MATEpiAUY NOMINKAMN BFIGOTOBNeHHY. Y BnJaKDy UHHHOI rapaHTI 3BepTITcBdo IpoDABuH N BHaJIbNKChm ABTOPI3OBAHn CepBHCN CEHTP 3 DOKUMeHTaJIbHM NiTBTpeDKEHnM NOKYNK.
(Adpecn nBn. Na 3BPOtI)
3anachi yactnHn
BukopctobyTtbnk opirihnsh3 zanachi qactHHn fipmn KARCHER. Onc 3anachnx qactnh napankiHui daHOI hCTpykuij 3 ekcnnyataui.
3axnch npncTrooi
OBEPEXHO
3axuChi npucmpoi cnyyomb dna 3axucmy kopucmyaeiae. Budo3mHa zaxuchux npucmpoie yu Hexmyaehn HUMHe doynyckaembcr.
Pernylantop Tncky
PerynlaTOp TnCKy UTPMMyE TNCB KOTn iN dac EKCNnyataaui NO MOKNIBOcTI NOCTIHMM. HarpBaHnR npu DOcHHeHHi MAcMNAmIbHorO pOBoOro TNCy B KOTn BIMKaeTbCra Ta 3HOBy BMNaeTbCpa Npu NaDiHHI TNCy B KOTn BHaCniDOK BiD6Op npn.
TePMoCTaKOTna
JIKUO npn BHNKHeHHI NOMUNB KOTNI HEMAc BOHIN, TEMNEPAPyTA B KOTNI 3POCTAE. TepMOCTAT KOTNA BIД-KHIOuae HarpibaHHa. HopMaIbHN pEKIM 3HOBy MOKJIbHM, KOJI N KOTEN 3ANOBHEHIN.
3axnchn TepmoCTaT
JaKuo peryIaTOp TnCKy Ta TePMoCTat KOTNa BmIaN3 IaNy prN BuHInKeHHi NOMAnK i npNCtpi npeRpiBaCtBcA,To 3axiChNepTeMOPCTAT BMMKae pncrpti. DnI NOBepHeHHaXACHOro TepMOCTaTy BxIDHe NoLoJHexHe Hno6XiDiHO 3eByHTcNdo KOMNeTeHTHOI cepBicHO CIyXbO fipMn KARCHER.
3aTbip iHcneKzHoro OTbopy
3aTbip IHcnekuiHoro OTbOpy cOdNoCHAcHO KnaHOM o6MeJHHN TcKy. Bih 3akynopoe KOten BiD TcKy npu, IIO yTbOpioTeBc.
JaKIOpeyIaTOp TnCKY BnBnBCR HeCnpaBnIM, a TnCK napi y KOTNI 3POCTAc, TO BiDkPnBaetbC kNaanH oMeKeHHN TnCKY i npa BNXoHTb HsO3OBHi Yepe3 3aTBip IHcneuiHoro OTBpy.
Длноюгого Oв В ecknpyatauII Heo6xIDHO 3BepHyTcNcdo kOMnTeHTHOI cepBICHOI cnyKbI ΦiPMK KARRIER.
Onc npucTropo
YcBomyNocibHky3ekcnnyatauHabeJeHOOnnc npnCTPO3MAKcIMaJIbHOU KOMnKeTkaIeIO.KOMnKeTauIa BIDpi3HReTbc3aJeXHoBIdMoJI (DINy.nayKaYBaH-H).
306paXeHHaNb.Ha po3BopOt!

A1 ⅢTeNceIbHa po3eTka npuNay 3 KpU
A2 Pe3epByap dny Bovn
A3 Puyka pe3epByapy Ira BOn
A4 IpepeMkaue
A5 Panahe ly npablinn
a IHNkaTOp "IonoJxHnBIMNK"
b IHydkaTOp "HeCTaVa BoDn" (UEPBOHNI)
H1 Ipaacka dny npacybAHn npao n iD TnCKOM
H2 Bmikau napu (Hixhhi)
H3 IIndkaTop "HarpiB" (IOMAPAHUeBn)
H4 Bumka napn (Bepxhi)
H5 BnokyBaHHBmNkaa napi
H6 Perynatop tempeatypn
H7 Ⅲtekep npaui napu
Kopotka iHctpyukia
→ДИВ.MaHIOHKnHaCTOpIHci2
MaJIHOHOK
HanobHNtI p3eepByap IJIa BOIN Do BIIMTKI "MAX".
MaJIHOHOK 2
BctabTe 1tKepe npaui npu B tencbHy po-3eKy npnaNy.
MaJIHOHOK 3
BCTaBTe wTeNCeIbHy BnIKy.
→ YbIMKHyTN npncTpi, o6epHyBwn nepemnka.
MaJIHOHOK 4
→ KɔnmpoŋbHa nʌmna "Haepie" - 6πμmaε 3eηeHUM KOJIbOpOM.
KtINbKn KOHTpOblha NaMna -HaRpIbAHnRopntb NoCTiHo,napoOuHcNk FOToBm Do EKcnIpyataJIi.
MaJIHOHOK 5
→Пиндайтесадкуdo napoboro nicToeta.
→ Hatachitb nepemkaay napn.
Ekcnnyataia
→ 3o6paXeHHaNb.Ha po3BopOToI!

3MOHTyBaTu 06JnaHaHHa
→ ManIOHOK 2
BiDkPntu KpniKUpo3'Emy npicTpOIO.
→ ③TKeK nep muiMuO zAkrpInHTN B UTenCeIbHI po-3eTI npnCTPOU 3 KoxyXOM. PnI cybOM yTeke NOBHeH 3aΦiCKyBaTINc i 3 kuaaHnM.
Дя bio'edhaHna:
PnTnCHyTN KpnuKy po3'emy npnctpoIO donH3y Ta BnTnHyTN uTekep napi i3 po3'my npnctpoIO.
→ MaJIIOHOK A-B
3'εηHATn Heo6xīnHe npɪnlaɪdɪ (ɪnB. pɔːzɪn "3a-ctocybaHH npɪnlaɪdɪ") 3 napOBɪm nICTOJIeTOM.
Дяьboro надягнітБ BiДКрNTМ краи рпнанек-HOCТIHA napOBИ nicTONETа hAcYHteHa napOBI nicTONet HacITbKN,単бКнОКа po3БLOKyBAHнЯ napOBOro nicTONeTaazφikCyBanaCЯ.
MaJIIOHOK C
Пи Рeo6xIDHOCI BVKOPCtOBYte NOOBOKyBAHbI Tpy6Kn.ДЯ сюугэ 3'eндайт e napOBIM nicoTeTOM Ody aabo DBI NOOBOKyBAHbI Tpy6Kn.
HacyhTe Heo6XiDiPi npHaIeKHoCTi Ha BiBnHi KpaI noOboXyBaIbHOI Tpy6Kn.
BiD'EDHaHH HaCaDoK
BctahOBHTn 3axnt BID DITEB HINKHe NOLOKeHHa (Baxijb noadi npa 3abIOKOBAHm).
MaJIIOHOK D
ДяЗHRТЯпИАнEXHOCTeHаNTCHITbHA KONKY po3bIOKyBaHHa TAreBIDOKpeMe DeTani Ody BiD OHOI.
HanoBHTn pe3epByap nra BOn
MaJIIOHOK 1
Pezeperbyaar IaBovnMOxHa HAnOBHOBaTn B 6yIb- kIyIac.
YBATA
He eukopucmooyeamu konohcarn3 cywapku dny 6i- n3Hu!
He hanohnoam 3acobam dny uueneha 6o iHUMU dobaekamu (hapanpuknad apomamuzamopamu)!
He eukopucmoeyamu yucmy ducmunboaHy oody!
Makc. 50% ducmunboaHOi oodu i 50% eoonpoeIOHOI oodu.
He ukopecmoeyamu 3ibpany doooy body!
Дланноьевна BODJO MOXHA 3нгТи pe3eрБуар Дд BOДи abO的手OBHOBaTN IORO BOHO6e3nocepeHbO Na npIcTpoI.
3HATTpe3epByapy DnBODN
→ПOTЯнHyTN pe3epeByap ДЯВ ВОДи ВерТИКаЛьHoуrogy.
→ 3anOBHnTI pe3epBpyIAR DoBIOB eptNkAblNo iIID BOJDPOBiDHM KPAHOM Do nO3NaHuK, MAX"
BCTaHOBHTn pe3epByap IIN BODI Ta HATNCHyTN Ha HbOro Do φikcauii.
Be3nocepEdhboHa npJlaDi
→ HaniTn BOy 3 EMHoCTi y 3aIINBHy Bnpy. 3anOBHHTn DO nO3NauchKn ,MAX".
YbIMKHeHn npuIaNy
→Пилад Heo6xIDHO BCTaHOBIOBATn Ha MiChy OCHOBy.
BCTaBTe MepeXnH mTeKepe y wTeNceIbHy po3eKy npnaJy.
→ПеревсанперемикayЗ похенив BMIMKВ no- noхени, BiДовидно ВибраHOMу dianazHOv BITPAPn nap. 1Dukamop "Haapie"БлUMaEЗелEHUM.
3auekaTn, nOKn He 3acBHTNcraHdNkATop "HaRpiB". Napobni cenapatop rotobni do pObotn.
Bka3iBkn
KIO B napOBMy KOTNI BODN HEMAc a6o 3aHaITo MaNO, TO NOnHnAe npaCIOBATN BOJAHIN HaOC Ta NoDAe BODY 3 baky dny BODN B napOBn KOTen. Ipoec HAnOBHeHHa MoKe TpNBaTn KiNbKa XbNmH.
Pnictpi Koxhi 60 cekyHd Ha kopoTkn qac 3aKpnBae Knanah. Lc nepeuKdoKae TOM, 0o knahanM OMOZ KaKNHNTN. Pn MOHs KaYTu Tnx KlaaHn. Bnnyck npn 3abKn bOmy He npoyuETbcN.
DOnnBaHnBovn
Пин ecteч BOIN b pe3epByapi dЯя BOINбпIMa€ chepBOHIn iHnkaTop "HeDonik BOIN", a TAKOK 3ByuNTb 3ByKOBIN CInHaN.
→ HanoBHTn pe3epByap dIa BOI NO BIDMIITKN "MAX".
Bka3iBk
3aBxJn, KOJI B napOBomy KOTNI 3HaxOJntbC8 3aMaNo BOJN, BOJAH N HACOC ABTOMATNUHO NOaE BOy 3 baky dIpy BOJN B napOBn KOTeJ. JkUo 6ak DnBOJN NOPOKHI, TO BOJAH N HACOC He MoKe 6ilbJe HANOBHOBaTN npOBn KOTeI i BiD6ip napn 6LOKUYbC8.
Upe3 KopoTki IHTepBaII N BoIaHNI HAcO pObITb cnPooby HanoBbNTn NapOBni KOTeI. JkIo HanoBHeHH BnKOHaHO YcPiIHo, YepBOHa KOHTpOlbHa lamMa rache.
PeryIIOBaHHK KJIbKOcTi napi
Unpablinnna KInbKiCtIO npa 3diChiOeTbC8a 3a DonOMoRo nepemnkaa.3anexho BID BRrIyTa iTHecNBOcTi 3abpydHeHH nei pepeMnKauchD3OBJIe BVpArHn HanaTuBaHHB DianazHOi BmIH. (He3HaHi 3abpydHeHH) Do MaKc. KInbKocTI napi (3NaHHi 3abpydHeHH). DnI cInbHnX 3abpydHeHH, po3tauWoBaHHx y BaKkoDoCTynHnx MicJx, cnD bNbpatn FyHKcuio Vapohydro.
YcTaHObKa KInbKocTi nap
BctaHOBTn nepemKau Ha Heo6xidHy KInbKiCTb napy.
→ HataChiBb Na BaxiJIb NpaIJI napri, npu bOmy cnoaHTky HnapBaJIyOHy npaOBn NiCToJeH naTKaHNHY, nOKn npaH e Bye DHXoDTNI pIBOMHIO.
BmKHeHH npnlaNy
ManIOHOK
Пелевсан ВIMКач В положеня "ВIMNK" ta ВIMKHyTN писчтiod.
BtIaHrHiB MepeXHHn 1wTeKep 3i 1WTeNceNbHOI po-3ETKn.
ManIOHOK H
BvdaJIeHnHaKIny 3 napOBoro KOTny
JaIIO haTcIHKape3eByapy yTBOpBnCBAHKIN, MIn peKOMeHdYcMo BvdaJIaTNI HOrO HAcTyPiNIM YHOM (TF=HaNoBHeHHepe3eByapy):
| ДIANAZHOKOPSTKOSTI | °dH | mmol/l | TF | |
| I | М'Яка | 0-7 | 0-1,3 | 100 |
| II | середny | 7-14 | 1,3-2,5 | 90 |
| III | Жорстka | 14-21 | 2,5-3,8 | 75 |
| IV | дужешен STКа | >21 | >3,8 | 50 |
Bka3iBka
XKopctkcb TpyobnpoBidiHOI BOH MOnKHa yni3HATN B ynpabnHHI BoDOnocTaahnHa a60 KOMyHaJIbHOMy roCnoaDcTBI.
BntraHITb MepexHn I TeKepe 3i WTeNcIbHOo po- 3ETKn.
→Дати napocenapatopy oxoiohytN.
→ Pe3epByapДЯВODи nopoJHnI a6o BNTaRHyTn 3 npucTpOIO.
3nTn 0bHaHHa 3 depXakB 0bHaHHa.
MaJIHOHOK J
BiiKnptn 3amok BiDciky dIy akcecyapib.
→ BnHrTn akcecyapu 3 BiDciKy dIy akcecyapib.
→ BldkpnTn npo6ky dny TeXHHoro oOcbnyrobyaHn. Dnla cIboro BCTaBHTN KIneIc noOObxByaBHOI Tpy6Kn B npOky dny TeXHHoro OOBcnyrobyaHn, 3aDfKcByatn II B HnapmHi Ta BiKpyTNi.
MaJIHOK K
→ NOBHICTU BUNaJIHTN BOy3 KOITNa.
→ДлвдаленьВанногоHalbOtВКОпТаI-Te 3ac6длвдаленьВанhaФIpMH KARCHER.ПрвИКОпТанHi 3aco6уДлвдаленьВанha3berHITb yayHa BkA3iBKN 3do3yBaHHa, HabeDeHiHa ynaKOBuI.
3aunite aacid nra BnndaneHn HAKNpy ype3epByap Ta 3anuittb iTn npotrom np6n3no 8 roHH.
Yepe3 8 roDINH BnIHTN 3 pe3eRByaBc BpO3uH INIy BnIADAEHNH HAKINY. Y KOTII 3aIINiHaCTbC3A IIMKOBAIkbICbTbPO3uHNY, TOMy 2-3 pa3N IpO-MIITe KOTEN XoONHO BOIOJ, IO6 BnIADInTbBCI 3AINIKN pO3uHNY DnA BnIADEHNAHAKINY.
MaJIIOHOK K
IOBnicTO BndaJIInT BOy 3 KOtJa.
→ 3aBnHTnTnpo6ky DnTexHnHOrO o6cLyroByBaHHra 3IOOBxvBaIbHOIO Tpy6koHO.
→ HanoBHTn 6ak dny BODN
→Парови сениатог roTOBndopo6OTn.
Dorna3a npnlaadym
Bka3iBka
TKaHHa nI pIiNOrn t IxOoN dIra pyHoro cOnna nopeHbIO npOMTI, TOMy Ix MOxHa Opa3y BIKOPNCOTByBAtnPiJ vac pOBoTH 3 napooNCHKOM.
→ 3abpyndeni TkaHHn Dnpi niDnOr npaT npn 60^ B npalbni MaunH. He BnkOpNCTOByaTn KOHNiLIOHeP, 1o6 TKAHHN 6ynn 3daTHI DO6pe npnMaTn 6pyd. ManpoBy TkaHHy MoXHa cyuHTn y cyuapui. MikoPoBOJOKOHHy TkaHHNy He MOxHa cyuHTn y cyuapui.
Donomora y Bnnaqky Henoiaok
Hacto noIkoJxHnE HcOcNt IpocTmN, TOMy 3a DOnomorOIO npBedeHOrO HxKue OrnLy Bu cami 3MoKeTe ix yCuyHTn. JaKIO Bu MaCTe CymHiBn A60 npn HaeBHocTI noIkoJxHe, He 3raDaHnx yOrnIi, 3BepTaIteCb, ByDb Nacka,do ABTopu3ObaHOi CnyKbO6cnlyroByBaHH KJIeHTB.
TpmbaHn Yac HarpiBaHHa
Y napobomy pe3epbyapi 3'raBbCra Hakn
→ BnДaJIbIb HakIN 3 napOBOro pe3epByapa.
Hemac napu
IIndkaTOp "HeCTaay BoDn" 6bnMaC YepBOHm KOnbOpom i3ByuThb 3ByKOBn CnHaJ.
Ype3epByapi HemaB BOIN.
→ HanoBnHTI pe3epByaup IaI BOIN IO BIDMIKN "MAX".
Topntb YepboHn iHdkatop "HectaBoDn".
Hemaé BOIN y napOBOMy KOtni. Cnpaucobab 3axnt Bid nepeharpibaHHa Hacoca.
BuknIOuITb npucTpI.
→ HANOBHTIne3epByaup IJNAI BOINIO BIDMIKIN "MAX".
BbimKHytn npncTpii.
3epeByar dans BOBtCAHOBNEHO HnpeabunbHO a60 IYOBO BKPTIO BAHNHHM HANbOTOM.
→ BnHrTa Ta npomTu pe3epByap dIy BoDn.
BctaHOBTnpe3epByapIINBaONTaHaTNCHTNa HbOroDoΦikcauii.
BaxiNb npaui napn He moXHa haTnchuty
Baxilip noaqui napi 3aikcobaHHn 6kOyBaHm / aXnCTOM BiD BKNIOUeHHN DItbMn.
PereBecn v nepeDne npoLoKeHnna 3axNCT Bi dI-Tei.
Kannbl Hycaynap. KK 5
Kayincizik Kypanapbl KK 5
Bvibim cinnattamacbl KK 6
KbickaHa HycKayIbIK KK 6
KoIdaHy KK 6
KabdbkTapbl KOnlaHy KK 8
Kytmy Meh TexHnKaIbIK TeKcepy XyMbIcTapbl. KK 9
Keepirep6oIraHaKaEMeKany KK 10
TexHnkaJIbIK MaFlyMaTTap. KK 10
ApHaBJI Xa6bIKTap 11
Xannbln Hcykaynap
Kypmetti Tytbihyblb,


БуlbmbHb3dbl anraIaKbI pet kondaHy anbIbO ocbKayinci3dk TpyabI HcykaIyapnbIOkbnAInBnOBfHa
cānéc āpekēt ātɪh₃. OcblKayinciDik HycKaynapbH KeiHi naiDanahyuHn Hemece oCbEyMbIbIy KeiH naiDanahtbYtynfnapaYuHn CaKtan KoBHyb3.
O3 MEPzimH aayTaFAN KpyaIapda 6aFaNb, ekHsi eHdeyre XapaMdbI MaTePnAIIap 6ap
CoHbIHTKoJdAhlIbnFae HxEecki 6yIbIMapIbpIaIhbiipIKTeHNay KyeIepe IApkBblKaNlBkTIpraTaTANCbIpyBbI3 na3bIM.
3NeKtpnIKxHe3NKeTPOHdbk6bYbIMapDbH KypaMbIHaKaTE KOJIaNHy Hemece KaTe KeJere Jxapaty HtNHexcInDe aam DeHCaylbHfBaX HeOe KOpwaFaH optaraKayin ToHApDiy bIKTNMaH 6bluKep Kxi Ke3deci. AaiJa aAtanFah 6bluKTeP 6bYbIMdb TniciHne naIdAnany yuih KaKet 6bIaB. Ocbi TaHbAmen 6bnIineHReh 6blIMapDbI y KOKbCTapbIMe 6ipre Tactayra 6bImaDbI. KypaMbIHdaBt 3aTtAP typaBt anbIKTaMaIap (REACH)
БуИМИнКУрмьIHДЯБЛЗТAPТуРANБCOHfbl MaFJMyMaTTaPbI abCTbI KaPcETiINrH INHTepHET 6BETePIM3de OKI anAca3b:
www.kaercher.com/REACH
KanTama iwiHdere 6enweekrep
Cizdih 6yibMbHb3dbH jxKtkiJy KeNemi Kopanwa da
6eHHeHEnrH. 6yibM KopanwacbH aWkaHaJa Kopanwa
iHiJderi 6yibMm HcBnueKTePiH TOnbIK XHe
6y3bImarAH Tpyde BoIraHdbfH TeKcepi AnbH3.
Erep KeBip JxaDbkTap KOK bocnca Hemece
TacbImaJday Ke3iHderi akaynap Bocna, annapaTbI
caTkaH cnnpMaHbXabapdAp etHi3.
Kenildeme
Biyimdapmbi3 yiwinepenJe kayanTbI eTim cepiKTEcTePIMi3 tapaibHn WbIrapbIaNbH KeniIndeme wapTTapbl KUwte bOanbl. Erep MATEpnaIapdbH aKayPiFbH MeHEme DaINHday bapbcHbNdaftkatenikTept Tablnc, 613 bIKTNMaA kAYbIbTApdbKenil MEP3imi iWihne akbcIb3 xHeJeMIm3. Keni mep3imi iWihne Hapa3blbTAPbHb3 60nca, acnAnTbCatKah caYMaMeMecine HeMece XakbiHdArfEkinETTI cepBcTtK b3MeT Kepcety OpbHaCatbin any YerHH Kepcetin, xaBapNaCbHb3.
THdipinre H KyHKepeTeiIReH Typ KeCTeciHe du
Keke caHapdbiH MafbihacbI KeleciJe60aDbI:
MbicaJIbI:30190
3 ΘHdpijirehXbJIbI
0 ΘHdpipireh facbipbl
1 EHdpipireh OHXbINdbIK
9 ΘHdpinre anbHbH ekHw caHb
0 ΘHπipinreH aibHbH bpiHwi caHbI
CoHbImeH 6yI MbIcaJIa 30190 KoIbI 09/(2)013 eHdipinreN KYHIN 6iJnIpeJI.
Kocajki b6eJweKeTp
Tek KaHa TynHcyckaBnK KARCHER Kocankbl 6eIweKteP KOnDaHbHbI3. Kocankbl 6eIweKtePdiCypTeTMeci Ocbl HcyckayblKbTHCohbHda 6epiTHe
Kayincizdik Kypaapanapbl
A5AJIaHbI3
KayincdiK kypandapbHbIH MAKcmbi KOndaHyuBbIbIkyinmeh cakmanhobipy, ocbnapbIe3eepmye Hemece bblnacbsI kbnOpbyra BonmaUbi.
KbICbIMDb peTteri
KbICbIMdbpeTteriui xyMbIC Ke3iHne Ka3aHaDbfblcBIMdbEHxOFapblbipkabnITbI mEnwepde caKTan TpyaBl. Ka3aHaDbfblxMybIC KbICbIMbIHbEHxOFapbl DeHreInHe xeTKeHDe, XblbTkbU 3nEMeHT oWei, an By uIfbblH aTnxXeciHde KbICbIM TeMeHdece, KaTa KocBJaDaB.
Ka3aH TepMOCTaTbI
Kaazah iuHHe cy 6oBnMaHaN akayIbI KaFdaIa, KaazAHdAfl TemNepatypa KeTepeIeJI. KaazAH TepMOCTaTb JxblITydu EiwipeI. KaIbIbTI KOnDaHbICTb KaazAH ToNTbIpbIbnFaH 6oBnFaHa KaJfactbIpY MymKIn.
Kayinci3dk TepMOCTaTbI
ErepKaTe HETINKeciHcKe KbcIbIM peTteriUj KHe He Ka3aH TepMOCTaBl icTeH Ukca KHe 6yblm UaMaJaH TbIC Kbl3ca, Kayinc3diK TepMOCTaBl 6yblmbl eUipedi. Kayinc3diK TepMOCTaBl H Kepi KaIbInka KaIbayu yin H ekineTTI KARCHER Kb3Met KepcTeY 6enimiHe xaBapnacblHb3.
Kayinci3dk KannaKaWacbl
Kayinci3iik KananakacbI cohImeH katap ukeTey KnanabHb6bnJTabbIaNb. On ka3aHdb6 By KbIcMbHbIN, KETepinyIHEN KOPaIbIy.
Erep kbcim peTteriwi akaynb 6onca KHe Ka3aHdaBb By kblmbkTepeince,weKtey knanaHb auBnAbd kHe by kayincdik kannakwacb apkblb cbiptKa sbIfba.
BiybIMbl KaTaNan naDnnap anDbHa eKiNetTI KARCHER Kb3MeT KepeTy 6aJIime XabapNaCbIbI3.
ByiBIM CnNaTtAmacBi
OcbI naIaIaNHy cKcaybIHaToIbIK XnblHTbIK KepcetInreH. MoIeBRE baIaNbIcTb IeKtXiYI KcnEMHe e3eueWenik BoIaNbI (KanTAMaHbI KaPaHbI3

Cypetep6yKTeMei 6eTKe KapaHb3!

A1 ByIbIMHbIH 3JIeKtp po3EKacbl KaKnafbImeH
A2 Cy caybTb
A3 Cy 6aBbHa apHaHaT TaTka
A4 AybIcTbIPbIN-KCKbII
A5 Bacekapy naheji
a KepceKiI - OFF kyni
b KepceTkiw-Cy keTkijikci3iri (Kbl3blJ)
c KepceKiW-JbIyj (XACbJI)
d MIn.6y DeHreNi
e TaHdaImaJIbI 6y KUJI
f MaKc.6y deHreNi
g By denrei -Vapohydro yHKnrcbI
A6 KepeK-kaapakTap Kawirine apHaanfah knanaH bICbIPMaCbl
A7 Kayinci3ik kannakwacb
A8 TaCbImaJday TyTkacbl
A9 BənwekeptepiHIn yCTaftbIwbl
A10 Kepek kapaTapDbI caTay opHbI
A11 KyaT cbIMbIH caTay oPbI
A12 EeH copy wymek yctay wuih tyTkacb
A13 3JIeKtp ToKka Kocy KaBeJndep aWacbIMeH
A14 Nuckipep (2 daHa)
A15 BafttaftbIu polnK
B1 By nctoneti
B2 By 6epydiH deHreHH peTteri
B3 AxbpaTkbIITyIMe
B4 BaJanaapdaH KopraHbIc
B5 By 6epu shaehri
B6 By uTekepi
C1 HykTei afbH yMeri
C2 DeHreIeK kblnak
D1 Kon wymeri
D2 TykTi MaTadaH XacanFaH Kan
E1 ¥3apTkbIu TtyriKTeP (2 daHa)
E2 AxbipaTkbIu TYIme
F1 EeH xyyf ahpAnfah yMeri
F2 Byinpiik kaKaNaKTap
F3 MinkpoΦn6paan Jxacalran eJeHre apHaIraH y6epeK
G1 Tat KeTipyre apHaIraH TaKaWJaAp
Onzna
H1 By kblcimbl-γTik
H2 By axbipaTkblIbI (TeMeH)
H3 KepceTkiu -XbNy (CAPFbJT)
H4 By aKbIpaTkblbI (koFapbl)
H5 By axbipaTkblbHa apHaHan 6ekTkiu
H6 TemnepaTpaHbI peTteriU
H7 By uTekepi
Kbickawa Hcyckaynbik
Cypertep 26eTKe kapaHb13
Cypet 1
→ Cy 6aBbIn "MAX" 6eJrCine HeiH ToTbIpbHbI3.
Cypet 2
By wTekepi 6yMbIMHbIH 3JNEKtp po3eTKacbHa caJIbIbI3.
Cypet 3
Keni awhacbH eHri3iH3.
AbyCbTybPiN-KocBbIbTuaiHaanDbpy apKbIbYbOyMbIdbKOcbIbH3.
Cypet 4
→ BaKBInay wAmbl - XbIny kAcbl mycneH Xblnblkmauobl.
Kb3y BaKbInay WAmbl TpyaKtbl KaHfAn Ke3de 6y Ta3anaFbIbbl XMybICKa daBbH 60Nabl.
Cypet 5
Ka6dbikTapdbbynntOJTeHxKaIHaHbI3.
By niHTiperin 6acbHb3.
KoIyIaNy
Cypetep 6yKtemeni 6eTTe KapaHbI3!

BiybIM KepeK-JapaKaTapbIn Ophaty
Cypet 2
BvibIM p03EtKacbHbH KaNfBbH aWbHbI3.
→ By wTekepih 6bIMHbI 3neKtp po3eTkacbHa Tbbl3dAn eHri3H3. CoBImeH KATap wTeke Weptnek ectineTinDei 60bn, opHaTbInyI kaxet. Axbpamyuih:
Булмьин 3пект розелкабин KaJaTаьи
Темен карбын, Булмьин 3пект
posztakbsHHb 6чтесгпстары Any kepek.
CypetTep A-B
KaKet JkaDbIKTapBly (《JkaDbIKTapBly KOJaHny》
BeJIIMIH KapaBIs) 6y NICTOTeTIEN KAIraTbI3. OCbYuIH JkaDbIbTHaBk YUbIK YUbIH 6y NICTOTeTKe
OpHaTbIN, OHBI 6y NICTOTeTIH 6bOKTaH bUfRpy
BaTbPmaCbIbN (C2) OpaHayBaHa DeiH, 6y
NCTOTeTIHe Kapa XblXkbIta 6epiH3.
Cypet C
KaKet 60nfah XaFda Y3apTkbl TytikTepi KOnlaHy Kepe. Ocb yuHin bip Hemece Eki 3apTkbl TytikTepi By nctOteTneH XaNfaHbI3. KaKet Xa6dbItapDbY3apTkbl TytikTIn 6oc yuBHa OPHaTbHbI3.
Ka6dbikTapdbiaxbpapaty
→ BaIanapdah KopraHbIcTbI apTka opHaTbIHb3 (6y miHTiperi kynblntaHa).
Cypet D
Ka6dbkTapdbiBn 6bnKtepeH axbipaTy uhi,
6bONtAH bIbFapy 6bIbPmacbN bacIn,
6bnKeTepeDi 6biHIN iuHHe 6biH cybipn anbbl3.
CaybItbTOnTbipy
Cyper 1
Cy caybIbH Ke3 KeIreH Ke3e KaIra TOnTbIpyFa 6oNaIbI.
HA3AP AYdAPbIHbI3
Kip Kenmipeiiumen KOndehcauunbIK cyobI naDanaHbI3!
Ta3anaIbIu 3ammapoI He baca KocnanapobI (MbIcIbI, Jynp) KyMaHbI3!
Tasa duumnbdeHceH cyobi KOndaH6aHbI3! MaKc. 50%
ducmunbdeHcMeH 50% Ky6bip cybl.
XaHbip cybIn KOJdaHaBbI3!
Tontbyuhi cy barh anbntactayfa bonaibi Hemece ticenebymda tontbpyra bonaibi.
Cy 6aBbIn any
→ Cy 6aBbIH TIK KOFaPbI KeTepiH3.
Cy 6aBbIbIc syWMyerHInAcTbIHaN TIK "MAX" 6eJIricHe DeIH ToTbIpbHbI3.
Cy6abihOpHaTbHb3XeHe6ekITINMEREHeIue 6acbIb3.
TikeJeB6yHbIMda
→ CydbblbicTaH WHyKbipra KybHb3. "MAX" 6eIricHeiH ToTbipbHb3.
BvibIMdbeWiPy
→ MybIMdb TypaKbIbIFbH KAMTaMa3b3 eTeTih Setke KoibHb3.
→ 3JneKtp aWacbIH 3JneKtp po3eTKacbHa caJIbIbI3.
AbyicTbipbn-kockblwnneH OFF kyiineH TaHdAnMaBn by kyui kyiHe aHaNdbipbHb3. Kpcemkiu -Xbiny xacbIn mycneN XblnbimmaDbI.
→ Xbiny KepcetkiuI TypaKtby KaH6aHaWsa KyTih3. By Ta3anaFbIu XMybIcKa daBbH.
Ha3apbIHbI3da 60ncbH
By ka3aHbInda cy kOKe he a3 60nca, cy copab6bl KocbIaNdb JxHe cydbl cy barbHaBc Ka3aHbHa KToTapab. ToTbpy npoceci bipheue MmHyr anybl MyMKH.
Bvibim ap 60 cekyHd caBHn KlanahDbI KbICKa yaBtKa Xaaba. Bykn KananaHHIn TybIn KaNYbH BoNlbPmaiBly. JXMcak wepty dlObbcI da ctineDi. By sbIrapabMbHba acep etinmeNi.
Cydbieecen Kyio
Cy 6a8bHnda cy Jxok 6oTnanda Kepcetkiu - Cy XeKtiNikci3diir Kbl3bn Tycneh XblnbTkaiDbjXHe CInHan dlBbCi bctiE.
→ Cy 6aBbIH "MAX" 6eBricHe DeiH ToTbIpbHb3.
Ha3apbIHyI3da 6OJcbiH
By ka3aHbIHda cydbIn KekTkiNkci3 MmIepi 6onfah Ke3IHde, Cy copfbIbI bAOTMATTb TyPeDe cy dbI cy pe3epByapbIbH an By ka3aHbHa XjIbepei. Cy 6abIb 6oc Ke3IHde, Cy copfbIbIb By ka3aHbN ToNTbIpa amnAbI da, By sbIbIbHI kAmaNbIN Ka6bIaNbI.
Kbicka apanbikTapda cy copfbblb6y ka3AHbIN TOnTbpyFaepekTeHedi.ErepToBpy cTeiOpbnDaNca,Kbbln BakblnyAmblceneDi.
By meJIsepiH petTey
UbfaTbH 6y mIupei aybCTbIPbIN-KoCKblnne H bacaPbIaDbI. TaLactHy TUPE MIn JtactHy KApKbIHbIbIbIbHa 6baIaNbICTbOcbl aybCTbIPbIN- KocBbM NHMImdAbl 6by DeHreIeHH (KeHJl NaCTaHy) MAKcIManDbI 6by DeHreIHe DeiH (KaTTb NaCTaHy) napAmetprnpdi OphATy MymkHirin 6bepei. KonJxETki3y Kblh Xepnerde OPhaIacKaH KaTTb NaCTaHy KaFdaBHaDla VaphydrofHyHKmraCbl KOnJkeTIIdM.
By mənsepiH opHaTy
→ KeNnO3nUaJIbI aXbIpaTbI-NKCKblTbI 6yDbH KaJxET MeJIuEpIe opHaTy.
6y bepydIN DeHreIH peTteriUH KOCY, oCb Ke3de, anIbIMe 6y TaNaHUsacBIn, 6y bIpKaNtBtbl bIbKaHua DeHIn, KaHdai Da bIp WSybepeke 6aBttTay KaKet.
BiyibIMdbi icTeH wblfapy
Cypet G
Byibmbbl eipy wih, KockbiWtB1 OFF kyiHe aiHaIbIpbHb3.
→ ΘηεΚTp aʌaçbɪn əŋεΚTp pɔ3eTkacbɪHaH Žbɪfapbɪn anbɪhɒi3.
CypeT H
→ 5y bIyIbIy IOKTaMaraHaIIa, 6y 6bpUdIeHreIH peTteriuih 6acblHla. EHNJI 6yblMHbI 6y Ka3aHbIHa KbcIMJxOK.
→ Banaapadn KoprAfbIbCTbApTkA opHbTbH3 (6y HInTiperi KynbTnTaNfA).
→ 5yIbIMHbI 3neKtp pO3eTKacBbHbI KaNfA bIH TEmEH KapaI 6acBIn, 6yIbMHbI 3NeKtp pO3eTKcBbHbAN By 5TuKePbI TaTbpIN any Kepek.
Kanfah cydbc6aibHb6ocatbHb3.
BvibIMbIcaKtay
Cyper F
Cyper
→ ΣηθΓeNEK KblIaKaTbI KepeK-JapakTap KəwirIHe opHaNaCTbIPbHb3.
KoJ WymeriH y3apKbIuT Tyikke eHri3iH3.
→ 3apKbIiTyIKTepdi Kepek-kaapKaTapFa apHaH yctafblka eHri3iH3.
HykTei afbH wMyerin KepeK-kaPaKaTapDbI caKTay opHbHa oPHaTbHb3.
EeH Jyyra apHaHraH uMyerIH npk yctaybIbHa iIniHa.
By xibiépyre aphannfah wananhiri y3apTkbiw tyTikertdi aiHnblpa opahb3 xhe 6y Tañahshabi eén Xyyfa aphannfah shymerihe eHr3H13.
Kyat cblmbH e3iHcakTay ophbHa opHaNACTbIpbHbI3.
Xa6dbikTapbI KOJaHy
MaHb3DbI KOndaHy TpaIbI HycKayIaPbI
Kep 6erih ta3anay
By taanaarbIbIbn KOnlaHb6ac 6bybn EeHedNdi CblnbpHy He shaHcOpfbIay ycbIbHLbIa. OcbIaNlaa eEHN bIbnFaBdI Taanay aIbHbIa KIP/60C KOkblCTah TanaHbAaJI
ToKbImaHbJkaHaPty
ToKbIma 6yIbIMapabH Ta3aJaiybl 6actMaac 6ypbH, anDbIMeH KePIH6eHTIH aMakTa ToKbIMahbH 6by acepiHe typaKbTJIbIFbH TeKcepy KaKeT. AnDbIMeH 6ymeh Ta3aJaih3 da, KeTIPin, MaTahbH Tyci, niiHi e3repyih TeKcepiH3.
KanTaNFaH, KaIaNfBnFah HEmece NaKTaNFaH 6etTerpDi Ta3anay
Ac 6eMecinH xhe yJxihha3b, eciKtep, npkET CnKTbI NaTaNfAH HEMECE XacaHdbI MATEpnaIapMeH KAnTaNfAH BeteTpdi TazanaFah Ke3de, BanaBy3, XhiHa3 NOINTypacb, XacaHdbI MATEpnaIapDaH XacaIaNfAH BeteTpXeHe cbIp BcHInM, Tycin KanybI, DaTap naJa D BoNYi MyMKInO.ObI BeteTpdi Tazaiay Ke3HJe Matahbl KiUke He KyPfAteB1b3 Xhe BeteTpH cyPTIH3.
HA3AP AYdAPbIHbI3
Xancbipbnrah xuekmepee 6yda barbimamaHb3,
6e6be jxa6bcmbpbiu mycin kanyb MyMkiH.
Eybimba naKxarblmarah arau Hemece napkem
edeHdepoi mazanay yiw naudanaHaB3.
OHeKTepei Ta3aIay
Cbyk aya paib k3iHde, acipece KbIcTa, Tepe3e eHneKtepiH, anHEK b6Tih yBmEH aklbipHAn dHden, kbltbHbIbIc. OcbInaHa, anHEKTe japbikwakTapbIH naDy60blya h Akenyi MymKiH anHEK b6Tihin deOpmaunnaHy KePehyi Tycedi.
CodaH KeiH Tepe3e 6etIH KOn 6pykkiuIme HxHe KaNTaMaMeH Ta3anaHbI3. CydAn BocAty yInP aKeBbI KOJaHaHbIbHE MeHecE 6eTepHc Kyprak etIN cyptHiz. HA3AP AUYAPbIHbI3
Tepeea kaxmaybHbIH naknei Kanmanrah XepnepiHe hkycah Kennipin anmac yuiH, 6yobI oraH kappa aBarfimmamahB3.
By nctoleti
C36 by nictoletin cantamanaapcbla da naiaana anaacb3, MbicaJIbI:
- iyni Tpyrah KIMdEeri Jxehin 6ypmEnepdi Ketipy ysiH onapdbI 10-20 cm KaMbIKtbkTah 6ymeH eHdEHI3.
- eCIMdkTepDen WaHdbi Ketipy yuH. CoN yuH 20-40 cm KaUbIKTBfBt H CaKtaHbI3.
IshAnDbI bInanDbI KetipY yuH,OCbMaKcTaTAta IyBepeKeTI a3dAn 6ymen eHden,OnbImeN xHa3dbI cyPTIH3.
HykTei afbH wyMeri
Cypet A
HykTeJI aftbI uMyerIH 6y nuctonetIe OPhaTbHb3.
Ta3anay canacbHyKTei aBbH yMerieHH KipneHRe
Xepre JxakblDfBbHa TaeyIe JxorapblnaiDb, c6eb6i
TemnepaTypa MeH KbCbIM yMerieHH sbIfa bepicinde
EH xorapbl 60bn TabbnaDb. KOn JeTyre KbH
Xepnerdi, fYranaPabl, apMaTypanapbl,
cyarapnapbl, YNfhbluanaPabl, dApetxhananapbl,
XaHIO3nepdIXeH Xbblity BaTapeRanpbl Taa3anayfa
acipece TnIMdi BoJbn TaBbJaDb. KtIH KaTbIN KaNFaH
kepeepiH 6yMeH Ta3aIaNbH, anbDuHa cIpKe cybIme
HEmece JIMHOK bIbKbIbIMe Cypan, cipKe cyb5 MmHT
iHiHe acep ety yuH ToCbIn, cOan H KeHH 6yMeH
Ta3aIaan, ketipyre 6oJaDb.
LnnHdpnik KblwaK
Cypet B
→ LcHnHdpNkBilwakTbIyWmErHe opHaTbHbI3. LcHnHdpNkBilwakTbIKoCbIMua petIHNe HYKTei aBfIH WymerHe opHaTyFa 60anaJIb. KblwakneH TaaalaydbI apKaibHa, TypIn KanFAn KipnpepDI OHaibpak Ketipyre 60anaJIb.
HA3AP AYdAPbIHbI3
Te3 akaynaHambin bempei ma3anayra keMeoi.
KoJ wyMeri
Cypet C
KoJIyMeHIN6yNtCTOnTeiHeOpHaTbHb3.
KoJIyMeHInH YCTIHderI KANTAMahbl TaptbHb3.
OcipeceYIKeHEmec, KyyFa 60NaTaBH6BtTeP yHH
XaKcb KeJeDl, MbcAclbl, Duy Ka6nHaIapbl XKeH
aHAnap yuH.
EeHxyyra apHaJFaH wYmeri
KyyfbaolatbH bapblk Ka6bIprHa HeMece eHeHdI TceMep yuH xKaCbI kEndi, MbCanbl Tae edHdep, Kaefbel nPiunlapanbX jHeNE PBX XacanFaH eEDn TceMepyuiH. Thex KipInHenB TeTepRe 6 ByzAfpak Ecep ety MaKcTaBHa da bary Xymbc iCTeH3.
Hyckay
Erep Ta3anaHaTbH Tcem YcTiHe Jyfbl 3aTTbH
Hemece NoInpneiTH 3MylbcNlaHapdbH KaIdbIKTapbl
Kanca, OHa 6bMeH Ta3anay Ke3IHDe, eDEHde
Cb3bIKTap NaJa 6Olyb MyMkiH, ONap aTeTte bMyeh
Ta3anaybipheWe pet KOndaHFaHHaNKeIH
XoBlaNaDb.
Cypet C
→ ¥3apTkbIu TTyikTepey nncToIeIHe XaNfAHB13.
EeH copy wymerin y3apKbIw Tytikke 6kiriHj3. Cypet E
EeH wSybepeKti eEH kyyf a phanfah wymeriHe 6ekitih3.
- ¥3apTbIi Tytik TIK TypMaHaHua OHJI anfA Kapai eHKeYiTHi3, HNTKeCiHcEeH eEN copy WyMeriHiH 6yIpiNk KaKnKaTaptbI TeMeH Xa6blJaIb.
- Edeh copy wymerih edeh kyyfa aphanrban wyebekek KoBnB3 da, 6yipnk KaKnakTap edeh kyyfa aphanrban wyepekti eki eHdpmere KipyTmic.
- 丫apTkblu Tytki KaTadaan apTk eKeiH3, HtNkceCHe dyipnik kKaNkapt KblntaHaBj Xhe wSybepeK eEen copy wYmeriHe bepik BekitIeJe.
EeH xyyra apHaIFaH wUmeriH napK no3nucbHa KOnblh13.
Cypet F
→ Kymbictb Toktakah Ke3Je, eeh Kyyf a phanfah Wymerih napk yctaybiuha iinj3.
By KblicbIMbl-γTik
Ha3apbIbI3da 6oJIcbIh
Bis 6ydbI 6bcenHdi Tpyde KARCHER yTikTeY yCTeHIN KOJaHaHy dbI yCbHAmbI3. Ocbl yTikTeY yCTeTI cI3 catbIn aIraH acnAna oHTaNbl Tpyde CaiKec KeJIe.On YtikTeY apeketIH keHInDeTei XeHe XbldAmdaTAb.I Ke3 KeIre HkaJaA da 6ydbI eTkiEtiH,TopbI heri3i bap yTikTeY yCTeHIN KOJaHaY KaXeT.
YtKxanfahran Ke3e 6y deHreHH VapoHydo fynHKuNcBnOpHaTnAb3, 8nTnece yTKTeRhen iW KIM bIaTaNbIb 6oAnd.
Bymen Ta3anaftbih iihde Ta3a, Ky6bpIbCy 6ap eKeHdirHe Ke3iH3di JeKtki3H3.
Ytkteri6yItekeipH6bIMhIH3eKtp po3eTKacbiHa TbIfB3dAn eHri3iJ3. CoHbIme KaTAP ItekeepIeptneK ectinetIne 60bn opHaTbIybl Kaxket. Kpcemkiu -Ymik Xacbl mycneH mypaKmbI xhaDbI
→ By TaanaaftbHbH HcckaynbTa CnnaTaNfHaDai Icke KocbHbI3. ¥cbHbJrHaf H dy deHreJnepi:
→ Ka3aHHaH TaTbI KeTipy
By xok
Kepcetkiu-CyXeTknikci3diRkIb3bn TycneH KbinblkTAaDbI XHe CNrHaN Dlb6bcI ectinei.
Cy 6aIbIHda cy kok.
→ Cy 6aBbIH "MAX" 6eIrciHe DeiH ToTbIpbIbI3.
Kepcetkiw-Cy Kektkiikci3diri Kb13bl Tycneh KaHaDbI.
By Ka3aHbIHaCy Jok. CopfbluTbIH Kbl3yDaH KopfaHbICbI eWipinDi.
→ ByIbIMdbI ICTeH IbIFapbIHb3.
→ Cy 6aBbH "MAX" 6eNricHe DeiH ToTbIbHbI3.
→ BybIMdbI KOcbIHbI3.
CyBaBtDyBbCpOHaTbIImFaH He OdaH KaK KeripimMerE.
Cy 6aarbH aIbHb3 KHe IaIbHb3.
Cy6aBihOpHaTbHb3XeHe6eKITINMeRHeUe 6acBbHb3
By 6epydIn DeHre peTteriin bacy MymkIn emec.
CaKaTHdbIpBbIiNeH / 6aIaIapDbIH Kocbln XjIbepyIeH KOpFayMeH Ka6blIn KaJbl.
→ BaIapdaH KOpFaHbIcTbI aJIdbHa opHaTbIHbI3.
By KbcibmbI yTiri cydbI "Tykipei!"
→ TemnepaTypapeTteriuiiH…fa3acbHaKoBbIbI3.
By Ta3aJnAfBilHbIH Ka3aHbIH WaBbIH 3 Hemece KaKTbI KetipH3.
By deHrein H Vapohydro yHKcncbOpHaTbnFa
→ AybIcTbIpbIn-KoCKbIbTb TaHaIaMaIb6y Kyuji KyiHe aHaNDbIpbHb3.
Ytikteyderi y3iicTeH kein 6y KbcbIMbl YtiriHeN cy TAMbIaPb IbHybl MyMkH.
Erep y3inictep y3aKa c03blnca, 6y ky6bipbHdafl by KOHNHeHCauIraHaIbI.
→БудьнбipiHшi afbIhBn 6eJIeK MaTafa 6aftTahbI3.
Cydbin6nik Wbifybl
By ka3aHbIHDa TaT naIda 6oNdbI.
→ Ka3aHHaH TaTbI KeTipy
TexHnkaIbIK MaflymaTtap
| Злес耗费 косу | ||
| Злес耗费 керneyi | 220-240 V | |
| 1~50 Hz | ||
| Корray даржesci | IPX4 | |
| Корray Кпалы | I | |
| Жимьс сидаэрbayl | ||
| Жылч озддгiri | 2200 BT | |
| Утikтух жылч озддгiri | 700 BT | |
| Кысынмbingен яжогары | 0,42 6ap | |
| Дени | ||
| Жылч укыты | 3 МИнуT | |
| Бу кени | ||
| Чадak укыты 6b By kiбepy | 60 r/MIN | |
| Бу afыны макс. | 150 r/MIN | |
| Vapohydro | 250 r/MIN | |
| Толъруншешeri | ||
| Су 6агы | 1,5 n | |
| Бу казаны | 0,5 n | |
| Кени | ||
| Бүйынүй karpeк- харakтары 3 салма bayl | 6,0 kг | |
| Чындыгы | 439 MM | |
| Ени | 301 MM | |
| Биikтiri | 304 MM | |
TexHuaBik 3eepicme npaia 60bIn Kanybi MymkiH!
ApaHai bixa6dbikTap
| Tancbipbc Homicepi | |
| Comfort Plus eden copy shymerine | 2.863-020 |
| aphanfaan taflbih taalbiktbta7a1anaib MaTa | 2.863-020 |
| XorapbIc canalab taftbH taillbIKtapdaH jacaIaNfA 2 | 2.863-174 |
| JyMCAK eden kyyfa aphanfaan yu6bepek. | 2.863-174 |
| 7aftbH ta1lbbkTBta3anaib MaTa, | 2.863-174 |
| JyMCAK KANTama | 2.863-174 |
| XorapbIc canalab taftbH taillbIKtapdaH jacaIaNfA 2 | 2.863-174 |
| JyMCAK KANTama. | 2.863-174 |
| 3nohIX KaNTamacB | 6.370-990 |
| MaKaTadaH jacaIaNFAH 5 kaNTama | 6.370-990 |
| Uzhiinndprnk kblwakrkapomnkekti | 2.863-058 |
| 4 NkTKeTI aftbH uWMeRiHIN UZHIINHDprnk kblwakrkapbI | 2.863-061 |
| Ke3dhen jacaIaNFAH kbl6ap | 2.863-061 |
| Uzhiinndprnk kblwakrkapomnkekti | 2.863-061 |
| kaTbIkpIepeDj keTipy yushi. IqeAdbI ce3imTeH emec | 2.863-140 |
| KbIrPbIbIb6ap zhiinndprnk kblwak | 2.863-140 |
| Eki KaTAP JyblNyFA Te3iIMDi kblIaIbApI xHe JyRbIbIb6ap | 2.863-140 |
| KbIYIaIbIb6ap zhiinndprnk kblwak. Ce3IMTaI TceScmped yushi | 2.863-140 |
| KoIaHaHyra bOImaIbIb. | 2.863-140 |
| Ulyken DeHreleK kblwak | 2.863-140 |
| Ulyken Ta3anay beTinH apkacbiHnda Ke6ipeK | 2.863-140 |
| paidanaHny MymKIndiKterPiH bepeDi, acipece yIyken | 2.863-140 |
| BeTyp6okblwarbI | 2.863-159 |
| Aca KaTbIb KETipydi TaIan erTietn Ta3anay | 2.863-159 |
| KMybIcTapbIHa aphanfA | 4.130-390 |
| ToKbIMaHb KyTu Wymeri | 4.130-390 |
| Kmim MeH ToKbIMaHapDbI XaHapTy aphanfA | 4.130-390 |
| TyckaRa3 Ta3anaIFbIbIb | 2.863-062 |
| TVCKaRa3dAp MeH XeJIiM KAnDbIKTapbIH ketipyre | 2.863-062 |
| aphanfA | 2.863-062 |
| Tat Ketipyre aphanfA rTaikwapanap | 6.295-206 |
| By KblcMbIbYtIK | 2.863-209 |
| KapbIyra KapcbIb TaIbAH | 2.860-142 |
| Ce3imTaI MaTan apTbIb YtIKteyre aphanfA | 2.860-142 |
| BencenHdi YtIKteyre aphanfA yctel AB 1000 | 2.884-933 |
| Edoyip KAYat YHemDey apkblbIe OTe Jxofapbl YtIKtey | 2.884-933 |
| HToTnKgeLepiHe aphanfA (tek 230 B yushi) | 2.884-933 |
yall
2.863-020
yoacgiaoawlloacga
Comfort Plus aaf
aIc aagd aJwJ no aocj J 2
.0g
2.863-174
yo aegiao auiio agga
s.()gKlALL)aa
pclj
0gJALl aIe aagd a2wJ 2
6.370-990
5.29 μs
joll o acgua 5
2.863-058
oDzissall olawal agga
J 29
2.863-061
jw 3o yduu u jpab
a bawwA y aIy oaiy all y
. >J
2.863-140
absso 13 o yuusoo
Jn Jn nn nnnnnnnnnnnnnnnnnnnnnnnnnnnnnnnnnnnnnnnnnnnnnnnnnnnnnnnnnnnnnnnnnnnnnnnnnnnnnnnnnnnnnnnnnnnnnnnnnnnnnnnnnnnnnnnnnnnnnnnnnnnnnnnnnnnnnnn
aawliae. aaiwka oogog oJrJgall
.
2.863-022
oA 4aJdOJ
J 1
oJbWJl 1 aol, pJzWJl JkO]
2.884-282
12.12.11 0.2>gg a1111 a
e) lglgogg
a a a a a a a a a a a a a a a a
oo>g Joo. Jooa aoc o>yo
a#all oJrJb
jLgJlLp
aolsccll jLjJp
"
jJJJ Joo
jg jglal Jklll 0e all
ωj
alwogclall jεjρ
aLb2algljgJlglallljJlslp
.
jlll jie bdojj
a/100 1000000000000000000000000000000000000000000
Jlalb
gogll Jle Jabll aLaoaLw gol
L
clo gio 《j》 jI I biaia aolal oIgSall
…aJjIcOJrJlAeJgPbiaIaio
alljgljllablljg>alcabw
.
Vapohydrod
J 1
o e a 12
jolololso
aJy aJy aJy aJy aJy aJy aJy aJy aJy aJy aJy aJy aJy aJy aJy aJy aJy aJy aJy aJy aJy aJy aJy aJy aJy aJy aJy aJy aJy aJy aJy aJy aJy aJy a
aI aI aI
a269gjLjll jao 9Jg a>g p
alaeio wao
olaljoo 05 a05包
JlLJIaXe JgJzJg>g
Jl l aLc no aJy jll Jj y
gogp9 liq .aill all 0j0s
oJwJyJyJyJyJyJyJyJyJyJyJyJyJyJy
Joggollolgagaaaagaiiaal
1.65g
Ko
laaiyjg>glclal
a|j|gω|ρdω|a|j|a|j|
wioiogic J.KAERCHER
aJl JdJ 0eJyJyJyJyJyJy
aJl lcc aJd
aJg, aLall g aJg Jll aJg
Lwcl8oJ
y. 1clw8gjdo jj
aLc 100000000000000000000000000000000000000
Jn nn nnnnnnnnnnnnnnnnnnnnnnnnnnnnnnnnnnnnnnnnnnnnnnnnnnnnnnnnnnnnnnnnnnnnnnnnnnnnnnnnnnnnnnnnnnnnnnnnnnnnnnnnnnnnnnnnnnn
JlJI JI JIOJIOJIOJIOJIOJIOJIO
jJ
Ko
laaiyixj ygogolll clal g
.aaill ojgwsla aal all aod
olaljz
209 JjJU 1j> 1
.
aJolll aJoll
abg>lo
a@g wlaell ssg aiojll aaiao Jus
aill jge gall lgl aolg
J
wJg a zaiiil aia jaiu Juaa
a 60 a>
j 1
o 1
012xWU aWlu aRulwliu.
a aaa aag aal 1
a
Jlbei jgsiee
aabssyjg cagaae gocglo
jollldcluayduaiy dcll lkiy
pJ 1
a0s j s o j 00000000000000000000
aaisllc
algobjzj
JlJIaXe Jg aJzj
Jl l aLc no aJy jll Jy jp
4
zlaogj lcll jll zlao J
Jawl J
Jb. Jc. Jc. Jc. Jc. Jc. Jc. Jc. Jc. Jc. Jc. Jc. Jc. Jc. Jc. Jc. Jc. Jc. Jc. Jc. Jc. Jc. Jc. Jc. Jc. Jc. Jc. Jc. Jc. Jc. Jc. Jc. Jc. Jc. Jc
Iggsaagaaaljllbglgds
aLc
zliololpawwaijaii
gds. aikso f 2
pIaOyJzJI .oJaaoo oJgOgJzJI JzJI
. ploU palaI lgl bdoI gdoI y
a2b3 JJ LjL j a2d Jg1 a> g
0g 0g 0g 0g
.5glwlll l 1
jlll o<all p|ssla
J 1
J
4
slo lio oos /i/121/111
.
wliu la oglcal oJr> a2j piaio iaol
JyXll aebg 0
acllal
1 1
山山山
ab>lo
J 10000000000000000000000000000000000000000000000000000000000
0
J 1000000000000000000000000000000000000000000
日
A aJ 0
W Jc aieaill abaiil a g q W J
J
J
J
J
J
J
J
J
J
J
J
J
J
J
J
J
J
J
J
J
J
J
J
J
J
J
J
J
J
J
J
J
J
J
J
J
J
J
J
J
J
J
J
J
J
J
J
J
J
J
J
J
J
J
J
J
J
J
J
J
J
J
J
J
J
J
J
J
J
J
J
J
J
J
J
J
J
J
J
J
J
J
J
J
J
J
J
J
J
J
J
J
J
oJyjIJI oJyJI
aJrJrJrJrJrJrJrJrJrJrJrJrJrJrJrJrJrJrJrJrJrJrJrJrJrJrJrJrJrJrJrJrJrJrJrJrJrJrJrJr
eclll Jg 10gaoaiaiaia a>Jl all
Jolj 12 j 12 J 12
a>1jlllal lgl aaiil jg
j j 1
a@g9 p12w y o jll baw aab
aJw pdool all no aalill .wq s
.1gill lawl 9 gil
4
0020g > 00l/ ( S > y/1/g) 00/00g = 0
0j j 1
.
jll aos 9 pS2ill
c 1
LgDwGdIaIyIgOgIbIaJg. JzJz
J 1
aJrJl (aaeeallll) J aJr
(..)
J 1
aagg gglgogllgglglll
.Vapohydro clalg jll
jlll aos laio
a0jUJlJIJIaS JcJluXyI Zua
p 10
a>g
J 1
jgl
G
OFF JJgGgJg
jglj
Jogill ssoo aKssll wuGswl
H
29> 1jlll lal
J 10
.bai
giagll Jle Jlabll aIa> alwng baiol
(jdujoojou)
Jawj jgeJI Jooe oocbc lc baoi
jgljllgssaaon no jlaalwgl
.1all 1j> no aaiJll 1al 1g
jglzjj 1
F
1a>lao
gxdo oyydowll alwrall jx
.
a oogwlo 1c aagll aagll s
aJolgJdDjOg
.12
b>uLo jIgJgJgJg
.
a0d1w a0jy a0g9 gai
aill oogwlo Jg>JlI gbl 0
a
Joo
a
Jey sgs Jkwa clal jg w
111 111 111 111
sagac Jkssgogd jg:
clll
ale baidally jgejgl clal jj J
aogoo
jglll o o o o o
p9g .Jall gag 9 ceg joo clll
cllll aiao oJraIaIyIaIyIaIyIaIy
- jLlal yI clal 1Jz Jocclll Jaig
gj0c 1Jall aLac gzsui
liag.a 60 Js palaal jlaJIa
p>plalldjduaJgJdaiw no
y.g. abu yj gaaa dgsic
J 1
cllljoo
a a a a a a a a a a a a a a a
aJl 111111111111111
.
aalc slll jj a
"
J
a aee
joo all Jaai jai all aiaall gaa
cucu logcugulogggllll aLcIaI
aia gaii jIgjglal
alac Jbaa piw g Jlll ayle cJo clll
- 2,3,4
Joo 000000000000000000000000000000000000000000
212 0Jll aIac ploLg jIaI
a>100 100
J
!aalla aollljai jai
a
2 0
←
Jalllllog aagullll kss
.
Jgss
gss slll 1 j 1 g.
EGA
jawy jgjll uie euee ie baiol: aed
jgljll jssao no joljllg
B-A
←
Jzjzil) aOJUU JzJUJ Uoogu
pallg jlll lss wss slll pdd
a a
Jy Jy
j j gao
J.
C
←
lg3 > 2
J 1
jUJLJI J
a aai 000000000000000000000000000000000000
J
gogll JlalbIaIlaIwI bIol
()
D
j j 1e bdoiaaiaaia
joo lgljy
cllll jj
1
g 1 10
4
(a2a2 2) a2awll ojswlo E1
E2
aJyI a9 F1
auiJJI aIbcJF2
a aFJ F3
aJgJgJgJgJ G1
J
JbJI biaia alolJI oJcJI H1
(Jawy)JzH2
()jwJyJH3
OFFJ JJJJJJJJJJJJJJJJJ
(a)clll aaaa aollll lll b
()
d
a 0000
f( x) = ( 1 + ax) - ( 1 - ax) - 2ax
JjSguaVapohydro abg g
a>all b> gog gl oA6
aJall a 0A7
JaaA8
A9
A10
Og yio jolil g JooJolll all
Jzj aag oIgol oia jie.

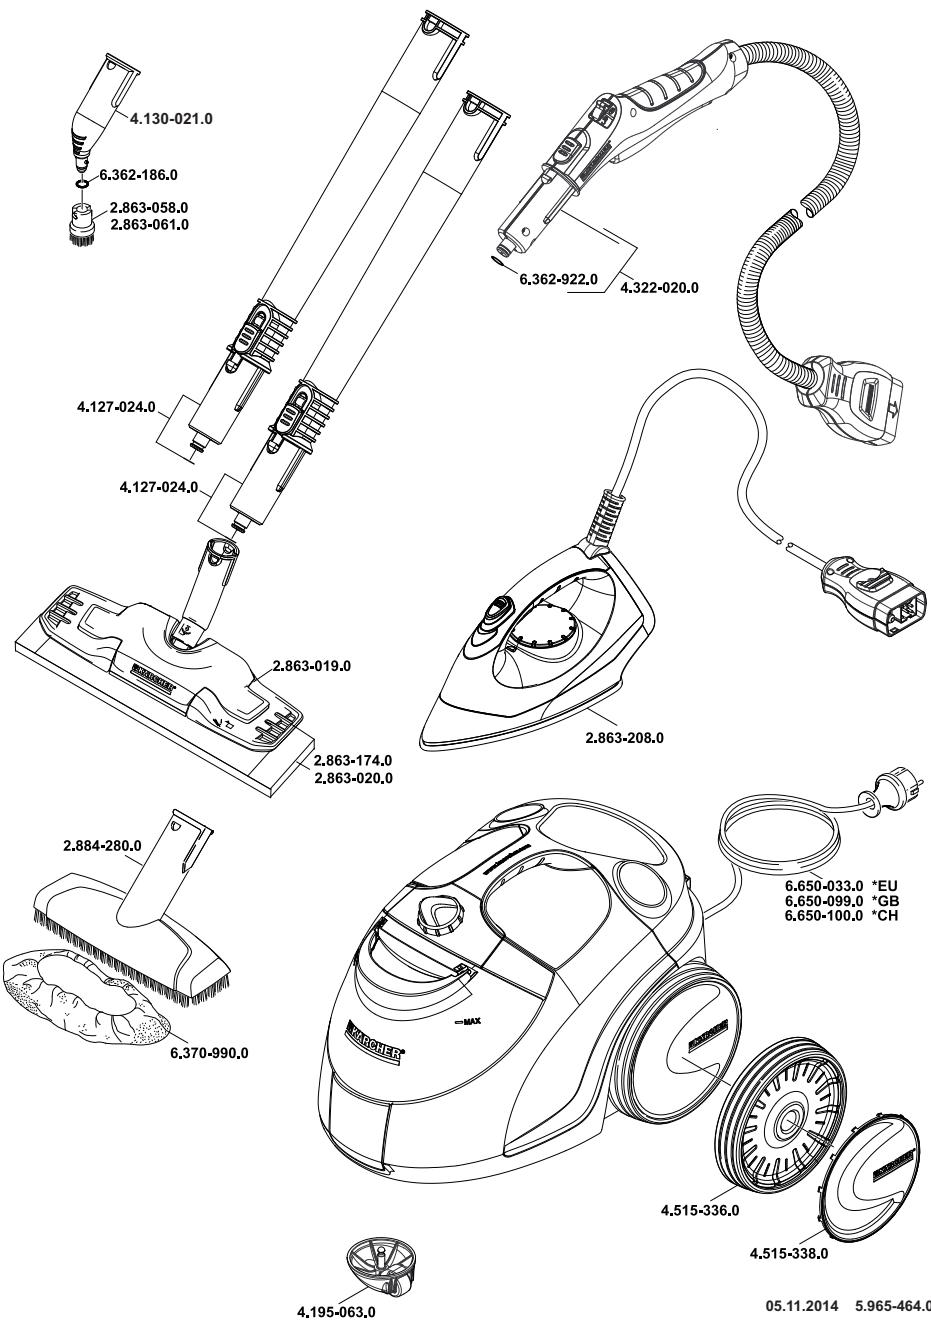

http://www.kaercher.com/dealersearch

71364 Winnenden (Germany)
Tel.: +49 7195 14-0
Fax: +49 7195 14-2212