LunAqua Power LED XL - Lighting OASE - Free user manual and instructions
Find the device manual for free LunAqua Power LED XL OASE in PDF.
User questions about LunAqua Power LED XL OASE
0 question about this device. Answer the ones you know or ask your own.
Ask a new question about this device
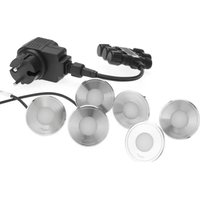
Download the instructions for your Lighting in PDF format for free! Find your manual LunAqua Power LED XL - OASE and take your electronic device back in hand. On this page are published all the documents necessary for the use of your device. LunAqua Power LED XL by OASE.
USER MANUAL LunAqua Power LED XL OASE
natural_image
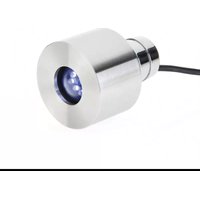
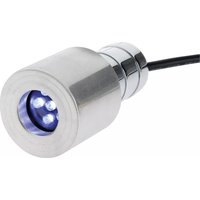
Close-up of a black circular LED array with 12 central lights (no text or symbols visible)LunAqua Power LED XL
EN Operating instructions
FR Notice d'emploi
LAA0049
LAA0050
LAA0051
Lagern/Überwintern
DE
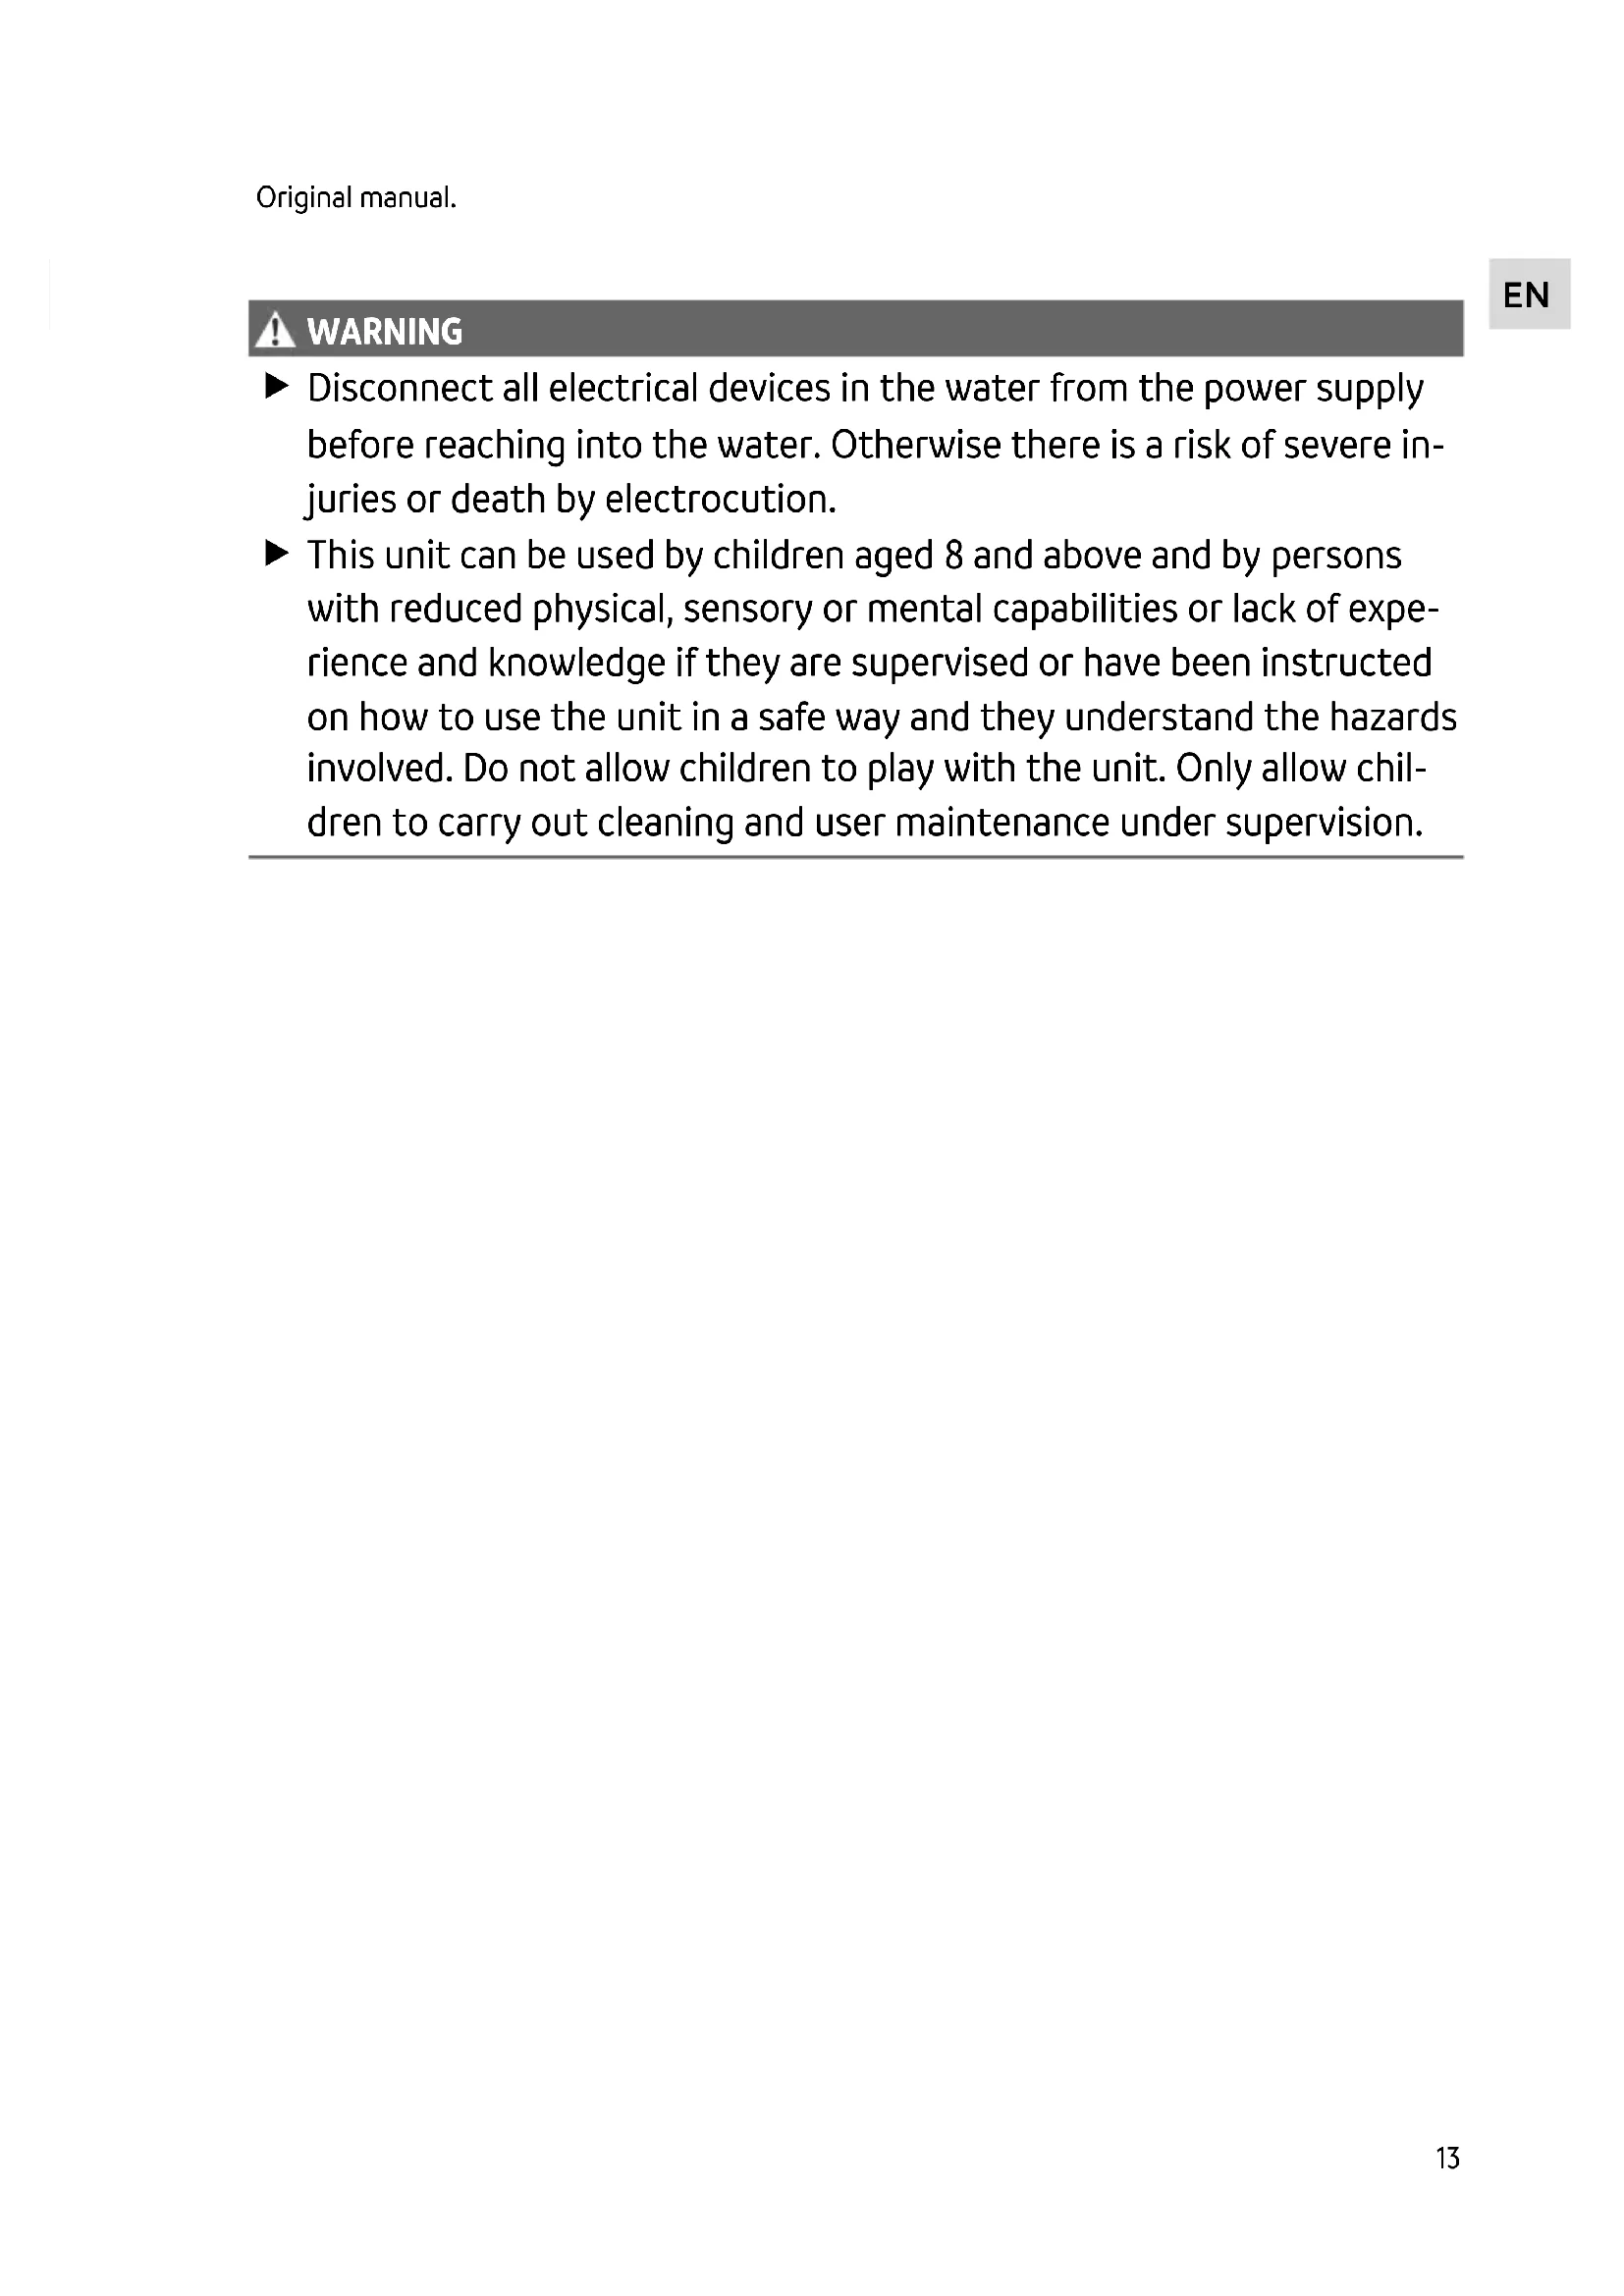
▶ Disconnect all electrical devices in the water from the power supply before reaching into the water. Otherwise there is a risk of severe injuries or death by electrocution.
This unit can be used by children aged 8 and above and by persons with reduced physical, sensory or mental capabilities or lack of experience and knowledge if they are supervised or have been instructed on how to use the unit in a safe way and they understand the hazards involved. Do not allow children to play with the unit. Only allow children to carry out cleaning and user maintenance under supervision.
Safety information
Electrical connection
- Special regulations apply for electrical installation in outdoor spaces. Only a qualified electrician may perform the electrical installation.
- The qualified electrician has the necessary professional training, knowledge and experience to perform electrical installation in outdoor spaces. The electrician can detect potential dangers and knows how to adhere to regional and national standards, regulations and directives.
- For your own safety, please consult a qualified electrician.
- Only connect the unit if the electrical data of the unit and the power supply match.
- Extension cables and power distributors (e.g. outlet strips) must be suitable for outdoor use (splash-proof).
- Protect open plugs and sockets from moisture.
Safe operation
- Do not use the unit, if electrical lines or the housing are damaged.
- The supply cord cannot be replaced. If the cord is damaged, the appliance should be scrapped.
- Do not carry or pull the unit by its power cable.
- Route lines in such a way that they are protected from damage and do not present a tripping hazard.
- Only carry out work on the unit that is described in this manual.
- Only operate the unit with the suitable driver.
- Do not look directly into the light source.
- Never carry out technical changes to the unit.
- Only use original spare parts and accessories.
- Should problems occur, please contact the authorised customer service or OASE.
Intended use
Only use the product described in this manual as follows:
Only use the product described in this manual as follows:
- For use in water fountain systems and ponds.
- For use above and under water.
- While adhering to the technical specifications. (→ Technical data)
- Connection to a suitable OASE driver.
Product Description
Overview
EN
LAA0049
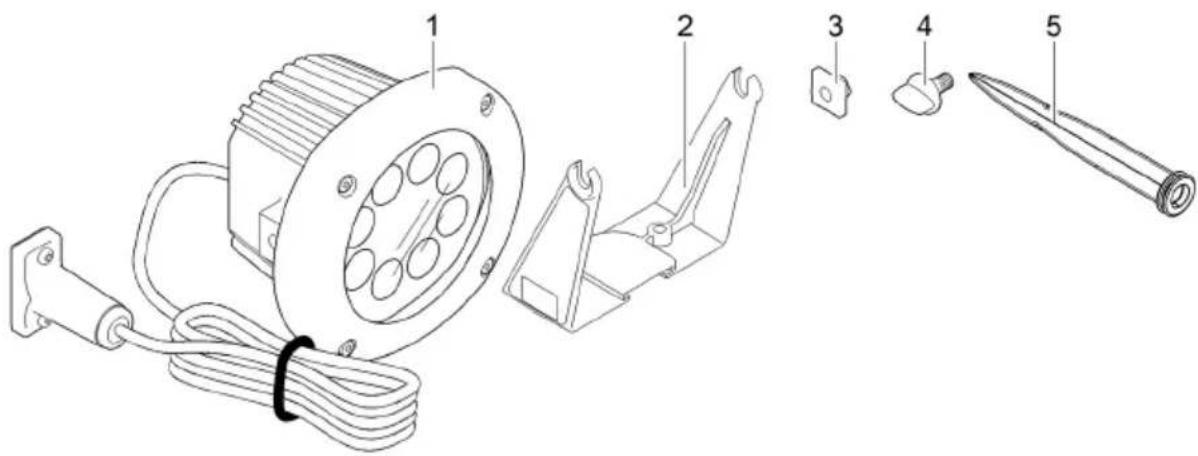
1 1 × spotlight
2 1× holding fixture
3 2 × square nut
4 2 × clamping screw
5 1× ground stake
Properties
LunAqua Power LED XL is a sturdy spotlight with LED lamps permitting simple and safe operation above and below water (up to 4 m).
Accessories
LunAqua Power LED Cable 10 m (42636) as extension cable between driver and spotlight.
Symbols on the unit
| IP68 4.0 m | The unit is dust-tight and protected against the results of permanent immersion in water to a depth of 4 m. | |
 | The unit has protection rating III. Only operate the unit with safety-low voltage. | |
 | Operation is only permitted with a safety transformer. | |
 | Only operate the unit at a safe distance of at least 0.5 m from combustible materials. | |
 | Replace any damaged glass. | |
 | The light source (LED) in the LED spotlight cannot be replaced. | |
 | Do not dispose of the unit with normal household waste. | |
 | Read the operating instructions. | |
Installation and connection
WARNING
Risk of severe injuries or death by electric shock.
▶ Disconnect all electrical devices in the water from the power supply before reaching into the water.
▶ Disconnect the unit from the mains before you start working on it.
NOTE
The unit is sensitive. Hard impacts and vibrations may damage mechanical or electronic components.
▶ Protect the unit from hard impacts or vibration.
The device can be installed in or outside of the water.
- Never cover the unit, as this will result in a risk of fire.
- For installation outside of the water, keep a minimum safety distance of 50 cm from combustible material.
- Place the unit in the pond on horizontal, firm and sludge-free ground.
- A ground stake can be used for installation outside of the water.
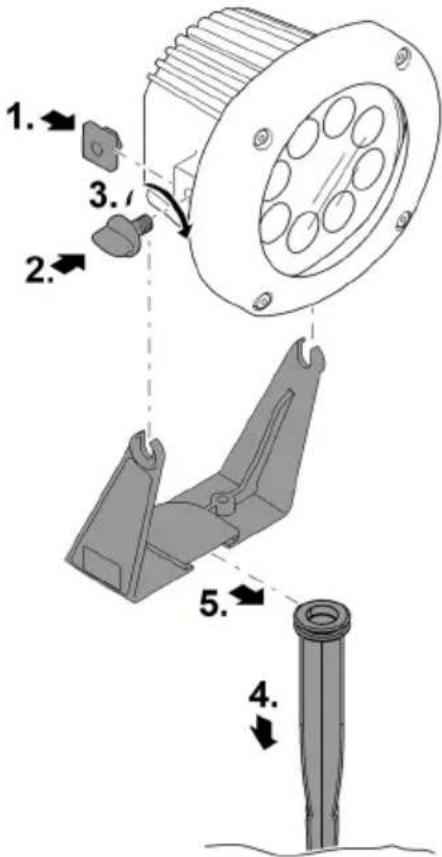
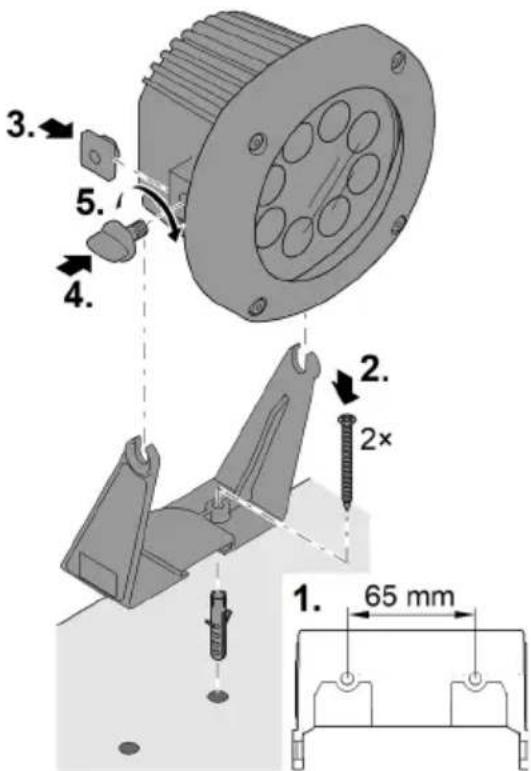
Installation with the ground stake
How to proceed:
- Insert a square nut into the spotlight on both sides.
- Turn the clamping screws into the square nuts by several rotations, then insert the spotlight in the holding fixture.
- If necessary, adjust the tilt of the spotlight. (→Adjusting the tilt of the spotlight)
- Tighten the clamping screws.
- Insert the ground stake in the ground.
- Install the unit on the ground stake.
LAA0052
Wall or floor installation
The supplied holding fixture is intended for fastening the spotlight, either on a stable wall or on the ground (stable substrate).
- It is not permissible to fasten the driver to the ceiling.
How to proceed:
- Drill two holes with the indicated spacing.
- Fasten the holding fixture.
— Use suitable fastening materials. - Insert a square nut into the spotlight on both sides.
- Turn the clamping screws into the square nuts by several rotations on both sides, then insert the spotlight in the holding fixture.
-
If necessary, adjust the tilt of the spotlight. (→Adjusting the tilt of the spotlight)
-
Tighten the clamping screws.
LAA0053
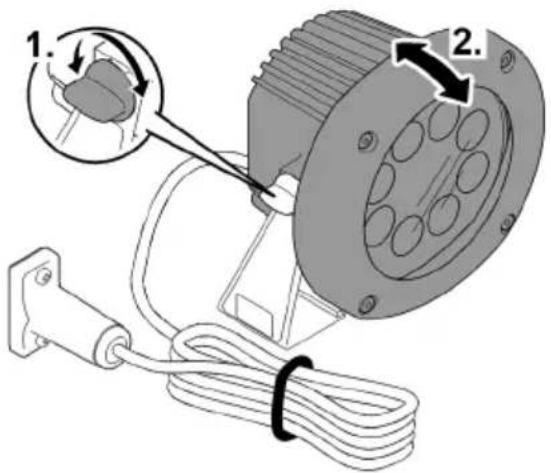
Adjusting the tilt of the spotlight
How to proceed:
- Loosen the clamping screws on the spotlight on both sides.
- Tilt the spotlight as required.
- Retighten the clamping screws.
EN
LAA0050
Establishing the connections
- Each spotlight can be connected to the driver directly or with the aid of one or more 10 m LunAqua Power LED extension cables (42636). The maximum cable length between spotlight and driver must not exceed 45 m.
- Do not exceed the max. connected load of the driver. (→ Driver operating manual)
- This figure shows an example of how to connect spotlights to a driver. Depending on the spotlight and the driver, different connection variants are possible.
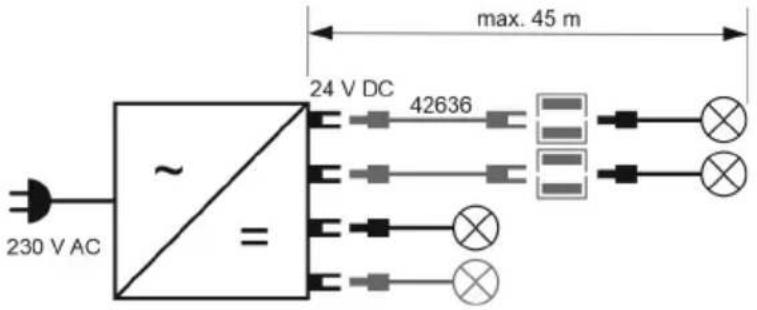
LAA0048
How to proceed:
- Remove the protection cap from the driver.
- Fit the plug connector and secure with the two screws (max. 2.0 Nm (max. 18 lb-in)).
— Ensure that the rubber seal is clean and fits exactly.
— Replace the rubber seal if damaged.

PLX0004
Commissioning/start-up
The spotlight is controlled via the driver. ( Operating manual of the OASE driver in use)
Maintenance and cleaning
WARNING
Risk of severe injuries or death by electric shock.
▶ Disconnect all electrical devices in the water from the power supply before reaching into the water.
▶ Disconnect the unit from the mains before you start working on it.
If necessary, clean the unit with clear water using a soft brush.
- Ensure that no moisture can enter the unit.
Repair work
The light source (LED) in the LED spotlight cannot be replaced.
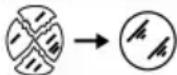
Replacing the lamp glass
How to proceed:
- Undo the screws and remove the top section.
- Remove the lamp glass and the O-ring.
- Replace the lamp glass.
- Assemble the spotlight in the reverse order.
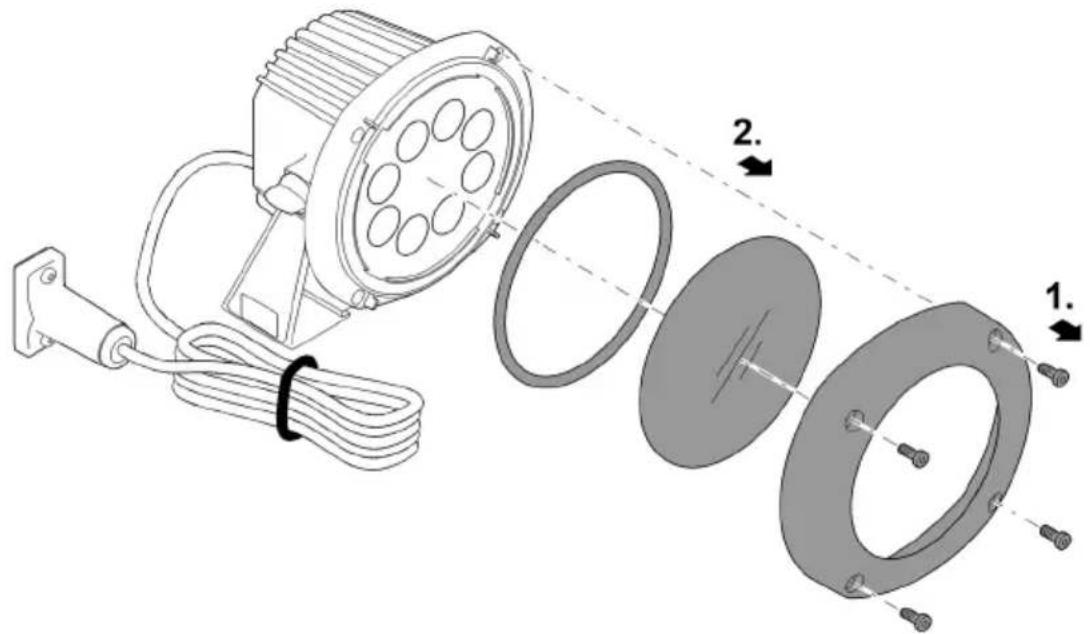
LAA0051
Storage/winter protection
If the water or ambient temperature is outside the permissible temperature range, deinstall the unit and store it in a dry place. ( Technical data)
Malfunction remedy
| Malfunction | Cause | Remedy |
| Spotlight is not lit | Spotlight not connected / no supply voltage | Check all cables and connections. |
| Driver defective | Replace the driver. | |
| Spotlight defective | Replace the spotlight. | |
| Strength of the spotlight decreased | Lamp glass soiled | Clean lamp glass |
| In the event of severe heat build-up, the strength of the light is automatically reduced by the over temperature protection system | Allow the spotlight to cool down.Keep away from additional heat sources | |
| Water in the spotlight housing | Seal defective | Check seal |
Technical data
| LunAqua Power LED XL | 3000 | 4000 | ||
| Article number | Narrow Spot | 51968 | 51970 | |
| Spot | 57763 | 51971 | ||
| Flood | 57762 | 51969 | ||
| Wide Flood | 57764 | 51978 | ||
| Light angle | Narrow Spot | ° | 10 | 10 |
| Spot | ° | 15 | 15 | |
| Flood | ° | 30 | 30 | |
| Wide Flood | ° | 45 | 45 | |
| Mains voltage | lm | 1250 | 1350 | |
| Current consumption | K | 3000 ±200 | 4000 ±200 | |
| Power consumption | V DC | 24 | 24 | |
| Protection class | mA | 625 | 625 | |
| Excess temperature protection | W | 15 | 15 | |
| Energy efficiency class | IP 68 | IP 68 | ||
| Number of white LEDs | Yes | Yes | ||
| Maximum operating life | F | F | ||
| Maximum submersion depth | 8 | 8 | ||
| Permissible water temperature (operation in water, product active) | h | 50000 | 50000 | |
| Permissible ambient temperature (operation outside the water, product active) | m | 4 | 4 | |
| Storage temperature (product inactive = disconnected from the power supply) | °C | +4... +35 | +4... +35 | |
| Dimensions (L × W × H) | °C | -10 ... +40 | -10 ... +40 | |
| Cable length | °C | -20 ... +70 | -20 ... +70 | |
| Weight | mm | 145 × 160 × 182 | 145 × 160 × 182 | |
| Mains voltage | m | 5 | 5 | |
| Current consumption | kg | 1.6 | 1.6 | |
EN
Disposal
NOTE
Do not dispose of this unit with household waste.
▶ Dispose of the unit by using the return system provided for this purpose.
▶ Should you have questions, please contact your local disposal company. They will give you information on how to correctly dispose of the unit.
▶ Render the unit unusable by cutting the cables.

AVERTISSEMENT
LAA0049
LAA0050
LAA0051
NL
LAA0049
1 1×lamp
2 1× houder
3 2 × vierkantmoer
4 2 × Klemschroef
5 1 × grondpen
Eigenschappen
Wand of bodembevestiging
NL
LAA0050
LAA0051
Opslag/overwinteren
LAA0049
LAA0050
ES
LAA0048
LAA0051
PT
LAA0049
1 1 × lâmpada
2 1 × suporte
3 2 × porca quadrada
4 2 × parafuso de aperto
5 1×espeto
Efeitos
PT
LAA0050
LAA0051
Armazenar/Invernar
LAA0049
LAA0050
LAA0051
LAA0049
DA
1 1× lygte
2 1× holder
3 2 × firkantmøtrik
4 2 × klemskrue
5 1×jordspyd
Egenskaber
DA
LAA0050
Skab forbindelse
LAA0051
Opbevaring/overvintring
LAA0049
| 1 | 1 x Lys |
| 2 | 1 x Holder/brakett |
| 3 | 2 x Firkantmutter |
| 4 | 2 Klemmeskrue |
| 5 | 1 x Jordspyd |
Egenskaper
LunAqua Power LED XL Er en robust lampe med LED-lys, som tillater enkel og sikker drift over og under vann (inntil 4 m).
Tilbehør
LAA0050
LAA0051
Lagring/overvintring
LAA0049
LAA0050
SV
LAA0051
LAA0049
LAA0050
LAA0051
LAA0049
LAA0050
HU
LAA0051
Tárolás/Telelés
LAA0049
LAA0050
Podłączenie
LAA0051
LAA0049
LAA0050
CS
Vytvoření připojení
LAA0051
Uložení/zazimování
LAA0049
1 1 × svietidlo
2 1 × držiak
3 2 × štvorhranná matica
4 2 × stahovacia skrutka
5 1 × zapichovací kolík
Vlastnosti
LAA0050
LAA0051
Uloženie/prezimovanie
LAA0049
LAA0050
SL
LAA0049
| 1 | 1 × svjetiljka |
| 2 | 1 × držač |
| 3 | 2 × četverokutna matica |
| 4 | 2 × stezni vijak |
| 5 | 1 × klin |
Svojstva
LunAqua Power LED XL je robusna svjetiljka s LED svjetlosnim sredstvima koja dopušta jednostavan i siguran rad iznad i ispod vode (do 4 m).
Dodatna oprema
LunAqua Power LED kabel od 10 m (42636) kao produžni vod između pogonske jedinice i svjetiljke.
Simboli na uređaju
| IP68 4.0 m | Uređaj je nepropustan na prašinu i zaštićen od trajnog uranjanja na dubinu vode do 4 m. | |
 | Uređaj udovoljava razredu zaštite III. Rabite uređaj samo sa sigurnosnim ni-skim naponom. | |
 | Rad samo sa sigurnosnim transformatorom. | |
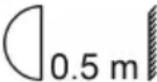 | Rabite uređaj samo na sigurnosnoj udaljenosti od najmanje 0,5 m od zapa-ljivih materijala. | |
 | Zamijenite oštećenu staklenu ploču. | |
 | Izvor svjetlosti (LED) u LED reflektoru nije moguće mijenjati. | |
 | Ne zbrinjavajte uređaj s običnim kućnim otpadom. | |
 | Pročitajte priručnik za uporabu. | |
LAA0050
LAA0051
LAA0049
LAA0050
RO
LAA0051
RO
LAA0049
LAA0050
Свързване
LAA0051
LAA0049
LAA0050
UK
LAA0051
UK
LAA0049
LAA0050
LAA0051
LAA0050
建立连接
LAA0051
存放/过冬
1
36467
2
13422
LAA0054