ProfiLux Garden LED RGB - Lighting OASE - Free user manual and instructions
Find the device manual for free ProfiLux Garden LED RGB OASE in PDF.
| Product type | RGB-LED spotlight for garden and pond |
| Brand | Oase |
| Model | ProfiLux Garden LED RGB |
| Use | Above and under water, water feature installations and ponds/basins |
| Power supply | Via ProfiLux Garden LED Controller (not included), compatible Easy Garden Control (EGC) |
| Maximum number of spotlights per controller | 4 |
| Ambient temperature (under water) | +4 °C to +35 °C |
| Ambient temperature (dry) | -10 °C to +40 °C |
| Functions | RGB lighting effects without programming |
| Installation | On stake, wall/floor mount, on adjustable extension, under water or out of water |
| Connection | Waterproof connector with rubber gasket, optional extension cable up to 10 m |
| Safety | Disconnect before contact with water, do not look directly into the light source |
| Maintenance and cleaning | Clean with clear water and a soft brush, avoid moisture inside |
| Winter storage | Remove and store dry if temperatures outside permitted range |
| Spare parts | Available at www.oase-livingwater.com/piecesdetachees |
| Delivery contents | LED lamp, mounting kit, stake, Allen key, connection cable with terminals |
Frequently Asked Questions - ProfiLux Garden LED RGB OASE
User questions about ProfiLux Garden LED RGB OASE
0 question about this device. Answer the ones you know or ask your own.
Ask a new question about this device
Download the instructions for your Lighting in PDF format for free! Find your manual ProfiLux Garden LED RGB - OASE and take your electronic device back in hand. On this page are published all the documents necessary for the use of your device. ProfiLux Garden LED RGB by OASE.
USER MANUAL ProfiLux Garden LED RGB OASE
natural_image
Black-and-white photo of reeds and shrubs reflected in a calm pond, no text or symbols visibleProfiLuxGarden LED RGB
EN Operating instructions
FR Notice d'emploi
natural_image
Close-up of a black mechanical device with a circular dial and mounting bracket (no visible text or symbols)
A
PLX0024
B
PLX0023
C
LAA0034
D
LAA0035
H
PLX0004
Translation of the original Operating Instructions
WARNING
- This unit can be used by children aged 8 and above and by persons with reduced physical, sensory or mental capabilities or lack of experience and knowledge if they are supervised or have been instructed on how to use the unit in a safe way and they understand the hazards involved.
- Do not allow children to play with the unit.
- Only allow children to carry out cleaning and user maintenance under supervision.
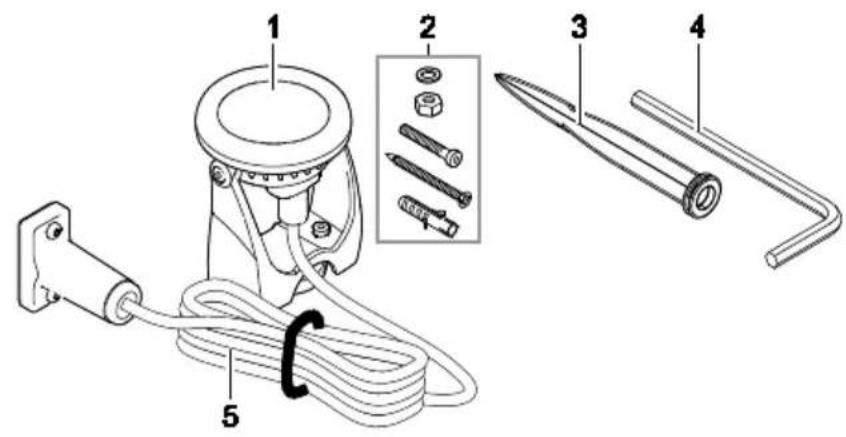
- Possible death or severe injury from electrocution! Before reaching into the water, always disconnect all units in the water that have a voltage of >12 V AC or >30 V DC from the power supply.
Safety information
Electrical connection
- Electrical installations must meet the national regulations and may only be carried out by a qualified electrician.
- A person is regarded as a qualified electrician if, due to his/her vocational education, knowledge and experience, he or she is capable of and authorised to judge and carry out the work commissioned to him/her. This also includes the recognition of possible hazards and the adherence to the pertinent regional and national standards, rules and regulations.
- For your own safety, please consult a qualified electrician.
- The device may only be connected if the electrical data of the device and the power supply coincide. The device data is to be found on the device type plate, on the packaging or in this manual.
Safe operation
- Never operate the unit if the housing is defective!
- Never operate the unit if an electrical cable is defective!
- Only open the unit housing or its attendant components if this is explicitly specified in the operating instructions.
- Never carry or pull the unit by the electrical cable.
- Route cables such that they are protected from damage and do not present a tripping hazard.
- Only carry out work on the unit that is described in this manual. If problems cannot be overcome, please contact an authorised customer service point or, if in doubt, the manufacturer.
- Never carry out technical changes to the unit.
- Only use original spare parts and accessories for the unit.
- Do not look directly into the light source.
Information about these operating instructions
Welcome to OASE Living Water. You made a good choice with the purchase of this product ProfiLux Garden LED RGB.
Prior to commissioning the unit, please read the instructions of use carefully and fully familiarise yourself with the unit. Ensure that all work on and with this unit is only carried out in accordance with these instructions.
Adhere to the safety information for the correct and safe use of the unit.
Keep these instructions in a safe place! Please also hand over the instructions when passing the unit on to a new owner.
Symbols used in these instructions
The warning information is categorised by signal words, which indicate the extent of the hazard.

WARNING
- Indicates a possibly hazardous situation.
• Non-observance may lead to death or serious injuries.

NOTE
Information for the purpose of clarification or for preventing possible damage to assets or to the environment.
Additional information
☐ A Reference to a figure, e.g. Fig. A.
→ Reference to another section.
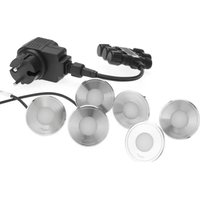
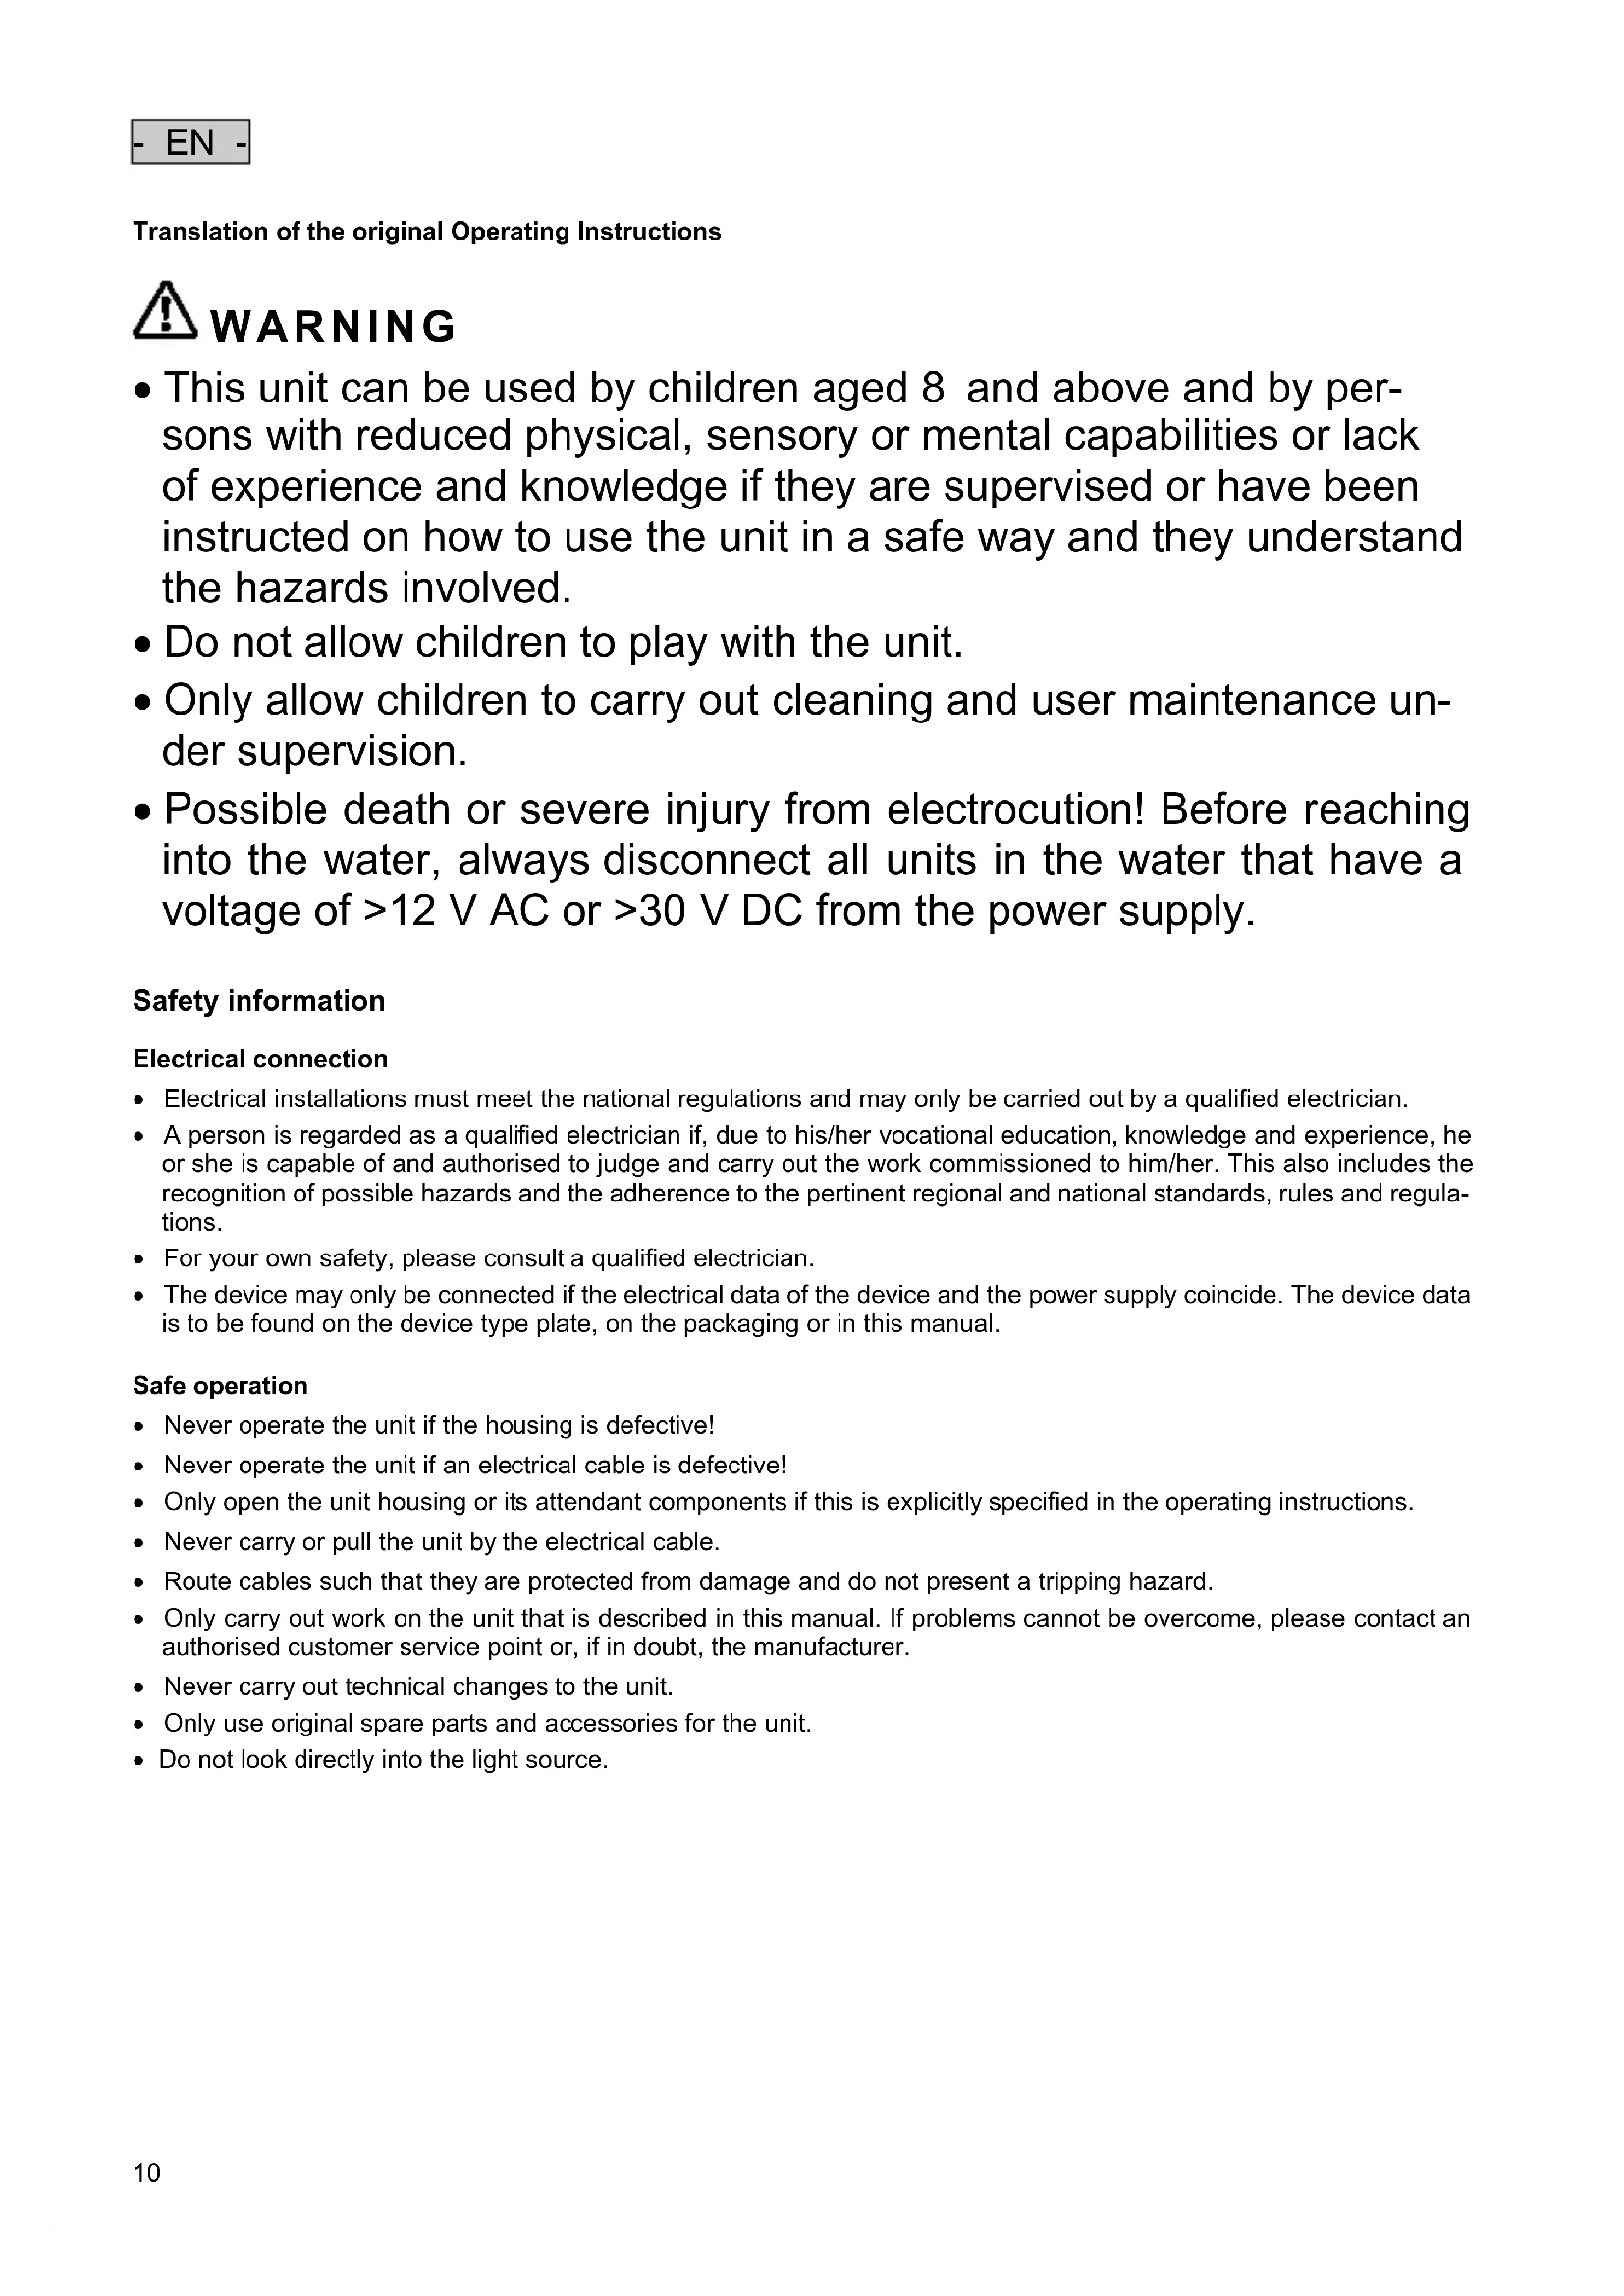
Scope of delivery
| ☐ A | Description |
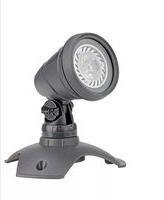
| 1 | LED spotlight |
| 2 | Fastening set |
| 3 | Ground stake |
| 4 | Allen key |
| 5 | Connection cable with connection plug |
Operation and utilisation of the full functional scope requires the following products, which are not included in the scope of delivery:
- InScenio FM-Master WLAN EGC (INT: 47035, GB: 47036, FR/PL: 47037), in order to control the ProfiLux Garden LED RGB spotlight via an app.
• ProfiLux Garden LED Controller (42639), as controller for the ProfiLux Garden LED RGB spotlight. - Connection cable EGC (2,5 m: 47038, 5 m: 47039, 10 m: 47040), for connecting the ProfiLux Garden LED Controller to the InScenio FM-Master WLAN EGC.
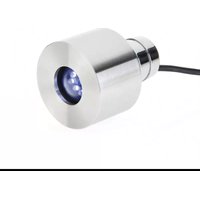
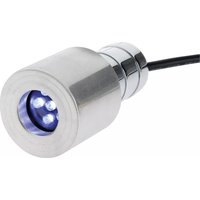
Product Description
ProfiLux Garden LED RGB is a RGB-LED spotlight that offers coloured lighting effects without the need for programming.
Easy Garden Control System (EGC)
This product can communicate with the Easy Garden Control-System (EGC). EGC allows convenient control in the garden and pond via smartphone or tablet, and ensures maximum convenience and reliability. Information about EGC and the possibilities it offers can be found at www.oase-livingwater.com/egc-start.
- EN -
Intended use
ProfiLux Garden LED RGB, referred to as "unit", may only be used as specified in the following:
- Only operate the unit with OASE ProfiLux Garden LED Controller.
- For use in water fountain systems and ponds.
- For use above and under water.
• Operation under observance of the technical data.
Permissible ambient temperatures for operation
• Underwater installation: Water temperature of +4 °C to +35 °C.
- Dry installation: Air temperature of -10^ to +40^ .
Installation

WARNING
Possible death or severe injury from hazardous electrical voltage!
- Prior to reaching into the water, isolate (switch off and disconnect) all units/devices used in the water.
- Isolate the device (disconnect from the power supply) before carrying out any work on it.
□ B
The device can be installed in or outside of the water.
- Fit the unit to a nozzle extension to illuminate a fountain.
- Use the supplied long Allen key for fitting if necessary.
Adjusting the tilt of the spotlight
How to proceed:
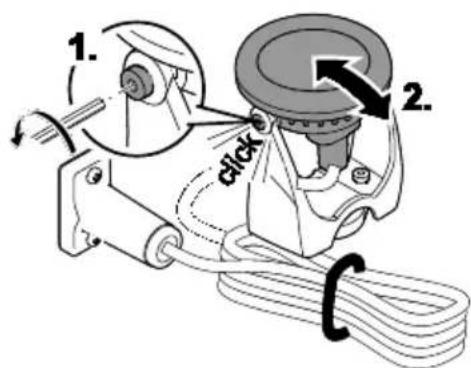
□ C
Slightly loosen the fastening screws on both sides of the LED spotlight.
Tilt the LED spotlight as required.
Tighten the fastening screws again.
Installation with the ground stake
How to proceed:
□ D, C
Fully insert the ground stake into the ground.
Fit the spotlight onto the ground stake.
Slightly loosen the fastening screws on both sides of the LED spotlight.
Tilt the LED spotlight as required.
Tighten the fastening screws again.
Wall or floor installation
How to proceed:
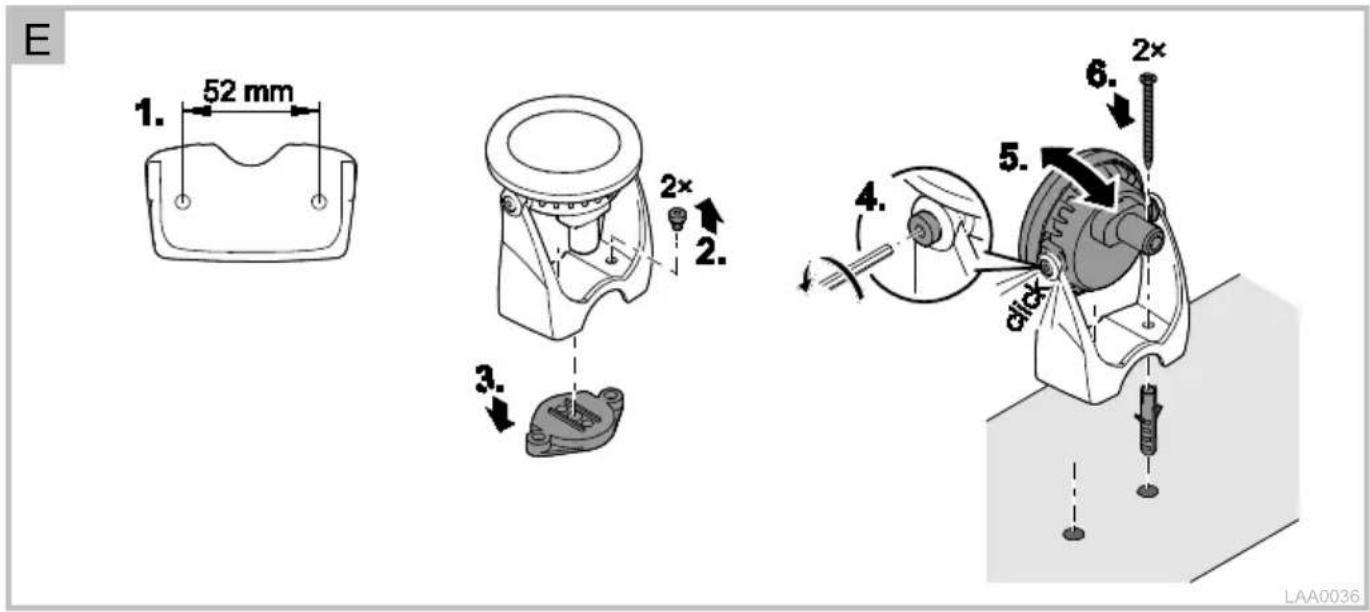
□ E, C
Drill 2 holes in a firm base or in a load bearing wall.
- Drill each 5 mm hole at least 35 mm deep.
Undo the short socket head cap screws and remove.
Remove the base plate.
Loosen the fastening screws on the spotlight head.
Tilt the spotlight head.
Fasten the LED spotlight in place.
- Use the wall plugs and screws provided.
Slightly loosen the fastening screws on both sides of the LED spotlight.
Tilt the LED spotlight as required.
Tighten the fastening screws again.
Ceiling installation
- The supplied wall plug is not approved for use in ceilings and must not be used for this purpose!
Fastening a single spotlight to a nozzle extension
How to proceed:
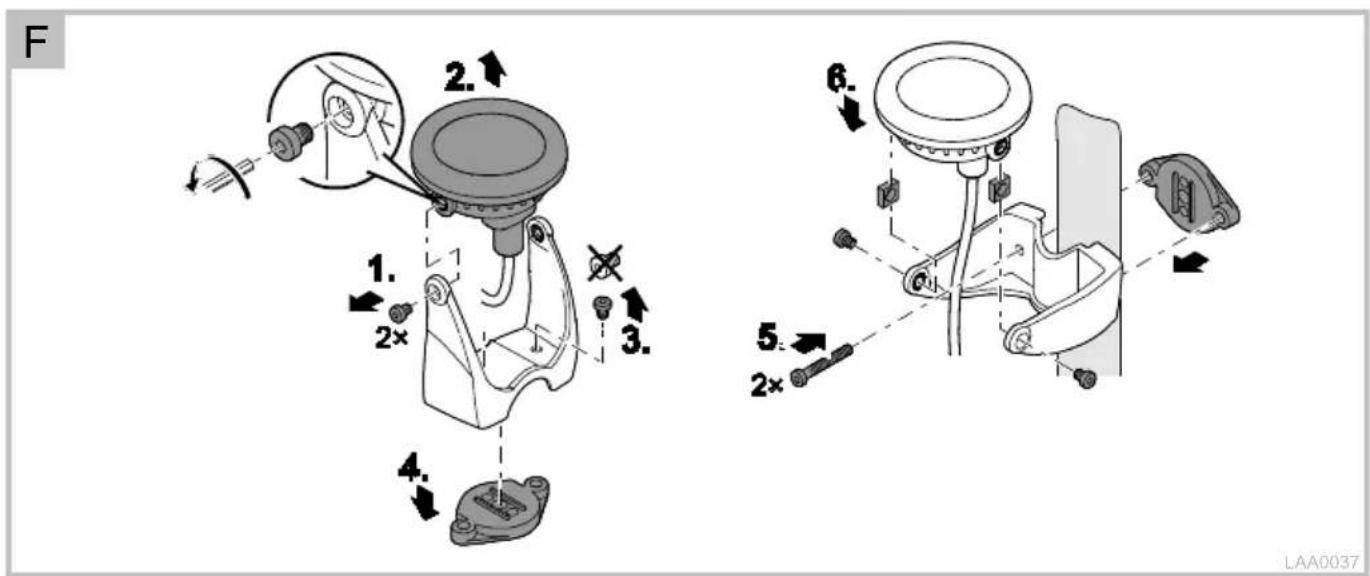
□ F
Undo and remove the fastening screws from the spotlight head of a spotlight.
Remove the LED spotlight from the mounting bracket.
Undo the short socket head cap screws and remove.
Remove the base plate.
Turn the mounting bracket into the indicated position, fit it onto the nozzle extension and screw it on with the base plate on the opposite side.
Fasten the LED spotlight onto the mounting bracket again using the fastening screws.
- The spotlight head should point upwards in the direction of the nozzle.
- The connection cable should hang down freely near the nozzle tube.
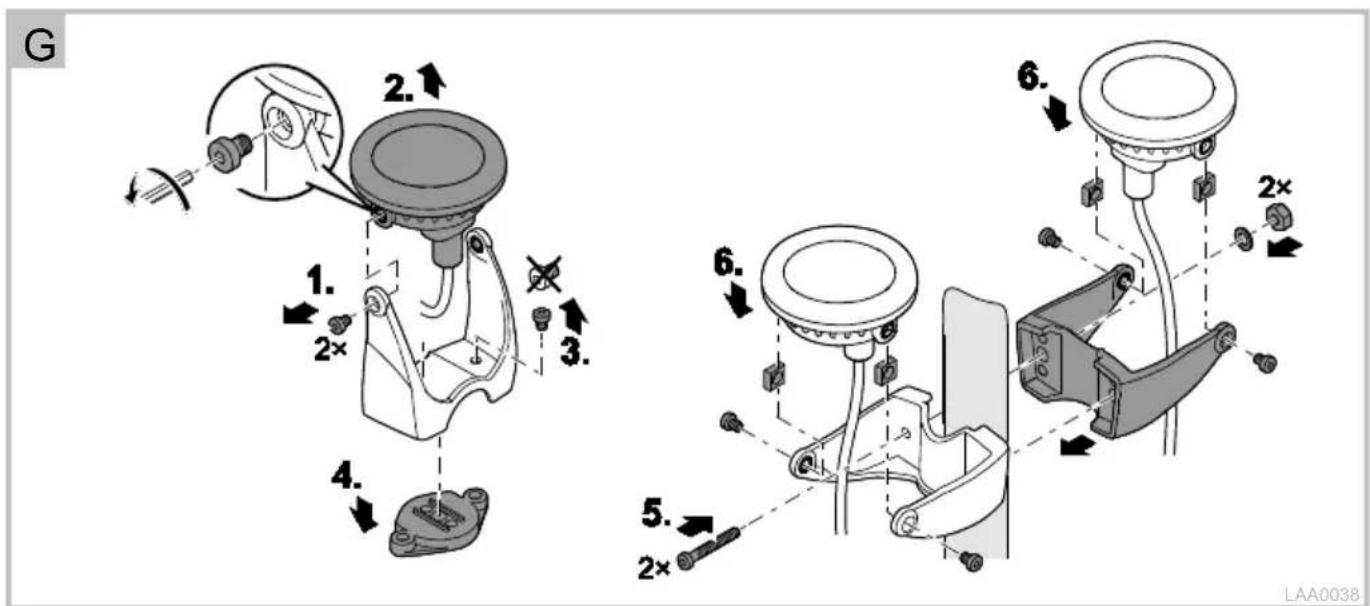
Fastening spotlights in pairs to a nozzle extension
How to proceed:
□G
Undo and remove the fastening screws from the spotlight head of two spotlights.
Remove the LED spotlights from the mounting brackets.
Undo the short socket head cap screws and remove.
Remove the base plates.
Turn the mounting brackets into the indicated positions, fit them to each side of the nozzle extension and screw together.
- Use washers and nuts.
Fasten each spotlight to its mounting bracket again using the fastening screws.
- The spotlight head should point upwards in the direction of the nozzle.
- The connection cable should hang down freely near the nozzle tube.
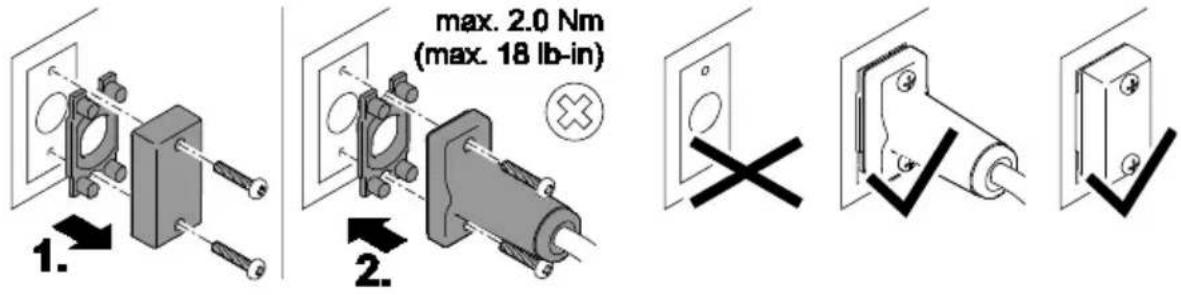
Connection
Connect the unit with the connection cable to the ProfiLux Garden LED Controller ( instructions for use ProfiLux Garden LED Controller). Max. four spotlights can be connected to each controller.
- The ProfiLux Garden LED Kabel is optionally available as an extension cable as an accessory in the length 7.5 m (42640).
- One extension cable is permitted per spotlight.
How to proceed:
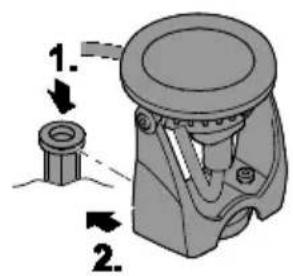
□H
Remove the protection cap from the unit.
Fit the plug connector and secure with the two screws (max. 2.0 Nm).
- Ensure that the rubber seal is clean and fits exactly.
- Replace the rubber seal if damaged.
Remedy of faults
| Malfunction | Cause | Remedy |
| None of the lamps are lit. | No supply voltage | Check all cables and connections. |
| Controller defective | Replace the controller. | |
| One of the spotlights is not lit. | Spotlight not connected | Check the connection between spotlight and controller. |
| Spotlight defective | Replace the spotlight. | |
| The controller output is defective. | Replace the controller. | |
| Luminous intensity of a spotlight is insufficient. | Protection lens soiled | Clean the protection lens. |
Cleaning

WARNING
Possible death or severe injury from hazardous electrical voltage!
- Prior to reaching into the water, isolate (switch off and disconnect) all units/devices used in the water.
- Isolate the device (disconnect from the power supply) before carrying out any work on it.
If necessary, clean the unit with clear water using a soft brush.
- Ensure that no moisture can enter the unit.
Storage/overwintering
The unit must be removed and stored in a dry place if temperatures outside the permissible ambient temperatures are expected.
Disposal

NOTE
Do not dispose of this unit with domestic waste.
- Render the unit unusable beforehand by cutting the cables and dispose of the unit via the return system provided for this purpose.
Spare parts
The use of original parts from OASE ensures continued safe and reliable operation of the unit.
Please visit our website for spare parts drawings and spare parts.

www.oase-livingwater.com/spareparts
Wand of bodembevestiging
Zo gaat u te werk:
□ E, C

www.oase-livingwater.com/onderdelen

www.oase-livingwater.com/spareparts_INT

www.oase-livingwater.com/spareparts_INT

www.oase-livingwater.com/spareparts_INT

www.oase-livingwater.com/spareparts_INT

www.oase-livingwater.com/spareparts_INT

www.oase-livingwater.com/spareparts_INT

www.oase-livingwater.com/nahradnidily

www.oase-livingwater.com/spareparts_INT
Prevod originalnih navodil za uporabo

OPOZORILO

www.oase-livingwater.com/spareparts_INT

www.oase-livingwater.com/spareparts_INT

www.oase-livingwater.com/spareparts_INT

www.oase-livingwater.com/spareparts_INT

www.oase-livingwater.com/spareparts_INT

www.oase-livingwater.com/spareparts_INT
| DE | Bemessungsspannung | Leistungsaufnahme | Tauchtefe | Kabellänge | Abmessungen | Gewicht |
| EN | Rated voltage | Power consumption | Immersion depth | Cable length | Dimensions | Weight |
| FR | Tension assignée | Puissance absorbée | Profondeur d'immersion | Longueur de câble | Dimensions | Poids |
| NL | Berekeningsspanning | Opgenomen vermogen | Dompeldiepte | Kabellengte | Afmetingen | Gewicht |
| ES | Tensión asignada | Consumo de potencia | Profundidad de inmersión | Longitud del cable | Dimensiones | Peso |
| PT | Rated voltagem | Consumo de energia | Profundidade de Imersão | Comprimento do cabo | Dimensões | Peso |
| IT | Tensione di taratura | Potenza assorbita | Profondità d'immersione | Lunghezza cavo | Dimensioni | Peso |
| DA | Nominel spanding | Effektforbrug | Bassindybde | Ledningslængde | Dimensioner | Vægt |
| NO | Dimensjoneringsspenning | Effektforbruk | Nedsenkningsóybde | Kabellengde | Dimensjoner | Vekt |
| SV | Märkspänning | Effekt | Doppningsdjup | Kabellängd | Mått på | Vikt |
| FI | Mitoitusjännite | Ottoteho | Upotussyvyys | Kaapelin pituus | Mittaukset | Palino |
| HU | mért feszültsége | Teliesítményfelvétel | Merülési mělység | Kábelhossz | Méretei | Süly |
| PL | Napięcie zwymiarowane | Pobór mocy | Głębokość zanurzenia | Diugość kabla | Wymiary | Ciężar |
| CS | Jmenovité napětí | Příkon | Hloubka ponoření | Délka kabelu | Rozměry | Hmotnost |
| SK | Dimenzačné napätie | Prikon | Hlbka ponorenia | Dĺžka kábla | Rozmer | Hmotnost |
| SL | Nazivna napetost | Nazivna moč | Potopna globina | Dolžina kabla | Dimenzije | Teža |
| HR | Nazivni napon | Ulazna snaga | Dubina uranjanja | Duljina kabela | Dimenzije | Težina |
| RO | Tensiune de calcul | Putere consumatã | Adâncime de imersie | Lungime cablu | Dimensiuni | Greutate |
| BG | Разчетно напряжение | Консумирана енергия | дълбочина на потапяне | Дължина на кабелите | Размери | Terlo |
| UK | Номинальна napруга | Споживана потужність | Глибина зануроння | Довжина кабелю | Розміри | Bara |
| RU | Расчётное напряжение | Потребляемая мощность | Глубина погружения | Длина кабеля | Размеры | Bec |
| CN | 功率消耗 | 潜水深度 | 电缆长度 变压器尺寸 | 重量 | ||
| 24 V | 6 W | 4 m | 5 m | 80 ×117 mm | 0.6 kg |
 |  | [ZSY3] |  |  |  |  |  |  | |
| DE | Staubdicht. Wasserdicht bis 4 m Tiefe. | Sicherheitstransformator | Der kleinste Abstand zum be-leuchteten Gegenstand muss 0,5 m betragen | Vor direkter Sonnenein-strahlung schützen | Ersetze jede zersprun-gene Glasscheibe | Nicht mit normalem Hausmüll entsorgen! | Achtung! Lesen Sie die Gebrauchsanleitung! | ||
| EN | Dust tight. Water tight to 4 m depth. | Safety transformer | The smallest distance to the il-luminted object must be 0,5 m | Protect from direct sun radiation. | Replace each broken glass | Do not dispose of to-gether with household waste! | Attention! Read the operating in-structions! | ||
| FR | Imperméable aux poussières. Etanche à l'eau jusqu'à une profon-deur de 4 m. | Transformateur de sécurité | La distance minimale par rap-port à l'objet éclairé doit être de 0,5 m | Protéger contre les rayons directs du soleil. | Remplacer impérative-ment chaque vitre fendue | Ne pas recycler dans les ordures ménagères ! | Attention ! Lire la notice d'emploi ! | ||
| NL | Stofdicht. Waterdicht tot een diepte van 4 m | Veiligheids-transformator | De afstand ten opzichte van het verlichte object moet mini-maal 0,5 m bedragen. | Beschermen tegen di-rect zonlicht. | Vervang een gesprongen glasplaatje altijd meteen. | Niet afvoeren met het normale huisvuil! | Let op! Lees de gebruiksaanwijzing! | ||
| ES | A prueba de polvo. Impermeable al agua hasta 4 m de profundidad. | Transformador de seguri-dad | La distancia mínima al objeto iluminado tiene que ser de 0,5 m | Protéjase contra la ra-diación directa del sol. | Sustituya cada cristal roto | ¡No deseche el equipo en la basura doméstica! | ¡Atención! Lea las instru-cucciones de uso! | ||
| PT | À prova de pô. À prova de água até 4 m de profundidade. | Transformador de segu-rança | A disláncia mínima do objaclo iluminado deve ser de 0,5 m. | Protéger contra radia-cão solar directa. | Subsilituir vidros defeituo-sos | Não daitar ao lixo domés-tica! | Atenção! Leia as instru-cões de utilização! | ||
| IT | A tenuta di polvere. Impermeabile all'acqua fino a 4 m di profondità. | Trasformatore di sicu-rezza | La distanza mínima dall'oggetto iluminato deve essere di 0,5 m | Proteggere contro i raggi solan diretti. | Sostituire ogni lastra di vetro franturnata! | Non smallíre con normali rifiuti domestici! | Attenzione! Leggete le istruzioni d'uso! | ||
| DA | Støvtæt. Vandtæt indtil 4 m dybde. | Sikkerhedstransformator | Mindsteafstanden til den belyste genstand skal være 0,5 m | Beskyt mod direkte sol-lys. | Udskift alle sprængte glasskiver! | Må ikke bortskaffes med det almindalige hushold-nings-affaid! | OBSI Laes brugsanvis-ningen! | ||
| NO | Støvtett. Vanntett ned til 4 m dyp. | Sikkerhetstransformator | Minimumsavstand til gjenstanden som skal opplyses mà være 0,5 m. | Beskytt mot direkte sol-lys. | Skift alltid ut glasskiver med sprekker! | Ikke kast i alminnelig husholdningsavfall! | NB! Les bruksanvisnin-gen! | ||
| SV | Dammtät. Vattentät till 4 m djup. | Säkerhetstransformator | Minsta avståndet till det belysta föremålet máste uppgå till 0,5 m | Skydda mot direkt sol-stråning. | Byt ut alla glasplattor som har spruckit | Får inte kastas i hushålls-soporna! | Varning! Läs igenom bruksanvisningen | ||
| FI | Pölytlivis. Vesitlivis 4 m syvyyteen astl. | Suojamuuntaja | Etälssyden valaistuun esinee-seen on oltava 0,5 m. | Suqatlava suoralta au-ringonvalolta. | Valhda rikkoontunut lasi-levy uuteen! | Älä hävitä laitetta tavall-sen talousjätteen kanssa! | Huomio! Lue käyttöohje! | ||
| HU | Portömitett. Vizálló 4 m-es mélységig. | Biztonsági transzformátor | A megvilágított tárgyhoz képesti legklisebb távolságnak 0,5 m-nek kell lennie. | Óvja közvetlen nap-sugárzástól. | Helyettesit minden szétugrott üveglapot | A készüléket nem a nomál háztartási szeméttel együtt kell megsemmisiteni! | Figyelem! Olvassa el a használati útmutató! | ||
| PL | Pyłoszczelny. Wodoszczelny do 4 m głębokości. | Transformator ochronny | Najmniejsza odległość od oświe-tłonego przedmiotu musi wyno-sić 0,5 m. | Chronić przed be-zpořednim nasłonecznieniem. | Wymienić każdy pęknięty klosz szklany | Nie wyrzucać wraz ze śmieciami domowymi! | Uwaga! Przeczytać in-strukcję użytkowania! | ||
| CS | Prachotelsny. Vodolęsny do hloubky 4 m. | Bezpečnostni transformátor | Najmenši vzdialenosł k osvětle-nému předmátu musi byt 0,5 m | Chránit před prijmys slunečnim zařením. | Vyměnte kaźdou prasklou sklenénou ta-bulku | Nelikvidova! v normálním komunálním odpadu! | Pozor! Prečitēle Návod k použitì! | ||
| SK | Prachotesny. Vodolesny do hlbky 4 m. | Bezpečnostny transformátor | Najmenšia vzdialenosł k osvětlenému predmetu musi byt 0,5 m | Chránit’ pred priamym slnečným žiarením. | Vyměnte kaźdú pras-knutú sklenenú tabulku | Nelikvidova! v normáln-nom komunálnom od-pade! | Pozor! Prečitajle si Ná-vod na použitie! | ||
| SL | Ne prepušća prahu. Ne prepušća vode do globine 4 m. | Varnostni transformator | Najmanjša razdalja do osvetlje-nega predmeta mora znašati 0,5 m | Zaščitite pred neposre-dnimi sončnimi żarki. | Vedno zamenjajte počeno šipo | Ne zawrzite skupaj z go-spodinjskimí odpadki! | Pozor! Prebente navodila za uporabo! | ||
  (wott) (wott) |  |  |  |  | (3444) | (cct7) | |||
| HR | Ne propušta prašinu. Ne propušta vodu do 4 m dubine. | Sigurnosni transformator | Najmanji razmak od predmeta koji se osvjatiljava mora iznositi 0,5 m. | Zaštitite od izravnog sunčevog zračenja. | Zamijenile sva naprsnuta stakla | Ne bacati u običan kućni otpad! | Pažnja! Pročitajte upute za upotrebul | ||
| RO | Etanş la praf. Etanş la apă până la o adâncime de 4 m. | Transformator de siguranță | Ce mai mică distanță până la corpul luminat trebuie să fie de 0,5 m | Protejați împotriva razelor directe ale soaringlui. | Înlocuiti fiecare geam spart | Nu aruncați în gunoiul menajer ! | Atenție ! Citiți instrucțiu-nile de utilizare ! | ||
| BG | Запитено от прах. Волоустойчив ло дыбочиша 4 м. | Прелпазен трансформатор | Най-малкото разстояние към предмета, коітто се осветва трябва да с 0,5 м | Да се пази от слънчеви пъчи. | Сменяйте всяко спукано стъкло | Не изхвърляйте заслне с обикновения домакински боктук! | Внимание! Прочетете ультавшето! | ||
| UK | Пилонепроникний, водонепроникний до 4 м. | Захисний трансформатор | Об'єкт освітлення повинен знаходится не ближче 0,5 м | Пристрій повинен бути захищений зід пря- мого солнечного випро- мінювання. | Замінити скляні диски з тріщинами! | Не викидайте разом із побутовим сміттям! | Увага! Читайте інструкцію! | ||
| RU | Пыленепрониц. Водонепрониц, на глубине до 4 м. | Предохранительный трансформатор | Наименьшее расстояние до освещаемого предмета должно составлять 0,5 м | Защищать от прямого воздействия солнечных лучей. | Заменяйте каждое по- тресканное стекло | Не утилизировать вме-сте с домашним мусором! | Внимание! Прочитайте инструкцию по использ-зованина! | ||
| CN | 防尘 防水水深至4米 | 安全变压器 | 距发光体的最小距离必须要有 0.5 米 | 防止阳光直射。 | 更换所有破裂的 玻璃片 | 不要与普通的家庭垃圾一起处理! | 注意!请阅读使用说明书! | ||