
i Music 15 3790 - Keyboard BONTEMPI - Free user manual and instructions
Find the device manual for free i Music 15 3790 BONTEMPI in PDF.



| Product Type | Digital Keyboard |
| Brand | Bontempi |
| Model | i Music 15 3790 |
| Power Supply | 4 R6/AA 1.5 V batteries (not included) or 5 V / 500 mA mains adapter (not included) |
| Number of Sounds | 40 |
| Number of Rhythms | 100 |
| Preset Songs | 60 |
| Main Functions | Demo, Record, Playback, OKON, Easy Chord, Metronome, Transposer, Sustain, Vibrato, Drum |
| Display | Digital Screen |
| Connectors | USB port (MP3 USB stick), Headphone jack, Audio input jack, Microphone jack, DC5V jack |
| Accessories Included | USB-DC cable, Pentagram band |
| Learning Methods | OKON (One Key One Note), Easy Chord, simplified numbered scores |
| Number of Keys | 3 octaves (37 keys) |
| Volume Control | Yes, VOLUME + and - keys |
| Tempo Control | Yes, TEMPO + and - keys |
| Maintenance | Clean with a soft damp cloth using water and mild detergent. Do not use alcohol or solvents. |
| Safety | Use batteries with correct polarity; use safety isolated mains adapter; do not short-circuit; remove batteries if not used for a long time. |
| General Information | Manual available on notice-facile.com; brand Bontempi; manufactured by ICOM S.p.A. |
Frequently Asked Questions - i Music 15 3790 BONTEMPI
User questions about i Music 15 3790 BONTEMPI
0 question about this device. Answer the ones you know or ask your own.
Ask a new question about this device
Download the instructions for your Keyboard in PDF format for free! Find your manual i Music 15 3790 - BONTEMPI and take your electronic device back in hand. On this page are published all the documents necessary for the use of your device. i Music 15 3790 by BONTEMPI.
USER MANUAL i Music 15 3790 BONTEMPI
Digital keyboard 37 keys
GB - OWNER'S MANUAL ....10 F - MANUEL D'INSTRUCTIONS ...... 14 D - BEDIENUNGSANLEITUNG......18 E - LIBRO DE INSTRUCCIONES ...... 22 P - MANUAL DE INSTRUÇÕES......26 NL - GEBRUIKSAANWIJZING 30 PL - INSTRUKCJA OBSŁUGI......34 LT - NAUDOJIMOSI INSTRUKCIJA......38 LV - LIETOTĀJA INSTRUKCIJA......42 EE - KASUTUSJUHEND 46 CZ - NÁVOD K OBSLUZE 50 SK - NÁVOD NA OBSLUHU 54 RO - MANUALUL PRODUCATORULUI..... 58
DK - INSTRUKTIONSVEJLEDNING......62
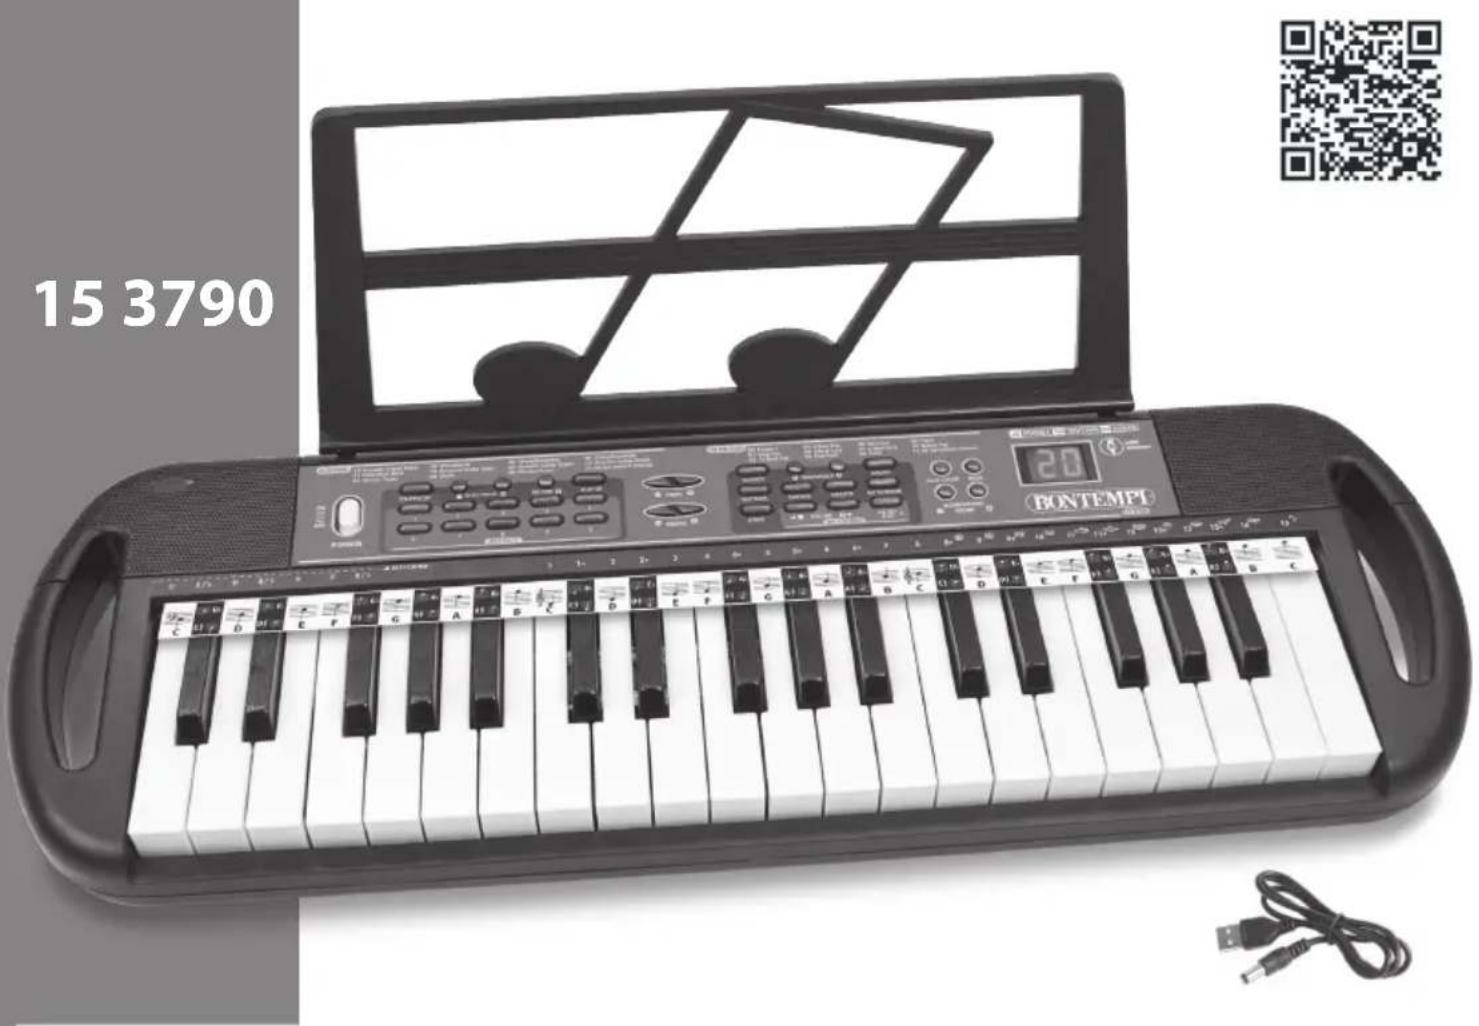
① 40 SOUNDS -Sounds list; ② ON/OFF -Turns the instrument on and off ③ START/STOP -Starts/Stops a rhythm or a song ④ Select Numb +/- - To select functions, rhythms, songs and sounds ⑤ RECORD -Records what is being played ⑥ PLAY -Plays what has been recorded ⑦ TEMPO +/- -Sets the tempo for RHYTHM performance, songs or metronome ⑧ 100 RHYTHMS-Rhythms list; ⑨ SOUNDS -To select the sounds on the keyboard ⑩ SUSTAIN -Enables or disables the SUSTAIN function (prolonged sound) ⑪ TRANSPOSER +/- -Allows pitch of notes to be changed ⑫ VIBRATO -Enables or disables the VIBRATO function (sound modulation) ⑬ DRUM -Enables or disables percussion instruments on white and black keys ⑭ EASY CHORD -Enables composition of chords on the left side of the keyboard according to the easy method ⑮ OKON-To play a song note after note, simply press a white or black key; ⑯ DISPLAY ⑰ Stave Strip (supplied) ⑱ Numeric keyboard 0-9 - To select functions, rhythms, songs and sounds ⑲ VOLUME +/- -Sets the master volume ⑳ RHYTHMS -To select the rhythms ②1 DEMO -To listen to all pre-recorded songs in sequence ②2 MP3 Player -Adjusts MP3 songs read by the USB port
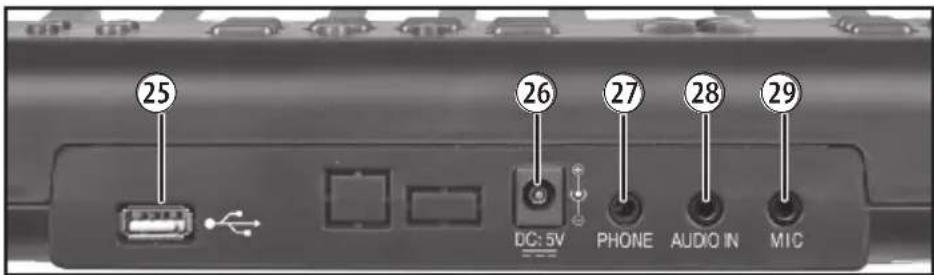
②3 METRONOME - Switches on and off the metronome beat 24 ACCOMPANIMENT VOLUME ⑲ Socket for connecting a USB Flash Drive ②6 Socket for USB-DC cable (supplied) or for mains adapter (not supplied) ⑳ Socket for headphones (not included) ⑳ Socket for external audio source (MP3 player, smartphone etc.) ⑲ Socket for condenser microphone (not included)
FRANÇAIS
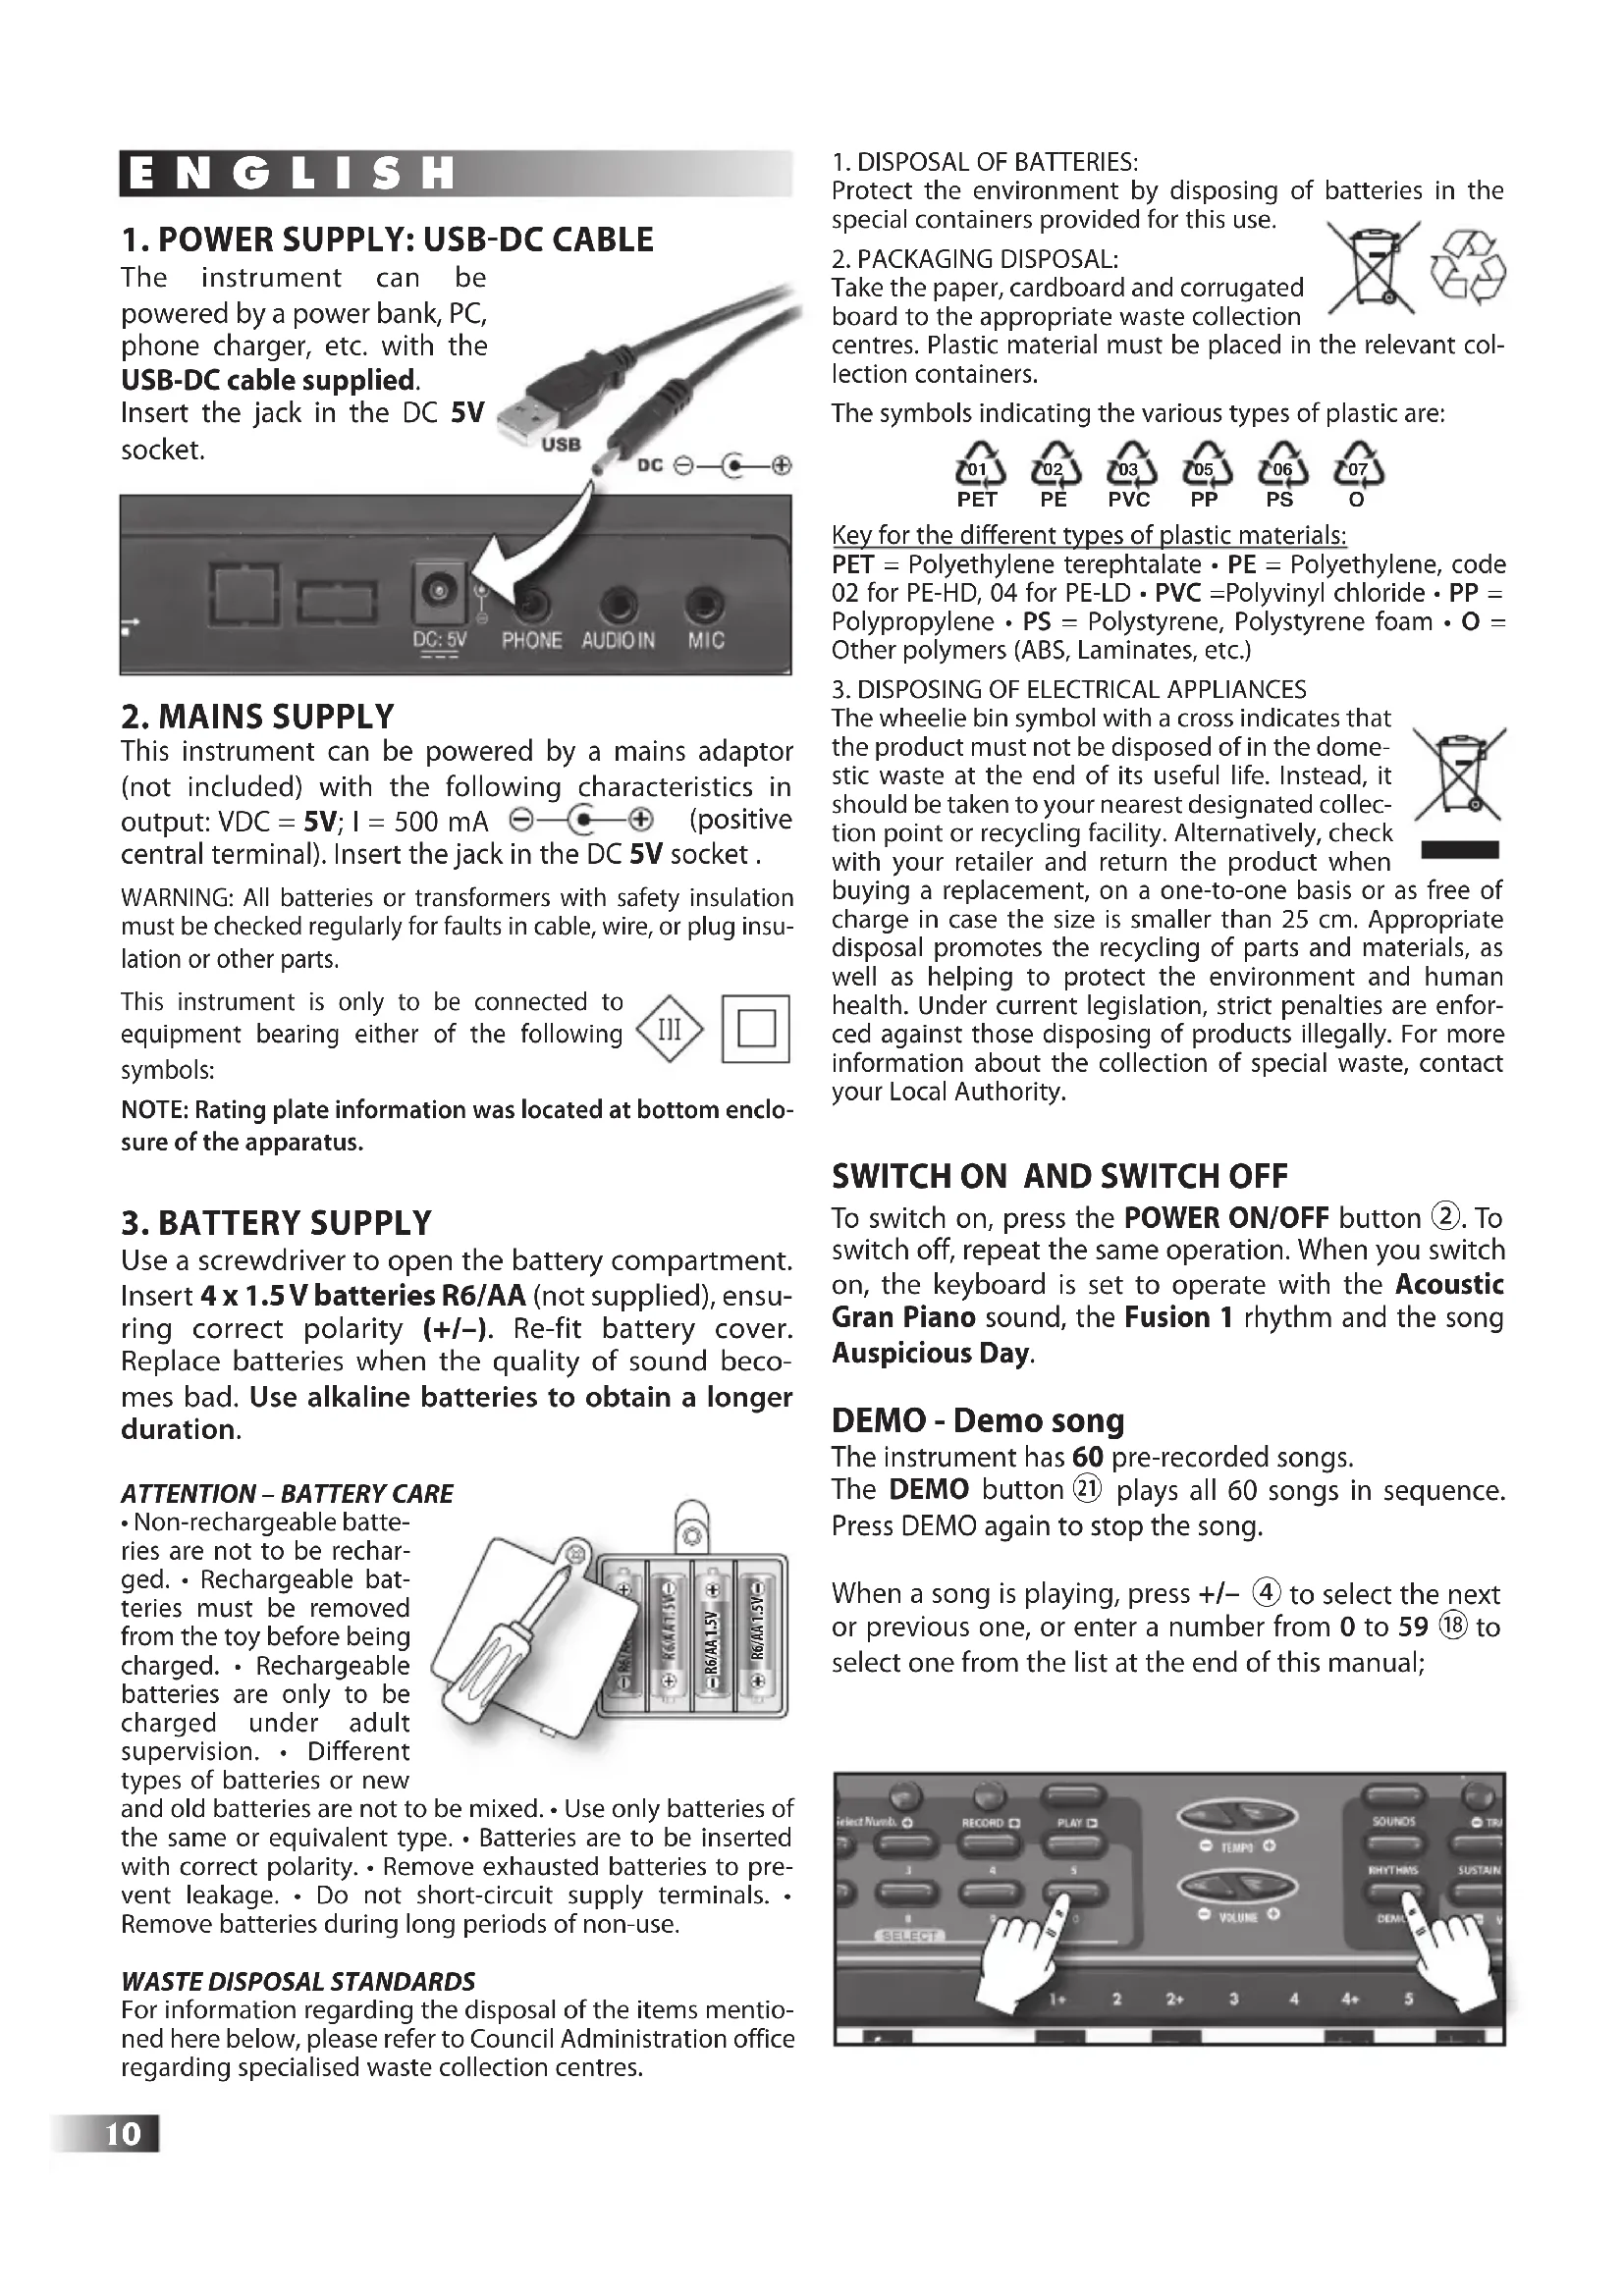
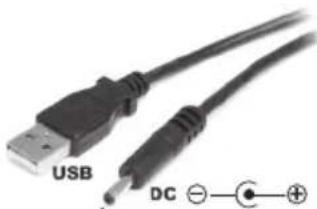
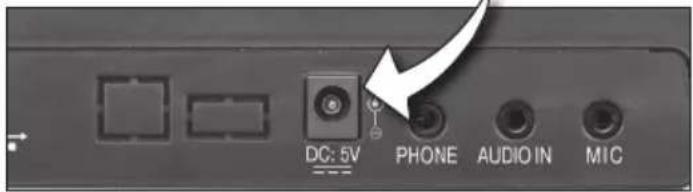
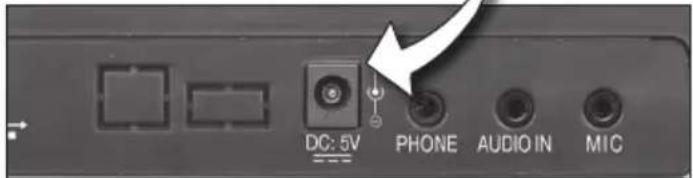
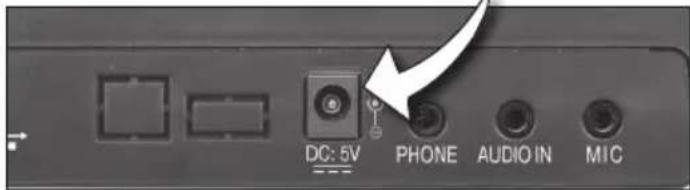
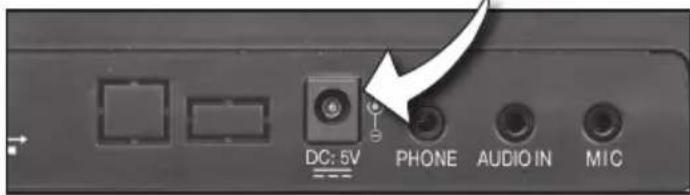
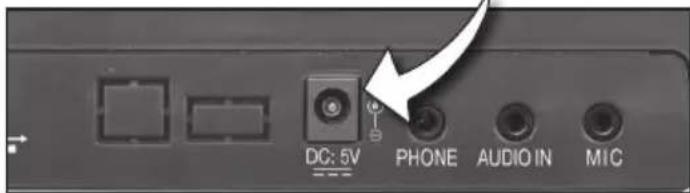
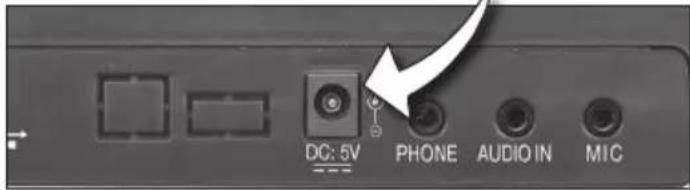
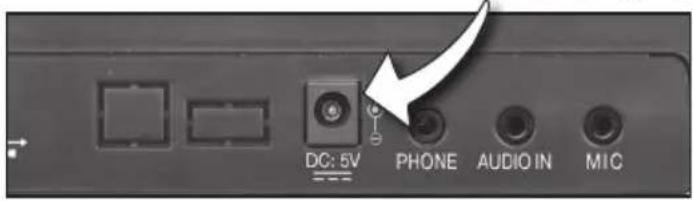
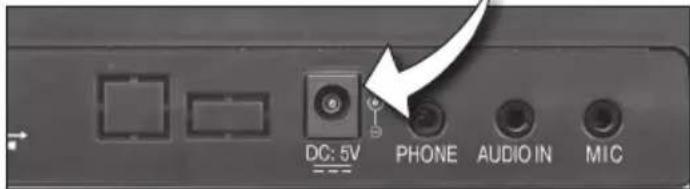
The instrument can be powered by a power bank, PC, phone charger, etc. with the USB-DC cable supplied. Insert the jack in the DC 5V socket.
2. MAINS SUPPLY
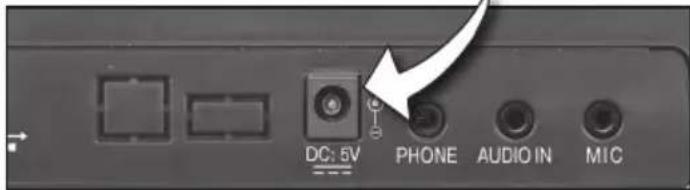
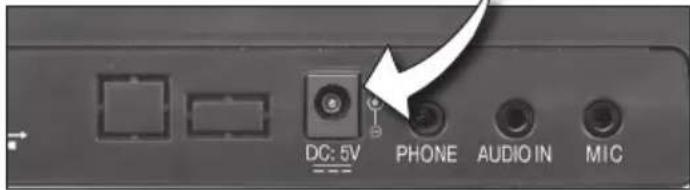
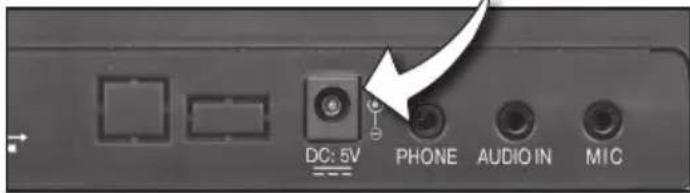
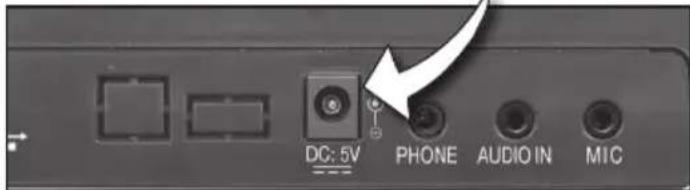
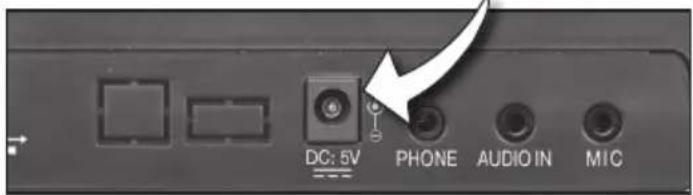
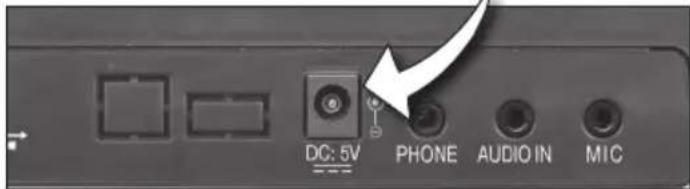
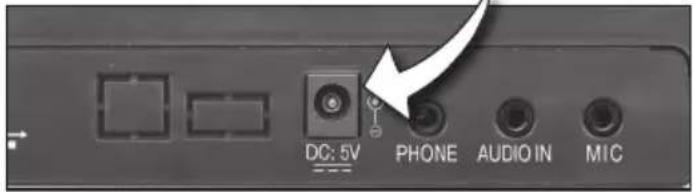
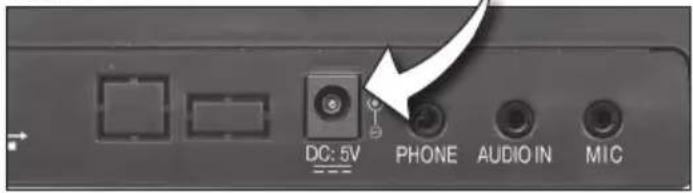
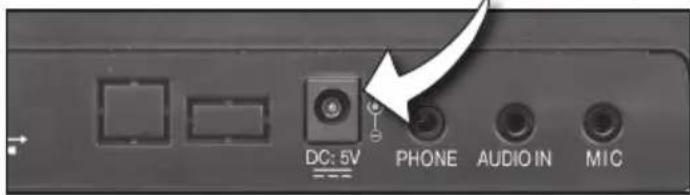
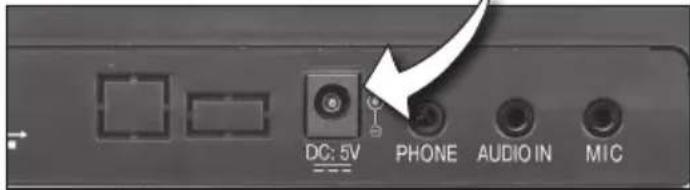
This instrument can be powered by a mains adaptor (not included) with the following characteristics in output: VDC = 5V; I = 500 mA ⊖—●—⊕ (positive central terminal). Insert the jack in the DC 5V socket.
WARNING: All batteries or transformers with safety insulation must be checked regularly for faults in cable, wire, or plug insulation or other parts.
This instrument is only to be connected to equipment bearing either of the following symbols:


NOTE: Rating plate information was located at bottom enclosure of the apparatus.
3. BATTERY SUPPLY
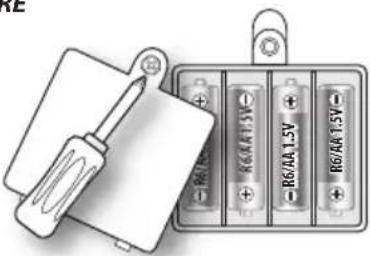
Use a screwdriver to open the battery compartment. Insert 4 x 1.5 V batteries R6/AA (not supplied), ensuring correct polarity (+/-). Re-fit battery cover. Replace batteries when the quality of sound becomes bad. Use alkaline batteries to obtain a longer duration.
ATTENTION - BATTERY CARE
- Non-rechargeable batteries are not to be recharged. Rechargeable batteries must be removed from the toy before being charged. Rechargeable batteries are only to be charged under adult supervision. Different types of batteries or new
and old batteries are not to be mixed. Use only batteries of the same or equivalent type. Batteries are to be inserted with correct polarity. Remove exhausted batteries to prevent leakage. Do not short-circuit supply terminals. Remove batteries during long periods of non-use.
WASTE DISPOSAL STANDARDS
For information regarding the disposal of the items mentioned here below, please refer to Council Administration office regarding specialised waste collection centres.
- DISPOSAL OF BATTERIES:
Protect the environment by disposing of batteries in the special containers provided for this use.
- PACKAGING DISPOSAL:
Take the paper, cardboard and corrugated board to the appropriate waste collection

centres. Plastic material must be placed in the relevant collection containers.
The symbols indicating the various types of plastic are:

Key for the different types of plastic materials:
PET = Polyethylene terephthalate · PE = Polyethylene, code 02 for PE-HD, 04 for PE-LD · PVC = Polyvinyl chloride · PP = Polypropylene · PS = Polystyrene, Polystyrene foam · O = Other polymers (ABS, Laminates, etc.)
- DISPOSING OF ELECTRICAL APPLIANCES
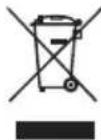
The wheelie bin symbol with a cross indicates that the product must not be disposed of in the domestic waste at the end of its useful life. Instead, it should be taken to your nearest designated collection point or recycling facility. Alternatively, check with your retailer and return the product when
buying a replacement, on a one-to-one basis or as free of charge in case the size is smaller than 25 cm. Appropriate disposal promotes the recycling of parts and materials, as well as helping to protect the environment and human health. Under current legislation, strict penalties are enforced against those disposing of products illegally. For more information about the collection of special waste, contact your Local Authority.
SWITCH ON AND SWITCH OFF
To switch on, press the POWER ON/OFF button ②. To switch off, repeat the same operation. When you switch on, the keyboard is set to operate with the Acoustic Grand Piano sound, the Fusion 1 rhythm, and the song Auspicious Day.
DEMO - Demo song
The instrument has 60 pre-recorded songs.
The DEMO button ② plays all 60 songs in sequence. Press DEMO again to stop the song.
When a song is playing, press +/- ④ to select the next or previous one, or enter a number from 0 to 59 ⑱ to select one from the list at the end of this manual.
VOLUME
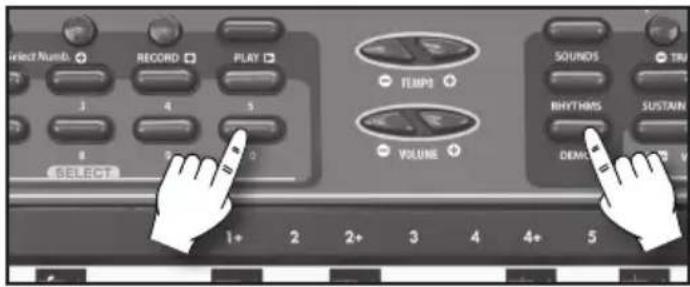
To regulate the volume of the instrument, use the VOLUME + (to turn up) or VOLUME - (to turn down) buttons ⑲. By holding the button pressed down, the variation becomes continuous. To restore the standard volume, press both VOLUME + and VOLUME - buttons together.
SOUNDS
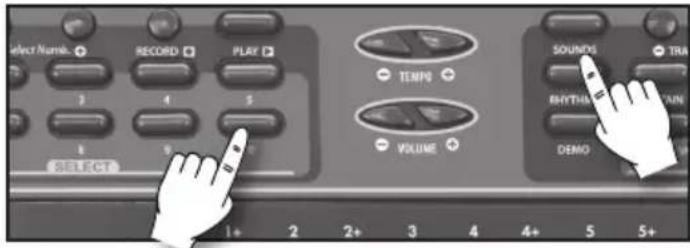
To select one of the 40 sounds recorded in the instrument, press SOUNDS ⑨ and enter a number from 0 to 39 ⑱ to select one from the "LIST OF SOUNDS" table at the end of this manual; the display indicates the selected sound number (e.g., 01).
To select the next or previous sound, press Select Numb. +/- from the numerical keyboard.
Sustain
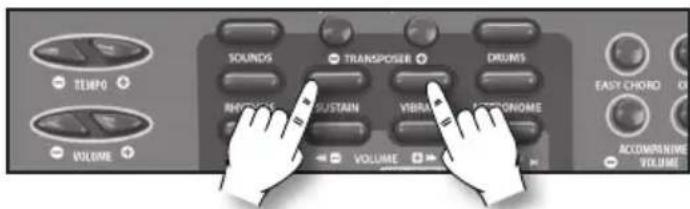
Prolongs the sound of a note when the key is released. To enable or disable this function, press SUSTAIN ⑩.
Vibrato
The vibrato effect is a sound modulation. To enable or disable this function, press VIBRATO ⑫.
THE TRANSPOSER
The TRANSPOSER +/- controls ⑪ shift the whole keyboard tonality by +/- 6 semitones.
By pressing one of the two buttons, the display temporarily shows the current value.
By simultaneously pressing the "+/-" buttons of TRANSPOSER, you will return to the standard 0 value.
RHYTHM SELECTION
The keyboard has 100 rhythms recorded.
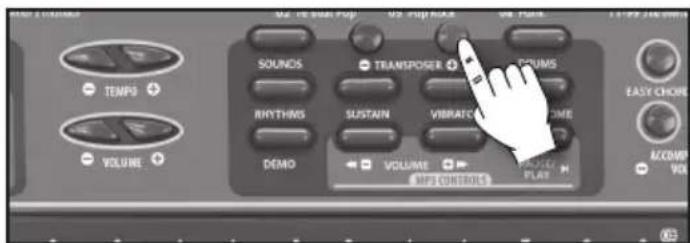
To select them, press RHYTHMS ⑳ followed by a number from 0 to 99 to select one from the "RHYTHMS LIST" table at the end of this manual; the display will indicate the selected rhythm number (e.g.: 01). To select the next or previous rhythm, press Select Numb. +/- from the numerical keyboard.
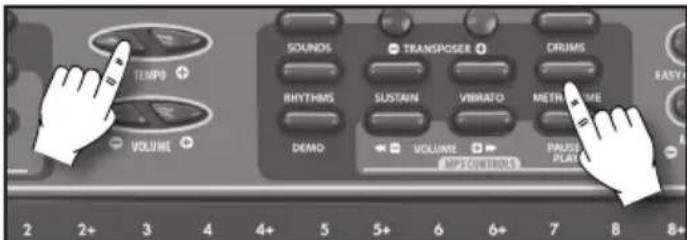
To start or to stop a rhythm press the START/STOP button ③. To increase or decrease the speed of the song press the two buttons TEMPO + and TEMPO - ⑦.
By holding the button pressed down, the variation becomes continuous. To go back to standard rhythm press buttons TEMPO + and TEMPO - together.
The TEMPO + / - buttons are also used to adjust the speed of a demo.
EASY CHORD
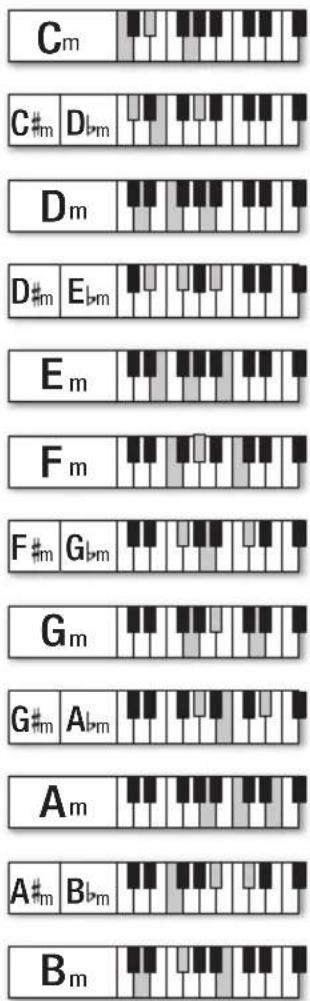
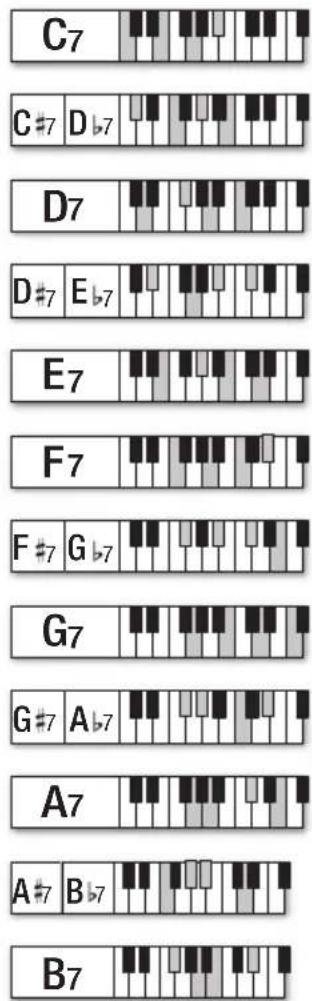
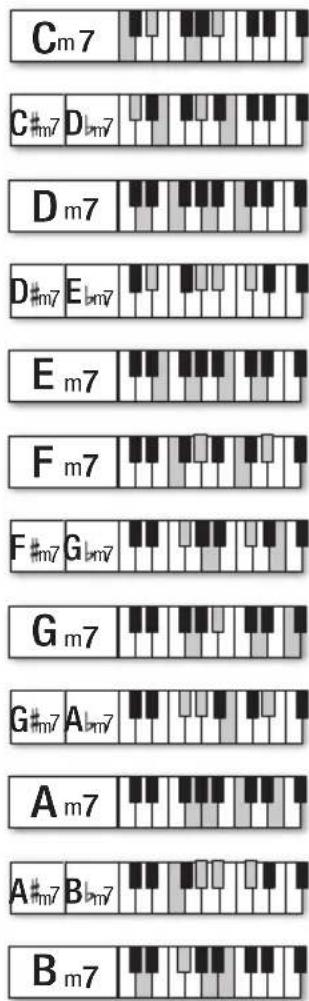
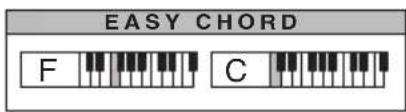
With a rhythm on, by pressing the button EASY CHORD ⑭ the keyboard is automatically divided into two
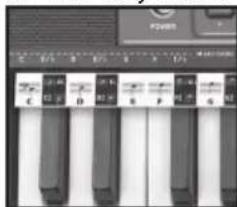
sections, so that the chords can be composed in the left part EASY CHORD (from C1 to F#1) in facilitated mode with one, two or three fingers (see the chords table at the end of this manual).
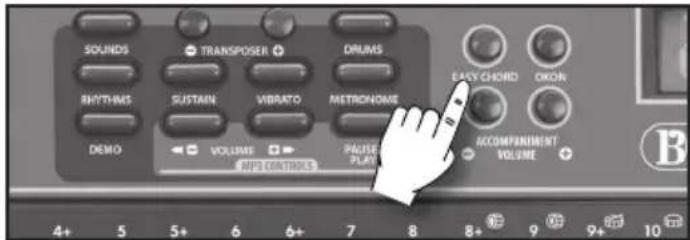
ACC. VOL + (24) turns up the accompaniment volume. ACC VOL - (24) turns down the accompaniment volume.
To exit the EASY CHORD mode, press the DEMO button ②1 twice.
THE METRONOME
The metronome helps you to learn the music, giving the beat during musical exercises and simulating the traditional time-marking instrument.
It can be turned on and off with the METRONOME button ②3.
The divisions available are: 1/4, 2/4, 3/4, 4/4; to change the tempo, use the TEMPO +/- buttons ⑦.
ENGLISH
PERCUSSIONS
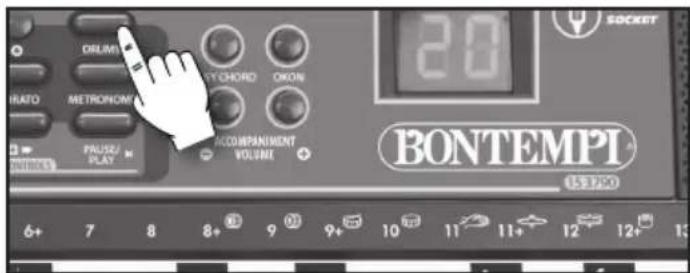
Pressing DRUMS 13 enables 12 rhythmic percussions on the white and black keys, which are repeated on all 5 octaves of the keyboard.
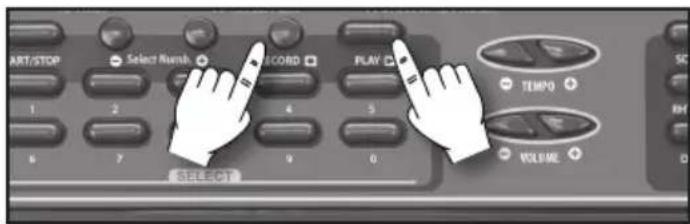
This function enables you to record and playback a tune played on the keyboard. Press RECORD ⑤ before playing a tune. When you have finished press PLAY ⑥ to listen to the tune.
MP3 Player
This keyboard enables you to read MP3 songs on a USB Flash drive (Pen Drive) when it is connected to a USB port at the back of the instrument 25 . After connecting the device, the first song will automatically start playing
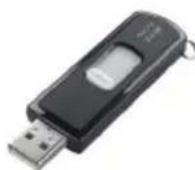
and will be heard from the speakers on the keyboard. To adjust the volume, keep the MP3 PLAYER VOLUME + or - button ②2 pressed; to pause the song, press PAUSE/PLAY ▶ ②2; to go to the next or previous song, press ▶ or ㉓.
OKON - Learning function
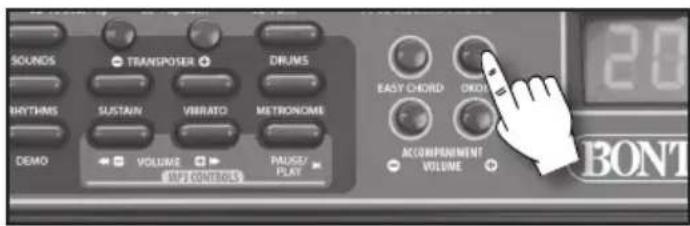
The One Key One Note function allows easy playing of the melody of one of the pre-recorded songs.
Press the OKON 15 button, enter a number from 0 to 59 10 to select one from the list at the end of this manual (the accompaniment starts up); to perform the melody press any of the keys in succession.
How to read the display notes
Each note has a name: A, B, C, D, E, F, G, in anglo-saxon notation which correspond to LA, SI, DO, RE, MI, FA, SOL, in Latin notation and A, H, C, D, E, F, G, in German
notation. This correspondence is illustrated on the next diagram.
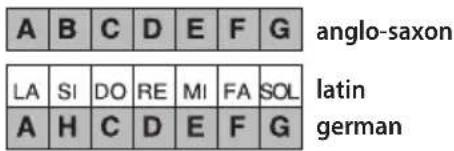
This keyboard displays the notes in the Anglo-Saxon notation.
SONGS
Some of the songs written with the Bontempi method can be found at the end of this manual; another 60 songs collected in the "SONG BOOK" can be downloaded at www.bontempi.com
COMPOSING A SONG
Each song is printed on a separate page. Under the title there is information regarding:
SOUND: the sound needed to create the tune
RHYTHM: the rhythm of the song
TEMPO: the speed of the song
SONG: The song number recorded on the keyboard

You can use this information to configure the keyboard and play the song at its best. This manual tells you how to select sound, rhythm and tempo.
The song also indicates:
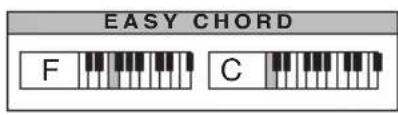
EASY CHORD: the easy chords for song accompaniment
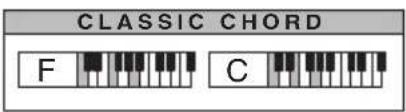
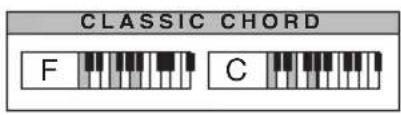
CLASSIC CHORD: the classic chords for song accompaniment.

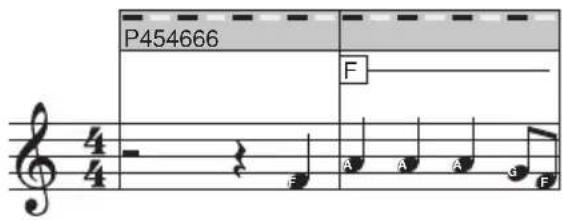
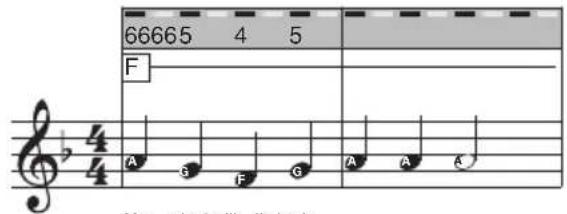
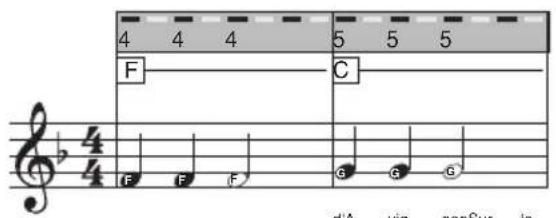
The song is marked by a continuous grey strip that indicates the numbers used to play the melody with your right hand. Each key must be pressed for some time, depending on the distance that separates each number on the grey strip from the next.

Basically, above the numbers you will notice a sequence of alternating black and grey sections within the grey strip. The distance between one black section and another represents the unit of musical time known as "beat", which corresponds to the movement of the metronome pointer from one end to the other. Every black and grey section represents a half "beat".
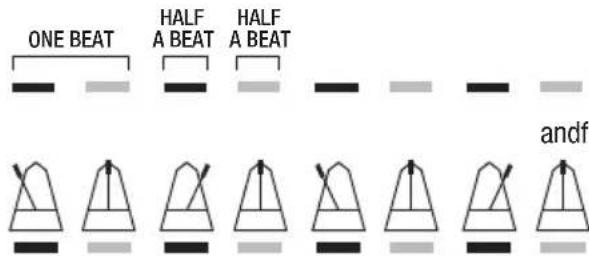
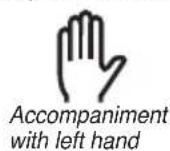
The instructions (meaning squares with letters) are found under this strip in order to use your left hand to play the accompaniment chords.
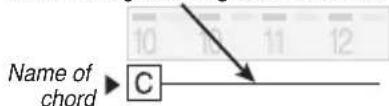
Line showing how long the chord lasts
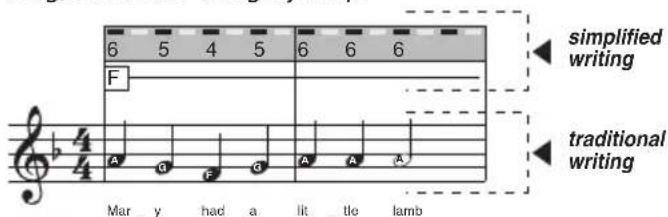
All musical notes of the song, which use classical wording, are under the grey strip.
STAVE STRIP
Apply the stave strip supplied to identify the notes on the keyboard and on the stave. The names of the notes are written in the international notation system.
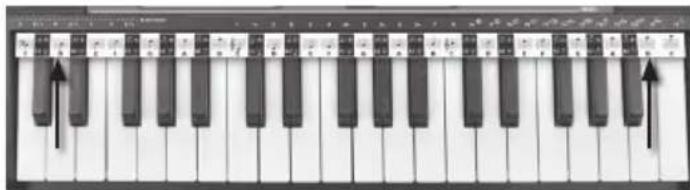
HOW TO PLAY THE SONG IN EASY MODE
MELODY
Numbers 1 to 15 indicate the keys to play a melody with the easy musical scores at the end of this manual.

Each note corresponds to a number on the grey strip.
To play the melody, read the sequence of numbers contained in the grey band and press, one after the other, the white keys which correspond to the same numbers on the strip above the keyboard. The black keys correspond to the numbers for example on the music method grey band followed by the "+". The black key after white key 1 corresponds to the symbol 1+.
Now that you know which key corresponds to which note, try and play the tune following the numbers on the grey strip.
CHORDS
The letters on the stave strip indicate the name of the notes in order to compose a chord in EASY CHORD (from C1 to F#1) and CLASSIC CHORD mode (from C1 to F#1) (refer to the relative section).
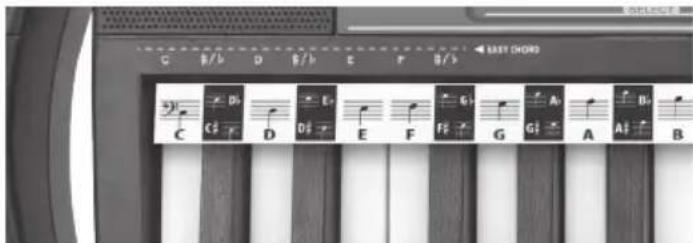
To use accompaniment, press each chord with EASY CHORD or CLASSIC CHORD mode for the time indicated by the line next to the letter that represents the chord, until you come to the next one.
THE DURATION OF THE NOTES AND OF THE PAUSES
With reference to the tick-tock of a metronome, each note and each pause has to be performed for a time more or less long according to the schedule.

FRENCH
1. POWER SUPPLY WITH USB-DC CABLE
2. MAINS POWER SUPPLY
Vibrato
SELECTION OF RHYTHMS
PERFORMING A PIECE IN SIMPLIFIED MODE
THE MELODY
2. MAINS CONNECTION
Vibrato
HOW TO PERFORM THE PIECE IN SIMPLIFIED MODE
THE MELODY
HOW TO PERFORM THE MELODY IN SIMPLIFIED MODE
THE MELODY
2. POWER SUPPLY TO THE MAINS
Vibrato
HOW TO PLAY THE PIECE IN SIMPLIFIED MODE THE MELODY
2. MAIN POWER SUPPLY
Sustain
Vibrato
HOW TO PLAY THE SONG IN EASY MODE MELODY
2. POWER SUPPLY
NOTE: Rating plate information was located at bottom enclosure of the apparatus.
3. BATTERY POWER SUPPLY
Vibrato
HOW TO PERFORM THE PIECE IN SIMPLIFIED MODE
MELODY
2. POWER SUPPLY
Vibrato
HOW TO PLAY A COMPOSITION IN SIMPLIFIED MODE
MELODY
2. POWER SUPPLY
Vibrato
RHYTHM SELECTION
HOW TO PLAY A COMPOSITION IN SIMPLIFIED MODE
MELODY
2. POWER SUPPLY
Vibrato
HOW TO PLAY A COMPOSITION IN SIMPLIFIED MODE
MELODY
2. POWER SUPPLY
Vibrato
HOW TO PLAY A COMPOSITION IN SIMPLIFIED MODE
MELODY
2. POWER SUPPLY
Vibrato
HOW TO PLAY THE PIECE IN THE SIMPLIFIED WAY
THE MELODY
2. POWER SUPPLY
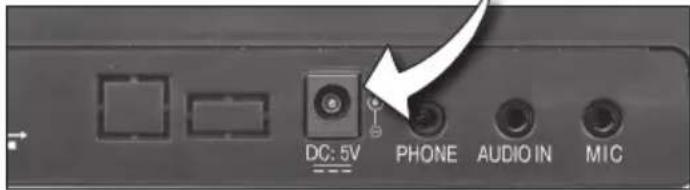
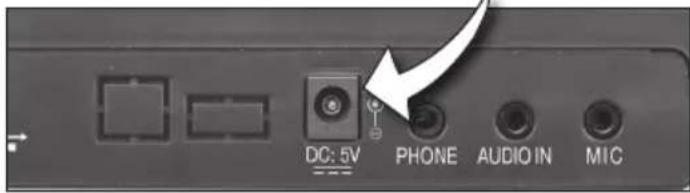
The instrument can be powered by a power adapter (not included), with the following specifications: Vdc = 5V, I = 500 mA (center positive terminal). Plug the connector into the DC5V jack.
Vibrato
MP3 Player
HOW TO PLAY A SONG IN THE SIMPLIFIED WAY
THE MELODY
Vibrato
2. MAINS POWER SUPPLY
PRECAUTIONS FOR USING BATTERIES:
Vibrato
SELECTING RHYTHMS
HOW TO PLAY A PIECE IN A SIMPLIFIED WAY
THE MELODY
2. POWER SUPPLY
INSTRUCTIONS FOR USING BATTERIES:
Vibrato
MP3 Player
HOW TO PLAY A SIMPLIFIED MELODY
2. POWER SUPPLY
Vibrato
SELECTING RHYTHMS
HOW TO PERFORM A PIECE IN SIMPLIFIED MODE
THE MELODY
1. POWER SUPPLY VIA USB-DC CABLE
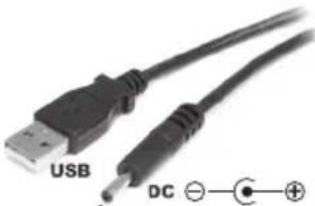
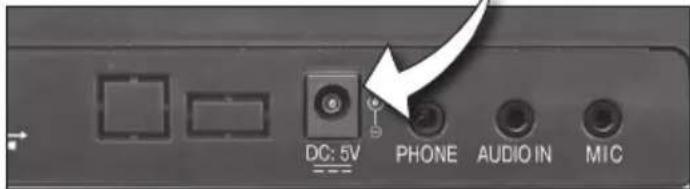
The instrument can be powered by a power bank, PC, phone charger, etc., via the provided USB-DC cable. Insert the plug into the DC5V socket of the keyboard.
2. POWER SUPPLY CONNECTION
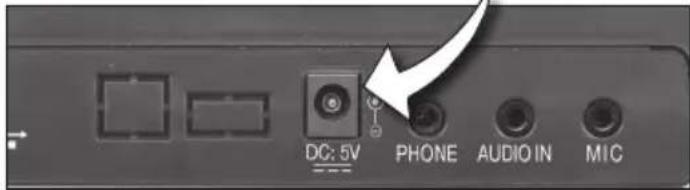
The instrument can be connected to the power supply using a power adapter (not supplied) that has an output with the following characteristics: Vdc = 5V; I = 500 mA ⊙—⊕—⊕ (positive terminal in the middle). Insert the jack into the DC5V socket.
WARNING: Any adapter, even if it has a safety isolation means, should be checked regularly to avoid risks that may arise from damage to the wire or plug, keysing, or other parts. In case of such damage, contact qualified personnel.
This instrument must only be connected to devices that have one of the following symbols:


HOW TO BEST USE THE BATTERIES
The vibrato effect is a modulation of the sound. To activate or deactivate this function, press the VIBRATO key ⑫.
THE TRANSPOSER
The +/- buttons of the TRANSPOSER ⑪ allow you to shift the tonality of the entire keyboard by +/- 6 semitones.
If you press one of the two buttons, the display will temporarily show the current value.
On the gray strip of the method, each note has a corresponding number.
2. MAINS POWER SUPPLY
WARNINGS FOR BATTERY USE
RHYTHM SELECTION
HOW TO PLAY A SONG IN AN EASY WAY
MELODY
INSTRUCTIONS FOR USE
Vibrato
PLAYING A SONG IN SIMPLE MODE MELODY
2. MAINS POWER SUPPLY
Vibrato
2. MAIN SPEAKER
BATTERY PRECAUTIONS
Vibrato
COMPOSING A MUSIC TRACK
HOW TO PLAY THE TRACK IN SIMPLE MODE
THE MELODY
2. MAINS POWER SUPPLY
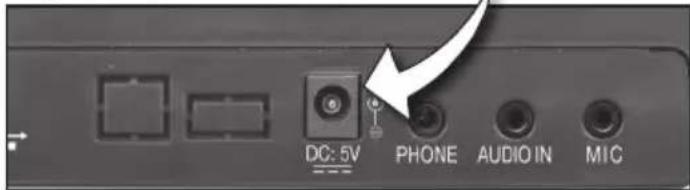
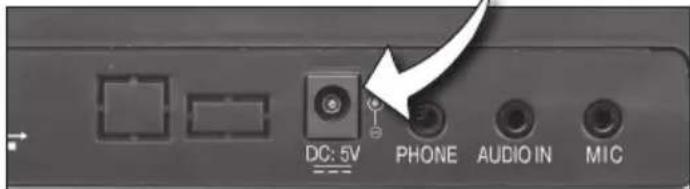
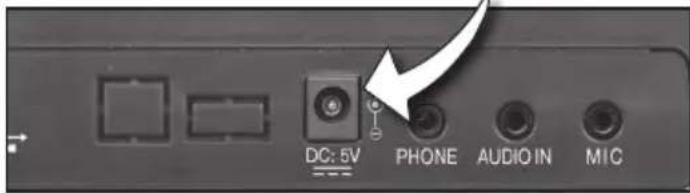
The instrument can be powered by a mains adapter (not supplied) with the following specifications: Vdc = 5V; I = 500 mA ⊙—⊕—⊕ (center positive terminal). Insert the plug into the DC5V DC socket.
BATTERY USAGE TIPS
Remove old batteries from the battery compartment. • Do not charge non-rechargeable batteries. • For recharging, remove the batteries from the battery compartment. • Charge batteries under adult supervision. • Insert batteries with correct polarity. • Do not mix different types of batteries or new and used batteries together. • Use only recommended or equivalent batteries. • Do not short-circuit the power terminals. • Remove batteries if the instrument is not used for an extended period.
DISPOSAL INSTRUCTIONS
For disposal of the parts listed below, ask the municipal authorities about specialized disposal centers.
- BATTERY DISPOSAL: To help protect the environment, do not throw used batteries in household waste; instead, take them to appropriate containers at collection centers.
- PACKAGING DISPOSAL: Paper, cardboard, and corrugated cardboard used as

packaging should be delivered to special collection centers. Plastic packaging parts must be placed in appropriate collection containers.
Symbols indicating different types of plastic are:

Legend regarding the type of plastic material: PET = Polyethylene terephthalate • PE = Polyethylene, code 02 for PE-HD, 04 for PE-LD • PVC = Polyvinyl chloride • PP = Polypropylene • PS = Polystyrene, Expanded polystyrene • O = Other polymers (ABS, Blends, etc.)
- INFORMATION FOR USERS OF ELECTRICAL DEVICES: The symbol of a crossed-out wheeled bin indicates that the equipment at the end of its useful life is not ordinary municipal waste and the consumer must dispose of it in special waste bins at the municipality of residence or return it to the retailer when purchasing new equivalent equipment, one piece for one, free of charge, if the equipment size is less than 25 cm. Proper waste disposal helps avoid potential negative impacts on the environment and health and promotes recovery and/or recycling of the materials from which the equipment is made. Unauthorized disposal of the product by the user leads to penalties in accordance with applicable legal regulations. For more information on special waste collection, contact the competent local authorities.
TURN ON AND OFF
To turn on, press the POWER ON/OFF button ②. To turn off, repeat the same procedure. When turned on, the keyboard will work with Acoustic Grand Piano sound, Fusion 1 rhythm, and the song Auspicious Day.
DEMO - Demo song
The song is marked with a continuous gray bar that indicates the numbers for playing the melody with the right hand. Each key must be pressed for a certain time, depending on the distance separating each number on the gray bar from the next.

Basically, above the numbers you will notice a series of alternating black and gray sections within the gray bar. The distance between one black section and another represents a unit of musical time known as a "beat" corresponding to the movement of the metronome from one end to the other. Each black and gray section represents half a "beat".

HOW TO PLAY A SONG IN SIMPLE MODE
MELODY
Numbers from 1 to 15 indicate the keys for playing the melody with the simple musical scores at the end of this manual.

2. MAINS POWER SUPPLY
Vibrato
HOW TO PLAY THE PIECE IN SIMPLIFIED MODE
THE MELODY
| LA PRIMAVERA | THE SPRING | LE PRINTEMPS | A. VIVALDI |
| DER FRÜHLING |
SOUND

06 STRING ENSEMBLE
STYLE

16 DISCO
TEMPO

10


Mary had a little lamb





| SUR LE PONT D'AVIGNON | TRADITIONAL | ||




| GB - TROUBLE SHOOTING GUIDE | |
| ProblemSolution | |
| The instrument doesn’t work or distorted sound | Batteries low – fit new batteries. Batteries incorrectly fitted – check. |
| The instrument switches on or off when keys are pressed. | Batteries low – fit new batteries. |
| The display does not light up. | Check the batteries or the mains adapter. |
| ATTENTION: in the case of malfunctioning remove and re-insert the batteries | |
GB - ICOM S.p.A. reserves all rights to modify specifications of this product without notice.
Read and keep this manual for future reference.
ATTENTION: Do not use alcohol, solvents or similar chemical substances for cleaning. Use a soft cloth dampened in a bland solution of water and neutral detergent.


- DIGITAL KEYBOARD 37 KEYS
- FRANÇAIS
- MAINS SUPPLY
- BATTERY SUPPLY
- ATTENTION - BATTERY CARE
- WASTE DISPOSAL STANDARDS
- SWITCH ON AND SWITCH OFF
- DEMO - DEMO SONG
- VOLUME
- SOUNDS
- SUSTAIN
- VIBRATO
- THE TRANSPOSER
- RHYTHM SELECTION
- EASY CHORD
- THE METRONOME
- ENGLISH
- PERCUSSIONS
- MP3 PLAYER
- OKON - LEARNING FUNCTION
- HOW TO READ THE DISPLAY NOTES
- SONGS
- COMPOSING A SONG
- STAVE STRIP
- HOW TO PLAY THE SONG IN EASY MODE
- MELODY
- CHORDS
- THE DURATION OF THE NOTES AND OF THE PAUSES
- FRENCH
- POWER SUPPLY WITH USB-DC CABLE
- MAINS POWER SUPPLY
- SELECTION OF RHYTHMS
- PERFORMING A PIECE IN SIMPLIFIED MODE
- THE MELODY
- MAINS CONNECTION
- HOW TO PERFORM THE PIECE IN SIMPLIFIED MODE
- HOW TO PERFORM THE MELODY IN SIMPLIFIED MODE
- POWER SUPPLY TO THE MAINS
- HOW TO PLAY THE PIECE IN SIMPLIFIED MODE THE MELODY
- MAIN POWER SUPPLY
- HOW TO PLAY THE SONG IN EASY MODE MELODY
- POWER SUPPLY
- BATTERY POWER SUPPLY
- HOW TO PLAY A COMPOSITION IN SIMPLIFIED MODE
- HOW TO PLAY THE PIECE IN THE SIMPLIFIED WAY
- HOW TO PLAY A SONG IN THE SIMPLIFIED WAY
- PRECAUTIONS FOR USING BATTERIES
- SELECTING RHYTHMS
- HOW TO PLAY A PIECE IN A SIMPLIFIED WAY
- INSTRUCTIONS FOR USING BATTERIES
- HOW TO PLAY A SIMPLIFIED MELODY
- HOW TO PERFORM A PIECE IN SIMPLIFIED MODE
- POWER SUPPLY VIA USB-DC CABLE
- POWER SUPPLY CONNECTION
- HOW TO BEST USE THE BATTERIES
- WARNINGS FOR BATTERY USE
- HOW TO PLAY A SONG IN AN EASY WAY
- INSTRUCTIONS FOR USE
- PLAYING A SONG IN SIMPLE MODE MELODY
- MAIN SPEAKER
- BATTERY PRECAUTIONS
- COMPOSING A MUSIC TRACK
- HOW TO PLAY THE TRACK IN SIMPLE MODE
- BATTERY USAGE TIPS
- DISPOSAL INSTRUCTIONS
- TURN ON AND OFF
- HOW TO PLAY A SONG IN SIMPLE MODE
- HOW TO PLAY THE PIECE IN SIMPLIFIED MODE
Brand : BONTEMPI
Model : i Music 15 3790
Category : Keyboard