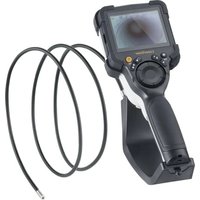
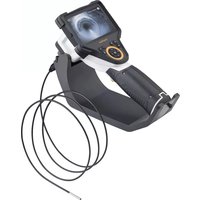
VideoInspector 3D - Video camera Laserliner - Free user manual and instructions
Find the device manual for free VideoInspector 3D Laserliner in PDF.

| Product type | Professional inspection video camera |
| Brand | Laserliner |
| Model | VideoInspector 3D |
| Display | TFT 3.5 inches, 640 x 480 pixels resolution |
| Recording format | JPEG (photo) / MP4 (video) |
| LED lighting | 7 adjustable brightness levels |
| Digital zoom | 10 magnification levels |
| Memory | micro SD card up to 8 GB (not included) |
| Protection rating | IP54 (base unit) |
| Power supply | Li-ion battery 3.7 V / 1.7 Ah + power adapter 5 V / 2 A |
| Battery life | Approximately 3.5 hours |
| Charging time | Approximately 4 hours |
| Dimensions (W x H x D) | 115 x 190 x 115 mm (without hose or mount) |
| Weight | 505 g (with battery and magnetic mount) |
| Operating temperature | -10 °C to 50 °C |
| Storage temperature | -20 °C to 60 °C |
| Operating humidity | 20 to 85% RH (non-condensing) |
| Connections | Micro USB (charging/data), HDMI, micro SD slot |
| Image rotation | In 90° steps (0°, 90°, 180°, 270°) |
| Main functions | Visual inspection of pipes, cavities, masonry; photo/video recording; zoom; lighting; joystick rotation |
| Maintenance and cleaning | Slightly damp cloth; avoid solvents; dry and clean storage; remove battery if storing for long periods |
| Safety | Do not use for medical examinations; avoid contact with liquids, chemicals, voltage; keep 30 cm away from medical implants |
| Spare parts and repairability | Battery and camera unit replaceable; firmware update via customer service |
| Warranty | Warranty valid only with original accessories |
| Standards | CE, UKCA compliant; recycling according to WEEE |
Frequently Asked Questions - VideoInspector 3D Laserliner
User questions about VideoInspector 3D Laserliner
0 question about this device. Answer the ones you know or ask your own.
Ask a new question about this device
Download the instructions for your Video camera in PDF format for free! Find your manual VideoInspector 3D - Laserliner and take your electronic device back in hand. On this page are published all the documents necessary for the use of your device. VideoInspector 3D by Laserliner.
USER MANUAL VideoInspector 3D Laserliner
natural_image
Medical endoscopy device with visible gears and control panel (no text or symbols)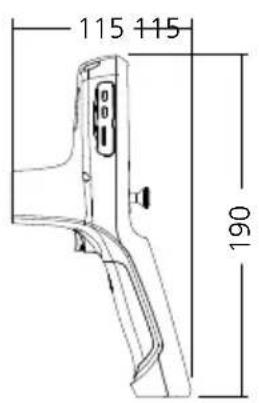
text_image
115 115 190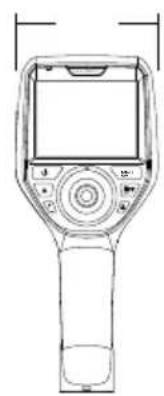
natural_image
Line drawing of a handheld electronic device with control panel and display screen (no text or symbols)Laserliner
!
text_image
Micro-USBtext_image
11:18:16 00:01 00:03 V Wtext_image
-A -B -C -D -E 2019-01-07 12:17:09
text_image
-F -G -H -I 2019-01-07 12:17:09text_image
Diagram of a medical device with labeled ports and a digital display screen, showing a connector or sensor interface.
text_image
4 Einstellungsmodus MENU SETnatural_image
Generic smartphone home screen with status bar and date (no readable text or symbols)text_image
Two smartphone screenshots showing a video camera icon before and after modification, with date and time labels visible.Laserliner
c. LED-Beleuchtung

natural_image
Blank grayscale image with no visible text, symbols, or discernible content.
natural_image
Technical line drawing of a Laser/Flux motor with no visible text or symbols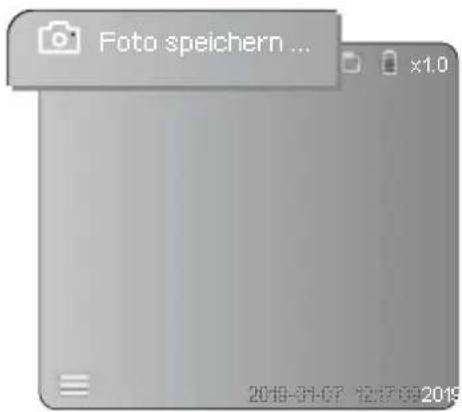
text_image
Foto speichern ... x1.0 2019-01-07 12:17:09 20196 Wiedergabemodus

text_image
2019-01-07 12:12:09 2019natural_image
Close-up of hands using a medical endoscope to apply liquid, no visible text or symbolsWechseln des Akkus
natural_image
Diagram of a mechanical device with rotating components and directional arrows (no text or symbols)
text_image
Technical diagram showing a mechanical component with labeled parts and directional arrows indicating motion or force vectors.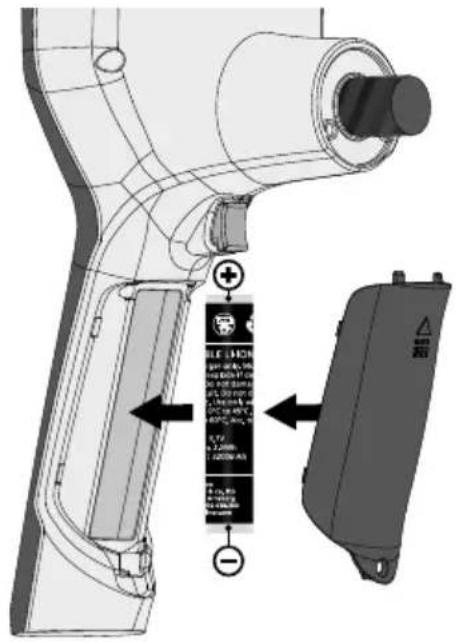
text_image
Technical diagram of a handheld device with labeled components and directional arrows indicating assembly or installation.https://packd.li/ll/aih/in
!
Completely read through the operating instructions, the „Warranty and Additional Information“ booklet as well as the latest information under the internet link at the end of these instructions. Follow the instructions they contain. These documents must be kept in a safe place and passed on together with the device.
Intended use
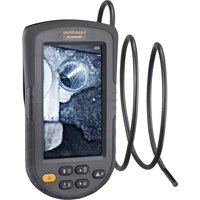
This professional video inspection system Videolnspector 3D combined with an exchangeable camera unit is suitable for easy visual inspection of hard-to-reach places in pipes, cavities, shafts, masonry and motor vehicles. Images and videos can be stored on the Micro-SD memory card for analysis and documentation.
General safety instructions
- The device must only be used in accordance with its intended purpose and within the scope of the specifications.
- This product and its accessories are not toys. Keep out of reach of children.
- The structure of the device must not be modified in any way.
- Do not expose the device to mechanical stress, extreme temperatures, moisture or significant vibration.
- The device must not be used if one or a number of its functions fails, or if the housing or connecting cables are damaged.
- When using the device outdoors, make sure that the weather conditions are appropriate and/or that suitable protection measures are taken.
- Charge the device's battery completely prior to use.
- Charging is completed when the LED indicator lights green.
- The battery can also be charged while using the device.
- Use only genuine accessories. Use of inappropriate accessories will invalidate the warranty.
- The base unit must not come in contact with liquids.
- It is absolutely vital to ensure that the Videolinspector does not come into contact with chemicals, voltage, moving or hot objects. This can damage the device and put its user at risk of serious injury.
- The Videolinspector must not be used for medical examinations / examining people.
- To maintain the IP 54 protection class, the caps on the connections must be firmly locked in.
- Please ensure compliance with the safety regulations set out by local and national authorities with regard to the correct and proper use of the device.
- The unit is not suitable for taking measurements close to dangerous voltages. Therefore always make sure that conductive parts are at zero potential when carrying out measurements in the vicinity of electrical systems. Safe isolation from the power supply and precautions to prevent systems being switched on again must be ensured by implementing suitable measures.
Safety instructions
Dealing with electromagnetic radiation and electromagnetic disruptions
- The measuring device complies with safety and electromagnetic compatibility regulations and limit values in accordance with Directive 2014/35/EU (Low Voltage Directive / LVD) and 2014/30/EU (Electromagnetic Compatibility Directive / EMC).
- Local operating restrictions – for example, in hospitals, aircraft, petrol stations or in the vicinity of people with pacemakers – may apply. Electronic devices can potentially cause hazards or interference or be subject to hazards or interference.
Laserliner
text_image
1 2 3 4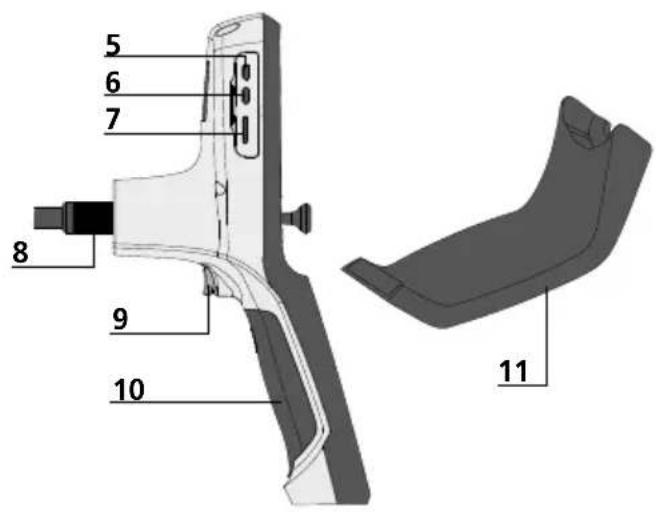
text_image
5 6 7 8 9 10 11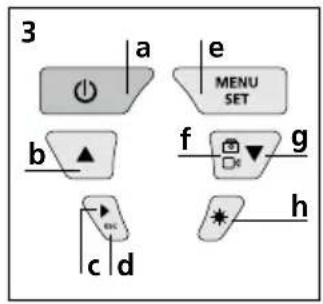
text_image
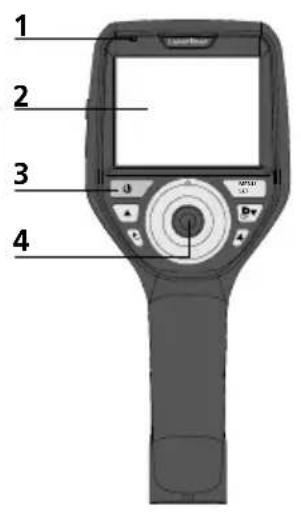
3 a e MENU SET b f g c d * h1 Operation indicator
2 LCD
3 Hot keys
4 Joystick to turn the camera head
5 HDMI interface
6 Micro USB interface / Charging socket
7 Micro SD card slot
8 Connection for flex cable
9 Trigger
10 Battery compartment
11 Magnetic holder
a ON/OFF / Still image
b Rotation 180° / Menu control
c Media gallery Image / video
d Cancel
e Settings mode / Confirm / Select recordings / Delete recording
f Image / video selection
g Menu control
h LED lighting
1 Using the power supply / lithium-ion rechargeable battery
- Use the power supply/charger unit only in closed rooms; do not expose to moisture or rain otherwise risk of electric shock.
- Charge the device's battery completely prior to use.
- Connect the power pack/charger to the mains power supply and the socket in the battery pack. Please only use the power pack/charger supplied. Using any other power pack/charger will invalidate the warranty.
- The LED lights up red while the device is charging. The LED changes to green when charging is complete.
- Remove the charging cable after charging and disconnect the power pack from the mains.

text_image
Micro-USBThe device has a replaceable battery. Contact your distributor or the UMAREX-LASERLINER service department.
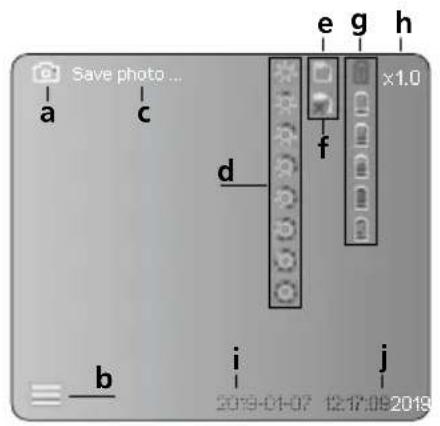
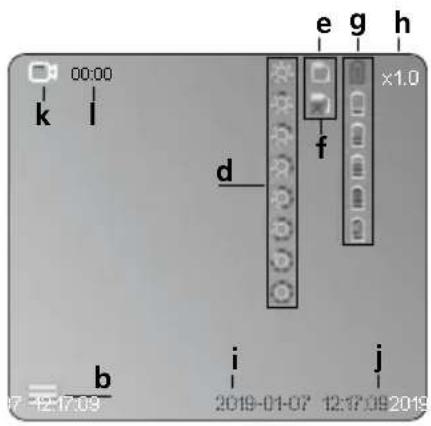
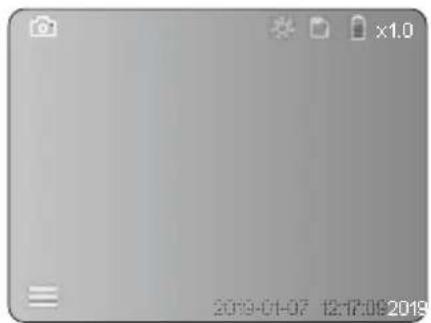
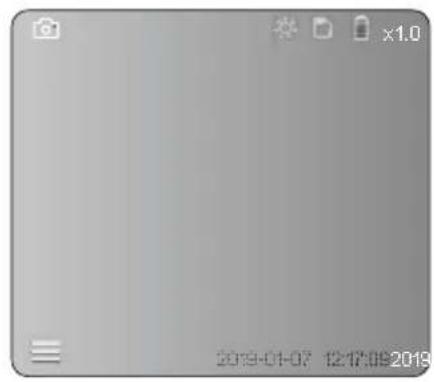
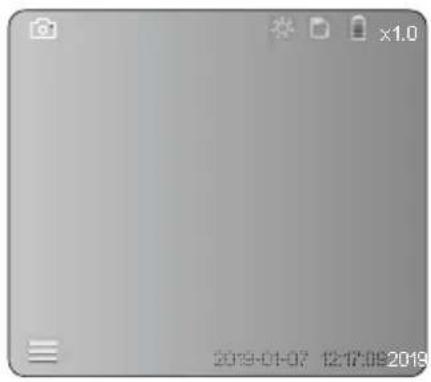
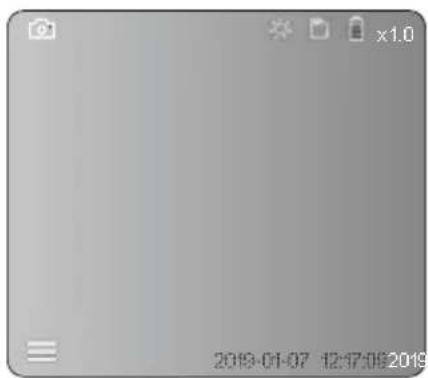
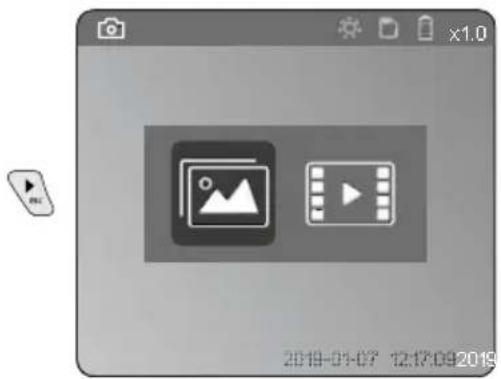
Image record mode
text_image
Save photo... a c e g h x1.0 d f b i j 2019-01-07 12:17:08 2019Video record mode
text_image
00:00 k l e g h x1.0 d f b i j 07-12-17-09 2019-01-07 12:17:09 2019a Image recording
b Menu closed
c Save
d LED lighting
e SD card active
f Insert SD card
g Battery status
h Zoom
i Current date
j Current time
k Video recording
I Recording
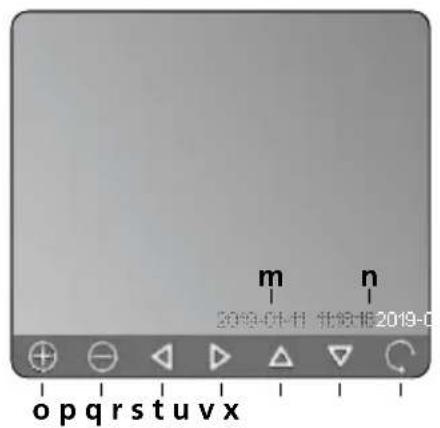
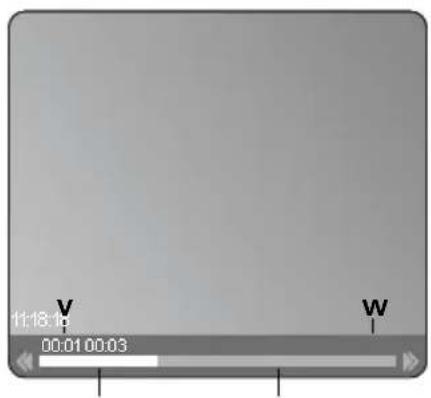
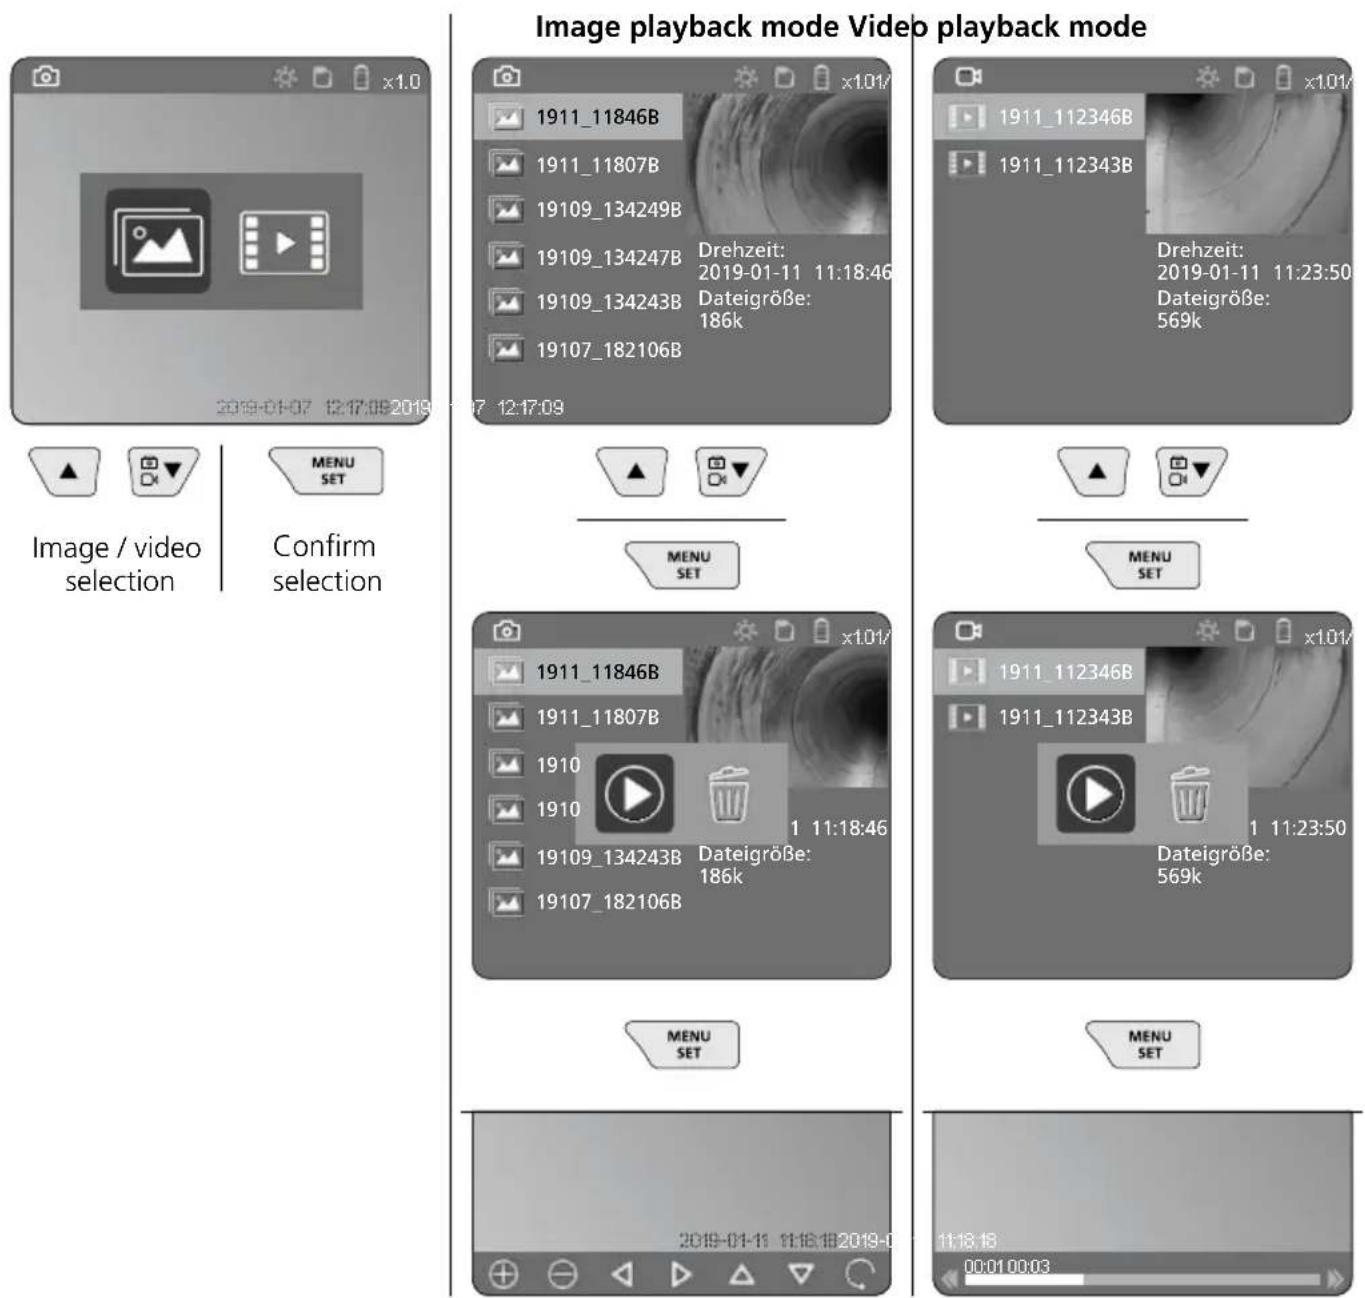
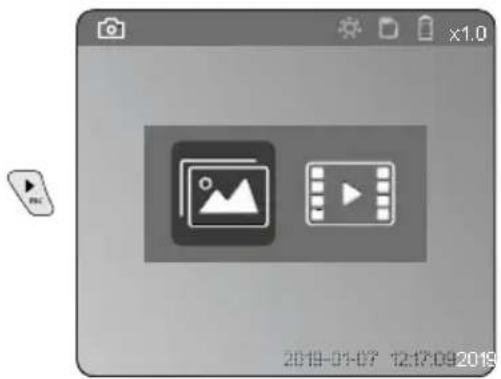
Image playback mode
text_image
m 2019-01-11 北信1E 2019-0 op q r s t u v xVideo playback mode
text_image
11:18:10 00:01 00:03 V Wm Recording date
n Recording time
- Zoom +
p Zoom -
q Navigate zoomed image
r Navigate zoomed image
s Navigate zoomed image
t Navigate zoomed image
u Back to media gallery
v Played time
w Recording time
x Remaining time
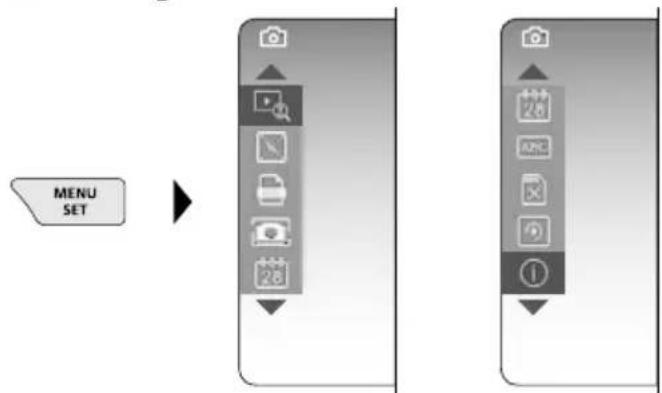
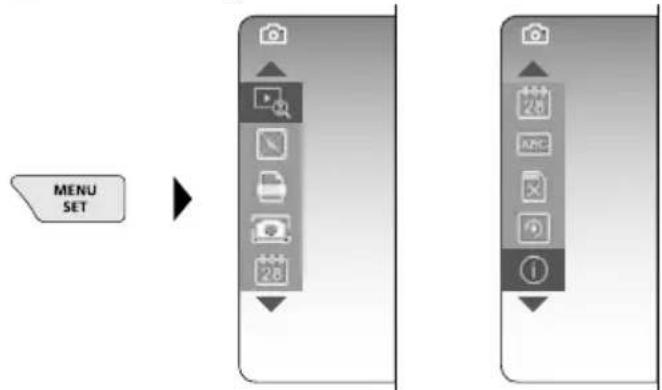
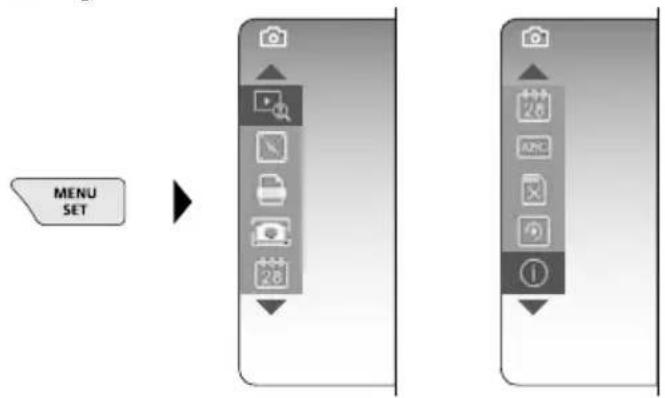
Settings mode

text_image
-A -B -C -D -E 2019-01-07 12:17:09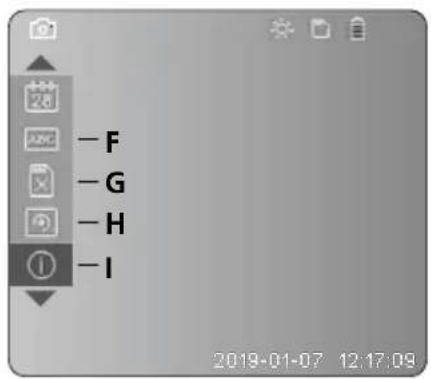
text_image
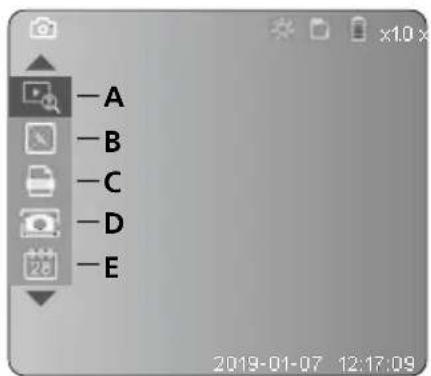
-F -G -H -I 2019-01-07 12:17:09A Zoom
B Date and time stamp
C Image format
D Image rotation
E Set date/time
F Select language
G Format data medium
H Factory setting
I Firmware version
Laserliner
2 ON / OFF

text_image
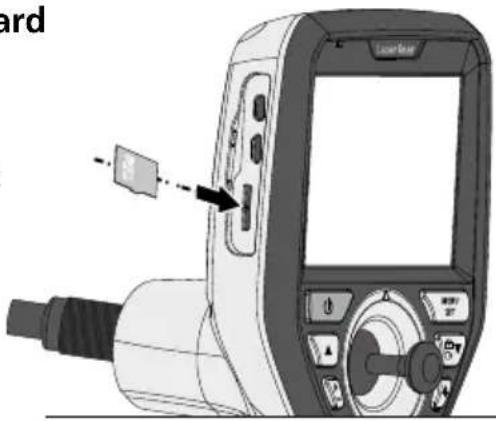
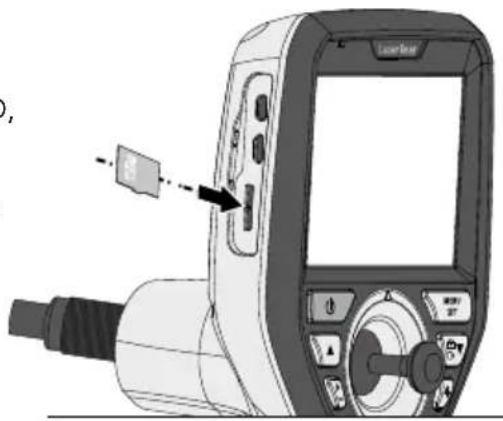
Latimer MOSA SET 2 sec3 Inserting micro-SD card
To insert a micro-SD card, first open the rubber cover and then insert the memory card as illustrated. You cannot record anything without a storage medium.
text_image
Check4 Settings mode
flowchart
graph LR
    A["MENU SET"] --> B["Arrow pointing to a device panel with icons for camera, document, phone, and navigation"]
    B --> C["Next step: Camera icon with '1' label"]
    style A fill:#f9f,stroke:#333
    style B fill:#ccf,stroke:#333
To return to recording mode, press the ESC button (several times).
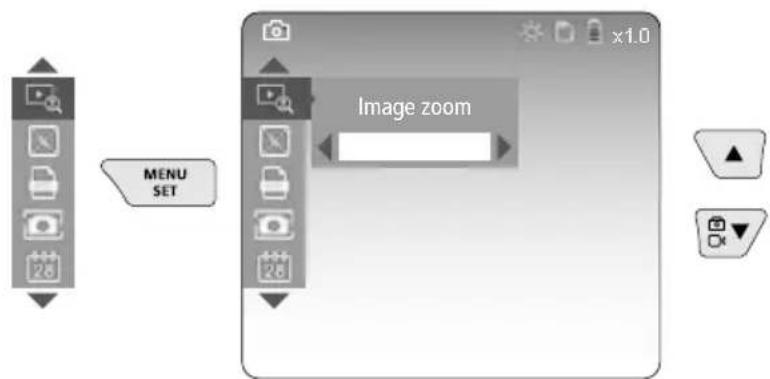
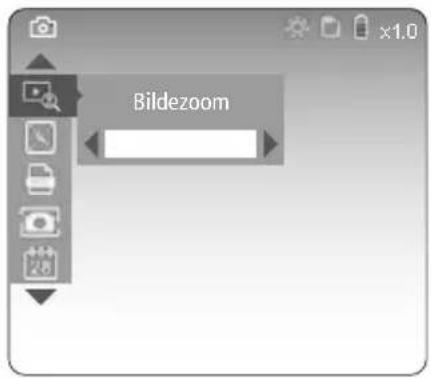
a. Zoom
text_image
MENU SET Image zoomZoom level 1 ... level 10
b. Date and time stamp
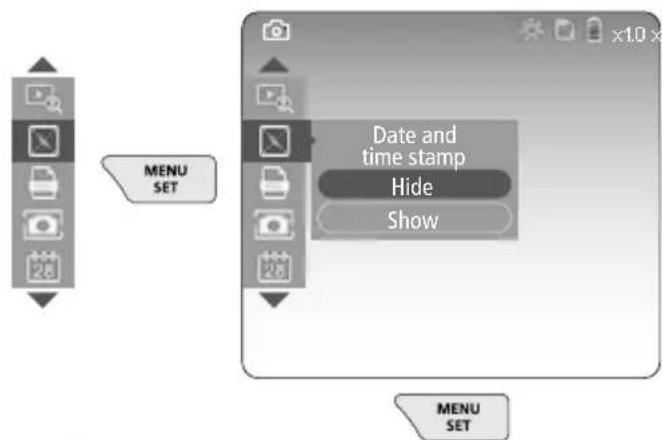
flowchart
graph TD
    A["User Interface"] --> B["MENU SET"]
    B --> C["Date and time stamp"]
    C --> D["Hide"]
    C --> E["Show"]
c. Image format
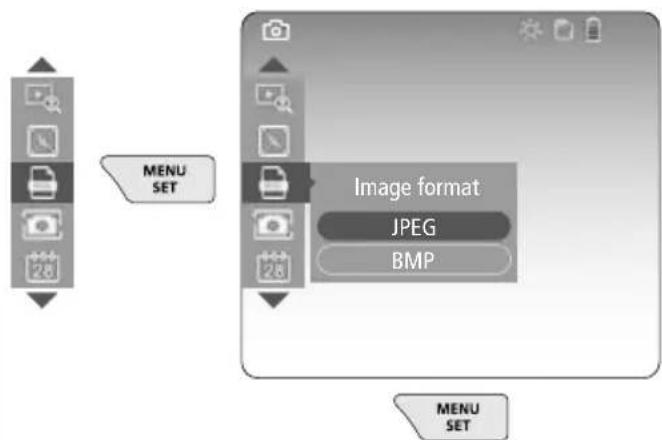
flowchart
graph TD
    A["Menu SET"] --> B["Image format"]
    B --> C["JPEG"]
    B --> D["BMP"]
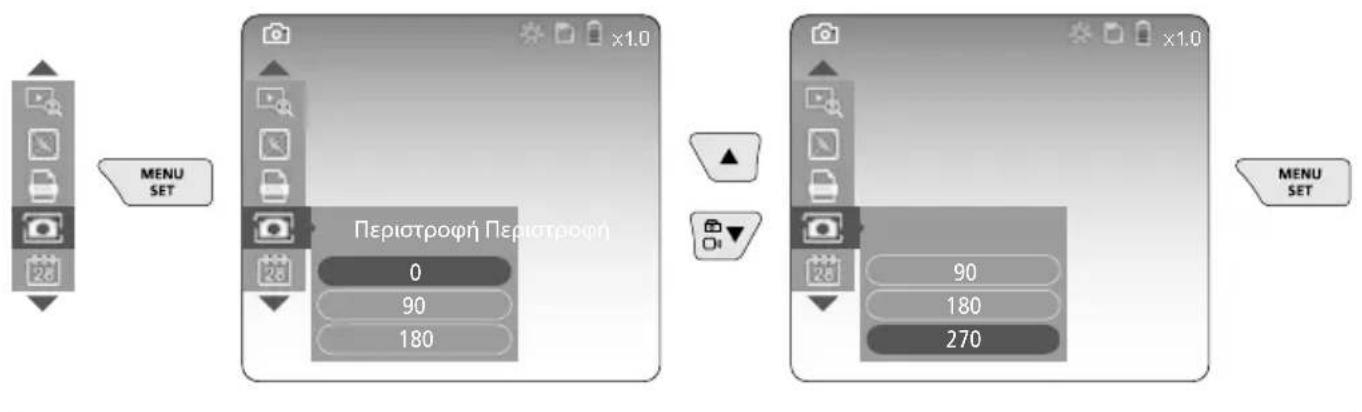
d. Image rotation
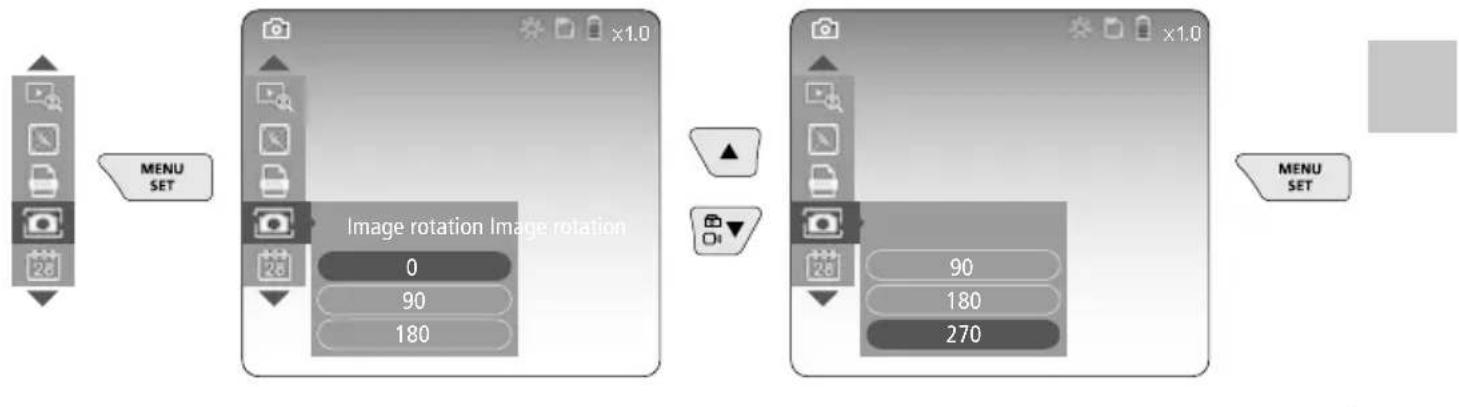
text_image
MENU SET Image rotation Image rotation 0 90 180 90 180 270 MENU SETe. Set date / time
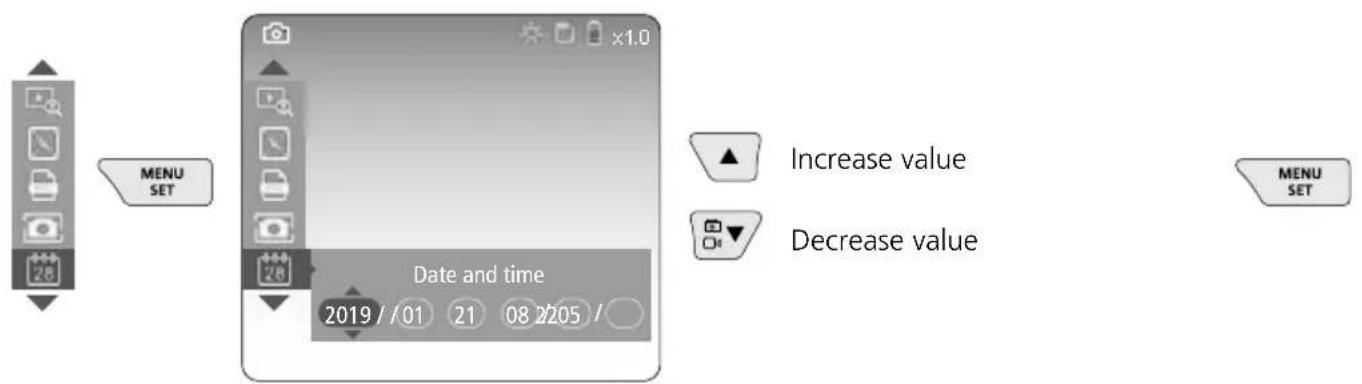
flowchart
graph TD
    A["MENU SET"] --> B["Date and time"]
    B --> C["Increase value 2019/01 21 08 2205/"]
    B --> D["Decrease value"]
    E["MENU SET"] --> F["Increase value"]
    E --> G["Decrease value"]
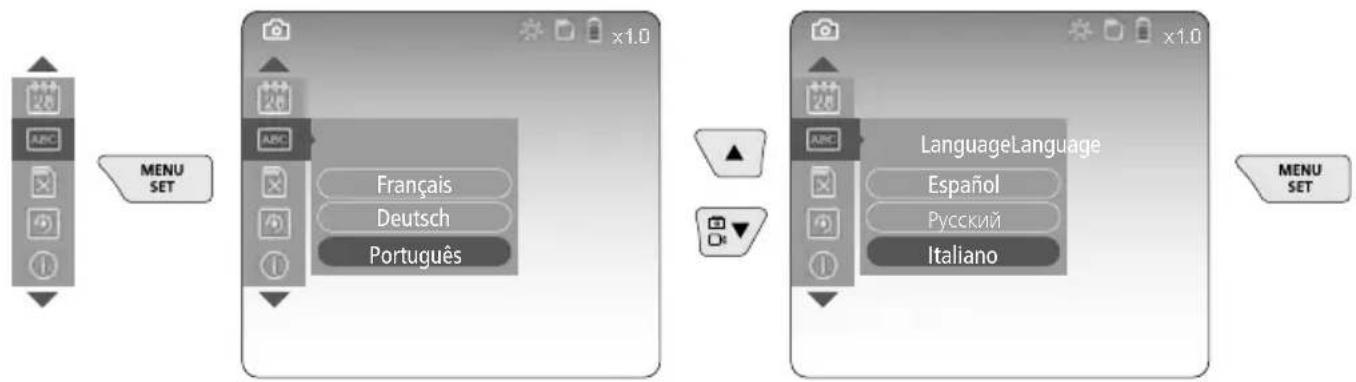
f. Select language (ZH-CN, ZH-TW, EN, JA, KO, FR, DE, PT, ES, RU, IT, NL)
flowchart
graph LR
    A["MENU SET"] --> B["Language Language"]
    B --> C["MSCI"]
    style A fill:#f9f,stroke:#333
    style B fill:#ccf,stroke:#333
    style C fill:#cfc,stroke:#333
g. Format data medium
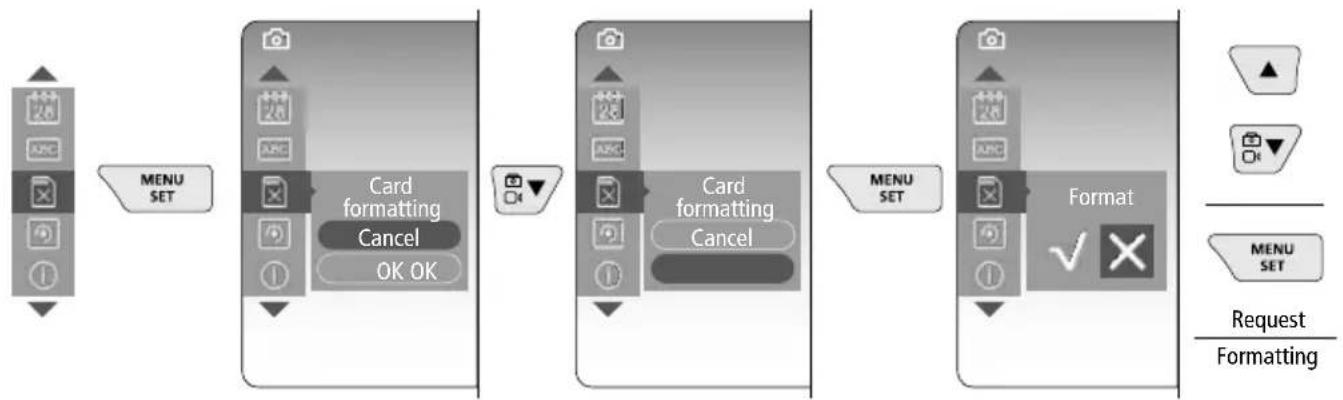
flowchart
graph LR
    A["Menu SET"] --> B["Card formatting Cancel OK OK"]
    B --> C["Card formatting Cancel"]
    C --> D["Format"]
    D --> E["Request/Formatting"]
Laserliner
h. Factory setting
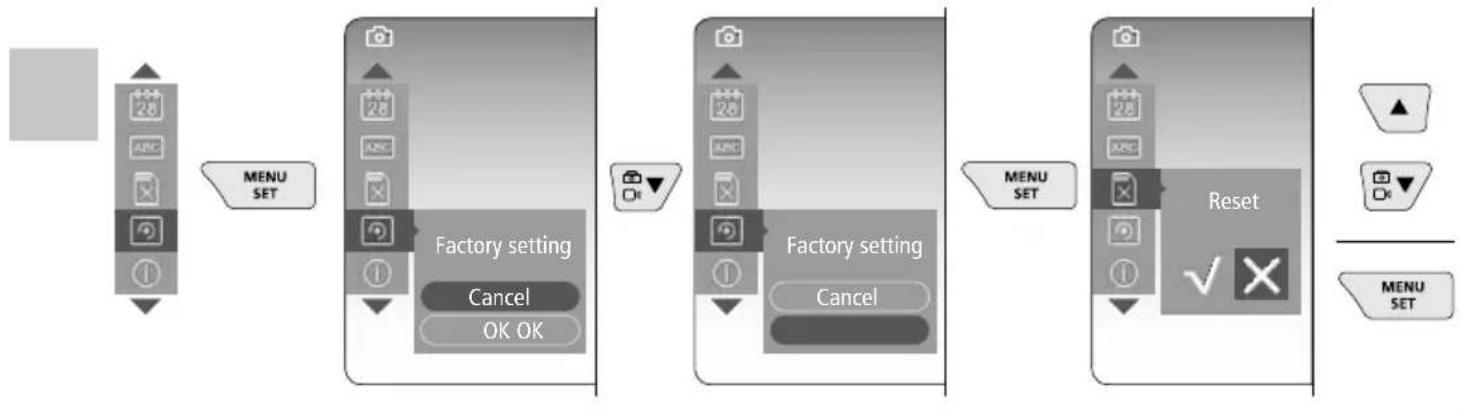
flowchart
graph LR
    A["28 ABC"] --> B["MENU SET"]
    B --> C["Factory setting Cancel OK OK"]
    C --> D["28 ABC"]
    D --> E["Factory setting Cancel"]
    E --> F["28 ABC"]
    F --> G["Reset ✓"]
    G --> H["MENU SET"]
i. Firmware version / System update
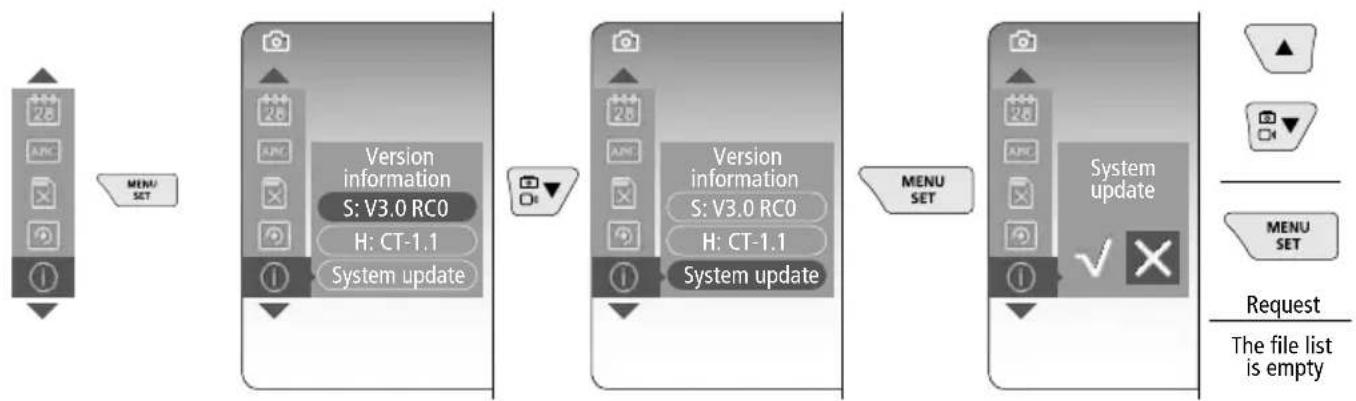
flowchart
graph LR
    A["28 ARC"] --> B["MENU SET"]
    B --> C["Version information S: V3.0 RC0 H: CT-1.1 System update"]
    C --> D["Version information S: V3.0 RC0 H: CT-1.1 System update"]
    D --> E["MENU SET"]
    E --> F["System update ✓"]
    F --> G["Request The file list is empty"]

For a system update please contact the UMAREX-LASERLINER Service Department.
5 Record mode
natural_image
Generic smartphone home screen with status bar and date (no readable text or symbols)Still images / Video recordings
Guide the camera head on the flexible tubing to the required position and adjust it with the joystick (4). If lighting conditions are poor, switch on the LED lighting. Zoom in on distant or small objects. The manual image rotation function allows the image to be rotated by 90° steps on the display. Briefly press the trigger (9) to take a still image or make a video recording and save it to the SD card. Press the button again to stop the video recording.
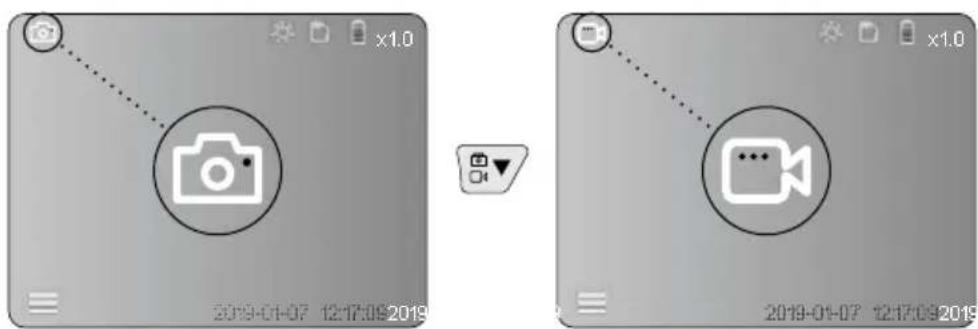
a. Image / video recording selection
text_image
Two smartphone screenshots showing a video call interface with camera icon and video camera symbol before and after modification.c. LED lighting

natural_image
Blank grayscale image with no visible text, symbols, or discernible content.
| 1x OFF | ||
| 2x | LED Level 1 | |
| 3x | LED Level 2 | |
| 4x | LED Level 3 | |
| 5x | LED Level 4 | |
| 6x | LED Level 5 | |
| 7x | LED Level 6 | |
| 8x | LED Level 7 | |
d. Zoom (see section 3 a.)

text_image
Image zoome. Image rotation

natural_image
Generic smartphone home screen with date and time settings (no readable text or symbols)
1x = Rotation 90° 2x = Rotation 90° 3x = Rotation 90° 4x = Original image
f. Image / video recording
Briefly press the trigger (9) to take a still image or make a video recording and save it to the SD card. Press the button again to stop the video recording.
natural_image
Technical line drawing of a LaserPoint device with no visible text or symbols on the body or background
text_image
Save photo ... x1.0 2019-01-07 12:17:00:20196 Playback mode
text_image
2019-01-07 12:17:09 2019Playback of still images / video recordings
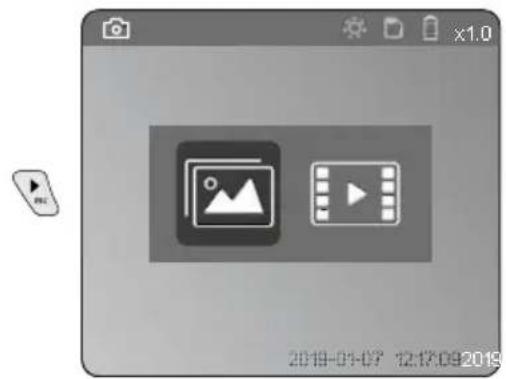
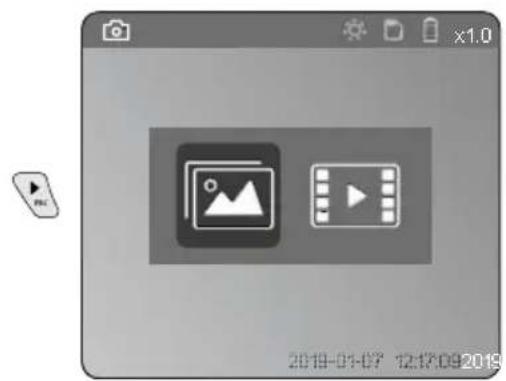
Press the „c“ button to call up the media gallery. Press the „c“ button again to exit playback mode.
a. Playing back and deleting image / video recordings
To delete image or video recording, select the image in the media gallery, see section 5 a.
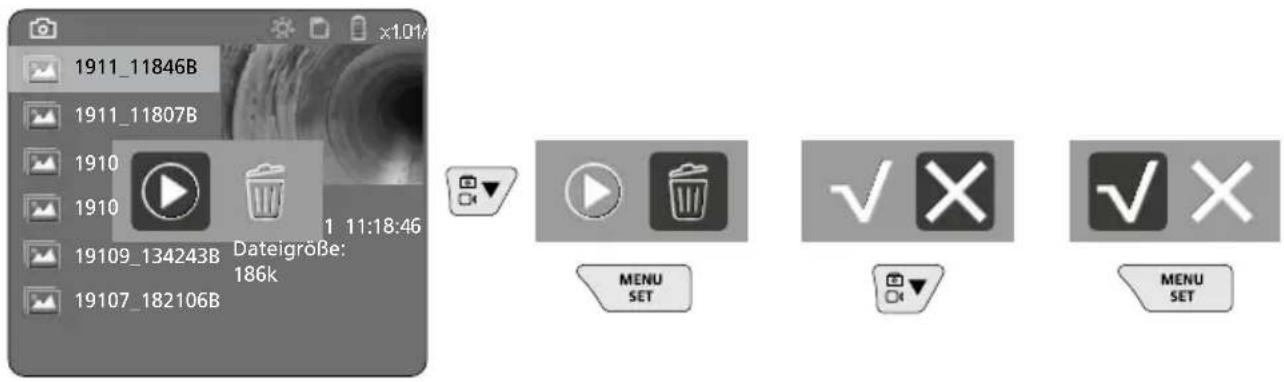
text_image
1911_11846B 1911_11807B 1910 1910 19109_134243B Dateigröße: 186k 19107_182106B 1 11:18:46 MENU SET ✓ × ✓ × MENU SET! Deleting cannot be undone.
All files and folders can be deleted by reformatting the data medium. Refer to „3 g. Format Data Medium“.
USB data transfer
Data saved on the SD card can be transferred to a PC with the supplied card reader.
Danger - powerful magnetic fields
Powerful magnetic fields can adversely affect persons with active medical implants (e.g. pacemaker) as well as electromechanical devices (e.g. magnetic cards, mechanical clocks, precision mechanics, hard disks).
With regard to the effect of powerful magnetic fields on persons, the applicable national stipulations and regulations must be complied with such as BGV B11 §14 „electromagnetic fields“ (occupational health and safety - electromagnetic fields) in the Federal Republic of Germany.
To avoid interference/disruption, always keep the implant or device a safe distance of at least 30 cm away from the magnet.
Laserliner
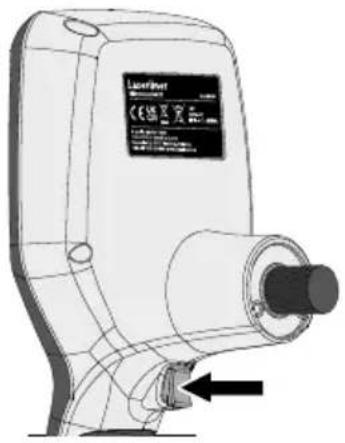
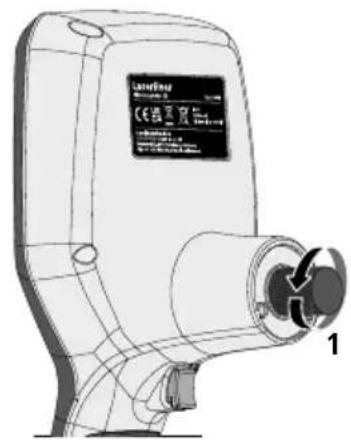
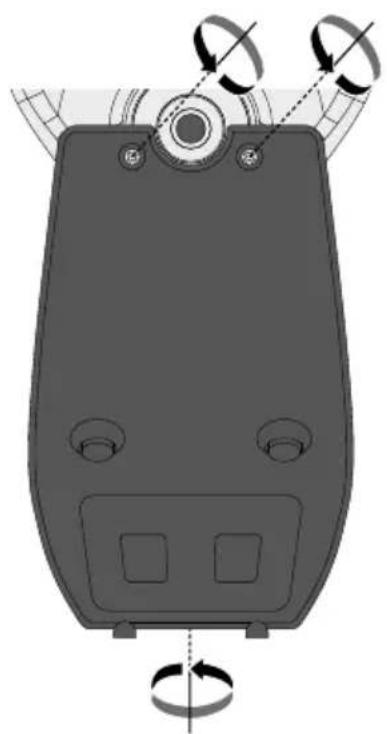
Camera unit replacement
The camera unit is easy to remove and replace. Simply undo the screw and pull out the camera unit by the joystick.
natural_image
Technical line drawing of a device with labeled components (no readable text or symbols)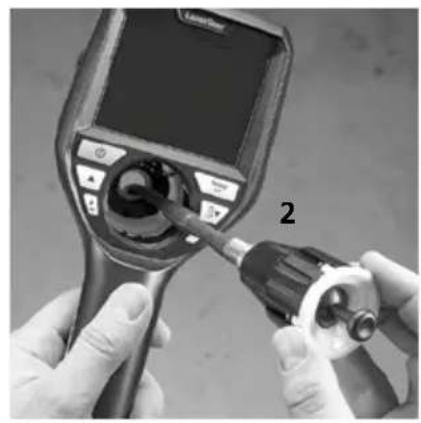
natural_image
Close-up of hands using a medical endoscope to adjust internal components (no visible text or symbols)Changing the battery
Remove magnetic holder, open battery compartment and insert battery as indicated by the installation symbols. Ensure correct polarity.
natural_image
Diagram of a device with rotating buttons and a central dial (no text or symbols)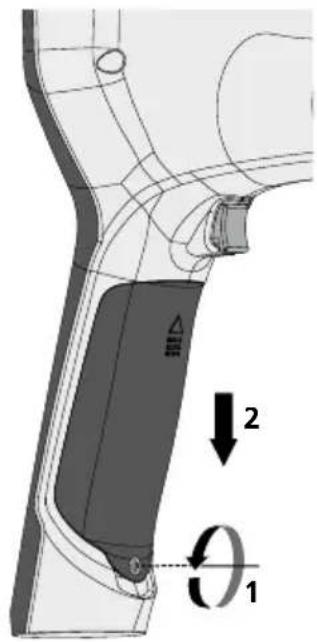
text_image
Technical diagram showing a mechanical component with labeled parts and directional arrows indicating motion or force vectors.
text_image
Technical diagram of a handheld device with labeled components and directional arrows indicating assembly or installation.Information on maintenance and care
Clean all components with a damp cloth and do not use cleaning agents, scouring agents and solvents. Remove the battery(ies) before storing for longer periods. Store the device in a clean and dry place.
Technical Data
Technical revisions reserved. 24W45
| Screen type 3.5" TFT colour display | |
| Display resolution 640 x 480 pixels | |
| Image format / Video format JPEG / | MP4 |
| Lighting 7 brightness levels | |
| Digital zoom 10 zoom levels | |
| Memory Micro-SD memory card up to 8 GB | |
| Protection class Base unit: IP 54 | |
| Connections Micro USB, power supply unit 5V/DC | |
| Power supply | Li-ion battery pack 3.7V/1.7Ah / power supply unit 5V/DC / 2A |
| Operating time approx. 3.5 h | |
| Charging time approx. 4 h | |
| Operating conditions | -10°C ... 50°C, max. humidity 20 ... 85% rH, no condensation, max. working altitude 4000 m above sea level |
| Storage conditions -20°C ... 60°C, max. humidity 80% rH | |
| Dimensions (W x H x D) | 115 x 190 x 115 mm (not including flexible tubing and holder) |
| Weight | 505 g (incl. battery pack and holder) |
EU and UK directives and disposal
This device complies with all necessary standards for the free movement of goods within the EU and the UK.
This product, including accessories and packaging, is an electrical appliance that must be recycled in an environmentally appropriate manner in accordance with European and UK directives on waste electrical and electronic equipment, batteries and packaging, in order to recover valuable raw materials. Electrical devices, batteries and packaging do not belong in household waste. Users are obliged by law to surrender used batteries or battery packs to a public collection point, to sales outlets, or to technical customer services, free of charge. Remove the battery pack from the device without damaging it using standard tools and a separate collection arranged before returning the device for disposal. Please do not hesitate to contact the UMAREX-LASERLINER service department if you have any queries regarding removing the battery. Look for information on local disposal facilities and note the relevant disposal and safety information at the collection points.
Further safety and supplementary notices at:
https://packd.li/ll/aih/in
!
text_image
Micro-USB Cancellinertext_image
11:18:16 00:01:00:03 V Wtext_image
-A -B -C -D -E 2019-01-07 12:17:09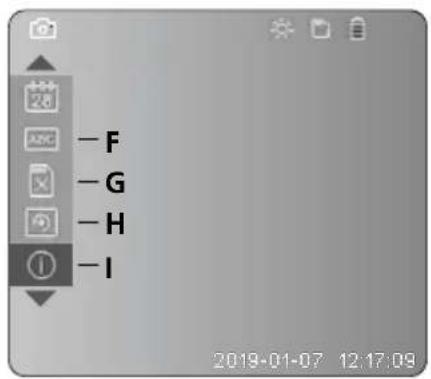
text_image
-F -G -H -I 2019-01-07 12:17:09A Zoom
text_image
LaserNet 2 secnatural_image
Illustration of a medical device with a labeled control panel and connector (no text or symbols visible)4 Instellingsmodus

flowchart
graph LR
    A["MENU SET"] --> B["Arrow pointing to a central menu item"]
    B --> C["Next step: Camera icon at top, menu icon at bottom"]
    C --> D["Next step: Menu icon at bottom, menu icon at top"]
natural_image
Generic smartphone home screen with status bar and date (no readable text or symbols)text_image
Two smartphone screenshots showing camera and video interface icons with timestamps and control buttonsLaserliner
c. LED-verlichting

natural_image
Generic smartphone home screen with status bar and date (no readable text or symbols)
| 1x | UIT | |
| 2x | LED stand 1 | |
| 3x | LED stand 2 | |
| 4x | LED stand 3 | |
| 5x | LED stand 4 | |
| 6x | LED stand 5 | |
| 7x | LED stand 6 | |
| 8x | LED stand 7 |
natural_image
Technical line drawing of a LaserJet air purifier device with no visible text or symbols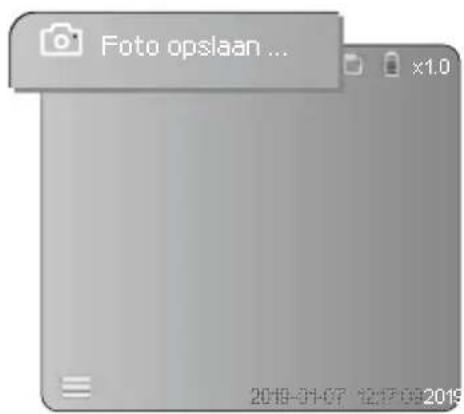
text_image
Foto opslaan ... x1.0 2019-01-07 12:17:09 20196 Weergavemodus
natural_image
Generic video player interface with two icons: a photo and a play button, displayed within a browser window (no readable text or symbols)natural_image
Technical line drawing of a Laserfly device with labeled component (no text or symbols beyond branding)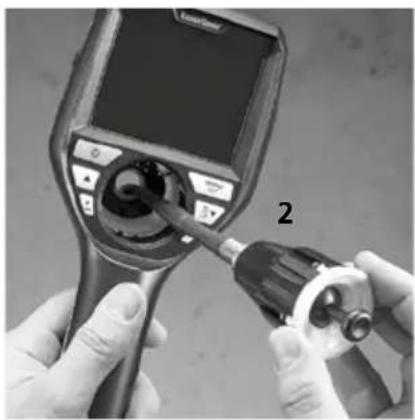
natural_image
Close-up of hands using a medical endoscope to adjust the device (no visible text or symbols)natural_image
Diagram of a device with rotating buttons and a dial, showing no text or symbols
text_image
Technical diagram of a mechanical component with labeled parts and directional arrows indicating motion or force vectors.
text_image
Technical diagram of a handheld device with labeled components and warning labels in Chinesehttps://packd.li/ll/aih/in
!
text_image
Micro-USB Nettext_image
11:18:16 00:01:00:03 V Wm Optagelsesdato
n Optagetid
- Zoom +
p Zoom -
text_image
-A -B -C -D -E 2019-01-07 12:17:09
text_image
-F -G -H -I 2019-01-07 12:17:09A Zoom
B Dato- og tidsstempel
C Billedformat
D Billedrotation
text_image
LRaser H20A SET 2 secnatural_image
Illustration of a medical device with a screen and connector, showing no visible text or symbols.4 Indstillingsmodus

flowchart
graph LR
    A["MENU SET"] --> B["Arrow pointing to a device panel with icons for camera, document, phone, and navigation"]
    B --> C["Next step: Camera icon with '1' label"]
natural_image
Blank grayscale image with no visible text, symbols, or discernible featurestext_image
Two smartphone screenshots showing a camera icon and video call with timestamps, connected by dotted lines to UI controls.c. Diodelampe

natural_image
Blank grayscale image with no visible text, symbols, or discernible content.
natural_image
Generic smartphone home screen with date and time settings (no readable text or symbols)
| 1x = Spejling 90° |
| 2x = Spejling 90° |
| 3x = Spejling 90° |
| 4x=Udgangs-billede |
natural_image
Technical line drawing of a LaserJet air purifier device with no visible text or symbols
text_image
Gem foto ... x1.0 2019-01-07 12:17:09 20196 Gengivelsesmodus
text_image
2019-01-07 12:17:09 2019natural_image
Technical line drawing of a device with labeled parts (no readable text or symbols)
natural_image
Close-up of hands using a medical endoscope to adjust the internal components (no visible text or symbols)natural_image
Diagram of a device's front panel with circular components and directional arrows indicating rotation (no text or symbols)
text_image
Technical diagram showing a mechanical component with labeled parts and directional arrows indicating motion or force vectors.
text_image
Technical diagram of a handheld device with labeled components and warning labels in Chinesehttps://packd.li/ll/aih/in
!
text_image
Micro-USBtext_image
V 11:18:16 00:01 00:03 Wtext_image
-A -B -C -D -E 2019-01-07 12:17:09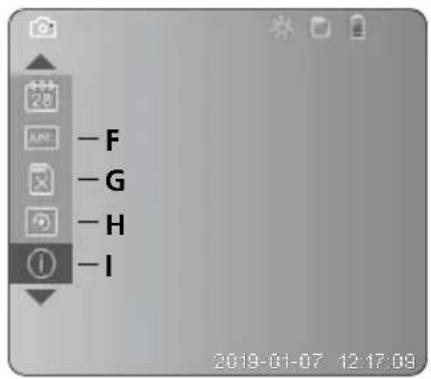
text_image
-F -G -H -IA Zoom
text_image
LaserNet 2 secnatural_image
Illustration of a medical device with a labeled control panel and connector (no text or symbols visible)4 Mode de réglage

flowchart
graph TD
    A["MENU SET"] --> B["Arrow pointing to a central menu icon"]
    B --> C["Next step: Camera Icon, Module Icon, Display Icon, File Icon, Calendar Icon, Left/Right Arrow"]
natural_image
Generic smartphone home screen with no visible text, numbers, or symbols on the screen areatext_image
Two smartphone screenshots showing camera and video interface icons with timestamps and control buttonsLaserliner
c. Éclairage DEL

natural_image
Generic smartphone home screen with status bar and date (no readable text or symbols)
natural_image
Technical line drawing of a LaserPoint device with no visible text or symbols on the body or background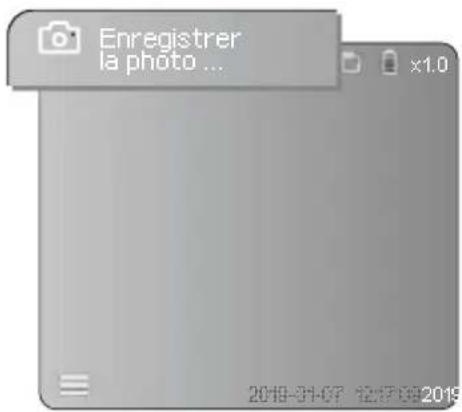
text_image
Enregistrer la photo ... 2019-01-07 12:17:09 2019natural_image
Generic video player interface with two icons: a photo and a play button, displayed within a browser window (no readable text or symbols)natural_image
Close-up of hands using a medical endoscope to adjust internal components (no visible text or symbols)natural_image
Diagram of a mechanical device with rotating components and directional arrows (no text or symbols)
text_image
Technical diagram showing a mechanical component with labeled parts and directional arrows indicating motion or force vectors.
text_image
Technical diagram of a device with labeled components and warning labels in Chinesehttps://packd.li/ll/aih/in
!
text_image
Micro-USB Laserboxtext_image
V 11:18:18 W 00:01 00:03a Tomar imagen
b Menú cerrado
text_image
- F - G - H - I 2019-01-07 12:17:08A Zoom
text_image
Latimer 2 secnatural_image
Illustration of a medical device with a screen and control panel, no visible text or symbolsnatural_image
Blank grayscale image with no visible text, symbols, or discernible featurestext_image
Two smartphone screenshots showing a camera icon and video call with timestamps, connected by dotted lines to UI control buttons.c. Iluminación LED

natural_image
Blank grayscale image with no visible text, symbols, or discernible content.
natural_image
Technical line drawing of a LaserPoint device with no visible text or symbols on the body or background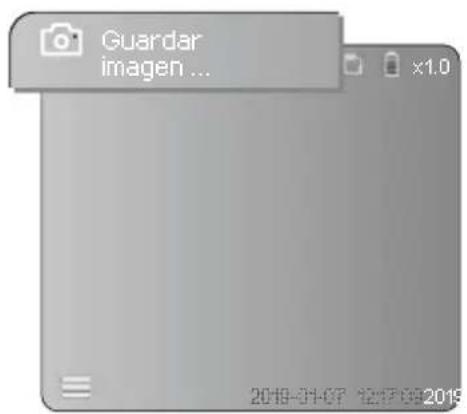
text_image
2019-01-07 12:17:09:2019natural_image
Technical line drawing of a device with labeled parts (no readable text or symbols)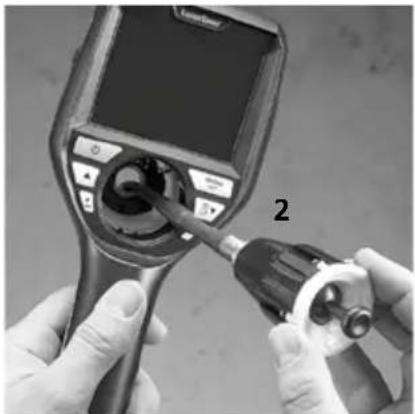
natural_image
Close-up of hands using a medical endoscope to adjust internal organs (no visible text or symbols)Cambio de batería
natural_image
Diagram of a mechanical device with rotating components and directional arrows (no text or symbols)
text_image
Technical diagram of a mechanical component with labeled parts and directional arrows indicating motion or force vectors.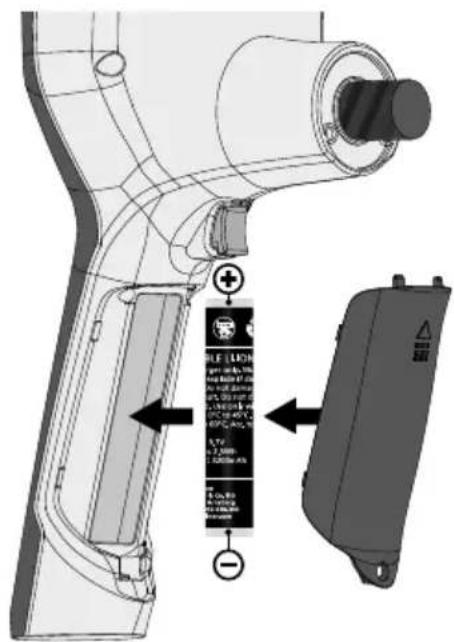
text_image
Technical diagram of a handheld device with labeled components and directional arrows indicating assembly or installation.https://packd.li/ll/aih/in
!
text_image
Micro-USB Learlinetext_image
V 11:18:16 00:01 00:03 Wtext_image
Diagram of a medical device with labeled ports and a control panel, showing a pointing arrow indicating a specific component.natural_image
Generic smartphone home screen with status bar and date (no readable text or symbols)natural_image
Generic smartphone home screen with status bar and date (no readable text or symbols)
natural_image
Technical line drawing of a LaserPoint device with no visible text or symbols on the body or background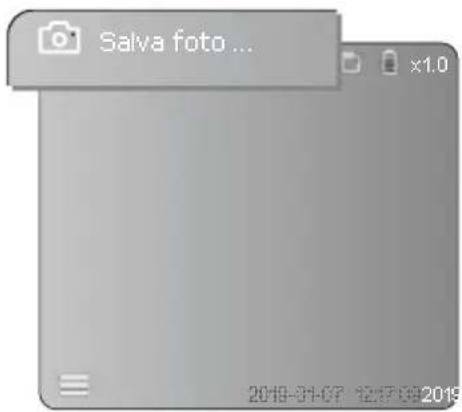
text_image
Salva foto ... x1.0 2019-01-07 12:17:09 2019natural_image
Generic video player interface with two icons: a photo and a play button, displayed within a browser window (no readable text or symbols)natural_image
Technical line drawing of a device with labeled parts (no readable text or symbols)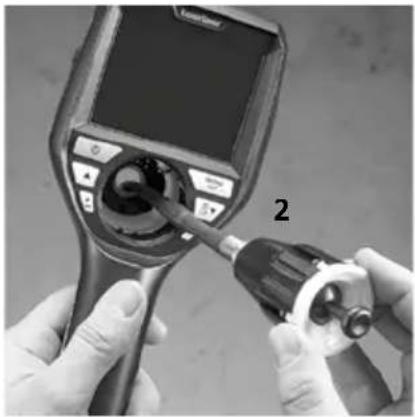
natural_image
Close-up of hands using a medical endoscope to adjust a device (no visible text or symbols)natural_image
Diagram of a device with rotating buttons and a dial, showing no text or symbols
text_image
Technical diagram of a mechanical component with labeled parts and directional arrows indicating motion or force vectors.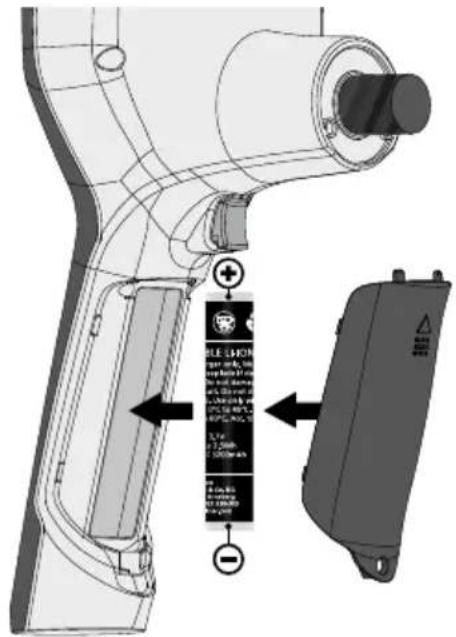
text_image
Technical diagram of a handheld device with labeled components and warning labels in Chinesehttps://packd.li/ll/aih/in
Videolnspector 3D
!
text_image
Micro-USBtext_image
11:18:16 00:01 00:03text_image
-A -B -C -D -E 2019-01-07 12:17:09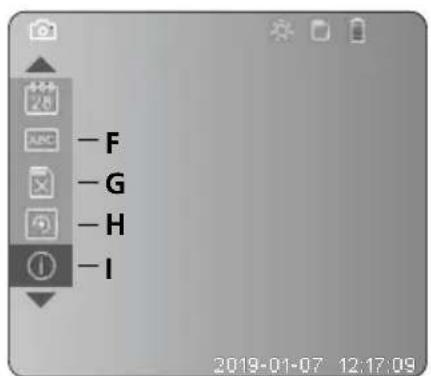
text_image
-F -G -H -I 2019-01-07 12:17:09natural_image
Illustration of a medical or diagnostic device with a labeled control panel and connector (no text or symbols visible)4 Tryb konfiguracji

flowchart
graph LR
    A["MENU SET"] --> B["Arrow pointing to a device panel with icons for camera, document, calendar, and navigation"]
    B --> C["Next step: Display icon with cursor 28 and number 1"]
natural_image
Generic smartphone home screen with status bar and date (no readable text or symbols)text_image
Two smartphone screenshots showing a video call interface with camera icons and a play button, both connected by dotted lines to date 2019-01-07.Laserliner
c. Oświetlenie LED
natural_image
Generic smartphone home screen with status bar and date (no readable text or symbols)
natural_image
Technical line drawing of a LaserPoint device with no visible text or symbols on the body or background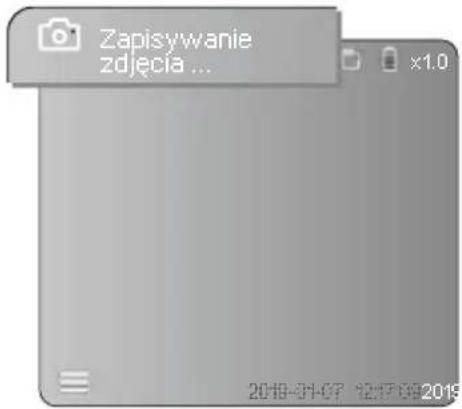
natural_image
Generic video player interface with two icons: a photo and a play button, displayed within a browser window (no readable text or symbols)natural_image
Close-up of hands using a medical endoscope to adjust the internal components (no visible text or symbols)Wymiana akumulatora
natural_image
Diagram of a mechanical device with rotating components and directional arrows (no text or symbols)
text_image
Technical diagram showing a mechanical component with labeled parts and directional arrows indicating motion or force vectors.
text_image
Technical diagram of a device with labeled components and directional arrows indicating assembly or installation steps.https://packd.li/ll/aih/in
text_image
Micro-USBtext_image
11:18:10 00:01 00:03 V Wm Päiväys
n Tallennusaika
- Zoomaus +
p Zoomaus -
text_image
-A -B -C -D -E 2019-01-07 12:17:09
text_image
-F -G -H -I 2019-01-07 12:17:09A Zoomaus
text_image
Latimer 2 secnatural_image
Illustration of a medical device with a screen and control panel, no visible text or symbols4 Asetustila
flowchart
graph LR
    A["MENU SET"] --> B["Device Icon 1"]
    A --> C["Device Icon 2"]
    B --> D["Camera Icon 3"]
    C --> E["Document Icon 4"]
    D --> F["Phone Icon 5"]
    E --> G["Phone Icon 6"]
natural_image
Generic smartphone home screen with status bar and date (no readable text or symbols)text_image
Two smartphone screenshots showing camera and video interface icons with timestamps and control buttonsc. Led-valo

natural_image
Blank grayscale image with no visible text, symbols, or discernible content.
| 1x Pois | ||
| 2x | LED porras 1 | |
| 3x | LED porras 2 | |
| 4x | LED porras 3 | |
| 5x | LED porras 4 | |
| 6x | LED porras 5 | |
| 7x | LED porras 6 | |
| 8x | LED porras 7 | |
natural_image
Generic smartphone home screen with date and time settings (no readable text or symbols)
1x = Kierto 90°
2x = Kierto 90°
3x = Kierto 90°
4x=Lähtökuva
natural_image
Technical line drawing of a LaserPoint device with no visible text or symbols on the body or background
text_image
Tallenna kuva... x1.0 2019-01-07 12:30:00 20196 Toistotila

text_image
2019-01-07 12:17:09 2019natural_image
Technical line drawing of a Laserbox device with labeled component (no readable text or symbols)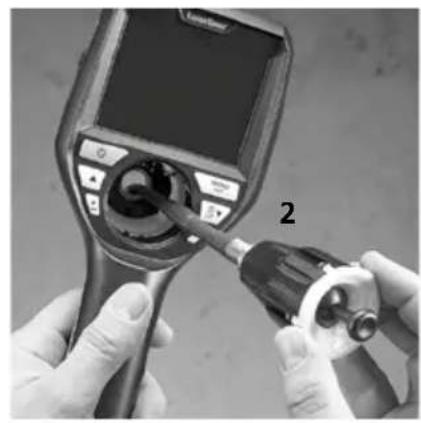
natural_image
Close-up of hands using a medical endoscope to adjust internal components (no visible text or symbols)Akun vaihtaminen
natural_image
Diagram of a device with rotating buttons and a dial, showing no text or symbols
text_image
Technical diagram showing a mechanical component with labeled parts and directional arrows indicating motion or force vectors.
text_image
Technical diagram of a device with labeled components and annotations, including a battery label and directional arrows.https://packd.li/ll/aih/in
!
text_image
Micro-USBtext_image
V 11:18:16 W 00:01 00:03m Data da gravação
n Tempo de registo
- Zoom +
p Zoom -
text_image
-A -B -C -D -E 2019-01-07 12:17:09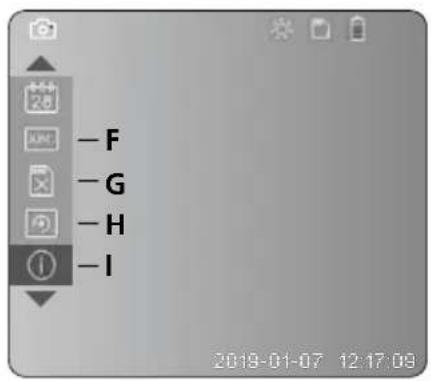
text_image
-F -G -H -I 2019-01-07 12:17:08A Zoom
B Carimbo de data e hora
C Formato de imagem
D Rotação da imagem
E Acertar data/hora
F Alterar língua
natural_image
Illustration of a medical device with a screen and connector, showing no visible text or symbols.4 Modo de ajuste
flowchart
graph LR
    A["MENU SET"] --> B["Next Step"]
    B --> C["Next Step 1"]
    B --> D["Next Step 2"]
natural_image
Generic smartphone home screen with status bar and date (no readable text or symbols)text_image
Two smartphone screenshots showing a camera icon and video call with timestamps, connected by dotted lines to UI elements.Laserliner
c. Iluminação LED

natural_image
Generic smartphone home screen with status bar and date (no readable text or symbols)
natural_image
Technical line drawing of a LaserPoint device with no visible text or symbols on the body or background
text_image
Guardar foto ... x1.0 2019-01-07 12:17:09 2019natural_image
Close-up of hands using a medical or industrial device to apply a tool, no visible text or symbolsMudar o acumulador
natural_image
Diagram of a device with rotating buttons and a dial, showing no text or symbols
text_image
Technical diagram showing a mechanical component with labeled parts and directional arrows indicating motion or force vectors.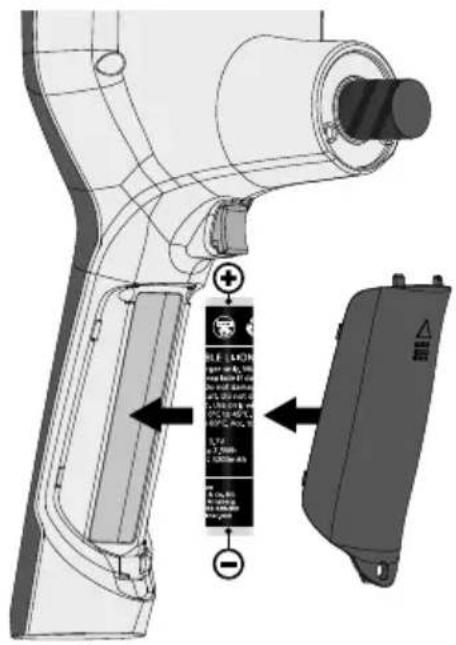
text_image
Technical diagram of a device with labeled components and annotations, including a battery terminal and control panel.https://packd.li/ll/aih/in
!
text_image
11:18:10 00:01 00:03 V Wtext_image
-A -B -C -D -E 2019-01-07 12:17:09
text_image
-F -G -H -I 2019-01-07 12:17:09text_image
Latire 2 secnatural_image
Illustration of a medical device with a screen and control panel, no visible text or symbols4 Ställ in-läge

flowchart
graph LR
    A["MENU SET"] --> B["Arrow pointing to a device panel with icons for camera, document, phone, and navigation"]
    B --> C["Next step: Camera icon with number 28"]
    C --> D["Next step: Number 1 icon with arrow"]
text_image
Two smartphone screenshots showing a camera icon and video call with timestamps, connected by dotted lines to UI controls.c. Lysdiodsbelysning
natural_image
Blank grayscale image with no visible text, symbols, or discernible content.
natural_image
Generic smartphone home screen with date and time settings (no readable text or symbols)
| 1x = Vridning 90° |
| 2x = Vridning 90° |
| 3x = Vridning 90° |
| 4x = Utgångsbild |
natural_image
Technical line drawing of a LaserPoint device with no visible text or symbols on the body or background
text_image
Spara foto ... x1.0 2019-01-07 12:57:09 20196 Återge-läge

text_image
x1.0 2019-01-07 12:17:09:2019natural_image
Technical line drawing of a mechanical device with labeled component (no readable text or symbols)
natural_image
Close-up of hands using a medical endoscope to adjust the bulb (no visible text or symbols)Byte av batteri
natural_image
Diagram of a mechanical device with rotating components and directional arrows (no text or symbols)
text_image
Technical diagram showing a mechanical component with labeled parts and directional arrows indicating motion or force vectors.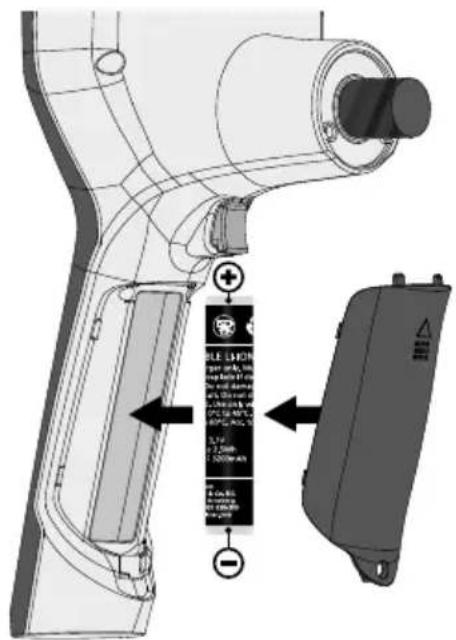
text_image
Technical diagram of a handheld device with labeled components and directional arrows indicating assembly or installation.https://packd.li/ll/aih/in
!
text_image
Micro-USBtext_image
11:18:16 00:01:00:03 V Wm Opptaksdato
n Opptakstid
- Zoom +
p Zoom -
q Navigere zoomet bilde
r Navigere zoomet bilde
s Navigere zoomet bilde
t Navigere zoomet bilde
text_image
-A -B -C -D -E 2019-01-07 12:17:09
text_image
-F -G -H -I 2019-01-07 12:17:09A Zoom
B Dato- og tidsstempel
C Bildeformat
D Bilderotasjon
text_image
Diagram of a medical device with labeled ports and a control panel, showing a device with an arrow pointing to its screen.4 Innstillingsmodus

flowchart
graph LR
    A["MENU SET"] --> B["Next Step"]
    B --> C["Next Step"]
natural_image
Generic smartphone home screen with status bar and date (no readable text or symbols)Foto- / videoopptak
text_image
Two smartphone screenshots showing a camera icon and video call with timestamps, connected by dotted lines to UI controls.Laserliner
c. LED-belysning

natural_image
Generic smartphone home screen with status bar and date (no readable text or symbols)
| 1x AV | ||
| 2x | LED trinn 1 | |
| 3x | LED trinn 2 | |
| 4x | LED trinn 3 | |
| 5x | LED trinn 4 | |
| 6x | LED trinn 5 | |
| 7x | LED trinn 6 | |
| 8x | LED trinn 7 | |
d. Zoom (se kapittel 3 a.)
text_image
Bildezoome. Bilderotasjon
natural_image
Blank grayscale image with no visible text, symbols, or discernible content.
natural_image
Technical line drawing of a LaserPoint device with no visible text or symbols on the body or background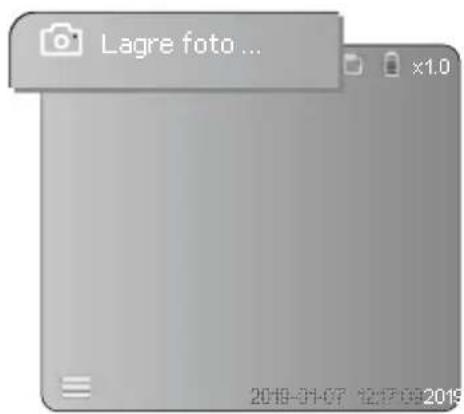
text_image
Lagre foto ... x1.0 2019-01-07 12:17:09 20196 Avspillingsmodus
text_image
2019-01-07 12:17:09 2019natural_image
Close-up of hands using a medical endoscope to adjust the internal components (no visible text or symbols)Skifte batteri
natural_image
Diagram of a device's front panel with rotating buttons and adjustment knobs (no text or symbols)
text_image
Technical diagram of a mechanical component with labeled parts and directional arrows indicating motion or force vectors.
text_image
Technical diagram of a robotic arm with labeled components and warning labels in Chinesehttps://packd.li/ll/aih/in
!
text_image
Micro-USBtext_image
11:18:10 00:01 00:03 V Wm Kayıt tarihi
n Kayıt süresi
- Zoom +
p Zoom -
text_image
-A -B -C -D -E 2019-01-07 12:17:09
text_image
-F -G -H -I 2019-01-07 12:17:09A Zoom
text_image
Latimer 2 sectext_image
Diagram of a medical device with labeled ports and a highlighted control panel, showing a device with an arrow pointing to the control panel.4 Ayar modu
flowchart
graph LR
    A["MENU SET"] --> B["Photo Icon"]
    B --> C["Image Icon"]
    C --> D["Display Icon"]
    D --> E["Photo Icon"]
    E --> F["Image Icon"]
    F --> G["Display Icon"]
    G --> H["1 Icon"]
text_image
Two smartphone screenshots showing a camera icon and video call with timestamps, connected by dotted lines to UI controls.natural_image
Technical line drawing of a LaserPoint device with no visible text or symbols on the body or background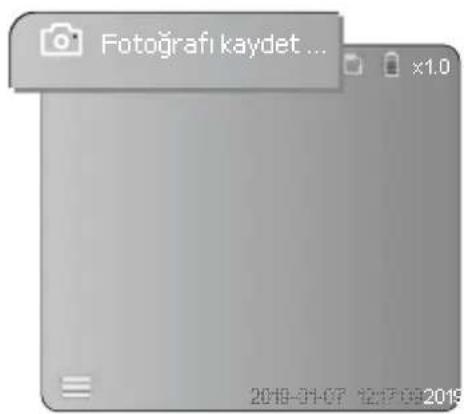
text_image
Fotografı kaydet ... x1.0 2019-01-07 12:17:09 20196 izleme modu

text_image
2019-01-07 12:17:09-2019natural_image
Technical line drawing of a laser power supply unit with labeled component (no readable text or symbols)
natural_image
Close-up of hands using a medical endoscope to adjust the internal components (no visible text or symbols)natural_image
Diagram of a device's top view showing rotating components and directional arrows (no text or symbols)
text_image
Technical diagram of a mechanical component with labeled parts and directional arrows indicating motion or rotation.
text_image
Technical diagram of a handheld device with labeled components and warning labels in Chinesehttps://packd.li/ll/aih/in
!
text_image
Micro-USBtext_image
11:18:16 00:01 00:03 V Wm Дата съемки
n Время записи
o Масштаб +
p Масштаб -
text_image
-A -B -C -D -E 2019-01-07 12:17:09
text_image
- F - G - H - I 2019-01-07 12:17:09A Масштаб
text_image
LRaser 2 sectext_image
Diagram of a medical device with labeled ports and a control panel, showing a dial indicator.4 Режим настройки

flowchart
graph LR
    A["MENU SET"] --> B["Screen with Display Icon"]
    B --> C["Next Step"]
    C --> D["Next Step with Display Icon"]
    style A fill:#f9f,stroke:#333
    style D fill:#bbf,stroke:#333
natural_image
Generic smartphone home screen with status bar and timestamp (no readable text or symbols)text_image
Two smartphone screenshots showing a video call interface with camera and video icons, connected by dotted lines to a control panel.Laserliner
natural_image
Blank grayscale image with no visible text, symbols, or discernible features| 1x ВЫКЛ. | |
| 2x Светодиод уровень 1 | |
| 3x | Светодиод уровень 2 |
| 4x Светодиод уровень 3 | |
| 5x Светодиод уровень 4 | |
| 6x | Светодиод уровень 5 |
| 7x Светодиод уровень 6 | |
| 8x | Светодиод уровень 7 |
natural_image
Technical line drawing of a Laser/Port device with no visible text or symbols on the body or side
natural_image
Generic video player interface with two icons: a photo and a play button, displayed within a browser window (no readable text or symbols)natural_image
Technical line drawing of a LaserFlow device with labeled component (no readable text or symbols)
natural_image
Close-up of hands using a medical endoscope to adjust the internal components (no visible text or symbols)Замена аккумулятора
natural_image
Diagram of a device's front panel with rotating buttons and adjustment knobs (no text or symbols)
text_image
Technical diagram showing a mechanical component with labeled parts and directional arrows indicating motion or rotation.
text_image
Technical diagram of a handheld device with labeled components and directional arrows indicating assembly or installation steps.text_image
Micro-USBtext_image
V 11:18:16 00:01 00:03 Wm Дата зйомки
n Час запису
o 3yM +
p 3yM -
text_image
- F - G - H - I 2019-01-07 12:17:09A 3yM
В Часова позначка (дата і час)
С Формат знімків
D Поворот
text_image
Latimer H20A SET 2 sectext_image
Diagram of a medical device with labeled control panel and indicator hand pointing to a buttonnatural_image
Generic smartphone home screen with status bar and date (no readable text or symbols)Записи фото/відео
natural_image
Grayscale image of a mobile phone interface with no visible text, numbers, or symbols on the device itself.
natural_image
Technical line drawing of a mechanical device with no visible text or symbols
text_image
Зберегти фото... 2019-01-07 12:17:00 2019natural_image
Generic video player interface with two icons: a photo and a play button, displayed within a browser window (no readable text or symbols)natural_image
Technical line drawing of a mechanical device with labeled parts (no readable text or symbols)
natural_image
Close-up of hands using a medical endoscope to apply a tool, no visible text or symbolsnatural_image
Diagram of a device's top view showing rotating components and directional arrows (no text or symbols)
text_image
Technical diagram of a mechanical component with labeled parts and directional arrows indicating motion or force vectors.
text_image
Technical diagram of a handheld device with labeled components and directional arrows indicating assembly or installation.https://packd.li/ll/aih/in
!
text_image
Micro-USBtext_image
11:18:10 00:01 00:03 V Wtext_image
-A -B -C -D -E 2019-01-07 12:17:09
text_image
-F -G -H -I 2019-01-07 12:17:09text_image
Latimer 2 secnatural_image
Illustration of a medical device with a screen and control panel, no visible text or symbols4 Režim nastavení

flowchart
graph LR
    A["MENU SET"] --> B["Arrow pointing to a device panel with icons for camera, document, phone, and navigation"]
    B --> C["Next step: Camera icon with '26' label and number 1 in the right panel"]
natural_image
Blank grayscale image with no visible text, symbols, or discernible featurestext_image
Two smartphone screenshots showing a camera icon and video call with timestamps, connected by dotted lines to UI controls.c. Osvětlení LED

natural_image
Grayscale image of a mobile phone interface with no visible text, numbers, or symbols on the screen.
natural_image
Generic smartphone home screen with date and time settings (no readable text or symbols)
natural_image
Technical line drawing of a LaserJet air purifier device with no visible text or symbols
natural_image
Technical line drawing of a device with labeled parts (no readable text or symbols)
natural_image
Close-up of hands using a medical endoscope to adjust the internal components (no visible text or symbols)Výměna akumulátoru
natural_image
Diagram of a device with rotating buttons and a dial, showing no text or symbols
text_image
Technical diagram showing a mechanical component with labeled parts and directional arrows indicating motion or force vectors.
text_image
Technical diagram of a handheld device with labeled components and directional arrows indicating assembly or installation steps.https://packd.li/ll/aih/in
!
text_image
Micro-USBtext_image
11:18:16 00:01:00:03 V Wm Ülesvõtmiskuupäev
n Salvestusaeg
o Suumimine +
p Suumimine -
text_image
-A -B -C -D -E 2019-01-07 12:17:09
text_image
-F -G -H -I 2019-01-07 12:17:09A Suumimine
text_image
LRaser MODEL SET 2 sec3 Micro-SD-kaardi sisestamine
natural_image
Illustration of a medical device with a screen and connector, no visible text or symbols4 Seadistusrežiim

flowchart
graph LR
    A["MENU SET"] --> B["Next Step"]
    B --> C["Next Step"]
natural_image
Generic smartphone home screen with status bar and date (no readable text or symbols)natural_image
Generic smartphone home screen with status bar and date (no readable text or symbols)
| 1x VÄLJA | ||
| 2x | LEDi tase 1 | |
| 3x | LEDi tase 2 | |
| 4x | LEDi tase 3 | |
| 5x | LEDi tase 4 | |
| 6x | LEDi tase 5 | |
| 7x | LEDi tase 6 | |
| 8x | LEDi tase 7 | |
natural_image
Technical line drawing of a LaserPoint device with no visible text or symbols on the body or background
text_image
Foto salvestamine... x1.0 2019-01-07 12:17:09 20196 Esitusrežiim
text_image
2019-01-07 12:12:09 2019Pilt- ja videosalvestiste esitamine
natural_image
Technical line drawing of a laser pump device with labeled components (no readable text or symbols)
natural_image
Close-up of hands using a medical endoscope to apply a tool, no visible text or symbolsAkude vahetamine
natural_image
Diagram of a device with rotating buttons and a dial, showing no text or symbols
text_image
Technical diagram showing a mechanical component with labeled parts and directional arrows indicating motion or force vectors.
text_image
Technical diagram of a handheld device with labeled components and warning labels in Chinesehttps://packd.li/ll/aih/in
!
text_image
Micro-USBf Introducere Card SD
g Stare baterie
h Zoom
i Data actuală
j Ora actuală
text_image
11:18:10 00:01 00:03 V Wtext_image
-A -B -C -D -E 2019-01-07 12:17:09
text_image
-F -G -H -I 2019-01-07 12:17:09A Zoom
text_image
Latimer 2 sec3 Inserare card MicroSD
Pentru a insera cardul MicroSD, deschideti capacul de cauciuc si inserati cardul dupa cum este ilustrat. Nu puteti efectua inregistrari fara un mediu de stocare.
text_image
Diagram of a medical device with labeled ports and a control panel, showing a device's internal components.4 Modul de setare

flowchart
graph LR
    A["MENU SET"] --> B["Device Icon 1"]
    A --> C["Device Icon 2"]
    B --> D["Camera Icon 3"]
    C --> E["Document Icon 4"]
    D --> F["Phone Icon 5"]
    E --> G["Phone Icon 6"]
text_image
MENU SET Zoom imagine x1.0Zoom treapta 1 ... treapta 10
text_image
Two grayscale images showing a camera icon and a video call with a play button, both connected by dotted lines to UI elements.c. Iluminare cu led

natural_image
Generic smartphone home screen with status bar and date (no readable text or symbols)
| 1x OPRIT | ||
| 2x | LED treapta 1 | |
| 3x | LED treapta 2 | |
| 4x | LED treapta 3 | |
| 5x | LED treapta 4 | |
| 6x | LED treapta 5 | |
| 7x | LED treapta 6 | |
| 8x | LED treapta 7 | |
d. Zoom (vezi capitolul 3 a.)

text_image
Zoom imaginee. Rotire

natural_image
Generic smartphone home screen with date and time settings (no readable text or symbols)
natural_image
Technical line drawing of a LaserPoint device with no visible text or symbols on the body or background
text_image
Memorare poză ... x1.0 2019-01-07 12:17:00:20196 Modul de redare
text_image
x1.0 2019-01-07 12:17:09:2019natural_image
Technical line drawing of a device with labeled components (no readable text or symbols)
natural_image
Close-up of hands using a medical endoscope to adjust the device (no visible text or symbols)natural_image
Diagram of a device with rotating buttons and a central display (no text or symbols)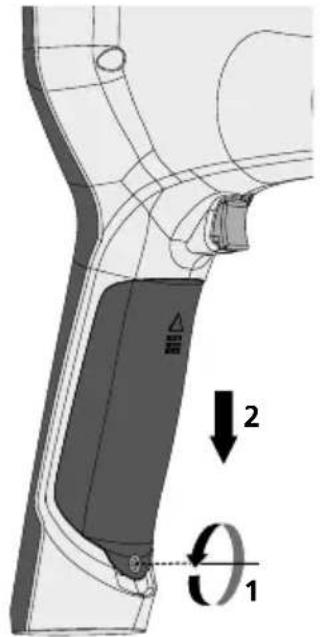
text_image
Technical diagram showing a mechanical component with labeled parts and directional arrows indicating motion or force vectors.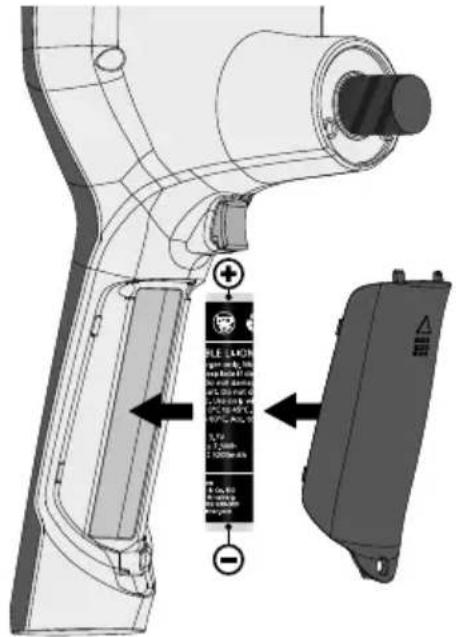
text_image
Technical diagram of a handheld device with labeled components and directional arrows indicating assembly or installation steps.https://packd.li/ll/aih/in
!
text_image
Micro-USBtext_image
11:18:16 00:01 00:03 V Wm Дата на заснемане
text_image
-A -B -C -D -E 2019-01-07 12:17:09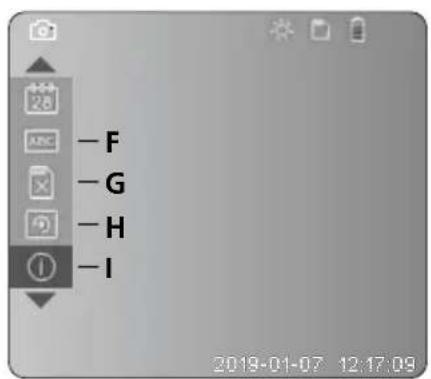
text_image
-F -G -H -I 2019-01-07 12:17:09A Промяна на мащаба
text_image
Latimer H20A SET 2 sectext_image
Diagram of a medical device with labeled ports and a control panel, showing a dial indicator.4 Режим настройка

flowchart
graph LR
    A["MENU SET"] --> B["Next Step"]
    B --> C["Next Step"]
flowchart
Mobile phone menu setup flowchart showing steps from menu set to menu set with version, CT-1.1, and system data.
natural_image
Generic smartphone home screen with status bar and timestamp (no readable text or symbols)text_image
Two smartphone screenshots showing a video call interface with camera and video icons, connected by dotted lines to a play button.Laserliner
с. LED-осветление

natural_image
Generic smartphone home screen with status bar and date (no readable text or symbols)
natural_image
Blank grayscale image with no visible content, text, or symbols
natural_image
Technical line drawing of a Laser/Port device with no visible text or symbols on the body or background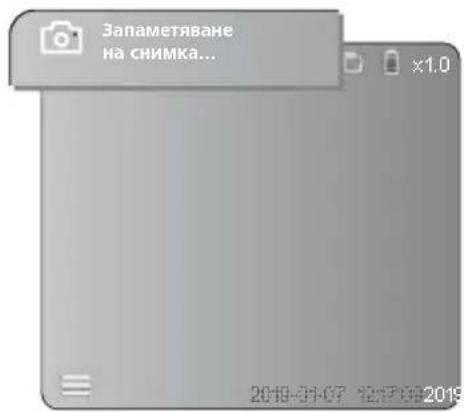
natural_image
Generic video player interface with two icons: a photo and a play button, displayed within a browser window (no readable text or symbols)natural_image
Close-up of hands using a medical endoscope to apply liquid into a device (no visible text or symbols)natural_image
Diagram of a device with rotating buttons and a dial, showing no text or symbols
text_image
Technical diagram showing a mechanical component with labeled parts and directional arrows indicating motion or force vectors.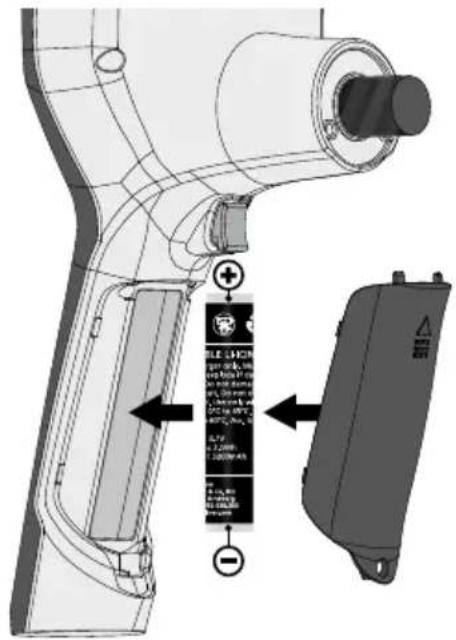
text_image
Technical diagram of a handheld device with labeled components and directional arrows indicating assembly or installation steps.https://packd.li/ll/aih/in
!
text_image
Micro-USBtext_image
V W 11:18:16 00:01 00:03Λειτουργία ρύθμισης
text_image
-A -B -C -D -E 2019-01-07 12:17:09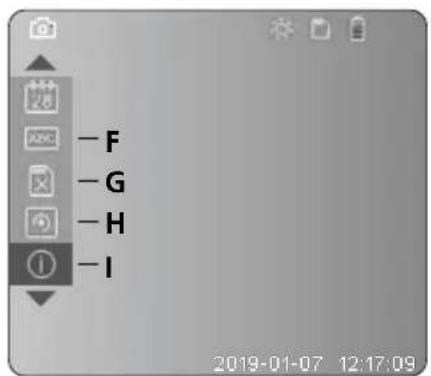
text_image
- F - G - H - I 2019-01-07 12:17:09text_image
Latimer 2 secnatural_image
Illustration of a medical device with a screen and control panel, no visible text or symbolstext_image
MENU SET Morphótopo eikóváç JPEG BMP MENU SETd. Περιστροφή
natural_image
Generic smartphone home screen with status bar and date (no readable text or symbols)text_image
Two smartphone screenshots showing camera and video interface icons with timestamps and control buttonsc. Φωτισμός LED
natural_image
Generic smartphone home screen with status bar, date, and control buttons (no readable text or symbols)natural_image
Technical line drawing of a LaserPower device with labeled component (no readable text or symbols beyond label)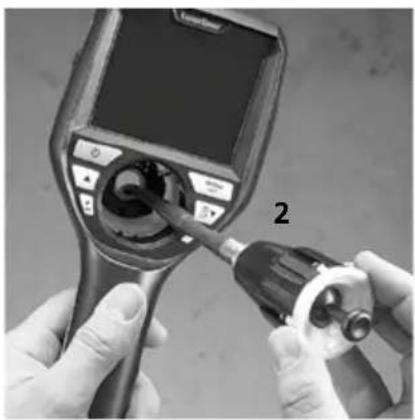
natural_image
Close-up of hands using a medical endoscope to adjust internal components (no visible text or symbols)natural_image
Diagram of a device with rotating buttons and a dial, showing no text or symbols
text_image
Technical diagram of a mechanical component with labeled parts and directional arrows indicating motion or force vectors.
text_image
Technical diagram of a handheld device with labeled components and warning labels in Chinesehttps://packd.li/ll/aih/in
natural_image
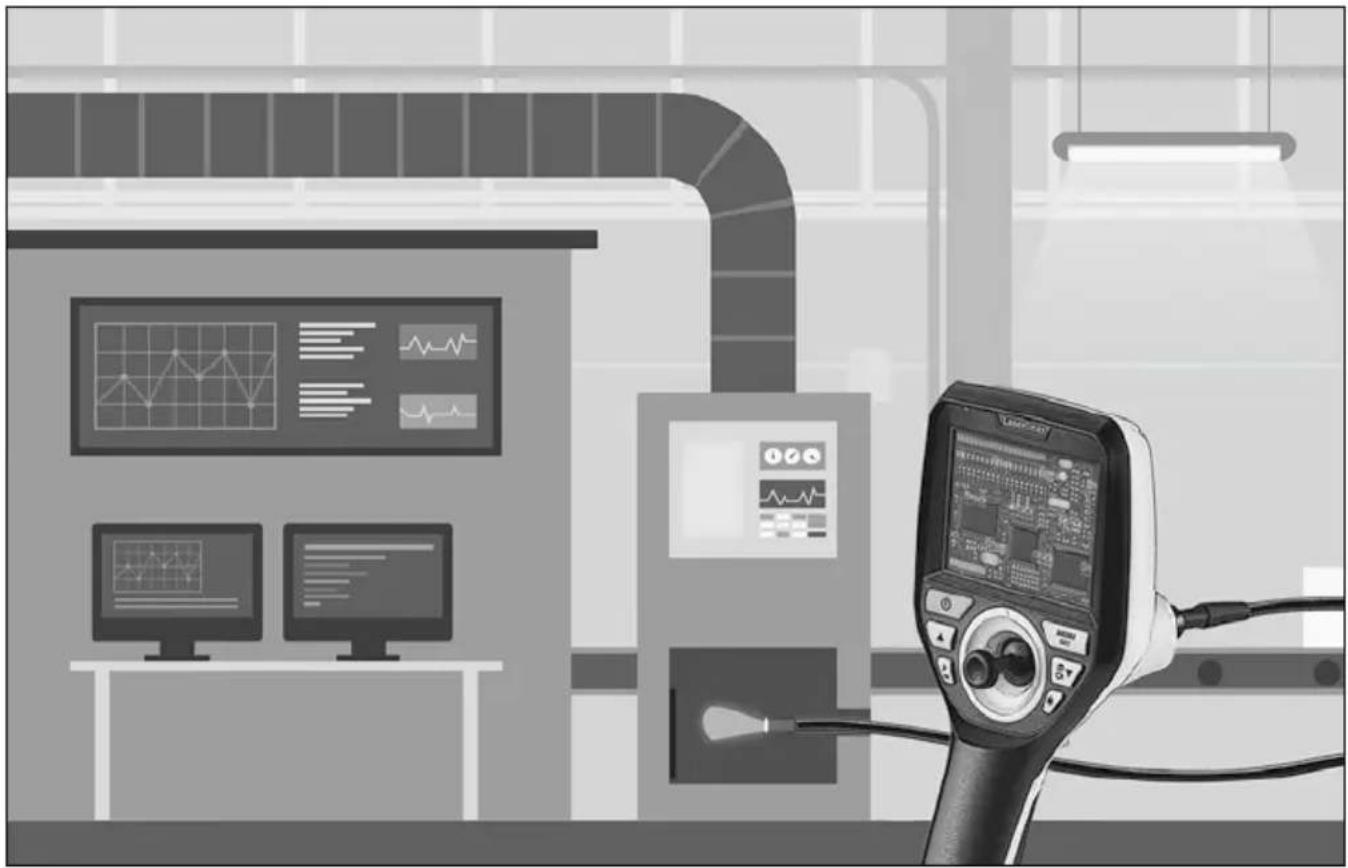
Illustration of a medical imaging device connected to a control panel with multiple monitors displaying charts and graphs (no readable text or symbols)Manuale
PAP 22
CARTA
RACCOLTA CARTA