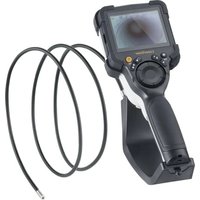
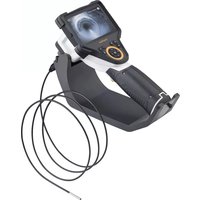
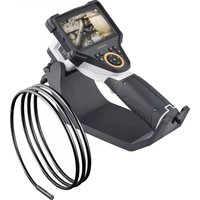
VideoPocket HD - Video camera Laserliner - Free user manual and instructions
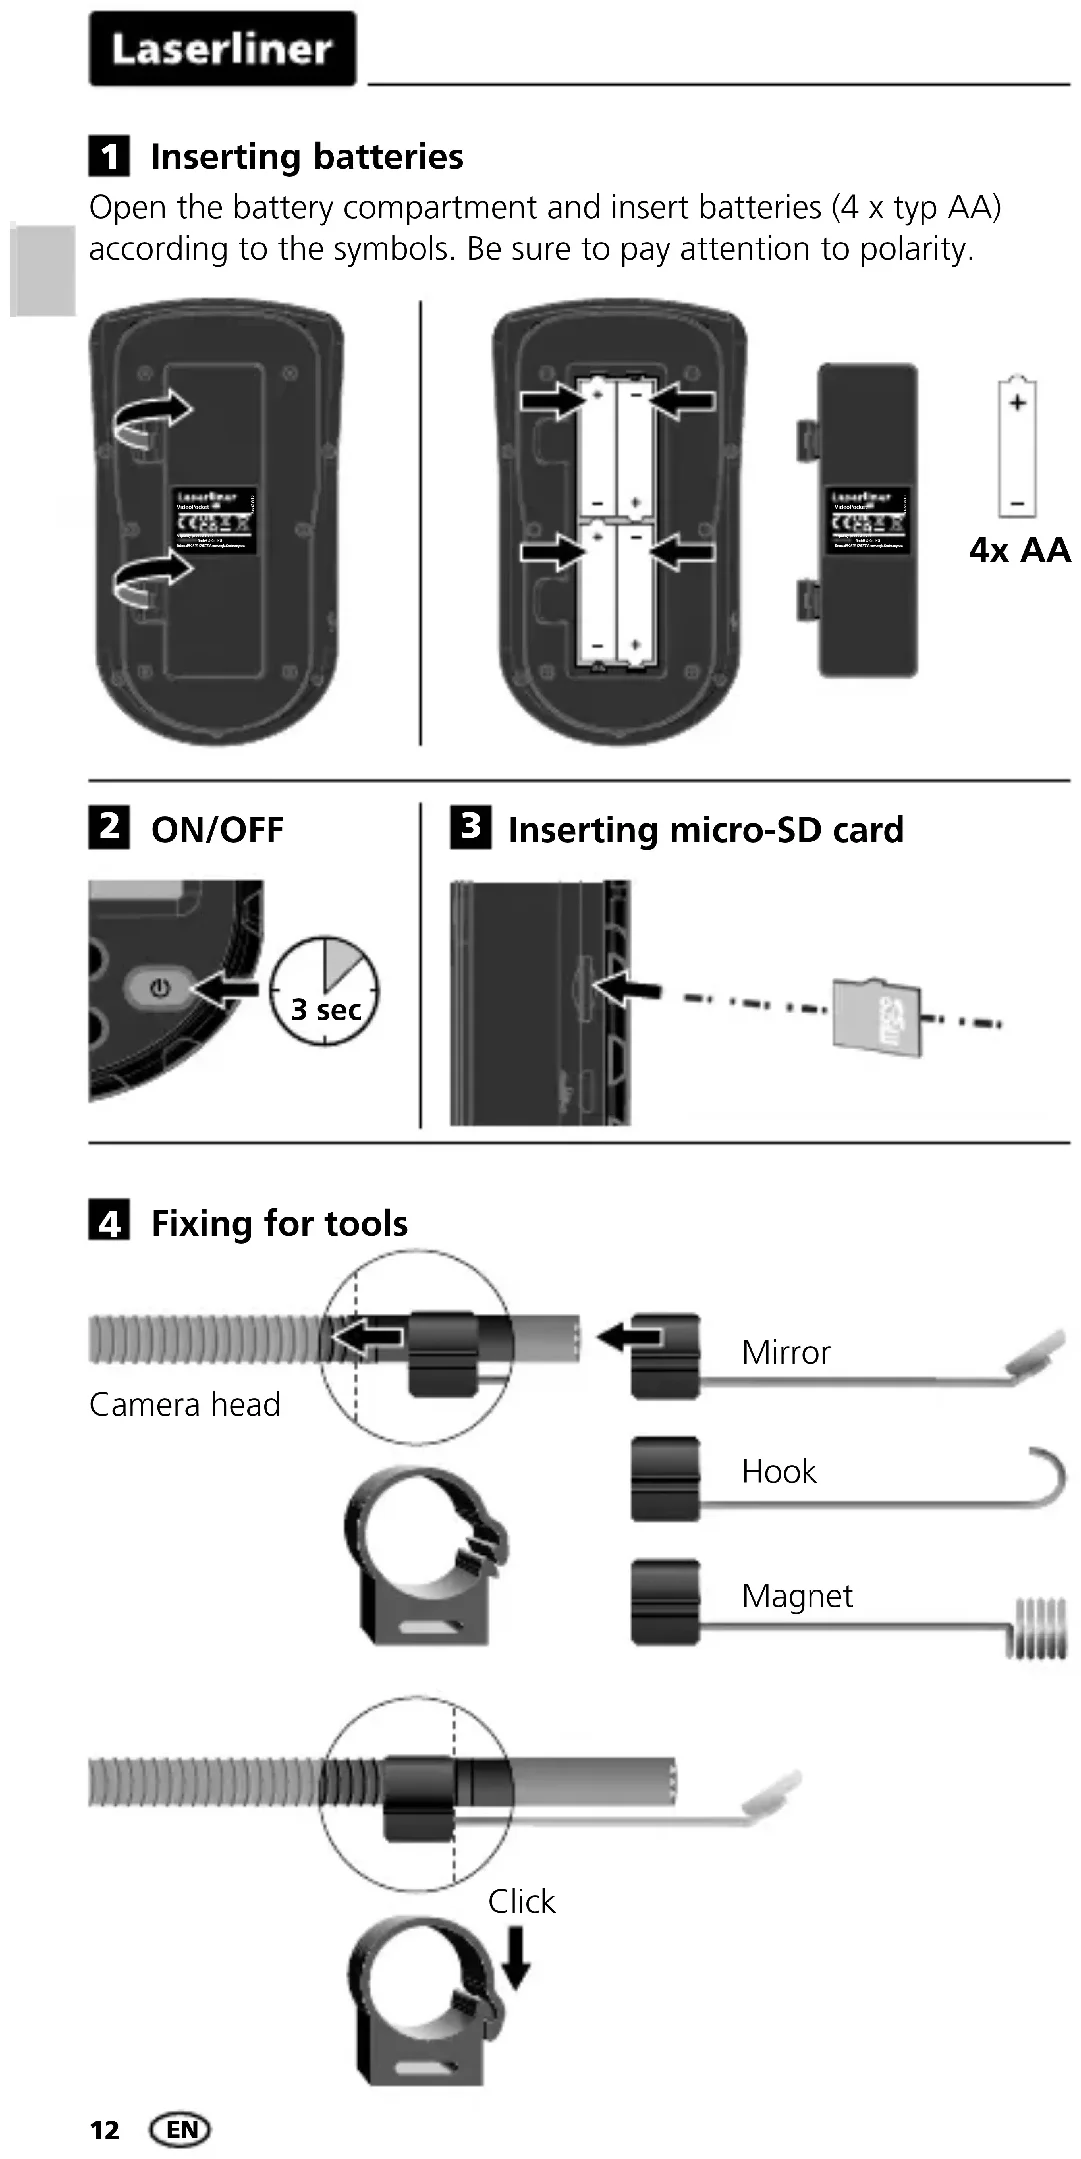
Find the device manual for free VideoPocket HD Laserliner in PDF.
| Product type | Compact high-resolution video inspection camera |
| Brand | Laserliner |
| Model | VideoPocket HD |
| Dimensions (L x H x D) | 85 x 155 x 32 mm |
| Weight (with batteries) | 370 g |
| Power supply | 4 AA 1.5 V batteries (LR6) |
| Battery life | Approximately 4 hours |
| Screen | 4.3" color TFT, resolution 480 x 272 pixels |
| Camera resolution | 1280 x 720 pixels |
| Probe length | 1 m |
| Probe diameter | 5 mm |
| Min. bending radius of probe | 30 mm |
| Field of view (FOV) | 65° |
| Depth of field (DOF) | 3 to 8 cm |
| Number of LEDs | 6 |
| Image formats | JPEG |
| Video formats | MJPG (AVI) |
| Interface | Micro-USB |
| Storage | Internal memory and micro SD card |
| Zoom | 4x digital (4 levels) |
| Special functions | Photo comparison, image rotation (mirror/180°), color/B&W switching, brightness and contrast settings |
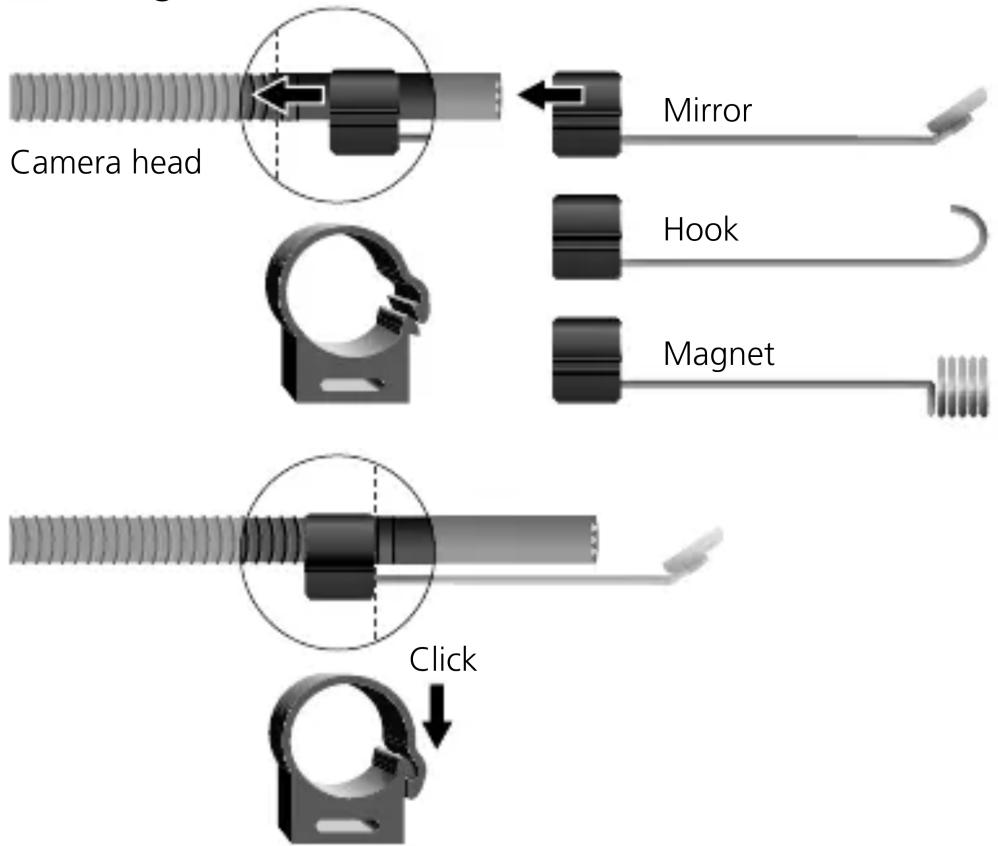
| Included accessories | Mirror, hook, magnet |
| Maintenance and cleaning | Clean with a slightly damp cloth; do not use solvents or abrasive products |
| Safety | Do not use near hazardous voltages; do not immerse the screen; keep out of reach of children |
| Working conditions | -10°C to 50°C, max. humidity 85% RH, non-condensing |
| Storage conditions | -20°C to 60°C, max. humidity 85% RH |
Frequently Asked Questions - VideoPocket HD Laserliner
User questions about VideoPocket HD Laserliner
0 question about this device. Answer the ones you know or ask your own.
Ask a new question about this device
Download the instructions for your Video camera in PDF format for free! Find your manual VideoPocket HD - Laserliner and take your electronic device back in hand. On this page are published all the documents necessary for the use of your device. VideoPocket HD by Laserliner.
USER MANUAL VideoPocket HD Laserliner
natural_image
Exterior view of a Laserliner medical device with a coiled cable and endoscopic lens (no text or symbols visible on the device body)1m
FLEXIBLE TUBE

CAMERA Ø 5.2 MM
micro
SD-CARD INCLUDED
HD
HIGH DEFINITION
Laserliner
DE
02
EN
09
NL
16
DA
23
FR
30
ES
37
IT
44
PL
FI
PT
SV
NO
TR
RU
UK
CS
ET
RO
BG
EL
HR

natural_image
Three vertical poles with black bases, one with a curved hook and the other two with a spring-like structure (no text or symbols)g Haken
h Magnet
i Spiegel
text_image
LaserLinear Wavelength (10000000000000000000000000000000000000000000000000000000000000000000000000000000000000000000000000000
text_image
4x AA2 ON/OFF
text_image
3 secnatural_image
Medical illustration showing a cross-sectional view of a tunnel with an inset close-up of a small object (no text or symbols present)text_image
CE UK CA -
Completely read through the operating instructions, the „Warranty and Additional Information“ booklet as well as the latest information under the internet link at the end of these instructions. Follow the instructions they contain. This document must be kept in a safe place and passed on together with the device.
Function / Application
This high-resolution, compact video inspection system is suitable for easy visual inspection of hard-to-reach locations such as pipework, suspended ceilings and vehicles. The compare image function allows the user to see the differences between the live image and a saved reference image. The images and videos can be saved to the internal photo memory or a micro SD card.
General safety instructions
- The device must only be used in accordance with its intended purpose and within the scope of the specifications.
- The measuring tools and accessories are not toys. Keep out of reach of children.
- The structure of the device must not be modified in any way.
- Do not expose the device to mechanical stress, extreme temperatures, moisture or significant vibration.
- The device must no longer be used if one or more of its functions fail or the battery charge is weak. ist.
- When using the device outdoors, make sure that the weather conditions are appropriate and/or that suitable protection measures are taken.
- The LCD unit must not be immersed in water. The base unit must not come in contact with liquids.
- The camera head is not acid-resistant or fireproof.
- It is absolutely vital to ensure that the VideoPocket HD does not come into contact with chemicals, voltage, moving or hot objects. This can damage the device and put its user at risk of serious injury.
- The VideoPocket HD must not be used for medical examinations/examining people.
- Please ensure compliance with the safety regulations set out by local and national authorities with regard to the correct and proper use of the device.
- The unit is not suitable for taking measurements close to dangerous voltages. Therefore always make sure that conductive parts are at zero potential when carrying out measurements in the vicinity of electrical systems. Safe isolation from the power supply and precautions to prevent systems being switched on again must be ensured by implementing suitable measures.
Safety instructions
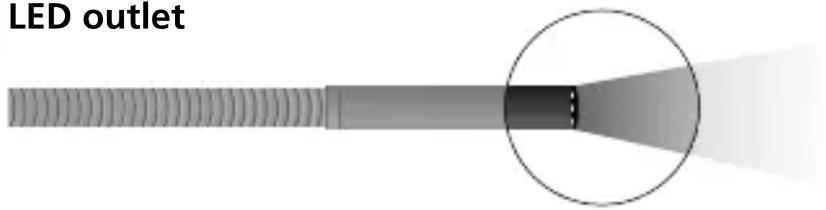
Using artificial, optical emission (OStrV)
LED outlet
text_image
LED outlet- The device works with LEDs of risk group RG 0 (exempt, no risk) in accordance with the latest versions of applicable standards relating to photobiological safety (EN 62471:2008-09ff / IEC/TR 62471:2006-07ff).
- When used for the intended purpose and under reasonably foreseeable conditions, the accessible radiation of the LEDs is safe for the human eye and skin.
Safety instructions
Dealing with electromagnetic radiation
- The measuring device complies with electromagnetic compatibility regulations and limit values in accordance with EMC-Directive 2014/30/EU.
- Local operating restrictions – for example, in hospitals, aircraft, petrol stations or in the vicinity of people with pacemakers – may apply. Electronic devices can potentially cause hazards or interference or be subject to hazards or interference.
text_image
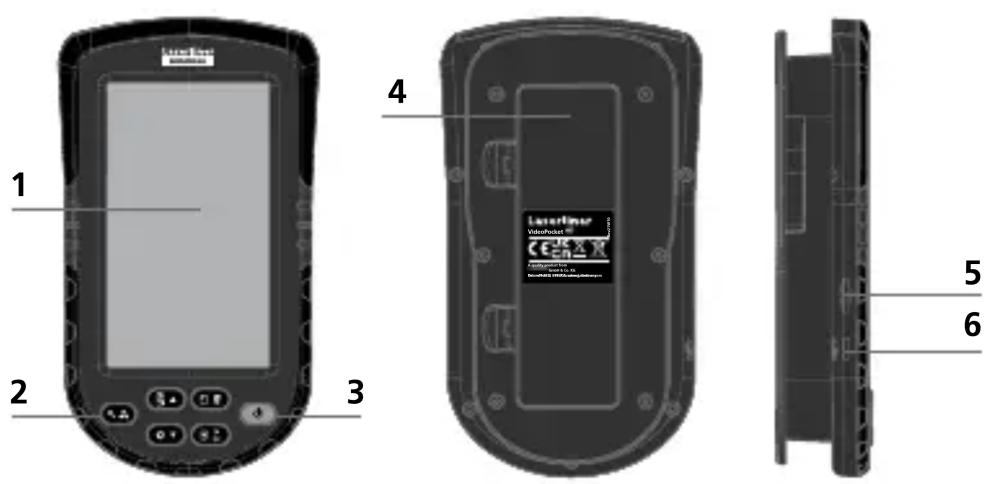
1 2 3 4 5 61 LCD 4 Battery compartment
2 Hot keys 5 Micro SD card slot
3 ON/OFF 6 Micro USB interface
text_image
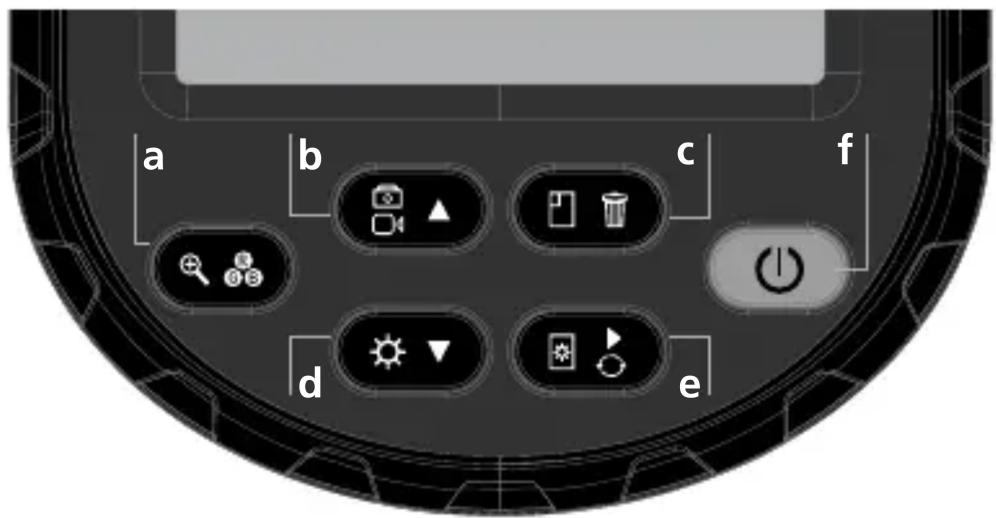
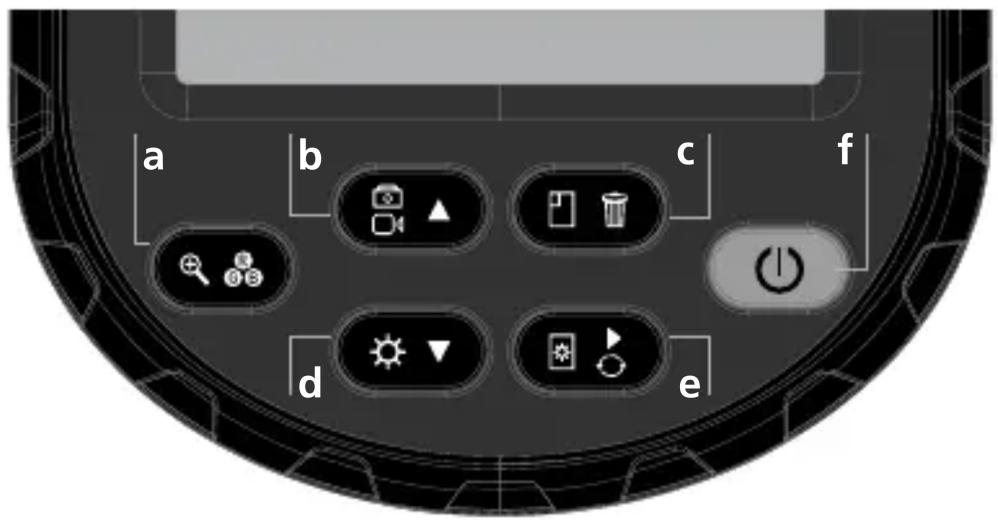
a b c f d ea 4x zoom
b Take photos and videos 'Back' menu function
c Photo and video gallery Compare image function
d Brightness adjustment 'Next' menu function
e Contrast adjustment
f ON/OFF
text_image
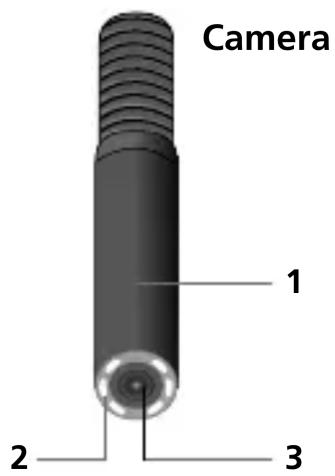
Camera 1 2 31 Camera head
2 LED
3 Lens
ToolsSym

Battery status

Brightness indicator

Contrast indicator

Zoom (4 steps)

Internal memory card full
natural_image
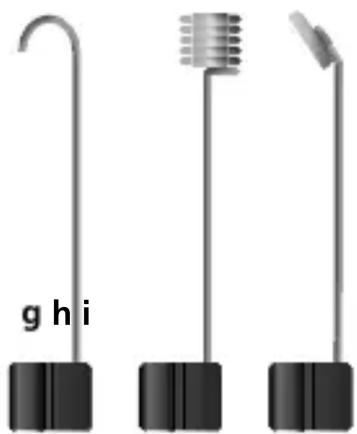
Three vertical poles with black bases, one curved and one metallic, labeled 'g hi' at the bottom (no other text or symbols)g Hook
h Magnet
i Mirror
Laserliner
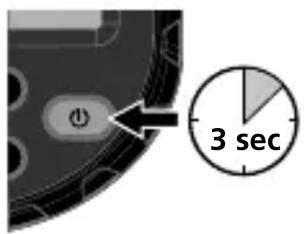
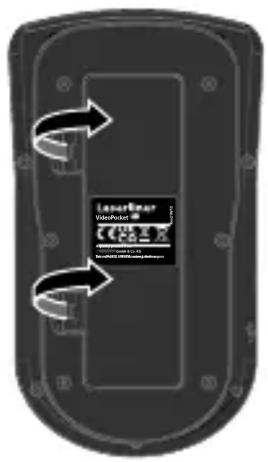
1 Inserting batteries
Open the battery compartment and insert batteries (4 x typ AA) according to the symbols. Be sure to pay attention to polarity.
text_image
LaserStar Worber © 2014-03-05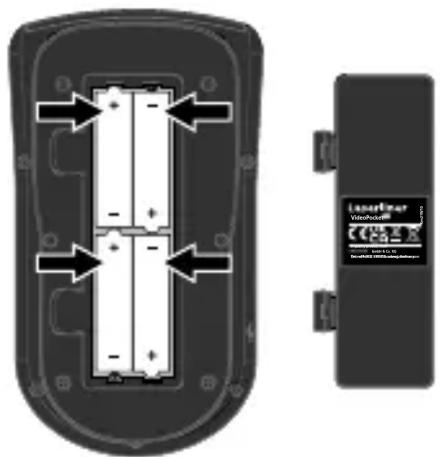
natural_image
Diagram of a device showing internal components with arrows indicating flow or movement, next to a separate labeled device (no readable text or symbols)
2 ON/OFF

text_image
3 sec3 Inserting micro-SD card

flowchart
graph TD
    A["Input"] --> B["Processing Step"]
    B --> C["Output"]
4 Fixing for tools
text_image
Camera head Mirror Hook Magnet Click5 Take photo

Press button once
6 Compare image function

- Retrieve reference image by pressing the gallery button.

- Select reference image by pressing 'next' and 'back' button.

- Confirm selected reference image (A) with the gallery button.
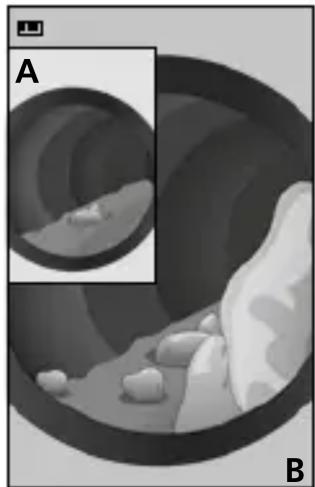
natural_image
Medical illustration showing a cross-sectional view of internal organs with an inset magnified view (no text or labels)- Selected reference image (A) appears on the display, the live view is running in the background (B) for comparison. Press the gallery button to fade out the reference image (A).

Video mode / take video

- Set video mode: hold down the photo and video button for 3 seconds. Video recording will start automatically.

- To stop the video recording, press the button again.
8 Play video recordings

- Retrieve saved videos.

- Select video with the 'next' and 'back' button. Videos are marked with a 'PLAY' symbol (▶)

- Replay video with the 'PLAY' button.
Laserliner
9 Delete image/video
- Retrieve saved media by pressing the gallery button.

- Select image/video with the 'next' and 'back' button.

- To delete, hold down the gallery button.
10 Zoom (4 steps)

Press button

Switch between colour/bw

Hold button down for 3 seconds
Brightness (10 steps)

Press button briefly
12 Contrast (10 steps)

Press button briefly
14 Image rotation
4x

1x


Hold rotation button down for 2 seconds
3x

2x
From the original image
1x = Horizontal mirroring
2x = Rotation 180°
3x = Vertical mirroring
4x=Original image
USB data transfer
Data saved on the SD card can be transferred to PC either with a suitable card reader or directly via the USB port. Please refer to the manual supplied with your card reader for information about connecting your card adapter or card reader to a PC.
Information on maintenance and care
Clean all components with a damp cloth and do not use cleaning agents, scouring agents and solvents. Remove the battery(ies) before storing for longer periods. Store the device in a clean and dry place.
| Technical data (Technical revisions reserved. Rev21W46) | |
| Display resolution 480 x 272 Pixel | |
| Camera resolution | 1280 x 720 Pixel |
| Probe length 1 m | |
| Probe diameter 5 mm | |
| Probe min. bending radius | 30 mm |
| Length camera head 35 mm | |
| Camera head diameter | ø 5.2 mm |
| Field of view (FOV) 65° | |
| Depth of focus (DOF) | 3 ... 8 cm |
| Operating time | approx. 4 hours |
| Screen type 4.3" TFT colour display | |
| Number of LED lights | 6 |
| Image format JPEG | |
| Video format | MJPG (AVI) |
| Port Micro-USB | |
| Camera probe protection class IP 67 | |
| Power supply | 4 x 1,5V LR6 (AA) |
| Operating conditions | -10°C ... 50°C, max. humidity85% rH, no condensation, max.working altitude 2000 m abovesea level |
| Storage conditions | -20°C ... 60°C, max. humidity85% rH, no condensation |
| Dimensions (W x H x D) 85 x 15 | 5 x 32 mm |
| Weight | 370 g (incl. batteries) |
EU directives and disposal
This device complies with all necessary standards for the free movement of goods within the EU.
This product is an electric device and must be collected separately for disposal according to the European Directive on waste electrical and electronic equipment.
Further safety and supplementary notices at:
https://packd.li/ll/ale/in

text_image
CE UK CA -!
natural_image
Diagram of a mechanical or optical component with a circular highlight and gradient shading (no text or symbols)text_image
4 Laserline Wesbank CEEnX CENX® 2016-03-01 19:50 © 2016-03-01 19:50 © 2016-03-01 19:50 © 2016-03-01 19:50 © 2016-03-01 19:50 © 2016-03-01 19:50 © 2016- © 2016- © 2016- © 2016- © 2016- © 2016- © 2016- © 2016- © 2016- © 2016- © 2016- © 2016- © 2016- © 2016- © 2016- © 2016- © 2016- © 2016- © 2016- © 2016- © 2016- © 2016- © 2016- © 2016- © 2016- © 2016- © 2016- © 2016- © 2016- © 2 © 2 © 2 © 2 © 2 © 2 © 2 © 2 © 2 © 2 © 2 © 2 © 2 © 2 © 2 © 2 © 2 © 2 © 2 © 2 © 2 © 2 © 2 © 2 © 2 © 2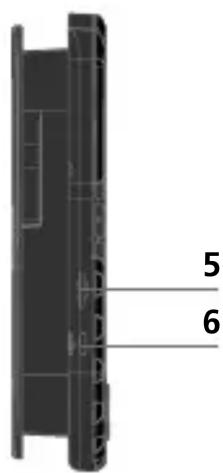
text_image
5 6text_image
Camera 1 2 31 Camerakop
2 Leds
3 Lens
Symbolen Gereedschap

Batterijstatus

natural_image
Three vertical poles with labeled positions: one with a curved hook, two with a spring-like symbol, and one with a triangular tip (no text or symbols on poles)g Haak
h Magneet
i Spiegel
1 Batterij plaatsen
natural_image
Diagram of a device rear panel with internal components and directional arrows, next to a separate labeled component (no readable text or symbols)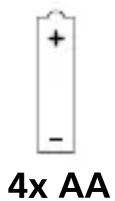
2 ON/OFF

text_image
3 secnatural_image
Medical illustration showing a cross-sectional view of internal organs with an inset magnified view (no text or labels)https://packd.li/ll/ale/in

text_image
CE UK CA —
natural_image
Three vertical poles with black bases, one curved and one upright, labeled 'g hi' (no text or symbols on poles)g Krog
h Magnet
i Spejl

Batteristatus

Lysstyrkevisning

Kontrastvisning

Zoom (4 trin)

natural_image
Diagram of a device showing internal components with arrows indicating flow or movement, next to a labeled inset (no readable text or symbols)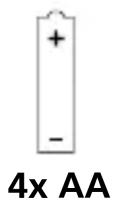
2 ON/OFF

text_image
3 secnatural_image
Medical imaging view showing a cross-sectional view of internal tissue with an inset magnified view (no text or symbols)https://packd.li/ll/ale/in

text_image
CE UK CA -
natural_image
Close-up of a metallic tool or probe with a circular highlight highlighting a section (no text or symbols visible)natural_image
Three vertical poles with labeled positions: one with a curved hook, two with a spring-like symbol, and one with a triangular tip (no text or symbols on poles)g Crochet
h Aimant
i Miroir
natural_image
Pure diagram of a mechanical or electrical component with no visible text, numbers, or symbolsnatural_image
Medical imaging scan showing a cross-sectional view of internal tissue with labeled regions A and B (no text or symbols beyond labels)text_image
CE UK CA -
natural_image
Diagram of a fiber optic cable with a highlighted section showing internal structure (no text or symbols)text_image
4 Laserline Market CEpa R 100% Power 100% Power 100% Power 100% Power 100% Power 100% Power 100% Power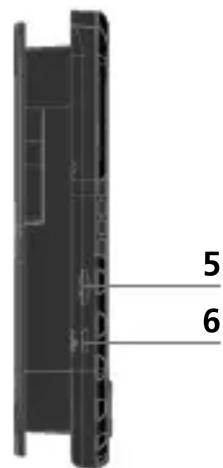
text_image
5 61 Pantalla LC 4 Compartimento de pilas
2 Botones directos 5 Ranura para tarjeta micro-SD
3 ON / OFF 6 Puerto micro-USB
text_image
a b c f d enatural_image
Three mechanical devices with hooks and a central spring, labeled 'g hi' at the bottom (no text or symbols on devices)g Gancho
h Imán
i Reflector
Laserliner
1 Poner las pilas
natural_image
Illustration of a bowl with granular substance inside, labeled A and B (no text or symbols on the main subject)https://packd.li/ll/ale/in

text_image
CE UK CA —
natural_image
Close-up of a metallic tool or probe with a circular highlight highlighting a section (no text or symbols visible)natural_image
Three vertical poles with black bases, one with a curved hook and the other two with a spring-like structure (no text or symbols)g Gancio
h Magnete
i Specchio
natural_image
Diagram of a device back panel with two curved arrows indicating rotational motion (no text or symbols)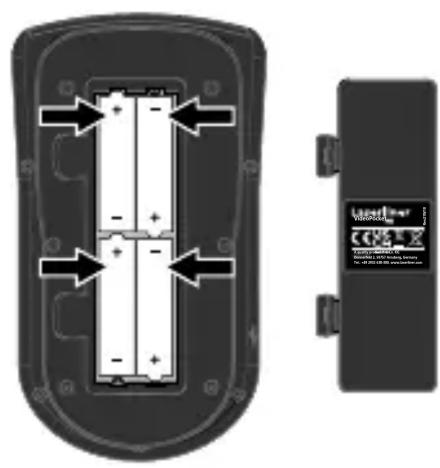
natural_image
Diagram of a battery pack and its internal structure, showing internal compartments with arrows indicating flow direction (no text or symbols present)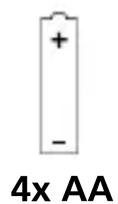
2 ON/OFF

text_image
3 secnatural_image
Medical illustration showing a cross-sectional view of internal tissue with an inset magnified view (no text or symbols)https://packd.li/ll/ale/in

text_image
CE UK CA -
natural_image
Close-up of a car engine bay with a touchscreen display and mechanical components, showing a close-up inset of the engine (no text or symbols visible)SERVICE


Umarex GmbH & Co. KG
- Laserliner -