
ASBS 1810 AS - Vacuum Cleaner Fein - Free user manual and instructions
Find the device manual for free ASBS 1810 AS Fein in PDF.
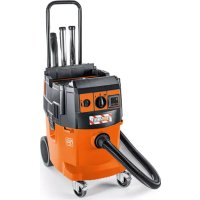
| Product type | Cordless wet and dry vacuum cleaner |
| Brand | Fein |
| Model | ASBS 1810 AS |
| Tank capacity (gross) | 10 L |
| Net capacity for liquids | 6 L |
| Weight (with battery) | 5.1 – 6.1 kg |
| Power supply | Lithium-Ion battery 18 V (recommended GBA 18V... or ProCORE18V...) |
| Nominal power consumption | 260 W |
| Max vacuum pressure | 90 hPa |
| Max flow rate | 24 L/s (86 m³/h) |
| Filtration class | L (for hazardous dusts with exposure limit > 1 mg/m³) |
| Protection rating | IPX4 |
| Runtime per battery charge | Approx. 4 min per Ah (e.g. 32 min with 8 Ah) |
| Sound level | 79 dB(A) |
| Vibrations | < 2.5 m/s² |
| Main functions | Dry vacuuming, wet vacuuming, blowing, connection to power tool |
| Filtration system | Bagless filter, washable with water |
| Automatic shut-off | Float for shut-off when max fill level is reached |
| Included accessories | Suction hose, suction adapter, angled nozzle, straight nozzle, floor nozzle, suction tube, mounting brackets, castors |
| Maintenance and cleaning | Regular cleaning of tank and filter; filter washable with water |
| Safety | Not for use with flammable/explosive dusts, asbestos; remove battery before maintenance |
| Spare parts and repairability | Original spare parts available at www.fein.com; repair by qualified professional |
| General information | Professional use on construction sites, industry and workshops; operating temperature -20 to +50 °C |
Frequently Asked Questions - ASBS 1810 AS Fein
User questions about ASBS 1810 AS Fein
0 question about this device. Answer the ones you know or ask your own.
Ask a new question about this device
Download the instructions for your Vacuum Cleaner in PDF format for free! Find your manual ASBS 1810 AS - Fein and take your electronic device back in hand. On this page are published all the documents necessary for the use of your device. ASBS 1810 AS by Fein.
USER MANUAL ASBS 1810 AS Fein
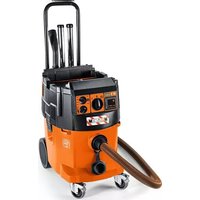
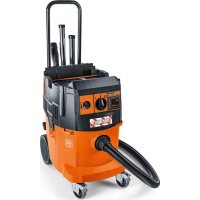
natural_image
3D rendered image of a vacuum cleaner with coiled tubing and pipe fittings (no text or symbols visible)
ASBS18-10AS [**] 9 260 ...
2
| de | 7 | no | 79 | sl | 146 | zh-CN | 214 |
| en | 15 | sv | 86 | sr | 153 | zh-TW | 219 |
| fr | 23 | fi | 93 | hr | 160 | ko | 225 |
| it | 31 | tr | 100 | ru | 167 | th | 231 |
| nl | 39 | hu | 107 | uk | 176 | ja | 238 |
| es | 47 | cs | 115 | bg | 184 | ar | 245 |
| pt | 55 | sk | 122 | et | 192 | hi | 252 |
| el | 63 | pl | 130 | lt | 199 | ||
| da | 72 | ro | 138 | lv | 206 | CE |
CE
UK CA i


6


de
Original instructions
Safety information for vacuum cleaners

Read all the safety information and instructions. Failure to observe the safety information and follow instructions may result in electric shock, fire and/or serious injury.
Save all warnings and instructions for future reference.
This vacuum cleaner is not intended for use by children or persons with physical, sensory or mental impairments. It should not be used by persons who have insufficient experience and knowledge. Otherwise, there is a risk of operating errors and injuries.
- Supervise children. This will ensure that children do not play with the vacuum cleaner. - Do not vacuum beech or oak wood dust of asbestos. Only vacuum rock dust in conjunction with dust extraction systems, which have been explicitly approved for use with ASBS18-10AS by FEIN. These substances are classified as carcinogenic.
WARNING
Only use the vacuum cleaner if you have been adequately informed about the use of the equipment, the substances to be vacuumed and how to dispose of these safely. Thorough instruction on how to use the equipment prevents accidental misuse and injuries.
WARNING
The vacuum cleaner is suitable for vacuuming dry substances, and can also be used to vacuum liquids when taking appropriate measures. The penetration of liquids increases the risk of an electric shock.
▶ Do not use the vacuum cleaner to vacuum combustible or explosive liquids, such as petrol, oil, alcohol or solvents. Do not vacuum hot, burning or explosive dust. Do not operate the vacuum cleaner in areas
subject to explosion hazards. Dust, vapours and liquids can ignite or explode.
WARNING If you notice a foam or water leak, switch off the vacuum cleaner immediately and empty the container. Otherwise, the vacuum cleaner can become damaged.
NOTE: The vacuum cleaner must only be stored indoors.
NOTE: Clean the float regularly and check whether it is damaged. Otherwise, the equipment may not function properly.
▶ Ensure that the workplace is well ventilated.
The vacuum cleaner should be repaired exclusively by a qualified professional using only genuine spare parts. This will ensure that the safety of the vacuum cleaner is maintained.
WARNING The dust extractor contains dust particles that pose a risk to health. Emptying and maintenance procedures, including the disposal of dust containers, should only be carried out by professionals. Suitable protective equipment is required. Do not operate the vacuum cleaner unless the complete filter system is correctly inserted. Otherwise, you are putting your health at risk.
Before using the equipment for the first time, check that the vacuum hose is in perfect condition. Leave the vacuum hose fitted to the vacuum cleaner while doing this so that no dust escapes accidentally. Otherwise, you may end up inhaling dust particles.
▶ Do not clean the vacuum cleaner by spraying a jet of water directly at it. Water entering the top of the vacuum cleaner will increase the risk of electric shock.
▶ Do not open the battery. There is a risk of short-circuiting.
In case of damage and improper use of the battery, vapours may be emitted. The battery can set alight or explode. Ensure the area is well ventilated and seek medical attention should you experience any adverse effects. The vapours may irritate the respiratory system.
If used incorrectly or if the battery is damaged, flammable liquid may be ejected from the battery. Contact with this liquid should be avoided. If contact accidentally occurs, rinse off with water. If the liquid comes into contact with your eyes, seek additional medical attention. Liquid ejected from the battery may cause irritation or burns.
The battery can be damaged by pointed objects such as nails or screwdrivers or by
force applied externally. An internal short circuit may occur, causing the battery to burn, smoke, explode or overheat.
When the battery is not in use, keep it away from paper clips, coins, keys, nails, screws or other small metal objects that could make a connection from one terminal to another. A short circuit between the battery terminals may cause burns or a fire.
▶ Only use the AMPShare battery in the manufacturer's products or those of the AMPShare partners. This is the only way in which you can protect the battery against dangerous overload.
▶ Only charge the batteries using chargers recommended by the manufacturer. A charger that is suitable for one type of battery may pose a fire risk when used with a different battery.

Protect the battery against heat, e.g. against continuous intense sunlight, fire, dirt, water and moisture.
There is a risk of explosion and short-circuiting.
▶ Do not screw or nail any signs or labels onto the dust extractor. Damaged insulation offers no protection against electric shocks. Use stick-on labels instead.
Symbols
The following symbols may provide you with important information pertaining to the use of your dust extractor. Please take note of these symbols and their meaning. Knowing what these symbols mean will help you to use your extractor more effectively and more safely.
Symbols and their meaning

WARNING! Read all the safety and general instructions. Failure to observe the safety and general instructions may result in electric shock, fire and/or serious injury.

WARNING! The dust extractor contains dust particles that pose a risk to health. Emptying and maintenance procedures, including the disposal of dust containers, should only be carried out by professionals. Suitable protective equipment is required. Do not operate the dust extractor unless the complete filter system is correctly inserted. Otherwise, you are putting your health at risk.
Symbols and their meaning

Dust extractor from dust class L in accordance with IEC/EN 60335-2-69 for the dry extraction of harmful dusts with an exposure limit of >1 mg/m ^3
Product Description and Specifications
Please observe the illustrations at the beginning of this operating manual.
Intended Use
The dust extractor is intended for collecting, vacuuming, conveying and separating non-flammable dry dusts, non-flammable liquids and a water-air mixture. The dust extraction capability of the dust extractor has been tested and corresponds to dust class L. It is suitable for the increased demands in professional use, e.g. in trade, industry and workshops.
Dust extractors from dust class L in accordance with IEC/EN 60335-2-69 may only be used to vacuum and extract harmful dust with an exposure limit of >1 mg/m ^3 .
Only use the dust extractor if you can fully evaluate all functions and carry them out without restrictions, or if you have received corresponding instructions.
The bagless filter system removes the need to use dust bags. Dirt is collected on the inside wall of the container.
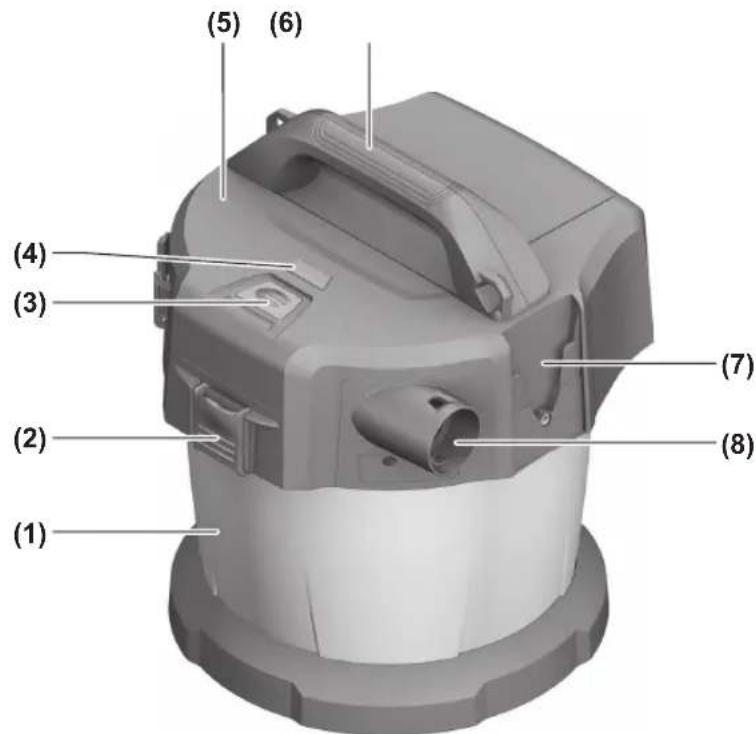
Product Features
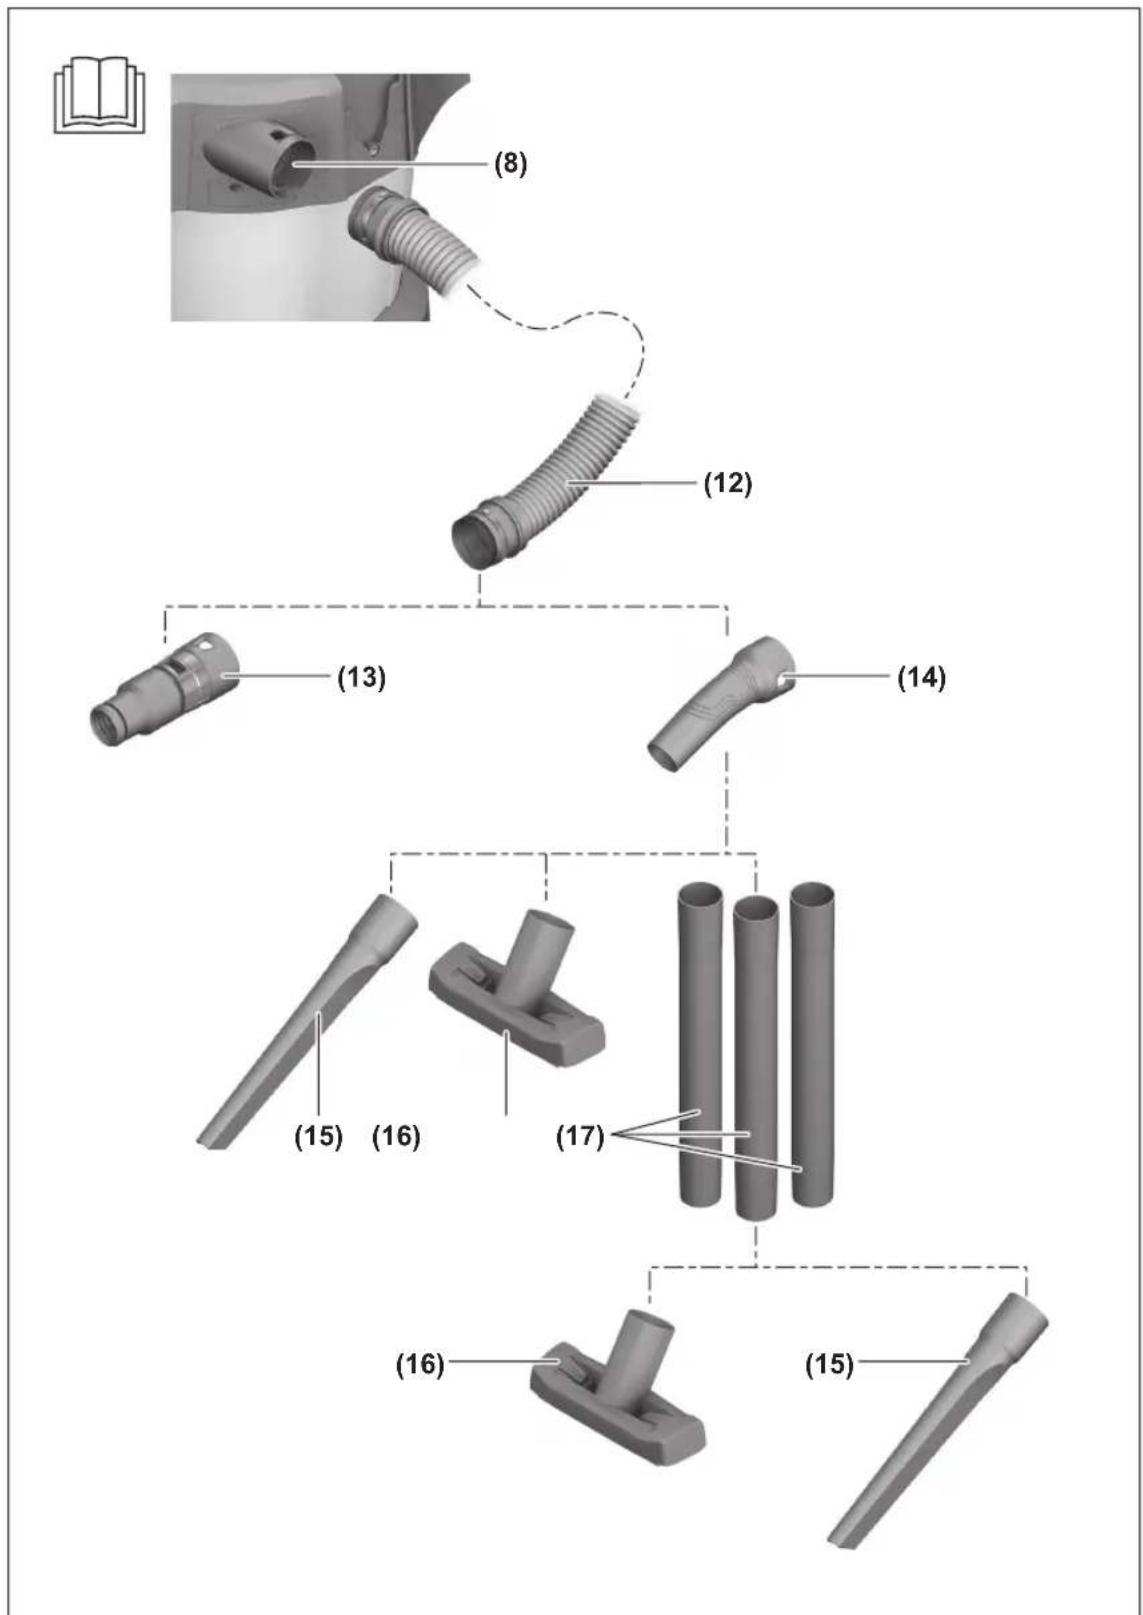
The numbering of the product features refers to the representation of the vacuum cleaner on the graphic pages.
(1) Container
(2) Catch for top part of dust extractor
(3) On/off button
(4) Battery charge indicator
(5) Top part of dust extractor
(6) Carrying handle
(7) Adapter for vacuum hose/floor nozzle bracket
(8) Hose adapter
(9) Adapter for suction tube/crevice nozzle bracket
(10) Battery compartment cover release button
(11) Battery compartment cover
(12) Vacuum hose
(13) Dust extraction adapter
(14) Curved nozzle
en
(15) Crevice nozzle
(16) Floor nozzle
(17) Suction tube
(18) Battery bay
(19) Rechargeable battery ^a)
(20) Rechargeable battery release button ^a
(21) Bracket for suction tube and crevice nozzle
(22) Fixing bolt for bracket (23)
(23) Bracket for vacuum hose and floor nozzle
(24) Snap fastener
(25) Castor
(26) Castor adapter
(27) False air intake
(28) Filter
(29) Float
(30) Filter holder
(31) Retaining strap of the vacuum hose
a) Accessories shown or described are not included with the product as standard. You can find the complete selection of accessories in our accessories range.
Technical data
Cordless wet/dry dust extractor ASBS18-10AS
| Article number 9 260 ... | |
| Voltage V 18 | |
| Rated power input W 260 | |
| Protection class IPX4 | |
| Container volume (gross) l 10 | |
| Net volume (liquid) l 6 | |
| Max. vacuum ^A) | |
| – Dust extractor ^B) | hPa 90 |
| – Turbine hPa 115 | |
| Max. flow rate ^A) | |
| – Dust extractor ^B) | l/s 24m3/h 86 |
| – Turbine | l/s 34m3/h 122 |
| Dust class | L |
| Weight according to EPTA-Procedure 01:2014 | kg 5.1–6.1 ^C) |
| Recommended ambient temperature during charging | °C 0 to +35 |
| Permitted ambient temperature during operation ^D) and during storage | °C –20 to +50 |
| Recommended rechargeable batteries(2–8 Ah) | GBA 18V...ProCORE18V... |
| Recommended chargers GAL 18... | |
| Operating time per battery charge | min/Ah 4 |
A) Measured at 20–25 °C with rechargeable battery GBA 18V 8.0Ah.
B) measured with vacuum hose (12) and curved nozzle (14)
C) Depends on battery in use
D) Limited performance at temperatures < 0 °C
Noise/Vibration Information
Noise emission values determined according to EN 60335-2-69.
Typically the A-weighted sound pressure level of the dust extractor is 79 dB(A). Uncertainty K = 2 dB. The noise level when working can exceed the volume stated. Wear hearing protection!
Vibration total values a_h (triax vector sum) and uncertainty K determined according to
EN 60335-2-69:
$$ a _ {h} < 2. 5 \mathrm{m} / \mathrm{s} ^ {2}, K = 1. 5 \mathrm{m} / \mathrm{s} ^ {2}. $$
Assembly
▶ Remove the battery before cleaning or performing maintenance on the dust extractor, making tool adjustments, changing accessories or placing the dust extractor in
storage. This safety measure prevents the dust extractor from being started accidentally.
Charging the Battery
▶ Use only the chargers listed in the technical data. Only these chargers are matched to the lithium-ion battery of your dust extractor.
Note: Lithium-ion rechargeable batteries are supplied partially charged according to international transport regulations. To ensure full rechargeable battery capacity, fully charge the rechargeable battery before using your tool for the first time.
▶ Do not continue to press the on/off button after the dust extractor has automatically switched itself off. This can damage the battery.
A significantly reduced operating time after charging indicates that the battery has deteriorated and must be replaced.
Follow the instructions on correct disposal.
Battery Charge Indicator
When the rechargeable battery is inserted, you can see the state of charge of the battery on the battery charge indicator (4) on the dust extractor. When the rechargeable battery is removed, you can see this on the battery itself.
Battery Charge Indicator on the Dust Extractor
After the dust extractor is switched on, the five green LEDs of the battery charge indicator (4) will light up individually one after another in ascending and descending order. Then the LEDs will indicate the state of charge of the battery (19).
Battery Charge Indicator on the Rechargeable Battery
If the rechargeable battery is removed from dust extractor, its state of charge may be indicated by the green LEDs of the battery charge indicator on the battery.
Press the button for the battery charge indicator
or to show the state of charge.
If no LED lights up after pressing the button for the battery charge indicator, then the battery is defective and must be replaced.
Battery model GBA 18V...

| LEDs Capacity | |
| 3× continuous green light 60 | -100 % |
| 2× continuous green light 30 | -60 % |
| 1× continuous green light 5 | -30 % |
| 1× flashing green light 0–5 % |
Battery model ProCORE18V...

| LEDs Capacity | |
| 5x continuous green light 80 | -100 % |
| 4x continuous green light 60 | -80 % |
| 3x continuous green light 40 | -60 % |
| 2x continuous green light 20 | -40 % |
| 1x continuous green light 5 | -20 % |
| 1x flashing green light 0 | -5 % |
Inserting and Removing the Battery (see figures A1–A2)
▶ Do not use force to insert the battery. The battery is designed in such a way that it can only be inserted into the product when it is in the right position.
- Keep the battery compartment and the battery bay clean and dry at all times to ensure good, safe operation.
- Press the release button (10) to open the battery compartment cover (11).
- Slide the battery (19) into the battery bay (18) until it audibly clicks into place.
- To remove the battery (19), press the release button (20) on the battery and pull it out of the battery bay (18).
- Close the battery compartment cover (11).
Fitting the Brackets for Extractor Accessories (see figure B)
- Slide the bracket (21) for the suction tube and crevice nozzle firmly into the adapter (9) provided for it from above until it clicks into place.
- Slide the bracket (23) for the vacuum hose and floor nozzle firmly into the adapter (7) provided for it from above and tighten the fixing bolts (22).
Fitting the vacuum hose (see figure C)
- Insert the vacuum hose (12) into the hose adapter (8) until both snap fasteners (24) of the vacuum hose click into place.
Note: The friction generated by the dust in the vacuum hose and accessory during extraction causes an electrostatic charge that the user may experience as static discharge (depending on environmental factors and their physiological state).
Fitting the Vacuuming Accessories
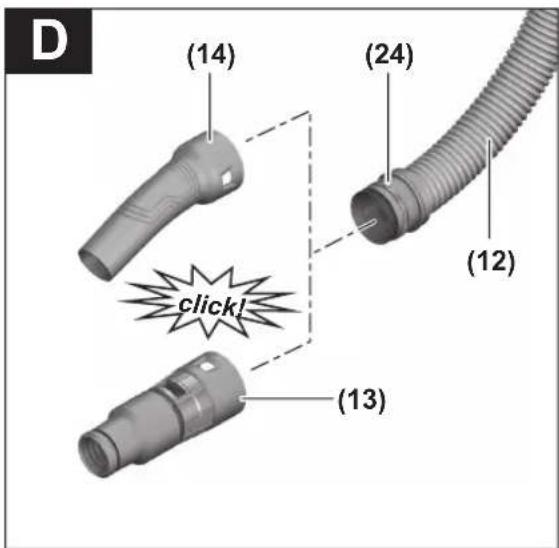
The vacuum hose (12) is equipped with a clip system which can be used to connect vacuuming accessories (dust extraction adapter (13), curved nozzle (14)).
Fitting the extraction adapter or curved nozzle (see figure D)
- Fit the extraction adapter (13) or the curved nozzle (14) to the vacuum hose (12) until the two snap fasteners (24) on the vacuum hose audibly click into place.
- To remove the adapter, press the snap fasteners (24) inwards and pull apart the components.
Fitting the Nozzles and Tubes
- If required, place the suction tubes (17) firmly inside one another and then attach them firmly to the curved nozzle (14).
- Attach the floor nozzle (16) or the crevice nozzle (15) firmly to the suction tube (17) or the curved nozzle (14).
Fitting the Rollers (see figure E)
Insert the 4 fastening pins on the rollers (25) into the roller adapters (26) until they audibly click into place.
Other rollers can also be used as per the EN 12529 standard (11 mm fastening pin diameter).
▶ Check the functionality of the roller brakes before using the dust extractor.
Operation
Remove the battery before cleaning or performing maintenance on the dust extractor, making tool adjustments, changing accessories or placing the dust extractor in storage. This safety measure prevents the dust extractor from being started accidentally.
▶ Ensure that the work area is clean and tidy to minimise the risk of tripping.
Starting Operation
▶ The dust extractor must not be used without a filter.
▶ Do not use damaged filters (e.g. no cracks, small holes, etc.). Replace any damaged filters immediately.
▶ Before extraction, ensure that the filter unit is securely fitted.
▶ Before extraction, ensure that the battery compartment cover is securely closed.
▶ Please inform yourself about the applicable regulations/laws on how to handle harmful types of dust in your country.
The dust extractor must categorically not be used in potentially explosive areas.
To ensure optimum suction power, you must always fully unwind the vacuum hose (12) from the vacuum hose bracket (23).
Switching On and Off
To switch on the dust extractor, briefly press the on/off button (3).
To switch off the dust extractor, press the on/off button (3) again.
For safety reasons, the dust extractor does not switch on if the on/off button (3) is held down for longer than five seconds.
Dry Vacuuming
Extracting dust that accumulates from working power tools (see figure F)
There must be a sufficient air exchange rate (L) in the room when the exhaust air comes back into the room. Be aware of the corresponding national regulations.
- Fit the dust extraction adapter (13) or the curved nozzle (14) (see "Fitting the extraction adapter or curved nozzle (see figure D)", page 19).
- Insert the extraction adapter (13) or the curved nozzle (14) into the power tool's dust extraction outlet.
Only when using the dust extraction adapter (13):
Note: When working with power tools that have a low air feed into the vacuum hose (e.g. jigsaws, sanders, etc.), the false air intake (27) of the dust extraction adapter (13) must be opened. This will improve the total output of the dust extractor and the power tool. To do this, turn the ring above the false air intake (27) until the opening is at its maximum size.
Wet Vacuuming
▶ Do not use the vacuum cleaner to vacuum combustible or explosive liquids, such as petrol, oil, alcohol or solvents. Do not vacuum hot, burning or explosive dust. Do not operate the vacuum cleaner in areas subject to explosion hazards. Dust, vapours and liquids can ignite or explode.
Before wet vacuuming:
- Empty the container (1).
- Clean the filter (28) and fit it back into the dust extractor (see "Cleaning/replacing filters (see figures H1–H2)", page 20).
The dust extractor is equipped with a float (29). Extraction is stopped when the maximum filling level is reached.
After wet vacuuming, always:
- Empty the container (1).
- Empty the water from the filter (28).
To prevent mould growth after wet vacuuming:
- Remove the dust extractor lid (5) and leave it to dry thoroughly.
- Remove the filter (28) and also leave this to dry thoroughly (see "Cleaning/replacing filters (see figures H1–H2)", page 20).
Maintenance and Service
Maintenance and Cleaning
Remove the battery before cleaning or performing maintenance on the dust extractor, making tool adjustments, changing accessories or placing the dust extractor in storage. This safety measure prevents the dust extractor from being started accidentally.
▶ To ensure safe and efficient operation, always keep the dust extractor and the ventilation slots clean.
For the user to carry out maintenance, the dust extractor needs to be disassembled, cleaned and maintained as far as this is possible without endangering maintenance personnel or other persons. Before disassembly, the dust extractor should be cleaned to prevent any potential hazards. The room/enclosure in which the dust extractor is disassembled should be well ventilated. Wear personal protective equipment while carrying out maintenance. After completing maintenance, the maintenance area should be cleaned. An inspection regarding the dust extraction capability must be carried out at least once a year by the manufacturer or someone who has been trained, e.g. to check for filter damage, that the dust extractor is tight and that the control unit is functioning correctly.
Class L dust extractors which were located in dirty environments should have their exteriors, as well as all their components, cleaned or treated with sealant. When performing maintenance and repair work, all dirty parts that cannot be cleaned satisfactorily must be disposed of. Such parts must be disposed of in impermeable bags in accordance with the valid provisions for disposing of such waste.
– Clean the housing of the dust extractor occasionally with a damp cloth.
– Clean dirty charging pins using a dry cloth.
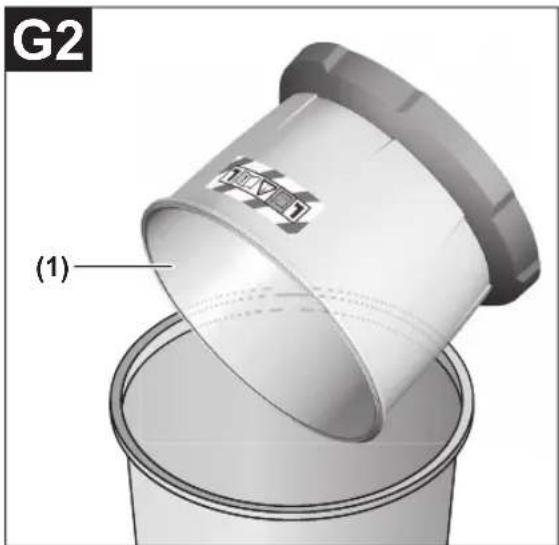
Cleaning the container (see figures G1–G2)
Clean the container (1) after each use in order to ensure that the dust extractor continues to perform optimally.
- Open the catches (2) and remove the dust extractor lid (5).
-
Shake out the container (1) over a suitable waste bin.
-
If necessary, clean the container with a damp cloth. Clean the filter if required (see "Cleaning/replacing filters (see figures H1–H2)", page 20).
- Replace the dust extractor lid (5) and close the catches (2).
Cleaning/replacing filters (see figures H1–H2)
Suction power is dependent on the condition of the filter. Therefore, the filter should be cleaned regularly.
Replace any damaged filters immediately.
- Open the catches (2) and remove the dust extractor lid (5).
- Turn the filter (28) as far as it will go in the direction of rotation band remove it from the filter bracket (30).
- If the filter is dry:
Tap the filter (28) on the side of a suitable waste bin. When doing so, ensure that you do not damage the flaps on the filter.
To achieve maximum suction power, brush down the flaps of the filter using a soft brush. or
If the filter is wet:
Rinse the filter (28) under running water and then leave it to dry thoroughly. or
Replace the filter (28) if it is damaged. - Position the filter (28) over the filter bracket (30) and turn it as far as it will go in the direction of rotation
- Replace the dust extractor lid (5) and close the catches (2).
Make sure that the catches engage firmly.
Faults
If the suction power is insufficient, check:
– Is the container (1) full?
▷(see "Cleaning the container (see figures G1–G2)", page 20).
- Is the filter (28) clogged with dust?
▷(see "Cleaning/replacing filters (see figures H1–H2)", page 20).
- Is the battery capacity too weak?
▷(see "Charging the battery", page 18).
Regularly emptying the container (1) and cleaning the filter (28) will ensure optimum suction power.
If suction power is not achieved after that, the dust extractor should be sent to the after-sales service.
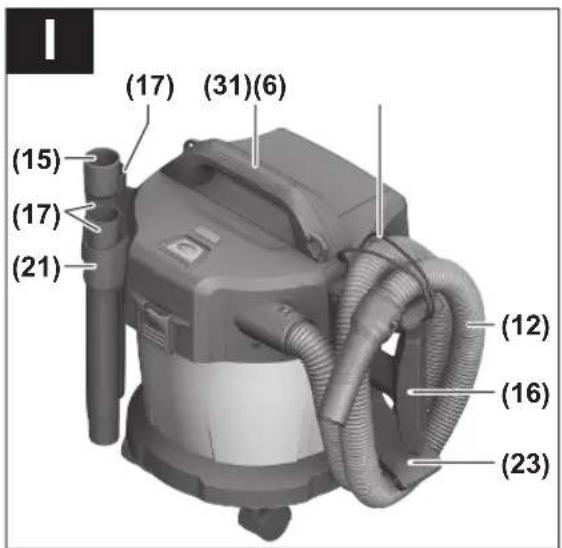
Storage (see figure I)
- Insert the suction tubes (17) into the brackets (21).
-
Insert the crevice nozzle (15) into a suction tube (17).
-
Insert the floor nozzle (16) into the bracket (23).
- Wind the vacuum hose (12) around the bracket (23) from below and fasten the retaining strap (31).
- Only ever carry the dust extractor by the carrying handle (6) or by the carrying strap (if present).
- Store the dust extractor in a dry room and secure it so that it cannot be used by unauthorised persons.
Range of accessories
Only use original FEIN accessories. The accessories must be intended for the power tool type.
Maintenance and After-Sales Service
Please note that power tools must only be repaired, serviced and tested by qualified electricians. Improper repairs can pose considerable hazards to the user.
When working metals in extreme conditions, conductive dust can settle in the interior of the power tool. Regularly blow out the interior of the power tool through the ventilation openings with dry and oil-free compressed air.
When processing gypsum-containing materials, dust can settle in the interior of the power tool and on the switching element and may harden due to the humidity. This may impair the switching mechanism. Regularly blow out the interior of the power tool through the ventilation openings and switching element with dry and oil-free compressed air.
Products that have come into contact with asbestos must not be brought for repair. Dispose of products contaminated with asbestos according to the regulations for disposing of waste containing asbestos that apply in the country of use. If FEIN power tools or accessories require repair, please contact the FEIN after-sales service. The address can be found online at
www.fein.com.
Replace labels and warnings on the power tool if they show signs of ageing or wear.
The current spare parts list for this power tool can be found online at
www.fein.com.
Only use original spare parts.
Warranty and Guarantee
The warranty on the product is in accordance with the statutory provisions of the country in which it is placed on the market. Furthermore, the FEIN guarantee applies in accordance with the FEIN manufacturer guarantee declaration. It is possible that only some of the accessories described or depicted in this operating manual will be supplied with the power tool you have purchased.
Declaration of Conformity
The CE declaration only applies to countries of the European Union and EFTA (European Free Trade Association) and only to products intended for the EU or EFTA market.
Once the product is placed on the EU market, the UKCA mark will cease to be valid.
The UKCA declaration only applies to the British market (England, Wales and Scotland) and only to products intended for the British market.
Once the product is placed on the British market, the CE mark will cease to be valid.
FEIN declares, under its sole responsibility, that this product complies with the relevant provisions specified on the final pages of this instruction manual.
Technical documentation at:
C. & E. Fein GmbH, 73529 Schwäbisch Gmünd, Germany
Transport
The recommended lithium-ion batteries are subject to legislation on the transport of dangerous goods. The user can transport the batteries by road without further requirements.
When shipping by third parties (e.g.: by air transport or forwarding agency), special requirements on packaging and labelling must be observed. For preparation of the item being shipped, consulting an expert for hazardous material is required.
Dispatch battery packs only when the housing is undamaged. Tape or mask off open contacts and pack up the battery in such a manner that it cannot move around in the packaging. Please also observe the possibility of more detailed national regulations.
Disposal
Vacuum cleaners, batteries, accessories and packaging should be sorted for environmentally friendly recycling.

Do not dispose of vacuum cleaners or battery packs/batteries with household waste.
Only for EU countries:
According to the Directive 2012/19/EU on waste electrical and electronic equipment and its transposition into national law, dust extractors that are no longer usable, and, according to the Directive 2006/66/EC, defective or drained batteries must be collected separately and disposed of in an environmentally correct manner.
22
If disposed incorrectly, waste electrical and electronic equipment may have harmful effects on the environment and human health, due to the potential presence of hazardous substances.
Only for United Kingdom:
According to The Waste Electrical and Electronic Equipment Regulations 2013 (SI 2013/3113) (as amended) and the Waste Batteries and Accumulators Regulations 2009 (SI 2009/890) (as amended), products that are no longer usable must be collected separately and disposed of in an environmentally friendly manner.
Battery packs/batteries:
Li-ion:
Please observe the notes in the section on transport (see "Transport", page 21).
fr 23
Notice originale
Etter vätsuging, for å unngå muggdannelse
natural_image
Three identical gray cylindrical pipes arranged vertically (no text or symbols visible)3 13 24 000 19 0

natural_image
3D rendered image of a gray cylindrical mechanical part with tapered ends (no text or symbols)3 13 24 000 19 1

3 13 24 000 19 3
natural_image
Four identical gray cylindrical mechanical components with threaded ends, arranged in a row (no text or symbols visible)3 13 24 000 19 4

3 13 24 000 19 2
CE
| de | EU-Konformitätserklärung | Wir erklären in alleiniger Verantwortung, dass die genannten Produkte allen einschlägigen Bestimmungen der nachfolgend aufgeführten Richtlinien und Verordnungen entsprechen und mit folgenden Normen übereinstimmen.Technische Unterlagen bei: * | |
| Akku-Nass-/Trockensauger | Sachnummer | ||
| en | EU Declaration of Conformity | We declare under our sole responsibility that the stated products comply with all applicable provisions of the directives and regulations listed below and are in conformity with the following standards.Technical file at: * | |
| Cordless wet/dry dust extractor | Article number | ||
| fr | Déclaration de conformité UE | Nous déclarons sous notre propre responsabilité que les produits décrits sont en conformité avec les directives, règlements normatifs et normes énumérés ci-dessous.Dossier technique auprès de: * | |
| Aspirateur eau et poussière sans-fil | N° d'article | ||
| es | Declaración de conformidad UE | Declaramos bajo nuestra exclusiva responsabilidad, que los productos nombrados cumplen con todas las disposiciones correspondientes de las Directivas y los Reglamentos mencionados a continuación y están en conformidad con las siguientes normas.Documentos técnicos de: * | |
| Batería del aspirador en húmedo y seco | N° de artículo | ||
| pt | Declaração de Conformidade UE | Declaramos sob nossa exclusiva responsabilidade que os produtos mencionados cumprem todas as disposições e os regulamentos indicados e estão em conformidade com as seguintes normas.Documentação técnica pertencente à: * | |
| Aspirador universal sem fio | N.° do produto | ||
| it | Dichiarazione di conformità UE | Dichiariamo sotto la nostra piena responsabilità che i prodotti indicati sono conformi a tutte le disposizioni pertinenti delle Direttive e dei Regolamenti elencati di seguito, nonché alle seguenti Normative.Documentazione Tecnica presso: * | |
| Aspiratore a umido/a secco a batteria | Codice prodotto | ||
| nl | EU-conformiteitsverklaring | Wij verklaren op eigen verantwoordelijkheid dat de genoemde producten voldoen aan alle desbetreffende bepalingen van de hierna genoemde richtlijnen en verordeningen en overeenstemmen met de volgende normen.Technisch dossier bij: * | |
| Accu-alleszuiger | Productnummer | ||
| da | EU-overensstemmelses-erklæring | Vi erklærer som eneansvarlige, at det beskrevne produkt er i overensstemmelse med alle gældende bestemmelser i følgende direktiver og forordninger og opfylder følgende standarder.Tekniske bilag ved: * | |
| Akku-våd-/tørstøvsuger | Typenummer | ||
| sv | EU-konformitetsförklaring | Vi förklarar under eget ansvar att de nämnda produkterna uppfyller kraven i alla gällande bestämmelser i de nedan angivna direktiven och förordningarnas och att de stämmer överens med följande normer.Teknisk dokumentation: * | |
| Sladdlös våt-/torrdamm-sugare | Produktnummer | ||
| no | EU-samsvarserklæring | Vi erklærer under eneansvar at de nevnte produktene er i overensstemmelse med alle relevante bestemmelser i direktivene og forordningene nedenfor og med følgende standarder.Teknisk dokumentasjon hos: * | |
| Batteridrevet våt-/tørrsuger | Produktnummer | ||
| fi | EU-vaatimustenmukaisuus-vakuutus | Vakuutamme täten, että mainitut tuotteet vastaavat kaikkia seuraavien direktiivien ja asetusten asiaankuuluvia vaatimuksia | |
CE
| Akkukäyttöi- nen märkäkuivaimuri | Tuotenumero ja ovat seuraavien standardien vaatimusten mukaisia. Tekniset asiakirjat saatavana: * | |
| el | Δήλωση πιστότητας EE | |
| Απορροφητή-ρας υγρής/ στεγνής αναρρόφησης μπαταρίας | Αριθμός ευρετηρίου | |
| tr | AB Uygunluk beyani | |
| Akülü ıslak/ kuru elektrikli süpürge | Ürün kodu | |
| pl | Deklaracja zgodności UE | |
| Akumulatorowy odkurzacz do pracy na sucho i mokro | Numer katalogowy | |
| cs | EU prohlásení o shodě | |
| Vysavač na mokré/suché sání | Objednací číslo | |
| sk | EÚ vyhlásenie o zhode | |
| Vysávač na vysávanie namokro/ nasucho | Vecné číslo | |
| hu | EU konformitási nyilatkozat | |
| Akkumulá- toros száraz/ nedves porszívó | Cikkszám | |
| ru | Заявление о соответствии EC | |
| Аккумуля- торный влагоотсос/ пылесос | Товарный No | |
| uk | Заява про відповідність ЄС | |
| Акумуля- торний вологовід- смоктувач/ пилосмок | Товарний номер | |
| ro | Declarație de conformitate UE | |
| Aspirator universal cu acumulator | Număr de identificare | |
| bg | EC декларация за съответствие | |
| Акумула- торна прахо- | Каталожен номер | |
CE
• |||
| смукачка засухо и мокрозасмукване | следните-ддарти.Техничес-документация при:* | |||
| sr | EU-izjava o usaglašenosti | Na sopstvo-odgovornost izjavljujemo, da navedeni proizvodi-ovaraju svim dotičnim odredbama naknadno navedeni-ernica u uredaba i da su u skladu sa sledećim standardi- | ||
| Usisivač za mokro i suvo usisavanje sa akumulatorom | Broj predmeta | Tehnička-umentacija kod:* | ||
| sl | Izjava o skladnosti EU | Izjavljamo-izključno odgovornostjo, da je omenjen izdelek v z vsemi relevantnimi določili direktiv in uredb ter ustrez- slednjim standardom.Tehnična-mentacija pri:* | ||
| Akumulatorski sesalnik za mokro in suho čiščenje | Številka artikla | |||
| hr | EU izjava o sukladnosti | Pod puno-ogovornošću izjavljujemo da navedeni proizvodi-ovaraju svim relevantnim odredbama direktiva i propisima-edenima u nastavku i da su sukladni sa sljedećim-mama.Tehnička-mentacija se može dobiti kod:* | ||
| Akumulatorski usisavač za mokro/suho usisavanje | Kataloški br. | |||
| et | EL-vastavusdeklaratsioon | Kinnitame-uvastutajatena, et nimetatud tooted vastavad järgneval-letud direktiivide ja määruste kõikidele asjaomas-õuetele ja on kooskõlas järgmiste normidega.Tehnilise-umentaid saadaval:* | ||
| Akutoitega märg-/kuivtol-muimeja | Tootenumber | |||
| lv | Deklaracija par atbilstību ES standartiem | Mēs ar pil-tildību paziņojam, ka šeit aplūkotie izstrādāju-tilbst visiem tālāk minētajās direktīvās un rīkojumo-ertajām saistošajām nostādnēm, kā arī sekojošie-standartiem.Tehniskā-umentacija no:* | ||
| Akumulatora vakuumšćējs mitrai unsausai uzsūkšanai | Izstrādājuma numurs | |||
| lt | ES atitikties deklaracija | Atsakinga-reiškiame, kad išvardyti gaminiai atitinka visus privalomu-emiau nurodytu direktyvu ir reglamentu reikalavin-ir šiuos standartus.Technine-argumentacija saugoma:* | ||
| Akumulia-torinis skysčių ir sausų dulkių siurblys | Gaminio numeris | |||
| ASBS18-10AS 9 | 260 42 03 00 0 2006/42/EC | EN 60335-1:2012+A11:2014+A13:2017+A14:2019+A1:2019+A2:2019+A15:2021EN 60335-2-69:2012EN 55014-1:2017+A11:2020EN 55014-2:2015EN IEC 63000:2018 | ||
| *C. & E. Fein GmbH73529 Schwäbisch Gmünd | ||||
| i.V. S. Bör...Director oQuality ManagementC. & E. Fein mbH, Hans-Fein-Straße 81,73529 Sc-bisch Gmünd-Bargau, GermanySchwäbis-Gmünd-Bargau, 24.06.2022 | ||||


IV.
CE
UK CA
Declaration of Conformity
Cordless wet/dry dust extractor Article number
ASBS18-10AS 9 260 42 03 00 0
We declare under our sole responsibility that the stated products comply with all applicable provisions of the directives and regulations listed below and are in conformity with the following standards. Technical file at: *
The Supply of Machinery (Safety) Regulations 2008
The Electromagnetic Compatibility Regulations 2016
The Restriction of the Use of Certain Hazardous Substances in Electrical and Electronic Equipment Regulations 2012
EN 60335-1:2012+A11:2014+A13:2017+
A14:2019+A1:2019+A2:2019+A15:2021
EN 60335-2-69:2012
EN 55014-1:2017+A11:2020
EN 55014-2:2015
EN IEC 63000:2018

i.V. S. Böhm
Director of Quality Management
Director of Product Development

1 609 92A 7HF


- de
- Original instructions
- Safety information for vacuum cleaners
- WARNING
- Protect the battery against heat, e.g. against continuous intense sunlight, fire, dirt, water and moisture.
- Symbols
- Symbols and their meaning
- Product Description and Specifications
- Intended Use
- Product Features
- en
- Technical data
- Noise/Vibration Information
- EN 60335-2-69:
- Assembly
- Charging the Battery
- Battery Charge Indicator
- Battery Charge Indicator on the Dust Extractor
- Battery Charge Indicator on the Rechargeable Battery
- Battery model GBA 18V...
- Inserting and Removing the Battery (see figures A1–A2)
- Fitting the Brackets for Extractor Accessories (see figure B)
- Fitting the vacuum hose (see figure C)
- Fitting the Vacuuming Accessories
- Fitting the extraction adapter or curved nozzle (see figure D)
- Fitting the Nozzles and Tubes
- Fitting the Rollers (see figure E)
- Operation
- Starting Operation
- Switching On and Off
- Dry Vacuuming
- Extracting dust that accumulates from working power tools (see figure F)
- Wet Vacuuming
- Before wet vacuuming:
- After wet vacuuming, always:
- To prevent mould growth after wet vacuuming:
- Maintenance and Service
- Maintenance and Cleaning
- Cleaning the container (see figures G1–G2)
- Cleaning/replacing filters (see figures H1–H2)
- Faults
- Storage (see figure I)
- Range of accessories
- Maintenance and After-Sales Service
- www.fein.com.
- Warranty and Guarantee
- Declaration of Conformity
- Transport
- Disposal
- Only for EU countries:
- Only for United Kingdom:
- Battery packs/batteries:
- Li-ion:
- fr 23
- Notice originale
- Etter vätsuging, for å unngå muggdannelse
- UK CA
Brand : Fein
Model : ASBS 1810 AS
Category : Vacuum Cleaner