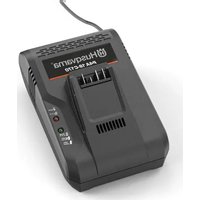
40C80 - Battery charger HUSQVARNA - Free user manual and instructions
Find the device manual for free 40C80 HUSQVARNA in PDF.
| Product type | Battery charger |
| Brand | Husqvarna |
| Model | 40C80 |
| Input voltage | 220-240 V ~, 50/60 Hz |
| Output voltage | 36 V DC |
| Charge current | 2.2 A |
| Compatible batteries | 40-B70, 40-B140, BLi30 (original Husqvarna) |
| Operating temperature | 5 °C to 40 °C |
| LED indicators | Charge indicator (green/yellow/red), error indicator, temperature indicator |
| Protections | Overload, overheating, short circuit |
| Built-in fan | Yes, active cooling |
| Use | Indoor only |
| Wall mounting | Possible (dedicated screw holes) |
| Weight | Approximately 0.5 kg |
| Dimensions (L x W x H) | 150 x 100 x 70 mm (approx) |
| Color | Orange and black |
| Power cord | Removable, standard length |
| Maintenance and cleaning | Clean with a dry cloth; do not use water |
| Spare parts and repairability | Replaceable power cord; do not disassemble; entrust to an approved service center |
| Safety | Follow instructions: do not use outdoors, keep out of reach of children, unplug during storms |
| General information | Charger for Husqvarna Lithium-ion batteries; CE compliant; mandatory recycling |
Frequently Asked Questions - 40C80 HUSQVARNA
User questions about 40C80 HUSQVARNA
0 question about this device. Answer the ones you know or ask your own.
Ask a new question about this device
Download the instructions for your Battery charger in PDF format for free! Find your manual 40C80 - HUSQVARNA and take your electronic device back in hand. On this page are published all the documents necessary for the use of your device. 40C80 by HUSQVARNA.
USER MANUAL 40C80 HUSQVARNA
natural_image
Two symbolic icons: a warning triangle with an exclamation mark and an open book with blank pages (no text or symbols present)Husqvarna®
EN Operator's manual 2-14
text_image
Diagram of a device with numbered parts and labeled connectors, including a power plug, cable, and connector pinout.- Battery charger 40-C250
- Battery charger 40-C80
- Charging and error indicator
- Power cord
- Battery (accessory)
- State of charge button
- Error indicator
- Battery temperature indicator
- State of charge indicator
SYMBOLS ON THE PRODUCT
Be careful and use the product correctly. This product can cause serious injury or death to the operator or others.

Read the operator's manual carefully and make sure that you understand the instructions before use.

The product agrees with the applicable EC directives.

The product or package of the product is not domestic waste. Recycle it at an applicable disposal location for electrical and electronic equipment.

Keep the unit away from water and rain.
Use and keep the battery charger indoors only.
Note: Other symbols/decals on the product refer to certification requirements for some commercial areas.
Product damage
We are not responsible for damages to our product if:
• the product is incorrectly repaired.
• the product is repaired with parts that are not from the manufacturer or not approved by the manufacturer.
- the product has an accessory that is not from the manufacturer or not approved by the manufacturer.
- the product is not repaired at an approved service center or by an approved authority.
Support
For support about the product, go to the Support section on to access instructions, troubleshooting guides, or to use the Husqvarna Self-Service and the Product Assistant (if available in your market). For more support about the product, speak to your Husqvarna servicing dealer.
SAFETY DEFINITIONS
Warnings, cautions and notes are used to point out specially important parts of the manual.
WARNING: Used if there is a risk of injury or death for the operator or bystanders
if the instructions in the manual are not obeyed.
CAUTION: Used if there is a risk of damage to the product, other materials or the adjacent area if the instructions in the manual are not obeyed.
Note: Used to give more information that is necessary in a given situation.
IMPORTANT SAFETY INSTRUCTIONS
WARNING: Read all safety warnings and all instructions. Failure to obey the warnings and instructions may result in electrical shock, fire and/or serious injury.
- Only use the battery charger 40-C80, 40-C250 to charge Husqvarna original batteries, refer to TECHNICAL DATA on page 13 for specific batteries.
The batteries are software encrypted.
- Do not use non-rechargeable batteries.
- Do not try to disassemble or repair the battery charger.
- Do not connect the battery charger terminals to metal objects.
- Use an approved grounded mains socket that is not damaged.
- Regularly examine that the power cord is not damaged. Immediately disconnect the
battery charger if the power cord is damaged.
- If the power cord is damaged replace the power cord.
- Do not lift the battery charger by the power cord. To disconnect the battery charger from a power outlet, pull out the power plug. Do not pull the power cord.
-
Keep all cables and extension leads away from water, oil and sharp edges. Make sure that the power cord is not caught between doors, fences or equivalent.
-
Do not clean the battery or the battery charger with water.
- Keep the battery charger away from children.
- Do not use a damaged battery charger or battery.
- Do not use the battery charger when there is a risk of lightning.
- Only use the battery charger indoors in an environment with good airflow and the correct temperature.
-
Keep the battery charger away from sunlight. Do not use the battery charger outdoors or in wet conditions.
-
Do not operate the battery charger with wet hands.
- Do not use the battery charger near flammable materials or materials that can cause corrosion. Pull out the power plug to the battery charger if there is smoke or fire.
- Do not put a cover on the battery charger during operation.
- This appliance can be used by children aged from 8 years and above and persons with reduced physical, sensory or mental capabilities or lack of experience and knowledge
if they have been given supervision or instruction concerning use of the appliance in a safe way and understand the hazards involved. Children shall not play with the appliance. Cleaning and user maintenance shall not be made by children without supervision.
Introduction
There are different procedures to install the battery charger on a surface:
- Use the dedicated screw holes (40-C80, 40-C250).
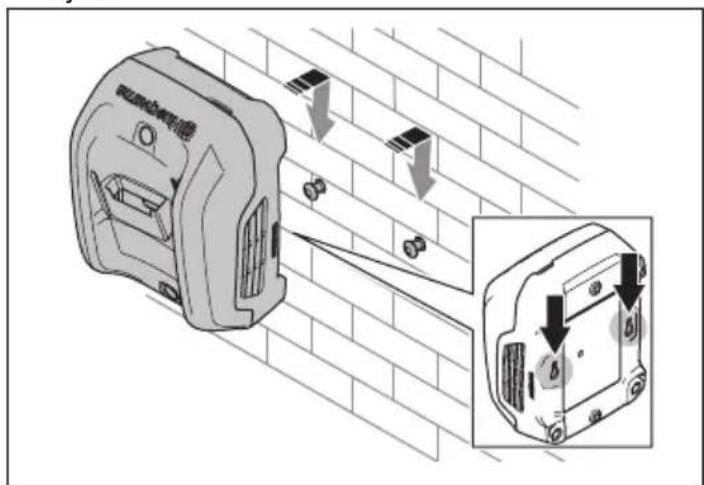
- Use the dedicated key holes which are at the rear side of the battery charger (40-C250).
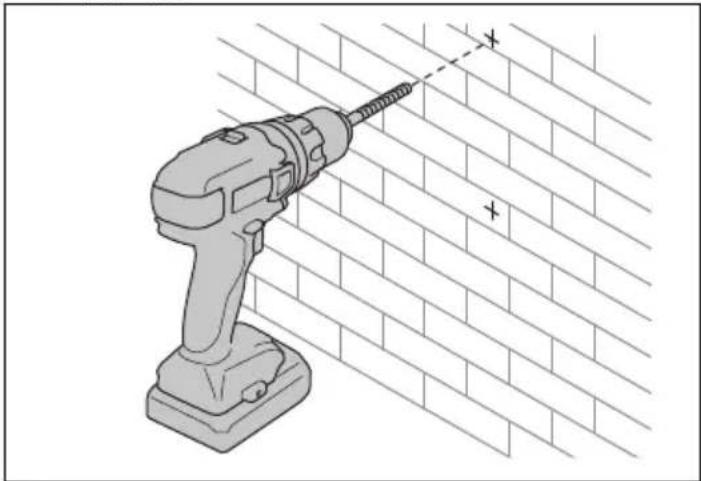
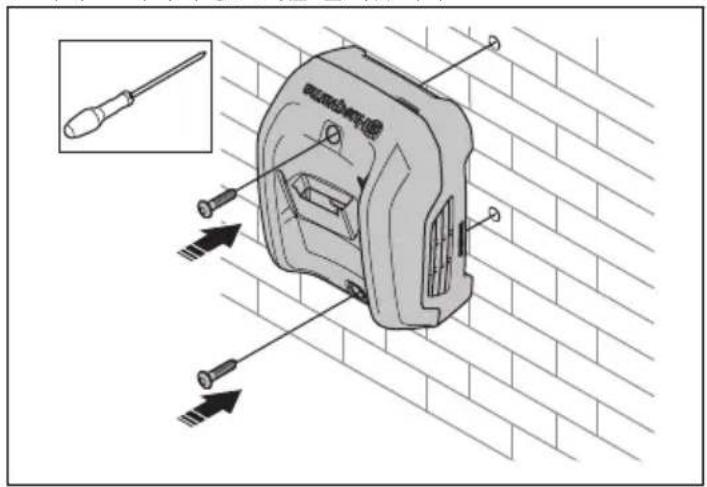
To use the screw holes for installation on a surface (40-C80, 40-C250)

CAUTION: Do not use an electric screwdriver to install the battery charger to the wall. An electric screwdriver can cause damage to the battery charger.
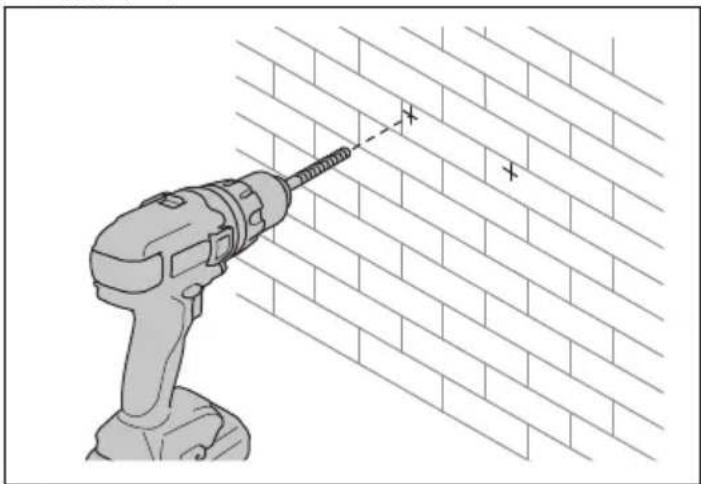
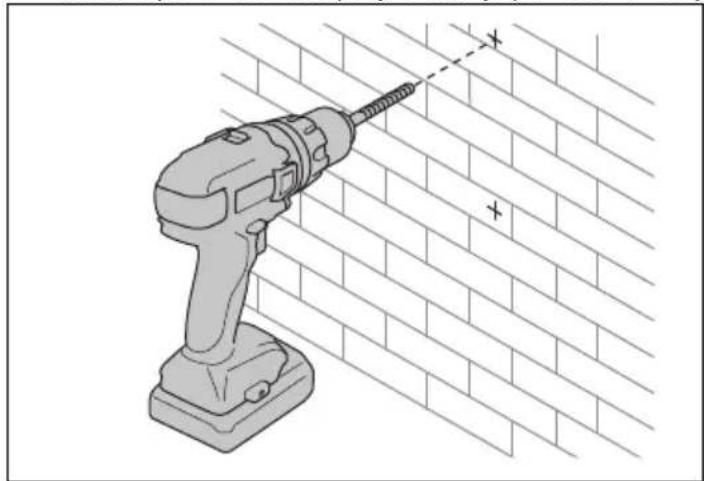
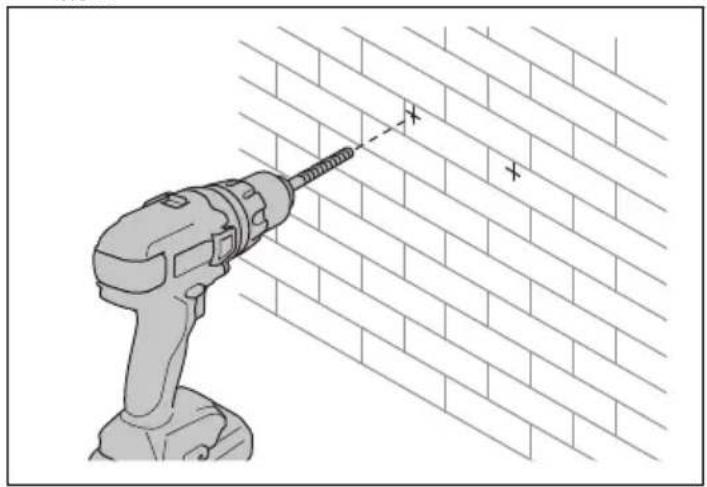
- Mark the positions of the holes.

text_image
Technical diagram of a mechanical device with labeled parts and alignment indicators- Drill the holes.
natural_image
Illustration of a drill bit on a brick wall with a power tool (no text or symbols)3. Install the battery charger with screws.

text_image
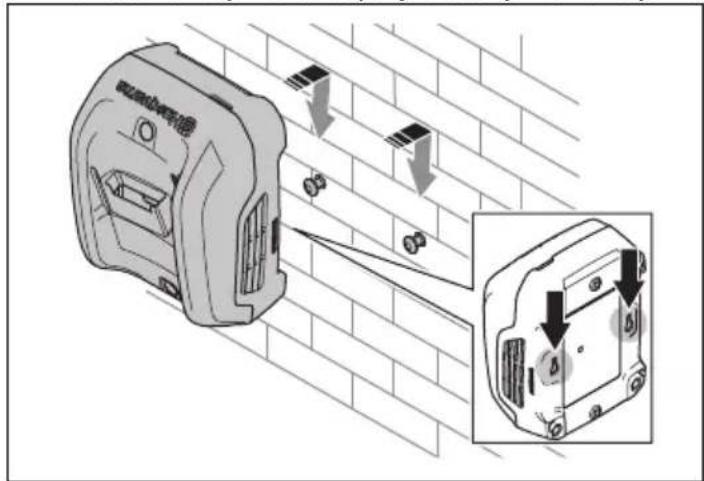
Technical diagram of a screwdriver with labeled parts and directional arrows indicating assembly or installationTo use the key holes for installation on a surface (40-C250)
1. Mark the positions of the holes.

text_image
94 mm94 mm- Drill the holes. 3. Attach the screws and install the battery charger on the

natural_image
Illustration of a power drill on a brick wall with a screwdriver (no text or symbols)
text_image
Diagram showing installation of a mechanical component with downward arrows indicating assembly or inspection, alongside an inset close-up of the component detail.OPERATION
- Use the battery charger only when the ambient temperature is between 5^ (41°F) and 40^ (104°F).
- The battery does not charge if the battery temperature is more than 50 °C (122 °F).
- The battery does not charge if the battery temperature is less than 0 °C (32 °F).
To charge the battery
CAUTION: Make sure that the battery, the battery charger and the terminals on the battery are clean and dry. Do not put the battery in the battery charger if it is dirty or wet.
- Connect the battery charger to a power outlet. The charger starts an automatic function test. The charging indicator flashes green 1 time, yellow 1 time, red 1 time, and the fan operates briefly.

CAUTION: Only connect the battery charger to a power outlet with the voltage and frequency specified on the rating plate.
-
Put the battery in the charger. When the charging indicator on the charger is green, the battery is correctly connected to the battery charger.
-
The battery is fully charged when all the state of charge indicators on the battery are on. Push the battery indicator button to show state of charge for the battery.
Note: The charging indicator on the charger stays green during the full charging process.
- Remove the battery from the charger. Pull the power plug to disconnect the charger from the power outlet. Do not pull the power cord.
Husqvarna Connect
Husqvarna Connect is a free app for your mobile device. The Husqvarna Connect app gives extended functions for your Husqvarna product.
- Extended product information.
• Information about, and help with, product parts and servicing.
To start to use Husqvarna Connect
- Download the Husqvarna Connect app on your mobile device.
- Register in the Husqvarna Connect app.
- Follow the instruction steps in the Husqvarna Connect app to connect and register the product.
Note: Husqvarna Connect app is not available for download in all markets. Speak to your servicing dealer for more information.
TROUBLESHOOTING
| Symptoms Possible faults Possible procedure | ||
| The charging indicator on the charger is yellow.The battery error indicator flashes, or the battery temperature indicator is on. | Temperature deviation, the battery is too cold or too hot to use or charge. | If the battery is too hot, keep it connected to the charger.The built-in fan of the charger decreases the temperature of the battery. When the battery has the recommended temperature, the charging starts automatically.If the battery is too cold, move it indoors. When the battery has the recommended temperature, continue the charging.Obey the temperature range for operation, refer to OPERATION on page 10. Keep the charger away from sunlight. If the problem continues, speak to your Husqvarna servicing dealer. |
| The charging indicator on the charger is yellow. The battery error indicator on the battery is on. | The battery has a critical error. | Speak to your Husqvarna servicing dealer. |
| The charging indicator on the charger is red. | The charger has a critical error. | Speak to your Husqvarna servicing dealer. |
TRANSPORTATION AND STORAGE
- Disconnect the power plug and remove the battery from the charger.
- Safely attach the product during transportation to prevent damage and accidents.
- Keep the product in a locked area to prevent access for children or persons that are not approved.
- Put the product in a dry, frost-free and clean space with correct temperature.
- Put the product in storage where the temperature is between 5^ (41 °F) and 25^ (77 °F). Keep the product away from sunlight.
- Keep the battery away from the battery charger during storage.
Disposal
The symbol means that the product is not domestic waste.
Recycle it through your local collection system for electrical and electronic equipment. This contributes to proper end of life waste management. Contact local authorities, domestic waste services, your dealer or retailer for information. Incorrect disposal may have potential negative effects on the environment and human health, due to the potential presence of hazardous substances.

Note: The symbol shows on the product or package of the product.
TECHNICAL DATA
For technical data, refer to the rating plate of the battery charger.
Table 1: Approved batteries
| Battery 40-B70 40-B140 BLi30 | |||
| Type Lithium-ion Lithium-ion Lithium-ion | |||
| Battery capacity, Ah 2 4 7.5 | |||
| Nominal voltage, V 36 36 36 | |||
| Weight, kg 0.8 1.3 1.9 |
text_image
Technical diagram of a device with numbered parts and labeled connectors, likely for assembly or labeling purposes.text_image
Technical diagram of a measuring tool with labeled parts and alignment indicatorstext_image
Technical diagram of a screwdriver with labeled parts and directional arrows indicating assembly or installation
natural_image
Illustration of a drill bit on a brick wall with a power tool, no text or symbols present- قم إحداث فتحات.

natural_image
Illustration of a power drill on a brick wall with a screwdriver (no text or symbols)text_image
94 mm94 mmلشحن البطاربة
text_image
Diagram showing installation of a wall-mounted device with directional arrows and component detail, including a magnified inset view.الاستعمال
Expected Amsterdam Information Systems for the 1980s, Canada.

text_image
Diagram of a device with numbered parts and labeled connectors, including a power plug, cable, and connector pinout.text_image
Technical diagram of a mechanical device with labeled parts and alignment indicators
natural_image
Illustration of a drill bit on a brick wall, no text or symbols presenttext_image
Technical diagram of a screwdriver with labeled parts and directional arrows indicating assembly or installationtext_image
94 mm94 mmnatural_image
Illustration of a power drill on a brick wall with no text or symbolstext_image
Diagram showing installation of a wall-mounted device with downward arrows indicating assembly or inspection steps, including a magnified inset detail.РАБОТА
text_image
Diagram of a device with numbered parts and labeled connectors, including a power plug, cable, and connector pinout.text_image
Technical diagram of a mechanical device with labeled parts and alignment indicatorsnatural_image
Illustration of a power drill on a brick wall, showing a screwdriver and a plus symbol (no text or labels)
text_image
Technical diagram showing a screwdriver inserted into a mechanical component with directional arrows indicating movement or assembly.text_image
94 mm94 mm- Vyvrtejte otvory.

natural_image
Illustration of a power drill on a brick wall with a screwdriver (no text or symbols)text_image
Diagram showing installation of a device with arrows indicating downward motion, alongside an inset close-up of the component.OBSLUHA
text_image
Technical diagram of a device with numbered parts and labeled connectors, likely for assembly or labeling purposes.SYMBOLER PÅ PRODUKTET
text_image
Technical diagram of a mechanical device with labeled parts and construction lines, including a pencil and screwdriver.natural_image
Illustration of a power drill on a brick wall, no text or symbols present
text_image
Technical diagram showing a screwdriver inserted into a mechanical component with directional arrows indicating movement or assembly.text_image
94 mm94 mm- Bor hullerne.

natural_image
Illustration of a power drill on a brick wall with a screwdriver (no text or symbols)text_image
Diagram showing installation of a wall-mounted device with labeled components and directional arrows indicating assembly or inspection.BETJENING
text_image
Diagram of a device with numbered parts and labeled connectors, including a power plug, cable, and connector pinout.text_image
Technical diagram of a measuring tool with labeled parts and alignment indicators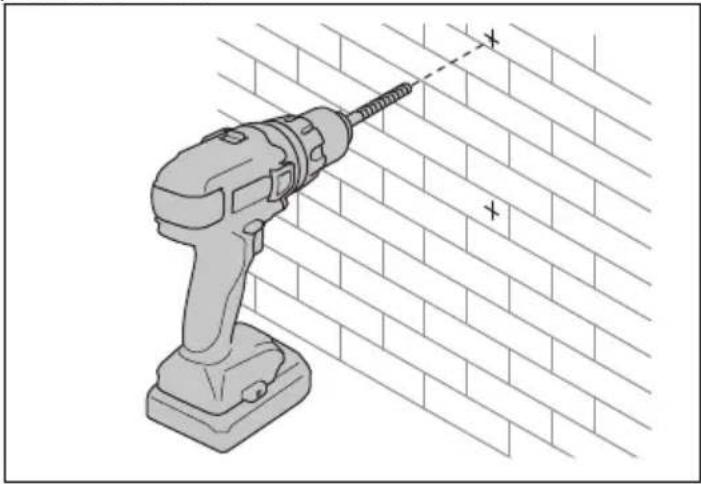
natural_image
Illustration of a drill bit on a brick wall, no text or symbols presenttext_image
Technical diagram of a screwdriver with labeled parts and directional arrows indicating assembly or installationtext_image
94 mm94 mmnatural_image
Illustration of a power drill on a brick wall with a screwdriver (no text or symbols)
text_image
Diagram showing installation of a wall-mounted device with downward arrows indicating assembly or inspection stepstext_image
Diagram of a device with numbered parts and labeled connectors, including a power plug, cable, and connector pinout.text_image
Technical diagram of a mechanical device with labeled parts and alignment indicatorsnatural_image
Illustration of a power drill on a brick wall, no text or symbols present
text_image
Technical diagram of a screwdriver with labeled parts and directional arrows indicating assembly or installationtext_image
94 mm94 mm- Ανοίξτε τις οπές.

natural_image
Illustration of a power drill on a brick wall with a screwdriver (no text or symbols)text_image
Diagram showing installation of a wall-mounted device with arrows indicating direction and detail viewΛΕΙΤΟΥΡΓΙΑ
text_image
Diagram of a device with numbered parts and labeled connectors, including a power plug, cable, and connector pinout.text_image
Technical diagram of a mechanical device with labeled parts and alignment indicatorsnatural_image
Illustration of a power drill on a brick wall, no text or symbols present
text_image
Technical diagram of a screwdriver with labeled parts and directional arrows indicating assembly or installationtext_image
94 mm94 mmnatural_image
Illustration of a power drill on a brick wall with a screwdriver (no text or symbols)text_image
Diagram showing installation of a wall-mounted device with downward arrows indicating process flow, including a close-up inset of the component.FUNCIONAMIENTO
text_image
Diagram of a device with numbered parts and labeled connectors, including a power plug, cable, and connector pinout.OLULISED OHUTUSJUHISED

text_image
Technical diagram of a mechanical device with labeled parts and alignment indicators
natural_image
Illustration of a drill bit on a brick wall, no text or symbols present3. Paigaldage akulaadija kruvidega seinale.

text_image
Technical diagram of a screwdriver with labeled parts and directional arrows indicating assembly or installationRiputusavade abil seinale paigaldamiseks (40-C250)
text_image
94 mm94 mmnatural_image
Illustration of a power drill on a brick wall with a screwdriver (no text or symbols)kruvidele.

text_image
Diagram showing installation of a device with downward arrows indicating movement, alongside an inset close-up of the device's internal structure.KASUTAMINE
text_image
Technical diagram of a mechanical device with labeled parts and construction lines, including a pencil and screwdriver.
natural_image
Illustration of a drill bit on a brick wall, no text or symbols presenttext_image
Technical diagram of a screwdriver with labeled parts and directional arrows indicating assembly or installationtext_image
94 mm94 mmnatural_image
Illustration of a power drill on a brick wall with a screwdriver (no text or symbols)
text_image
Diagram showing installation of a wall-mounted device with labeled components and directional arrows indicating assembly or inspection.KÄYTTÖ
text_image
Technical diagram of a device with numbered parts and labeled connectors, likely for assembly or labeling purposes.SYMBOLES SUR LE PRODUIT

text_image
Technical diagram of a mechanical device with labeled parts and alignment indicatorsnatural_image
Illustration of a drill bit on a brick wall, no text or symbols present
text_image
Technical diagram showing a screwdriver inserted into a mechanical component with directional arrows indicating movement or assembly.text_image
94 mm94 mm- Percez les trous.

natural_image
Illustration of a power drill on a brick wall with a screwdriver (no text or symbols)text_image
Diagram showing installation of a wall-mounted device with downward arrows indicating process flow, including a close-up inset of the component.UTILISATION
text_image
Diagram of a device with numbered parts and labeled connectors, including a power plug, cable, and connector pinout.- Punjač baterije 40-C250
- Punjač baterije 40-C80
- Indikator punjenja i pogreške
- Kabel napajanja
- Baterija (dodatna oprema)
- Gumb stanja napunjenosti
- Indikator pogreške
- Indikator temperature baterije
- Indikator napunjenosti
SIMBOLI NA PROIZVODU
Budite oprezni i pravilno upotrebljavajte ovaj proizvod. Ovaj proizvod može izazvati teške ozljede ili smrt rukovatelja ili drugih osoba.

VAŽNE SIGURNOSNE UPUTE
UPOZORENJE: Pročitajte sva sigurnosna upozorenja i sve upute. Nepridržavanje upozorenja i uputa može uzrokovati strujni udar, požar i/ili teške ozljede.
- Upotrebljavajte samo punjače baterija 40-C80, 40-C250 za punjenje Husqvarna originalnih baterija, određene baterije potražite u TEHNIČKI PODACI na stranici 168. Baterije su softverski kodirane.
- Nemojte upotrebljavati baterije koje nisu punjive.
- Punjač baterije nemojte rastavljati niti pokušavati popraviti.
- Priključke punjača baterije nemojte spajati metalnim predmetima.
- Upotrebljavajte neoštećenu uzemljenu mrežnu utičnicu.
- Redovito provjeravajte je li pojni kabel neoštećen. Ako je pojni kabel oštećen, smjesta izvadite punjač baterije iz utičnice.
-
Ako je kabel za napajanje oštećen, zamijenite ga.
-
Punjač baterije nemojte podizati za električni kabel. Za odspajanje punjača baterije od električne utičnice izvucite utikač. Nemojte povlačiti kabel za napajanje.
- Sve kabele i produžne kabele držite podalje od vode, ulja i oštrih rubova. Pojni kabel nemojte prikliještiti vratima, ogradom ili nečim sličnim.
- Bateriju ili punjač baterije nikada nemojte čistiti vodom.
-
Punjač baterije držite podalje od djece.
-
Nemojte upotrebljavati oštećen punjač baterije ili bateriju.
- Punjač baterije nemojte upotrebljavati kada postoji opasnost od grmljavinskog nevremena.
- Upotrebljavajte punjač baterije samo u zatvorenom prostoru u okružjima s dobrim strujanjem zraka i odgovarajuće temperature.
-
Punjač baterije držite podalje od sunčeve svjetlosti. Ne upotrebljavajte punjač baterije na otvorenom ili u vlažnim uvjetima.
-
Punjačem baterija nemojte rukovati mokrim rukama.
- Punjač baterije nemojte upotrebljavati u blizini zapaljivih materijala ili materijala koji mogu uzrokovati koroziju. Ako dođe do razvoja dima ili požara, izvucite utikač punjača baterije.
- Tijekom rada na punjač baterije nemojte stavljati poklopac.
- Uređaj mogu koristiti djeca od osam godina i starija te osobe s umanjenim fizičkim, osjetilnim ili mentalnim sposobnostima ili nedostatkom iskustva i znanja ako je osiguran njihov nadzor ili ako su upućeni u sigurno
text_image
Technical diagram of a measuring tool with labeled parts and alignment indicators
natural_image
Illustration of a drill bit on a brick wall, no text or symbols present3. Ugradite punjač baterije pomoću vijaka.

text_image
Technical diagram of a screwdriver with labeled parts and directional arrows indicating assembly or installationtext_image
94 mm94 mm- Izbušite rupe. 3. Pričvrstite vijke i postavite punjač baterija na vijke.

natural_image
Illustration of a power drill on a brick wall with a screwdriver (no text or symbols)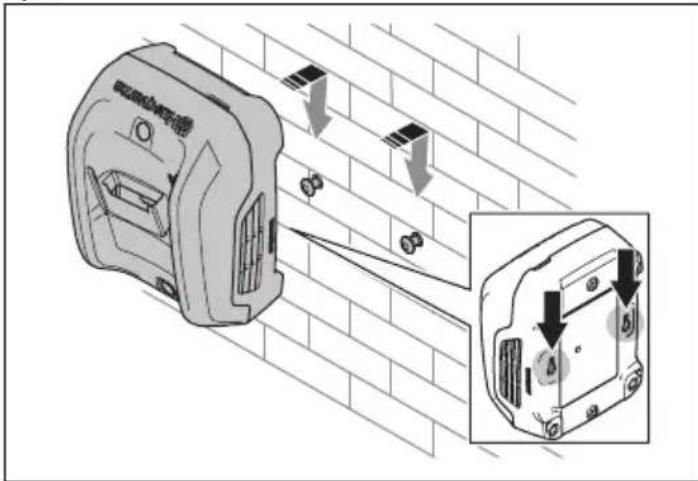
text_image
Diagram showing installation of a wall-mounted device with labeled components and directional arrows indicating assembly or inspection.RUKOVANJE
- Punjač baterije upotrebljavajte samo pri temperaturama okoline između 5 °C (41 °F) i 40 °C (104 °F).
- Baterija se neće puniti ako je njezina temperatura veća od 50 °C (122 °F).
- Baterija se neće puniti ako je njezina temperatura manja od 0 °C (32 °F).
Zamjena baterije

OPREZ: Pobrinite se za to da baterija, punjač baterije i priključci na bateriji budu čisti i suhi. Ne umećite bateriju u punjač baterije ako je on prljav ili mokar.
- Punjač baterije priključite na strujnu utičnicu. Punjač pokreće automatsko ispitivanje funkcije. Indikator punjenja treperi 1 put zeleno, 1 put žuto, 1 put crveno i ventilator kratko radi.
OPREZ: Spojite punjač baterije samo na strujnu utičnicu s naponom i frekvencijom koji su navedeni na natpisnoj pločici.
- Postavite bateriju u punjač. Kada indikator punjenja na punjaču svijetli zeleno, baterija je pravilno priključena na punjač baterije.
- Baterija je potpuno napunjena kada su uključeni svi indikatori punjenja na bateriji. Pritisnite gumb indikatora baterije da biste saznali stanje napunjenosti baterije.
text_image
Diagram of a device with numbered parts and labeled connectors, including a power plug, cable, and connector pinout.text_image
Technical diagram of a measuring tool with labeled parts and alignment indicators
natural_image
Illustration of a drill bit on a brick wall, no text or symbols presenttext_image
Technical diagram of a screwdriver with labeled parts and directional arrows indicating assembly or installationtext_image
94 mm94 mmnatural_image
Illustration of a power drill on a brick wall with a screwdriver (no text or symbols)
text_image
Diagram showing installation of a device with mounting holes and a close-up view of the component detailKEZELÉS
text_image
Diagram of a device with numbered parts and labeled connectors, including a power plug, cable, and connector pinout.text_image
Technical diagram of a mechanical device with labeled parts and alignment indicatorsnatural_image
Illustration of a drill bit on a brick wall with a power tool, no text or symbols present
text_image
Technical diagram showing a screwdriver inserted into a mechanical component with directional arrows indicating movement or assembly.text_image
94 mm94 mm- Praticare i fori.
natural_image
Illustration of a power drill on a brick wall with a screwdriver (no text or symbols)text_image
Diagram showing installation of a wall-mounted device with arrows indicating downward motion, including an inset close-up of the component.FUNZIONAMENTO
text_image
Diagram of a device with numbered parts and labeled connectors, including a power plug, cable, and connector pinout.text_image
Technical diagram of a mechanical device with labeled parts and alignment indicatorsnatural_image
Illustration of a drill bit on a brick wall, no text or symbols present
text_image
Technical diagram of a mechanical device with screwdriver and directional arrows indicating assembly or installationtext_image
94 mm94 mm- ドリルで穴を開けます。

natural_image
Illustration of a power drill on a brick wall with a screwdriver (no text or symbols)text_image
Diagram showing installation of a wall-mounted device with directional arrows and component detail, including a magnified inset view.操作
text_image
Diagram of a device with numbered parts and labeled connectors, including a power plug, cable, and connector pinout.text_image
Technical diagram of a mechanical device with labeled parts and alignment indicators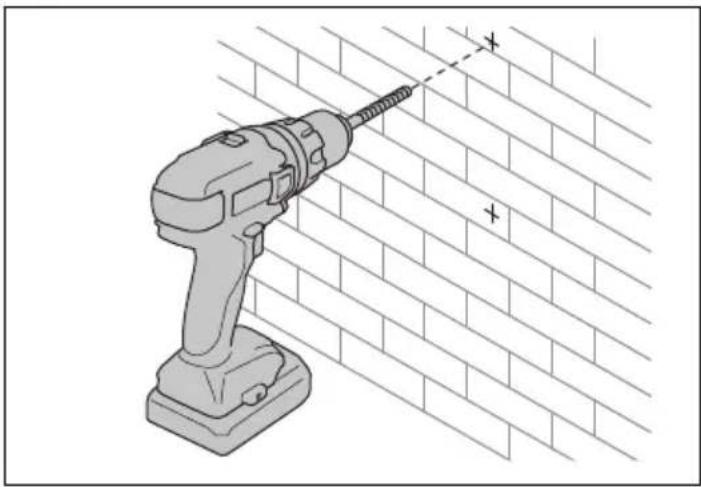
natural_image
Illustration of a drill bit on a brick wall, no text or symbols present- 나사로 배터리 충전기를 설치합니다.
text_image
Technical diagram of a screwdriver with labeled parts and directional arrows indicating assembly or installationtext_image
94 mm94 mmnatural_image
Illustration of a power drill on a brick wall with a screwdriver (no text or symbols)
text_image
Diagram showing installation of a wall-mounted device with arrows indicating downward motion, including an inset close-up of the component.작동
text_image
Diagram of a device with numbered parts and labeled connectors, including a power plug, cable, and connector pinout.text_image
Technical diagram of a mechanical device with labeled parts and alignment indicatorsnatural_image
Illustration of a power drill on a brick wall, no text or symbols present
text_image
Technical diagram of a screwdriver with labeled parts and directional arrows indicating assembly or installationtext_image
94 mm94 mm- Išgręžkite angas.

natural_image
Illustration of a power drill on a brick wall with a screwdriver (no text or symbols)- [sukite varžtus ir pakabinkite akumuliatoriaus jkroviklj ant varžtu.

text_image
Diagram showing installation of a wall-mounted device with arrows indicating downward movement, including an inset close-up of the component.NAUDOJIMAS
text_image
Diagram of a device with numbered parts and labeled connectors, including a power plug, cable, and connector pinout.text_image
Technical diagram of a mechanical device with labeled parts and alignment indicatorsnatural_image
Illustration of a power drill on a brick wall, no text or symbols present
text_image
Technical diagram of a screwdriver with labeled parts and directional arrows indicating assembly or installationtext_image
94 mm94 mm- Izurbiet caurumus.

natural_image
Illustration of a power drill on a brick wall with a screwdriver (no text or symbols)natural_image
Technical illustration of a wall-mounted electrical socket with mounting brackets and a magnified inset showing internal components (no text or symbols)LIETOŠANA
GAMBARAN KESELURUHAN PRODUK

text_image
Diagram of a device with numbered parts and labeled connectors, including a power plug, cable, and connector pinout.ARAHAN KESELAMATAN PENTING
text_image
Technical diagram of a mechanical device with labeled parts and alignment indicatorsnatural_image
Illustration of a power drill on a brick wall, no text or symbols present
text_image
Technical diagram showing a screwdriver inserted into a mechanical component with directional arrows indicating movement or assembly.text_image
94 mm94 mm- Gerudi lubang.

natural_image
Illustration of a power drill on a brick wall with a screwdriver (no text or symbols)text_image
Diagram showing installation of a wall-mounted device with arrows indicating downward motion, including an inset close-up of the component.PENGENDALIAN
- Hanya gunakan pengecas bateri apabila suhu sekeliling adalah antara 5 °C (41 °F) hingga 40 °C (104 °F).
- Bateri tidak akan dicas jika suhu bateri lebih daripada 50°C (122°F).
- Bateri tidak akan dicas jika suhu bateri lebih daripada 0°C (32°F).
text_image
Technical diagram of a mechanical device with labeled parts and alignment indicatorsnatural_image
Illustration of a power drill on a brick wall, no text or symbols present
text_image
Technical diagram showing a screwdriver inserted into a mechanical component with directional arrows indicating movement or assembly.text_image
94 mm94 mm- Boor de gaten.

natural_image
Illustration of a power drill on a brick wall with a screwdriver (no text or symbols)text_image
Diagram showing installation of a wall-mounted device with arrows indicating downward movement, including an inset close-up of the component.BEDIENING
SYMBOLER PÅ PRODUKTET

text_image
Technical diagram of a measuring tool with labeled parts and alignment indicators
natural_image
Illustration of a drill bit on a brick wall, no text or symbols presenttext_image
Technical diagram of a screwdriver with labeled parts and directional arrows indicating assembly or installationSlik bruker du nøkkelhullene til montering på en overflate (40-C250)
1. Merk borehullenes posisjon.

text_image
94 mm94 mmnatural_image
Illustration of a power drill on a brick wall with a screwdriver (no text or symbols)
text_image
Diagram showing installation of a wall-mounted device with labeled components and directional arrows indicating assembly or inspection.DRIFT
- Bruk batteriladeren bare i omgivelsestemperaturer fra 5 °C (41 °F) til 40 °C (104 °F).
- Batteriet lades ikke hvis batteritemperaturen er på over 50 °C (122 °F).
- Batteriet lades ikke hvis batteritemperaturen er på over 0 °C (32 °F).
text_image
Diagram of a device with numbered parts and labeled connectors, including a power plug, cable, and connector pinout.natural_image
Technical illustration of a mechanical device with two tool tips, set against a brick wall (no text or symbols)- Wywiercić otwory.

natural_image
Illustration of a drill bit on a brick wall with a power tool, no text or symbols presenttext_image
Technical diagram of a screwdriver with labeled parts and directional arrows indicating assembly or installationtext_image
94 mm94 mmnatural_image
Illustration of a power drill on a brick wall with a screwdriver (no text or symbols)
text_image
Diagram showing installation of a mechanical component with downward arrows indicating assembly or inspection, alongside an inset close-up of the component detail.OBSŁUGA
text_image
Diagram of a device with numbered parts and labeled connectors, including a power plug, cable, and connector pinout.text_image
Technical diagram of a measuring tool with labeled parts and alignment indicators
natural_image
Illustration of a drill bit on a brick wall, no text or symbols present- Instale o carregador de bateria com parafusos.

text_image
Technical diagram of a screwdriver with labeled parts and directional arrows indicating assembly or installationtext_image
94 mm94 mmnatural_image
Illustration of a power drill on a brick wall with no text or symbols
text_image
Diagram showing installation of a wall-mounted device with downward arrows indicating assembly or repair steps, including a magnified inset detail.FUNCIONAMENTO
text_image
Technical diagram of a device with numbered parts and labeled connectors, including a power plug, cable, and connector pinout.text_image
Technical diagram of a mechanical device with labeled parts and construction lines, including a pencil and screwdriver.- Faceți găurile.

natural_image
Illustration of a drill bit on a brick wall, no text or symbols presenttext_image
Technical diagram of a screwdriver with labeled parts and directional arrows indicating assembly or installationtext_image
94 mm94 mm- Faceți găurile.

natural_image
Illustration of a power drill on a brick wall with a screwdriver (no text or symbols)text_image
Diagram showing installation of a wall-mounted device with labeled components and directional arrows indicating assembly or inspection.FUNCTIONAREA
text_image
Diagram of a device with numbered parts and labeled connectors, including a power plug, cable, and connector pinout.natural_image
Technical illustration of a mechanical device with two tool tips, set against a brick wall (no text or symbols)natural_image
Illustration of a drill bit on a brick wall with a power tool, no text or symbols presenttext_image
Technical diagram of a screwdriver with labeled parts and directional arrows indicating assembly or installationtext_image
94 mm94 mmnatural_image
Illustration of a power drill on a brick wall with a screwdriver (no text or symbols)
text_image
Diagram showing installation of a mechanical component with downward arrows indicating assembly or inspection, alongside an inset close-up of the component detail.ЕКСПЛУАТАЦІЯ
text_image
Technical diagram of a mechanical device with labeled parts and alignment indicatorsnatural_image
Illustration of a power drill on a brick wall, no text or symbols present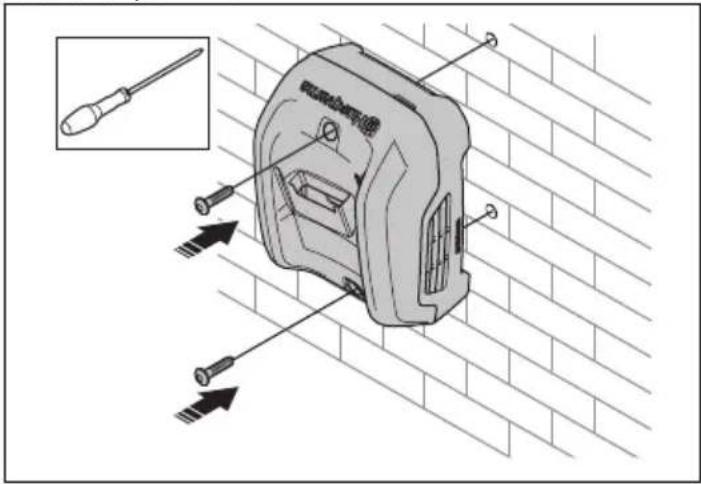
text_image
Technical diagram of a screwdriver with labeled parts and directional arrows indicating assembly or installationtext_image
94 mm94 mmnatural_image
Illustration of a power drill on a brick wall with a screwdriver (no text or symbols)text_image
Diagram showing installation of a wall-mounted device with downward arrows indicating process flow, including a close-up inset of the component.ЭКСПЛУАТАЦИЯ
text_image
Technical diagram of a device with numbered parts and labeled connectors, including a power plug, cable, and connector pinout.- Nabíjačka 40-C250
- Nabíjačka 40-C80
- Indikátor nabíjania a chýb
- Napájací kábel
- Akumulátor (príslušenstvo)
- Tlačidlo stavu nabitia
- Indikátor chýb
- Indikátor teploty batérie
- Indikátor stavu nabitia
SYMBOLY NA VÝROBKU

DÔLEŽITÉ BEZPEČNOSTNÉ POKYNY

text_image
Technical diagram of a mechanical device with labeled parts and alignment indicators- Vyvítajte otvory. 3. Nainštalujte nabíjačku pomocou skrutiek.

natural_image
Illustration of a drill bit on a brick wall, no text or symbols present
text_image
Technical diagram of a screwdriver with labeled parts and directional arrows indicating assembly or installationtext_image
94 mm94 mm- Vyvítajte otvory.

natural_image
Illustration of a power drill on a brick wall with a screwdriver (no text or symbols)text_image
Diagram showing installation of a wall-mounted device with arrows indicating downward motion, including an inset close-up of the component.OBSLUHA
- Nabíjačku používajte iba vtedy, ked' je teplota okolitého prostredia v rozsahu 5 °C (41 °F) až 40 °C (104 °F).
- Akumulátor sa nenabíja, pokiaľ je jeho teplota vyššia než 50 °C (122 °F).
- Akumulátor sa nenabíja, pokial je jeho teplota nižšia ako 0 °C (32 °F).
Nabíjanie akumulátora

text_image
Diagram of a device with numbered parts and labeled connectors, including a power plug, cable, and connector pinout.- Polnilnik akumulatorja 40-C250
- Polnilnik akumulatorja 40-C80
- Indikator polnjenja in napake
- Napajalni kabel
- Akumulator (dodatna oprema)
- Gumb za stanje napolnjenosti
- Indikator napake
- Indikator temperature akumulatorja
- Indikator stanja napolnjenosti
SIMBOLI NA IZDELKU

text_image
Technical diagram of a mechanical device with labeled parts and alignment indicatorsnatural_image
Illustration of a power drill on a brick wall, no text or symbols present
text_image
Technical diagram of a screwdriver with labeled parts and directional arrows indicating assembly or installationtext_image
94 mm94 mm- Izvrtajte luknje.

natural_image
Illustration of a power drill on a brick wall with a screwdriver (no text or symbols)- Pritrdite vijake in namestite polnilnik akumulatorja na vijake.
text_image
Diagram showing installation of a wall-mounted device with labeled components and directional arrows indicating assembly or inspection.UPORABA
text_image
Diagram of a device with numbered parts and labeled connectors, including a power plug, cable, and connector pinout.- Punjač baterije 40-C250
- Punjač baterije 40-C80
- Indikator za punjenje i greške
- Kabl za napajanje
- Baterija (oprema)
- Dugme statusa punjenja
- Indikator greške
- Indikator temperature baterije
- Indikator statusa punjenja
SIMBOLI NA PROIZVODU

Budite pažljivi i koristite proizvod na pravilan način. Ovaj proizvod može prouzrokovati teške telesne povrede ili smrt rukovaoca i drugih osoba.

VAŽNA BEZBEDNOSNA UPUTSTVA

text_image
Technical diagram of a mechanical device with labeled parts and alignment indicators- Izbušite rupe. 3. Učvrstite punjač baterija pomoću zavrtanja.
natural_image
Illustration of a drill bit on a brick wall with a power tool, no text or symbols present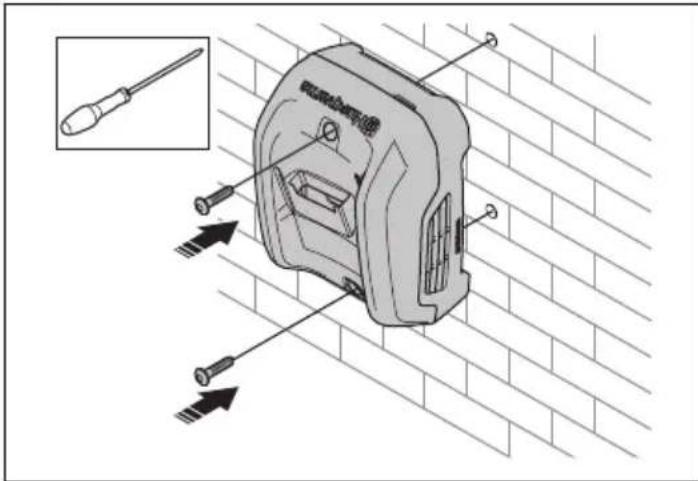
text_image
Technical diagram of a screwdriver with labeled parts and directional arrows indicating assembly or installationtext_image
94 mm94 mm- Izbušite rupe.

natural_image
Illustration of a power drill on a brick wall with a screwdriver (no text or symbols)3. Pričvrstite zavrtnje i okačite punjač baterija na zavrtnje.
text_image
Diagram showing installation of a wall-mounted device with arrows indicating downward motion, including an inset close-up of the component.RUKOVANJE
- Koristite punjač baterije samo kad je temperatura okoline između 5 °C (41 °F) i 40 °C (104 °F).
- Baterija se neće puniti ako je temperatura baterije veća od 50 °C (122 °F).
- Baterija se neće puniti ako je temperatura baterije manja od 0 °C (32 °F).
Punjenje baterije

OPREZ: Uverite se da su baterija, punjač baterije i terminali na bateriji čisti i suvi. Nemojte stavljati bateriju u punjač baterije ako je zaprljana ili vlažna.
- Povežite punjač baterije na strujnu utičnicu. Punjač započinje test automatske funkcije Indikator punjenja zasvetli zeleno jedanput, žuto jedanput, crveno jedanput i ventilator se na kratko uključi.

OPREZ: Povežite punjač baterije na strujnu utičnicu čiji su napon i frekvencija naznačeni na pločici tipa.
-
Stavite bateriju u punjač. Kada indikator punjenja na punjaču svetli zeleno, baterija je pravilno povezana na punjač baterije.
-
Baterija je potpuno napunjena kad su svi indikatori napunjenosti na bateriji uključeni. Pritisnite dugme indikatora baterije da prikažete napunjenost baterije.
Napomena: Indikator punjenja na punjaču nastavlja da svetli zeleno u toku čitavog procesa punjenja.
- Izvadite bateriju iz punjača. Povucite strujni utikač da biste isključili punjač iz strujne utičnice. Ne vucite kabl za napajanje.
Husqvarna Connect
Husqvarna Connect je besplatna aplikacija za mobilne uređaje. Aplikacija Husqvarna Connect pruža proširene funkcije za proizvod Husqvarna.
• Dodatne informacije o proizvodu.
- Informacije o delovima proizvoda i servisiranju i pomoći u vezi s njima.
text_image
Technical diagram of a device with numbered parts and labeled connectors, likely for assembly or labeling purposes.SYMBOLER PÅ PRODUKTEN

text_image
Technical diagram of a mechanical device with labeled parts and directional arrows indicating alignment or assembly.- Borra hålen.

natural_image
Illustration of a drill bit on a brick wall, no text or symbols presenttext_image
Technical diagram of a screwdriver with labeled parts and directional arrows indicating assembly or installationtext_image
94 mm94 mmnatural_image
Illustration of a power drill on a brick wall with a screwdriver (no text or symbols)skruvarna.

text_image
Diagram showing installation of a device with downward arrows indicating assembly or inspection, alongside an inset close-up of the device's internal structure.ANVÄNDNING
TRANSPORT OCH FÖRVARING
text_image
Diagram of a device with numbered parts and labeled connectors, including a power plug, cable, and connector pinout.text_image
Technical diagram of a mechanical device with labeled parts and alignment indicatorsnatural_image
Illustration of a drill bit on a brick wall, no text or symbols present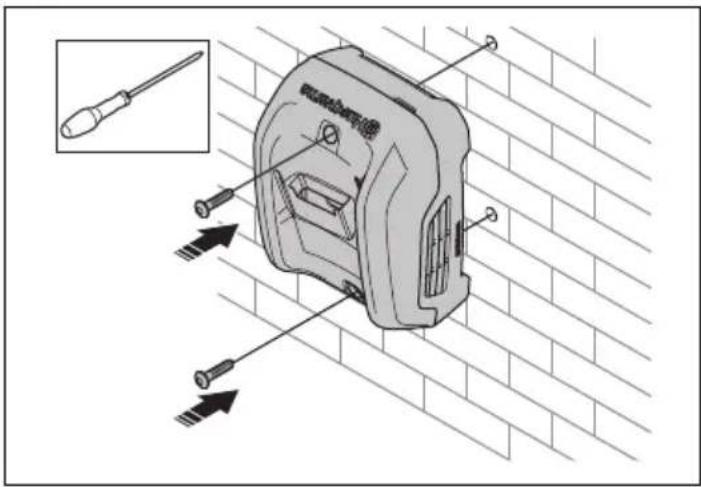
text_image
Technical diagram showing a screwdriver inserted into a mechanical component with directional arrows indicating movement or assembly.text_image
94 mm94 mm- Delikleri açın.

natural_image
Illustration of a power drill on a brick wall with a screwdriver (no text or symbols)text_image
Diagram showing installation of a wall-mounted device with arrows indicating downward motion, including an inset close-up of the component.ÇALIŞMA
text_image
Technical diagram of a mechanical device with labeled parts and construction lines, including a pencil and screwdriver.
natural_image
Illustration of a drill bit on a brick wall, no text or symbols presenttext_image
Technical diagram of a screwdriver with labeled parts and directional arrows indicating assembly or installationtext_image
94 mm94 mmnatural_image
Illustration of a power drill on a brick wall with a screwdriver (no text or symbols)
text_image
Diagram showing installation of a wall-mounted device with downward arrows indicating assembly or inspection stepsVÂN HÀNH
text_image
Diagram of a device with labeled parts including a power adapter, internal components, and cable connection.text_image
Technical diagram showing a mechanical device with labeled parts and construction lines, including a pencil and screwdriver.
natural_image
Illustration of a drill bit on a brick wall, no text or symbols present3. 用螺丝安装电池充电器。

text_image
Technical diagram showing screwdriver installation on a wall-mounted device with labeled components and directional arrows使用挂孔进行表面安装(40-C250)
1. 标记孔的位置。

text_image
94 mm94 mm2. 钻孔。
natural_image
Illustration of a power drill on a brick wall with a screwdriver (no text or symbols)text_image
Diagram showing installation of a wall-mounted device with labeled components and directional arrows indicating assembly or inspection.操作
Original instructions
الأصلية الإرشادات
Оригинални инструкции
Původní pokyny
text_image
Black and white barcode image with vertical lines and a small number '1' at the bottom left.2026-01-20