BDP 501500 C - Polisher Kärcher - Free user manual and instructions
Find the device manual for free BDP 501500 C Kärcher in PDF.

User questions about BDP 501500 C Kärcher
0 question about this device. Answer the ones you know or ask your own.
Ask a new question about this device
Download the instructions for your Polisher in PDF format for free! Find your manual BDP 501500 C - Kärcher and take your electronic device back in hand. On this page are published all the documents necessary for the use of your device. BDP 501500 C by Kärcher.
USER MANUAL BDP 501500 C Kärcher
Chairman of the Board of Management

S. Reiser
Director Regulatory Affairs & Certification
71364 Winnenden (Germany)
Tel.: +49 7195 14-0
Fax: +49 7195 14-2212
Winnenden, 2019/01/01
Technische Daten
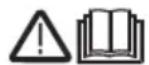
Please read and comply with these original instructions prior
to the initial operation of your appliance and store them for later use or subsequent owners.
Contents
Environmental protection . . . EN 1
Symbols in the operating instructions. EN 1
Safety instructions. EN 2
Safety Devices EN 2
Unlocking EN2
Function EN2
Proper use EN 2
Operating and Functional Elements EN 3
Assembly EN4
Before Startup. EN 4
Operation EN5
Transport. EN 6
Storage EN6
Care and maintenance. EN 6
Troubleshooting EN 7
Warranty EN 8
Accessories and Spare Parts. EN 8
EU Declaration of Conformity. EN 8
Technical specifications EN 9
Environmental protection

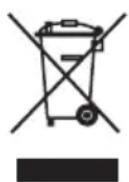
The packaging materials are recyclable. Please do not throw packaging in the domestic waste but pass it on for recycling.
Old units contain valuable recyclable materials. Batteries, oil and similar substances may not be released into the environment. Therefore please dispose of old units through suitable collection systems.
Notes about the ingredients (REACH)
You will find current information about the ingredients at:
www.kaercher.com/REACH
Symbols in the operating instructions
Danger or hazard levels
△DANGER
Immediate danger that can cause severe injury or even death.
WARNING
Possible hazardous situation that could lead to severe injury or even death.
CAUTION
Pointer to a possibly dangerous situation, which can lead to minor injuries.
ATTENTION
Pointer to a possibly dangerous situation, which can lead to property damage.
Safety instructions
Before using the appliance for the first time, read and observe these operating instructions and the accompanying brochure: Safety information for Disc single-pulley machine machines No. 5.956-659.0.
Safety Devices
Safety devices serve to protect the user and must not be rendered in operational or their functions bypassed.
Unlocking
Prevents the machine from being switched on accidentally.
Function
The appliance is used for the wet cleaning or polishing of level floors.
The dust generated during polishing is absorbed by an exchangeable filter bag.
- A working distance of 500mm will improve the efficiency.
- Power supply operation allows a high capacity without a restriction of the working time.
Proper use
Use this appliance only as directed in these operating instructions.
- The appliance should only be used for polishing level floors.
- The appliance may only be equipped with original accessories and spare parts.
- The appliance is not suited for the use in potentially explosive environments.
- This appliance is designed only for dry applications and should not be used or stored in the open under moist conditions.
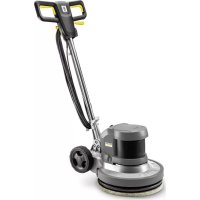
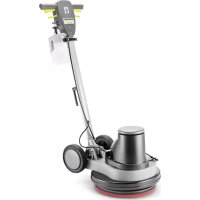
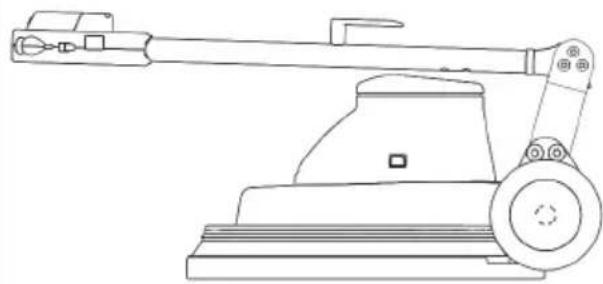
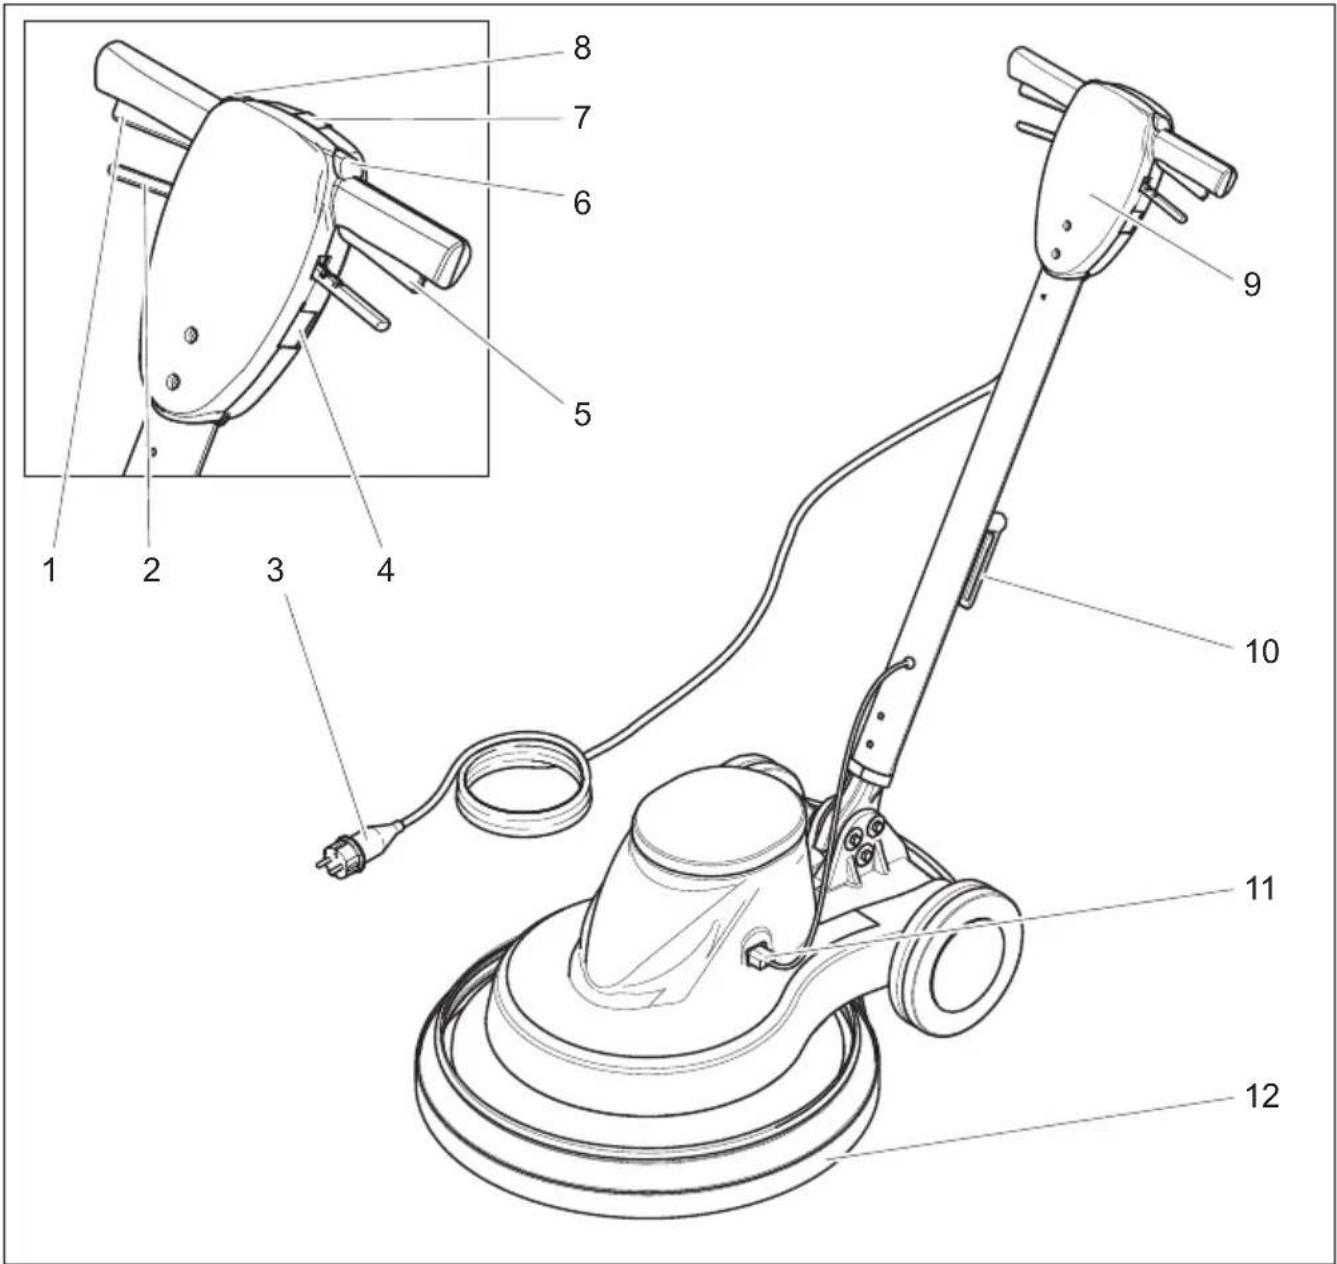
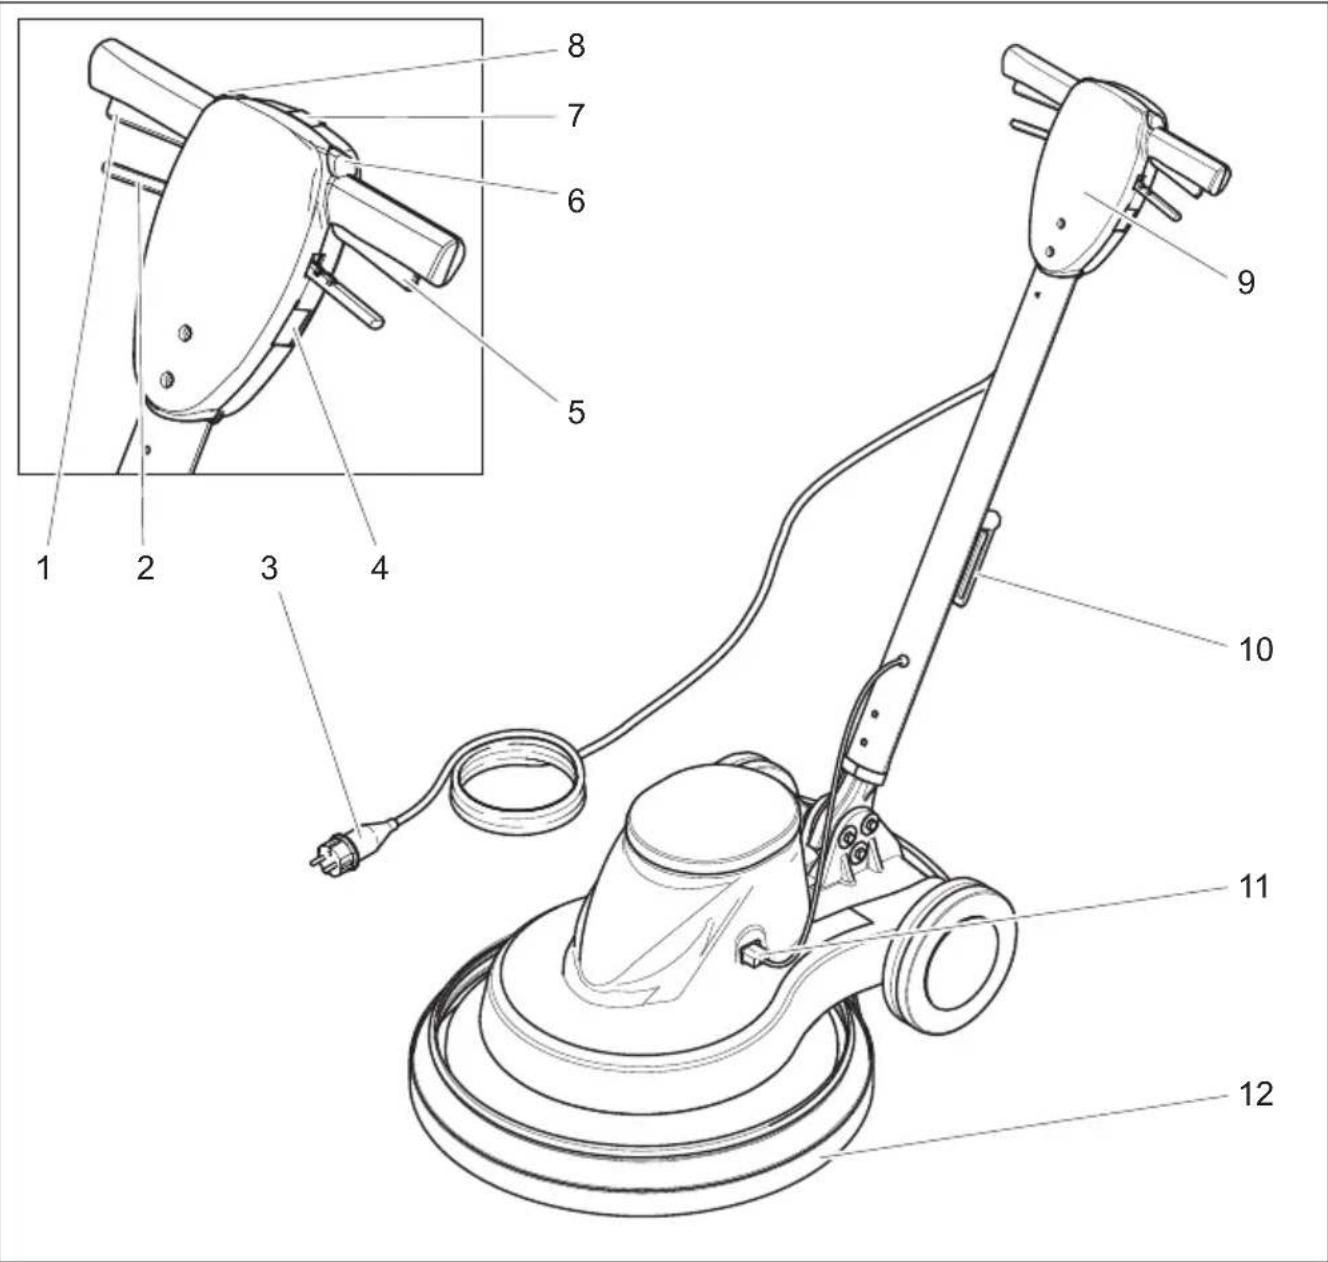
Operating and Functional Elements

1 Right switch
2 Lever for level adjustment
3 Mains cable with mains plug
4 Receptacle (only use manufacturer approved accessories)
5 Left switch
6 Left unlocking
7 Indicator lamp "Mains voltage present"
8 Right unlocking
9 Handle
10 Cable hook, rotating
11 Plug connection for control cable
12 Vacuum apron
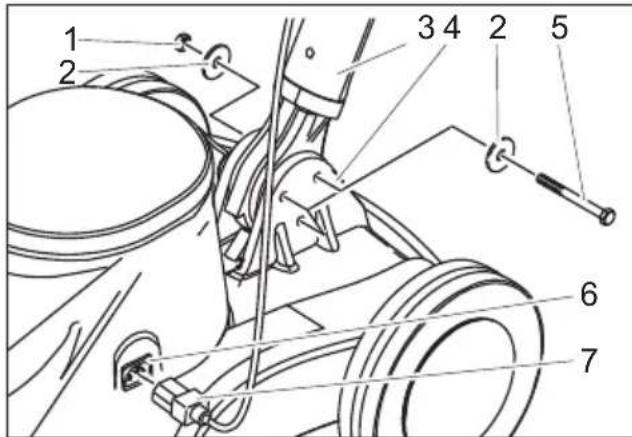
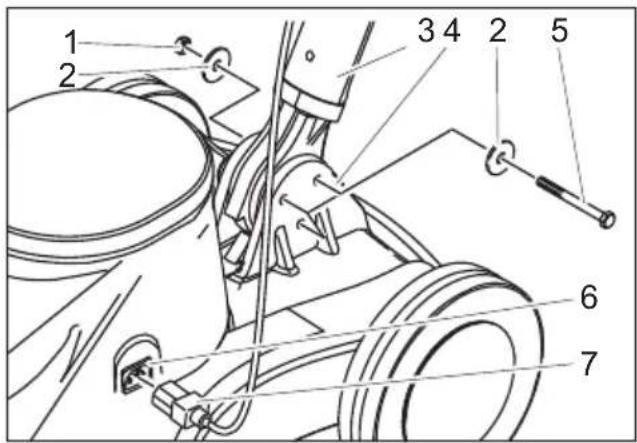
Assembly
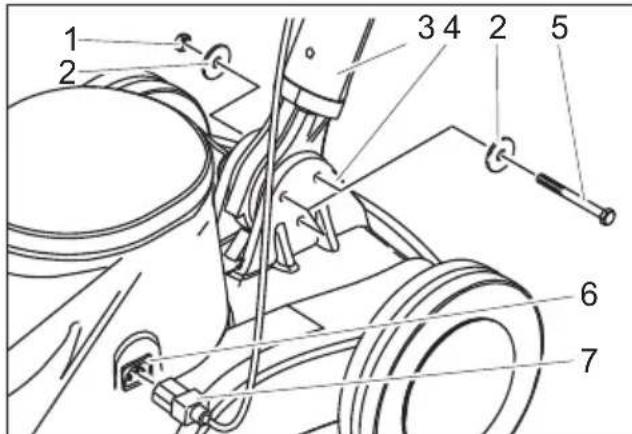
1 Nut
2 Disc
3 Handle
4 Appliance base
5 Hexagonal screw
6 Female connector control line
7 Male connector control line
Unpack the appliance.
Remove the cable ties from the bottom end of the handle.
NOTICE
Ensure that the toothed wheel does not fall out of the opening.
Hold the handle over the appliance base upright and with the cable hook to the back.
Insert the bottom end of the handle between the two tabs of the appliance base.
Align the borings.
Connect the handle and the appliance base using the 3 enclosed screws, 6 washers and 3 nuts as shown in the illustration above.
Tighten the screws using the enclosed open end wrench.
Insert the plug of the control line into the female connector of the control line.
Before Startup
Inserting a filter bag
Disconnect the mains plug from the socket.
Pull the lever for level adjustment and bring the handle in a vertical position.
Tilt the appliance backward and store it on the handle.
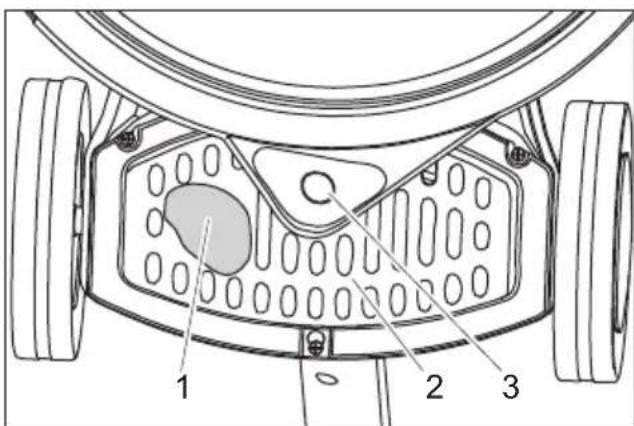
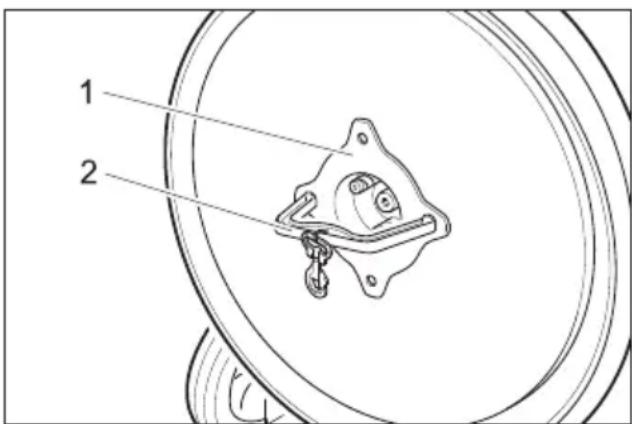
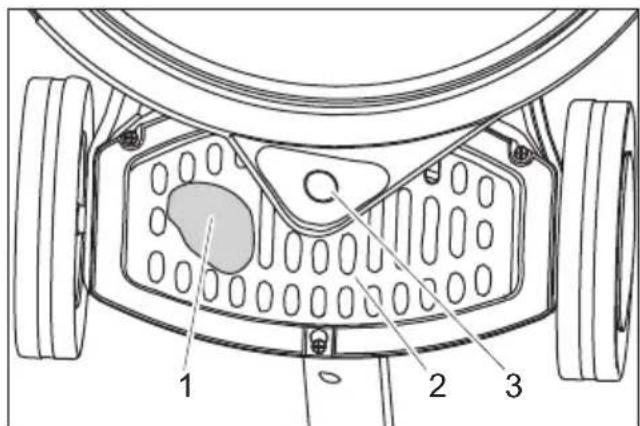
1 Filter bag
2 Cover
3 Connection neck, vacuum apron
Slide the cover downward/to the rear and remove it.
Insert the filter bag into the appliance and place over the connection neck of the vacuum apron.
Replace cover.
Attach the pad
CAUTION
Risk of damage!
Do not store the appliance with inserted pad. Always remove the pad after every use.
Disconnect the mains plug from the socket.
Pull the lever for level adjustment and bring the handle in a vertical position.
Tilt the appliance backward and store it on the handle.
1 Nut
2 Tool
Unscrew the nut in the clockwise direction using the enclosed tool.
Remove the washer.
Place the pad on the centre of the driving plate and press it slightly.
Install the washer.
Screw the nut in the anti-clockwise direction and tighten it using the enclosed tool.
Remove the tool.
Tilt the appliance forward.
Operation
△DANGER
Risk of injury on account of the rotating pad. Do not bring your hands and feet anywhere close to the rotating pads.
Adjust handle
Pull the lever for level adjustment.
Tilt the handle into a comfortable position.
Release the lever for level adjustment.
Transport
Park the handle in vertical position.
Tilt the appliance backwards and drive it to the place of use.
Turning on the Appliance
Warning
Risk of damage to the floor covering. Do not operate the appliance on the spot.
Do not use the appliance when no pad is mounted.
NOTICE
The device cannot be switched on while the handle is perpendicular to the floor.
Swivel bottom cable hook upward and remove the cable completely from the appliance.
Insert the mains plug into a socket. The indicator lamp "main power" will illuminate.
Set handle to working height.
Hold the handle with both hands.
Press the left or right release and hold it.
Press the switch on the same side - the appliance starts.
Release unlocking mechanism.
Move the appliance forward and backward over the surface to be processed.
Release the switch to interrupt operation.
Shutting down
Release the switch.
Disconnect the mains plug from the socket.
Pull the lever for level adjustment and bring the handle in a vertical position.
Swivel the cable hook toward the bottom and wind the cable between the handle and the cable hook.
Tilt the appliance backward and store it on the handle.
Remove the pad.
Tilt the appliance forward.
Clean the casing with a damp cloth.
Store the appliance in a dry room.
WARNING
Device can roll away and cause accidents.
Do not park the device on slopes.
Swivel the handle to the front
With the 230V/60Hz variant the handle can be swivelled to the front for transport and storage.
Pull the lever for level adjustment.
→ Swivel the handle to the front.
Release the lever for level adjustment.
Transport
When transporting in vehicles, secure the appliance according to the guidelines from slipping and tipping over.
Remove the pad from the device.
Storage
CAUTION
Risk of personal injury or damage! Consider the weight of the appliance when storing it.
This appliance must only be stored in interior rooms.
Select the storage site for the appliance taking into consideration the permissible total weight of the appliance in order not to impact its stability.
Remove the pad from the device.
Care and maintenance
△DANGER
Risk of injury. Pull the plug from the mains before carrying out any tasks on the appliance.
Check the mains connection cable for damages. Replace the defective mains cable.
Check filled level of the filter bag; replace, if required.
Maintenance contract
To ensure a reliable operation of the appliance maintenance contracts can be concluded with the competent Kärcher sales office.
Troubleshooting
△DANGER
Risk of injury. Pull the plug from the mains before carrying out any tasks on the appliance.
In case of faults that cannot be remedied using the table below please contact the customer service.
| Fault Remedy | |
| Appliance does not start, indicator lamp "main power" does not illum- nate. | Check fuse in the building, main cables, plugs and socket. If the fuse in the building is tripped several times, contact customer service. |
| Appliance does not start, indicator lamp "main power" is illuminated. | Properly operate the release, see "switching on the appliance". |
| Put the handle into the working position. With the handle in the upright position, the appliance cannot be started. | |
| Check for correct connection of the connector in the control line. | |
| Appliance vibrates strongly Check pad | pad attachment |
| Clean the pad | |
| Replacing the pad | |
| Pad does not turn Check if foreign bodies | bodies are blocking the pad; remove the foreign bodies if required. |
Warranty
The warranty terms published by the relevant sales company are applicable in each country. We will repair potential failures of your appliance within the warranty period free of charge, provided that such failure is caused by faulty material or defects in manufacturing. In the event of a warranty claim please contact your dealer or the nearest authorized Customer Service centre. Please submit the proof of purchase.
Accessories and Spare Parts
Only use accessories and spare parts which have been approved by the manufacturer. The exclusive use of original accessories and original spare parts ensures that the appliance can be operated safely and trouble free.
Spare parts
- At the end of the operating instructions you will find a selected list of spare parts that are often required.
- For additional information about spare parts, please go to the Service section at www.kaercher.com.
Accessories
| Description Part no.: | |
| Pad, soft, nature 6.371-146.0 | |
| Pad, soft, biege 6.369-468.0 | |
| Pad, medium soft, red 6.369-079.0 | |
| Pump spray bottle, 1 liter 6.394-409.0 | |
| Pre-spraying unit 6.670-020.0 |
Detergent
| Description Part no.: | |
| Spray Cleaner RM 748, 10 liters | 6.295-162.0 |
EU Declaration of Conformity
We hereby declare that the machine described below complies with the relevant basic safety and health requirements of the EU Directives, both in its basic design and construction as well as in the version put into circulation by us. This declaration shall cease to be valid if the machine is modified without our prior approval.
Product: Floor cleaner
Type: 1.291-xxx
Relevant EU Directives
2006/42/EC (+2009/127/EC)
2014/30/EU
Applied harmonized standards
EN 60335-1
EN 60335-2-67
EN 55014-1: 2006+A1: 2009+A2: 2011
EN 55014-2: 2015
EN 61000-3-2: 2014
EN 61000-3-11: 2000
EN 62233: 2008
Applied national standards
The signatories act on behalf of and with the authority of the company management.


Documentation supervisor:
S. Reiser
Alfred Kärcher SE & Co. KG
71364 Winnenden (Germany)
Tel.: +49 7195 14-0
Fax: +49 7195 14-2212
Winnenden, 2019/01/01
Technical specifications
| BDP 50/1500 | |||
| Power | |||
| Mains voltage V/Hz 230/50 230/60 | |||
| Motor output W 1100 1100 | |||
| Pad | |||
| Working width mm 500 500 | |||
| Diameter mm 500 500 | |||
| Speed 1/min 1500 1500 | |||
| Contact pressure N/cm | 2 | 0,04 0,04 | |
| Dimensions and weights | |||
| Theoretical surface cleaning performance m2/h 900 900 | |||
| Volume of filter bag | 1 | 1 | 1 |
| Weight | kg | 34,5 34,0 | |
| Dimensions (I x b x h) | mm 760x5 | 60x1260 760x5 | 60x1260 |
| Cable length m 20 | 20 | ||
| Supply Cord | H07RN-F 3x1,5 mm² | ||
| Noise emission | |||
| Sound pressure level (EN 60704-1) | dB(A) | 56 | 61,3 |
| Machine vibrations | |||
| Vibration total value (ISO 5349) | m/s² | 0,35 0,78 | |

www.kaercher.com/REACH
Chairman of the Board of Management

S. Reiser
Director Regulatory Affairs & Certification
Responsible de la documentation : S. Reiser
Alfred Kärcher SE & Co. KG
71364 Winnenden (Germany)
Tel.: +49 7195 14-0
Fax: +49 7195 14-2212
Winnenden, 2019/01/01
\section*{Caracteristiques techniques}
www.kaercher.com/REACH
2006/42/CE (+2009/127/CE)
2014/30/UE
Chairman of the Board of Management

S. Reiser
Director Regulatory Affairs & Certification
71364 Winnenden (Germany)
Tel.: +49 7195 14-0
Fax: +49 7195 14-2212
Winnenden, 2019/01/01
Dati tecnici
www.kaercher.com/REACH
Chairman of the Board of Management

S. Reiser
Director Regulatory Affairs & Certification
71364 Winnenden (Germany)
Tel.: +49 7195 14-0
Fax: +49 7195 14-2212
Winnenden, 2019/01/01
Technische gegevens
| BDP 50/1500 | |||
| Vermogen | |||
| Netspanning V/Hz 230/50 230/60 | |||
| Vermogensopname motor W 1100 1100 | |||
| Pad | |||
| Werkbreedte mm 500 500 | |||
| Diameter mm 500 500 | |||
| Toerental 1/min 1500 1500 | |||
| Aanlegdruk N/cm | 2 | 0,04 0,04 | |
| Maten en gewichten | |||
| Theoretische oppervlaktekapaciteit m2/h 900 | 0 900 | ||
| Volume filterzak | 1 | 1 | 1 |
| Gewicht | kg | 34,5 34,0 | |
| Afmetingen (L x B x H) | mm 760x5 | 60x1260 760x5 | 60x1260 |
| Lengte snoer | m | 20 | 20 |
| Stroomkabel H07RN-F 3x1,5 mm | 2 | ||
| Geluidsemissie | |||
| Geluidsdrukniveau (EN 60704-1) | dB(A) | 56 | 61,3 |
| Apparaattrillingen | |||
| Totale bewegingswaarde (ISO 5349) m/s2 | 0,35 | 0,78 | |
www.kaercher.com/REACH
2006/42/CE (+2009/127/CE)
2014/30/UE
Chairman of the Board of Management

S. Reiser
Director Regulatory Affairs & Certification
Responsible de documento:
S. Reiser
Alfred Kärcher SE & Co. KG
71364 Winnenden (Germany)
Tel.: +49 7195 14-0
Fax: +49 7195 14-2212
Winnenden, 2019/01/01
Datasétécnicos
www.kaercher.com/REACH
| Denominacao Refa | |
| Spray Cleaner RM 748, 10 litros | 6.295-162.0 |
2006/42/CE (+2009/127/CE)
2014/30/UE
Chairman of the Board of Management

S. Reiser
Director Regulatory Affairs & Certification
71364 Winnenden (Germany)
Tel.: +49 7195 14-0
Fax: +49 7195 14-2212
Winnenden, 2019/01/01
Dados技术和
www.kaercher.com/REACH
2006/42/EF (+2009/127/EF)
2014/30/EU
Chairman of the Board of Management

S. Reiser
Director Regulatory Affairs & Certification
71364 Winnenden (Germany)
Tel.: +49 7195 14-0
Fax: +49 7195 14-2212
Winnenden, 2019/01/01
Tekniske data
www.kaercher.com/REACH
Symboler i bruksanvisningen
Risikotrinn
△FARE
2006/42/EF (+2009/127/EF)
2014/30/EU
Anvende overensstemmende normer
EN 60335-1
EN 60335-2-67
EN 55014-1: 2006+A1: 2009+A2: 2011
EN 55014-2: 2015
EN 61000-3-2: 2014
EN 61000-3-11:2000
EN 62233: 2008
71364 Winnenden (Germany)
Tel.: +49 7195 14-0
Fax: +49 7195 14-2212
Winnenden, 2019/01/01
Tekniske data
| BDP 50/1500 | |||
| Effekt | |||
| Nettspenning V/Hz 230/50 230/60 | |||
| Leistungsaufnahme Motor W 1100 1100 | |||
| Pad | |||
| Arbeidsbredde mm 500 500 | |||
| Diameter mm 500 500 | |||
| Turtall o/min. 1500 1500 | |||
| Børstetrykk N/cm | 2 | 0,04 0,04 | |
| Mål og vekt | |||
| Teoretisk flateeffekt m2/h 900 900 | |||
| Volum filterpose | I | 1 | 1 |
| Vekt | kg | 34,5 34,0 | |
| Mål (I x b x h) | mm 760x5 | 60x1260 760x5 | 60x1260 |
| Kabellengde | m | 20 | 20 |
| Nettledning H07RN-F 3x1,5 mm | 2 | ||
| Støy | |||
| Støynivå (EN 60704-1) | dB(A) | 56 | 61,3 |
| Maskinvibrasjon | |||
| Svingningsverdi iht. ISO 5349 | m/s2 | 0,35 0,78 | |
www.kaercher.com/REACH
Symboler i bruksanvisningen
Risknivaer
△FARA
Chairman of the Board of Management

S. Reiser
Director Regulatory Affairs & Certification
Dokumentationsbefullmaktigad: S. Reiser
Alfred Kärcher SE & Co. KG
71364 Winnenden (Germany)
Tel.: +49 7195 14-0
Fax: +49 7195 14-2212
Winnenden, 2019/01/01
Tekniska data
www.kaercher.com/REACH
Chairman of the Board of Management

S. Reiser
Director Regulatory Affairs & Certification
Dokumentointivastaava: S. Reiser
Alfred Kärcher SE & Co. KG
71364 Winnenden (Germany)
Tel.: +49 7195 14-0
Fax: +49 7195 14-2212
Winnenden, 2019/01/01
Tekniset tiedot
www.kaercher.com/REACH
Chairman of the Board of Management

S. Reiser
Director Regulatory Affairs & Certification
71364 Winnenden (Germany)
Tel.: +49 7195 14-0
Fax: +49 7195 14-2212
Winnenden, 2019/01/01
Texvika xapakntnpiOTIKa
www.kaercher.com/REACH

Chairman of the Board of Management

S. Reiser
Director Regulatory Affairs & Certification
71364 Winnenden (Germany)
Tel.: +49 7195 14-0
Fax: +49 7195 14-2212
Winnenden, 2019/01/01
Teknik Bilgiler
www.kaercher.com/REACH
СИМВОЛыВ руковордъ ВО эКсплyaataци
CTepeHb onachoctn
ONACHOCTb
Диненорсмьенho epo3aue onacchocmu, komopar npueodum K mxeJIbIM ybeyam unu K cmepmu.
△PENEYNPEXDEHNE
Дя bo3moхною nomehuаьho onachou cumyaцuu, komopar moxem npueecmu K mxeblm yeebyam unu K cmepu.
OCTOPOXHO
Yka3aHue Ha nomeHuaJIbHO onaChyIO cumyaUIO, Komopar MoXem npueecMu K noJyuEHUo neKux mpaM.
BHUMAHNE
yKa3aHue omHocumelbHo 603MOxHOJ noMeHuaJIbHO onaCHOcmyauuu, Komopra MoXem IOBneYb MamepuaIbHbIu yuep6.
Yka3aHnno TExHnKe 6e30NaChOCTN
Ipeed nepBbIM nCnoJb3ObaHnem npnbopa npoHTaTe n co6JIouaIte daHoe PykoBOdCTBO nO 3KcNJaTaUu N npNJarAeMyd 6pOshOpy nO TexHnke 6e3OnacHocTn npi pa6ote c DnCKOBbIMM MOUzUMn npnbopam N5.956-659 n DeIcTBuyIte COOTBeTCTBENHO.
3auntbIe yctpoiCTBa
3aunthbIe npncnocoblenna npeHa3hauehblnla3auntbI onepaTopa.Ix OTKIOUyeHne,a TaKke pa6oTa B o6xoJnx fynKcN He dOnyckaIOTc.
Pa36IoknpoBka
IpeDoTbpaaet cnyaHoe BkIoueHne npibopa.
Ha3naueHne
Pnp6op npedHa3NaueH dIy nOpOBKn pOBhIX nOIOB.
6bIb co6paetcB CMeHHOM pOBaHbHom nakeTe.
- Pa6o7a 500 MM nO3B0JAreT o6ecneuHb 3ΦΦeKTHBHOe npImeHeHne.
-Питанне OT cETN obecneuBaet BbICOKyI npON3BOIDTeJIbHOCTb 6e3 orpaHn-ueHnBpeMeHn pa6Otbl.
PpHaJnEJXHocTn 3aNaChbIe DeTaJIIn
Pa3pe7aetcI NCNoJIb3OBaTb TOJIbKO Te npHaJNeXHOCTN 3aNaChBle YAcTNI, NcNoJIb3OBaHne KOToPbIX 6blIO ODo6peHo n3- roTOBHTeJeM. NcNoJIb3OBaHne OpnHaJIbHbIX pInHaJdJIeXHOCTeN 3aNuacteY raPaHTnpuyET Bam HaJeKHyU N 6ecpe6oHyO pa6Oty np6Opa.
3aNachbIe yactn
- Bb6op Hau6oJee yacto Heo6xOaIMbIX 3aIyacteBbl HaJeTe B KOHcE NHCTpyKcN IN O KcPnPyTaCIn.
-Дальбейшую Информацию O 3anчacTЯх Bы НадеTe Ha caйТe www.kaercher.comВ pa3дene Service.
PpHnHaIeXHoCTn
| Овознayaенье № Deталу | |
| Нakладka, Мягков, Нату- разьнай | 6.371-146.0 |
| Нakладka, Мягков бжевая | 6.369-468.0 |
| Нakладka, средемоград Краснай | 6.369-079.0 |
| Рассы国际贸易有限公司 Насoca, 1 пир | 6.394-409.0 |
| Устroy STBO predecessor of Ного разбравлий | 6.670-020.0 |
Moouee cpeDCTBO
| Овоз nauseю № detали | |
| Spray Cleaner RM 748, 10 litropond | 6.295-162.0 |
3aayBneHne o COOTBeTCTBn EU
HaCTOaM MbI 3aBJIeM, yTO HnKeyka-3aHHbI np6Op nO CBOe KOHcEaN IN KOHCTpyKcN, a TAKKe B OcyUeCTBJeHNOM I DONyUeHHOM HAMN K npOdaJKe NcNoJIHeHbIM OTBeuAeT COOTBeTCTByIOUsm OCHOBHBIM Tpe6oBaHnM NO 6e3OnacHOCTN IN 3dOpOBbIO corlacho DNpeKTnBam EU. Ppi BHeceHn N3MeHeHn, He corlaCOBaHHbIX C HAMN, DaHHoe 3aABJeHne TepReT CBOIO cnIy.
PpOdyKT OUHCTHTeJIb NOJa
Tun: 1.291-xxx
OchOBhIe dInpeKTHBbI EU
2006/42/EC (+2009/127/EC)
2014/30/EU
Прииме HeHbIe rapMOHn3NpOBaHHbIe HOpMbI
EN 60335-1
EN 60335-2-67
EN 55014-1: 2006+A1: 2009+A2: 2011
EN 55014-2: 2015
EN 61000-3-2: 2014
EN 61000-3-11:2000
EN 62233: 2008
PpumHeHHbIe BHyTpnpocSyapcTBeHHbIe HopMbI
一
HuxenodncaBwneceIuza DeiCTbYOT OT ImeHn n no DoBepeHHocTn PpaBneHna.
H.Jenner
Chairman of the Board of Management

S. Reiser
Director Regulatory Affairs & Certification
YIIOHOMOeHHbI COTpydNk NO BeDeHNIO DOKyMeHTOO6Opota:
S. Reiser
Alfred Kärcher SE & Co. KG
71364 Winnenden (Germany)
Tel.: +49 7195 14-0
Fax: +49 7195 14-2212
Winnenden, 2019/01/01
TexHnueckne daHHbIe
www.kaercher.com/REACH
Chairman of the Board of Management

S. Reiser
Director Regulatory Affairs & Certification
71364 Winnenden (Germany)
Tel.: +49 7195 14-0
Fax: +49 7195 14-2212
Winnenden, 2019/01/01
Muszaki adatok
www.kaercher.com/REACH
2006/42/ES (+2009/127/ES)
2014/30/EU
Chairman of the Board of Management

S. Reiser
Director Regulatory Affairs & Certification
71364 Winnenden (Germany)
Tel.: +49 7195 14-0
Fax: +49 7195 14-2212
Winnenden, 2019/01/01
Technické udaje
www.kaercher.com/REACH
Zadevne directives EU:
2006/42/ES (+2009/127/ES)
2014/30/EU
H.Jenner
Chairman of the Board of Management
S. Reiser

Director Regulatory Affairs & Certification
71364 Winnenden (Germany)
Tel.: +49 7195 14-0
Fax: +49 7195 14-2212
Winnenden, 2019/01/01
Tehnični podatki
| BDP 50/1500 | |||
| Zmogljivost | |||
| Omrežna napetost V/Hz 230/50 230/60 | |||
| Poraba moči motorja W 1100 1100 | |||
| Blazinica | |||
| Delovna širina mm 500 500 | |||
| Premer mm 500 500 | |||
| Št. vrtljajev 1/min 1500 1500 | |||
| Pritisni tlak N/cm | 2 | 0,04 0,04 | |
| Mere in teža | |||
| Teoretićna površinska moč m | 2/h 900 900 | ||
| Prostornina filtrske vrečke | 1 | 1 | 1 |
| Teža | kg | 34,5 34,0 | |
| Dimenzije (D x Š x V) | mm 760x5 | 60x1260 760x5 | 60x1260 |
| Dolžina kabla | m | 20 | 20 |
| Omrežni kabel | H07RN-F 3x1,5 mm2 | ||
| Emisija hrupa | |||
| Raven zvočnega tlaka (EN 60704-1) | dB(A) | 56 | 61,3 |
| Vibracije naprave | |||
| Skupna vrednost nihanja (ISO 5349) | m/s2 | 0,35 0,78 | |

www.kaercher.com/REACH
2006/42/WE (+2009/127/WE)
2014/30/UE
Chairman of the Board of Management

S. Reiser
Director Regulatory Affairs & Certification
Administrator dokumentaci:
S. Reiser
Alfred Kärcher SE & Co. KG
71364 Winnenden (Germany)
Tel.: +49 7195 14-0
Fax: +49 7195 14-2212
Winnenden, 2019/01/01
Dane techniczne
www.kaercher.com/REACH
Directive UE respectate:
2006/42/CE (+2009/127/CE)
2014/30/UE
Norme armonizate utilize:
EN 60335-1
EN 60335-2-67
EN 55014-1: 2006+A1: 2009+A2: 2011
EN 55014-2: 2015
EN 61000-3-2: 2014
EN 61000-3-11:2000
EN 62233: 2008
Norme de aplicare nationale:
Chairman of the Board of Management

S. Reiser
Director Regulatory Affairs & Certification
71364 Winnenden (Germany)
Tel.: +49 7195 14-0
Fax: +49 7195 14-2212
Winnenden, 2019/01/01
Date tehnice
www.kaercher.com/REACH
2006/42/ES (+2009/127/ES)
2014/30/EÜ
Uplatnovanie harmonizovanie normy:
EN 60335-1
EN 60335-2-67
EN 55014-1: 2006+A1: 2009+A2: 2011
EN 55014-2: 2015
EN 61000-3-2: 2014
EN 61000-3-11:2000
EN 62233: 2008
Chairman of the Board of Management

S. Reiser
Director Regulatory Affairs & Certification
71364 Winnenden (Germany)
Tel.: +49 7195 14-0
Fax: +49 7195 14-2212
Winnenden, 2019/01/01
Technické udaje
www.kaercher.com/REACH
Simboli u uputama za rad
Stupnjevi opasnosti
OPASNOST
| Oznaka Br. bijela | |
| Spray Cleaner RM 748, 10 litara | 6.295-162.0 |
EU izjava o usklaedenosti
2006/42/EZ (+2009/127/EZ)
2014/30/EU
Primijenjene uskladene norme:
EN 60335-1
EN 60335-2-67
EN 55014-1: 2006+A1: 2009+A2: 2011
EN 55014-2: 2015
EN 61000-3-2: 2014
EN 61000-3-11: 2000
EN 62233: 2008
Primijenjeni nacionaln standards
Chairman of the Board of Management

S. Reiser
Director Regulatory Affairs & Certification
Opunomoceni za izradu dokumentacije: S. Reiser
Alfred Kärcher SE & Co. KG
71364 Winnenden (Germany)
Tel.: +49 7195 14-0
Fax: +49 7195 14-2212
Winnenden, 2019/01/01
Tehnicki podaci
| BDP 50/1500 | |||
| Snaga | |||
| Napon el. mreže V/Hz 230/50 230/60 | |||
| Potrošnja energije motora W 1100 1100 | |||
| Disk | |||
| Radna širina mm 500 500 | |||
| Promjer mm 500 500 | |||
| Broj okretaja 1/min 1500 1500 | |||
| Tlak nalijeganja N/cm | 2 | 0,04 0,04 | |
| Dimenzije i težine | |||
| Teoretski površinski učinak m | 2/h 900 900 | ||
| Zapremnina filtarske vrećice l 1 | 1 | ||
| Težina | kg | 34,5 34,0 | |
| Dimenzije (d x š x v) | mm 760x5 | 60x1260 760x5 | 60x1260 |
| Duljina kabela | m | 20 | 20 |
| Strujni kabel | H07RN-F 3x1,5 mm² | ||
| Emisija buke | |||
| Razina zvučnog tlaka (EN 60704-1) | dB(A) | 56 | 61,3 |
| Vibracije stroja | |||
| Ukupna vrijednost oscilacija (ISO 5349) | m/s² | 0,35 0,78 | |

Pre prve upotrebe Vaseg uredaja procitajte ove originalno
www.kaercher.com/REACH
Simboli u uputstvu za rad
Stepeni opasnosti
OPASNOST
Ukazuje na neosredno pretecu opasnost koja dovodi do tešikh telesnih povreda ili smrti.
UPOZORENJE
Ukazuje na eventualno opasnu situaciju koja moze dovesti do teških telesnih povreda ili smrti.
△OPREZ
Napomena koja ukazuje na eventualno opasnu situaciju, koja moze izazvati lakse telesne povrede.
PAZNJA
Napomena koja ukazuje na eventualno opasnu situaciju koja moze izazvati materijalne stete.
Sigurnosne napomene
Pre prvog korišćenja ureža pročitajte i uzmite u obzir ovo uputstvo za rad kao i prilozhenu brošuru sa sigurnosnim napomenama za diskasti mašinu za podove br. 5.956-659 i postupajte u skladu sa njima.
Sigurnosni elementi
2006/42/EZ (+2009/127/EZ)
2014/30/EU
Primenjene uskladene norme:
EN 60335-1
EN 60335-2-67
EN 55014-1: 2006+A1: 2009+A2: 2011
EN 55014-2: 2015
EN 61000-3-2: 2014
EN 61000-3-11:2000
EN 62233: 2008
Chairman of the Board of Management

S. Reiser
Director Regulatory Affairs & Certification
Opunomoceni za izradu dokumentacije: S. Reiser
Alfred Kärcher SE & Co. KG
71364 Winnenden (Germany)
Tel.: +49 7195 14-0
Fax: +49 7195 14-2212
Winnenden, 2019/01/01
Tehnicki podaci
| BDP 50/1500 | |||
| Snaga | |||
| Napon el. mreže V/Hz 230/50 230/60 | |||
| Potrošnja energije motora W 1100 1100 | |||
| Disk | |||
| Radna širina mm 500 500 | |||
| Prečnik mm 500 500 | |||
| Broj obrtaja 1/min 1500 1500 | |||
| Pritisak naleganja N/cm | 2 | 0,04 0,04 | |
| Dimenzije i težine | |||
| Teoretski površinski učinak m | 2/h 900 900 | ||
| Zapremina filterske kese | 1 | 1 | 1 |
| Težina | kg | 34,5 34,0 | |
| Dimenzije (d x š x v) | mm 760x5 | 60x1260 760x5 | 60x1260 |
| Dužina kabla | m | 20 | 20 |
| Strujni kabl | H07RN-F 3x1,5 mm² | ||
| Emisija buke | |||
| Nivo zvučnog pritiska (EN 60704-1) | dB(A) | 56 | 61,3 |
| Vibracije urežaja | |||
| Ukupna vrednost oscilacija (ISO 5349) | m/s² | 0,35 0,78 | |

Ppei npBBOTo n3nOJ3BaHe Ha Bauny ypei npoyeTe ToBa
opunnaHNO nHctpkyua 3a pa6oTa, DeiCTBaIte cnopeI Hero I ro 3ana3eTe 3a IIO-KbCHO n3nO13BaHe nII 3a CneDbaUy npTEkataJ.
CbDbpxaHne
Ona3BaHe Ha okolHaTa cpea BG 1
CnmbonB YnbTbaHeTo 3a pa-
6ota BG1
YkaHna 3a 6e3onacHocT .BG2
PpeDn3Hn npncnoc6JeHHa BG 2
Дeблokиранe BG2
Функць BG2
Ynotpe6a no npedHa3NaueHne BG 2
O6cnykBaunn yHKuNoHaJIHn
eIemEnTn BG3
Mohtaxk. BG 4
Ipei n yckaHe B ekcnloataunB4
Ecknoataua. BG5
TpaHcnpr. BG6
CbxaheHne BG6
PnKn nOaPbXka BG6
POMOUI npHn3npaBHOCTN..BG7
TapaHua BG8
PpHaIeJXHocTn np3epBHN
chaTn. BG 8
ECДeknapaun3a cbotbet-
CTBHe. BG9
TexHnueckn daHHN BG 10
Ona3BaHe Ha OKoJIHaTa cpeJa

OnapobbHnTe MaTePnAn Mo- rat da ce peuKnIpaT. MoJ He XBpIaIe OnapOBKInTe npN DoMaunHe OTnaDbu, a rN ppeJaIte Ha BTOpUHN CypOBHH C ueI NOBtOpHa yNoTpe6a.
CTapnte ypei n cbdpkata Hn MaTePnai, noIeXaun Ha peuKlnpaHe, KOITo MOrat da 6bDat ynoTpe6eHn NOBTOPO. BaTePn, macna i noO6Hn Ha TEx He 6uBa Da Ionoadat B OKOIHaTa Cpea. Iopau TOBA MoJr OTcTpaHraIte CTapnte ypei, N3NoI3BauiKn IOxOJaun 3a ueTTa CnCTeMn 3a Cb6npaHe.
Yka3aHnna 3a ccbctaBknte (REACH)
AkyaHa HOpMaun 3a CbCTaBKnTe Ie Hamepnte Ha:
www.kaercher.com/REACH
CnmboJIb VytBtBaHeTo 3a pa6ota
CTeNeHn Ha onaCHOCT
ONACHOCT
3a HenocpecdmbeHo epo3ra onachocm, kOmo bdu do mexku melechu nopedu unu do cMbpm.
△PENEYNPEXDEHNE
3a eb3MOxHa onacha cumyaun, KOAmo 6u MoZna da doeede do meKku meNechu noepdu unu cmbpm.
△PENEIA3JNBOCT
Yka3aHue 3a 6b3MOxHa onacha cumya- uja, Kjmo MoKe da doeede do neku Ha- paHraHua.
BHIMAHHE
Yka3aHue 3a 6b3MOxHa onacha cumya- u, Kjmo MoKe da doeede do MamepuanHu uemu.
Yka3aHnna 3a 6e3oNaCHocT
Ipei Da n3noBate yepa 3a npbwn PtBT, npoTeTe n cb6nOdaBaTte Hacto- yntBAHe 3a ekCnloataunn npInnoXeHATA 6poUpya Ka3aHn 3a 6e3onac-HocT 3a DnCKOBMaunn C eHa 7aN6a No 5.956-659 n rncn3BaTte.
PpeDn3Hn npncno6JeHna
IpeDn3HnTe npncnocobneHna Cnykata 3a 3aHTa Ha noTpe6nteHa Tp8Ba da ce n3KnOuBbAT nn Da ce npomeHrT cyHKnnte IM.
Дeблokиранe
IpeDoTbpaTЯBa HenpeDHaMepeHOTOBKIOUcBaHe Ha ypeDa.
Функця
YpeIbT ce n3PON3Ba 3a noInpaHe Ha paBHNIOIOBE.
IonyuabaunrCe npn noipanahe npax ce eoema OT eHa cMeHraMa qntbprHa TOp6nka.
Pa6oTHaTa ⅢnpHa oT 500 MM daBa Bb3-MoXHOCT 3a eΦeKTnBHO n3NoJ3BaHe.
- 3aDéиctBaHeto B MpeXaTa DaBa Bb3-MOxHocT 3a BnCOKa Ipon3BOdnteHocT 6e3 orpaHnueHne Ha pa6oTHOTO BpeMe.
YnoTpe6a no npedHa3NaueHne
N3noJI3BaIte To3n ypeD cAmO B CbOTBETCTBHe cbc 3aJaHTe B HAcTOrJIoTO YnblTBAHe 3a EKcNlloatauia.
- YpeIbT TpI6Ba Da ce I3NoI3Ba cAmO 3a NOpIpaHe Ha rJaIKn IoIOBe.
- YpeIbT MoKe Ia ce obOpyIbBa cAmO c opINHaJIHn PrInHaJneXHoCTN n pe3epBHN YactN.
- YpeIbT He e IoXOJa, 3a npInIOKeHHe B 3acTpaweHn OTeKcPiO3nN o6-KpbJKeHn.
-To3n ypeJe o npedeJen cMo 3a cyxo npInIOxKeHne H He 6Ba Da ce N3NoI3Ba INn CbXpaHaBa Ha OTKpITo Pn MOKpn YcNOBna.
1PpeKbCBAuBdACHO
2 Noc 3a HacTpoKa Ha peryInpaHeTo
3MpexKoBnKa6eNc 8encen
4 KoHTaKT (cAmO 3a nO3BOJEnH O T npOn3-BoNTeJIHa ypeDa npHaIeJXHOCTN)
5 PpeKbcBaU BnABo
6 De6nKpaHe BnBO
7 KoHTpOHa IaMaNa ,HaNPexKeHne OT MpeXkata"
8ДeблOKиранБДясHo
9Дрьжka
10 Kyka 3a ka6ena, BbptTaa ce:
11 电epno cbeHHeHne ynpabBa Ka6eJ
12 KaIbΦ noHxKeHo haIraHe
MоHTaЖ
1 Raika
2 5a6a
3Дрьжka
4ДолначстHaурда
5 BoNToBe c WeCTOCTeHHrnaBn
6 Bykca ynpabna Ka6eJ
7 UkepeynpaBnaKa6eJ
Pa3oNaKOBaIe ypeJa.
OTCTpaHete Bpb3Knte 3a Ka6eJN OT DOHNRA KpaH Na DpbXkata.
YKA3AHNE
Bhumabaune 3a mo8a, 3b6homo konelno da he u3nahe om om8opa.
Дрьжтдрьжкata OTBeCHO n C KykaTa Ha Ka6eNa Harope Hnd DoJHaTa YacT Ha ypeDa.
Пoctabete Долния край Ha дрьжkaTa МекдБete панka Ha долнота уаст Ha уpeda.
Hacouete OTBOPnTe.
→ CbpxeTe dpkKaTa n DoHaTa Yact Ha ypea c npINOxKeHte 3 6oTta, 6 Waibn 3 raikn, KaKTo e NOKa3aHo Ha fNrgpata rope.
3aterheTe 6oTobete c npnoKeHnte raeyHn KIOOBE.
NocTabete ukepa Ha ynpabnBaun Ka6eB 6yKcata Ha ynpabnaun Ka-6en.
Ipei nyskaHe B ekcnloatauia
NoctabRHe Ha ФиNTbPHaTa Top6nUka
→ ɪəBaʌdete ʌŋeCenca na OT KOHTaKtA.
→Издьрnaite locta 3a perynilpahe Ha NaKIOHa n IOCTaBeTe dpbXkKaTa B OT-BeCHO NOIoxKeHne.
HaKnoHete ypeDa Ha3aN ro noDnpeTe Ha dpbXkata.

1ФиЛТьрнa Top6Ичka
2 Kanak
3Ппсбеб endtehen uyepeHa KaIbФa 3a NOHIXeHO HAnraHe
36ytaTe kanaKa haOny/ha3aI n ro cBaJeTe.
NocTaBeTe QnIITbPHaTAtop6uYKaBypeDa HnHa nPncBedeHInTeHnHnUyuepHa KaNbΦ NoHnKeHo HaJIraHe.
Da ce noctabn kanaKa.
NocTabaHHe Ha noJIOxKaTa
△ПЕДПАЗЛИВОСТ
Chairman of the Board of Management

S. Reiser
Director Regulatory Affairs & Certification
ПьнHomоцнк NOДOKуMeHTaцЯТа:
S. Reiser
Alfred Kärcher SE & Co. KG
71364 Winnenden (Germany)
Tel.: +49 7195 14-0
Fax: +49 7195 14-2212
Winnenden, 2019/01/01
TexHnueckn daHHN
| BDP 50/1500 | |||
| Мошист | |||
| Напожения ot мржatinga V/Hz 230/50 230/60 | |||
| Консуmpана мошист на двигателя W 1 | 100 1100 | ||
| Въларничka | |||
| РавOTнашируна ММ 500 500 | |||
| Диаметьр MM 500 500 | |||
| Овороти 1/Mин 1500 1500 | |||
| Налаяне на п Fiatпскане N/cm | 2 | 0,04 0,04 | |
| Мерки Тergа | |||
| TeоретICAL NOB'brpxhocTha мошист m | 2/h 900 900 | ||
| Обem Фелтberha торбочka п 1 | 1 | ||
| Тergло | КГ | 34,5 34,0 | |
| Разmersи (д x в x в) | MM 760x560x1260 760x560x1260 | ||
| Дължina на кабela | M | 20 | 20 |
| Зхсаньш кабел | H07RN-F 3x1,5 mm² | ||
| Шушиные Emиси | |||
| ДопUCTимо Нво нашum (EN 60704-1) | dB(A) | 56 | 61,3 |
| Вибрацни на уреда | |||
| Обща стойост Вибрацни (ISO 5349) | m/cesk² | 0,35 0,78 | |

Ohutusalased markused. ET 2
Ohutusseadised ET 2
www.kaercher.com/REACH
71364 Winnenden (Germany)
Tel.: +49 7195 14-0
Fax: +49 7195 14-2212
Winnenden, 2019/01/01
Tehnilised andmed
www.kaercher.com/REACH
Chairman of the Board of Management

S. Reiser
Director Regulatory Affairs & Certification
Pilvarotais sagatavot dokumentaciju:
S. Reiser
Alfred Kärcher SE & Co. KG
71364 Winnenden (Germany)
Tel.: +49 7195 14-0
Fax: +49 7195 14-2212
Winnenden, 2019/01/01
Tehniskie datum
www.kaercher.com/REACH
Chairman of the Board of Management

S. Reiser
Director Regulatory Affairs & Certification
71364 Winnenden (Germany)
Tel.: +49 7195 14-0
Fax: +49 7195 14-2212
Winnenden, 2019/01/01
Techninai duomenys
| BDP 50/1500 | |||
| Galia | |||
| Tinklo jtampa V/Hz 230/50 230/60 | |||
| Variklio galios suvartojimas W 1100 1100 | |||
| Padas | |||
| Darbinis plotis mm 500 500 | |||
| Skersmuo mm 500 500 | |||
| Apsukć kiekis 1/min 1500 1500 | |||
| Prispaudimo slègis N/cm | 2 | 0,04 0,04 | |
| Matmenys ir masé | |||
| Teorinis našumas m²/h 900 900 | |||
| Filtro maišelio talpa | I | 1 | 1 |
| Masé | kg | 34,5 34,0 | |
| Matmenys (I x b x h) | mm 760x5 | 60x1260 760x5 | 60x1260 |
| Kabelio ilgis | m | 20 | 20 |
| Maitinimo kabelis | H07RN-F | 3x1,5 mm² | |
| Keliamas triukšmas | |||
| Triukšmo lygis (EN 60704-1) | dB(A) | 56 | 61,3 |
| Prietaiso vibracija | |||
| Bendroji svyravimo reiksmè (TSO 5349) | m/s² | 0,35 0,78 | |

IpeD npHm 3acTocyBaHHaM BaIoro npncTroO npouHTaIte
IOpnirHbHy IHcTpyKciIO 3 ekCnnyataaui, nicna boro diIte BiINOBiIDHO Hei Ta 36epejItb ii Iy noanbWoTO KOpNCtYBaHN a6o dIra HAcTyNHorO Blnachnka.
3mict
3axnCT HABKOINHbOro cepe- doBnua UK 1
3HaKn y noci6Hnky UK 1
Ppabnna 6e3neKn .UK2
3axnhi npnctroi UK 2
Po36nokyBaHHra. UK 2
Pn3NaueHnR UK 2
PpaBnIbHe 3aCTocyBaHHa ... UK 2
ElenMeHTn ynpabHInHH iФyHKioHaJIbHi By3JN. UK 3
YcTaHOBka UK 4
Ipeed noaTkom po60Tu .UK 4
Eknpnyataia UK 5
TpaHcnpTyBaHHa UK 6
36epiranHnUK 6
Iorna Ta texHicHe o6cnyroByBaHHa UK 6
ДономогауВипадкУненona-ДOK.. UK7
TapaHTiA UK 8
Ppniladny 3anaChi Detani.. UK 8
3aBa npn BiINOBiHicTb Cbponebcko rCnIBTOBapncTba...UK 8
TexhiHixapaKTepcntnKU99
3axnct HaBkoJnHbOro cepeoBnua

MaTepiAn ynapokBn nIdaHObc nepepo6i dny nobTopHOro BnKOpNCtAHn. BybJnacka, He BnKndaIte npkyBaIbHi MaTepiA nn pa3OM i3 DomauHIM CmITTAM, BiDaaiTe ix dny nobTopHOro BNKOpNCtAHn.
CTapi npnctpoi MicTb zinHIMaTepiAIN, 1o MOxTyB BkOpnCTOByBaTncr NOBtOPO. Batapei, MaCtnIO Ta cxoxi MaTepiAIn He NobHHI NOTpaNTu y HABKOJIshc cepeDObuIe. Tomy,6ydI nacka, yTNl3yIte cTapi npnctpoi 3a DOnOMOrO CneZiaIbHNxCCTem 360py cmTTra.
Ihctpykuii i3 3aCTocyBaHHaKOMnoHHeTIB (REACH)
AkyaIbHi BiOMOCTi npo KOMHOHTn HaBeHeHi Ha Be6-By3ni 3a aDpecoIO:
www.kaercher.com/REACH
3нakиу посбнky
CTyniHb He6e3neKn
△HE6E3NEKA
Дя He6e3neku,Яka 6e3nocepedHbO 3a-epoxye ma npu3eodumb do mxxkuxmpaem Yu cmepmi.
△NONEPENKEHNA
Дяnomenuho moxnuoI He6e3neuHoi cumyaui, zo moke npu3ecmu do mKkuxmpaem Yu cmepmi.
OSEPEXHO
Bkaieka uodo nomenuHo He6e3neuHoi cumyaui, kA moKe cnpuuHmu ompuMaHHa neKux mpaM.
YBAFA
Bkaieka uodo moKlueo i nomeHuiHo He-6e3neHiu cumyaui, uO moKe cnpuHuMu MamepiIbHI 36umku.
Ppabnla 6e3nekn
Ipeed nepuIM BIKOpNCtAHnM npncTpoIO npoHTaIte Ta dOTpIMyTEcB daHoro KepiBnucTba 3 ekCnnyataui Ta 6poUpyi 3 texhikn 6e3neKn npu pOboTi 3 nCKOBUMM MnOChmN npncTporAmN No 5.956-659 (doDaCTbca) Ta diIte BiDnOBiDHO.
3axnchi npnctroi
YcTaTkyBaHHaTexHikn 6e3neKn npu3HaueHe dJa 3axNCTy KopNCtByauiB, BOHO He NOBUNHO BnKOpNCTOByBaTncb 3a MeXaMn BnPo6HnTBA Ta He 3a npu3HaueHHaM.
Po36JIOkyBaHHa
3anobirae BnnaKOBomy BKIOueHHIO npNCTpOIO.
Pn3HaueHna
Ppncptpi npn3naeHn dny nonipybaHH npBHX niDnor.
Hn, yTBOpIOeTbcra nd qac nonipyBaHHa, 3bnpaTbcB 3MiHOMy pIbTpBaNbHOMy naketi.
-Po6oHa 500 MMdo3BOJAE 3a- 6e3neuHTn eΦeKTHBHe 3aCTOCyBaHHJ.
- XnBneHn Bid MepeXi 3a6e3neue BCOKy npOdyKTnBHiCTb 6e3 o6mExeHHa cacy po60tn.
PpaBnIbHe 3aCTocyBaHHa
BnKOpNCToBvBaTn DaHn npuad BnHrTKoBO y BiNIOBIDHOCTI Do Bka3IBOK daHOi IHCTpyKci 3 ekCnnyataui.
-Ппст piДоЗВОЛЯЕТбСВИКОРиСТОВВВATN ЛшЕ ДЛЯ ПОЛIPУВАнHApiBHOI PIДПOrn.
- Y npncTrooi Do3BOJЯeTbcS BnKOpNCToBbATn IInIe opriHaJIbHe 6IaHaHnHa Ta opriHaJIbHi 3anachi YaactuHn.
-Прилад He npn3HaueHn Дя ВИКОпСТанну Bn6yXoHe6e3neuHomy cepeДOBицi.
- Lcien npnctpiM aE BnKOpncTOByBaTncb y cyxomy npmiiueHHi. BiH ne npn3Ha-ueHn dIy BnKOpncTaHHa Ta 36epirHn Ha BIDKnPTOMy nobITpi y BOJornx yMOBax.
EJemeHTn ynpaBInHn i cyHKioHaJIbHi By3JIi
1 Peremkau npabopyu
2 Baxjnlb perynIOBaHHra HaxnIy
3 MepexeBn Ka6eBb 3 BnIKoIO
4 WTeNcEbnHa po3eTka (TiNbKn DnJa Do- DaTKOBOrO o6IaDHaHHa, Do3BOJeHOro BInpo6HnKOM)
5 NepemkaJibOpuy
6 Po36nokybaHnaNibOpuy
7 INdkaTOp ,Hanpyra"
8 Po36nokybaHn npabOpuy
9 PykoTka
10 Raqun dna Ka6eIIO, 0o o6epTaIOTbcra
11 3'eHaHH npoBdy KepyBaHH
12БиИЗКOBИК Hn3bKOrO TnCKy
YCTaHOBka
1 Raika
2 5a6a
3 PykoTka
4 HnXnHa YactnHa npncTpoIO
5ΓBnHT i3 WecntrpaHHOIO rONiBKOIO
6 Btylka liHii kepyBaHHa
7 WTekep liHii kepyBaHHa
→ Po3nakyBaTu npncTpii
Budanu Ka6eIbHn 3'cHyBaU i3 HnKHBoro KINp4 pyKn.
IOBIDOMJIENHRA
Cmexumu 3a mum, uo6 wecmepn He bu- nadana 3 omeopy.
YCTaHOBHTn pyKy BepTKaJIbHO Ta 3a-KpInNTn II 33aNy 3a DOnOMoHO raKIB y HxHHi YactHI npCtpoI.
BCTaBnTu HnXHi KHeu pyKu MIX BOMa HaKaMaN B HnXHi YaCTuHi npNCPOU.
BupiBnTn OTbOpn.
3'6dHaTn pykTu HxKHO qactHy npu-CTPOU 3a DOnOMOIO 3 rBHTIB, IO DOJaOTbcra, 6 dNCKIB Ta 3 raioK, k NOKa-3aHO Ha MaJIHOHky BnIe.
MiHcHO 3aTAYrI rBnHTn 3a DOnOMoTO npKnaDeEHnx RaIKOBnX KInOuYiB 3 BiKpNTMn 3iBaMn.
BctaBnTn 1TeKepeiHkepyBaHHy Btynky nHkepyBaHH.
Peped noaTkom po6oTN
BcTaBnTn φiNbtpyBaIbHn naket
BntarHitb MepeKnI uTekep 3i uTencelbHOI pO3eTKN.
→ Notaryntu Baxinb perynIOBaHHaHnIy Ta BCTaHOBHTn pykU y BeptnKaJIbHn CTaH.
IpekeHHTn anapat Ha3aT Ta nocTaBn- Tn Ha pyky.
1ΦinbTpuyuoynnaKeT
2Koxyx
3 CnoIyHi IHTuepn 6pn3KOBnKa Hn3b-Koro TnCKy
IpecyHyTu KpnuKy BBepx/BHn3 Ta 3HrTu II.
YcTaHOBnTnΦiNbTpYBaJIbHn NaKeT y npNCTpi Ta HaJrTn NOro Ha npNeHyBaJIbHn 1Tuuep 6pn3KOBnKa Hn3bKOTo TnCKy.
YCTaHOBUNKOxyX.
BcTaHOBJIeHHaHKJaIKN
OBEPEXHO
He6e3neKa nowkoJehn!
He 36epizamu anapam 3i ecmaHOeNoHO HAKnadKOIO. HAKnadky 3HIMamu nicnKoKHO2O buKOpucmaHHa.
BntarHitb MepeKnI uTekep 3i uTencceIbHOI p03eTKN.
→ Notaryntu Baxinb perynIOBaHHaHnIy Ta BCTaHOBHTu pyky y BePTnKaJIb-Hn CTaH.
IpekeHHTn anapaT ha3aT Ta noCTaBn- Tn Ha pyKy.

1 Raika
2 INHcTpymeHT
→ BiDBePhyTu raiky no HaprMky roHnHHKOBoI cTpiIKN 3a DOnOMoIO IHcTpymeHTa, 0o DoJaCTbcra.
3HЯТи niДКнадКOBу wai6y.
YcTaHOBnTu HaKnJaKy nOcepeDnHi TaipiKn Ta npNTnCKaTn.
YcTaHOBnTnPiKNaIKOBy Wai6y.
3aKpyTnTaRy npOTn rOINHHNKOBoi CtpiIK Ta 3aTgTN iHCTpyMeHTOM, IIO DOJaETbcra.
→ BndaJntiHcTpymeHT.
→ ΠepeKnHytn anapat ynepe.
Ekcnnyataciia
HEBE3NEKA
He6e3neka odepkaHnma paem bid haKnaadku, uo obepmacbca. He cmaumu Hoo ma pyku no6nu3y hakadku, uo obepmacbca.
YcTaHOBnT pyuKy
→IToTARHyTuBaXijBpeRyIOBaHHaHxNlNy.
→Повернуtn рунуВЗруну поицю.
→ Biidnyctu Tn BaXiNb perynIOBaHHa HaxuIy.
TpaHcnOpTyBaHHa
Kopctko BCTaHOBNTn pyuKy y BepTNKaJIbHOMy CTAHI.
Haxinntn anapat Ha3aT a nepeixatn Do MiczraCTOCyBaHH.
YbimkHeHH npnlaNy
△PonepeoKeHHa
Hebe3neka yukodkeHn npkumma nIdnou. 3abopohembcpaobama npucmpoio, ocmoih Ha micui.
He Kopucmyeamuca anapamom, kuo He ecmaHOeHa hKnadka.
NOBIDOMJIENHRA
He BkIouaTe npicTpim, kUO pyka nepe6yBae y BeptnKaJIbHOMy cTaHI BiIDHOCHOniINOrn.
BidknHytn rauKn dny ka6eIIO BBepx Ta nobHicTIO BNTAITN ka6eIb i3 npncToIO.
BCTaBTe MepeXnH uTKeep y uTenCeIbHy po3ETky npuIady. KOnTpOJbHa IamNoUka MepeXi noUHaC CBITnCra.
YcTaHOBnTu pyuKHa po6Ouy BnCOTy.
→ Tpimata npuyky DbOMa pykamn.
Haxatn po36nokyBaHHnaibopya6o npabopyTu 3aΦikcyBatn npncTpi.
Haxatn nepemkau Ha tiJ xe ctopoHi anapaT 3anyckaTbcra.
Bidiynyctntpuo36nokybaHHa.
IpecyBaTn anapat BnepeD ta Ha3aD no OunuBahi NOBepxHi.
→Дпяперпвання робOTи BiDnyctNTN BUMKau.

Chairman of the Board of Management

S. Reiser
Director Regulatory Affairs & Certification
YnoBHOBAxHn CnIBPO6iTnK NO BeDeHHIO DOKyMeHToo6iry:
S. Reiser
Alfred Kärcher SE & Co. KG
71364 Winnenden (Germany)
Tel.: +49 7195 14-0
Fax: +49 7195 14-2212
Winnenden, 2019/01/01
Texhichi xapaKTepeNCTnKn