
VC25 - Vacuum Cleaner SCHEPPACH - Free user manual and instructions
Find the device manual for free VC25 SCHEPPACH in PDF.
| Product type | Wet and dry vacuum |
| Brand | Scheppach |
| Model | VC25 |
| Rated voltage | 220-240 V ~ |
| Frequency | 50/60 Hz |
| Rated power | 1200 W |
| Protection class | II |
| Protection rating | IPX4 |
| Power cable length | 3 m |
| Tank volume | 25 L |
| Suction pressure | 20 kPa |
| Max. suction power | 30 L/s |
| Suction hose length | 2 m |
| Net weight | 4.8 kg |
| Tank material | Stainless steel |
| Functions | Vacuuming and blowing |
| Filter types | Foam filter (wet vacuuming), Paper dust bag (dry vacuuming) |
| Included accessories | Suction hose, suction tubes (x3), floor nozzle, crevice tool, paper dust bag, foam filter |
| Safety | Safety float valve (automatic shut-off at max. fill level) |
| Maintenance | Regular cleaning of foam filter, emptying tank after wet vacuuming |
| Storage | Dry place, frost-free, between 5 and 30°C |
| Compliance | CE |
| Warranty | Legal warranty |
Frequently Asked Questions - VC25 SCHEPPACH
User questions about VC25 SCHEPPACH
0 question about this device. Answer the ones you know or ask your own.
Ask a new question about this device
Download the instructions for your Vacuum Cleaner in PDF format for free! Find your manual VC25 - SCHEPPACH and take your electronic device back in hand. On this page are published all the documents necessary for the use of your device. VC25 by SCHEPPACH.
USER MANUAL VC25 SCHEPPACH
Division Manager Product Center

Andreas Pecher
Head of Project Management
Garantiebedingungen
Revisionsdatum 26.11.2021
1 Introduction 18
2 Product description (Fig. 1-11). 18
3 Scope of delivery (Fig. 2) 18
4 Proper use. 19
5 Safety instructions. 19
6 Technical data. 20
7 Unpacking 20
8Assembly. 20
9 Operation 22
10 Working instructions. 22
11 Cleaning and maintenance 23
12 Storage and transport 24
13 Electrical connection 24
14 Repair and ordering spare parts 24
15 Troubleshooting 25
16 Disposal and recycling 25
17 EU Declaration of Conformity 26
18 Exploded view. 242
Explanation of the symbols on the product
Symbols are used in this manual to draw your attention to potential hazards. The safety symbols and the accompanying explanations must be fully understood. The warnings themselves will not rectify a hazard and cannot replace proper accident prevention measures.
| Before commissioning, read and observe the operating manual and safety instruc-tions! | |
| CE | The product complies with the applicable European directives. |
| ΔΔΔ | The product complies with the applicable Serbian directives. |
1 Introduction
Manufacturer:
Scheppach GmbH
GünzburgerstraBe 69
D-89335 Ichenhausen
Dear Customer
We hope your new product brings you much enjoyment and success.
Note:
In accordance with the applicable product liability laws, the manufacturer of this product assumes no liability for damage to the product or caused by the product arising from:
-
Improper handling
Non-compliance with the operating manual -
Repairs carried out by third parties, unauthorised speciaIstists
- Installing and replacing non-original spare parts
- Improper use
- Failures of the electrical system in the event of the electrical regulations and VDE provisions 0100, DIN 57113 / VDE0113 not being observed.
Note:
The operating manual is part of this product.
It includes important instructions for the safe, proper and economic operation of the product, for avoiding danger, for minimising repair costs and downtimes and for increasing the reliability and extending the service life of the product. In addition to the safety instructions in this operating manual, you must also observe the regulations applicable to the operation of the product in your country.
Familiarise yourself with all operating and safety instructions before using the product. Only operate the product as described and for the specified areas of application. Keep the operating manual in a good place and hand over all documents when passing the product on to third parties.
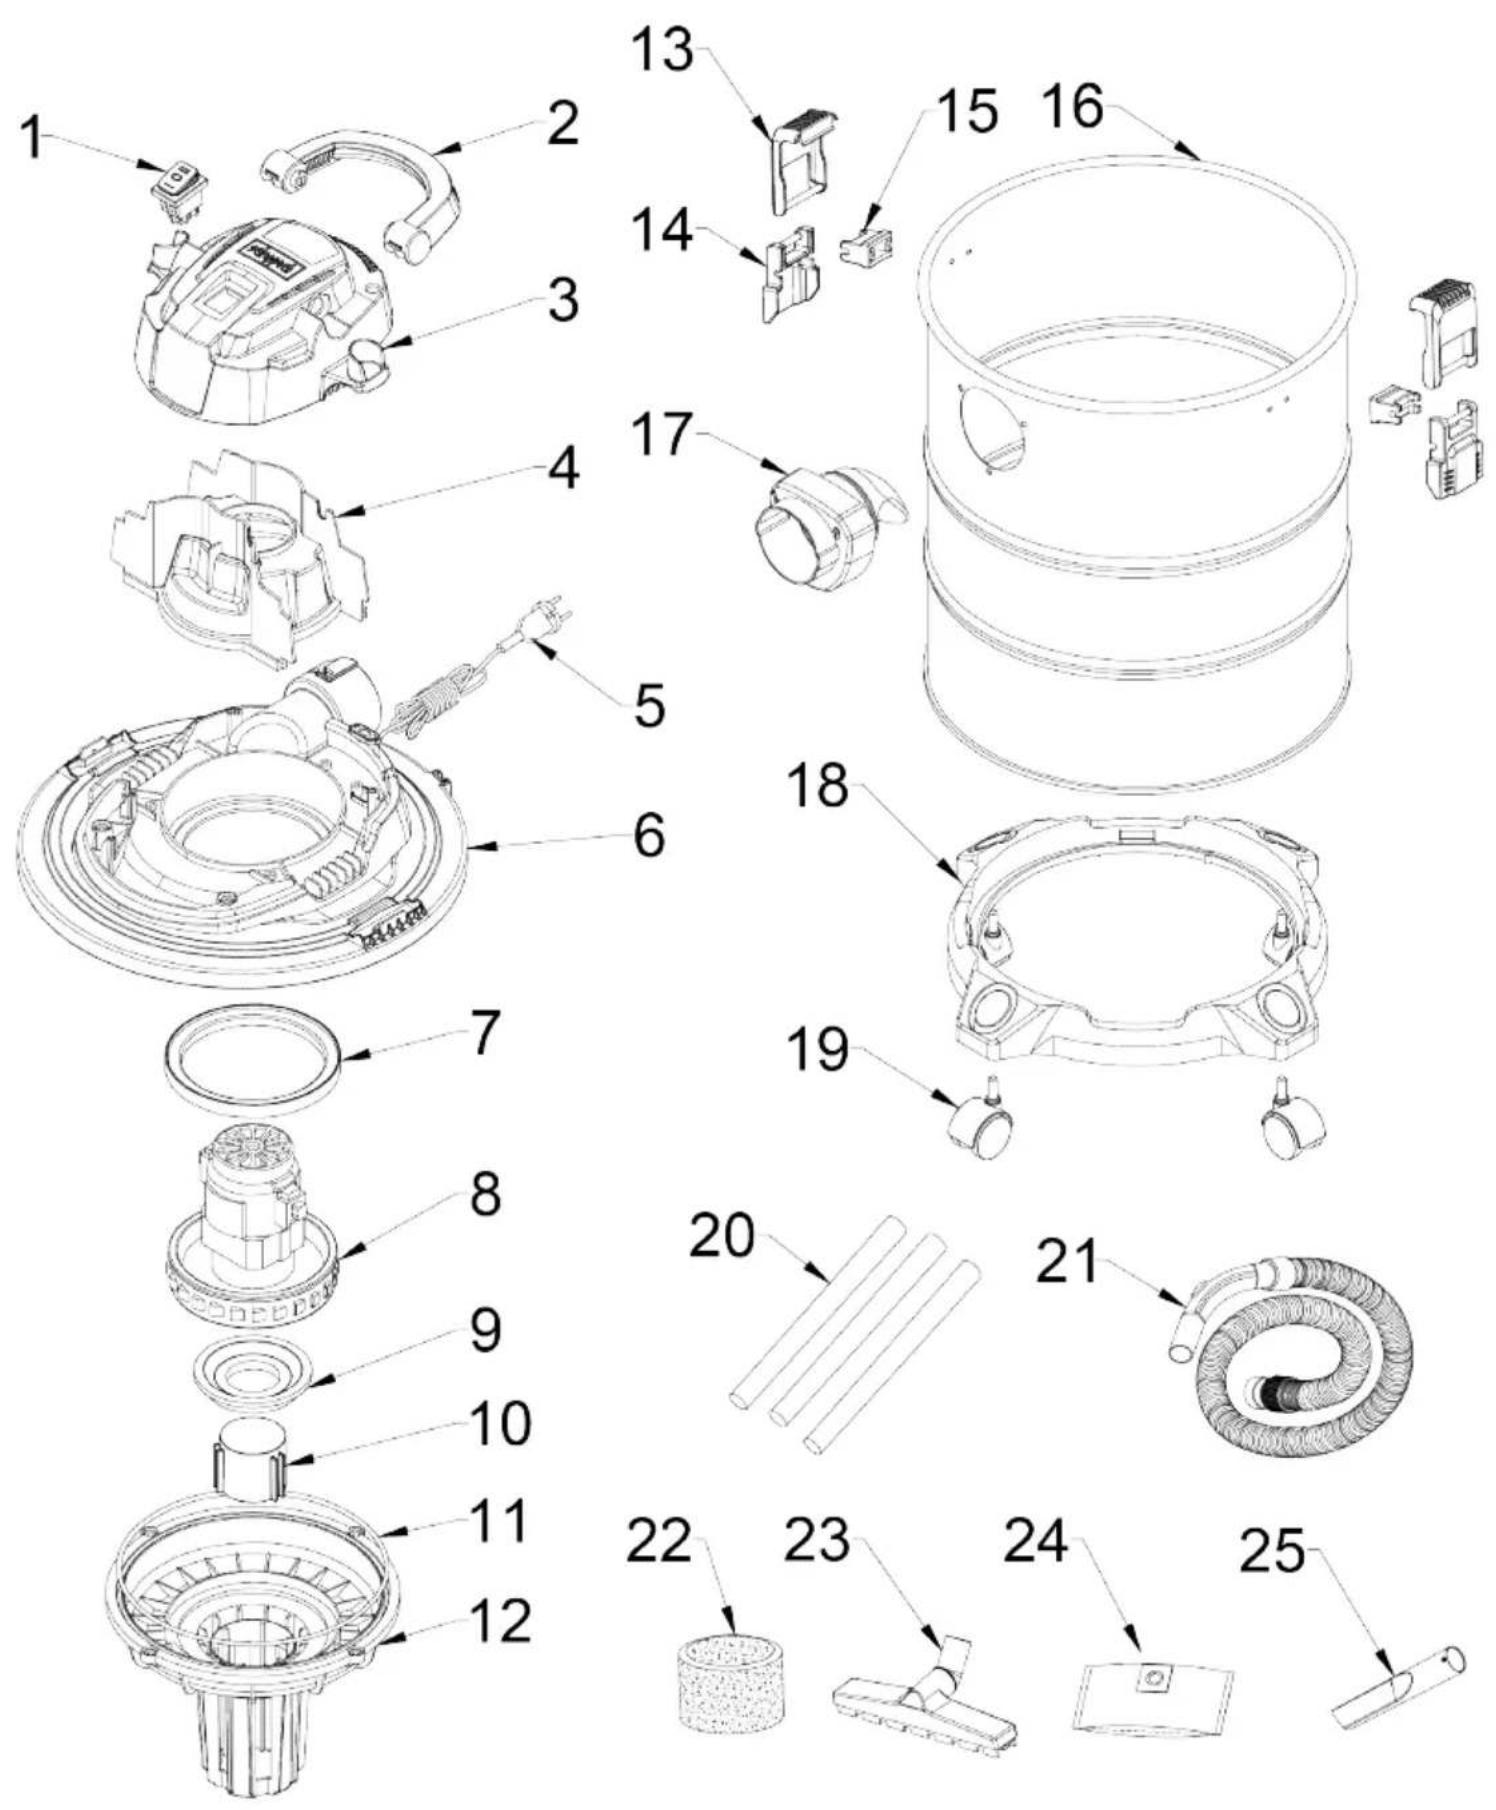
2 Product description (Fig. 1-11)
- Carrying handle
- Blast connection
- Container
3a. Locking mechanisms - Base frame
4a. Holders
4b. Mounting holes - Castors
- Suction connection
6a. Fitting port - Container cover
7a. Holder - On/off switch
- Filter cage
9a. Safety float valve - Vacuum hose
10a. Hose coupling - Handle
11a. Slider - Suction pipe
- Floor nozzle
- Joint nozzle
- Paper filter bag
15a. Sealing ring - Foam filter
3 Scope of delivery (Fig. 2)
Item Quantity Designation
4.
1x
Base frame
5.
4x
Castors
10
1x
Vacuum hose
12
3x
Suction pipe
13
1x
Floor nozzle
14
1x
Joint nozzle
15
1x
Paper filter bag
16
1x
Foam filter
1x
Electric wet / dry
1x
Operating manual
4 Proper use
The wet and dry vacuum cleaner is suitable for wet and dry vacuuming using the appropriate filter. The product is not intended for vacuuming flammable, explosive or harmful substances.
The product may only be used in the intended manner. Any use beyond this is improper. The user, not the manufacturer, is responsible for damages or injuries of any type resulting from this.
An element of the intended use is also the observance of the safety instructions, as well as the assembly instructions and operating information in the operating manual.
Persons who operate and maintain the product must be familiar with the manual and must be informed about potential dangers.
The liability of the manufacturer and resulting damages are excluded in the event of modifications of the product.
The product may only be operated with original parts and original accessories from the manufacturer.
The safety, operating and maintenance specifications of the manufacturer, as well as the dimensions specified in the technical data, must be observed.
Please note that our products were not designed with the intention of use for commercial or industrial purposes. We assume no guarantee if the product is used in commercial or industrial applications, or for equivalent work.
Explanation of the signal words in the operating manual
| DANGER |
| Signal word to indicate an imminently hazardous situation which, if not avoided, will result in death or serious injury. |
| WARNING |
| Signal word to indicate a potentially hazardous situation which, if not avoided, could result in death or serious injury. |
| CAUTION |
| Signal word to indicate a potentially hazardous situation which, if not avoided, could result in minor or moderate injury. |
| ATTENTION |
| Signal word to indicate a potentially hazardous situation which, if not avoided, could result in product or property damage. |
5 Safety instructions
General power tool safety warnings
WARNING
Read all safety warnings, instructions, illustrations and specifications provided with this power tool.
Failure to follow all instructions listed below may result in electric shock, fire and/or serious injury.
Save all warnings and instructions for future reference.
The term "power tool" in the warnings refers to your mains-operated (corded) power tool or battery-operated (cordless) power tool.
5.1 General safety instructions
- Children, persons with reduced physical, sensory or mental capabilities or lack of experience and knowledge, or persons unfamiliar with the instructions for operating the machine are not allowed to use the machine. Local regulations may restrict the age of the user.
Children may not play with the Product. - Cleaning and user maintenance must not be carried out by children.
ATTENTION
The following safety measures for protection against electric shock, and the risk of injury and fire must be observed when using electric tools:
5.2 It will help you avoid accidents and injuries
- Never leave a product ready for operation unattended at the workplace.
People and animals must not be suctioned with the product. - Never point the product or nozzles at yourself or others, especially your eyes and ears, during operation. There is a danger of injury.
- Do not suck up any hot, glowing, flammable, explosive or hazardous substances. These include hot ash, petrol, solvents, acids or alkalis. There is a risk of fire and injury.
- Check the product and accessories regularly for damage. Do not use a damaged product or accessories.
5.3 To avoid accidents and injuries due to electric shock
-
Switch off the product:
-
when the product is not in use, is being transported or is unattended.
- when checking the device, it is raining or when removing blockages.
- when cleaning or performing maintenance or changing accessories.
-
after contact with foreign objects or in the event of abnormal vibrations.
-
Do not immerse the product in water and do not operate it in a damp environment.
- Never immerse the product in water or other liquids for cleaning.
- Do not touch the product with damp or wet hands!
5.4 This way, product damage and any resulting personal injury can be avoided
- Ensure that the product is correctly assembled and that the filters are in the correct position.
- Do not work without a filter. The product may become damaged.
- Only use original spare parts and accessories (see "Spare parts/accessories") supplied and recommended by our Service Centre. Using third-party parts leads to a loss of guarantee claims.
- Only have repairs carried out by authorised service centres.
- Follow the instructions for cleaning and maintaining the product.
- Store the product in a dry place and out of reach of children.
Residual risks
The product has been built according to state-of-the-art and the recognised technical safety rules. However, individual residual risks can arise during operation.
- Health hazard due to electrical power, with the use of improper electrical connection cables.
- Furthermore, despite all precautions having been met, some non-obvious residual risks may still remain.
- Residual risks can be minimised if the "Safety Instructions" and the "Intended Use" together with the operating manual as a whole are observed.
- Prevent the product being unintentionally started up.
- Keep your hands away from the working area when the product is in operation.
- Unintentional starting up of the product.
- Comply with the stipulated maintenance and safety instructions in the operating manual.

WARNING
This power tool generates an electromagnetic field during operation. This field can impair active or passive medical implants under certain circumstances. In order to prevent the risk of serious or deadly injuries, we recommend that persons with medical implants consult with their physician and the manufacturer of the medical implant prior to operating the power tool.
6 Technical data
| Rated voltage 220-240 V~/50/60 Hz |
| Nominal power 1200 W |
| Protection class II |
| Protection category IPX4 |
| Length of mains connection cable 3 m | |
| Container volume approx. 25 l | |
| Suction pressure | 20 kPa |
| Max. suction power | 30 l/s |
| Hose length | approx. 2 m |
| Weight | approx. 4.8 kg |
Subject to technical changes!
7 Unpacking

WARNING
The product and the packaging material are not children's toys!
Do not let children play with plastic bags, films or small parts! There is a danger of choking or suffocating!
- Open the packaging and carefully remove the product.
- Remove the packaging material, as well as the packaging and transport safety devices (if present).
- Check whether the scope of delivery is complete.
- Check the product and accessory parts for transport damage. Immediately report any damage to the transport company that delivered the Product. Later claims will not be recognised.
If possible, keep the packaging until the expiry of the warranty period. - Familiarise yourself with the product by means of the operating manual before using for the first time.
- With accessories as well as wearing parts and replacement parts use only original parts. Spare parts can be obtained from your specialist dealer.
- When ordering please provide our article number as well as type and year of manufacture for the product.
8 Assembly

WARNING
Danger of injury!
Only insert the mains plug into the socket when the product is ready for use.
- Place the product on a level, even surface.
8.1 Attaching and removing the container cover (7) (Fig. 3)
Removing the container cover:
- Before removing the container cover (7), remove all nozzles (13/14) and all suction tubes (12) from the holders (7a) on the container (3).
- Loosen the latches (3a).
- Lift the container cover (7) from the container (3).
Attaching the container cover:
- Place the container cover (7) on the container (3).
- Fasten the container lid (7) with the latches (3a). Ensure that the latches (3a) latch into the recesses in the container lid (7).
8.2 Fitting the container (3) to the base frame (4) (Fig. 4)
- Put the container (3) on the base frame (4).
- Gently push the container (3) onto the base frame (4).
- Ensure that the locking mechanism of the base frame (4) engages on the container (3).
8.3 Fitting the rollers (5) (Fig. 5)
- Remove the container cover (7) as described in 8.1.
- Set the container down (3) on a solid surface with the underside facing upwards.
- Place the rollers (5) into the assembly holes (4b) provided on the base frame (4).
- Gently press the rollers (5) into the assembly holes (4b).
- Flip the container (3) and place it on the rollers (5).
8.4 Filter and filter bag (Fig. 2)
The product has the following filter and filter bag included in the scope of delivery:
Paper filter bag (15)
Dry vacuuming
Foam filter (16)
Wet vacuuming
Note:
- In order to fit/remove the filter and filter bag, remove the container cover (7) as described under 8.1.
- Always set down the container cover (7) with the top facing downwards.
- After you have assembled/removed the desired filter and filter bag, reattach the container cover (7) to the container (3).
8.4.1 Fitting/removing the paper filter bag (15) (Fig. 6)
Removing:
- Remove the paper filter bag (15) from the bar (6a) on the suction connection (6).
Assembling:
- Attach the paper filter bag (15) to the bar (6a) on the suction connection (6) inside the container (3).
- Check that the paper filter bag (15) is installed correctly and the sealing ring (15a) fully envelopes the bar (6a) on the suction connection (6).
8.4.2 Fitting/removing the foam filter (16) (Fig. 7)
Removing:
- Remove the foam filter (16) from the filter cage (9).
Assembling:
- Remove the foam filter (16) over the filter cage (9).
- Check that the foam filter (16) is installed correctly and fully envelopes the filter cage (9).
8.5 Connecting the suction hose (10)
8.5.1 Suction function (Fig. 8)
- Push the hose coupling (10a) fully into the suction connection (6).
- Turn the hose coupling (10a) clockwise until it fully engages.
- Check that the suction hose (10) is installed correctly by gently pulling on the hose coupling (10a).
8.5.2 Blast function (Fig. 9)
- Push the hose coupling (10a) fully into the blowing connection (2).
- Turn the hose coupling (10a) clockwise until it fully engages.
- Check that the suction hose (10) is installed correctly by gently pulling on the hose coupling (10a).
8.6 Uncoupling the suction hose (10) (Fig. 8, 9)
Uncouple the suction hose (10) from the suction connection (6) or the blast connection (2):
- Turn the hose coupling (10a) counter-clockwise.
- Pull the hose coupling (10a) out of the suction connection (2) or the blowing connection (10).
8.7 Storing the nozzles (13/14), suction pipe (12) and suction hose (10) (Fig. 2, 3, 10)
- You can store the nozzles (13/14) and the suction pipe (12) in the holders (7a/4a) on the container cover (7) and on the base frame (4).
- You can store the suction hose (10) in the holders (7a) on the container lid (7).
- You can store the cable on the holder on the blowing connection (2).
8.8 Attaching the suction pipe (12) (Fig. 11)
- Attach a suction pipe (12) to the handle (11). Connect the suction pipe (12) at the desired length.
8.9 Using the various nozzles (13/14) (Fig. 11)
Floor nozzle (13)
- Vacuuming of solid materials and liquids on medium to large surfaces, carpets or floor mats.
- Use the floor nozzle (13) in conjunction with the suction pipes (12).
- If required, it can also be used without the extensions.
Joint nozzle (12)
Vacuuming of solid materials and liquids in joints, corners, radiators and hard-to-reach areas.
8.9.1 Fitting the nozzle (Fig. 11)
- Insert the desired nozzle (13/14) into the handle (11) or the suction pipe (12).
- Remove the nozzle (13/14) by pulling it forwards off the respective suction pipe (12) or off the handle (11).
9 Operation
The product is equipped with a stainless steel container. The castors allow the product to be highly manoeuvrable. With wet vacuuming, the suction air flow is switched off by a safety float valve when the container is full. The product also has a blowing function. Please refer to the following descriptions for the function of the control elements.
ATTENTION
Always make sure the product is fully assembled before commissioning!
WARNING
Danger of injury!
Only insert the mains plug into the socket when the product is ready for use.
9.1 Switching the product on/off (Fig. 1)
ATTENTION
Do not use without a filter!
Switching on
- Insert the mains plug into a properly fused mains socket.
- Switch the product on by setting the on/off switch (8) to the "l" position.
Switching off
- Switch the product off by setting the on/off switch (8) to the "0" position.
10 Working instructions
10.1 Suction function
WARNING
Vacuuming glowing ash as well as flammable, hazardous substances is prohibited. There is a danger of injury!
ATTENTION
Fine dusts, such as those from cement, soot and plaster, are too fine to be absorbed. There is a risk that it could get into the motor and damage it.
ATTENTION
Do not use without a filter!
- Place the product on a level, even surface.
- Do not suck up any hot, glowing, flammable, explosive or hazardous substances. These include hot ash, petrol, solvents, acids or alkalis. There is a risk of fire and injury.
- If the products heats up switch the product off and pull out the mains plug. Let the product cool down outdoors under supervision.
-
During breaks, the suction tube can be stored in the holder on the container lid.
-
Fill the container no more than half way so that the safety float valve (9a) always remains free (Fig. 7).
-
Attach the hose coupling (10a) to the suction connection (6) (see 8.5.1).
- Switch on the product (see 9.1).
10.1.1 Dry vacuuming (Fig. 1, 2)
Note:
Do not use a wet or damp product for dry vacuuming!
- Insert the paper filter bag (15) into the container (3) (see 8.4.1).
- Fit the foam filter (16) (see 8.4.2).
- Connect the suction coupling (10a) to the suction connection (6) (see 8.5).
-
Fit the suction pipe (12) to he handle (11) (see 8.8). Floor vacuuming: Connect the suction pipes (12) and one of the nozzles (13/14). Vacuuming at table height or in confined spaces: Connect one of the nozzles (13/14) directly (with no suction pipe) or with only one suction pipe (12).
-
Hold the suction pipe (10) handle (11) firmly.
- Switch on the product (see 9.1).
- Vacuum the area to be cleaned.
- If necessary, adjust the suction power by sliding the slider (11a) on the handle (11) forwards and backwards.
- Switch off the product (see 9.1).
10.1.2 Wet vacuuming (Fig. 1, 2)
Note:
A float integrated in the filter basket ensures that the suction channel is automatically closed as soon as the container has reached its maximum capacity. In this case, the product must be switched off and the container emptied before operation can be continued.
- Empty the container (3) before wet vacuuming (see 11.1.1).
-
The container (3) is not suitable for storing liquids. Empty the container (3) after wet vacuuming (see 11.1.1).
-
Remove the paper filter bag (15) from the container (3) (see 8.4.1).
- Fit the foam filter (16) (see 8.4.2).
- Connect the hose coupling (10a) to the suction connection (6) (see 8.5.1).
- Fit the suction pipe (12) to he handle (11) (see 8.8). Floor vacuuming: Connect the suction pipes (12) and one of the nozzles (13/14). Vacuuming at table height or in confined spaces: Connect one of the nozzles (13/14) directly (with no suction pipe) or with only one suction pipe (12).
- Hold the suction pipe (10) handle (11) firmly.
- Switch on the product (see 9.1).
- Vacuum the area to be cleaned.
- Switch off the product (see 9.1).
- Clean the product (see 11.1).
10.2 Blast function

WARNING
Danger of injury!
If you direct the airflow at people, animals or objects, this can cause injury and damage.
- Direct the air flow away from you.
- Never direct the airflow at other people, animals or objects.
-
Do not blow away hard objects such as stones or branches.
-
Insert the paper filter bag (15) into the container (3) (see 8.4.1).
- Fit the foam filter (16) (see 8.4.2).
-
Fit the hose coupling (10a) to the blowing connection (2) (see 8.5.2). Connect a nozzle (13/14) if required (see 8.9.1).
-
Hold the suction pipe (10) handle (11) firmly.
- Switch on the product (see 9.1).
- Blow off a surface or objects.
- Switch off the product (see 9.1).
- Connect the suction hose to the suction connection (6) (see 8.5.1).
11 Cleaning and maintenance

WARNING
Have maintenance and repair tasks that are not described in this operating manual, carried out by a specialist workshop. Use only original spare parts.
There is a risk of accident! Always carry out maintenance and cleaning work with the motor switched off and the mains plug disconnected. There is a danger of injury! Let the Product cool down before all maintenance and cleaning tasks. Elements of the engine are hot. There is a danger of injury and burning!
The product can start unexpectedly and cause injuries.
- Switch off the motor before carrying out any cleaning or maintenance work.
- Allow the motor to cool down.
- Pull out the mains plug!
11.1 Cleaning
- Never immerse the product in water or other liquids for cleaning.
- Do not splash the product with water.
- Keep protective devices, air vents and the motor housing as free of dust and dirt as possible. Rub the product clean with a clean cloth or blow it off with compressed air at low pressure. We recommend that you clean the product directly after every use.
-
Ventilation openings must always be free.
-
Do not use any cleaning products or solvents; they could attack the plastic parts of the product. Make sure that no water can penetrate the product interior.
^* = may not be included in the scope of delivery!
11.1.1 Emptying the container (3) (Fig. 1)

WARNING
Empty and clean the product before and after use to avoid the accumulation of materials that could pose a fire risk in the product.
- Remove the container lid (7) from the container (3) as described in 8.1.
- Empty the container (3).
11.1.2 Cleaning the foam filter (16) (Fig. 1, 7)
Clean the foam filter (16) if suction power decreases.
Note:
Before installing the filter again, make sure that it is dry.
- Remove all nozzles (13/14), suction pipe (12) and the suction hose (10) from the holder (7a/4a).
- Remove the container cover (7) as described in 8.1.
- Flip the container cover (7).
- Remove the foam filter (16) from the filter cage (9).
- Remove the dust from the foam filter (16) by shaking it out or washing it out if necessary.
- Allow the foam filter (16) to air dry before attaching and using it again.
- Reattach the foam filter (16) to the filter cage (9).
- Close the container (3) with the container cover (7).
11.2 Maintenance
- Check the product for obvious defects such as loose, worn or damaged parts before each use.
- Check the covers and protective devices for damage and correct seating. Replace them if necessary.
11.2.1 Replacing the foam filter (16) and paper filter bag (15) (Fig. 1)
- Remove all nozzles (13/14) and suction pipes (12) from the holder (7a/4a).
- Remove the container cover (7) as described in 8.1.
- Flip the container cover (7).
- Pull the foam filter (16) off the filter basket (9) or remove the paper filter bag (15) from the fitting port (6a).
- Fit the new foam filter (16) to the filter cage (9) as described in 8.4.2.
- To replace the paper filter bag (15), proceed as described in 8.4.1.
- Close the container (3) again with the container cover (7).
12 Storage and transport
12.1 Storage
Clean and check the product for damage.
Store the product and its accessories in a dark, dry and frost-free place that is inaccessible to children.
The optimum storage temperature is between 5^ and 30^ .
Store the product in its original packaging.
Cover the product to protect it from dust or moisture.
Store the operating manual with the product.
12.2 Transport
- To transport the product, disconnect the it from the power supply and set it up in the new position you want to use it in.
- The product may only be lifted or transported by the carrying handle.
- Lift the product for transport over stairs or obstacles.
- The product must be secured against tipping and slipping during transport in vehicles in order to prevent damage and injuries.
13 Electrical connection
The electrical motor installed is connected and ready for operation. The connection complies with the applicable VDE and DIN provisions. The customer's mains connection as well as the extension cable used must also comply with these regulations.
13.1 Damaged electrical connection cables
The insulation on electrical connection cables is often damaged.
This may have the following causes:
- Pressure points, where connection cables are passed through windows or doors,
- Kinks where the connection cable has been improperly fastened or routed,
- Places where the connection cables have been cut due to being driven over,
Insulation damage due to being ripped out of the wall socket, - Cracks due to the insulation ageing.
Such damaged electrical connection cables must not be used and are life-threatening due to the insulation damage.
Check the electrical connection cables for damage regularly. Ensure that the connection cables are disconnected from electrical power when checking for damage.
Electrical connection cables must comply with the applicable VDE and DIN provisions. Only use connection cables of the same designation.
The printing of the type designation on the connection cable is mandatory.
Safety information for replacing damaged or defective mains connection cables
Connection type Y
If it is necessary to replace the mains connection cable, this must be done by the manufacturer or their representative to avoid safety hazards.
13.2 Important information
In the event of overloading, the motor will switch itself off. After a cool-down period (time varies) the motor can be switched back on again.
13.3 AC motor
Connections and repair work on the electrical equipment may only be carried out by electricians.
- The mains voltage must be 220V - 240V
- Extension cables up to 25m long must have a cross-section of 1.5mm^2
14 Repair and ordering spare parts
After repairs or maintenance, make sure that all safety-related parts are installed and are in perfect condition. All parts which may cause injury must be kept where they are inaccessible to children or others.
ATTENTION
According to the German Product Liability Act, no liability is accepted for damage caused by improper repairs or by not using original spare parts.
Such work should be performed by a customer service centre or an authorised specialists. The same applies to accessory parts.
Spare parts and accessories can be obtained from our Service Centre. To do this, scan the QR code on the front page.
Connections and repairs
Connections and repair work on the electrical equipment may only be carried out by electricians.
14.1 Ordering spare parts
Please provide the following information when ordering spare parts:
- Model designation
- Item number
- Type plate data
14.2 Service information
With this product, it is necessary to note that the following parts are subject to natural or usage-related wear, or that the following parts are required as consumables.
Wearing parts*: Paper filter bag, foam filter
= not included in the scope of delivery!
15 Troubleshooting
The following table shows fault symptoms and describes remedial measures in the event of your product failing to work properly. If you cannot localise and rectify the problem with this, please contact your service workshop.
| Fault Possible cause Remedy | ||
| Product does not run. | Product switched off. On/off switch switched off. | Switch the product on with the On/Off switch. |
| Damaged mains connection cable. Sw | switch the product off and disconnect from the mains. Check for mains connection cable for damage. If necessary, have the mains connection cab replaced by an authorised specialist. | |
| On/off switch defective. Please contact | our service department. | |
| Motor defective. | ||
| Faulty power supply. Check the elect | ical system for compliance with the specifications on the type plate. | |
| Product works with interruptions. | Internal loose contact. Please contact | our service department. |
| On/off switch defective. | ||
| Container not closed. Close the container. | iner. | |
| The container is full. Empty the container. | ner. | |
| The airway is blocked. | Check the following parts for blockages and remove the blockages: ·Container ·Vacuum hose ·Suction pipe | |
| The foam filter is blocked. | Clean the foam filter. | |
| The suction capacity is also reduced after cleaning the foam filter. | The foam filter is damaged. | Replace the foam filter. |
| The product is overheated. | The foam filter is blocked. | Clean the foam filter. |
| The paper filter bag is full. | Replace the paper filter bag. | |
| Dust escapes from the product. | The container cover has not been installed correctly. | Attach the container cover correctly. |
| Material sucked in is blown out again at the container cover. | Foam filter damaged. Replace the foam | m filter. |
| There is no filter present. | Insert a filter. | |
16 Disposal and recycling
Notes for packaging


The packaging materials are recyclable. Please dispose of packaging in an environmentally friendly manner.
Notes on the electrical and electronic equipment act (ElektroG)

Waste electrical and electronic equipment does not belong in household waste, but must be collected and disposed of separately!
- Used batteries or rechargeable batteries that are not installed permanently in the old device must be removed non-destructively before disposal! Their disposal is regulated by the battery act.
- Owners or users of electrical and electronic devices are legally obliged to return them after use.
-
The end user is responsible for deleting their personal data from the old device being disposed of!
-
The symbol of the crossed-out dustbin means that waste electrical and electronic equipment must not be disposed of with household waste.
- Waste electrical and electronic equipment can be handed in free of charge at the following places:
Public disposal or collection points (e.g. municipal works yards)
- Points of sale of electrical appliances (stationary and online), provided that dealers are obliged to take them back or offer to do so voluntarily.
- Up to three waste electrical devices per type of device, with an edge length of no more than 25 centimetres, can be returned free of charge to the manufacturer without prior purchase of a new device from the manufacturer or taken to another authorised collection point in your vicinity.
Further supplementary take-back conditions of the manufacturers and distributors can be obtained from the respective customer service.
- If the manufacturer delivers a new electrical device to a private household, the manufacturer can arrange for the free collection of the old electrical device upon request from the end user. Please contact the manufacturer's customer service for this.
- These statements only apply to devices installed and sold in the countries of the European Union and which are subject to the European Directive 2012/19/EU. In countries outside the European Union, different regulations may apply to the disposal of waste electrical and electronic equipment.
17 EU Declaration of Conformity
Translation of the original Declaration of Conformity
Manufacturer:
Scheppach GmbH
Günzburger Straße 69
D-89335 Ichenhausen
We declare under our sole responsibility that the product described here complies with the applicable directives and standards.
Brand: SCHEPPACH
Art. designation: ELECTRIC WET/DRY VACUUM CLEANER - VC25
Item No. 5907745901
EU directives:
2014/30/EU, 2014/35/EU, 2011/65/EU*
- The object of the declaration described above fulfils the regulations of the directive 2011/65/EU of the European Parliament and Council from 8th June 2011, on the restriction of the use of certain hazardous substances in electrical and electronic equipment.
Applied standards:
EN 60335-1:2012+A11:2014+A13:2017+A1:2019+
A14:2019+A2:2019+A15:2021+A16:2023;
EN IEC 60335-2-2:2023+A11:2023
EN 62233:2008; EN 61000-3-3:2013+A1:2019+A2:2021;
EN IEC 61000-3-2:2019+A1:2021:
ENIEC55014-1:2021;
EN IEC 55014-2:2021;
Documentation authorised representative:
Dawid Hudzik
Günzburg Str. 69
D-89335 Ichenhausen
Division Manager Product Center
Andreas Pecher
Head of Project Management
Sommaire
Division Manager Product Center

Andreas Pecher
Head of Project Management
Indices
Division Manager Product Center

Head of Project Management
Inhoudsopgave
Division Manager Product Center

Andreas Pecher
Head of Project Management
Indices
Division Manager Product Center

Andreas Pecher
Head of Project Management
Indices
Division Manager Product Center

Andreas Pecher
Head of Project Management
Obsah
Division Manager Product Center

Andreas Pecher
Head of Project Management
Obsah
Division Manager Product Center
Andreas Pecher
Head of Project Management
Tartalomjegyzék
Division Manager Product Center

Head of Project Management
Spis tresci
Günzburger Straße 69
D-89335 Ichenhausen
Division Manager Product Center

Andreas Pecher
Head of Project Management
Popis sadrzaja
1 Uvod. 113
2 Opis proizvoda (sl. 1-11) 113
3 Opseg isporuke (sl. 2). 113
4 Namjenska uporaba 114
5 Sigurnosne napomene. 114
6 Tehnicki podatci 115
7 Raspakiravanje 115
8 Montaza 115
9 Rukovanje 117
10 Napomene za rad. 117
11 Ciścenje i održavanje 118
12 Skladistenje i transport. 119
13 Priključivanje na elektrichnu mrežu. 119
14 Popravak i narucivanje rezervnih dijelova. 119
15 Otklananje neispravnosti 120
16 Zbrinjavanje i recikliranje 120
17 EU izjava o sukladnosti. 121
18 Povecani crtez. 242
Objašnjenje symbola na proizvodu
Svrha je simbola u ovom prisucniku skrenuti va su pozornost na moguce rizike. Sigurnosne simbole i objasnjenja uz njih valja pomno prouciti. Sama upozorenja ne otklanjaju rizike i ne mogu zamijeniti ispavne mjere za sprečavanje Nesreca.
| Prije stavljanja u pigeon pročitajte i poštujte prisćnik za rukovanje i sigurnosne napome- ne! | |
| CE | Proizvod je u skladu s važćeim europskim direktivama. |
| ΔΔΔ | Proizvod je u skladu sa važëm srpskim smernicama. |
1 Uvod
Proizvodac:
Scheppach GmbH
Günzburgerstraße 69
D-89335 Ichenhausen
Poštovani kupće
Zelimo vam mnogo zadovoljstva i uspjeha prilikom rada s novim proizvodom.
Napomena:
Prema vazecem njemaackom Zakun o odgovornosti za proizvode, proizvodač ovog proizvoda ne odgovara za stete koje nastanu na ovom proizvodu ili koje ovaj proizvod uzrokuje u slučaju:
neispravnog rukovanja
- nepridržavanja priručnika za uporabu
- popravaka koje obave drugi, neovlăsteni stručnjaci
- ugradnje i zamjene neoriginalnih rezervnih dijelova
- nenamjenske uporabe.
kvarova elektricnog sustava zbog nepridržavanja propisa i odredaba o elektricnoj energiji VDE 0100, DIN 57113 / VDE0113.
Vodite računa o sljedecem:
Prirucnik za uporabu sastavni je dio ovog proizvoda.
On sadržava važne napomene za siguran, propisan i ekonomičan rad s proizvodom te za izbjegavanje opasnosti, smanjivanje troškova popravaka i prekida rada te povečanje pouzdanosti i vijeka trajanja proizvoda. Osim sigurnosnih propisa iz ovog prisćnika za uporabu morate se svakako pridržavati nacionalnih propisa koji se odnose na rad ovog proizvoda.
Prije uporabe proizvoda upoznajte se sa svim napomenama za rukovanje i sigurnosnim napomenama. Rabite proizvodismo prema opisu iz naVEDena podruca primjene. Cuvajte prisucnik za uporabu, a u slucaju predaje proizvoda trecim osobama, predaje i sve dokumente.
2 Opis proizvoda (sl. 1-11)
- Ručka za noosenje
- Prikjučak za ispuhivanje
- Spremnik
3a. Blokade
4.Osnovno postolje
4a. Držači
4b. Montazne rupe - Valjci
- Usisni priključak
6a. Spojnica - Poklopac spremnika
7a.Drza - Sklopka za uključivanje/isključivanje
- Filtarska košara
9a. Sigurnosni ventil's plovkom - Usisno crijevo
10a. Crijevna spojka
11.Rucka
11a.Zasun - Usisna cijev
- Podna sapnica
- Sapnica za fuge
- Papirna filtrarska vrećica
15a. Brtveni prsten - Spuzvasti filtar
3 Opseg isporuke (sl. 2)
Poz. KoličinaNaziv
- 1x Osnovno postolje
- 4x Valjci
- 1x Usisno crierevo
- 3x Usisna cijev
- 1x Podna sapnica
- 1x Sapnica za fuge
- 1x Papirna fittarska vrecica
- 1x Spuzvasti filtar
Division Manager Product Center
Andreas Pecher
Head of Project Management
Kazalo
1 Uvod. 122
2 Opis izdelka (sl. 1-11). 122
3 Obseg dostave (sl. 2) 122
4 Namenska uporaba 123
5 Varnostni napotki 123
6 Tehnicni podatki 124
7 Razpakiranje 124
8 Montaza 124
9 Uporaba 126
10 Delovna navodila 126
11 Cišćenje in vždrževanje 127
12 Skladischenje in transport 128
13 Elektrichi priključek. 128
14 Popravila in narocanje rezervnih delov 128
15 Pomoč pri motnjah 129
16 Odlaganje med opadke in reciklaza. 129
17 EU izjava o skladnosti 130
18 Eksplozjska risba. 242
Razlaga simbolov na izdelku
Z uporabo simbolov v tem prirocniku zelimo va so pozornost usmeriti na mogoca tveganja. Varnostni simboli in razlage, ki jih spremljajo, je treba natancno razumeti. Sama opozorila ne odpravijo tveganj in ne morejo nadomesti ustreznih ukrepov za preprecevanje NESRC.
Division Manager Product Center

Andreas Pecher
Head of Project Management
Sisukord
8.2 Mahuti (3) monteerimine pōhikandmikule (4) (joon. 4)
Division Manager Product Center
Andreas Pecher
Head of Project Management
Turinys
Günzburger Straße 69
D-89335 Ichenhausen
Division Manager Product Center
Andreas Pecher
Head of Project Management
Satura raditajs
1 levads. 149
2 Ražojuma apraksts (1.-11. att.) 149
3 Piegades komplekts (2. att.) 149
4 Noteikumiem atbilstoša lietosana. 150
5 Drośibas norādījumi. 150
6 Tehniskie dati. 151
7 Izpakosana 151
8 Montaza 151
9 Lietosana. 153
10 Darba noradijumi. 153
11 Tirisana un apkope 154
12 Glabasana un transporte.. 155
13 Pieslegsana elektfiklam 155
14 Labošana un rezerves dalu pasutišana 156
15 Traucejumu noversana 156
16 Utilizacija un otreizeja izmantošana. 157
17 ES atbilstibas deklaracija. 157
18Klaidskats. 242
Division Manager Product Center

Andreas Pecher
Head of Project Management
Division Manager Product Center

Andreas Pecher
Head of Project Management
Sisallysluettelo
Division Manager Product Center
Andreas Pecher
Head of Project Management
Indholdsfortegnelse
Division Manager Product Center
Andreas Pecher
Head of Project Management
Innholdsfortegnelse
Division Manager Product Center
Andreas Pecher
Head of Project Management
CbDbpxKaHne
1 yBOi 194
2 OncaHne Ha npOyKta (Fur. 1-11) 194
3 O6eMa 10ctabkata (Fur.2) 194
4 YnoTpe6a no npedna3NaueHne. 195
5 Yka3aHna 3a 6e3oNaCHOCT 195
6Texnueckn daHHn. 196
7 Pa3onakobaHe. 196
8 MoHTax 197
9 O6cnykBaHe 198
10 Yukazama pa6ota 198
11 PocntBaHe n noDpBxka. 199
12 CbxaheHne n TpaHcnpOpTupaHe 200
13 EneKtpnuecko Cbbp3BaHe 200
14 Pemont n nopbUbahe Ha pe3epBn qactn. 201
15 OTeTpaHbAbe Ha Henn3npaBHOctn. 202
16 N3xBbPJIHe n peuKInpaHe 202
17 ECДeКларuaцязabotbETCTBue. 203
18 N3o6paXeHnE B pa3rno6eH BnD 242
O6aCHeHne Ha cIMBOJnTe Bbpxy npoDyKta
N3noJ3BaHeTo Ha CmBOJIN B HactoIIO To pBKOBoDCTBO CJeBa Da HacOuH BHMaHHeTo Bn KbM eBEHTyaJIHn PnCKObE.CmBOJNTe 3a 6e3oNaChOcT n O6rCheHnra, KOtTO rnpdpykabat, Tpr6Ba Da 6bDat pa36paHn ToHc. CamTe npdynpexKeHn He npemaxBat pncOBete n He Morat Da 3aMeHr npabHnHte MepKn 3a npedOTbpaTaBaHe Ha 3JIOJnyKn.
Xenaem Bn MHO npaTHMOMeHTN uynex npn pa6oTata c Baun HOB npoDyKT.
Yka3aHHe:
CbIaCHO DeIcTBaUH 3aKOH 3a npOdyKTobata OTROBOPHOCT, pON3BOIDTEJIAT Ha To3n IpOdyKT He HOCN OTROBOPHOCT 3a UeTn, Bb3HKnHaJI N O NIN Nopadn To3n ypeD, npi:
-
HenpaBnHo 60paBeHe
-
HecnaBaHe Ha pBkoBOcTBTO 3a ynoTpe6a
PemOHnOT HeynbHOMOeHN CneuaNCTn, RBAuIcN Ce TpeTn Iuca - Mohtaxи noDmHaHa He opuHnHaHn pe3epBn Yactu
- YnoTpe6a He no npedHa3NaueHne
- OTKa3 Ha eNeKtpnueckKaTa HnctanaZuI npH He npeDnncAnrta 3a pa6Ota c eNeKtpnueCTBO n pa3nopeD6nte Ha VDE 0100, DIN 57113 / VDE0113.
B3eMeTe IOBHNMaHHe:
PbKOBOIDCTBOTO 3a ynoTpe6a e cbctabHa qact OT TO3n npOdyKT.
To cBbpxba Baxn yka3aHn OTHOCHO 6e3oNacHATA, npabnHaTa nIKOHOMnHata pa6ota C npodykTa, n36rBaHeto Ha onachOCTn, cneTBAHeto Ha pa3xoyn 3a peMOHT, HamaJraBaHTo HA BpemeHaTa Ha npctOn n yBeJIuHaBaHTo Ha HndexKnHocTTa n EKcnNoaTaunOHn JNBOT Ha npodykTa. B DonbIHeHne KbM yka3aHnraTa 3a 6e3-ONACHOCT B TOBa pKOBODCTBO 3a ynOTpe6a, 3aNbJnxTeJIHO Tp8Ba Da cna3BaTe OTHACsUInTe ce Do ekCnNoaTaunTaHa n npodykTa npedncaHn BB BaWata cTpaHa.
Ipei Da n3no3BaTe npOkyTa, 3a0n3HaIte ce C BCNUK yka3AHn 3a pa6oTa n 6e3onacHocT. N3no3BaIte npOdykTa cAmo KaKTo e OINcaHO 3a NOCOeHNTE oBnactn Ha yNtpe6a.CbXpaHraBe pKOBODCTBOTo 3a yNtpe6a Ha CNrpyHo MAcTo n PpeDaBaTe BCNUK DOKyMeHTN, KOrato npedabate npOdykTa Ha TpeTu nla.
CnHaHa Dyma 3a 06o3HaayBaHe Ha Heno CpeDCTBeHO ONaCHA CNTyaun, KOrTO, aKO He 6bJe n36erHaTa, ue DOBeDe Do CMBpT nn cepno3Ho HapaHbAHe.

PPEyPExKDeHne
CnHaHa Dyma 3a 06o3HaayBaHe Ha Bb3- MoxHa Onacha Cntyaun, KOrTo, aKO He 6bJe n36erHata, MoKe Da IOBeDe Do CmBpT NJI cepNo3HO HapaHbAHe.

BHIMAHNE
CnHaHa Dyma 3a 6o3HaayBaHe Ha notehuHaHO onacHa cnTyauN, KOrTo, aKO He 6b-De n36eHata, MoKe Da DOBeDe Do Jekn Nn CpeHN HapaHbAHn.
BHIMAHNE
CnHaHa Dyma 3a Obo3HaayBaHe Ha NotenuHaNo onacHa cnTyauN, KOrTo, aKO He 6b-De n36erHata, MoKe da DoBee do nobpeXdaHe Ha npOdykTa Hn NmUyecTBeHN uetn.
5 Yka3aHn 3a 6e3onacHOCT
O6u yka3aHn 3a 6e3oNaChocT 3a eNeKtpnueckn HNCTpyMeHTn

PPEyPExKDEHNE
Ipooyete BCnck yka3aHna 3a 6e3onac-HocT, HNCTpyKcH, NIOCTpaCmN INTexHnueCKn DaHHN, IpeOCTaBeHN C TO3n eJekTpHu-ecKN IHCTpymENT.
Pponyckn npn cna3BaHeto Ha nHCTpyKuInTe no-dony MORaT da IOBeDaT DO TOKOB yap, NOxap u/nn TeKKn HapaHbAHNA.
3ana3e BCnUk yka3aHna 3a 6e3onacHocT n HNCTpyKuIN 3a 6bJeC npabKn.
N3noJ3BaHOTo B yka3aHnIra Ta 3a 6e3onacHOCT noHRTne "eJeKTPnueCKn INHCTpymeHT" ce OTHACr DO 3axpaHbAHN OT MPekata eNeKTPnueCKn INHCTpymeHTn (C MPekOB npoBODnK) nJIn Do 3axpaHbAHn C akyMnyatop eJeKTPnueCKn INHCTpymeHTn (6e3 MPekOB npoBOdNHk).
5.1 O6uynka3aHnna 3a 6e3oNaCHOCT
Ha deca, nica c orpaHnueHn fH3nueckn, CETNBn nnncxnueeckn CnOC6HOCTn, nNc cnnca Ha ONNT uNO3HaHnru, nNHa Nua, KOTo He ca 3aNo3HaTN C pb-KOBODCTBaT a 06cnyXbaHe Ha MaunHata, He ce NO3BOJRA Da N3NOJ3BAt MaunHata, PnI KoEtO MeCTHn pa3npoeDOn MORat da orpaHnUaBAT Bb3pacTTa Ha Notpe6nten.
-ДeцаТа He TpЯБа Дa сиИграTс npoДуКТa.
-Почиствано notpe6nteJCKaTа noДрьжka He 6nBa Da ce N3BbPwBaT OTe4a.
BHIMAHNE
Pn ynoTpe6a Ha eNeKtpnueckn ypeu Tp8Ba da ce cboIIOaBAAT CneHIne TpeNa3Hm MepKn Cpeu onacHOCT OT TKOB yap, HapaHraBaHe nNokap:
5.2Kak da n36erHeTe 3JonoJyKn HapaHЯBaHn
- HnKora He octabryte roTOB 3a pa6oTa npOyKT 6e3 Ha3Op Ha MCTOTO Ha n3NoJ3BaHe.
C npOyKta He Tp86Ba Da ce 3acMyKBaT Xopa n XnBOTHN.
-По Врeme Ha pa6oTa HnKOra He HacoUBaIte npOdyKta nДIO3NTE KbM ce6e cn Nn KbM dpyrXopa,OCO6eHo KbM OuHTe nn yuHTe. CbueCTByBa onaCHOcT OT HapaHraBaHe.
He 3acmykbaTe ropeuH, HaxekxHn, 3anaJIMn, eknnnoBn nn OnaChn 3a 3dpabeto BeuecTba. Te BKNHOyBaT ropeua nenei, 6eH3n, pa3TBOpnten, KncelHHn n OCHOBn.
CbueCTByBa onaCHOCT OT NOXap N HapaHraBaHe.
- PeioBHO npoBepaBaiTe npOdykTa n npHaIeNkHocHTne 3a nobpei. He n3no3BaIte nobpeDeH npOdyKTnnn noBpeDeH npHaIeNkHocTn.
5.3 Kaka n36erHeTe 3IonoIyKn HapaHЯBaHnO t eIeKtpnueckn TOK
- 3cmykBaHe Ha TBbpN BeuecCTBa N TeuHocTn OT cyr, bIIN, OTONNTeHN TEa N TpyHNOCTbHIM MecTa.
8.9.1 NocTaBAnHe Ha IIO3a (ΦnR. 11)
- NocTabete XeJHaHata 13/14) Bbpxy pbkoxBaTkaT (11) INN Bbpxy BCMyKaTeHata Tpb6a (12).
- OtrcpaheTe IHO3ata (13/14), Kato Jn3ternnte Ha- npei OT CbotBETHata BCMykateJIHa Tpb6a (12) nnOT pboKoXBtKaTata (11).
9 O6cJnyKbaHe
PpOdykTB e o6OpyDbAH C KOHTeHep OT HepbXdaemaCTOMaHa. PoKnTe N03BOJRABAT rOJaMa MaHeBpeHOCT Ha npOdykTa. Pn MOKPo NocNCTBaHe N3KJIIOUcBAHeTo Ha BCMyKaTeHnB Bb3DyWeH NOTOK CE N3BbPbWA Ype3 NpeIa3EH NOnPaBBueH KLnAaH, KORAto KOHTeHepBT e PbJeH. DOnbHNrTeHNo npOdykTB pa3noJara C cyHKzra 3a n3DyXBaHe.
Функиониранeto Ha eIeMeHNTte 3a ynpaBHeHne ue Hamepnte B ONICAHnra TNo-DoNy.
BHIMAHHE
PpeNnyckaHTo B eKcNlOaTaunr 3aDbJIXTeHNO crNo6eTe HanbJIno npOdykTa!
I PENEYPEXDEHNE
Onachoct OT HapaHbaHe!
BkapBaIte eencena B KOHTaKaTc cAmo KOrato npOdyK- TbTe roToB 3a yNoTppe6a.
9.1 BkIIOUBaHe/IM3KIOUBaHe Ha npOdyKta (Φn.r. 1)
BHIMAHHE
He n3non3BaTte 6e3 fntb!
BkJIIOUyBaHe
- BkIIOHcTe ⅢeCenca Ha 3axpaHbaaTa MPexa B nOxOJaU KOHTaKT C npedna3nten.
- BkJIOyTe npOdyKTa, KaTo nOCTaBnTe npeBkJIOyBaTeJIra 3a BkJIOyBaHe/n3KnIOyBaHe (8) Ha no3nIur I.
N3KnIOuBaHe
1.ИЗклioуete npOdyKta,kaTo noCTaBnTe npeBknIOyBaTeJIЯ 3a BkIIOUbaHe/нЗКlIOUbaHe (8)Ha no3nUЯ 0.
10 Yukazahna 3pa6oTa
10.1Функцязн3смукbaHe
I PEPdUYPEXDEHNE
3a6paHeNo e 3acMyKBaHeTo Ha HaxKeHa ne- nen i 3anaHm, onachn BeuecTb. Cb- uectByBa onachOCT OT HapaHraBe!
BHIMAHHE
HINHT npax, HAnpIMep OT cImeHT, caKdN Ma3nUKa, e TBbpDe fH, 3a da 6bJe 3acMyKaH C npaxocMykaU. Ima onachOCT ToJ da nonaHe B Dnuratena n da ro noBpeu.
BHIMAHHE
He n3non3BaIte 6e3 fIITb!
- NocTabete npOdykTA Bbpy paBHa NOBbpxHOCT.
He 3acmykbaTe ropeuH, HaxkexeHn, 3anaJIMn, EKcnnIO3NBn nn OnaChn 3a 3npaBeTo BeIecTb. Te BKNIOyBaT ropeua nenen, 6eH3n, pa3TBOpNTeIN, KInCeHNn N OCHOBn.
CbueCTByBa onaCHOCT OT noXap n HapaHbaHe.
BcnyaHa 3aqrbaHe n3KnUoyTe npOdykTa n 3terIeTe uencena. OctabeTepoOdykTa da ce oxnaHn HaOTkpnto noHa6nIOdeHne.
- No Bpeme Ha NOUYBkInTe MOKeTe Da NOCTaBnTe CmyKaTeHHa Tpb6a B DbPkaHa KaNaka Ha KOHTeHepa.
-Пьнгет контейнера мakсимул до NOOBHATA,ТаKa Ye npedna3HnT nonnaBbueH Klnanah (9a) BUNaHnDa octaba CBO6OeH (ФИ.7).
1.Пoctabete cbeHHeHHeTo Ha Mapkya (10a) KbM n3-BoDa 3a n3CMyKBAhe (6) (BnKTe 8.5.1).
2.BKIOUoyeI npOdykTa(BNXTe 9.1).
10.1.1 Cyxo nouicBaHe (Fnr. 1, 2)
Yka3aHue:
He n3noJ3BaIe MOKbp IIN BnJaKeH npOdyKT 3a cyxo nouchTbaHe!
- NocTaBeTe ФиNTbPHaTa TOp6uYka (15) B KOHTeHepa (3) (BnKTe 8.4.1).
2.Пoctabete duHaPepHHnФиNTbp (16) (BnKTe 8.4.2). - CbpxkeTe cbeHHeHneTo Ha Mapkyua (10a) KbM n3-BoDa 3a n3cMyKbaHe (6) (BnKTe 8.5).
- NocTabete BcMykateJIHITe Tpb6n (12) Ha pbkoXBaTKata (11) (BIXKTe 8.8). NocCTBaHe Ha NOd: CbpxKeTe BcMykATEJHITe Tpb6n (12) n eHa ot IIO-3nTe (13/14). NocCTBaHe Ha BnCOUHHaTa Ha MacaTa Hn Ha TECHN MecTa: He cBbp3BaIte mnn CbpxKeTe cAmO eHa BcMyKaTeJIHa Tpb6a (12) n eHa ot IIO3nTe (13/14).
- XbaHete 3dpaBO mapkyua 3a n3cmyKBaHe (10) 3a pbkoXBatkata (11).
- BkJIOUeTe npOdyKta (BnKTe 9.1).
7.ИЗмучete 3онта 3a NOUHCTBaHe.
8.Пи Heo6xOIMOCKopnnpaTe BCMyKaTeJIHaTa MOuHocT, KaTo Nb3rAte HAnpei Ha3aI Nb3raYa (11a)Ha pkoXBaTKata (11).
9.ИЗКЛЮЧЕТIpOДУКТa(BИЖТe 9.1).
10.1.2 Mokpo nouchTahe (Mnrg. 1, 2)
Yka3aHue:
Brpadeh BbB fHNTbphata KOHNua nonlaBk OCHrypBa aBTOMaTHUHO 3aTbapRe Ha cMyKaTeJHHa KaHaJI, UOM KOHTeHepbT DOCTnHre CB0r MAKcImaJIeH KanaunTeHa BMeCTUMoCT. B To3n Clyuay npOdyKbT Tpr6Ba Da 6bJe n3KnIOueH N KOHTeHepbT n3npa3HeH, ppeDn pa6oTa Ta da MoKe Da npOdbJxN.
-Изпраэтete контейнера (3) педи мokpoTo no-унctBaHe(BuXTe 11.1.1).
KoHTeHepbT (3) He e noDxOJa3a cbXpaHeHne Ha TeuHOCTn. CneM oKpTo NouchBaHe n3npa3HeTe KOHTeHepa (3) (BuxTe 11.1.1).
- OtctpaHete fNITbPHaT a TOp6uKa (15) ot KOHTeHepa (3) (BnXTe 8.4.1).
- NocTaBeTe DyaHappeHHnФnTbp (16) (BnKTe 8.4.2).
- Cbpxte cbeHHeHneTo Ha Mapkya (10a) KbM n3-BOda 3a n3CMyKBaHe (6) (BnKTe 8.5.1).
- NocTabeTBCMyKaTeHHTe Tpb6n (12) Ha pbKoXBatKata (11) (BnXte 8.8). NocCTBaHe Ha noD: CbBpxKeTBCMyKaTeHHTe Tpb6n (12) n eHa ot DIO3nte (13/14). NocCTBaHe Ha BnCOunHata Ha Macata Hn Ha TeCHMecTa: He CbBp3BaIte Hn CBpKxTe cAmo eHaBCMyKaTeHHTp6a (12) n eHa ot DIO3nte (13/14).
- XbaHete 3dpabo Mapkyua 3a n3cMyKBaHe (10) 3a pkoxbatkata (11).
- BkJIOUeTe npOdyKta (BnXKe 9.1).
7.ИЗмучete 30ната 3a nouNTBaHe.
8.ИЗкlioуентpoДуКТa(BИЖТe9.1).
9.Почирсте прodyкт(aBнжTe 11.1).
10.2Функцязаи3duyxbaHe

PPEyPExKdEHN
OnachoctOT HapaHbAhe!
Ako HacouHTe Bb3dyuHaTa Ctpy KbM Xopa, JxuBOTHnI INpeDMETN, TOBa MOKe Da DOBeDe Do HapaHraBaHnI N NOBpeDn.
-HacouyeteBb3dyuHnnoTOKdaJeUoBac.
—Hikora He HacouBaIte Bb3dUshnIa NOTOK KbM dpyTIN Xopa, JNBOTHN INI ppeDMETN.
-He n3dyxbaIe TBbpIIN ppeImEtN, KATO KAMbHn nn KIOHN.
- IocTabete ФиЛТьрнata Top6Ичka (15) B KOHTeHepa (3) (BnKTe 8.4.1).
2.Пoctabete duHaPeneHHnФинТьр(16)(BuxTe 8.4.2). - NocTaBete CbeHHeHneTo Ha Mapkyua (10a) KbM n3-BoDa 3a n3dyXBaHe (2) (BnKTe 8.5.2).
Ppi HxJa CBbpKte eHa dO3a (13/14) (BnKTe 8.9.1). - XbaHeTe 3dpaBO mapkyua 3a n3cMyKBaHe (10) 3a pb-KoXBaTkata (11).
5.BKJIIOUeTe npOdyKta(BNXTe 9.1). - PpOdyxaIte onpeJeHeHa nobbpxHocT nn npeMe- Tn.
7.ИЗкlioутete npodykta(BnKTe 9.1).
8.CbpxKeTe CbeDInHeHHeTo Ha MapKyua 3a n3CMyKBaHe KbM n3BOda 3a n3CMyKBaHe (6) (BnXTe 8.5.1).
IOncTeTe DyHaPEnHHaΦnTbp (16), aKo BcMyKaTeJI-Hata MOuHOCHT HamaJee.
Yka3aHue:
Ppei Da MOHTnpaTe OTHOBO fHITbpa ce yBepeTe, Te Toi e cyx.
- OTCpaHete BCnKn IIO3n (13/14), BCMyKaTeJHInTe Tpb6n (12) n Mapkyua 3a n3cMyKBaHe (10) ot Dbpxka-ya (7a/4a).
- CbaneTe Kanaka Ha KOHTeHepa (7), KaKTo e onucaHo B 8.1.
3.06bpe Kanaka Ha KOHTeHepa (7).
4.ИЗТЕпЕ ДУнрЕнгЯ ФИNTБР (16)OTФИNTБРHA-Ta KОШицa (9). - OToTO H3TVaTe HUN H3MNETe PnHUYKa.
- Octabete duHappeHHnA qntbP (16) da n3cbxhe Ha Bb3dyx, npedn da ro noCTaBte o6paTHO n 3noJ3BaTe OTHOBO.
- IocTabete dyHAnpeHHnI nITbP (16) OTHOBo Bbpxy nITbPHata KOUHNua (9).
- 3aTbOpTe KOHTeHepa (3) c KanaKa Ha KOHTeHepa (7).
11.2 PpBkka
1.Прди BCяку npOTpe6a npOBeRpaIte npOdykTa 3a OueBnHn DeΦeKTH, KaTO pa3Xna6eHN, n3HOceHn nIN NOBpeHn YactN.
2.Поверете калцпги 3ацHTHTE yctpoCTBa 3a NOBpeN IN npabINHO NOLOXKeHne.CMeHeTe r, ako e Heo6xOIMO.
11.2.1 CmHa Ha duHaIpeHOBnA nTbP (16) n Ha nTbPhaTa TOp6uKa (15) (Φnr. 1)
1.OTCTpaHETECNCHNIO3n(13/14)INBCMYKaTeHNr Tpb6n(12)OTdbpKaaya(7a/4a).
2. CbaTe KanaKa Ha KOHTeHepa (7), KaKTo e onucaHO B 8.1.
3.ObpHeTe KaNaKa Ha KOHTeHepa (7).
4.ИЗТERЛЕ ДУНAPEHHHЯФиNTbp(16)OTФиNTbPHa- Tа кошнua(9)ил OTCTpaHeteФиNTbPHaTATOP- 6nka(15)OTшнКATA(6a).
5. NocTabete HOBINyHAnpeHen FnITbp (16) Ha FnITbPHTaT KOUHNHa (9), KaKTo e OINCAHO B 8.4.2.
6. 3a da cmeHnte fntbphata Top6nka (15), npouei-paTe, KaKTo e OINCAHO B 8.4.1.
7. 3aTBOPeTe OTHOBO KOHTeHepa (3) c KanaKa Ha KOHTeHepa (7).
12 CbXpaHenne n TpaHcnpTupaHe
12.1 CbxaHHeHne
-ПоистeteипpoВepeTe npOДуКТа 3a noBpeI.
CbXpaHraBaTe npOykTa n HerOBuTE npHaIaNeXHoCTn Ha TbMHO, cyxo n He3amPb3BaUo MRCTO, HeIOCTbNHO 3a deua.
OnTmamHaTa TemnepaTypa 3a cbxpaHeHne e MeKdy 5^ n 30^
CbXpaHbAaTe npOdykTa B opuHaJHaTa My onaKOBka.
IokpnTe npodykTa, 3a da ro 3aunTte ot npax nnn Bnara. CbxpaHbAte pkoBOcTBOTO 3a ynotpe6a npn npodykTa.
12.2 TpaHcnpTupaHe
1.3a Ta TpaHcnpTnpe npOyKta, n3KnUoyTe ro ot eNeKtpnueckata Mpeka n ro octaBeTe Ha Dpyro PpeBnEHO 3a HeNTa Macto.
2. IpoDyKbT MoXe Da Ce Bnura Nn TpaHcNOpTnpa CaMO C NOMOHTa Ha DpbKkTa 3a HOceHe.
3. NOBdHHeTe npOyKta, KOrato ro TpaHCnOpTnpaTe HAD CTbJbN NII INPepnTCTBnA.
4.3a npeoTbpaTne NOBpeN HapaHbaHn, npn TpaHCnpOpTaHe B aBTOMo6nn o6eONacTe npOdy-Kta Cpeu Npeo6pbuaHe NIOxNb3BaHe.
13 EneKtpnuecko Cbbp3BaHe
MOnTnpaHnIeJeKtpoDbnIateJ e Cbbp3aH B roTOBHOCT 3a ekCnIIOataun. Cbbp3BaHeTo OTROBapHa npInOxHMte pa3nope6n Ha VDE n DIN.MpeXOBOTcBp3BaHe O TcPaHa Ha KInEHTa, KaKTo n N3No13-BAHnT yDlbNkAbaU Ka6eJ, Tpr6Ba Da OTROBaprHa Te3n PpeDnncAHn.
13.1 Повреени CBьрзВаши eльектучески правODиц
No Cbbp3BaunTe eNeKtpnueeCKn npoBODHnU qecTo Bb3- HkBA TOBpeuB uN0launra.
PnunHn 3a TOBa MoRat Da 6bdaT:
- Tocn Ha npitckaHe, KOraTo Cbbp3BaunTe npoBoHnCi ca npokapAH npe3 npoCen Ha npo3OpuN IIn BpTu;
TOUKNHaIpeBBAHeNopaHnHEnpaBnHO3akpenBaHe Hnn npokapBaHe Ha Cbbp3Baun npoBOHNK; - MecTa Ha Ipep3BaHe IopaI IN pera3BaHe Ha CBbp3BaIIN IPOBOIDHIK;
- NOBpeiN B I30laqyTa NopaDi NbPnaHe OT CTeHHn KONTAKT;
-nykHaTmHn nopadn CTapeeHe Ha n3OJaIyraTa.
TaknBa deeKTHn CBbp3Baun eNeKtpueeCKn npoBOHnHe 6nBa da ce n3non3Bat n nopadn nobpeHaTa n30Jaua ca onachn 3a XVBota.
PeIOBHO npOBepaIte 3a noBpei CBbp3BaunTe eJIeK-tpueckn npOBODHnC. BHMabaIte 3a TOBa, npnpoBepkata CBbp3BaunT npOBOnHK da He e Cbbp3aH KbM eJIeKtpueckKaTa Mpeka.
Cbpb3BaunTe eJeKtpnueeKn npOBdHnTp6Ba da otroBaprHa npINOxMnTe pa3npoe6n Ha VDE n DIN.13noJI3BaIte cAmO cbpb3Baun npOBdHnC bC cbIoTO o6o3haueHne.
OtneataBaHe Ha TINOBOTo 063HaueHne Bbpxy Cbbp3Ba-
Yka3aHn 3a6e3oNaCHOCT3a CmHa Ha NOBpeHeHnn DeekTHN npOBODHn3a CBbP3BaHe KbMmpexkata
BnHa cBbP3BaHTo Y
Ako e Heo6xOdma CmHa Ha npoBOdHka 3a CBp3BaHe KbM MpeXaT, TOBa Tpr6Ba Da ce N3BbPUn OT npOn3BO- dTeJI Hn HerOB npeDCTaBtTeJ, 3a Da ce N36erHe 3a- cTaPawabaHe Ha 6e3onacHOcCTT.
13.2 Baxhny yka3aHna
Pn npetobapBaHe Ha DBratena,Toe Ce n3KIOUba aB- TomaTHNo. Cne BpeMe Ha OxnaXdaHe (pa3NnuHO no BpeMe),DBratelaT MoKe Da CE BKIOU OTHOBO.
13.3ДВrataTeHa npomeHJIb TOK
Cbpb3BaHnI pemOnTH n o eJekTpnueCKOTo o6OpyDbaHE MOrat da cE N3BbPWBat cAmO OT eJekTpotexHnK.
- Мөховотанрөхөнгүлрбүдүү. 220 V - 240V~.
- YIbJIkaBaUnte npOBdHnC dIbJxHa do 25 m TpI6Ba Da ca c HanpeHcceHne ot 1,5 KBaIpaTHMmIImMeTpA.
Division Manager Product Center

Andreas Pecher
Head of Project Management
Iivakac TepieXoEvwV
1 Eioaywy 204
2 IIepiypaippoiovtos (Eik. 1-11). 204
3Iapadotéo uAIko (Eik.2). 204
4 Evδεδειγμένη xρήση. 205
5 Yro8eicic a0qaaleia 205
6TexviKa xaapaktnpiOTiKa 206
7 Atooukeuaia 206
8SigmaapuOaoyn 207
9 Xειρισμός 208
10 YtnoBxiEic Epyaoiaac 208
11 KaopiaoKai ouvtipnoan 210
12 AToθηκευοι και μεταφορά 211
13 Hεκτρικό σύνδεση. 211
14 Etnoekun kai npayyEia avtaakTikwv 211
15 Avtietwian npoAetaWv 212
16 Atroppn kai avakukwon. 212
17 Anawon oumuoppwong EEE 213
18 Diεupμévo σχδio 242
- AnevepytooiéTe to Tpoiov:
-otav dev xpoioutoie,otavmuapepe n apnveTe xwpiic EriBaeyn to npiov.
-otav eayxETe, kaapicETo Tpoiov n aTouakpuVETe Eppoaeic.
-otav tpaaypatottoieite epyaies kaqapioou n ouvtnpnncn aaaaacet eaeouap.
-eta nV eTAPnE EVA Owata n OE TEPiTTwo n quiooayikov kpaaoov.
Division Manager Product Center

Andreas Pecher
Head of Project Management
Cuprins
1 Introducere. 214
2 Descrierea produsului (fig. 1-11). 214
3Pachetul delivrare (fig.2) 214
4 Utilizarea conforma cu destinata. 215
5 Indicatii de sécurité 215
6 Date tehnice. 216
7 Despachetare 216
8 Montajul. 216
9 Operarea. 218
10 Indicati de lucru 218
11 Curataea si intretinerea curenta 219
12 Depozitare sitransport. 220
13 Bransamentul electric. 220
14 Reparatie si comanda pentru把这些 de schimb.. 221
15 Remedierea avariilor. 221
16 Eliminarea ca deseu si revalorificarea 222
17 Declaratie de conformitate UE 223
18 Desen de ansamblu explodesat 242
Division Manager Product Center

Andreas Pecher
Head of Project Management
Sadržaj
1 Uvod. 224
2 Opis proizvoda (sl. 1-11) 224
3 Opseg isporuke (sl. 2). 224
4 Namenska upotreba. 225
5 Sigurnosne napomene 225
6 Tehnicki podaci 226
7 Raspakivanje 226
8 Montaza 226
9 Rukovanje 228
10 Radna uputstva 228
11 Ciśćenje i odrzavanje 229
12 Skladistenje i transport. 230
13 Elektrichi priključak 230
14 Popravka i narucivanje rezervnih delova 230
15 Pomoc za otklanjanje smetnji 231
16 Odlaganje na OTPad i reciklaza. 231
17 EU izjava o usaglasenosti 232
18 Znak eksplozije 242
Objašnjenje symbola na proizvodu
Division Manager Product Center

Head of Project Management
icindekiler
2 Ürüncastle (Res. 1-11)
- Tasima kulpu
- Üfleme baglantisi
- Kap
3a. Kilitler - Taban cerevesi
4a. Tutucular
4b. Montaj delikleri - Tekerlekler
- Emme baglantisi
6a. Cubuk - Kap kapaqi
7a. Tutucu - AçaMa/Kapama salteri
- Filtre sepeti
9a. Emniyet Şamanda valfi - Emme hortumu
10a. Hortum baglantisi - Tutamak
11a. Suryu - Emme borusu
- Taban memesi
- Yarik memesi
- Kajit fibre torbasi
15a. Sizdirmazlik halkasi - Köpuk滤etre
3 Teslimat kapsami (Res. 2)
Poz. Adet Tanim
4.1 x Taban cergevesi
5.4 x Tekerlekler
10. 1 x Emme hortumu
12. 3 x Emme borusu
13. 1 x Taban memesi
14. 1 x Yarik memesi
15. 1 x Kagit litre torbasi
16. 1 x Köpuk filtrte
Division Manager Product Center

Andreas Pecher
Head of Project Management
Garantie DE
Obvious defects must be reported within 8 days after receipt of the goods, otherwise the purchaser loses all claims due to such defects. We guarantee our machines, if handled correctly, for the duration of the statutory warranty period from handover in such a way that we will replace free of charge any machine part that demonstrably becomes unusable within this period as a result of material or manufacturing defects. For parts that we do not manufacture ourselves, we only provide a warranty to the extent that we are entitled to warranty claims against the upstream suppliers. The purchaser shall bear the costs of fitting the new parts. Claims for conversion and reduction and other claims for damages are excluded.
Garantie FR


- Garantiebedingungen
- Explanation of the symbols on the product
- Introduction
- Manufacturer:
- Dear Customer
- Note:
- Product description (Fig. 1-11)
- Scope of delivery (Fig. 2)
- Item Quantity Designation
- Proper use
- Explanation of the signal words in the operating manual
- Safety instructions
- WARNING
- General safety instructions
- ATTENTION
- It will help you avoid accidents and injuries
- To avoid accidents and injuries due to electric shock
- This way, product damage and any resulting personal injury can be avoided
- Residual risks
- The product has been built according to state-of-the-art and the recognised technical safety rules. However, individual residual risks can arise during operation.
- Technical data
- Unpacking
- The product and the packaging material are not children's toys!
- Assembly
- Danger of injury!
- Attaching and removing the container cover (7) (Fig. 3)
- Removing the container cover:
- Attaching the container cover:
- Fitting the container (3) to the base frame (4) (Fig. 4)
- Fitting the rollers (5) (Fig. 5)
- Filter and filter bag (Fig. 2)
- Paper filter bag (15)
- Foam filter (16)
- Fitting/removing the paper filter bag (15) (Fig. 6)
- Removing:
- Assembling:
- Fitting/removing the foam filter (16) (Fig. 7)
- Connecting the suction hose (10)
- Suction function (Fig. 8)
- Blast function (Fig. 9)
- Uncoupling the suction hose (10) (Fig. 8, 9)
- Storing the nozzles (13/14), suction pipe (12) and suction hose (10) (Fig. 2, 3, 10)
- Attaching the suction pipe (12) (Fig. 11)
- Using the various nozzles (13/14) (Fig. 11)
- Floor nozzle (13)
- Joint nozzle (12)
- Fitting the nozzle (Fig. 11)
- Operation
- Switching the product on/off (Fig. 1)
- Switching on
- Switching off
- Working instructions
- Suction function
- Dry vacuuming (Fig. 1, 2)
- Do not use a wet or damp product for dry vacuuming!
- Wet vacuuming (Fig. 1, 2)
- Blast function
- Cleaning and maintenance
- Cleaning
- Emptying the container (3) (Fig. 1)
- Cleaning the foam filter (16) (Fig. 1, 7)
- Maintenance
- Replacing the foam filter (16) and paper filter bag (15) (Fig. 1)
- Storage and transport
- Storage
- Transport
- Electrical connection
- Damaged electrical connection cables
- Connection type Y
- Important information
- AC motor
- Repair and ordering spare parts
- Connections and repairs
- Ordering spare parts
- Service information
- Troubleshooting
- Disposal and recycling
- Notes for packaging
- Notes on the electrical and electronic equipment act (ElektroG)
- EU Declaration of Conformity
- Translation of the original Declaration of Conformity
- Art. designation: ELECTRIC WET/DRY VACUUM CLEANER - VC25
- EU directives:
- Applied standards:
- Documentation authorised representative:
- Division Manager Product Center
- Head of Project Management
- Sommaire
- Indices
- Inhoudsopgave
- Andreas Pecher
- Obsah
- Tartalomjegyzék
- Spis tresci
- Popis sadrzaja
- Objašnjenje symbola na proizvodu
- Uvod
- Proizvodac:
- Poštovani kupće
- Napomena:
- Vodite računa o sljedecem:
- Opis proizvoda (sl. 1-11)
- Opseg isporuke (sl. 2)
- Poz. KoličinaNaziv
- Kazalo
- Razlaga simbolov na izdelku
- Sisukord
- Mahuti (3) monteerimine pōhikandmikule (4) (joon. 4)
- Turinys
- Satura raditajs
- Sisallysluettelo
- Indholdsfortegnelse
- Innholdsfortegnelse
- CbDbpxKaHne
- O6aCHeHne Ha cIMBOJnTe Bbpxy npoDyKta
- Yka3aHHe:
- B3eMeTe IOBHNMaHHe:
- PPEyPExKDeHne
- BHIMAHNE
- Yka3aHn 3a 6e3onacHOCT
- 3ana3e BCnUk yka3aHna 3a 6e3onacHocT n HNCTpyKuIN 3a 6bJeC npabKn.
- O6uynka3aHnna 3a 6e3oNaCHOCT
- 5.2Kak da n36erHeTe 3JonoJyKn HapaHЯBaHn
- Kaka n36erHeTe 3IonoIyKn HapaHЯBaHnO t eIeKtpnueckn TOK
- NocTaBAnHe Ha IIO3a (ΦnR. 11)
- O6cJnyKbaHe
- BHIMAHHE
- I PENEYPEXDEHNE
- Onachoct OT HapaHbaHe!
- BkIIOUBaHe/IM3KIOUBaHe Ha npOdyKta (Φn.r. 1)
- BkJIIOUyBaHe
- N3KnIOuBaHe
- Yukazahna 3pa6oTa
- 10.1Функцязн3смукbaHe
- I PEPdUYPEXDEHNE
- Cyxo nouicBaHe (Fnr. 1, 2)
- Yka3aHue:
- Mokpo nouchTahe (Mnrg. 1, 2)
- 10.2Функцязаи3duyxbaHe
- PPEyPExKdEHN
- OnachoctOT HapaHbAhe!
- PpBkka
- CmHa Ha duHaIpeHOBnA nTbP (16) n Ha nTbPhaTa TOp6uKa (15) (Φnr. 1)
- CbXpaHenne n TpaHcnpTupaHe
- CbxaHHeHne
- TpaHcnpTupaHe
- EneKtpnuecko Cbbp3BaHe
- Повреени CBьрзВаши eльектучески правODиц
- Baxhny yka3aHna
- 13.3ДВrataTeHa npomeHJIb TOK
- Iivakac TepieXoEvwV
- Cuprins
- Sadržaj
- icindekiler
- Ürüncastle (Res. 1-11)
- Teslimat kapsami (Res. 2)
- Poz. Adet Tanim
- Garantie DE
- Garantie FR
Brand : SCHEPPACH
Model : VC25
Category : Vacuum Cleaner