KM 7540 W G - Vacuum Cleaner Kärcher - Free user manual and instructions
Find the device manual for free KM 7540 W G Kärcher in PDF.
Download the instructions for your Vacuum Cleaner in PDF format for free! Find your manual KM 7540 W G - Kärcher and take your electronic device back in hand. On this page are published all the documents necessary for the use of your device. KM 7540 W G by Kärcher.
USER MANUAL KM 7540 W G Kärcher
Register your product www.kaercher.com/welcome KM 75/40 W G
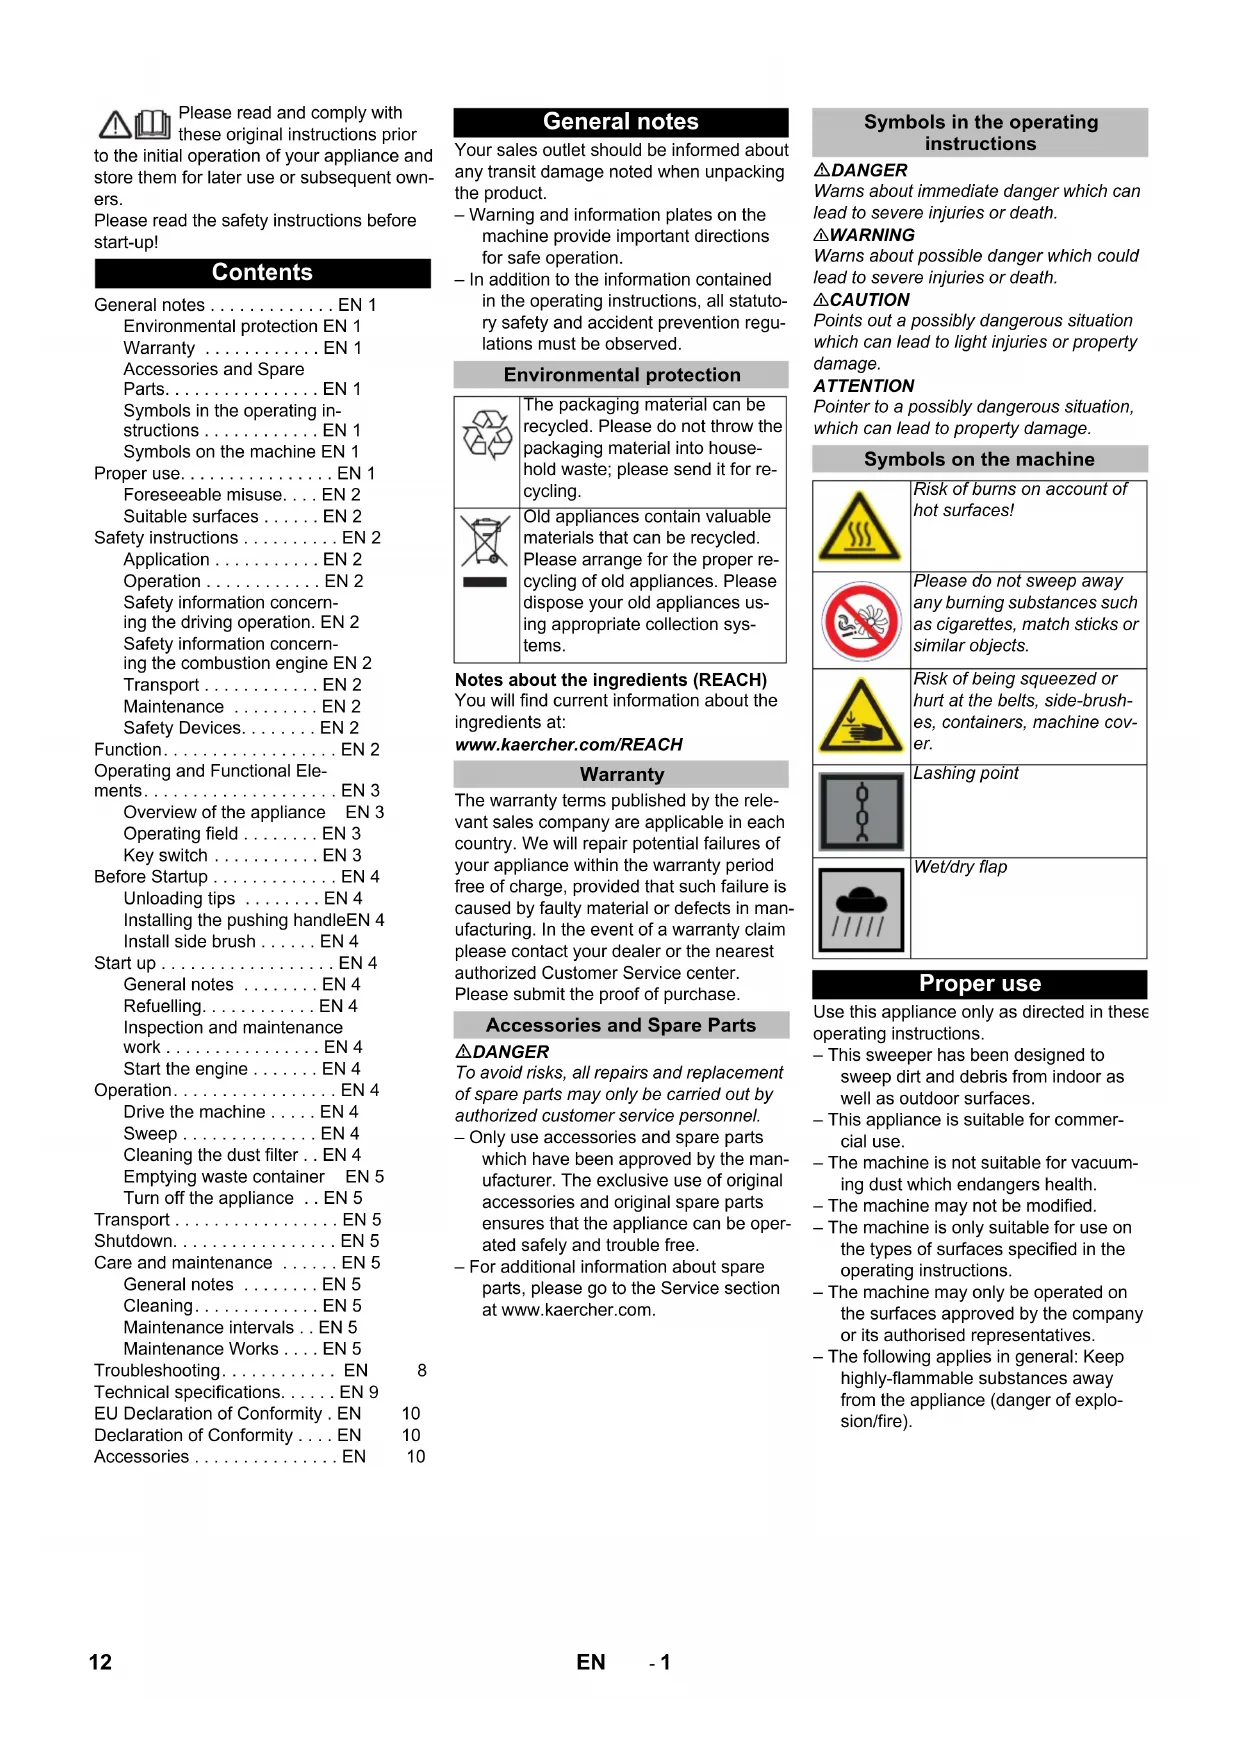
Angewandtes Konformitätsbewertungs- verfahren 2000/14/EG: Anhang V Schallleistungspegel dB(A) Gemessen: 82 Garantiert: 83 Chairman of the Board of Management Director Regulatory Affairs & Certification Zubehör Seitenbesen, hart 6.905-625.0 Zur Entfernung von fest haftendem Schmutz im Außenbereich, nässefest. Kehrwalze, weich 6.906-886.0 Mit Naturborsten speziell für Feinstaub- kehren auf glatten Böden im Innenbe- reich. Nicht nässefest, nicht für abrassive Oberflächen. Kehrwalze, hart 6.906-885.0 Zur Entfernung von fest haftendem Schmutz im Außenbereich, nässefest. Kehrwalze, antista- tisch 6.906-950.0 11DE- 1 Please read and comply with these original instructions prior to the initial operation of your appliance and store them for later use or subsequent own- ers. Please read the safety instructions before start-up! Your sales outlet should be informed about any transit damage noted when unpacking the product. – Warning and information plates on the machine provide important directions for safe operation. – In addition to the information contained in the operating instructions, all statuto- ry safety and accident prevention regu- lations must be observed. Notes about the ingredients (REACH) You will find current information about the ingredients at: www.kaercher.com/REACH The warranty terms published by the rele- vant sales company are applicable in each country. We will repair potential failures of your appliance within the warranty period free of charge, provided that such failure is caused by faulty material or defects in man- ufacturing. In the event of a warranty claim please contact your dealer or the nearest authorized Customer Service center. Please submit the proof of purchase. DANGER To avoid risks, all repairs and replacement of spare parts may only be carried out by authorized customer service personnel. – Only use accessories and spare parts which have been approved by the man- ufacturer. The exclusive use of original accessories and original spare parts ensures that the appliance can be oper- ated safely and trouble free. – For additional information about spare parts, please go to the Service section at www.kaercher.com. DANGER Warns about immediate danger which can lead to severe injuries or death. 몇 WARNING Warns about possible danger which could lead to severe injuries or death. 몇 CAUTION Points out a possibly dangerous situation which can lead to light injuries or property damage. ATTENTION Pointer to a possibly dangerous situation, which can lead to property damage. Use this appliance only as directed in these operating instructions. – This sweeper has been designed to sweep dirt and debris from indoor as well as outdoor surfaces. – This appliance is suitable for commer- cial use. – The machine is not suitable for vacuum- ing dust which endangers health. – The machine may not be modified. – The machine is only suitable for use on the types of surfaces specified in the operating instructions. – The machine may only be operated on the surfaces approved by the company or its authorised representatives. – The following applies in general: Keep highly-flammable substances away from the appliance (danger of explo- sion/fire). Contents General notes ... EN 1 Environmental protection EN 1 Warranty ... EN 1 Accessories and Spare Parts... EN 1 Symbols in the operating in- structions ... EN 1 Symbols on the machine EN 1 Proper use... EN 1 Foreseeable misuse... EN 2 Suitable surfaces ... EN 2 Safety instructions ... EN 2 Application ... EN 2 Operation ... EN 2 Safety information concern- ing the driving operation. EN 2 Safety information concern- ing the combustion engine EN 2 Transport ... EN 2 Maintenance ... EN 2 Safety Devices... EN 2 Function... EN 2 Operating and Functional Ele- ments... EN 3 Overview of the appliance EN 3 Operating field ... EN 3 Key switch ... EN 3 Before Startup ... EN 4 Unloading tips ... EN 4 Installing the pushing handleEN 4 Install side brush ... EN 4 Start up ... EN 4 General notes ... EN 4 Refuelling... EN 4 Inspection and maintenance work ... EN 4 Start the engine ... EN 4 Operation... EN 4 Drive the machine ... EN 4 Sweep ... EN 4 Cleaning the dust filter ... EN 4 Emptying waste container EN 5 Turn off the appliance ... EN 5 Transport ... EN 5 Shutdown... EN 5 Care and maintenance ... EN 5 General notes ... EN 5 Cleaning... EN 5 Maintenance intervals ... EN 5 Maintenance Works ... EN 5 Troubleshooting... EN 8 Technical specifications... EN 9 EU Declaration of Conformity . EN 10 Declaration of Conformity ... EN 10 Accessories ... EN 10 General notes Environmental protection The packaging material can be recycled. Please do not throw the packaging material into house- hold waste; please send it for re- cycling. Old appliances contain valuable materials that can be recycled. Please arrange for the proper re- cycling of old appliances. Please dispose your old appliances us- ing appropriate collection sys- tems. Warranty Accessories and Spare Parts Symbols in the operating instructions Symbols on the machine Risk of burns on account of hot surfaces! Please do not sweep away any burning substances such as cigarettes, match sticks or similar objects. Risk of being squeezed or hurt at the belts, side-brush- es, containers, machine cov- er. Lashing point Wet/dry flap Proper use 12 EN- 2– Never vacuum up explosive liquids, combustible gases or undiluted acids and solvents. This includes petrol, paint thinner or heating oil which can gener-ate explosive fumes or mixtures upon contact with the suction air. Acetone, undiluted acids and solvents must also be avoided as they can harm the mate-rials on the machine.– Never sweep/vacuum up reactive metal dusts (e.g. aluminium, magnesium, zinc), as they form explosive gases when they come in contact with highly alkaline or acidic detergents.– Do not sweep/vacuum up any burning or glowing objects.– The machine may not be used or stored in hazardous areas. It is not allowed to use the appliance in hazardous loca-tions.– Asphalt– Industrial floor– Screed– Concrete– Paving stones– The machine with working equipment must be checked to ensure that it is in proper working order and is operating safely prior to use. Otherwise, the appli-ance must not be used.– If the appliance is used in hazardous ar-eas (e.g. filling stations) the corre-sponding safety provisions must be ob-served. It is not allowed to use the ap-pliance in hazardous locations.– The appliance must not be operated by children or persons who have not been instructed accordingly.– The appliance may be used by individ-uals with limited physical, sensory or cognitive abilities or lack of experience and knowledge if they are under super-vision or were instructed regarding the safe use of the appliance and under-stand the resulting risks.– The operator must use the appliance properly. The person must consider the local conditions and must pay attention to third parties, in particular children, when working with the appliance.– Prior to starting work, the operator must ensure that all protective devices are properly installed and function correct- ly. – The operator of the appliance is liable for accidents with other individuals or their property.– Ensure that the operator wears tight-fit-ting clothes. Wear sturdy shoes and avoid wearing loose-fitting clothes.– Check the immediate vicinity prior to starting (e.g. children). Ensure suffi-cient visibility!– Never leave the machine unattended so long as the engine is running. The operator may leave the machine only when the engine has come to a stand-still, the machine has been protected against accidental movement, if neces-sary, by applying the immobilization brake and the ignition key has been re-moved.– The appliance may only be used by per-sons who have been instructed in han-dling the appliance or have proven qualification and expertise in operating the appliance or have been explicitly assigned the task of handling the appli-ance.– Children should be supervised to pre-vent them from playing with the appli-ance. DangerRisk of injury!Danger of tipping if gradient is too high.– The gradient in the direction of travel should not exceed 15%.Danger of tipping on unstable ground.– Only use the machine on sound surfac- es. Danger of tipping with excessive sideways tilt.– The gradient perpendicular to the direc-tion of travel should not exceed 15%. DangerRisk of injury!– Do not close the exhaust. – Do not bend over the exhaust or touch it (risk of burns). – Do not touch the drive motor (risk of burns). – Ensure that there is adequate ventila-tion or provision for diverting the ex-haust gas while operating the appliance in closed rooms (risk of poisoning).– Exhaust gases are poisonous and haz-ardous to health, do not inhale them. – The engine requires approx. 3-4 sec-onds to come to a standstill once it has been switched off. During this time, stay well clear of the working area.– The appliance may only be tilted back-wards if the fuel tank is empty.– The engine is to be brought to a stand-still and the appliance is to be fastened properly during transportation. – First switch off the appliance and re-move the key before performing any cleaning or maintenance tasks on the appliance, replacing parts or switching over to another function.– Do not clean the appliance with a water hose or high-pressure water jet (danger of short circuits or other damage).– Maintenance work may only be carried out by approved customer service out-lets or experts in this field who are famil-iar with the respective safety regula-tions. – Please observe the local safety regula-tions regarding portable commercially used appliances.– Always use appropriate gloves while working on the device. DANGERIf the appliance hood is opened while the motor is running, the motor has to switch off. If the motor does not shut off, there is a defect on the hood contact switch. Inform customer service. To secure the device against an acci-dental start, turn the key switch to posi-tion "0" and remove the key. In case of dangerous situations or in or-der to quickly switch off the device, turn the key switch to position "0".The sweeper operates using the overthrow principle.– The side brushes (1) clean the corners and edges of the surface and move dirt and debris into the path of the roller brush.– The rotating roller brush (2) moves the dirt and debris directly into the waste container (3).– The dust raised in the container is sep-arated by the dust filter (4) and the fil-tered clean air is drawn off by the suc-tion fan (5). Foreseeable misuse Suitable surfaces Safety instructions Application Operation Safety information concerning the driving operation Safety information concerning the combustion engine Transport Maintenance Safety Devices Open/ close device hoodKey switch Function
13EN- 3 1 Cover 2 Tank lid 3 Petrol engine 4Starter rope 5 Lever to raise and lower the bulk waste flap 6 Push handle 7 Lever for forward drive 8 Operating field (described in the following chapter) 9 Fastening screw for slider 10 Dust filter 11 Removable waste container 12 Halting plate 13 Rear sealing strip (at the waste contain- er) 14 Roller brush 15 Front sealing strip 16 Side sealing strip 17 Bulk waste flap 18 Steering roller with fixed position brake 19 Fastener of the side brush 20 Side brushes 1 Key switch (described in the following chapter) 2 Lever for lowering and raising the side- brush 3 Locking screw of the dust filter cover 4 Locking bow of the waste container 5 Filter cleaning for dust filter 6 Wet/dry flap 1Key 2 Position 0/OFF Motor off 3 Position “1” The appliance is now ready for opera- tion. Motor can be started (starter cord) The roller brush and blower are active when the motor is running Operating and Functional Elements Overview of the appliance Operating field Key switch 14 EN- 4 DANGER Risk of injury, risk of damage! Observe the weight of the appliance when you load it! Remove the cardboard. Remove the wooden blocks that secure the wheels and raise the device from the palette by hand. Release the parking brake on the steer- ing roller. The push handle is folded onto the cover upon delivery. Fasten it before initial start- up. Loosen the screws. Align the pushing handle. Tighten the screws. The side brush is included with delivery and is not installed on the device. Install the side brush before initial start- up, see the chapter "Replacing the side brush". DANGER Risk of injury! Switch off the appliance prior to removing the waste container. ATTENTION Only operate while the appliance hood is closed. The appliance is equipped with a hood contact switch to protect the operator. The motor starts up only when the appli- ance hood is closed. Park the sweeper on an even surface. Switch off engine. Lock parking brake. Danger Risk of explosion! – Only use the fuels specified in the Op- erations Manual. – Do not refuel the machine in enclosed spaces. – Smoking and naked flames are strictly prohibited. – Ensure that no fuel reaches the hot open surfaces. Switch off the motor by setting the key switch to position 0/OFF. Open fuel filler cap. Use "regular unleaded petrol". Fill tank to max. 1 cm below the lower edge of the filler nozzle. Wipe off any spilt fuel and close fuel fill- er cap. NOTICE The machine can be operated for a maxi- mum of 2.0 hours on a full tank. Carry out the daily maintenance tasks (see section "Maintenance and Care"). DANGER Ensure that there is adequate ventilation or provision for diverting the exhaust gas while operating the appliance in closed rooms (risk of poisoning). NOTICE The device has an automatic choke. When the motor starts, the roller brush and side brushes rotate. 1 Fuel cock, open Open the device hood. Open the fuel supply. Turn the rotating knob parallel to the hose of the fuel tap. Close cover. Turn the main switch to "1". Pull the starter rope slowly until a resist- ance can be felt. Pull starter rope swiftly. When the motor starts running, let go of the starter cord. NOTICE The drive speed for forward drive can be adjusted steplessly depending on the posi- tion of the lever. Release parking brake. Pull the lever for forward drive. Release the lever for forward drive. De- vice comes to a halt. When moving the device backwards, pull back on the push handle. Driving over fixed obstacles which are 30 mm high or less: Raise bulk waste flap. Drive forwards slowly and carefully. Driving over fixed obstacles which are more than 30 mm high: Only drive over these obstacles using a suitable ramp. Danger Risk of injury! If the bulk waste flap is open, stones or gravel may be flung forwards by the roller brush. Make sure that this does not endanger persons, animals or objects. 몇 Warning Do not sweep up packing strips, wire or similar objects as this may damage the sweeping mechanism. NOTICE To achieve an optimum cleaning result, the driving speed should be adjusted to take specific situations into account. An optimum cleaning result can only be achieved if the bulk waste flap has been lowered completely. Empty the waste container at regular inter- vals during the sweeping operation. Clean the dust filter at regular intervals dur- ing operation. NOTICE To sweep up larger items up to a height of 50 mm, e.g. cigarette packs, the bulk waste flap must be raised briefly. Raising bulk waste flap: Pull the lever for raising the bulk waste flap. Lowering the bulk waste flap: Release the lever for raising the bulk waste flap. Move the lever to lower the side brush to the front. The side brush will be low- ered. Close wet/dry flap Open wet/dry flap. NOTICE This protects the filter from moisture. Pull the handle of the filter clean-off out several times and reinsert it. Before Startup Unloading tips Net weight (transport weight) 84 kg Unloading Installing the pushing handle Install side brush Start up General notes Refuelling Inspection and maintenance work Start the engine Operation Drive the machine Driving over obstacles Sweep Sweeping with bulk waste flap raised Sweeping with side brushes Sweeping dry floors Sweeping damp or wet floors Cleaning the dust filter 15EN- 5 DANGER Risk of injury! Switch off the appliance prior to removing the waste container. ATTENTION Make sure the seal strip is not damaged while emptying the waste container. The max. load of the waste container is 40 kg. Switch off engine. Shake off dust filter. Pull lock bow of the waste container up- ward. Pull out the waste container. Empty waste container. Push in the waste container. Push lock bow of the waste container downward. Switch off the motor by setting the key switch to position 0/OFF. The side-brushes lift up. Lock parking brake. Open the device hood. 1 Fuel cock closed Close the fuel supply. Turn the rotating knob perpendicular to the fuel tap. Close cover. 몇 Warning The appliance must be secured against slippage during transport. NOTICE Do not kink the bowden or sheathed ca- bles. Observe markings for fixing points on base frame (chain symbols). Switch off engine. Lock parking brake. Empty fuel tank. Secure the wheels of the machine with wheel chocks. Secure the machine with tensioning straps or cables. 1 Fastening area above the pushing han- dle 2 Fastening area under the device hood Follow operating instructions of the en- gine manufacturer! If the sweeper is going to be out of service for a longer time period, observe the follow- ing points: Park the sweeper on an even surface. Switch off engine. Lock parking brake. Lock the sweeper to ensure that it does not roll off. Empty fuel tank. Change engine oil. Raise roller brush. Thus, engage both adjustment levers in the top boring. The side-brushes lift up. Clean the inside and outside of the sweeper. Park the machine in a safe and dry place. To secure the device against an acci- dental start, turn the key switch to posi- tion "0" and remove the key. – Maintenance work may only be carried out by approved customer service out- lets or experts in this field who are famil-
r with the respective safety regula- tions. – Mobile appliances used for commercial purposes are subject to safety inspec- tions according to VDE 0701. 몇 WARNING Risk of damage! Do not clean the appliance with a water hose or high-pressure water jet (danger of short circuits or other dam- age). Danger Risk of injury! Wear dust mask and protec- tive goggles. Open the device hood. Clean machine with a cloth. Blow through machine with com- pressed air. Close cover. Clean the machine with a damp cloth which has been soaked in mild deter- gent. ATTENTION Do not use aggressive and abrasive deter- gents. NOTICE Where maintenance is carried out by the customer, all service and maintenance work must be undertaken by a qualified specialist. If required, a specialised Archer dealer may be contacted at any time. NOTICE See chapter "Maintenance work” for a de- scription of the maintenance work. ATTENTION With a new motor, the oil must be changed after the first 5 operating hours. Daily maintenance: Check engine oil level. Check and ensure proper fitting of the spark plug. Check the roller brush and the side brush for wear, foreign bodies and wrapped belts Shake off dust filter. Check and clean air filter inserts. Empty waste container. Weekly maintenance: Check tension, wear and tear and func- tioning of the drive belts. Check for smooth running of the Bowden cables and the moveable parts Check the sealing strips in the sweep- ing area for position and wear. Check the sweeping track of the sweep- ing roller. Remove and clean the dust filter. Maintenance to be carried out every 50 operating hours: Change air filter inserts. Perform a motor oil change. Check spark plug. Check function of hood contact switch. Maintenance to be carried out after 5 op- erating hours: Carry out initial inspection. Maintenance to be carried out every 100 operating hours Maintenance to be carried out every 300 operating hours NOTICE In order to safeguard warranty claims, all service and maintenance work during the warranty period must be carried out by the authorised KÄRCHER specialist in accord- ance with the maintenance booklet. Preparation: Park the sweeper on an even surface. Lock parking brake.
DANGER Risk of in jury! The engine requires approx. 3-4 seconds to come to a standstill once it has been switched off. During this time, stay well clear of the working area. 몇 CAUTION The appliance may only be tilted back- wards if the fuel tank is empty. Emptying waste container Turn off the appliance Close fuel cock Transport Shutdown Care and maintenance General notes Cleaning Cleaning the inside of the machine External cleaning of the appliance Maintenance intervals Maintenance by the customer Maintenance by Customer Service Maintenance Works General notes on safety 16 EN- 6 Close the fuel tap, remove the waste con- tainer and move the pushing handle to the front prior to tilting the appliance. Do not rest the appliance on the pushing handle. Allow the machine sufficient time to cool down before carrying out any mainte- nance and repair work. Do not touch any hot parts, such as the drive motor and exhaust system. Switch off the appliance prior to clean- ing and performing any maintenance tasks or replacing parts. Danger Risk of burns! Allow engine to cool down. Wait for at least 5 minutes after switch- ing off the engine before checking the engine oil fill level. Open the device hood. 1 Oil dipstick/oil filler neck Unscrew and withdraw oil dipstick. Wipe off oil dipstick and screw it in. Unscrew and withdraw oil dipstick. Read the value of the oil level. – The oil level must be within the marking. – Top up motor oil if necessary, do not overfill. Fill motor oil into the oil fill neck. Oil grade: see Technical Data Reinsert the oil dipstick. Wait at least 5 minutes. Check engine oil level. DANGER Risk of burns due to hot oil! Allow engine to cool down. Open the device hood. Unscrew and withdraw oil dipstick. Draw off engine oil via the oil filler neck using 6.491-538 oil-change pump. Fill motor oil into the oil fill neck. Oil grade: see Technical Data Reinsert the oil dipstick. Wait at least 5 minutes. Check engine oil level. 1 Air filter cover 2 Pre-filter 3 Filter element 4 Air filter housing 5 Unlocking button Turn the unlocking button and remove the air filter cover. Remove both filter inserts. Clean or change the filter inserts. Place the pre-filter in the air filter cover. Insert the filter element. The filter slats must point in the direc- tion of the air filter cover. Fit and lock the air filter cover. Danger Risk of burns! 1 Ignition plug Open the device hood. Remove spark-plug connector. Unscrew and clean spark plug. Check the electrode gap (0.8 mm), cor- rect if necessary. Screw in a cleaned or new spark plug (27 Nm). Push on spark-plug connector. Allow engine to cool down. Open the device hood. Close the fuel supply. Turn the rotating knob perpendicular to the fuel tap. Compress the fuel hose from the tank to the fuel cock so that no fuel leaks out. Loosen the hose clamp on the fuel tap. Remove the fuel hose. Open fuel filler cap. Hold the fuel hose over a suitable catch bin and drain the fuel. If the tank is empty, reattach the fuel hose to the stub of the fuel tap and in- stall the hose clamp. The Bowden cable for adjusting the drive is on the left in the direction of travel. This must be adjusted if the drive perfor- mance of the appliance becomes insuffi- cient when driving uphill. 1 Counter-nut 2 Bowden traction cable Open the device hood. Loosen counter-nut. Adjust the adjustment screw. Tighten the counter-nut. Switch off engine. Lock parking brake. Remove the waste container. Remove belts or cords from roller brush. An adjustment is necessary if the sweeping result has deteriorated due to wear of the bristles. Check the sweeping pattern: Raise the sweeper from the front and drive it on to a smooth, even surface covered with a visible layer of dust or chalk. Lock parking brake. Let the sweeping roller rotate for ap- prox. 15-30 seconds. Raise the sweeper at the front and drive it towards the side. The right sweeping track is a regular rectangle that is 30-40 mm wide. Adjust sweeping track: The sweeping track can be adjusted with the left and right adjustment levers. Adjust the left and right adjustment le- vers and engage into the same boring. Check engine oil level and top up, if required Change the engine oil Cleaning/replacing air filters Clean or replace the spark plug Empty fuel tank Adjust the Bowden cable of the acceleration drive Checking roller brush Adjusting the sweeping track of the roller brush 17EN- 7 1 Adjustment lever 2 Holes (setting range) – Engage adjustment lever into the lower boring (+): Sweeping track becomes bigger – Engage the adjustment lever into the upper boring (-): Sweeping track be- comes smaller Check sweeping mirror. The change is necessary if the sweeping result has visibly deteriorated despite the adjustment of the sweeping track. Lock parking brake. Close fuel cock. Remove the waste container. Tilt the appliance rearward. Lift the waste flap, press in the bearing cap and swivel the roller brush toward the front. Pull out roller brush. Attach the new roller brush to the drive pin (left). Engage the bearing cup into the boring of the roller brush swinging arm on the opposite side. Make sure that the bristles do not get caught in the hole of the roller brush swing arm Once the new roller brush has been in- stalled, the sweeping track must read- justed. An adjustment is necessary if the sweeping result has deteriorated due to wear of the bristles. Release the wing nut. 1 Wing nut 2 Adjustment screw Adjust the adjustment screw. Tighten the wing nut. The change is necessary if the sweeping result has visibly deteriorated despite the lowering of the side brush. Unscrew 3 screws from the underside of the side brush. Remove the wiper blade. Clip new side brushes on to driver and screw on. The Bowden cable for the coarse dirt flap is on the right in the direction of travel. – Adjustment is necessary if the bulk waste flap cannot be raised wide enough. The Bowden cable needs to be re- leased a little if the sweeper results be- come poorer, for e.g. due to the wearing of the front lip. 1 Counter-nut 2 Bowden traction cable Open the device hood. Loosen counter-nut. Adjust the adjustment screw. Tighten the counter-nut. Front sealing strip Loosen the fastening screws of the sealing strip. Adjust or replace sealing strip. Set the distance between the sealing strip and the floor so that the bottom edge trails behind at a distance of be- tween 0-10 mm. Adju st sealing strip. Tighten the fastening of the sealing strip. Rear sealing strip Remove the waste container. Loosen the fastening screws of the sealing strip. Adjust or replace sealing strip. Set the distance between the sealing strip and the floor so that the bottom edge trails behind at a distance of be- tween 0-10 mm. Tighten the fastening of the sealing strip. Side sealing strips Loosen the fastening screws of the sealing strip. Adjust or replace sealing strip. To set the floor clearance, insert a sheet with a thickness of max. 2 mm un- der the sealing strip. Adjust sealing strip. Tighten the fastening of the sealing strip. Danger Empty waste container before replacing dust filter. Wear a dust mask when working around the dust filter. Observe safety regu- lations on the handling of fine particulate material. 몇 CAUTION Risk of damage! Do not rinse out the dust filter. ATTENTION Make sure when installing the new filter that the fins are not damaged. If the locking screw is not tightened all the way, there may be damages. Lock parking brake. Shake off dust filter. 1 Screwed sealing plug 2 Dust filter cover 3 Dust filter Open the locking screw of the dust filter cover in an anticlockwise direction. Lift the dust filter cover. Replace dust filter Make sure the dust filter is inserted correctly (see figure). Screw in the locking screw all the way. Setting range (-) 1...10 (+) Minimum sweeping track 1 Maximum sweeping track 10 New roller brush 1...3 Replacing roller brush Adjust side-brush lowering Replacing side brush Adjust the bulk waste flap Adjusting and replacing sealing strips Replacing dust filter 18 EN- 8 Troubleshooting Fault Remedy Appliance cannot be started Close appliance hood Check the contact switch cover for correct functionality In order to start the device with the starter rope, turn the key switch to position "1". Refuel Open fuel cock Check and clean spark plug, replace if necessary. Engine is running but machine is not moving Adjust the Bowden cable of the acceleration drive Checking the V-Belt Device comes to halt while climb- ing a slope Drive over a path with lesser slope Adjust the Bowden cable of the acceleration drive Checking the V-Belt Machine is not sweeping properly Adjust the sweeping track of the roller brush Adjust side-brush lowering Check roller brush and side brushes for wear, replace if necessary. Check function of bulk waste flap Release the Bowden cable of the bulk waste flap (adjustment screw) Check belts for tension and functioning; replace, if required Dust gathers in the machine Check function of bulk waste flap Release the Bowden cable of the bulk waste flap (adjustment screw) Check dust filter, clean or replace Do not rinse out the dust filter. Empty waste container Replace sealing profile at the waste container Check the seal on the dust filter Check sealing strips for wear, adjust or replace as required Poor cleaning performance at edg-
Lower the side brushes Check the drive belt of the side brush Side-brush raising does not func- tion Check Bowden cable of the side-brush raising The new roller brush brushes against the waste container Correct the setting of the sweep track; for this, engage both adjustment levers into the upper boring (1...3)
Emission according to the measurement procedure of EU regulation 2016/1628 (level V) g/kWh 725 Operating speed 1/min 2600 Max. power kW/PS 3,1/4,1 Capacity of fuel tank, normal petrol (unleaded) l 1,1 Motor oil (SF, SG) l 0,6 (10W30) Spark plug -- Kohler 14 132 14-S Filter and vacuum system Filter surface area, fine dust filter m
1,8 Category of use – filter for non-hazardous dust -- L Nominal vacuum, suction system mbar 5 Nominal volume flow, suction system l/s 45 Working conditions Temperature °C -5 and +40 Air humidity, non-condensing % 0 - 90 Noise emission Sound pressure level L
< 2,5 20 EN- 10 We hereby declare that the machine de- scribed below complies with the relevant basic safety and health requirements of the EU Directives, both in its basic design and construction as well as in the version put into circulation by us. This declaration shall cease to be valid if the machine is modified without our prior approval. The signatories act on behalf of and with of the authority of the company management. Documentation supervisor: S. Reiser Alfred Kärcher SE & Co. KG Alfred-Kärcher-Straße 28-40 71364 Winnenden (Germany) Tel.: +49 7195 14-0 Fax: +49 7195 14-2212 We hereby declare that the product de- scribed below complies with the relevant provisions of the following UK Regulations, both in its basic design and construction as well as in the version put into circulation by us. This declaration shall cease to be valid if the product is modified without our prior approval. The signatories act on behalf of and with of the authority of the company management. Documentation supervisor: S. Reiser Alfred Kärcher SE & Co. KG Alfred-Kärcher-Straße 28-40 71364 Winnenden (Germany) Tel.: +49 7195 14-0 Fax: +49 7195 14-2212 Winnenden, 2021/02/01 EU Declaration of Conformity Product: Vacuum sweeper Type: 1.049-xxx Relevant EU Directives 2006/42/EC (+2009/127/EC) 2014/30/EU 2000/14/EC 2011/65/EU Applied harmonized standards EN 60335–1 EN 60335–2–72 EN 55012: 2007 + A1: 2009 EN 61000–6–2: 2005 EN 62233: 2008 EN IEC 63000: 2018 Applied national standards
Applied conformity evaluation method 2000/14/EC: Appendix V Sound power level dB(A) Measured: 82 Guaranteed: 83 Chairman of the Board of Management Director Regulatory Affairs & Certification Declaration of Conformity Product: Vacuum sweeper Type: 1.049-xxx Currently applicable UK Regulations S.I. 2008/1597 (as amended) S.I. 2016/1091 (as amended) S.I. 2001/1701 (as amended) S.I. 2012/3032 (as amended) Designated standards used EN 60335–1 EN 60335–2–72 EN 55012: 2007 + A1: 2009 EN 61000–6–2: 2005 EN 62233: 2008 EN IEC 63000: 2018 Applied national standards