WB 7 Plus - Vacuum Cleaner Kärcher - Free user manual and instructions
Find the device manual for free WB 7 Plus Kärcher in PDF.
| Product Type | Wash brush for high-pressure cleaner |
| Brand | Kärcher |
| Model | WB 7 Plus |
| Main Use | Cleaning of painted surfaces, glass, plastic (garden furniture, vehicles, motorcycles, winter gardens, garage doors, roller shutters, blinds) |
| Compatibility | Kärcher Home & Garden high-pressure cleaners classes K2 to K7 |
| Cleaning Functions | Flat jet, cleaning foam, wash brush |
| Connection Type | Bayonet with coupling nut |
| Maximum Allowed Water Temperature | 60 °C |
| Minimum Nozzle/Surface Distance | 30 cm for sensitive or painted surfaces |
| Detergent Tank | Integrated, removable |
| Edge Protection | Yes, integrated |
| Bristles | Integrated, upward orientation for storage |
| Maintenance After Use | Rinse detergent tank and foam nozzle, clean brush, dry with bristles pointing upward |
| High-Pressure Nozzle Cleaning | Removable, rinseable with clean water |
| Safety Precautions | Do not use near people or animals; operate only at sufficient distance; do not turn adjustment ring under pressure |
| Storage | Frost-free, bristles pointing upward |
| Warranty | According to country conditions, material or manufacturing defects |
| Accessories and Spare Parts | Available at www.kaercher.com |
Frequently Asked Questions - WB 7 Plus Kärcher
User questions about WB 7 Plus Kärcher
0 question about this device. Answer the ones you know or ask your own.
Ask a new question about this device
Download the instructions for your Vacuum Cleaner in PDF format for free! Find your manual WB 7 Plus - Kärcher and take your electronic device back in hand. On this page are published all the documents necessary for the use of your device. WB 7 Plus by Kärcher.
USER MANUAL WB 7 Plus Kärcher
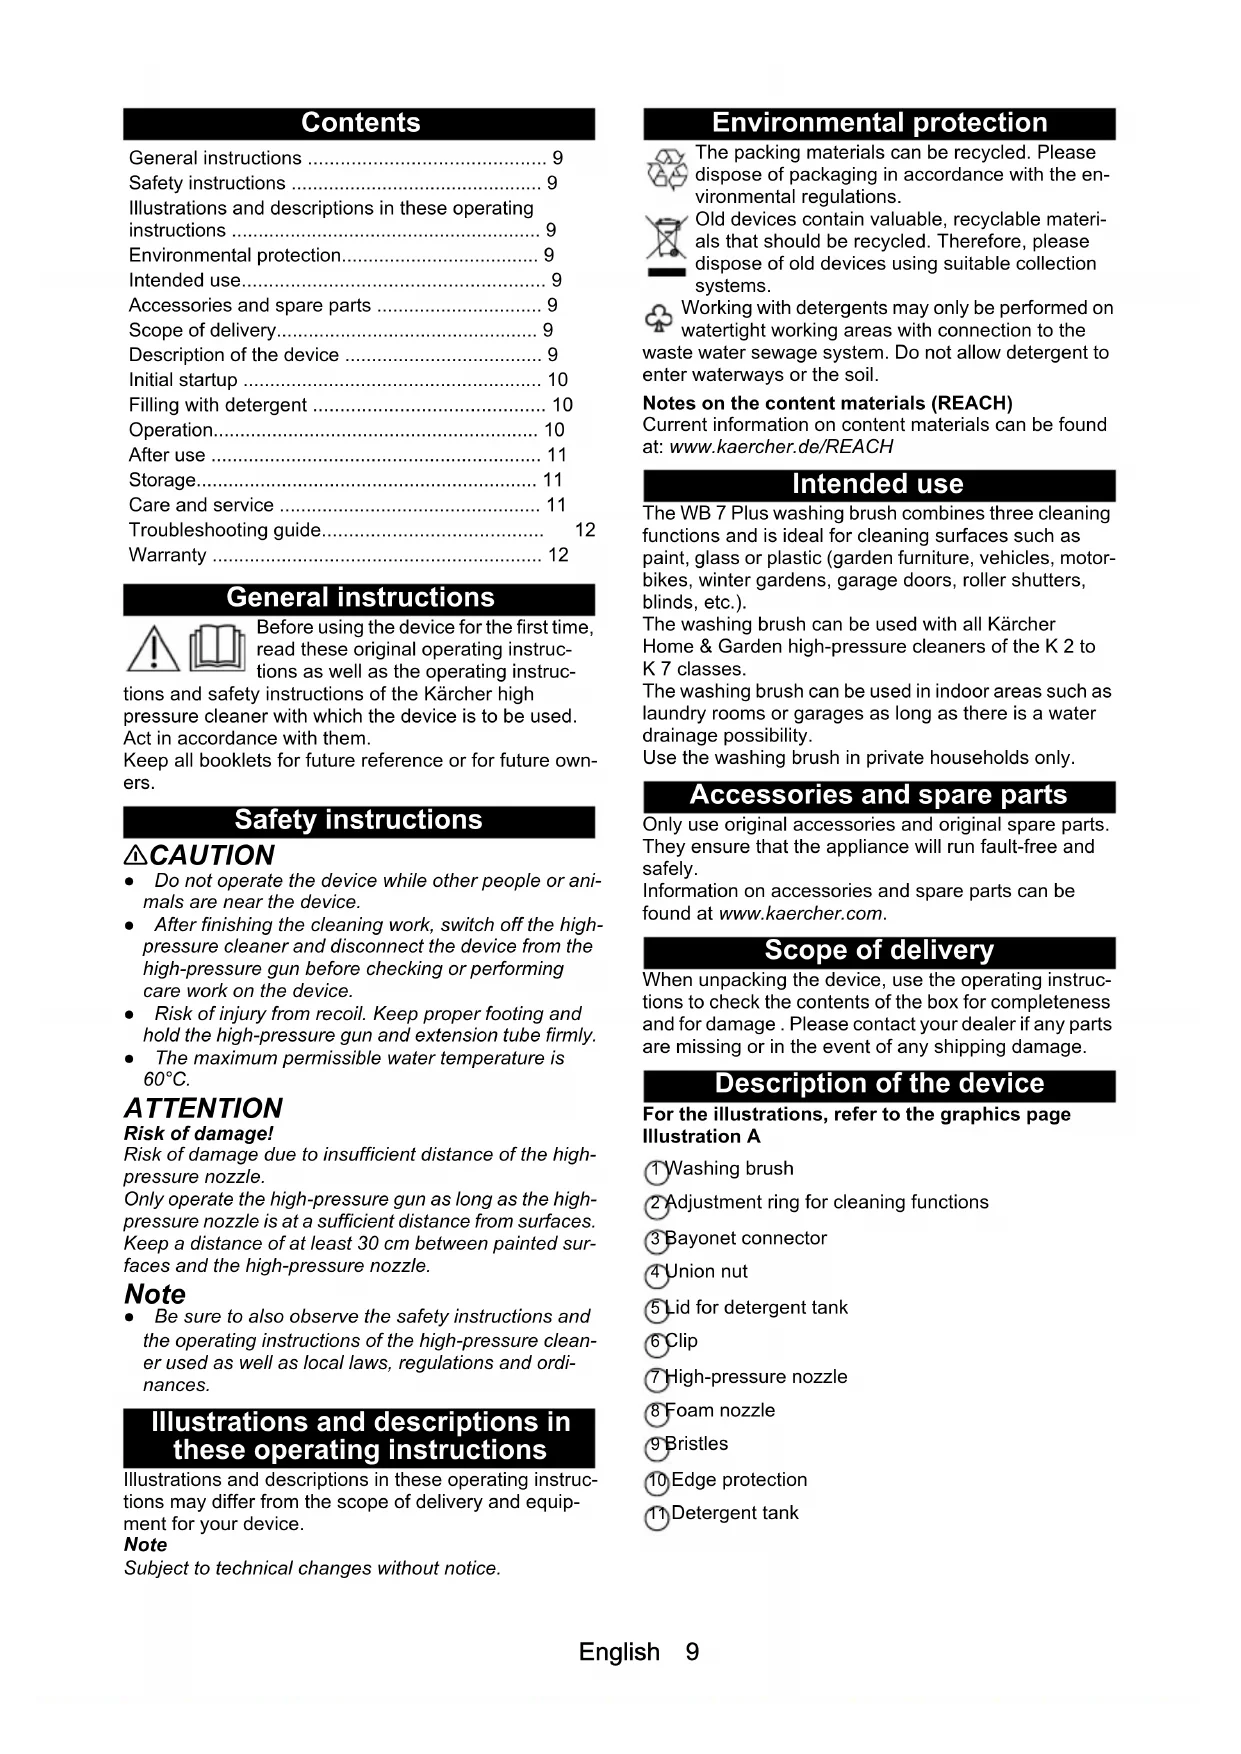
WB 7 Plus 3-in-1 wash brush
natural_image
3D rendering of a cleaning power tool with black and yellow components, no visible text or symbolsDeutsch 5
English 9
Français 13
Italiano 18
Nederlands 22
Español 26
Português 30
Dansk 35
Norsk 39
Svenska 42
Suomi 47
Ελληνικά 50
Türkçe 55
Русский 59
Magyar 63
Čeština 68
Slovenščina 72
Polski 75
Românește 80
Slovenčina 84
Hrvatski 89
Srpski 92
Български 96
Eesti 101
Latviešu 105
Lietuviškai 109
Українська 113
Қазақша 117
中文 122
日本語 125
繁體中文 129
한국어 132
العربيئة 136
A


natural_image
Close-up of a car washing machine with a blue plastic component being inserted, showing a close-up inset of the handle (no text or symbols visible)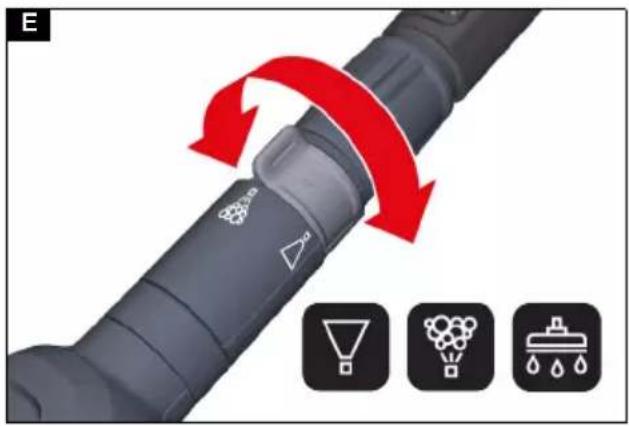
natural_image
Close-up of a car front view with a hand washing a car, showing the brush applying white powder (no text or symbols visible)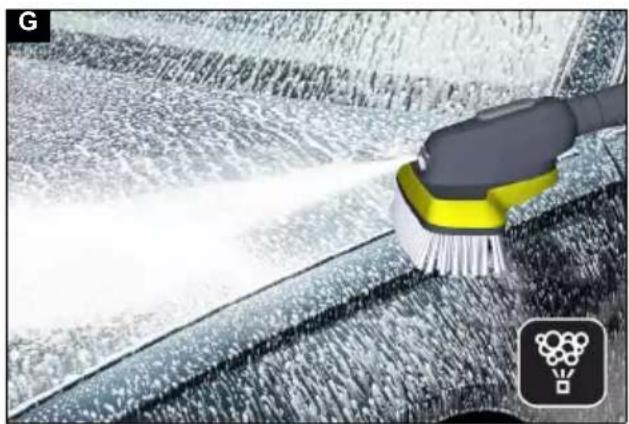
natural_image
Close-up of a cleaning brush applying white powder to a car surface, with no visible text or symbols.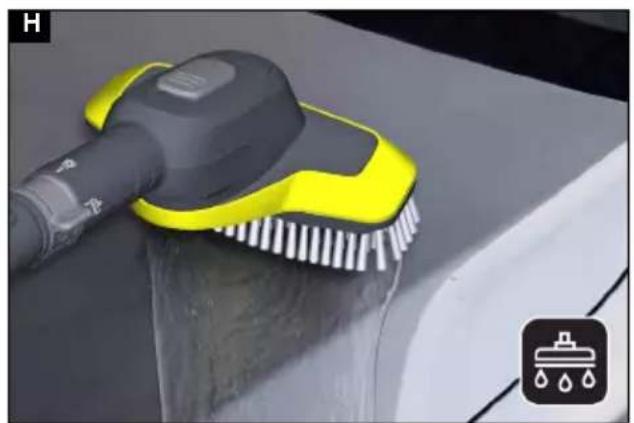
natural_image
Close-up of a yellow and black hairdryer brush applying water to a surface, with a small icon showing a showerhead (no text or symbols on the brush itself)
natural_image
3D rendering of a mechanical device with a blue and yellow component inserted into a bottle (no text or symbols visible)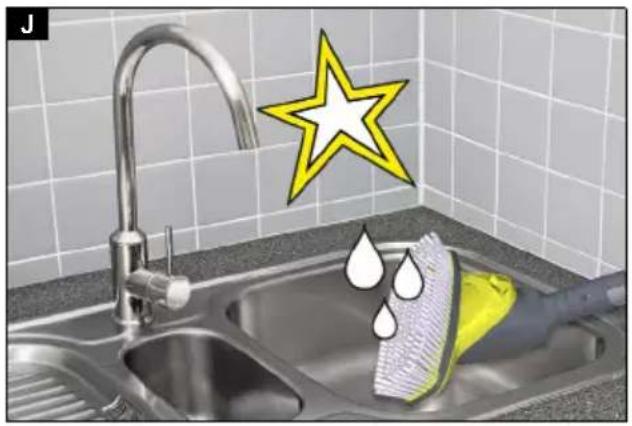
natural_image
Kitchen sink with stainless steel faucet and a yellow star symbol above it, no text or symbols present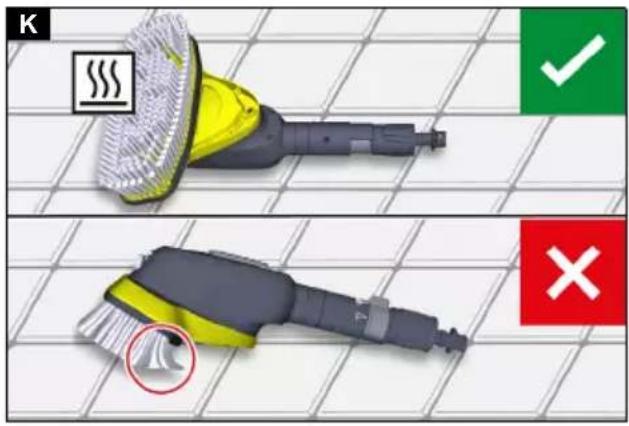
Inhalt
General instructions 9
Safety instructions 9
Illustrations and descriptions in these operating instructions 9
Environmental protection....9
Intended use....9
Accessories and spare parts 9
Scope of delivery....9
Description of the device 9
Initial startup 10
Filling with detergent 10
Operation.... 10
After use 11
Storage.... 11
Care and service 11
Troubleshooting guide.... 12
Warranty 12
General instructions


Before using the device for the first time, read these original operating instructions as well as the operating instruc-
tions and safety instructions of the Kärcher high pressure cleaner with which the device is to be used. Act in accordance with them.
Keep all booklets for future reference or for future owners.
Safety instructions
⚠CAUTION
- Do not operate the device while other people or animals are near the device.
- After finishing the cleaning work, switch off the high-pressure cleaner and disconnect the device from the high-pressure gun before checking or performing care work on the device.
- Risk of injury from recoil. Keep proper footing and hold the high-pressure gun and extension tube firmly.
- The maximum permissible water temperature is 60^ C.
ATTENTION
Risk of damage!
Risk of damage due to insufficient distance of the high-pressure nozzle.
Only operate the high-pressure gun as long as the high-pressure nozzle is at a sufficient distance from surfaces. Keep a distance of at least 30 cm between painted surfaces and the high-pressure nozzle.
Note
- Be sure to also observe the safety instructions and the operating instructions of the high-pressure cleaner used as well as local laws, regulations and ordinances.
Illustrations and descriptions in these operating instructions
Illustrations and descriptions in these operating instructions may differ from the scope of delivery and equipment for your device.
Note
Subject to technical changes without notice.
Environmental protection

The packing materials can be recycled. Please dispose of packaging in accordance with the environmental regulations.

Old devices contain valuable, recyclable materials that should be recycled. Therefore, please dispose of old devices using suitable collection systems.

Working with detergents may only be performed on watertight working areas with connection to the
waste water sewage system. Do not allow detergent to enter waterways or the soil.
Notes on the content materials (REACH)
Current information on content materials can be found at: www.kaercher.de/REACH
Intended use
The WB 7 Plus washing brush combines three cleaning functions and is ideal for cleaning surfaces such as paint, glass or plastic (garden furniture, vehicles, motor-bikes, winter gardens, garage doors, roller shutters, blinds, etc.).
The washing brush can be used with all Kärcher Home & Garden high-pressure cleaners of the K 2 to K 7 classes.
The washing brush can be used in indoor areas such as laundry rooms or garages as long as there is a water drainage possibility.
Use the washing brush in private households only.
Accessories and spare parts
Only use original accessories and original spare parts. They ensure that the appliance will run fault-free and safely.
Information on accessories and spare parts can be found at www.kaercher.com.
Scope of delivery
When unpacking the device, use the operating instructions to check the contents of the box for completeness and for damage. Please contact your dealer if any parts are missing or in the event of any shipping damage.
Description of the device
For the illustrations, refer to the graphics page Illustration A
① Washing brush
② Adjustment ring for cleaning functions
③ Bayonet connector
4 Union nut
⑤ Lid for detergent tank
6 Clip
⑦ High-pressure nozzle
⑧ Foam nozzle
9 Bristles
⑩ Edge protection
⑪ Detergent tank
Initial startup
- Switch off the high-pressure cleaner.
- Attach the washing brush to the high-pressure gun.
Note
KÄRCHER extension tubes can be used if necessary. Ensure that the device parts are tightly connected on installation.
Illustration B
a Completely unscrew the union nut.
b Press the bayonet connection into the mount on the high-pressure gun.
c Turn the washing brush clockwise by 90° until the bayonet connection engages on the mount. If necessary, turn the washing brush 90° anticlockwise to let the bristles point upwards.
d Tighten the union nut.
ATTENTION
Risk of damage!
Risk of damage to sensitive or painted surfaces due to absorbed dirt particles.
Risk of damage to the bristles.
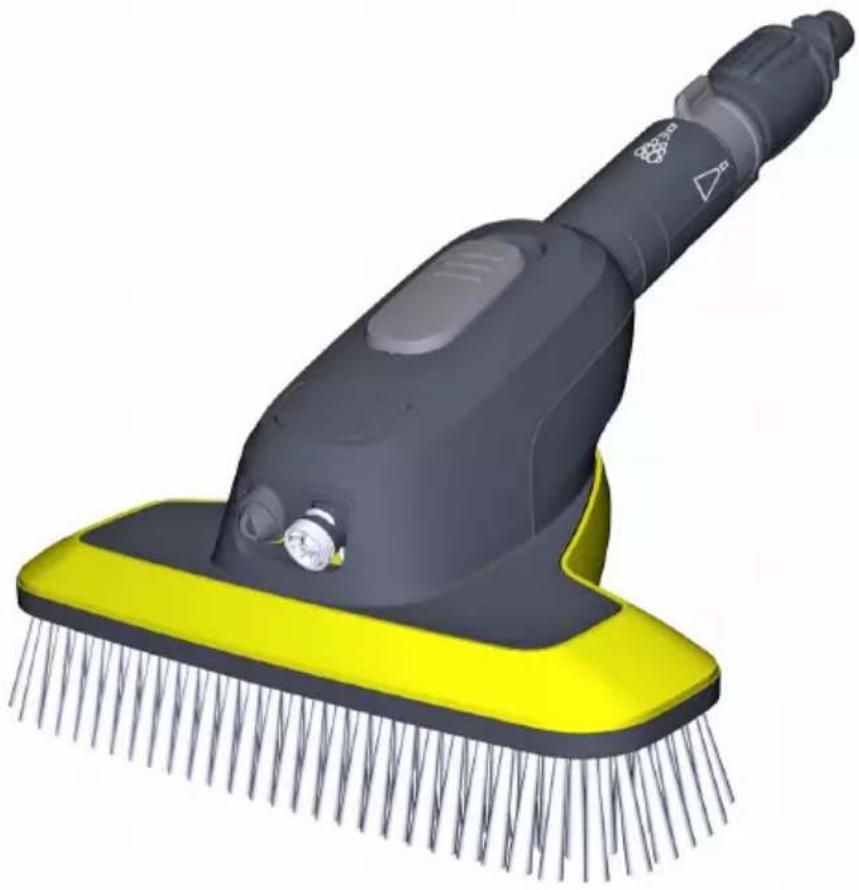
Never place or lay the washing brush on the bristles to avoid picking up dirt particles and damaging the bristles. Always place the washing brush so that the bristles point upwards.
Illustration C
- Removing the washing brush is done in the reverse order.
Filling with detergent
⚠️DANGER
Health risk!
There is a danger of serious damage to health if the detergent is used improperly.
Observe the safety data sheet of the detergent manufacturer, in particular the instructions on personal protective equipment.
ATTENTION
Risk of damage!
Risk of damage if unsuitable detergents are used. Do not use any unsuitable detergents that can damage the device or the object to be cleaned.
Note
We recommend using Kärcher detergents such as e.g. Kärcher Universal Cleaner, Plastic Cleaner, Car Shampoo.
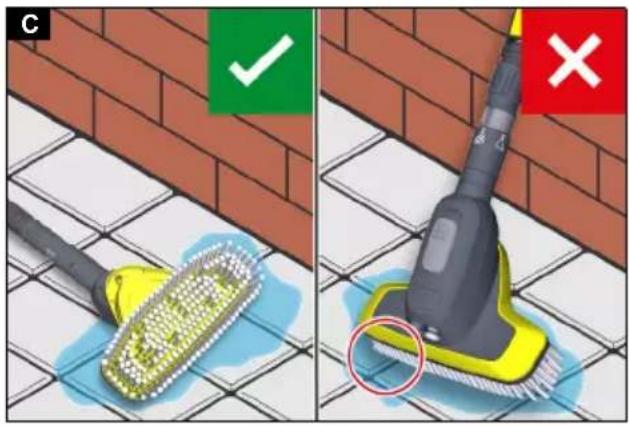
- Release the detergent tank lid by pulling it slightly upwards out of the filling opening and turn it to the side.
Illustration D
-
Tilt the washing brush slightly downwards.
-
Fill the detergent into the detergent tank. Pour in the detergent slowly to avoid bubbles. Fill up to the edge of the housing (arrow) at the most.
-
Turn back the detergent tank cap and press it into the filling opening.
Operation
Setting the cleaning function
ATTENTION
Risk of damage!
Turning the adjustment ring for cleaning functions while the high-pressure gun is actuated can damage the washing brush.
Do not turn the adjustment ring for cleaning functions while the high-pressure gun is actuated.
- Turn the cleaning function adjustment ring to the corresponding symbol to set the desired cleaning function.
Illustration E
| eFlat jetA flat jet comes out of the high-pressure nozzle when the high-pressure gun is actuated.Application:Pre-cleaning, loosening coarse dirtThorough main cleaningRinsing off cleaning foam and dissolved soiling | |
| Cleaning foamCleaning foam comes out of the foam nozzle when the high-pressure gun is actuated.Application:Application of detergents | |
| Washing brushWater is emitted in the area of the bristles when the high-pressure gun is actuated.Application:Gentle, mechanical main cleaning with water-rinsed bristles. Loosening and constant rinsing of soiling, to avoid surface damage. |
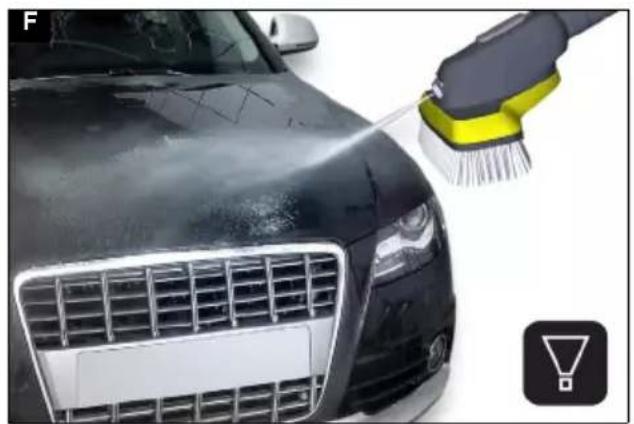
Pre-clean
ATTENTION
Surface damage
Damage to sensitive or painted surfaces due to insufficient distance of the high-pressure nozzle.
For sensitive or painted surfaces, keep a spray distance of at least 30 cm.
Do not remain in one area, but rather keep the washing brush in motion.
First test the cleaning functions on an inconspicuous spot.
-
Set the "Flat jet" cleaning function, see chapter Setting the cleaning function.
-
Operate the high-pressure gun and pre-clean the surfaces from bottom to top.
Illustration F
Applying cleaning foam
- Set the "Cleaning foam" cleaning function, see chapter Setting the cleaning function.
- For high-pressure guns with pressure control, set the highest pressure level to achieve optimum foaming.
ATTENTION
Risk of damage!
Cleaning foam can damage surfaces on hot surfaces and if left on too long.
Do not apply cleaning foam to hot surfaces and observe the maximum contact time.
Do not allow cleaning foam to dry on the surfaces being cleaned.
- Operate the high-pressure gun and apply the cleaning foam from the bottom to the top of the surfaces to be cleaned.
Note
If the foam output is low or the residual amount in the detergent tank is small, tilt the foam nozzle slightly downwards as shown or top up with detergent.
Note
The detergent has a better effect on a dry surface.
Illustration G
Cleaning with the washing brush
ATTENTION
Paint damage
Damage to surfaces through a dirty washing brush. Make sure that the washing brush is free from dirt or other particles before using it.
- Set the "Washing brush" cleaning function, see chapter Setting the cleaning function.
ATTENTION
Risk of damage!
Damage to surfaces due to coarse dirt.
Remove coarse dirt from the surfaces to be cleaned with the flat jet before each use of the washing brush, see chapter Pre-clean.
ATTENTION
Risk of damage!
Risk of damage due to excessive force.
Guide the washing brush over the surfaces with only a small amount of force to avoid damage caused by contact with the washing brush housing.
In addition, the edge protector protects against contact with sensitive surfaces.
- Operate the high-pressure gun and clean the surfaces from bottom to top with the washing brush. Illustration H
Post-cleaning
ATTENTION
Surface damage
Damage to sensitive or painted surfaces due to insufficient distance of the high-pressure nozzle.
For sensitive or painted surfaces, keep a spray distance of at least 30 cm.
Do not remain in one area, but rather keep the washing brush in motion.
First test the cleaning functions on an inconspicuous spot.
Post-cleaning:
-
Set the "Flat jet" cleaning function, see chapter Setting the cleaning function.
-
Operate the high-pressure gun and rinse off any remaining soiling and cleaning foam from the bottom up.
Illustration F
After use
Rinsing the detergent tank and foam nozzle
ATTENTION
Risk of damage!
Risk of damage due to clogging of the foam nozzle with dried detergent.
Rinse the detergent tank and foam nozzle after each use of detergent.
- Release the detergent tank lid by pulling it slightly upwards out of the filling opening and turn it to the side.
Illustration I
-
Fill unused detergent from the detergent tank back into the detergent bottle.
-
Fill the detergent tank about halfway with clean water, swing it out and empty it.
-
Fill the detergent tank with clean water.
-
Turn the cleaning function adjustment ring to the "Cleaning foam" position.
-
Operate the high-pressure gun for approx. 15 sec. The foam nozzle is rinsed.
-
Empty the detergent tank.
-
Turn back the detergent tank cap and press it into the filling opening.
Cleaning the washing brush
Clean the washing brush thoroughly and let it dry after each use.
-
Remove the washing brush from the high-pressure gun, see chapter Initial startup.
-
Rinse the washing brush thoroughly with clean water, especially the bristles.
Illustration J
ATTENTION
Risk of damage!
There is a danger of permanent deformation when the washing brush is placed on the bristles.
Do not store the washing brush standing on the bristles.
- Shake out the washing brush vigorously and lay it down so that the bristles point upwards.
Illustration K
- Allow the washing brush to dry completely.
Storage
ATTENTION
Risk of damage!
There is a danger of permanent deformation when the washing brush is placed on the bristles.
Do not store the washing brush standing on the bristles. Store the cleaned, dry washing brush with the bristles pointing upwards in a frost-free place.
Illustration K
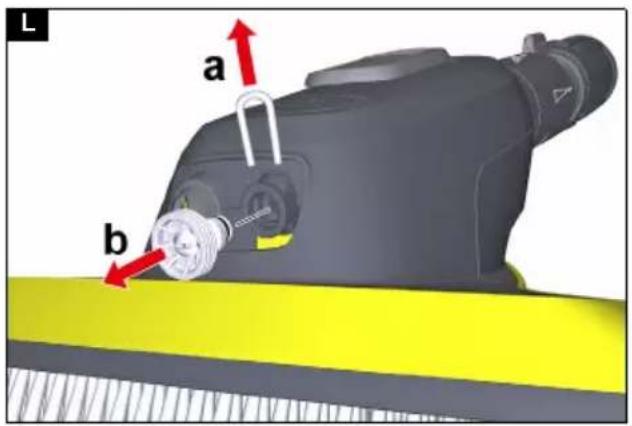
Care and service
Removing/installing the high-pressure nozzle
-
Remove the washing brush from the high-pressure gun, see chapter Initial startup.
-
Remove the friction high-pressure nozzle from the washing brush.
Illustration L
△CAUTION
Risk of injury
When using screwdrivers, there is a danger of stabbing and cutting injuries as well as material damage due to slipping.
Use screwdrivers carefully.
a Lever out the clips the using a screwdriver. b Pull the high-pressure nozzle out.
- Install the high-pressure nozzle in the washing brush in the reverse order.
Cleaning the high-pressure nozzle
-
Remove the high-pressure nozzle, see chapter Removing/installing the high-pressure nozzle.
-
Flush the high-pressure nozzle with clean water in both directions. Replace a damaged high-pressure nozzle if necessary.
-
Install the high-pressure nozzle, see chapter Removing/installing the high-pressure nozzle.
Troubleshooting guide
| Malfunctions often have simple causes that you can remedy yourself using the following overview. When in doubt, or in the case of malfunctions not mentioned here, please contact your authorised Customer Service. |
| Fault Cause Rectification | ||
| High-pressure cleaner not building up pressure or pulsing. | The high-pressure nozzle is clogged or damaged. | 1. Remove the high-pressure nozzle, see chapterRemoving/installing the high-pressure nozzle.2. Check the high-pressure nozzle for block-age and clean if necessary, see chapterCleaning the high-pressure nozzle.3. Check the high-pressure nozzle for dam-age and replace if necessary.4. Rinse the washing brush without the high-pressure nozzle with clean water.5. Install the high-pressure nozzle, see chapterRemoving/installing the high-pressure nozzle. |
| No foam or too little cleaning foam comes out of the foam nozzle. | The adjustment ring for cleaning functions is not turned to the "Cleaning foam" position. | 1. Turn the adjustment ring for cleaning functions to the "Cleaning foam" position, see chapterSetting the cleaning function. |
| No detergent or too little detergent in the detergent tank. | 1. Fill suitable detergent into the detergent tank, see chapterFilling with detergent. | |
| The detergent tank and foam nozzle have not been rinsed with clean water after use and are clogged with dried detergent. | 1. Fill the detergent back into the detergent bottle, see chapterRinsing the detergent tank and foam nozzle.2. Fill the detergent tank with clean, cold water.3. Turn the cleaning function adjustment ring to the "Cleaning foam" position and operate the high-pressure gun to rinse the foam nozzle.4. If foam still does not come out, open the detergent tank lid and immerse the washing brush completely in clean, cold water for 1 hour.5. Fill the detergent tank with clean, cold water and operate the high-pressure gun for approx. 30 sec. to rinse the foam nozzle.6. Empty the detergent tank.7. Fill detergent into the detergent tank, see chapterFilling with detergent. |
Warranty
The warranty conditions issued by our relevant sales company apply in all countries. We shall remedy possible malfunctions on your appliance within the warranty period free of cost, provided that a material or manufacturing defect is the cause. In a warranty case, please contact your dealer (with the purchase receipt) or the next authorised customer service site. (See overleaf for the address)
Contenu
The image is too blurry to recognize any text content.
التطبيق اللاحق
تَبِيْهُ
الأضرار السطحية
Organizational Cleaner
natural_image
Black and white icon of a hand giving a thumbs-up gesture (no text or symbols)THANK YOU!
Register your product and benefit from many advantages.
www.kaercher.com/welcome


Rate your product and tell us your opinion.
natural_image
Icon showing a gear and wrench inside a square frame (no text or symbols)www.kaercher.com/dealersearch
Alfred Kärcher SE & Co. KG
Alfred-Kärcher-Str. 28-40
71364 Winnenden (Germany)
Tel.: +49 7195 14-0
Fax: +49 7195 14-2212