IVR-L 100/18-2 Tc Dp - Vacuum Cleaner Kärcher - Free user manual and instructions
Find the device manual for free IVR-L 100/18-2 Tc Dp Kärcher in PDF.

User questions about IVR-L 100/18-2 Tc Dp Kärcher
0 question about this device. Answer the ones you know or ask your own.
Ask a new question about this device
Download the instructions for your Vacuum Cleaner in PDF format for free! Find your manual IVR-L 100/18-2 Tc Dp - Kärcher and take your electronic device back in hand. On this page are published all the documents necessary for the use of your device. IVR-L 100/18-2 Tc Dp by Kärcher.
USER MANUAL IVR-L 100/18-2 Tc Dp Kärcher
natural_image
3D rendering of a vacuum cleaner with attached tubing and control panel (no text or symbols visible)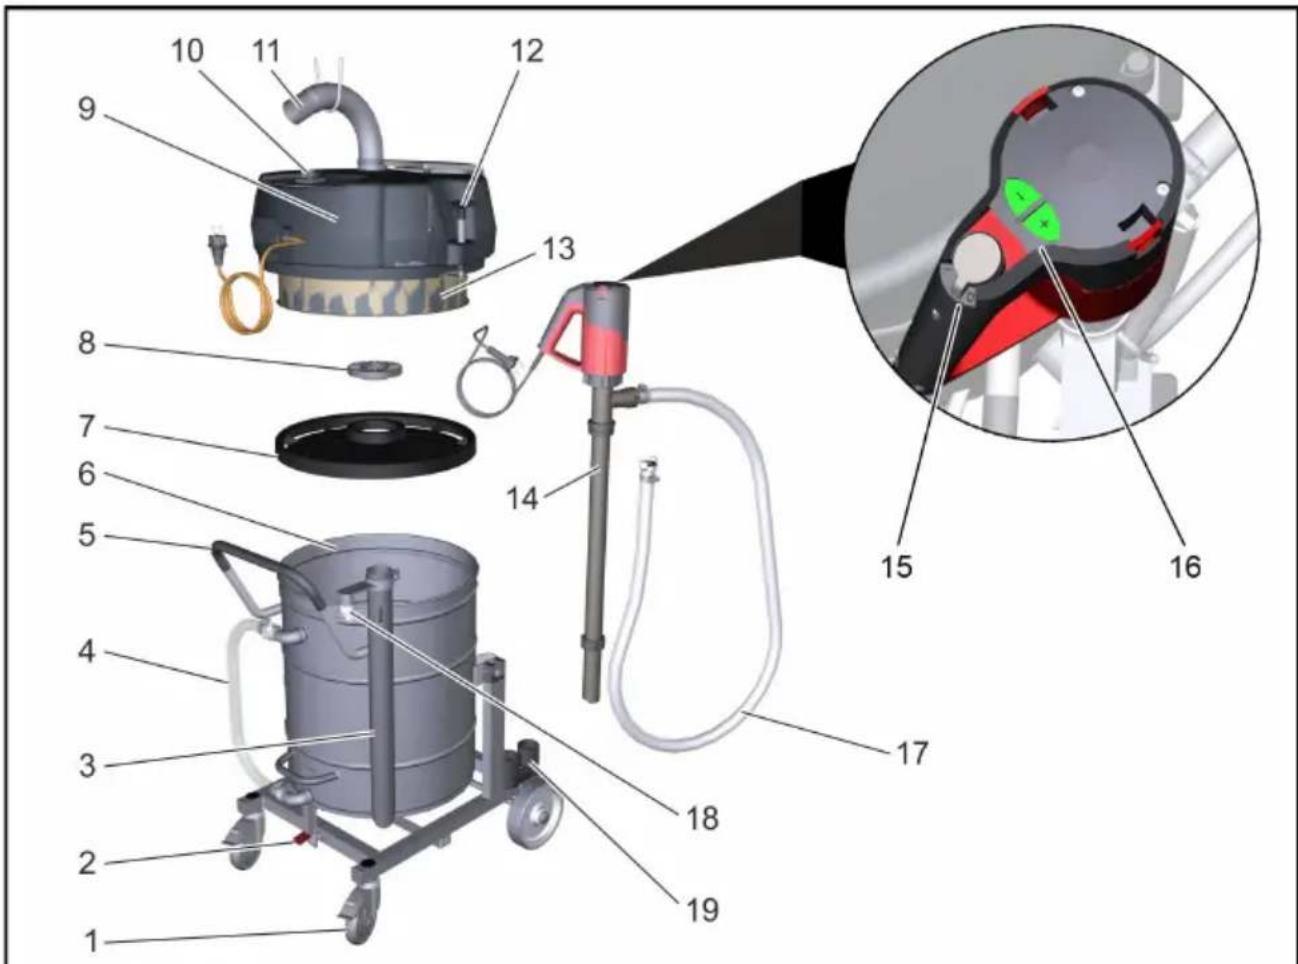
natural_image
Close-up of a gasifier with hoses and a red arrow indicating airflow direction (no text or symbols)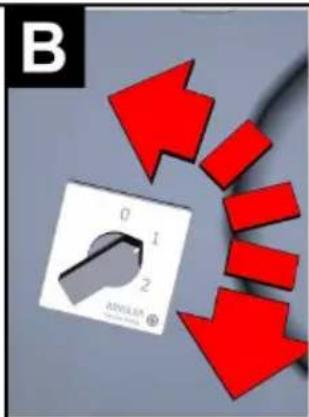
natural_image
Close-up of a white switch labeled '012' with red arrows pointing downward, no visible text or symbols beyond the label.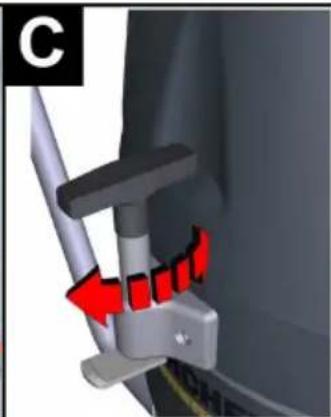
natural_image
Mechanical assembly diagram showing a lever mechanism with red arrows indicating motion direction (no text or symbols)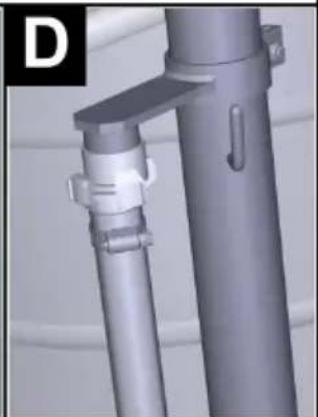
natural_image
3D rendered mechanical component with cylindrical shaft and mounting bracket (no text or symbols visible)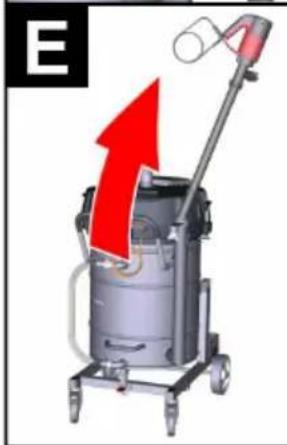
natural_image
Illustration of a portable vacuum cleaner with a red upward arrow and label 'E' (no text or symbols on the device itself)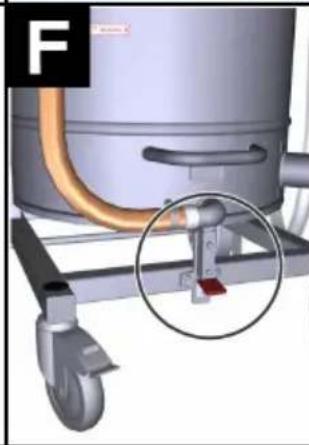
natural_image
Close-up of a mechanical device with a highlighted component (no visible text or symbols)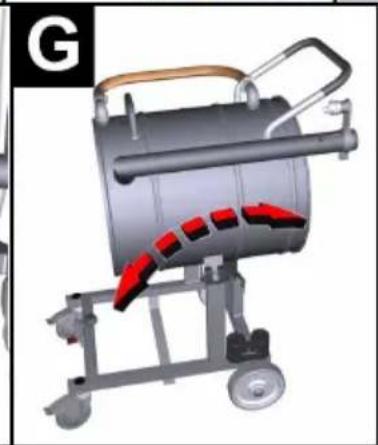
natural_image
3D rendering of a mechanical device with red clamped parts and wheels (no text or symbols visible)IMPORTANT SAFETY INSTRUCTIONS
READ ALL INSTRUCTIONS BEFORE USING THIS MACHINE
■ Inform your dealer immediately if there is any shipping damage.
■ Completely remove the accessories from the box.
■ The suction unit is not suitable for sucking up hazardous dusts as asbestos. Please consult your Kärcher branch or your Kärcher dealer with regard to such applications.
■ Only operate the vacuum from a grounded outlet. Refer to the Technical data for the necessary main fuse.
■ Connect to a properly grounded outlet only. See Grounding Instructions.
When using an electrical machine, basic precautions should always be followed, including the following: This vacuum is intended for commercial use.
1 DISCONNECT VACUUM CLEANER FROM POWER CIRCUIT before removing the cover, performing maintenance work, and when not in use.
2 DO NOT LEAVE the machine unattended when plugged in.
3 ALWAYS CHECK THE POWER SUPPLY CORD for damage or signs of any aging before each use.
4 DO NOT PULL OR CARRY VACUUM CLEANER BY CORD. Do not close door on cord or pull cord around sharp edges.
5 KEEP CORD AWAY FROM HEAT AND OIL. Do not leave cord lying around after job is complete. It can become a tripping hazard.
6 DO NOT RUN VACUUM OVER CORD.
7 TURN SWITCH TO OFF before unplugging power supply cord.
8 DO NOT UNPLUG BY PULLING CORD. To unplug, grasp plug, not cord.
9 DO NOT GRASP PLUG WITH WET HANDS.
10 A DAMAGED CORD OR PLUG should only be replaced by an authorized service center representative. DO NOT ATTEMPT TO REPAIR POWER CORD.
11 TO AVOID SHOCK, do not expose to rain. Store indoors.
12 USE ONLY AS RECOMMENDED BY THIS MANUAL. Use only with recommended attachments.
13 KEEP HAIR, CLOTHING, LOOSE JEWELRY, FINGERS and all parts of the body away from openings and moving parts.
14 DO NOT BLOCK OR OBSTRUCT OPENINGS. Keep openings free of lint, hair, dust, and anything that restricts air flow.
15 DO NOT PICK UP ANYTHING THAT IS BURNING, smoldering, or smoking such as matches, cigarettes, or hot ashes.
16 DO NOT USE TO VACUUM COMBUSTIBLE EXPLOSIVE MATERIALS, such as coal, grain, and other finely divided combustible material.
17 DO NOT USE TO VACUUM COMBUSTIBLE, hazardous, toxic, or carcinogenic materials, including gasoline, diesel fuel, acetone, paint thinner, heating oils, undiluted acids and solvents, pesticide, and asbestos.
18 USE RECOMMENDED FILTERS when vacuuming drywall materials.
19 DO NOT USE WITHOUT FILTER and/or dust bag in proper place.
20 CONNECT VACUUM CLEANER WITH PROPERLY GROUNDED OUTLET ONLY. See grounding instructions.
21 DO NOT ALLOW VACUUM CLEANER TO BE USED AS A TOY. Keep children away from Vacuum Cleaner.
22 DO NOT LEAVE UNATTENDED while Vacuum Cleaner is running.
23 DO NOT USE IF CORD, PLUG, FILTER, OR VACUUM CLEANER IS IN POOR CONDITION. If the Vacuum Cleaner has been dropped, damaged, exposed to weather, or dropped into water; have it checked by an authorized service.
24 ALWAYS USE EYE PROTECTION when operating Vacuum Cleaner.
25 USE EXTRA CAUTION when operating on stairs.
26 STAY ALERT! Do not use Vacuum Cleaner when you are tired or under the influence of drugs, alcohol or medication.
SAVE THESE INSTRUCTIONS
This vacuum is intended for commercial use.
SAFETY INSTRUCTIONS
GROUNDING INSTRUCTIONS
- This appliance must be grounded. If it should malfunction or break down, grounding provides a path of least resistance for electric current to reduce the risk of electric shock.
- This appliance is equipped with a cord having an equipment grounding conductor and ground plug.
- The plug must be inserted into an appropriate outlet that is properly installed and grounded in accordance with all local codes and ordinances.
WARNING:
- Improper connection of the equipment-grounding conductor can result in a risk of electric shock.
- Check with a qualified electrician or service person if you are in doubt as to whether the outlet is properly grounded.
- Do not modify the plug provided with the appliance.
- If it will not fit the outlet, have a proper outlet installed by a qualified electrician.
- This appliance is for use on a nominal 120-volt circuit, and has a grounded plug that looks like the plug illustrated in Fig.A.
- A temporary adapter that looks like the adapter illustrated in Fig.B, may be used to connect this plug to a two-pole receptacle as shown in Fig.B, if a properly grounded outlet is not available.
- The temporary adapter should be used only until a properly grounded outlet (Fig.A) is installed by a qualified electrician.
- The green colored rigid ear, lug, or the like extending from the adapter must be connected to a permanent ground such as a properly grounded outlet box cover.
- Whenever the adapter is used, it must be held in place by a metal screw.
IN ALL CASES, MAKE SURE THE RECEPTACLE IN QUESTION IS PROPERLY GROUNDED.
NEVER REMOVE GROUNDING PRONG FROM POWER PLUG.
EXTENSION CORDS
Use only three-wire extension cords that have three-prong grounding-type plugs and three-pole receptacle that accepts the appliance's plug. Replace damaged or worn cord immediately.
DO NOT ATTEMPT TO REPAIR POWER CORD.
Figure A
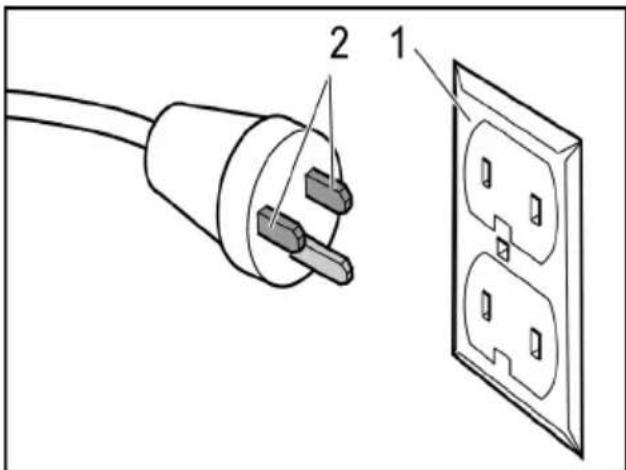
1 Grounded outlet box
2 Current carrying prongs
Grounding prong is longest of the 3 prongs
Figure B
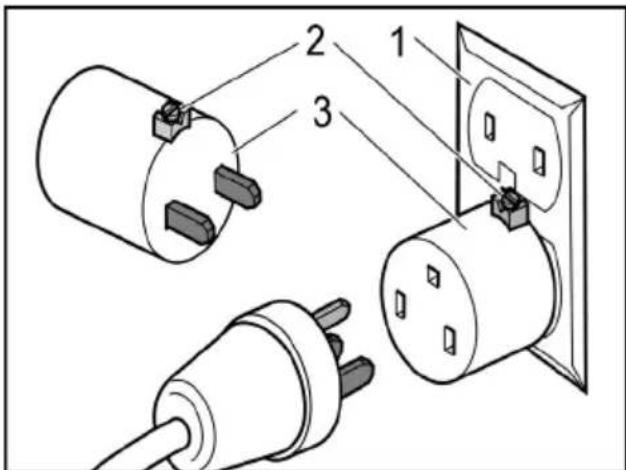
1 Grounded outlet box
2 Grounding means
3 Adapter
Note: In Canada, the use of a temporary adapter is not permitted by the Canadian Electrical Code.
Servicing of double-insulated machines In a double-insulated machine, two sys- tems of insulation are provided instead of grounding. No grounding means is provid- ed on a double-insulated machine, nor should a means for grounding be added to the machine. Servicing a double-insulated machine requires extreme care and knowl- edge of the system, and should be done only by qualified service personnel. Re- placement parts for a double-insulated ma- chine must be identical to the parts they replace.

Please read and comply with these original instructions prior
to the initial operation of your appliance and store them for later use or subsequent owners.
- The non-compliance of the operating and safety instructions may lead to damages of the appliance and to dangers for the operator and other persons.
– In case of transport damage inform vendor immediately.
Contents
Environmental protection .... EN 1
Danger or hazard levels ..... EN 1
Proper use ...... EN 2
Symbols on the machine..... EN 2
Safety instructions..... EN 2
Device elements ..... EN 3
Start up ...... EN 3
Operation ...... EN 4
Shutting down ..... EN 5
Transport..... EN 6
Storage ..... EN 6
Care and maintenance ..... EN 6
Troubleshooting ..... EN 6
Warranty ...... EN 7
Accessories and Spare Parts. EN 7
Technical specifications ..... EN 8
Environmental protection

The packaging material can be recycled. Please do not throw the packaging material into household waste; please send it for recycling.
Old appliances contain valuable materials that can be recycled; these should be sent for recycling. Batteries, oil, and similar substances must not enter the environment. Please dispose of your old appliances using appropriate collection systems.
Notes about the ingredients (REACH)
You will find current information about the ingredients at:
www.kaercher.com/REACH
Danger or hazard levels
⚠️DANGER
Immediate danger that can cause severe injury or even death.
⚠ WARNING
Possible hazardous situation that could lead to severe injury or even death.
△CAUTION
Pointer to a possibly dangerous situation, which can lead to minor injuries.
ATTENTION
Pointer to a possibly dangerous situation, which can lead to property damage.
Proper use
⚠ WARNING
The appliance is not suitable for vacuuming dust which endangers health.
ATTENTION
This unit is only to be used indoors.
- This device has been designed to vacuum up non-flammable and non-explosive substances.
- This appliance is suitable for the vacuuming of oil-containing liquids, cooling lubricants and chips.
- This device is not suitable for vacuuming up fine dust.
- This appliance is suitable for commercial use.
– Any other use other than the specified one will be treated as improper use of the appliance.
Symbols on the machine
Risk of damage! Empty device in time. The maximum filling level must not be exceeded.
Safety instructions
⚠ WARNING
The appliance is not suitable for vacuuming dust which endangers health.
⚠ WARNING
Protect the unit from rain. Do not store outside.
⚠ WARNING
Do not deliver combustible fluids with the drum pump.
⚠ WARNING
Do not operate device and drum pump in rooms subject to explosion hazard.
ATTENTION
This unit is only to be used indoors.
ATTENTION
Risk of crushing! Wear gloves when removing and fitting the suction head.
→ Switch off the appliance after completing work and pull the mains plug.
→ Never vacuum without a filter or a damaged a filter, otherwise the device can get damaged.
ATTENTION
Risk of crushing when tilting the fluid container
→ Engage the locking mechanism after tilting.
ATTENTION
Risk of damage! Do not run drum pump dry.
In Emergency
→ In case of emergency (e.g. when sucking in combustible materials, in case of a short-circuit or some other electrical defect), switch off the appliance and pull the mains plug.
Electrical connection
The appliance may only be connected to an electric supply that has been installed by an electrician in accordance with IEC 60364.
For connection values, see technical data and type plate.
You are not allowed to use an extension cable.
⚠️DANGER
Risk of electric shock. Electrical connecting cables must not be damaged through being driven over, crushed, pulled or the like. Protect the power cord from heat, oil, and sharp edges.
Check the mains cables of the machine each time before using the machine to see that it is not damaged. Never operate a machine with damaged cables. Get the damaged cables replaced by an electrician.
△CAUTION
The highest allowed net impedance at the electrical connection point (refer to technical data) is not to be exceeded.
In case of any uncertainty regarding the present net impedance at your connection point, please contact your local power supply company.
Device elements
Illustration on the inside of the front cover
1 Guiding rolls with fixed position brake
2 Unlocking lever
3 Standpipe for drum pump
4 Drain hose
5 Push handle
6 Liquid reservoir
7 Deflector plate
8 Screwed sealing plug
9 Suction head
10 ON/OFF switch
11 Suction hose connection
12 Lock
13 Filter
14 Drum pump
15 On/Off switch drum pump
16 Adjustment of the delivery rate of the drum pump (+/- button)
17 Disposal hose drum pump
18 Support disposal hose
19 Accessories compartment
Start up
Illustration on the inside of the front cover
→ Bring the appliance to working position - secure it, if required, with parking brakes.
→ Ensure that the suction head has been fitted properly.
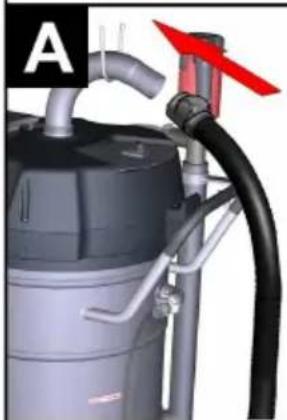
Illustration A
→ Insert the suction hose into the suction hose connection.
→ Attach the desired accessories to the suction hose.
Operation
Illustration on the inside of the front cover
→ Insert the mains plug into the socket. Illustration B
→ Turning on the Appliance
Note: The switch has several switching stages:
0 Device is switched off
1 Motor 1 switched on
2 Motor 1 and 2 switched on
Always operate the device in stage 2. ATTENTION
Risk of damage! Always switch the switching stages quickly in order to prevent damage of the drive motor.
→ Start suction process.
natural_image
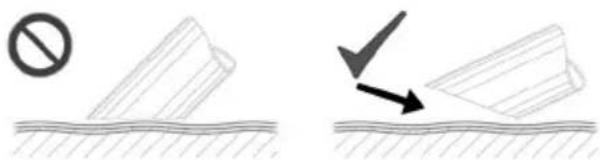
Diagram showing two scenarios of a triangular object on a surface, one with a prohibition symbol and the other with a downward arrow (no text or labels)Note: When vacuuming up fluids, only immerse the accessories half way in order to deliver sufficient air.
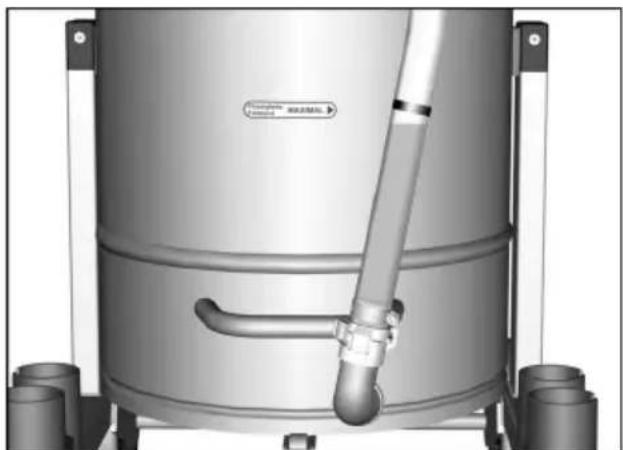
Check the fill level display
natural_image
3D rendering of a stainless steel industrial vessel with a piping and valve (no visible text or symbols)Note: The red marking on the drain hose shows the maximum admissible filling level.
Draining the fluid container by means of drum pump
Illustration D
→ Secure the disposal hose in the support when it is not used.
Emptying during vacuuming operation
→ Connect the disposal hose to the disposal unit.
→ Plug in the mains plug of the drum pump.
→ Start vacuuming operation.
→ Use the On/Off switch to switch on the drum pump.
→ Adjust the delivery rate by means of the +/- button.
Note: Choose the delivery rate according to the vacuumed quantity. Prevent the drum pump from running dry. Do not leave the drum pump unattended.
Emptying after the vacuuming operation
→ Switch off the appliance and remove the plug from the socket.
→ Drive the appliance to the disposal site for the liquid.
→ Connect the disposal hose to the disposal unit.
→ Plug in the mains plug of the drum pump.
→ Use the On/Off switch to switch on the drum pump.
→ Adjust the delivery rate by means of the +/- button.
Note: Prevent the drum pump from running dry. Do not leave the drum pump unattended.
Emptying the fluid container manually
→ Switch off the appliance and remove the plug from the socket.
→ Drive the appliance to the disposal site for the liquid.
→ Disconnect the drain hose at the upper hose coupling.
→ Hold the drain hose over a suitable collection unit and drain the content.
→ Dispose of the contents according to the local provisions.
Tilting the container
Illustration on the inside of the front cover
→ Switch off the appliance and remove the plug from the socket.
→ Drive the appliance to the disposal site for the liquid.
Illustration C
→ Open the lock of the suction head.
→ Remove the suction head and put aside.
Illustration E
→ Remove the drum pump from the stand-pipe.
Illustration F
→ Open the lock (foot rest).
Illustration G
→ Tilt the container with the push handle.
→ Dispose of the contents according to the local provisions.
→ Fit and lock the suction head again.
→ Reinsert the drum pump.
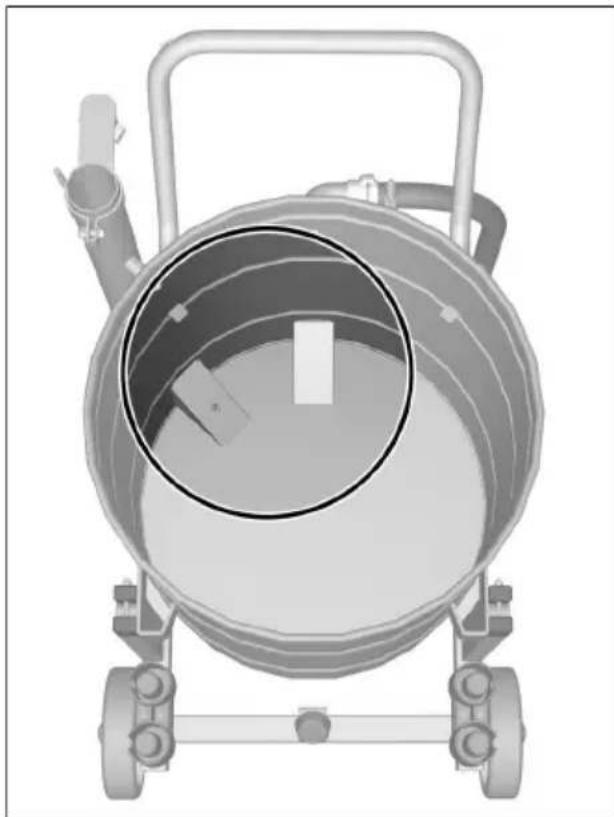
Clean the container
Note: Water based cooling lubricants can cause a bacterial contamination. Wear appropriate protective gear during the removal.
→ Empty the container.
→ Remove deposits from the container.
→ Dispose of deposits in accordance with the applicable regulations.
natural_image
Top-down view of a mechanical device with a circular opening and wheels, no visible text or symbols→ Free the retaining plates from chips and deposits.
Shutting down
→ Switch off the appliance using the On/Off switch.
→ Empty and clean the container.
→ Clean drum pump.
→ Dismantle the accessory and rinse it with water and let dry if necessary.
Note: Empty the vacuum cleaner after each use and let it dry with the container open.
Transport
△CAUTION
Risk of injury and damage! Observe the weight of the appliance when you transport it.
→ When transporting in vehicles, secure the appliance according to the guidelines from slipping and tipping over.
Storage
△CAUTION
Risk of injury and damage! Note the weight of the appliance in case of storage.
This appliance must only be stored in interior rooms.
Care and maintenance
→ Rinse the appliance and the accessories with fresh water at regular intervals and let them dry.
→ In order to avoid bacterial contamination, do not leave fluids inside the device.
→ During extended operation breaks, open the cover to let the residual moisture escape.
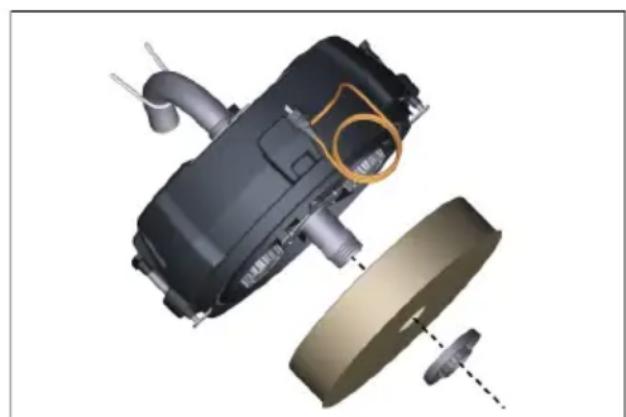
Replacing the filter
natural_image
3D mechanical assembly diagram showing internal components and a highlighted section (no text or symbols)→ Unscrew the screw plug.
→ Remove and replace filter.
→ Insert new filter.
→ Screw in the locking screw and tighten it again.
Note: During installation, it must me ensure that the filter is inserted correctly.
Troubleshooting
⚠️DANGER
First pull out the plug from the mains before carrying out any tasks on the machine.
⚠️DANGER
Have all checks and works on electrical parts performed by an expert.
Motor (suction turbine) does not start
- No electrical voltage.
→ Check the receptacle and the fuse of the power supply.
→ Check the power cable and the power plug of the device.
Drum pump is not delivering
- Fluid container empty.
→ Only use the drum pump when the fluid container is filled. - No electrical voltage.
→ Check the receptacle and the fuse of the power supply.
→ Check the power cable and the power plug of the device.
– Delivery rate set incorrectly.
→ Adjust the delivery rate by means of the +/- button.
– Retaining plate clogged.
→ Clean retaining plate.
Suction capacity decreases slowly
- Nozzle, suction hose or suction pipe may be blocked.
→ Check, clean accessories. - Filter is dirty.
→ Clean filter.
Manual emptying of the fluid container takes a long time
- Drain hose crushed or obstructed.
→ Check / clean drain hose.
– Retaining plate clogged.
→ Clean retaining plate.
Customer Service
If malfunction can not be fixed, the device must be checked by customer service.
Warranty
The warranty terms published by the relevant sales company are applicable in each country. We will repair potential failures of your appliance within the warranty period free of charge, provided that such failure is caused by faulty material or defects in manufacturing. In the event of a warranty claim please contact your dealer or the nearest authorized Customer Service centre. Please submit the proof of purchase.
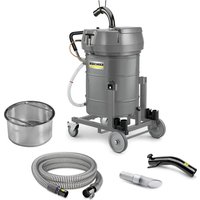
Accessories and Spare Parts
Accessories are not included in the delivery. The accessories for the device must be ordered separately, depending on the application.
- Only use accessories and spare parts which have been approved by the manufacturer. The exclusive use of original accessories and original spare parts ensures that the appliance can be operated safely and trouble free.
- For additional information about spare parts, please go to the Service section at www.kaercher.com.
Technical specifications
| IVR-L 100/18-2 Tc Dp | ||
| Mains voltage V 120 | ||
| Frequency Hz 1~60 | ||
| Rated current A 15 | ||
| Container capacity gal (l) 26.4 (100) | ||
| Filling quantity (liquid) gal (l) 13.2 (50) | ||
| Air quantity CFM (l/s) 2x 136 (2x 64) | ||
| Under-pressure in H2O (kPa) 84 (21) | ||
| Protective class -- I | ||
| Type of protection -- IPX 4 | ||
| Suction hose connection | Nominal width | DN50 |
| Length x width x height | in (mm) | 32,9 x 26 x 52(837 x 661 x 1322) |
| Typical operating weight | lbs (kg) | 125.6 (57) |
| Ambient temperature (max) | °F (°C) | 104 (+40) |
| Values determined to EN 60335-2-69 | ||
| Sound pressure level L_pA | dB(A) | 65 |
| Uncertainty K_pA | dB(A) | 2 |
| Power cord | SJTW-A 3x14 AWG E41542 | |
| Part no.: | Cable length | |
| USA | 6.650-465.0 | 33 ft (10.0 m) |
Technical data drum pump
| Mains voltage | V | 120 |
| Frequency | Hz | 1~60 |
| Power | W | 500 |
| Type of protection | -- | IP 24 |
| Weight | lbs (kg) | 4.4 (2.4) |
| Length x width x height | in (mm) | 38.0 x 7.5 x 5.0 (961 x 194 x 131) |
| Ambient temperature | °F (°C) | 14/104 (-10/+40) |
| Media temperature max. | °F (°C) | 248 (120) |
| Flow rate | gal/min (l/min) | 0-42.2 (0-160) |
| Max. transportation height | ft (m) | 9.8-23.0 (3-7) |
| Length of disposal hose | ft (m) | 7.9 (2.4) |
CONSIGNES DE SÉCURITÉ IMPORTANTES
OBSERVEZ LES POINTS SUIVANTS AVANT LA MISE EN SERVICE DE L'APPAREIL
Entreposage .... FR 6
Entretien et maintenance .... FR 6
Assistance en cas de panne .. FR 6
Garantie FR 7
www.kaercher.com/REACH
Niveaux de danger
⚠️DANGER
natural_image
Two diagrams showing a shaded object on a surface with a prohibition symbol and an arrow pointing to a tilted object (no text or labels)natural_image
3D rendering of a stainless steel industrial vessel with a piping and valve (no visible text or symbols)natural_image
Top-down view of a mechanical device with a circular opening and wheels (no text or symbols visible)natural_image
3D cutaway view of a mechanical assembly showing internal components and a shaft (no text or symbols visible)www.kaercher.com/REACH
Niveles de peligro
⚠️ PELIGRO
natural_image
Two diagrams showing a shaded object on a surface with a prohibition symbol and an arrow pointing to a tilted object (no text or labels)natural_image
3D rendering of a stainless steel industrial vessel with a piping and valve (no visible text or symbols)natural_image
Top-down view of a mechanical device with a circular opening and wheels, no visible text or symbolsnatural_image
3D mechanical assembly diagram showing internal components and a highlighted section (no text or symbols)natural_image
Icon showing a gear and wrench inside a square frame (no text or symbols)http://www.kaercher.com/dealersearch