IVS 100/40 HEPA - Vacuum Cleaner Kärcher - Free user manual and instructions
Find the device manual for free IVS 100/40 HEPA Kärcher in PDF.

User questions about IVS 100/40 HEPA Kärcher
0 question about this device. Answer the ones you know or ask your own.
Ask a new question about this device
Download the instructions for your Vacuum Cleaner in PDF format for free! Find your manual IVS 100/40 HEPA - Kärcher and take your electronic device back in hand. On this page are published all the documents necessary for the use of your device. IVS 100/40 HEPA by Kärcher.
USER MANUAL IVS 100/40 HEPA Kärcher
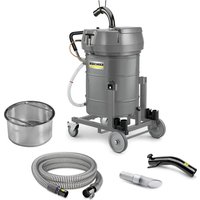
natural_image
Two industrial vacuum cleaner units with wheels and control panels, labeled 'Hepa' (no additional text or symbols visible)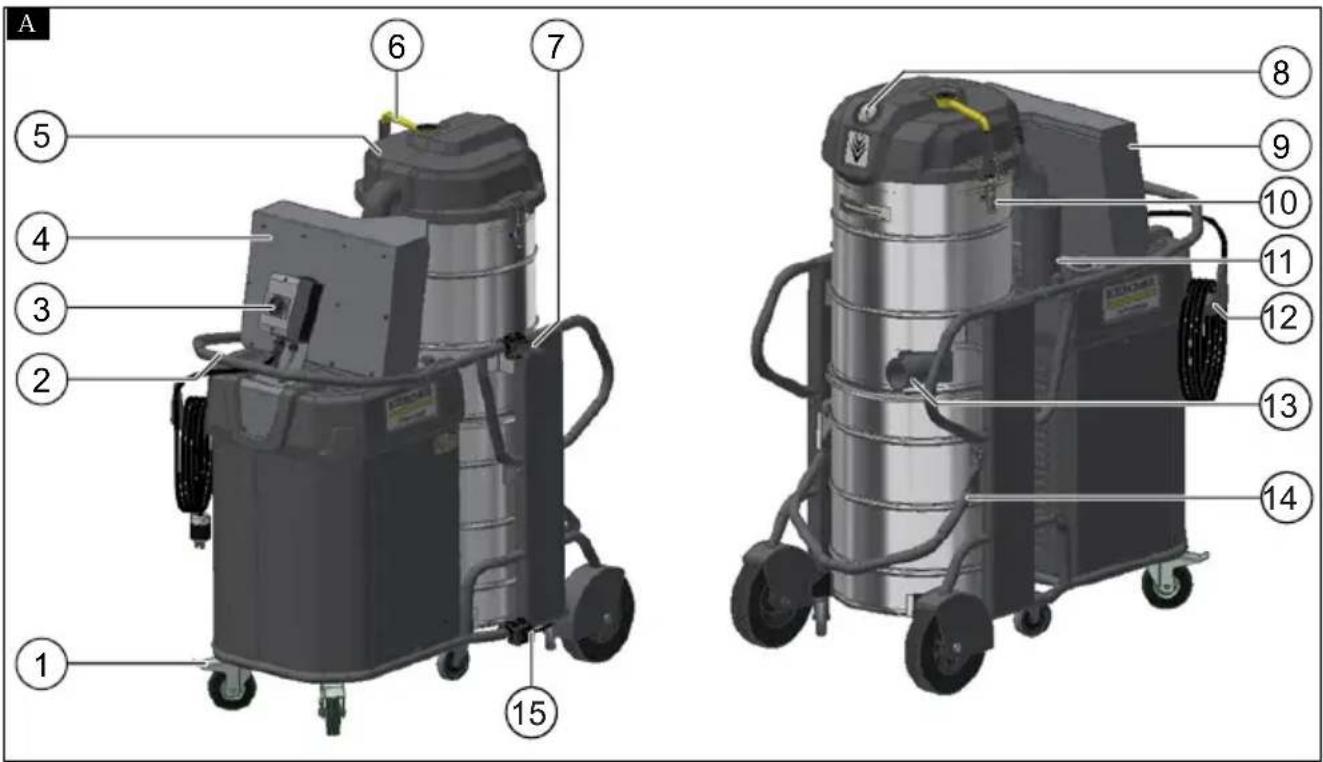
Contents
Important Saftey Instructions .... 3
General notes 4
Intended use 4
Environmental protection 5
Accessories and spare parts...... 5
Warranty.... 5
Safety devices.... 5
Description of the unit 5
Initial startup.... 6
Operation 6
Shutting down 7
Transport....7
Storage 7
Care and service.... 7
Troubleshooting guide...... 9
Technical data.... 10
Important Saftey Instructions
READ ALL INSTRUCTIONS BEFORE USING THIS MACHINE
- Inform your dealer immediately if there is any shipping damage.
- Completely remove the accessories from the box.
- The suction unit is not suitable for sucking up hazardous dusts as asbestos. Please consult your Kärcher branch or your Kärcher dealer with regard to such applications.
- Only operate the vacuum from a grounded outlet. Refer to the Technical data for the necessary main fuse.
- Connect to a properly grounded outlet only. See Grounding Instructions.
When using an electrical machine, basic precautions should always be followed, including the following: This vacuum is intended for commercial use.
1 DISCONNECT VACUUM CLEANER FROM POWER CIRCUIT before removing the cover, performing maintenance work, and when not in use.
2 DO NOT LEAVE the machine unattended when plugged in.
3 ALWAYS CHECK THE POWER SUPPLY CORD for damage or signs of any aging before each use.
4 DO NOT PULL OR CARRY VACUUM CLEANER BY CORD. Do not close door on cord or pull cord around sharp edges.
5 KEEP CORD AWAY FROM HEAT AND OIL. Do not leave cord lying around after job is complete. It can become a tripping hazard.
6 DO NOT RUN VACUUM OVER CORD.
7 TURN SWITCH TO OFF before unplugging power supply cord.
8 DO NOT UNPLUG BY PULLINGCORD.
To unplug, grasp plug, not cord.
9 DO NOT GRASP PLUG WITH WET HANDS.
10 A DAMAGED CORD OR PLUG should only be replaced by an authorized service center representative. DO NOT ATTEMPT TO REPAIR POWER CORD.
11 TO AVOID SHOCK, do not expose to rain. Store indoors.
12 USE ONLY AS RECOMMENDED BY THIS MANUAL. Use only with recommended attachments.
13 KEEP HAIR, CLOTHING, LOOSE JEWELRY, FINGERS and all parts of the body away from openings and moving parts.
14 DO NOT BLOCK OR OBSTRUCT OPENINGS. Keep openings free of lint, hair, dust, and anything that restricts air flow.
15 DO NOT PICK UP ANYTHING THAT IS BURNING, smoldering, or smoking such as matches, cigarettes, or hot ashes.
16 DO NOT USE TO VACUUM COMBUSTIBLE EXPLOSIVE MATERIALS, such as coal, grain, and other finely divided combustible material.
17 DO NOT USE TO VACUUM COMBUSTIBLE, hazardous, toxic, or carcinogenic materials, including gasoline, diesel fuel, acetone, paint thinner, heating oils, undiluted acids and solvents, pesticide, and asbestos.
18 USE RECOMMENDED FILTERS when vacuuming drywall materials.
19 DO NOT USE WITHOUT FILTER and/or dust bag in proper place.
20 CONNECT VACUUM CLEANER WITH PROPERLY GROUNDED OUTLET ONLY. See grounding instructions.
21 DO NOT ALLOW VACUUM CLEANER TO BE USED AS A TOY. Keep children away from Vacuum Cleaner.
22 DO NOT LEAVE UNATTENDED while Vacuum Cleaner is running.
23 DO NOT USE IF CORD, PLUG, FILTER, OR VACUUM CLEANER IS IN POOR CONDITION. If the Vacuum Cleaner has been dropped, damaged, exposed to weather, or dropped into water; have it checked by an authorized service.
24 ALWAYS USE EYE PROTECTION when operating Vacuum Cleaner.
25 USE EXTRA CAUTION when operating on stairs.
26 STAY ALERT! Do not use Vacuum Cleaner when you are tired or under the influence of drugs, alcohol or medication.
SAVE THESE INSTRUCTIONS
This vacuum is intended for commercial use.
SAFETY INSTRUCTIONS
GROUNDING INSTRUCTIONS
- This appliance must be grounded. If it should malfunction or break down, grounding provides a path of least resistance for electric current to reduce the risk of electric shock.
- This appliance is equipped with a cord having an equipment grounding conductor and ground plug.
- The plug must be inserted into an appropriate outlet that is properly installed and grounded in accordance with all local codes and ordinances.
WARNING:
- Improper connection of the equipment grounding conductor can result in a risk of electric shock.
- Check with a qualified electrician or service person if you are in doubt as to whether the outlet is properly grounded.
- Do not modify the plug provided with the appliance.
- If it will not fit the outlet, have a proper outlet installed by a qualified electrician.
IN ALL CASES, MAKE SURE THE RECEPTACLE IN QUESTION IS PROPERLY GROUNDED.
NEVER REMOVE GROUNDING PRONG FROM POWER PLUG.
EXTENSION CORDS
Use only three-wire extension cords that have three-prong grounding-type plugs and three-pole receptacle that accepts the appliance's plug. Replace damaged or worn cord immediately.
DO NOT ATTEMPT TO REPAIR POWER CORD.
Note: In Canada, the use of a temporary adapter is not permitted by the Canadian Electrical Code.
Servicing of double-insulated machines In a double-insulated machine, two systems of insulation are provided instead of grounding. No grounding means is provided on a double-insulated machine, nor should a means for grounding be added to the machine. Servicing a double-insulated machine requires extreme care and knowledge of the system, and should be done only by qualified service personnel. Replacement parts for a double-insulated machine must be identical to the parts they replace.
General notes
Read these original operating instructions and the enclosed safety instructions before using the device for the first time. Proceed accordingly.
Keep both books for future reference or for future owners.
Intended use
Use the device as a wet/dry vacuum cleaner:
● For vacuuming floors and wall surfaces
- For vacuuming moist and liquid substances
- For vacuuming dry, non-flammable dust particles from machines
● In business and industry
The following are not in accordance with the intended use:
● Vacuuming of substances harmful to health and inflammable substances.
Environmental protection

The packing materials can be recycled. Please dispose of packaging in accordance with the environmental regulation.

Electrical and electronic appliances contain valuable, recyclable materials and often components such as batter-rechargeable batteries or oil, which - if filled or disposed of incorrectly - can be a potential threat to human health and environment. However, these compounds are required for the correct operation the appliance. Appliances marked by this tool are not allowed to be disposed of either with the household rubbish.
Notes on the content materials (REACH)
Current information on content materials can be found at: www.kaercher.de/REACH
Accessories and spare parts
Only use original accessories and original spare parts. They ensure that the appliance will run fault-free and safely.
Information on accessories and spare parts can be found at www.kaercher.com.
Warranty
The warranty conditions issued by our relevant sales company apply in all countries. We shall remedy possible malfunctions on your appliance within the warranty period free of cost, provided that a material or manufacturing flaw is the cause. In a warranty case, please contact your dealer (with the purchase receipt) or the next authorized customer service site.
(See overleaf for the address)
Safety devices
Insertion / locking of the vacuum cleaner waste container
⚠️DANGER
Risk of injury when inserting / locking the vacuum cleaner waste container
Hands could become trapped when inserting and locking the waste container.
Always hold the locking lever of the vacuum cleaner waste container with both hands when locking.
Behavior in the event of an emergency
⚠️DANGER
Risk of injury and material damage when vacuuming inflammable materials, or in the case of a short-circuit or other electrical faults
Danger of inhalation of gases hazardous to health, danger of electric shock, danger of burns.
In the event of an emergency, switch off the device and unplug the mains plug.
Description of the unit
For the figures, please refer to the graphics page
Illustration A
① Steering rollers with parking brake
② Sliding handle
③ On / Off switch
④ Control cabinet
⑤Filter cleaning cover
⑥ Filter cleaning handle
⑦ Suction pipe holder
⑧ Pressure gage
⑨Hepa Filter (HEPA variant only)
⑩Filter chamber lock
⑪Muffler
⑫ Cable clips
⑬Suction hose connection nozzle
⑭Vacuum cleaner waste container un-locking lever
⑮ Floor nozzle holder
Initial startup
- Bring the device into the working position and secure with the parking brake if necessary.
- Insert the suction hose into the suction hose connection.
- Plug the desired accessory onto the suction hose.
- Ensure that vacuum cleaner waste container is inserted correctly.
Operation
Switching the device on
- Connect the mains plug.
- Switch on the device at the On/Off switch.
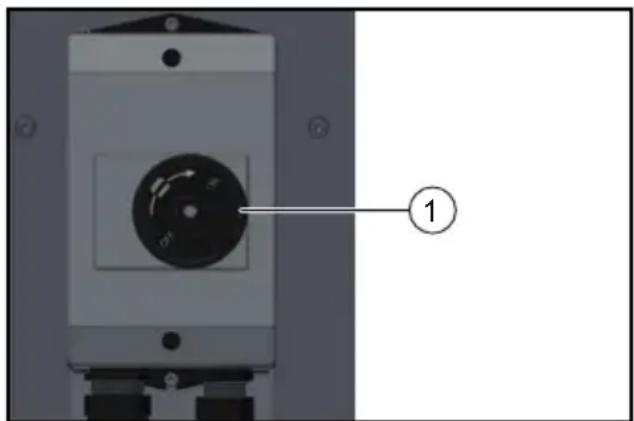
natural_image
Close-up of a mechanical device with a circular dial and labeled component (1), no readable text or symbols beyond the label.1 On / Off switch
Vacuuming process
- Perform vacuuming.
- Regularly check the filling level in the dirt receptacle, since the device does not switch off automatically.
- Empty the vacuum cleaner waste container as necessary.
- Clean or replace the filter as necessary.
Cleaning the main filter
A pressure gauge showing the vacuum inside the device is mounted on the front of the device.
- Switch off the device at the On / Off switch.
- Move the filter cleaning lever back and forth several times.
If this cleaning does not result in an improvement, the main filter can be removed and washed or replaced, see chapter Replacing the main filter.
Using a dust collection bag
A dust collection bag can be inserted in the vacuum cleaner waste container to allow dust-free emptying of the device.
Note
The dust collection bag must not be used for wet vacuum cleaning.
- Insert the dust collection bag in the vacuum cleaner waste container and carefully press it against the wall of the container.
- Pull the edge of the dust collection bag over the edge of the vacuum cleaner waste container.
- Insert the vacuum cleaner waste container into the device.
- On completion of vacuuming, close the dust collection bag and remove it from the vacuum cleaner waste container.
- Dispose of the dust collection bag and contents according to the applicable waste disposal regulations.
Dry vacuuming operation
ATTENTION
Damage to the skin, lungs and eyes through fine dust
Emission of fine dust due to a non-approved filter
When changing from wet vacuuming to dry vacuuming, please note that vacuuming dry substances with a wet filter can damage the filter and make it unusable. Vacuum only with a dry filter.
- Allow the wet filter to dry completely or replace it with a dry filter before use.
- Clean or replace the filter as necessary.
Wet vacuum cleaning
ATTENTION
Risk of damage if the dirt receptacle overflows
The dirt receptacle can fill within a few seconds and overflow when vacuuming large amounts of liquids.
Continuously monitor the filling level.
- Dry the filter.
- Clean the container with a moist cloth and dry it off.
Emptying the vacuum cleaner waste container
The vacuum cleaner waste container must be emptied when it is has filled up to approx. 3 cm below the upper edge.
- Switch off the device.
- Secure the device using the parking brakes on the steering rollers.
- Open the lock on the vacuum cleaner waste container upwards.
- Pull the vacuum cleaner waste container out of the device.
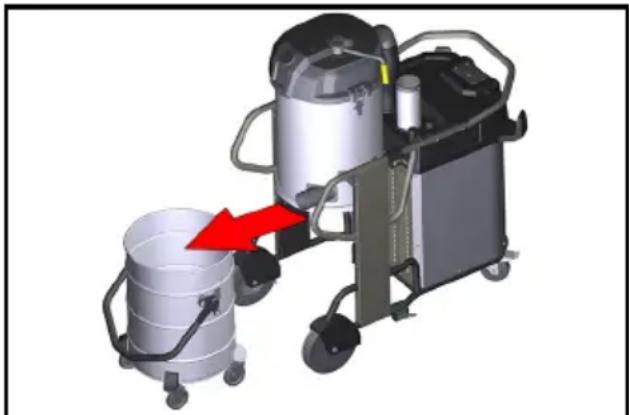
natural_image
3D rendering of a vacuum cleaner with a red arrow indicating motion, next to a cylindrical container (no text or symbols visible)- Empty the vacuum cleaner waste container and insert it back into the device in the reverse order.
Note
The vacuum cleaner waste container can be lifted at the handle using a crane. Maximum load for crane transport: 50 kg.
△CAUTION
Risk of injury and damage!
Note the total weight of the vacuum cleaner waste container when transporting with a crane.
Do not overload the container.
Observe the applicable regulations for lifting with a crane.
Shutting down
Switching off the device
- Switch off the device at the main switch.
- Pull out the mains plug.
Finishing operation
- Switch off the device.
-
Remove the accessory and, if necessary, flush it out with water and allow to dry.
-
Empty the vacuum cleaner waste container, see chapter Emptying the vacuum cleaner waste container.
- Vacuum off the inside and outside of the device and clean with a moist cloth.
Transport
△CAUTION
Tipping and slipping of the device during transport
Risk of injury and damage
When transporting in vehicles, secure the device against slipping and tipping over according to the applicable regulations.
Storage
△CAUTION
Failure to observe the weight
Risk of injury and damage
Be aware of the weight of the device during transport and storage.
- Store the device indoors only.
Care and service
⚠️DANGER
Device unintentionally starting / electric shock
Unintentional starting of the suction motor can cause injuries. Voltage on electrical components can lead to an electric shock. Switch off the device and unplug the mains plug before performing any work on the device.
Maintenance intervals / user maintenance
No periodic maintenance intervals are specified for this device. The following maintenance is to be performed as necessary:
- Wash the filter.
- Change the filter.
- Replace the filter.
Inspection and maintenance work
Have the vacuum cleaner regularly inspected according to the respective national accident prevention regulations. Maintenance work as specified by the manufacturer must be performed by a technically qualified person at the specified regular intervals and in
accordance with the applicable regulations and safety requirements. Work on electrical components may only be performed by a qualified electrician. Please contact a KÄRCHER branch office if you have any questions.
Wash the main filter
The main filter can be washed out under running water.
ATTENTION
Damage to the main filter through deter- gents or bleaches
Cleaning with detergents or bleaches can damage the main filter.
Clean the main filter with water only. Only insert the main filter into the device when it is completely dry.
Replacing the main filter
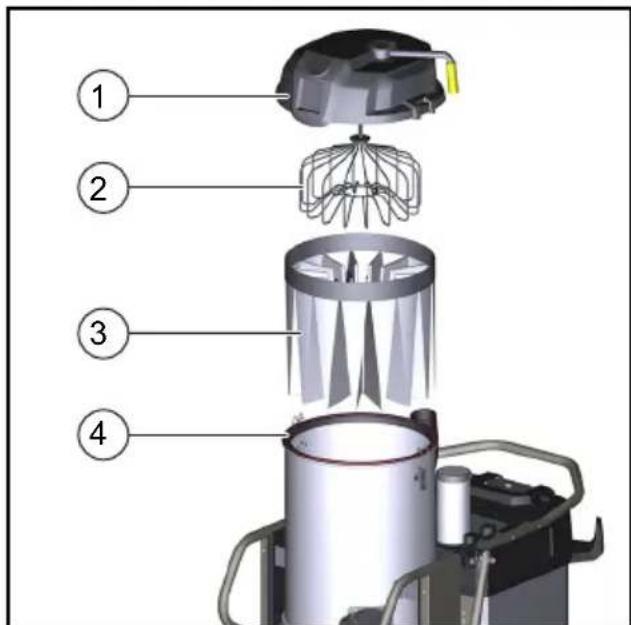
1 Filter chamber lid
2 Filter spreader
3 Main filter
4 Sealing ring
- Standard variant: Release the hose clamp on the connection hose using a screwdriver and remove.
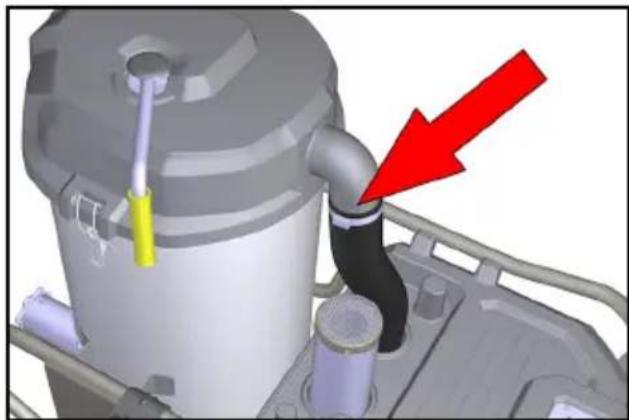
natural_image
3D mechanical assembly diagram showing a pipe connection with a red arrow pointing to a component (no text or symbols present)HEPA variant: Pull the filter chamber out of the rubber sleeve.
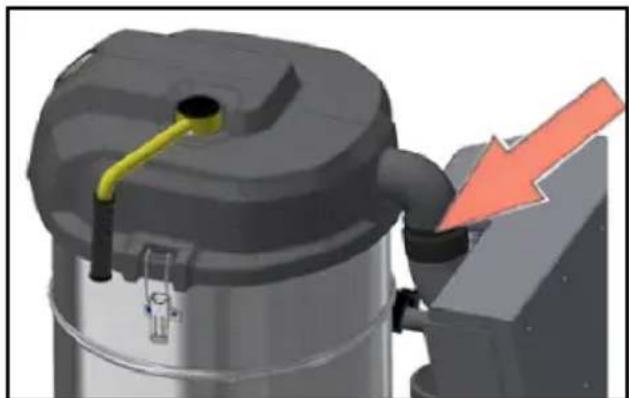
natural_image
3D rendering of a mechanical device with a yellow pipe and black components, showing a red downward arrow (no text or symbols)- Open the filter chamber latches.
- Remove the filter chamber lid.
- Remove the main filter.
- Check the sealing ring for damage.
- Insert the new main filter in reverse sequence and take care to ensure that the filter spreader is aligned correctly in the filter bag.
Replacing the HEPA filter
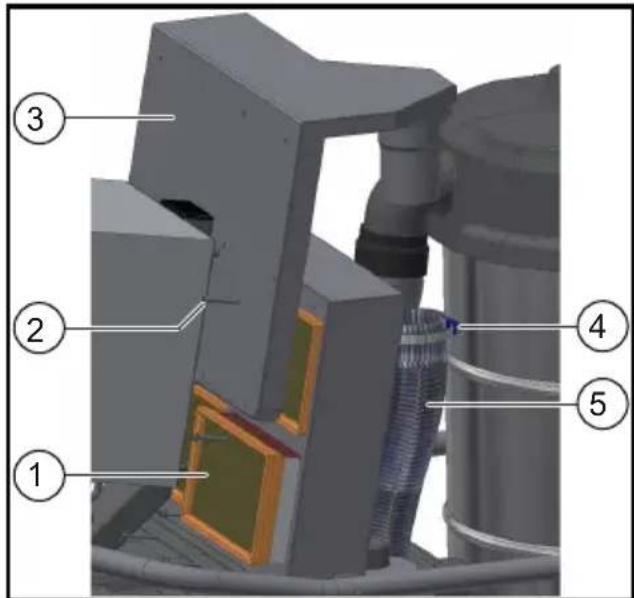
1 H E P A f i l t e r
2 HEPA box fastening screws
3 HEPA box cover
4 S t r a p
5 Connection hose
- Release the strap.
- Pull off the connection hose.
- Remove the fastening screws using a suitable tool.
- Remove the HEPA box lid.
- Remove the HEPA filter.
- Insert the new HEPA filter.
- Fit the HEPA box lid and screw in place.
- Attach the connection hose and fasten with the strap.
Troubleshooting guide
⚠️DANGER
Device unintentionally starting / electric shock
Unintentional starting of the suction motor can cause injuries. Voltage on electrical components can lead to an electric shock.
Switch off the device and unplug the mains plug before performing any work on the device.
The motor (suction turbine) does not start running
No electrical voltage present
- Check the socket and the power supply fuse.
- Check the mains cable and the mains plug of the device.
- Check all parts for clogging.
- Check that all electric connections are seated correctly.
No vacuuming operation, airflow escapes from the suction hose.
Suction turbine rotating in the wrong direction
- Swap the phases on the plug.
Suction force slowly reduces
Filter, nozzle, suction hose or suction pipe clogged.
- Check the accessory for clogging.
- Clean the accessory if necessary.
- Clean the filter.
- Replace the filter if necessary.
Escaping dust when vacuuming
Filter not correctly fastened or faulty.
- Clean the filter and insert it correctly.
- Check the filter for faults and replace if necessary.
Customer Service department
If the malfunction cannot be corrected, the device must be checked by the Customer Service department.
Technical data
| IVS 100/40 | IVS 100/40 HEPA | IVS 100/65 | IVS 100/65 Hepa | ||
| Electrical connection | |||||
| Mains voltage V 460 460 460 460 | |||||
| Power frequency Hz 3~ 60 3~ 60 3~ 60 3~ 60 | |||||
| Nominal power W 4000 4000 6500 6500 | |||||
| Rated current A 7,55 7,55 11,5 | 11,5 | ||||
| Protection class | IP 55 | IP 55 | IP 55 | IP 55 | |
| Protection class | I | I | I | I | |
| Dimensions and weights | |||||
| Typical operating weight | Ibs (kg) | 330 (150) | 374 (170) | 372 (169) | 416 (189) |
| Length x width x height | in (mm) | 47,3x27x58(1202x686x1475) | 47,3x27x58(1202x686x1475) | 47,3x27x58(1202x686x1475) | 47,3x27x58(1202x686x1475) |
| Nominal width of the suc-tion hose | DN70 | DN70 | DN70 | DN70 | |
| Ambient conditions | |||||
| Ambient temperature (max.) | °F (°C) | 41 - 104(+5 - +40) | 41 - 104(+5 - +40) | 41 - 104(+5 - +40) | 41 - 104(+5 - +40) |
| Device performance data | |||||
| Tank content | gal (l) | 26,4 (100) | 26,4 (100) | 26,4 (100) | 26,4 (100) |
| Air quantity (max.) | CFM (l/s) | 214 (101) | 214 (101) | 381 (180) | 381 (180) |
| Vacuum (max.) in H | _2O (kPa) | 108 (27) | 108 (27) | 80,4 (20) | 80,4 (20) |
| Sound pressure level L_pA | dB(A) | 75 | 75 | 75 | 75 |
| Uncertainty K_pA | dB(A) | 2 | 2 | 2 | 2 |
Subject to technical changes without notice.
natural_image
Mechanical component with a circular dial and labeled part 1, shown in 3D view (no text or symbols beyond label)1 Interruptor on/off
natural_image
3D rendering of a vacuum cleaner with a red arrow pointing to a cylindrical container (no text or symbols visible)natural_image
3D mechanical assembly diagram showing a valve and cylinder with a red arrow pointing to a component (no text or symbols present)natural_image
3D mechanical component with yellow pipe and black ports, no visible text or symbolsnatural_image
Mechanical component with a circular dial and directional arrows, labeled with number 1 (no text or symbols on the dial itself)natural_image
3D rendering of a vacuum cleaner with a red arrow pointing to a cylindrical container (no text or symbols visible)natural_image
3D mechanical assembly diagram showing a cylindrical component with a red arrow pointing to a specific part (no text or symbols present)natural_image
3D rendering of a mechanical device with a yellow pipe and black components, showing a red downward arrow (no text or symbols)1 Filtre HEPA
natural_image
Icon showing a gear and wrench inside a square frame (no text or symbols)http://www.kaercher.com/dealersearch