IVR-L 100/24-2 Tc Set - Vacuum Cleaner Kärcher - Free user manual and instructions
Find the device manual for free IVR-L 100/24-2 Tc Set Kärcher in PDF.

| Product type | Industrial wet/dry vacuum |
| Brand | Kärcher |
| Model | IVR-L 100/24-2 Tc Set |
| Dimensions (L x W x H) | 840 x 660 x 1320 mm |
| Weight (standard) | 47 kg |
| Supply voltage | 220-240 V, 50-60 Hz, phase ~ |
| Nominal power | 2400 W |
| Main fuse | 16 A (slow-blow) |
| Protection rating | IPX4 |
| Protection class | I |
| Tank capacity | 100 liters |
| Air flow | 2 x 74 l/s |
| Vacuum pressure | 23 kPa (230 mbar) |
| Sound pressure level | 68 dB(A) |
| Hand-arm vibration | < 2.5 m/s² |
| Mains cable length | 10 m |
| Nominal hose diameter | DN50 |
| Max ambient temperature | +40 °C |
| Main functions | Suction of oily liquids, cooling lubricants, chips, coarse dust; integrated drum pump for easy drainage |
| Maintenance and cleaning | Rinse regularly, empty tank after each use, clean filter; use only original accessories |
| Safety | Parking brake, suction head lock, IPX4 protection; do not vacuum harmful or flammable substances (flash point <55 °C) |
| Spare parts and repairability | Replaceable filter, drum pump, original accessories available at www.karcher.com |
| General information | Industrial use, compliant with EU standards |
Frequently Asked Questions - IVR-L 100/24-2 Tc Set Kärcher
User questions about IVR-L 100/24-2 Tc Set Kärcher
0 question about this device. Answer the ones you know or ask your own.
Ask a new question about this device
Download the instructions for your Vacuum Cleaner in PDF format for free! Find your manual IVR-L 100/24-2 Tc Set - Kärcher and take your electronic device back in hand. On this page are published all the documents necessary for the use of your device. IVR-L 100/24-2 Tc Set by Kärcher.
USER MANUAL IVR-L 100/24-2 Tc Set Kärcher
The Ground Truth image displays a single, solid horizontal line. According to Rule 2 (UNDERSCORE & LINE RULES), this is a stylistic or background line, not a placeholder underscore. Therefore, the OCR result must ignore it and output nothing or only meaningful text. The provided OCR content is "\_\_\_\_", which consists of four underscores. This is an incorrect interpretation of the line as a placeholder, violating the rule that stylistic lines must be ignored. The OCR has hallucinated underscores where none should exist based on the GT's visual context. Hence, the OCR result is inconsistent with the Ground Truth.
IVR-L 100/24-2
IVR-L 100/24-2 Me
IVR-L 100/24-2 Tc
IVR-L 100/24-2 Tc Me
IVR-L 100/24-2 Tc Dp
IVR-L 100/24-2 Tc Me Dp
IVR-L 120/24-2 Tc
IVR-L 120/24-2 Tc Me
IVR-L 120/24-2 Tc Me Dp
Deutsch 6
English 13
Français 20
Italiano 27
Nederlands 34
Español 41
Português 48
Dansk 55
Norsk 62
Svenska 68
Suomi 74
Ελληνικά 81
Türkçe 88
Русский 95
Magyar 103
Čeština 110
Slovenščina 116
Polski 123
Românește 130
Slovenčina 137
Hrvatski 144
Srpski 150
Български 157
Eesti 165
Latviešu 171
Lietuviškai 178
Українська 185

natural_image
Illustration of an open book with a black arrow indicating rotation (no text or symbols)A
natural_image
3D rendered mechanical component with pipe and valve assembly, no visible text or symbols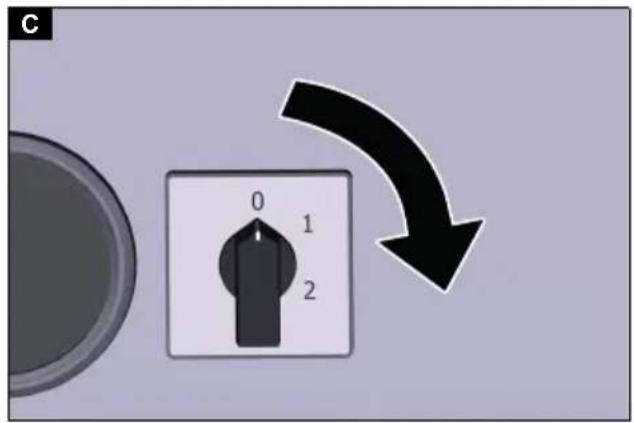
natural_image
3D rendering of a metallic cylindrical tank with attached pipes and control panel (no visible text or symbols)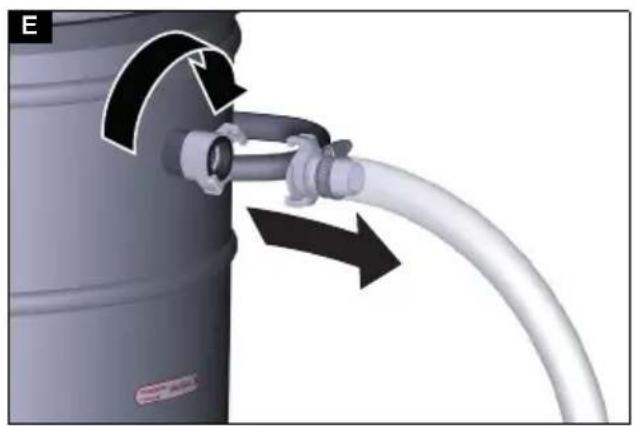
natural_image
Diagram of a gas pump connected to a container with two black arrows indicating flow direction (no text or symbols)
natural_image
Diagram showing a medical or laboratory setup with a syringe connected to a cylindrical container, and a curved tube inserted into it (no text or symbols present)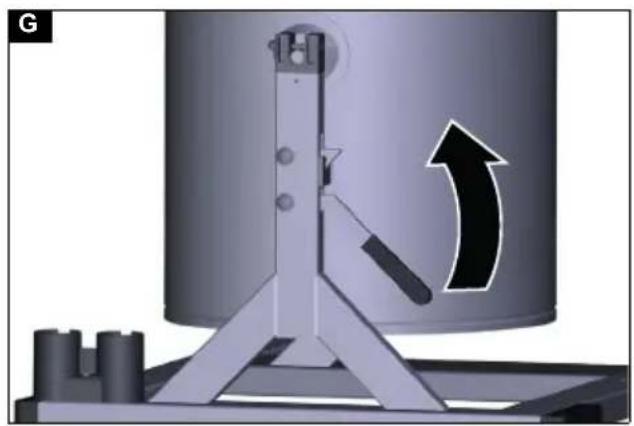
natural_image
Mechanical assembly diagram showing a cylindrical component with a lever and directional arrow (no text or symbols)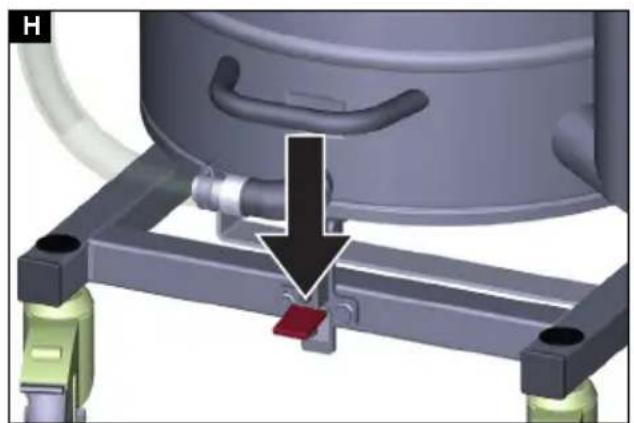
natural_image
Mechanical assembly diagram showing a valve mechanism with a red component and black arrow indicating motion (no text or symbols)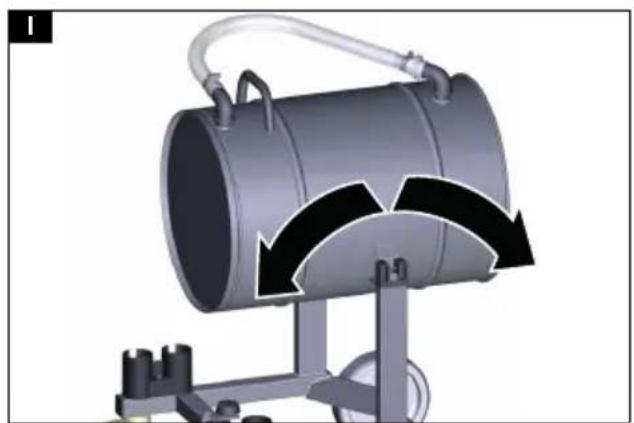
natural_image
Mechanical diagram showing a cylindrical device with internal components and directional arrows indicating motion (no text or symbols)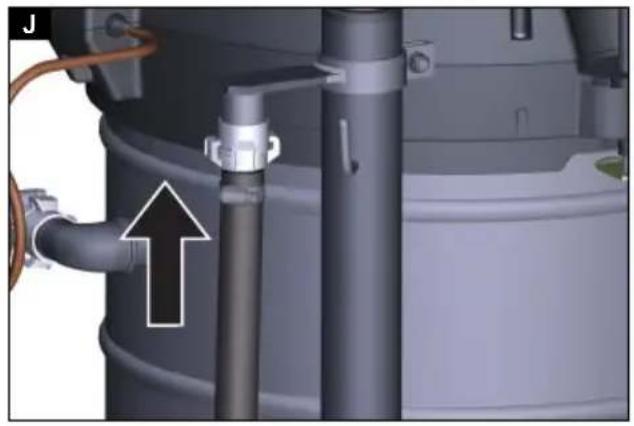
natural_image
Close-up of a mechanical assembly with pipes and a valve, no visible text or symbols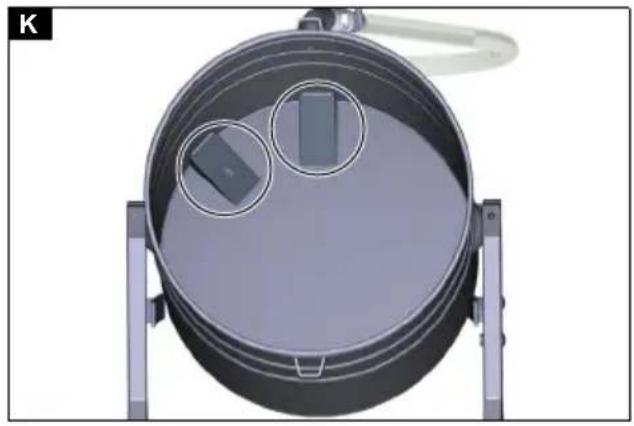
natural_image
Top-down view of a circular mechanical component with two circular cutouts and a rectangular inset, mounted on a stand (no text or symbols visible)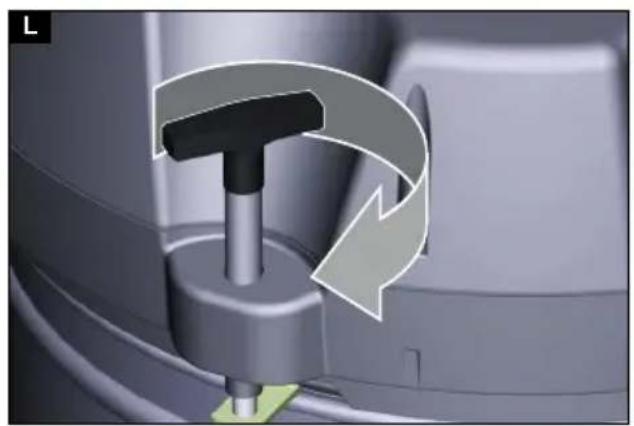
natural_image
Close-up of a mechanical component with a T-shaped knob and curved arrow indicating rotation (no text or symbols)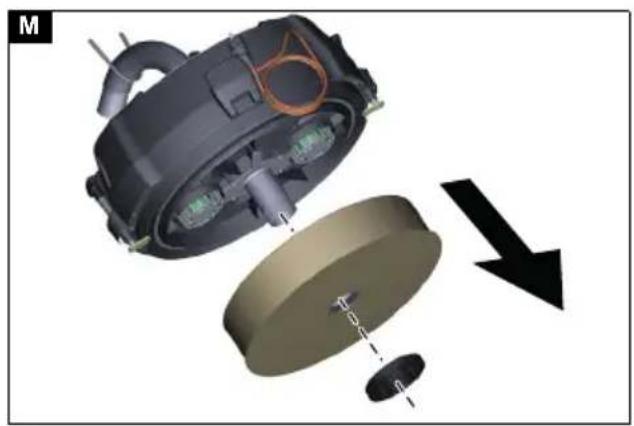
natural_image
3D mechanical assembly diagram showing internal components and a downward arrow indicating motion (no text or symbols)Inhalt
Hinweis
73550 Waldstetten (Germany)
Tel.: +49 7171 94888-0
Fax: +49 7171 94888-528
Waldstetten, 2021/11/01
Contents
General notes 13
Intended use 13
Environmental protection 13
Accessories and spare parts.... 13
Scope of delivery 13
Safety devices.... 14
Device description.... 15
Start-up 15
Operation 15
Finishing operation.... 17
Transport.... 17
Storage 17
Care and service.... 17
Troubleshooting guide...... 17
Warranty.... 18
Technical data 18
Declaration of Conformity 19
General notes
Read these original operating instructions and the enclosed safety instructions before using the device for the first time. Proceed accordingly.
Keep both books for future reference or for future owners.
Intended use
⚠ WARNING
Inhalation of dusts posing a health hazard
Health hazard
Never use the appliance to vacuum up dusts which pose a health hazard.
ATTENTION
Short-circuit due to high levels of humidity
Damage to the device
Only use the device indoors.
The device is intended for:
- the vacuuming of liquids containing oil, cooling lubricants and chippings.
- the vacuuming of flammable liquids (flash point above 55 °C).
- the vacuuming of non-explosive substances.
• the vacuuming of dusts and coarse dirt. - industrial use.
The device is not intended for:
• the vacuuming of fine dust.
- the vacuuming of flammable liquids (flammable, easily flammable, highly flammable according to Dangerous Substances Directive 67/548/EEC) (flash point below 55 °C) and mixtures of flammable dusts and liquids.
- The vacuuming of concentrated acids, ketones, ethers, esters, PAGs, aromatic and chlorinated hydrocarbons.
Any other use constitutes improper use.
Environmental protection

The packing materials can be recycled. Please dispose of packaging in accordance with the environmental regulation.

Electrical and electronic appliances contain valuable, recyclable materials and often components such as batteries, rechargeable batteries or oil, which - if handled or disposed of incorrectly - can pose a potential threat to human health and the environment. However, these components are required for the correct operation of the appliance. Appliances marked by this symbol are not allowed to be disposed of together with the household rubbish.
Notes on the content materials (REACH)
Current information on content materials can be found at: www.kaercher.com/REACH
Accessories and spare parts
Only use original accessories and original spare parts. They ensure that the appliance will run fault-free and safely.
Information on accessories and spare parts can be found at www.kaercher.com.
Scope of delivery
Check the contents for completeness when unpacking. If any accessories are missing or in the event of any shipping damage, please notify your dealer.
Safety devices
Hazard levels
⚠️DANGER
- Indication of an imminent threat of danger that will lead to severe injuries or even death.
⚠ WARNING
- Indication of a potentially dangerous situation that may lead to severe injuries or even death.
△CAUTION
- Indication of a potentially dangerous situation that may lead to minor injuries.
ATTENTION
- Indication of a potentially dangerous situation that may lead to damage to property.
Safety instructions
⚠ WARNING
- The device is not suitable for vacuuming up dusts that are harmful to human health.
- Protect the device from rain. Do not store the device outdoors.
- Every time before use, check whether the equipotential bonding conductors (earthing conductors) are connected.
△CAUTION
- Switch off the device after each use and remove the mains plug.
ATTENTION
• Only use the device indoors.
- Risk of crushing! Wear gloves when removing or installing the suction head, filter inlay or collection container.
- Risk of damage! Never vacuum without a filter or with a damaged filter.
- Wear safety shoes when operating the device.
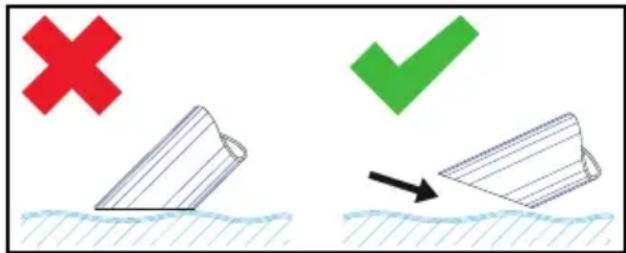
- Only move the device at walking speed, and to move down a decline, have two workers steady the device as necessary.
- Be careful to ensure that there is no dust spillage when replacing accessories.
Device with tilting chassis (Tc)
ATTENTION
Risk of injury
Risk of crushing due to the liquid container tipping
Allow the lock to latch after tipping.
Behaviour in the event of an emergency
⚠️DANGER
Risk of injury and material damage when vacuuming inflammable materials, or in the case of a short-circuit or other electrical faults
Danger of inhalation of gases hazardous to health, danger of electric shock, danger of burns.
In the event of an emergency, switch off the device and unplug the mains plug.
Electrical connection
The device may only be connected to an electrical connection which has been set up by a qualified electrician as per IEC 60364. For the connection values see Technical data and type plate. Use of an extension cable is prohibited.
⚠️DANGER
Danger of electric shock
Danger of death
Avoid damaging the power cables by driving over them or otherwise crushing them, or by jerking them.
Protect the cables from heat, oil and sharp edges.
Check the mains connection of the device for damage every time before operation.
Do not operate the device using a damaged cable. Have any damaged cables replaced by a qualified electrician.
Symbols on the device
Marking the maximum permissible fluid level
See chapter Checking the filling level display.

ATTENTION
Risk of damage to the device
Leaking water due to the maximum fluid level being exceeded.
Drain the device before the maximum fluid level is reached.
Device description
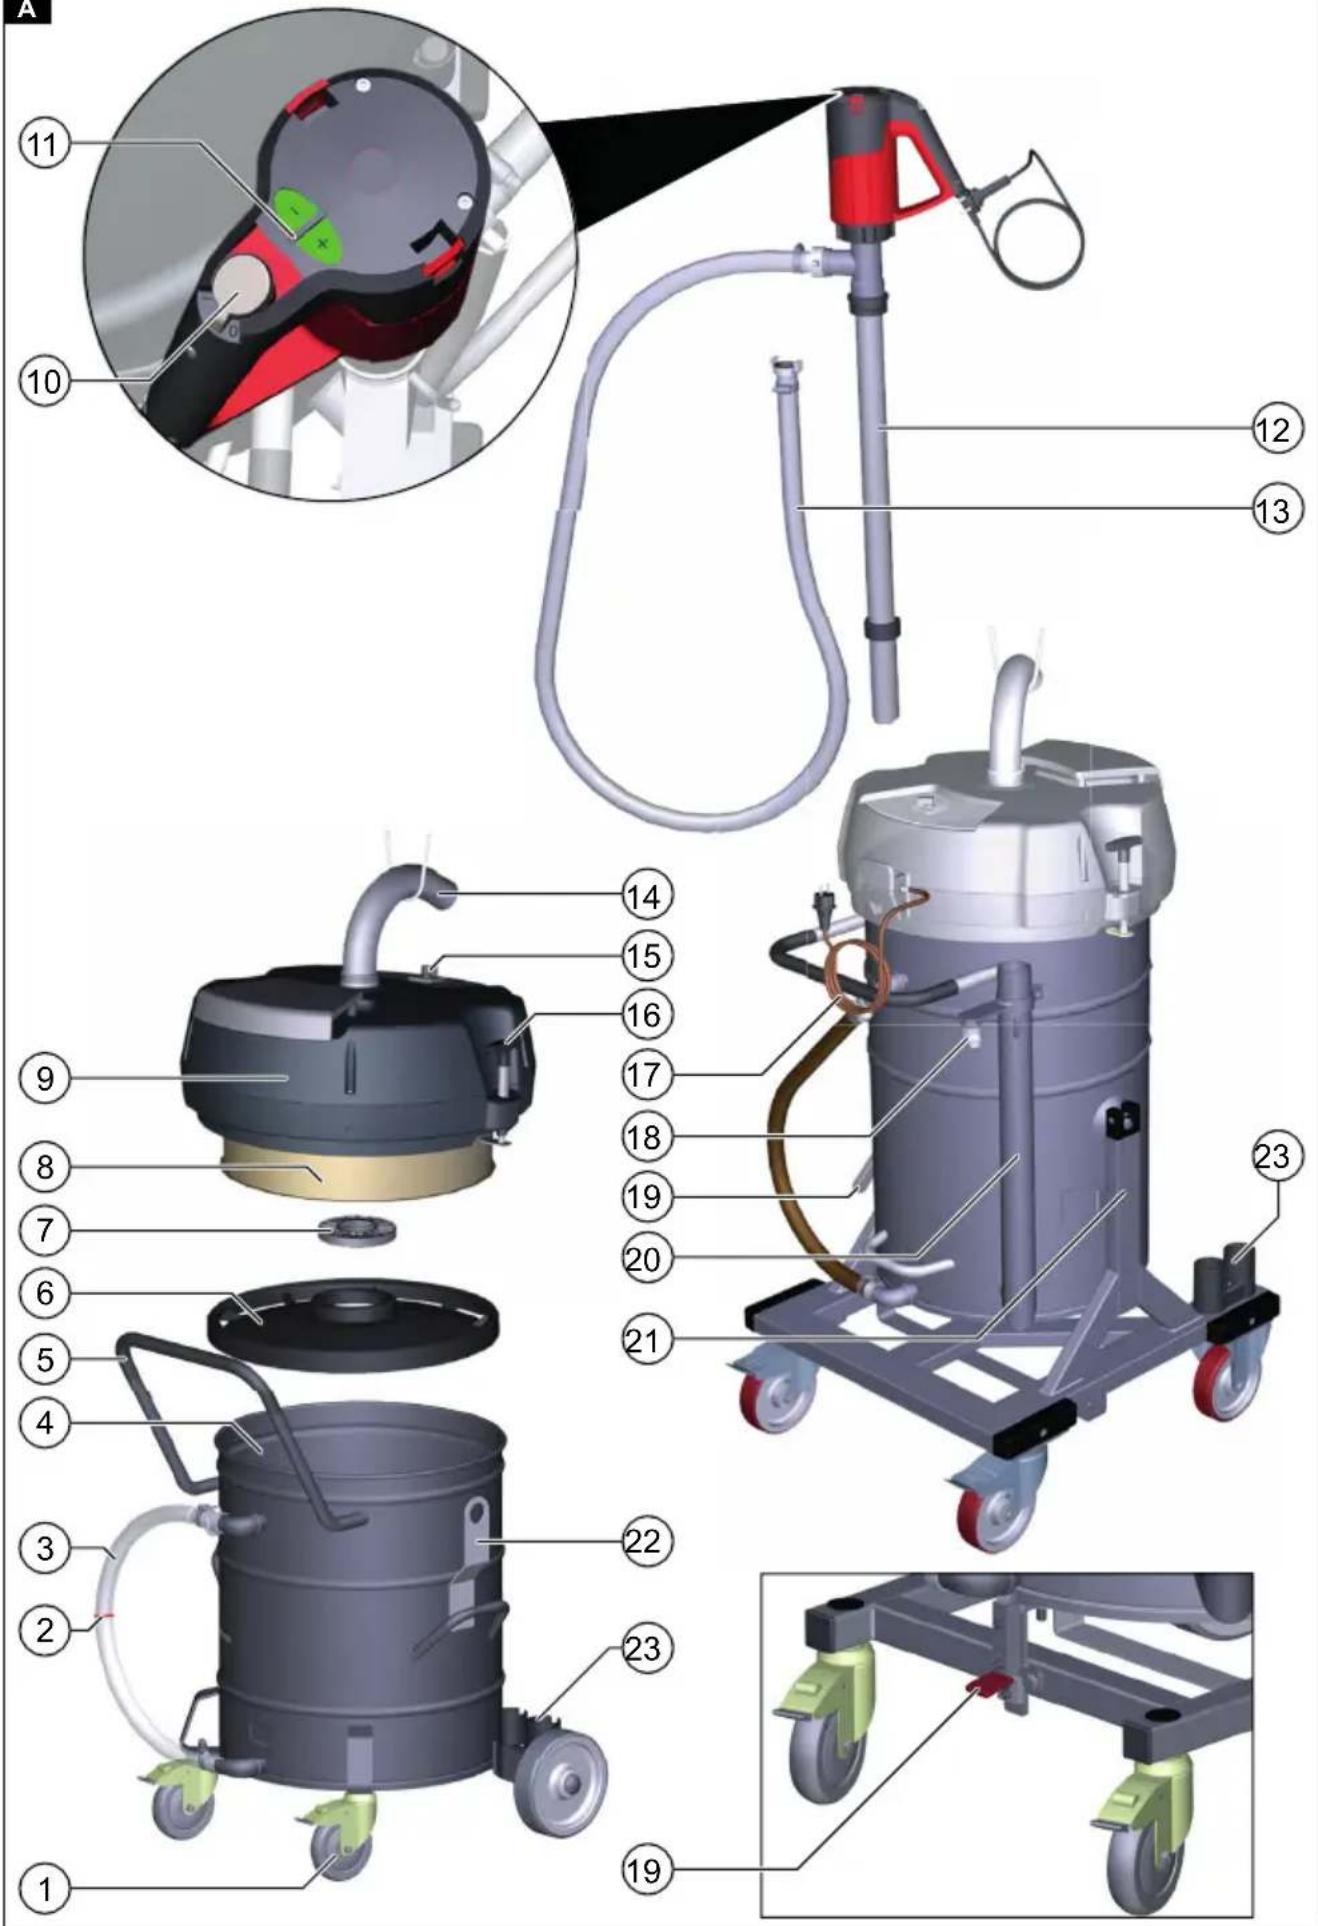
See graphics page for illustrations Illustration A
① Steering rollers with parking brake
② Maximum filling level mark
③Drain hose
④Liquid container
⑤Push handle
⑥Deflector plate
⑦ Screw plug
⑧Filter
⑨ Suction head
⑩Drum pump on/off switch
⑪ Drum pump flow rate adjustment (+/-button)
⑫Drum pump
⑬Drum pump disposal hose
⑭Suction hose connection
⑮Power switch
⑯Suction head lock
⑰Mains cable
⑱ Disposal hose holder
⑲ Unlocking lever
⑳Stand pipe for drum pump
②1 Tilting chassis
⑳Liquid container crane grommet
②3 Accessory holder
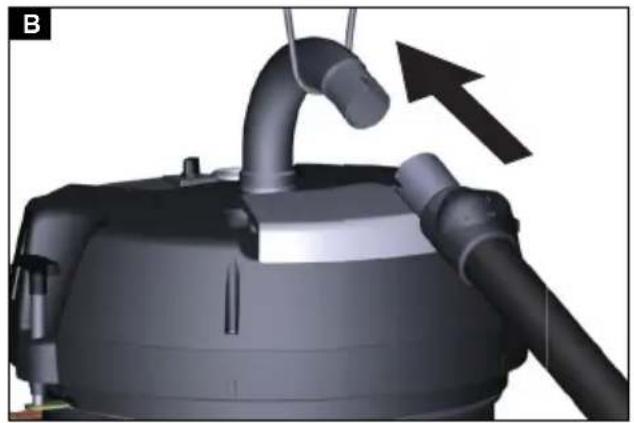
Start-up
See graphics page for illustrations
- Bring the device into the working position.
- If necessary, secure the device using the parking brake.
- Ensure that the suction head is fitted correctly.
- Insert the suction hose into the suction hose connection.
- Plug the desired accessory onto the suction hose.
Illustration B
Operation
See graphics page for illustrations
- Plug the mains plug into the socket.
- Switch on the device using the power switch.
Illustration C
The switch has multiple level settings: 0The device is off.
1Motor 1 is switched on.
2Motors 1 and 2 are switched on.
- Start vacuuming.
Suction process
Note
Only immerse the accessory halfway when vacuuming liquids to encourage sufficient air.
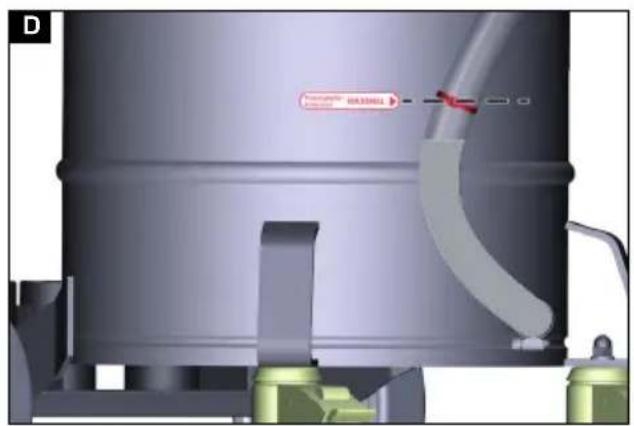
Checking the filling level display
See graphics pages for illustration Illustration D
Note
The red marking on the drain hose shows the maximum permissible filling level.
ATTENTION
Risk of damage to the device
The liquid container will overflow within a few seconds of filling.
Constantly check the filling level in the liquid container when filling large quantities of liquid.
Emptying the liquid container
See graphics page for illustration
-
Switch the device off and disconnect it from the power supply.
-
Move the device to the waste water tank.
-
Empty the liquid container:
a Connect the drain hose to the upper hose coupling.
Illustration E
b Hold the drain hose over a suitable collecting container and drain the contents.
- Dispose of or reuse the contents in accordance with statutory regulations.
Emptying the liquid container by tilting
See graphics page for illustrations
-
Switch the device off and disconnect it from the power supply.
-
Move the device to the waste water tank.
-
Take the drum pump out of the stand pipe.
Illustration F
-
Remove the suction head (see chapter Removing the suction head).
-
Remove all accessory parts.
-
Prepare the liquid container for emptying:
- Using the tilting device Tc (Device with tilting device Tc)
a Open the lock of the liquid container.
IVR-L 120/24-2
Illustration G
IVR-L 100/24-2
Illustration H
- using the crane grommet (Device without tilting device Tc)
a Lift the device onto the crane grommet (see chapter Device description) using suitable lifting gear.
⚠️DANGER
Failure to observe the weight
Risk of injury from falling device
Observe the applicable accident prevention guidelines and safety instructions.
Every time before lifting, check to ensure correct functioning of the lifting device.
Only lift the device via the provided crane grommet.
Ensure that there will be no unintentional unhooking of the lifted load.
The crane may exclusively be operated by qualified staff.
No people may be located within the hazard zone of the crane.
Do not leave the device hanging unattended on the crane.
-
Tip the container with the push handle. Illustration I
-
Dispose of or reuse the contents in accordance with statutory regulations.
- Fit and lock the suction head.
Emptying the liquid container using the drum pump
See graphics page for illustration
Note
Secure the disposal hose in the holder when not in use.
Illustration J
- Only when emptying after vacuuming operations:
a Switch the device off and disconnect it from the power supply.
b Move the device to the waste water tank.
- Connect the disposal hose to the waste water tank.
- Plug in the mains plug of the drum pump.
- Switch the drum pump on at the on/off switch.
Note
Avoid dry running the drum pump.
Do not leave the drum pump unattended.
- Adjust the flow rate with the +/- button.
Note
Only when emptying during vacuuming operations:
Select the flow rate according to the vacuumed amount.
6. Dispose of or reuse the contents in accordance with statutory regulations.
Cleaning the liquid container
See graphics page for illustrations
Note
Bacterial contamination may occur through the use of water-based cooling lubricants.
Wear suitable protective clothing when removing deposits.
- Empty the container.
- Remove deposits in the container.
-
Dispose of the deposits in accordance with the applicable regulations.
-
Remove chippings and deposits from the support plates.
Illustration K
Removing the suction head
See graphics page for illustrations
- Switch off the device and disconnect from the power supply.
- Open the lock for the suction head. Illustration L
- Remove the suction head and put to one side.
Finishing operation
- Switch off the device using the on/off switch
- Empty and clean the liquid container.
- Remove the accessories and clean and dry them as necessary.
Note
Empty the vacuum cleaner after every use. Allow the vacuum cleaner to dry with the container open.
Transport
△CAUTION
Failure to observe the weight
Risk of injury and damage Be aware of the weight of the device during transport and storage.
- When transporting in vehicles, secure the device against slipping and tipping over according to the applicable guidelines.
Storage
△CAUTION
Failure to observe the weight
Risk of injury and damage Be aware of the weight of the device during transport and storage.
- Store the device indoors only.
Care and service
- Rinse off the device and accessories at regular intervals using a suitable liquid and allow to dry.
- To prevent contamination, do not leave fluids in the device.
- For longer breaks in operation, open the cover to allow the residual moisture to evaporate.
- Replace the filter if damaged.
Replacing the filter
See graphics page for illustrations Illustration M
- Unscrew the screw plug.
- Remove and replace the filter.
- Insert the new filter.
Ensure that the filter is inserted correctly during installation. - Screw in and tighten the screw plug.
Troubleshooting guide
⚠️DANGER
Risk of injury
Danger of the device unintentionally starting and danger of electric shock Switch off the device and unplug the mains plug before performing any work on the device.
Have all checks and work on electrical parts performed by an qualified technician.
The motor (suction turbine) does not start up
No electrical voltage present
- Check the socket and the power supply fuse.
- Check the mains cable and the mains plug of the device.
The suction power decreases
Nozzle, suction hose or suction pipe clogged.
- Check the nozzle, the suction hose and the suction pipe and clean if necessary.
The filter is dirty.
- Clean the filter.
Emptying the liquid container takes a long time
The drain hose is kinked or blocked.
- Check and, if necessary, clean the drain hose.
The drum pump does not pump
The liquid container is empty.
- Only use the drum pump when the liquid container is filled.
No electrical voltage is present.
- Check the power socket and the power supply fuse.
- Check the mains cable and the mains plug of the device.
The flow rate is set incorrectly.
- Adjust the flow rate with the +/- button. The support plate is blocked.
- Clean the support plate.
Customer Service department
If the malfunction cannot be corrected, the device must be checked by the Customer Service department.
Warranty
The warranty conditions issued by our relevant sales company apply in all countries.
We shall remedy possible malfunctions on your appliance within the warranty period free of cost, provided that a material or manufacturing defect is the cause. In a warranty case, please contact your dealer (with the purchase receipt) or the next authorised customer service site.
(See overleaf for the address)
Technical data
| IVR-L 100/24-2 | IVR-L 100/24-2 Tc | IVR-L 120/24-2 Tc | |||
| Electrical connection | |||||
| Mains voltage V 220-240 220-240 220-240 | |||||
| P | h | a | s | e | ~ |
| Power frequency Hz 50-60 50-60 50-60 | |||||
| Degree of protection IPX4 IPX4 IPX4 | |||||
| Protection class | I | I | I | ||
| Nominal power | W | 2400 | 2400 | 2400 | |
| Power protection (slow-blowing) | A | 16 | 16 | 16 | |
| Dimensions and weights | |||||
| Typical operating weight standard (Me) | kg | 44 | 47 | 66 | |
| Typical operating weight Dp (Me) | kg | 57 | 76 | ||
| Length x width x height | mm | 825 x 660 x 1210 | 840 x 660 x 1320 | 810 x 720 x 1595 | |
| Ambient conditions | |||||
| Ambient temperature | °C | +40 | +40 | +40 | |
| Device performance data | |||||
| Tank content | l | 100 | 100 | 120 | |
| Air quantity | l/s | 2 x 74 | 2 x 74 | 2 x 74 | |
| Vacuum | kPa (mbar) | 23 (230) | 23 (230) | 23 (230) | |
| Nominal width of the suction hose | DN50 DN50 DN50 | ||||
| Determined values in acc. with EN 60335-2-69 | |||||
| Hand-arm vibration value | m/s^2 | < 2.5 | < 2.5 | < 2.5 | |
| Uncertainty K | m/s^2 | 0.2 | 0.2 | 0.2 | |
| Sound pressure level L_pA | dB(A) | 68 | 68 | 68 | |
| Uncertainty K_pA | d | B | ( | A | |
| IVR-L 100/24-2 | IVR-L 100/24-2 Tc | IVR-L 120/24-2 Tc | |
| Mains cable | |||
| Mains cable H07BQ-F mm ^2 | 3 x 1.5 | 3 x 1.5 | 3 x 1.5 |
| Part number (EU) 9.988-393.0 | 9.988-393.0 | 9.988-393.0 | |
| Cable length m 10 10 10 | |||
Subject to technical modifications.
Declaration of Conformity
EU Declaration of Conformity
We hereby declare that the machine described below complies with the relevant basic safety and health requirements in the EU Directives, both in its basic design and construction as well as in the version placed in circulation by us. This declaration is invalidated by any changes made to the machine that are not approved by us.
Product: Dry vacuum cleaner
Product: Wet/dry vacuum cleaner
Type: 9.987-xxx
Type: 9.989-xxx
Currently applicable EU Directives
2006/42/EC (+2009/127/EC)
2014/30/EU
2011/65/EU
Harmonised standards used
EN 55014-2: 2015
EN 55014-1: 2017 + A11: 2020
EN 60335-1
EN 60335-2-69
EN IEC 61000-3-2: 2019
EN 61000-3-3: 2013 + A1: 2019
EN 61000-3-11: 2000
EN 62233: 2008
EN IEC 63000: 2018
The signatories act on behalf of and with the authority of the company management.

Managing partner
M.Pfister
Kärcher Industrial Vacuuming GmbH
73550 Waldstetten (Germany)
Ph.: +49 7171 94888-0
Fax: +49 7171 94888-528
Waldstetten, 2021/11/01
Declaration of Conformity (UK)
We hereby declare that the product described below complies with the relevant provisions of the following UK Regulations, both in its basic design and construction as well as in the version put into circulation by us. This declaration shall cease to be valid if the product is modified without our prior approval.
Product: Dry vacuum cleaner
Product: Wet/dry vacuum cleaner
Type: 9.987-xxx
Type: 9.989-xxx
Currently applicable UK Regulations
S.I. 2008/1597 (as amended)
S.I. 2016/1091 (as amended)
S.I. 2012/3032 (as amended)
Designated standards used
EN 55014-2: 2015
EN 55014-1: 2017 + A11: 2020
EN 60335-1
EN 60335-2-69
EN IEC 61000-3-2: 2019
EN 61000-3-3: 2013 + A1: 2019
EN 61000-3-11: 2000
EN 62233: 2008
EN IEC 63000: 2018
The signatories act on behalf of and with the authority of the company management.

Managing partner
M.Pfister
Kärcher Industrial Vacuuming GmbH
73550 Waldstetten (Germany)
Ph.: +49 7171 94888-0
Fax: +49 7171 94888-528
Waldstetten, 2021/11/01
Contenu
Remarque
2006/42/CE (+2009/127/CE)
2014/30/UE
2011/65/EU
73550 Waldstetten (Germany)
Tél. : +49 7171 94888-0
Nota
73550 Waldstetten (Germany)
Tel.: +49 7171 94888-0
Fax: +49 7171 94888-528
Waldstetten, 01/11/2021
Inhoud
Instructie
73550 Waldstetten (Germany)
Tel.: +49 7171 94888-0
Fax: +49 7171 94888-528
Waldstetten, 2021/11/01
Nota
2006/42/CE (+2009/127/CE)
2014/30/UE
2011/65/UE
Aviso
2006/42/CE (+2009/127/CE)
2014/30/UE
2011/65/UE
Obs
2006/42/EF (+2009/127/EF)
2014/30/EU
2011/65/EU
73550 Waldstetten (Germany)
Tlf.: +49 7171 94888-0
Fax: +49 7171 94888-528
Waldstetten, 2021/11/01
Indhold
Generelle merknader 62
Forskriftsmessig bruk.... 62
Miljøvern 62
Merknad
Transportmengden er feil innstilt.
- Still inn fraktmengden med +/- tasten. Holdeplaten er tett.
2006/42/EF (+2009/127/EF)
2014/30/EU
2011/65/EU
Anvendte harmoniserte standarder
EN 55014-2: 2015
EN 55014-1: 2017 + A11: 2020
EN 60335-1
EN 60335-2-69
EN IEC 61000-3-2: 2019
EN 61000-3-3: 2013 + A1: 2019
EN 61000-3-11: 2000
EN 62233: 2008
EN IEC 63000: 2018
73550 Waldstetten (Germany)
Tlf.: +49 7171 94888-0
Faks: +49 7171 94888-528
Waldstetten, 2021/11/01
Innehåll
Allmän information 68
Hänvisning
73550 Waldstetten (Germany)
Tfn: +49 7171 94888-0
Fax: +49 7171 94888528
Huomautus
73550 Waldstetten (Germany)
Υπόδειξη
73550 Waldstetten (Germany)
Tηλ.: +49 7171 94888-0
Φαξ: +49 7171 94888-528
Waldstetten, 2021/11/01
İçindekiler
Not
73550 Waldstetten (Germany)
Tel.: +49 7171 94888-0
Faks: +49 7171 94888-528
Waldstetten, 2021/11/01
Содержание
Общие указания 95
Примечание
Megjegyzés
Upozornění
2006/42/ES (+2009/127/ES)
2014/30/EU
2011/65/EU
Napotek
2006/42/ES (+2009/127/ES)
2014/30/EU
2011/65/EU
Wskazówka
2006/42/WE (+2009/127/WE)
2014/30/UE
2011/65/UE
Indicatie
Directive UE relevante
2006/42/UE (+2009/127/UE)
2014/30/UE
2011/65/UE
Norme armonizate aplicate
EN 55014-2: 2015
EN 55014-1: 2017 + A11: 2020
EN 60335-1
EN 60335-2-69
EN IEC 61000-3-2: 2019
EN 61000-3-3: 2013 + A1: 2019
EN 61000-3-11: 2000
EN 62233: 2008
EN IEC 63000: 2018
Upozornenie
2006/42/ES (+2009/127/ES)
2014/30/EÚ
2011/65/EÚ
73550 Waldstetten (Germany)
Tel.: +49 7171 94888-0
Fax: +49 7171 94888-528
Napomena
Prilikom usisavanje tekućina uronite opremu samo do pola kako bi osigurali i dovoljnu količinu zraka.
2006/42/EZ (+2009/127/EZ)
2014/30/EU
2011/65/EU
Primijenjene uskladene norme
EN 55014-2: 2015
EN 55014-1: 2017 + A11: 2020
EN 60335-1
EN 60335-2-69
EN IEC 61000-3-2: 2019
EN 61000-3-3: 2013 + A1: 2019
EN 61000-3-11: 2000
EN 62233: 2008
EN IEC 63000: 2018
73550 Waldstetten (Germany)
Tel.: +49 7171 94888-0
Telefaks: +49 7171 94888-528
Napomena
Prilikom usisavanja tečnosti uronite pribor samo do pola da bi se unela i dovoljna količina vazduha.
Provera prikaza nivoa punjenja
Slika, pogledajte strane sa grafikonima Slika D
Napomena
Crvena oznaka na crevu za ispuštanje prikazuje maksimalni dozvoljeni nivo napunjenosti.
PAŽNJA
Opasnost od oštećenja uređaja
Prelivanje rezervoara za tečnost usled punjenja u roku od svega nekoliko sekundi. Proveravajte stalno nivo napunjenosti rezervoara za tečnost prilikom prihvata velike količine tečnosti.
Pražnjenje rezervoara za tečnost
Slika, pogledajte strane sa grafikonima
- Isključite uređaj i prekinite strujno napajanje.
- Pokrenite uređaj za uređaj za pražnjenje tečnosti.
- Pražnjenje rezervoara za tečnost:
a Odvojite crevo za ispuštanje na gornjoj spojnici creva.
b Držite crevo za ispuštanje iznad odgovarajuće sabirne posude i ispustite sadržaj. - Sadržaj odložite na otpad u skladu sa zakonskim odredbama.
Slika E
2006/42/EZ (+2009/127/EZ)
2014/30/EU
2011/65/EU
Primenjene harmonizovane norme
EN 55014-2: 2015
EN 55014-1: 2017 + A11: 2020
EN 60335-1
EN 60335-2-69
EN IEC 61000-3-2: 2019
EN 61000-3-3: 2013 + A1: 2019
EN 61000-3-11: 2000
EN 62233: 2008
EN IEC 63000: 2018
Potpisnici deluju u ime i sa punomoćju uprave kompanije.

Vodeći saradnik
M.Pfister
Kärcher Industrijsko usisavanje GmbH
Указание
Märkus
2006/42/EÜ (+2009/127/EÜ)
2014/30/EL
2011/65/EL
73550 Waldstetten (Germany)
Tel: +49 7171 94888-0
Faks: +49 7171 94888-528
Waldstetten, 2021/11/01
Saturs
Norādījum
Pastaba
Вказівка
natural_image
Icon showing a gear and wrench inside a square frame (no text or symbols)http://www.kaercher.com/dealersearch