
GLM 10025 C Professional - Laser pointer BOSCH - Free user manual and instructions
Find the device manual for free GLM 10025 C Professional BOSCH in PDF.
| Product type | Digital laser rangefinder |
| Brand | Bosch |
| Model | GLM 100-25 C Professional |
| Category | Laser pointer / Rangefinder |
| Maximum range | 100 m (favorable conditions) |
| Range in unfavorable conditions | 60 m |
| Measurement accuracy | ±1.5 mm (favorable conditions) |
| Accuracy in unfavorable conditions | ±3.0 mm |
| Smallest display unit | 0.5 mm |
| Laser class | 2 (650 nm, < 1 mW) |
| Power supply | 3 AA batteries (LR6) 1.5 V |
| Battery life | Approx. 5,000 measurements (estimated) |
| Automatic laser shut-off | 20 s |
| Automatic device shut-off | 5 min |
| Connectivity | Bluetooth Low Energy 4.2 |
| Bluetooth frequency | 2,402–2,480 MHz |
| Bluetooth transmission power | 8 mW |
| Measurement functions | Distance, area, volume, indirect measurement, inclination, spacing tracking, continuous measurement |
| Selectable reference planes | Rear edge, front edge, tip of stop plate, center of tripod thread |
| Display | Color display with target view (reticle) |
| Integrated camera | Yes (target view for long distances) |
| Tripod thread | 1/4" |
| Operating temperature | -10 °C to +45 °C |
| Storage temperature | -20 °C to +70 °C |
| Weight | Approx. 200 g |
| Dimensions (approx.) | 120 x 50 x 28 mm |
| Included accessories | Wrist strap, protective pouch, batteries |
| Care and cleaning | Clean with a soft, damp cloth; do not use solvents |
| Safety instructions | Do not point the beam at eyes; laser class 2; always turn off after use |
| Repairability | Repair only by an authorized Bosch repair center; spare parts available |
Frequently Asked Questions - GLM 10025 C Professional BOSCH
User questions about GLM 10025 C Professional BOSCH
0 question about this device. Answer the ones you know or ask your own.
Ask a new question about this device
Download the instructions for your Laser pointer in PDF format for free! Find your manual GLM 10025 C Professional - BOSCH and take your electronic device back in hand. On this page are published all the documents necessary for the use of your device. GLM 10025 C Professional by BOSCH.
USER MANUAL GLM 10025 C Professional BOSCH
natural_image
Illustration of two identical mobile phone devices with control knobs and buttons (no text or symbols visible)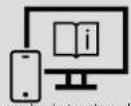
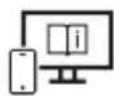
en Visit the online operating instruction for additional product information.
1 609 92A 7PV | (30.05.2022) Bosch Power Tools
1 609 92A 7PV | (30.05.2022) Bosch Power Tools
6
flowchart
graph TD
    A["Circle"] --> B["Func"]
    A --> C["c"]
    B --> D["Arrow Left"]
    C --> E["Arrow Right"]
    D --> F["Arrow Up"]
    E --> F
    F --> G["Arrow Down"]
    G --> H["Arrow Up"]
    H --> I["Arrow Down"]
    I --> J["Arrow Up"]
    J --> K["Arrow Down"]
    K --> L["Arrow Up"]
    L --> M["Arrow Down"]
    M --> N["Arrow Up"]
    N --> O["Arrow Down"]
    O --> P["Arrow Up"]
    P --> Q["Arrow Down"]
    Q --> R["Arrow Up"]
    R --> S["Arrow Down"]
    S --> T["Arrow Up"]
    T --> U["Arrow Down"]
    U --> V["Arrow Up"]
    V --> W["Arrow Down"]
    W --> X["Arrow Up"]
    X --> Y["Arrow Down"]
    Y --> Z["Arrow Up"]
Deutsch
Sicherheitshinweise

flowchart
graph TD
    A["Step 1: Circular Component with Internal Components"] --> B["Step 2: Hand Holding Bowl"]
    B --> C["Step 3: Object with Arrow to Top Right"]
    C --> D["Step 4: Arrow to Top Left"]
    D --> E["Step 5: Arrow to Top Right"]
www.bosch-pt.com/serviceaddresses
Transport
All instructions must be read and observed in order for the measuring tool to function safely. The safeguards integrated into the measuring tool may be compromised if the measuring tool is not used in accordance with these instructions. Never make warning signs on the measuring tool unrecognisable. SAVE THESE INSTRUCTIONS FOR FUTURE REFERENCE AND INCLUDE THEM WITH THE MEASURING TOOL WHEN TRANSFERRING IT TO A THIRD PARTY.
▶ Warning! If operating or adjustment devices other than those specified here are used or other procedures are carried out, this can lead to dangerous exposure to radiation.
The measuring tool is delivered with a laser warning sign (marked in the illustration of the measuring tool on the graphics page).
If the text of the laser warning label is not in your national language, stick the provided warning label in your national language over it before operating for the first time.
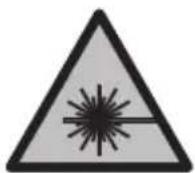
Do not direct the laser beam at persons or animals and do not stare into the direct or reflected laser beam yourself. You could blind somebody, cause accidents or damage your eyes.
▶ If laser radiation hits your eye, you must close your eyes and immediately turn your head away from the beam.
▶ Do not make any modifications to the laser equipment.
▶ Do not use the laser goggles (accessory) as protective goggles. The laser goggles make the laser beam easier to see; they do not protect you against laser radiation.
▶ Do not use the laser goggles (accessory) as sunglasses or while driving. The laser goggles do not provide full UV protection and impair your ability to see colours.
▶ Have the measuring tool serviced only by a qualified specialist using only original replacement parts. This will ensure that the safety of the measuring tool is maintained.
▶ Do not let children use the laser measuring tool unsupervised. They could unintentionally blind themselves or other persons.
▶ Do not use the measuring tool in explosive atmospheres which contain flammable liquids, gases or dust. Sparks may be produced inside the measuring tool, which can ignite dust or fumes.
If used incorrectly or if the battery is damaged, flammable liquid may be ejected from the battery. Contact with this liquid should be avoided. If contact accidentally occurs, rinse off with water. If the liquid comes into contact with your eyes, seek additional medical attention. Liquid ejected from the battery may cause irritation or burns.
▶ Only charge the batteries using chargers recommended by the manufacturer. A charger that is suitable for one type of battery may pose a fire risk when used with a different battery.

Protect the measuring tool against heat, e.g. including prolonged sun exposure, fire, water, and moisture.
Danger of explosion.
The measuring tool is equipped with a wireless interface. Local operating restrictions, e.g. in aeroplanes or hospitals, must be observed.
26 | English
The Bluetooth ^® word mark and logos are registered trademarks owned by Bluetooth SIG, Inc. and any use of such marks by Robert Bosch Power Tools GmbH is under license.
▶ Caution! When using the measuring tool with Bluetooth ^® , a fault may occur in other devices and systems, aeroplanes and medical devices (e.g. pacemakers, hearing aids). Also, damage to people and animals in the immediate vicinity cannot be completely excluded. Do not use the measuring tool with Bluetooth ^® in the vicinity of medical devices, petrol stations, chemical plants, areas with a potentially explosive atmosphere and in blasting areas. Do not use the measuring tool with Bluetooth ^® on aeroplanes. Avoid using the product near your body for extended periods.
▶ Do not operate the measuring tool with the USB cable connected.
▶ Do not use the measuring tool as external USB storage.
▶ Do not use the measuring tool to photograph any people or animals, as this can involve the laser beam being continuously switched on. You could blind somebody or cause accidents or eye damage with the laser beam switched on.
▶ Do not use the measuring tool if the display glass is visibly damaged (e.g. cracks in the surface, etc.). This poses a risk of injury.
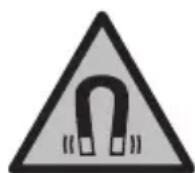
Keep the measuring tool and the magnetic accessories away from implants and other medical devices, e.g. pacemakers or insulin pumps. The magnets inside the measuring tool and accessories generate a field that can impair the function of implants and medical devices.
▶ Keep the measuring tool and the magnetic accessories away from magnetic data storage media and magnetically sensitive devices. The effect of the magnets inside the measuring tool and accessories can lead to irreversible data loss.
Safety instructions for power supply
This power supply is not intended for use by children or persons with physical, sensory or mental limitations or a lack of experience or knowledge. This power supply can be used by children aged 8 or older and by persons who have physical, sensory or mental limitations or a lack of experience or knowledge if a person responsible for their safety supervises them or has instructed them in the safe operation of the power supply and they understand the associated dangers. Otherwise, there is a risk of operating errors and injuries.

Do not expose the power supply to rain or wet conditions. Water entering the
power supply will increase the risk of electric shock.
▶ Keep the power supply clean. Dirt poses a risk of electric shock.
▶ Always check the power supply before use. Stop using the power supply if you discover any damage. Do not open the power supply yourself, and have it repaired only by a qualified specialist using only original replacement parts. Damaged power supplies increase the risk of electric shock.
Product Description and Specifications
Please unfold the fold-out page with the diagram of the measuring tool and leave it open while reading the instruction manual.
Intended Use
The measuring tool is intended for measuring distances, lengths, heights, clearances and inclines, and for calculating areas and volumes.
The measuring tool is suitable for indoor and outdoor use.
The measuring results can be transferred to other devices via Bluetooth®.
Product Features
The numbering of the product features refers to the representation of the measuring tool in the images.
| (1) | Display |
| (2) | ▲ Measuring button |
| (3) | ■ Right soft button |
| (4) | ▶ Plus button |
| (5) | ○ Zoom button |
| (6) | Carrying strap mount |
| (7) | Stop pin release button |
| (8) | Stop pin |
| (9) | ○ On/off button |
| (10) | ○ Target display button (GLM 100-25 C) |
28 | English
(11) Camera button (GLM 150-27 C)
(12) Minus button
(13) Left soft button
(14) Func Function button
(15) Laser warning label
(16) Serial number
(17) Battery compartment cover (GLM 100-25 C)
(18) USB port (GLM 150-27 C)
(19) 1/4" tripod thread
(20) Reception lens
(21) Laser beam output
(22) Camera
(23) Carrying strap ^A)
(24) Protective bag
(25) Screw cap (GLM 100-25 C)
(26) Non-rechargeable batteries (GLM 100-25 C)
(27) USB cable (GLM 150-27 C)
A) Accessories shown or described are not included with the product as standard. You can find the complete selection of accessories in our accessories range.
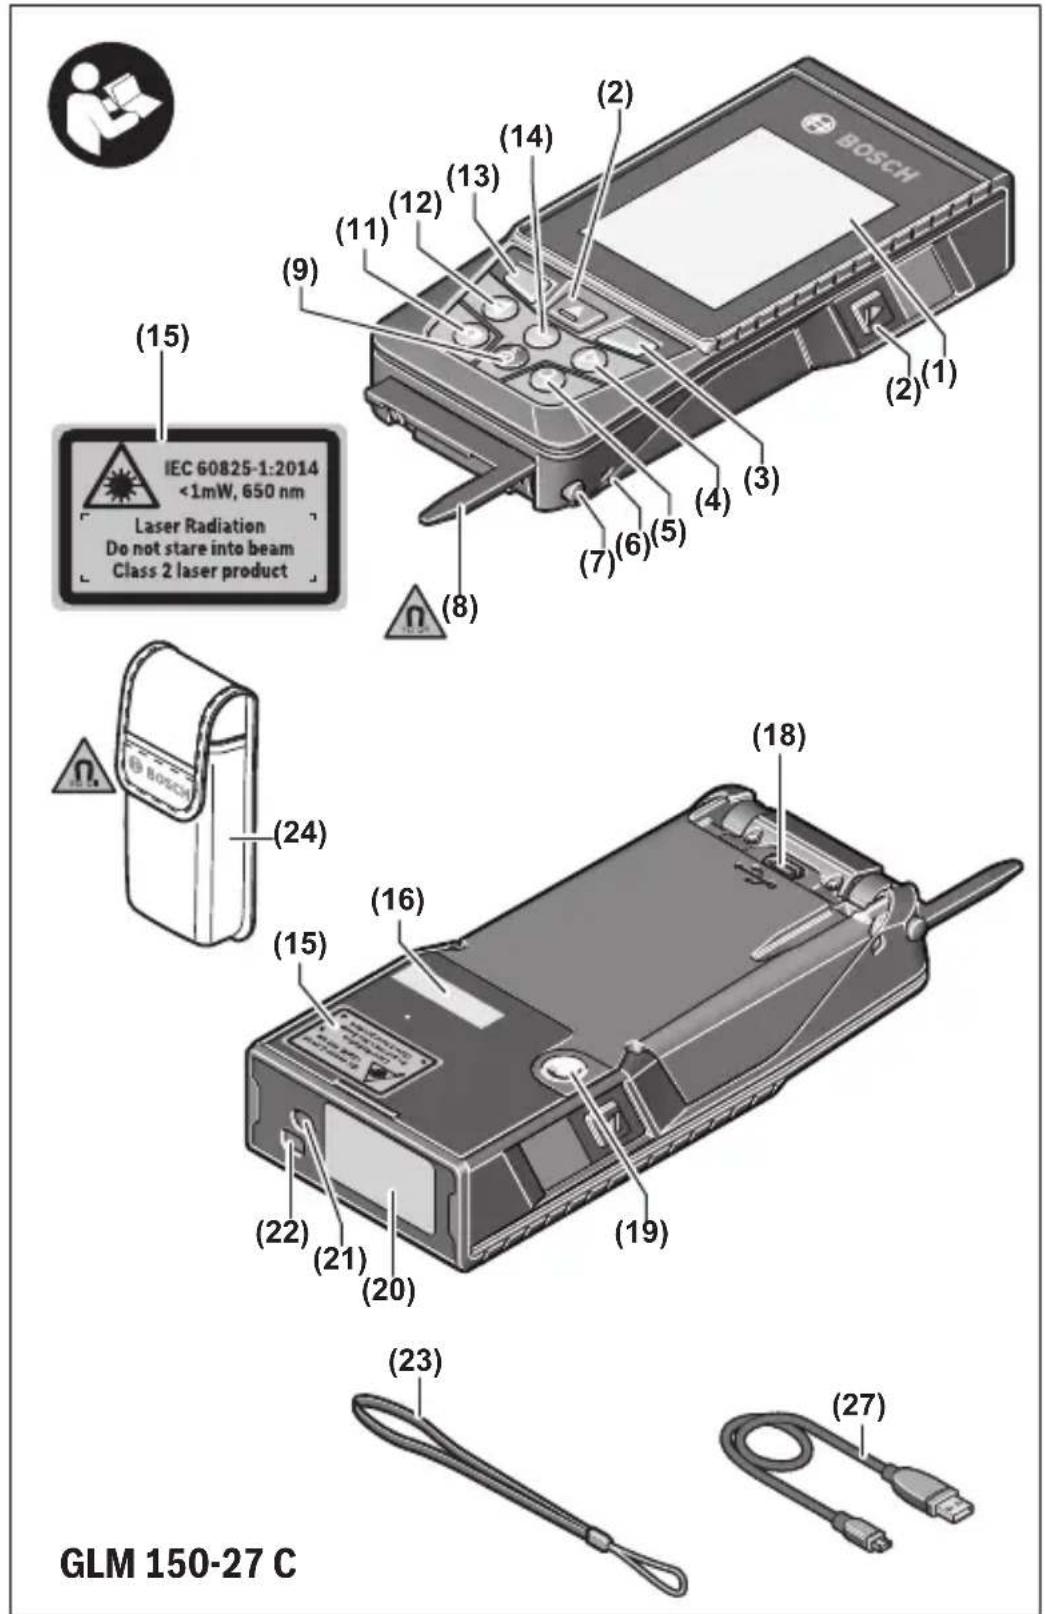
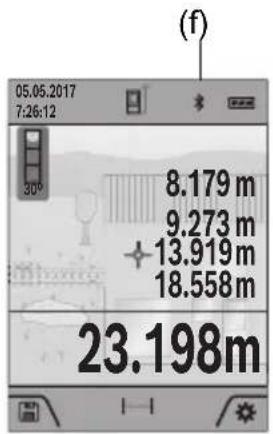
Display elements
(a) Result line
(b) Target display (crosshairs)
(c) Slope angle display
(d) Date/time
(e) Reference level of measurement
(f) Bluetooth ^® status
Bluetooth ^® not activated
* Bluetooth ^ activated, connection established
(g) Battery charge indicator
(h) Measured value lines
(i) Basic settings
(j) Measuring function display
(k) Internal Memory
(I) Back
(m) Integrated help function
(n) Start screen
(o) Further basic settings menu
(p) Basic settings menu
(q) Measuring functions menu
Technical data
| Digital laser measure GLM 100-25 C GLM 150-27 C | ||
| Article number | 3 601 K72 Y.. | 3 601 K72 Z.. |
| Measuring rangeA) | 0.08–100 m | 0.08–150 m |
| Measuring range (unfavourable conditions)B) | 0.08–60 m | 0.08–60 m |
| Measuring accuracyA) | ±1.5 mm | ±1.5 mm |
| Measuring accuracy (unfavourable conditions)B) | ±3.0 mm | ±3.0 mm |
| Smallest display unit 0.5 mm 0.5 mm | ||
| General | ||
| Operating temperatureC) | -10 °C to +45 °C | -10 °C to +45 °C |
| Permitted charging temperature range | +5 °C to +40 °C | |
| Storage temperature -20 °C to +70 °C | -20 °C to +70 °C | |
| Relative air humidity max. 90 % 90 % | ||
| Max. altitude 2000 m 2000 m | ||
| Pollution degree according to IEC 61010-1 | 2D) | 2D) |
| Laser class 2 2 | ||
Bosch Power Tools 1 609 92A 7PV | (30.05.2022)
30 | English
Digital laser measure GLM 100-25 C GLM 150-27 C
| Laser type 650 nm, < 1 mW 650 nm, < 1 mW | ||
| Divergence of the laser beam < 1.5 mrad (full angle) < 1.5 mrad (full angle) | ||
| Automatic switch-off after approx. | ||
| – Laser 20 s 20 s | ||
| – Measuring tool (without measurement) | 5 min 5 min | |
| Non-rechargeable batteries 3 × 1.5 V LR6 (AA) | ||
| Rechargeable battery Li-ion | ||
| Rated voltage | 3.6 V --- | |
| Capacity 3120 mAh | ||
| Number of battery cells 1 | ||
| Recommended Micro USB cable | 2 609 120 670 | |
| Power supply | ||
| Charging time ^E) | approx. 5.5 h | |
| Output voltage | 5.0 V --- | |
| Output current 1000 mA | ||
| Recommended power supply ^F) | 2 609 120 713 (EU) | |
| 2 609 120 718 (UK) | ||
| 1 600 A01 3A0 (ARG) | ||
| 1 600 A01 3A1 (MEX) | ||
| 1 600 A01 3A2 (BRL) | ||
| Data transmission | ||
| Bluetooth® Bluetooth® 4.2 | Low Energy ^G) | Bluetooth® 4.2Low Energy ^G) |
| Operating frequency range | 2402-2480 MHz | 2402-2480 MHz |
Digital laser measure GLM 100-25 C GLM 150-27 C
Max. transmission power 8 mW 8 mW
A) When measuring from the front edge of the measuring tool, this applies for high reflectivity of the target (e.g. a wall painted white), weak background lighting and a 25 °C operating temperature; a distance-dependent deviation of ±0.05 mm/m must additionally be factored in.
B) When measuring from the front edge of the measuring tool, this applies for high reflectivity of the target (e.g. a wall painted white), strong background lighting, 25 °C operating temperature and large altitudes. In addition, a deviation of ±0.15 mm/m must be taken into account, depending on the distance.
C) In continuous measurement mode, the max. operating temperature is +40 °C.
D) Only non-conductive deposits occur, whereby occasional temporary conductivity caused by condensation is expected.
E) At an operating temperature of 25^ C. Charging time with 1 A USB charger. Faster charging with the measuring tool switched off.
F) For additional technical data, visit: https://www.bosch-professional.com/ecodesign
G) When using Bluetooth® Low Energy devices, it may not be possible to establish a connection depending on the model and operating system. Bluetooth® tools must support the GATT profile.
The serial number (16) on the type plate is used to clearly identify your measuring tool.
Inserting/Changing the Battery
GLM 100-25 C
Always replace all the batteries/rechargeable batteries at the same time. Only use batteries/rechargeable batteries from the same manufacturer and which have the same capacity.
When inserting the batteries, ensure that the polarity is correct according to the illustration on the inside of the battery compartment.
▶ Take the batteries out of the measuring tool when you are not using it for a prolonged period of time. The batteries can corrode and self-discharge during prolonged storage.
Li-ion rechargeable battery
GLM 150-27 C
Charging the Li-ion Battery
For recharging, use a USB power supply unit whose technical data (voltage and charging current) corresponds to that of the recommended power supply unit. Observe the
32 | English
operating manual of the USB power supply unit.
Recommended power supply unit: See technical data.
▶ Pay attention to the mains voltage. The voltage of the power source must match the voltage specified on the rating plate of the power adaptor. Power adaptors marked with 230 V can also be operated with 220 V.
i Lithium-ion rechargeable batteries are supplied partially charged according to international transport regulations. To ensure full rechargeable battery capacity, fully charge the rechargeable battery before using your tool for the first time.
For more information, you can access the online operating instructions at www.bosch-pt.com/manuals
Operation
Start-Up
▶ Never leave the measuring tool unattended when switched on, and ensure the measuring tool is switched off after use. Others may be dazzled by the laser beam.
▶ Protect the measuring tool from moisture and direct sunlight.
▶ Do not expose the measuring tool to any extreme temperatures or variations in temperature. For example, do not leave it in a car for extended periods of time. In case of large variations in temperature, allow the measuring tool to adjust to the ambient temperature before putting it into operation. The precision of the measuring tool may be compromised if exposed to extreme temperatures or variations in temperature.
▶ Avoid substantial knocks to the measuring tool and avoid dropping it. After strong external influences on the measuring tool, you should always carry out an accuracy check (see "Accuracy Check", page 38) before further work.
Switching On and Off
» Press the button to switch the measuring tool and the laser on.
You can also switch on the measuring tool without the laser by pressing the button.
» Press and hold the button to switch off the measuring tool.
The measured values and device settings in the memory are retained.
Camera
Press the 📄 button to switch the camera on or off.
1 609 92A 7PV | (30.05.2022) Bosch Power Tools
The selected setting remains saved after you switch off the measuring tool.
For larger distances (approx. > 5 m), a target marking is additionally shown for marking the measuring point.
For more information, you can access the online operating instructions at www.bosch-pt.com/manuals
Measuring Process
Once switched on, the measuring tool is in the length measurement function.
Once the measuring tool has been switched on, the rear edge of the measuring tool is selected as the reference level for measurement. You can change the reference level. (see "Selecting the Reference Level", page 34)
» Apply the measuring tool to the point at which you want to start the measurement (e.g. wall).
» Press the Button to start the measurement.
Once the measurement process is complete, the laser beam will switch off. For a further measurement, repeat this process.
Measured values or end results can be added or subtracted.
With a switched-on permanent laser beam and in the continuous measurement function, the measurement begins immediately after the first press of the button.
The switched-on permanent laser beam is not switched off after the measurement Permanent Laser Beam.

For more information, you can access the online operating instructions at www.bosch-pt.com/manuals
The measuring tool must not be moved during a measurement. Therefore, place the measuring tool, as far as this is possible, against or on a firm stop or supporting surface.
The reception lens (20), the laser beam output (21) and the camera (22) must not be covered during the measuring process.
34 | English
Selecting the Reference Level
For the measurement, you can select from various reference levels:
The rear edge of the measuring tool (e.g. when placing against walls)
The tip of the stop plate folded by 180° (e.g. for measurements from corners)
The front edge of the measuring tool (e.g. when measuring from a table edge)

The centre of the tripod thread (19) (e.g. for tripod measurements)
For more information, you can access the online operating instructions at www.bosch-pt.com/manuals
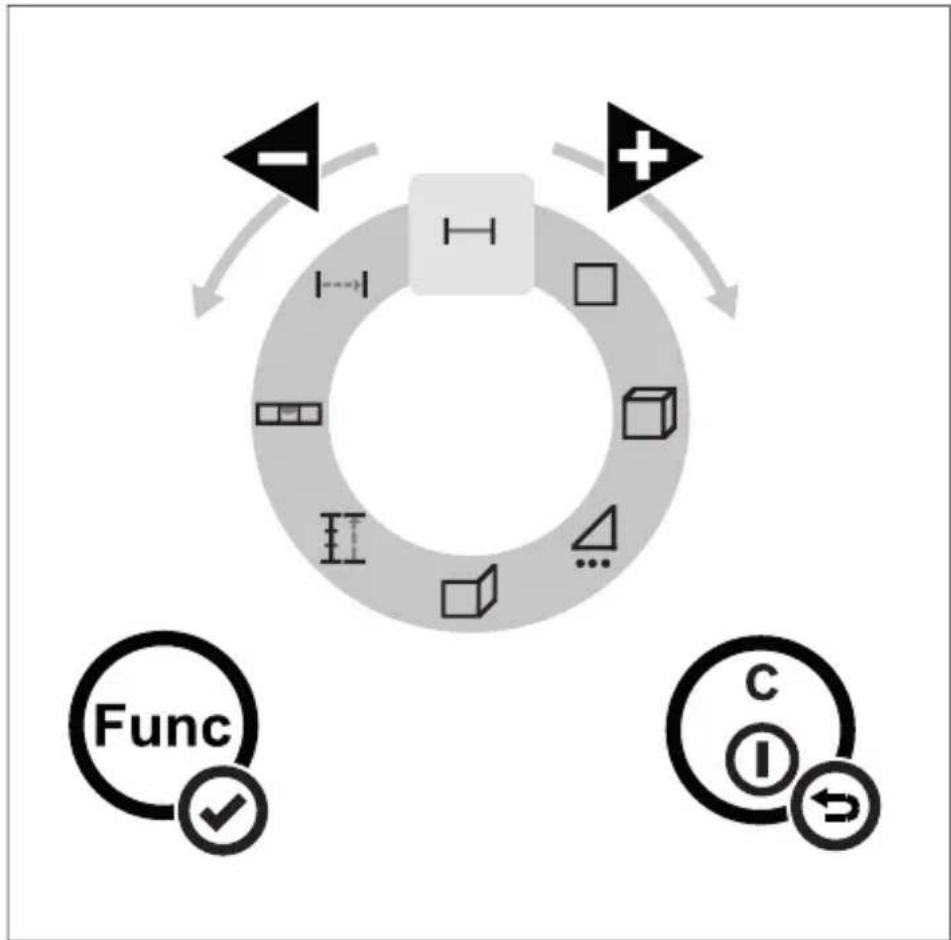
Basic Settings Menu
In the Basic settings menu, you can find the following basic settings:
- Switching on and off Bluetooth®
- Changing the reference level (see "Selecting the Reference Level", page 34)
- Timer
- Switching on and off permanent laser beam
- Grade measurement calibration (see "Accuracy Check", page 38)
- Target display calibration
- Deleting Memory (GLM 150-27 C)
- Setting the language
- Setting Date & Time
- Changing the unit of measurement
- Changing the Unit of Measurement of an Angle
- Activating PRO360
-
Calling up Device Information
-
Switching audio signals on and off
- Adjusting the Cut-Off Time
- Adjusting the Dimming Time
- Setting display brightness
- Switching automatic screen rotation on and off
» Briefly press the button or press and hold the button to open the Basic set-
tings menu.
» Use the button or button to select the required setting.
» To confirm a selection, press the button.
» To exit the Basic settings menu, press the button or the button
For more information, you can access the online operating instructions at www.bosch-pt.com/manuals
Measuring functions
Selecting/Changing Measuring Function
You will find the following functions in the Functions menu:
- Length measurement
- Area measurement
- Volume measurement
-
Indirect distance measurement
-
Indirect height measurement
- Double indirect height measurement
- Indirect length measurement
-
Trapezoid measurement
-
Wall area measurement
- Stake-out function
- Grade measurement/digital spirit level
- Continuous measurement
36 | English
» Press the button to open the Functions menu.
» Use button for button to select the required measuring function.
» To confirm the selection, press the button or the button.
For more information, you can access the online operating instructions at www.bosch-pt.com/manuals
Integrated help function ?

flowchart
graph TD
    A["①: Circular Object"] --> B["②: Hand Icon"]
    B --> C["③: 3D Modeling Process"]
    C --> D["④: 3D Modeling Setup"]
    D --> E["?"]
    E --> F["?"]
    F --> G["?"]
    G --> H["?"]
    H --> I["?"]
The help function integrated in the measuring tool offers detailed animations for individual measuring functions/measuring processes.
» Open the Functions menu.
» Select the required function with the button or with the button and press the button.
The animation shows the detailed procedure for the selected measuring function.
» Press the button to stop the anima-
» Press the button or the button to display the next or the previous step.
Bluetooth® interface
Activating the Bluetooth® interface for transmitting data to a mobile device
√ Ensure that the Bluetooth® interface is activated on your mobile device.
» Briefly press the button or press and hold the butunc ton to open the Basic settings menu.
Select
» Press the button or the button to select.
» To confirm the selection, press the button. The Bluetooth® symbol is shown on the display in white (f).
Deactivating the Bluetooth® interface
» Briefly press the button or press and hold the button to open the Basic settings menu.
Select .*
» Press the button or the button to select.
» To confirm the selection, press the button. The Bluetooth® symbol is shown on the display in grey.
USB port
GLM 150-27 C: Data Transfer via USB Port
Data can be transferred from the measuring tool to certain devices with a USB port (e.g. computer, notebook) via its micro USB connection.
Connect the measuring tool to your computer or notebook using the micro USB cable. The operating system on your computer or notebook will automatically recognise the measuring tool as a drive.
As soon as the measuring tool is connected to a computer or Notebook via the Micro USB cable, the lithium-ion rechargeable battery is charged. Charging time varies depending on the charging current.
Bosch Power Tools 1 609 92A 7PV | (30.05.2022)
38 | English
Accuracy Check
Regularly check the accuracy of the grade measurement and distance measurement.

For more information, you can access the online operating instructions at www.bosch-pt.com/manuals
Error Message

The measuring tool monitors correct operation in every measurement. If a defect is detected, the display will indicate only the symbol shown opposite and the measuring tool switches itself off. In this case, have the measuring tool checked by an after-sales service agent for Bosch power tools.
Maintenance and Service
Maintenance and Cleaning
Only store and transport the measuring tool in the protective bag provided.
Keep the measuring tool clean at all times.
Never immerse the measuring tool in water or other liquids.
Wipe off any dirt using a damp, soft cloth. Do not use any detergents or solvents.
Particularly clean the reception lens (20), the laser outlet aperture (21) and the camera (22) very carefully. Ensure that no dirt is on the reception lens, the laser outlet aperture and the camera. Clean the reception lens, the laser outlet aperture and the camera only with means that are also suitable for lenses of photographic equipment. Do not try to remove dirt from or wipe the reception lens, the laser outlet aperture or the camera with sharp objects (danger of scratching).
If the measuring tool needs to be repaired, send it off in the protective bag (24).
After-Sales Service and Application Service
Our after-sales service responds to your questions concerning maintenance and repair of your product as well as spare parts. You can find explosion drawings and information on spare parts at: www.bosch-pt.com
The Bosch product use advice team will be happy to help you with any questions about our products and their accessories.
In all correspondence and spare parts orders, please always include the 10-digit article number given on the nameplate of the product.
Great Britain
Robert Bosch Ltd. (B.S.C.)
P.O. Box 98
Broadwater Park
North Orbital Road
Denham Uxbridge
UB 9 5HJ
At www.bosch-pt.co.uk you can order spare parts or arrange the collection of a product in need of servicing or repair.
Tel. Service: (0344) 7360109
E-Mail: boschservicecentre@bosch.com
You can find further service addresses at:
www.bosch-pt.com/serviceaddresses
Transport
The contained lithium-ion batteries are subject to the Dangerous Goods Legislation requirements. The batteries are suitable for road-transport by the user without further restrictions.
When shipping by third parties (e.g.: by air transport or forwarding agency), special requirements on packaging and labelling must be observed. For preparation of the item being shipped, consulting an expert for hazardous material is required.
Disposal

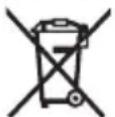
Measuring tools, chargers, batteries, accessories and packaging should be recycled in an environmentally correct manner.

Do not dispose of measuring tools, chargers or batteries with household waste.
Only for EU countries:
According to the Directive 2012/19/EU on waste electrical and electronic equipment and its transposition into national law, measuring tools and chargers that are no longer usable, and, according to the Directive 2006/66/EC, defective or drained batteries must be collected separately and disposed of in an environmentally correct manner.
If disposed incorrectly, waste electrical and electronic equipment may have harmful effects on the environment and human health, due to the potential presence of hazardous substances.
40 | Français
Only for United Kingdom:
According to Waste Electrical and Electronic Equipment Regulations 2013 (2013/3113) and the Waste Batteries and Accumulators Regulations 2009 (2009/890), measuring tools that are no longer usable must be collected separately and disposed of in an environmentally friendly manner.
Battery packs/batteries:
Li-ion:
Please observe the notes in the section on transport (see "Transport", page 39).
▶ Integrated batteries may only be removed for disposal by qualified personnel.
Opening the housing shell can destroy the measuring tool.
Before you can remove the battery from the measuring tool, you will need to use the measuring tool until the battery is completely discharged. Unscrew the screws on the housing and remove the housing shell in order to remove the battery. To prevent a short circuit, disconnect the connectors on the battery one at a time and then isolate the poles. Even when fully discharged, the battery still contains a residual capacity, which can be released in case of a short circuit.
Français
(27) Câble USB (GLM 150-27 C)
Robert Bosch (France) S.A.S.
www.bosch-pt.com/serviceaddresses
Transport
(27) Cable USB (GLM 150-27 C)
www.bosch-pt.com/serviceaddresses
Transporte
www.bosch-pt.com/serviceaddresses
90 | Português
Transporte
www.bosch-pt.com/serviceaddresses
Trasporto
www.bosch-pt.com/serviceaddresses
Vervoer
Bosch Service Center
Telegrafvej 3
2750 Ballerup
På www.bosch-pt.dk kan der online bestilles reservedele eller oprettes en reparations ordre.
Tlf. Service Center: 44898855
Fax: 44898755
E-Mail: vaerktoej@dk.bosch.com
www.bosch-pt.com/serviceaddresses
Transport
flowchart
graph TD
    A["Step 1: Circular Device with Box, Square, Circle, Triangle, etc."] --> B["Step 2: Hand Gesture"]
    B --> C["Step 3: Object manipulation with 3D object"]
    C --> D["Step 4: 3D object manipulation with 3D box, square, triangle, and circle components"]
Bosch Service Center
Telegrafvej 3
2750 Ballerup
Danmark
Tel.: (08) 7501820 (inom Sverige)
Fax: (011) 187691
www.bosch-pt.com/serviceaddresses
Transport
(18) USB-plugg (GLM 150-27 C)
www.bosch-pt.com/serviceaddresses
Transport
flowchart
graph TD
    A["Step 1: Circular Device with labeled boxes and directional arrows"] --> B["Step 2: Hand gesture"]
    B --> C["Step 3: Object manipulation with 3D box and horizontal line"]
    C --> D["Step 4: Object manipulation with horizontal line and checkmark"]
www.bosch-pt.com/serviceaddresses
Kuljetus
www.bosch-pt.com/serviceaddresses
Μεταφορά
www.bosch-pt.com/serviceaddresses
Nakliye
Robert Bosch Sp. z o.o.
www.bosch-pt.com/serviceaddresses
Transport
Bosch Service Center PT
K Vápence 1621/16
692 01 Mikulov
www.bosch-pt.com/serviceaddresses
Přeprava
www.bosch-pt.com/serviceaddresses
Transport
www.bosch-pt.com/serviceaddresses
Szállítás
www.bosch-pt.com/serviceaddresses
Транспортировка
www.bosch-pt.com/serviceaddresses
Транспортування
www.bosch-pt.com/serviceaddresses
Тасымалдау
உஷாஜஷஷஷஷஷஷஷஷஷஷஷஷஷஷஷஷஷஷஷஷஷஷஷஷஷஷஷஷஷஷஷஷஷஷஷஷஷஷஷஷஷஷஷஷஷஷஷஷஷஷா
JU3M7G8B05
JU3MNSOSOHSADOS
(19)(d_2g_2m_2n_2m_2n_2, )
- 623560 1086570U h6m3s/3d4m6m3s
www.bosch-pt.com/serviceaddresses
అనునిక్రణమారినంగున
3md3m0j0d0 d0d3s0m0 m00n0d0u omb65 s3y0d7m0s0m0d0g 3m0m0g0s u6b0z0m 03n0m0d0u goc6o0z0u dm0m3b0d0.s3y0d7m0s0m0u d5y0m0u 0f6s6l3m0m0m0d0s d2y0d0m m3n0s dm3bds0g0m1 s3y0m0s6j6n0 m0d5y0d0n 6m6d0d0u us0n6m0d0u g6m0g0.
Service scule electrice
Strada Horia Măcelariu Nr. 30–34, sector 1
013937 Bucureşti
www.bosch-pt.com/serviceaddresses
Transport
Service scule electrice
Strada Horia Măcelariu Nr. 30–34, sector 1
013937 Bucureşti, România
www.bosch-pt.com/bg/bg/
www.bosch-pt.com/serviceaddresses
Транспортиране
www.bosch-pt.com/serviceaddresses
Транспорт
www.bosch-pt.com/serviceaddresses
Transport
Akumulatorske baterije koje sadrže litijum jon podležu zahtevima prava o opasnim materijama. Akumulatorske baterije korisnik može transportovati na drumu bez drugih pakovanja.
Kod slanja preko trećih lica (na primer vazdušnih transportom ili špedicijom) mora se obratiti pažnja na posebne zahteve u pogledu pakovanja i označavanja. Tada se kod pripreme paketa za slanje mora pozvati stručnjak za opasne materije.
Uklanjanje dubreta

Merne alate, punjače, akumulatore, pribor i pakovanja treba odlagati u reciklažu koja ispunjava ekološke uslove.
Merne alate, punjače i akumulatore nemojte bacati u kućni otpad!
Samo za EU-zemlje:
Prema evropskoj direktivi 2012/19/EU o starim električnim i elektronskim uređajima i njenoj primeni u nacionalnom pravu, merni alati i punjači koji se više ne mogu koristiti, a prema evropskoj direktivi 2006/66/EC akumulatori/baterije koje su u kvaru ili istrošene moraju se odvojeno sakupljati i uključiti u reciklažu koja ispunjava ekološke uslove.
www.bosch-pt.com/serviceaddresses
Transport
www.bosch-pt.com/serviceaddresses
Transport
Litij-ionske aku-baterije podliježu zakonu o transportu opasnih tvari. Korisnik bez ikakvih preduvjeta može transportirati aku-baterije cestovnim transportom.
flowchart
graph TD
    A["Step 1: Object manipulation"] --> B["Step 2: Input shape"]
    B --> C["Step 3: Transform from rectangle to cube"]
    C --> D["Output: Shape with checkmark"]
www.bosch-pt.com/serviceaddresses
Transport
flowchart
graph TD
    A["①: Square with diagonal lines and internal shapes"] --> B["②: Hand gesture"]
    B --> C["③: 3D object manipulation diagram with arrows indicating direction"]
    C --> D["④: 3D object with horizontal arrows and checkmark at bottom"]
www.bosch-pt.com/serviceaddresses
Transportēšana
www.bosch-pt.com/serviceaddresses
Transportavimas
https://www.bosch-professional.com/ecodesign
flowchart
graph TD
    A["Step ①: Hand press"] --> B["Step ②: Touch key"]
    B --> C["Step ③: Click 3D object with question mark"]
    C --> D["Step ④: Click 3D object with question mark"]
    D --> E["Step ⑤: Click 3D object with question mark"]
    E --> F["End"]
Robert Bosch Morocco SARL
www.bosch-pt.com/serviceaddresses
النقل
www.bosch-pt.com/serviceaddresses
جمل دستگاه
Declaration of Conformity
Hereby, Robert Bosch Limited as authorised representative acting on behalf of Robert Bosch Power Tools GmbH declares that the radio equipment type GLM 100-25 C/GLM 150-27 C is in compliance with the Radio Equipment Regulations 2017. The full text of the declaration of conformity is available at the following internet address:
-> https://gb-doc.bosch.com
