
WA400MP - Gardening accessory MAKITA - Free user manual and instructions
Find the device manual for free WA400MP MAKITA in PDF.

| Product Type | Gardening Accessory - Weeder |
| Brand | Makita |
| Model | WA400MP |
| Cutting Width | 220 mm |
| Dimensions (L × W × H) | 980 mm × 226 mm × 196 mm |
| Net Weight | 2.8 kg |
| Compatible Power Units | DUX60, DUX18, UX01G (cordless) |
| Power Source | Battery (via power unit) |
| Blade Type | Weeding blade |
| Adjustable Cutting Angle | Yes, 3 positions |
| Usage | Ground weeding, weeds < 15 cm |
| Required Protective Equipment | Helmet, goggles, earmuffs, gloves, non-slip boots |
| Safety Distance | At least 5 m from bystanders and animals |
| Cleaning | Dry or slightly damp cloth (soapy water) |
| Lubrication | Makita Grease N°2 (axle) and SG N°0 (gears) every 25 hours |
| Storage | With blade cover, out of reach of children, away from moisture |
| Warranty | See Makita conditions |
Frequently Asked Questions - WA400MP MAKITA
User questions about WA400MP MAKITA
0 question about this device. Answer the ones you know or ask your own.
Ask a new question about this device
Download the instructions for your Gardening accessory in PDF format for free! Find your manual WA400MP - MAKITA and take your electronic device back in hand. On this page are published all the documents necessary for the use of your device. WA400MP by MAKITA.
USER MANUAL WA400MP MAKITA
Due to our continuing program of research and development, the specifications herein are subject to change without notice.
- Specifications may differ from country to country.
Approved power unit
This attachment is approved to use only with the following power unit(s):
- DUX60 Cordless multi function power head
DUX18 Cordless multi function power head
UX01G Cordless multi function power head
WARNING: Never use the attachment with non-approved power unit. Non-approved combination may cause serious injury.
Symbols
The followings show the symbols which may be used for the equipment. Be sure that you understand their meaning before use.


Read and follow the instruction manual.

Wear protective helmet, eye and ear protection.

Wear protective gloves.

Wear sturdy boots with non-slip soles.

Warning; Disconnect battery before maintenance.

Keep your feet away from the weeding blade.
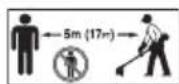
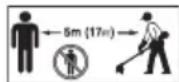
Keep bystanders and animals at least 5 m away from the power tool.

Hot surfaces - Burns to fingers or hands.

Guaranteed sound power level according to EU Outdoor Noise Directive.
Sound power level according to Australia NSW Noise Control Regulation.
Intended use
This attachment is designed for only the purpose of weeding grass on the ground in conjunction with an approved power unit. Never use the attachment for the other purpose. Abusing the attachment may cause serious injury.
EC Declaration of Conformity
For European countries only
We as the manufacturers: Makita Europe N.V., Business address: Jan-Baptist Vinkstraat 2 3070 Kortenberg BELGIUM. Authorized Kazuhisa Makino for the compilation of the technical file and declare under our sole responsibility that the product(s); Designation: Weeding Attachment. Designation of Type(s): WA400MP.
Fulfills all the relevant provisions of 2006/42/EC and also fulfills all the relevant provisions of the following EC/EU Directives: 2000/14/EC and are manufactured in accordance with the following Harmonised Standards: EN 62841-1:2015+A11:2022, EN ISO 11806-1:2022, EN IEC 62841-4-7:2022+A11:2022.
Place and date of declaration: Kortenberg, Belgium. 27.9.2023
Responsible person: Kazuhisa Makino, Director - Makita Europe N.V.

Declaration of Conformity (For UK)
For UK only
We as the manufacturers: Makita Europe N.V., Business address: Jan-Baptist Vinkstraat 2 3070 Kortenberg BELGIUM. Authorized Kazuhisa Makino for the compilation of the technical file and declare under our sole responsibility that the product(s); Designation: Weeding Attachment. Designation of Type(s): WA400MP.
Fulfills all the relevant provisions of S.I. 2008/1597 (as amended) and also fulfills all the relevant provisions of the following UK Regulations: S.I. 2001/1701 (as amended) and are manufactured in accordance with the following Designated Standards: EN 62841-1:2015+A11:2022, EN ISO 11806-1:2022, EN IEC 62841-4-7:2022+A11:2022.
Place and date of declaration: Kortenberg, Belgium. 27.9.2023
Responsible person: Kazuhisa Makino, Director - Makita Europe N.V.
Importer: Makita (UK) Limited, Michigan Drive, Tongwell, Milton Keynes, Buckinghamshire, MK15 8JD, UK

SAFETYWARNINGS
Weeding Attachment safety warnings
- Do not use the machine in bad weather conditions, especially when there is a risk of lightning. This decreases the risk of being struck by lightning.
- Thoroughly inspect the area for wildlife where the machine is to be used. Wildlife may be injured by the machine during operation.
- Thoroughly inspect the area where the machine is to be used and remove all stones, sticks, wires, bones, and other foreign objects. Thrown objects can cause personal injury.
- Before using the machine, always visually inspect to see that the weeding blade is not damaged. Damaged part increases the risk of injury.
- Follow instructions for changing accessories. Improperly tightened blade securing nuts or bolts may either damage the blade or result in it becoming detached.
- Wear eye, ear, head and hand protection. Adequate protective equipment will reduce personal injury by flying debris or accidental contact with the cutting line or blade.
- While operating the machine, always wear nonslip and protective footwear. Do not operate the machine when barefoot or wearing open sandals. This reduces the chance of injury to the feet from contact with the moving cutters or lines.
-
While operating the machine, always wear long trousers. Exposed skin increases the likelihood of injury from thrown objects.
-
Keep bystanders away while operating the machine. Thrown debris can result in serious personal injury.
- Always use two hands when operating the machine. Holding the machine with both hands will avoid loss of control.
- Hold the machine by the insulated gripping surfaces only, because the cutting line or blade may contact hidden wiring. Cutting line or blades contacting a "live" wire may make exposed metal parts of the machine "live" and could give the operator an electric shock.
- Always keep proper footing and operate the machine only when standing on the ground. Slippery or unstable surfaces may cause a loss of balance or control of the machine.
- Do not operate the machine on excessively steep slopes. This reduces the risk of loss of control, slipping and falling which may result in personal injury.
- When working on slopes, always be sure of your footing, always work across the face of slopes, never up or down and exercise extreme caution when changing direction. This reduces the risk of loss of control, slipping and falling which may result in personal injury.
- Keep all parts of the body away from the weeding blade when the machine is operating. Before you start the machine, make sure the weeding blade is not contacting anything. A moment of inattention while operating the machine may result in injury to yourself or others.
- Do not operate the machine above waist height. This helps prevent unintended weeding blade contact and enables better control of the machine in unexpected situations.
- When cutting brush or saplings that are under tension, be alert for spring back. When the tension in the wood fibres is released, the brush or sapling may strike the operator and/or throw the machine out of control.
- Use extreme caution when cutting brush and saplings. The slender material may catch the blade and be whipped toward you or pull you off balance.
- Maintain control of the machine and do not touch weeding blade and other hazardous moving parts while they are still in motion. This reduces the risk of injury from moving parts.
- Carry the machine with the machine switched off and away from your body. Proper handling of the machine will reduce the likelihood of accidental contact with a moving cutter, line or blade.
- When transporting or storing the machine, always fit the cover on the weeding blade. Proper handling of the machine will reduce the likelihood of accidental contact with the blade.
- Only use replacement weeding blades specified by the manufacturer. Incorrect replacement parts may increase the risk of breakage and injury.
- When clearing jammed material or servicing the machine, make sure the switch is off and the battery pack is removed. Unexpected starting of the machine while clearing jammed material or servicing may result in serious personal injury.
Additional safety warnings
General instructions
- To ensure correct operation, user has to read this instruction manual to make himself familiar with the handling of the equipment. Users insufficiently informed will risk danger to themselves as well as others due to improper handling.
- Never allow children, persons with reduced physical, sensory or mental capabilities or lack of experience and knowledge or people unfamiliar with these instructions to use the machine, local regulations may restrict the age of the operator.
- Use the equipment with the utmost care and attention.
- Operate the equipment only if you are in good physical condition. Perform all work calmly and carefully. Use common sense and keep in mind that the operator or user is responsible for accidents or hazards occurring to other people or their property.
- Never operate the machine while people, especially children, or pets are nearby.
- The motor is to be switched off immediately in case that the equipment shows any problem or abnormal sign.
- Switch off and remove the battery cartridge when resting and when leaving the equipment unattended, and place it in a safe location to prevent danger to others or damage to the equipment.
- Avoid using the machine in bad weather conditions especially when there is a risk of lightning.
Personal protective equipment
- Wear eye protection and stout shoes at all times while operating the machine.
- Always wear substantial footwear and long trousers while operating the machine.
Starting up the equipment
- Make sure that there are no children or other people nearby, also pay attention to any animals in the working vicinity. Otherwise stop using the equipment.
- During operation, keep bystanders or animals at least 5m away from the tool. Stop the tool as soon as someone approaches.
- Before use always check that the equipment is safe for operation. Check the security of the cutting tool and the switch trigger for easy and proper action. Check for clean and dry handles and test the function of the start/stop.
-
Check damaged parts before further use of the equipment. A part that is damaged should be carefully checked to determine that it will operate properly and perform its intended function. Check for alignment of moving parts, binding of moving parts, breakage of parts, mounting, and any other condition that may affect its operation. A part that is damaged should be properly repaired or replaced by our authorized service center unless indicated elsewhere in this manual.
-
Switch on the motor only when the hands and feet are away from the cutting tool.
- Before starting make sure that the cutting tool has no contact with any objects.
- Hold the tool firmly when using the tool.
- Avoid unintentional starting. Do not carry the tool when the battery cartridge is installed and with finger on the switch. Make sure that the switch is off when installing the battery cartridge.
- Before operation, examine the work area for wire fences, stones, or other solid objects. They can damage the weeding blade.
- Check the hedges and bushes for foreign objects, such as wire fences or hidden wiring before operating the tool.
Method of operation
- Only use the equipment in good light and visibility. During the winter season, beware of slippery or wet areas, ice and snow (risk of slipping). Always ensure a safe footing on slopes and be sure to walk and never run.
- Take care against injury to feet and hands from the cutting tool.
- Never stand on a ladder and run the equipment.
- Never climb up into trees to perform cutting operation with the equipment.
- Never work on unstable surfaces.
- Remove sand, stones, nails etc. found within the working range. Foreign particles may damage the cutting tool and can cause dangerous kick-backs.
- Should the cutting tool hit stones or other hard objects, immediately switch off the motor and inspect the cutting tool.
- Inspect the cutting tool at short regular intervals for damage (detection of hairline cracks by means of tapping-noise test).
- Always remove the battery cartridge from the equipment:
whenever leaving the equipment unattended;
before clearing a blockage;
before checking, cleaning or working on the equipment;
after striking a foreign object;
whenever the equipment starts vibrating abnormally.
- Cutting means continues to run after the motor is switched off.
- When attaching or removing the blade cover, be careful not to injure your hands.
Maintenance instructions
- The condition of the equipment, in particular of the cutting tool of the protective devices must be checked before commencing work.
-
Turn off the motor and remove the battery cartridge before carrying out maintenance, replacing cutting tools or cleaning the equipment or cutting tool.
-
When not in use, attach the blade cover to the tool and store the tool indoors in dry, and high locked-up place, out of reach of children.
SAVE THESE INSTRUCTIONS.
WARNING: DO NOT let comfort or familiarity with product (gained from repeated use) replace strict adherence to safety rules for the subject product. MISUSE or failure to follow the safety rules stated in this instruction manual may cause serious personal injury.
PARTS DESCRIPTION
Fig.1: 1. Blade cover 2. Cap 3. Weeding blade
ASSEMBLY
WARNING: Before assembling or adjusting the equipment, switch off the motor and remove the battery cartridge. Otherwise, the machine may start unintentionally and result in an injury.
WARNING: When assembling or adjusting the equipment, always put it down. Assembling or adjusting the equipment in an upright position may result in serious injury.
WARNING: Follow the warnings and precautions in the chapter "SAFETY WARNINGS" and the instruction manual of the power unit.
Assembling the attachment
- Attach the 2 adjusting plates to the attachment so that the grooves of the plates face outward.
Fig.2: 1. Adjusting plate - Attach the weeding blade to the adjusting plates while opening the blade outward slightly.
When attaching the weeding blade, make sure the arrow points toward the pipe.
Fig.3: 1.Arrow
The angle of the weeding blade can be changed by aligning the protrusion on the weeding blade with the one of the protrusions on the adjusting plates.
Fig.4: 1. Protrusion
NOTICE: Make sure that the arrows on the weeding blade face in the direction shown in the figure.
Fig.5: 1.Arrow
- Make sure that the weeding blade is engaged with the adjusting plates.
Fig.6 - Insert the bolt from the side without the nut and tighten the bolt with the wrench.
Make sure that the bolt is securely tightened.
Fig.7: 1. Bolt 2. Nut
NOTE: Tightening torque : 5 - 10 N·m
Mounting the attachment pipe
CAUTION: Always check that the attachment pipe is secured after installation. Improper installation may cause the attachment falling off from the power unit and cause personal injury.
Mount the attachment pipe to the power unit.
- Remove the cap from the end of the pipe.
Fig.8: 1. Pipe 2. Cap
NOTICE: Do not dispose of the cap since the cap is necessary for storing the attachment.
-
Turn the lever toward the attachment.
Fig.9: 1. Lever -
Align the pin with the arrow mark on the power unit. Insert the pipe until the release button pops up.
Make sure that the position line is on the tip of the arrow mark on the power unit, and the arrow mark on the power unit and the arrow mark on the pipe are facing each other.
Fig.10: 1. Release button 2. Arrow mark on the power unit 3. Pin 4. Position line 5. Arrow mark on the pipe
4. Turn the lever toward the power unit.
Fig.11: 1.Lever
Make sure that the surface of the lever is parallel to the pipe.
NOTICE: Do not tighten the lever without the attachment pipe inserted. Otherwise the lever may tighten the entrance of the drive shaft too much and damage it.
To remove the pipe, turn the lever toward the attachment and pull the pipe out while pressing down the release button.
Fig.12: 1. Release button 2. Lever 3. Pipe
Removing or attaching the blade cover
To remove the blade cover, push the blade cover toward the inside and turn it.
Fig.13: 1.Blade cover
To attach the blade cover, hook the blade cover to one side of the weeding blade, and then turn it.
Fig.14: 1.Blade cover
NOTE: You can attach the blade cover to the pipe as shown in the figure.
Fig.15: 1.Blade cover
Installing or removing the weeding blade
CAUTION: When replacing the weeding blade, always wear gloves so that your hands do not directly contact the weeding blade.
CAUTION: Attach the blade cover before removing or installing the weeding blade.
- Attach the blade cover to the weeding blade.
- Remove the bolt by loosening the bolt with the wrench.
Fig.16: 1.Bolt
- Remove the weeding blade while opening the weeding blade outward slightly.
Fig.17
Install the weeding blade referring to the instructions for assembling the attachment.
FUNCTIONAL DESCRIPTION
CAUTION: Always be sure that the tool is switched off and the battery cartridge is removed before adjusting or checking function on the tool.
Adjusting the cutting angle
CAUTION: Always be sure that the tool is switched off before adjusting the cutting angle.
The angle of the weeding blade can be changed in three levels. To change the angle, align the protrusion on the weeding blade with the one of the protrusions on the adjusting plates, and then install the weeding blade.
- Loosen the bolt that fix the cutting blade with the wrench.
- Align the protrusion on the weeding blade with the one of the protrusions on the adjusting plates.
- Retighten the bolt to fix the cutting blade.
Fig.18: 1. Protrusion
OPERATION
WARNING: Follow the warnings and precautions in the chapter "SAFETY WARNINGS" and the instruction manual of the power unit.
Operating the tool
WARNING: Keep hands away from weeding blade.
WARNING: Be extremely careful to maintain control of the tool at all times. Do not allow the tool to be deflected toward you or anyone in the work vicinity. Failure to keep control of the tool could result in serious injury to the bystander and the operator.
WARNING: Before weeding, clear away sticks and stones from the weeding area.
NOTE: This tool is intended for removing weeds less than 15 cm (5-7/8").
Fig.19
CAUTION: Avoid operating the tool in very hot weather as much as practicable. When operating the tool, be careful of your physical condition.
CAUTION: Be careful not to accidentally contact a metal fence or other hard objects while weeding. The weeding blade may break and cause an injury.
CAUTION: Overreaching with the tool, particularly from a ladder, is extremely dangerous. Do not work while standing on anything wobbly or infirm.
NOTICE: Do not use the tool in a way that causes the motor to stop or to rotate extremely slowly.
Hold the tool with both hands by holding the front handle and the rear grip of the power unit.
Fig.20: 1. Front handle 2. Rear grip
Turn the tool on with the weeding blade off the ground. Place the weeding blade on the ground, and pull the tool toward you slowly to weed. It is easier to work when the weeding blade is at an angle nearly perpendicular to the ground.
Fig.21
Fig.22
MAINTENANCE
WARNING: Before inspecting or maintaining the equipment, switch off the motor and remove the battery cartridge. Otherwise, the machine may start unintentionally and result in serious injury.
WARNING: When inspecting or maintaining the equipment, always put it down. Assembling or adjusting the equipment in an upright position may result in serious injury.
WARNING: Follow the warnings and precautions in the chapter "SAFETY WARNINGS" and the instruction manual of the power unit.
CAUTION: Wear gloves when performing the inspection or maintenance.
NOTICE: Never use gasoline, benzine, thinner, alcohol or the like. Discoloration, deformation or cracks may result.
To maintain product SAFETY and RELIABILITY, repairs, any other maintenance or adjustment should be performed by Makita Authorized or Factory Service Centers, always using Makita replacement parts.
Cleaning the tool
Clean the tool by wiping off dust with a dry cloth or one dipped in soapy water and wrung out.
Blade maintenance
After operation, remove the entangled grass or roots from the blade.
NOTICE: Do not wash the blade in water. Doing so may cause rust or damage to the blade or attachment.
Storage
Attach the blade cover to the weeding blade. Store the tool out of the reach of children. Store the tool in a place not exposed to moisture or rain.
When storing the attachment separated from the power unit, put the cap onto the end of the pipe.
Fig.23
Lubricating moving parts
NOTICE: Follow the instruction of the frequency and amount of grease supplied. Otherwise insufficient lubrication may damage moving parts.
Drive axle:
Apply grease (Makita grease N No.2 or equivalent) every 25 hours of operation.
Fig.24
NOTE: Genuine Makita grease may be purchased from your local Makita dealer.
Grease lubrication
Interval of lubrication: Every 25 operating hours
- Remove the bolt from the hole for lubrication.
Fig.25:1.Bolt - Apply the grease (Makita grease SG No.0 or equivalent) to the tool (approximately 3.0g as a guide).
- Tighten the bolt.
TROUBLESHOOTING
Before asking for repairs, conduct your own inspection first. If you find a problem that is not explained in the manual, do not attempt to dismantle the tool. Instead, ask Makita Authorized Service Centers, always using Makita replacement parts for repairs.
| State of abnormality Probable cause | (malfunction) Remedy | |
| Motor does not start. - Refer to the instruction manual of the power unit. | ||
| Motor stops soon. - Refer to the instruction manual of the power unit. | ||
| Motor speed does not increase. - Refer to the instruction manual of the power unit. | ||
| Weeding blade do not move: → stop the machine immediately! | The drive system does not work correctly. | Ask your local authorized service center for repair. |
| Abnormal vibration: → stop the machine immediately! | Weeding blade is broken, bent or worn. | Replace the weeding blade. |
| The drive system does not work correctly. | Ask your local authorized service center for repair. | |
| Weeding blade and motor cannot stop: → Remove the battery immediately! | Electric malfunction. Remove the battery | and ask your local authorized service center for repair. |
OPTIONAL ACCESSORIES
CAUTION: These accessories or attachments are recommended for use with your Makita
machine specified in this manual. The use of any other accessories or attachments might present a risk of injury to persons. Only use accessory or attachment for its stated purpose.
If you need any assistance for more details regarding these accessories, ask your local Makita Service Center.
Weeding blade
Cultivator blade
- Makita genuine battery and charger
NOTE: Some items in the list may be included in the product package as standard accessories. They may differ from country to country.
SPÉCIFICATIONS
Modèle:WA400MP
Lubrification des pieces mobiles
ACCESSIONS EN OPTION
VEILIGHEIDSWAAR-SCHUWINGEN
OPTIONELE ACCESSOIRES
Persona responsible: Kazuhisa Makino, Director - Makita Europe N.V.

BEMAERKING: Undlad at vaske klingen i vand.
Móvo yia xwpe ts Eupwnns
Eueic oI kataaekuaotec: Makita Europe N.V. 1nXeipnon; Jan-Baptist Vinkstraat 2 3070
Kortenberg BEAIO. EouoiOToUe ToV Kazuhisa
Makino yia t n ouvtanou texviko apxieou kai gnw voume, uTo TnV aTOKaIOTIKn paC eUbvn, oTI to(a) pioiov(α),
PpoooipiooC: PpooaPTnma Eoxoptapiaogatoc. PpoooipiooC tntou(wv): WA400MP.
Ikavtoie oles TIG oxetikec biataeic nG odnyiaC 2006/42/EK kai etions Ikavtoie oles TIG oxetikec biataeic twv akolouow Ondyiv EK/EE: 2000/14/EC kai kataoekuaovtai oupwva ta akoloutheta evapoviopeva npotu: EN 62841-1:2015+A11:2022, EN ISO 11806-1:2022, EN IEC 62841-4-7:2022+A11:2022.
NAPATHPHsH:Potn ouoipg5-10 N·m
Fig.13: 1. Knivskydd
- Fjern bolten fra hullet for smoring.
Fig.25:1.Bolt
- Pafor smrefett (Makita-smrefett SG No.0 ellertilsvarende) pa verktoyet (som en veilednng ca. 3,0 g).
- Trekk til bolten.
FEILSØKING
TIETO POKNY USCHOVAJTE.
AVAROVANIE: NIKDY nepripustite,aby sebavedomie a dobra znalost'vyrobku (ziskané opakovanym pouzivanim) nahradili presné dodrziavanie bezpecnostnych pravidiel pre naradie. NESPRAVNE POUZIVANIE alebo nedodrziavanie bezpecnostnych zasad uvedenych v toto navode moze viest'k vaznemu zraneniu.
POPIS SUCASTI
Obr.1: 1. Kryt Čepeli 2. Kryt 3. Čepel na burinu
ZOSTAVENIE
AVAROVANIE:Pred zostavenim alebo nastavenim zariadenia vypnite motor a vyberte akumulator. Inak sa zariadenie moze neumyselne spustit a sposobit zranenie.
VAROVANIE: Pri dostavovani a nastavovani zaria-denie vždy položte. Pri dostavovani alebo nastavovani zariaDENIA v zvislej polohe moze dojst k vázznemu zraneniu.
VAROVANIE: Riad'te sa varovaniami a preventvynmi opatreniami uvedenymi v kapitole "BEZPECNOSTNE VAROVANIA" a nadvodom na pouzivanie motorovej Jednotky.
Zostavenie nadstavca
- Pripevnite 2 nastavovacie platnicky k nadstavcu tak, aby dražky platniciek smerovali von.
Obr.2: 1. Nastavovacia platnicka - Čepel na burinu upevnite k nastavovacim platnic-kám, pričom nož mierne otvorte smerom von.
Pri upevnovani cepele na burinu dbajte na to, aby šipka smerovala k tyci.
Obr.3: 1. Sipka
TYTO POKNY USCHOVEJTE.
VAROVANI: NEDOVOLTE,aby pohodnost nebo pocit znalosti vyrobku (ziskany na zaklade predchozio pouziti) vedk zanedbani dodržovani bezpečnostnich pravidel platnych pro tento vyrobek.NESPRAVNEPOUZIVANI ci nedodrzeni bezpečnostnich pravidel uvedenych v toto nadvu k obsluze muze zpusobit vaźne zraneni.
POPIS DILU
Obr.1: 1. Kryt nozu 2. Kryt 3. Pleci nuz
SESTAVENI
VAROVI: Pred montaizi a serizenim zaizeni vypnete motor a vyjmete akumulator. Jinak se muze stroj nechtene spustit a zpusobit zraneni.
VAROVANI: Pri monta zi nebo serizovani mejte zaizeni vzdny polozenene na zemi. Provadi-li se monta znebo serizovani zaizeni ve svisle poloze, muze dojit k vaznemu zraneni.
VAROVÁNÍ: Rid'te se vystrahami a dodržujte opatřeni uvedená v kapitole „BEZPECNOSTNI VAROVÁNÍ“ a v námodu k obsluze motorové Jednotky.
Montáž nástavce
Odo6peH 3aBnXBaU mExaHn3bM
Ta3n npncTabka e oOobpeHa 3a n3noJ3BaHe cMo cbc CneHnra(Te) 3axpaHbauu(n) MexaHn3bM(MN):
MhorofyHKcnoHaHa 3aDbNkBaua rnaBa 6e3 ka6en DUX60
MhorofyHKcnoHaHa 3aDbNkBaua rnaBa 6e3 Ka6en DUX18
MHoroФункционанha 3aДВиЖВаца rJЯBa 6e3 Ka6eI UX01G
A PEPENPEXEHN: HnKora He n3no3BaIte npncTabKaTc HneO6peH 3aDbNKBaMexAHN3bM. Heo6peHaTa KombHaun MoKe da npuHH cepNo3H HapaHbaHH.
CNMBOJIH
No-dony ca onncaHn CmBONITE, KOINTO MOKe Da ce 3nON3BaT 3a Ta3n MaunHa. 3aJbJnxIeNHO e Da ce 3aNO3HaTe C TexHInTe 3HaueHn, PpeDn da npucTbNITe KbMa pa60Ta.


Ipooyete n cna3BaIte pkoBODCTBOTO 3a eknnoatauia.

HocTe npedna3Ha kacka, ouniln npedna3Hn cpeDCTBa 3a cnlyxa n ouHte.

HocTe npedna3n pkbauu.

HocTe 3dpBn ObyKn C HeNJIb3raun Ce IIOmETKn.

PpeynpeXeHne;N3KnIOuBaIte 6aTepeYra, Ppei Da npncTbniTe KbM noDpBkKa.

IpbkTe KpaKaTa Cn Daneu OTHoKa 3a IJIeBeHe.
He donyckaTe cTpaHnHn Jnua n KJNBOTHHa pa3CToHne, No-Manko OT 5 M, OTeEKeKTPnueckn HNCTpyMeHT.

IopeuIN NOBbpxHocTN - IV3rapHnHa npbcTNe ININ pbceTe.

TapaHTnpaHO HNBO Ha 3BvKObA MOuHOCCTbflnacHO DnpeKTHBaTa Ha EC 3a WymoBNTe emncn Ha cbOpBXeHn, npeHa3HaueHN 3a ynoTpe6a N3BbH crpaNTe.

HINBOHa3ByKOBAMoUHOCcBrlnACHO PernaMeHTa 3a ynpabIeHne Ha Wyma Ha HOB HOxEN YeNC, ABCTpAINr
PpeHa3NaueHne
Ta3n npncTabka, 3aeHNo c oO6peH 3axpaHbau 6Iok, e npeHa3NaueHa eINHCTBeHo 3a IneBeHe Ha TpeBa, pacta no 3emrTa. Hnkora He n3noJ3BaTe npncTabkata 3a npyrn ceJIH. HenpaBnHTo n3noJ3BaHe Ha npncTabkata MoKe da IOBeDe Do cepNo3HNapaHbAHn.
EO deknapaun 3a cboTBeTCTBne
Camo 3a eeponeueckume cmpahu
B kaueCTBOTo cH Ha npOn3BOUnteJIH: Hne, Makita Europe N.V., TbproBcN aDpec: Jan-Baptist Vinkstraat 2 3070 Kortenberg BEJnR. YnbHMOUaBAme Kazuhisa Makino Da CbCTaBn TEXHnueCKaTa DOKymenTAtaUNI DEknapaMe Ha CBOA JNUHa OTROBOPHOCT, Ye npOdyKTbT(NTe);
06o3haueHHe: PnucTabKa 3a nneBHe. O6o3haueHHe Ha Tnna(OBeTe): WA400MP.
OTROBAPHa BCNUKn PpINOxMn Knaay3n Ha 2006/42/ EO,cbso n Ha BCNUKn PpINOxMn Knaay3n Ha cneDbauTe DnpeKtNBn Ha EO/EC:2000/14/EC n ca npou3- BeDeHn B cbOTBeTCTBnE cbc CneHNte XapMOHn3npaHn CTaNapTn:EN 62841-1:2015+A11:2022,EN ISO 11806-1:2022,EN IEC 62841-4-7:2022+A11:2022.
- Binhari n3BaJdaIe aKymyNaTopHaTa 6aTepeHn oT o6OpyDbaHeTo:
—Korato octabTe 06opydBaHeto 6e3 HaD3Op;
— npedn nooictBaHe Ha 3aepbctBahe;
— npeDn npOBepka, nouchTbaHe nnn pa6oTa no o6OpdyBaHeto;
— Cnei ynap BBB BbHweH 06ekt;
Korato 606pyDbaHeto 3aOnue Hea Bn6pnpa Heo6nuaHNo.
- Pexeune TaCn npoDbJxabat da ce dBXkaT Cnei n3KIOUbaHe Ha eNekTpOMOTopa.
- Korato noctabte nnn cbaaTe kanaka Ha octpneeta, BnHmAbaTe da He HapaHnte pbuete cn.
Hnctpykun 3a noDpBjXka
- PpeDn npOdbJkaBaHe Ha pa6oTaTa e Heo6xo- DmO Da ce npOBepn CbCToHneTo Ha 06opyd BaHeto, OcOBeHO TOBa Ha pExeun Hnctpy-MENT nPpeDna3Hnte yCTpOInCTBa.
- Ppei noDpBkKa, CmHa Ha pexeui HnHCTpyMeHTn, NOuHCTBaHe Ha o6OpyDaBaHTo uPi pexeun HnHCTpyMeHT n3KnIOUeTe MOTopa nN3BaTe aKymyIaTopHaTa 6aTePnI.
- Korato He n3non3BaTe nHCTpymeHTa, noCTa-Bete Kanaka Ha ocTpneTaTaNcbxpaHbAte HnHCTpyMeHTa Ha 3akpnto, Ha cyxo N BucOKO pa3noJooKeHO 3akNIOUbaUc ce MRCTo, daJeue OT DOCTbNa Ha Deua.
3AIIA3ETE HACTOUINTEHNCTPYKLI.
ANPEUYPEXDEHNE:HE no3BOJBAIte KOMoopTa OT no3HaBaHeTo Ha npOyKta (npn- do6nt npn DblraTMy ynoTppe6a) Da 3ameHn CTpNKTHOTO cna3BaHe Ha npabUNata 3a 6e3onacHOCT 3a Bbnpocnna npOdyKT. HENPABNJHATA YNOTPE6A n HeCn3BaHeTo Ha npabUNata 3a 6e3onacHOcT, NOCOeyH B HAcTOJIoTO pBkoBOdCTBO 3a ekCNloatauN, MoKe Da DOBeDe Do TeKKn HapaHBaHn.
ОпиcaнеHAчACTNTE
Phur.1: 1. Kanak ha Hoxka 2. Kanayka 3. HoX 3a nJIeBeHe
CΓЛОБЯBAHE
A PEPENPEXHEN: Pepn crno6BaHe nnpeynpaHa o6opyDbaHTo n3KnUoTe MoTopa N3BaTe aKymlaTophata 6aTePN. B npOTuBEn cnyaMaunHATA MOKe da ce CTapTnpa BHe3aHNO I Da npuHH HapaHbAhe.
A PEPDYNPEXKDEHNE: Pn crno6BaHe nn perynnpaHa na obopydBaHTo BnHarTo nocTabrte Ha 3emTa. Crno6BaHTo nn perynnpaHTo Ha obopydBaHTo B n3npaBEO noJoxeHne MoKe Da doBeDe Do cepNo3Ho HapaHbAe.
PPEyPPEKDEHNE:CneBaaTe npedynpexdeHnra Mepknte 3a 6e3onachocT B rnaBata,IPPEyPPEXDEHNA 3A BE3O1NACHOCT" nB pkoBoiCTBTO 3a ekcnnoataun Ha 3aDbNXBaun MExaHN3bM.
CrIIO6BaHe Ha IpNCTabKaTa
-
PpNkpenete 2-Te peryIpaun nnactnHKnBm npntabkata Taka, Ye KaHaJIte Ha nlaCTIHNTe da ca Hacooyen HABbH.
Φn.r.2: 1. Perynnpaua nnaactnHa -
PnKpenTe Hoxa 3a nIeBHe KbM peryInpaunTe nnactHn, KaTO FO OTBOpTe JKeHOHBH.
Pn npKpenBaHe Ha Hoxa 3a nIeBHe ce yBepTe, ye cTpeJkata coyn KbM Tpb6ata.
Φur.3:1.Ctpenka
bIbT Ha HOka 3a IIeBeHe MOKe Da ce Ipomehn Upe3 NOpBaHReBaHe Ha I3daHeHa T My Yact C eEdHa OT I3daHeHtte Yactn Ha perynipaunTe PnactHH.
Φn.4: 1.ɪnədæna恢T
BENEXKA: YBepete ce, ye cTpeJIKNTe Ha HOka 3a nNe-Bene ca 06bphATN B NocOKaTA, NOkA3aHa Ha Hnrypata.
Φur.5:1.Ctpenka
-
YBepTe Ce, Ye HOxbT 3a PJIeBeHe e 3axBaHaT OT peryJnnpaunTe PnactHn.
Φur.6 -
BkapaiTe 6oJTA ot cTpaHata 6e3 raikata n ro 3aTeHHeTe C raeuHnKJIouH.
YBepete ce, ye 6oNTbTe e3npaBO 3aTeHaT.
Φur.7: 1. Bont 2. Faika
3A6EENKKA: MomeHT Ha 3aTrahe: 5 - 10 N·m
MOnTnpaHe Ha Tpb6aTa 3a npncTabKa
BHIMAHHE: BnHarn npOBepraBte 3akpenBaHeTo Ha Tpb6aTa 3a npNCtABkata Cne MoHTaxa. HenpaBnHNrT MOHTax MOKe Da DoBeDe Io NaDaHe Ha npCtABkata OT 3aDbNkBaun MexaHN3bM I da npEni3BnKa HapaHBAHe.
MOnTnpaIe Tpb6aTa 3a npncTabKa KbM mHcTpymeHaT.
- CbaIe KaauKaTa OT KpaHa Tpb6aTa.
Φn.r.8: 1. Tpb6a 2. Kanayka
BENEXKA: He n3xBpJnTe kanaKaTa, TbKnato Tg ue e Heo6xOuMa npn npn6npaHe na npnctabkata.
- 3aBbptete IocTa KbM npncTakata.
Фиг.9: 1.Юст
- ⅢpaBHeTe uHcTa CbC cTpeNkata Ha 3aDnKBa- mexAHm3bM. BmkbAaTe Tpb6ata, DOKATO 6yToHbT 3aOCBO60XdAbaHe N3CKOu.
YBepete Ce, Ye NINnra Ta 3a No3nOohpaHe E Bbpxy Bbpxa Ha CTpeNkata Ha 3aDbNkBaunr MexAH3bM, a CTpeJkata Ha 3aDbNkBaunr MexAH3bM n CTpeNkata Ha Tpb6ata ca 06bphatu eHa KbM dpyra.
Φur.10: 1.Ocbo6oxkaDaBaU 6yToH 2.CtpeIka Ha 3aDbNkBaun MexaHn3bM 3.LuHT 4.Linna Ha N03nOHHpaHe 5.CtpeKHa Tpb6ata
- 3aBbpteteIOCTa KbM 3aADBKBaunm MexHaHn3bM.
Φnr.11:1.ⅡOCT
YBepTe ce,Ye NOBbpxHocCTTa Ha IocTa e npaenHa Ha Tpb6ata.
BENEXKA: He 3aTgraTe Nocta, 6e3 da cte NoctabnI Tpb6ata 3a npictabkata. B npotnbEn CnyaJIOCTbT MOKe Da 3aTeHne IpeKaJIeHO MHO BOxOda Ha 3aDbNKBaunia BaI N da Ro NOBpeNi.
3a da cba nte Tpb6ata, 3abbpTe Te JocTa KbM npncTabkata n 3d bpnaTe Tpb6ata HABbH, KaTO HaTnckateHaD0Jy 6yToHa 3a OcB6oxkDaBaHe.
Φnur.12: 1.Ocbo6oxkdaBaAa6yToH 2.LoCT 3.Tpb6a
CbaJIaHe nIIN NOCTaBЯHe Ha KaNaka Ha octpneTaTa
3a da cbaNTe Kanaka Ha octpneTaTa, HATNCHETe ro HABBTpe nro 3aBbPTeTe.
Φur.13: 1.Kanak Ha ocTpneTaTa
3a da 3akpenite KaNaka Ha octpneTa, 3akaueTe ro OT eHata CTpaHa Ha HOka 3a PNeBeHe n CneT Oba r 3aBbptTe.
Φur.14: 1. Kanak Ha ocTpneTaT
3A6ELEKKA: MoKeTe Da npKpenHc Kanaka Ha octpneTaT, KaKTo e Noka3aHO Ha fHypata.
Φur.15: 1.Kanak Ha ocTpneTaTa
MOnTnpaHe nIeMoHTnpaHe Ha HOxA 3a PIIeBeHe
ABHIMAHHE: Korato cmeHare HOx a 3a nneBHe, BnHaRn HocTe pKabuN, 3a da N36erHeTe npK KOHTAKT Ha pbute Cn C Hero.
ABHIMAHHE: PnKpenete Kanaka Ha OCTpneTaTAppeDn DEmOHTnpaHe NIn MOHTnpaHe Ha HOxA 3a PnIeBeHe.
- PnKpeTe Kanaka Ha ocTpneTa KaM HoKa 3a nnBeHe.
- CbaneTe 6oTtA, KaTo rnaPaxJa6nTe craeHnKJIIOU.
Φnr.16: 1. BonT
- CbaTe HOka 3a nJIeBeHe, KaTo rO OTBOpNTe JIeKO HABbH.
Chr.17
MOnTpaIte Hoxa 3a IIeBHe, KaTo HanpaBInTe CnpabKa C INHCTpyKcInTe 3a CrIIO6BaHe Ha npuctabkata.
ОписимеHA
ФУнкцИNTE
ABHUMAHNE: BnHa npoBepBaTe daHn HNCTpyMeHTbTe e3KnUoyeH KaceTaTc aKymyNaTophata 6aTepye e N3BaDeHa, npdi da peryInpate nn npoBepBaTe daeHa yHKuHa Ha NHCTpyMeHTa.
PerynupaHe Ha bIbJa Ha p3aHe
BHUMAHNE: BnHaH npOBepBaTe daHn HcTpymeHTbTe n3KnUoye, npEa da peryInpaTe bTba Ha p3aHe.
bblbT Ha HOka 3a PnIeBHe MoKe Da ce npomeHa TpN HnBa. 3a Da npOMEHnte bIJa, NOppaBHete n3daJeHATA Yact Ha HOka 3a PnIeBHe C eHa OT n3daDeHnte Yactn Ha peryInpaunTe PnactuHn nCneT TOBa MOHTpaIte HOka 3a PnIeBHe.
- Pa3xla6te 60nta, KoTo 3akpenBa pekeunia HOK, c NOMOuTa Ha raeuHn KInOH.
2.Подрав overheиздаденотачсп на hoха 3а пьевенс с endа OT n3dadeHNTe qactn Ha perylnupaunte pIacTNH. - 3aterheTe OTHOBO 6oJTa, 3a Da 3akpenite pekeu HOK.
Hok 3a nIeBeHe
Hox Ha KyTnBaTopa
OpunHaHa akymyNaTopHa 6aTepeHn 3apJHo yctpoiCTBO Ha Makita
3A6ELEKKA: HЯко apTnkyJи OT cncsbKa MoKe Da ca BKNHoyeH N KOMNJIeKTA Ha npOdykTa KaTO cTaNapTHN akcecoapu. Te MoKe Ja ca pa3nUnHb pa3nUnHNTe DbpxKabN.
SPECIFIKACije
Model: WA400MP
| Širina reza 220 mm | |
| Dimenzije (D x Š x V) | 980 mm x 226 mm x 196 mm |
| Neto težina 2,8 kg |
- Zahvaljuuci našem stalnom programu razvoja i istraživanja, navedene specifikacije podložne su promjenama bez obavijesti.
- Specifikacja mogu biti razlichte ovisno o zemlji.
Odobrena jedinica napajanja
HarodyBaHe Ha aroJot Ha ceYeBe
ABHIMAHHE: IpeHarOyBaHe Ha aroNt Ha ceYeBe, cekoraW ocNrypeTe deKa anaTOT e NCKnyeH.
Aronot Ha ceynlto 3a nneBem Moke da ce noctabn Ha TPN HnBOa. 3a da ro npomeHnte aronot, nopamHete ro NcnaKHATNOt den Ha ceynlto 3a nneBEN co eeden OD nCnakHaNTe DeIOBn Ha HaroDyBauckte pIoou, na MOHTnpajTe ro ceynlto 3a nneBen.
- Pa3na6abete ja 3aBpTkata wTo ro npuBpcTyBa ceHnOTo 3a ceeHe co KnyOT.
- NopamHete ro nCnakHaTnot den Ha ceuNtoto 3a nnBeBc co eEeH od nCnakHaTnte deJIOBn Ha HaroDyBaKHTe nIOUH.
- NOBTOPO 3aTeHHeTe ja 3aBPTkata 3a da ro fHKcnpate CeuNIOTo 3a ceeHebe.
Cn.18: 1.Испангдeн
PAEOTEHE
ANPEUYNPEYBAHBe:CneDeTe
rnpnpeynpeyBaHaTa N MepKNeHa
npetna3nBocT Bo nornabJeTo ,BE36EHOCHN
PNEUYNPEYBAHbA"u ynatcTBOTo 3a
KOpncTeHe Ha ypeDoT 3a HanojyBaHe.
Pa6oTeHbe co aJaTOT
A PEPENPENYBAHE: npkeTe r paueTe HactpaHa oC ceHnOTo 3a nIeBn.
A PEPENPENYBAHE: BnTe MHORYBHNBOOxkyBaHTo KOHTpOna Bp3anATOTcNo BpeMe.Heo3BOyBajTe anatot dace O6ne KOH Bac Nn Koj 6nlo BO pa6oTHataOBnact.AKO He oPxyBaTe KOHTpOna Bp3 anatot,MOKe Da DoJde Do TeuKa NobpeHa NaUcaTa BO6NnHa Nn Ha ONepaTopoT.
ANPEyPENEYBAHbE: Ppe Da 3anoyheTe CO nBebe, pauchte Te r CTanNbata N Kamehata oD obnacta wTo Ke ce nBn.
HANOMEHA: Anatot e Hamehet 3a OTCpaHyBaBe nneBENI WTO Ce nomn oD 15 cm (5-7/8").
Cn.19
A BHIMAHNE: N36erHyBajTe pa6oTa co anaTOn HA MHORY TOnNO BpeMe KOJky wTO e MOxHO NOBeKe. Kora pa6oTnte co anaTOT, BHIMaBajTe Ha BaWata qn3uKa cocToj6a.
BHIMAHHE: BHIMaBajTe cnyajHo da He DonpeTe MeTaNHa orpaDa Hn Dpyr TBPdN npEdMeTu 3a BpeMe Ha NpBeBeBeTo. CeuNoTO 3a NpBeJI MoKe Da ce CkPsN I da npEiN3BnKa nobpeJa.
A BHUMAHNE: IpecerHyBaIbeTo co anaTOT, ocobeno od ckaJa, e MHory onaCHO. He pa6oTeTe Kaeyn Ha ctpyKtypa uTO ce HmHa nH He e ctaBnHa.
3A6ENEUKA: HemojTe Da ro KopnCTnte anaTOT Ha Naunu NTo Ke npedn3BnKa MOTOPT da conpe nn da potnpa MHory 6abHO.
Ipxte ro anatot co dbete paace taKa Ito Ke ro dpknte 3a npedhata paKa n 3aHaT a npka Ha ypeoT 3a HanojyBaHe.
Cn.20: 1. Ппеба рачka 2. Зада дшka
BknyeTe ro anatot kora ceunloto 3a nneBEn He ja donnpa 3emjata. Ctabete ro ceunloto 3a nneBEn n noIeKa nobJeUeTe ro anatot KOH BAC 3a da nneBInTe. Ionecho e da pa6OTnte co ceunloto 3a nneBEn kora HerOBnOt aorE peuNC NOd npab arOn co 3emjata.
Cn.21
Cn.22
OДРЖУBAИБЕ
A PEPENPENYBAHbE: Ppe npOBepKa n OdpKByBaHe Ha onpemata, Ncknyte ja n 3BaTe je kaCetata 3a 6atepnjata. Bo CnpoTINBHO, MaUNHaTa MOKe Da ce aKTINBupa HeHaJeJHO Toa Da pe3yNTnpa co TeuKa nobpeda.
A PEPENPENYBAHbE: Pnp npOBepka nnn OdpKyBaBe Ha onpeMaTa, cekoraaw CTabajTe ja dony. CknonyBaBeTo nHa HArOdyBaBeTo Ha onpeMaTa BO nCnpaBeHa nNoJ6a MoKe da pe3yTnpa co cepno3Ha NobpeDa.
A PEPYPENYBAHbE: CneDeTe
rnppeynpeDyBaHaTa n MepKnte Ha
npeTna3nBocT BO norNaBJeTo ,BE35EDHOCHN
PEPYPNPEYBAhBa" u ynaTcTBoTo 3a
KOpncTeHe Ha ypeDoT 3a HanojyBaHe.
BHUMAHNE: Hocete paKaBnCn Kora n3BpUyBaTe npOBepKa nn OdpKyuBaHe.
3A6EJELWKA: 3a YnCTeHBe, He KOpNCTeHaΦTa, 6eH3nH, pa3peDyBaq, anKoxoN nIcnuHo. Tne cpeDCTba ja Baat 6oJata n MoKe da npedn3BnKaat Deopmaun nIyn NyKHATnHn.
3a da ce odpxN B36EДHOCTA n CnΓYPHOCTA Na npOn3BOoT, nonpaBKeTe, odpxyBaBaTa nn DoTepyBaHbTa Tpe6a Da ce BpMaT BO ObJaCTeHn cepBnCHn nn fa6pnKu ζeHTpn Ha Makita, cekoraW co pe3epBn DeNoBn od Makita.
YnCTeHBeHa aJatOT
YnCTeTe ro anatot, taKa 7To Ke ja 6pniuTe npaunHaTa CO cyBa Kpna NIn Kpna HaToneHa BO canyHua, na NCueDeHa.
OdpjxuBaHe Ha ceuHnlaTa
Ipo pa6oTata, oTcTpaHete ja 3aannetkaHaTa TpeBa nnKopeBa OJ ceuNlOTo.
3A6ENEUKA: He MnjTe ro ceuNoto co BODa.
Bo cnpoTnBHO, MoKe Da DojDe Do KopoDnpaBe nn OwTeTyBaHBe Ha CeuNtOTo nn DoaTOKOT.
Cklaɪnpaɪhe
Pnkaute To kanaot Ha ceuNtO 3a nIeBJI.
CknapajTe ro anatot HaBOp oD oOaT Ha Deua. CknapajTe ro anatot Ha MecTo wTO He e n3IOKeHo Ha BJaRa nn DoxJ.
Pn OndeHcKnaIpaHbe Ha DoTaTOKOT od ypeDTo 3a HanojyBaHe, CTaBeTe ro KaNaYeTo Ha KpaJOT oD ueBkata.
Cπ.23
ПодмачkyBaHbe Ha ПОДВИХнITE DeNoBn
3A6ENEWKA: CnedeTe rnyaTcTBaTa 3a 3aueCTeHocTa n KOInueCTBOTO Ha oBe36eHOTO cpeDCTB0 3a NOMaUkyBaHe. HAnky, HeIOBOJHOTO NOMaUKyBaHe MoKe Da rN OWTETN NOBVKHITe DeNoBN.
Norohcka ocka:
Hahecybajte cpeCTBO 3a noMauchyBaHbe (Macno Makita N No.2 nnn cnnuHo) Ha cekoun 25 yaca od pa60tata.
Cn.24
HANOMEHA:OpunHaJIHO cpeCTBO 3a noMaKyBaHe Ha Makita MoKe Ja ce Kyno od BaAnOT NOKaHEN npOdaBau Ha Makita.
IopMaayKaBaHe co MaCNo
HHTepBaJHaNoDMaUKyBaHe:HaceKoN25yaca pa60TeHe
- ⅠЗваде TE ja 3aВPTKaTа OД OTBOPOT 3a NOДмачКУВа№.
Cn.25: 1.3aBpTk - HaheceTe ja MacTa (MaCT Makita SG No.0 nIneHaKaBa Ha Taa) Ha anaTOT (Pn6JnxHo 3,0 r KaKo Hacoka).
- 3aterHete ja 3aBpTkata.
PEWABAHBE IPOBJEMN
Ipei da hapaate nonpaBka, npBO camn npoBepete ja coctoj6ata. Ako HajTe npo6lem To He e objacHT BO yNaTCTBOTO, He obuYbajte ce da ro packlonnte anatOT. HameTo toa, no6apajte nomou od OBnacteHnte cepBnCHn ueTpni Ha Makita n cekoraaw KopncTe deJOBn 3a 3ameHa n nonpaBka od Makita.
| Состojба на(anomalinnoМожна р�ч ида(дeфekt) Порравka | |
| Моторот не с的对象ы. -Погледные Во п国际机场укот co уразсва за ьпогледные Во п国际机场укот co уразсва за ьпогледные Во п国际机场укот co уразсва за ьпогледные Во п国际机场укот co уразсва за ьпогледные Во п国际机场укот co уразсва за ьпогледные Во п国际机场укot co уразсва за ьпогледные Во п国际机场укot co уразсва за ьпогледные Во п国际机场укot co уразсва за ьпогледные Во п国际机场укot co уразсва за ьпогледные Во п国际机场укot co уразсва за ьпогlorота на motopot не се Зрелемва. | Уре dot 3a наюжва. уре dot 3a наюжва. уре dot 3a наюжва. Бразната на motopot не се Зрелемва. |
| Сейниото за пленам не се д��ожи: → Вedlyши за的答案е ja машина! Абогмално вибрацим: → Вedlyши за的答案е ja машина! Сейниото за пленам не се д��ожи: → Вedlyшииз的答案е ja машина! | Пов生态系统 состems He paobotn правлино. Сейниото за пленам се Кшени, Извиткою и посьени. Пов生态系统 состems He paobotn правлино. Сейниото за пленам се Кшени. Извиткою и посьени. Пов生态系统 сostems He paobotn правлино. Сейниото за пленам се Кшени. Извиткою и посьени. Пов生态系统 сostems He paobotn Извиткою. Сейниото за пленам се Кшени. Извиткою. Сейниото за пpenам се Кшени. Извиткою. Сейниото за пpenам се Кшени. Извиткою. Сейниото за пpenам се Кшени. Извиткою. Сейниото за пpenам се Кшени. Извиткою. Сейниото за пpenам се Кшени. Извитkoю. Сейниото за пpenам се Кшени. Извитkoю. Сейниото за пpenам се Кшени. Извитkoю. Сейниото за пpenам се Кшени. Извитkoю. Сейниото за пpenам се Кшени. Извитkoю. Сейниото за пpenамс Извитkoю. Сейниото за пpenамс Извитkoю. Сейниото за пpenамс Извитkoю. Сейниото за пpenамс Извитkoю. Сейниото за пpenамс Извитkoю. Сейниото за пpenамс Извитkoю. Сей Norris. Сейниото за пpenамс Извитkoю. Сейниото за пpenамс Извитkoю. Сейниото за пpenамс Извитkoю. Сейниото за пpenамс Извитkoю. Сейниото за пpenамс Извитkoю. Сейниото за пpenamc Извитkoю. Сейниото за пpenamc Извитkoю. Сейниото за пpenamc Извитkoю. Сейниото за пpenamc Извитkoю. Сейниото за пpenamc Извитkoю. Сейниото за пpenamc Извитkoю. Сeilниото за пpenamc Извитkoю. Сeilниото за пpenamc Извитkoю. Сeilниото за пpenamc Извитkoю. Сeilниото за пpenamc Извитkoю. Сeilниото за пpenamc Извитkoю. Сeilниото за пpenamc Од��д��яп. Вedlyшииз的答案e ja бateprijata! → Вedlyшииз的答案e ja bateprijata! |
Опционов几乎所有 ПИБОР
ABHIMAHHE: Oboj npnbop nnn doaTOU ce npenopaYbaat 3a KopncTeBe CO MaunHaTa OD Makita habeDeHa BO yNaTcBTo. Co KopncTeBe dpyr npnbop nnn DoaTOU MoKe Da Ce n3IOKInTe Ha pN3NK oD TeNeCHn NobpeDi. KopncTeTe r nnpnbopOT IdoaTOUte CaMo 3a HNBHaTa Ha3HaueHa HameHa.
Ako Bn Tpe6a nomou 3a noBeKe DeTani 3a npnbopot, npaaajTe BO IOKaHnOt cepBnCeH ueHTap Ha Makita.
Ceyno 3a nIeBEn
- CeuNo Ha KyJTNBaTopoT
OpunHaHa 6atepiJa n noHaMakita
HANOMEHA: Hekon CTaBKn Ha NtCTaTa MoKe Da ce BkIyueHn CO NaKeTOT PpOn3BOu KaKo CTAHdApDeH np6op. Tne MoKe Da ce pa3NkYBaAe Od DpxKaBa Do dpXaBa.
TEXHnUKNIODAuN
| Моden: WA400MP | |
| ШирINA pe3аьа 220 MM | |
| Димензиje (Д x Ш x В) | 980 MM x 226 MM x 196 MM |
| Нeto Тенин a 2,8 кг |
36or Hawer HnpeTaHOr nCTpaXnBaHa pa3BoJa 3aDpXkABMo npabo HabeDeHX CneunKaunja 6e3 npTeXoNDHe Hajabe.
Cneunfkaune mory da ce pa3nkyj y pa3nuytum 3embaama.
Odopeha norohcka jeHHnca
Obaj hactabak je odo6pen 3a kopuhebe caMo ca cneheHM norOHckm jeHHua:
DUX60 BeXnHa BnSeHamaHcKa nOroHcKa rnaBa
DUX18 BeKuHa BnSeHamaHcKa ITOHcKa rIaBa
UX01G BeKnHa BnSeHameHcKa nOroHcKa rnaBa
AynO3OpeHbE: HkaJa HeMoJTe da KopnCTIte HacTaBak ca HeoDo6peHOM nOrOHckOM jeDHHcOM. KopnWeHeBe HeoO6peHnx DeNoBa MoKe DoBecTu Do HaHoSeHa o3bHnx nobpeda.
CnM60nn
Y hacTaBky cy npka3aHn Cm60JN KOJn ce OndOce Ha onpemy. Ipe ynoTpe6e ce 06abe3Ho yno3HaJte ca HbNXOBIM 3HaueHem.


IpounTajTe n npaTne npnpyHnK ca ynyTCTBnMa.

Hocnte 3aWTnTH nJem, 3aWTnTH Heoayape n 3aWTnTH cnyuannie.

Hocnte 3aHTnTHe pyKaBnE.

Hocnte po6yche yn3me ca HeKIn3ajyHm hohom.

Yno3opeHe, nckbbyuTe 6aTepnj npe OndpkaBaHa.
Ipxnte ctonana dahe od owtpnue 3a nIeBbeHe.
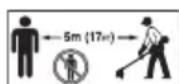
BoNTe paUHa o Tome da nocMaTpaun I KINBOTnHe 6ydy ydaJIbeHOn od eJeKTPnHOr aIaTa HajMaBe 5 M.

Bpyhe noBpHHe - oneKoTHe npctnju y nIu waka.

TapaHToBaHn HINBO 3BvUHe CHaRe yCKJaDy ca EY DnpeKtNBOM O6yU Kojy EMItyje onpema Ha OTBopeHOM IpocTopy.

HnBO 3ByHe cHare y cKnAkypeD6om o KOHTPOJN6yKe y AycTpaJInj, HJB
HameHa
Obaj Hactabak je din3ajHnpaH cAmo 3a KopuWhebe npnIKOM PJIeBbEba TpaBe Ha 3emJbY KOM6nHaunj ca oOobpeHOM NOROHcKOM jeINHcOM. HkaDa HEmoTe KopNCHTn Hactabak 3a dpyre HameHe. HenpaBnHO KopuWhebe HactabKa MoKe DOBecTn Do HAHOseBa 03bNbHex Nobpeda.
E3 deknapaunja o ycarnaeHocTn
Camo 3a eeponcke 3eMbe
YIME npOn3BoHa: Makita Europe N.V.,NocIOBHa aDpeca: Jan-Baptist Vinkstraat 2 3070 Kortenberg BELGIUM. Kazuhisa Makino je OBlaawhen 3a CkynbAbeTexnUckx DaTOTeKa nI3jaBByje NOd NyHom ODROBOPHOHy da npOn3BODi O3Haka: HAcTabak 3a PBeBBeHe. O3Haka TIna: WA400MP.
IcnyhbajcypepeBaHThe Ondpe6e DnpeKTHBe 2006/42/E3 n TaKoHe NcnyhbaJcy Cbe peJeBaHThe odpe6e cteDeHnx DnpeKTHBa E3/EY: 2000/14/EC n npOn3BeHcN cy y cKnady ca cteDeHm ycKaJahEnHM cTaHapMa: EN 62841-1:2015+A11:2022, EN ISO 11806-1:2022, EN IEC 62841-4-7:2022+A11:2022. MecTo n DaTym DeKnapaunje: Kortenberg, BEnrna. 27.9.2023
OndroBopHa oco6a: Kazuhisa Makino, dnpekTop - Makita Europe N.V.

БЕЗБЕД"HОCHA
yN03OPEHbA
БeЗб endocha yno3opeBa 3a
HaCTaBak 3a ПлевJBeHBe
- HemojTe KOpNCHTn MaunHy y louIM BpeMeHckm ycNoBMa, HapouHTo KaDa nocToJn pn3nk od ydapa rPoma.Tako cMaHyjete onaCHOCT OD ydapa rPoma.
- TemeJbHo npereJaTe noOpyuJe Ha kojem heTe KOpNCHTn MaunHy Ha npncycTBo DNJBnx XNBOTnHa.MaunHa TOKOM paJa MOKe da NOBpeN dINBJe XNBOTnHe.
- TeMeIbHo npErJepaTe noDpyue Ha kojem heKOpNCHTn MaunHy n yKnOHNte CBe KaMeHe, npyHe, Xnue, KocTN n Dpyra CtpaHa TeJa. BaueHn npEpmTu Mory da doBey Do TeneChnx Nobpea.
- Ipe ynoTpe6e MaunHe, yBek Bn3yeJHo nperneajTe da JI ne je ceuNBO 3a NneBJeHe oWteHeno. OwTeHEni denobn noBehabajy onaCHOCT od nobpeda.
- Pnpdpjxabajte ce ynytctaba 3a 3ameHy np6opa.HenpaBnH0 3aterhyTe HABpTke nIN BnjUN 3a npuBpwhnBahe ceynBa Mory da OwTeCeynBO NIO DOBey Do HeroBOr OdBaja.
- Hocnte 3aunty 3a ouh, yun, rnaby n wake. Ondrobapajyha 3auntnha onpema ymahyje teleche nobpeede od neTehnx onnbaka nn cnlyuajHor KOHTAKTa ca nnHjom ceehba nn ceHBOM.
7.Дok ynpabte MaunHom,yBek Hocnte HeKn3ajyHy n 3aunTHy o6yhy. HeMojtke KopnctHTMaunHy 6ocn nn ca OTbopeHm caHaJama.OBO cmaByje moryhnoCT nobpeDe CTOnana od doDnapa ca NOKpeTHM CeKaHMa nn nnHnjom ceyeBa.
8.Дok paDHTe ca MaunHOM, yBek Hocnte Dyre naHTaNoHe. N3naRaIbe KoKe noBeHaBa BepoBaTHOHy nobpeDe od 6aueHx npEdMeta. - NocmatpaHn He Cmej y da 6dy y 6n3HH nok ce paHn ca MaunHom. OnIbU KoJy cy 6aueH Mory da DOBeDy Do TeuKnx TeJeCHnx NOpeHa.
- YBeK KopnCTnTe DBe pyKe npuNkOM paJa ca MaunHom.ДpxKeMaunHy c o6e pyKe da 6ncte n36erIy6ntak KOHTpone.
11.ДрхиTe MaunHy 3a n3ONoBaHe NOBpUnHe 3a XBataBe jep NnHja ceYeBa Nn CeuBO Mory Da doHy y DoInp ca cakPbEHM eKeKtpnHm NHctanaJama. NnHja ceyeBa NN CEuNBA KOja DoOpnyj CtpyJH BOD MOry da CTabe NOd HAnOH n3IOXeHe MeTAnHe DeNoBe MaunHe n n3IOXe pyKOBaoC tpyjHom yDapy. - YBek 6e36eIte OndroBapajyHn ocNoHaa 3a cTOnaJa N KopNCTHe MaunHy caMo KaDa cTojInTe Ha Tny. KIn3abe nn Hecta6nHe NOBpUHe MOry Da IOBeDy Do rYbNTka paBHOTeKe INN KOHTPone HAD MaunHom.
-
HemojTe ynpaBbaTn MaunHom Ha n3y3eTHO cTpmm Harn6bMa. OBO cmaHye peu3NK oJ ry6ntka KOHTpOJe, npokn3aBaHa n naDa, wTo MOKe n3a3BaTu Teneche NOBpeDe.
-
KaJa paJnte Ha Harn6nMa, yBeK 0636eJnte Iobap ocNoHauc 3a Hore, yBeK paJnte nonpeuHo Ha Harn6y, Hnkad Habnue mHn HaHnKe n 6yJnte N3y3eTHo NaKlbNBn KaJa MeBaTe Cmep. OBO cMaHyje pN3IK OD rYbNTKa KOHTpOne, pOKKn3aBaHa bI naDa, wTO MoKe n3a3BAtN TeNEcHe nobpeJe.
- CBe DeNoBe TeNa DpXnTe DaJIbe Od CeuNbBa 3a nnEeBHeBe KaDa MaunHa paN. Ipe Hero wTo nOKpeHete MaunHy, yBepnte Ce Da Ha CeuHy 3a nnEeBHeBe Hema HnUerA. JeDAH TpeHyTak HenaXhBe. TOKOM pyKOBaHa MaunHom MoKe Da DOBeGe Do NOBpeHbHaBa BAC NIN HeKe Dpyre OcObe.
- HemojTe paanTu ca MaunHom Ha BnCnHn 3HaBnCHe ctpya. Ha taj hauH heTe cnpeHTn HeKeJbeHN KOtAaT ca CeYbOM 3a nnEJIbeH e OMOryHNTn 6oBy KOHTpOny HaMaunHom y HeooyeKuBaHm CntyaunJaMa.
- KaJa ceYeTe K6yH mnn MnaIaIe KoJe cy noTc H3njom, na3nTe Da He oDcKoYe. KaJa ce TeH3nJa y BnakHmMa dpBeta ocNo6oN, K6yH nnn MnaIaIuca MoKe Da ydapn pykoBaOua n/Inn da DOBeDe Do r6bNTka KOHTpOne HaD MaunHom.
- Bydnte n3y3eTHo naXJbNbK ka da ceyeTe K6yn mIaIne. TaHKn MaTePnJaI N Mory da ce yXBaTe y ceuBy n 6dy OndaeHn Ipema BaMa IIN Da Bac n3baue n3 paBHOteke.
- OdpkaBajTe KOHTpOy HAD MaunHom H HeMoJTe DoInPbATn CeINBO 3a NpeBBeHe e nn Dpyre onache nokpethe DeIOBE dOK cy jou y noKpety. OBO cMaHyje onachOCT OD NobPeDa NOKpeTHm DEIOBIMa.
- MaunHy hocnTe nckbvyehy dpxehn je dahe oTeta. IcnpaBHM pyKOBaHem MaunHom yMaHbneTEMoryHOCT CnyajHor KOHTaKTa ca NOKpeTHmCEkaqem, JINHjom 3a ceuebe nn CEYBOM.
- PpNJIKOM ppeHOWeHa Hn CKnAaNtTeBa MaHInHe yBek NoCTaBnTe NOKlonaU Ha CeYINBO 3a nIeBBeHe. IcnpabHm pyKOBaHbEm MaunHom yMaHbHHe MeoryhHOCT CnyajHor KOHTaCa CEHNBO.
- KopnCTnte camo OHa 3aMeHcKa ceuBa 3a PnBHe Koja je Habeo npOn3BoJau. IorpeuH pe3epBn DeIOBn Mory da yBehajy pN3NK od IOMa n IOBpeJe.
- KaDa YnCTHe 3aRNaBBeHm MaTePnJan nIe cepBncpuapeMaunHy, yBepnte ce da je npekndauchKbUeyHn Da je 6atepnja yKnObeHa. HeoeyekBaHO nokpetae MaunHe TOKOM uNHeBa 3arnaBbeHnx MaTePnJa nn CepBncpuHa MoKe da DoBede Do Teuke TeLece He NobpeDe.
DoataHa 6e36eHocHa yno3opeBa
Onwta ynyTCTBa
1.Да 6и obe36eДи npaBnIah paI, KOpncHmK MopaДа npoHTa OBO ynyTCTBO n yno3Ha ce ca pykoBaHem onpeMOM.KopncHnI KoJn HnCy ydoBoJHoJ МрИнФОмИсAnH pN3NKjy da he n3NoXHTn OnaChOCTn Ce6e, kao n dpyre ocObe ycneI He npaBnIHor pykoBaHa.
2. HnkaJa HeMoJTe Da Do3BoJInTe Da anat KopncTe Deua, Oo6e Ca CmaHBeHm Fn3NkHM, ceH3OpHm Nn MeHTaHm CnOCo6HoCTMa, oc6e Ca HeOCTaTKOM NCKyCTBa N 3HaBa, Kao HN oc6e Koje HnCy yNo3HaTe ca OBm yNyTcTBMa; IOKaHN npONcH MoKDa OrpaHnUaBajy CTapocT oc6e Koja CMe Da KopnCTn OBaj ypehaj.
3. Anat Kopnctnte ca Hajbehm onpe3m n naXbom.
- PykyjTe aIaTOM cMo aKO cTe y do6pom ФИЗЧКOM cTaHb.Y.Cab pad o6aBbajTe СМирно nпжьнBo.Kopистte 3dpaB pa3ym И ИмajTe Ha yMy da je pykoBaNaц Ип KOpиснк OДROBOPan 3a HepehHe CnyajeBe Илл onaCHOCT Koja je n3a3BaHa dpyrIM Лыдma ИИн bHXOBOJ ИMOВИH.
- HkaHa He ykbyyjTe MaunHy DoK cy y 6nn3HH Jbyn, noce6Ho deca, nn KyHn ly6mnc.
- Motop ce odmax mopa nckbuyntu ykoNko ce Ha anaty jabn 6nlo kakab npo6jem nn a6hopmaJah 3HaK.
- Nckbuynte n cknHnTe ynoK 6aTepejye nay3ama nn Kaada onpemy octabnte 6e3 Ha30pa n CTaBnTe ra Ha 6e36eHNO MeTo da 6ncte cnpeuHn OnacHOCT 3a npre Hn OwTehe be onpeme.
8.ИЗбэравajteДаКористе МашуУ loшьmВременckIM yCLOBUMa,нарочTo Ka daNoctои ри3NK od уdapa rpoma.
JnUHa 3aWTHTha onpema
1.ДOKpykyjeTeMaunHOMHOCHTUHTNHK3a OUnn3aWTNTHyObyh.
2. YBek Hocnte odrobapajhy oyhy n dyraue KaHTaIOHe DOK ynpabbaTe aIaTOM.
Pokpetahe onpeMe
- YBepnte Ce Da y 6Jn3HH HeMa Jece Hn Dpyrnx JbYdn, a o6paTne naxKBy n Ha KINBOTnHe y 6Jn3HH pada.Ako nx nma, npectaHNTe da KopncTne onpeMy.
- Tokom paDA, BOInTe paUyHa da NocMaTpauH nnXHBOTnHe 6dy ydaIbeHN oJ anaTa HajMaHBe 5M.3ayCTaBNTe anat YIM ce HeKo np6nKn.
- Ipe KopnshheBa yBek npOBepnte da n je onpema 6e36eHa 3a pad.IpOBepnte cnryphocT pe3HOr anata n OKndaupneKnaa 3a naK n aDeKBaTaH pad.IpOBepnte da nn cy pyuKe YnCTe n cyBe n TecHpajTe fynKunOHncaHe npEKnDaHa 3a NOKpeTaHbe/3ayCTaBbAhe.
- PpOBepnta Ja nHa oWteHeHX deNoBa nppe daBer KopuWeHa onpeme. Deo KoJn je owTeHn Tpe6a naXbNBO nperneDatn KaKo 6nCTe ce yBepnHa he paNTn aDeKBaTHO nncnyHHTn CBOjy HameHcky fynKunjy. PpOBepnte ycknaHeOcT NOKpeTHnx DeNoBa, cnojeBe NOKpeTHnx DeNoBa, IOMObe DeNoBa, MOHTaxy n CBE dpyre ycNoBE KoJn Mory Da yTuCy Ha pad anata. Deo KoJn je owTeHn Tpe6a BaIbaHO nonpaBHTn nn 3aMeHnTu y Haewem OBnaUHeHOM cepBnCHom cEHTpy OCm Ako y OBOM yNyTCTBy HnJe dpyraVJe HabeDeHo.
- YKbYHTe MOTOp TEK Kada Cte Wake n CTonana ydaJbHnOd pe3Hor anata.
- Пп почета рада уверпге сда peзн anat He doируж НкakBE npedmete.
- YbpcTo dpKnte anaT npuNkOM pykoBaHa.
- Bodnte payuHa da He nokpeHete cnyaJho anat. He hocnte anat kada je y hera noCTaBbeH yIoxak 6aTepeJne i ca npctom Ha npeknauy. YBepnte ce da je npeknau nckbyeH kada noCTaBbaTe yIoxak 6aTepeJne.
-
Пп почета рада поверпге ду npocotpy 3a pad Иma кчанх orpaDA, kameha nI IN pyrnx YBpctnx PpeDMeTa. OHI Mory dOwTeTe ceuNBO 3a NneBJIbeHe.
-
IpoBepnta Jn y xHbunu Hx6yHy noctoje cTpaHnpedmetn, kao wTo cy xHuahe orpade nnckpmbehxNue, npe Hero wTo ynoTpe6nte obaj anat.
HauHHpaHa
- KopnCTHTe onpemy cmo npn do6pom cbetny n BnIbNbBOcTn. Tokom 3nme na3nte ce Kn3aBnx nNn BnaJxNx NObpunHa, Jeda n Chera (pn3nk od kIn3aBa). Bodnte pauyHa o 6e36edHom ocNoHcy dok cTe Ha Harn6mHa XoJaTe, HnKaada HeMojTe TpuATn.
- Na3nte Da Bam pe3Hn anat He noBpeDn CTonaja nnu wake.
- HkaJaHemojTe pyKOBaTH OnpemOM DOK CTojnte Ha MepeBuHaMa.
- HnkaJaHemojTe Da ce neHeTe Ha dpBehe da 6nCTe HeWTo NceKn y3 nomoh onpeme.
- HkaJa HeMoJTe Da paAnTe Ha HeCTa6nHm NOBpuHHama.
- YknHnTe necak, KameHe, ekcepe n cnuHne npedmete koju ce mory hahny noDpyjy pada. CtpaHn objektmory da owtete pe3Hn anat n da y3pOKyj onache nobpaTHe ydape.
- YKoJIHKo pe3Hn aJat yIapu y KameHe nJIn dpyre YBpCTe ppeMeTe, OdMax NCKJbYuHTe MOTOp n npOBepNTe pe3Hn aJat.
- y kpaHm peOBHM nHTepBaHnma npoBepaBajTe da Hn Ha pe3Hom aatay hMa oWteHeBa (OTkpNBaBe TaHKx NyKOTHa npoBepom 3Byka naHOr ydapaHa).
- YBek cKNHnTe yIoxak 6aTepeJce ca onpeMe: KaJa onPemy ocTaBbate 6e3 Ha30pa; npe yKnaHaBa 3aueNbeHa; npe npoBepe, uShHeBa HnPaHa onPemn; NaKoH uTo ydApnte y HeKo cTpaHo TeNo; KaI rOg onPema NoUHe a6HOpMaJIHO da Bn6pnpa.
10.Anat3aceheHeHaCTaBbda paan HaKOH wTO ce MoTOp NCKJbuyn. - Ppnnikom npnUbpshnBa ncknaHa noknonca ceuBa, na3nte da He nobpeDHTe pyke.
YnyTCTBa 3a OdpkBaHaBe
- Ппе поета рада мора да с поберс стабе onpeme, noce6ho pe3hor anata n 3aWTTHnx ypehaja.
- Nckbnyte MOTOp n cknHnTe yIoxk 6aTepeJne HrO Hero wTO npucTynTe ODPXaBaHy, 3ameHn pe3nX anata nn nuwheby onpeme nn pe3Hor anata.
- KaRa Ra He KopnCTHe, NoCTaBnTe NOKlonauceuBa Ha anat n YuBajTe aNat y 3aTBopeHOM npocTopy, Ha cyBOM, Bucokom N 3aKJbYuHaOM MeCtY, BaH Domawaja Deue.
CAUYBAJTE OBO YNYTCTBO.
A yNO3OPEHbE: HEMOJTE ce6n da
do3BOJInte Da 3aHeMapIte cTpora 6e36eHocHa npabIna Koja ce Ondoce Ha OBaj npOn3BOd ycnei
HNBeHnue Da CTe npOn3BOd Do6po yNo3HaII
INCTeKnn pyTuHy y pKOBaBy hNme (ycnei
yector KopuSheBa). HEHAMEHCKA YNOTPEBA
Hn HeNoTObaHe 6e36eHocnX npabIna
HaBeDeHnx y OBom yNyTCTBy Mory DOBecTN do
TeewkNx TeJeCHNX NOBpeJa.
Опс дЕЛобА
Cnka1: 1. NOKnonaCceHbA 2. NOKnona3. CeyHBO 3a PJIeBJIbeHe
CKJIAPAAHbE
A yno3OPEHbE: NcKbUynte MoToP n KJIOHnTe yIooK 6aTepeNje npe cKlanaba nn NoeHaBaHa onpeme. Y cynpothm, MaunHa moKe n3HeHaDa da ce yKbUyn n3a3OBe nobpe.
Ayn03OPEHbE: npnnkOM cknanaHa nnopeaBa hba onpeme, yBek cnyeTne onpemy. Cknanahe nn noeewaba he onpeme y ycnpabHom noJoxajy moke doBeCTn Do 03bHNx nobpega.
Ayn03OPEbE: npaTe yno3opeBa mpe npedocptpoxhocn y oedeKy ,BE3BEOHOCHA YNO3OPEbA" n npnpuyHK ca ynyTCTBIma 3a norohcky jeDHHu.
CknanaheHaCTaBka
- PnivBpCTnTe 2 nNoe 3a noDeuBaHe 3a HacTaBAk Tako Da Jxne6oBn nNoa 6ydy OkpeHyTu Ka CnoJbA.
Cnka2:1. Pioa 3a noewaBahe
2.ПичврстteceuBO3a npeBbeHe 3a nIOye 3a noDeewabaHe dOK 6naro OTbapate ceuBO npema cnoJb.a.
Kaanda npuBpshyjeteceuBO3aPJIeBbIbe, yBepTe ce da je cTpeNua ycmepeHa Ka ueBn.
Cnka3:1.CtppeNua
Yrao ceuBa 3a nIeBbeJe moryhe npomeHnTn nopabHabaem nCynyeha Ha ceuBy 3a nIeBbeHe ca jeHNm Ond nCynyeha Ha IIOUH 3a NOdeWabaBe.
Cnka4:1.Ncnynebe
OBABEWTEHbE:Bodnte pauyHa da ce cTpeIuIe Ha IInu cyceINBa 3a PJIeBJIbe OkpeHy y Cmepy npka3aHOM Ha cInu.
Cnka5:1.Ctpenua
- YBepnte ce da je ceuBO 3a nneBbehe y KOHTAKTy ca nOouama 3a NOdeUaBaHe.
Cnka6
- YmETHnTE Bujak ca cTpaHe 6e3 HABpTke n 3aTeHnTE ra NOMoHy KJbUya.
Ioctapajte ce da 3aBpTaH 6yde yBPCTo 3aTeHTY.
Cnka7:1.BujaK2.HaBPtKa
HANOMEHA: MOMENT npuBpuhnuBaHa: 5-10 H·M
NocTabJaHbe UeBN HaCTaBka
AAXHbA:YBeK npOBepuTe da nI ne ueB HactaBka YbpCTo NOCTaBJIbeHa HaKOH MOHTnpaBa. Ako je HenpaBnHIO MOHTpate, HactaBak 6n MoraO da ce OTKaHy ca norOHcke jeDHHue n N3a3OBe nobpeJe.
IocTabte HacTaBak Ha noroHcKy jeiHnUcy.
- YKJIOHnTe NOKJOnaHa KpaJy OCOBHe.
Cnka8:1.OcObHa2.1oKnona
OBABEWITEHe: He oJnaxnte noklonau jep je HeonxOaHa3 aCKJaAnWTeHbe HaCTaBka.
- OkpeHnTe noJyry Ka hAcTaBky.
Clnka9:1. Nolyra - NopabHajTe nRny ca 03HaKOM cTpeNue Ha noroHcKoj jeiHHu. YMeTHHe LOK He NCKOu dyIme 3a OTnyTaHe.
YBepnte ce da ce IINHja nolokaja Hala3n Ha Bpxy O3HaKe CTpeNue Ha norOHckoj jeDHHu, a Da cy O3Haka CTpeNue Ha norOHckoj jeDHHu N O3Haka Ha ueBv ycmepeHe jeDHa npema dpyroj.
Cnka10: 1. Dyrme 3a otnyuTahe 2. O3haka cTpeHnue Ha noroHcKoJ jeDnHnU 3. Irna 4. LInHja noLoXaja 5. O3haka cTpeHnue Ha ceBn
- OkpeHnTe nonyry ka noroHckoj jeuHnUz.
Cnka11:1.
PnoBepTe da IJI neOBpHnHa nOlyre npaJIeJHa y Ondocy Ha ueB.
OBABEWITEHbE: HeMoJTe cTe3aTu noLyry 6e3 yMeTHyTe OCOBnHe HAcTaBka. NOnyra MoKe npBeNtue da 3aTeRHe yJa3 NorOHcKe OCOBnHe n OwTeTne je.
Ia 6nCTe yKnOHNIOOBHny, OKpeHnTe nOnyry y npabuy hactabka n N3ByuNTe OCOBHny DOK npntnckate Dyrme 3a OTnyuTaBe.
Cnka12: 1. Dyrme 3a otnyuTahe 2. Npyra 3. Leb
YKnaBaBe n npuBpshnBaHbe NOKlonca ceynBa
Да бисте уклонлп полonaц сени, рунite полonaц сени Ка уHyтрашьов CTpanи И Okpenite ra.
Clnka13:1. POKlonauc ceHnBa
Да 6истпричьрстлп полonaц ceинba,зakaynte
пokлonaц ceинba 3a седу CTpaHy ceинba 3a
Плевъе,а 3atIM ra OKpeHNTe.
Clnka14:1. Poklonauc ceHnBa
HANOMEHA: MoKeTe npuBpCTnTn noklonaCceNBa 3a ceB kao wTo je npka3aHo Ha cInu.
Clnka15:1. Poklonauc ceHnBa
NocTaBbAbe nnn yKnaBaHBe ceuNb3a nnEeBHe
AAXHB: PpHnKOM 3aMeHe ceYnBa 3a nneBbeHe, yBeK HOCHTe pyKaBnCe da pyKe He 6n DoWNe y DnpeKTah KOHTaKT ca CeYnBOM 3a nneBbeHe.
AAXHbA: NocTabTe noknonaue CeyBa nppe yknaaba an noctabbaHa ceyBa 3a neBbebe.
- NocTaBnTe noknonaCceHbHa ceHBO 3a nnEeBbeHe.
- YKNOHnTe Bnajk Tako To hTo heTe ra OTnyCTnTn NOMOHy KJbUyA.
Cnka16:1.Bujak
- YKIOHHTe CEINBO 3a NNebBbeHe DOK 6naro OTbapate CEINBO 3a NneBBeHe Ipema CnoBa.
Cnka17
IocTabnte ceuBO 3a nIeBbeHe y cKnady C nyTCTbMa 3a cKnanaHe HacTabka.
TEXHIYHXAPAKTEPNUCTNKN
Modenb:WA400MP
HaIraTe Miue He B3yTTi 3 NiOuBAMN,IO HE KOB3aHTb.

IonepeJxHn. IpeTeXHiHm 06cIyROvBaHHaHEo6XiIDHO BiE'EdHaTn akymyIaTOp.
TpmaTe CTOnn noDani BiJ ne3a nna BnuIaENHb6yp'raHB.

CTopoHHI OOC6H N TBAPHHN He NOBHHI H6nKkATNC4o eNEeKtpoiHcTppyMeHTa Ha BiDcTaHb MeHwe 5 M.

Tapayi noBepxhi! MoKJIbI onIKn naIbciB i pyk.

IapaTobAHn pIBeHb 3BykoBoi nOtYxHocTi BIDIOBIDHO Do NipeKTHBn EC oDo wymib No3 npMlueHHaMn.

PibeH 3ByKOBoI NToyXHOCTI BiNObiDHO Do PernameHTy ABCTpAlII (HOBINPiBdeHHN YeIbc) 3 KOHTPOJIO 3a WymOM
Ppnu3HaueHn
LHa Hacadka npn3NaHe HaIne DnBnJaJIeHHy 6yp'AnHy Ha 3emni BnKOpNCTOByETbcra pa3om i3 peKOMeHDoBaHIM npNbOBDnM IHcTpymeHTOM. 3a6oPoHeHO BnKOpNCTOByBaTu HacaDky 3 IHIOIO MeTOIO. HeHaJIexKeBnKOpNCTaHHa HacaKn MoKe npn3BeCTn Do TjKKnx TpaBM.
Ieknapaia npo BiAnOBiHicTb cTaHdaptam EC
Tinbku dna kpaH Ceponu
Mn, Bvpo6hNk CuBOrO oBnAHaHnR: KOMnHiMakita Europe N.V., UpNiDnHa aDpeCa: Jan-Baptist Vinkstraat 23070 Kortenberg BELGIUM (BeIbri), yNOBHOaKyEmo Kazuhisa Makino CKlaCTn TexHiCyHy DOKyMeHTaCiIO Ta NiD CBOIO BuKnIOUHy BiNObiDaJIbHicTb 3aABnE Mo pTe, uO BnPi6; POn3NaeHH: HacaKa dN BuaJeHHra 6yp'AnH. MoJeni: WA400MP. BiNobiJaEc BCIM 3AcTOCOBHM BmORMd INpeKtNB 2006/42/EC,a TAKoX ycIM 3AcTOCOBHM BmORMaTakNX DInpeKTHB EC, k2000/14/EC,i Bvpo6nEcbr3iNo 3 TaKIMn rapMOHIzOBaHmN cTaHdpTamN: EN 62841- 1:2015+A11:2022,EN ISO 11806-1:2022,EN IEC 62841-4-7:2022+A11:2022. Micne i DaT aeknapaii: Kortenberg,Belgium (BEnbri).27.9.2023 BiNobiAlbHa oc6a: Kazuhisa Makino, INpeKtop Komnaii Makita Europe N.V.

Pnc.13: 1. Koxyx ne3a
Uo6 3akpinnt Koxy Xe3a, 3akpiinb Koxy Xe3a 3 Ondoro 60ky Je3a Dnra BndaeneHHy 6yp'HIB, a notim nobephiTb Ioro.
Puc.14: 1. Koxyx ne3a
PIMITKA: KoxyX Jea3a MoXHa npKpInTu Do Tpy6n, YK Noka3aHo Ha pncyHky.
Pnc.15: 1.Koxyx ne3a
YcTaHOBHeHHa 3HrTTaJe3a dJa BnDaIeHHa 6yp'HaHB
OSEPEXHO: Ipea 3amio ne3a nla Bnda-eneHH 6yp'AHIB 3abXdn BdraTe pykabuci, o6 yHnKHyTN npmoro KOHTky pK i3 ne3om dnn BndaenHH 6yp'AHIB.
OBEPEXHO: PnKpInHouTe Koxy X ne3a, nepu HIX 3HimaT N BCTaHOBIOBaTN Ne30 dnn BuaJeHH6yp'HNB.
-
Pnkpinitb koxyx ne3a do ne3a dna Bnu danen H6yp'hIB.
-
3a donomoroio kIoua nocna6Te 3himtb 6oJt.
Pnc.16:1.BoNT
- 3HIMITb neo dna BndaJeHHa6yp'AHIB, TPOXIN BiDkPnBUNeO nra BndaJeHHa6yp'aHIB Ha3OBHI.
Pnc.17
YctahOBiTbJe3oDnBnDaIeHHB6yp'HIB,DTpMHyO- Yncb IHCTpyKciuOdo 36npaHnHaCaNk.
ONMC POBOTN
OBEPEXHO: O6OB'3KOBo nepekoHaTecra, 10 npnlaBmKHeHO,a KaceTy 3 akyMnyTopom 3HrTo, neped perynIOBaHHa 60 nepeBipKOo cyHKcioHyBaHHiaHCTpyMeHTa.
IopraokpeRyIIOBaHHaKyTa pi3aHHa
OBEPEKHO:pepepeynoBaHHm KyTa p3aHHnpekoHaTecra,io IHcTpymeHT BIMKHeHO.
Kyt ne3a dny BndaeneHH 6yp'hIB MOxHa 3miHOBaTH, dny yoro nepedbueho Tpi pibhi. 6mihntu kyt, cymictiB BVCTyn Ha ne3i dny BndaeneHH 6yp'hIB 3 ODNIM i3 BNCTynIB Ha peryIIOBAJbHNX PIACTINAX, a NOTIM yCTAHOBiT bne0 dny BndaeneHH 6yp'hIB.
- BnKOpNCToBMyOn raIKOBn KJIOn, nocna6Te 6oJr, AKn #iKcye piaJIbHe ne30.
- CymictiB BuCTyn Ha nezi Ia BnuaJenHna 6yp'hIB 3 ODHIM i3 BuCTyniB Ha nlaCTnHax perynIOBaHHa.
- 3HOBy 3aTgHITb 6oNT, 0o6 3aΦikCyBaTu pi3aIbHeJIe3O.
Pnc.18:1.BucTy
POBOTA
ANONEPEDJXEHH:IoTpmyTeecnonepeJxehb i 3acepeJxehb,HaBeJeHux y po3dini «NONEPEDJXEHH IPO HEOXBIDHICTbDOTPUMAHH TEXHIK N E3NEKN Ta noci6nky3 ekcnnyatau npnbOHoro IHctpymeHTa.
Ekcnyataia iHctpymeHTa
ANONEPEDKEHH: TpMaTe pyKn noaI BiN ne3a nra BndaJeHH 6yp'HIB.
A NOPEJXEHH: BybTe Ha3BnuaHNO 6epekhi noctiHno 36epiraute KOHTpObn HaI INCTpyMeHToM. He DO3BOJnIte IHCTpyMeHTy BIXNJIaTncy y BaW 6iK a6o B 6ik iHmX oci6, 30 3haxoJTBcra N6bN3y Micza po6Ot. Ype3 BtpaTy KOHTpOIO HaI IHCTpyMeHToM OepaTop Ta iHsi OOC6n MoKyTB OTPMaTHn cepNo3Hi TpaBMn.
IIOPEJXEHH: IpeB BuaJeHHaM 6yp'HNIB np6epiTB i3 po6ooi dInrHKn rIKN KAMIHHA.
PIMITKA: L'ien hctpymEn Tpns3haeHn dna BuaenHHbyp'hBdo 15 cm (5-7/8").
Pnc.19
OSEPEXHO: RAKHaMeHwe BnKOpncToBnyTe IHCTpymEt y cneKoTHy nOroHy. IiD Yac BnKOpncTaHHI IHCTpyMeHTa CTExTe 3a CBOIM i3nHMM CTahOM.
O6EPEXHO: BybTe o6epexhi: He
donyckaIte BnnaKOBoro KOHTaKTy 3 MeTaIOM
a6o IHmN TBePmN 06'cKtAm N iD Yac Bnda-
enneHs 6yp'raHIB. Ne3O dJaBnAneHHa 6bp'raHIB
MOKe 3NaMaTnCJ CnpuHHTn TpaBMy.
O6EPEXHO: He haMaraiTeC8 doTayuTEc8do BiiDaeHnx 30H, KOJI npauoCTe 3 IHCTpyMeHTOM, OCO-6JIbBO cToaHn Ha dpa6uHi - ue HAD3BvauHNo He6e3neuHO. IiJ vac po6oTu He CTiIte Ha HectiKII a6o HemiuH NOBepxHi.
YB4A: He BnKOpncToByte iHCTpyMeHT dIaI, 0o MoKyTb npN3BeCTn Do 3ynHKn a6o dyXe nobIbHorO o6epTaHHa.
TpmaTe iHcTpyment o6oMa pykAmu, ytpmuyouu Ioro 3a nepeDnHIO pyky Ta 3aDnHO pyky npINBOdHOro arperaTy.
Pnc.20:1.IpepeHpyka 2.3aHpyka
YbIMKHiB IHCTpymeHT, TpMaIOHJe3o DnB BuaJAEHH 6yp'HIB HAD 3emHe. POMictiB Je3o DnB BuaJAEHH 6yp'HIB Ha 3emIIO, a NOTIM WTOXBaIte IHCTpymeHT ypeE, 0o6 Nobilho BuaJAHs 6bp'HN. PpaObaTn Ierwe, KOJI Je3o DnB BuaJAEHH 6bp'HNb po3TaWObaHe MaJke NepneHdNkUyIrpHO 3emNI.
Pnc.21
Pnc.22
TEXHlYHE OBCJyROBYAHNЯ
A NOPEPKEHH: Npeo ornaom a6o texHiHm 06cnyroByBaHHaM 06nlaHaHH BUMKHTb DBuHy i 3HimtB kaceTy 3 akymyIaTOPOM. Y pa3i HeoTpMaHHa ciEi BmOrn MaunHa MOKe BnAnKOBO 3aNyCTNTNCr CnpuHHTN TAKKi TpaBMn.
NONEPEDKEHH: O6OB'3KOBO KnaiItb 6nlaHaHH Ha rOpH3oHTaJIbHy NOBepXHIO nepeD orJaOM a6o TexHiHM o6cnyROByBaHHM. 36npAHnA6o peryIIOBaHHa 6nlaHaHH y BepTKaJIb Homy nOLOKeHH MoKe np3BeCTn Do cepNo3HO TpaBMn.
A NOPEJXEHH: IOTpmyItec nonepeJxHb i 3acTepeJxHb,HaBeJeHx y po3diN I NOPEJXEHH NPO HEO6XIHCTb DOTPUMAHH TEXHIK INEKN Ta noci6nky 3 ekcnlyatau npNbOdHoro IHcTpymenta.
OBEPEXHO:Пдчac ornayabo npoBeHnTeXhiHoro 6cnyroByaHHo OJaRaTe pykAbuci.
YBAG: Hikon He BnKOpncToByte ra30in, 6eH3HH, po3piJxvBauchnpt Ta noDi6hi peoBHN. IX BnKOpncTaHHa MoKe npN3BecTN Do 3MiHN KOJIbOpy, deOpmaui a6o nOBu TpiunH.
Дязбe3neuehenьБE3NEKN ta HADINHOCTI npodykui, II peMOHT, a TAKOX po6OTn 3 obcnyrobyBaHHa 60pey JIOBAHH NOBHHI BIKOHByATncb yNOBHOBAKeHmN a60 3aBOcBKMn cepBicHMn ueHtpamM Makita i3 BIKOpNC TaHHM 3anuactNH BINO6HNTBa KOMNaHII Makita.
OuHsenn HnCtpymeHTa
UO6 ouHCTnI INCTpyMeHT, npoTpiTb Ha HbOMy nIN cyXIO TKaHNHO a6o 3aHypTe NOro B MInbHy BOdy Ta BNIMtB 3BiDTH.
Texhichne 06cnyrobyBaHHnJe3a
Pio6oT np6epitbtpaby KopHHa 3Je3a.
YBAGA:He MnTeJe3o y BoDi. Ce MoKe npi- 3BeCTn Do yTBOpEHHa ipXi NnOwKOJxHnJe3a Yn HacaDkn.
36epirannn
Pnpiinb Koxy Ie3a Do ne3a DnBnAneHH 6yp'HIB. 36epiraTe iHCTpymEt y HeIOCTynHomy dna diTei Micu. 36epiraTe iHCTpymEt y Micu, uO He 3a3hae BnNBBy BOJOrTa DOuy.
JaKuo HacaKa 36epiraTbcra OKpEmo BiI npNBOJHO IHCTpyMeHTa,3akPnBaTe KHeu Tpyb KOBnaqKom.
Pnc.23
3mauYBaHHaTeTaNen,po pyXaIObCra
YBAFA:BukohyTe iHCTpyKuIi zoDo nepioDnHocTi N O6cry 3actocyBaHH KOHCnCTeHTHO MaTnJa. Y pa3i HeBukOHaHH LciE BmOrn HeoCTaTHc 3MaUyBaHH MOKe pN3BeCTn Do N0WkoDxKeHH pyXOMNX DeTaJIe.
Bénya Bicb
HaHociTb MaCTnIO (MaCTnIO Makita N No.2 a6o anaIoro-riuhe) Koxhi 25 roDIn po6OtN.
Pnc.24
PIMITKA: OpiriHaIbHe MaCTnIO Makita MoXHa npu6aTu B dUnepa Komnaii Makita.
3MaUyBaHHKOHcNCTeHTHM MaCTNJOM
IHTepBaJ 3MaUyBaHHa: KoxHi 25 roDInH po6OtN
-
BnmiTb 6oJr 3 OTBOpy IJRA 3MaueHnra.
Puc.25:1.BoNT -
HaheciTb MaCTnIO (MaCTnIO Makita SG No.0 nn eKBiBaIeHTHe) Ha iHcTpMeHT (Pn6nn3Ho 3,0 r).
- 3aTHiB 6oJt.
UCYHEHHH HECNPABHOCTE
Iepw Hix 3BepTaTcra 3 npBoby pemOHTy IHCTpymeHTa, npOBeITb Ioro nepeBipKy camocTiHo. Y pa3 BnABnEHnHecnPabHocti, kY He OncaHO B cboMy Nocihky, He HamaraTeCpa0i6paTN IHCTpymeHT. HatomicTb 3BepHtbcrdo ABTopu3OBaHnx cepBichx ceHTpIB Makita Ta BnKOpNCToByte dny pemOHTy TINbKN 3anachi qactHHn Bnpo6Hn- tBA KomnaHii Makita.
Pnc.15:1.Yexon ne3Bn
YCTaHOBka HnN CHrTne npONoJOnHOrO Je3BnA
BHIMAHHE: npn 3ameHe npononoHoro ne3Bna 06a3aTeNbHO HadeBaIte nepuAtK, YTO6bI He KacaTbcraero HenocpeDCTBeHHo pyKaMn.
ABHUMAHNE: Ipeed ChrTneM Hn yCTaHOBKO npononoUOHo ne3Bn npKpEnIe K Hemy qExoJ.
- PnPKpEnTe yexoJ dJa ne3BnK nponnoHOMy ne3BnIO.
- BbIeHNTe 6oNT, ocna6NB erO raeHbIM KIOHcOM.
Pnc.16:1.Bont
- CHIMITE npoONOuHoe Je3Bne, Cnerka BbirHyB ero HapyKy.
Pnc.17
YcTaHOBtE npOnoJIOHoe ne3Bne, cNeyra yKa3aHnma m no pa36OpKe hacaKn.
ОпИСАнUE PAБOTыI
BHIMAHNE:pepe npynpOBKOn nnpoBepko yHKun HnCTpyMeHTa 63aTeJbHOy6eNTecb,TO OH BbIKNoueH erO aKKymJTopHbI 6JOK cHrT.
Pereynipobka yrna cpe3aHn
BHIMAHNE:pepepepynpobko yrape3aHnO6a3aTeNbHOy6eNTecbBTOM,TOHHCTpyMeHTBbIKJIOueH.
YroI npOnoNoHOrO Je3BnA MoKeT MeHrTbCmMeKdTyPemr yPoBnMn. Ira n3MeHeHn rTa CoBMeCTnte BbICTyn Ha npOnoNoOHOM Je3BnC OAnHM N3 BbICTyOBHa perynpOBOuHbIX PnactInhax, a 3aTeM yCTaHOBtne npOnoNoOHoe Je3BnE.
1.Ocna6bTe 6oT,Фнксуюп ржушee Ne3Bne, C NOMOsbroraeHoro Klnoua.
2. CoBmctnte BbICTyn Ha nponnoOyHom Je3BnC OdHIM n3 BbICTyOB HA peryNIpOBOHybIX PInactnHex.
3. NOBTOPHO 3aTAHnTe 6oNT dIg IOKcaun npexy-
Pnc.18:1.BbIcTyn
3KcπJyATAUЯ
OCTOPOXHO: Co6IIOJaTe Mepbl 6e30- nachocTn I npedocTopoxHoctn, npBedeHHbIe B rnaBe «MEPbl E3ONACHOCTN» npykoBoDcTbe no 3Knlyatau nnOBoro arperata.
3KcnJnyataunn HNCTpyMeHTa
OCTOPOXHO: He noDHOCHTe pyKn 6Jn3Ko K nponolouHOMy ne3BnO.
OCTOPOXHO: Co6HpaTe Oc6yO octopoxHoCTb, Yo6bI COxpaHrTb KOHTpOJIb HaINHCTpyMeHToM BO BpeMa pa6oTb. He DOnyckaTe OTKNoHEHn INCtpyMeHTa No HAnpaBHeHIO K BAM Nn K dpyHM NIOdAm, HaxOJaUMcN IO6JN30CTn. Hec6JIIODeHne DaHHOr Tpe6OBaHn MOXET npIBeCTn K cepBe3HbIM TpaBMam NOCTOpOHnX NlU nIe ONepaTopa.
OCTOPOXHO: Ipeep nponokoy6epnte naKN KAMHN 30HbI nponONK.
INPMUEAHNE:ДаньиИНСТРУМЕТпpeДиЗАнчENДЯудяпенсоргяковДиHоМeHee15cm(5-7/8").
Puc.19
BHIMAHNE:IO BO3MOXHOCTn He nCNoB3yTe HNCTpyMeHT B Xapkyo norOdy. Pnp pa6ote C NHCtpyMeHToM yHTbIbaIte CBOe 0n3UneCKoe COCTOHNHe.
ABHUMAHNE:Co6IIOJaTe oCTOpOxHocTb, 706bl BO BpEmr npOnoJIKn CnyaHNO He 3aDeTb MeTaNueckyU orpaDy Nn DpyRne TBepDbie npEdMeTb.IponoOnuHoe Ne3BHe MOXET CnOMaTbcN nn HaheCTn cepBe3HyTO TaBMY.
A BHIMAHNE: He nbItaItecB dOTRAHyTbcR INHCTpyMeHTOM DO OTdAneHHbIX yAcTKOB,OCo6eHHo C neCTHnCuI. 3To KpaHHe onacHO. Bo BpeM pa6oTbI HE CTOnTe Ha WATKnx NIN HeyCtOuNHBix npeDMeTax.
PIMMEAHHE: He nCnoNb3yIte HnCTpyMeHt cnoc6amn, 3actaBnIooMm DnRatEn bOctaHaBnBaTbcra NN BpaataBcra OeHb MeJeHHO.
ДерхиTe INHCTpymEnT O6eIMn pykAmn, yIepxNba erO 3a NepeiHIOU n 3aDHIIO pyKoATrKn CInOBoro arperaTa.
Pnc.20:1.IpepeHnry pyKoTka 2.3aHnry pyKoTka
PnB BKJIOUeHm INCTpymeHTa OTcPaHraIte npoNOJIOuHoeJe3BneOT 3emJIN. JIy BbINOJIHeHn IPOONIKN NOMECTITE npoNOJIOHoe Je3Bne Ha 3emJIOI TAHIne IHCTpymeHT Ha ce6a. Pa3MeueHne npoNOJHOroJe3BnI POJyIOM, 6nI3KIM K nepNeHdNKyIpy K nobepx-HOCTn 3emJIN, OJIeJHaet pa60Ty.
Pnc.21
Pnc.22
OBCJNYXMBAHNE
OCTOPOXHO: Ipeep ocmotpom nIIN TexHn-ueckm 06cnykBaHneM 6opydoBHaNr OTKHO-utyTe DBnraTeB n3BnEKeTte 6nok akKymJrTopa.
B npotubHom cnyae Bo3MOxKeH HenpeHaMepeHHbI 3anyck HnCTpyMeHTa, KOtOpbIMoKeT npNBecTu K noJyehNIO TjKeJoTtpABMbI.
OCTOPOXHO: Bo Bpemr ocmotpa nnn 06cnykubnna o6opydoBaHnna 683aTeJbHo nnoxute er. C6opka nnpepynpobKa ycptpoi-CTBa B BePTNKaJIbHOM NIOXeHN MoKet npNBecTn K cepbe3HO TpaBMe.
OCTOPOXHO:Co6HouaTe MepbI 6e30- nachocTN INpeoCTOpoxHocTN,INPBBeHeHbIe B rnaBe «MEpbI 5E3ONACHOCTN» npkoBoDcTbe no 3Knnyatauun cnnoBoro arperata.
BHIMAHNE:PnOcMOrpeN O6cnyxHBHnHaDeBaTe 3aunTHbIe nepuATKn.
PIMMEAHHE: 3anpeaetcnaonb3oBaTb 6eH3nH, pactBopnten, cnprt n dpyrne noo6HbIe XnKoCTn. 3To moKeT npNBecTn K oBeCuBe- YBaHIO, deOpMaunn TpueHHam.
IЯ obecneueHЯ BE3OJACHOCTN I HADEXHOCTUOBpyoBaHnpeMOHT,JIIO6oe dpyroe Texo6cIyKuBaHne NJI peRyINPOBky Heo6xOIMo IpoN3BOIDITb BYNOJHOMOeHHbIX CepBNC-CEHTpax Makita IIN CepBNC-CEHTpax PpeDnpaTnC INCNoJB3OBAHnem TOJbKO CMeHHbIX YAcTei npOn3BOIDCTBa Makita.
OuHCTKa nHcTpymeHTa
Pn BbIIOJIHeHn OUcTkn HcTpymeHa Tpe6yeTcB bITnpaTb nbIb cyXo JIN60 CMOueHHoMbIbHOB BOO IN BBIXaTO TKaHbIO.
yXo3aJIe3BnEM
Iocne pa60tby ydaHnTe C ne3BnCnyTaHHyTO TpaBy nn KOpHn.
PIMMEUAHNE:He MoIteJe3BnE BBOe.
3TO MOKET npBecTN K NOBpeKdeHIO Je3BnI HnI HacaKn N6o NOBneHIO Ha Hx pKaBUnHbI.
XpaHeHne
PnKpEnIte YexoI nJne3BnR K npOnOIOuHOMy ne3BnHO. XpaHIne INCTpyMeHT B HeDOCTynHom DnRA DeTeMecTe. XpaHIne INCTpyMeHT B MeCte, 3aunueHHOM OTBO3dEChTBnB BLaIg NIN DoXJr.
Pn nomeeHn HacaKn Ha xpaHeHne OTeJeBHOOT CINOBOr arperaTa HadeHbTe 3arJyUkY Ha KOHeu Tpy6Kn.
Pnc.23
Cma3ka DbNxUxxCsJeTaJne
PIMMEAHHE: Co6IIOaIte peKoMeHDoBaHHyIO nepHOINuHOCt b KOJINuCeTBO NOJaCn Cma3Kn. HeIOCTaTOUHoe KOJINuCeTBO CMA3KN MOKeT npIBeCTN K IOBpeKdEHN O BnKyuXxCaCTeN.
PnBODHaOcb:
HaHocnte cMa3ky (cMa3ky Makita N No.2 nIn aHaJIO- rnuHyU) kaxdbie 25 yacob pa6oTbI.
Pnc.24
MaKyIaHFaH KyaT KOHdbipfbicbl
Byt canTaMa TeMeHne KepCtiIreH Kyat KOHdbipfblnapbimeHa naaJaNaHyfa apHaIraH:
DUX60 BaKaHa caTamaJapbHa apHaJFaH KeNpYHKUHOHaJIbI AkKMyJrTOpJIbI XeTeK
DUX18 BaKaHa caTamaJapbHa apHaJIFaH KENΦyHKUHOHaJIdbI akKymJIaTOpJIb JKeTEK
UX01G BaKaWa canTamaJapbHa apHaJIFaH KeNΦyHKUHOHaJIbI aKKMyJrTOpJIbI KeTeK
A ECKEPTY: CanTaMaHbI MaKyIaHa6aFaH KyaT KOHdbipfbicbImeH naJaIaHyra 6oJMaIdbI. MaKyIaHa6arAH tipKecimde naJaIaHa yabip JapaKaTaKa ce6en 6OlybIMymKin.
Bennep
TeMeHeJxabkTa naJaIaNbIybl MyMkiH 6eJIrInep KepceTirreH. NaIdaIaHy aIbIHDa oIapDbH, MaftiHaCbi TyciHn anbH3.


PainananyHyckaynbIFbINOKbINWBIFbIN, epexepeipopihdaH3.

KoprafbuDyNbfa KIn, KoprafbuW Ke3indipik neH KyNaKkAn TaftbHb3.

Koprafbii konfani.

Ta6aHbI TaYFaHaMaTbIH, MblKTbl aR KIM KINH3.

EckepTy; aKkMyIaTOpIbI TeXkbI3MeT KepceTneC 6ypbIH aKbIpaTbIbI3.
AaKTabbHb3Ib apamwn otay nbWafbHa KaKbHdTaNaHb3.

AHaIaIaIbI aamap MeH KaHyapIap 3JIeKTpIIk KypanDaH KEMIHDe 5 M KaIbIKbIKTa 6Olybi KepeK.

BeTI bICbIK - caycaKTapNbI HeMece KOnDbI Kyndipei.

Kenilik6epinietihdbibckbicmbiHbH deHreI EO cbiptkblybn6oBbHwa dnpektnbacha caKeC keNedi.

Ib6ic KyaTbHbH DeHrei ABCTpaNnHBH NSW yBbNb backapy TypaJIe epexecine cainke Keenei
KoIpaHy MaKcaTbI
Bny KOHdbipMa MaKyIaHaFah Kyat KOHdbipfbicbHa
KanfaHbIn, Kepderi apamwentepdi OtaYf aHa
aphanraH. KOHdbipMaHb I backa MaKcatneH
naiDanahya MyIe 6OImaIbI. KOHdbipMaHb KaTe
naDanaHy caIaPbIH aYbip JapaKaT aIybiHb3
MymkIH.
EC caikectik deeknapauncbi
Tek Eypona enedepihe aphanfah
Bis eHdpuWinepeTINe: Makita Europe N.V.,
Bn3HeC MeKeH-KaIbI: Jan-Baptist Vinkstraat 2 3070
Kortenberg, BELbΓN. Kazuhisa Makino aTTbl
DInpeKTOpra TexHNKaIbIK KxKaTTbl aAaTayfa yKaIMdIK
6epy KeHe aApbIka JxayanKePwIirimImi36en EHIc(Mep)
HIn KeLeciDeE keHIn MAnIMdeMl3;
Ataybl: cbIbIpa KxipTKblw canTaMaCbI. Typ(lep)iHn
aTaybl: WA400MP.
2006/42/EC DInpeKTNbBaCbIHbH XeHe 2000/14/
EC EC/EO DInpeKTNbBaJIapbIHbH baplbIK TnicTi
TaNanTapbHa caikec KeJeDi, coHda-n-aK EN 62841-
1:2015+A11:2022, EN ISO 11806-1:2022, EN IEC
62841-4-7:2022+A11:2022 KeicinreH cTaHapTTapbHa
caH eHdiPiIReH.
DeknapaunHBiH jXacalraH xepi XeHe KyHi:
Kortenberg, BEnbRn. 27. 9.2023
Xayantbl aam: Kazuhisa Makino, dInpeKTop - Makita
Europe N.V.

KAYINCI3ДIK BOИьIHSHA ECKEPTUJIPEP
CbIbIpa XbIPTKbIiW canTaMaIcBiHbIH Kayinci3iK TexHnKacbl 6oBbIHwa eckepTuJep
- KypbIrfHbI aya paBHaawap 6oNraHda, ocipece Hau3ara TIO kayni 6ap 6oNraH xaFdaIa NaIdaIaH6aHbI3. OcblnaIwa Hau3ara cory kayni a3aIaIbI.
- Kypblfbl kondaanbilaatbih ayMaKaTa KaHyapnapdbH 6ap-koFBH MyKnT Tekcepiri3. Kypblfbl naDanaHaBilFaH Ke3de, KaHyapnapfa 3aKbIM KeJyIMyMKIH.
- KypbIbI KOJaHaBJIaTbIH ayMaKtBi MyKnRTekcepi, TactapDbIH, TaKaTApdbIH, CbIM TemipJepiH, cyKeTepiH 6apJbHbIH, coHa-ak 6acka 6TeH 3aTAPbl anbl TaTaHbI. KaH-kaKa yUkAH 3aTTap aamDbI JkapaKaTTaybMyMkiH.
- KypbIfBInbI naIaIaNy aIbIHda apamwen O'Tay nbIwaftbHbI 3aKbIMdaJMaFaHBiH MINDeTTI TypeKeapan TeKcepiHi3.3aKbIMdaJFaH 6eIKTeH JapaKaTAtHy Kayni apTaIbI.
- Akceccyapnapdbaybictbipy HycKaynapbH opbHdaHbI3. PbIwaKtB6ekiteTirH raKaIaP HEmece 6oJIITap KaKcbIaN 6ypan TapTBImaca, PbIwak 3aKbIMdAnbHEmece axbipan KeTyi MymkiH.
6.Ke3di,kynaKtbI,6actbIXe KOndbi KopraTbIH KypanDapDbIKnH3.Tnicti KopraHbc KypanDap ywaTBH cbHbIKTapdHa,He 6oMaCa KNrTBH 6eNikke Hemece Nbiwakka 6aaycb3da TnIN KetydeH JapaKaTTaHy Kayinh a3aTaBbl. - KypbIbHbI naHaJHaHaR Ke3de MInDeTTI TypDe TaMaHTbIH XHe KopraTbIH aK KnIM KnIH3. KypbIbHbI KaJaH aK Kypin Hemece aBbIK caHdAn KnIN naDaJAN6aHbI3. BydAn Ko3raJaNbIH nbIwaKTapra Hemece 6eJIkTepre Tnin aAKTbI JapaKaTTay MyMkiHdiI a3aJbI.
- KypbInfbHb nainanaHaHKe3de mHdETTI TypDe y3bH 6aNaKTbI wa6ap KniH. DeHeHH aWbIK JepnepiH WkaH 3aTTapdaH JapaKaTay bIKTMaNdbfbl apTaBl.
- KypbIrfHbI naIdaIaNraH Ke3Je, aIaMdapDbI XaKbIHDaTNaHbI3. YIkaH cbIbIKTap aIaMdapDbI aybIp kapaKaTTaybl MyMKiH.
- KypblfbiHbmiHdETTI Tpyde eki KOJMeH naDanaHbHbI3. KypblfbiHbEki KOJMeH yCTacaHbI3, oHa He 6oJa aIma KaNy KaFdaBHa Tan 6oJMaCbl3.
-
KypbInfbHbIOkwaaynHaRan apHaBbI yCTay 6eTepineH raHa ycTaHbI3, ce6bi keCetIH 6oNik Hemece nbIwak KePiH6e TpyraH cbIM Temipre Tnin KeTyi MymKIN. KeCetIH 6oNik Hemece nbIwakTap KepHeyni CBIM Temipre Tnin KeTCE, KypbInfbHbIH aWbIK MeTAnl N 6oNikTepeHde KepHey NaJaDa 6OJybl MymKIN, HaTNXeCiHne NaJaHaNAHysbHbI TOK COFybl MymKIN.
-
Θрдаймаякт haBik TypbHb3 xHe KypblfbiHbI Tek Xepde TypbIn naJaHaHbHbI3. TaRak Hemece TypaKcbI 6etTepdiH caIapbHaH Tepe-TeHdiirH3 6y3bIybl Hemece KypblfbiFa ne 6ona aJmai KaNybiHbI3 MymkiH.
- KypblfnbHbI TbIM Kynama 6eTkeNepne naDanaH6aHbI3. CoHa KaPbInfBIfa ne 60na anMaJ Kany, TaHraHay XHe Kynay Kayni a3aBIn, kapaKaTTaH6aCbI3.
- Enic Kepneppe Jxmbic icTeReHne, aRbHb3dbi MIndeTTI TpyDe HbIK KObHb3, eHicTi MIndeTTI TpyDe KeJdEHeKecin Jxmbic icTeHi3, XOFapbl HeMece TeMeH MyJde JxypMeHi3 XeHe 6aftbbIe te a6aunan 03repTlH3. CoHa KaPbInFbIra Ne 6oNa anMaJ KaNy, TaYFaHay XeHe KyIay Kayni a3aBIn, XapaKaTTaHbAcbI3.
- KypbInfBi JxMlbc icTe n TyPhaHa, DeHeH3iH e6ip 6oirin apamwn otay nbIwArBHa XaKbIHdaTnAb3. KypbInrBihb I cKe Kocna Tpybn, apamwn otay nbIwArBbH EHNepcere TnT yPmaraHbHa Ke3 XeTki3iH3. KypblfBhl naDalaHaF an Ke3de KeHJIiH3 6ip cTke aybIn KeTce, e3H3 XapaKaTTaHybHb3 XHe 6acka aadamap JapaKaTaHybIMyMkiH.
- KypblfnbHb 6eJhen Xofapbi KeTepin naDanaH6aHbI3.Ocblnna apamw en otay nblaafbl 6aikaycbI3da TIn KETneNdj XHe KypblfBIFA Kytneren XaFdaunapda XaKcbipak 6ackapacbl3.
- Kepinin Tpyran 6ytanapdbI Hemece KeWeTepdi KfRan Ke3de, abaunahbI3. Onap Kepi cepinyi MymkH. Arau TaunbIKTapbIHdaFbI Kepinic 6ocafan Ke3de, 6yTa Hemece KeWet NaDanaHybHbCofyJxHe/Hemece KypblfHbKoJaH KaBn xi6epyi MymkiH.
- Bytanap MeN KeWeTTePdi KnraH Ke3de, aca MyKnT 6oNbIbI3. XihiKe MaTePnAn nbiwaKa iInHin, ci3di ocBn xi6epy i Heme Ce Tene-TeHirH3di 6y3yIMykH.
- KypbInfbira ne 6oNbHbI3 XaHe apamuen otay nbIwaftbIH XaHe 6acka Ko3raIaNbIH Kayinti 6eIWeKTePdi Ko3FaIbIN TyPraHda YcTaMaHbI3. OcbIaIIa Ko3raIaNbIH 6eJIWeKTePdeH kapaKaattHy Kayni a3aIbI.
- KypbilfnbHbI eWipin XeHe DeHei3dEn anbc yCTan TacbHbI3. KypbilfnbHbI dypblc KondaHcaHbI3, Ko3fanaTbH KeckiWeke, KeceTIH 6eNikKe HeMece nbIwaKka 6aIKaycbI3da TnIN KeTy bIKTMaNDbIbI a3aJbI.
- KypbIrfbHbI TacbImaIdaFaHdHaHEMece caKTaRaHda, apamwen OTay nbIiawfBbIH Xa6bIbHm iHdETTI Type OPhaTbIHbI3. KypbIrfbHbI dYpbIC KOndaHcaHbI3, nbIiakKa 6aikaycbI3da TnIN KeTy bIKTmAmIbIFb a3aIbI.
- EHHiPywi 6eJrinen KepcTeKHe KocAnkbl apamwn OTay nbIwakTapbH FaHa naJaIaNbHbI3. BacKa KocAnkbl 6eJIWeKTepeH cbHy XeHe JapaKaTTaHy Kayni apTybl MymKiH.
- Typbn Kanfah MaTepnanDbI anBn TactaFah HEmece Kypbnfbi KyTimH XacaraH Ke3de, KOckbIwTbI eWipy XaHe aKkymJrTop 6nOrbH WbIrApy Kepe.KTypbn Kanfah MaTepnanDbI anBn XaTKaHa HEmece Kytim Xacan XaTKaHa KaPbIbfi KytnerE HxepDe IcKe Kocblnca, aybp Xapakat anybHb3 MymKiH.
Kayinci3dk TexHnKacbl 6oBbIHwa KocbIMwa eCkeptynep
Kannbl HycKaynap
- DypbIC Kymbic icteydi KaMTamacbl3 ety ywiH naDanaHywbl OcbI HycKaynbIKbl OKbin WbIFbn, Xa6dbkTbI naDanaHydbI yipeHyi KaKeT. Kayin-kaTeP kaNbl xa6apdap 6onMaran aamdap dypbc naindaan6aybl ce6eBiHe e3depihe de, backanapra da kayin TeHdpedi.
- BaIaIapDbH, qn3KkAJIbIK, ceHCOPnbIK HeMece aKbI-N-oi Ka6iTeTI TcMeH HeMece Toxipn6eci MeH 6inimi XeticneTih aamdapdbIH, coHdaN-AK OcbI KypblfBHL NaJaHaHy HcKaynapbIH OKbIMarAH aamdapdbIH 6yN KypblfBHL NaJaHaHybHa 6oJMaIDbl. XepriniKTi epexeJep 6oBbIHwa onepatop XacbHa WeKTEY KObIybl MymKiH.
- Ka6dbkTbKoJHaHfKae3Je Ha3ap aydapbHb3 KHe caK 60nbHb13.
- 3iH3di jakcbi ceiHcH3 fHa (aybipin TypmacaHb13, wapwamacaHb13) ocbI Xa6dbIKTBI KOJaHaBbHb13. BapnbIK Kymbictbl 6aibnne HxHe MkyrT opbHdaHb13. KbiparblbIK TaHbITbHb13 xHe onepaTop HeMece naDanaHywbI backa aamdapra HeMece OJapDbIH MyNkHe 6aJNaHbICTbl TybHdaTbIH Jka3aTaBbIM OKfAnapra HeMece kayintepre kayantbI eKehH eckepiH3.
- KaBn HKepe aamdap, cipece 6ananap hemecy nKaHyapnapb60nca, MaunHaHb naDanaH6aHb13.
- Ka6bikTa KaHdai Da 6ip MceJe Hemece KaNbInTah Tbc KaFdaia naJa 6oJca, MOTop 6ipDen eWipipJei.
- DemaHaH Ke3De XHe Ka6DbIKbI KapaycbI3 KaIbIpcAhI3, 6ackanap XapaanH6aybIX He Ka6dbIK 3akbIMdaIamaybl ywiH, OHbl eWiipiH3 XHe aKKyMyJrTop KapTpNdxin WbIFapBIn anbln, Kayinci3 Xepre KOnbHbI3.
- KypblfblHbHaawapaya paBla KaFdaanapbIHda, cicipce Ha3aFaT NIO kayni 6ap 6oIraH kaFdaIa naDaIaN6aHbI3.
Keke KopraHbIC Ka6dbIbI
- KypbIrfbIhbl naIaIaNraH Ke3Je, Ke3 KoprahbIcbl MeH 6epik aK KNIMi KNIH3.
- KypbIrfbImeH KyMbIC icTey 6apbcBHa da apdaibIM 6epik aK KNIM MeH y3bIH Wan6ap KNIHI3.
Ka6dbikTbickeKocy
- MaHai da eW6ip aam Hemece 6aJa XOKTbIFbIH Tekcepini3, coHdai-ak XyMbIC aMAmFBiHdaFbIXaHyapnapra Da Ha3ap aydapbIHbI3. Bonmaca, Xa6dbIKTb I naDaJAAhyDbI TOKTaTBHbI3.
- NaiDanaHrah Ke3e, aHaHaJaTa bI aadMap Hemece XaHyapnap KypanDaH KeMHde 5 M KaBbIKbIKTa 6onybI KepeK. Bipey XaKaBbIHdaRaH Ke3e, KypaNDbI TOkTaTbIHbI3.
-
NaandaHny anbIHda, xa6dbIKbI kayinci3 naandaHrya 6oNaTbIHbIN mIndeTTI Tpyde Tekcepini3. KeckiW Kypan MeH aybCTbIPrbiw wypinne Kayinci3dirH XeHe Onapbl OHaH XeHe Dypbc NaandaHrya 6oNaTbIHbIN Tekcepini3. TyTKaIapDbH Ta3a XeHe KypraK eKeHH Tekcepini3 XeHe icke Kocy/ewipy cyHKnncbH cbHaHbI3.
-
Ka6dbkTb Apa Kaap naDanaHy anDbIHda, 3akbmdanraH 6eWekTepeiH3. 3akbmdanraH 6eWekTI MyKnT TeKcepy XHe OHbH dypbc iTeHTiHHe XHe MaKcaTbHa caH cyHKcNcBbH aTKapa aNaTbHbHa Ke3 XeKtiy Kaxet. Ko3rMaHb 6eWekTeepH bIFbcIn KetnerEHH, TyTBIN KaIMaraHBH, 6eWekTeepH 3akbmdanmaRaHbH, OPhaTBnraHbH XHe KypbInFBHbH JxMbICbHa Tepic acep eTe aNaTbH 6ackka XaFdaJnapDbH 6ap-KorBH TeKcepiH3. Ocb HcyKaynbikTa 6ackawa Hyckay 6epimce, 3akbmdanraH 6eWek MaKyndanraH cepBnctIK optanbIfbmbI3Da Tnicti Typde XeHNDeNy i Hemece aybICTbipbIyblTnic.
- Kon men aek kecy kypaJIbIH anIbc 6onfah Ke3de faHa MOTOpbl Kocblb13.
- Motopdbicke KocnaT pybIn, Keckiw KypanDbIH eHApcere TmEn TyPraHbIN TeKcepH3.
- KypaIbI naIaIaNraH Ke3De OHbl KaTTbI yCTaHbI3.
- KypaIbIH Ke3deCOK icke KocBnybIHcak 6oNbHbI3.AKKymyIaTOp KapTpndxio pHaTbIraH Ke3De, caycafbHbI3dbla ybiCTbIPbIN-KoCKbIwKa KObIN, KypaIbITacbIMaHbI3.AKKymyIaTOp KapTpndxih opHaTKaHda, aybiCTbIPbIN-KoCKbIwTbIH eWipinreHine Ke3 keTki3iH3.
- NaiDanaHy anDbIHda, xMbc aHMaRbIHda cbIM TemipJI KOpwaynapdbIH, TAcTapdbIH Hemece 6acka KaTbI 3aTTapdbIH 6ap-KOFbIH TekcepH3. Onap apamwn otay nbIwaBH 3akbIMdaybl MYMKH.
- ByI KypaIbI naIdaIaN6ac 6ypbH KERan MeH 6ytanapda 6erde 3aTTapdbIH, MbicaJIbI cbIM KopwaynapbIHbIH HeMece XacbIPbIH cbIMapdbIH 6oNMaybIH TeKcepin aJIbIH3.
KoIaHny eIici
- Ka6bIKbI TEK XapBk XHe XaKcbI KepiHTeH XepDe nauDanaHbHbI3. KbICbI MaycIMda TaRfak Hemece cybl, My3dbI XHe Kapbl aMakTapdAn (cbipraHay kayni) abai 6oNbIHbI3. Ke6ey xepde 6oNraHa JxHe XaYy xypreHde aKaTa HbIK TypbIn, eWkaaH KyripMeHi3.
- Keckiw Kypandbih aak neh konfka KeNTipeTih kapaKaattah aba 60nbHb3.
- BacnandaKaTa TypbIn Ka6dbkTbI icKe Kocyra 6oJMaNDbI.
- Kecy JxmbicTapbH opbIHay ywiH xa6dbkneH arafTBH yCTIhe ubyra 60MaiaBbl.
- TypaKcbI3 6eTepDe Kymblc icteyre 6oJMaIbI.
- Kymbic aykbimihah Ta6bIraH Kymdi, Tactbl, werehi, T.6. anbin TactaHb3. Berde 6enwekter Kecy KypanbHa 3akbIM KeTipin, Kayinti Kepi cokkbifa akenyi MyMKIH.
- Keckiw Kypan Tacka Hemece 6acka KaTbI HbICAHra cofBInca, MOTOpdbI 6ipDeH eWipin, Keckiw KypaNDbI TeKcepHi3.
-
Keckiw KypaIbIh 3aKbIMdAmMarHaBbH XnI apaJIbIKTa TeKcepi TpybIHbI (TbIKbINDaNtBIn WByblDbH KEMERImEH MKNpOxapbIKTapdbI aHbIKay).
-
Ka6dIbIKTaH aKKyMylTOp KapTpNdxIn YHemi anbln TactaHbI3:
Ka6DbikTbI KapaycbI3 KaIdbipraHda;
KyblntaydaTa3anay andbHda;
- Ka6dbkTbI TeKcepy, Ta3anay Hemece OHbIMeH Kymblc icTey anDbIHda;
6ege 3aTbCokKaHHHaKeiH;
-ka6dbkTaKaJbInTaH Tbic dipin naJa 6oJraH KaFdaJa.
- Keckiw KypaIap MOTOP eWKeHHeH KeiH de aHaJIbIn TypaIbI.
- Πbɪwak Jæ6bɪhɪn TaɪkKaHɒdæ Hemece weɪin anfəhɒdɑ, Kɔŋbɪhɪbɪdɒl JæpɑkɑaTTan aɪmʌhɒtɪ3.
TexHnKaIbIK KbI3MeT KepCeTy HycKaynapbl
- Kymbictbi 6actamai Typbin, Xa6dbiktbih Xa4nbiH, aTan antkaHda, KeckiW KypaIbIH XHe Kopraftwi KypblrnapdBiH Xa4nbiH TeKcepy KaKeT.
- Ka6dbikka Hemece Keckiw Kypanfa TexHKaIbIK KbI3Met KepceTy, Keckiw KypanDbI aybictbipy XHe KypanDbI Ta3anay anDbIHda MOTOpdbI eipin, aKKymyIaTOp KapTpndKin aBIn WbHapbHb3.
- KypaIbI naIdaIaN6arH Ke3e orAH Ky3 KaKnaFBiH Knri3in, KypraK XeHe 6aIaNapDbIH KOJI bXeTneTIH Xa6bIK XepDe, XOFapblda cAKTaHbI3.
OCbI HYCKAYLAPDbI CAKTAHbI3.
ECKEPTY: ΘHIMdi KaTaNaIaNanHy 6apbIcbIHda CAIFbIPTTBk TAHbITNAI, Kayinci3dk epexepein yctahbiH3. Ocbl naIaNanHy xeHHderi HycKaynbikTa KeNTipinreH kayinci3dk epexepein DYPbIC NAIJAIAHBAH YeMece opbIHdAmay aybip kapaKaTTapra eken COKbIPybl MymkiH.
БОЛшЕКТЕР СИПATTAMACьI
Cyper1: 1. Xγ3 TBicbl 2. KaKnaK 3. ApaMuen otay nbllwafbl
KYPACTbIPY
ECKEPTY: Ka6bIKbI XnHay HeMece peTtey anDbIHda MOTOpdbI eWipin, AkKymyJrTop KapTpNdxH WbIFapbIH3. Θntne MaunHa abaCbI3da icKe Kocbln, aamdbI kapaKaTTaybl MymkiH.
ECKEPTY: Ka6dbIKTbI XnHay Hemece peTtey Ke3iHde OHbl apdaibIM TeMeHre anbIn KoBih3. Ka6dbIKTbI Kofapbla XnHay Hemece peTtey aybip JapaKaTaKa aKeIyIMyMKiH.
ECKEPTY:"KAYINC13IK WAPANAPbl" TapaybHdaRbl eCKepTy MeH caKTbIK wapanapbln KHe Kyat 6NOrbHbH HcckayNbIfbH OpbIHDaHbI3.
KoHdbipMaHbI opHaTy
-
2 petteri nlaactnHaada fbi ObIKapdbcbiptkakapaTbIn, nlaactnHaapdb KOHdbipmafa6ekTiH3.
Cypet2: 1. Petteriui nactnHa -
Apamuenotay nbIwafbH cbIpTkKa kapa a3dan KaibpbIn, nbIwakTb peTteriW nlaactnHaIapbHa 6eKiTiH3.
Apamwen otay nbiwaftbH 6eKITKeH Ke3Je, Kepcetki TyTikke kapaTbIybl Tnic.
Cyper3: 1. Kepcetki
Apamwen otay nbiwaftbHdaftb WbIfbHKbJ Kep MepeTteriwnactnHaIapdaftb WbIfbHKbJ KepnepeDih6ipeyih 6ip-6ipHe typaiay apkblbApamwen otay nbiwaftbHbH 6ypblbH e3reptyre 60naDbI.
CypeT4:1. WbIbfbIKbl Xep
HA3AP CAJbIHbI3: apamuen onay nblaafbnHdaftkepeKtinepei cypeTKepcetinre 6aftka kapaTy kepk.
Cyper5: 1. KepceTki
- Apamuen otay nbuafb peTteriH nactnHaapfa 6ekitirreHHe Ke3 keTki3iH3.
Cyper6 - Bonttbraikacb3 kKaTah canbln, KInTneH 6ypan taptbHbI3. BonttbrMbIKtan 6ypan tapTy KepeK.
Cyper7: 1. Bont 2. Raika
ECKEPTNE: Bypay kywi: 5-10 H·M
KoHdbipMa Tytirih opHaTy
CAK BOJIbIHbI3:OpHaTkaHHaKeiH epkaaH KOHdbIpMa TYtiriH6eKITinReHH
TeKcepi3.IpybcOpHaTbImMaFaH XaFdaIa KOHdbipMa Kyat6JorbiHAn KJlan, aam Xapakat anybl MyMKiH.
KoHdbipMa tyririn Kyat 6norbHa opHaTbHb3.
- Tytik ymbihah kaknaktbl anbnt TactaHbi3.
Cypet8: 1. Tyrik 2. KaiknaK
HA3AP CAJbIHbI3: KaKaNaKTbI NaKTbIPMaHbI3, ce6e6i KaKaNa KOHDbIPMaHbI caKTay ywiH KaXeT.
-
TyTkahbI KOHDbIpMaFa Kaapai 6ypaHbI3.
Cypet9: 1. Terik -
Ictikti Kyat 6IorbHaBk Kepcetki 6enricimen 6ipikTipiH3. UNaHtBi canFaHda, 6ocaty tyMeci Xofapbl KeTepiNyi KepeK.
Kaaracbim cb3bfbkyat 6norhdafbi Kepcetki
BenricinH cohHa, an kyat 6norbHdafti Kepcetki
Benrici MeH wnaHtafbi Kepcetki Benrici 6ip-6ipHe
Kapan TyprAhHa Ke3 Xetki3iH3.
Cyper10: 1. Bocaty tyuMeci 2. Kyat 6norbHdafti Kepcetki 6eJrici 3. Ictik 4. Ophanacy cb3bIf5. UHaHTafti KepeTki 6eJrici
- TyTKaHbI Kyat 6NorbiHa kapaI 6ypaHbI3.
Cyper11: 1. Terik
TyKaHbH 6eTI TyTikKe npaPnneIb eKeHiHe Ke3 XeTKi3iHi3.
HA3AP CAJIbIbI3: KOHdbIpMa TyTirin
CanMaBbIHwa TyTKaHbI TapTnaHbI. ΘNtnece, TyTkα
XeTeK 6iJIrHiKipicIH TbIM KaTTbI KbICbIN, 3aKbIMdaybl
MymKiH.
Tytki any yuH tyKaHbI KOHbIpMaHa Kaapan 6paHbI
KHe 6ocaty TyMeciH 6acBn TypbIn, TyTki TaptBn
WbIfapblHbI3.
Cyper12: 1. Bocaty tyuMeci 2. Tetik 3. Tytik
Kauiy3iHin Xa6bHbH wein any Hemece TaFy
IbwaKaXa6bHbH anbinTacay ywiH,nbwaKaXa6bHbH iwe KaapnTepin,6ypbHb3.
Cypet13: 1.Пьшakха6bHbI
NbiwakXa6bHbH 6ekity ywiH, OHbl apamwn otay nbiafBHBi 6ip XaFbHa iin3 de, 6ypbHb3.
Cypet14: 1.Пьшakka6bHbI
ECKEPTNE: Nbiwak Jka6bHbIH TYtIKKe cypeTTe KepcetinireHei 6ekityre 6oIabl.
Cypet15: 1.Пьшakха6bHbI
Apamwen oTay nbiwarfbihH xa6bHBn OPHAty Hemece wewin any
CAK BOJIbIbI3: apamuen otay nbIwaKTapbIH aybICtbipraH Ke3de, KOJaapbIHbI3 nbIwaKTapra Tnin Ketneyi ywiH, MInDeTTI TypeKoRan KIn JxypiHi3.
CAK BOJIbIHbI3: apamuen otay nbIwaIbH wein any Hemece opHaTy anDbIHda, nbIwaK Ka6bIHbIH TaBbIH3.
- Apamuenotay nbuaibaHa xa6bHbH Kri3iH3.
- BonttbkiTneh 6ocatbIn, 6ypan anbHb3.
Cyper16: 1. Bon - ApamuenotaynbIwaBnCbiptKa kapan cai KaibpIn, nbIwaKTbi Wein anHb13.
Cyper17
KoHbIpMaHbI KypacTbipy HcyckaynapbIn kapaOnTbipBn, apamwn OTay nbllawfbIn OPhaTbIH3.
ФУнкцион�дыКСИПATTAMACbl
CAK BOJIbIbI3: KypaIbIbI ΦyHKIcIbIH peTtemec XeH TeKcepmc 6ypbIH, apdaIbIM KypaIbIH eWipyni eKeHirine XeHe aKKymJrTOp KapTpNdxHIn anBHaRaHbHa Ke3 XeTki3iHi3.
Kecy 6ypbIWBIn peTney
CAK BOJIbIHbI3: Kecy 6ypblWBH peTrey anDbHa, Kpaandbi MinDeTTI Typde eWipy Kepek.
Apamuen otay nbIwaIbIHbH 6ypbIbIH yw deHreire e3repty e0naDbI. BypbltbE3repy uin, apamuen otay nbIwaIbIHdaIbI bIbIHKbI Kep MeH peTteriI INaactnHaIapdaIbI bIbIHKbI KepJepDIn 6ipeYih 6ip-6ipine typanan, codah KeHH apamuen otay nbIwaIbIH opHaTbIHb3.
- KeceTih nbIwaKtbI 6ekiTetIH 6oTTapdbI KInTneH 6ypan 6ocatbHbI3.
- Apamwen otay nbuwaifbHdaftbU bIfbHKbJ Kep MeH petteriunactnHaIapdaftbU bIfbHKbl XepJIepdi H 6ipeyih 6ip-6iphe TypanaHb3.
- BonTb Kaeta 6ypan TapTy apKbInbKeceTiH nbIwaKaTb 6ekitiH3.
Cyper18: 1. LbifbIKbI Kep
Пайдалану
ECKEPTY:"KAYINC13IK WAPANAPbl" TapaybHdaRbI eCKeTpMeH caKTbIK wapanapbIH KHe Kyat 6NorbiHBiHyCKayNbIFbIH OpbIHDaHbI3.
KypaIdbi naJaIaNHy
ECKEPTY: apamw en otay nbiwarfbHa KOndaapbHbI3dbI XaKaBHaatNaHbI3.
ECKEPTY: KypaIbI yHemi KaIaranay yWIn oTe cak 60nbHbI3. KypaIbIH xMbc aMafBHa e3iH3re Hemece 3rere Kapai ayItkBn KeTyIe Kon 6epMeHi3. KypaIbI backapa anMaJ kany onepaTOpDbH xHe aHaIadaRbI aDAMhbH aybip JkapaKaT anybHa eKeNyi MymKIn.
ECKEPTY: 6ip kepdiH apamwio6iH otamai TypbIn, ON keperi TaKTap MeH Tactapbl aIbIn TactaHb13.
ECKEPTNE: ByI Kypan 15 cm-DeH (5-7/8 dHm)
Kbicka apamwentepdi OtaYra apHaJFaH.
Cyper19
CAK BOJIbIbI3: KypaJImEH MymKiHirinHe bICTbIK aya paBbIHda XyMbIC icTeMeHI3. KypaJImEH XyMbIC icTeY Ke3IHde Qn3nKaJIbIK KaFdaiBbIbI3dbI ecENKe aNbIHbI3.
CAK BOJIbIHbI3: apamwenti otarah ke3de, MeTann KOpWayra Hemece 6acka KaTbI 3aTka 6aikaycbI3da TInn KeTneHiz. Apamwn OTay nbIwaftcBihbn, aadMdbI Jkapanaybl MymkH.
CAK BOJIbIHbI3: Kypanra, acipece catbIaH, TBIM KaTbI Kon Co3y aca Kayinti. TeHceJeiH Hemece bepik emec HopceHH YcTIHe TpybIn JxMbIC icTeeyre BoImaIbI.
HA3AP CALbIHb13: KypaJIbI MOtOpdbIH TOKtaYbHa Hemece eTe 6aay aHaNybHa eKeJeTIn XOJIMeH naJaIaHyfa 6oJMaIdbI.
Kypanbl anblhfb ca6bi meH kyat 6norbHbH apTkbl tyTKacbHaH eki KOJIbHb36eH yCTaHb3.
Cypet20: 1. A.IIdbIHfbI can 2. ApTKbI TyTkA
Apamuen otay nbiafbin xepen Keetepin anbin, Kpaanbikocbih3. Apamuen otay nbiafbin xepre Koibih3da, Kpaandbi e3iH3re Kapai baryaptbn apamuen oTaH3. Apamuen otay nbiafbin xepre nepneHdkyIap6oJtaBnDain yctaTfHaHda, XyMbic OHaan atKapblJaBbl.
Cyper21
Cyper22
TEXHINKAJIbIK KbI3MET KOPCETY
ECKEPTY: Ka6bIKbI TeKcepy Hemece TexHnKaJIbIK KytimH Kacay aAnDbIHDa, MOTOpDbI eWipin, AkkymyIaTOp KapTpNdxH WbIFapbHbI3. Θtnece MaunHa abaCbI3da icke KocblbIn, aamdbI aybp Typde JkapaKaTTaybl MymkiH.
ECKEPTY:Ka6dbkTBlTeKcepy Hemece TexHnKaJIbIK KbI3MeT KepCeTy Ke3IHDe OHbI epdaibIM TeMeHRe aIbIN KOIBHbI3. Ka6dbkTBl XorapblaJxN Hay Hemece pettey aybpjXapaKaTa eKeenyi MyMkiH.
ECKEPTY:"KAYINCI3IK WAPANAPbl" TapaybHdaftbI ecepty MeH caKTbIK wapanapbIH XeHe KyaT 6NoRbHbH HcckayNbIfbH OpbIHDaHbI3.
CAK BOJIbIHbI3: kapan TeKcepren Hemece TexHnKaJIbIK KytIM XacaraH Ke3Je, KOJfAn KniHi3.
HA3AP CAIbIHb13:KaHapMaIdbI,6eH3nHdi, cyblNTkbIwTbI, cNnptTI Hemece corah YKcac 3aTTapdbI eWkaawn naDanaHaBbI3. HtNxkeciHe Tycci3deHy,6yInHy Hemece XapbIKtap naDa 6onybHa oKeenyi MymkiH.
EHIMHIN KAYINCI3IIM MeH CEHIMDIIINI H KaMTaMaCbI 3 eTy YwH, XeHNeY KymbICTapbl, Ke3 KeTReh BacaTexnKaJIbK KbI3MeT KepcTeY HeMece petTey aPdaiMakita Kocalkb6JIweKTEpi naiDaIaNHy apKbIbMakita KomnaHncaBHBn ekinetti Hemece 3aybITbIK KbI3MeT KepcTeY OPTaJIbIKTapbl TapanbIHah OpbHdaNyblKepeK.
KypaandbTa3anay
Kypan wahbH Kpyrak wy6epeKeH Hemece ca6bHdbCyfa 6atbipbJraH wy6epeKti cbfBn anBn ta3aHaHbI3.
NbiwaKa Kytimi
PnIaIaNbIN 60JFaH COH, NbiWakKa opaJIbN KaJIFaH WENTI HemeCe TAmblapdbI anBIn TaTcHaH3.
HA3AP CAIbIHbI3: nbIaKtbl cyfa caIbIn
Xyyra 6oMaIbI. OHTnce OHbl TOT 6acybl, He
6oMaCa nbIaK HEmeCE KOHdbIpMa 3aKbIMdaHybl
MymkiH.
CakRay
Apamwen otay nbiwaribaHa Jaa6bHbH Knri3iH3. Kypandb
6ananapdbH KOJIbXeTneTIH XepDe cakTaHbI3.
Kypandbbl bInFaHemece XaH6bip TImeHTIH xepDe
cakTaHbI3.
KoHdbIpMa MeH Kyat 5NorBH 6JNEK cAKTaFAH Ke3de,
KaJNaKTbI TYtIKTH YwBaHa Knr3iH3.
Cyper23
Ko3famalbl6eJneKTepeH maJnay
HA3AP CAJbIHbI3: Bepinre MaNbIH XnIniri MeH MoIwepi TypaIbI HcykaynapdbI opBHaHbI3. Θntnece, MaNbIH JxETKJIiKcI3 6Olybl Ko3FaJMaJIbI 6eJWeKTepe 3akBIM KeTtipy MyMKIN.
XeTeKw6iNik:
Maib(Makita Maib N No.2 HeMece 6aIamacb)
KMBICTbIH ap6ip 25 caraTbI caBih KaBIn TypbHbI3. Cypet24
ECKEPTNE: Tynycka Makita Maibin xepriniKtia Makita dinepinen catbn anyfa 6onaDbI.
KoIOnaHFaH MaIMeH MaJnay
MaJlay apaIbIbI: NaIdaIaNy Ke3iHne ep 25 caT caIbIH
- Manay yuin 6oTbH caHbIaydaH anbIn TactaHbi3. Cypet25:1.Bont
- KypaIra MaI (Makita MaIbI SG No.0 Hemece OHbIb6anamacbl) Xafblb3 (WAMAMEH 3,0 r).
- BoTTb6eKiTiHj3.
AKAYIbIKTAPdbI JXOIO
KHeHdey KymbicTapbiHa Tancbipbc 6epyden 6ypbH, TeKcepyep Kypri3iH3. HcyaynbikTa KepeTinmeren Meceenepe aHbIKtanca, Kpaanblb 6eIweKeTemeh3. Makita KomnaHnrcbHbH eKineTTk b3MeT KepcTeOpTaNbIKtapbHa xa6apnacBbH3 Xhe KHe KHeDey yuH epKaawH Makita Kocalkb 6eIweKtePi naDanaHbHb3.
| Акayлы Кени bіltимал себ abi (akay lyk) Шевим | ||
| Motop icke косылмады. -Сондай-ak Куат SFLOBHyн падалану | HSCAYbIFbH KapaHy3. | |
| Motop кени узамай тokтайы. -Сондай-ak Куат SFLOBHyн падалану | HSCAYbIFbH KapaHy3. | |
| Motop жылдамыгы.apтпайы. -Сондай-ak Куат SFLOBHyн падалану | HSCAYbIFbH KapaHy3. | |
| Арамшөн otay nbiшаftы Коштамды: → Машинны дөрүүүүүүл. Kanbintan Тьс дipindeу: → Машинны дөрүүүүүл. Kanbintan Tьс дipindeу: → Машинны dөрүүүүүл. Kanbintan Tьс dIPindeу: → Машинны dөрүүүүл. Kanbintan Tьс dIPindeу: → Машинны dөрүүүл. Kanbintan Tьс dIPindeу: → Машинны dөрүүл. Kanbintan Tьс dIPindeу: → Машинны dөрүүл. Kanbintan Tьс dIPindeу: → Машинны dөрүүл. Kanbintan Tьс dIPindeу: → Машинны dөрүүл. Kanbintan Tьс dIPindeу: → Маш kinnyd →Дepeу akkymларordы shырын anbhylsh! | Жeтук жүесi дүрүс күmbic icTeMeу di. | Жeprinikti к苇зmet керсету optaылбинан кендeydi сураыз. |
| Жeтук жүесi дүрүс күmbic icTeMeу di. | Жeprinikti к苇зmet керсету optaылбинан кендeydi сураыз. | |
| Арамшөн otay nbiшаftы мен motop ТOKтамды: →Дepeу akkymларordы shырын anbhylsh! | Знект pinek akay lyk. Akkymларordы shыр Богрьл anbHydжэ He eKilletti к苇зmet керсету optaылбинан кендe beryih cyaRaHy3. |
KOCbIMWA KEPEK-KAPAKTAP
CAK BOJIbIbI3: Byn Kepek-JapaKaTapDbI Hemece KOHdbIpMaJapDbI OcbI HycKayNbIKTa KepcTeiReh Makita MaunHacbImeH 6ipre naJaHaRaH dypbc. Baca KepeK-JapaKaTapDbI Hemece KOHdbIpMaJapDbI naJaAnaHy aJaMaDapDbIH JapaKaTTaHbHa eKeNy i MymKiH. KepeK-JapaKTbI Hemece KOHdbIpMaHbI TeK MaKCaTbHa caikec naJaHaHaHbI3.
OcbI KepeK-KapakTap TpaJIbI KocBIMMa MAnimet any yuHIN KEMEK KaKeT 6oNca,KeprinikTi Makita KbImET KepCteTy optaJIbIFbHa xa6apJaCbIHbI3.
Apamwen O'Tay nbiWafbl
KyIbTnBaTOp Ta6aHbI
- Makita TynHcyka aKKymyIaTOpbI XaHe 3apIaTay Kypblfbcbl
ECKEPTNE: Ti3imderi Kei6ip anemeHTTep CTaHapTTbI Kepek-kaPakTap petIHde eHIMHi KaTAMacbIHda 6onybl MymkiH. Onap ep ene eptypJI 6onybl MymkiH.