
AL1 3420 Li - Lawn mower ALPINA - Free user manual and instructions
Find the device manual for free AL1 3420 Li ALPINA in PDF.
| Product type | Cordless electric lawn mower |
| Brand | Alpina |
| Model | AL1 3420 Li |
| Cutting width | 34 cm |
| Power source | 20 V lithium-ion battery (not included) |
| Battery runtime | Varies depending on battery capacity and mowing conditions |
| Cutting height adjustment | Central, multiple positions |
| Blade type | Rotary steel blade |
| Collection system | Rear grass catcher bag |
| Grass catcher capacity | Approx. 30 L |
| Handlebar | Folding and height-adjustable |
| Weight | Approx. 12 kg |
| Safety features | Rear ejection guard, safety key, automatic motor stop when the control is released |
| Maintenance | Regular cleaning of the housing and blade, check screw tightness, sharpening or replacement of the blade by a professional |
| Storage | In a dry place, sheltered from the weather, battery removed and periodically recharged |
| Sound power level | 96 dB(A) (guaranteed) |
| Vibration | Vibration emission value < 2.5 m/s² |
| Warranty | Manufacturer's warranty covering defects in materials and workmanship |
Frequently Asked Questions - AL1 3420 Li ALPINA
User questions about AL1 3420 Li ALPINA
0 question about this device. Answer the ones you know or ask your own.
Ask a new question about this device
Download the instructions for your Lawn mower in PDF format for free! Find your manual AL1 3420 Li - ALPINA and take your electronic device back in hand. On this page are published all the documents necessary for the use of your device. AL1 3420 Li by ALPINA.
USER MANUAL AL1 3420 Li ALPINA
[16] Akumulatory, mod.
natural_image
Technical line drawing of a mechanical component with directional arrows indicating flow or movement (no text or symbols)
natural_image
Line drawing of a 3D mechanical device with internal grating and handle (no text or symbols)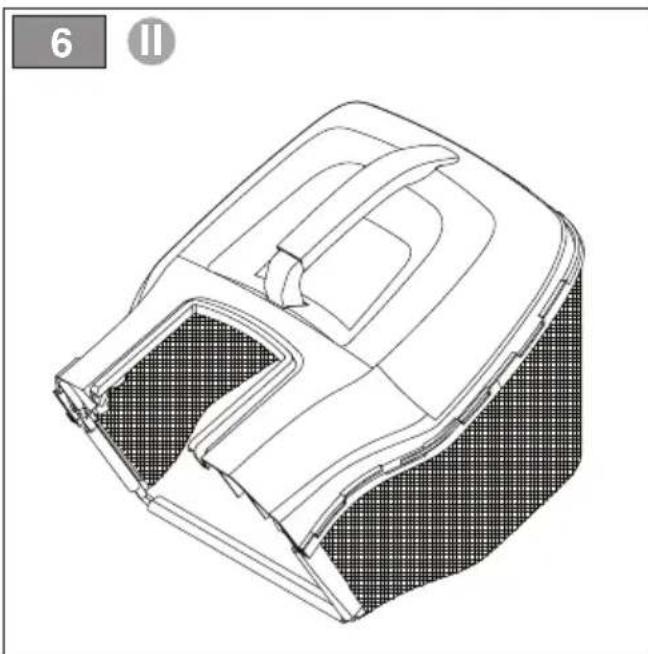
natural_image
Technical line drawing of a 3D mechanical component with internal cavities and textured surfaces (no text or symbols)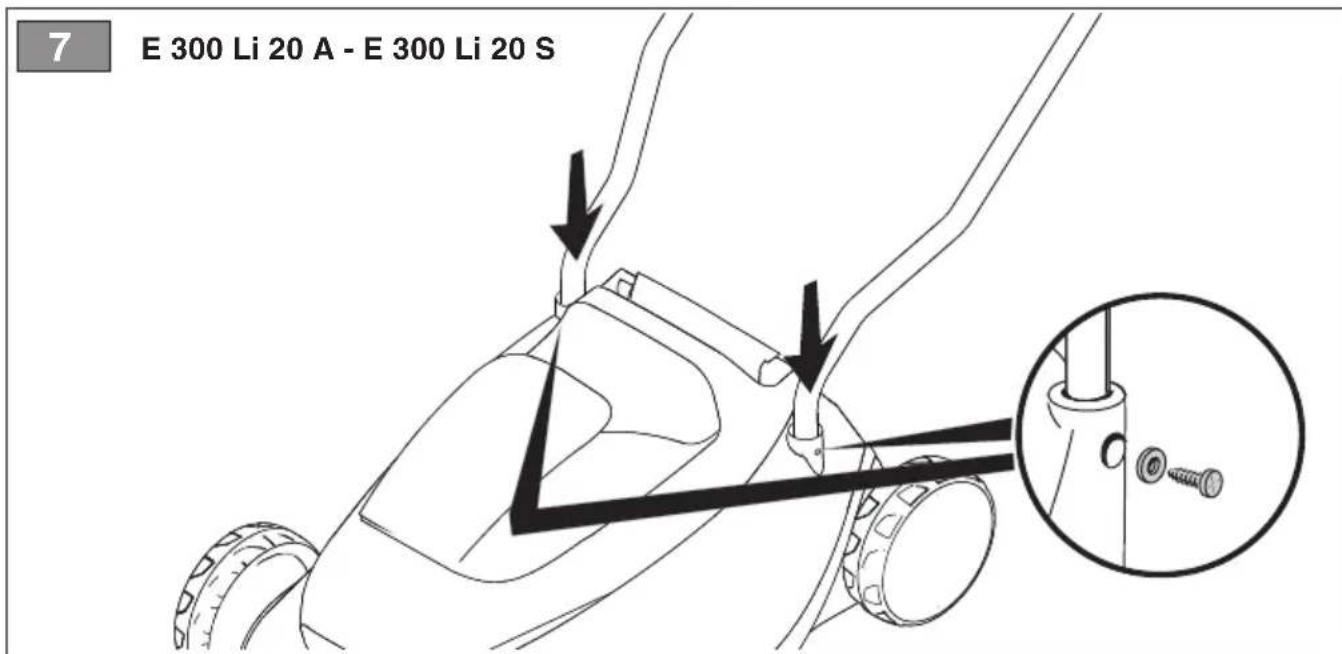

17
E 300 Li 20 A - E 300 20 Li S
E 340 Li 20 A - E 380 Li 20 A

E 340 Li 20 S - E 380 Li 20 S
18
19
natural_image
Technical line drawing of a car air vent system with airflow arrows indicating flow direction (no text or symbols)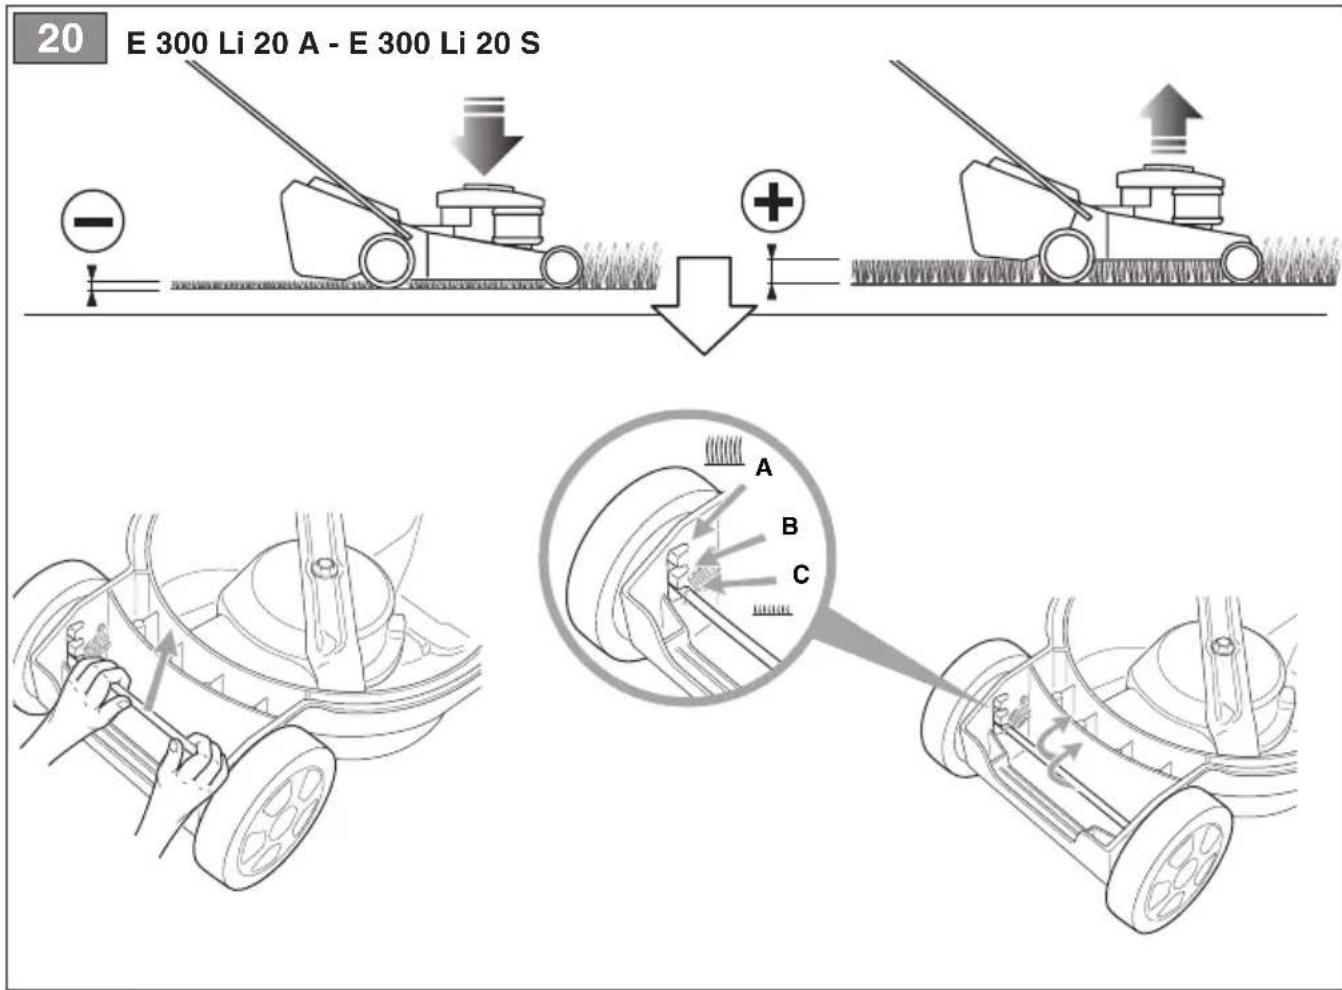
E 340 Li 20 A - E 340 Li 20 S
23
E 300 Li 20 A - E 300 Li 20 S
E 380 Li 20 A - E 380 Li 20 S

natural_image
Diagram of a car gear shift lever assembly with a mounted sensor device (no text or symbols visible)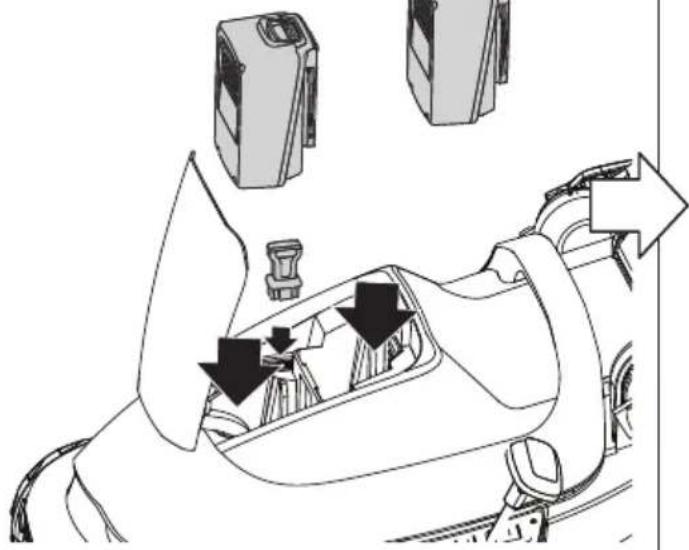
natural_image
Diagram of a car interior showing seatbelt and vehicle-mounted devices, with arrows indicating movement or force (no text or symbols)E 340 Li 20 A - E 340 Li 20 S
24
E 300 Li 20 A - E 300 Li 20 S
E 380 Li 20 A - E 380 Li 20 S
natural_image
Top-down schematic of a car interior showing steering wheel, dashboard, and steering wheel (no text or symbols)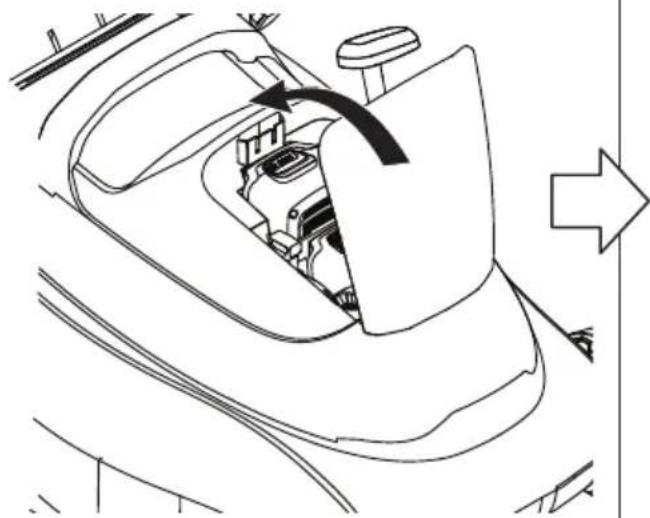
natural_image
Diagram of a car interior showing intake manifold and directional arrows indicating flow or movement (no text or symbols)25
E 300 Li 20 A - E 300 20 Li S
E 340 Li 20 A - E 380 Li 20 A
E 340 Li 20 S - E 380 Li 20 S
26
natural_image
Illustration of a worker pushing a large cart with motion arrows, surrounded by a smiley face (no text or symbols)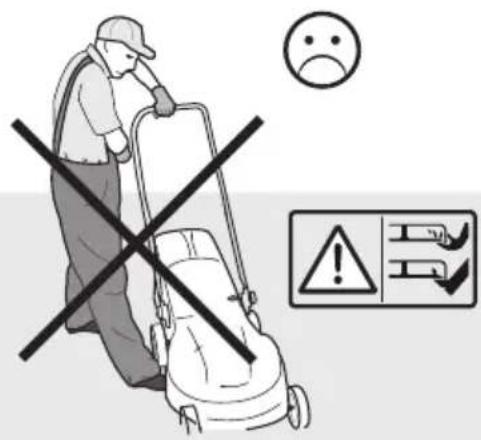
27
natural_image
Illustration of a person using a lawn mower in a grassy field (no text or symbols)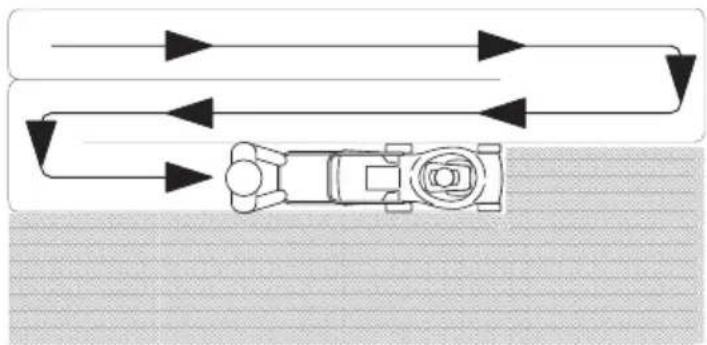
flowchart
graph TD
    A["Top Left Arrow"] --> B["Top Right Arrow"]
    B --> C["Bottom Left Arrow"]
    C --> D["Bottom Right Arrow"]
    D --> E["Bottom Left Arrow"]
    style A fill:#f9f,stroke:#333
    style B fill:#f9f,stroke:#333
    style C fill:#ccf,stroke:#333
    style D fill:#ccf,stroke:#333
    style E fill:#cfc,stroke:#333

natural_image
Blank white image with no visible content, text, or symbols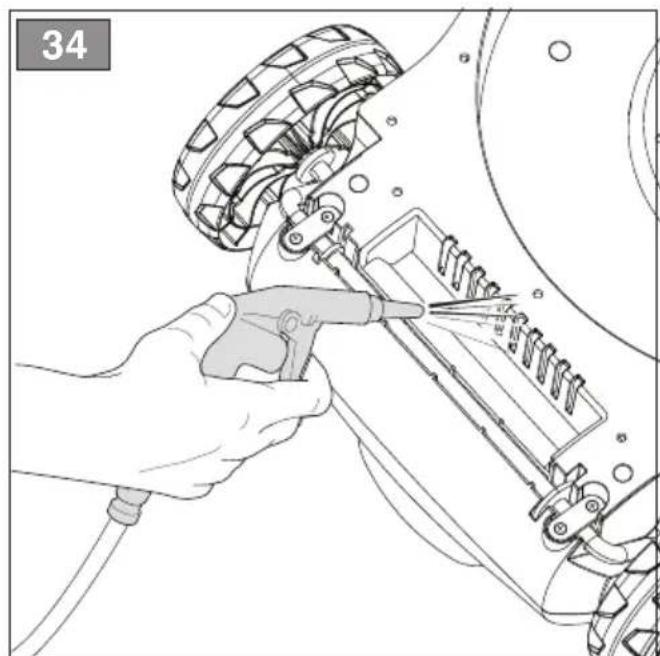
natural_image
Illustration of a hand using a power tool to adjust or install a mechanical component, no text or symbols visible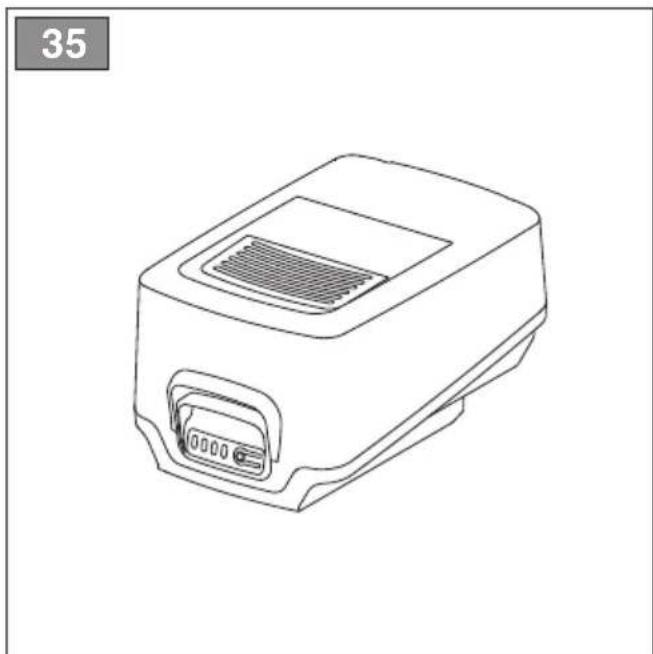
natural_image
Line drawing of a rectangular electronic device with a port and label '35' (no text or symbols on the device itself)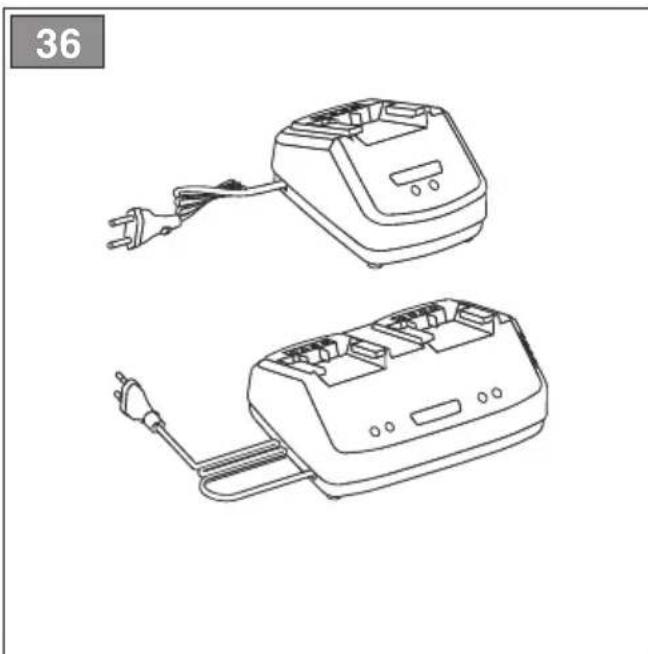
natural_image
Line drawings of two electric shock absorbers with power plugs and a plug, shown from different angles (no text or symbols)INDICE
- GENERALITÀ....1
- CONOSCERE LA MACCHINA....5
- USO DELLA MACCHINA 6
6. USO DELLA MACCHINA
6.5 ARRESTO (Fig.28)
4.2 MONTÁŽ KOŠE (obr. 4 ÷ 6)
4.3 MONTÁŽ RUKOJETI (obr. 7÷15)
5. OVLÁDACÍ PRVKY
5.1 BEZPEČNOSTNÍ KLÍČ (VYPÍNACÍ ZAŘÍZENÍ)
- XEIPISTHPIA EΛΕΓΧΟΥ....6
1.1 How to read the manual 1
1.2 References.... 1
- SAFETY REGULATIONS 2
2.1 GENERAL POWER TOOL SAFETY WARNINGS....2
2.2 LAWNMOWER safety WARNINGS 3
2.3 MAINTENANCE AND STORAGE.... 3
2.4 BATTERY / battery charger.... 4
2.5 Protecting the environment....4
- GETTING TO KNOW THE MACHINE....5
3.1 Description of the machine and planned use ..... 5
3.2 Main components (Fig. 1) 5
3.3 Identification label (Fig. 1)....5
3.4 Safety signs (Fig. 2)....6
- ASSEMBLY 6
4.1 Unpacking (Fig.3)....6
4.2 Grass catcher assembly (Fig.4 - 6)....6
4.3 Handle assembly (Fig.7 -15)....6
- CONTROLS....6
5.1 Safety key (Deactivation device) 6
5.2 Switch command....6
- USING THE MACHINE....6
6.1 Preliminary procedures 6
6.2 Safety checks....7
6.3 Start-up (Fig.22-25) 7
6.4 Operation (Fig.26)....7
6.5 Stop (Fig.28)....7
6.6 After use 7
- MAINTENANCE....8
7.1 Battery....8
7.2 Cleaning 8
7.3 Blade 8
- STORAGE....9
8.1 Storing the machine....9
8.2 Storing the battery....9
-
HANDLING AND TRANSPORT 9
-
ASSISTANCE AND REPAIRS 9
- WARRANTY 9
- TROUBLESHOOTING.... 10
- ATTACHMENTS ON REQUEST ....11
13.1 Batteries....11
13.2 Battery charger ....11
1. GENERAL ASPECTS
1.1 HOW TO READ THE MANUAL
Some paragraphs in the manual contain important information regarding safety and operation and are emphasized in this manner:
NOTE or IMPORTANT These give details or
further information on what has been previously indicated and aim to prevent damage to the machine or cause other damage.

The symbol highlights danger. Failure to observe the warning can lead to the risk of injury to oneself and others and/or damage.
The paragraphs inside a grey dotted frame refer to optional features not available on all the models referred to in this booklet. Check if the characteristic is on this model.
Whenever reference is made to a position on the machine "front", "back", "left" or "right" hand side, this refers to the operator's working position.
1.2 REFERENCES
1.2.1 Figures
The figures in these instructions for use are numbered 1, 2, 3, etc.
The components indicated in the figures are identified with letters A, B, C, and so on.
Reference to component C in figure 2 is indicated with the wording: "See fig. 2.C" or simply "(Fig. 2.C)".
The figures are given as a guide only. The actual pieces can differ from those illustrated in this document.
1.2.2 Titles
The manual is divided into chapters and paragraphs. The title of paragraph "2.1 Training" is a subtitle of "2. Safety regulations". References to titles or paragraphs are marked with the abbreviation chap. or par. and the relevant number. Example: "chap. 2" or "par. 2.1".
2. SAFETY REGULATIONS
2.1 GENERAL POWER TOOL SAFETY WARNINGS
WARNING Read all safety warnings, instructions, illustrations and specifications provided with this power tool. Failure to follow all instructions listed below may result in electric shock, fire and/or serious injury.
Save all warnings and instructions for future reference.
The term "power tool" in the warnings refers to your mains-operated (corded) power tool or battery-operated (cordless) power tool.
1) Work area safety
a) Keep the work area clean and well lit. Cluttered and dark areas invite accidents.
b) Do not operate power tools in explosive atmospheres, such as in the presence of flammable liquids, gases or dust. Power tools create sparks which may ignite the dust or fumes.
c) Keep children and bystanders away while operating a power tool. Distractions can cause you to lose control.
2) Electrical safety
a) Power tool plugs must match the outlet. Never modify the plug in any way. Do not use any adapter plugs with earthed (grounded) power tools. Unmodified plugs and matching outlets will reduce risk of electric shock.
b) Avoid body contact with earthed or grounded surfaces, such as pipes, radiators, ranges and refrigerators. There is an increased risk of electric shock if your body is earthed or grounded.
c) Do not operate the lawnmower in rain or wet conditions. This may increase the risk of electric shock.
d) Do not abuse the cord. Never use the cord for carrying, pulling or unplugging the power tool. Keep cord away from heat, oil, sharp edges or moving parts. Damaged or entangled cords increase the risk of electric shock.
e) When operating a power tool outdoors, use an extension cord suitable for outdoor use. Use of a cord suitable for outdoor use reduces the risk of electric shock.
f) If operating a power tool in a damp location is unavoidable, use a residual current device (RCD) protected supply. Use of an RCD reduces the risk of electric shock.
3) Personal safety
a) Stay alert, watch what you are doing and use common sense when operating a power tool. Do not use a power tool while you are tired or under the influence of drugs, alcohol or medication. A moment of inattention while operating power tools may result in serious personal injury.
b) Use personal protective equipment. Always wear eye protection. Protective equipment such as a dust mask, non-skid safety shoes, hard hat or hearing protection used for appropriate conditions will reduce personal injuries.
c) Prevent unintentional starting. Ensure the switch is in the off-position before connecting to power source and/or battery pack, picking up or carrying the tool. Carrying power tools with your finger on the switch or energising power tools that have the switch on invites accidents.
d) Remove any adjusting key or wrench before turning the power tool on. A wrench or a key left attached to a rotating part of the power tool may result in personal injury.
e) Do not overreach. Keep proper footing and balance at all times. This enables better control of the power tool in unexpected situations.
f) Dress properly. Do not wear loose clothing or jewellery. Keep your hair and clothing away from moving parts. Loose clothes, jewellery or long hair can be caught in moving parts.
g) If devices are provided for the connection of dust extraction and collection facilities, ensure these are connected and properly used. Use of dust collection can reduce dust-related hazards.
h) Do not let familiarity gained from frequent use of tools allow you to become complacent and ignore tool safety principles. A careless action can cause severe injury within a fraction of a second.
4) Power tool use and care
a) Do not force the power tool. Use the correct power tool for your application. The correct power tool will do the job better and safer at the rate for which it was designed.
b) Do not use the power tool if the switch does not turn it on and off. Any power tool that cannot be controlled with the switch is dangerous and must be repaired.
c) Disconnect the plug from the power source and/or remove the battery pack, if detachable, from the power tool before making any adjustments, changing accessories, or storing power tools. Such preventive safety measures reduce the risk of starting the power tool accidentally.
d) Store idle power tools out of the reach of children and do not allow persons unfamiliar with the power tool or these instructions to operate the power tool. Power tools are dangerous in the hands of untrained users.
e) Maintain power tools and accessories. Check for misalignment or binding of moving parts, breakage of parts and any other condition that may affect the power tool's operation. If damaged, have the power tool repaired before use. Many accidents are caused by poorly maintained power tools.
f) Keep cutting tools sharp and clean. Properly maintained cutting tools with sharp cutting edges are less likely to bind and are easier to control.
g) Use the power tool, accessories and tool bits etc. in accordance with these instructions, taking into account the working conditions and the work to be performed. Use of the power tool for operations different from those intended could result in a hazardous situation.
h) Keep handles and grasping surfaces dry, clean and free from oil and grease. Slippery handles and grasping surfaces do not allow for safe handling and control of the tool in unexpected situations.
5) Battery tool use and care
a) Recharge only with the charger specified by the manufacturer. A charger that is suitable for one type of battery pack may create a risk of fire when used with another battery pack.
b) Use power tools only with specifically designated battery packs. Use of any other battery packs may create a risk of injury and fire.
c) When battery pack is not in use, keep it away from other metal objects, like paper clips, coins, keys, nails, screws or other small metal objects, that can make a connection from one terminal to another. Shorting the battery terminals together may cause burns or a fire.
d) Under abusive conditions, liquid may be ejected from the battery; avoid contact. If contact accidentally occurs, flush with water. If liquid contacts eyes, additionally seek medical help. Liquid ejected from the battery may cause irritation or burns.
e) Do not use a battery pack or tool that is damaged or modified. Damaged or modified batteries may exhibit unpredictable behaviour resulting in fire, explosion or risk of injury.
f) Do not expose a battery pack or tool to fire or excessive temperature. Exposure to fire or temperature above 130 °C may cause explosion. NOTE The temperature „130 °C“ can be replaced by the temperature „265 °F“.
g) Follow all charging instructions and do not charge the battery pack or tool outside the temperature range specified in the instructions. Charging improperly or at temperatures outside the specified range may damage the battery and increase the risk of fire.
6) Service
a) Have your power tool serviced by a qualified repair person using only identical replacement parts. This will ensure that the safety of the power tool is maintained.
b) Never service damaged battery packs. Service of battery packs should only be performed by the manufacturer or authorized service providers.
2.2 LAWNMOWER SAFETY WARNINGS
a) Do not use the lawnmower in bad weather conditions, especially when there is a risk of lightning. This decreases the risk of being struck by lightning.
b) Thoroughly inspect the area for wildlife where the lawnmower to be used. Wildlife may be injured by the lawnmower during operation.
c) Thoroughly inspect the area where the lawnmower is to be used and remove all stones, sticks, wires, bones, and other foreign objects. Thrown objects can cause personal injury.
d) Before using the lawnmower, always visually inspect to see that the blade and the blade assembly are not worn or damaged. Worn or damaged parts increase the risk of injury.
f) Check the grass catcher frequently for wear or deterioration. A worn or damaged grasscatcher may increase the risk of personal injury.
g) Keep guards in place. Guards must be in working order and be properly mounted. A guard that is
loose, damaged, or is not functioning correctly may result in personal injury.
h) Keep all cooling air inlets clear of debris. Blocked air inlets and debris may result in overheating or risk of fire.
i) While operating the lawnmower, always wear non-slip and protective footwear. Do not operate the lawnmower when barefoot or wearing open sandals. This reduces the chance of injury to the feet from contact with the moving blade.
j) While operating the lawnmower, always wear long trousers. Exposed skin increases the likelihood of injury from thrown objects.
k) Do not operate the lawnmower in wet grass. Walk, never run. This reduces the risk of slipping and falling which may result in personal injury.
I) Do not operate the lawnmower on excessively steep slopes. This reduces the risk of loss of control, slipping and falling which may result in personal injury.
m) When working on slopes, always be sure of your footing, always work across the face of slopes, never up or down and exercise extreme caution when changing direction. This reduces the risk of loss of control, slipping and falling which may result in personal injury.
n) Use extreme caution when reversing or pulling the lawnmower towards you. Always be aware of your surroundings. This reduces the risk of tripping during operation.
q) Do not touch blades and other hazardous moving parts while they are still in motion. This reduces the risk of injury from moving parts.
r) When clearing jammed material or cleaning the lawnmower, make sure all power switches are off and the battery pack is disconnected. Unexpected operation of the lawnmower may result in serious personal injury.
2.3 MAINTENANCE AND STORAGE

Before cleaning or doing maintenance work, disconnect the machine from the mains and read the relevant instructions. Wear proper clothing and protective gloves whenever your hands are at risk.

Never use the machine with worn or damaged parts. Faulty or worn-out parts must always be replaced and not repaired. Only use original spare parts: the use of non-original and/or incorrectly fitted parts will jeopardize the safety of the machine, may cause accidents or personal injuries for which the Manufacturer is under no circumstance liable or responsible.
IMPORTANTE
Any adjustments or maintenance
operations not described in this manual must be carried out by your Dealer or a specialized Service Centre with the necessary knowledge and equipment to ensure that the work is done correctly maintaining the machine's original safety level. Any operations performed in unauthorized centres or by unqualified persons will totally invalidate the Warranty and all obligations and responsibilities of the Manufacturer.
1) After each use, disconnect the machine from the mains and check for damage.
2) Keep all nuts, bolts and screws tight to be sure the machine is in safe working condition. Routine maintenance is essential for safety and for maintaining a high performance level.
3) Check that the cutting means screws are properly tightened on a regular basis.
4) Wear work gloves when handling, disassembling and reassembling all cutting means.
5) Keep the cutting means well balanced during sharpening. All work on the cutting means (disassembly, sharpening, balancing, reassembly and/or replacing) are demanding jobs that require special skills as well as special tools. For safety reasons, these jobs are best carried out at a specialised centre.
6) Be careful during adjustment of the machine to prevent entrapment of the fingers between moving parts of the cutting means and fixed parts of the machine.
7) Do not touch the cutting means until the machine is disconnected from the mains socket and the cutting means is completely stationary. When servicing the cutting means, bear in mind that, even though the power supply is switched off, the cutting means can still move.
8) Check the side discharge guard, the rear discharge guard and the grass catcher frequently for signs of wear or deterioration. Replace them if they are damaged.
9) Replace any instruction or warning message stickers, if damaged.
10) Store the machine out of the reach of children!
11) Allow the motor to cool down before storing in any enclosure.
12) To reduce fire hazards, keep the lawnmower and, in particular, the motor free of grass, leaves, or excessive grease. Always empty the grass catcher and do not leave containers full of cut grass inside storage areas.
2.4 BATTERY / BATTERY CHARGER

ATTENTION
The following safety rules complement the safety rules contained in the battery charger manual.
- Only use battery chargers recommended by the manufacturer to recharge batteries. An inadequate battery charger may cause electric shock, overheating or corrosive liquid to leak from the battery.
- Use only batteries specifically designed for your power tool. The use of other batteries may cause injuries and fire risks.
- Keep all unused batteries at a distance from paper clips, coins, keys, nails, screws or other small metal objects as contact with the same can cause short circuits. Short circuits between battery contacts can lead to explosion or fires.
- Never use the battery charger in environments in the presence of vapours, flammable substances or on easily flammable surfaces such as paper, fabric, etc. The battery charger heats up during recharging and may cause a fire.
- When transporting batteries, make sure the contacts never come into contact with each other and never use metal containers to transport them.
2.5 PROTECTING THE ENVIRONMENT
Safeguarding the environment must be a relevant and priority aspect of machine use, of benefit to the community and the environment we live in.
- Avoid being a disturbance to the neighbourhood. Use this machine at reasonable times of the day only (not early morning or late evening when the noise could cause disturbance).
- A certain amount of chain lubricating oil is released into the environment when the machine is running, so only use biodegradable oils made specifically for this use. Use of a mineral oil or motor oil causes serious damage to the environment.
- Comply with local regulations for the disposal of packaging, deteriorated parts or any elements with a strong environmental impact; this waste must not be disposed of as normal waste, it must be separated and taken to specified waste disposal centres where the material will be recycled.
- Comply with local regulations for the disposal of waste materials
- When the machine is withdrawn from service, do not dispose of it in the environment, but take it to a waste disposal facility in accordance with the local regulations in force.
Do not throw electrical equipment away with domestic waste. According to the European Directive 2012/19/EU on electrical and electronic equipment waste and its implementation, according to UK Regulation "The waste electrical
and electronic equipment regulations 2013 (as amended)" and according to national regulations, old electrical equipment must be collected separately, for eco-compatible recycling. If electrical equipment is disposed of in landfills or in the ground, hazardous substances can leak into the groundwater and contaminate the food chain, damaging your health and well-being. For further information on the disposal of this product, contact your dealer or a domestic waste collection service.
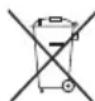
At the end of their working life, dispose of batteries paying due attention to the environment. Batteries contain material classified as hazardous for you and the environment. They must be removed and disposed of separately at a facility that accepts
lithium-ion batteries.

Separate waste collection of the products and packaging used allows the materials to be recycled and reused. Reuse of recycled materials help to prevent environmental pollution and reduces the demand for raw materials.
3. GETTING TO KNOW THE MACHINE
3.1 DESCRIPTION OF THE MACHINE AND PLANNED USE
This machine is a pedestrian controlled lawnmower.
The machine is essentially composed of a motor which drives a blade enclosed in a casing, equipped with wheels and a handle.
The operator is able to operate the machine and use the main controls, always staying behind the handle at a safe distance from the rotating blade. If the operator leaves the machine, the motor and blade will stop within a few seconds.
3.1.1 Intended use
This machine was designed and manufactured for cutting grass in gardens and grassy areas, carried out by a pedestrian operator.
Generally speaking this machine can:
- Mow the grass and collect it in the grass catcher.
- Mow the grass and discharge it on the ground from the rear section.
- Mow, cut and deposit the grass on the ground (mulching effect - if provided).
The use of special attachments provided for by the Manufacturer as original equipment or which may be purchased separately, allows this work to be done in various operating modes, illustrated in this manual or the instructions that accompany the single attachments.
3.1.2 Improper use
Any other usage not in keeping with the afore-mentioned ones may be hazardous and harm persons and/or damage things.
Examples of improper use may include, but are not limited to:
- Allowing children, animals or other passengers to ride on the machine as they could fall off and injure themselves or compromise safe driving by the operator.
- Letting oneself be transported by the machine.
- Using the machine to tow or push loads.
– Using the blade on surfaces other than grass. - Using the machine for leaf or debris collection.
- Using the machine to trim hedges, or for cutting vegetation other than grass.
– Use of the machine by more than one person.
IMPORTANT Improper use of the machine will invalidate the warranty, relieve the Manufacturer from all liabilities, and the user will consequently be liable for all and any damage or injury to himself or others.
3.1.3 User types
This machine is intended for use by consumers, i.e. non-professional operators.
It is intended for "DIY" use only..
IMPORTANT The machine must be used by one operator.
3.2 MAIN COMPONENTS (FIG. 1)
A. Chassis: this is the casing that houses the rotating blade.
B. Motor: the driving force for the blade.
C. Cutting blade: the element designed to cut the grass.
D. Rear discharge guard: it is a safety device which prevents objects drawn up by the blade from being hurled away from the machine.
E. Grass catcher: as well as collecting the grass cuttings, this is also a safety element that stops any objects drawn up by the blade from being hurled away from the machine.
F. Handle: this is the operator's work station. It is long enough to ensure the operator remains at a safe distance from the rotary blade whilst working.
G. Control lever: starts/stops the motor and simultaneously engages/disengages the blade.
H. Hatch for accessing the battery compartment
I. Safety key (Deactivation device): The key enables / disables the machine's electric circuit.
J. Battery (if it is not supplied with the machine, see chapter 13 "attachments on request"): provides the energy for starting the motor. Its specifications and regulations for use are described in a specific manual.
K. Battery charger (if it is not supplied with the machine, see chapter 13 "attachments on request"): device used to recharge the battery.
3.3 IDENTIFICATION LABEL (FIG. 1)
- Sound power level.
- Conformity marking.
- Year of manufacture.
- Type of machine.
- Serial number.
- Name and address of Manufacturer.
- Article code.
- Max. motor operation speed.
- Weight in kg.
- Power voltage.
- Electrical protection rating.
- Nominal power.
IMPORTANT Quote the information on the product identification label whenever you contact an authorised service dealer.
IMPORTANT The example of the Declaration of Conformity is provided on the last pages of the manual.
3.4 SAFETY SIGNS (Fig. 2).
The machine has various symbols on it. Meaning of symbols:


Warning. Read the instructions before operating the machine.


Danger! Risk of thrown objects. Keep all persons away from the work area whilst working.


Be careful when using the sharp blade. Do not put hands or feet near or under the opening of the blade. The blade continues to turn even after the motor has been switched off. Remove the battery before any inspection, cleaning or maintenance/adjustment operation on the machine.


Only for electric lawnmowers powered by mains supply.


Only for electric lawnmowers powered by mains supply.
IMPORTANT Any damaged or illegible decals must be replaced. Order replacement decals from an authorised service dealer.
4. ASSEMBLY

The safety regulations to follow are described in 2. Strictly comply with these instructions to avoid us risks or dangers.
For storage and transport purposes, some components of the machine are not installed in the factory and have to be assembled after unpacking. Follow the instructions below.

Unpacking and completing the assembly should be done on a flat and stable surface, with enough space for moving the machine and its packaging, always making use of suitable equipment. Do not use the machine until all the instructions provided in the “ASSEMBLY” section have been carried out.

Before assembling, make sure the safety key is not inserted in its housing.
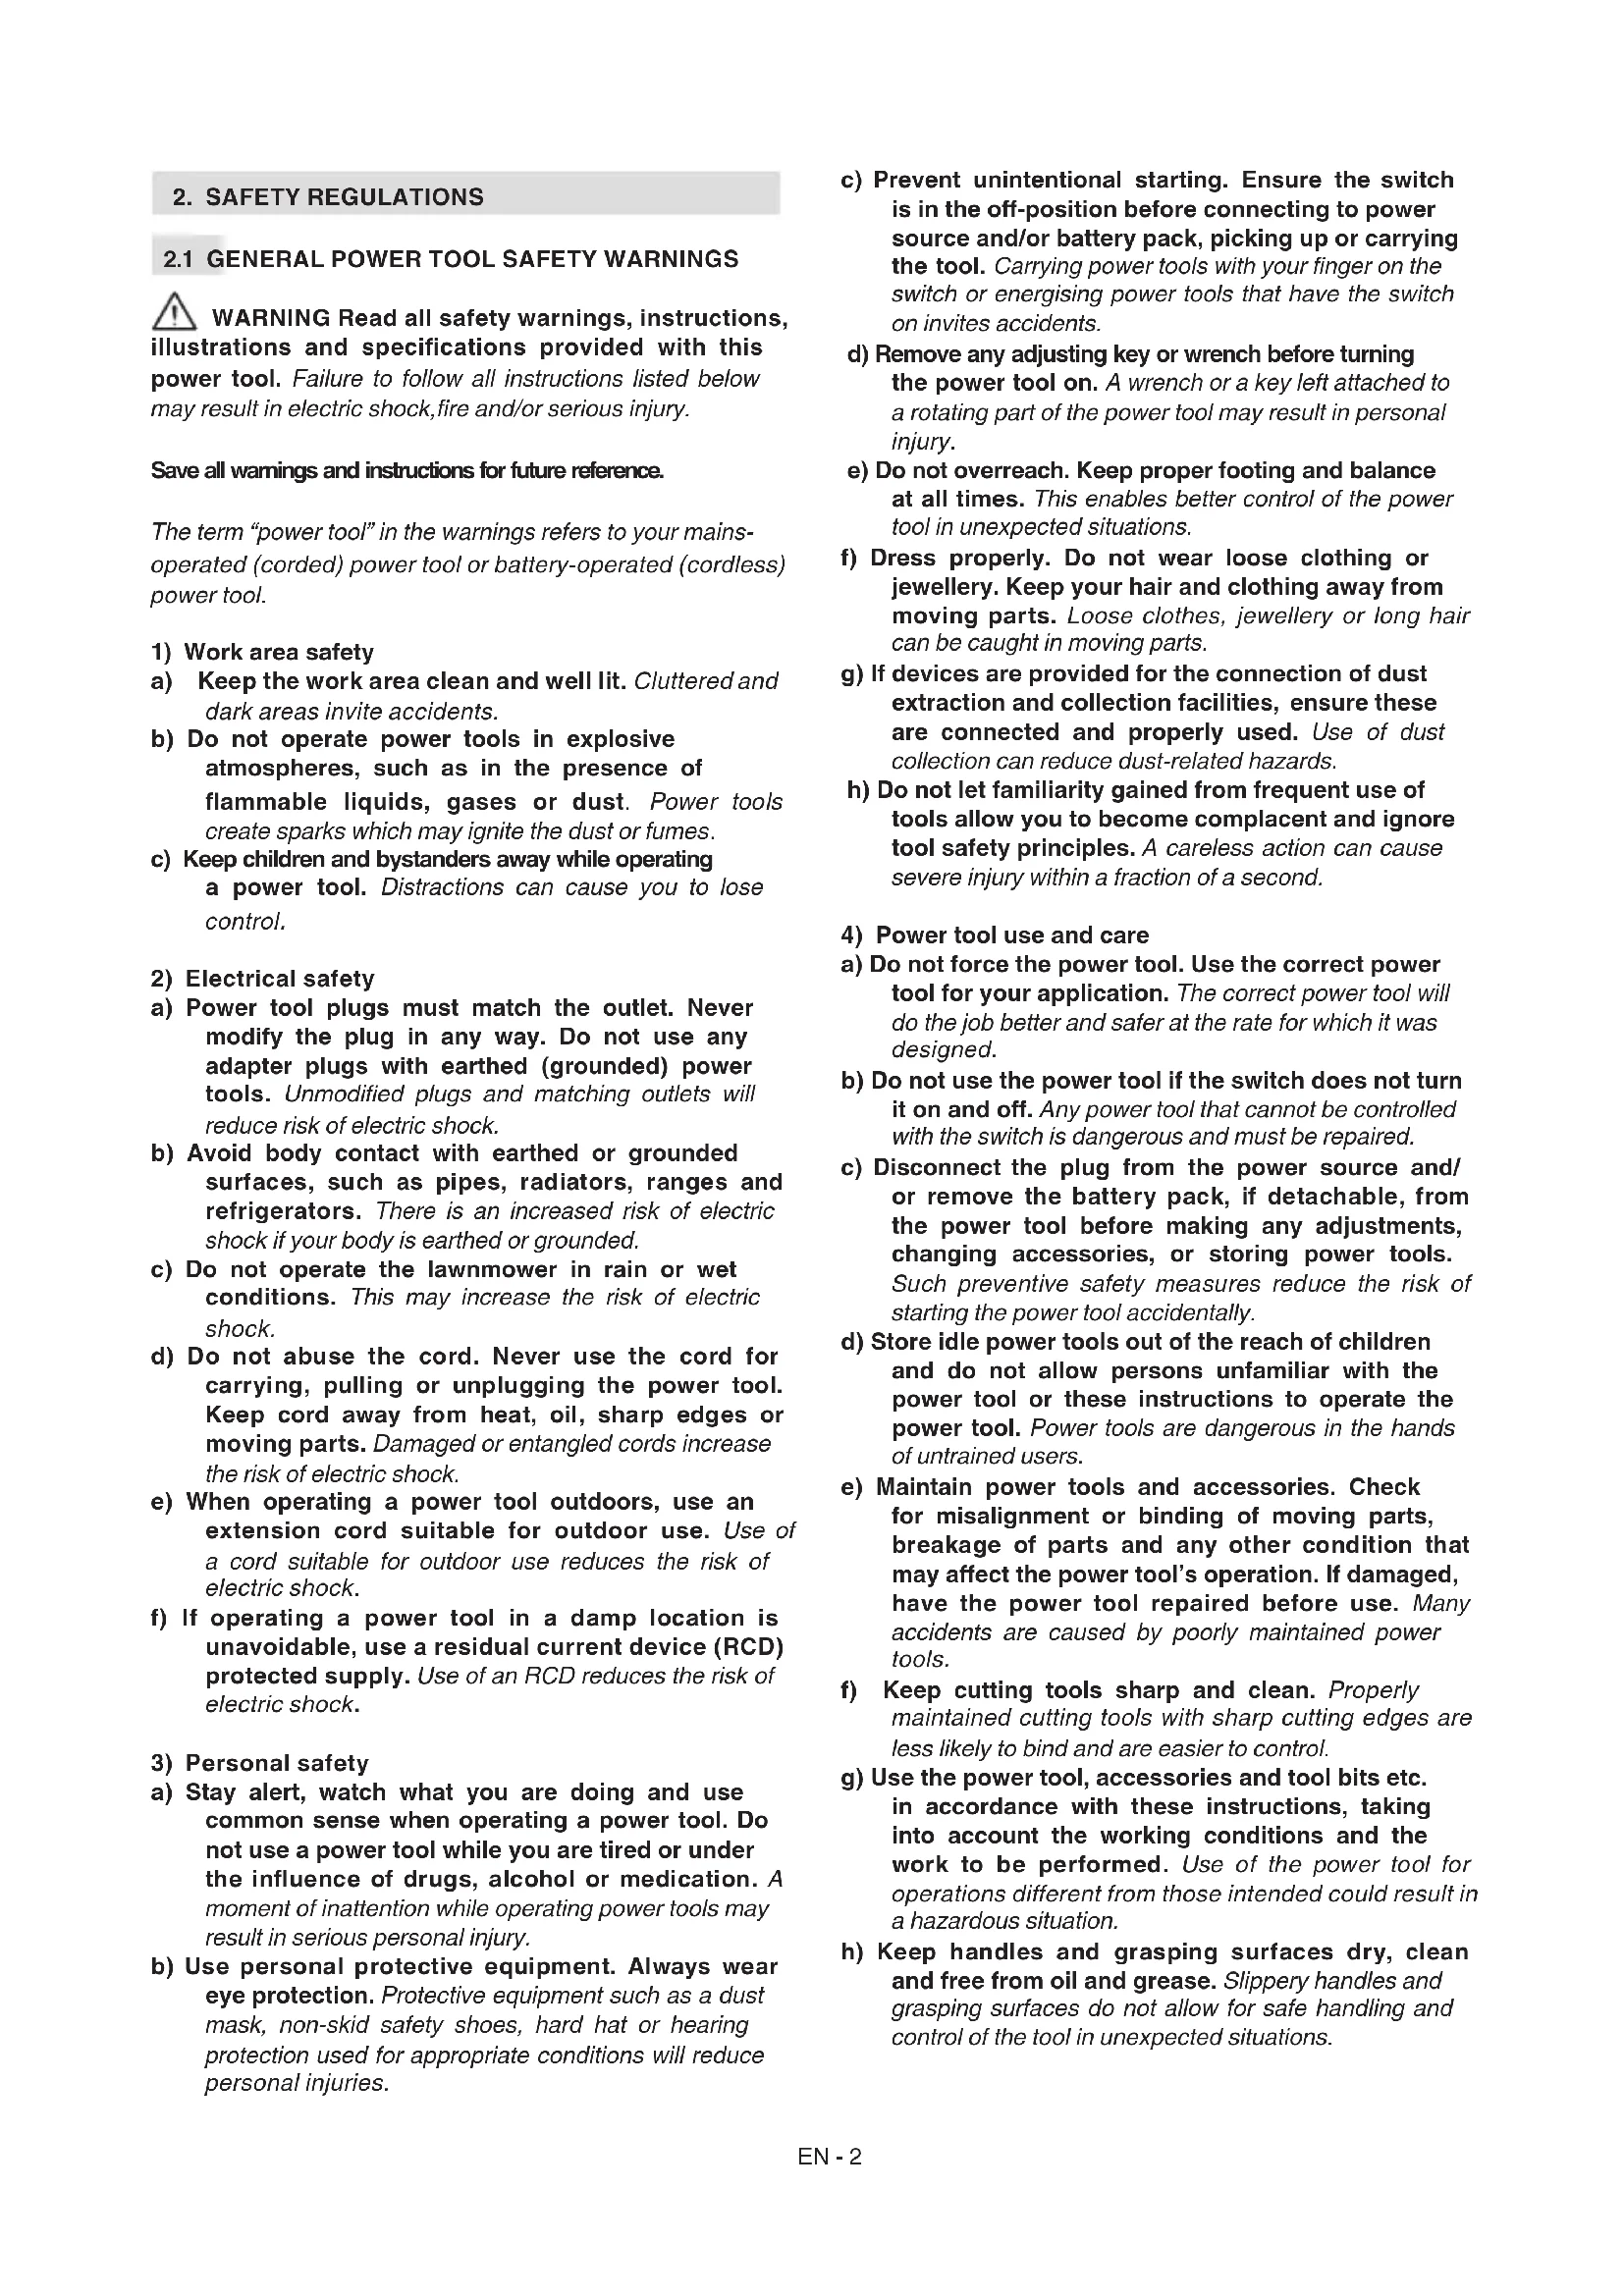
4.1 UNPACKING (Fig.3)
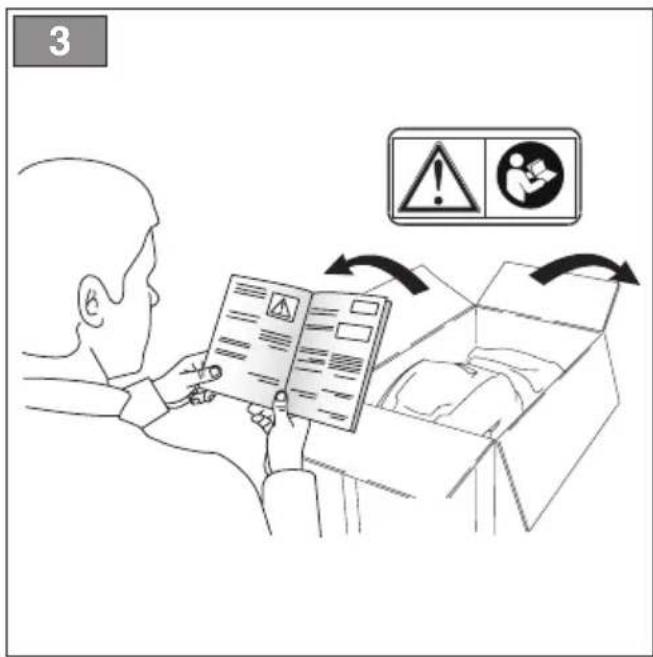
4.2 GRASS CATCHER ASSEMBLY (Fig.4 - 6)
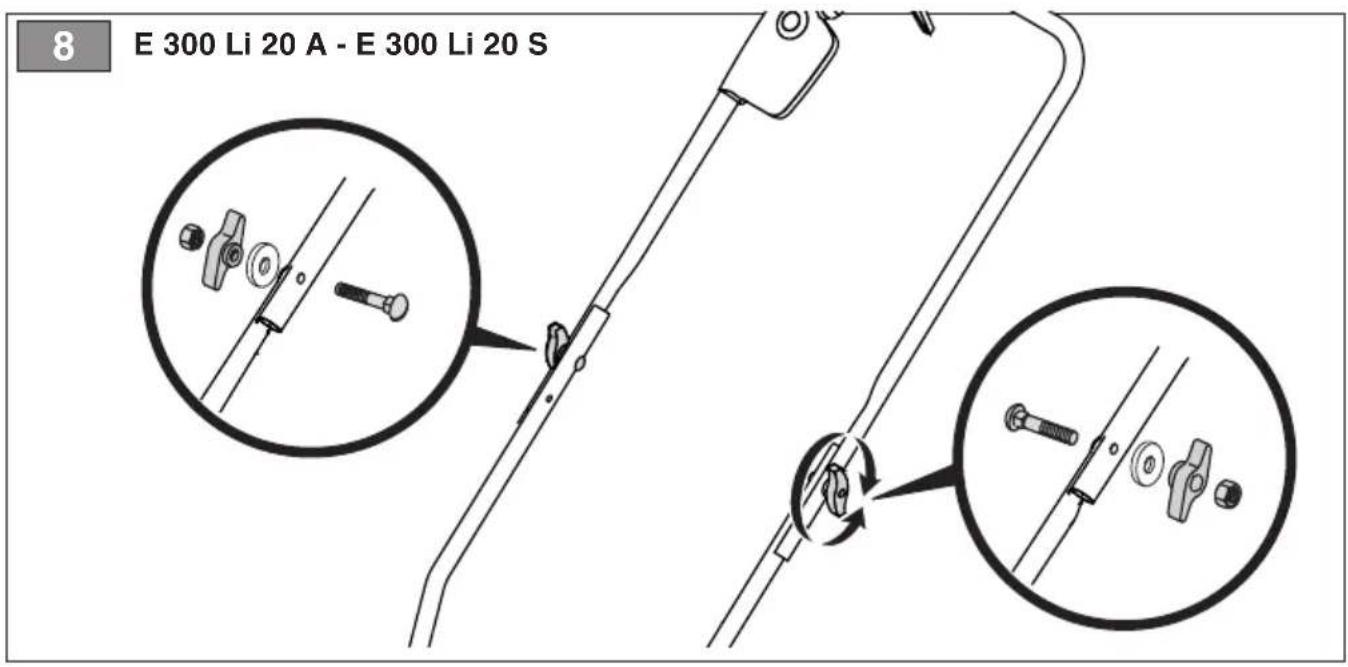
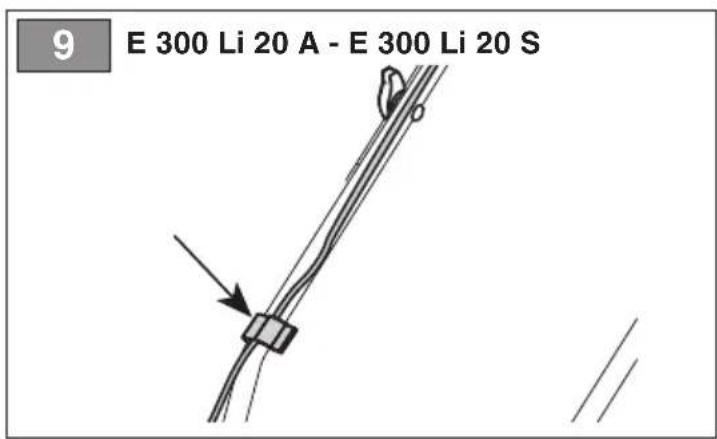
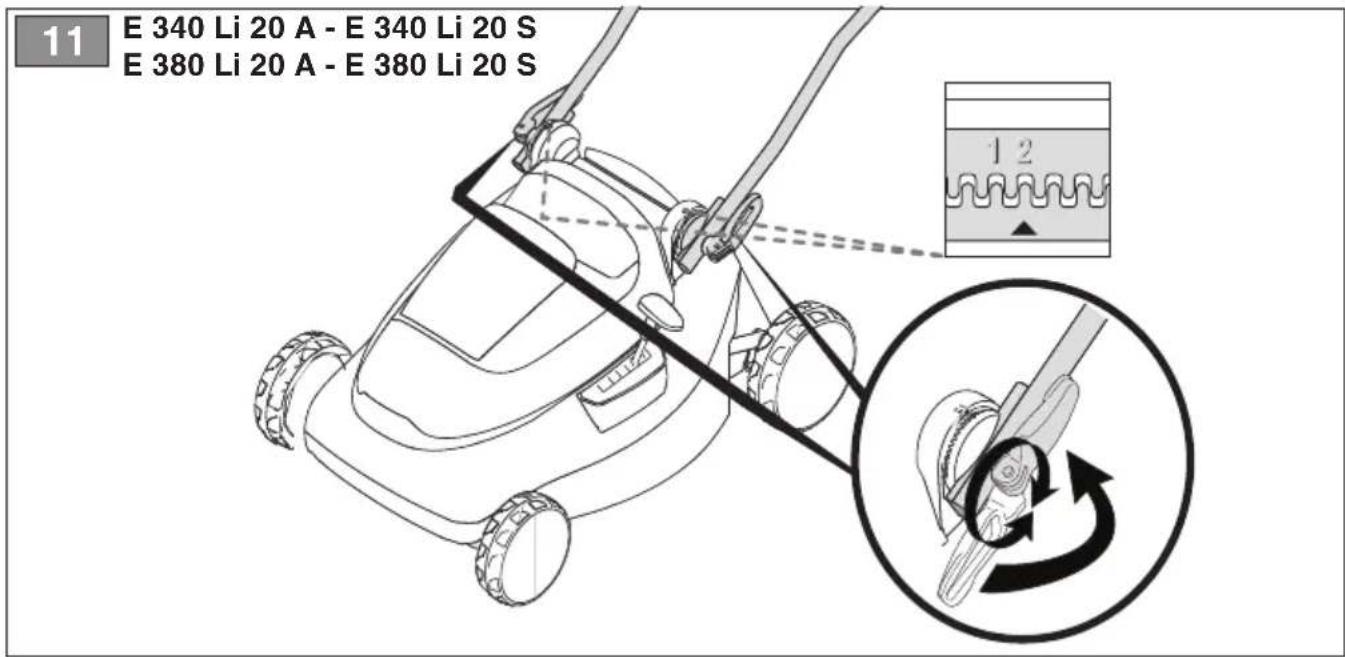
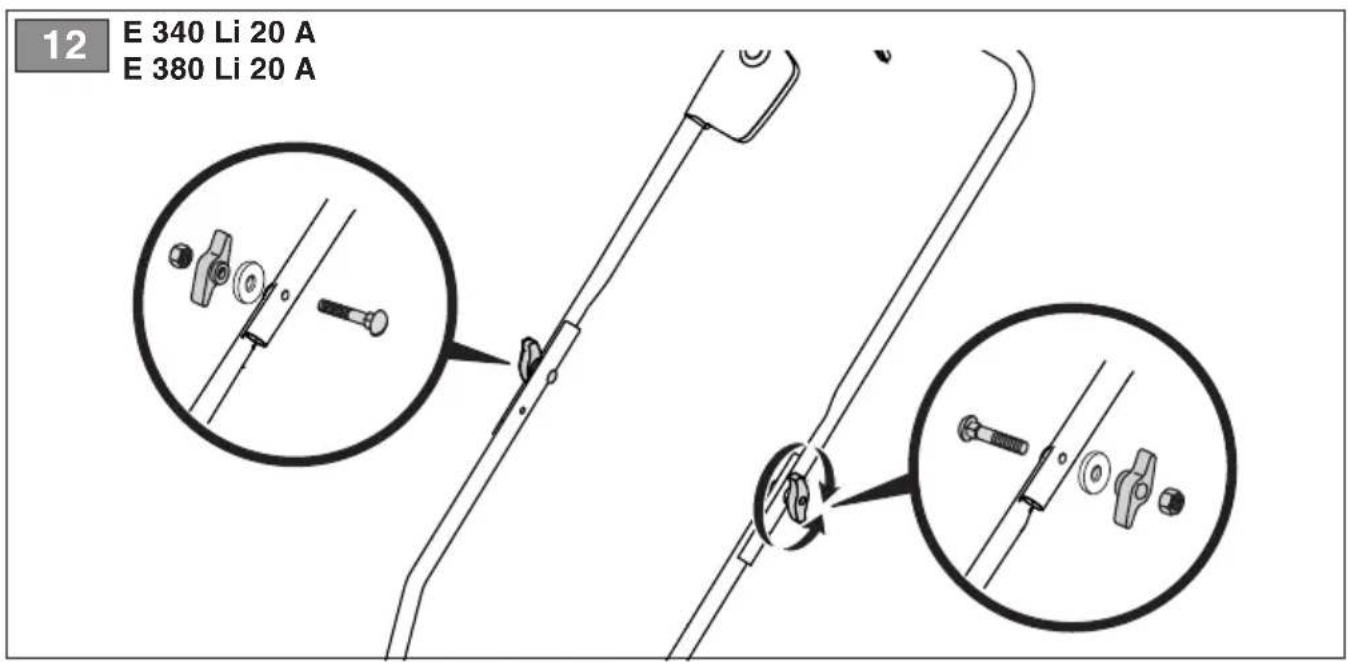
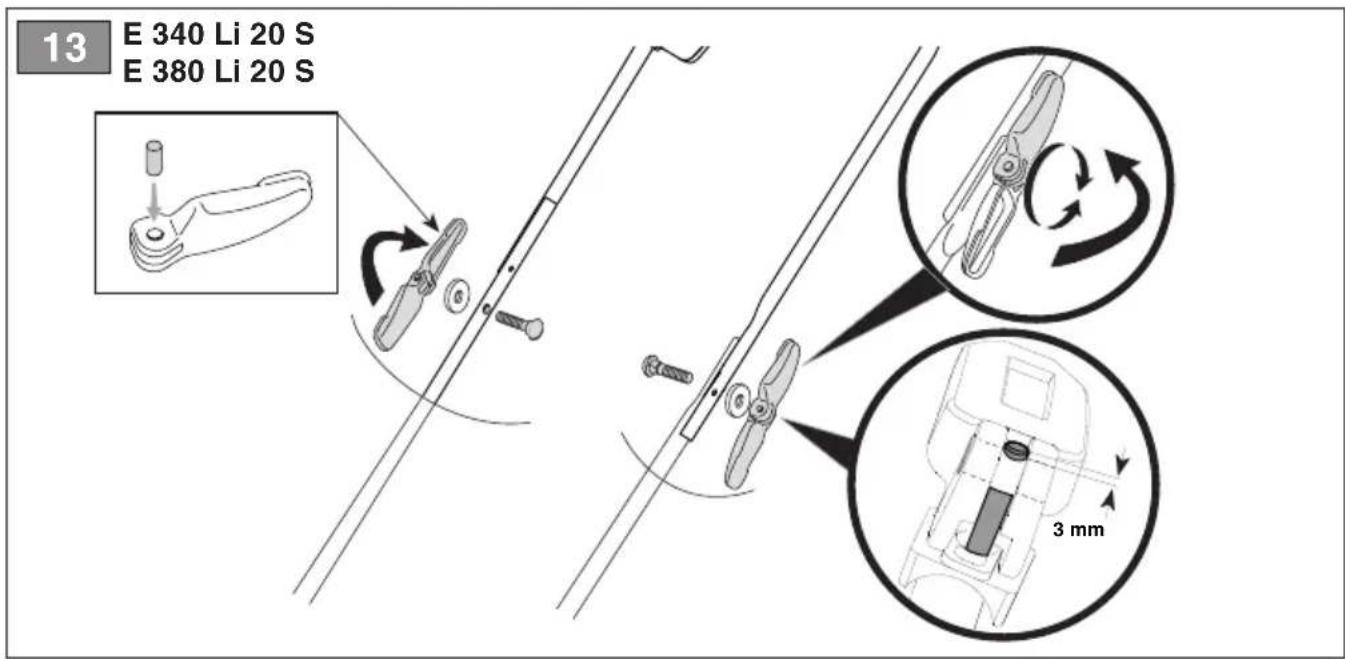
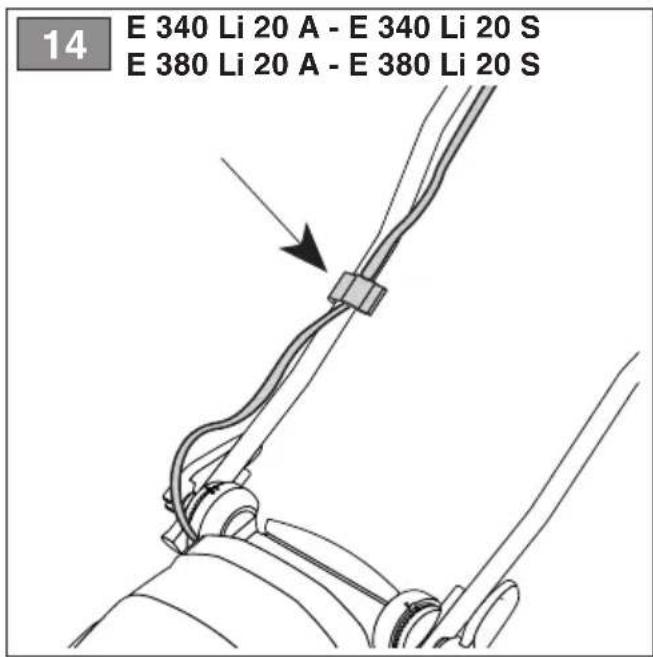
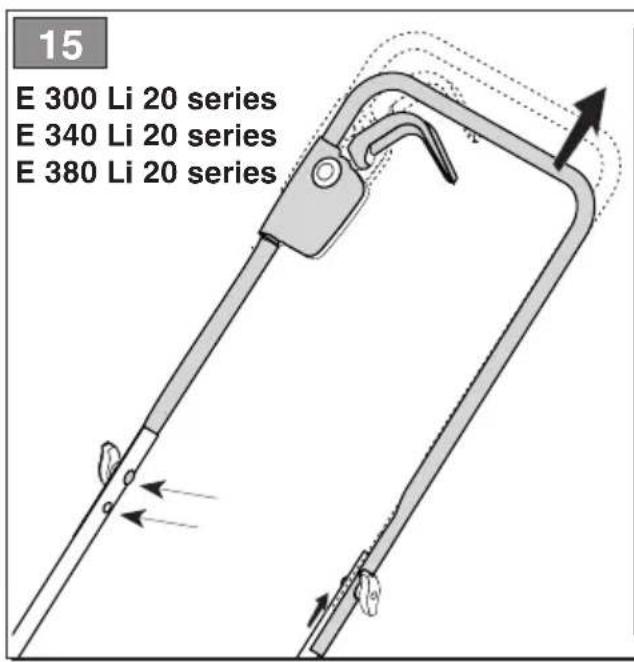
4.3 HANDLE ASSEMBLY (Fig.7 -15)
5. CONTROLS
5.1 SAFETY KEY (DEACTIVATION DEVICE)
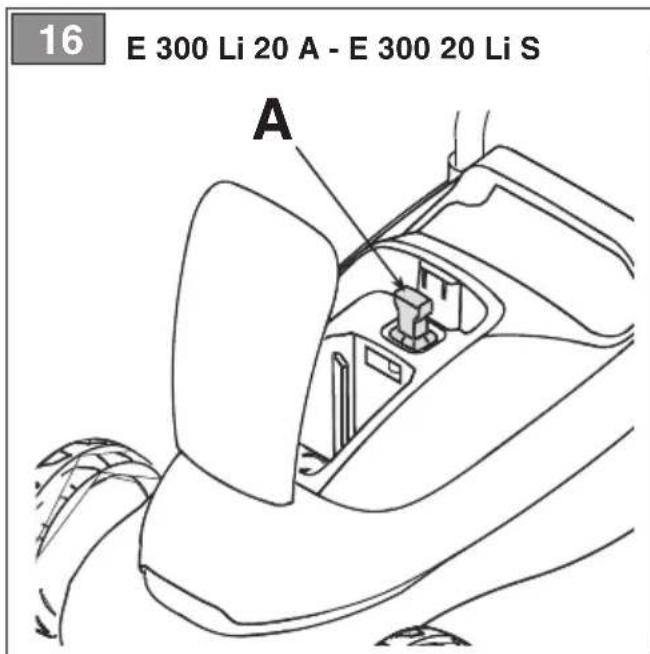
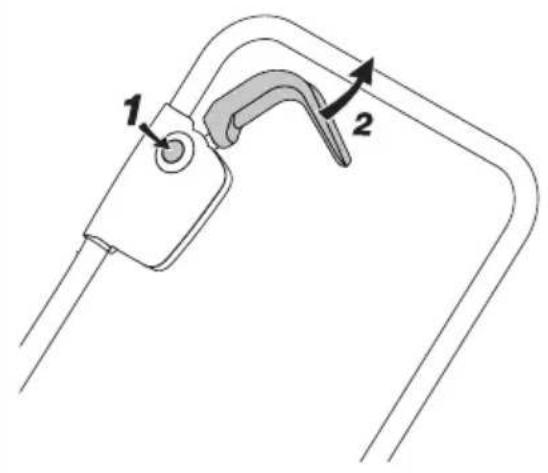
The key (Fig. 16.A) found inside the battery compartment enables / disables the machine's electric circuit. Removing the key, the electric circuit is completely deactivated to prevent uncontrolled use of the machine.
IMPORTANT Remove the safety key whenever the machine is unused or left unattended.
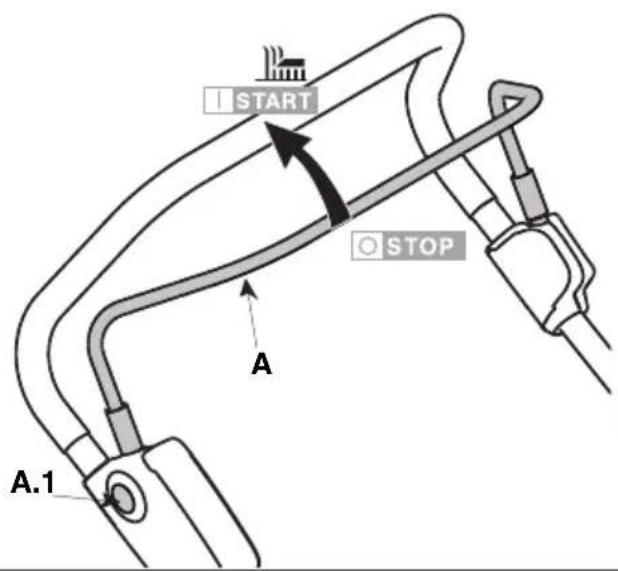
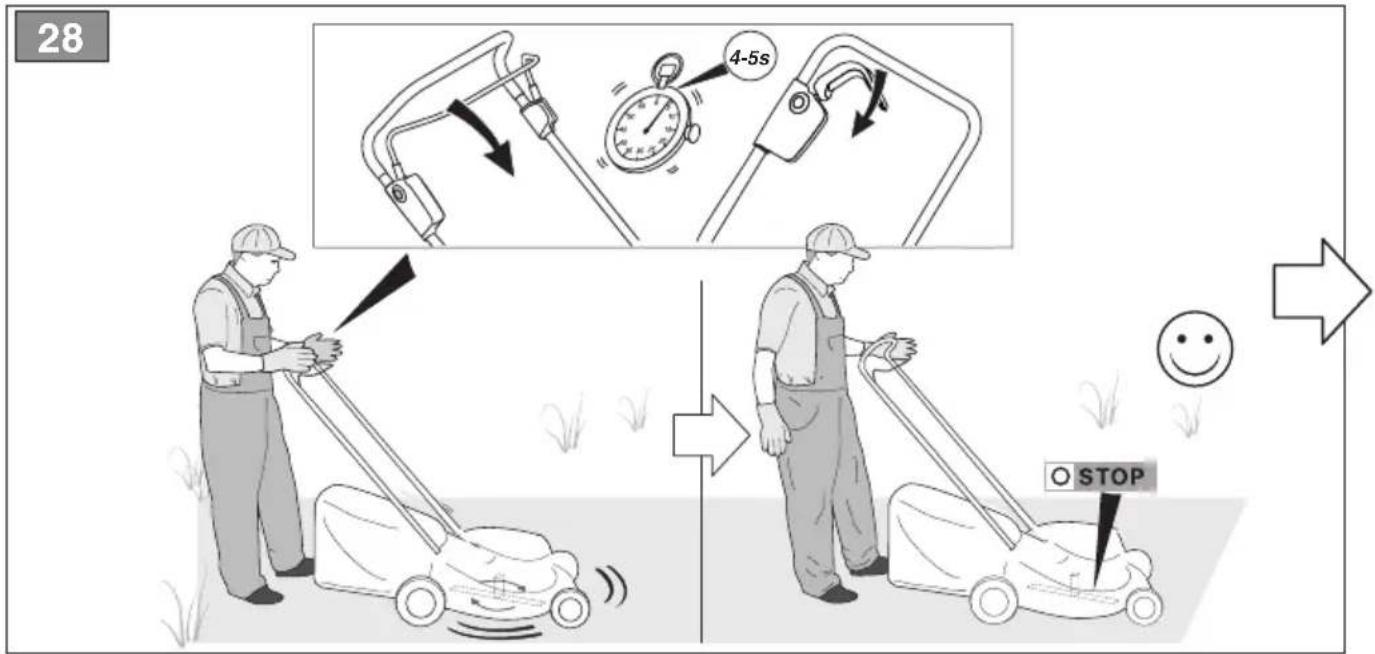
5.2 SWITCH COMMAND
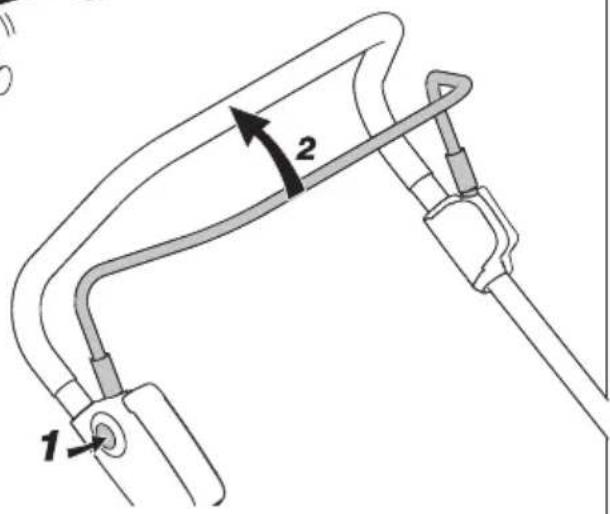
The switch control (Fig.17.A, Fig.17.A.1) starts/stops the engine and at the same time engages/disengages the cutting blade:

Start-up. To start, press the safety button (fig. 17.A.1) and pull the lever (fig. 17.A).

Blade engagement. When the engine starts, the cutting blade is also engaged.

Stop. The engine stops automatically when the lever (Fig. 17.A) is released.
6. USING THE MACHINE

The safety regulations to follow are described in chap. 2. Strictly comply with these instructions to avoid serious risks or dangers.
6.1 PRELIMINARY PROCEDURES
Make sure that the safety key is not inserted in its slot.
Place the machine in a stable horizontal position on the ground;

Carry out this operation when
the cutting blade is stationary.
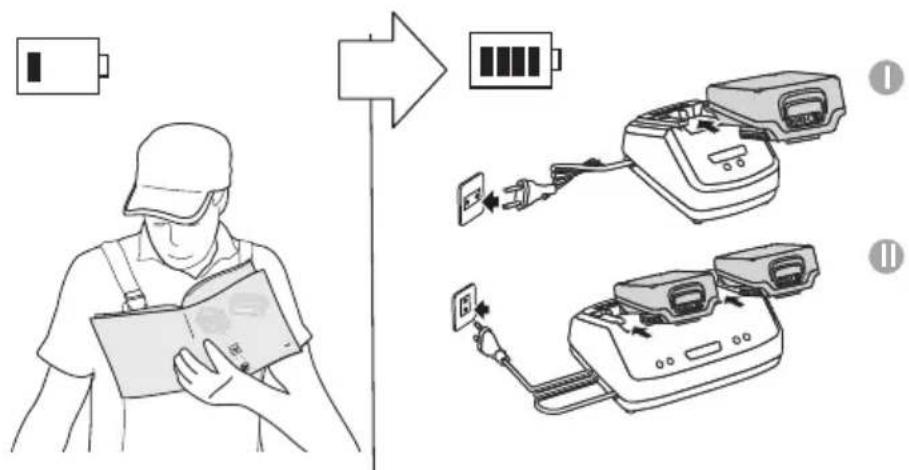
6.1.1 Checking and recharging the battery (Fig.18)
6.1.2 Preparation for grass cutting and collection in the grass catcher (Fig.19))
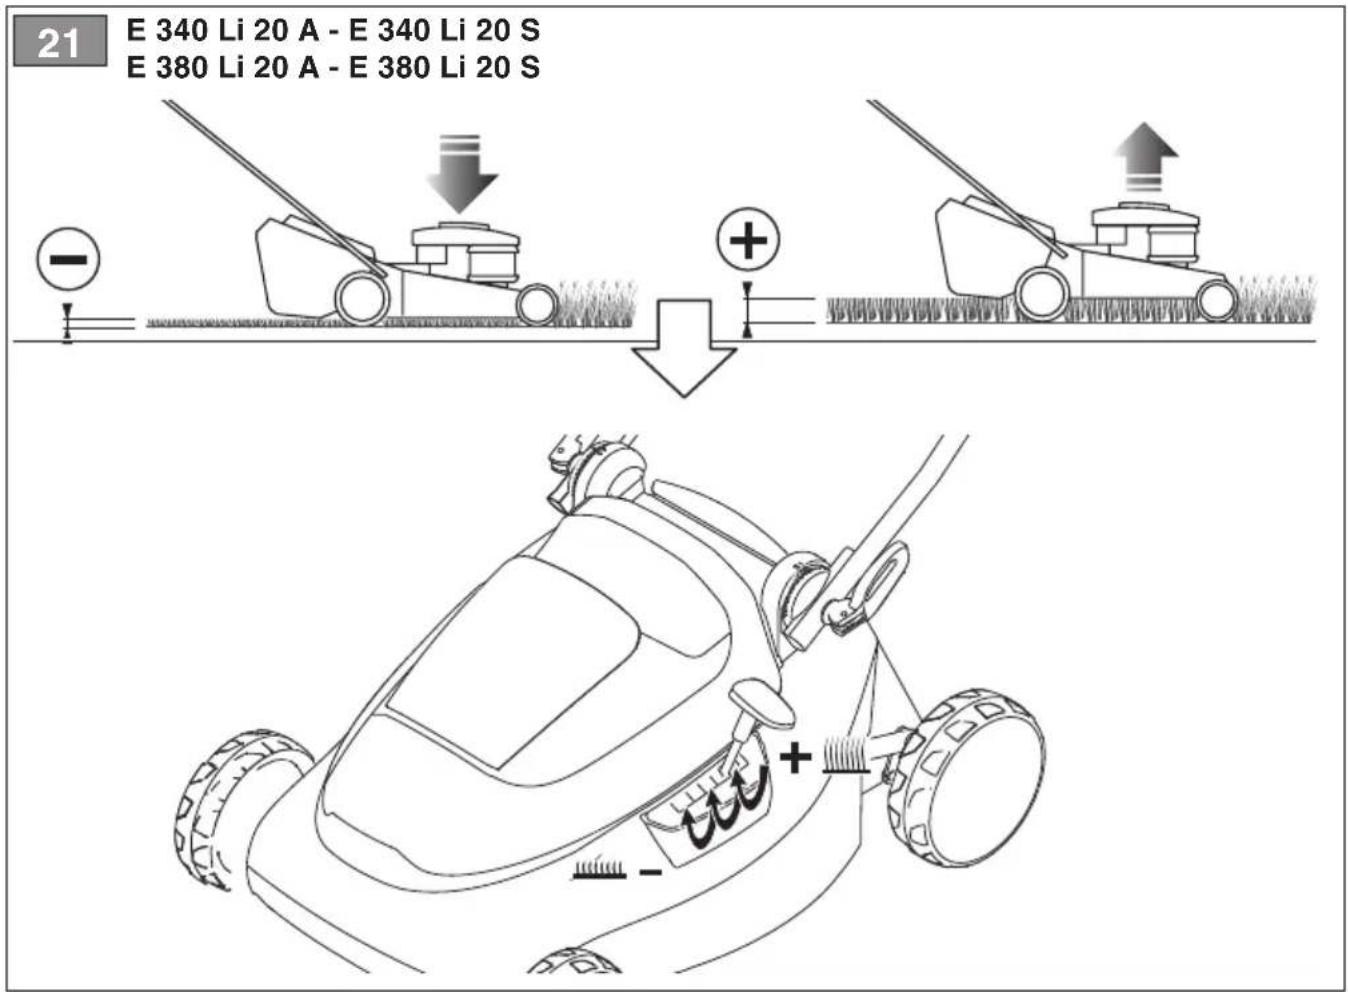
6.1.3 Cutting height adjustment (Fig.20÷21)
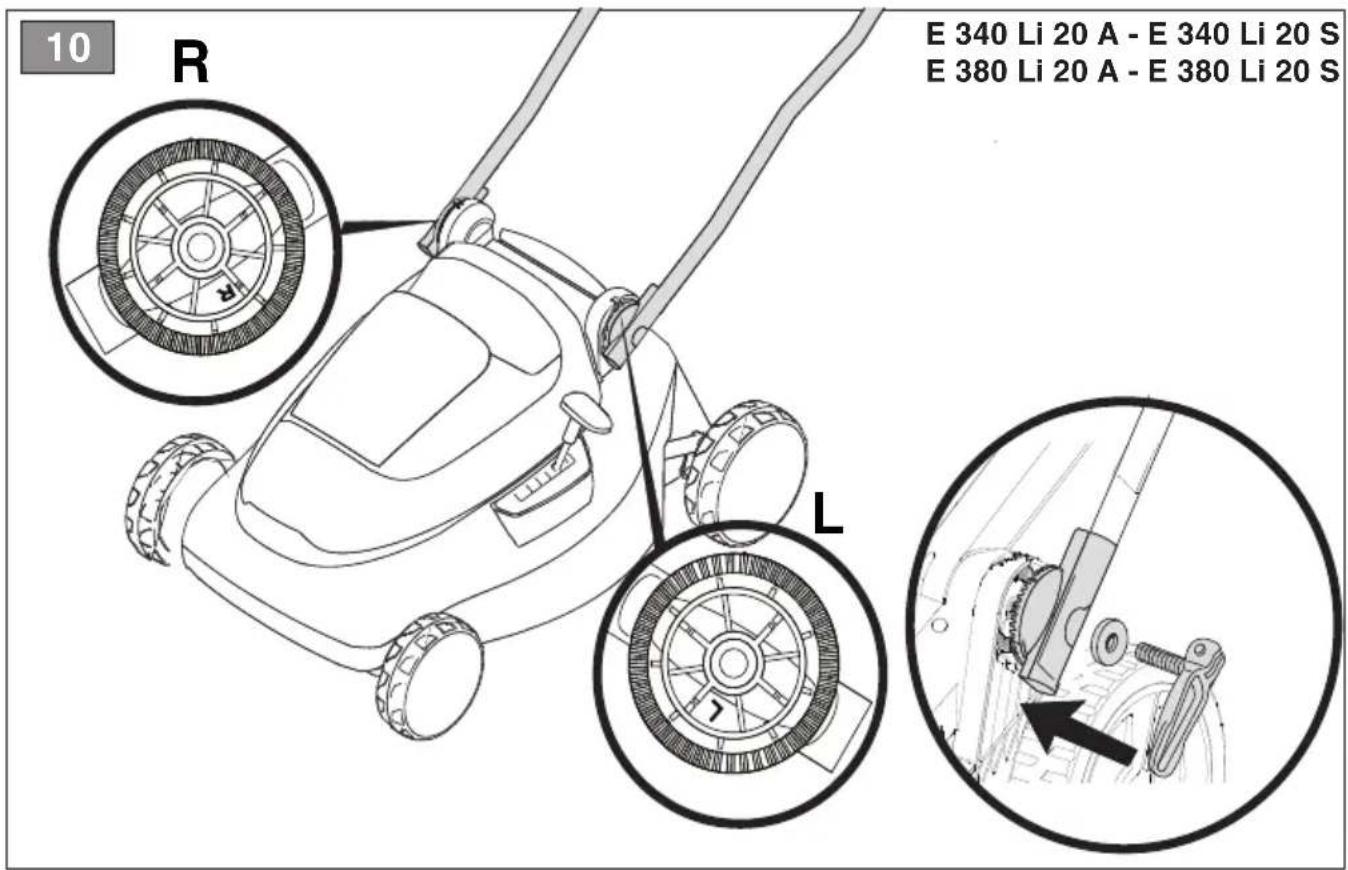
6.1.4 Handle height/inclination adjustment (Fig.15)
6.2 SAFETY CHECKS

Always carry out the safety checks before use.
6.2.1 General safety check
| Object Result | |
| Grips Clean, dry. | |
| Handle Fixed firmly to the machine. | |
| Blade Clean, not damaged or | worn, well sharpened. |
| Rear discharge guard; grass catcher | Good condition. No damage. Properly installed. Replace if damaged. |
| Switch command | The lever must move freely, it must not need forcing and should return automatically and rapidly back to the neutral position. |
| Battery | No damage to the casing, no liquid leakage. |
| Screws/nuts on the machine and on the cutting blade | Correctly tightened (not loose). Not damaged or worn. |
| Cooling air ducts Not clogged | |
| Machine No signs of damage | or wear. No abnormal vibrations. No abnormal sound. |
| Action Result | |
| 1. Start the machine (par. 6.3).2. Release the switch control (Fig.28). | 1. The blade should move.2. The lever should automatically and quickly return to neutral position, the engine must switch off and the blade must stop within a few seconds. |

If any of the results fail to match the indications provided in the tables, do not use the machine! Contact an authorised service dealer to have it checked and repaired if necessary.
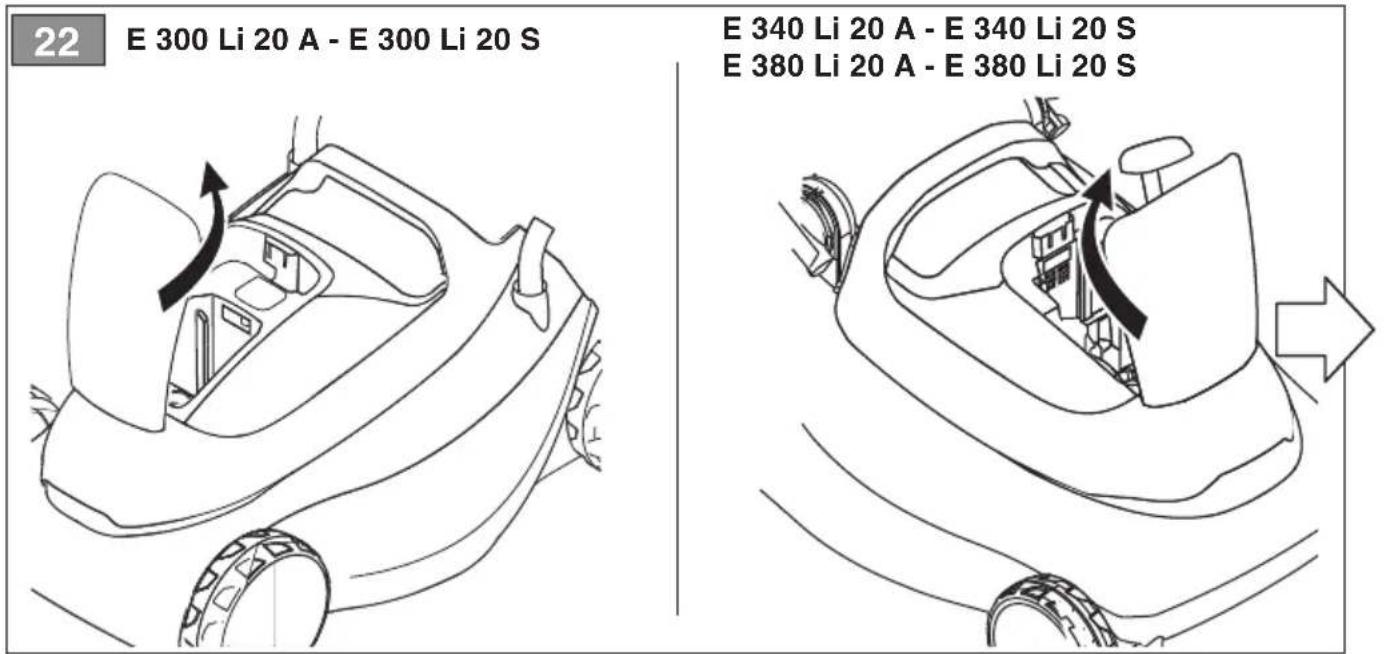
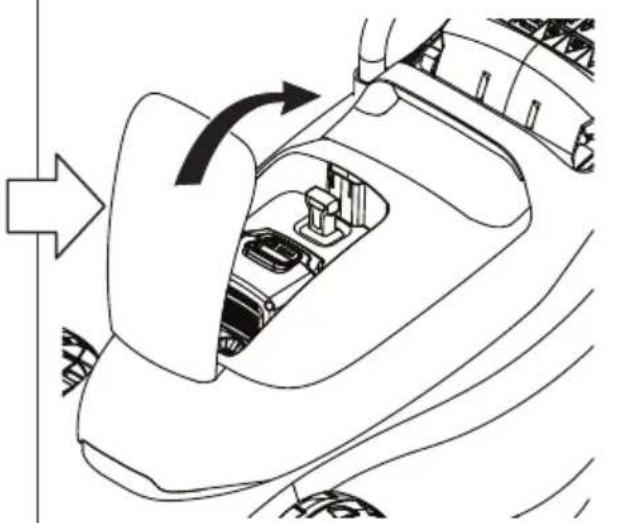
6.3 START-UP (Fig.22-25)
NOTE Start up the machine on a flat surface without obstacles or high grass.

Start of the motor simultaneously engages the g blade.
6.4 OPERATION (Fig.26)
IMPORTANT If the motor stops because it is overheated whilst mowing, you must wait approximately 5 minutes before restarting it.
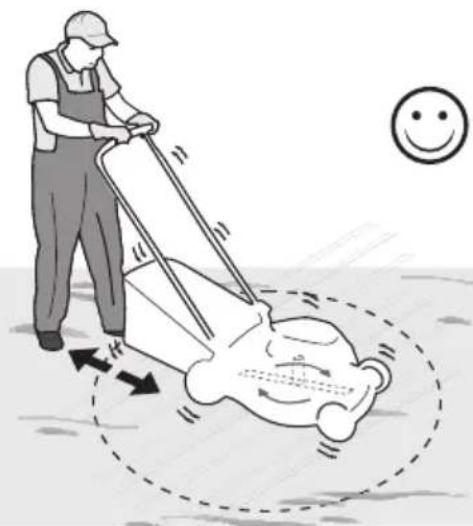
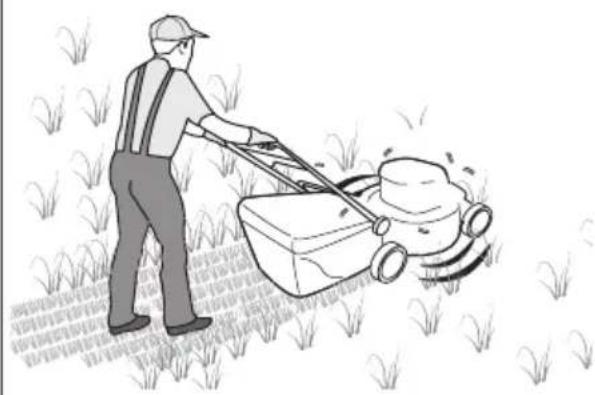
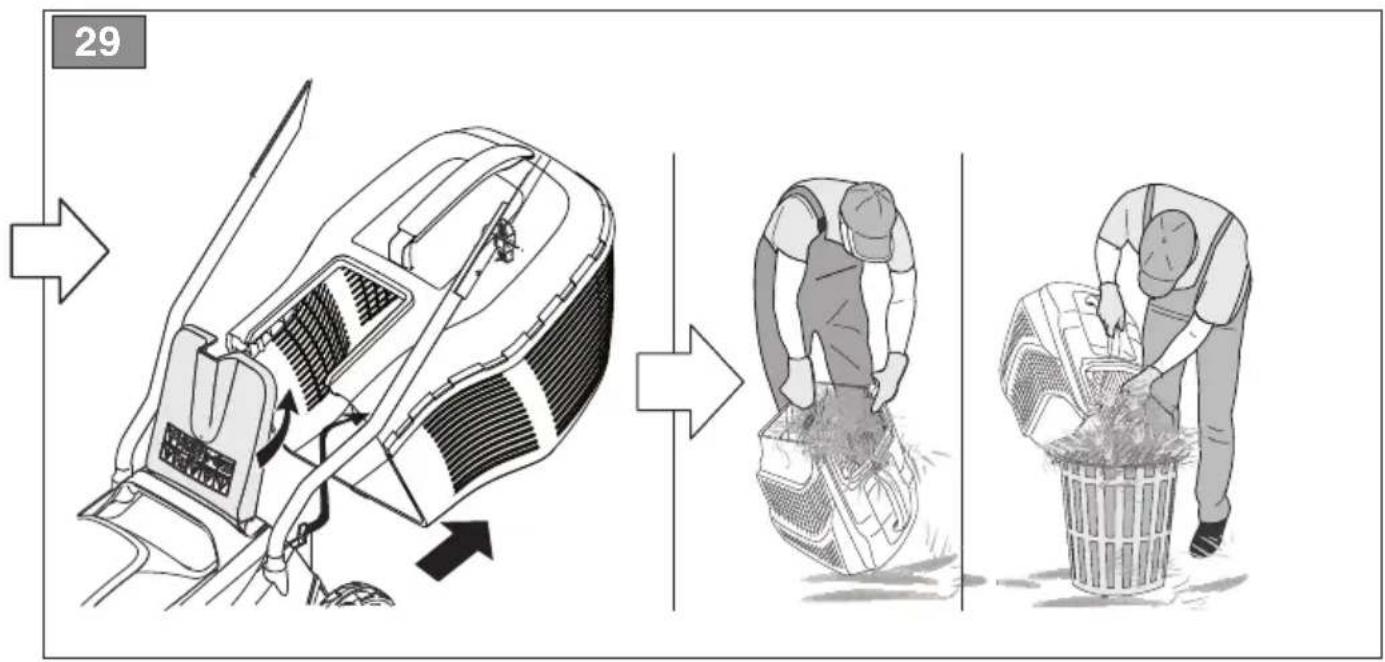
6.4.1 Grass cutting (Fig.27)
NOTE Regulate the forward speed and the cutting height considering the conditions of the lawn (the height, density and dampness of the grass) and the amount of grass collected.
6.4.2 Emptying the grass catcher (Fig.28-29)
6.5 STOP (Fig.28)

When you have stopped the machine, it will a few seconds for the cutting blade to stop.
IMPORTANT | Always stop the machine:
- When moving between work areas.
- When driving on grass free surfaces.
• Every time it is necessary to overcome an obstacle.
• Before adjusting the cutting height. - Whenever you remove or reattach the grass catcher.
6.6 AFTER USE
- Open the hatch and remove the safety key.
- Remove the battery from its housing and recharge it (par 7.2.3).
- Allow the engine to cool before storing in an enclosed space.
- Clean (par. 7.3).
- Make sure there are no loose or damaged components. If necessary, replace the damaged components and tighten any screws and loose bolts or contact the authorised service dealer.
- Check there are no damages to the machine. If necessary contact the authorised service dealer.
IMPORTANT Remove the safety key whenever the machine is unused or left unattended.
7. MAINTENANCE

The safety regulations to follow are described in chap. 2. Strictly comply with these instructions to avoid serious risks or dangers.

Before conducting any inspections, cleaning or maintenance/adjustment interventions on the machine:
- Stop the machine.
- Remove the safety key, (never leave the key in the ignition or within reach of children or unauthorised persons).
- Remove the battery.
- Make sure that all moving parts have come to a complete stop.
- Allow the motor to cool before storing in an enclosed space.
- Use suitable clothing, protective gloves and goggles.
- Read the relevant instructions.
7.1 BATTERY
7.1.1 Battery power reserve
Battery power reserve (the mowable lawn surface before recharging is required) mainly depends on:
a. Environmental factors that cause higher energy requirements:
- Mowing dense, high and/or wet grass.
b. Machine cutting width; the wider the width, the greater the energy needed.
c. Operator behaviour that should be avoided:
- Switching the machine on and off frequently whilst working.
- Setting a cutting height that is too low for the lawn conditions.
- Working at a speed that is too high in relation to the amount of grass to be removed.
NOTE During use, the battery is protected against total drainage with a protective device that switches off the machine and stops it from working.
To optimise battery power reserve,
it is always recommended to:
– Cut the grass when the lawn is dry.
- Cut the grass frequently so that it doesn't grow too tall.
- Set a higher cutting height when the grass is very tall, then set a lower height and cut the lawn again.
- Do not use the machine in "mulching" mode when the grass is very tall.
If the need arises to use the machine for sessions which exceed the capability of a standard battery, it is possible to:
– Purchase a second standard battery to immediately replace the discharged battery, without compromising the continuity of operations.
Purchase a battery with an extended power reserve compared to the standard version (par. 13.2)..
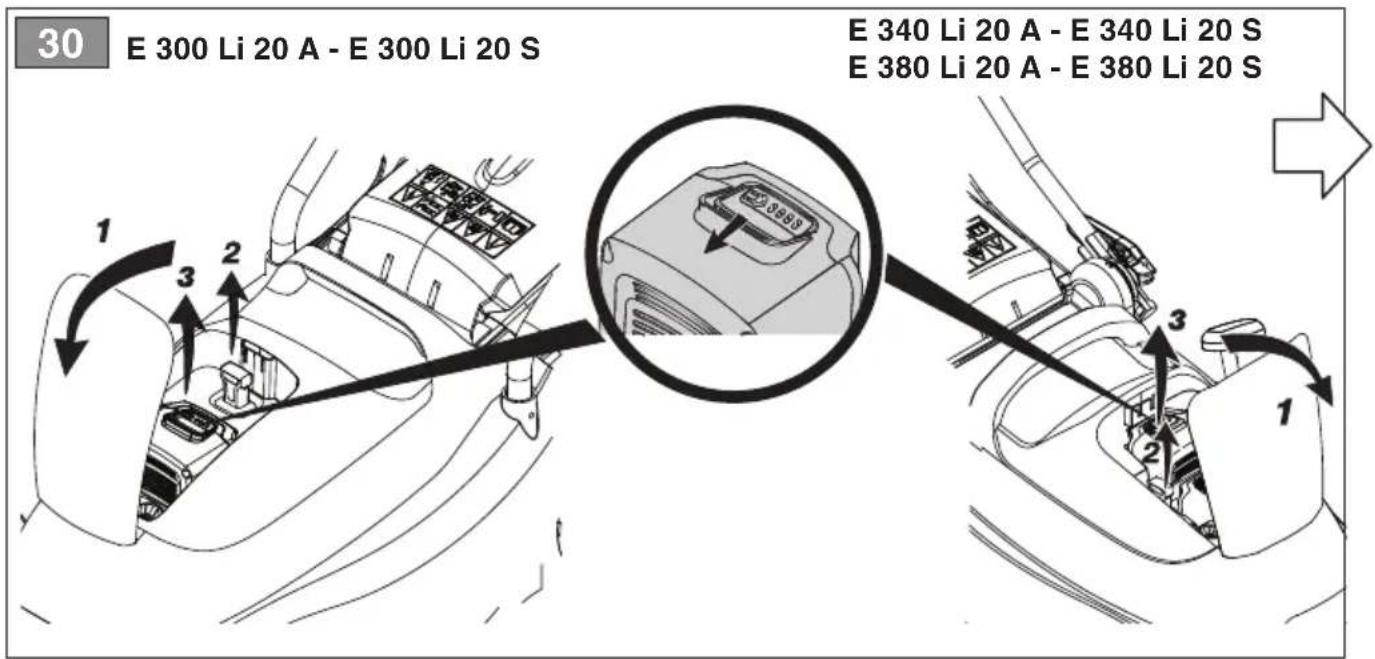
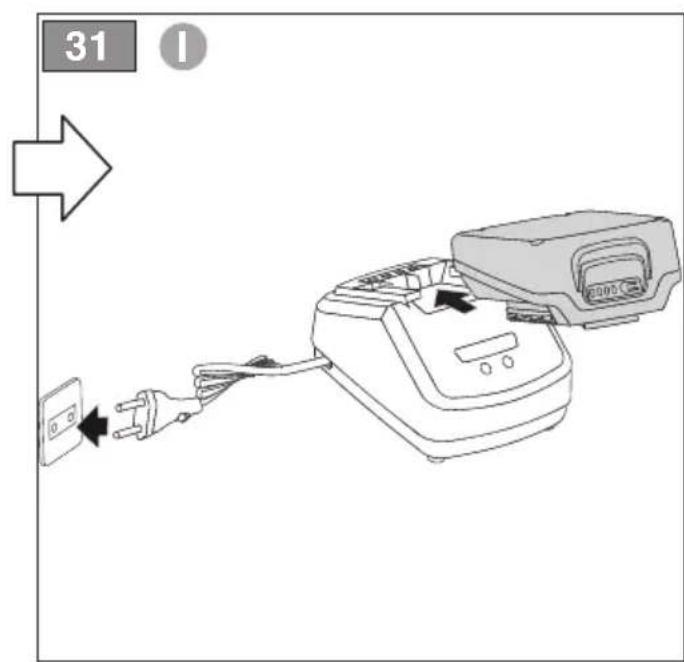
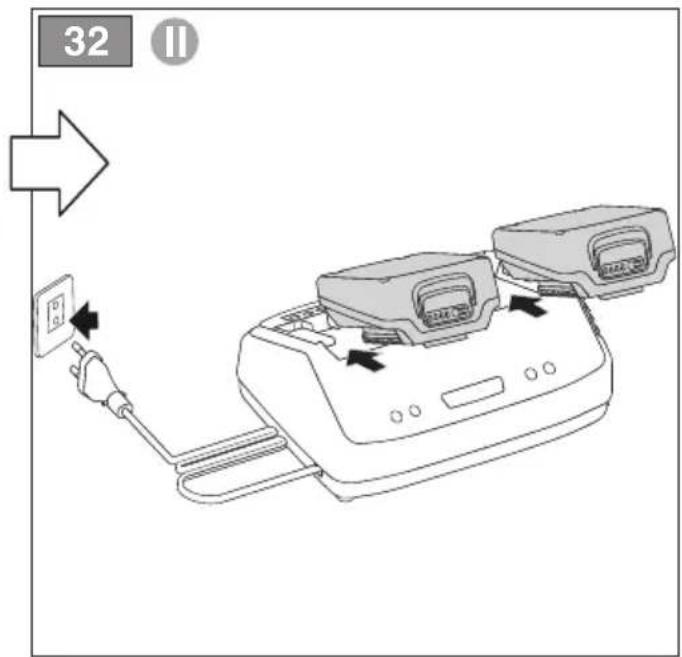
7.1.2 Battery removal and recharging (Fig.30-32)
NOTE The battery is equipped with a guard that inhibits recharging if the environmental temperature is not between 0 and +40 °C.
NOTE The battery can be recharged at any time, even partially, with no risk of damaging it.
7.2 CLEANING
Clean thoroughly following the instructions below every time it is used.
7.2.1 Cleaning the machine
- Do not spray water onto the motor and electrical components and prevent them from getting wet.
- Do not use aggressive liquids to clean the chassis.
- To reduce fire hazards, keep the lawnmower and, in particular, the motor free of grass, leaves, or excessive grease.
7.2.2 Cleaning the cutting blade assembly
IMPORTANT Tilt the machine laterally and make sure that it is stable before starting any work.
Remove grass debris and mud accumulated in the chassis to prevent it from drying and causing problems the next time the lawnmower is used.
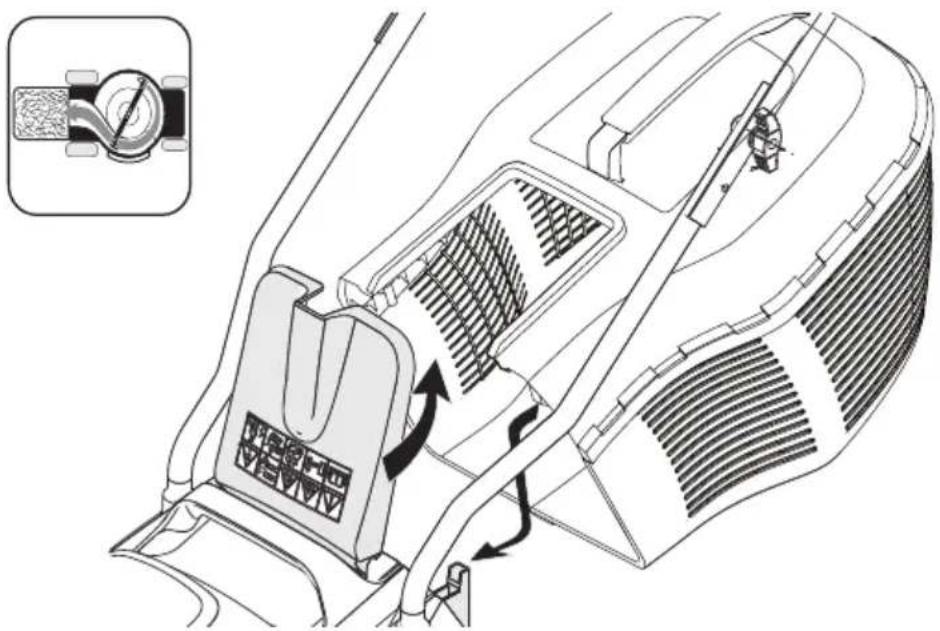
7.2.3 Cleaning the cooling air vents
To avoid overheating and damage to the motor or the battery, always keep the cooling air vents clean and free of debris.
Proced as follows:
- Tilt the machine laterally and make sure that it is stable.
- Blow a jet of compressed air through the cooling air vents (fig 34).
7.2.4 Cleaning the grass catcher
- Empty the grass catcher
- Shake it to remove grass cuttings and soil residue
- Wash it, rinse it and fit it back so as to facilitate quick drying.
7.3 BLADE
Badly sharpened blades pull at the grass and cause the lawn to turn yellow.

Do not touch the blade until the key has been reed and the blade is completely stationary. Bear in that, even though the key has been removed, the he can still move.

All work on the blade (disassembly, sharpening, fencing, repairing, reassembly and/or replacing) are standing jobs that require special skills as well as aial tools; for safety reasons, these jobs are bested out at an authorised service dealer.

Make sure damaged, misshapen or worn blades replaced, together with the screws in place to pre- be balance.
IMPORTANT Always use original blade bearing the code indicated in the "Technical Data".
Given product evolution, the blade listed in the “Technical Data” table may be replaced in time with others having similar interchangeable and operating safety features.
8. STORAGE
8.1 STORING THE MACHINE
⚠️ Store the machine only in a horizontal position and safely positioned on the ground. Do not store the machine upright.
When the machine is to be stored away:
- Wait for the engine to cool
- Remove the safety key.
- Remove the battery from its slot and recharge it (par 7.2.2).
- Clean (par. 7.3).
-
Store the machine:
-
in a dry place
- protected from inclement weather
– covered with a sheet if possible
– in a place out of children's reach - making sure that keys or tools used for maintenance are removed.
8.2 STORING THE BATTERY
If the battery is not charged for a long period of time, it must be kept in a cool, shaded place without humidity, with environmental temperature between 0\~45°C.
NOTE If unused for any length of time, recharge the battery every two months to prolong its working life.
9. HANDLING AND TRANSPORT
Whenever the machine is to be handled, lifted, transported or tilted you must:
- Stop the machine (par. 6.5)
- Remove the safety key
- Make sure that all moving parts have come to a complete stop
– Wear protective work gloves
- Hold the machine in the points offering a safe grip, taking into account the weight and its layout.
- Use an appropriate number of people for the weight of the machine and the characteristics of the transport vehicle or the place where it must be placed or collected.
- Make sure that machine handling does not cause damage or injuries.
When transporting the machine on a vehicle or trailer, always:
- Use an access ramp of suitable strength, width and length
- Lower the cutting blade assembly.
- Position it so that it does not cause a hazard to anyone.
- Fasten it firmly to the means of transport using ropes or chains to prevent it from tipping over.
10. ASSISTANCE AND REPAIRS
This manual provides all the necessary information to run the machine and for correct basic maintenance operations which can be performed by the user. Any regulations and maintenance operations not described herein must be carried out by your Dealer or Authorised Service Dealer.
Any operations performed by unauthorised dealers or by unqualified persons will totally invalidate the Warranty and all obligations and responsibilities of the Manufacturer.
Non-original parts and attachments are not approved; use of non-original spare parts and attachments will jeopardise the safety of the machine and relieve the Manufacturer from all obligations or liabilities.
Original spare parts are supplied by authorised Dealers and by Authorised Service Dealers.
11. WARRANTY
The warranty conditions are intended for consumers only, i.e. non-professional operators.
The warranty covers all material quality and manufacturing defects recognised during the warranty period by your Dealer or Authorised Service Dealer.
The warranty is restricted to the repair or replacement of components recognised as faulty.
It is advisable to send your machine once a year to an Authorised Service Dealer for servicing, assistance and safety inspection.
The warranty only applies to machines subjected to regular maintenance.
The user must follow all the instructions provided in the accompanying documentation.
The warranty does not cover damages resulting from:
- Failure to become familiar with the documentation accompanying the machine (Owner's manual).
• Professional use. - Carelessness, negligence.
- External causes (lightning, impact, presence of foreign bodies inside the machine) or incidents.
- Incorrect use or assembly or prohibited by the manufacturer.
- Poor maintenance.
- Modification to the machine.
- Use of non-genuine spare parts (adaptable parts).
- Use of attachments not supplied or not approved by the manufacturer.
The warranty does not cover:
- The routine/occasional maintenance operations (described in the instruction manual).
- Normal wear and tear of consumables such as blades, wheels, safety bolts and wiring.
- Normal wear and tear.
- Deterioration in the appearance of the machine due to use.
• Cutting blades supports. - Any ancillary expenses related to the enforcement of the warranty, such as costs incurred to travel to the user's location, transfer of the machine to the Dealer, rental of replacement equipment or calling of independent enterprises to perform maintenance work.
The user is protected by his or her own national legislation. The user's rights under the national laws or his or her own country are not in any way restricted by this warranty.
12. TROUBLESHOOTING
| If problems persist after having performed the above operations, contact your dealer or authorised service dealer. | ||
| PROBLEM PROBABLE CAUSE SOLUTION | ||
| 1. The engine does not start when using the switch | Safety key is not inserted or is inserted incorrectly. | Insert the key (Fig. 16.A). |
| Battery is not inserted or is inserted incorrectly. | Open the hatch and check that the battery is fitted in its housing correctly (Fig. 23) | |
| Low battery. Check the battery status and recharge if necessary (Par. 7.1.2). | ||
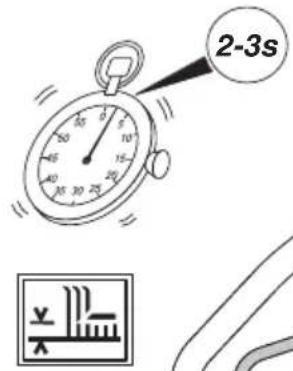
| Motor start-up is slow. Press and hold the control lever for 2-3 seconds (Fig. 25). | ||
| The thermal protection has tripped due to overheating of the motor. | Wait for at least 5 minutes, then restart the machine. | |
| 2. The engine is running but the blade does not rotate | The blade fittings are loose. Immediately turn off the motor and remove the safety key. Contact an authorised service dealer for checks, replacements or repairs (par. 7.3). | |
| 3. The motor shuts down whilst working | Battery is not inserted correctly. | Open the hatch and check that the battery is fitted in its housing correctly (Fig. 23). |
| Low battery. Check the battery status and recharge if necessary (par. 7.1.2). | ||
| Obstructions that prevent the cutting blade rotating | Remove the safety key, put on your work gloves and remove any grass remains or debris from the lower part of the machine and/or the discharge channel. | |
| The thermal protection has tripped due to overheating of the motor. | Clean the cooling air vents (par. 7.2.3). Wait for at least 5 minutes, then restart the machine. | |
| Thermal protection has tripped due to excessive current absorption caused by:Excessive high grass cutting.Obstructions that prevent rotation of the blade.Too much grass debris accumulated in the chassis and discharge channel. | Set a higher cutting height when the grass is very tall, then set a lower height and cut the lawn again.Remove the obstructions (par. 7.2.2).Clean the machine (par. 7.2.1, 7.2.2, 7.2.3 Wait for at least 5 minutes, then restart the machine. | |
| 4. The cut grass is no longer collected in the grass catcher | The blade hit a foreign object | Turn off the motor and remove the safety key. Check if there is any damage and contact a Authorised Service Dealer to replace the blade if necessary. (par. 7.3) |
| The inner part of the chassis is soiled | Clean the inner part of the chassis to facilitate the evacuation of the grass toward the grass catcher (par. 7.2.2) | |
| 5. Mowing is difficult. | The blade is not in good condition | Contact an authorised service dealer for the sharpening or replacement of the blade. |
| 6. Excessive noise and/or vibration is experienced whilst working. | Blade fittings are loose or the blade is damaged. | Immediately turn off the motor and remove the safety key.Contact an authorised service dealer for checks, replacements or repairs (par. 7.3). |
| 7. Battery power reserve is low. | Severe working conditions requiring greater current absorption. | Optimise operations (par. 7.1.1). |
| Battery is insufficient for operating requirements. | Use a second battery or extended battery (par. 13.1). | |
| 8. The battery charger is not recharging the battery. | Battery is not correctly inserted in the battery charger. | Check it is correctly inserted (par. 7.1.2). |
| Unsuitable environmental conditions. Recharge the battery in places with suitable temperatures (see battery/battery charger instruction manual). | ||
| Dirty contacts. Clean the contacts. | ||
| The battery charger is not energised. Check it is plugged in and the power socket is energised. | ||
| Faulty battery charger. Replace with an original spare part. | ||
| If the problem persists, refer to the battery/battery charger manual. | ||
13. ATTACHMENTS ON REQUEST
13.1 BATTERIES
Different capacity batteries are available to suit specific operating requirements (Fig.35). The list of approved batteries for this machine is found in the “Technical Data” table.
13.2 BATTERY CHARGER
Device used to recharge the battery (Fig. 36).
INDICE
1.1 KUIDAS KASUTUSJUHENDIT LUGEDA
2.3 HUOLTO JA SÄILYTYS
9. MANUTENTION ET TRANSPORT
- SIGURNOSNE UPUTE....1
2.1 OPĆA SIGURNOSNA UPOZORENJA ZA ELEKTRIČNE ALATE.... 1
2.2 OPĆA SIGURNOSNA UPOZORENJA ZA KOSILICE....3
2.3 ODRŽAVANJE I SKLADIŠTENJE.... 3
2.4 BATERIJA/punjač baterije 4
2.5 Zaštita okoliša 4
- POZNAVANJE STROJA 4
3.1 Opis stroja i predviđena uporaba.... 4
3.2 Glavne komponente (sl. 1) 5
1.2 Referenties....1
- VEILIGHEIDSVOORSCHRIFTEN....1
2.1 ALGEMENE VEILIGHEIDSVOORSCHRIFTEN VOOR DE ELEKTRISCHE GEREEDSCHAPPEN.... 1
2.2 ALGEMENE VEILIGHEIDSWAARSCHUWINGEN VOOR GRASMAAIERS .... 3
2.3 ONDERHOUD EN OPSLAG....3
2.4 ACCU / acculader.... 4
2.5 BESCHERMING VAN DE OMGEVING
6.4 WERKING (Afb.26)
- SIKKERHETSBESTEMMELSER....1
2.1 GENERELLE SIKKEHETSVARSLER FOR ELEKTRISKE VERKT∅Y....1
2.2 GENERELLE SIKKERHETSADVARSLER FOR GRESSKLIPPERE.... 3
2.3 VEDLIKEHOLD OG OPPBEVARING.... 3
2.4 BATTERI/ batterilader....4
2.5 Miljøvern 4
- BLI KJENT MED MASKINEN 4
6.5 Stans (Fig.28)....7
6.6 Etter bruk....7
- VEDLIKEHOLD....7
7.1 Batteri....7
7.2 Rengjøring....7
7.3 Klippeinnretning 8
- OPPBEVARING....8
2.3 VEDLIKEHOLD OG OPPBEVARING
3. BLI KJENT MED MASKINEN
3.1 BESKRIVELSE AV MASKINEN OG BEREGNET BRUK
13.1 Akumulatory....11
13.2 Ładowarka akumulatora .....11
1. INFORMACJE OGÓLNE
1.1 JAK POSŁUGIWAĆ SIĘ INSTRUKCJĄ OBSŁUGI
4.2 MONTÁŽ KOŠA (obr. 4 ÷ 6)
4.3 MONTÁŽ RUKOVÄTI (obr. 7÷15)
5. OVLÁDACIE PRVKY
5.1 BEZPEČNOSTNÝ KLÚČ (VYPÍNACIE ZARIADENIE)
6.3 Zagon (slike 22–25)....7
6.4 Delo s strojem (slika 26)....7
- SIGURNOSNA PRAVILA 1
2.1 OPŠTA SIGURNOSNA UPOZORENJA ZA
ELEKTRIČNI ALAT .... 1
2.2 OPŠTA BEZBEDNOSNA UPOZORENJA ZA KOSILICE....3
2.3 ODRŽAVANJE I SKLADIŠTENJE.... 3
2.4 BATERIJA/Punjač baterije 4
2.5 Zaštita životne sredine....4
- UPOZNAVANJE MAŠINE....4
3.1 Opis mašine i predviđena upotreba.... 4
3.2 Glavne komponente (sl. 1) 5
3.3 Identifikaciona nalepnica (sl. 1) 5
3.4 Sigurnosne oznake (sl. 2)......5
- MONTAŽA 5
4.1 Skidanje ambalaže (sl. 3)....5
4.2 Montaža vreće za sakupljanje trave (sl. 4 ÷ 6) ... 5
4.3 Montaža drške (sl. 7÷15) 5
- UPRAVLJAČKE KOMANDE....6
5.1 Sigurnosni ključ (Uređaj za isključivanje)......6
5.2 Komandni prekidač 6
- UPOTREBA MAŠINE 6
6.1 Pripremne radnje....6
6.2 Sigurnosne kontrole....6
6.3 Pokretanje (sl. 22÷25)....6
6.4 Rad (sl. 26) 7
6.5 Zaustavljanje (sl. 28)....7
6.6 Nakon upotrebe 7
- ODRŽAVANJE....7
7.1 Baterija 7
7.2 Čišćenje....7
7.3 Rezna glava 8
- SKLADISTENJE 8
8.1 Skladištenje mašine 8
8.2 Skladištenje baterije....8
-
POMERANJTE I TRANSPORT 8
-
ASISTENCIJA I POPRAVKE 8
- POKRIĆE GARANCIJE....9
- PREPOZNAVANJE PROBLEMA....9
- DODATNA OPREMA NA ZAHTEV.... 10
13.1 Baterije 10
13.2 Punjač baterije 10
1. UOPŠTENO
1.1 KAKO SE SLUŽITI PRIRUČNIKOM
U tekstu priručnika neki paragrafi koji sadrže informacije od posebnog značaja, u pogledu sigurnosti ili rada, istaknuti su na drugačiji način, prema sledećem kriterijumu:
NAPOMENA ili VAŽNO navodi detalje ili druge elemente u vezi sa već prethodno naznačenim, radi izbegavanja oštećenja mašine ili uzrokovanja štete.
INNEHÅLLSFÖRTECKNING
- ALLMÄN INFORMATION .... 1
6.3 Start (Fig.22÷25)....6
6.4 Arbete (Fig.26) 7
6.5 Stopp (Fig.28)....7
UK DECLARATION OF CONFORMITY
(Supply of Machinery (Safety) Regulations 2008, S.I. 2008 No. 1597, Annex II, part A)
-
The company: ST. S.p.A. – Via del Lavoro, 6 – 31033 Castelfranco Veneto (TV) – Italy
-
Hereby declares under its own responsibility that the machine: Pedestrian-controlled lawn mower (grass cutting)
E 3·0 Li 20 S, E 3·0 Li 20 A
25A···WBH000001 ÷ 99L···WBH999999
Battery
c) Serial number
d) Engine
forms to UK Regulations:
• S.I. 2008/1597 - Supply of Machinery (Safety) Regulations 2008
• S.I. 200701 - Schedule 8 - Noise Emission in the Environment by Equipment for use Outdoors Regulations
• S 2016/15 E1 magnetic Compatibility Regulations 2016
• 20.52 Restriction of the Use of Certain Hazardous Substances in Electrical and Electronic
;
- Reference to 'nised sta
V
EN 62841-1:2015+A
EN IEC 62841-4-3:2v.
+A11:2021 EN IEC 55014-1:2021 EN IEC 55014-2:2021
EN IEC 61000-3-2:2019+A1:2021
EN 61000-3-3:2013+A2:2021 EN IEC 63000:2018
[Non-Text]
g) Measured sound power level
n) Person authorised to compile the technical file:
CEO Stiga Group Sean Robinson

o) Castelfranco V.to, 01.03.2025

171516224/4 - 171516225/4 - 171516226/4
UK CA
Unit 8, Bluewater Estate Plympton, Devon, PL7 4JH, England
171516224/4 - 171516225/4 - 171516226/4
CEO Stiga Group Sean Robinson

| FI (Akuperašten ojeden klasnios) | CS (Překiad původního rávodu k použivání) | PL (Tlumaczenie instrukoj oryginainej) |
| EY-VAITIMUSTENNUKAISUUSVAKUUTUS(Konedreditvi 2006/42/EY, Lille II, osa A)1. Yitys2. Vakutlava onatla vastuštan, ellă kone: Kivvelen ohjattava ruchoniakkuri/ ruchoniakkuau Typpl / Perusmallic Seranumero d Močtori : ašku3. On yhzenmukainen seuraavien direktivlen asettamlen vastinusten kanssa; e) Sertkontityrysti : EI ovesleđitrivsse4. Villais harmoniszkiutih standarodihin h) Miatlu ašimlohtoso h) Tsaitu ašintenočaso i) Letrkuselevs n) Tekstelen asklirjenja laatimiseen valtučetu henklidó o) Paikka ja pālivnárārā | ES - Prohláste o shodě(Směrnice o Strojnic zaftzenich 2006/42/ES, Prlioha II, čast A)1. Společnost2. Prohlásuje na vlastní odpovědnost, že stroj: Sekačka se stořol obsuhou / sekáčka na trávu3. Typ / Základní modelc) Výtorní číslo4. Motor: akumulator5. Je ve shodě s naftzení ml sněmíc:e) Certifikadní organ: Neze použit4. Odkaz na Harmonizované normy5. Naměřaná úroveň akustického výkonu6. Zaručená úroveň akustického výkonu7. Šiřka režani8. Osoba autorizovaná pro vyvoření Technickéno spisu; o) Misto a Datum | Declaradja zgodnosie WE(Dyrektvya maszynova 2006/42/EW, Załącznik II, sręćć A)1. Spokka2. Ośwarkoza na własną odpovledzialnić, že maszyna: Kosliarka prowadzona przez operators piezego / djęcie travya) Typ / Model podstawowy2. Numer serylýj4. Silnik: akumulator5. Spenia podstawowe wynogi następujących Dyrektyw e) Jednostka certifikulacja: nie dotyczy4. Odkozna do Vorm chamorizovanýchg) Zmierzony zocom mocy akustycznej9. Gwarantovany pozom mocy akustycznej1) Szerokość cieja10. Osoba upozatlóna do zmedagowania Dokumentaciji technicznej; o) Miescovość i dała |
| SL (Prevod izvirnih ravedil)ES izjava o skladnosti(Direktiva 2006/42/ES, priloga II, del A)1. Druža2. pod lasino odgovornojski izjavla, da je stroj: Koslinica za stojćega devaču / košnja travaa) Tip / osnovni modelc) Seriška številka d) Motor: baterja3. Skladen je z dočili direkty :e) Uslanova, ki izda potrádio: Se ne uporabája4. Sklosvanje na usklajene predpisag) Izmerjeni nivo zvučne moch) Zagotovljen nivo zvučne moci) Caseg koslenye Oseba, podblaštena za sestavo tehníne knjičlice o) Kraj in datum | BS (Prijevot originalnih uvula)EZ izjava o sukladnosti(Direktiva o mašinama 2006/42/EZ, Prilog II, deo A)1. Firma2. Daje izjavu pod vlastlom odgovornošća da je mašina: Koslička na guranje / Koslenje travaa) Tip / Osnovni modelc) Serijski brod) Motor: akumulator3. sukodna a osnovnim zaņitevlna direktyve: Certifikaciero ljelio: Nje prinjeņgivo4. Pozivanje na uskladene normag) Izmereni nivo zvučne snape5. Garantovani nivo zvučne snage6. Šiřna koslenjan) Osoba ovlašena za izradu tehníne brošure; o) Mjesto i datum | SK (Freklad původního rávodu na použille)ES vynlásenie o zhode(Směrnica o Strojnicj zariadeniach 2006/42/ES, Prlioha II, čast A)1. Spoločnost2. Vyhtasuje na vlastnu zodpovečnost, že stroj: Kosáčka so stojacou obsuhou / kosačka na trávua) Typ / Základní modelc) Výrotné číslod) Motor: akumulator3. Je v zhode s nariadsniami smorníc; e) Certifikacní orgán: Nepoužteňé4. Odkaz na Harmonizované normyg) Namerana úroveň akustického výkonuh) Zaručená úroveň akustického výkonu) Šiřka koslenian) Osoba autorizovaná na vyvorenie Technického spisu; o) Miesto a Datum |
| RO (Traducorosa manualului fabricantului)CE -Declaratie de Conformitate (Directive Masini 2006/42/CE, Anexa II, partea A)1. Societatea2. Declará po propria raspundere că mašina: Masjna de luns iarba cu conducátor pedestru / tăsiel iarbaa) Tip / Model de bazac) Numár de seried) Motor: bateria3. Este in conformitate cu specificaljke directivelor:c) Organism de certificare: Nu se garlici4. Referinii la Standarde armonizaleg) Nivel de putiere sonorča másurath) Nivel de putiere sonorča garanist) Liątmra de tisiern) Persoaná autorizata să Intomeasca Dosarul Telnic o) Locui ji Data | LT (Originaliu instrukciju verlinas)EB stokos deklarsacija(Mašinu direktva 2006/42/CE, Priedas II, dalis A)1. Bendrové2. Prislira alaskomyte, kak jangjins: Pėsčio operatoriaus vaidoma vajsajové' Zołes povinasa) Tipas / Bazinis Modelsc) Serijos numerisd) Varkis: bateria1. Altinka direktyose paleiktas specifikacijas:e) Sertifikavyno jstaiga: Netakovna4. Nuoroda i suberintis Normas5. Išmaluctas garso galios lygis6. Užbikramas garso galios lygis7. Pijvicn plotis8. Autorizuotas semuc sudaryli Technię Dokumentacijja: o) Vieta ir Data | LV (Inšinukciju tulkojums no originálvaldos)EK ablistibas deklarsčia(Direktva 2006/42/EK par mašinám, pielikuma II, daja A)1. Uznámums2. Uzjernolias par to pilhu abtilčtu, pazino, ka mašina: Pėsčio operatoriais valdoma vojapové' záles plaušanaa) Tips / Bázas modelsc) Sérijas numursd) Motors: akumulators3. Ablist šću direktvu prasítbím4. Sertifikárias kestáce, Now vpončenjuvars4. Ássuce už harmonizáciem standardomg) Izmirnitas skanas internstátes limenish) Garantelais skanas internstátes limenisi) Plautanas patumsn) Pilvarctais carbineks, kas sagatavojta teknisko dokumentáciju:o) Vieta un datums |
| SR (Prevod originalnih upulsva!)EC oklanacija o usagliašnosti(Direktiva o mašinama 2006/42/EC, Prilog II, deo A)1. Preduzeče2. Daje izjavu pod vlastlom odgovornošću ca je mašina: Kosáčka na guranje / koslenje travaa) Tip / Osnovni modelc) Serijski brod) Motor: akumulator3. u skladu o osnovnim zahtevima direktva:e) Sertifikaciero telc: Nje priomenljivo4. Pozivanje na uskladene normeg) Izmereni nivo zvučne snageh) Garantovani nivo zvučne snagei) Srina koslenja......n) Osoba ovlašena za sastavljanja tehničke brošureo) Mesto i datum | BG (Preved na originaalnite инструкции)EO декарация за съответствие(Директива Машини 2006/42/EO, Приложение II, част A)1. Дружествого2. На собствена отстворност декларира, че машината: Kosacna с изигреван водач / рязне на траваa) Вид / Basians HDOD4. Серейн номерd) Motor: akumputato3. E в съответствие със стеификмата на директивале: Ceriftiniwava орган: Не в плоjdихло4. Базирано на кармонизраните нормimm) Нико на измереня акустична мощностi) Гранитранне нивс на акустична мощностi) Широчина на косенep) Лиле, углинсюшено да състави ТехниекскатаДокументация:o) Mesto i data | ET (Algupirase kasulusuhundi Elpe)EU vastavusdeklaratsion(Masinadrekliv 2006/42/EU, Lisa II, osa A)1. Firma2. Knittab omai vastutsel, et masin: Seiava juhga mununilija / mununiljaa) Tučio / Põhimudelc) Matrikkeld) Moctor: aku3. Vastab direktivde nöuelete:e) Kirnitav asutus: El ole kohalotisy4. Vide ühlustatus standarditeg) Möšdelud helvöimsuse lasseh) Garanteeritud helvöimsuse lasei) Lõikelaiusn) Tahillise Lene autoriseeritud koostaja:o) Kont ja Kupašev |
| FR (Traduction de la notice originale)Declaration CE de Conformité(Directive Machines 2006/42/CE, Annexe II, partie A):1. La Société2. Déclare sous sa propre responsabilité que la machine : Tondeuse à gazon à conducteur a pied / coupe du gazon a type / Modèle de Basec) Sériea) Moleur, à batterie3. Est conforme aux prescriptions des directives :e) Organisme de certification . Non applicable4. Renvoi aux Normes harmoniséesg) Niveau de puissance sonore mesuréh) Niveau de puissance sonore garantii) Largeur de coupen) Personnability a été établir le Dossier Technique :o) Lieu et Date | EN (Translation of the original instruction)EC Declaration of Conformity(Machine Directive 2006/42/EC, Annex II, part A):1. The Company2. Herby declares under its own responsibility that the machine: Pedestrian controlled lawn mower / Grass cuttinga) Type / Bessa Modelc) Serial numberd) Motor: battery-operated3. Conforres to directive specifications:e) Certifying body: Not applicable4. Reference to harmonised Standardsg) Sound power level measuredh) Sound power level guaranteedi) Range of cutn) Person authorised to create the Technical Foder:o) Place and Date | DE (Überserung der Originalsanteilierung)EG-Konfomitätserklänk(Maschinenrichtlinie 2006/42/EG, Anhang II, Teil A):1. Die Gesellschafi2. Erkfleri auf eigene Verantwortung, dass die Maschine: Handgeführter Rasenmäher / Rasenschnita) Typ / Basismodellc) Seriennummerd) Motor: Batterie3. Den Anforderungen der folgenden Richtlinien entspricht: e) Zemittelenerungssteile: unvortreffend4. Bezugnahme auf die Harmonisten Normeng) Gemessener Schaltleistungspegelh) Gareanierter Schaltleistungspagni) Schnittbreilen) Zur Verfassung der technischen Unterlagen befragtePerson:o) Ort und Datum |
| NL (Verlating van de corsoronselijke gebruiksaarivizing)(Richtlijn Machines 2006/42/CE, Biljage II, deal A):1. Het bedrijf2. Verklaat onder zijn eigen verantwoordelijkheid dat de machine: Lopend bediende grasmasier / grasmasier a type / Basismodelc) Sarannummerd) Moseel asam3. Voldoet en dat specifakties van de richtlijnen:c) Certificate-instituut Net kipapbaar4. Verkizing naar de Geharmonneerde normen g) Ognolende uit de veldsvermogen h) Cegrandeerd niveau van geluidsvermogen i) Snijarsedite n) Bevoegd person voor het opstellen van het Technisch Dossier o) Plats en Datum | ES (Traduction del Manual Original)Denariación de Conformidad CE(Directiva Máquinas 2006/42/CE, Anexo II, parte A):1. La Emorea2. Declara baja su propia responsabilidad que la máquina: Cortadora de paso con operador de pie / corte hierbaa) Tipo / Modelo Baseg) Varticulea) Motor: bateria3. Cumpia con las especificaciones de las directivas. ente certificador. De aptiva4. Referencia a las Normas harmonizadasg) Nivel de potencia sonora medidoh) Nivel de potencia sonora garantizadoi) Amplitud de corten) Person autorizada a realizar el Manual Técnico:o) Lugar y Fecha | PT (Tradução do manual original)Denariação CE de Conformidade(Diretiva de Máquinas 2006/42/CE, Anexo II, parte A):1. A Emorea2. Declara sob a própria responsabilidade que a máquina: Cortia-relas para operador apeado / corte da relvaa) Tipo / Modelo Baseg) Varticulea) Motor: Bateria3. É conforme as especificações das diretives:o) Orgão certificador. Não aplicável4. Referência às Normas harmonizadasg) Nivel medido se potência sonorah) Nivel garantido de potência sonorai) Amplitud de corten) Pessoa autorizada a elaborar o Caderno Técnicoo) Local e Data |
| EL (Métérappont ou πρατοσίπου του οδημέν χρήσης)EK-Δλυκοι συμμερωσης(Οδημε Μηχανον 2006/42/CE, Περαρημο II, μρος A)1. H Etrapla2. Δλυκόν απτυθενο ση μη μηχανή; Χλοκοπτική μηχανή μερέο χριστη / κοτή της χλόνος) a) Tótopiç / Βοσικό Μοτίλοc) c) Apírúcos μπρώσιού) Κινηρίες μποπαρίς3. Συμορφάνεται με της προδυγρασές της οδηγίος o) Αγνηκούς πετοπολήσης δαν εσμρούσται4. Ανορορτό στοις Κονονστρούς εναρμόνσηςg) Σιδύμ μεραργεία ακοσυτική χριχοςh) Σύσμν νυγμερμένη ακοσυτικής εχυόςi) Εξοσκ κοτιειοι Εξοστοστον στοιο για την κατάστη του Τεγνικού φυλασίου.o) Τότος και Χρόνος | TR (Original Talmattianen Tecúmes)AT Uyunkluß Beyani(2006/42/CE Makine Direktifi, Ek II, böltim A):1. Sirket2. Sansi sorumluluğu altında aşağıdaki makinenin: Ayak kumandisi çim bigné makines / çim kesinia) Tip / Standari modelc) Sliot numarasid) Motor : batanya3. Asagidiaki direktiflerin özelliklerine uygun olduğunu beyan ebnekledir:a) Sertikkalandrin kurum: Uygulansmez2. Haarmonize standardis adávlg) Ölçalen ses guč servyesih) Carant edilen ses guč servyesi: Kesim geniäligi) Teknik Dosyayi ouşturmaya yekdi kijci:o) Yer ve Tarih | MK (Preveda na originaalmente упастства)Депларациза ze unsyloaneso co EY(директива за машини 2006/42/CE, Анexo II, дел A):1. Команцяјата2. изяйева со цепсона лична одговорност река σредната машине: Тревокосчача со оператор на нозе / косенье треба) a) Tip / основен моделв) елимита) мотор: акукулатор3. Усогласно со специокиадите според директивте: d) тело за сертиджикајы: Не се применуевг) Text CE за типот. Не со приминуа4. Редерення за усогласни норматионе) Асентов Hypnoticsa: HIBO не гарантювана звучна молностH) областено лице за составуване на Техничката броурурао) место и дству |
| NO (Oversettitelse av original trucksanvisning).EF-Sansvaransklering(Maskindirektiv 2006/42/EF, Vedlegg II, del A):1. Finnaei2. Erlerser på eget ansvar at maskinen: Händrat grosskipper/ grasskippinga) Type / Modellc) Seriennummerd) Motor: balteri3. Oppyllyer kravene i direktivene: e) Sertifserstingsorgan: Ilxe aldeit4. Henwlingen til harmoniserte standarderg) Möll lydefektivna(g) Garantari lydefektivniva(k) Karantner lydefektivne(i) Person som har fullmist akt å utterlöge teknisk dokumentasjon:o) Sted og dato | SV (Oversalting av bruksanvisning i original)EC-forsatican om overenastämnesse(Maskindirektiv 2006/42/EG, bilaga II, de la)1. Färelaget2. Forsaklar på eget ansvar att maskinen: Förariedd gräskippare / gräskiplninga) Tip / Basmodellc) Seriennummerd) Motor: balteri3. Overseatämmer med föreskrillema i direktivele) Infigorgarn_Annält organ, inte filämpbar4. Referens till harmoniserade standarderg) Upendäll lydefektivna(h) Garantard lydefektivniva(k) Skredreldm) Autoriseraad person för upprättandet av den tekniska dokumentationen:o) Ort och datum | DA (Oversatellese af den originale brugsanvisning)EF-overenastammeseerkläring(Maskindirektiv 2006/42/EF, stlag II, del A):1. Finnaei2. Erlerser på eget ansvar, at maskinen: Pleneklipper beljent af gående person / klipping af grassseta) Type / Modelc) Seriennummerd) Motor: balteri3. Er i overenastemmelse med specifikationerne ifsigedirektivene:e) Certifleringsorgan: ikke anvendelig4. Henwering till harmoniserede standarderg) Möll lydefektivnava: h) Carantner lydefektivneau) Kloppebredea: n) Person: der her benyndigelise til at udarbesde del tekniske dossier:o) Sted og dato |
| HU (Eredeti hasznélat utasítás fordítása)EK-megleleöseägi nyallalkozala(2006/42/IEP péärányev, II, melléklet "A" rész)1. Tórlak Valbalta2. Fevelöseögenek belljes tusataben lijkeinti, hogy az slaböl gép: Gyaltogvezelsü fünyligésp / fünylása) a) Tlaus / Alaplipusc) Gyárftse számd) Motor: akkumulator3. Megfelet az alabbi járnyevek előtlásainakc) Tanúsó szerv: Non alkalmaznáti4. Hivskozá a harmonizität szabványokong) Mert zajtelesítmény szinti) Garantátt zajtelesítmény szinti) Vagási szelessingn) Muzárak Dossáje szerkesztésére felhalatalnazott személy:o) Heye os idpe | RU (Перевод оригинальных инструкций)Декларация соответствия нормам EC(Декрения о машином оборудования 2006/42/EC, Приложение II, часть A):1. Предвартием2. Заказа под собственную ответственность, что машина: Газонокоскина с певеждущим управлением стри (%), газонаT) Tip / Барава модельc) Паспортd) Дагатель, батера сограния3. Сонтастаует требованным следующих двертина: c) Сертификирующий орган-Нерноводный4. Сольки на гармонизированные нормы5. Измеренный уровень закупой мощностиn) Гарентрумную уровень закупой мощностиi Амгипуска equalitynii) Itaúz, уплейномчинное на подготовку технической документации:o) Место и дата | HR (Pájevod originalnih upula)EK ljavá o sukladnosti(Directive 2006/42/EZ o strojevima, dodatak II, dio A):1. Top distition odgovornólošu izjavluje da je stroj: Ručno upravljena kosítica fraver kõsenje fixeva) a) Vsta / Osocyni modelc) Matěni brojd) Motor: baterija3. sukladan s terměljím zahljevina direkliva:e) Certifikacjsko ljelo: Nijo prinyjengývo4. Primijenjene su slijedećo harmonizirane normoe:lg) Ikmjerena razina svůžne snageh) Zajamčena razina zvučne snagei) Šrina rezanjaŋ) Ocobs ovlastena za pravljenje Tehničke daloteke:o) Mesto i datum |
EN • The content and images in this User Manual were produced expressly for ST. S.p.A. and are protected by copyright – any unauthorised reproduction or modification to the document, either partially or in full, is prohibited.

- INDICE
- USO DELLA MACCHINA
- ARRESTO (Fig.28)
- OVLÁDACÍ PRVKY
- BEZPEČNOSTNÍ KLÍČ (VYPÍNACÍ ZAŘÍZENÍ)
- GENERAL ASPECTS
- HOW TO READ THE MANUAL
- NOTE or IMPORTANT These give details or
- REFERENCES
- Figures
- Titles
- SAFETY REGULATIONS
- GENERAL POWER TOOL SAFETY WARNINGS
- Save all warnings and instructions for future reference.
- LAWNMOWER SAFETY WARNINGS
- MAINTENANCE AND STORAGE
- IMPORTANTE
- BATTERY / BATTERY CHARGER
- ATTENTION
- The following safety rules complement the safety rules contained in the battery charger manual.
- PROTECTING THE ENVIRONMENT
- GETTING TO KNOW THE MACHINE
- DESCRIPTION OF THE MACHINE AND PLANNED USE
- This machine is a pedestrian controlled lawnmower.
- Intended use
- Improper use
- User types
- MAIN COMPONENTS (FIG. 1)
- Hatch for accessing the battery compartment
- IDENTIFICATION LABEL (FIG. 1)
- SAFETY SIGNS (Fig. 2).
- ASSEMBLY
- UNPACKING (Fig.3)
- CONTROLS
- SAFETY KEY (DEACTIVATION DEVICE)
- SWITCH COMMAND
- USING THE MACHINE
- PRELIMINARY PROCEDURES
- SAFETY CHECKS
- START-UP (Fig.22-25)
- OPERATION (Fig.26)
- Grass cutting (Fig.27)
- Emptying the grass catcher (Fig.28-29)
- STOP (Fig.28)
- IMPORTANT | Always stop the machine:
- AFTER USE
- MAINTENANCE
- BATTERY
- Battery power reserve
- Battery removal and recharging (Fig.30-32)
- CLEANING
- Cleaning the machine
- Cleaning the cutting blade assembly
- Cleaning the cooling air vents
- Cleaning the grass catcher
- BLADE
- STORAGE
- STORING THE MACHINE
- STORING THE BATTERY
- HANDLING AND TRANSPORT
- ASSISTANCE AND REPAIRS
- WARRANTY
- TROUBLESHOOTING
- ATTACHMENTS ON REQUEST
- BATTERIES
- BATTERY CHARGER
- KUIDAS KASUTUSJUHENDIT LUGEDA
- HUOLTO JA SÄILYTYS
- MANUTENTION ET TRANSPORT
- BESCHERMING VAN DE OMGEVING
- WERKING (Afb.26)
- VEDLIKEHOLD OG OPPBEVARING
- BLI KJENT MED MASKINEN
- BESKRIVELSE AV MASKINEN OG BEREGNET BRUK
- INFORMACJE OGÓLNE
- JAK POSŁUGIWAĆ SIĘ INSTRUKCJĄ OBSŁUGI
- OVLÁDACIE PRVKY
- BEZPEČNOSTNÝ KLÚČ (VYPÍNACIE ZARIADENIE)
- UOPŠTENO
- KAKO SE SLUŽITI PRIRUČNIKOM
- INNEHÅLLSFÖRTECKNING
- UK DECLARATION OF CONFORMITY
- UK CA
Brand : ALPINA
Model : AL1 3420 Li
Category : Lawn mower