
SHT 660 K - Hedge trimmers STIGA - Free user manual and instructions
Find the device manual for free SHT 660 K STIGA in PDF.
| Product type | Hedge trimmer |
| Brand | Stiga |
| Model | SHT 660 K |
| Engine | 2-stroke petrol engine |
| Fuel system | Petrol-oil mixture (ratio 50:1) |
| Tank capacity | Approximately 0.6 L |
| Cutting length | 660 mm |
| Blade type | Double-action serrated blades |
| Handle | Rear handle adjustable to 3 positions |
| Weight | Approximately 5.5 kg |
| Guaranteed sound power level | ≤ 110 dB(A) |
| Vibration front handle | ≤ 8.0 m/s² |
| Vibration rear handle | ≤ 8.0 m/s² |
| Starting system | Easy Start recoil starter |
| Safety | Safety throttle lever, engine stop, blade guard |
| Maintenance | Clean air filter every 8-10 h, check spark plug, lubricate gearbox every 20 h |
| Included accessories | Blade guard, spark plug wrench, mixing bottle |
| Intended use | Cutting and trimming hedges |
Frequently Asked Questions - SHT 660 K STIGA
User questions about SHT 660 K STIGA
0 question about this device. Answer the ones you know or ask your own.
Ask a new question about this device
Download the instructions for your Hedge trimmers in PDF format for free! Find your manual SHT 660 K - STIGA and take your electronic device back in hand. On this page are published all the documents necessary for the use of your device. SHT 660 K by STIGA.
USER MANUAL SHT 660 K STIGA
natural_image
Simple line drawing of a tool or bracket with a serrated edge (no text or symbols)


GGP ITALY SPA
Via del Lavoro, 6
I-31033 Castelfranco Veneto (TV) ITALY

IT Tagliasiepi - MANUALE DI ISTRUZIONI
BG Тример за плет - УПЪТВАНЕ ЗА УПОТРЕБА
BS Trimer za živicu - UPUTSTVO ZA UPOTREBU
CS Plotové nůžky - NÁVOD K POUŽITÍ
DA Hækkeklipper - BRUGSANVISNING
DE Heckenschere - GEBRAUCHSANWEISUNG
EL Κλαδευτήρι θάμνων - ΟΔΗΓΙΕΣ ΧΡΗΣΠΣ
EN Hedge Trimmer - OPERATOR'S MANUAL
ES Cortasetos - MANUAL DE INSTRUCCIONES
ET Hekilõikur - KASUTUSJUHEND
FI Pensasleikkuri - KÄYTTÖOHJEET
FR Taille-haies - MANUEL D'UTILISATION
HR Rezač živice - PRIRUČLNIK ZA UPORABU
HU Sövénynyíró - HASZNÁLATI UTASÍTÁS
LT Krūmapjovė - INSTRUKCIJŲ VADOVAS
LV Dzivžoga škēres - OPERATORA ROKASGRĀMAT
MK Поткаструвач - УПАТСТВА ЗА УПОТРЕБА
NL Heggeschaar - GEBRUIKERSHANDLEIDING
NO Hekksaks - INSTRUKSJONSBOK
PL Przycinarka do żywopłotu - INSTRUKCJE OBSŁUGI
PT Cortador de sebes - MANUAL DE INSTRUÇÕES
RO Trimmer pentru gard viu - MANUAL DE INSTRUCTIUNI
RU Шпалерные ножницы - РУКОВОДСТВО С ИНСТРУКЦИЯМИ
SK Plotové nožnice - NÁVOD NA POUŽITIE
SL Rezalnik grmičevja - PRIROČNIK ZA UPORABO
SR Trimer za živu ogradu - PRIRUČNIK SA UPUTSTVIMA
SV Häcksax - BRUKSANVISNING
TR Çit budama makinesi - KULLANIM KILAVUZU
ITALIANO - Istruzioni Originali
БЪЛГАРСКИ - Превод на оригиналните инструкции......
BOSANSKI - Prijevod originalnih uputa ....
ČESKY - Překlad původního návodu k používání ....
DANSK - Oversættelse af den originale brugsanvisning ....
DEUTSCH - Übersetzung der Originalbetriebsanleitung ....
ΕΛΛΗΝΙΚΑ - Μετάφραση του πρωτοτύπου των οδηγιών χρήσης ......
ENGLISH - Translation of the original instruction ....
ESPAÑOL - Traducción del Manual Original
EESTI - Algupärase kasutusjuhendi tõlge
SUOMI - Alkuperäisten ohjeiden käännös ....
FRANÇAIS - Traduction de la notice originale ....
HRVATSKI - Prijevod originalnih uputa ....
MAGYAR - Eredeti használati utasítás fordítása ....
LIETUVIŠKAI - Originalių instrukcijų vertimas ....
LATVIEŠU - Instrukciju tulkojums no oriğinālvalodas ....
МАКЕДОНСКИ - Превод на оригиналните упатства ....
NEDERLANDS - Vertaling van de oorspronkelijke gebruiksaanwijzing
NORSK - Oversettelse av orginal bruksanvisning ....
POLSKI - Tłumaczenie instrukcji oryginalnej ....
PORTUGUÊS - Tradução do manual original ....
ROMÂN - Traducerea manualului fabricantului ....
РУССКИЙ - Перевод оригинальных инструкций ......
SLOVENSKY - Preklad pôvodného návodu na použitie ....
SLOVENŠČINA - Prevod izvirnih navodil ....
SRPSKI - Prevod originalnih uputstva ....
SVENSKA - Översättning av bruksanvisning i original ....
TÜRKÇE - Orijinal Talimatların Tercümesi

| SHT 660 K SHT 675 K | |||
| [61] cm | ^3 | 22,5 22,5 | |
| [62] kW | 0,63 0,63 | ||
| [63] NGK-R BPMR8Y NGK-R BPMR8Y | |||
| [64] mm | 0,7 0,7 | ||
| [65] 50:1 | 50:1 | ||
| [66] dm | ^3 | 0,4 0,4 | |
| [67] mm | 550 | 690 | |
| [68] [71] | dB(A) dB(A) | 82,3 1,6 | 82,3 1,6 |
| [69] [71] | dB(A) dB(A) | 102 1,07 | 102 1,07 |
| [70] | dB(A) | 103 | 103 |
| [72] [71] | m/s ^2 m/s ^2 | 5,11 0,26 | 5,11 0,26 |
| [73] | m/s ^2 m/s ^2 | 4,64 0,23 | 4,64 0,23 |
| [74] | kg | 5,8 | 5,9 |
| [75] | 118802307/0 | 118802308/0 | |
natural_image
Illustration of a person using a power shaver to cut through soil, with an arrow indicating the process (no text or symbols present)
natural_image
Illustration of a worker using a manual power shaver to cut seeds in a field (no text or symbols)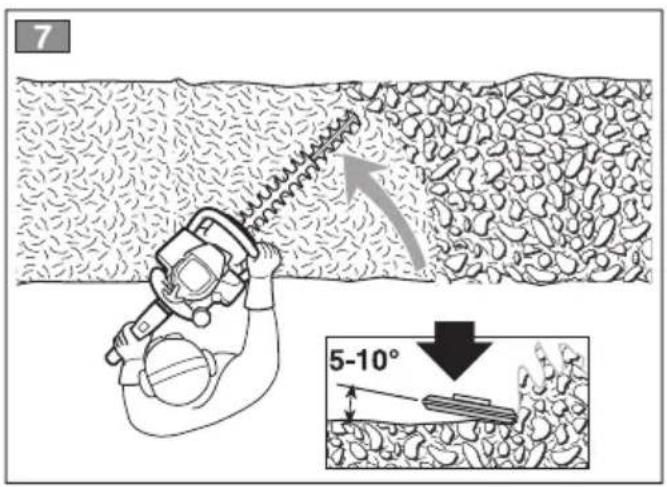
natural_image
Diagram of a car seatbelt switch mechanism showing angle and direction (no text or symbols)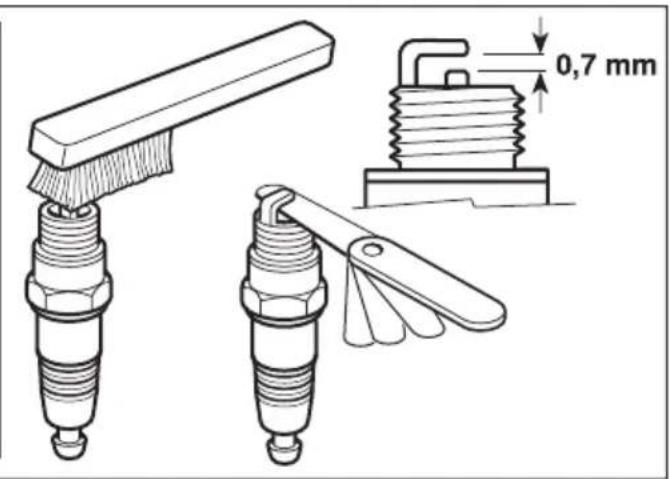
INDICE
CONOSCERE LA MACCHINA
4.6 OBDOBÍ DLOUHODOBÉ NEČINNOSTI
1.3 PÅFYLDNING AF BRÆNDSTOF
Getting to know the machine 5
Safety regulations 6
Operating instructions 8
-
Preparing to work 8
-
Use of the machine 9
-
Cutting and adjusting hedges 11
-
Routine maintenance 11
-
Extraordinary maintenance 12
-
Diagnostics 13
HOW TO READ THE MANUAL
Certain paragraphs in the manual contain particularly significant information and are marked with various levels of highlighting with the following meaning:
NOTE or
IMPORTANT These give details or further information on what has been previously indicated and aim to prevent damage to the machine or cause other damage.
WARNING! Non-observance will result in the risk of injury to oneself or others.
DANGER! Non-observance will result in the risk of serious injury or death to oneself or others.
GETTING TO KNOW THE MACHINE
NOTE - The images corresponding to the references are found on page 2 of this manual.
DESCRIPTION OF THE MACHINE AND ITS RANGE OF USE
This machine is a garden tool, and precisely a portable hedge trimmer with petrol engine home use.
The machine is basically composed of a power unit and a pair of serrated blades that are driven by a mechanism that provides an alternating straight movement.
The safety systems impede accidental movements of the blades while the operator is absent.
Intended use
This machine was designed and manufactured for cutting and adjusting hedges that consist of bushes with small branches that are in proportion to the machine's characteristics.
Improper use
Any other use differing from the above mentioned ones could be hazardous and harm people and/or damage things. Examples of improper use may include, but are not limited to:
– cutting grass in general and in particular close to curbs;
– shredding of materials for composting;
- pruning;
– use of the machine for cutting non-plant material;
– use of the machine by more than one person.
Improper use of the machine will invalidate the warranty, relieve the manufacturer from all liabilities, and the user will consequently be liable for all and any damage or injury to himself or others.
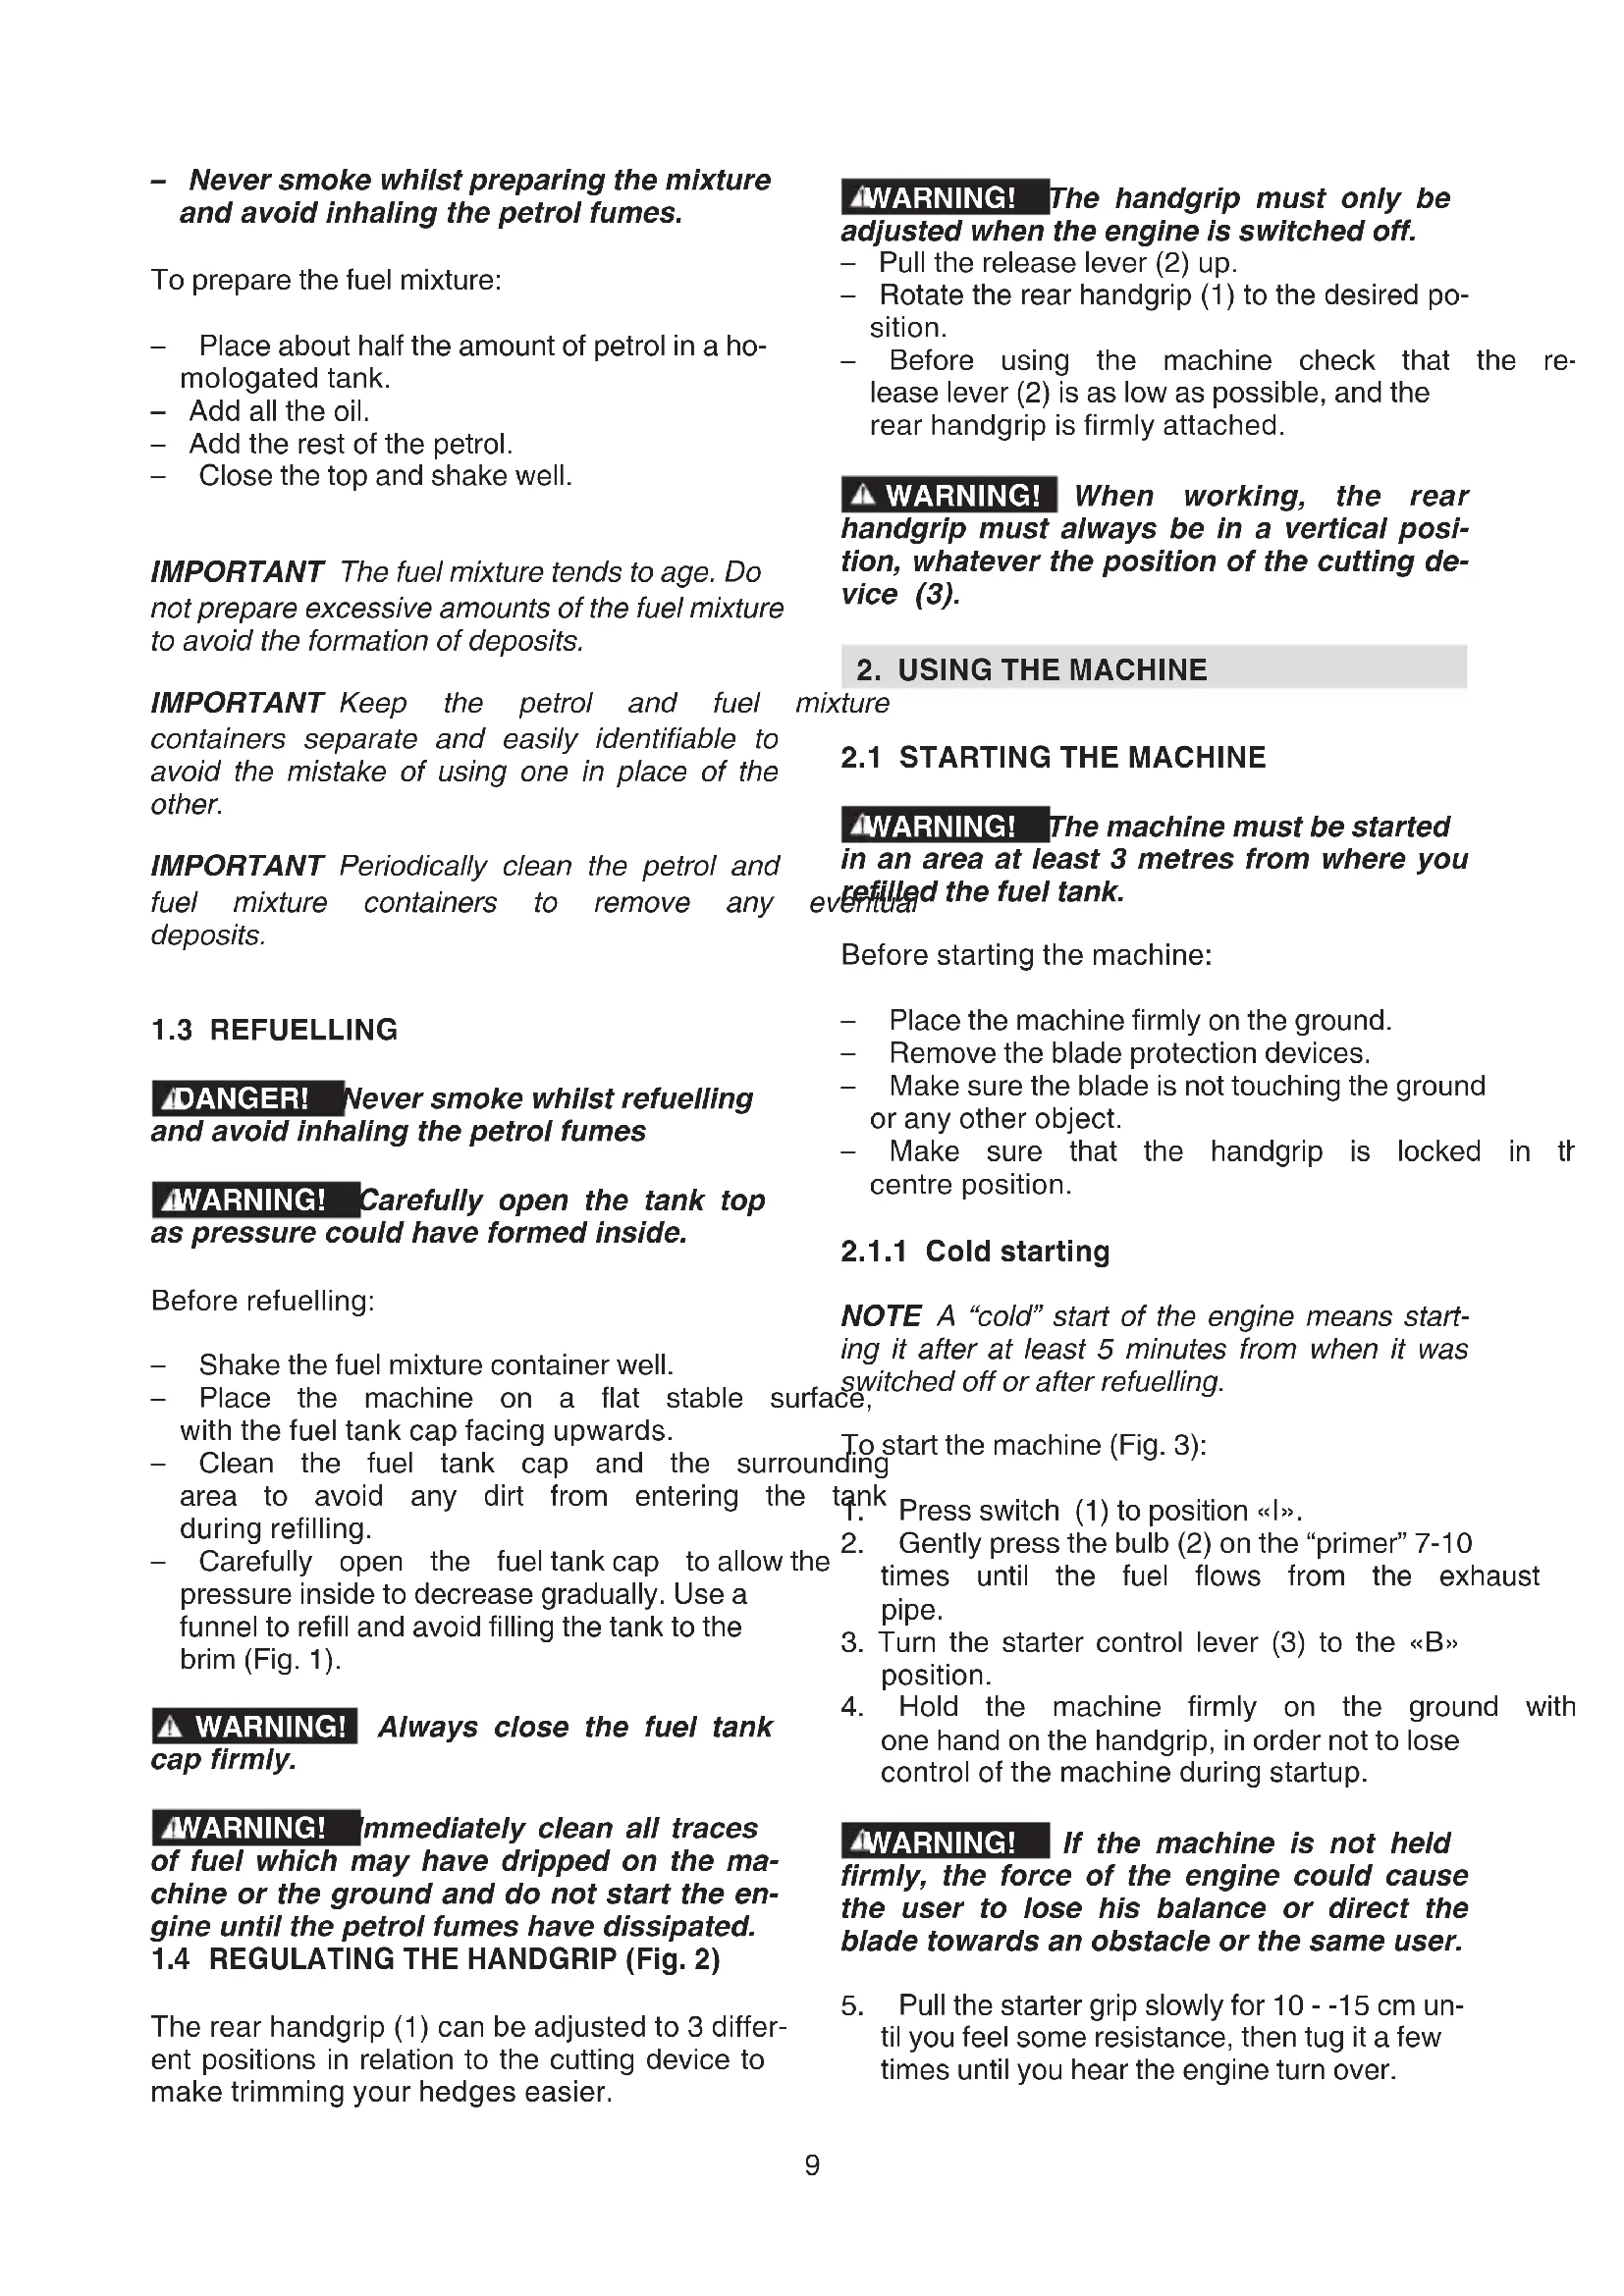
IDENTIFICATION LABEL AND MACHINE COMPONENTS
- Engine
- Cutting device (blade)
- Cutter protection plate
- Front handgrip
- Rear handgrip
- Rear handgrip release control
- Fuel mixture tank cap
- Starter grip
- Spark plug housing
- Blade protection
- Engine stop switch
- Blade control (Throttle trigger)
- Throttle safety lever
- Choke
-
Primer
-
Conformity marking
- Name and address of the manufacturer
- Sound power level guaranteed
- Manufacturer's reference model
- Machine model (if indicated)
- Serial number
-
Certification institute trade mark (if indicated)
-
Year of manufacture
- Article code
- Emission number
The example of the conformity declaration is found in the penultimate page of the manual.
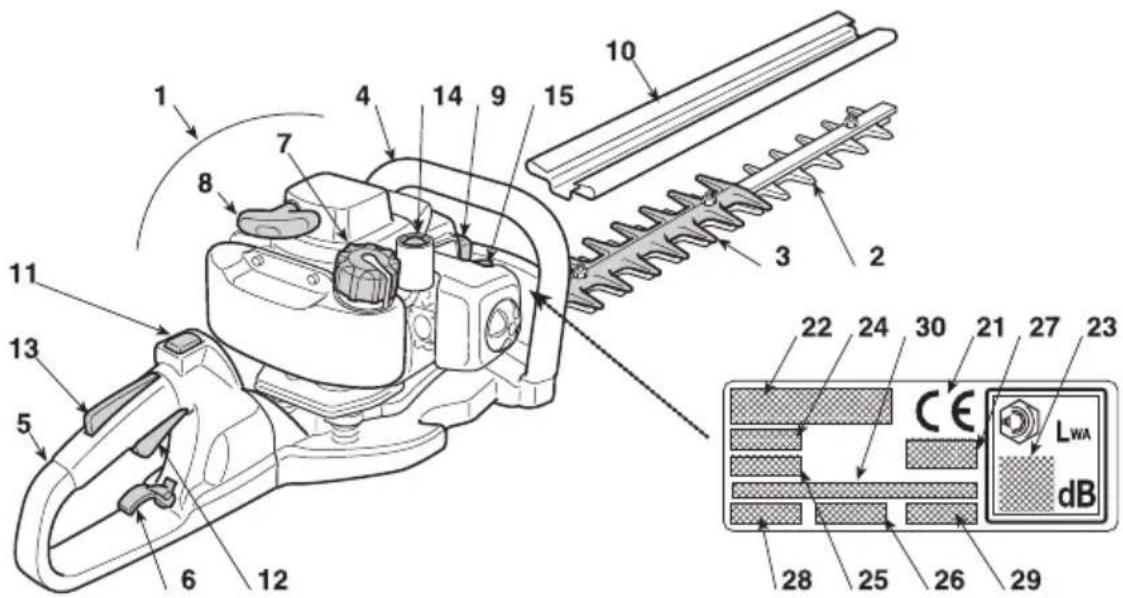
DESCRIPTION OF EXPLANATORY SYMBOLS (where applicable)
- Fuel mixture tank
- Run
- Stop
SAFETY REQUIREMENTS
Your machine must be used with care. Symbols have therefore been placed on various parts of the machine to remind you of the main precautions to be taken. Their meaning is explained below. You are also asked to carefully read the safety regulations in the specific chapter of this manual.
Replace damaged or illegible labels.
- WARNING! Danger.
- Read the instruction manual before using the machine.
- Your auditory system is in danger of be irreversibly impaired. Anyone operating this machine under normal conditions during continuous daily use may be exposed to a noise level equal to or exceeding 85 dB (A). The operator must wear Personal Protective Equipment (PPE). Whenever the machine is in use, safety goggles must be worn to safeguard against flying objects, as must each protectors, such as a soundproof helmet, in order to protect the operator's hearing. If the operator is working in an area where there is a risk of falling objects, a safety helmet must also be worn.
- Wear protective footwear and gloves!
- Fire hazard! The fuel mixture is inflammable. Do not spill the fuel.
- These fumes are deadly! During use, the engine produces toxic gases. Do not use the machine in closed or poorly ventilated areas. These fumes are deadly!
TECHNICAL DATA
[61] Capacity
[62] Power
[63] Spark plug
[64] Spark plug electrode distance
[65] Petrol / oil ratio
[66] Tank capacity
[67] Cutting length
[68] Operator ear noise pressure level
[69] Measured acoustic power level
[70] Guaranteed acoustic power level
[71] Measurement uncertainty
[72] Vibrations transmitted to the hand on the front handgrip
[73] Vibrations transmitted to the hand on the rear handgrip
[74] Mass
[75] Blade code (pair)
SAFETY REGULATIONS to be observed scrupulously
A) TRAINING
(1) THIS MACHINE MAY CAUSE SERIOUS DAMAGE AND INJURIES. Carefully read the instructions for proper use, preparation, maintenance, start up and stopping of the machine. Become acquainted with the controls and the proper use of the machine. Learn how to stop the engine quickly.
2) Never allow children or people unfamiliar with these instructions to use the machine. Local laws can restrict the minimum age of the operator.
3) The machine must never be used by more than one person.
4) Never use the machine:
- when people, especially children or pets are nearby;
– if the user is tired or unwell, or has taken medicine, drugs, alcohol or any substances which
may slow his reflexes and compromise his judgement; - if the user is not capable of holding the n chine firmly with two hands and/or remaining standing on the ground whilst working.
5) Bear in mind that the operator or user is responsible for accidents or unexpected events occurring to other people or their property.
B) PRELIMINARY OPERATIONS
1) Always wear adequate clothing which does not hamper movements when using the machine.
- Always wear slim-fitting protective clothing, fitted with shear-proof protection devices.
- Always wear protective gloves and eye-goggles and safety anti-shear boots with non-slip soles.
- Always wear ear and hearing protection devices. Do not operate the engine in a confined space where dangerous carbon monoxide fumes can
- Never wear scarves, shirts, necklaces, any hanging or flapping accessory that could catch in the machine or in any objects or materials in the work area.
- Tie your hair back if it is long.
2) WARNING: DANGER! Petrol is highly flammable. - Keep the fuel in containers which have been specifically manufactured and homologated for such use.
– Never smoke when handling fuel;
– slowly open the tank cap to allow the pressure inside to decrease gradually; - Top up the tank with fuel in the open air, using a funnel.
- add fuel before starting the engine. Never remove the tank cap or add fuel while the engine is running or when the engine is hot.
- if you have spilt some fuel, do not attempt to start the engine but move the machine away from the area of spillage and avoid creating any source of ignition until the fuel has evaporated and fuel vapours have dissipated.
– immediately clean up all traces of fuel spilt on the machine or on the ground;
– never start the machine in the same place you refilled it with fuel. - make sure your clothing does not come contact with the fuel, on the contrary, change your clothes before starting the engine.
- always put the tank and fuel container back on and tighten well;
3) Replace faulty or damaged silencers.
4) Before using the machine, check its general condition and in particular: - the throttle trigger and the safety lever move freely, they must not need forcing should return automatically and rapidly back to the neutral position;
– the throttle trigger must remain locked until the safety lever is pressed; - the engine stop switch must easily move from one position to the other;
- the electric cables and in particular the spark plug cable must be in perfect condition avoid the generation of any sparks, and cap must be correctly fitted on the spark plug;
- the machine handgrips and protection devices must be clean and dry and well fastened to the machine;
– the blades must never be damaged or in poor condition;
5) Before starting your work, make sure that all the protection devices are correctly fitted.
do not operate the engine in a confined space where dangerous carbon monoxide fumes can or develop.
2) Work only in daylight or good artificial light.
3) Take on a firm and well-balanced position: - where possible, avoid working on wet, slippery ground or in any case on uneven or steep ground that does not guarantee stability for the operator;
– avoid using unstable ladders or platforms;
– never run, but walk carefully paying attention to the lay of the ground and any eventual obstacles; - Always be aware of your surroundings and stay alert for possible hazards of which you may not be aware due to the noise of the machine.
4) Start the engine when the machine is firmly on the ground and hold it in place with your free hand: - start the engine in an area at least 3 met from where you refuelled; ng check that there are no persons in the vicinity of the machine;
- do not direct the silencer and therefore the exhaust fumes towards inflammable materials.
5) Exercise caution when near live electric cables.
6) Do not change the engine settings or over-speeded the engine.
7) Check that when the machine is running at minimum speed and ticking over, there is no capsvement of the blades and, after accelerating, the engine quickly returns to minimum speed.
8) Make sure the blades do not come into violent contact with foreign bodies and try to prevent any material from being hurled after trimming.
most If the cutting mechanism strikes any for- sign object or the hedge trimmer starts mak- ing any unusual noise or vibration, shut off the power source and allow the machine to stop. Disconnect the spark plug wire from the spark plug and take the following steps:
– inspect for damage;
– check for and tighten any loose parts;
– have any damaged parts replaced or repaired
to with parts having equivalent specifications.
the0) Stop the engine before:
– cleaning or when clearing a blockage;
– checking, carrying out maintenance or working on the hedge trimmer; - adjusting the working position of the cutting device;
– leaving the machine unattended.
C) DURING USE
1) Keep all nuts and screws tight to be sure the
machine is always in safe working condition. Before starting work please:
Routine maintenance is essential for safety and for maintaining a high performance level.
2) Do not store the machine with fuel in the tank in an area where the fuel vapours could an open flame, a spark or a strong heat source.
3) Allow the engine to cool down before storing in any enclosure.
4) To reduce fire hazards, keep the engine, ex-haust silencer and fuel storage area free from branches, leaves, or excessive grease; never leave containers with the cut debris inside the storage area.
5) If the fuel tank has to be emptied, this should be done outdoors once the engine has cooled down.
6) Always wear protective gloves when handling the cutting device.
7) Make sure the blades are well sharpened. All operations on the blades require a certain level of experience and specialised tools. For safety reasons, take them to a specialised centre to be sharpened.
8) For safety reasons, never use the machination of the mechanical parts over time.
with a worn or damaged cutting device or other parts. Damaged parts are to be replaced and never repaired. Only use original spare parts.1
Parts that are not of the same quality can seriously damage the equipment and compromise safety.
9) Store the machine out of the reach of dren!
E) TRANSPORTATION AND HANDLING
1) Whenever the machine is to be inspected, handled or transported you must: 1
- turn off the engine, wait for the blades to stop, disconnect the spark plug cap and wait the machine cools down;
– apply the protection devices to the blades;
- only hold the machine using the handgrips and position the blades in the opposite direction to that used during operations.
2) When using a vehicle to transport the chine, position it so that it can cause no danger to persons and fasten it firmly in place to avoid it from tipping over, which may cause damage or fuel spillage.
OPERATING INSTRUCTIONS
NOTE - The figures mentioned in the text are found on page 3 and following of this manual.
1. PREPARING TO WORK
1.1 CHECKING THE MACHINE
- Check that all the screws on the machine and the blade are tightly fastened;
– check that the blades are sharp and there are reacho signs of any damage;
– check that the air filter is clean;
- check that the protection devices are well fastened and working efficiently;
– check the handgrips are well fastened.
the2 PREPARING THE FUEL MIXTURE
This machine is fitted with a two-stroke engine which requires a mixture of petrol and lubricating oil.
IMPORTANT Using petrol alone will damage the engine and will cause for invalidation of the warranty.
IMPORTANT Only use quality fuels and oils to maintain high performance and guarantee the duration of the mechanical parts over time.
.1.2.1 Petrol characteristics
Only use unleaded petrol with a fuel grade of at least 90 ON. chil-
IMPORTANT Unleaded petrol tends to create deposits in the container if preserved for more than 2 months. Always use fresh petrol!
1.2.2 Oil characteristics
unghly use top quality synthetic oil specifically for two-stroke engines.
Your Retailer can provide you with oils which have been specifically developed for this type of engine, and which are capable of guaranteeing a migh level of protection.
The use of these oils makes it possible to prepare a 2% mixture, consisting in 1 part oil to 50 parts petrol.
1.2.3 Preparation and preservation of the fuel mixture
DANGER! Petrol and the fuel mixture are highly inflammable!
- Keep the petrol and fuel mixture in homologated fuel containers, in safe place, away from any flames or heat sources.
- Never leave the containers within the reach of children.
- Never smoke whilst preparing the mixture and avoid inhaling the petrol fumes.
To prepare the fuel mixture:
- Place about half the amount of petrol in a homologated tank.
- Add all the oil.
- Add the rest of the petrol.
- Close the top and shake well.
IMPORTANT The fuel mixture tends to age. Do not prepare excessive amounts of the fuel mixture to avoid the formation of deposits.
IMPORTANT Keep the petrol and fuel containers separate and easily identifiable to avoid the mistake of using one in place of the other.
IMPORTANT Periodically clean the petrol and fuel mixture containers to remove any deposits.
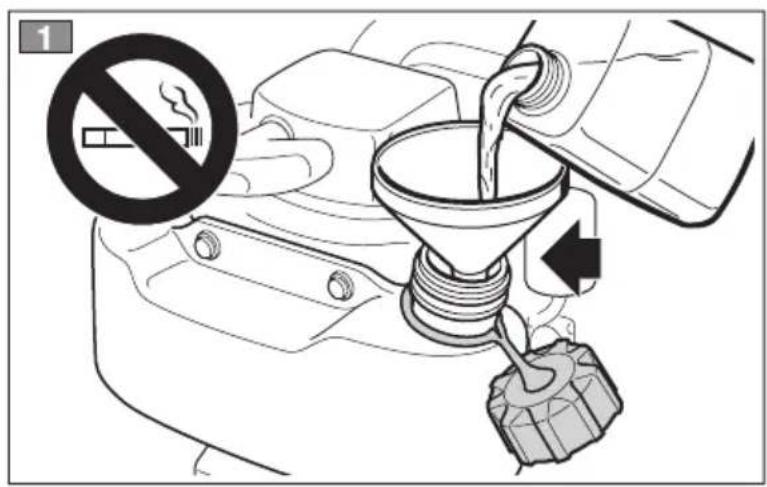
1.3 REFUELLING
DANGER! Never smoke whilst refuelling and avoid inhaling the petrol fumes
WARNING! Carefully open the tank top as pressure could have formed inside.
Before refuelling:
- Shake the fuel mixture container well.
- Place the machine on a flat stable surface, with the fuel tank cap facing upwards.
- Clean the fuel tank cap and the surrounding area to avoid any dirt from entering the tank during refilling.
- Carefully open the fuel tank cap to allow the pressure inside to decrease gradually. Use a funnel to refill and avoid filling the tank to the brim (Fig. 1).
WARNING! Always close the fuel tank cap firmly.
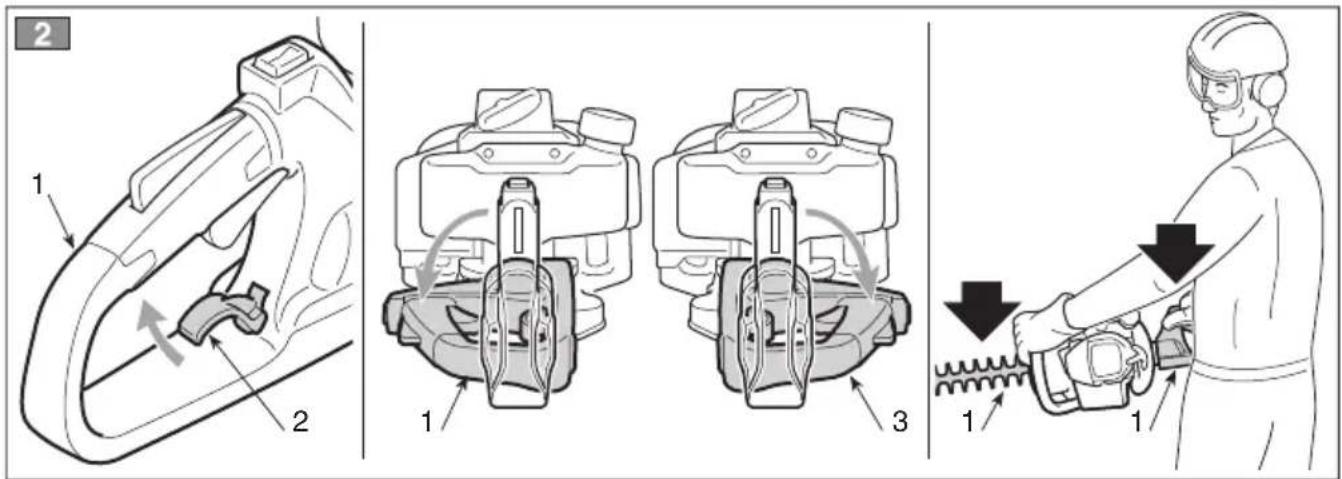
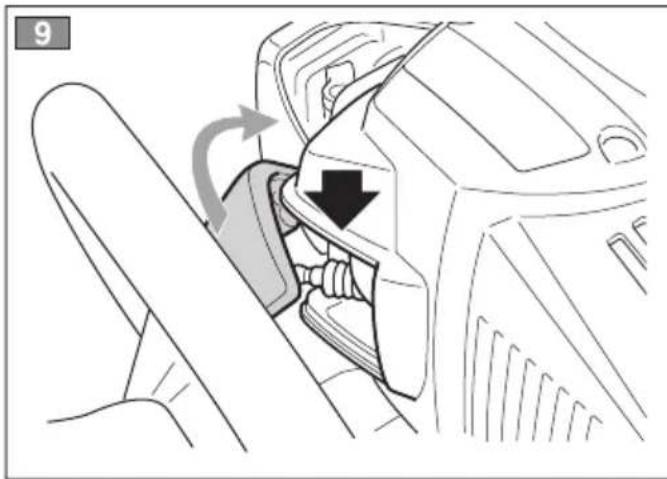
WARNING! Immediately clean all traces of fuel which may have dripped on the machine or the ground and do not start the engine until the petrol fumes have dissipated. 1.4 REGULATING THE HANDGRIP (Fig. 2)
The rear handgrip (1) can be adjusted to 3 different positions in relation to the cutting device to make trimming your hedges easier.
WARNING! The handgrip must only be adjusted when the engine is switched off.
– Pull the release lever (2) up.
- Rotate the rear handgrip (1) to the desired position.
- Before using the machine check that the release lever (2) is as low as possible, and the rear handgrip is firmly attached.
⚠ WARNING! When working, the rear handgrip must always be in a vertical position, whatever the position of the cutting device (3).
2. USING THE MACHINE
mixture
2.1 STARTING THE MACHINE
WARNING! The machine must be started in an area at least 3 metres from where you refilled the fuel tank.
Before starting the machine:
- Place the machine firmly on the ground.
- Remove the blade protection devices.
- Make sure the blade is not touching the ground or any other object.
- Make sure that the handgrip is locked in the centre position.
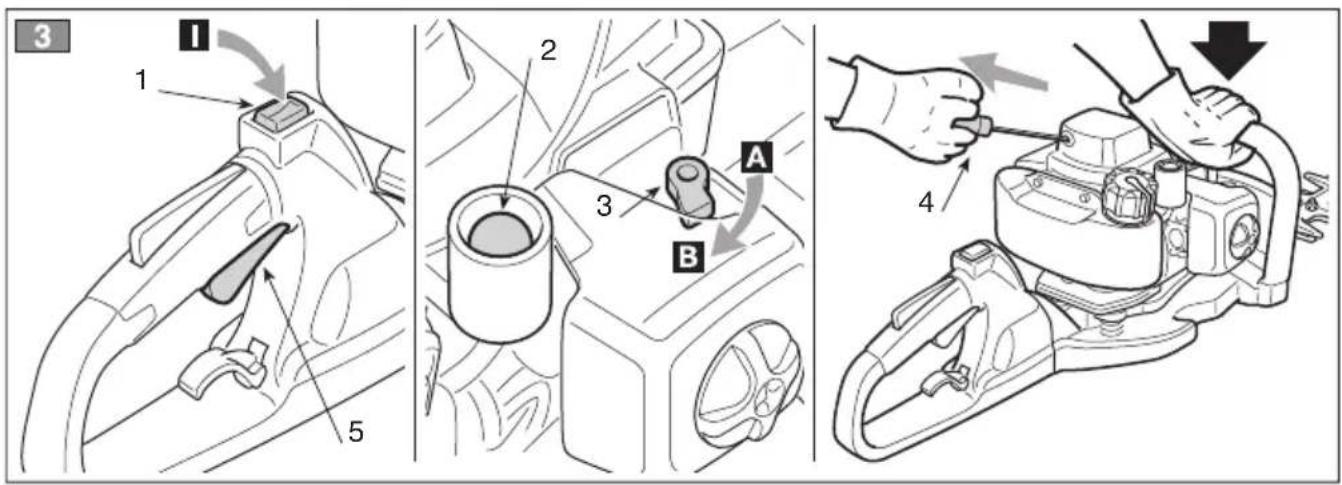
2.1.1 Cold starting
NOTE A "cold" start of the engine means starting it after at least 5 minutes from when it was switched off or after refuelling.
To start the machine (Fig. 3):
tank 1. Press switch (1) to position «I».
- Gently press the bulb (2) on the "primer" 7-10 times until the fuel flows from the exhaust pipe.
- Turn the starter control lever (3) to the «B» position.
- Hold the machine firmly on the ground with one hand on the handgrip, in order not to lose control of the machine during startup.
WARNING! If the machine is not held firmly, the force of the engine could cause the user to lose his balance or direct the blade towards an obstacle or the same user.
- Pull the starter grip slowly for 10 - -15 cm until you feel some resistance, then tug it a few times until you hear the engine turn over.
IMPORTANT This machine is fitted with an “Easy Start” system which makes the starting procedure different and easier compared to traditional methods. This system reduces the effort required to start the machine. The cord only requires pulling until you hear the engine start to tick over; no effort is required to pull the cord as it does not create any resistance.
WARNING! To avoid breaking the starter cord, do not pull the whole length of it or let it slide along the edge of the cable guide hole. Release the starter grip gradually, to avoid letting it fly back uncontrollably.
- Gradually release the grip (4) on the cord to avoid it from returning too fast and out of control.
- Briefly operate the throttle lever (5) to the choke control lever (3) automatically to the «A» position.
- Allow the engine to run at minimum for at least one minute before accelerating to maximum speed.
IMPORTANT If the starter cord grip (4) is pulled repeatedly with the starter control lever (3) in the «B» position it can flood the engine and make starting difficult.
If you have flooded the engine, remove the spark plug and gently pull the grip (5) of the starter cord to eliminate any excess fuel; then dry the spark plug electrodes and replace it on the engine.
2.1.2 Warm starting
When hot starting (immediately after stopping the engine), follow the procedure indicated above in points 1 - 4 - 5 - 6.
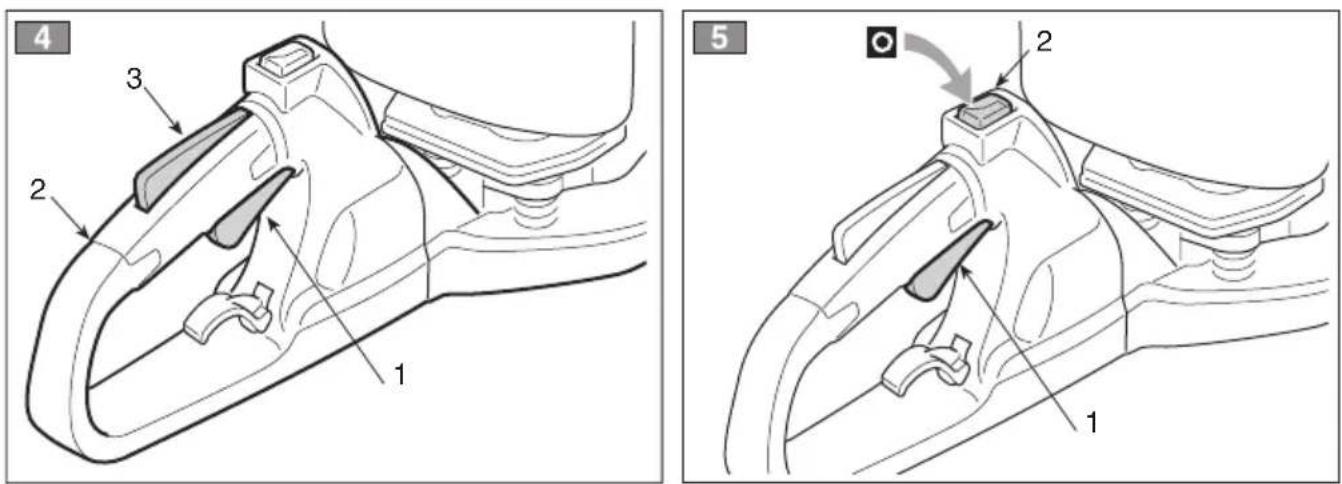
2.2 ADJUSTING THE SPEED OF THE CUTTING DEVICE (Fig. 4)
The speed of the cutting device is regulated by the throttle trigger (1) positioned on the rear handgrip (2).
It is only possible to use this lever if the safety lever (3) is pressed simultaneously.
The movement is transmitted from the engine to the blade by a centrifugal mass clutch that prevents the blade from moving when the engine is running at minimum speed.
WARNING! The cutting device must not move when the engine is running idle. If the cutting device moves when the engine is run-
ning idle, contact your Retailer to correctly regulate the engine.
The correct running speed will be achieved by pressing the throttle trigger (1) as far as possible.
IMPORTANT Avoid using the machine at full power for the first 6-8 working hours.
2.3 STOPPING THE MACHINE (Fig. 5)
To stop the machine:
- Release the throttle trigger (1) and allow the starterengine to run at minimum speed for a few seconds.
- Press the switch (2) to position «O». bring
⚠ WARNING! When the engine is ticking over, it will take a few seconds for the blades to stop.
WARNING! In the event of an emergency stop, move the switch immediately to the «O» position.
3. CUTTING AND ADJUSTING HEDGES
To respect people and the environment:
– Try not to cause any disturbance.
- Scrupulously comply with local regulations and provisions for the disposal of waste materials after sawing.
- Scrupulously comply with local regulations and provisions for the disposal of oils, petrol, damaged parts or any elements which have a strong impact on the environment.
– Disposal of the packaging should be done in accordance with the local regulations in force.
▲ WARNING! Prolonged exposure to vibrations can cause injuries and neurovascular disorders (also called “Raynaud’s syndrome” or “white hand”), especially to people suffering from circulation disorders. The symptoms can regard the hands, wrists and fingers and are shown through loss of sensitivity, torpor, itching, pain and discolouring of or structural changes to the skin. These effects can be worsened by low ambient temperatures and/or by gripping the handgrips excessively tightly. If the symptoms occur, the length of time the machine is used must be reduced and a doctor consulted.
DANGER! This machine's starter unit ge-
nerates an average sized electromagnetic field, but it is not however possible to exclude the possibility of interference on any active or passive medical devices that operators may be wearing; this could be risky for their health conditions. All those using medical devices should always consult their GP, or the device manufacturer, before using this machine.
WARNING! Always wear suitable clothing when using the machine. Your Dealer can provide you with all the information on the most suitable accident-prevention devices to guarantee your safety.
⚠ WARNING! If something breaks or an accident occurs during mowing, turn off the engine immediately and move the machine away to prevent further damage; if an accident occurs with injuries or third parties are injured, carry out the first aid measures most suitable for the situation immediately and contact the medical authorities for any necessary health care. Carefully remove any debris that might cause damage or harm persons or animals should it not be seen.
3.1 CUTTING PROCEDURES
WARNING! When cutting, always hold the machine firmly with both hands.
WARNING! Immediately stop the machine if the blades block while running or if they get caught up in the hedge branches.
It is recommended to trim the two vertical sides of the hedge before trimming the top. Adjust the machine's handgrip according to the type of cutting (see 1.4).
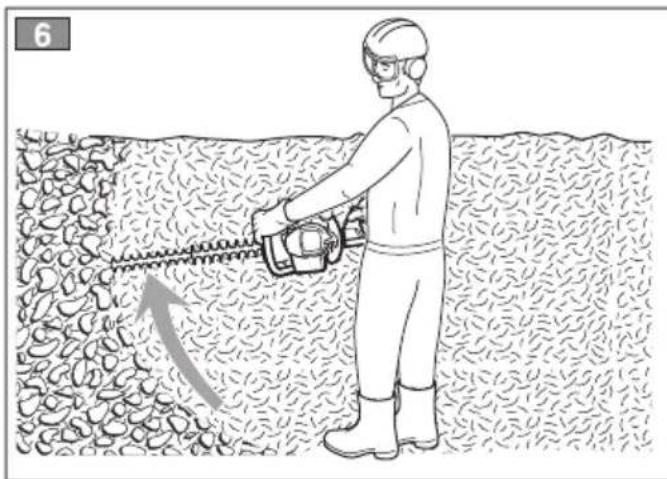
3.1.1 Vertical cutting (Fig. 6)
Proceed by cutting using curved movements from the bottom towards the top, keeping blade as far from the body as possible.
3.1.2 Horizontal cutting (Fig. 7)
The best results will be obtained with the blade slightly inclined ( 5^ - 10^ ) in the direction you are cutting, proceed with a curved movement, slowly and without interruptions, especially in the case of very thick hedges.
3.2 WHEN WORK IS FINISHED
When you have finished your work:
- Stop the machine as indicated previously (see 2.3).
- Wait for the blades to stop and replace the protection device.
4. ROUTINE MAINTENANCE
Correct maintenance is essential to maintain the original efficiency and safety of the machine over time.
WARNING! During maintenance operations:
- remove the spark plug cap.
- Wait until the engine is sufficiently cold.
- Use protective gloves when handling the blades.
- Keep the blade protection devices on, except when intervening directly on the blade.
- Never dispose of oils, fuel or other polluting materials in unauthorised places.
4.1 STORAGE
At the end of each working session, carefully clean the machine of dust and debris, and make sure that there are no damaged parts; replace any faulty parts and lubricate the blades to prevent rust.
The machine must be preserved in a dry area, protected from all weather conditions and with the blade protection device correctly fitted.
4.2 CLEANINGTHE ENGINE AND THE SILENCER
To reduce fire risks, periodically clean the cylinder fins with compressed air and clear the silencer area from branches, leaves or other debris.
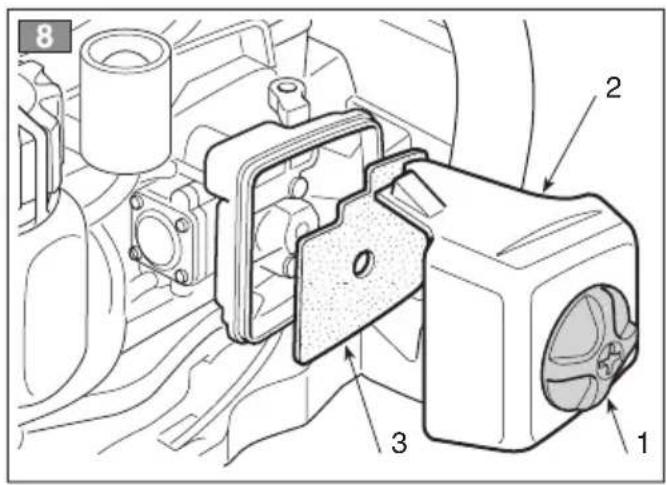
the4.3 CLEANING THE AIR FILTER
IMPORTANT Cleaning the air filter is essential to guarantee the efficiency and duration of the machine.
It must be cleaned after every 8-10 working hours.
To clean the filter (Fig. 8):
- Loosen the knob (1) remove the cover (2) and the filter element (3).
- Wash the filter element (3) with soap and water. Do not use petrol or other solvents.
– Leave the filter to dry in the open air.
Replace the filter element (3) and the cover (2) and tighten the knob (1).
4.4 CHECKING THE SPARK PLUG
Periodically remove and clean the spark plug using a metal brush to get rid of any depo (Fig. 9).
Check and reset the correct distance between Dealer.
the electrodes (Fig. 9).
Replace the spark plug and fasten it firmly using the supplied wrench.
The spark plug must be replaced with one with the same characteristics whenever the electrodes have burnt or the insulation has worn, and in any case every 100 working hours.
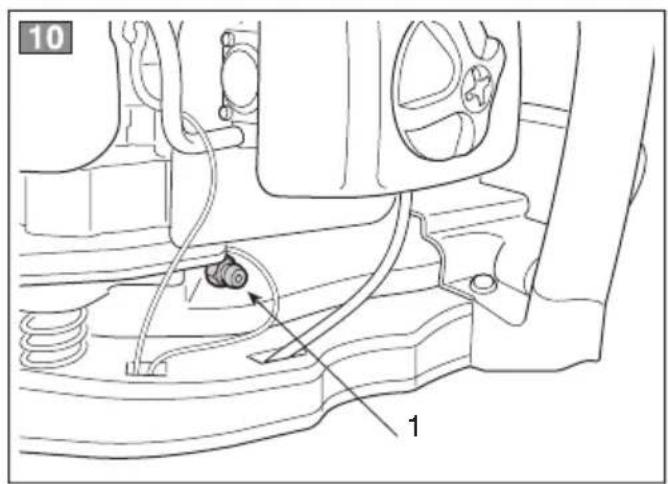
4.5 LUBRICATING THE REDUCTION GEAR (Fig. 10)
Every 20 working hours, top up the level with special molybdenum bisulphur lubrication, in-5.4 injecting it into the lubricator (1).
4.6 LONG PERIODS OF DISUSE
IMPORTANT If you are not going to use the machine for a period of more than 2-3 months, we recommend you do a few things before putting it away. This will make it easier when you want to use the machine again and will also prevent permanent damage to the engine.
Before putting the machine away:
- Empty the fuel tank.
- Start the engine and run it idle until it comes to a halt, so that it uses up all the fuel that is left in the carburettor.
- Wait for the engine to cool down before storing the machine.
When you wish to start using the machine again, prepare it as indicated in chapter "1. Preparing to work.
5. EXTRAORDINARY MAINTENANCE
This work must be done exclusively by your Dealer.
All and any operations performed in unauthorised centres or by unqualified persons will totally invalidate the warranty.
5.1 TUNING MINIMUM SPEED
WARNING! If the cutting device moves when the engine is running idle, contact your Dealer to correctly regulate the engine.
5.2 FUEL FILTER
The fuel tank there is a filter which prevents impurities from entering the engine.
The filter should be replaced once a year by your
5.3 CARBURETTOR ADJUSTMENTS
The carburettor is tuned by the manufacturer to achieve maximum performance in all situations, with a minimum emission of toxic gas in compliance with the regulations in force. In the case of poor performance, first check that the blades are not partially blocked or deformed, on the contrary ask your Dealer to check the carburettor and the engine.
WARNING! Periodically check that the blades are not bent or deformed and that the screws are adequately tightened.
5.4.1 Adjusting the blades
The blades are subject to progressive wear, which is noticed by a decrease in the trimming performance due to excessive play of the unit.
▲ WARNING! Blade adjustment is an operation that can damage the blades and machine or cause injuries or accidents if not done properly. For these reasons, it must always be done by your Dealer.
5.4.2 Sharpening the blades
It is necessary to sharpen the blades when the trimming performance decreases and the branches tend to stick together.
⚠ WARNING! Always replace and never repair a blade which has blunt cutting edges.
IMPORTANT We recommend you take your machine to your Dealer for sharpening as he has the required tools and suitable experience.
5.4.3 Replacing the blades
IMPORTANT Blades must be replaced by your Dealer.
Blades bearing the code indicated on the chart on page 2 should be used on this machine.
Given product evolution, the above mentioned blades may be replaced in time with others having similar interchangeable and operating safety features.
- DIAGNOSTICS
| What to do when ... | |
| Source of problem Corrective action | |
| 1. The machine will not start or will not keep running | |
| Incorrect starting procedure | Follow the instructions (see chapter 2) |
| Dirty spark plug or incorrect distance between the electrodes | Check the spark plug (see chapter 4) |
| Air filter clogged Clean and/or replace the filter (see chapter 4) | |
| Carburation problems Contact your Dealer | |
| 2. The machine starts but is lacking in power | |
| Air filter clogged Clean and/or replace the filter (see chapter 4) | |
| Carburation problems Contact your Dealer | |
| 3. The machine runs irregularly and lacks in power when revved | |
| Dirty spark plug or incorrect distance between the electrodes | Check the spark plug (see chapter 4) |
| Carburation problems Contact your Dealer | |
| 4. The machine makes too much smoke | |
| Incorrect composition of the fuel mixture | Prepare the fuel mixture according to the instructions (see chap. 1) |
| Carburation problems Contact your Dealer | |
| 5. The blades heat up and give off smoke | |
| Overheating due to poor regulation | Contact your Dealer |
| 6. The blades move with the engine idling | |
| Incorrect carburation regulation | Contact your Dealer |
ÍNDICE
KUIDAS KASUTUSJUHENDIT LUGEDA
1.2 POLTTOAINESEOKSEN VALMISTUS
1. PASIRUOŠIMAS DARBUI
1.1 IRENGINIO PATIKTINIMAS
4. PLĀNOTĀ TEHNISKĀ APKOPE
BLI KJENT MED MASKINEN
D) VEDLIKEHOLD OG OPPBEVARING
4. ORDINÆRT VEDLIKEHOLD
5.4 VEDLIKEHOLD AV KNIVBLADENE
5. EKSTRAORDINÆRT VEDLIKEHOLD
1) ESTA MÁQUINA PODE PROVOCAR DANOS E LESÕES GRAVES. Leia com atenção as ins-
4.6 DLHODOBÁ NEČINNOST
4.6 DALJŠE OBDOBJE NEUPORABE
BEZBEDNOSNA UPUTSTVA
INNEHÅLLSFÖRTECKNING
1.4 KABZA AYARI (Res. 2)
D. Lgs. 262/2002, ANNEX V (Italy)
• EMCD: 2004/108/EC
• NRMM: 2010/26/EU
the law: 0 - A H H P, 0
| NEEF. Sumoverserklaing(Maskindirektiv 2006/42/EF, Vedlogg II, del A)1. Firmot2. Erflaner på eget ansvar at maskinen: Barbareret för att hoksaks kuttitrimensing av heksera) Type / Modell) Banglanspav) Pradsktionserpam) Sor Copenhagen) Motor: forbenningsmotor3. Copyfär krownen i direktvena; Sporttisingsorgan) EF-dyapoproling4. Hervänling till harmonisierle standanderi) Måst lydeftoktrivä) Garantart lydeftoktrivä) Instellert nettoeffekt) Parson som har fullmakt till å utfürdige teknik dokumentasjon; I Stod og dato | SVEG-förstkän am forveranskreden (Maskindirektiv 2006/42/EF, bilag II, del A)1. Fremtag)2. Für die erstand anvar at maskinen: Måst lydeftoktrivä; Sporttisingsorgan) EF-dyapoproling3. Overreiter der med förningklad direktiva; Anmali of) gG EY typiken4. Reformats till bevändete standarder) Uppsdatt budjedelnivä) Garantorad (gadefoktrivä) m Instellert nettoeffekt) Aktienkirkenen für upprätendel av den teknikta dokumentationen; Ir Ort och datum | DAEF-oververskreden (Maskindirektiv 2006/42/EF, bilag II, del A)EF-maatErflaner på gett envar at maskinen: Måst lydeftoktrivä; Sporttisingsorgan) EF-dyapoproling3. Er oververskredenelse med specifikationerne tiljato direktivome; Fratilliceringsergan) EF-typeaprunning4. Hervänling till harmoniserede standanderi) Måst lydeftoktrivä) Garantorad (gadefoktrivä) m Instellert nettoeffekt) Parson, der har bemyndigelise till at uderbajde det tekniske dossier; Ir Stod og dato |
| FIEV-YAATIUSTENNUKABISUUSVAKUITUS (Markindirektiv 2006/42/EY, Little II, oxx A)1. Yritys2. Veluktatta omalla vastuillain, etti kone: Keslin keratellens amortirkdyilimen pensasakul, pensaseaden likkualmudtolu) Typpi i Perusemili) Myrvtimalli) Valutinavansizi) Sarjanumore) Moottori - rajidylasmodortori3. Ot yvänmmukalinen senzerveiden direktivien ausstaltinen vastuistaten kettse; Soffiltintilyritys) EG-Eyopirtkerbeva) Vittauas harmorsaltuhlin standardelin) Mästiu Atjelbitelose) Tasttu dijkholosalo) Asnerati teltabuke) Tekvirben asteipigen belstimben vellundeltu tekkiplu; Raiska je piakimisela | CSBS - Prehildženi o shošč (Hemstřejne zdrjených adriženich 2006/42/ES, Pitloha II, čast A)1. Spočnost2. Prohlabuje na vlední odvodnost, že stroj: Ploncislé motoroté pičetové rizdy, sdfihělnýpřeze žlivých pletoi a) Typ i Zuklední modelbi Obochodní model) Rob vyrobní záslo) Výrobní záslo3. Je na spalača x nažržením számnic: Trickičekho spasce; Výrobní záslo) Motor: spatevlové motor3. Je na spalača x nažržením számnic: Trickičekho spasce; Výrobní záslo) ES žekouška Typu4. Odkzy na lermontovanové nermyj Namážení įrovat aktašického výkenuj Žeznáčka ovočni skvistického výkenum Osty Istolvanový výkonč Osoba autorizvaný pro vytaňení Technického spasce; R misto a Datum | PLDeklaracja zagradnoček WE(Dyrektyw masymynema 2006/42/WE, Załącznik II, ciečač I). Spółka2. Ozwiedsca na wlesnąna odpowiedzielnkođe, že masztyna: Sekulator spaliwnovy trzymany w rykach, cieciņnprzycrinanie zyamplotu a) Typ / Model podstawowyb) Modki komasnyryc) Rak produkciči) Numer serinyi4. Siltih šiliko se zaplonie iskrayom7. Spelnia podstawowe wymogli następujących Dyrektyw:a) Jednostka certyklujćaç) Badunie typu WE4. Odsheslanie da Norm pharmonizowanychi Zmlerzony pozlom mocy akutycznejj Gwarantomyu pozlom mocy akutycznejmi linc zerobilizowane nettoj) Osoba upuazplonio za zdrodagowania Dokumentacji technicznej; R majecorovost i data. |
| HLEK-megneleločegi rytiskicozeta (2008/42/EK gepirányve, II. mellátket "A" rész) Vörlüret Viklauti2. Felskreditek teljes tudatiben kitjekendi, hogy za alablik gasp: Urdorachta motore sáverygyriro, lodviny kultiklukai) Típus i Alelipituss Kereskedemil típus) Gyralási avG Zeyransz éramMotor: robbanomotor3. Maglélai ze slabli irányvek seðirksinsink) Taniaticó ezprusa) CE verszáglat típus3. Hivskotce a harmonisk azvahvyrokcsii Mort zagbelgestnýny szintj Garantali zagbeljavinyšni salintM Nech bescheltebjevelmingj Muzszeni Dossze sztarkcsizileva belufmaldment számiki; Holye os óje | NLDepravarići соответταιν нормы EC(Директина в машинном оборудовании 2004/42/ES, Propionenne II, чисть А)1. Представные2. Законит под собственную ответственность, что машина: Планикальные моторазивным шляренным можливки, стрикацьшерменление жилкой моргоди a) Typ i Œaškode nadaltb) кокомирное киниконенняc) God ingotabilнняd) ПиспортiD annaltate: дивентать внутреннего струковиE. Соответствует трейовними следующих директives: f) Certrafiniquirящий органg) Elsikomane EC «Колкової обрація» C-Сельна на гармонизированные нормыj Измеренные урімень звукової мощностиD Гаретерумный уровень leukовой мощностiim Чистан установленням мощкостьe Liaje, уполномочиное на подготовку технического дохрументиціє: R Misto i дата | HREK-Igavja os sukladnosti(Dividative 2006/42/EZ o strojevima, dodatak II, dio AI)1. Yritics;2. pod vlasifikom odgovornomácu izljivňuje da je stroj:Pyrenone motorne skare za živicu, rezmaporeprerechna zvizea) Vrsta / Ocnovni modeli B komercijali modeliC Gedina motorovodnjeF Matčini brojM) Motor: motor x undernijn izgarzenjam3. sukladan e teminijn zahtevima direktova; Triktikarcickho tipojTipsko inpitivanje EZ4. Primijlenjene su slijede doharmonizranoe nomin:j) Izprasena razina zvužne snegaj) Zajatimčna razina zvužne snegami Noto instalena negajO Osoba ovasistena za przvijenje Tehničke datóctoko;r Miesto i datum |
| SL | BS | SK |
| ES izjava o sukladnosti(Direktiva 2006/42/ES), prilloga II, del AI1. Druliba2. pod latino odgovornoću tijevlja, da je stroj:Pristovni i motori rozatnik gmičnica, kodinjavskomano reznije travoai) Tip / osnovni modeli) Bržin modela) Laplo kladelvei) Serijska štvitika) Motor: motor z notrajnim izgorevanjem3. Sikladen je z dološiti direktiv :Ustavova, ki izda potrdilo) ES pregled tipa4. Siklovanje na uuklajene predpisaeI zmerjeni nivo zvotne modi) Zagovojení nivo zvotne molsiMi Nebo instalairna modi) Oseba, poublaščena za sastovo tehnične skojtine;) Kraj in datum | EZ izjava a sukladnosti(Direktiva o maštnama 2006/42/EZ, Prillog ii, deo AI1. Firma2. Saje izjavu pod vlastitnom odgovornoću da je mašina:Rutni moterni trimer za živicu raznadljednošetnave živica) Tip / Ucnovni modeli b) Komercijani modeli c) Godina prizvodnje d) Serijaki broj e) Motor: motor z ungrađenijim izgaranjemii) Certifikacionsi lijela) EZ lajifivnje tipa4. Požvanje na uukladene normiII Izmjerleni nive zvotne snage) Garantovanje nivo zvotne snagee) Neja neitašetnava (d)Osobo ovýstena za izradu tehničke brosura;) Mjesto i datum | ES vyhlésenie o zhude(fimetróka o štrujných zariadenloch 2006/42/ES, Prillog II, časť AI1. Spolčnost2. Výhlasná za vlastné zodpovednost, že stroj:Proneční motorovi platovu ražníčice strňanljegovry živnega plataa) Typ Žakadný modelai) Obchodný modelai c) Rok výrobky iVýrobné čísloe) Motor: spalavneč motorJe je v grupo s narpadnami smerec;E certifikacijn orgelnj) Šnišké typy ES4. Odikaz na Hamorizované normyI nematná úroveň akutiského výkonuJ Zaratoná úroveň akutiského výkonuMi Čoty Instalovaný výkoniOseba autorovanje na vývornenia Technického spisu;n) Mjesto a Datum |
| RCCE-Doxtavitte do Conformátva(Direktiva napge 2006/42/CE, Anasta II, portes AI)1. Società2. Declari pe proprie risupendere ca mišina:Maxima de laid gardeni vii portebila, ku motor, la motor, la motor, la motor, la motor, la motor, la motor, la motor, la motor, la motor, la motor, la motor, la motor, la motor, la motor, la motor, la motor, la motor, la motor, la motor, la motor, la motor, la motor, la motor, la motor, la motor, la motor, la motor, la motor, la motor, la motor, la motor, la motor, la motor, la robot, la motor, la motor, la motor, la motor, la motor, la motor, la motor, la motor, la motor, la motor, la motor, la motor, la motor, la motor, la motor, la motor, la motor, la motor, la motor, la motor, la motor, la motor, la motor, la motor, la motor, la motor, la motor, la motor, la motor, la motor, la motor, la motor, la motor | LIESB aktivitica doktanogilaN.Bing dimkityva 2006/42/CE, Piedex II, delix A)1. Bondiová2. Pristima atsakomybe, kad jranglyns:Rerkinas motorines gyvetora zříklas, glyvotrava površnosciplutkarlítvisa) Tijpas / Buzinis Modellab) Komerciniis modela) Pagamínimo metal) Svenja mola | LVEK abtilizcas deltaricjla(Direktiva 2006/42/EK per maximim, pladikuma II, dalá AI)1. Uzojvannma2. Uzemněties pe por tiplnu atbí idšiu, pazljiv, ke mošlavaAr pladizju aprikultais rotkuransals drživoga apprizeja,d) Dvyzogga prošana/glídčekihšanaII lpa Ištai mola modela) Komerciliáls modellsiC Bezlošanas gedeS Svenja numanaII Motors: helskodzus motors3. Altilisi sadu direktivu prasibam:F Sertifikacijas netadeG CE upvišta párbadne2. Atkouze už harmoniziem standleriemI izměřals skasnas intonslštěs finersiJ Garantalačia skapra internališles fimena mi Uztaděta neta juda4. Pinyarajtača darbiJEKS, kas sagatvoja tehnisku dokumentaciju;M Vieta ir data |
| SKCEC deklančija o ukslagtenosti(Direktiva o maštnama 2006/42/EC, Prillog ii, deo AI)1. Praduzće2. Deja izjavu pod vlastitnom odgovornoću da je mašina:Rutni moterni trimer za živu ogradu rezanjopokstevanje žive ogradei) Tip / Osognymi modeliB Komercijani modeli) Gedina mola prevednje3. Sorički broje) Motor: motor z ungrađenijim kegromvanjem 5. skladu s ocnovnim zahřivima direktiv:Sertifikacioni lenoIC Espiritivanje tips:4. Pozvanje na uukladene normeI zmerjeni nivo zvotne snagemi Netto instaltsana snagai) Oseba uvsklčena za sastovnjenje tehničke brosura;M Jesto i datum | BUEO deklanjerde za sastrotstevni(Đirektiva Minnašna 2006/42/CE, Prilpočenija ni, čast AI)Dredanstvo2. Na sebetanina ottenkornost direktirarie, на мазината:Примосна мотори тример za žinn. plan' sviprodsnema на žinn. plan'ta) BVD i Basokom modeli E ykremosna moženii F pašnaya procederstaoT Čorsoni noheraMtoror: motor k-trymina forminaE o cieletomostu no CS adrišnificnata na durestruktiva:M Certinihaipsuči opramiji EO koleddane na zidaE škranama na xuperešanjanate neramiH Handi na kažerpička akustnica možestiF Garantarabo nimo na ayustvena možnostH Nittry inestatlanna možnostI Liud uplykunjužinno da systovni transkomstnicta Dокументarejo:c) Mjesto i data | EIELi vlastavujedekapraskanta(Meistrednikov 2006/42/EU, Lia II, osa A)1. Firma2. Klimtab omai vastbutel, et masin:Kwaskerkelj motorige behliskur, tevi itikominispogomineM Täjup / Poinluk2. Knoubandiskim modeliE Ethiguspta3. Raishka4. Kimoh: Motor: Sieplopěminismotor3. Vestab direktivdo nobuteće;P Kimler kusula5. Elü ličtušihindskime6. Vlida itihukastud standardiška7. Möcadetud helvivõmsuse tase8. Garantornitud helvõmsuse tase9. Instaltveliud natervidimamaq7. Tehliniše Leite autoriserinud koostaja:i Kohl ja Kuupdev |
© by GGP ITALY SPA
- Soggetto a modifiche senza preavviso • Подлежи на промени без предупреждение • Moguće su promjene bez najave • Možnost změn bez předešlého upozornění • Ret til ændringer forbeholdes • Kann ohne Vorankündigung geändert werden • Упóкεται σε αλλαγές χωρίς προειδοποίηση • Subject to modifications without notice • Sujeto a modificaciones sin previo aviso • Võimalikud muudatused ilma ette teatamata • Voidaan tehdä muutoksia ilman ennakkoilmoitusta • Sujet à des modifications sans aucun préavis • Podložno promjenama bez prethodne obavijesti • Előzetes értesítés nélkül módosítható • Objekto pakeitimai be perspėjimo • Var tikt mainīts bez iepriekšēja brīdinājuma • Подлежи на промени без претходно известување • Kan zonder kennisgeving wijzigingen ondergaan • Kan endres uten forvarsel • Poddawany modyfikacjom bez awizowania • Sujeito a alterações sem aviso prévio • Poate fi modificat, fără preaviz • Может быть изменено без преомления • Možnosť zmien bez predošlého upozornenia • Lahko pride do sprememb brez predhodnega obvestila • Podložno izmenama bez upozorenja • Kan utsättas för modifieringar utan att detta meddelas • Önceden haber verilmeksizin değiştirilebilir

- INDICE
- CONOSCERE LA MACCHINA
- OBDOBÍ DLOUHODOBÉ NEČINNOSTI
- PÅFYLDNING AF BRÆNDSTOF
- HOW TO READ THE MANUAL
- NOTE or
- GETTING TO KNOW THE MACHINE
- DESCRIPTION OF THE MACHINE AND ITS RANGE OF USE
- Intended use
- Improper use
- IDENTIFICATION LABEL AND MACHINE COMPONENTS
- DESCRIPTION OF EXPLANATORY SYMBOLS (where applicable)
- SAFETY REQUIREMENTS
- TECHNICAL DATA
- SAFETY REGULATIONS to be observed scrupulously
- A) TRAINING
- B) PRELIMINARY OPERATIONS
- C) DURING USE
- E) TRANSPORTATION AND HANDLING
- OPERATING INSTRUCTIONS
- PREPARING TO WORK
- CHECKING THE MACHINE
- the2 PREPARING THE FUEL MIXTURE
- .1.2.1 Petrol characteristics
- Oil characteristics
- Preparation and preservation of the fuel mixture
- DANGER! Petrol and the fuel mixture are highly inflammable!
- REFUELLING
- DANGER! Never smoke whilst refuelling and avoid inhaling the petrol fumes
- WARNING! Carefully open the tank top as pressure could have formed inside.
- WARNING! Always close the fuel tank cap firmly.
- WARNING! Immediately clean all traces of fuel which may have dripped on the machine or the ground and do not start the engine until the petrol fumes have dissipated. 1.4 REGULATING THE HANDGRIP (Fig. 2)
- WARNING! The handgrip must only be adjusted when the engine is switched off.
- ⚠ WARNING! When working, the rear handgrip must always be in a vertical position, whatever the position of the cutting device (3).
- USING THE MACHINE
- STARTING THE MACHINE
- WARNING! The machine must be started in an area at least 3 metres from where you refilled the fuel tank.
- Cold starting
- WARNING! If the machine is not held firmly, the force of the engine could cause the user to lose his balance or direct the blade towards an obstacle or the same user.
- Warm starting
- ADJUSTING THE SPEED OF THE CUTTING DEVICE (Fig. 4)
- STOPPING THE MACHINE (Fig. 5)
- CUTTING AND ADJUSTING HEDGES
- CUTTING PROCEDURES
- Vertical cutting (Fig. 6)
- Horizontal cutting (Fig. 7)
- WHEN WORK IS FINISHED
- ROUTINE MAINTENANCE
- STORAGE
- CLEANINGTHE ENGINE AND THE SILENCER
- the4.3 CLEANING THE AIR FILTER
- CHECKING THE SPARK PLUG
- LUBRICATING THE REDUCTION GEAR (Fig. 10)
- LONG PERIODS OF DISUSE
- EXTRAORDINARY MAINTENANCE
- TUNING MINIMUM SPEED
- FUEL FILTER
- CARBURETTOR ADJUSTMENTS
- Adjusting the blades
- Sharpening the blades
- Replacing the blades
- ÍNDICE
- KUIDAS KASUTUSJUHENDIT LUGEDA
- POLTTOAINESEOKSEN VALMISTUS
- PASIRUOŠIMAS DARBUI
- IRENGINIO PATIKTINIMAS
- PLĀNOTĀ TEHNISKĀ APKOPE
- BLI KJENT MED MASKINEN
- D) VEDLIKEHOLD OG OPPBEVARING
- ORDINÆRT VEDLIKEHOLD
- VEDLIKEHOLD AV KNIVBLADENE
- EKSTRAORDINÆRT VEDLIKEHOLD
- DLHODOBÁ NEČINNOST
- DALJŠE OBDOBJE NEUPORABE
- BEZBEDNOSNA UPUTSTVA
- INNEHÅLLSFÖRTECKNING
- KABZA AYARI (Res. 2)
Brand : STIGA
Model : SHT 660 K
Category : Hedge trimmers