Rally - Video conferencing system LOGITECH - Free user manual and instructions
Find the device manual for free Rally LOGITECH in PDF.
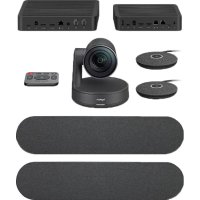
| Product type | Video conferencing system |
| Brand | Logitech |
| Model | Rally |
| Main components | Camera, Screen hub, Table hub, Remote control, Speakers |
| Camera resolution | 4K Ultra HD |
| Field of view | 90° diagonal |
| Zoom | Digital 15x |
| Microphones | Audio modules up to 7 (optional) |
| Speakers | Built-in |
| Connectivity | Bluetooth, HDMI, USB |
| Power supply | 100-240V AC via hub |
| Camera dimensions (approx.) | 19.8 x 18.4 x 11.8 cm |
| Camera weight (approx.) | 1.5 kg |
| Remote control functions | Pan/Tilt, zoom, volume, mute, presets, Bluetooth |
| Applications | Logitech Camera Settings, diagnostic application |
| Optional accessories | Wall mount kit, TV support, hubs for audio modules |
| Maximum number of remotes | 5 |
| Manual languages | FR, EN, DE, ES, IT, etc. |
Frequently Asked Questions - Rally LOGITECH
User questions about Rally LOGITECH
0 question about this device. Answer the ones you know or ask your own.
Ask a new question about this device
Download the instructions for your Video conferencing system in PDF format for free! Find your manual Rally - LOGITECH and take your electronic device back in hand. On this page are published all the documents necessary for the use of your device. Rally by LOGITECH.
USER MANUAL Rally LOGITECH
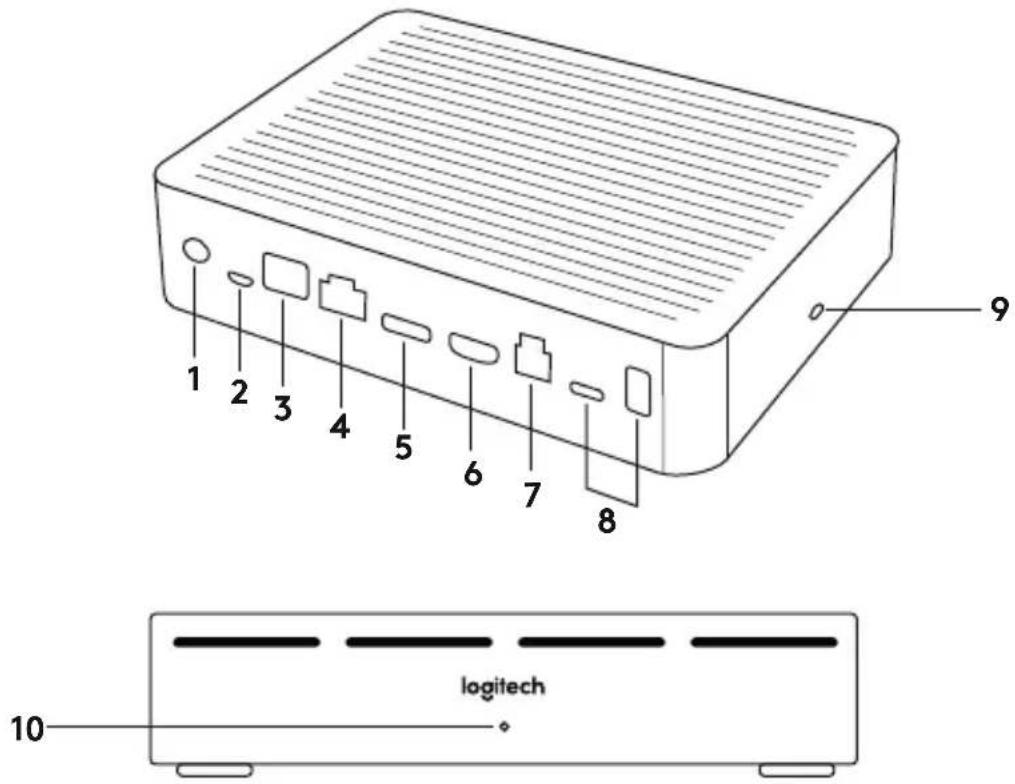
- Remote control pairing button
- USB
-
Status LED
-
Security slot
- MIPI
- Tripod Thread
- Expansion Slot
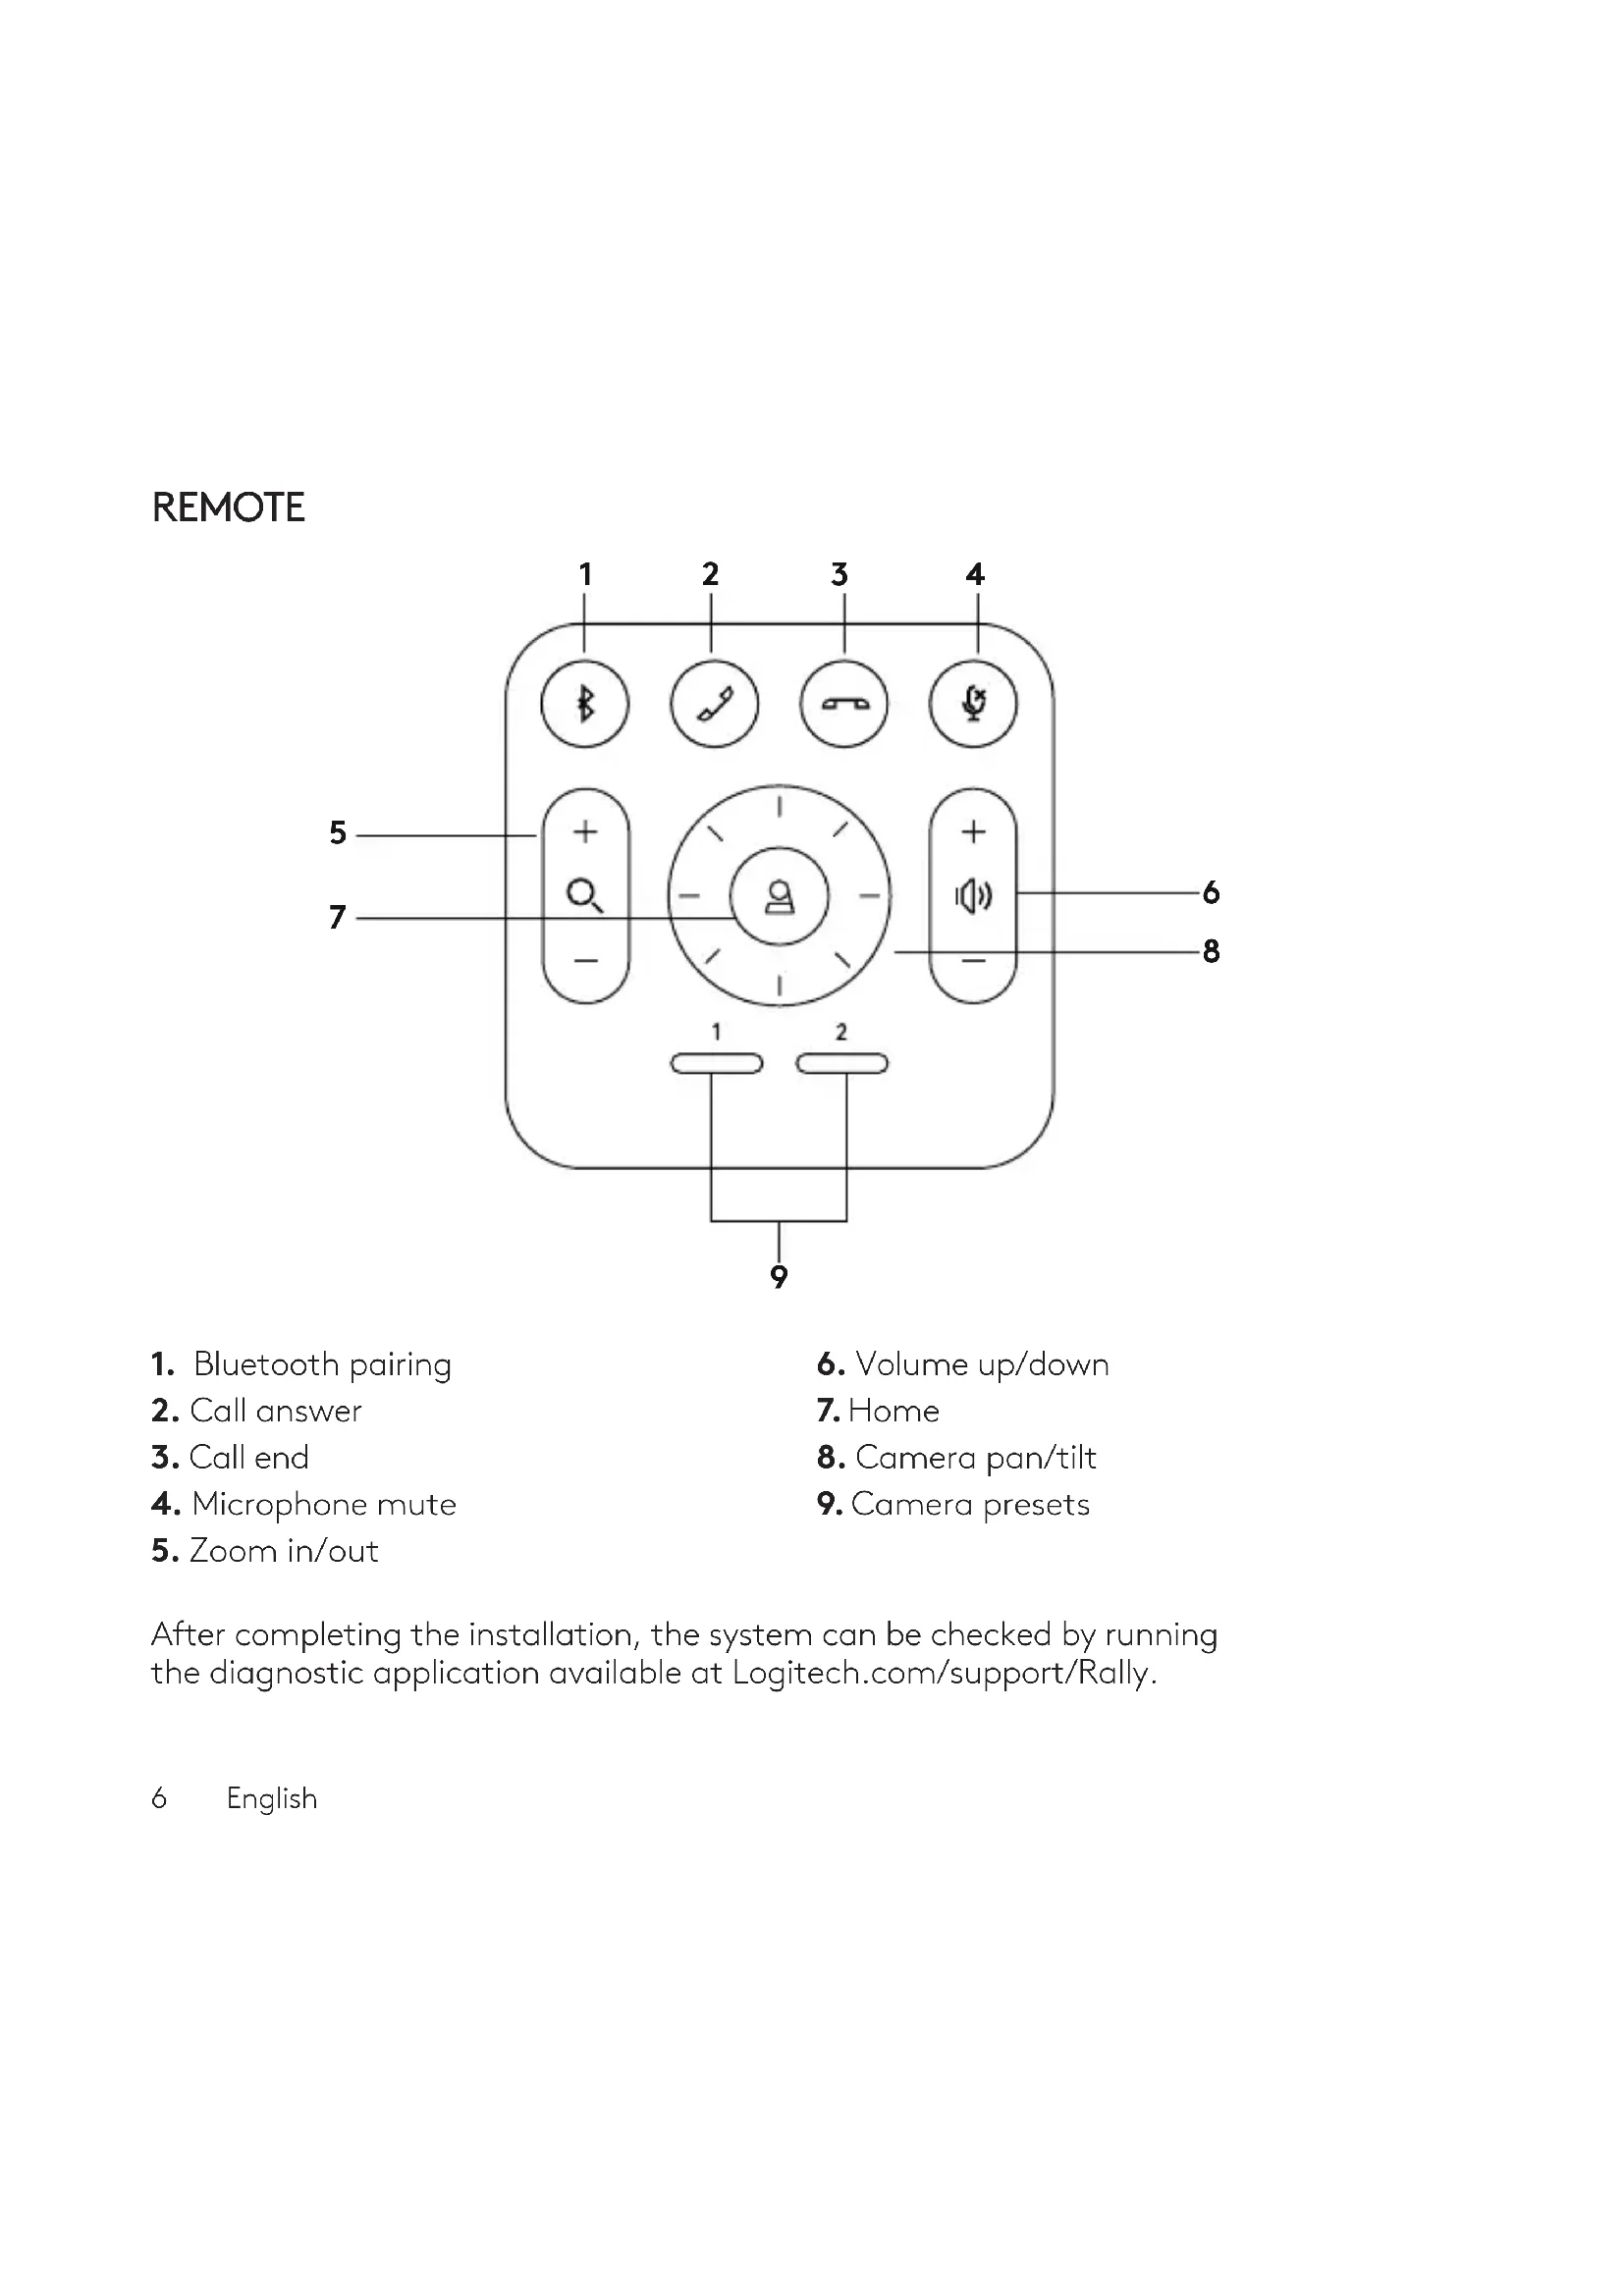
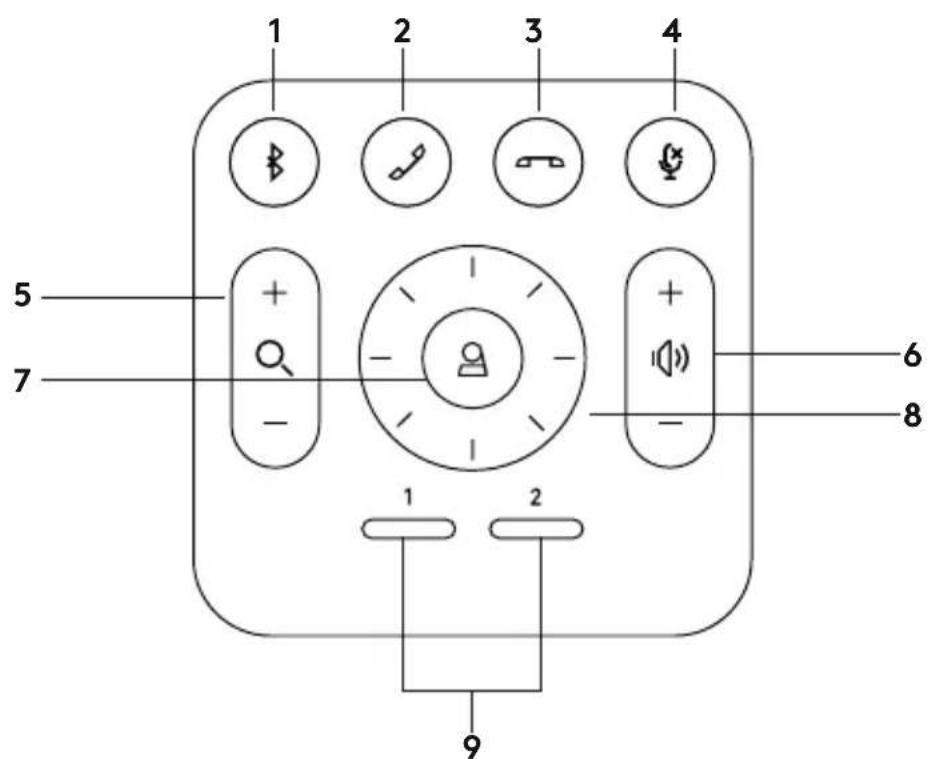
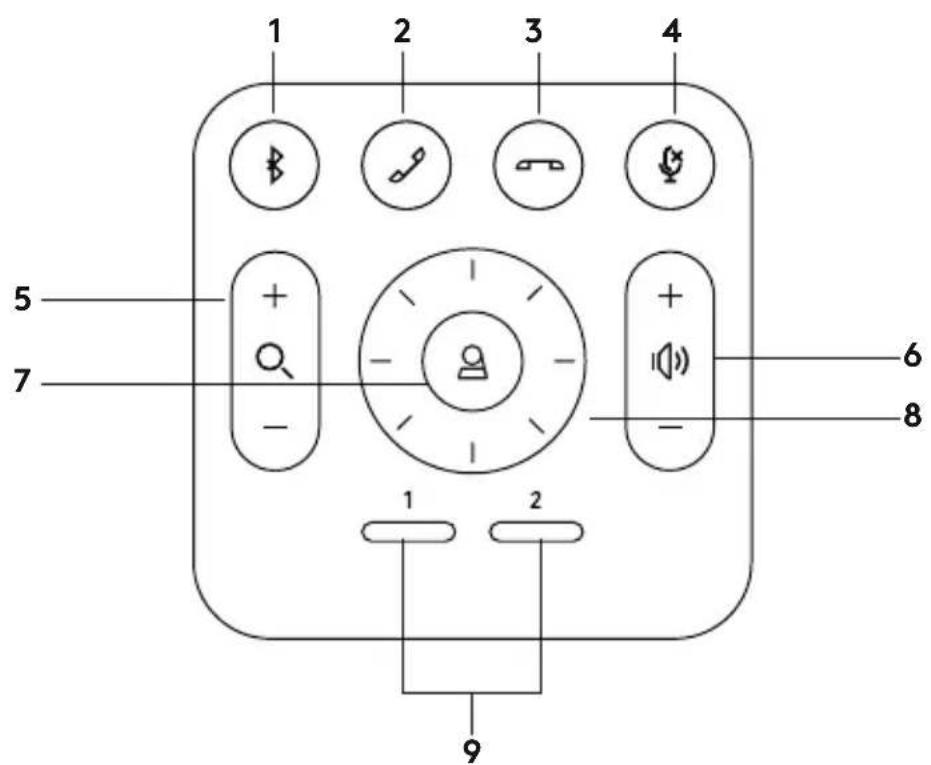
REMOTE
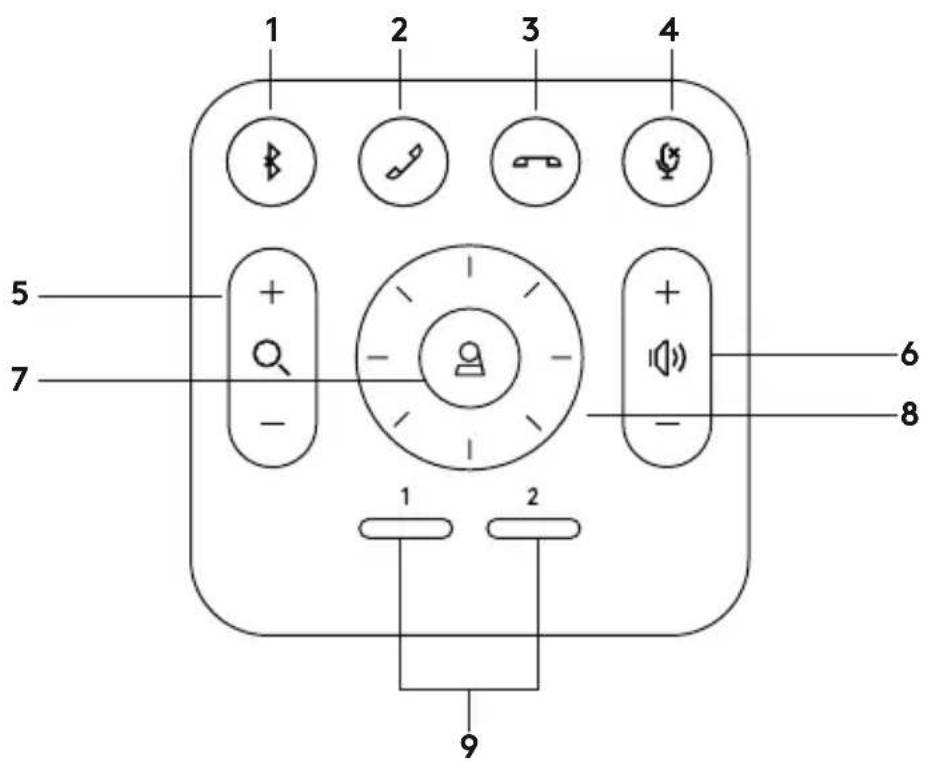
- Bluetooth pairing
- Call answer
- Call end
- Microphone mute
-
Zoom in/out
-
Volume up/down
- Home
- Camera pan/tilt
- Camera presets
After completing the installation, the system can be checked by running the diagnostic application available at Logitech.com/support/Rally.
MAKE RALLY THE DEFAULT DEVICE
Ensure that R ALLY is chosen as the camera, speaker and microphone in your video conferencing applications. Please consult the application documentation for further instructions on how to do this.
STARTING A VIDEO CALL
After installing RALLY and ensuring it is the default device in your video conferencing application, simply start the application in the normal manner and enjoy the benefits of improved audio and video.
PAIRING RALLY TO A BLUETOOTH DEVICE
You can use RALLY for audio calls when paired to a Bluetooth device. To pair your Bluetooth device to RALLY, follow these simple step:
-
Press and hold the Bluetooth button on the remote control until you see a flashing blue light on the camera and microphones.
-
Place your mobile device in Bluetooth pairing mode and select "Logitech Rally".
-
You are now ready to use RALLY for audio calls.
PAIRING A REMOTE CONTROL TO R ALLY
RALLY and the remote control are paired at the factory. You can pair up to 5 remote controls to RALLY to make it easier to control the system in larger rooms. Or, if you need to pair a remote to the camera, such as when replacing a lost remote, do the following:
- Press and hold button on the back of the camera until the LED flashes blue.
- Press and hold the Bluetooth button on the remote for 10 seconds to place it in pairing mode.
- Once the remote and camera are paired the LED will stop flashing.
- If the pairing fails, the LEDs will keep flashing. Start from step 2 and repeat.
- Press and hold the pairing button on the Display Hub until the LED flashes white.
- Press and hold the Bluetooth button on the remote for 10 seconds to place it in pairing mode.
- Once the Display Hub and camera are paired the LED will stop flashing.
- If the pairing fails, the LEDs will keep flashing for 2 minutes then stop. Start from step 2 and repeat.
CAMERA SETTINGS APPLICATION
Use this program to control the camera pan, tilt, zoom, focus, and image quality (like brightness and contrast) from your computer. The software can be downloaded from www.logitech.com/support/Rally.
ENHANCING RALLY
There are several optional accessories that ease installation and allow RALLY to be used in larger rooms:
- Rally Mounting Kit: Mounting brackets for the Table Hub, Display Hub, Camera and Speakers.
- Extra Mic Pods: RALLY can support up to 7 Mic Pods allowing great flexibility in room size and configuration.
- Mic Pod Hub: Used to branch microphone routing and run most of the Mic Pod cabling is below the table. The Mic Pod Hub has 3 jacks that can be connected to a combination of Mic Pods or other Mic Pod Hubs.
- TV mount: Works with one of either the Camera or Speaker mounting brackets. The TV Mount can be used in pairs to mount the Camera and Speaker above and below the TV.
FOR MORE INFORMATION
You can find additional information on RALLY including:
-FAQs
- Software to enable functions in various application
- How to order replacement parts and more at
www.logitech.com/support/Rally
WAS IST WAS
TISCH-HUB
RALLY HET STANDAARD- APPARAAT MAKEN
VOOR MEER INFORMATIE
- Fjärrstyrd parningskontrollknapp
- USB
-
Statusindikatorlampa
-
Säkerhetslucka
- MIPI
- Stativgänga
- Expansionslucka
FJÄRRKONTROLL
"RALLY" KĀ NOKLUSĒJUMA IERĪCE
- Dugme za uparivanje daljinskog upravljača
- USB
-
LED indikator za status
-
Bezbednosni otvor
- MIPI
- Kačenje na stativ
- Priključak za proširenje
DALJINSKI UPRAVLJAČ
- Bluetooth uparivanje
- Odgovaranje na poziv
- Prekidanje poziva
- Isključivanje mikrofona
-
Uvećavanje/umanjivanje
-
Povećavanje/smanjivanje jačine zvuka
- Funkcija tastera Home
- Horizontalno/vertikalno pomeranje kamere
- Početne postavke kamere
Po završetku instalacije, sistem je moguće proveriti pokretanjem dijagnostičke aplikacije dostupne na adresi Logitech.com/support/Rally.
POSTAVITE RALLY KAO PODRAZUMEVANI UREĐAJ
Proverite da li je RALLY odabran kao kamera, zvučnik i mikrofon u aplikacijama za video konferencije. Pogledajte dokumentaciju aplikacije za dodatna uputstva u vezi sa ovim.
POKRETANJE VIDEO POZIVA
Nakon što instalirate RALLY i proverite da li je podrazumevani uređaj u aplikaciji za video konferencije, samo pokrenite aplikaciju na uobičajeni način i uživajte u prednostima poboljšanog zvuka i video.
UPARIVANJE RALLY SA BLUETOOTH UREĐAJEM
PENTRU MAI MULTE INFORMATII
© 2018 Logitech, Logi and the Logitech Logo are trademarks or registered trademarks of Logitech Europe S.A. and/or its a liates in the U.S. and other countries. All other trademarks are the property of their respective owners. Logitech assumes no responsibility for any errors that may appear in this manual. Information contained herein is subject to change without notice.
WEB-621-001375.002