JDWK907S0 - Range hood JUNO - Free user manual and instructions
Find the device manual for free JDWK907S0 JUNO in PDF.
 FR
FR
 BG
BG
 CS
CS
 DA
DA
 DE
DE
 EL
EL
 EN
EN
 ES
ES
 ET
ET
 FI
FI
 HU
HU
 IT
IT
 KK
KK
 LT
LT
 LV
LV
 MK
MK
 NL
NL
 NO
NO
 PL
PL
 PT
PT
 RO
RO
 RU
RU
 SK
SK
 SL
SL
 SQ
SQ
 SR
SR
 SV
SV
 TR
TR
 UK
UK
| Product Type | Cooker Hood |
| Brand | JUNO |
| Model | JDWK907S0 |
| Width (cm) | 90 |
| Number of speeds | 4 speeds + timed maximum speed |
| Hob2Hood Function | Yes, infrared communication with the hob |
| Lighting | Integrated LED (not user-replaceable) |
| Grease filter type | Washable metal filter (at least once a month) |
| Charcoal filter type | Non-washable charcoal filter, replace according to alarm |
| Filter saturation alarm | Yes, red light for grease filter, flashing for charcoal filter |
| Alarm reset | Press the dedicated button for 3 seconds |
| Minimum installation height | 65 cm between the hob and the lower part of the hood |
| Power supply | 220-240 V, 50 Hz |
| Motor power (estimated) | 200 W |
| Weight (estimated) | 15 kg |
| Grease filter maintenance | Dishwasher or hand wash with mild detergent |
| Charcoal filter replacement | Remove grease filter, rotate and remove charcoal filter |
| Child safety | Use by children over 8 years old under supervision |
| Repairability | Original parts available from authorized service |
| Protection rating | Class III (earthing required if symbol absent on rating plate) |
Frequently Asked Questions - JDWK907S0 JUNO
User questions about JDWK907S0 JUNO
0 question about this device. Answer the ones you know or ask your own.
Ask a new question about this device
Download the instructions for your Range hood in PDF format for free! Find your manual JDWK907S0 - JUNO and take your electronic device back in hand. On this page are published all the documents necessary for the use of your device. JDWK907S0 by JUNO.
USER MANUAL JDWK907S0 JUNO
Hob to Hood function
This is an automatic function that connects the hob to an extractor hood. Both the hob and the hood have infrared communication. The fan speed is automatically determined based on the cooking mode and the temperature of the pan on the hob. You can also use the fan manually by using the hob. The function can be activated from the hob's panel.

For more information on how to use the function, refer to the user manual for the hob.
Electrical connection

WARNING! Risk of fire or electric shock.
- All electrical connections must be made by a qualified electrician.
- Make sure that the parameters on the data plate are
compatible with the electrical data of the mains supply.
If the symbol () is on the data plate, the appliance must be earthed. Always use a properly installed contact with protection against electric shock. Do not allow the electrical cables to be twisted. Do not use extension cords or multi-socket adapters. - If the contacts are loose, do not connect the appliance. Do not pull the power cable to disconnect the appliance. Always pull the plug. The protection against electric shock of the live and insulated parts must be secured in such a way that it cannot be removed without tools. - Make sure that the appliance is installed correctly. A damaged or incorrectly installed electrical cable can lead to overheating of the terminals. Connect the appliance at the end of the installation. Make sure that the mains supply is accessible after installation.
Use

WARNING! Risk of burns, fire, or electric shock.
This appliance is intended only for cooking. Do not use the appliance for other purposes.
INSTALLATION

WARNING! See chapter "Safety".
Do not misuse the appliance. Do not use the appliance with wet hands or in contact with water. - Use only the accessories supplied with the appliance. - Keep the appliance away from the edge of the hob during cooking or frying. Do not use uncovered electric grills. Do not use the appliance as a storage surface. Do not use lamps, candles, or similar devices that emit direct light on the appliance.
- Adjust the device at an authorized service center. Use only original spare parts.
Disposal

WARNING! Risk of injury or suffocation.
Contact the local authorities for information on how to dispose of the device properly. -Disconnect the device from the power supply. - Remove the batteries and dispose of them separately.
Installation instructions

For complete information on installing the device, see the separate installation manual.
DESCRIPTION OF THE DEVICE
General view
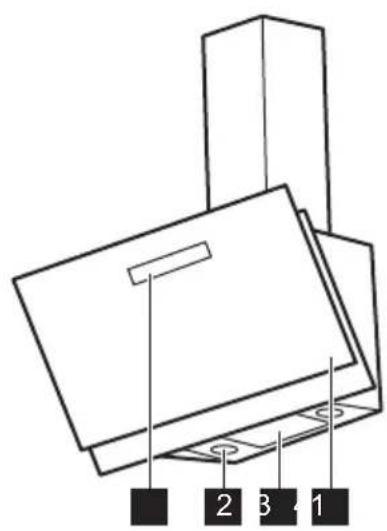
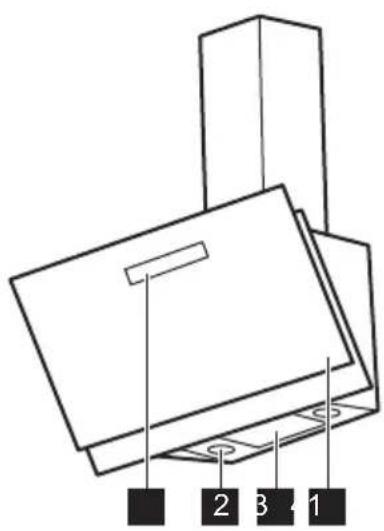
1 Control panel 2 Lamp 3 Filter 4 Filter cover
Control panel overview

1 On/Off 2 Motor speed 1 3 Motor speed 2 4 Motor speed 3 5 Maximum motor speed
6 Filter reminder 7 Function Hob to Hood 8 Lamp
EVERYDAY USE
Using the absorber
Set the recommended speed according to the table below.


For boiling, use a pot with a lid.
For cooking with a lid on top of the pressure cooker or pot; first bring to a boil.
The filter with activated carbon is above
The filter with activated carbon must be replaced if the filter indicator is activated.

Refer to the filter alarm in this chapter.
The time for replacing the filter with activated carbon depends on the type of cooking and the frequency of filter cleaning for the hood.

WARNING! The filter with activated carbon must not be washed! The filter cannot be regenerated!
To replace the filter with activated carbon:
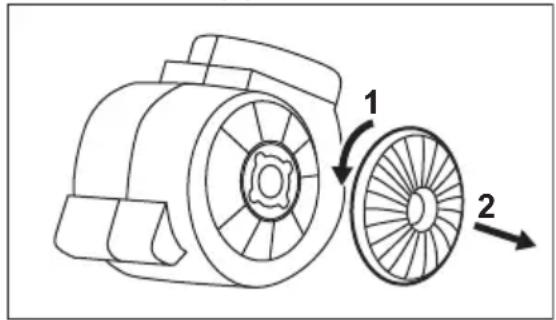
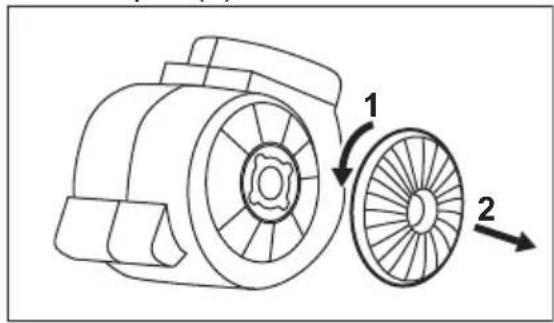
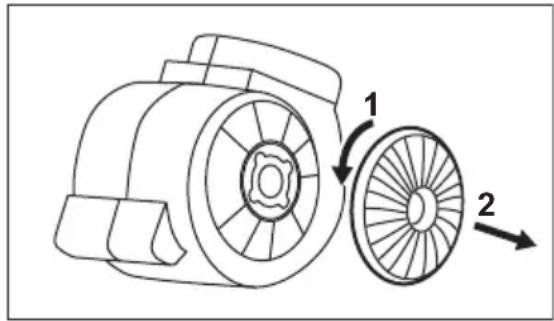
1. Remove the filters for the hood. See "Cleaning the filters for the hood" in this chapter. 2. Turn the filter counterclockwise (1) and remove it (2).
To install the filters, insert the tabs in the reverse order.
Filter alarm

See the instructions for activating and deactivating the filter alarm in the chapter on daily use.

See "Cleaning the filters for the hood" in this chapter.

Refer to the cleaning and replacement of the filter with activated carbon (depending on the type of filter).
3a da HynipaTe aJapMaTa:
DOKOCHTe 3ceKyHn.
Смяна на Лампунkaта
To3n ypeI e cHa6dEn cbc CBeToNDnOHa lamnnuKa (LED). Ta3n qact Tpr6Ba da ce cmEH eDInHCTBeHO OT texHnK. B cnUyai Ha Hen3npaBnOCT BVXkTe ,ObcnykBaHe" BrnaBa ,INhctpyKun 3a 6e3OnacHOCT".
OTCTPAHЯBAHE HA HEN3ПРABHOCTN

BHUMAHNE! Bx. rnaBa
"Бeэ�онacht".
Kak da noctbnte, ako...
| ПюбLEM Възмохна р孥ни VAOTСТРАНБАНЕ | ||
| He можete на вкlioочite урEDA. | Уреьт He e CBьрзан Кьм[eleknро3axpanBaHeto Илиe CBьрзан Нерравилно. | Пювере Тдалу уреьт eCBьрзан павилно Кьм[eleknро3axpanBaHeto. |
| He можete на вкlioочite урEDA. | Предпазителяг e n3кlio-чл. | Пювере Далу пedingлдп-теляг e priчина за неи-правноCTta. Ако пedingлдп-тел�п подьлжават за ИЗ-KлЮчВа, се CBьржete Ква-лфициран[eleknротекнik. |
| Лампчкata на Функциони-раз. | Лампчкata e Deф ekтнa. Сmenete Лампчкata. Виж-Te гаВа „Грижи и поч-стванe" | |
| ПюбLEM Вьзможна ручни На OTстраявае | ||
| Уреьт не abсорбира до- статыно изарень. | Скорочта на моторе не e досдальна срreamо изап- разута. | Смене скорочта на мо- topа. |
| Инданатов т ha anapмata ha Филтыра вклоун. ВКлоун. БКлоун. | Алармatura ha Филтыра e ВКлоунена. Филтырьт 3a maЗни Трава за ce по- чеси. | Hangabete скравka оtnoc- но anapмatura ha Филтыра в глава „Почисвае и гри- жа". |
| Инданатов т ha anapмatura ha Филтыра впемогва. | Алармatura ha Филтыра e ВКлоунена. Филтырьт с ak- тувен Вьглип Трава за ce смени ил почиси. | Hangabete скравka otnoc- но anapmatura ha Филтыра в глава „Почисвае и гри- жа". |
ОПАЗВАЕ HA OKОЛHATA CРЕДА
PeuKnpaTe MaepnaIte cbc CmBOJa NoCTaBnTe ONaKOKBnTe B CbOTBeTHnte KOHTeHepn 3a peuKnnpaHeTo m. POMOrHeTe 3a ONa3BaHeTo Ha OKoHaTa cpea N YOBeWKOTO 3dpaBe, KaKTo n 3a peuKnnpaHeTo Ha OTnaDbun OT
eJektpnueckn eJektpoHn ypeHn. He 3XbBpIaTe ypeIte, 03HaueHn Cbc CIMBOJa 3aeDHO C6HTOBaTa CMeT. BbPHeTe ypeDa B MeCTHnA PyHKT 3a peuKlnpaHe nIn ce o6bPHeTe KbM BaWaTa 6UHNcKa cnyk6a.
SADRžAJ
Informacije o sigurnosti 19
Sigurnosne upute 21
Postavljanje 22
Product description 22
Daily use 23
PRODUCT DESCRIPTION
General overview
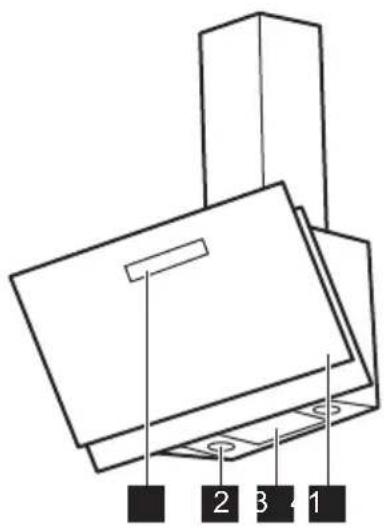
1 Control panel 2 Lamp 3 Filter 4 Filter cover
Safety Instructions 54
Installation 55
Product description 55
Daily use 56
Care and cleaning 57
Troubleshooting 58
Subject to change without notice.
SAFETY INFORMATION
Before the installation and use of the appliance, carefully read the supplied instructions. The manufacturer is not responsible for any injuries or damage that are the result of incorrect installation or usage. Always keep the instructions in a safe and accessible location for future reference.
Children and vulnerable people safety
- This appliance can be used by children aged from 8 years and above and persons with reduced physical, sensory or mental capabilities or lack of experience and knowledge if they have been given supervision or instruction concerning the use of the appliance in a safe way and understand the hazards involved.
- Children between 3 and 8 years of age and persons with very extensive and complex disabilities shall be kept away from the appliance unless continuously supervised.
- Children of less than 3 years of age should be kept away from the appliance unless continuously supervised.
- Do not let children play with the appliance.
- Keep all packaging away from children and dispose of it appropriately.
- Keep children and pets away from the appliance when it operates.
- Children shall not carry out cleaning and user maintenance of the appliance without supervision.
General Safety
- This appliance is intended for domestic use above hobs, cookers and similar cooking devices.
- Before carrying out any maintenance, disconnect the appliance from the power supply.
- CAUTION: Accessible parts may become hot during use with cooking appliances.
- Use only the fixing screws supplied with the appliance if not supplied, use the screws recommended in the installation instructions.
- Do not use adhesives to fix the appliance.
- The minimum distance between the hob surface on which the pans stand and the lower part of the appliance shall be at least 65 cm, unless otherwise specified in the installation instructions for the appliance or hob.
- The discharge of air must comply with local authorities regulations.
- Ensure good air ventilation in the room where the appliance is installed to avoid the backflow of unwanted gases into the room from appliances burning gas or other fuels, including open fires.
- Make sure that the ventilation openings are not blocked and the air collected by the appliance is not conveyed into a duct used to exhaust smoke and steam from other appliances (central heating systems, thermosiphons, water-heaters, etc.).
- When the appliance operates with other appliances the maximum vacuum generated in the room should not exceed 0.04 mbar.
- Make sure not to cause damage to the mains cable. Contact our Authorised Service Centre or an electrician to change a damaged mains cable.
- If the appliance is connected directly to the power supply, the electrical installation must be equipped with an isolating device that allows to disconnect the appliance from the mains at all poles. Complete disconnection must comply with conditions specified in the overvoltage category III. The means for disconnection must be incorporated in the fixed wiring in accordance with the wiring rules.
- Do not flambé under the appliance.
- Do not use to exhaust hazardous or explosive materials and vapours.
- Clean the appliance regularly with a soft cloth to prevent the deterioration of the surface material.
- Do not use a steam cleaner, water spray, harsh abrasive cleaners or sharp metal scrapers to clean the surface of the appliance. Use only neutral detergents.
- Clean grease filters regularly (at least every 2 months) and remove grease deposits from the appliance to prevent the risk of fire.
- Use a cloth or brush to clean the interior of the appliance.
SAFETY INSTRUCTIONS
Installation

WARNING! Risk of injury, electric shock, fire, burns or damage to the appliance.
- Only a qualified person must install this appliance.
- Do not install or use a damaged appliance.
- Follow the installation instructions supplied with the appliance.
- Always take care when moving the appliance as it is heavy. Always use safety gloves and enclosed footwear.
- Before installing the appliance remove all the packaging, the labelling and the protective film.
- Do not install the exhaust air into a wall cavity, unless the cavity is designed for that purpose.
Electrical connection

WARNING! Risk of fire and electric shock.
- All electrical connections should be made by a qualified electrician.
- Make sure that the parameters on the rating plate are compatible with the electrical ratings of the mains power supply.
- If the symbol () not printed on the rating plate, the appliance must be earthed. Always use a correctly installed shockproof socket.
- Do not let the electricity mains cable tangle.
- Do not use multi-plug adapters and extension cables.
- If the mains socket is loose, do not connect the mains plug.
- Do not pull the mains cable to disconnect the appliance. Always pull the mains plug.
- The shock protection of live and insulated parts must be fastened in such a way that it cannot be removed without tools.
- Make sure the appliance is installed correctly. Loose and incorrect electricity mains cable can make the terminal become too hot.
- Connect the appliance at the end of the installation. Make sure that there is access to the mains after the installation.
Use

WARNING! Risk of injury, burns and electric shock.
- This appliance is for cooking purpose only. Do not use the appliance for other purpose.
- Do not change the specification of this appliance.
- Do not operate the appliance with wet hands or when it has contact with water.
- Use only the accessories supplied with the appliance.
- Keep flames or heated objects away from fats and oils during cooking and frying.
- Do not use uncovered electric grills.
- Do not use the appliance as a storage surface.
- Do not use magnifying glasses, binoculars or similar optical devices to look directly at the lighting of the appliance.
INSTALLATION

WARNING! Refer to Safety chapters.
Service
To repair the appliance contact the Authorised Service Centre. - Use original spare parts only.
Disposal

WARNING! Risk of injury or suffocation.
- Contact your municipal authority for information on how to discard the appliance correctly.
- Disconnect the appliance from the mains supply.
- Cut off the mains electrical cable close to the appliance and dispose of it.
Installation instructions

For complete information about the installation of the appliance refer to a separate installation booklet.
PRODUCT DESCRIPTION
General overview
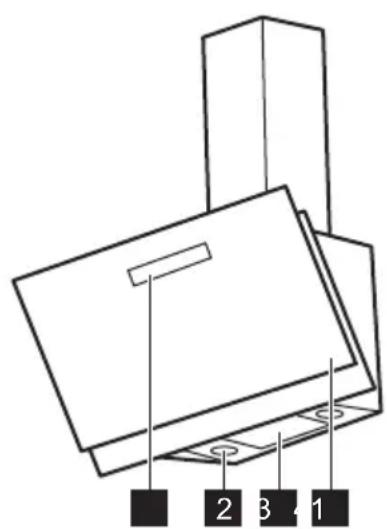
1 Control panel 2 Lamp 3 Filter 4 Filter cover
Control panel overview

1 On/Off 2 First motor speed 3 Second motor speed 4 Third motor speed 5 Maximum motor speed
6 Filter reminder 7 Hob to Hood function 8 Lamp
DAILY USE
Using the hood
Check the recommended speed according to the table below.
| 21 | While heating up food, cooking with covered pots. |
| 22 | While cooking with covered pots on multiple cooking zones or burn-ers, gentle frying. |
| 23 | While boiling, frying big quantities of food without a lid, cooking on multiple cooking zones or burners. |
| 24 | While boiling, frying big quantities of food without a lid, big humidity. The hood operates on maximum speed. After 6 minutes the appliance returns to previous setting. |

It is recommended to leave the hood operating for approximately 15 minutes after cooking.

The control panel is a sensor field. Touch the symbols to activate the functions.
To operate the hood:
- Turn on the appliance by pressing the ① button.
The functions are ready to be activated.
- To activate the function touch the symbol.
To turn off the appliance press the ① button again.
Hob to Hood function
It is an automatic function which connects the hob with a hood. Both the hob and the hood have an infrared signal communicator. Speed of the fan is defined automatically on basis of mode setting and temperature of the hottest cookware on the hob. You can also operate the fan using the hob manually. The function can be activated from panel of the hob.

For more information how to use the function refer to the hob user manual.
Activating Maximum Motor Speed
When you press the button the Maximum Motor Speed starts to operate for 6 minutes. After that time, the appliance returns to its previous speed settings.

When the function is active, the filter alarm indicator turned on (white).

When the function is turned on, additional touch on the button does not have any effects.
Activating and deactivating the filter notification
Filter alarm reminds to change or clean the charcoal filter and clean the grease
CARE AND CLEANING
Cleaning the grease filter
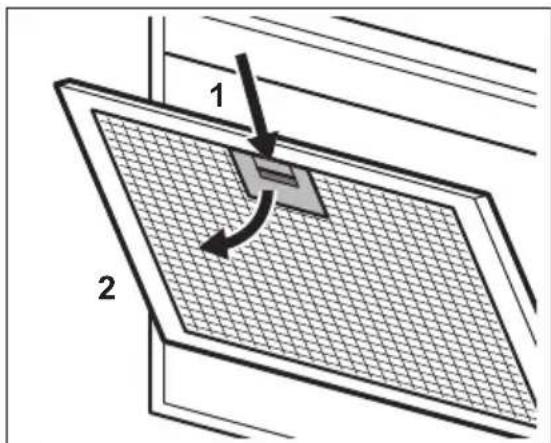
Each filter must be cleaned at least once a month. Filters are mounted with the use of clips and pins on the opposite side.
To clean the filter:
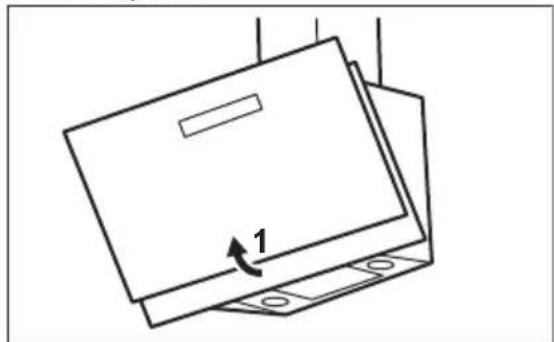
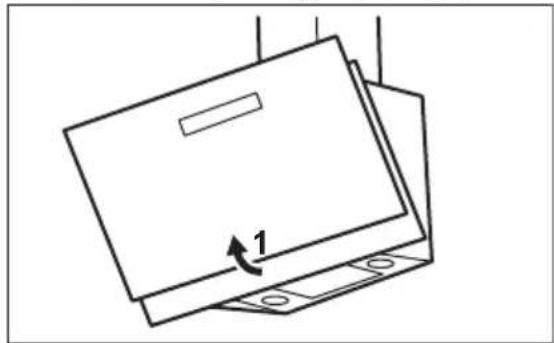
- Pull the cover to open it.
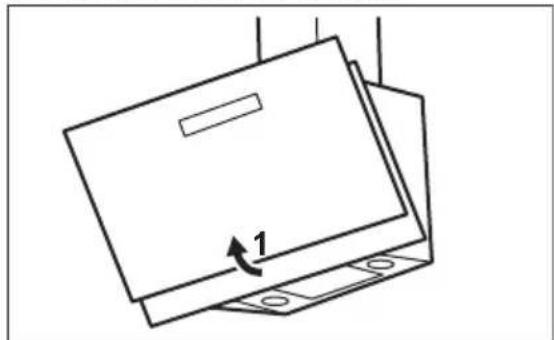
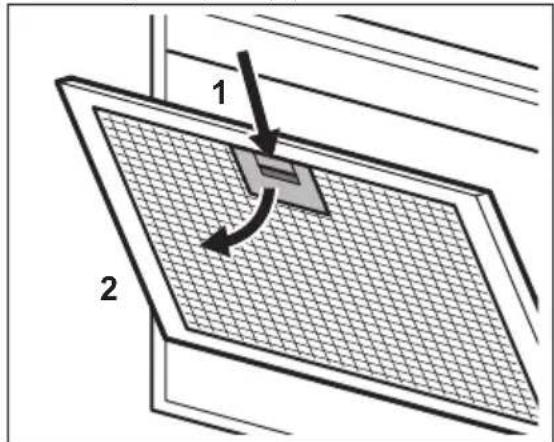
- Press the handle of the mounting clip on the filter panel underneath the hood (1).
filter. The filter indicator turned on (red) for 30 seconds if the grease filter must be cleaned. The filter indicator flashes (red) for 30 seconds if the charcoal filter must be replaced or cleaned.

Refer to filter alarm in care and cleaning chapter.
- Switch on the control panel.
- Make sure that the icons are turned off.
- To activate or deactivate the charcoal filter notification touch the button for 3 seconds.

If the charcoal filter notification is activated, the filter icon flashes (white) for 5 seconds.

If the charcoal filter notification is deactivated, the filter icon remains fixed (white) for 5 seconds.
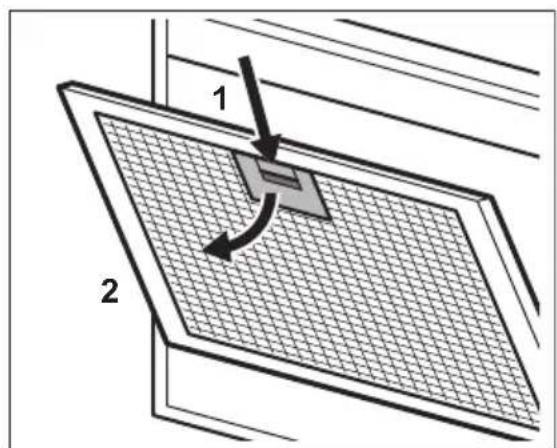
- Slightly tilt the front of the filter downwards (2), then pull.
Repeat the first two steps for all filters.
- Clean the filters using a sponge with non abrasive detergents or in a dishwasher.

The dishwasher must be set to a low temperature and a short cycle. The grease filter may discolour, it has no influence on the performance of the appliance.
- To mount the filters back follow the first two steps in reverse order. Repeat the steps for all filters if applicable.
Replacing the charcoal filter
The charcoal filter must be replaced if the filter alarm is on.

Refer to the filter alarm in this chapter.
The time of saturation of the charcoal filter varies depending on the type of cooking and the regularity of cleaning the grease filter.

WARNING! The charcoal filter is NON-washable! The filter cannot be regenerated!
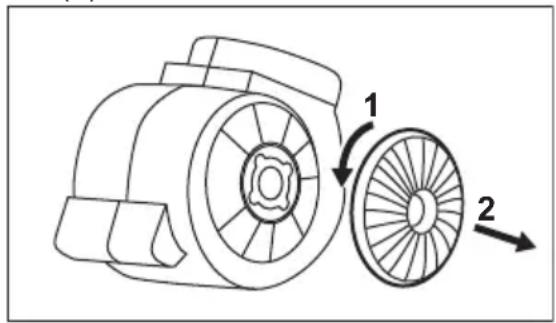
To replace the charcoal filter:
- Remove the grease filters from the appliance. Refer to "Cleaning the grease filter" in this chapter.
- Turn the filter counterclockwise (1) and then pull (2).
TROUBLESHOOTING

WARNING! Refer to Safety chapters.
To mount the filters back follow the steps in reverse order.
Filter alarm

Refer to activating and deactivating the filter alarm in daily use chapter.

Refer to cleaning the grease filter in this chapter.

Refer to cleaning the charcoal filter or replacing the charcoal filter (depends on filter type).
To reset the alarm:
Touch the or 3 seconds.
Replacing the lamp
This appliance is supplied with a LED lamp. This part can be replaced by a technician only. In case of any malfunction refer to "Service" in the "Safety Instructions" chapter.
What to do if...
| Problem Possible cause Remedy | ||
| You cannot activate the appliance. | The appliance is not connected to a power supply or it is connected incorrectly. | Check if the appliance is correctly connected to the electrical supply. |
| You cannot activate the appliance. | The fuse is blown. Make sure that the fuse is the cause of the malfunc-tion. If the fuse is blown again and again, contact a qualified electrician. | |
| The lamp does not operate. The lamp is defective. Replace the lamp. Refer to the "Care and Cleaning" chapter | ||
| The appliance does not ab-sorb enough vapours. | The motor speed is not ade-quate to the appearing va-pours. | Change the speed of the motor. |
| The filter alarm indicator is on. | The filter alarm is on. The grease filter must be cleaned. | Refer to the filter alarm in care and cleaning chapter. |
| The filter alarm indicator flashes. | The filter alarm is on. The charcoal filter must be re-placed or cleaned. | Refer to the filter alarm in care and cleaning chapter. |
ENVIRONMENTAL CONCERNS
Recycle materials with the symbol Put the packaging in relevant containers to recycle it. Help protect the environment and human health by recycling waste of electrical and electronic appliances. Do
not dispose of appliances marked with the symbol with the household waste.
Return the product to your local recycling facility or contact your municipal office.
CONTENTS
Safety information 60
Safety instructions 62
Installation 63
Product description 63
Hob to hood function
Safety information 96
Installation 98
INFORMATION FOR SAFETY
Follow the instructions and safety instructions provided with the device. The manufacturer is not responsible for any damage or injury resulting from improper installation or use. Always keep these instructions in a safe place for future reference.
Automatic operation
This is an automatic function that connects the hobs with an extractor hood. The hobs and the extractor hood are equipped with a wireless connection. The speed of the extractor is automatically set based on the function and the temperature of the cooking vessel.
Hobs. You can also operate the extractor manually using the hobs controls. The function can be activated from the hobs control panel.
For more information about using this function, refer to the User Manual of the Unit.
Activation of Maximum Speed
When the button is pressed, the maximum speed operates for 6 minutes. After this period, the device returns to the previous speed settings.
When the function is activated, the wireless connection is expected (on).
When the function is activated, the button's light indicator has no effect.
Enabling and disabling the filter alarm
Your filter alarm reminds you to clean or replace the anti-odor filter and to replace the anti-grease filter. The filter indicator lights up (red) for 30 seconds when it is time to replace the anti-grease filter. The filter indicator flashes (red) for 30 seconds when it is time to clean or replace the anti-odor filter.

Refer to the filter alarm in the Care and Cleaning chapter.
- Make sure the controls are off.
- To enable or disable the carbon filter alarm, press the button for 3 seconds.

If the carbon monoxide alarm is activated, the alarm icon will flash (white) for 5 seconds.

If the carbon monoxide alarm is deactivated, the alarm icon remains lit (white) for 5 seconds.
- Activate the device.
CARE AND CLEANING
Operating Instructions 123
Instructions 124
WARNING! Read the operating instructions carefully.
Do not expose the device to extreme temperatures. Do not place the device near open flames or hot surfaces. - Do not use the device together with flammable materials. Do not use the device in dusty or humid environments. Do not use the device near water or wet surfaces. Do not use the device with damaged power cords or plugs. Do not use the device if it has been dropped or damaged. Do not attempt to repair the device yourself. Contact qualified personnel for repairs.
Service
Contact the service center for device repair. Do not attempt to repair the device yourself.
Disposal

WARNING! There is a risk of fire or explosion.
Contact qualified personnel for proper disposal of the device. Disconnect the device from the power supply. Remove the batteries from the device before disposal.
Operating Instructions

The control panel of the washing machine is shown in the figure.
Description of the device
Control panel
1 Program selector 2 Display 3 Water supply 4 Water supply valve
Control panel

1 On/Off 2 First wash cycle indicator 3 Second wash cycle indicator 4 Third wash cycle indicator 5 Cold wash indicator
6 Water supply indicator 7 Temperature selector knob 8 Display
Program selection
Temperature selector knob setting
Set the desired temperature according to the table below.

When the appliance is turned on, the lid is locked and the door is closed.
WARNING! Read the safety instructions.
What to do if...
| Акayльк biktима сбentерi Шewim | |
| Курьлfbи icke кoca алmaынb. | Курьлfbи Кат Кеши Косылганжok Немес Тepic Косылган. |
| Курьлfbи icke кoca алmaынb. | Сараздырьш жанын Кетken. |
| Шam жанбайы. Шamда akay | бap. Шamны aybICTьрьнb. |

See the section on cleaning and maintenance of the water supply filter.

For cleaning or replacing the water supply filter, see the section (water supply filter).
Spare parts and accessories:

Description of the device.
Operation
LED lamp is installed. This device is a technical device. If you have any questions, please refer to the "Customer Service" section in the "Safety Instructions".
| Акayльк blктумал себentерi Шемпim | |
| Курьлфы 6уды кетikіkti Турде тарtnа'dы. | Козfasлткыш кулдамдыfы пайда bбоган bсларfa сэйес келмейд. |
| Сузгин eckeptу сигналынbIH Инданakotры кocуны. | Сузгин eckeptу сигналы Кocуны. Май сузricin Тазалay kepek. |
| Сузгин eckeptу сигналынbIH Инданakotры Жынbalыктайны. | Сузгин eckeptу сигналы Кocуны. Кемр сузricin аыстbyр уhemecе ta3anay kepek. |
DISPOSAL OF THE DEVICE
Dispose of the device and its packaging in an environmentally friendly manner. Place the device and its packaging in the appropriate recycling containers. Electrical and electronic devices must be disposed of separately from household waste.
Do not dispose of the device with household waste. Contact your local waste disposal facility or your local authorities for proper disposal.
CONTENTS
Safety information 130
Safety instructions 132
Installation 133
The manufacturer is not responsible for damage caused by improper installation or use.
Follow the safety instructions and use the device in a safe place.
Safety of children and persons with disabilities
This device may be used by children aged 8 and above and persons with reduced physical, sensory or mental capabilities or lack of experience and knowledge if they have been given supervision or instruction concerning use of the device in a safe way and understand the hazards involved. Children shall not play with the device. Cleaning and user maintenance shall not be made by children without supervision. Keep the device and its cord out of reach of children less than 8 years of age. Do not allow children to play with the device. Keep the device and its cord away from children and pets. Children should not clean or maintain the device without supervision.
Safety
The appliance is intended for household use only, for frying and grilling food. - Before cleaning, unplug the appliance. WARNING: The accessible parts may become hot during use of the frying appliance. - Use only the fixed attachments that are supplied with the appliance; if they are not supplied, we recommend using the attachments recommended in the installation instructions. Do not use the lid to close the appliance. The minimum distance between the surface on which the appliance stands and the lower part of the appliance must be at least 65 cm, unless otherwise specified in the installation instructions for the appliance and the frying surface. - The air exhaust must be in accordance with local regulations. - Make sure there is good ventilation in the room where the appliance is installed to avoid backflow of gases into the room from other appliances that burn different fuels, including open fires. - Make sure that the ventilation openings are not blocked and that the air collected by the appliance is not discharged into a duct used for exhausting fumes from other appliances (central heating systems, thermosiphons, water heaters, etc.). When the appliance operates with other appliances, the maximum vacuum generated in the rooms must not exceed 0.04 mbar. - Be careful not to damage the power cord. Contact our regional service center or an electrician to replace a damaged cord.
If the appliance is directly connected to the power supply, the electrical installation must be equipped with an isolation device that allows you to disconnect the appliance from the mains on all poles. The disconnection device must comply with the conditions specified in the overvoltage category III. The disconnection device must be integrated into the fixed wiring in accordance with the wiring rules. Do not use the appliance with a damaged cord. Do not use it for suction of flammable or explosive materials and vapors. - Regularly clean the appliance with a soft cloth to prevent damage to the surface material. Do not use steam cleaners, water sprays, abrasive cleaning agents, or sharp metal scrapers for cleaning the appliance surface. Use only neutral detergents. - Regularly clean the oil filters (at least every 2 months) and remove oil from the appliance to prevent the risk of fire. - Use a soft, damp cloth to clean the inside of the appliance.
SAFETY INSTRUCTIONS
INSTALLATION

WARNING!
Risk of injury, electric shock, fire, burns, or damage to the appliance.
The appliance must be installed only by a qualified person. - Do not install or use a damaged appliance. Follow the installation instructions provided with the appliance. - Always be careful when moving the appliance because it is heavy. Always wear protective gloves and suitable footwear.
- Install the device on a stable surface, away from vibrations and protective glass. Do not install it outdoors, unless the housing is designed for that purpose.
Connection to the mains

DANGER! Risk of fire and electric shock.
- All electrical connections must be made by a qualified electrician.
- Check the device parameters against the specifications and compare with the electrical power of the mains. If the symbol ( ) is printed on the rating plate, the device must be earthed.
- Always use a properly mounted plug for the mains connection. Do not leave cables lying around. Do not use extension cords with multiple sockets. - While the plug is loose, do not connect it to the mains. Do not pull the cable to disconnect the device from the mains. Always disconnect the plug from the mains. Protect the electric motor from active and corrosive agents by connecting it in such a way that it cannot be removed without tools.
- Check that the device is correctly mounted. Loose or unsuitable cables can damage the terminal.
- Check the device at the end of the installation. Check that there is access to the mains after installation.
Use

DANGER! Risk of injury, burns, and electric shock.
- This device is intended only for heating. Do not use the device for other purposes.
Installation

DANGER! See the chapter on protection and safety.
Do not immerse the appliance in water. Do not use the appliance with wet hands or when it is in contact with water. Use the additional device together with the appliance. Keep the appliance and its accessories away from hot surfaces while cooking and using it. Do not use uncovered electric grills. Do not use the appliance as a heating device. Do not use sharp, pointed, or other sharp objects to clean the appliance directly.
Servicing
To repair the appliance, contact the local service center. Use only original spare parts.
Disposal

WARNING! Risk of injury or suffocation.
- Contact the local authorities for information on proper disposal of the appliance.
- Disconnect the appliance from the power supply.
- Remove the electric cable from the appliance and dispose of it.
Installation instructions

For all installation information, see the separate installation brochure.
Product description
Overview
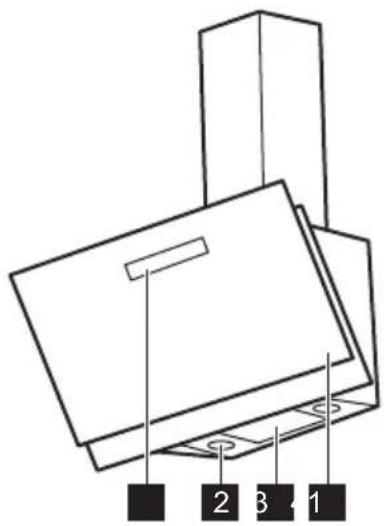
1 Control panel 2 Light 3 Filter 4 Grease filter
Control panel description

1 On/Off 2 First motor speed 3 Second motor speed 4 Third motor speed 5 Maximum motor speed
DAILY USE
Using the vacuum cleaner
Check that the suction power is set according to the table in the instructions.
| 21 | Kora загревехраната,rotвеве сокрени caюи. |
| 22 | Kora rotвite co покpenи тенцериьа плп на поveke рингп илпламенц,нжно пжев. |
| 23 | Kora варITE,пожITE полесma колчни на xpa на 6e3 калak,rotвеве на поveke рингп илпламенц. |
| 24 | Kora варITE,пожITE полесma колчни на xpa на 6e3 калak,rogelmaВлajхост. Асираторот пботи с мakсмална 6рин. ПО 6Minhyт anapatotсе врака на петхODнatura поставka. |

It is recommended to leave the vacuum cleaner running for about 15 minutes after use.

The control panel is a touch field. Press the symbols to activate the functions.
To use the vacuum cleaner:
- Turn on the appliance by pressing the button ①. The functions are set for suction. 2. To activate the function, press the symbol. To turn off the appliance, press again ①
Function from the floor to the vacuum cleaner
It is an automatic function that connects the floor for heating with a special cover. The floor for heating and the cover have an infrared signal communicator. The speed of the fan is automatically determined based on the setting of the mode and the temperature of the hottest part of the floor for heating. You can also work with the fan before the floor for heating. The function can be activated from the table on the surface for heating.

For more information on how to use this function, see the section on the floor for heating.
Activation of maximum motor speed
When you press the button, the maximum motor speed works for 6 minutes. After that, the appliance returns to the previous setting.

When the function is activated, the indicator for the sleep mode is activated (white).

When the function is activated, additional pressing of the button has no effect.
Press and hold the button for the filter indicator
The filter indicator will light up (orange) for 30 seconds if the filter for the hood needs to be cleaned. The filter indicator will light up (orange) for 30 seconds if the filter for the hood needs to be replaced or cleaned.

Press the button for the filter indicator in the chapter about it and clean it.
- Press the button to check the table. 2. Check that the icons are not lit.
- To turn on or off the indicator for the filter for the hood, press the button for 3 seconds.

If the indicator for the filter for the hood is on, the filter indicator light (white) will flash for 5 seconds.

If the indicator for the filter for the hood is on, the filter indicator light (white) will stay on for 5 seconds.
CLEANING AND MAINTENANCE
Cleaning the grease filter
The filter should be cleaned at least once a month. The filters are mounted with the use of clips and hooks on the opposite side.
To clean the filter:
1. Press the clip to open it.
2. Pull the handle of the filter downwards (1).
- Then tilt the front part of the filter downwards (2), and then pull it out.
Turn the two screws for the side clips.
4. Remove the filters and dispose of them with household waste. Do not dispose of them with unsorted municipal waste.

The appliance must be placed at room temperature and in a short cycle. The oil filter may lose its shape, but this does not affect the performance of the appliance.
5. To put the filters back, perform the first two steps in reverse order.
Turn the filters for all filters if possible.
Replacing the oil filter
The oil filter must be replaced if the filter alarm is activated.

Remove the filter alarm from this chapter.
The service life of the oil filter varies depending on the type of oil and the frequency of use of the oil filter.

WARNING!
The oil filter must not be washed! The filter cannot be regenerated!
To replace the oil filter:
1. Remove the oil filters from the appliance. See "Cleaning the oil filter" in this chapter. 2. Turn the filter to the left (1), then pull it out (2).
To put the filters back, perform the steps in reverse order.
Filter alarm

See the section on daily use for switching the filter alarm on and off.
SOLVING PROBLEMS

PREVENTION! Be vigilant for safety and security.
To adjust it...
| ПюбLEM Можна прична Peшениe | ||
| He можete за go вklучite anapatot. | AnapaTOT He e NOBp3ан co наюлье 3a сtrуja пони He e павино NOBp3ан. | Пюверete дani anapatot e_TOUHNo NOBp3an co eLEKtpuHa eHeprija. |

Heating in the cooker for cooking in both compartments.

Heating in the oven for baking or replacing the oven for baking (depending on the type of oven).
To reset the alarm:
Function “Hob to Hood” 参
△ SAFETY TECHNICAL INFORMATION
Before installation and operation, carefully read the supplied manual.
The manufacturer is not responsible for any injuries or damage resulting from incorrect installation or operation. Always keep this instruction manual at hand in a safe place for future reference.
Safety of children and persons with limited capabilities
-This appliance can be used by children aged 8 and above and persons with reduced physical, sensory or mental capabilities or lack of experience and knowledge only if they are supervised by a person responsible for their safety or have received instructions on the safe use of the appliance and understand the dangers involved. -Children between 3 and 8 years old and persons with severe and complex disabilities are prohibited from being near the appliance unless constant supervision is provided. -Children under 3 years old must be kept away from the appliance unless continuously supervised by adults. Do not let children play with the appliance.
Keep all packaging materials out of reach of children and dispose of them properly. - Do not allow children or pets near the appliance while it is in operation. Cleaning and user maintenance of the appliance should not be performed by children without supervision.
General safety rules
- The appliance is intended for use over cooking surfaces, kitchen stoves, and similar appliances for food preparation.
- Before servicing, disconnect the appliance from the power supply.
- WARNING: During operation, the appliance and accessible parts may become hot.
- Use the brackets supplied with the appliance. If the brackets are not supplied, use the brackets recommended in the instructions. Do not use adhesive compounds for mounting the appliance.
- Unless otherwise specified in the instructions for the built-in appliance, the minimum distance between the hob surface and the lowest part of the appliance must be at least 65 cm.
- The air extraction method must comply with local regulations. Ensure good ventilation in the room where the appliance is installed to avoid the backflow of undesirable gases into the room, produced by devices that burn gas or other fuels (including fireplaces).
- Make sure that the ventilation openings are not blocked and that the air exhausted by the appliance is not
discharged into a flue used for exhaust of smoke and steam from other appliances (central heating systems, thermosiphons, water heaters, etc.).
In case of combined operation with other appliances, the maximum negative pressure created in the room must not exceed 0.04 mbar. Be careful not to damage the power cord. For replacement of the power cord, contact an authorized service center or an electrician. - When connecting the appliance directly to the mains, it is necessary to provide a device that allows disconnecting the appliance from the mains with a contact gap between all poles. Full disconnection of contacts must comply with the conditions for overvoltage category III. In accordance with installation rules, means for disconnection must be provided. Do not cook flambé under the appliance. Do not use the appliance to exhaust harmful or explosive materials and vapors. To avoid damage to the appliance, clean it regularly with a soft cloth. Do not use steam cleaners, pressurized water, abrasive cleaners, or sharp metal scrapers for cleaning the appliance surface. Use only neutral detergents. - Clean the grease filters regularly (at least every 2 months) and remove grease deposits from the appliance to prevent fire risk. - To clean the internal chamber of the appliance, use a cloth or a brush.
Installation

WARNING! There is a risk of injury, electric shock, fire, or damage to the appliance.
- Installation of the appliance must be carried out only by qualified personnel. Do not install or connect the appliance if it is damaged. Follow the installation instructions supplied with the appliance.
- Remember not to forget about safety measures when moving it: the device is heavy. Always use protective gloves and closed footwear. - Before mounting the device, remove all packaging elements, stickers, and protective film. Do not insert the drain hose or air duct into a cavity in the wall, unless the cavity is intended for these purposes.
Do not use open flames. Do not use the electrical appliance for storing any items. Direct illumination of the device through a magnifying glass or similar optical devices is prohibited.
Service
Safety instructions
Installation

WARNING! Risk of electric shock, fire, burns, or injury.
- Only a qualified person may
- install the device. Do not install or use the device yourself.
- Follow the installation instructions provided with the device.
- Always be careful when moving the device because it is heavy. Always use protective gloves and closed footwear.
- Before installing the device, remove the complete packaging, stickers, and protective film. Do not install the exhaust hose into a wall cavity, unless the cavity is designed for that purpose.
Electrical connection

WARNING! Risk of fire and electric shock.
The appliance must be connected to a properly installed earthed socket. - Make sure that the parameters on the rating plate match the technical
characteristics of the electrical mains supply in your home.
If the symbol () is marked on the rating plate, the appliance must be earthed. - Always use a properly installed socket with earth protection. Do not allow the electrical cable to become tangled. - Do not use extension cords or multiple sockets. If the socket is damaged, do not plug in the appliance. Do not pull the power cord to unplug the appliance. Unplug the appliance by pulling the plug out of the socket. Protection against electric shock from live and insulated parts must be ensured so that it cannot be switched on without tools. - Check that the appliance is correctly installed. A damaged or inappropriate power cord can cause overheating of the terminal. - Connect the appliance at the end of the installation. Make sure there is access to the electrical mains after installation.
Use

WARNING! There is a risk of burns, electric shock, and electric shock.
INSTALLATION

WARNING! See the safety chapter.
This appliance is intended for cooking only. Do not use this appliance for other purposes. - Do not modify this appliance. - Do not touch the appliance when your hands are wet or when it is in contact with water. Use only the tools supplied with the appliance. - Keep flames and heated objects away from the appliance during cooking and frying. Do not use uncovered electric grills. - Do not use the appliance as a work surface. - Do not use glass containers, plastic containers, or aluminum foil to look directly at the appliance's lighting.
Service
- For repairs of the appliance, contact the authorized service center. Use only original spare parts.
Disposal

WARNING! Risk of injury to persons.
- Contact your local authorities to find out how to properly dispose of the appliance.
- Unplug the power cord from the socket and from the appliance.
- Place the power cord in a place near the appliance and store it.
Instruction for installation

For information about installation of the device, follow the instruction manual for installation.
PRODUCT DESCRIPTION
Operating instructions
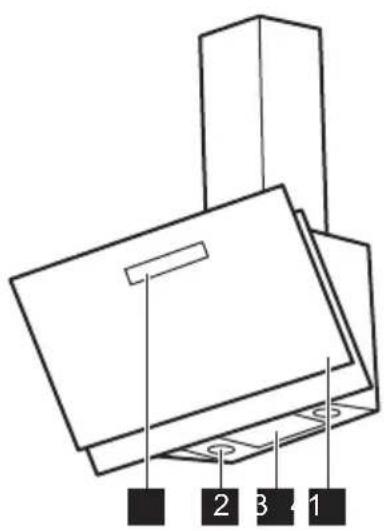
1 Control panel 2 Lamp 3 Filter 4 Filter release
Before using the control panel

1 On/Off 2 Motor speed 1 3 Motor speed 2 4 Motor speed 3 5 Maximum motor speed
6 Filter reset 7 Function for automatic switch-off 8 Lamp
DAILY USE
Using the extractor hood
Check the recommended speed in the table below.


Risk of fire when frying with oil, frying with covered pans.
Risk of fire when frying with covered pans, above the cooking zone or above the hob, with a naked flame.
ELECTROLUX APPLIANCES AB
BUSINESS SECTOR EMA-EMEA (SEE)
ST GÖRANSGATAN 143
SE-105 45 STOCKHOLM
SWEDEN
TEL: +46 (8) 738 60 00
FAX: +46 (8) 738 63 35
www.electrolux.com
Importer: Electrolux Dayanikli Tuketim Mamulleri San. ve Tic. AS.
TR-34435 Taksim-Beyoglu-Istanbul
Customer Service: 0 850 250 35 89
musteri_hizmetleri@electrolux.com
WEB: www.electrolux.com.tr
USER INSTRUCTIONS
USE OF THE APPLIANCE
Please follow the recommended power level according to the table below.
| 21 | Harpibahnia iXi, roTyBaHHa y haKpntomU kpiSkoI noCydi. |
| 22 | ГotyBaHHa y noCydi 3 кршкою Ha DeKilbKOx 3Oax HarpibAHnA abO KOHΦopKax, naɪdne obcmaJyBaHHa. |
| 23 | BapinHЯ, cMaJFeHЯ BéNIKOi KINbKOCTi iXi 6e3 кршkn, roTyBaHHa Ha DeKilbKOx 3Oax HarpibAHnA abO KOHΦopKax. |
| 24 | BapinHЯ, cMaJFeHЯ BéNIKOi KINbKOCTi iXi 6e3 кршkn, Bvscoka BOL- orictb. Buitjcka npaúOe Ha MaKcImaJIbHi NshVidKoCTi. Upe3 6 xBn-linN prinlad noBepTaεTbcSdo nonpeEdhbo rOHaJaSTyBaHHa. |
It is recommended to operate the appliance for approximately 15 minutes after cooking. The control is sensor. Touch the symbol to activate the function.
Remove the air filter
The air filter must be cleaned once a month. The filters are installed using clips and screws on the opposite side.
To clean the filter, do the following:
- Turn the cover to open it.
- Press the clip release button on the filter panel from the outside (1).
- Check that the indicator light is on. To activate or deactivate the filter replacement reminder, press the button for 3 seconds.

When the filter replacement reminder is activated, the filter indicator will blink for 5 seconds.

When the filter replacement reminder is activated, the filter indicator will blink for 5 seconds.
- Gently press the front part of the filter down (2), then pull it out. Repeat the first two steps for all filters. 4. Clean the filters with a soft brush or rinse them in the dishwasher.

In the dishwasher, set a low temperature and a short cycle. The filter may discolor, which does not affect the efficiency of the device.
- To install the filters back, repeat the first two steps in reverse order.
Repeat the steps for all filters that were removed.
Replacing the air filter
Replace the carbon filter. See the warnings about the carbon filter.

See the warnings about the filter in this section.
The neutralization time of the carbon filter may vary depending on the cooking method and the frequency of cleaning the grease filter.

WARNING! The carbon filter cannot be washed! The filter is not subject to regeneration!
Replacing the carbon filter:
- Remove the grease filters from the hood. Refer to the section "Cleaning the Grease Filter" in chapter 2. Turn the filters counterclockwise (1) and pull them out (2).
CLEANING THE GREASE FILTER

WARNINGS
See section 3 of the safety instructions.
Troubleshooting
| HecnpabHictb MoxklnBa np | ChnHa BnpiiSeHnHa | |
| He VdaεTbca yBimKhytn prni-lad. | Прилад He πίд'εdHaNo doМереки жИВпeня aboπίд'εdHaNo HεnpaВильно. | ПеpekonaiTecя, ζо р�ладПравильно πίд'εdHaNo doМереки. |
To install the filters back in place, repeat all the steps in reverse order.
Warnings about the filter

See "Turning the filter warning on and off" in the section "Using the Appliance".

Refer to the section "Cleaning the Grease Filter" in this section.

Refer to the section "Replacing the Carbon Filter" or "Replacing the Carbon Filter" (depending on the type of filter).
- HOB TO HOOD FUNCTION
- ELECTRICAL CONNECTION
- USE
- INSTALLATION
- DISPOSAL
- INSTALLATION INSTRUCTIONS
- DESCRIPTION OF THE DEVICE
- GENERAL VIEW
- CONTROL PANEL OVERVIEW
- EVERYDAY USE
- USING THE ABSORBER
- THE FILTER WITH ACTIVATED CARBON IS ABOVE
- FILTER ALARM
- 3A DA HYNIPATE AJAPMATA
- СМЯНА НА ЛАМПУНKAТА
- OTCTPAHЯBAHE HA HEN3ПРABHOCTN
- KAK DA NOCTBNTE, AKO
- ОПАЗВАЕ HA OKОЛHATA CРЕДА
- SADRŽAJ
- PRODUCT DESCRIPTION
- GENERAL OVERVIEW
- SAFETY INFORMATION
- CHILDREN AND VULNERABLE PEOPLE SAFETY
- GENERAL SAFETY
- SAFETY INSTRUCTIONS
- SERVICE
- DAILY USE
- USING THE HOOD
- ACTIVATING MAXIMUM MOTOR SPEED
- ACTIVATING AND DEACTIVATING THE FILTER NOTIFICATION
- CARE AND CLEANING
- CLEANING THE GREASE FILTER
- TO CLEAN THE FILTER
- REPLACING THE CHARCOAL FILTER
- TO REPLACE THE CHARCOAL FILTER
- TROUBLESHOOTING
- TO RESET THE ALARM
- REPLACING THE LAMP
- WHAT TO DO IF
- ENVIRONMENTAL CONCERNS
- CONTENTS
- INFORMATION FOR SAFETY
- AUTOMATIC OPERATION
- ACTIVATION OF MAXIMUM SPEED
- ENABLING AND DISABLING THE FILTER ALARM
- OPERATING INSTRUCTIONS
- CONTROL PANEL
- PROGRAM SELECTION
- TEMPERATURE SELECTOR KNOB SETTING
- SPARE PARTS AND ACCESSORIES
- OPERATION
- DISPOSAL OF THE DEVICE
- SAFETY OF CHILDREN AND PERSONS WITH DISABILITIES
- SAFETY
- WARNING
- CONNECTION TO THE MAINS
- SERVICING
- OVERVIEW
- CONTROL PANEL DESCRIPTION
- USING THE VACUUM CLEANER
- FUNCTION FROM THE FLOOR TO THE VACUUM CLEANER
- ACTIVATION OF MAXIMUM MOTOR SPEED
- PRESS AND HOLD THE BUTTON FOR THE FILTER INDICATOR
- CLEANING AND MAINTENANCE
- REPLACING THE OIL FILTER
- TO REPLACE THE OIL FILTER
- SOLVING PROBLEMS
- TO ADJUST IT
- FUNCTION “HOB TO HOOD” 参
- △ SAFETY TECHNICAL INFORMATION
- SAFETY OF CHILDREN AND PERSONS WITH LIMITED CAPABILITIES
- GENERAL SAFETY RULES
- INSTRUCTION FOR INSTALLATION
- BEFORE USING THE CONTROL PANEL
- USING THE EXTRACTOR HOOD
- USER INSTRUCTIONS
- USE OF THE APPLIANCE
- REMOVE THE AIR FILTER
- TO CLEAN THE FILTER, DO THE FOLLOWING
- REPLACING THE AIR FILTER
- REPLACING THE CARBON FILTER
- WARNINGS
- WARNINGS ABOUT THE FILTER
Brand : JUNO
Model : JDWK907S0
Category : Range hood