JDWK607S9 - Basket JUNO - Free user manual and instructions
Find the device manual for free JDWK607S9 JUNO in PDF.
User questions about JDWK607S9 JUNO
0 question about this device. Answer the ones you know or ask your own.
Ask a new question about this device
Download the instructions for your Basket in PDF format for free! Find your manual JDWK607S9 - JUNO and take your electronic device back in hand. On this page are published all the documents necessary for the use of your device. JDWK607S9 by JUNO.
USER MANUAL JDWK607S9 JUNO
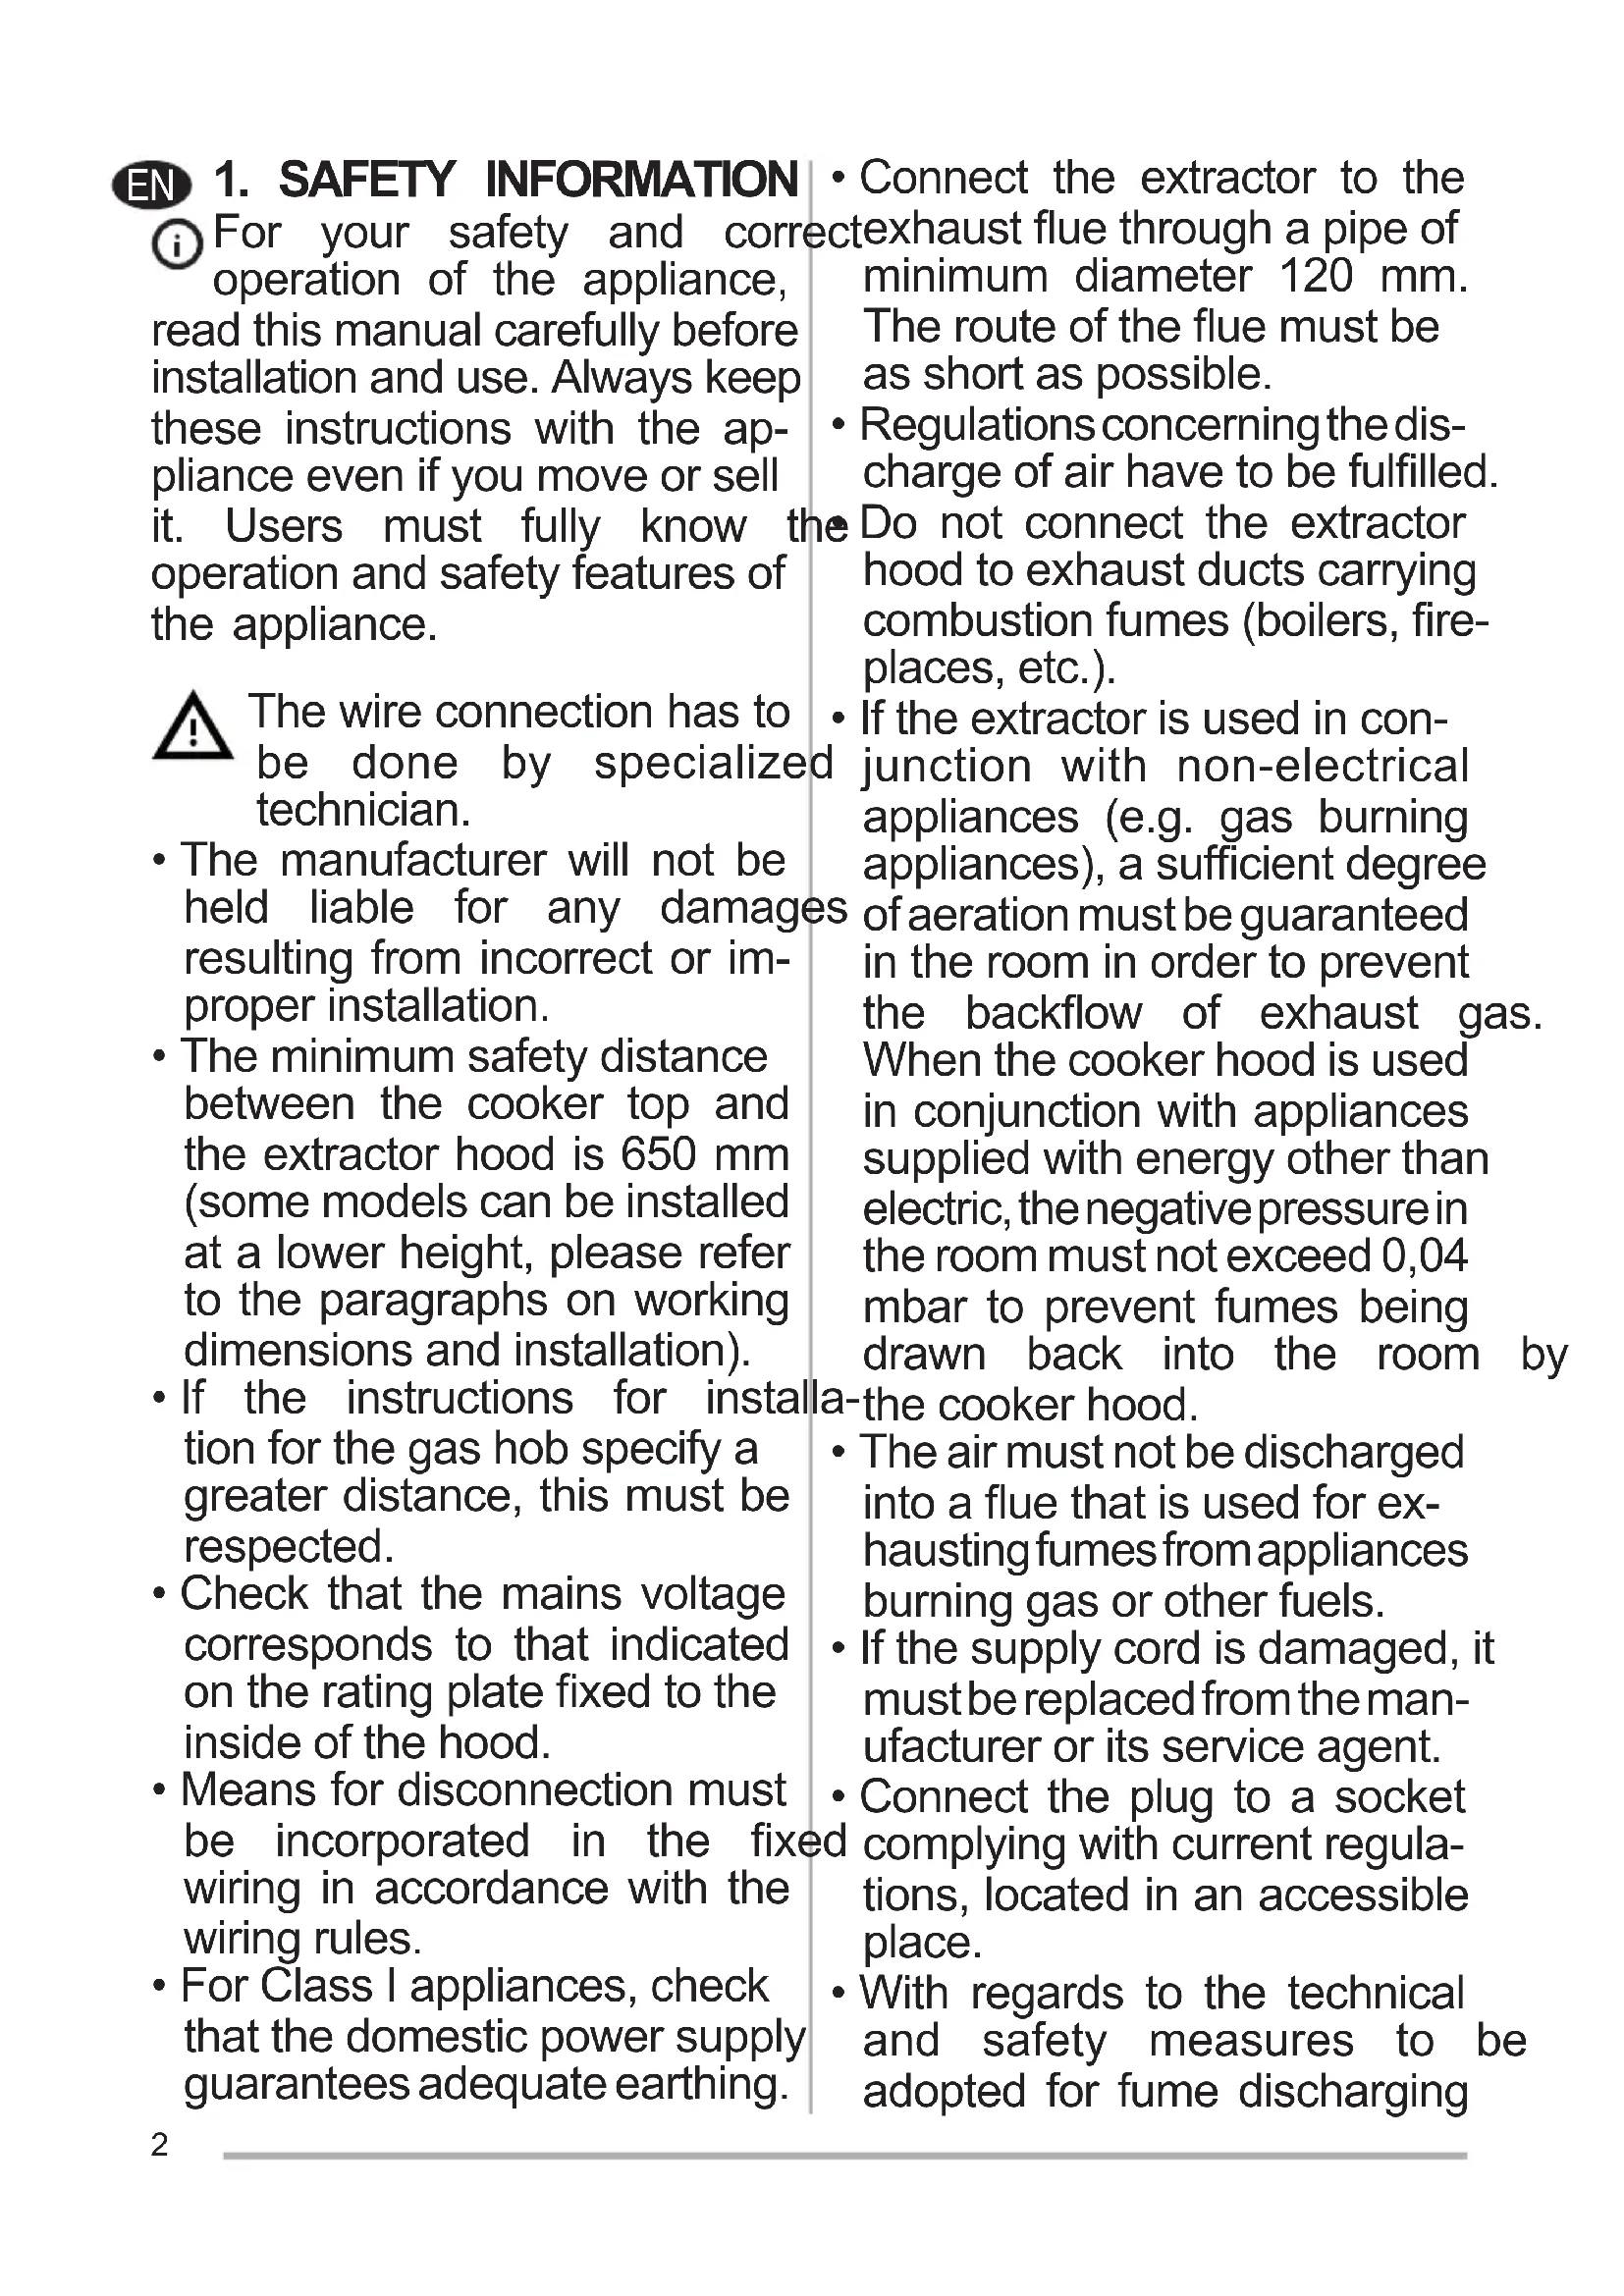
For your safety and cor operation of the appliance, read this manual carefully before installation and use. Always keep these instructions with the appliance even if you move or sell it. Users must fully know th operation and safety features of the appliance.

The wire connection has to be done by specialized technician.
- The manufacturer will not be held liable for any damages resulting from incorrect or improper installation.
- The minimum safety distance between the cooker top and the extractor hood is 650~mm (some models can be installed at a lower height, please refer to the paragraphs on working dimensions and installation).
- If the instructions for installation for the gas hob specify a greater distance, this must be respected.
- Check that the mains voltage corresponds to that indicated on the rating plate fixed to the inside of the hood.
- Means for disconnection must be incorporated in the fix wiring in accordance with the wiring rules.
-
For Class I appliances, check that the domestic power supply guarantees adequate earthing.
-
Connect the extractor to the ectexhaust flue through a pipe of minimum diameter 120~mm . The route of the flue must be as short as possible.
- Regulations concerning the discharge of air have to be fulfilled.
- Do not connect the extractor hood to exhaust ducts carrying combustion fumes (boilers, fireplaces, etc.).
-
If the extractor is used in conjunction with non-electrical appliances (e.g. gas burning appliances), a sufficient degree of aeration must be guaranteed in the room in order to prevent the backflow of exhaust gas. When the cooker hood is used in conjunction with appliances supplied with energy other than electric, the negative pressure in the room must not exceed 0.04 mbar to prevent fumes being drawn back into the room by a-the cooker hood.
-
The air must not be discharged into a flue that is used for exhausting fumes from appliances burning gas or other fuels.
- If the supply cord is damaged, it must be replaced from the manufacturer or its service agent.
- Connect the plug to a socket and complying with current regulations, located in an accessible place.
- With regards to the technical and safety measures to be adopted for fume discharging
it is important to closely follow the regulations provided by the local authorities.
WARNING: Before installing the Hood, remove the protective films.
- Use only screws and small parts in support of the hood.
WARNING: Failure to install the screws or fixing device in accordance with these instructions may result electrical hazards.
- Do not look directly at the light through optical devices (binoculars, magnifying glasses...).
- Do not flambé under the range hood; risk of fire.
- This appliance can be used by children aged from 8 years and above and persons with reduced physical, sensory or mental capabilities or lack of experience and knowledge if they have been given supervision or instruction concerning use of the appliance in a safe way and understand the hazards involved. Children shall not play with the appliance. Cleaning and user maintenance shall not be made by children without supervision.
- Children should be supervised to ensure that they do not play with the appliance.
- The appliance is not to be used by persons (including children) with reduced physical, sensory or mental capabilities, or lack
of experience and knowledge, unless they have been given supervision or instruction.
Accessible parts may become hot when used with cooking appliances.
- Clean and/or replace the Filters after the specified time period (Fire hazard). See paragraph Care and Cleaning.
There shall be adequate ventilation of the room when the range hood is used at the same time as appliances burning gas or other fuels (not applicable to appliances that only discharge the air back into the room). - The symbol on the product or on its packaging indicates that this product may not be treated as household waste. Instead it shall be handed over to the applicable collection point for the recycling of electrical and electronic equipment. By ensuring this product is disposed of correctly, you will help prevent potential negative consequences for the environment and human health, which could otherwise be caused by inappropriate waste handling of this product. For more detailed information about recycling of this product, please contact your local city office, your household waste disposal service or the shop
where you purchased the product.
2. USE
- The extractor hood has been designed exclusively for domestic use to eliminate kitchen smells.
- Never use the hood for purposes other than for which it has been designed.
- Never leave high naked flames under the hood when it is in operation.
- Adjust the flame intensity to direct it onto the bottom of the pan only, making sure that it does not engulf the sides.
- Deep fat fryers must be continuously monitored during use: overheated oil can burst into flames.
3. CARE AND CLEANING
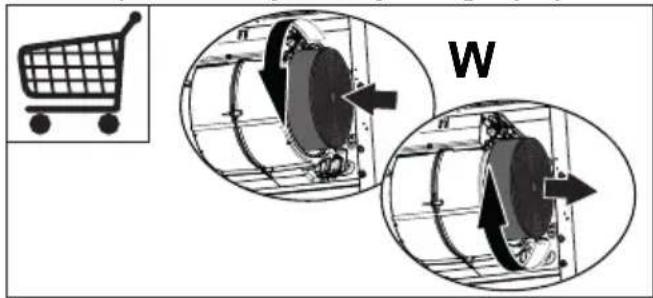
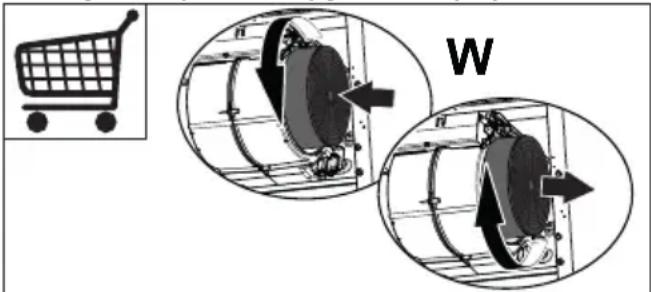
- The Activated charcoal filter is not washable and cannot be regenerated, and must be replaced approximately every 4 months of operation, or more frequently for particularly heavy usage (W).
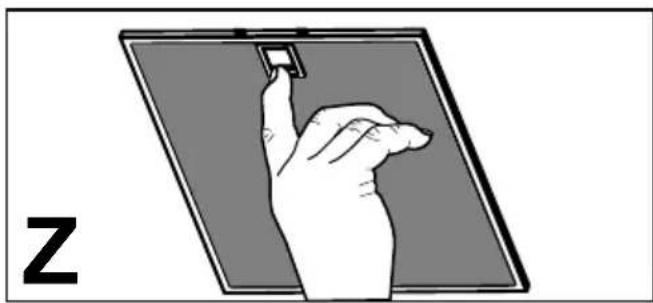
- The Grease filters must be cleaned every 2 months of operation, or more frequently for particularly heavy usage, and can be washed in a dishwasher (Z).
- Clean the hood using a damp cloth and a neutral liquid detergent.
4. CONTROLS
| ① | Y1 | Y2 | Y1 | Y2 | C | F/C | |
| A | B | C | D | E | F | G | H |
| Button Function Led | ||
| A Changes the intensity of the Lighting each time the Button is pressed, in cycle, passing via Off. | - | |
| B Motior off. The Leds indicating the Speed of the motor turn off. | ||
| Enables / Disables Keyboard Lock mode if pres-sed and held for 5 seconds. | All the Leds light up in cycle and run a start-up sequen-ce. | |
| C Activates speed one. The Leds indicating Speed one and Motor Off turn on. | ||
| D Activates speed two. The Leds indicating Speed two and Motor Off turn on. | ||
| E Activates the speed Intensive 1. This speed is ti-med to run for 10 minutes. At the end of this time the system will return to the speed set previously.It is disabled by pressing the Button or turning the Motor off. | The LED flashes. | |
| F Activates the speed Intensive 2. This speed is timed to run for 6 minutes. At the end of this time the system will return to the speed set previously.It is disabled by pressing the Button or turning the Motor off. | The LED flashes. | |
| G Activates / Deactivates Delay mode, with automa-tic shutdown of the Motor and the Lighting after 15 minutes. It is disabled by pressing the button or turning the motor off. | The Led lights up. | |
| Pressing and holding the button for 5 seconds enables the remote control and the H2H function.Pressing and holding the button for 5 seconds disables the remote control and the H2H function. | 2 flashes from Leds on Buttons B+C.1 flash from Leds on Buttons B+C. | |
| H With the filter alarm triggered, press the button Reset the alarm. These indications are only visible when the motor is turned off. | dWhen the procedure terminates, the indication shown previously turns off:Led H on = Indicates the need to wash the metal grease filters. The alarm is triggered after the Hood has been in operation for 100 working hours.Led H flashing = Indicates the need to change the activ-ated charcoal filters, and also to wash the metal grease filters. The alarm is triggered after the Hood has been in operation for 200 working hours. | |
| Press and hold the button for approximately 5 seconds, with all the loads turned off (Motor and Lights), to turn the Activated Charcoal Filter alarm on/off. | 2 flashes from Leds on Buttons B+H = A.C. filter alarm activated.1 flash from Leds on Buttons B+H = A.C. filter alarm deactivated. | |
5. LIGHTING
- For replacement contact technical support ("To purchase contact technical support").
3. LIMPEZA E a MANUTENÇA
BCTaHOBJIeHIMN MiccEbUMn OprHaMn BJaI.

NONEPEDJXEHH.NepeBCTaHOBJENHM BNTJKK3HiMiTb 3axnchy nIiBky.
BukopncToByTe TInbKn TBnHTn N MaI DeTani Dny NiTpMaHHa BNTJxKn.

IONEPEJXEHNA. YcTaHOBJIeHnRA TBNHTIB a6o KpiINbHOrO npNCtPOHO 3 NOpy-WeHHaHaBeJeHnx IHCTpyKzIIMoKe pN3BeCTN DoUpaJxehn eJIeKtpnHnM CTpymOM.
He donyckaetbca DnBntncb 6e3nocepedHbo Ha Jxepeloc CBiTla yepe3 onTnHi npIpaN (6iHOKlb, 36ilbSuYBaJbHe cKnO Ta iH.).
He qlam6yute ctpaBn iBNTJXKOIO, OCKIbKN ige MoKe
CπpηuHHTN NOXeJy.
Cen npncpti moKytb BnKOpncTOBvBaTn DITN BIKOM BiD 8 pOKIB,OCO6N 3 ObmexKeHIMn fiznHMM,ceHCOPHMn a6o PO3yMOBIMMOxJIINBOCTaMn,a TAKOXOCO6N,raKHeMaHTb DocBidyu 3HaHb,kaIoo 3a TaKIMN OC6amn HargJaATmMyTB a6o kso BOHn OTPMaHOt b yKa3iBKn 7oDo 6e3neuHoro KopNCtBuH-H npncTpoem i PO3ymiTmYtB MoXJIVBi He6e3neKn. DITram 3abOpOHReTbcra rpaTnca 3 npncTpoem.DITram 3abOpOHReTbcra YnCTNTn O6cnyROByBaTn pnncTpii 6e3 HaJpy Doopocnx.
Heo6xio ckiKyBaTu, 06 DiTu He rpaInc b i3 npicToeM.
Ley npncptiH He npn3naueho DJIy BnKOpNCtAHNry Oco6amn (y TOMy uicJIi dITbMn) 3 ObmxeHIMN oI3uHIMN, ceHCOPHMn a6o NCNXiUHIMN MOxJIINBOCTaMn, a TaKoJX OCO6amn 3 BiDCyTHICTHO DOCBiDy nn 3HaHb, KpIM BnPaIcIB, KOJIi 3a HIMN HaJIaIOb a60 ix 6byNo nonpeHbO npoiHCTpyKTOBaHO IooD O BnKOpNCtAHNry npncTPOHO.

HR 1. INFORMACije O SIGURNOSTI
i Radi vastite sigurnosti iisprav-nog rada uredaja, molimo da pažljivo procitate ovaj prisucnik prije instalacije i stavljanja u funkciju uredaja. Ove upute uvijek drzite uz uredaj, cak i u slucaustupanja ili prijenosa trecim osobama. Važno je da su korisnici upoznati sa svim značajkama rada i sigurnosti uredaja.

ELECTROLUX HOME PRODUCTS CORPORATION NV.
RAKETSTRAAT 40 / RUE DE LA FUSEE 40
B-1130 BRUSSEL / BRUXELLES
BELGIUM
TEL: +32 2 716 26 00
FAX: +32 2 716 26 01
www.electrolux.com
3. KYTIM KOPCETY XHE TA3APTY
-Беньсяндірінгікімірсузrieпі.Бун cuy3ri nepdi Jyyra 60lmaɪdʌbɪ apəpʌbɪ kaɪnɒhɑ Keɪtɪpy MymkɪH emec, coHɒbɪKTaH Оларɒbɪ 4 aɪda bip pet Hemece KEN naɪdaɪaHaɪbɪfən Ke3nde ODAH da Jxni aybɪCTbIPbɪN OTbIPy KaXeT (W).
-TypakTbI XyMbIC icTei KypReH Ke3de cy3rinepdi 2 ain caBih, an eTe aybip Hemece Kni naiDanaHbINFaHda OanHa Jxni aybICTbIPbIN OTbIPbIHb3, OHblbIC KyfblMaunHaJa Kyyfba6oNaDbI (Z).

CopbI any Kypblfbcih DbIMKbln 乌6epeken HeITpaT Ta3apTKbi 3aTTbI naDanaHbIn Ta3anayKepek.
4. BACKAPY ∃JIEMEHTTEPI
| ① | F/C | ||||||
| A | B | C | D | E | F | G | H |
| Ту微笑х | Фунreichа Керсөтkiшамы | |
| A Бүдүм Түйсөдөдөдөдөдөдөдөдөдөдөдөдөдөдөдөдөдөдөдөдөдөдөдөдөдөдөдөдөдөдөдөдөдөдөдөдөдөдөдөдөдөдөдөдөдөдөдөдөдөдөл. | - | |
| B Могурдүл Tүйсөдөдөдөдөдөдөдөдөдөдөдөдөдөдөдөдөдөдөдөдөдөдөдөдөдөдөдөдөдөдөдөдөдөдөдөдөдөдөдөдөдөдөдөдөдөдөдөд æшпгчүүүүүүүүүүүүүүүүүүүүүүүүүүүүүүүүүүүүүүүүүүүүүүүүүүүүүүүүүүүүүүүүүүүүүүүүүүүүүүүүүүүүүүүүүүүүүүүүүүүүoled. 5 Секундүбалдүхунгүлхунгүлхунгүлхунгүлхунгүлхунгүлхунгүлхунгүлхунгүлхунгүлхунгүлхунгүлхунгүлхунгүлхунгүлхунгүлхунгүлхуньлхунгүлхуньлхуньлхуньлхуньлхуньлхуньлхуньлхуньлхуньлхуньлхуньлхуньлхуньлхуньлхуньлхуньлхуньлхуньлхуньлхуньлхунвясты. | eшipirny ekeniH Керсөтedi. Барлык Kерсөтkiшamлар түллдүхааныхааныха Барлык Kерсөтkiшamлар түллдүхааныха Барлык Kерсөтkiшamlар tүллдүха Барлык Kерсөтkiшamlар tүллдүха Барлык Kерсөтkiшamlар tүллдүх Барлык Kерсөтkiшamlар tүлл Барлык Kерсөтkiшaml Барлык Kерсөтkiшaml Барлык Kерсөтkiшaml Барлык Kерсөтkiшaml Барлык Kерсөтkiшaml Барлык Kерсөтkiшaml Барлык Kерсөтkiшaml Барлык Kерс mongd Барлык Kерс mongd Барлык Kерс mongd Барлык Kерс mongd Барлык Kерс mongd Барлык Kерс mongd Барлык Kерс mongd Барлык Kерс mongd Барлык Kерс mongd Барлык Kерс mongd | |
| C 6 Биши Deнгий Xылдамыгьн IG 6 МИУТБОПБИK 10 MINYUT SOBIJ JXYMВIC ICTEY Y JXOSCAPANFRAH. ByI YAksIT ETKENHEN KENIH, JXYME TYPDE 6 ByI YAksIT ETKENHEN KENIH, JXYME TYPDE 6 ByI YAksIT ETKENHEN KENIH, JXYME TYPDE 6 ByI YAksIT ETKENHEN KENIH, JXYME TYPDE 6 ByI YAksIT ETKENHEN KENIH, JXYME TYPDE 6 ByI YAksIT ETKENHEN KINH, JXYME TYPDE 6 ByI YAksIT ETKENHEN KINH, JXYME TYPDE 6 ByI YAksIT ETKENHEN KINH, JXYME TYPDE 6 ByI YAksIT ETKENHEN KINH, JXYME TYPDE 6 ByI YAksIT ETKENHEN KINH, JXYME TYPDE 6 ByI YAMJI BAYI AOKIIPILNII ESWIPYRE BOJALD. 6 ByI YAMJI BAYI AOKIIPILNII ESWIPYRE BOJALD. 6 ByI YAMJI BAYI AOKIIPILNII ESWIPYRE BOJALD. 6 ByI YAMJI BAYI AOKIIPILNII ESWIPYRE BOJALD. 6 ByI YAMJI BAYI AOKIIPILNII ESWIPYREBOJALD. 6 ByI YAMJI BAYI AOKIIPILNII ESWIPYREBOJALD. 6 ByI YAMJI BAYI AOKIIPILNII ESWIPYREBOJALD. 6 ByI YAMJI BAYI AOKIIPILNII ESWIPYREBOJALD. 6 ByI YAMJI BAYI AOKIIPILNII ESNIPIDELI. 6 ByI YAMJI BAYI AOKIIPILNII ESNIPIDELI. 6 ByI YAMJI BAYI AOKIIPILNII ESNIPIDELI. 6 ByI YAMJI BAYI AOKIIPILNII ESNIPIDELI. 6 ByI YAMJI BAYI AOKIIPILNII ESNIPIDELI. 6 ByI YAMJI GAOY KAKETTINIHN KERCETEI. By copbll 200 caratka 6 ByI YAMJI GAOY KAKETTINIHN KERCETEI. By copbll 200 caratka 6 ByI YAMJI GAOY KAKETTINIHN KERCETEI. By copbll 200 caratka 6 ByI YAMJI GAOY KAKETTINIHN KERCETEI. By copbll 200 car atka 6 ByI YAMJI GAOY KAKETTINIHN KERCETEI. By copbll 200 car atka 6 ByI YAMJI GAOY KAKETTINIHN KERCETEI. By copbll 200 car atka 6 ByI YAMJI GAOY KAKETTINIHN KERCETEI. By copbll 2010 caratka 6 ByI YAMJI GAOY KAKETTINIHN KERCETEI. By copbll 2010 caratka 6 ByI YAMJI GAOY KAKETTINIHN KERCETEI. By copbll 2010 caratka 6 ByI YAMJI GAOY KAKETTINIHN KERCETEI. By copbll 1990 caratka 6 ByI YAMJI GAOY KAKETTINIHN KERCETEI. By copbll 1980 caratka 6 ByI YAMJI GAOY KAKETTINIHN KERCETEI. By copbll 1970 caratka 6 ByI YAMJI GAOY KAKETTINIHN KERCETEI. By copbll 1960 caratka 6 ByI YAMJI GAOY KAKETTINIHN KERCETEI. By copbll 1950 caratka 6 ByI YAMJI GAOY KAKETTINIHN KERCETEI. By copbll 1940 caratka 6 ByI YAMJI GAOY KAKETTINIHN KERCETEI. By copbll 1930 caratka 6 ByI YAMJI GAOY KAKETTINIHN KERCETEI. By copbll 1920 caratka 6 ByI YAMJI GAOY KAKETTINIHN KERCETEI. By copbll 1910 caratka 6 ByI YAMJI GAOY KAKETTINIHN KERCETEI. By copbll 1900 caratka 6 ByI YAMJI GAOY KAKETTINIHN KERCETEI. By copbll 1890 caratka 6 ByI YAMJI GAOY KAKETTINIHN KERCETEI. By copbll 1880 caratka 6 ByI YAMJI GAOY KAKETTINIHN KERCETEI. By copbll 1870 caratka 6 ByI YAMJI GAOY KAKETTINIHN KERCETEI. By copbll 1860 caratka 6 ByI YAMJI GAOY KAKETTINIHN KERCETEI. By copbll 1850 caratka 6 ByI YAMJI GAOY KAKETTINIHN KERCETEI. By copbll 1840 caratka 6 ByI YAMJI GAOY KAKETTINIHN KERCETEI. By copbll 1830 caratka 6 ByI YAMJI GAOY KAKETTINIHN KERCETEI. By copbll 1820 caratka 6 ByI YAMJI GAOY KAKETTINIHN KERCETEI. By copbll 1810 caratka 6 ByI YAMJI GAOY KAKETTINIHN KERCETEI. By copbll 1800 caratka 6 ByI YAMJI GAOY KAKETTINIHN KERCETEI. By copbll 1790 caratka 6 ByI YAMJI GAOY KAKETTINIHN KERCETEI. By copbll 1780 caratka 6 ByI YAMJI GAOY KAKETTINIHN KERCETEI. By copbll 1770 caratka 6 ByI YAMJI GAOY KAKETTINIHN KERCETEI. By copbll 1760 caratka 6 ByI YAMJI GAOY KAKETTINIHN KERCETEI. By copbll 1750 caratka 6 ByI YAMJI GAOY KAKETTINIHN KERCETEI. By copbll 1740 caratka 6 ByI YAMJI GAOY KAKETTINIHN KERCETEI. By copbll 1730 caratka 6 ByI YAMJI GAOY KAKETTINIHN KERCETEI. By copbll 1720 caratka 6 ByI YAMJI GAOY KAKETTINIHN KERCETEI. By copbll 1710 caratka 6 ByI YAMJI GAOY KAKETTINIHN KERCETEI. By copbll 1700 caratka 6 ByI YAMJI GAOY KAKETTINIHN KERCETEI. By copbll 1690 caratka 6 ByI YAMJI GAOY KAKETTINIHN KERCETEI. By copbll 1680 caratka 6 ByI YAMJI GAOY KAKETTINIHN KERCETEI. By copbll 1670 caratka 6 ByI YAMJI GAOY KAKETTINIHN KERCETEI. By copbll 1660 caratka 6 ByI YAMJI GAOY KAKETTINIHN KERCETEI. By copbll 1650 caratka 6 ByI YAMJI GAOY KAKETTINIHN KERCETEI. By copbll 1640 caratka 6 ByI YAMJI GAOY KAKETTINIHN KERCETEI. By copbll 1630 caratka 6 ByI YAMJI GAOY KAKETTINIHN KERCETEI. By copbll 1620 caratka 6 ByI YAMJI GAOY KAKETTINIHN KERCETEI. By copbll 1610 caratka 6 ByI YAMJI GAOY KAKETTINIHN KERCETEI. By copbll 1600 caratka 6 ByI YAMJI GAOY KAKETTINIHN KERCETEI. By copbll 1590 caratka 6 ByI YAMJI GAOY KAKETTINIHN KERCETEI. By copbll 1580 caratka 6 ByI YAMJI GAOY KAKETTINIHN KERCETEI. By copbll 1570 caratka 6 ByI YAMJI GAOY KAKETTINIHN KERCETEI. By copbll 1560 caratka 6 ByI YAMJI GAOY KAKETTINIHN KERCETEI. By copbll 1550 caratka 6 ByI YAMJI GAOY KAKETTINIHN KERCETEI. By copbll 1540 caratka 6 ByI YAMJI GAOY KAKETTINIHN KERCETEI. By copbll 1530 caratka 6 ByI YAMJI GAOY KAKETTINIHN KERCETEI. By copbll 1520 caratka 6 ByI YAMJI GAOY KAKETTINIHN KERCETEI. By copbll 1510 caratka 6 ByI YAMJI GAOY KAKETTINIHN KERCETEI. By copbll 1500 caratka 6 ByI YAMJI GAOY KAKETTINIHN KERCETEI. By copbll 1500 caratka 6 ByI YAMJI GAOY KAKETTINIHN KERCETEI. By copbll 1500 caratka 6 ByI YAMJI GAOY KAKETTINIHN KERCETEI. By coppIL 6 ByI YAMJI GAOY KAKETTINIHN KERCETEI. By coppIL 6 ByI YAMJI GAOY KAKETTINIHN KERCETEI. By coppIL 6 ByI YAMJI GAOY KAKETTINIHN KERCETEI. By coppIL 6 ByI YAMJI GAOY KAKETTINIHN K ERCETEI. By coppIL 6 ByI YAMJI GAOY KAKETTINIHN KERCETEI. By coppIL 6 ByI YAMJI GAOY KAKETTINIHN KERCETEI. By coppIL 6 ByI YAMJI GAOY KAKETTINIHN KERCETEI. By coppIL 6 ByI YAMJI GAOY LARIML TURSOY 6 ByI YAMJI GAOY LARIML TURSOY 6 ByI YAMJI GAOY LARIML TURSOY 6 ByI YAMJI GAOY LARIML TURSOY 6 ByI YAMJI GAOY LARIML TURSOY 6 ByI YAMJI GAOY LARIML TURSOY 6 ByI YAMJI GAOV LARIML TURSOY 6 ByI YAMJI GAOV LARIML TURSOY 6 ByI YAMJI GAOV LARIML TURSOY 6 ByI YAMJI GAOV LARIML TURSOY 6 ByI YAMJI GAOV LARIML TURSOY 6 ByI YAMJI GAOV LARIML TURSOY Gyulnytskii TUGUEKISKII TUGUEKISKII TUGUEKISKII TUGUEKISKII TUGUEKISKII TUGUEKISKII TUGUEKISKII TUGUEKISKII TUGUEKISKII TUGUEKISKII TUGUEKISKII TUGUEKISKII TUGUEKISKII TUGUEKISKII TUGUEKISKII TULU 6 ByI YAMJI GAOY LARIML TURSOY 6 ByI YAMJI GAOY LARIML TURSOY 6 ByI YAMJI GAOY LARIML TURSOY 6 ByI YAMJI GAOY LARIML TURSOY 6 ByI YAMJI GAOY LARIML TURSOY 6 ByI YAMJI GAOYTIFOL 6 ByI YAMJI GAOYTIFOL 6 ByI YAMJI GAOYTIFOL 6 ByI YAMJI GAOYTIFOL 6 ByI YAMJI GAOYTIFOL 6 ByI YAMJI GAOYTIFOL 6 ByI YAMJI GAOYTIFOL 6 ByI YAMJI GAOYTIFOL 6 ByI YAMJI GAOYTIFOL 6 ByIFOL 6 ByIFOL 6 ByIFOL 6 ByIFOL 6 ByIFOL 6 ByIFOL 6 ByIFOL 6 ByIFOL 6 ByIFOL 6 ByIFOL 6 ByIFOL 6 ByIFOL 6 ByIFOL 6 ByIFOL 6 ByIFOL 6 ByIFOL 6 ByIFOL 6 ByIFOL 6 ByIFOL 6 ByIFOL 6ByIFOL 6ByIFOL 6ByIFOL 6ByIFOL 6ByIFOL 6ByIFOL 6ByIFOL 6ByIFOL 6ByIFOL 6ByIFOL 6ByIFOL 6ByIFOL 6ByIFOL 6ByIFOL 6ByIFOL 6ByIFOL 6ByIFOL 6ByIFOL 6ByIFOL 6ByIFOL 6BYIFOL 6ByIFOL 6ByIFOL 6ByIFOL 6ByIFOL 6ByIFOL 6ByIFOL 6ByIFOL 6ByIFOL 6ByIFOL 6ByIFOL 6ByIFOL 6ByIFOL 6ByIFOL 6ByIFOL 6ByIFOL 6ByIFOL 6ByIFOL 6ByIFOL 6ByIFOL 6.ByIFOL 6ByIFOL 6ByIFOL 6ByIFOL 6ByIFOL 6ByIFOL 6ByIFOL 6ByIFOL 6ByIFOL 6ByIFOL 6ByIFOL 6ByIFOL 6ByIFOL 6ByIFOL 6ByIFOL 6ByIFOL 6ByIFOL 6ByIFOL 6ByIFOL 6ByIFOL 6byIFOL 6ByIFOL 6ByIFOL 6ByIFOL 6ByIFOL 6ByIFOL 6ByIFOL 6ByIFOL 6ByIFOL 6ByIFOL 6ByIFOL 6ByIFOL 6ByIFOL 6ByIFOL 6ByIFOL 6ByIFOL 6ByIFOL 6ByIFOL 6ByIFOL 6ByIFOL 6BcYSLR 6ByIFOL 6ByIFOL 6ByIFOL 6ByIFOL 6ByIFOL 6ByIFOL 6ByIFOL 6ByIFOL 6ByIFOL 6ByIFOL 6ByIFOL 6ByIFOL 6ByIFOL 6ByIFOL 6ByIFOL 6ByIFOL 6ByIFOL 6ByIFOL 6ByIFOL 6ByIFIL 6ByIFIL 6ByIFIL 6ByIFIL 6ByIFIL 6ByIFIL 6ByIFIL 6ByIFIL 6ByIFIL 6ByIFIL 6ByIFIL 6ByIFIL 6ByIFIL 6ByIFIL 6ByIFIL 6ByIFIL 6ByIFIL 6ByIFIL 6ByIFIL 6ByIFIL 6ByIFIF 6ByIFIF 6ByIFIF 6ByIFIF 6ByIFIF 6ByIFIF 6ByIFIF 6ByIFIF 6ByIFIF 6ByIFIF 6ByIFIF 6ByIFIF 6ByIFIF 6ByIFIF 6ByIFIF 6ByIFIF 6ByIFIF 6ByIFIF 6ByIFIF 6ByIFIF 6ByIFIL 6ByIFIL 6ByIFIL 6ByIFIL 6ByIFIL 6ByIFIL 6ByIFIL 6ByIFIL 6ByIFIL 6ByIFIL 6ByIFIL 6ByIFIL 6ByIFIL 6ByIFIL 6ByIFIL 6ByIFIL 6ByIFIL 6ByIFIL 6ByIFIL 6ByIFL 6ByIFIL 6ByIFIL 6ByIFIL 6ByIFIL 6ByIFIL 6ByIFIL 6ByIFIL 6ByIFIL 6ByIFIL 6ByIFIL 6ByIFIL 6ByIFIL 6ByIFIL 6ByIFIL 6ByIFIL 6ByIFIL 6ByIFIL 6ByIFIL 6ByIFIL 6ByIFill 6ByIFIL 6ByIFIL 6ByIFIL 6ByIFIL 6ByIFIL 6ByIFIL 6ByIFIL 6ByIFIL 6ByIFIL 6ByIFIL 6ByIFIL 6ByIFIL 6ByIFIL 6ByIFIL 6ByIFIL 6ByIFIL 6ByIFIL 6ByIFIL 6ByIFIL 6ByIFILL 6ByIFIL 6ByIFIL 6ByIFIL 6ByIFIL 6ByIFIL 6ByIFIL 6ByIFIL 6ByIFIL 6ByIFIL 6ByIFIL 6ByIFIL 6ByIFIL 6ByIFIL 6ByIFIL 6ByIFIL 6ByIFIL 6ByIFIL 6ByIFIL 6ByIFIL 6ByIFLL 6ByIFIL 6ByIFIL 6ByIFIL 6ByIFIL 6ByIFIL 6ByIFIL 6ByIFIL 6ByIFIL 6ByIFIL 6ByIFIL 6ByIFIL 6ByIFIL 6ByIFIL 6ByIFIL 6ByIFIL 6ByIFIL 6ByIFIL 6ByIFIL 6ByIFIL 6ByIFFL 6ByIFIL 6ByIFIL 6ByIFIL 6ByIFIL 6ByIFIL 6ByIFIL 6ByIFIL 6ByIFIL 6ByIFIL 6ByIFIL 6ByIFIL 6ByIFIL 6ByIFIL 6ByIFIL 6ByIFIL 6ByIFIL 6ByIFIL 6ByIFIL 6ByIFIL 6ByIF IL 6ByIFIL 6ByIFIL 6ByIFIL 6ByIFIL 6ByIFIL 6ByIFIL 6ByIFIL 6ByIFIL 6ByIFIL 6ByIFIL 6ByIFIL 6ByIFIL 6ByIFIL 6ByIFIL 6ByIFIL 6ByIFIL 6ByIFIL 6ByIFIL 6ByIFIL 6ByIF(IL 6ByIFIL 6ByIFIL 6ByIFIL 6ByIFIL 6ByIFIL 6ByIFIL 6ByIFIL 6ByIFIL 6ByIFIL 6ByIFIL 6ByIFIL 6ByIFIL 6ByIFIL 6ByIFIL 6ByIFIL 6ByIFIL 6ByIFIL 6ByIFIL 6ByIFIL 6ByIFil 6ByIFIL 6ByIFIL 6ByIFIL 6ByIFIL 6ByIFIL 6ByIFIL 6ByIFIL 6ByIFIL 6ByIFIL 6ByIFIL 6ByIFIL 6ByIFIL 6ByIFIL 6ByIFIL 6ByIFIL 6ByIFIL 6ByIFIL 6ByIFIL 6ByIFIL 6ByIFIl 6ByIFIL 6ByIFIL 6ByIFIL 6ByIFIL 6ByIFIL 6ByIFIL 6ByIFIL 6ByIFIL 6ByIFIL 6ByIFIL 6ByIFIL 6ByIFIL 6ByIFIL 6ByIFIL 6ByIFIL 6ByIFIL 6ByIFIL 6ByIFIL 6ByIFIL 6ByIFII 6ByIFIL 6ByIFIL 6ByIFIL 6ByIFIL 6ByIFIL 6ByIFIL 6ByIFIL 6ByIFIL 6ByIFIL 6ByIFIL 6ByIFIL 6ByIFIL 6ByIFIL 6ByIFIL 6ByIFIL 6ByIFIL 6ByIFIL 6ByIFIL 6ByIFIL 6ByIFILE 6ByIFIL 6ByIFIL 6ByIFIL 6ByIFIL 6ByIFIL 6ByIFIL 6ByIFIL 6ByIFIL 6ByIFIL 6ByIFIL 6ByIFIL 6ByIFIL 6ByIFIL 6ByIFIL 6ByIFIL 6ByIFIL 6ByIFIL 6ByIFIL 6ByIFIL 6ByIFIR 6ByIFIL 6ByIFIL 6ByIFIL 6ByIFIL 6ByIFIL 6ByIFIL 6ByIFIL 6ByIFIL 6ByIFIL 6ByIFIL 6ByIFIL 6ByIFIL 6ByIFIL 6ByIFIL 6ByIFIL 6ByIFIL 6ByIFIL 6ByIFIL 6ByIFIL 6ByIFll 6ByIFIL 6ByIFIL 6ByIFIL 6ByIFIL 6ByIFIL 6ByIFIL 6ByIFIL 6ByIFIL 6ByIFIL 6ByIFIL 6ByIFIL 6ByIFIL 6ByIFIL 6ByIFIL 6ByIFIL 6ByIFIL 6ByIFIL 6ByIFIL 6ByIFIL 6ByIFßL 6ByIFIL 6ByIFIL 6ByIFIL 6ByIFIL 6ByIFIL 6ByIFIL 6ByIFIL 6ByIFIL 6ByIFIL 6ByIFIL 6ByIFIL 6ByIFIL 6ByIFIL 6ByIFIL 6ByIFIL 6ByIFIL 6ByIFIL 6ByIFIL 6ByIFIL 6ByFIL 6ByFIL 6ByFIL 6ByFIL 6ByFIL 6ByFIL 6ByFIL 6ByFIL 6ByFIL 6ByFIL 6ByFIL 6ByFIL 6ByFIL 6ByFIL 6ByFIL 6ByFIL 6ByFIL 6ByFIL 6ByFIL 6ByFIL 6ByIFIL 6ByFIL 6ByFIL 6ByFIL 6ByFIL 6ByFIL 6ByFIL 6ByFIL 6ByFIL 6ByFIL 6ByFIL 6ByFIL 6ByFIL 6ByFIL 6ByFIL 6ByFIL 6ByFIL 6ByFIL 6ByFIL 6ByIFIL 6ByIFIL 6ByIFIL 6ByIFIL 6ByIFIL 6ByIFIL 6ByIFIL 6ByIFIL 6ByIFIL 6ByIFIL 6ByIFIL 6ByIFIL 6ByIFIL 6ByIFIL 6ByIFIL 6ByIFIL 6ByIFIL 6ByIFIL 6ByIFIL 6ByFIS 6ByFIS 6ByFIS 6ByFIS 6ByFIS 6ByFIS 6ByFIS 6ByFIS 6ByFIS 6ByFIS 6ByFIS 6ByFIS 6ByFIS 6ByFIS 6ByFIS 6ByFIS 6ByFIS 6ByFIS 6ByFIS 6ByFIS 6ByFIL 6ByFIL 6ByFIL 6ByFIL 6ByFIL 6ByFIL 6ByFIL 6ByFIL 6ByFIL 6ByFIL 6ByFIL 6ByFIL 6ByFIL 6ByFIL 6ByFIL 6ByFIL 6ByFIL 6ByFIL 6ByFIL 6ByFIS 6ByFIS 6ByFIS 6ByFIS 6ByFIS 6ByFIS 6ByFIS 6ByFIS 6ByFIS 6ByFIS 6ByFIS 6ByFIS 6ByFIS 6ByFIS 6ByFIS 6ByFIS 6ByFIS 6ByFIS 6ByFIS 6ByFIIS 6ByFIS 6ByFIS 6ByFIS 6ByFIS 6ByFIS 6ByFIS 6ByFIS 6ByFIS 6ByFIS 6ByFIS 6ByFIS 6ByFIS 6ByFIS 6ByFIS 6ByFIS 6ByFIS 6ByFIS 6ByFIS 6ByFIS 6ByFI IS 6ByFIS 6ByFIS 6ByFIS 6ByFIS 6ByFIS 6ByFIS 6ByFIS 6ByFIS 6ByFIS 6ByFIS 6ByFIS 6ByFIS 6ByFIS 6ByFIS 6ByFIS 6ByFIS 6ByFIS 6ByFIS 6ByFIS 6ByFUS 6ByFIS 6ByFIS 6ByFIS 6ByFIS 6ByFIS 6ByFIS 6ByFIS 6ByFIS 6ByFIS 6ByFIS 6ByFIS 6ByFIS 6ByFIS 6ByFIS 6ByFIS 6ByFIS 6ByFIS 6ByFIS 6ByFIS 6ByFis 6ByFIS 6ByFIS 6ByFIS 6ByFIS 6ByFIS 6ByFIS 6ByFIS 6ByFIS 6ByFIS 6ByFIS 6ByFIS 6ByFIS 6ByFIS 6ByFIS 6ByFIS 6ByFIS 6ByFIS 6ByFIS 6ByFIS 6ByF IS 6ByFIS 6ByFIS 6ByFIS 6ByFIS 6ByFIS 6ByFIS 6ByFIS 6ByFIS 6ByFIS 6ByFIS 6ByFIS 6ByFIS 6ByFIS 6ByFIS 6ByFIS 6ByFIS 6ByFIS 6ByFIS 6ByFIS 6ByFI S 6ByFIS 6ByFIS 6ByFIS 6ByFIS 6ByFIS 6ByFIS 6ByFIS 6ByFIS 6ByFIS 6ByFIS 6ByFIS 6ByFIS 6ByFIS 6ByFIS 6ByFIS 6ByFIS 6ByFIS 6ByFIS 6ByFIS 6ByFIST 6ByFIS 6ByFIS 6ByFIS 6ByFIS 6ByFIS 6ByFIS 6ByFIS 6ByFIS 6ByFIS 6ByFIS 6ByFIS 6ByFIS 6ByFIS 6ByFIS 6ByFIS 6ByFIS 6ByFIS 6ByFIS 6ByFIS 6ByFAS 6ByFIS 6ByFIS 6ByFIS 6ByFIS 6ByFIS 6ByFIS 6ByFIS 6ByFIS 6ByFIS 6ByFIS 6ByFIS 6ByFIS 6ByFIS 6ByFIS 6ByFIS 6ByFIS 6ByFIS 6ByFIS 6ByFIS 6ByFJS 6ByFIS 6ByFIS 6ByFIS 6ByFIS 6ByFIS 6ByFIS 6ByFIS 6ByFIS 6ByFIS 6ByFIS 6ByFIS 6ByFIS 6ByFIS 6ByFIS 6ByFIS 6ByFIS 6ByFIS 6ByFIS 6ByFIS 6ByFES 6ByFIS 6ByFIS 6ByFIS 6ByFIS 6ByFIS 6ByFIS 6ByFIS 6ByFIS 6ByFIS 6ByFIS 6ByFIS 6ByFIS 6ByFIS 6ByFIS 6ByFIS 6ByFIS 6ByFIS 6ByFIS 6ByFIS 6ByFJIS 6ByFIS 6ByFIS 6ByFIS 6ByFIS 6ByFIS 6ByFIS 6ByFIS 6ByFIS 6ByFIS 6ByFIS 6ByFIS 6ByFIS 6ByFIS 6ByFIS 6ByFIS 6ByFIS 6ByFIS 6ByFIS 6ByFIS 6By FIS 6ByFIS 6ByFIS 6ByFIS 6ByFIS 6ByFIS 6ByFIS 6ByFIS 6ByFIS 6ByFIS 6ByFIS 6ByFIS 6ByFIS 6ByFIS 6ByFIS 6ByFIS 6ByFIS 6ByFIS 6ByFIS 6ByFIS 6ByfIS 6ByFIS 6ByFIS 6ByFIS 6ByFIS 6ByFIS 6ByFIS 6ByFIS 6ByFIS 6ByFIS 6ByFIS 6ByFIS 6ByFIS 6ByFIS 6ByFIS 6ByFIS 6ByFIS 6ByFIS 6ByFIS 6ByFIS 6ByFiS 6ByFIS 6ByFIS 6ByFIS 6ByFIS 6ByFIS 6ByFIS 6ByFIS 6ByFIS 6ByFIS 6ByFIS 6ByFIS 6ByFIS 6ByFIS 6ByFIS 6ByFIS 6ByFIS 6ByFIS 6ByFIS 6ByFIS 6ByFIs 6ByFIS 6ByFIS 6ByFIS 6ByFIS 6ByFIS 6ByFIS 6ByFIS 6ByFIS 6ByFIS 6ByFIS 6ByFIS 6ByFIS 6ByFIS 6ByFIS 6ByFIS 6ByFIS 6ByFIS 6ByFIS 6ByFIS 6ByF(IS 6ByFIS 6ByFIS 6ByFIS 6ByFIS 6ByFIS 6ByFIS 6ByFIS 6ByFIS 6ByFIS 6ByFIS 6ByFIS 6ByFIS 6ByFIS 6ByFIS 6ByFIS 6ByFIS 6ByFIS 6ByFIS 6ByFIS 6ByF-IS 6ByFIS 6ByFIS 6ByFIS 6ByFIS 6ByFIS 6ByFIS 6ByFIS 6ByFIS 6ByFIS 6ByFIS 6ByFIS 6ByFIS 6ByFIS 6ByFIS 6ByFIS 6ByFIS 6ByFIS 6ByFIS 6ByFIS 6ByF5100000000000000000000000000000000000000000000000000000000000000000000000000000000000000000000000000001000000000000000000000000000000000000000000000000000000000000000000000000000000000000000000000000001100000000000000000000000000000000000000000000000000000000000000000000000000000000000000000000000000200000000000000000000000000000000000000000000000000000000000000000000000000000000000000000000000000021000000000000000000000000000000000000000000000000000000000000000000000000000000000000000000000000008100000000000000000000000000000000000000000000000000000000000000000000000000000000000000000000000000511111111111111111111111111111111111111111111111111111111111111111111111111111111111111111111111111112222222222222222222222222222222222222222222222222222222222222222222222222222222222222222222222222222. 722222222222222222222222222222222222222222222222222222222222222222222222222222222222222222222222222282323232323232323232323232323232323232323232323232323232323232323232323232323232323232323232323232323223232323232323232323232323232323232323232323232323232323232323232323232323232323232323232323232323282323232323232323232323232323232323232323232323232323232323232323232323232323232323232323232323232824242424242424242424242424242424242424242424242424242424242424242424242424242424242424242424242424242511111111111111111111111111111111111111111111111111111111111111111111111111111111111111111111111111 |
5.ЖAPыIKТАндыIPY KYPАЛы
- Aybictbyy ywiH, TexnHKaIbIK KOJday Kepcety opTaIbIbIMeH xa6apJaCbIHb3 («Catbn any ywiH, TexnHKaIbIK KbI3MeT Kepcety opTaIbIbIMeH xa6apJaCbIHb3»).
MK 1.БE3BEdHOCHN INHΦOPMALIN
3apaN Bawa coCTBeHa 6e36eHocT n 3apaN npaBnHNO cyHKcnoHnpaHbe Ha anapatOT, BHIMATEJHO npoHTajTe rO OBOj npupaHnk ped Da 3anoCHete CO MOHTpaHbe n ynoTpe6a. CekorauchyBaJTe rN OBne ynatCTBa Co anapatOT, Dypn N Kora cePpeCenYBaTe Nnro npoDaBate. Kopncnnte Mopa zelnocho da ce 3an03haehn Co pa6oTeheto n 6e36eHNOCHTe cyHKcnn Ha anapatOT.

Iobp3yBaHbeto Ha Ka6lnte Mopa Da ro HappaBn CpeunjaJn3npaH TexHnUap.
- ПОНЗВОДИТЕЛOT НEMA ДА БИDE OДГ罗БОРЕ 3a OшТЕТУВаьа КОН Habтане КAKO pe3yЛТаT Ha Heправилна Или HeCOODBeTHa MOHTаЖа.
MHHMaJIHOTo 6e36eIHO pactoJAHne MeIy IIOUaTa 3a rOToBeH e aCnnpaTopoTe 650 mm (HeKOn MoJeN MoXaT da ce HCTaJIpaAT N Ha NOMaHa BNCiHa, Be MOJIme, NOrJIeDHeTe rN DeJIOBInTe 3a pa6OTn DImEh3nN MOHTaJa).
Ako ynaTCTBaTa 3a MOHTaKa Ha IIIOyata 3a IOTBeHbe Ha rac HabeDyBaat DeKa e NOTpe6Ho IORoJemO pactoJaHne, THe Mopa Da Ce NoHTyBaat. - Пюверete дали ВOLTажатура odroba на оона koja
e HaBeDeHa Ha IIOUkata Co CneuΦnKaun, PnBpCTeHa Ha BHaTpeShHaTa CtpaHa Ha acnnpaTopoT.
HaunHnte Ha ncknyuBaHe Mopa da 6nDat BrpaDeHN BO pIKChata HnCTaIauNiJa BO cOrIaCHOCT CO npabNlata 3a NOBp3yBaHbe Ka6n.
3a ypei n od Kna cI, npoBepTe daJI N DoMaUHOTO HanojyBaHbe CO eJeKtpnHa cTpyja rapaHTnpa COODBeTHO 3a3emjyBaHe.
Iobp3eTe ro acnnpaTopoT co OndBoNDHO UpeBO ppeky ueBka Koja mMa MmHmAleH dniJaMeTap oD 120 mm. Tpacata Ha UpeBOTo Mopa da 6nde wTO NOKpaTka.
PerylaTnBtTe 3a nCnyuTaHbe Bo3dux Tpe6a Da ce nouHTyBaat.
He noBp3yBajTe ro acnnpaTopoT CO OndBoHn KaHaJI Nn 3 KOn Ce CnpOBeyBaat 3anaJIINracOBn (6oJlepN,OrHnStTa, nTH.)
Дokолку acnnpaTopoT ce
Kopnst 3aeDNo co ypei Koj He
pa60t Na eIeKtpuHa cTpyja
(Ha npimep, ypei Ha rac), Mopa
da ce obe36eDi NOBOJIEN CTepeH
Ha BeHTnlaZjuBa BO pOcTOpNJaTa
3a Da Ce cPpeu BpakHe Ha3aJ
Ha n3dYBHNTe rAcOBn. Kora
acnnpaTopoT ce Kopnst 3aeDNo
Co anapatN KOI He pa60TaT Ha
eJeKtpuHa cTpyJa, HerATINBHNO
PpNTUCOK Bo pOcTOpNJaTa He
cMee Da 6nDE nOrolem od 0,04
mbar, co zeI Da ce cPpeu
BpakaHBe Na n3dYBHNTe rAcOBn
Ha3aD Bo pOcTOpNJaTa Od
CTpHa Ha acnnpaTopoT.
Bo3dyxot He cMee da ce nCnyuTa BO Ouzak ITO Ce KOpNCTn NCnyuTaHbe rAcOBn Od anapatn ITO pa6oTaT Ha rac Nn Ha dpyr TropINA.
Ako e oWTeTeh KaBeIOT 3cTpyja, Mopa da 6nde 3aMeHET OJ pON3BOIDTEJOT INN OJ HeROBaHT 3a cepBnCnpaHe.
- Поврзete ro пиклунокOT Boшт ekep кошто одювара наTekobнite peгулathи и се Haorá Na ппстапна Лokациja.
Bo odHoc Ha texHnUknte n 6e36eHochnte MepKn 3a IcnyuTaIbe racOBn, BaxHo e cTpNKTHo Da ce cNeDaT peRyJatNBtE Ha JOKaJHNTe BlaCTn.

PPEyPDEyBAHbE: PpeI Da ro MOHTnpaTe acnnpaTOpOT OTCTpaHeTe 3aWTNTHTe FOJIIN.
KopinCTeTe cMo 7pafoBn mAln DeIOBn 3a Notnpa Ha acnnpaTOPOT.

I P E D Y N P E D Y B A H E: A K O U p a f o B I T e n i n y p e d o T 3a Ф n K C n p a H e He n M O H T n p a T e B O C O r l a c h O C T C O O B n e Y n a T C T B a, M o j e d a Do j d e O n a c h O C T n N O B p 3 a H N C O C t p y j a t a.
He rIeJaTe dIpeKTHO Bo CBETJOTO Hn3 ONTNUKN ypeDN (DBoIeD, Iyna...).
He pfam6npajTe xpana noid acnpaTOPOT; NOCTON ONaCHOCT
OД NOЖАР.
a·Oboj anapat moKe da ro kOpncTaT 3aDeu aNoctapn od 8 roDHH n INuca CO HamaJIeHn OIN3NcK, CETINH INIIM MeHTaJHn CNOco6HOCTN INIICo HEIOBOJHO NCKyCTBO 3a IN 3HaEHe, aKO ce IOd Na3Op INIaKO IM Ce DaBAaT yNaTCTBa 3a yNtpe6bata Ha anapatOT Ha 6e36eDen HauHn NCBeCHN o ce 3a OnaCHOCTITE. Deua He a CMeat Da cN nIrpaat Co anapatOT. e YnCTeHbeto n ODpKvBaHbeto He CMeat Da ro npBaT deua 6e3 IN Na3Op.
MaIIte Deca Tpe6a Da 6nDaT PoiHa3Op 3a Da He Irgpaat Co T ypeDoT.
Anapatot He e Hamehet 3a ynoTpe6a od cTpaHa Ha Iuca (BknynteJHo N Deua) Co HamaJIeHn fN3Uckn, CEN3OpHN IIN MeNTaJHn CnOCo6HOCT, IIN CO HeIOBOJHO NCKyCTBO N 3HaEHe, OCBEN BO CInyaua a KORA Ce IOd HaI3Op IIN KORA doNBaaT yNaTCTBa BO Bpcka Co KopncTeHbeto Ha ypeIoT.

ДocтаннITE DeJIOBIMOЖAT da ce BxeHTaT Kora ce KOpNCTaT co ypeNi 3a RotBeHbe.
- IcHnCTeTe n/Inn 3aMeHeTe rN oIuTTpIte nO npedeJeHnOT BpeMeHcKnot nepNoD (OnacHocT od noxkap).Budet eTo DeJot TpIXka n YnCTeHbe.
Mopa Да Има COODBeTHa BeHTnlaциja BO pOcTOpnjaTa KaDe ITo Ce KOpNCTn
acnpaTOPOT, a BO Koja
NCTOBpeMeHO Ce KOpNCtAT
anapatn 7TO pa60TaT Ha rac
Hn Ha dpyrI rOpNBa (He e
IprimeHInBO 3a anapatn 7TO
BO3dYXOT rO nCnyStaAT BO
IpocTopnJaTa).
CIMBOJOT Ha npoN3BOJOT IIN He rOBOTo NaKyBaIbe POKaKBya DeKa npoN3BOJOT He cMee Da Ce TpeTnpa KaKo OTnad OJ DomaknHCTBa.Toj TpeBa Da Ce npedae BO COODBeTeH COBupen NyHKT 3a peuKnipaHbE Ha eJeKtpuHa n eJeKTPoHcKa ONpema.Co IpaBnIHo pAcXoDyBaHbE Ha OBOJ npoN3BOi, BHe IomaratE Da Ce CnpeHaT NoteHunHHTe HeratNBHn NocPeDiu CB3 XHBOTHaTa CpeDInHa IN QOBekOBOTO 3dpaBje, KOI 6m MoKeJIe Da HactaHaT KaKO pe3yTTaT Ha HeCOOdBETHOTO pAcxOdyBaHbE Ha OBOJ npoN3BOJ KAKO OTnad. 3a IOBeKe DeTaJIи INHOpMaUIn BO BpCKa Co PeuKnIpaHbETo Ha OBOJ npoN3BOi, Be MOJIIME KOHTaKTnpajTe ja BaShaTa IOKaJIHa rpaIcka BlaCT, BaShaTa Clyk6a 3a pacXoDyBaHbE Ha DomaSeH OTnad IIN IpoDaBHNzAta OD KaDe StTO CTe rO KyIIne IPON3BOJOT.
2. yNOTPEBA
- AcnnpaTopoTe dIn3ajHnpaH ncknyuHTeHNO 3a DomaSha yNoTpe6a 3a eImmHnpaHe
i
J
J
J
J
J
J
J
J
J
J
J
J
J
J
J
J
J
J
J
J
J
J
J
J
J
J
J
aagilgaaegj 100
cjjn jao li aaii y
. 650 60 60
e 60
g 60
g 60
g 60
g 60
.
bcbwBcK bcls 1
j aL aL aL jll . Ll.
LJ LpIaI y I J
Jd Jgall gJ Jg
alil jaii 0jbj b jy . aai j g jg y i
Class I aai joo y a bll
Iaill aay dall JnJ
.
Jn 120 120 120
.120
.120
.120
.120
.120
.120
a aalaa aai aai aai aai aai aai aai aai aai aai aai aai aai aai aai aai aai aai aai aai aai aai aai aai aai aai aai aai aai aai aai aai aai aai aai aai aai aai aai aai aai aai aai aai aai aai aai aai aai aai aalaaalaaalaaalaaalaaalaaalaaalaaalaaalaaalaaalaaalaaalaaalaaalaaalaaalaaalaaalaaalaaalaaalaaalaaalaaalaaalaaalaaalaaalaaalaaalaaalaaalaaalaaalaaalaaalaaalaaalaaalaaalaaalaaalaaalaaalaaalaaalaaalaaalaaalaaaalaalaalaalaalaalaalaalaalaalaalaalaalaalaalaalaalaalaalaalaalaalaalaalaalaalaalaalaalaalaalaalaalaalaalaalaalaalaalaalaalaalaalaalaalaalaalaalaalaalaalaalaalaalaalaalaalaalaalaalaalaalaalaalaalaalaalaalaalaalaalaalaalaalaalaalaALAALAALAALAALAALAALAALAALAALAALAALAALAALAALAALAALAALAALAALAALAALAALAALAALAALAALAALAALAALAALAALAALAALAALAALAALAALAALAALAALAALAALAALAALAALAALAALAALAALAALAALAALAALAALAALAALAALAALAALAALAALAALAALAALAALAALAALAALAALAALAALAALAALAALAALAALAALAALAALAALAALAALAALAALAALAALAALAALAALAALAALAALAALAALAALAALAALAALAALAARA
.
Jgll Jl 1000000000000000000000000000000000000000000000000000000000000000000000000
aai dall bI yI aal J. 1
Lg) AaI IaI aIy
.()
sglj g y pJn 2
J
J
J
J
J
J
J
J
J
Jlababwgljglllpaiae 8 8 8 8 8 8 8 8 8 8 8 8 8 8 8 8 8 8 8 8 8 8 8 8 8 8 8 8 8 8 8 8 8 8 8 8 8 8 8 8 8 8 8 8 8 8 8 8 8 8 100
JabbI bI jg 8. aI dI Ic
Jagll cbi Jabi U g .JgJIy
pIgI cI rRbI bRbAil
pucnuslljlabyglcfrarly
abwgljglll plzj 8 .
pss (Jibla pgs L) solz
gl odgao aIacg g ydu cd
d jy jy dgyall g zll Jaia
. Laalei pgiIac! g
Jgogll jg gaggokall li
jgsi i hll jgs Jlaic Ic ll
.
.
| العربية | العربية | العربية |
| - | العربية | A |
| العربية الحرفية | العربية | B |
| العربية الحرفية بधانسwarل محيى | العربية | C |
| العربية Off | العربية | D |
| العربية Off | العربية | E |
| العربية Off | العربية | F |
| العربية | العربية | H |
| . B+C J R J R J R J R J R J R J R J R J R J R J R J R J R J R J R J R J R J R J R J R J R J R J R J R J R J R J R J R J R J R J R J R J R J R J R J R J R J R J R J R J R J R J R J R J R J R J R J R J R J R J | . C | H |
| . D | H | |
| . E | H | |
| . F | H |
85x1.5
iJ 1
(")