
SE 122 - Vacuum Cleaner STIHL - Free user manual and instructions
Find the device manual for free SE 122 STIHL in PDF.
| Product type | Wet and dry vacuum cleaner |
| Brand | STIHL |
| Model | SE 122 (SE 122 E with tool socket) |
| Rated voltage | 230 V - 240 V / 50 Hz |
| Maximum power consumption | 1500 W |
| Max. suction power | 3700 l/min |
| Max. vacuum pressure | 250 mbar |
| Tank volume | 30 litres |
| Suction hose length | 3 m |
| Hose inner diameter | 36 mm |
| Dimensions (L x W x H) | 485 x 385 x 600 mm |
| Net weight (SE 122) | 10 kg |
| Weight ready for use (SE 122) | 12.1 kg |
| Protection class | II (SE 122) / I (SE 122 E) |
| Protection rating | IP X4 |
| Vibration level | < 2.5 m/s² |
| Recommended mains fuse | 16 A |
| Main features | Dry and liquid suction, safety float, integrated filter cleaning, automatic mode (SE 122 E) |
| Included accessories | Chrome hose, crevice nozzle, universal nozzle, floor nozzle, dust bag, tube holder |
| Wear parts | Filter element, dust bag |
| Routine maintenance | Cleaning filter element, emptying tank, checking power cable |
Frequently Asked Questions - SE 122 STIHL
User questions about SE 122 STIHL
0 question about this device. Answer the ones you know or ask your own.
Ask a new question about this device
Download the instructions for your Vacuum Cleaner in PDF format for free! Find your manual SE 122 - STIHL and take your electronic device back in hand. On this page are published all the documents necessary for the use of your device. SE 122 by STIHL.
USER MANUAL SE 122 STIHL
natural_image
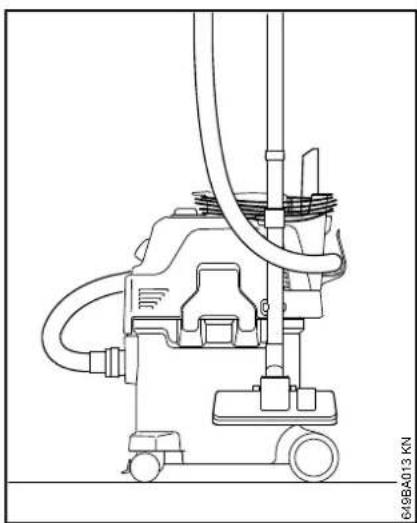
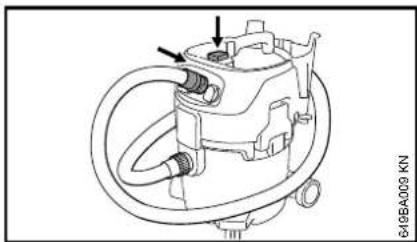
Exterior view of a Stihler vacuum cleaner with attached hose and control panel (no visible text or symbols)Gebrauchsanleitung
Instruction Manual
Notice d'emploi
natural_image
Diagram showing a person pressing down on a cart with a downward arrow, no text or symbols presentnatural_image
Mechanical assembly diagram showing a pipe fitting with a valve and directional arrow (no text or symbols)natural_image
Technical line drawing of a vacuum cleaner assembly (no text or symbols)natural_image
Technical line drawing of a mechanical device with no visible text or symbolsGuide to Using this Manual 20
Safety Precautions and Working
Techniques 20
Lock the machine in position 23
Assembling the Unit 23
Connecting to Power Supply 24
Switching On 25
Working 26
Switching Off 26
After Finishing Work 27
Emptying the container 27
Cleaning the filter element 28
Replacing the filter element 28
Maintenance and Care 29
Minimize Wear and Avoid Damage 30
Troubleshooting 30
Main Parts 32
Specifications 33
Maintenance and Repairs 34
Disposal 34
EC Declaration of Conformity 34
Dear Customer,
Thank you for choosing a quality engineered STIHL product.
It has been built using modern production techniques and comprehensive quality assurance.
Every effort has been made to ensure your satisfaction and trouble-free use of the product.
Please contact your dealer or our sales company if you have any queries concerning this product.
Your
Dr. Nikolas Stihl
STIHL
SE 122, SE 122 E
This instruction manual is protected by copyright. All rights reserved, especially the rights to reproduce, translate and process with electronic systems.
Guide to Using this Manual Safety Precautions and Working Techniques
Pictograms
All the pictograms attached to the machine are shown and explained in this manual.
Symbols in text

WARNING
Warning where there is a risk of an accident or personal injury or serious damage to property.

NOTICE
Caution where there is a risk of damaging the machine or its individual components.
Engineering improvements
STIHL's philosophy is to continually improve all of its products. For this reason we may modify the design, engineering and appearance of our products periodically.
Therefore, some changes, modifications and improvements may not be covered in this manual.

Special safety precautions are necessary when using the unit. The power supply is a particular source of danger.

Before commissioning, it is important to read and understand the User Manual and to keep it in a safe place for future reference. Failure to observe the User Manual may lead to serious or even fatal injury.

WARNING
- Minors should never be allowed to operate this power tool. Supervise children to make sure that they do not play with the unit.
- Do not pass on or lend the unit to persons who are not familiar with this model and its handling – always include the User Manual.
- Disconnect plug from wall outlet before performing any work on the machine, e.g. cleaning, maintenance, replacing parts.
Observe all applicable local safety regulations, e.g., by employers' liability insurance associations, social insurance systems, occupational safety authorities, etc.
When the unit is not in use, shut it off so that it does not endanger others. Secure it against unauthorized use and disconnect the mains plug.
The unit may only be used by persons who have been instructed in its use and handling or who can demonstrate that they can operate the tool safely.
The unit can be used by persons with limited physical, sensory or mental capacity or with little experience and know-how as long as they are supervised and have been instructed on how to handle the unit safely and understand the risks associated with it.
The user is responsible for accidents or risks involving third parties or their property.
If you have not used this unit before: Have your dealer or a trained expert show you how to operate it safely.
Before each use, check that the unit is in proper condition. Pay special attention to the connecting cable, mains plug and safety devices.
Inspect the connecting cable regularly for signs of damage and aging. Never use the unit if the connecting cable is damaged – Danger of electrocution!
Do not use the connecting cable to pull or transport the unit.
Connect only electric power tools to the socket outlet – see "Connecting the tool to the power supply" and "Turning on the tool".
Do not use a high-pressure washer to clean the unit. The solid jet of water may damage parts of the unit.
Never spray the upper part of the vacuum cleaner with water – Danger of a short circuit!
Accessories and Spare Parts
Only use parts and accessories that are explicitly approved for this power tool by STIHL or are technically identical. If you have any questions in this respect, consult your dealer. Use only high quality parts and accessories. Otherwise, there is a risk of accidents and damage to the unit.
STIHL recommends the use of original STIHL parts and accessories. They are specifically designed to match the product and meet your performance requirements.
Never attempt to modify your power tool in any way since this may increase the risk of personal injury. STIHL excludes all liability for personal injury and damage to property caused while using unauthorized attachments.
Applications
The unit is suitable for commercial use, such as in hotels, schools, hospitals, industry, stores, offices and rental property businesses.
Vacuum dry, non-flammable materials (dust, dirt, broken pieces of glass, wood chips, shavings, sand, etc.) and non-flammable liquids (wastewater, spilled juice, etc.)
Do not vacuum hot materials (hot ashes, flammable explosive dust, glowing cigarette butts, etc.), flammable liquids (gasoline, thinners, etc.) or aggressive liquids (acids, alkalis) – Danger of fire or explosion!
The unit is not suitable for harmful dusts.
Other uses of the unit are not permitted and may lead to accidents or damage to the unit. The unit must not be modified in any way – this may also lead to accidents or damage to the unit.
Transporting the Unit
For safe transportation in and on vehicles, attach the unit with straps so that it does not slide or tip over.
Do not tilt the unit if there is liquid in the tank.
Before transporting it, engage all locks on the tank.
Before Starting Work
Check the unit
- It must be possible to move the switch to the 0 position easily
- The switch must be in the 0 position.
To reduce the risk of accidents and personal injury, do not operate the unit if it is not in proper condition!
Only operate the unit if all of its components are undamaged and securely mounted.
Before vacuuming liquids or wet materials, remove the filter bag and check the functioning of the float. Always use the filter element when working.
Never attempt to modify the controls or safety devices.
Electrical connection.
Reduce the risk of electric shock:
- Voltage and frequency of the machine (see rating plate) and the voltage and frequency of your power supply must be the same.
- Examine the connecting cord, power plug and extension cord for damage. Damaged cords, couplings and plugs or connecting cords that do not comply with the regulations must not be used
- Only connect electrical connector to a properly installed wall outlet.
- Only use extension cords that comply with the regulations for the intended application.
- Check that the insulation of the connection cable, extension cord, plug and coupling is in good condition.
Position the connection cable and extension cord correctly:
- Check minimum cross section of wires (wire gauge) – see "Connecting to Power Supply".
- To reduce the risk of stumbling, position and mark the connecting cord so that it cannot be damaged or endanger others.
English
- Using unsuitable extension cords can be dangerous. Only use extension cords that are approved for outdoor use, are appropriately labeled and have a sufficient cable cross-section.
- The plug and coupling of the extension cord must be waterproof or routed in such a way that they cannot come into contact with water – the plug and coupling of the extension cord must not be immersed in water.
- Do not allow cord to rub on edges or pointed or sharp objects.
- don't trap or squeeze the cord in or under doors or windows
- If cords are twisted – unplug the power tool and straighten them out
- Always unwind the extension cord completely from the cable reel to reduce the risk of fire from overheating.
While Working

If the power cord is damaged, immediately disconnect the plug from the wall outlet to avoid the risk of electric shock.
Avoid damage to the power supply cord. Do not drive over it, pinch or tug it.
Never pull the connection cable to disconnect it from the wall outlet. To unplug, grasp the mains plug, not the cable.
Only touch the mains plug, connection cable and extension cord and electrical plug connections with dry hands.
Never spray electrical devices with water – Danger of a short circuit!

To reduce the risk of a short circuit or electrocution, never work with the vacuum cleaner in the rain or in wet or very damp locations!
In the event of imminent danger or in an emergency – move switch to 0.
Never leave a running unit unattended.
Do not leave the unit outdoors in the rain.
Only operate the unit while standing. Do not cover the unit; ensure adequate motor ventilation.
Only vacuum with undamaged filter element.
If foam develops or liquid leaks, end work immediately, pull mains plug and empty tank.
If the unit is subjected to unusual stress for which it was not designed (e.g., heavy impact or a fall), always check that it is in safe operating condition before continuing work – see also "Before Starting Work". Make sure the safety devices are working properly. Do not continue operating the machine if it is damaged. In case of doubt, contact a dealer.
Before leaving the unit unattended: Turn it off and disconnect the mains plug.
After Finishing Work
Disconnect the mains plug from the wall outlet.
Never jerk the connecting cord to disconnect it from the wall outlet. To unplug, grasp the plug, not the cord.
Always clean dust and dirt off the unit – do not use any grease solvents for this purpose.
Maintenance and repairs

WARNING
Before starting any work on the machine: Always disconnect the machine from the mains power supply.
- Use only high-quality spare parts. Otherwise, there may be a risk of accidents and damage to the unit. If you have any questions in this respect, consult a servicing dealer.
- To avoid risks, work on the machine (e.g. replacing a damaged connecting cord) may only be carried out by authorized dealers or qualified electricians.
Clean plastic parts with a cloth. Harsh detergents may damage the plastic.
Clean ventilation slots in motor housing as needed.
The machine must be serviced regularly. Do not attempt any maintenance or repair work not described in the Instruction Manual. All other work should be carried out by a servicing dealer.
STIHL recommends the use of genuine STIHL spare parts. Such parts have been optimized for the machine and the user's requirements.
STIHL recommends that maintenance and repair work be carried out only by authorized STIHL dealers. STIHL dealers receive regular training and are supplied with technical information.
Lock the machine in position
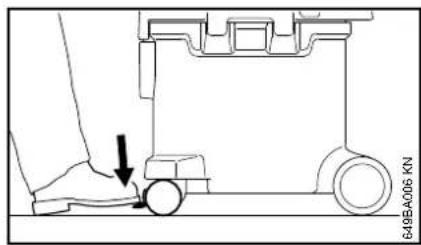
Apply the brake on the caster to lock the machine in a particular position.
Assembling the Unit
Various accessory parts must be mounted on the machines before starting for the first time.
WARNING
Do not plug the power cord into the outlet until the machine is completely assembled.
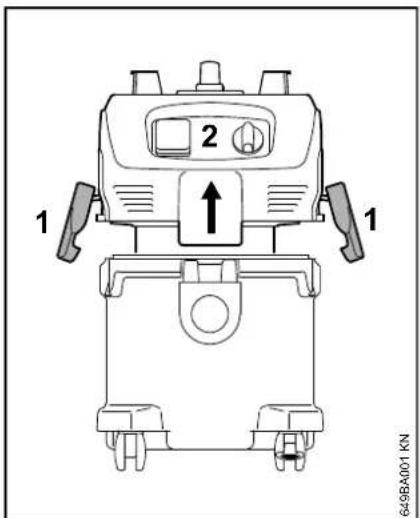
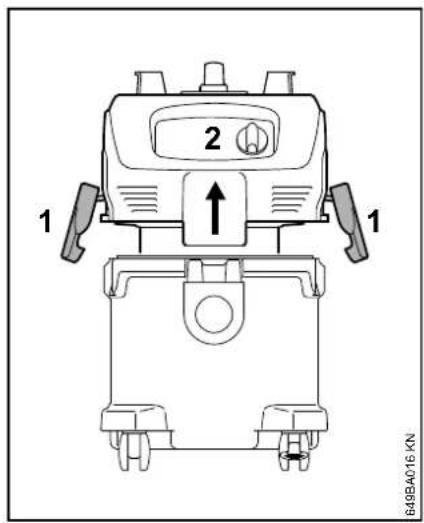
●Release the latches (1)
●Lift the upper part of the vacuum cleaner (2) vertically up and off
- Remove the accessories from the container
English
●Push filter bag sleeve onto intake port as far as possible (see instructions on filter bag)
- Refit the upper part of the vacuum cleaner (2) and close the latches (1) – ensure that the latches engage properly
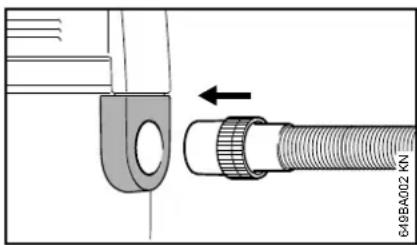
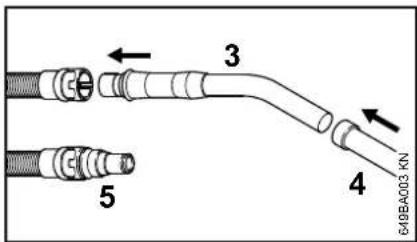
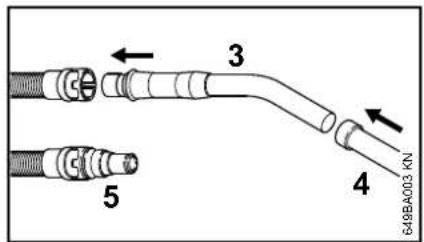
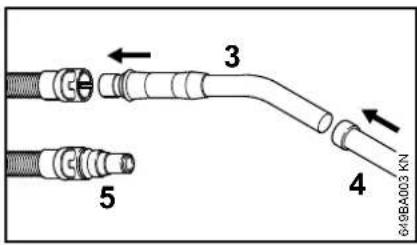
●Push the suction hose into the connector
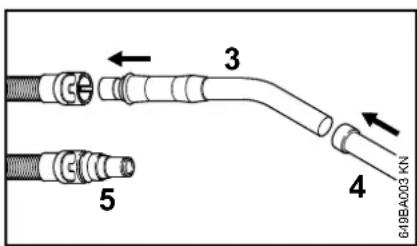
●Push the handle tube (3) into the sleeve of the suction hose
●Push extension tube (4) onto the handle tube
To connect other tools (e. g., grinding machine):
●Fit adapter for power tools (5) (supplied with the model SE 122 E) to suction hose instead of handle tube
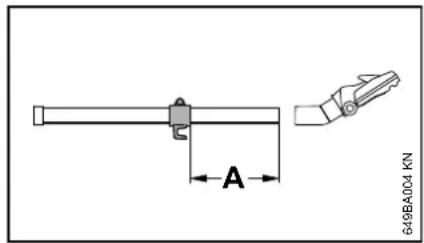
●Mount extension tube holder at a distance (A) of approx. 20 cm from the bottom edge of the extension tube
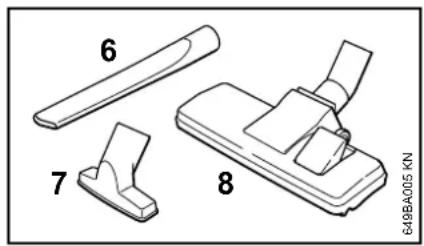
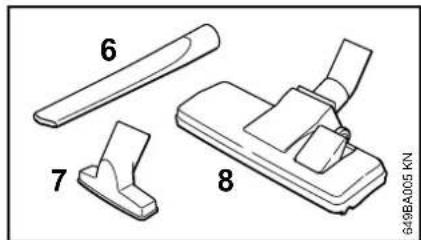
●Depending on the intended use of the vacuum, fit the crevice tool (6), all-purpose tool (7) or floor tool (8) onto the extension tube.
Connecting to Power Supply
The voltage and frequency of the machine (see rating plate) must match the voltage and frequency of the power connection.
The minimum fuse protection of the power connection must comply with the specifications – see "Specifications".
The machine must be connected to the power supply via an earth-leakage circuit breaker to disconnect the power supply if the differential current to earth exceeds 30 mA.
The power connection must correspond to IEC 60364 and relevant national regulations.
Extension cord
The design of the extension cord must at least fulfill the same features as the connecting cord on the machine. Observe the design marking (type designation) on the connecting cord.
The cores in the cord must have the following minimum cross-section depending on the mains voltage and cord length.
Cord length Minimum cross-section
| 220 V – 240 V: | |
| Up to 20 m 1.5 mm | ^2 |
| 20 m to 50 m 2.5 mm | ^2 |
| 100 V – 127 V: | |
| Up to 10 m AWG 14 / 2.0 mm | ^2 |
| 10 m to 30 m AWG 12 / 3.5 mm | ^2 |
Connection to the power supply socket
Before connection to the power supply, check that the machine is switched off – see "Switching off the machine"
●Plug the power cord or extension cord into a properly installed outlet
Switching On
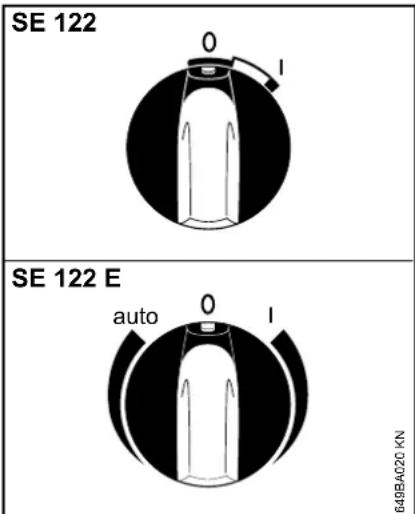
SE 122

Switch positions
Switch position 0 – vacuum cleaner is switched off
Switch position I – vacuum cleaner is switched on
● To switch on, turn master switch to I
SE 122 E
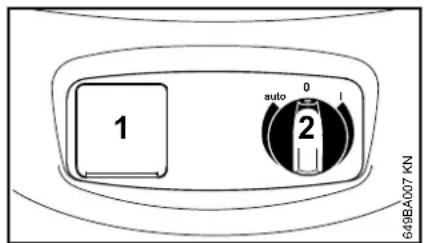
Power tools can be plugged into the machine socket (1). Do not exceed the maximum connected load of the machine socket – see "Specifications".
English
●Switch off the vacuum cleaner and the electric power tool that is to be connected prior to connection to the machine socket (1).
●The machine is switched on and off or to automatic mode by means of the switch (2). The suction power is adjusted manually by turning the switch.
Switch positions
Switch position 0 – Vacuum cleaner is switched off, the socket outlet cannot be used.
Switch position I – Vacuum cleaner is switched on, the socket outlet cannot be used.
Switch position auto – The power tool connected to the machine socket switches the vacuum cleaner on and off via the automatic function.
The connected power tool must be switched off before setting the master switch to the "auto" position.
The motor runs on for a few seconds after switching off in order to empty the suction hose.
●To switch on, set master switch to the corresponding switch position
English
Working Switching Off
Vacuuming dry materials

WARNING
Flammable materials must not be vacuumed.
Always make sure that the filter bag has been fitted in the container before vacuuming dry materials. The vacuumed material can then be disposed of without difficulty. Dry materials can also be vacuumed without filter bag.

NOTICE
Never use the vacuum cleaner with a damaged filter element or without the filter element.
Vacuuming liquids

WARNING
Flammable liquids must not be vacuumed.
Always remove the filter bag and check operation of the float before vacuuming liquids. The float switches off the air stream when the container is full. If the machine is exclusively used for wet-vacuuming, the filter element should be replaced by a special insert (special accessory).
The filter element is damp after vacuuming liquids. The filter element is likely to clog up more quickly if dry
material is vacuumed while it is still damp. For this reason, the filter element should be dried or replaced by a dry filter element before vacuuming dry materials.
649BA020 KN
●Turn the master switch to 0
●Unplug the power plug from the socket
After Finishing Work
●Empty the container and clean the machine
After vacuuming liquids:
- Remove the upper part of the vacuum cleaner so that the filter element can dry
natural_image
Technical line drawing of a vacuum cleaner assembly (no text or symbols)●Coil power cord around handle and holder
●Fasten the extension tube, suction hose and accessories to the holders provided for this purpose
●The vacuum cleaner must be stored in a dry room and protected against unauthorized use
Emptying the container
●Switch off the vacuum cleaner
●Unplug the power plug from the socket
●Release the spring catches (1)
●Lift the upper part of the vacuum cleaner (2) vertically up and off
When dry-vacuuming without filter bag and when wet-vacuuming
●Empty the container and dispose of its contents in accordance with the applicable regulations
●Continue with: Refit the upper part of the vacuum cleaner
When dry-vacuuming with filter bag
●Pull filter bag sleeve (1) off intake port and seal opening in filter bag sleeve with slide (2)
●Carefully remove filter bag from container and dispose of in accordance with statutory regulations
- Insert new filter bag (3) (instructions on filter bag)
●Push filter bag sleeve onto intake port as far as possible
Refit the upper part of the vacuum cleaner
●Clean the edge of the container
●Refit the upper part of the vacuum cleaner
●Clean the sleeve and intake port before fitting the suction hose
English
Cleaning the filter element

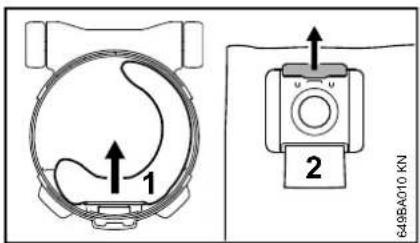
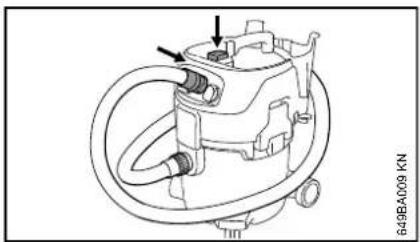
●Squeeze sleeve (1) of suction hose (arrows) together to release it
- Remove suction hose
●Switch on machine
natural_image
Technical line drawing of a mechanical device with no visible text or symbols●Seal the hose at the sleeve by firmly pressing the sleeve against the flat surface beside the switch (as shown in picture)
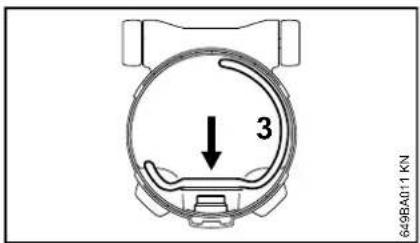
●Press the filter cleaning button 3 times
Dust deposits are removed from the filter element.
Replacing the filter element

●Unplug the power plug from the socket
- Remove upper part of vacuum cleaner and turn it over
●Unscrew supporting cage for filter (1)
- Remove filter element (2) and dispose of it in accordance with the statutory regulations
●Fit new filter element in the reverse sequence of steps
- Check correct operation of the float: the float must move easily when the supporting cage for the filter is turned over.
●Refit upper part of the vacuum cleaner

Never use the vacuum cleaner with a damaged filter element or without the filter element.
Maintenance and Care
| The following intervals apply for normal operating conditions. The specified intervals must be shortened accordingly when working for longer than normal or under difficult cutting conditions (extensive dust, etc.). | Before starting work | At the end of work and/or daily | Weekly | Monthly | If faulty | If damaged | As required | |
| Complete unit | visual inspection (condition) X | |||||||
| Clean X | ||||||||
| Connecting cable | check X | |||||||
| Have replaced by servicing dealer ^1) | X | |||||||
| Switch | Function test X | |||||||
| Have replaced by servicing dealer ^1) | X | X | ||||||
| Ventilation slots in motor housing Clean X | ||||||||
| Filter bag change X | ||||||||
| Filter element | Clean X | |||||||
| replace X | ||||||||
| Container Drain X | ||||||||
| Accessible screws, nuts and bolts Tighten X | ||||||||
| Safety information label | replace X | |||||||
Minimize Wear and Avoid Damage
Observing the instructions in this manual helps reduce the risk of unnecessary wear and damage to the power tool.
The power tool must be operated, maintained and stored with the due care and attention described in this instruction manual.
The user is responsible for all damage caused by non-observance of the safety precautions, operating and maintenance instructions in this manual. This includes in particular:
– Alterations or modifications to the product not approved by STIHL.
- Using tools or accessories which are neither approved or suitable for the product or are of a poor quality.
– Using the product for purposes for which it was not designed.
– Using the product for sports or competitive events.
- Consequential damage caused by continuing to use the product with defective components.
Maintenance Work
All the operations described in the "Maintenance Chart" must be performed on a regular basis. If these maintenance operations cannot be performed by the owner, they should be performed by a servicing dealer.
STIHL recommends that you have servicing and repair work carried out exclusively by an authorized STIHL
servicing dealer. STIHL dealers are regularly given the opportunity to attend training courses and are supplied with the necessary technical information.
If these maintenance operations are not carried out as specified, the user assumes responsibility for any damage that may occur. Among other things, this includes:
- Damage to the motor due to neglect or deficient maintenance (e.g. not cleaning cooling air inlets).
- Damage due to incorrect electrical connection (voltage, inadequately rated connecting cords).
- Corrosion and other consequential damage resulting from improper storage.
– Damage to the product resulting from the use of poor quality replacement parts.
Wear Parts
Some parts of the machine are subject to normal wear and tear even when the machine is used in conformity with its intended use. These parts must be replaced in good time, depending on the nature and duration of use. Among other parts, this includes:
- Filter element, filter bag
Troubleshooting
Fault: Motor does not start
Cause Remedy
Mains circuit-breaker has been tripped
Check and reset mains circuit breaker
Overload protection has been tripped
Let vacuum cleaner cool for approx. 5 minutes
Fault: Motor does not run in automatic mode
Cause Remedy
Power tool faulty or not plugged in correctly
Check correct operation of power tool and insert plug properly
Fault: Poor suction performance
Cause Remedy
Manually set suction See "Operation" power is too low
Filter bag is full See "Emptying the container"
Suction hose / tool is clogged
Clean suction hose / tool
Filter element is fouled
See "Cleaning the filter element" and "Replacing the filter element"
Gasket between upper part of vacuum cleaner and container is fouled or faulty
Clean or replace gasket
English
Fault: No suction performance when wet-vacuuming
Cause Remedy
Container full (intake port is sealed by float) See "Emptying the container"
Main Parts
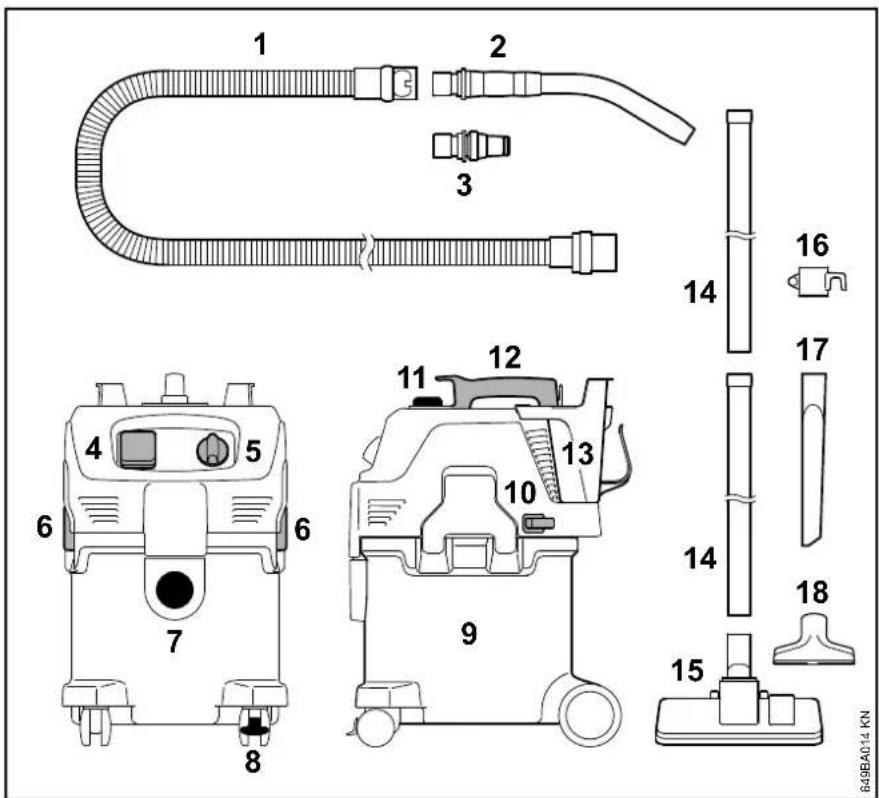
1 Suction hose
2 Handle tube
3 Sleeve for power tools 1)
4 Socket outlet 1)
5 Switch
6 Latch
7 Connector for suction hose
8 Caster with brake
9 Container
10 Extension tube holder
11 Filter cleaning button
12 Handle
13 Hose holder
14 Extension tube
15 Floor tool
16 Extension tube holder
17 Crevice tool
18 All-purpose tool
Specifications
Motor
| Rated voltage: | 230 V - 240 V 100 V^2) |
| Frequency: 50 Hz | 50 Hz - 60 Hz^2) |
Max. power
consumption: 1500 W
Power consumption to
Total connected load
SE 122 E: 3600 W
2300 W 3)
Mains fuse: 16 A
15 A 2)
10 A 1), 3)
Protection class
SE 122: II 回
Protection class
SE 122 E: I
Type of protection: IP X4
1) AU, NZ, only
2) JP only
3) CH only
Performance data
Max. intake capacity, air: 3700 l/min
Max. vacuum: 250 mbar
Dimensions
| Length approx.: 485 mm | |
| Width approx.: 385 mm | |
| Height approx.: 600 mm | |
| Container capacity: 30 l | |
| Length of suction hose | 3 m |
| Inside diameter: | 36 mm |
Weight
| SE 122 | |
| Device: | approx. 10 kg |
| Ready for operation: | approx. 12.1 kg |
SE 122 E
| Device: | approx. |
| 10 kg | |
| Ready for operation: | approx. |
| 12.3 kg |
Sound and vibration levels
| Sound pressure level L_p to EN 60704-1 at a distance of 1 m | 62 dB(A) |
| Vibration level a_hv on hand tube according to IEC 60335-2-69 | < 2.5 m/s^2 |
| For the sound pressure level, the K-value in accordance with Directive 2006/42/EC = 2 dB(A). | |
REACH
REACH is an EC regulation and stands for the Registration, Evaluation, Authorization and Restriction of Chemical substances.
For information on compliance with the REACH regulation (EC) No. 1907/2006 see
www.stihl.com/reach
Maintenance and Repairs Disposal
Users of this machine may only carry out the maintenance and service work described in this user manual. All other repairs must be carried out by a servicing dealer.
STIHL recommends that you have servicing and repair work carried out exclusively by an authorized STIHL servicing dealer. STIHL dealers are regularly given the opportunity to attend training courses and are supplied with the necessary technical information.
When repairing the machine, only use replacement parts which have been approved by STIHL for this power tool or are technically identical. Only use high-quality replacement parts in order to avoid the risk of accidents and damage to the machine.
STIHL recommends the use of original STIHL replacement parts.
Original STIHL parts can be identified by the STIHL part number, the STIHL logo and the STIHL parts symbol (the symbol may appear alone on small parts).
Contact the local authorities or your STIHL servicing dealer for information on disposal.
Improper disposal can be harmful to health and pollute the environment.
●Take STIHL products including packaging to a suitable collection point for recycling in accordance with local regulations.
●Do not dispose with domestic waste.
EC Declaration of Conformity
declares under our sole responsibility that
Designation: Wet and dry
vacuum cleaner
Make: STIHL
Series: SE 122,
SE 122 E
Serial identification 4774
number:
conforms to the relevant provisions of Directives 2011/65/EU, 2006/42/EC and 2014/30/EU and has been developed and manufactured in compliance with the following standards in the versions valid on the date of production:
EN ISO 12100-1, EN ISO 12100-2,
EN 60335-1, EN 60335-2-69,
EN 55014-1, EN 55014-2,
EN 61000-3-2, EN 61000-3-3
Technical documents deposited at:
The year of construction, the country of manufacture and the machine number are shown on the machine.
English
Done at Waiblingen, 03.02.2020
Director Product Certification &
Regulatory Affairs
CE
SE 122, SE 122 E
Table des matières
natural_image
Mechanical assembly diagram showing a pipe fitting with a valve and directional arrow (no text or symbols)natural_image
Technical line drawing of a vacuum cleaner assembly (no text or symbols)natural_image
Technical line drawing of a mechanical component with no visible text or symbolsnatural_image
Technical line drawing of a mechanical device with a foot and wheels, showing a downward force arrow (no text or symbols)natural_image
Mechanical assembly diagram showing a pipe fitting with a valve and threaded end (no text or symbols)natural_image
Technical line drawing of a mechanical device with hoses and wheels (no text or symbols)natural_image
Technical line drawing of a mechanical device with no visible text or symbolsnatural_image
Technical line drawing of a vacuum cleaner assembly (no text or symbols)natural_image
Technical line drawing of a mechanical device with no visible text or symbolsnatural_image
Technical line drawing of a mechanical device with a foot and wheels, showing a downward force arrow (no text or symbols)natural_image
Mechanical assembly diagram showing a pipe fitting with a valve and directional arrow (no text or symbols)natural_image
Technical line drawing of mechanical components including a rod, bracket, and clip (no text or symbols)natural_image
Technical line drawing of a vacuum cleaner assembly (no text or symbols)natural_image
Technical line drawing of a mechanical device with no visible text or symbolsnatural_image
Technical line drawing of a mechanical component with a foot and a roller, showing no text or symbols.natural_image
Technical diagram showing a mechanical component with a threaded fitting and an arrow indicating direction (no text or symbols present)natural_image
Technical line drawing of a mechanical device with hoses and wheels (no text or symbols)natural_image
Technical line drawing of a mechanical device with no visible text or symbolsnatural_image
Technical line drawing of a mechanical device with a foot and wheels, showing a downward arrow indicating motion (no text or symbols)natural_image
Mechanical assembly diagram showing a pipe fitting with a valve and directional arrow (no text or symbols)●Sæt sugeslangen i sugestudsen
natural_image
Technical line drawing of mechanical components including a rod, bracket, and clip (no text or symbols)natural_image
Technical line drawing of a mechanical device with hoses and wheels (no text or symbols)natural_image
Technical line drawing of a mechanical device with no visible text or symbolsnatural_image
Technical diagram showing a mechanical component with a threaded pipe and an arrow indicating direction (no text or symbols present)●Stikk sugeslangen inn i sugestussen.
natural_image
Technical line drawing of a mechanical device with hoses and wheels (no text or symbols)natural_image
Technical line drawing of a mechanical device with no visible text or symbolsnatural_image
Diagram showing a person pressing down on a cart with a downward arrow, no text or symbols presentnatural_image
Technical diagram showing a mechanical component with a threaded fitting and an arrow indicating direction (no text or symbols present)natural_image
Technical line drawing of a vacuum cleaner assembly (no text or symbols)natural_image
Technical line drawing of a mechanical device with no visible text or symbolsnatural_image
Diagram showing a person pressing down on a cart with a downward arrow, no text or symbols presentAby sa mohol vysávač pevne ustavit' na nejakom mieste, je možné stlačit' na vodiacom koliesku aretačnú brzdu.
natural_image
Mechanical assembly diagram showing a pipe fitting with a valve and directional arrow (no text or symbols)●Nasávaciu hadicu zasuňte do nasávacieho hrdla
●Zastrčte rúrovú rukovát' (3) do objímky nasávacej hadice
●Nasad'te nasávaciu rúru (4) na rúrovú rukovát'
natural_image
Technical line drawing of a vacuum cleaner assembly (no text or symbols)natural_image
Technical line drawing of a mechanical device with no visible text or symbolsnatural_image
Diagram showing a person pressing down on a cart with a downward arrow, no text or symbols presentnatural_image
Technical line drawing of a vacuum cleaner assembly (no text or symbols)natural_image
Technical line drawing of a mechanical device with no visible text or symbolsOverbelastingsbe- veiliging is ingeschakeld
Reservoir vol (vlot- Zie "Reservoir
ter sluit de legen"
aanzuigopening af)
natural_image
Mechanical assembly diagram showing a pipe fitting with a valve and threaded end (no text or symbols)natural_image
Technical line drawing of a vacuum cleaner assembly (no text or symbols)natural_image
Technical line drawing of a mechanical device with no visible text or symbolsnatural_image
Mechanical assembly diagram showing a pipe fitting with a valve and directional arrow (no text or symbols)natural_image
Technical line drawing of a vacuum cleaner assembly (no text or symbols)natural_image
Technical line drawing of a mechanical device with no visible text or symbolsnatural_image
Technical line drawing of a vacuum cleaner assembly (no text or symbols)natural_image
Technical line drawing of a mechanical device with no visible text or symbolsnatural_image
Technical line drawing of a vacuum cleaner assembly (no text or symbols)natural_image
Technical line drawing of a mechanical device with no visible text or symbolsnatural_image
Technical diagram showing a mechanical component with a threaded pipe and a separate curved component, no text or symbols present.●吸引ホースをコンテナに差し込みます
natural_image
Technical line drawing of a vacuum cleaner assembly (no text or symbols)natural_image
Technical line drawing of a mechanical device with no visible text or symbolsnatural_image
Technical line drawing of a vacuum cleaner assembly (no text or symbols)natural_image
Technical line drawing of a mechanical device with no visible text or symbols2006/42/WE = 2 dB (A).
REACH
Trukurivid sisaladavd tamiseid olsid, paper on
Original because subject Trucktud koinverbal peegitrad parabelle.
000000946 025 EST
0458-649-9921-B.VA0.M21
© ANDREAS STILL AG & CO. KG, 2022
STIHL
natural_image
Technical line drawing of a mechanical assembly with a foot and wheels, showing a downward force arrow (no text or symbols)natural_image
Technical diagram showing a mechanical component with a threaded pipe and an arrow indicating direction (no text or symbols present)●Pistke imivoolik imiotsakusse

natural_image
Technical line drawing of mechanical components including a rod, bracket, and clip (no text or symbols)natural_image
Technical line drawing of a mechanical device with hoses and components (no text or symbols)●Tömmake imivoolik maha
●Lülitage imiseade sisse
natural_image
Technical line drawing of a mechanical device with no visible text or symbolsSisediameeter: 36 mm
Mass
SE 122
Seade: u. 10 kg
natural_image
Technical line drawing of a mechanical assembly with a foot and wheels, showing a downward force arrow (no text or symbols)natural_image
Mechanical assembly diagram showing a pipe fitting with a valve and directional arrow (no text or symbols)natural_image
Technical line drawing of a vacuum cleaner assembly (no text or symbols)natural_image
Technical line drawing of a mechanical device with no visible text or symbolsnatural_image
Technical line drawing of a mechanical device with a foot and wheels, showing a downward arrow indicating motion (no text or symbols)natural_image
Technical diagram showing a mechanical component with a threaded pipe and directional arrow (no text or symbols)natural_image
Technical line drawing of mechanical components (no text or symbols)natural_image
Technical line drawing of a vacuum cleaner assembly (no text or symbols)natural_image
Technical line drawing of a mechanical component with no visible text or symbolsnatural_image
Diagram showing a person pressing down on a cart with a downward arrow, no text or symbols presentnatural_image
Technical diagram showing a mechanical assembly with a pipe fitting and a valve (no text or symbols)natural_image
Technical line drawing of a vacuum cleaner assembly (no text or symbols)natural_image
Technical line drawing of a mechanical device with no visible text or symbolsnatural_image
Technical line drawing of a mechanical assembly with a foot and wheels, showing a downward force arrow (no text or symbols)Radi pozicioniranja uređaja na jednom mestu, pritisnite kočnicu na transportnom valjku.
natural_image
Technical line drawing of a vacuum cleaner assembly (no text or symbols)●priključni kabl namotajte oko ručice i držača
●usisnu cev, usisno crevo i pribor pričvrstite na predviđenim držačima
- čuvajte usisivač na suvom mestu i osigurajte ga od neovlašćene upotrebe
natural_image
Technical line drawing of a mechanical device with no visible text or symbols- pritisnite čvrtsto naglavak na ravnu površinu pored prekidača – time se usisno crevo na naglavku zatvara (kao na slici)
●pritisnite dugme za čišćenje filtera 3 puta
Filterski element se tako čisti od naslaga prašine.
Srpski
Zamena filterskog elementa
1
2
649BA012 KN
- izvucite mrežni utikač iz utičnice
●gornji deo usisivača skinite i okrenite
●držač filtera (1) odvijte
-filterski element (2) izvucite i zbrinite prema zakonskim propisima
●novi filterski element ugradite po obrnutom redosledu
●proverite funkcionisanje plovka: pri okretanju držača filtera plovak mora biti lako pokretan
●montirajte gornji deo usisivača
UPUTSTVO


- Guide to Using this Manual Safety Precautions and Working Techniques
- Pictograms
- Symbols in text
- WARNING
- NOTICE
- Engineering improvements
- Accessories and Spare Parts
- Applications
- Transporting the Unit
- Before Starting Work
- Check the unit
- Electrical connection.
- English
- While Working
- After Finishing Work
- Maintenance and repairs
- Assembling the Unit
- Connecting to Power Supply
- Extension cord
- Connection to the power supply socket
- Switching On
- Switch positions
- Working Switching Off
- Minimize Wear and Avoid Damage
- Maintenance Work
- Wear Parts
- Troubleshooting
- Main Parts
- Performance data
- Maintenance and Repairs Disposal
- EC Declaration of Conformity
- Table des matières
- REACH
- Mass
- Zamena filterskog elementa
- UPUTSTVO
Brand : STIHL
Model : SE 122
Category : Vacuum Cleaner