XL 61 - Heating Master - Free user manual and instructions
Find the device manual for free XL 61 Master in PDF.
User questions about XL 61 Master
0 question about this device. Answer the ones you know or ask your own.
Ask a new question about this device
Download the instructions for your Heating in PDF format for free! Find your manual XL 61 - Master and take your electronic device back in hand. On this page are published all the documents necessary for the use of your device. XL 61 by Master.
USER MANUAL XL 61 Master
natural_image
Icon of an open book with an exclamation mark, enclosed in a diamond shape with a yellow diagonal stripe (no text or symbols)USER AND MAINTENANCE MANUAL
XL 61
| en | it | de | es | fr | nl | pt | da | fi | no | sv | pl | ru | cs | hu | sl | tr | hr | lt | | lv | et | ro | sk | bg | uk | bs | el | zh | kk |
NOTE:
TECHNICAL DATA TABLE - TABELLA DATI TECNICI - TECHNISCHE DATENTABELLE - TABLA DE DATOS TÉCNICOS - TABLEAU DES DONNÉES TECHNIQUES - TABEL TECHNISCHE GEGEVENS - TABELA DE DADOS TÉCNICOS - TEKNISK DATATABEL - TEKNISTEN TIETOJEN TAULUKKO - TABELL FOR TEKNISKE DATA - TABELL MED TEKNISKA EGENSKAPER - TABELA DANYCH TECHNICZNYCH - ТАБЛИЦЕ ТЕХНИЧЕСКИХ ДАННЫХ - TABULKA TECHNICKÝCH ÚDAJŮ - MŰSZAKI ADATOK TÁBLÁZATA - ТЕННИČNI PODATKI - TEKNÍK VERİLER TABLOSUNDA - TABLICI S TEHNIČKIM PODACIMA - TECHNINIŲ DUOMENU LENTELEJE - TEHNISKO DATU TABULA - TEHNILISTE ANDMETE TABEL - TABELUL CU DATE TEHNICE - TABULKA TECHNICKÝCH ÚDAJOV - ТАБЛИЦА ТЕХНИЧЕСКИ ДАННИ - ТАБЛИЦІ ТЕХНИЧНИХ ДАНИХ - TABELI SA TEHNIČKIM PODACIMA - ΠΙΝΑΚΙΔΑ ΤΩΝ ΤΕΧΝΙΚΩΝ ΣΤΟΙΧΕΙΩΝ - 技术参数 - ΤΕΧΝΙΚΑΛΒΙΚ ΚΘΡСЕТΚΙШТЕР ΚΕCTECI
| MODEL XL 61 | |
 | 17 kW-кВт14.600 kcal/h-ккал/ч58.000 Btu/h-БТЕ/ч |
 | 1,35 kg/h-кг/ч |
 | DIESEL-KEROSENEDизель-керосин |
 | 11 l-л |
 | ~220-240 V-B (-15% ÷ +10%) 50 Hz-Гц 0,85 A |
| ~110-120 V-B (-15% ÷ +10%) 50 Hz-Гц 1,7 A | |
 | 19 kg-кг |
 | 0,40 GpH 80°H LE DANFOSS |
 | 950 kPa-кПа9,5 bar-6ap |
IMPORTANT: In order to have a correct function you must use an electrical generator in class G3 or more (frequency variation ±1%, tension variation ±2%). The maximum power of electrical generator must be three time the nominal power of device that you must connect.
NOTE:
PICTURES - FIGURE - ABBILDUNGEN - FIGURAS - FIGURES - FIGUREN - FIGURAS - FIGURER - KUVAT - FIGURER - FIGUR - RYSUN-KI - РИСУНКИ - OBRÁZKY - ÁBRÁK - SLIKE - ŞEKİLLER - SLIKE - PAVEIKSLÉLIAI - ATTËLI - JOONISED - IMAGINI - OBRÁZKY - ФИ-ГУРА - МАЛЮНКИ - SLIKE - EİKONEΣ - 图 - СУРЕТТЕР
natural_image
Line drawing of an open cardboard box and a computer monitor with visible internal components (no text or symbols)1
natural_image
Diagram of a portable induction machine with airflow and heat transfer arrows (no text or symbols)2
PICTURES - FIGURE - ABBILDUNGEN - FIGURAS - FIGURES - FIGUREN - FIGURAS - FIGURER - KUVAT - FIGURER - FIGUR - RYSUN-KI - РИСУНКИ - OBRÁZKY - ÁBRÁK - SLIKE - ŞEKİLLER - SLIKE - PAVEIKSLÉLIAI - ATTËLI - JOONISED - IMAGINI - OBRÁZKY - ФИ-ГУРА - МАЛЮНКИ - SLIKE - EIKONEΣ - 图 - СУРЕТТЕР
text_image
B ON OFF C A 888° 888 ✓ ✓ ✓ X3
text_image
A B C4
IMPORTANT: READ AND UNDERSTAND THIS OPERATIONAL MANUAL BEFORE PERFORMING ASSEMBLY, COMMISSIONING OR MAINTENANCE ON THIS HEATER. INCORRECT USE OF THE HEATER CAN CAUSES SERIOUS INJURY. KEEP THIS MANUAL FOR FURTHER REFERENCE.
▶▶1. SAFETY INFORMATION (WARNINGS)
IMPORTANT: This air heater has been designed for mobile and temporary professional applications. It has not been designed for domestic use nor for thermal comfort of human.
IMPORTANT: This device is not suitable for operation by persons (including children) with impaired physical, sensory or mental faculties, as well as inexperienced personnel, unless supervised by a safety guardian. Children are not to be left unattended as to ensure they are not playing with the equipment.
WARNING: Carbon monoxide poisoning can prove to be fatal.
First symptoms of carbon monoxide poisoning are similar to influenza with severe headaches, dizziness and/or nausea. Such symptoms may be caused by heater fault. UPON NOTICING THESE SYMPTOMS, IMMEDIATELY LEAVE THE ROOM AND GO OUTSIDE, next, notify the technical service center that the heater needs to be repaired.
1.1. SUPPLY:
▶1.1.1. Personnel in charge of supply must be fully qualified, must be familiar with the manufacturer's manual as well as the effective regulations for safe supply of heaters.
▶1.1.2. Only the fuel types specifically listed on the heater's nameplate are to be used.
▶1.1.3. Before refueling, shut down the heater and wait for it to cool down.
▶1.1.4. Fuel cisterns are to be located in a separate facility.
▶1.1.5. All fuel containers are to be located within safe distance from the heater, as per the applicable regulations.
▶1.1.6. Fuel is to be stored in rooms with insulated floor, so that the fuel cannot penetrate the floor into the open flame below causing fuel combustion.
▶1.1.7. Fuel storage needs to follow all the applicable regulations.
1.2. SAFETY CONSIDERATIONS:
▶1.2.1. The heater should never be used in rooms with fuel, paint thinners and other combustible fumes.
▶1.2.2. All applicable local rules and regulations need be observed while using the heater.
▶1.2.3. Heaters in operation near tarpaulin, screens or other similar materials need to be located a safe distance away. The use of inflammable covers is highly encouraged.
▶1.2.4. The device is to be used in well ventilated interiors only. To ensure proper air circulation, a proper opening is required, as per the applicable regulations.
▶1.2.5. For heater power feed observe closely the voltage and frequency values given on the nameplate.
▶1.2.6. Only use grounded, three-core extension cords.
▶1.2.7. Minimal safety distance between the heater and combustible materials is: front = 2,5 m (8 ft); side, up and back = 1,5 m (5 ft).
▶1.2.8. To avoid fire, hot or working heater is to be placed on a stable and leveled flooring.
▶1.2.9. Animals are to be kept at a safe distance away from the heater.
▶1.2.10. Unplug the heater at all times during downtime.
▶1.2.11. Thermostat control allows the heater to be turned on at any time.
▶1.2.12. The heater must not be used in frequently visited rooms and in bedrooms.
▶1.2.13. If the heater is plugged in, hot, or currently running, it must not be moved, manipulated, refueled or attempt maintenance work of any kind.
▶1.2.14. Keep the safe distance between the hot parts of the heater and thermosensitive or combustible materials (including feeder cable).
▶1.2.15. In case the feeder cable is damaged, have it replaced at the technical service center to avoid danger.
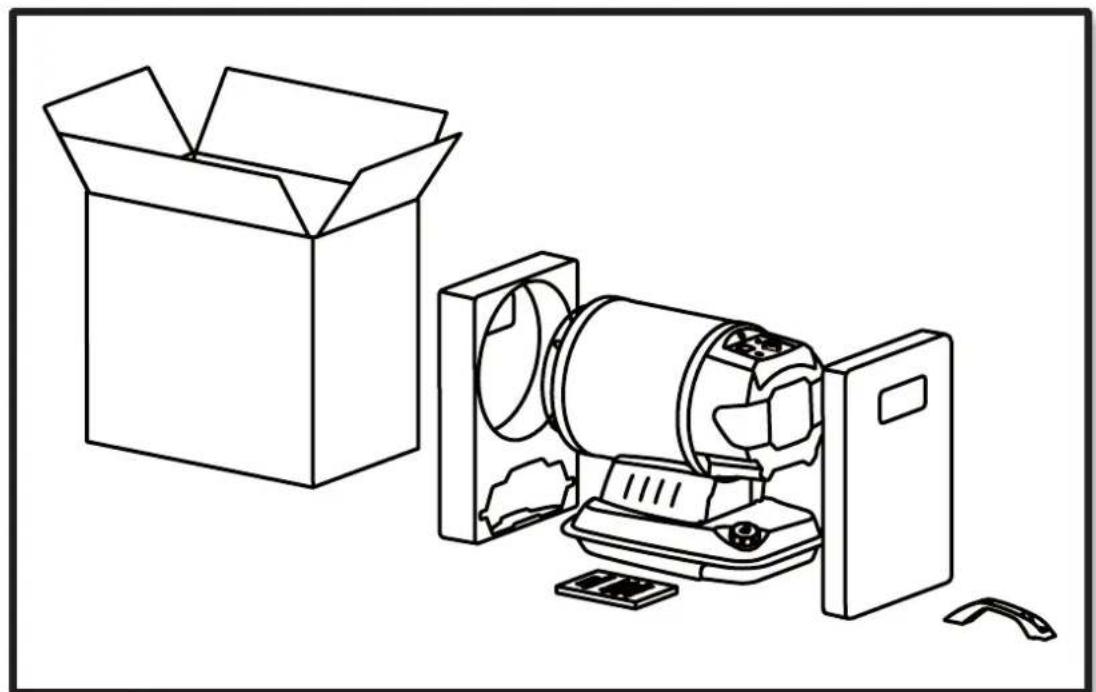
▶▶2. UNPACKING
See Fig. 1
▶2.1. Remove all the heater wrapping and packaging materials then dispose of them as per the applicable local regulations.
▶2.2. Remove all the components from the box.
▶2.3. Check for any damage during transport. If the heater appears damaged in any way, please inform your vendor promptly.
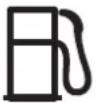
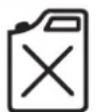
▶▶3. FUEL
⚠ WARNING: The heater only runs on DIESEL or KEROSENE fuel.
To avoid fire or explosion, use only diesel or kerosene fuel. Do not use gasoline, naphtha, paint thinners, alcohol or any other combustible liquids.
For low-temperature operation, use antifreeze supplements.
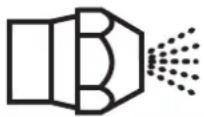
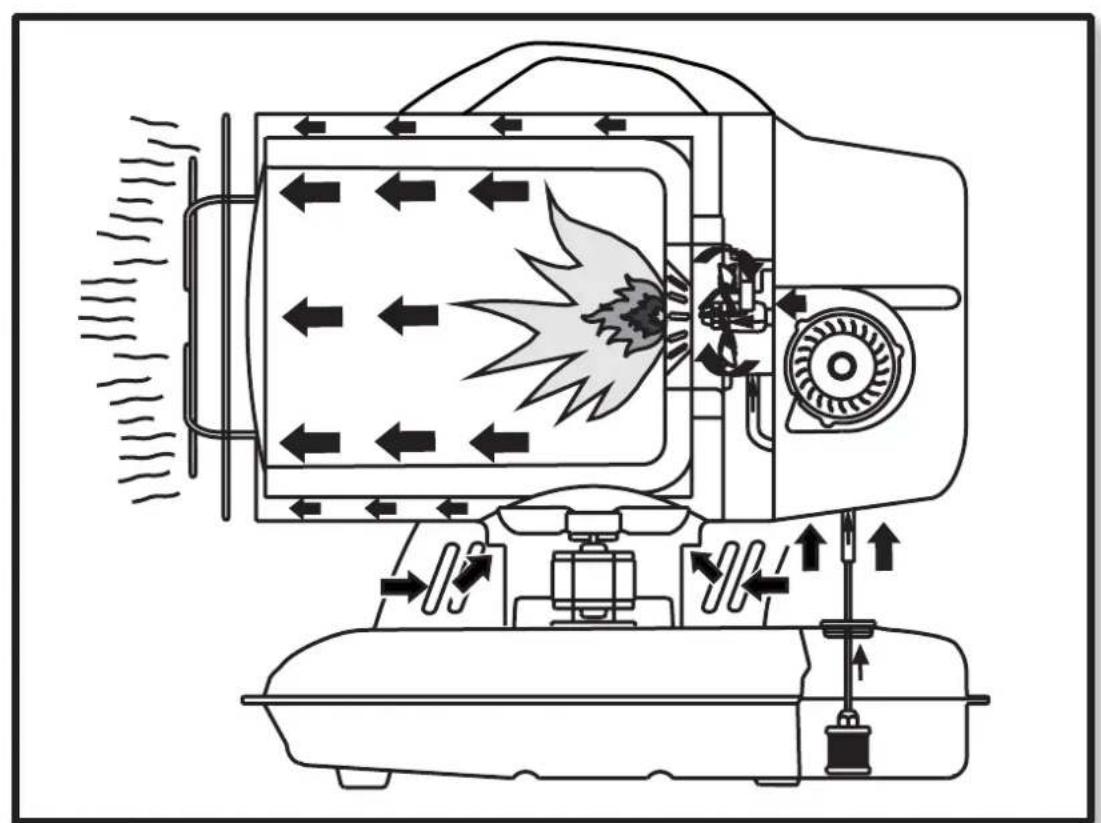
▶▶4. OPERATING PRINCIPLE
See Fig. 2
Airflow is necessary to ensure proper combustion, it is supplied by the internal burner fan. The air enters the burner funnel and gets mixed with a high-pressure fuel jet. The fuel flow is secured by an electrical pump, which sucks the fuel away from the tank and moves it to the nozzle under high pressure.
▶▶5. OPERATION
⚠ WARNING: Read the section "SAFETY CONSIDERATIONS" carefully before turning the heater on.
IMPORTANT: After the first time the heater does not switch on, make sure there is fuel in the tank, make sure the fuel filter is clean and make sure that the heater is positioned on a flat, stable surface.
IMPORTANT: This is a target infrared heater. Infrared heats bodies and not the air.
▶5.1. RUNNING THE HEATER:
▶5.1.1. Observe all safety instructions at all times.
▶5.1.2. Check if fuel is present in the tank.
▶5.1.3. Close the fuel tank filler plug.
▶5.1.4. Plug the feeder cable into the socket (CHECK THE VOLTAGE IN "TECHNICAL DATA SHEET").
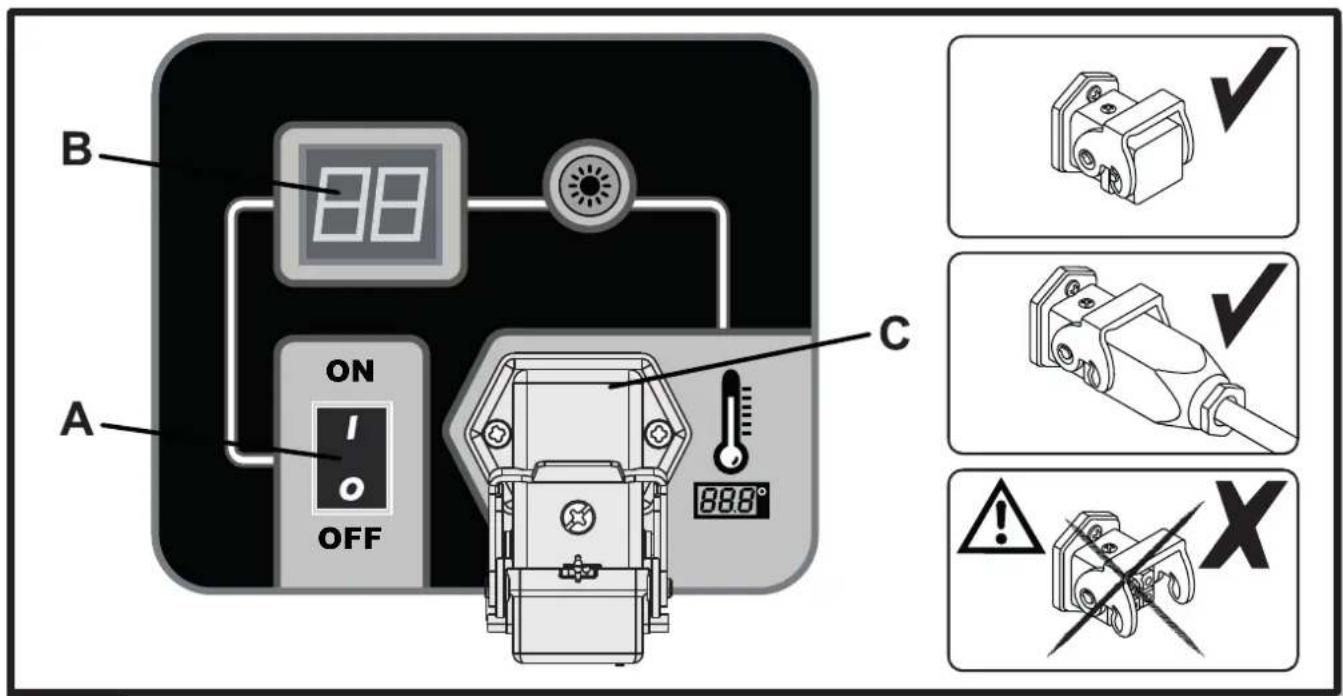
▶5.1.5. Turn the “ON/OFF” switch “ON” (I) (C Fig. 3). The heater should be online in a few seconds. If it is not, please refer to the section “PROBLEM IDENTIFICATION” (Paragraph 10).
NOTE: IN THE EVENT OF HEATER BEING TURNED OFF DUE TO RUNNING OUT OF FUEL, TURN THE HEATER OFF, REFUEL AND TURN IT BACK ON (SEE PARA. 5.1.).
▶▶5.2. TURNING THE HEATER OFF:
⚠ WARNING: DO NOT CUT THE POWER OR DISCONNECT THE FEEDER CABLE BEFORE THE HEATER COOLS DOWN COMPLETELY (ab. 5 minutes).
▶5.2.1. Turn the "ON/OFF" switch "OFF" (0) (A Fig. 3).
▶▶5.3. ROOM THERMOSTAT CONNECTION (optional):
Remove the plug connected to the appliance and connect the room thermostat (optional) (C Fig. 3).
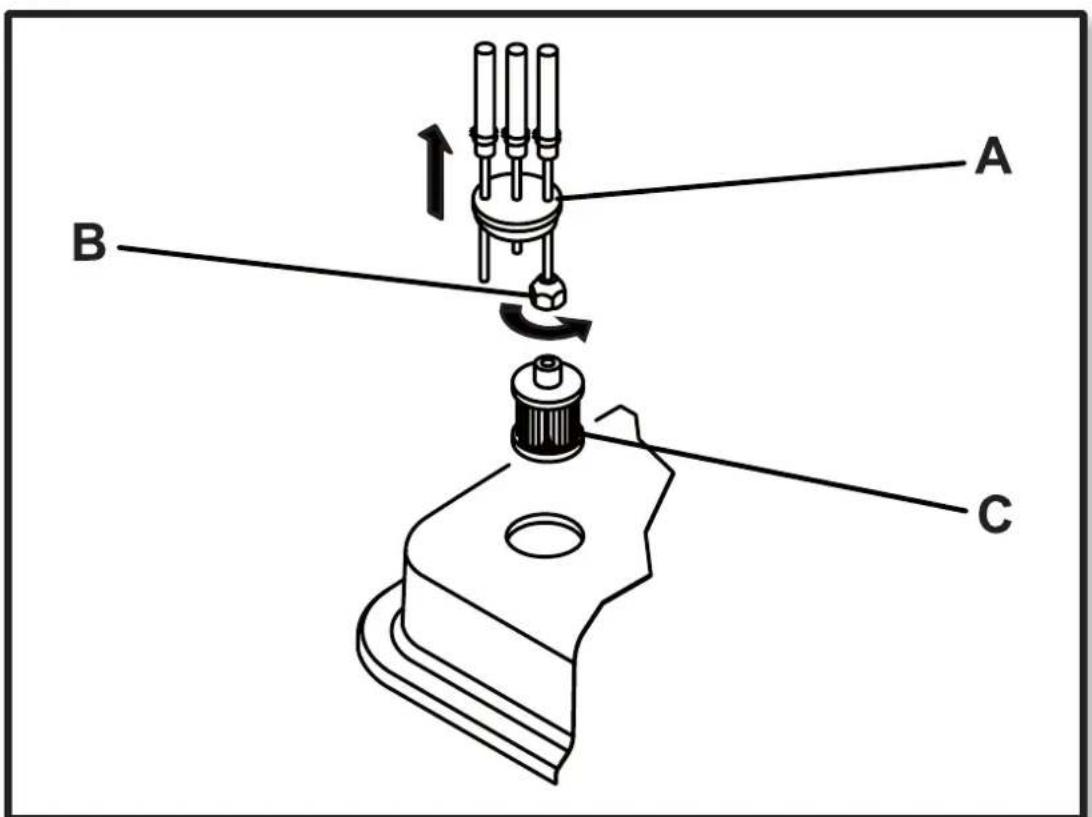
▶▶6. CLEANING THE FUEL FILTER See Fig. 4
DEPENDING ON THE QUALITY OF FUEL USED, IT MAY BE NECESSARY TO CLEAN THE FUEL FILTER.
▶6.1. Remove the plug on the fuel tank (A Fig. 4).
▶6.2. Remove the filter from the tank.
▶6.3. Unscrew the cap (B Fig. 4).
▶6.4. Remove the filter (C Fig. 4).
▶6.6. Clean the filter using clean fuel, do not damage the filter.
▶6.6. Replace the filter inside the tank.
▶▶7. MAINTENANCE AND TRANSPORTATION
TO ENSURE THE BEST MAINTENANCE AND/OR TRANSPORTATION PROCEDURE, PLEASE OBSERVE THE FOLLOWING PROCEDURE:
▶7.1. Empty the fuel tank.
▶7.2. If remainders are still present, pour in clean fuel and empty it again.
▶7.3. Close the tank filler plug, dispose of the fuel as per the applicable regulations.
▶7.4. To ensure proper heater maintenance, keep it leveled to prevent fuel leaks, keep it in a dry place and protect from getting damaged.
See B Fig. 3
| ERROR | CAUSE SOLUTION | |
| F0 | OPERATION ERROR | |
| 1. The “ON/OFF” switch is turned “ON” (I) when the heater is plugged in | 1. After disconnecting the heater, see that the switch is in the “OFF” (0) position, plug the heater in and turn the switch “ON” (I) | |
| F1 | PHOTOCELL ERROR | |
| 1. No fuel2. Fuel is contaminated3. Photocell is dirty or damaged4. Fuel filter is dirty5. Ignition error | 1. Turn the switch “OFF” (0), refill the fuel tank2. Turn the switch “OFF” (0) empty and refill the fuel tank. Clean the filter using clean fuel, do not damage the filter (SEE PARA. 6)3. Contact the technical service center4. SEE PARA. 65. Contact the technical service center | |
| F2 | TEMPERATURE CONTROL SENSOR ERROR | |
| 1. Interrupted cable2. Sensor is damaged | 1. Contact the technical service center2. Contact the technical service center | |
| F3 | THERMOSTAT ERROR | |
| 1. Internal heater overheating2. Antitilting sensor intervent | 1. Turn the heater off, wait until it is cooled down2. Place the heater on a level and stable surface | |
| F4 | INCORRECT VOLTAGE | |
| 1. Incorrect voltage 1. Check voltage of your electric supply system | ||
| FF | NO SWITCH-ON AFTER THREE ATTEMPTS | |
| 1. No fuel2. Dirty fuel filter3. Dirty or defective photocell4. Dirty or defective nozzle5. Anti-tilting sensor trip | 1. Contact the technical service center2. Contact the technical service center3. Contact the technical service center4. Contact the technical service center5. Contact the technical service center | |
| [ ] | HEATER IN STAND-BY | |
| 1. Thermostat connected2. Switching from cable to battery power supply | 1. Thermostat temperature set below the room temperature2. Automatic re-ignition | |
▶▶9. PREVENTIVE MAINTENANCE SCHEDULE
WARNING: BEFOR INITIATING ANY REPAIR OR MAINTENANCE PROCEDURE UNPLUG THE FEEDER CABLE AND MAKE SURE THAT THE HEATER IS COOLED DOWN.
IF THE HEATER IS USED IN PARTICULARLY DUSTY ENVIRONMENTS, MAINTENANCE AND CLEANING MUST BE CARRIED OUT MORE FREQUENTLY.
| Fuel tank Clean every 150-200 hours of operation or when necessary | Empty and rinse with fresh fuel |
| Nozzle Clean or replace once per season or when necessary | Contact the technical service center |
| Photocell Clean once per season or when necessary | Contact the technical service center |
| Fuel filter Clean or replace twice per season or when necessary | Clean the fuel filter with clean fuel |
| Ignition device Clean or replace every 1.000 hours of operation, or when necessary | Contact the technical service center |
| Fan blades Clean when necessary Contact the technical service center | |
▶▶10. PROBLEM IDENTIFICATION
| PROBLEM | POSSIBLE CAUSE POSSIBLE SOLUTION | |
| Heater doesn’t run | 1. Heater blocked2. The power switch is in the “OFF” (0) position3. No power4. Feeder cable unplugged5. Blocked control card6. Wrong thermostat setting7. Temperature sensor override8. Fuse damaged | 1. Restart the heater2. Turn the switch “ON” (I)3A. Plug the feeder cable properly into the socket3B. Check the power supply network3C. Contact the technical service center4. Contact the technical service center5A. Restart the heater5B. Identify the display error5C. Contact the technical service center6. Calibrate the thermostat by setting it higher than ambient temperature7A. Wait at least ten minutes then try to run ignition again7B. Contact the technical service center8. Contact the technical service center |
| Motor/pump runs but the flame does not start | 1. No fuel2. Ignition device is dirty3. Fuel filter is dirty4. Nozzle is dirty5. Photocell is dirty, damaged or installed improperly6. Foreign substances present in the tank7. Electrodes are used up or placed at an improper distance | 1. Turn off the heater, refill the fuel tank then restart the heater2. Contact the technical service center3. Clean the filter using clean fuel4. Contact the technical service center5. Contact the technical service center6. Empty and refill the fuel tank with clean fuel7. Contact the technical service center |
| Fan blocked or spins too slowly | 1. Engine damaged 1. Contact the technical service center | |
IMPORTANTE: LEGGERE E COMPRENDERE QUESTO MANUALE OPERATIVO PRIMA DI EFFETTUARE L'ASSEMBLAGGIO, LA MESSA IN FUNZIONE O LA MANUTENZIONE DI QUESTO RISCALDATORE. L'USO ERRATO DEL RISCALDATORE PUÒ CAUSARE LESIONI GRAVI. CONSERVARE QUESTO MANUALE A TITOLO DI FUTURO RIFERIMENTO.
▶5.1. ACCENSIONE DEL RISCALDATORE:
▶5.1. EINSCHALTEN DES GENERATORS:
▶5.3. ANSCHLUSS DES RAUMTHERMOSTATS (Optional):
▶5.2. ARRET DU GENERATEUR:
ATTENTION: NE PAS COUPER L'ALIMENTATION ET NE PAS DEBRANCHER LE CABLE D'ALIMENTATION JUSQU'AU REFROIDISSEMENT COMPLET DU GENERATEUR (environ 5 minutes).
PROBLEME CAUSE POSSIBLE SOLUTION POSSIBLE
▶5.3. AANSLUITING OMGEVINGSTHERMOSTAAT (Optioneel):
▶▶10. PROBLEEMOPSPORING
▶5.2. SLUKNING AF GENERATOREN:
OBS: BEMÆRK VENLIGST: DU MÅ IKKE AFBRYDE GENERATOREN FRA ELNETTET, KABLET MÅ IKKE TRÆKKES UD FRA STIKKONTAKTEN TIL GENERATOREN AFK∅LES FULDSTÆNDIGT (cirka 5 minutter.).
▶▶2. PAKKAUKSEN AVAAMINEN
Katso Kuva 1
▶5.3. KOBLING ROMTERMOSTAT (Tilleggsutstyr):
Å F∅LGE DISSE PROSEDYRENE:
▶▶9. TIDSPLAN FOR VEDLIKEHOLD
VARSEL: F∅R MAN BEGYNNER HVILKE SOM HELST VEDLIKEHOLDSARBEIDER ELLER REPARASJONER, MÅ MAN KOBLE TILF∅RSELSKABELEN FRA ELEKTRISITET OG FORSIKRE SEG AT GENERATOREN ER NEDKJ∅LT.
HVIS LUFTVARMEREN BRUKES I SPESIELT ST∅VETE OMGIVELSER, ER DET N∅DVENDIG MED HYPPIGERE VEDLIKEHOLD OG RENGJ∅RING.
▶▶10. IDENTYFIKACJA PROBLEMU
PROBLEM MOŻLIWA PRZYCZYNA MOŻLIWE ROZWIAZANIE
▶▶7. ÚDRŽBA A PŘEPRAVA
PRO ZAJIŠTĚNÍ OPTIMÁLNÍ ÚDRŽBY A/NEBO PŘEPRAVY DOPORUČUJEME POUŽÍT NÁSLEDUJÍCÍ POSTUP:
▶▶10. PROBLEMİN SAPTANMASI
▶5.3. APLINKOS TERMOSTATO PRIJUNGIMAS (Papildomas):
▶▶10. PROBLEEMI TUVASTAMINE
PROBLEEM VÕIMALIK PÕHJUS VÕIMALIK LAHENDUS
▶5.3. CONECTAREA TERMOSTATULUI AMBIENTAL (Optional):
▶▶4. ΑΡΧΗ ΤΗΣ ΛΕΙΤΟΥΡΓΙΑΣ
Δείτε Εικ. 2
| FO | Photoresistance |
| AT | Antitilting switch |
| TS | Safety thermostat |
| IN | Switch |
| TA | Room thermostat |
| SV | Solenoid valve |
| IG | Igniter |
| TR | Transformer |
| MF | Motor cooling |
| MC | Motor combustion |
| PM | Pump |
| RE | Reset |
| FU | Fuse |
NOTE:
CE CONFORMITY CERTIFICATE
CE
CE CONFORMITY CERTIFICATE - DICHIARAZIONE DI CONFORMITÀ CE - EG-KONFORMITÄTSERKLÄRUNG - DECLARACIÓN DE CONFORMIDAD CE - DECLARATION DE CONFORMITE CE - EG-CONFORMITEITVERKLARING - DECLARAÇÃO DE CONFORMIDADE CE - EU-OVERENSSTEMMELSESERKLÆRING - EY-VAATIMUSTENMUKAISUUSVAKUUTUS - CE-SAMSVARSERKLÆRING - EG-FÖRSÄKRAN OM ÖVERENSSTÄMMELSE - DEKLARACJA ZGODNOŚCI WE - ДЕКЛАРАЦИЯ О COOTBETCTВИИ CE - PROHLÁŠENÍ O SHODĚ CE - EK MEGFELELŐSÉGI NYILATKOZAT - IZJAVA O SKLADNOSTI IN OZNAKA CE - CE UYGUNLUK BEYANI - IZJAVA CE O SUKLADNOSTI - ES ATITIKTIES DEKLARACIJA - EK ATBILSTĪBAS - DEKLARĀCIJA - EÜ VASTAVUSDEKLARATSIOON - DECLARAȚIE DE CONFORMITATE CE - PREHLÁŠENIE O ZHODE CE - ДЕКЛАРАЦИЯ ЗА СЪВМЕСТИМОСТ CE - ДЕКЛАРАЦІЯ ВІДПОВІДНОСТИ CE - IZJAVA CE О PRIKLADNOSTI ΔΗΛΩΣΗ ΣΥΜΜΟΡΦΩΣΗΣ CE - CE 符合性声明
DANTHERM S.p.A. Via Gardesana 11, -37010- Pastrengo (VR), ITALY
Product: - Prodotto: - Produkt: - Producto: - Produit: - Product: - Produkt: - Tuote: - Produkt: - Produkt: - Produkt: - Изделие: - Výrobek: - Termék: - Izdelek: - Ürün: - Proizvod: - Gaminys: - Ierīce: - Toode: - Produsul: - Výrobok: - Продукт: - Виріб: - Proizvod: - Проїóv: - 产品:
XL 61
We declare that it is compliant with: - Si dichiara che è conforme a: - Es wird als konform mit den folgenden Normen erklärt: - Se declara que está en conformidad con: - Nous déclarons sa conformité à: - Hierbij wordt verklaard dat het product conform is met: - Declara-se que está em conformidade com: - Vi erklærer at produktet er i overensstemmelse med: - Vakuutetaan olevan yhdenmukainen: - Man erklærer at apparatet er i overensstemmelse med: - Härmed intygas det att produkten är förenlig med följande: - Oświadczca się, że jest zgodny z: - Заявляем о соответствии требованиям: - Prohlašuje se, że je v souladu s: - Kijelentjük, hogy a termék megfelel az alábbiaknak: - Izpolnjuje zahteve: - Aşağıdaki standartlara uygun olduğunu beyan ederiz: - Izjavljuje se da je u skladu s: - Pareiškiame, kad atitinka: - Tiek deklarēts, ka atbilst: - Käesolevaga deklareeritakse, et toode vastab: - Declarăm că este conform următoarelor: - Prehlasuje sa, že je v súlade s: - Декларира се че отговаря на: - Відповідає вимогам: - Izjavljuje se da je u skladu s: - Δηλώνουμε ότι είναι σύμφωνο με: - 兹证明符合:
2014/30/EU, 2014/35/EU
EN 62233:2008, EN 61000-3-2:2014, EN 61000-3-3:2013, EN 55014-1:2006/A2:2011, EN 55014-2:2015, EN 60335-1:2012/A11:2014, EN 60335-2-102:2016

text_image
Handwritten signature or scribble on white background, possibly a signature or artistic markPastrengo, 2023
▶en - DISPOSAL OF THE PRODUCT
-This product has been designed and manufactured with top-quality materials and components, which can be re-cycled and re-used.
-When a crossed-wheely bin symbol is attached to the product, it means that the product is protected by the, 2012/19/UE European Directive.
-Please obtain information regarding the local differentiated collection system for electrical and electronic products.
-Respect local Standards in force and do not dispose of old products as normal domestic waste. Correct disposal of the product helps to prevent possible negative consequences for health, the environment and mankind.
▶pl - UTYLIZACJA PRODUKTU
▶ Iv - PRODUKTA IZNÍCINÁŠANA
natural_image
Abstract geometric composition with yellow and black blocks (no text or symbols)Dantherm S.p.A.
Via Gardesana 11
37010 Pastrengo (VR)
Italy
t.: +39 045 6770533
e.: info.it@danthermgroup.com

DOWNLOAD CATALOGUE

SEND US YOUR FEEDBACK

REGISTER FOR 3-YEAR WARRANTEE