G24LT - Grass trimmer GREENWORKS - Free user manual and instructions
Find the device manual for free G24LT GREENWORKS in PDF.
User questions about G24LT GREENWORKS
0 question about this device. Answer the ones you know or ask your own.
Ask a new question about this device
Download the instructions for your Grass trimmer in PDF format for free! Find your manual G24LT - GREENWORKS and take your electronic device back in hand. On this page are published all the documents necessary for the use of your device. G24LT by GREENWORKS.
USER MANUAL G24LT GREENWORKS
English (original instructions)
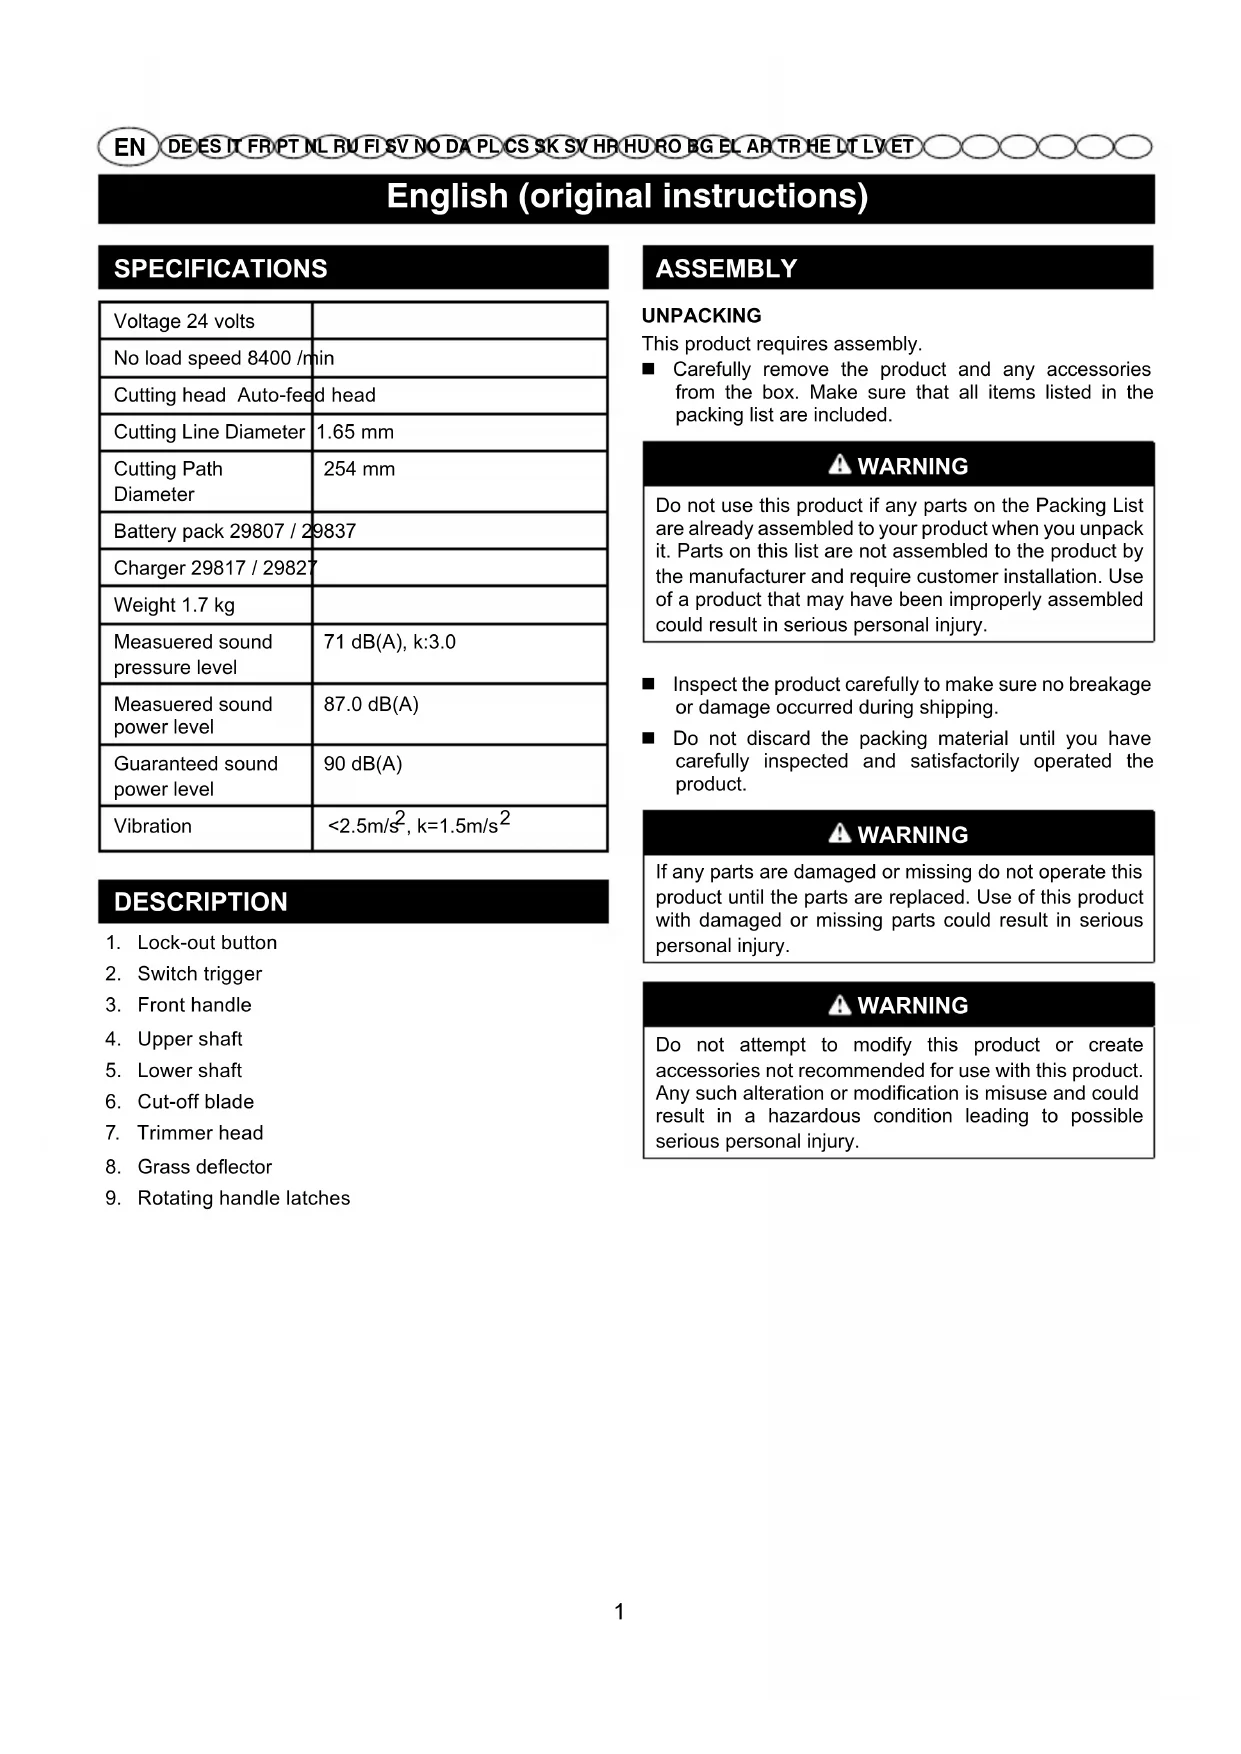
SPECIFICATIONS
| Voltage 24 volts | |
| No load speed 8400 /min | |
| Cutting head Auto-feed head | |
| Cutting Line Diameter | 1.65 mm |
| Cutting Path Diameter | 254 mm |
| Battery pack 29807 / 29837 | |
| Charger 29817 / 29827 | |
| Weight 1.7 kg | |
| Measured sound pressure level | 71 dB(A), k:3.0 |
| Measured sound power level | 87.0 dB(A) |
| Guaranteed sound power level | 90 dB(A) |
| Vibration | <2.5m/s2, k=1.5m/s2 |
DESCRIPTION
- Lock-out button
- Switch trigger
- Front handle
- Upper shaft
- Lower shaft
- Cut-off blade
- Trimmer head
- Grass deflector
- Rotating handle latches
ASSEMBLY
UNPACKING
This product requires assembly.
- Carefully remove the product and any accessories from the box. Make sure that all items listed in the packing list are included.
WARNING
Do not use this product if any parts on the Packing List are already assembled to your product when you unpack it. Parts on this list are not assembled to the product by the manufacturer and require customer installation. Use of a product that may have been improperly assembled could result in serious personal injury.
Inspect the product carefully to make sure no breakage or damage occurred during shipping.
- Do not discard the packing material until you have carefully inspected and satisfactorily operated the product.
WARNING
If any parts are damaged or missing do not operate this product until the parts are replaced. Use of this product with damaged or missing parts could result in serious personal injury.
WARNING
Do not attempt to modify this product or create accessories not recommended for use with this product. Any such alteration or modification is misuse and could result in a hazardous condition leading to possible serious personal injury.
English (original instructions)
WARNING
To prevent accidental starting that could cause serious personal injury, always remove the battery pack from the product when assembling parts.
ATTACHING GRASS DEFLECTOR See Figure 2-3.
WARNING
Avoid contact with the blade. Failure to avoid contact can result in serious personal injury.
Using a phillips screwdriver, remove the screw from the trimmer head.
Fit the grass deflector onto the raised posts on the trimmer head.
Reinstall the screw and tighten by turning clockwise.
WARNING
Do not allow familiarity with products to make you careless. Remember that a careless fraction of a second is sufficient to inflict serious injury.
WARNING
Always wear eye protection. Failure to do so could result in objects being thrown into your eyes resulting in possible serious injury.
WARNING
Do not use any attachments or accessories not recommended by the manufacturer of this product. The use of attachments or accessories not recommended can result in serious personal injury.
INSTALLING THE LOWER SHAFT TO THE UPPER SHAFT See Figure 4.
Push in the rotating handle latches located on the lower shaft. Align the latches with the positioning hole on the upper shaft.
- Slide the lower shaft into the upper shaft until the rotating handle latches engage in the positioning hole.
Insert the screws into the shaft, fastening the lower shaft in place.
OPERATION
TO INSTALL BATTERY PACK See Figure 5.
- Place the battery pack in the trimmer. Align raised ribs on battery pack with grooves in the trimmer's battery port.
Make sure the latch on bottom of the battery pack snaps in place and that battery pack is fully seated and secure in the trimmer before beginning operation.
TO REMOVE BATTERY PACK See Figure 5.
Press and hold the battery latch button at the bottom of the battery pack.
Remove battery pack from the trimmer.
STARTING/STOPPING THE TRIMMER See Figure 6.
To start the line trimmer, push the lock-out button (1) and pull the switch trigger (2).
To stop the line trimmer, release the switch trigger.
WARNING
Noise. A degree of noise from the machine is not avoidable. Route noisy work is to be licensed and limits for certain periods. Keep rest periods and they may need to restrict the working hours to a minimum. For their personal protection and protection of people working nearby, an appropriate hearing protection shall be worn;
Vibration. Always wear safety and anti-vibration glove. Excessive vibration may cause white finger disease or carpal tunnel syndrome. If you notice an unpleasant sensation or skin discoloration during use of the machine on your hands once you stop working. Place an adequate work breaks. And continual and regular users should monitor closely the condition of their hands fingers.
WARNING
Contact with the trimmer cutting head while operating can result in serious personal injury.
English (original instructions)
OPERATING THE TRIMMER See Figure 7.
Follow these tips when using the trimmer:
Hold the trimmer with your right hand on the rear handle and your left hand on the front handle.
- Keep a firm grip with both hands while in operation.
- Trimmer should be held at a comfortable position with the rear handle about hip height.
Cut tall grass from the top down. This will prevent grass from wrapping around the shaft housing and string head which may cause damage from overheating.
If grass becomes wrapped around the string head:
Remove the battery pack from the trimmer.
Remove the grass.
CUTTING TIPS See Figure 8.
- Keep the trimmer tilted toward the area being cut; this is the best cutting area.
The trimmer will cut better when moved from left to right across the area to be cut; it is less effective when moved from right to left.
Use the tip of the cutting line to do the cutting; do not force cutting head into uncut grass. - Wire and picket fences cause extra cutting line wear, even breakage. Stone and brick walls, curbs, and wood may wear cutting line rapidly.
- Avoid trees and shrubs. Tree bark, wood moldings, siding, and fence posts can easily be damaged by the cutting line.
- Attach metal knob to the rubber hole on the rear handle when in use, unlock the metal knob when not in use.
ADVANCING CUTTING LINE
NOTE: The trimmer is equipped with an auto-feed head. Bumping the head to try to advance the line will damage the trimmer and void the warranty.
With the trimmer running, release the switch trigger.
Wait two seconds, and press the switch trigger.
NOTE: The cutting line will extend approximately 0.635cm with each stop and start of the trigger until the cutting line reaches the length of the grass deflector cut-off blade.
Resume trimming.
ADVANCING THE CUTTING LINE MANUALLY
See Figure 9.
Remove the battery pack.
Push the black button (D) located on the cutting head while pulling on cutting line to manually advance the cutting line.
After extending new cutter line, always return the machine to its normal operating position before switching on.
ROTATING HANDLE See Figure 10.
The rotating handle is used when edging.
Remove the battery pack.
Depress the latches (B) on each side of the upper portion of the shaft.
Rotate the lower end of the tool to the edging position.
Make sure the latches snap into place and the lower end of the tool is secured before beginning operation.
EDGING See Figure 11.
Remove the battery pack.
- Rotate the tool to the edging position as described in the previous section when using the edge guide for edging sidewalks and walkways.
Always hold the line trimmer away from the body keeping clearance between the body and the line trimmer. Any contact with the line trimmer cutting head while operating can result in serious personal injury.
LINE CUT-OFF BLADE
This trimmer is equipped with a line cut-off blade (6) on the grass deflector. For best cutting, advance line until it is trimmed to length by the line cut-off blade. Advance line whenever you hear the engine running faster than normal, or when trimming efficiency diminishes. This will maintain best performance and keep line long enough to advance properly.
WARNING
When changing between grass trimming and edging mode, always make sure that you stop the line trimmer first and that the cutting lines have stopped rotating.
English (original instructions)
WARNING
When servicing, use only identical replacement parts. Use of any other parts may create a hazard or cause product damage.
WARNING
To avoid serious personal injury, always remove the battery pack from the tool when cleaning or performing any maintenance.
GENERAL MAINTENANCE
Before each use, inspect the entire product for damaged, missing, or loose parts such as screws, nuts, bolts, caps, etc. Tighten securely all fasteners and caps and do not operate this product until all missing or damaged parts are replaced.
Avoid using solvents when cleaning plastic parts. Most plastics are susceptible to damage from various types of commercial solvents and may be damaged by their use. Use clean cloths to remove dirt, dust, oil, grease, etc.
WARNING
Do not at any time let brake fluids, gasoline, petroleum-based products, penetrating oils, etc., come in contact with plastic parts. Chemicals can damage, weaken or destroy plastic which may result in serious personal injury.
Only the parts shown on the parts list are intended to be repaired or replaced by the customer. All other parts should be replaced at an Authorised Service Centre.
SPOOL REPLACEMENT See Figure 12.
Use original manufacturer's replacement cutting line for best performance.
Remove the battery pack.
Push in tabs (C) on side of spool cover (A).
Pull spool cover up to remove.
Remove the old spool.
To install the new spool (B), make sure the cutting line is captured in the slot on the new spool (F). Make sure the end of the cutting line is extended approximately 15cm beyond the slot.
Install the new spool so that the cutting line and slot align with the eyelet (E) in the cutting head (G). Thread the cutting line into the eyelet.
Pull the cutting line extending from the cutting head so the cutting line releases from the slot in the spool.
- Reinstall the spool cover by depressing tabs into slots (D) and pushing down until spool cover clicks into place.
CUTTING LINE REPLACEMENT See Figure 13.
Remove the battery pack.
Remove the spool from the cutting head.
NOTE: Remove any old cutting line remaining on the spool.
Cut a piece of cutting line approximately 3m long.
Insert the cutting line into the anchor hole (B) in the upper part of the spool. Wind the cutting line around the upper part of the spool clockwise, as shown by the arrows on the spool. Place cutting line in the slot (C) on upper spool flange, leaving about 15cm . extended beyond the slot. Do not overfill. After winding the cutting line, there should be at least 0.635cm between the wound cutting line and the outside edge of the spool.
Replace the spool (A), and the spool cover. Refer to spool replacement earlier in this manual.
English (original instructions)
STORING THE TRIMMER
- Remove the battery pack from the trimmer before storing.
Store it in a place that is inaccessible to children. - Keep away from corrosive agents such as garden chemicals and de-icing salts.
Store and charge your batteries in a cool area. Temperatures above or below normal room temperature will shorten battery pack life.
Store the battery pack where the temperature is below 27^ and away from moisture.
All batteries gradually lose their charge. The higher the temperature, the quicker they lose their charge. If you store your unit for long periods of time without using it, recharge the batteries every month or two. This practice will prolong battery pack life. - Secure the trimmer during transport to prevent damage or injury. Clean and maintenance before storage, use of guards on cutting attachments with metal blades. Use of cover for metal blades during transport and storage.
ENVIRONMENTAL PROTECTION
Environmental protection should be a priority of considerable importance when using the machine, for the benefit of both social coexistence and the environment in which we live. Try not to cause any disturbance to the surrounding area.
- Scrupulously comply with local regulations for the disposal of packaging, deteriorated parts or any elements with a strong environmental impact; this waste must not be disposed of as normal waste, it must be separated and taken to specified waste disposal centres where the material will be recycled.
■ Scrupulously comply with local regulations for the disposal of waste materials after mowing.
At the time of decommissioning, do not pollute the environment with the machine, but hand it over to a disposal centre, in accordance with the local laws in force.
TROUBLESHOOTING
| PROBLEM POSSIBLE CAUSE SOLU | TION | |
| String will not advance when using the auto-feed head. | String is welded to itself. Lubricate with silicone spray. | |
| Not enough string on spool. Install more string. Refer to string replacement earlier in this manual. | ||
| String is worn too short. Pull string whle pressing line release button. | ||
| String is tangled on spool. Remove string from spool and rewind. Refer to string replacement earlier in this manual. | ||
| Grass wraps around shaft housing and string head. | Cutting tall grass at ground level Cut tall grass from the top down to prevent wrapping. | |
| Motor fails to start when switch trigger is depressed. | Battery is not secure. | To secure the battery pack, make sure the latch on bottom of the battery pack snaps into place. |
| Battery is not charged. | Charge the battery pack according to the instructions included with your model. | |
| Shaft not connected completely | Make sure lower shaft is fully seated in shaft coupler on upper shaft and secure shaft coupler. | |
CHRTHAEKKYMUYIATOPHOIBATAPEN
CM.PucyHOK5
HaKMTe 3aueJky B HxHHeuactnakkymyIaTOPO6noka.
CHIMMTEAKKMYIATOPHYO 6aTaapeo CnHCTpyMeHTA.
3ANYCK/OCTAHOBKA TPUMMEPA CM.PucyHOK 6.
ДялэгуногутгмпахмпгКногу 6LOKINOBKN1)иNotHHTe nycBOBpIur(2).
YTo6bIOCTaHOBtB CTpyHHbIM TpMMep, OTNyCTNTe nyCKOBOp bHaI.

OCTOPOXHO
YpOBeHb 7yMa.Bo BpeMpa60Tb yCTpoiCTBa HeBO3MOxHO n36ExKaTH Obpa3OBAHN7yMa.Ipn BbIOnHHeHHn 7yMHbIX pa60Ha onPeJeHHeHbIX yAcTkax Tpe6yeTc OΦopMJIeHne pa3peSeHn N BbIOnHrTbcN OH MoYB U cTaHOBLeHHbIe nepIOdbI cyTOK.KpOME o8a3aTeJIbHbIX nepepbIBOB B pa60Te M OxET IOT pe6 O BA t b C no rpa Hnue Hn e npoJOnKHTbeHocTN pa60tbl.ДЯ obecneHHeHn nepcoHaNbHOH 3aUHTbl N 3aUHTbl HaxOJaXnxC B HENOCpeDCTBeHHoH 6JIIn3OCTN JIODeH No6xOIMo MCNoIb3OBA Tb HaJnxKaUne CpeDCTBa 3aUHTbl OprAHOB Cnyxa;
Bn6pa. Bcerda nCnoB3OBaTb 3aunTHbIe aHTNB6paonHbIe nepuATKn. N36blTOUHy ypoBeH b6paM MoKET Bbl3BaTb NO6neDHeHne NaIbueB nn CnHDPOM 3aJCTHO KAHana.Ecnn BO Bpemr NCNoB3OBAHn yctPoiCTBa NO8BnETCa HnpeNTHoe No6neDHeHne KOxpyk, CNeDuYt HeMeDnEHNO npepBaTb pa60Ty.Heo6xOdmo yctpanBaTb nepepbIBbHa OTdbIX Ecnn Bbl peynpHO noIb3yeTeCb yctPoiCTBOM, qacto KOHTPOINPyIne COCTOAHne NaIbueB pyK.

OCTOPOXHO
CnyaHbIKoHTaKT CpeKyuIeI rOIOBKO TpIMMepa MoKeT pNBecTI K TAgKeJIbIM TeJeCHbIM IOBpeXdEHnA.
Pycckn (IpebeO d opnHaJIbHbIX nHCTpyKcN)
PABOTA C NOIPE3YIKOM CM.PucyHOK7.
Pn noIb3OBAHn TpMMepom BbINOnHnTe CneDyUoNe peKOMeHdaun:
Bo3bMnte nope3vn npaBoi pyKo 3a 3aHIOpyKoTky, a neBOi pyKo - 3a nepeHIO pyKoTky.
Pn pa6ote KpeKo depKnte ero 06enm pykam.
Ioppe3nK cneyET dpKaTb B ydo6Hom noIOXeHH 3a 3aHIO pykOATky Ha BBicote 6epa.
O6pe3aTe BbICOKyTOpaby CBepx BYHn3.3To npedotBpaNT HabopayBaHne TpaBbHa Koxyx BaIa I rONOBky CTpyHbI, YTO MOKeT pNBecTu K NOnOMKe n3-3a neperpeBa.
Ecn TpaBa HAmOTanacb Ha rONOBky CTpyHbI:
BbHbTe aKkMynTOpHyIO 6aTapeIO N3 TpMMepa.
YdaHnTe TpaBy.
PEKOMEHDAUINIO BbINOJIHEHNIPOE3KN
CM.PucyHOK8.
ДерхиTe TpIMMep NOД HaKJOHOM K ПIOCKOCTN CTPNKKN, 3TO NOJIOXJEHNE YBJIeTcR ONTMaJIbHbIM.
BbIOOCTURHEI NyuHnx pe3yNbTaTOB ba6oTe,ecn 6ydeTe Dnuratb TpMMep CneBa HAnpaBO; cTpnKka 6ydet Mehee 30000000000000000000000000000000000000000000000000
IcnoB3ynte dnnctpnKKn kpan pexyuue HHTn; He BBODNTe pexuyuio rONOBky rny60o B TpaBy.
■ HataKbAHn Ha KJIouyI npoBOJOKy n OrpaDbI yckopReTc n3Hoc pexyueHHTN, BnIO TBdo ee pa3pbIBa. KamH, KInpNHy, DepeBO npuBOJr K 6bICTpOMy n3HOcy HHTN.
H36raTe KOtakTa C DepeBbMa N KcyTAM. Pexyua HHTb MoKeT HaHeCTN NOBpeKdEHNr Kope DepeBbeB, DepeBaaHHbIM CTPOeTbHbIM DeTaIaM, YacTAm NaHeNbHO O6WbKN u N3ropoJm N3 WtakeTHka.
YcTaHabJIbAaTe MeTaNJNueCKyIO pyKy B O6pe3nHeHHoe OTBepCTne Ha 3aDHe pyKoTKe nepeI pa60To, a no OKOHauHN pa60Tb1 pa36IoKupyTe n N3BNEKIne MeTAJIINueCKyIO pyKy.
I0DAUCACTPYHbI
PIMMEAHHE:Ha TpMMpe yctaHOBneHa rOIOBka c aBTOMATnuecko nOdaeN CTpyh. NOnbITKN NOCTyAtb No rOIOBKe dIy YCKOpEHn NODaun CTpyHb MoYr npNBecTN K NOBpeJdeHIO TpIMMepa I ppeKpaueHHIO DeICTBna rapaHTm.
Bo Bpempa6oTbI TpMMMepa OTnycTe KypkoBbIB BBIKIOUaTeJIb.
IIOJOKDITe DBe CEkyHdbI, 3aTeM HaxMMTe Ha KypKOBbI BbIKNIOUaTeJIb.
PIMMEAHHE: Pn KaKdOM OTnyckaHnn HaKaTn KypkoBOro BbIKNoHaTeN CTpyHa 6yDet yDInHrTbcn npimepHo Ha 1/4 IIOHa, noka He DoiDeT do pexyuero yCTpOcTBa OtpaKaTeN TpaBbl.
Bo3o6HOBnTe ctpnKky.
NODA CTPYHbI BPyHyIO CM.PucyHOK 9.
N3BnKeNTe aKKymyTOpHyo 6aTapeio.
Haxmte yepHyo KhONky Ha roJOBKe ctpHybl, notAHyB npn 3TOM 3a ctpHy, YTO6bI BbITaunItb ee HnyKHyIO nnHy.
Iocne BbITaHbAHnHOBOI pexyue CTpyhI nepeBedeHT HcTpymeHT B peXm HopMaNbHO pa60tI nepeedero BKIOUHeHem.
BPAUAIOUJARCA PYUKA CM.puc.10.
Bpaaouaayra pyka nnojb3yetc npn nope3aHnn Kpomkn.
13BnKeKnte 6aTaapeH.
HaxmTe 3aueKn (B) Ha BepxHeu qactn BaJa.
IIOBepHHTe HIXHN KOHeU INHCTpyMeHTa B NOIOXKeHNE IOpe3AHN KpOMOK.
Ipeed Hauanom pa6oTbI y6eHntecb, yTO 3aueKn BCTaJIH Ha MeCTo, HNXHNI KOHeU INHCTpyMeHTa HAdexKHO 3akpenneH.
IIOJPE3AHNE KPOMOK Cm. puc. 11.
I3BJIeKInTe 6aTapeJe.
■ NOBEPHNTe INHCTpyMeHT B NOJIOXeHne NOJpe3AHN KpOMOK, KAK ONIcAHO B IpeBIDyUeM pa3DeJe, YTO6bIC NOMOuHO HAnpaBnAoUeN IOJpe3aTb KpOMKn BDOJIb TPOTyapOB N DOPoXeK.
Bcerda depxnte ctpyHbI TpMMep Ha 6e3onacHom paccToHHn OT TeNa. JIObo KONTAKT C peKyuei roJIOBko CTpyHHoro TpMMepa BO Bpempa60tbi MOKeT PpNBecTN K cepbe3HbIM TpaBMam.
Pycckn (IpebeO d opnHaJIbHbIX nHCTpyKcN)
PEKUHNOHHTN
YcTPOINCTBO OCHaUeHO pe3Om DnHHTN,
yCTAHOBHeHHbIM Ha DeΦJIeKTope TpaBbI.ДnI
ONTMaJIbHOro BblIOJIHHeHnpe3a pa3MOTaTb HHTb
Ha HyxHyO dInHy. BblIOJNHtB pa3MOTky pexyuei
HHTN,ecnI DBrAteJIb HaunHaet BpaUaTbcra Co
CKOPocTbO, PpeBbIshaUoSei HopMaJIbHyO, IINI
ecn 3ameHo NOHNKeHne npOn3BOJnteJIbHOCTn
CTpIXKn.3TO N03BOJNT IOdEprXNBaTb ONTMaJIbHyO
POn3BOJNTeJIbHOCTb yCTPOINCTBa n PpaBUNbHyO
DInHypeKuUeHHTN.

BHUMAHNE!
Pn nepeKIOueHm MeJy peXIMaMn cKaUINBaHn I NOpe3AHN KpOMKn y6eINTecb, YTO yCTPOIcTBO NIOHOCTbIO OCTaHOBNeHO, a peXyUne CTpyHbI He BpaauOTc.

OCTOPOXHO
B cnyaee 3ameHbI nCnoJIb3OBAbT NCKIIouHTeJIbHO ΦnIpMeHHbIe 3aNaChbIe YactN. NcNoJIb3OBAHne dpyrIX KOMNOHEHTOB MOKeT NpeDCTaBnTb ONaCHOCTb INN NOCJyKHTb PnUHOn NobpeXdEHy yCTpoiCTBa.

OCTOPOXHO
Bo n36eKahne pncKa noJyueHn TjXeJIbIX NOBpeXdEHH CNeDyET 06aTeNbHO N3BLeKaTb AKyMylrTop n3 yCTpOcTBa BO BpEm eO YnCTKn I npn BblONHeHH JIObix pa6oT no TexHnueckomy o6cnyKBAHIO.
OBJEE TEXHNUECKOE OBCJNYKBAHNE
Ipeq KaKdbim NcNoJb3ObaHneM CneDyET npOKoHTpoJnPoBaTb yCTpOietBO dna O6hApUxHnnoBpejXdHn,OTcyTCTByIOuX nNn Ocna6NeHHbIX qacte, KAK, HAnpImep, BnHTbl, RaKN, 3axmbl n T.D. HadJexaum Obpa30m 3aTaNHe BCE KpeJexHbIe Detann He npNbOJTyeCTPOiCTBO DJeCTBnE Do Tex nop, noka He 6dyT 3aMeHeHbI BCE OTcyTCTByIOuHne nNn NobpejXdHbIe YacTN.
He nCNoJb3OBA Tb pactBOpHTeN IJy NcCTKn pNactNKOBbIX qacte. BoJbwa JAcTb PnactNKOBbIX MaTePnaNOB MOKeT 6bITb NOBpeXdHa IMeIOUIMNC B npOdaXe pactBOpHTeMn. NcNoJb3OBA Tb YcCTyO BeToMb dJa yDanaHn rpa3n, nbIIN, macna, rycToN Cma3Kn I T.D.

OCTOPOXHO
He donyckaTb nonadaHna Ha nlaCTNKOBbie qactn TOPMO3HOJ KNDKOCn, 6eH3nHa, HeΦTEXMUNueCKNX npOdyKTOB, pOOnHKaOuXm Macen n T.I. TaKne XIMNUeCKNE pOdoKyTb MOrY T NOBpeNTb, OcJa6ntb nn pa3pyuHTb NlactNY, YTo MoKeT pNIBeCTN K JNUHbIM TpaBMam PemOHTy uNt 3ameHe NoIb3oBaTeIeM NOJIeXkAT TOlbKO KOMNoHEtbl, BXOJaUe B CnICOK 3aNaChbIX qAcTei. BCE dpyrVe qACTn DOJXHbI 3aMeHrtbCABTOPu3OBAHHbIM cepBnCHbIM cHTpOM.
ДяpeMOHTaиЗamHebMOxHOИСПОьВaTbTOIbKO DeTANu,yKa3aHHbE B CnNcKe DeTanei.3aMeHa BCexdpyrnxDeTanei DOJXHa Ipon3BOdntbcB aBTopn3OBaHHOM cepBnCHOM ueHTpe.
3AM EHA KATYLKNCM.PucyHOK 12.
NcnoB3yIte 3aMeHy IINHn pe3a opuHaJIbHO npOn3BODnteJI JnyUweI npOn3BODnteJbHOCTN.
BbHyTb aKkMyIaTOp.
HaxaTb BHyTpB KpbIbIuKn, HaxoJaIuecra No 6okam KpbIuKn KaTyuKn.
Dnra ChTnK KpbIuKn KaTyuKn NotaHyb ee BBepx.
BbHyTb cTapyIO kaTyuKy.
IpepeyctaHOBKOHOBOKATyuKN y6eINTbcra,HTOBCTABNEHa Bn3 Ha HOBOKATyUKe. Y6eINTbcra,TO KOHePeXyUeHNTHBbIXOJNT N3 Na3a HA OKOIO 15cm.
YcTaHOBtB HOByo KaTyuKy TaK, YTo6bI peKyuJaHHTb Hn Na3 6bln BblpOBHeHbI No npoyuHHe BpeKyuJe roJIOBKe. IponyCTntb HtB B npoyuHy.
IOTaHyTb 3a HnTb, BbIXOJaIyIO n3 peKyuIeI rONOBKn, TaK, YTO6bl OHa npoWnaYepe3 na3 B KaTyUke.
HaTeB KpbIuKy Ha KaTyuKy, BCTaBnR 3bUKN Ba3bI HaxIMa Ha Hx Do NOHOr QKcaUN KpbIuKn.
3AMEHA CTPYHbl
I3BnKeKInTe aKKymyTApOpHyio 6aTapeIO.
BbHbTe katyki N3 roNoBKn ctpyHbl.
PIMMEYAHNE CHIMNTE c KaTyuKn OCTaTKn CTapOu CTpyHbl.
OtpexbTe KycOK CTpyHb IINHOI npIMepHO 9 cyTOB. NcnoJIb3yIte TOnbKO MOHOBOJOKOHHy OCTpyHy dnaMetpOM 0,065 duHaMa.
Pycckn (IpebeO d opnHaJIbHbIX nHCTpyKcN)
BCTABbTe CtpHy B aHKePhoe OTBepCte N B ePxHeu qactn KATyUKN. HamotaTe CtpHy Ha BepxHIOU qactb KATyUKN no YacOBoN CTpeJIke, KaN NOkA3aHO cTpeIkanMHa KATyUKe. 3aBeDIne CtpHy B na3 BepxHero FNaHua KaTyUKN, OCTaBnB ChapyKn OTpe3OK dNNHO npMepHO 6 DIOIMOB. He DOnyckaIte nepenONHeHry KATyUKN. Nocne HAMatbIBAHnA CtpYbI MExdY He N BHeUHeN KpOMKoN KATyUKN DOJXHO OCTaBaTbcra pacCTOARHe NAK MNHMym 1/4 IIOMa.
YcTaHOBnTe 6o6nHy n KpbIuKy 6o6nHbHa MeCTO. CM.pa3dEn "3aMeHa 6o6nHbPaHee B daHHOM pyKOBODCTBe.
XPAHEHNE TPMM EPA
■ Npeed nocTaHOBkoH Ha xpaHeHne BbIHytb n3 Tpmmepa aKKMyJrTOp.
IOMeCTb yCTpoNCTBO B HeIOCTynHoe dIa JeTeMecTo.
He depkaTb ero B6n3n ot pa3beaHux XmMuecknx BeueCTB, HapnmuEep XmMuecknx CpeDCTB nIra caIOBOdCTBa nn CoN nn y6OpKn cHera.
XpaHntb n 3apKaTb akymyIaTOPHyO 6aTapeo B npoxlaHOM MeCTe. Pn Tempeatype Bblwe nn HnKe HopMaIbHOm Tempeatypbl OKpykaIOue cpebl COKpaAaetc npck cnK6bl aKKMyIaTOpa.
XpaHnTb aKKyMyJrTOP npu TemnepaType Hnke 27°C n B MecTaX, NIIueHHbIX BNaXHOCTN.
Bce akymyIaTOpbI CO BpeMeHem TepaH. YEm Bblwe TemnepaTypa, Tem 6bIcTpee akymyIaTOp TepaET 3apA. B cnUae dNITeNbHO HeNCNoJIb3OBAHn yCTpoiCTBa NOD3apXaJTe akymyIaTOp pa3 B Mecau INN KaXDbIe Dba Mecua. 3TO N03BOJNT npoDInTB cPOK cnYk6bI akymyIaTopa.
Bo Bpemr TpaHcnpTnPOBKn DOJIKHbIM 6pa30M 3aKpeNITE TpMMep, YTO6bI N36eKaTb ero NOBpeXeHnra. Ipeed NOCTAHOBKOHa XpaHeHne NOUcHTe yCTPOINCTBO N BBIOJNHTe Heo6xOdImoe TEXHueCKoe OBCJyKINBaHne, 3auntte MeTaNueckne HOKN. IcNoIb3yInTe HAdIeXaUe YExNbI DnA MeTaNuecknx HOKei npn TpaHCnpTnPOBKe INxaHeHn.
OXPAHA OKPYKAIOLIEN CPEbl
OxpaHa OkpyXaIoUe CpeBIOIOLXHa IABJIbCAYIeCTBeHHbIM IN NepBOOuepeHbIM acNEKTOM PnINoJIb3OBaHm MaUNHO, BO 6Jano YeJIOBEeCKORO oIeCTBa n OkpyXaIoUe CpeBIO, B KOTOpONMbIKiBEm. CtapaTecb He BeCnOKoNTb OkpyXaIoUxN.
CTporo co6nOdaaTe MeCTHbIe HOpMbI NO yTnIN3aUy yNakOBKn, Macen, 6eHNHa, fNtBtpOB, NOBpeXdEHHbIX YactEn NN JIO6bIX 3JeMeHTOB CO 3NaHTeNbHbIM BnnaHHe Ha OKpyKaUuYcpeDy; 3TN OTXoDbI He DOJNXbI Bbl6paCbIBaTbCc C 6bITOBbIM MycopoM, a Co6npaTbcr OTeJIbHO INpepeDaBaTbcra B CneuaNBbIe cEHTpbl C6opa OTxODB, BblONHauOuine nx nepepa60Ky.
Ctporo co6nOaIte DeIcTByIOuIe Ha MeCTHOM ypOBHe npabUNa IIO BBIO3y OTXoIOB pa60TbI.
Iocne 3aBepWeHnA cpoKa Cnyk6bl MaunHbHe Bbl6paCbBaIte ee, a o6patntecb B ceHTp c6opa OTXoOB B COOTBetCTBm C DeiCTByIOUIM MecTHbIM 3aKOHoDaTeJIbCTBOM.
Pycckn (IpebeO d opnHaJIbHbIX nHcTpyKcn)
OBHAPYXEHNE IYCTPAHEHNE HENCINPABHOCTE
GENERELT VEDLIKEHOLD
| PROBLEM | MOGUĆI UZROK | RJEŠENJE |
| Flaks se ne izvlacovi kad se koristi automstako izvlacenje flaksa. | String is welded to itself. | Lubricate with silicone spray. |
| Not enough string on spool. | Install more string. Refer to string replacement earlier in this manual. | |
| String is worn too short. | Pull string while pressing line release button. | |
| String is tangled on spool. | Remove string from spool and rewind. Refer to string replacement earlier in this manual. | |
| Grass wraps around shaft housing and string head. | Cutting tall grass at ground level | Cut tall grass from the top down to prevent wrapping. |
| Motor fails to start when switch trigger is depressed. | Battery is not secure. | To secure the battery pack, make sure the latch on bottom of the battery pack snaps into place. |
| Battery is not charged. | Charge the battery pack according to the instructions included with your model. | |
| Shaft not connected completely | Make sure lower shaft is fully seated in shaft coupler on upper shaft and secure shaft coupler. |
AVANSAREA MANUALA A FIRULUI
A se vedea Figura 9.
I3BaTe aKymylaTophata 6aTepeia.
HaTncheteΦnKCaTopnte(B)OTBCraCtpaHaB rophatayactHa npTa.
3aBbptete DoHnHa HnHCTpyMeHTa B No3nna 3a oOpMaHe Ha p6oBe.
Ipei Da 3anoyhe Ta, ce yBepe, ye fikcatopnte Ca upaKaHn Ha MCTOTo cn n DoHHnKpau Ha HnCTpyMeHTa e oBe3onaceH.
OFOPMRAHHPbBOBEBx.duypa 11
I3BaTe aKymyIaTopHata 6aTepeIa.
3aBbptete INHCTpyMeHTA B N03nua 3a OopMHe Ha p6oBe, KaTTo e ONuCAHO B npeDnHn pa3dEn; H3noJ3BaIe BOa4a 3a OOpMHe Ha p6oBe, KOrato OopMTe p6oBe HA TpOaPn NeWexOdn anen.
Bunhar npbxte kopdoBn TpImep daJepe ot TaJnoTo cn, kaTO cna3BaTe 6eOnaCha nCTaHcN Mekdy Bac n TpImepa. Bcekn KOtAKT C pexeUata rnaBa Ha KopdoBn TpImep no BpeMe Ha pa6ota MoKe da npuHHn cepno3HN fN3nueckn HapaHraBaHn.
DnCK 3A PRA3A HE HA HNIJKATA
HCTpymEnbTe cHa6deh C dNcK 3a p3aHe Ha Hnskata Bbpxy DePnEeKTopa 3a TpeBaT. 3a ONTMaHNO p3aHe pa3BnTE HnKata, DOKato 6bJe OTp3aHa Ha TOHOTo HnBO OT nCKa 3a p3aHe Ha HnKata. Pa3BnBaIte pexeuaTa HnSKa, BNHarN KOrato ycETnte NO-ROJMO BbTeHe Ha DBnraTeJIr OT HopMaHnHO INI KOrato ce 3a6eIeXn HamaJIbaHe Ha eFekTNBHOCTTa Ha p3aHe. ToBa ige NODbPxk ONTMamHNo HnBO Ha eFekTNBHOCT I npabUNHa DblnxHa Ha pexeuaTa HnSKa, 3a da pa60tne npabunHo.
L 1
JU 1u JU 1u 1u 1u 1u 1u
A C
g 1 g j 1 1 1 1 1 1 1 1 1 1 1 1 1 1 1 1 1 1 1 1
A C:
1 1 1 1 1 1 1 1 1 1 1 1 1 1 1 1 1 1 1 1 1 1 1 1 1 1 1 1 1 1 1 1 1 1
JUeJg (JUeJgpa JUaJg)
A
1s 1s 1s 1s 1s 1s 1s 1s 1s 1s 1s 1s 1s 1s
A
JU 1uus uusuus
4.
1J 1J62 JgJg JgJg EJg Jg Jg Jg Jg Jg Jg Jg
1JU 1JU
1 1 1 1 1 1 1 1 1 1 1 1 1 1 1 1 1 1 1 1
U
JyEgU 1jI5
L 15
1 1 1 1 1 1 1 1 1 1 1 1 1 1 1 1 1 1 1 1 1 1 1 1
5.
1 1
1 1
6.
JUe JU (1) 2.
Jgj 1000000000000000000000000000000000000000000
A
Uusuue. 1 uuaa a uuaaue uauuua uuuuua uuuuua uuuuua uuuuua uuuuua uuuuua uuuuua uuuuua uuuuua uuuuua uuuuua uuuuua uuuuua uuuuua uuuuua uuuuua uuuuua uuuuua uuuuua uuuuua uuuuua uuuuua uuuuua uuuuua uuuuua uUU
1000 1 1000 1 1000 1 1000 1 1000 1 1000 1 1000 1 1000 1 1000 1 1000 1 1000 1 1000 1 1000 1 1000 1 1000 1 1
A
e 1s 1s 1s 1s 1s 1s 1s 1s 1s 1s 1s 1s 1s 1s 1s 1s
JUeJg (JUeJgpa JUaJg)
A
1
A
J 1 J 1 J 1 J 1 J 1 J 1 J 1 J 1 J 1 J 1 J 1 J 1 J 1 J 1 J 1 J 1 J 1 J 1 J 1 J 1 J 1 J 1 J 1 J 1 J 1 J 1 J 1 J 1 J 1 J 1 J 1 J 1 J 1 J 1 J
J 1 J 1 J 1 J 1 J 1 J 1 J 1 J 1 J 1 J 1 J 1 J 1 J 1 J 1 J 1 J 1 J 1 J 1 J 1 J 1 J 1 J 1 J 1 J 1 J 1 J 1 J 1 J 1 J 1 J 1 J 1 J 1 J 1 J 1 J
A C
JU 1 JU 1 JU 1 JU 1 JU 1 JU 1 JU 1 JU 1 JU 1 JU 1 JU 1 JU 1 JU 1 JU 1 JU 1 JU 1 JU 1 JU 1 JU 1 JU 1 JU 1 JU 1 JU 1 JU 1 JU 1 JU 1
J 1 J 1 J 1 J 1 J 1 J 1 J 1 J 1 J 1 J 1 J 1 J 1 J 1 J 1 J 1 J 1 J 1 J 1 J 1 J 1 J 1 J 1 J 1 J 1 J 1 J 1 J 1 J 1 J 1 J 1 J 1 J 1 J 1 J 1
12.
1
心
LcUcsuEUsEua
1
1jUJJJUJU()
JU 15 JU
1 111111111111111111111111111111
1 1
1 1 1 1 1 1 1 1 1 1 1 1 1 1 1 1 1 1 1 1
13.
iie e 1
Uuuaa
105
sbcjoofofofofofofofofofofofofofofofofofofofofofofofofofofofofofofofofofofofofofofofofofofofofofofofofofofofofofofofofofofofo
1 1 1 1 1 1 1 1 1 1 1 1 1 1 1 1 1 1 1 1 1 1 1 1 1 1 1 1 1 1 1 1 1 1 1 1 1 1 1 1 1 1 1 1 1 1 1 1 1 1 1
UuJU 1 uU
c
1
EJUJU
1 1
1 1
27 2
C 1 1 1 1 1 1 1 1 1 1 1 1 1 1 1 1 1 1 1 1 1 1 1 1 1 1 1 1 1 1 1 1
JUeJg (JUeJgpa JUaJg)
1 1 1 1 1 1 1 1 1 1 1 1 1 1 1 1 1 1 1 1 1 1 1 1 1 1 1 1 1 1 1 1 1 1 1 1
UcysUsus
1 1 1 1 1 1 1 1 1 1 1 1 1 1 1 1 1 1 1 1 1 1 1 1 1 1 1 1 1 1 1 1 1
1 1 1 1 1 1 1 1 1 1 1 1 1 1 1 1 1 1 1 1 1 1 1 1 1 1 1 1 1 1 1 1 1 1 1 1 1 1 1
U 1 U 1 U 1 U 1 U 1 U 1 U 1 U 1 U
10 11 12 13 14 15 16 17 18 19 20 21 22 23 24 25 26 27 28 29 30 31 32 33 34 35 36 37 38 39 40 41 42 43 44 45 46 47 48 49 50
1
CIM BICME MAKINESINI DEPOLAMAK
n nn nnnn nn nnn nnn nnn nnn nnn nnn nnn nnn nnn nnn nnn nnn nnn nnn nnn nnn nnn nnn nnn nnn nnn nnn nnn nnn nnn nnn nnn nnn nnn nnn nnn nnn nnn nnn nnn nnn nnn nnn nnn nnn nnn nnn
A
All new Greenworks Tools machinery is supplied with a 2 year parts and labour warranty from original date of purchase. A 30 day warranty is available for machines used professionally as Greenworks Tools are designed primarily to be used by DIY consumers. This warranty is non-transferable.
LIMITATIONS
This warranty applies only to defective parts/components and does not cover repairs due to:
- Normal wear and tear.
- Routine tune up or adjustment.
- Damage caused by improper handling/abuse/misuse or neglect.
- Overheating due to lack of maintenance
- Damage due to fittings/fasteners becoming loose/detached through lack of maintenance.
- Damage caused by cleaning with water.
- Machines serviced or repaired by non-authorised Greenworks Tools service centres.
- Machines incorrectly assembled or adjusted.
- Damage caused by improper use of the machine.
- Damage caused by improper winterisation (pressure washers)
-
Items considered as consumable parts are not normally covered by the warranty, including but not limited to:
-
Batteries
Electric cables - Blade and blade assemblies
Belts - Filters
-
Chucks and tool holders
-
Certain products may contain components such as engines, transmissions from an alternative manufacturer, these items will be subject to the appropriate manufacturer's warranty policy except where Greenworks Tools Europe GmbH agrees to underwrite any claims outside the said manufacturer's warranty period.
- Second hand goods are not covered under this warranty policy.
- The fitting of spares, replacements or extra components which are not supplied or approved by Greenworks Tools Europe GmbH.
Warranty
To claim a warranty on any product under this policy a proof of original purchase is required. Credit card statement do not qualify as sufficient proof of purchase. In the first instance of a warranty event occurring the consumer should return the product to the original place of purchase with their proof of purchase. The machine will be sent to our central service facility and an inspection made. If the machine be found to be at fault it will be repaired and sent back to the address of the consumer free of charge. Machines that retail for less than €100 euros including sales taxes will generally be replaced.
If the central service facility finds that machine is not found to be at fault then the consumer will be advised they will need to pay for the cost of the repair.
This warranty policy is subject to change from time to time to accommodate the needs of new products. A copy of the latest warranty policy will be available at www.greenworkstools.eu.
Greenworks Tools garanti for hobbymaskiner
GARANTIPERIOD
TapaHOnHH npaBnHa Ha Greenworks Tools 3a camoJeHN Maunnn
IEPNOD HA TAPAHUNRA
BcNKn MaunHn Ha Greenworks Tools ce npedoctabrt c 2-roDnHa rapaun3a cepBn3Ha deHoc n pe3epBN qactn, CHTnHO OT daTata Ha 3akynBaHe Ha npodykTa. PnpodctABrCe camo 30-dHeBHa rapaun3a npocecnoHAnHO n3noJ3BaHnTe MaunHn, 3auTo npodykTIne Ha Greenworks Tools ca npedHa3haueHn npedmH0 3a KIneHTn, paOteu cn cbCamOpEnH MaunHn
Hactoata rapaun He moke da ce npexBbprna.
OTPAHNUEHHN
Hactoata rapaunie e BaIuHa cAmO 3a DepekTHn Yactn/KOMnoHeHTn He nokpBa pemOHn, noPOeHN OT:
HopMaJIHO H3HOCBaHe n amOpTn3aUra.
PyTHHHH HAcTPOIKN JIN DeHOCHT No peryInpuHa.
EC DECLARATION OF CONFORMITY FOR MACHINERY
Manufacturer: Changzhou Globe Co., Ltd.
Address: No.65 Xinggang Road Zhonglou Zone Changzhou, Jiangsu 213000
P.R.China
Name and address of the person authorised to compile the technical file:
Name: Gary Gao Naixin (Director of Outdoor Power Equipment)
Address: Greenworks Tools Europe GmbH
Wankelstrasse 40.
50996 Koln
Germany
Herewith we declare that the product
LINE TRIMMER
Model.
2101207
Serial number
See product rating label
Year of Construction
See product rating label
-
is in conformity with the relevant provisions of the Machinery Directive (2006/42/EC)
-
is in conformity with the provisions of the following other EC-Directive
2014/30/EU (EMC-Directive), and
2000/14/EC (Noise-Directive) incl. modifications (2005/88/EC)
And furthermore, we declare that
- the following (parts/clauses of) European harmonised standards have been used
EN60335-1, EN 50636-2-91, EN ISO 3744, ISO 11094, EN 55014-1, EN 55014-2
ITS Testing & Certification, Davy Avenue, Knowlhill, Milton Keynes, MK5 8NL
Measured sound power level 87 dB(A)
Guaranteed sound power level 90 dB(A)
Conformity assessment method to Annex VI/ Directive 2000/14/EC
The notified body: Intertek Testing & Certification Ltd.
Address: Davy Avenue, kwowchill, Milton Keynes, MK5 8NL
Place, date: Changzhou, 02/09/2016
Signature: Gary Gao Naixin (BEng, CEng,
MIET) Vice president of Engineering


ITS Testing & Certification, Davy Avenue, Knowlhill, Milton Keynes, MK5 8NL
Yadelmas,declaremosque
ITS Testing & Certification, Davy Avenue, Knowlhill, Milton Keynes, MK5 8NL
ITS Testing & Certification, Davy Avenue, Knowlhill, Milton Keynes, MK5 8NL
2000/14/CE (Directive Emissions Sonores) y-comprismodifications (2005/88/CE)
ITS Testing & Certification, Davy Avenue, Knowhill, Milton Keynes, MK5 8NL
Lieu, date: Changzhou, 02/09/2016 Signature: Gary Gao Naixin (BEng, CEng,
Endereço: No.65 Xinggang Road Zhonglou Zone Changzhou, Jiangsu 213000
China
ITS Testing & Certification, Davy Avenue, Knowlhill, Milton Keynes, MK5 8NL
Naam: Gary Gao Naixin (Director of Outdoor Power Equipment)
Adres: Greenworks Tools Europe GmbH
Wankelstrasse 40.
50996 Kln
Germany
ITS Testing & Certification, Davy Avenue, Knowlhill, Milton Keynes, MK5 8NL
Gemeten geluidsdrukniveau 87 dB(A)
Endereço: No.65 Xinggang Road Zhonglou Zone Changzhou, Jiangsu 213000
China
ITS Testing & Certification, Davy Avenue, Knowlhill, Milton Keynes, MK5 8NL
ITS Testing & Certification, Davy Avenue, Knowlhill, Milton Keynes, MK5 8NL
Mitattu aanenteho 87 dB(A)
Taattu aanenteho 90 dB(A)
Namn: Gary Gao Naixin (Chef for Outdoor Power Equipment)
Adress: Greenworks Tools Europe GmbH
Wankelstrasse 40.
50996 Koln
Germany
ITS Testing & Certification, Davy Avenue, Knowlhill, Milton Keynes, MK5 8NL
Uppmatt ludeffekt 87 dB(A)
Garanterad ludeffekt 90 dB(A)
ITS Testing & Certification, Davy Avenue, Knowlhill, Milton Keynes, MK5 8NL
Malt lydeffektniva 87 dB(A)
Garantert lydeffektniva 90 dB(A)
Samsvarsvurdering til Tillegg VI/Direktiv 2000/14/EC
Sted, data: Changzhou, 02/09/2016
Signatur: Gary Gao Naixin (BEng, CEng,
ITS Testing & Certification, Davy Avenue, Knowlhill, Milton Keynes, MK5 8NL
Malt lydeffektniveau 87 dB(A)
Garanteret lydeffektniveau 90 dB(A)
Overensstemmelsesvurderingsmetode iht. Tillag VI / Direktiv 2000/14/EOF
Sted, date: Changzhou, 02/09/2016 Underskrift: Gary Gao Naixin (BEng, CEng,
MIET) Vicedirektor for maskinteknik

DEKLARACJA ZGODNOSCI WE DLA MASZYN
Producent: Changzhou Globe Co., Ltd.
Adres: No.65 Xinggang Road Zhonglou Zone Changzhou, Jiangsu 213000 P.R.
Chiny
ITS Testing & Certification, Davy Avenue, Knowlhill, Milton Keynes, MK5 8NL
ITS Testing & Certification, Davy Avenue, Knowlhill, Milton Keynes, MK5 8NL
Zmefenahladina akustickeho vkonu:
87 dB(A)
ITS Testing & Certification, Davy Avenue, Knowlhill, Milton Keynes, MK5 8NL
ITS Testing & Certification, Davy Avenue, Knowlhill, Milton Keynes, MK5 8NL
ITS Testing & Certification, Davy Avenue, Knowlhill, Milton Keynes, MK5 8NL
Izmjerena razina zvučne snage
87 dB(A)
Jamcena razina zvuene snage
90 dB (A)
Metoda procjene uskladenosti prema dodatkuvi/Direktive 2000/14/EC
Mjesto, datum: Changzhou, 02/09/2016
Potpis: Gary Gao Naixin (BEng)
CEng,MIET) Potpredsjednikinzenjeringa


EK GEPESZETIMEGFELEOSEGINYILATKOZAT
Gyartó: Changzhou Globe Co., Ltd.
Cim: No.65 Xinggang Road Zhonglou Zone Changzhou, Jiangsu 213000, Kina
ITS Testing & Certification, Davy Avenue, Knowlhill, Milton Keynes, MK5 8NL
- este in conformitate cu prevederile urmatoarelor Directive CE in conformity with the provisions of the following other EC-Directive
ITS Testing & Certification, Davy Avenue, Knowlhill, Milton Keynes, MK5 8NL
Nivel māsurat de putere sonora
87 dB(A)
Nivel garantat de putere sonora 90 dB(A)
Metoda declaratie de conformitate la Anexa /Directiva 2000/14/EC
Locul, data: Changzhou,02/09/2016
Semnataura: Gary Gao Naixin (BEng, CEng, MIET) Vice presedinte Departament
Inginerie


EC DEKAPAU3A CCBOTBETCTBNE HA MAUNHATA
Ipn3B0DHTen:Changzhou Globe Co.,Ltd.
Adec: No.65 Xinggang Road Zhonglou Zone Changzhou, Jiangsu 213000, Kuitai
Ime n apec Ha nueTo, ybHOMoEHO da cbCTaBn TEXHueCKTe DOKymeHTN:
Ime: Gary Gao Naixin (DnpeKTop Ha otena 3a BbHNO MexAHN3npaHO
obopydanahe)
Ampec: Greenworks Tools Europe GmbH
Wankelstrasse 40.
50996 Koln
Germany
C HactoioTo DeKnapnpame,Ye npodykTbT
Kateropn EneKtpueckn TpMepc BnaKHO
Mogen 2101207
CepneH HOpE BnKte eNKeTa C HOMHaHInTe CTOnHOCTN
TQINHa Ha npOH3BOIDCTBO BnKTe eTNKeTa C HOMHnAHnHTe CTOnHOCTN
OTROBAPRAHcB0TBETHTPe pa3nope6n Ha DnpeKTHBaTa OTHOCHOaHHTe 2006/42/EC
OTROBAPaP3nope6nteHaCneHHTeDpyrN DpuekTINBa HA EO
2014/30/EU (ДиректINA 3a EMC) n
2000/14/EC (N3MbYBaH Wym OT Maunn H CbOpBXeHNA, KOnTo pa6oTt Ha OTKpuTO)
BKNIOHTENHO npomeHnTe (2005/88/EC)
OcbenTobaDeknnapame,Ye
ca cna3eHn (aactn/klay3n 0T) cneHnTe oobnte eBponeckn ctaHdaptn
EN60335-1, EN 50636-2-91, EN ISO 3744, ISO 11094, EN 55014-1, EN 55014-2
ITS Testing & Certification, Davy Avenue, Knowlhill, Milton Keynes, MK5 8NL
H3MepeHo HnBO Ha Wym
87 dB(A)
TapaHTnpaHO HnBO Ha Wym
90 dB(A)
MetoHa OueHbAHe Ha cBoTBcTbMeTo Cbo6pa3Ho npnIOKeHne V1ot DnpeKTHBa
2000/14/EC
MЯсто,data:Changzhou,02/09'2016Подпс:GaryGaoNaixin(BEng,CEng,MIET)
Bunenpe3nndent, MaunHoctpoeHe


△HAQEH SYMMOPΦΩEHK
Kataoekuaotn; Changzhou Globe Co., Ltd.
u Buvon: No.65 Xinggang Road Zhonglou Zone Changzhou,
Jiangsu 213000 P.R.China
Ovopa kai dieuBuvon anoou eouoiodotneov ou auvtaeioTov Teyviok pakea:
Ovoa: Gary Gao Naixin (Aeuuovntc uaiptoi npkpoivntou eonlioou)
Address: Greenworks Tools Europe GmbH
Wankelstrasse 40.
50996Koln
Germany
Aia Tou TApovtoc 8nawouye ot to Ppoiov
Katyopla HAKTPIKO KOTIKO ypaun
Movélo 2101207
ApiBpOc oipac .BA. EIKETa BaOovOpnnc TpoioVTOC
EtoKataoKeu.. BA. Eiketa Baoovopnans TpoiovToS
Eivaouo 10sOxetikc biataeic nOdyia Mxavnuw 2006/42/EK
To npoiov elvai oupewvo e n ti npouTnoBteoei twv npapakw loiw Onyiw ts EK
2014/30/EE (Oδηγα EMC) κα
2000/14/EK (O8nyia 8opou) ouupiepiaaavovevw Tuv TpoTTOIOIeWv (2005/88/EK)
Kai emnlaov onawoune on
Eepapuootkav ta akoloutheta Eupwaiika evapovioeva potua (tnmuata npntpec)
EN60335-1, EN 50636-2-91, EN ISO 3744, ISO 11094, EN 55014-1, EN 55014-2
ITS Testing & Certification, Davy Avenue, Knowlhill, Milton Keynes, MK5 8NL
Metpnuevo emineo evtaon hou
87 dB(A)
90 dB(A)
Eyyunmuvo emirego evtaangxou
ITS Testing & Certification, Davy Avenue, Knowlhill, Milton Keynes, MK5 8NL
87 1
90
ITS Testing & Certification, Davy Avenue, Knowlhill, Milton Keynes, MK5 8NL
Olcalen ses gucu seviyesi:
87 dB (A)
90 dB (A)
Imza: Gary Gao Naixin (BEng, CEng)
MIET) Muhendislik Departmani Baskan Yardimcişi


y
Y: Changzhou Globe Co., Ltd.
Dian: No.65 Xinggang Road Zhonglou Zone Changzhou, Jiangsu 213000 P.R.China
:GaryGaoNaixin (nunwnnnnni)
Address: Greenworks Tools Europe GmbH
Winkelstrasse 40.
50996 Koln
2
XAN
poun n
2101207
no'0tn
y 2006/42/EC
yintanxw7nncnECniosinwh
ITS Testing & Certification, Davy Avenue, Knowlhill, Milton Keynes, MK5 8NL
ywn we wntn:
87 dB(A)
yannnnn
90 dB(A)
wnnnn nn nnnn 2000/14/EC
n10, n2y: y2x11, 102 092016
nnnn:GaryGaoNaixin
(BEng, CEng, IET) on"Mton


EKIRENGIMUATITIKTIESDEKLARACIJA
Gamintojas:Changzhou Globe Co.,Ltd."
Adresas: No. 65 Xinggang Road Zhonglou Zone Changzhou, Jiangsu 213000 P.R.
Kinija
Asmens, jgaloti tvarkyi technine byla, vardas, pavarde ir adreas:
Vardas, pavarde: Gary GaBekdins jrangos darbui lauke direktorius)
Adresas: Greenworks Tools Europe GmbH
Wankelstrasse 40.
50996 Koin
Germany
ITS Testing & Certification, Davy Avenue, Knowlhill, Milton Keynes, MK5 8NL
Ismatuotas akustinis lygis: 87 dB (A)
Garantuos akustinis lygis 90 dB (A)
Atitikties jvertinimo metodas pagal direktyvos 2000/14/EK, VIPrieda.
Viela, data: Changzhou, 02/09/2016
Parasas: Gary Gao Naixin (BEng,
Eng,MIET) Viceprezidentas,Inzinerijas


MASINU EK ATBILSTIBAS DEKLARACIJA
Razotajs: Manufacturer:Changzhou Globe Co., Ltd.
Adrese: No.65 Xinggang Road Zhonglou Zone Changzhou, Jiangsu 213000
P.R.China
Personas, kas pilnvarota sastadit tehnisko dokumentaciju, vards, uzvards un
adrese:
Vards, uzvards: Gary Gao Naixin (Lauka iekartu direktors)
Adrese: Greenworks Tools Europe GmbH
Wankelstrasse 40.
50996 Koln
Germany
ITS Testing & Certification, Davy Avenue, Knowlhill, Milton Keynes, MK5 8NL
Izmertais skanas jaudas limenis 87 dB(A)
Garantéais skanas jaudas limenis 90 dB(A)
Atbilstibas novertesana saskanaripelikumuV/2000/14/EK direktiva
Vieta, datums: Changzhou, 02/09/2016
Paraksts: Gary Gao Naixin (BEng,
CEng,MIET) Masinbues das priekssedetaja vietnieks


MASINA EC VASTAVUSDEKLARATSI0ON
Tootja:Changzhou Globe Co., Ltd.
Aadress: No.65 Xinggang Road Zhonglou Zone Changzhou, Jiangsu 213000
P.R.China
ITS Testing & Certification, Davy Avenue, Knowlhill, Milton Keynes, MK5 8NL