G24LT30M - Grass trimmer GREENWORKS - Free user manual and instructions
Find the device manual for free G24LT30M GREENWORKS in PDF.
| Technical specifications | Wireless electric grass trimmer, 30 cm motor, 24V battery |
|---|---|
| Cutting width | 30 cm |
| Battery type | 24V lithium-ion battery |
| Charging time | About 1 hour |
| Weight | About 2.5 kg |
| Usage | Ideal for small and medium areas, edging and garden maintenance |
| Maintenance | Regularly check the condition of the blade and battery, clean after use |
| Safety | Wear protective glasses, do not use in the rain |
| General information | Lightweight and maneuverable product, quiet, no pollutant emissions |
Frequently Asked Questions - G24LT30M GREENWORKS
User questions about G24LT30M GREENWORKS
0 question about this device. Answer the ones you know or ask your own.
Ask a new question about this device
Download the instructions for your Grass trimmer in PDF format for free! Find your manual G24LT30M - GREENWORKS and take your electronic device back in hand. On this page are published all the documents necessary for the use of your device. G24LT30M by GREENWORKS.
USER MANUAL G24LT30M GREENWORKS
English (Original Instructions)
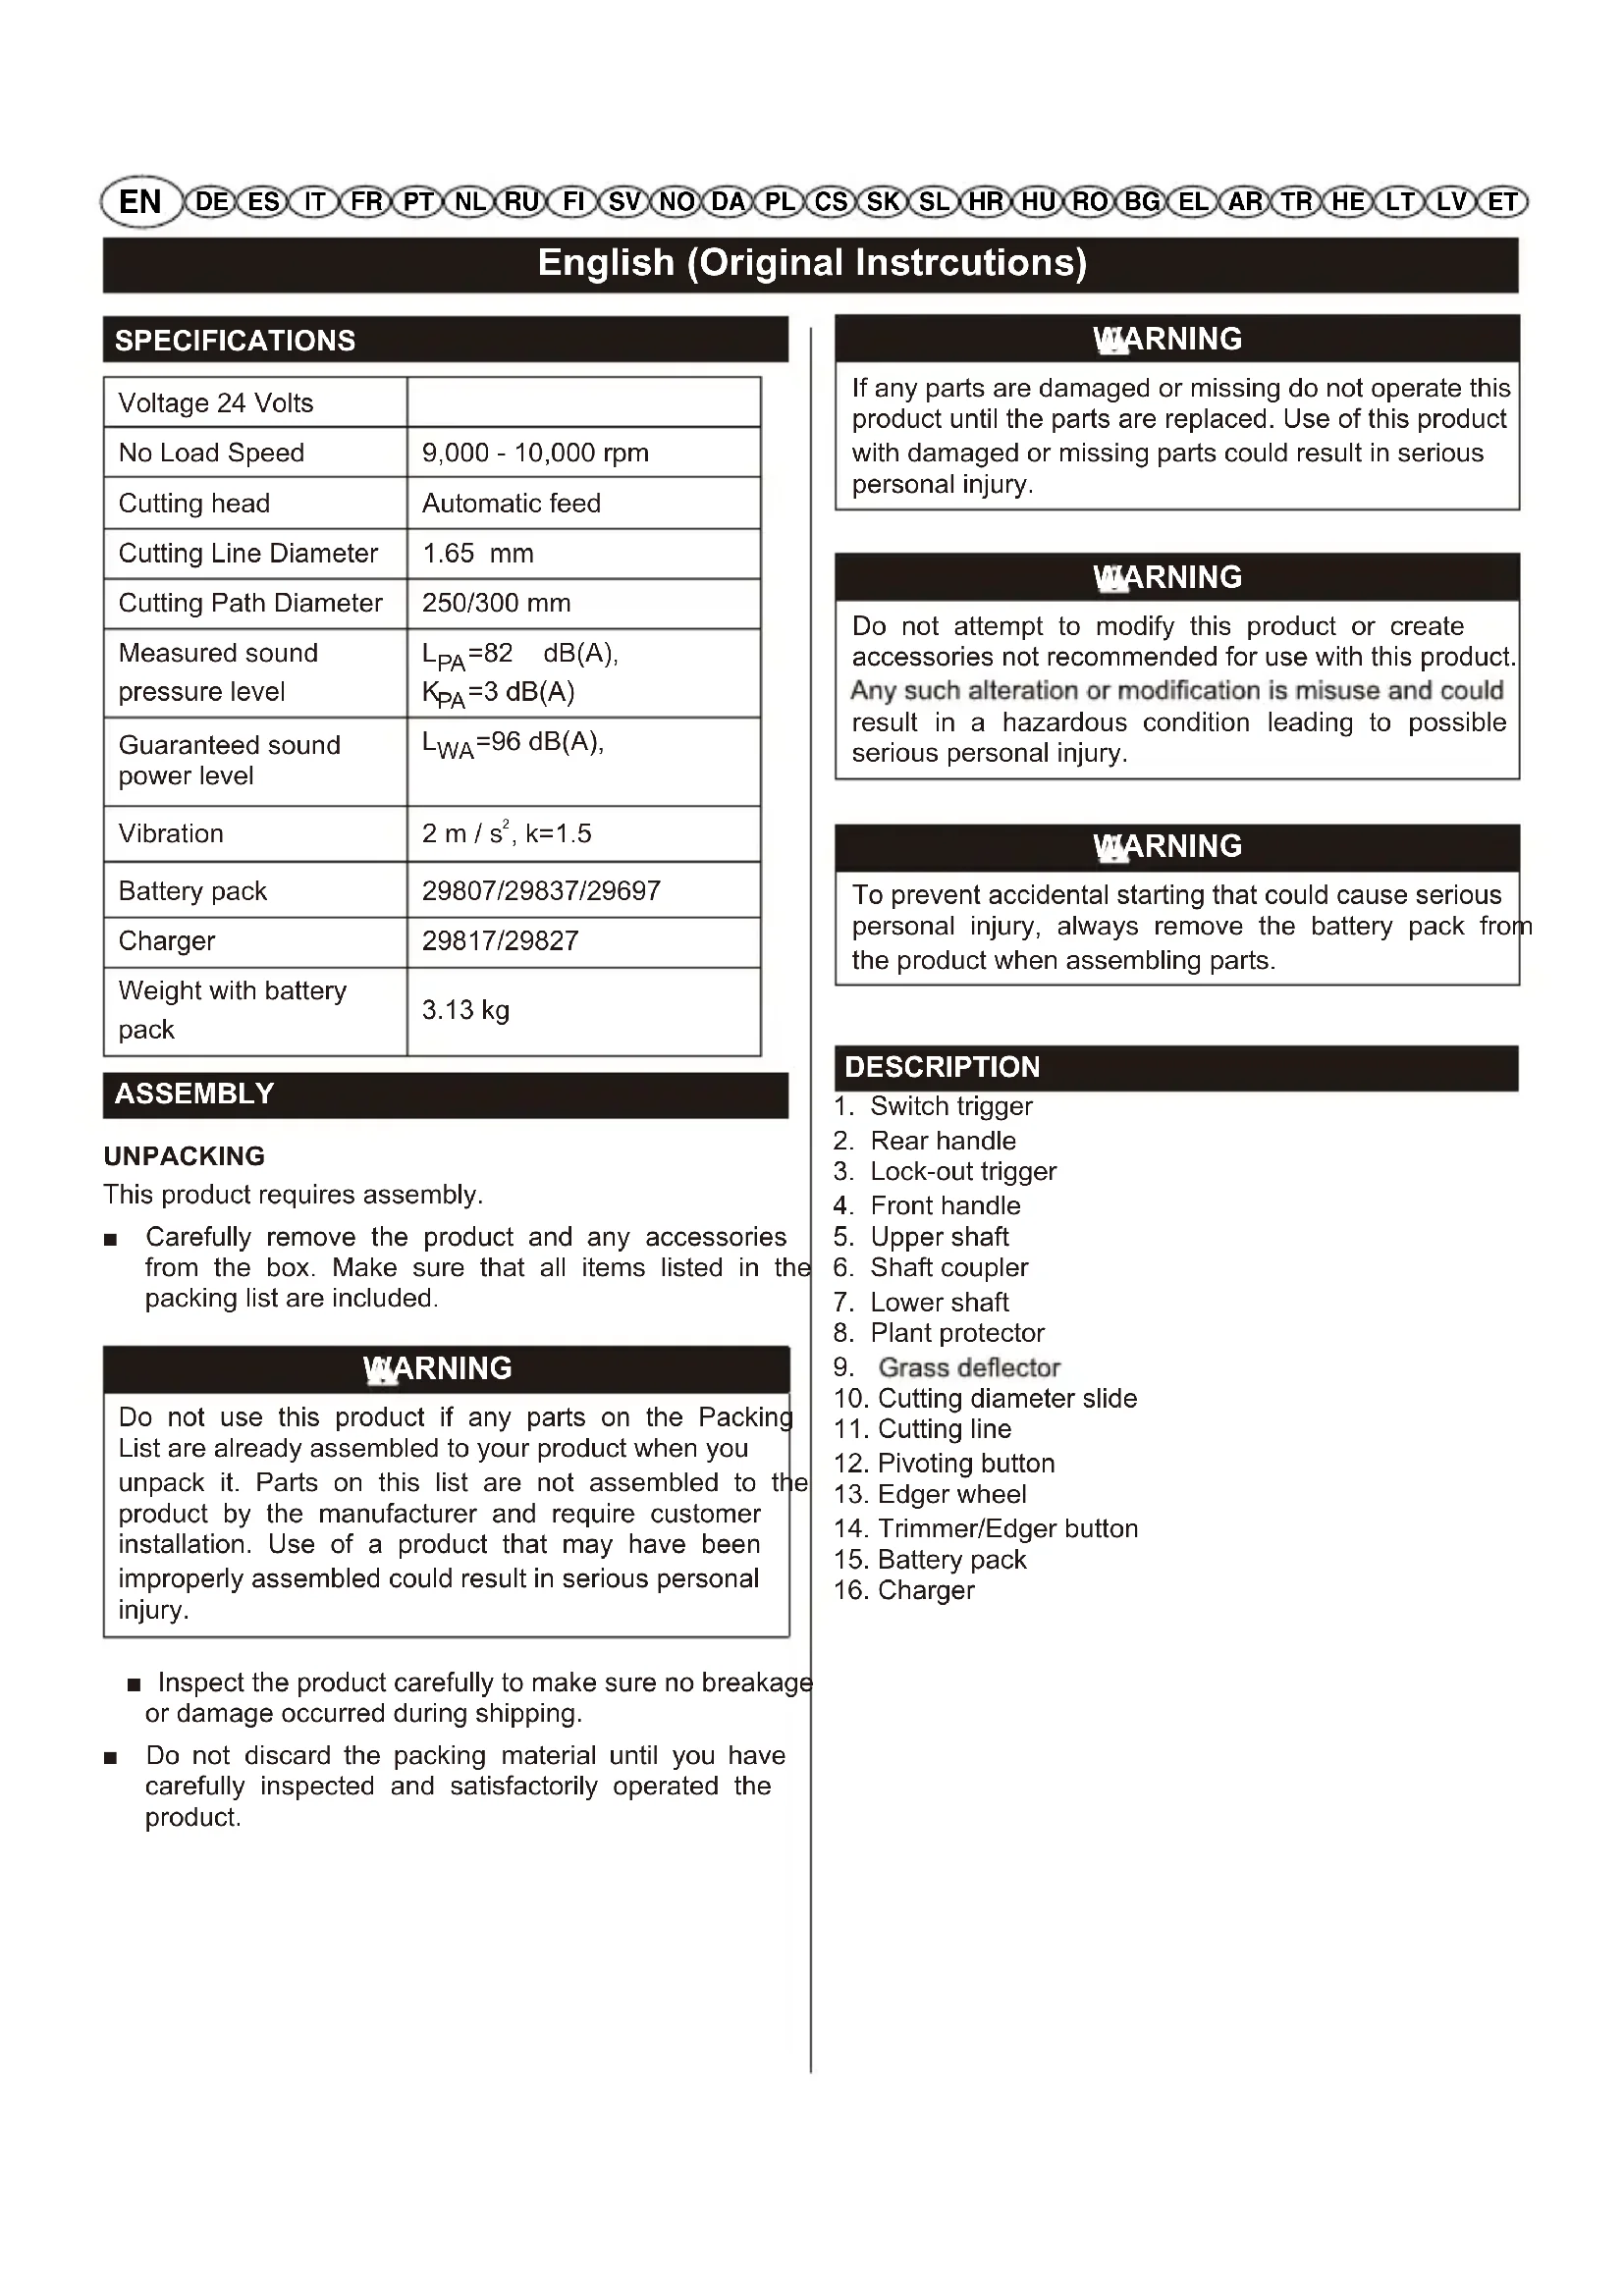
SPECIFICATIONS
| Voltage 24 Volts | |
| No Load Speed | 9,000 - 10,000 rpm |
| Cutting head | Automatic feed |
| Cutting Line Diameter | 1.65 mm |
| Cutting Path Diameter | 250/300 mm |
| Measured sound pressure level | LPA=82 dB(A), KPA=3 dB(A) |
| Guaranteed sound power level | LWA=96 dB(A), |
| Vibration | 2 m / s², k=1.5 |
| Battery pack | 29807/29837/29697 |
| Charger | 29817/29827 |
| Weight with battery pack | 3.13 kg |
ASSEMBLY
UNPACKING
This product requires assembly.
- Carefully remove the product and any accessories from the box. Make sure that all items listed in the packing list are included.
WARNING
Do not use this product if any parts on the Packing List are already assembled to your product when you unpack it. Parts on this list are not assembled to the product by the manufacturer and require customer installation. Use of a product that may have been improperly assembled could result in serious personal injury.
Inspect the product carefully to make sure no breakage or damage occurred during shipping.
- Do not discard the packing material until you have carefully inspected and satisfactorily operated the product.
WARNING
If any parts are damaged or missing do not operate this product until the parts are replaced. Use of this product with damaged or missing parts could result in serious personal injury.
WARNING
Do not attempt to modify this product or create accessories not recommended for use with this product. Any such alteration or modification is misuse and could result in a hazardous condition leading to possible serious personal injury.
WARNING
To prevent accidental starting that could cause serious personal injury, always remove the battery pack from the product when assembling parts.
DESCRIPTION
- Switch trigger
- Rear handle
- Lock-out trigger
- Front handle
- Upper shaft
- Shaft coupler
- Lower shaft
- Plant protector
- Grass deflector
- Cutting diameter slide
- Cutting line
- Pivoting button
- Edger wheel
- Trimmer/Edger button
- Battery pack
- Charger
English
ATTACHING GRASS DEFLECTOR
See Figure 2.
WARNING
The line cut-off blade on the grass deflector is sharp. Avoid contact with the blade. Failure to avoid contact can result in serious personal injury.
Remove supplied screws from the motor housing.
Fit the grass deflector into the slots on trimmer head.
- Turn counterclockwise to lock grass deflector into place.
Line up the screw holes in the grass deflector with the holes in the motor housing head.
Install supplied screws and tighten by turning clockwise with a phillips screwdriver.
OPERATION
WARNING
Do not allow familiarity with products to make you careless. Remember that a careless fraction of a second is sufficient to inflict serious injury.
WARNING
Always wear eye protection. Failure to do so could result in objects being thrown into your eyes resulting in possible serious injury.
WARNING
Never use blades, flailing devices, wire, or rope on this product. Do not use any attachments or accessories not recommended by the manufacturer of this product. The use of attachments or accessories not recommended can result in serious personal injury.
For complete charging instructions, refer to the Operator's Manuals for your battery pack and charger models.
NOTE: To avoid serious personal injury, always remove the battery pack and keep hands clear of the lock-out button when carrying or transporting the tool.
TO INSTALL BATTERY PACK
See Figure 3.
- Place the battery pack in the trimmer. Align raised ribs on battery pack with grooves in the trimmer's battery port.
Make sure the latch on bottom of the battery pack snaps in place and that battery pack is fully seated and secure in the trimmer before beginning operation.
TO REMOVE BATTERY PACK
See Figure 3.
- Release the variable speed control trigger to stop the trimmer.
Press and hold the battery latch button at the bottom of the battery pack.
Remove battery pack from the trimmer.
SHAFT ASSEMBLY
See Figure 4.
The shaft's length cannot be adjusted.
- Insert the lower shaft into the shaft coupler on the upper shaft.
- Tighten the coupler by turning clockwise. Make sure the upper and lower part of shafts are securely tightened before reinstalling the battery pack.
STARTING/STOPPING THE TRIMMER
See Figure 5.
To start the trimmer, grip the front handle with one hand while holding the rear handle with your other hand making sure to depress the lock-out trigger while squeezing the variable speed trigger.
To stop the trimmer, just release the variable speed control trigger.
English
Hold the trimmer with your right hand on the rear handle and your left hand on the front handle.
- Keep a firm grip with both hands while in operation.
- Trimmer should be held at a comfortable position with the rear handle about hip height.
Cut tall grass from the top down. This will prevent grass from wrapping around the shaft housing and string head which may cause damage from overheating.
If grass becomes wrapped around the string head:
Remove the battery pack from the trimmer.
Remove the grass.
WARNING
Contact with the trimmer cutting head while operating can result in serious personal injury.
CUTTING TIPS
See Figure 8
- Keep the trimmer tilted toward the area being cut; this is the best cutting area.
The trimmer will cut better when moved from left right across the area to be cut; it is less effective when moved from right to left.
Use the tip of the cutting line to do the cutting; do not force cutting head into uncut grass. - Wire and picket fences cause extra cutting line wear, even breakage. Stone and brick walls, curbs, and wood may wear cutting line rapidly.
- Avoid trees and shrubs. Tree bark, wood moldings, siding, and fence posts can easily be damaged by the cutting line.
ADVANCING CUTTING LINE
NOTE: The trimmer is equipped with an auto-feed head. Bumping the head to try to advance the line will damage the trimmer and void the warranty.
- With the trimmer running, release the switch trigger.
Wait two seconds, and press the switch trigger.
NOTE: The cutting line will extend approximately 0.635cm with each stop and start of the trigger until the cutting line reaches the length of the grass deflector cut-off blade.
Resume trimming.
ADVANCING THE CUTTING LINE MANUALLY
See Figure 7.
Remove the battery pack.
Push the black button located on the cutting head while pulling on cutting line to manually advance the cutting line.
After extending new cutter line, always return the machine to its normal operating position before switching on.
ADJUSTABLE CUTTING DIAMETER
See Figure 9.
- Rotate the plant protector to its working position to avoid cutting flowers or plants by mistake.
Remove the battery pack.
Adjust the "cutting diameter slide" on the grass deflector to adjust the cutting path diameter. There are 2 diameter options: 30cm, 25cm.
Note: a smaller diameter cutting path will maximize run time and cutting speed, while a larger cutting path will help complete the trimming task quicker.
LINE CUT-OFF BLADE
See Figure 10.
This trimmer is equipped with a line cut-off blade on the grass deflector. For best cutting, advance line until it is trimmed to length by the line cut-off blade. Advance line whenever you hear the engine running faster than normal, or when trimming efficiency diminishes. This will maintain best performance and keep line long enough to advance properly.
WARNING
When servicing, use only identical replacement parts. Use of any other parts may create a hazard or cause product damage.
WARNING
To avoid serious personal injury, always remove the battery pack from the tool when cleaning or performing any maintenance.
GENERAL MAINTENANCE
Before each use, inspect the entire product for damaged, missing, or loose parts such as screws, nuts, bolts, caps, etc. Tighten securely all fasteners and caps and do not operate this product until all missing or damaged parts are replaced.
Avoid using solvents when cleaning plastic parts. Most plastics are susceptible to damage from various types of
English
commercial solvents and may be damaged by their use. Use clean cloths to remove dirt, dust, oil, grease, etc.
WARNING
Do not at any time let brake fluids, gasoline, petroleum-based products, penetrating oils, etc., come in contact with plastic parts. Chemicals can damage, weaken or destroy plastic which may result in serious personal injury.
Only the parts shown on the parts list are intended to be repaired or replaced by the customer. All other parts should be replaced at an Authorised Service Centre.
CHARGER AND BATTERY PACK
29697/29807- 24V 43Wh Lithium battery pack
29837- 24V 86Wh Lithium battery pack
29817/29827- 24V charger
BATTERY PACK REMOVAL AND PREPARATION FOR RECYCLING
Contact customer service for the latest replacement parts and accessories.
WARNING
Upon removal, cover the battery pack's terminals with heavy-duty adhesive tape. Do not attempt to destroy or disassemble battery pack or remove any of its components. Lithium-ion and nickel-cadmium batteries must be recycled or disposed of properly. Also, never touch both terminals with metal objects and/or body parts as short circuit may result. Keep away from children. Failure to comply with these warnings could result in fire and/or serious injury.
SPOOL REPLACEMENT
See Figure 12.
Use only 1.65mm diameter monofilament cutting line. Use original manufacturer's replacement cutting line for best performance.
Remove the battery pack.
Push in tabs on side of spool cover.
Pull spool cover up to remove.
Remove the old spool.
To install the new spool, make sure the cutting line is captured in the slot on the new spool. Make sure the end of the cutting line is extended approximately 15cm beyond the slot.
Install the new spool so that the cutting line and slot align with the eyelet in the cutting head. Thread the cutting line into the eyelet.
Pull the cutting line extending from the cutting head so the cutting line releases from the slot in the spool.
- Reinstall the spool cover by depressing tabs into slots and pushing down until spool cover clicks into place.
CUTTING LINE REPLACEMENT
See Figures 12 - 13.
Remove the battery pack.
Remove the spool from the cutting head.
NOTE: Remove any old cutting line remaining on the spool.
Cut a piece of cutting line approximately 3m long. Use only 1.65mm diameter monofilament cutting line.
- Insert the cutting line into the anchor hole in the upper part of the spool. Wind the cutting line around the upper part of the spool clockwise, as shown by the arrows on the spool. Place cutting line in the slot on upper spool flange, leaving about 15cm . extended beyond the slot. Do not overfill. After winding the cutting line, there should be at least 0.635cm between the wound cutting line and the outside edge of the spool.
- Replace the spool, and the spool cover. Refer to spool replacement earlier in this manual.
STORING THE TRIMMER
- Remove the battery pack from the trimmer before storing.
Clean all foreign material from the trimmer.
Store it in a place that is inaccessible to children.
-
Keep away from corrosive agents such as garden chemicals and de-icing salts.
Store and charge your batteries in a cool area. Temperatures above or below normal room temperature will shorten battery pack life. -
Never store batteries in a discharged condition. Wait for battery pack to cool and fully charge immediately.
Store the battery pack where the temperature is below 27^ and away from moisture.
All batteries gradually lose their charge. The higher the temperature, the quicker they lose their charge. If you store your unit for long periods of time without using it, recharge the batteries every month or two. This practice will prolong battery pack life.
English
TROUBLESHOOTING
| Problem Possible cause Solution | ||
| String will not advance when using the auto-feed head. | String is welded to itself. Lubricate with silicone spray. | |
| Not enough string on spool. | Install more string. Refer to string replacement earlier in this manual. | |
| String is worn too short. Pull string while pressing line release button. | ||
| String is tangled on spool. | Remove string from spool and rewind. Refer to string replacement earlier in this manual. | |
| Grass wraps around shaft housing and string head. | Cutting tall grass at ground level. | Cut tall grass from the top down to prevent wrapping. |
| Motor fails to start when switch trigger is depressed. | Battery is not secure. | To secure the battery pack, make sure the latch on bottom of the battery pack snaps into place. |
| Battery is not charged. | Charge the battery pack according to the instructions included with your model. | |
| Shaft not connected completely. | Make sure lower shaft is fully seated in shaft coupler on upper shaft and secure shaft coupler. | |
Deutsch
SPEZIFIKATION
3ANYCK/OCTAHOB TPUMMEPA
CM.pnc.
"Дялязanycka noDpe3yNka TpaBbl OndHoi pyKoI BO3bMITEc6 3a nepeHIOO pyKy, a DpyroI pyKoI 3a 3aHIOO pyKy, yTO6bl Bbl MOrn HaxKaTb KypKObIi BbIKNoUaTeIb C 6IoKInpOBkoI u npabTb pbIarOM peYINPOBKn CKOpocTN.
I OCTaHOBA NOpe3uKa DOCTaTOUHO OTNyCTNTb Kypok peryraTopa ckopoctn.
PABOTA C NOДPE3YNKOM
CM.pnc.
Pn noJb3OBaHnn TpMMepom BbINOJIHrTe CneDyUoune peKOMeHdauN:
Bo3bMHTe noDpe3uK npaBOy pyKO 3a 3aHIOpyKoTky, a neBOy pyKO - 3a nepEDHIO pyKoTky.
Pn pa6oTe kpenko depknte er0 o6eumnypkam.
I Ondpe3nK cneJeYer TepKaTb B yO6Hom nIOxKeHN 3a 3aHIO pyKoRTy Ha BBicote 6ePa.
O6pe3aTe BbICOKyTO TpaBy Cbepxy BHN3. 3To npedeTbPaTNT HabopauNbaHne TpaBbHa KOkyx BaNa I rONOBKy CTpyHb, YTO MOKeT PnNBecTu K NOJOMKe H3-3a NepepeBa.
Ecn npaba HAMOTanacb Ha rONOBky CTpyHbI:
BbHbTe aKcMyrAToPHyO 6aTapeIO n3 TpMMepa.
YdaIITe TpaBy.
OCTOPOXHO
Bcerda depxnte Tpmmep Ha 6e3onachom pacctoHn ot cboero kopnyca. Pn malewem KOHTaTe C pekyuei roNoBkoT pmmepa BO BpeMa pa60tbl MoXHO NOnyUtt TaKeNyo TpaBMy.
COBETbI NO NOIDPE3AHIO
Cm.pnc.8.
Pn noJb3OBaHnn TpMMepom BbINOJIHrTe CneDyUoIe peKOMeHdauN:
I Ondpe3AHne BbINONHReTcC NyUIMMa KauecTBOM npn nepemeueHHN NOpe3uKa CneBa HnpaBO Pa6oey 30He; npn nepemeueHHN Cnpaba HaneBO KaeeCTBO NODpe3AHn yxudaaTcR.
I Ondpe3aHne BbINOJHReTc npn nepemeueHHyctpoiCTBa cnpaba HaneBO. 3To nomoxetn6exatb OT6paCbIBaHn Mycopa Ha onepaTopa.He npon3BODTe noDpe3aHne B onachbx 30hax, nokaahhbix Ha pncyHke.
I Ondpe3aHne BbINOJIHraTe KOHcIKOM CtpyHb; He npnlaraTe n3nnuHNx ycInn, HanpaBnaR rONOBky CtpyHb I HECKoUeHHyIO Tpaby.
I3ropoNn3 npOBOnOHyCNcTKn nOrpaBnI N3 WtakeTHNka npBODaT KdoONHHTeNBHOy N3Hocv ctpyHb I daKe ee NOBpeXdEHIO. KaMeHHbI IN KnpNCHbIE cTeHbI, 6OpDIOpHbI KaMHN I neComaTePnaJIb MoYr npVBecTN K 6bICTpOMy N3Hocy ctpyHbI.
O6xOHTepeBbIkyCTapHnKn.KopaDepeBbeB, DepeBHHbIE peKN,HapyKHaOBuNBA n CToJIbbl orpaIbMoYr 6bITb NERKO NOBpeXdeHbI CTpyHOH.
IIODAUCACTPYHbI
PIMMEUHNE:Ha TpIMMepe yCTaHOBHeHa roNOBKa c aBTOMaTnuecko nOaaye CTpyhbl. NOnbITKN NOCTyAtb no rOIOBKe dIy YCKopeHn NODaun CTpyHb MoYr npuBeCTN K NOBpeJdeEHn TO pIMMepa I PpeKpaueHHo DeiCTBra rapaHTnn.
Bo Bpempa6oTbI TpMMepa OTNcyCTnTe KypKOBbi BBkIOuateJIb.
I OdoKdnte DBe CekyHdbi, 3aTeM HAKMTe Ha KypKObBn BblKnIOuataJIb.
PIMMEUHNE: Pn KaXdOM OTnyckAHnn HaKaTHN KypkoBOro BbIKNoyateTcpyHa 6yDet yJINHtbcr npimepHo Ha 1/4 dIOHMa, noka He doNdETdo pexyueero yCTpoNCTBa OTPaTeN TpaBbl.
Bo3o6HOBnTe ctpnKky.
I0DA4A CTPYHbI BPYHyIO
CM.pnc.7.
I3BnKeKInTe aKKymyTApOpHyio 6aTapeHIO.
Haxmnte cephyo KhONky Ha rONOBke ctpyHbI, NOTAHyB npn 3Tom 3a ctpyHy, yTO6bl BbITaUNtbe Ha HxKHyIO dnnHy.
Nocne BbITBnBaHnHOBOI peKyuEe cTpyHbI nepeBeDInTe HNCTpyMeHT B pEXM HopMaJbHoI pa60tI nepeI erO BKNUOyeHEm.
Pycckn
PEYIINPOBKA DNAMETPA NODPE3AHN
CM.pnc.9.
Bo n36ekaHne cnyaHoro cpe3aHnue CBeTOB nDpyrnx paTeHn NOBepHnTe yCTpOcTBO 3aUNTbI paTeHn B pa6ooye noJoxKeHne.
CHIMMTEaKKMyJrTOpHyio6aTaapeio.
Дя yctaHOBKn DnAmETpa 30HbI NOpe3AHN HcnoNb3yInTe "nepeknIOyateNB DnAmETpa NOpe3AHNHa OtpaKATEnpaBl. MoXHo yCTaHOBtB 2 pa3Mepa: 30 cm; 25 cm.
PnmeaHne. MehBnDnAmEt npDpe3AHyBENuBaET BpEmN CKOpocTb NOpDpe3AHN, B TO BpEMKak6oBbMn DnAmEt nOmoraet 3aBepuHTb pa60Ty 6bIcTpee.
IIOCTPANBAIOUNE JINHEHHOE PEXKYUEE JE3BVE
CM.pnc.10.
Ha orpaxkateIe TpaBbI TPnMMepa yCTaHOBneH HOK dIra 6pe3aHNA CTpyHb.IIra ONTmAbHoH pe3KN NOaHTe CTPyH HAcToNbKO, YTO6bl OTpe3HOH HOK MOR 6pe3aTb ee. IOnDaBaIte CTPyH BCaKn pa3, KOrda ycblWnte, YTO YNCNo 6OpOTOB DBrGaTeJI npEbiwaet O6bHuOe, Nnn npn CHNXeHHN 3ΦeKTNBHOCTN NOpe3aHNA. 3TO NOMoXeT NOdepxHBaTB HaunyUwne pa6OuYe XapaKTePncTkn IN COxpaHrTa DInHy CTPyHbI DnA daNbHeHwe ee NOaH.

OCTOPOXHO
NcnoNb3OBaHne IIO6bIX dpyrNX 3aunacte MoKet CO3DaTb ONaCHOCTb Nn CTaTb PnPHHO BbIXOda H3dennr n3 CToP.

OCTOPOXHO
Bo n36eXaHHe noJyEHHn TjKeNo TpaBmbl Bcerda n3BNeKaIte aKKymyIaTophHyo 6aTapeo n3 HnCTpyMeHTa npn erO ouNCTke nn npOBedeHNn TexHnueckoro o6cnyKbAHn.
OBUEETEXHNUECKOE OBCJNYKBAHNE
Ipeq KaKdbIM NcNoJb3OBAHHeM OCMOTpTe yCTpoINCTBO, YTO6bl npOBepNTb, Het Hn Ha HEM NOBpeXDeHn, BCE nn DeTAnu YCTaHOBneHbN He OCna6nn nn Takne 3JeMeHTbl, KAK BnHTbl, RaKN, 6oNTbl, KpbUKN T.D. HAdExHo 3aTaNHTe BCE KpenexHbIe CpeDCTBa N KpbUKN, He NoJIb3yInTEcb DaHHbIM N3dennem Do Tex nop, noka He 6ydyT yCTaHOBneHbI BCE oTCyTCTByIOUne N He 6ydyT 3aMeHeHbI BCE NOBpeXDeHHbIe DeTAn.
Pn OuNCTKe NnactMaccOBbIX DeTaeNe 3anpeaetc
NCNoB3OBaTb paCTBopNTeNN. MHorne nlaCTMaCCbI
yBCTBNTeNBbIK BO3DeNCTBNIo pa3NnUHbIX 6bITOBbIX
paCTBopNTeNe I B pe3YbTaTe IN NCNoB3OBaHN
MOrYT pa3pywnTbcN. JnOuNCTKn OT rpa3N, nbIn,
MaCna, Cm3KN T.n. NCNoB3yInTe npOTnpOHyTO
TpAnky.
OCTOPOXHO
He donyckaTe B3aHMOeCTBn TOPMo3HbIX XnKocTei, 6eH3nHa, HeTepnoDyKTOB, npOnTuOHbIX Macen n T.I. C NlaCTMaCCOBbIMn DeTaIaMn. XmNkAtb MOrTy NOBpeNTb, Ocna6ntb IN pa3pyuHTb NlactMaCCy, YTO MoKeT npNBecTN K TaXKNM TeNeChbl NOBpeXDeHNAM.
GENERELT VEDLIKEHOLD
MANUEL FREMFØRING AF TRÄDEN
Se Fig. 7.
INDSTILBAR KLIPPEDIAMETER
Se Fig. 9.
UDSKIFTNING AF SPOLE
Se Fig. 12.
Brug kun twist 1,5mm diameter monofilament-klippetrad.
Tag batteriet af.
I3BaTe 6aTepyTa OT TpIMepa.
TELECKONNUHA DpBxKKA
BnKΦn.4.
ДьлжИнATERaHa npbTa He MoKe da ce perynupa.
IocTabete n3BNTn npbT B cbeHHTeHa rOpHn npbT.
3aterheTe cbeHHTe, kato ro 3aBbPTne no Nocoka Ha yacOBHKOBATA cTpeNka. YBepete ce, ye ropHaTa HdoNHaTa qactn Ha npbTOBeTe ca 3dpaBO 3aterHatn, npedn da noctabITE o6pAtho 6atepyta.
CTAPTNPAHE/CINPAHE HA TPIMMEPA
BnKΦnR.5
3a da cTaptnpate Tpimepa, Xbahe Te npedHaTa pbkoxbatka C eHa pbka, KaTO cbueBpeMeHHO dbpxkTe 3aHata C dpyraTc nPbKa, H HaTnchete fKCaTopa Ha cnycbKa, DOKATo CTnCKaTe cnycbKa 3a perynipane Ha ckopocTTa.
3a da cnpeTe TpImepa, Tp8Ba cAmo Da OTnycheTe perynatopa Ha ckopocTt.
PABOTACTPMMEPA
BnK qn.6.
Korato n3no13BaTe TpIMepa, cna3BaIe Te3n CbBETn:
DpbkTe 3aHaTa pbKOXBaTKa Ha TpMepa C dAChTa cn pka npeHaTa pbKOXBaTKa c JBaTa cn pbka.
IopdIpbkaTe Do6bp XbaT C DBeTe Pbue No BpeMe Ha pa6ota.
ДрькTe TpIMepa B ydo6Ha no3nua Cbc 3aHaTa pkoXBAtka Ha HbOTO Ha Ta3a.
Pexkete Bncokata TpeBa OT Bbpxa HADony. ToBa ue npedotBpatn 3acrahe Ha TpeBa OKO NO Kopnyca Ha 3aDbNKBaunr BaI n rnaBata, Koeto 6n Morno da HaHece nobpeOn ot nperpbahe.
Ako OKONO rnaBata C BnakHOTo ce 3anneTe TpeBa:
I3BaTe 6aTepyTa OT TpIMepa.
OTctpaHete TpeBaTa.
PNEpyPEXDEHNE
Bcekn kohtakc c pexeata rnaBa Ha Tpimepa no BpeMe Ha pa60ta MoKe da npuHn cepno3Hn 4n3ueckn HapaHbAHn.
CbBETNPNPR3AHE
Bux qur. 8.
Korato n3no13BaTe TpIMepa, cna3BaTe Te3n CbBETn:
Дрьктгимета Нан no nocoka obnactta,
KoTo 1e noPra3BaTe; otnped e Hau-dO6pata o6nact Ha p3aHe.
TpimepbT ue pexe no-do6pe, korato ce dBxkn OTnRABO HADRCHO no pa60THata 30Ha; Toe e NoHeeePekTNBEH npn DBXKeHne OTdRCHO HAJIBO.
N3non3BaTe Bbpxa Ha BnakHOTo 3a p3aHe; He HacnBaTe rnaBata C BnakHOTo B HenoDp3aHa TpeBa.
TeHnTe n DpBeHnTe orpaN npuHHBaT DonbHnTeJHO 3xa6raBaHe Ha BnaKHO I dopu CuynBaHe. KameHH, TyxneH cTeH, 6OpDopu N DpbBeta Morat 6bp3o Da n3HOcRt pexeOTo BnAko.
N36BaTe DpbBeta Xpactn. BlnakHTo NecHO MoKe Da NOBpeDN Kopa Ha DbpBO, DbpBeHN KOpHN3N, O6wnBKn Ha crpaDN n CTbN6OBe Ha orpaDN.
OTNYCKAHE HA BJIAKHOTO
3A6EJEXKKA: TpIMepbTe e cnaeH c rnaBa c aBtOMaTnUHO noDaBAHe. CnHTo ynpHe Ha rnaBata, 3a da ce OTnycHE BnakHOTo, ue DoBeDe Do nobpeHa TpIMepa n anynpaHe Ha rapaHcNraTa.
- DOKATO TpHMEpbT pa60Tu, OTnycHete cnycbka.
I3yakaaiTe DBe cekyHn HHaTNCHeTe Cnycbka.
3A6EJEXKKA:BnakHOToIe ce ydbJnxC npn6nntenH 1/4 nHua npn BcraKO cnnpaHe nn CTaptnpaHe Ha cnycbka, DOKATO BnakHOTo DOCTnHE DbJnxHaTa Ha OCTpneTo Ha OTKnIOHTeHa TpeBa.
Bb3o6HOBeTe noDp3BaHeTo.
Pb4HO OTNYCKAHE HA BJIAKHOTO
BnKΦn7.
OTcpaheTe 6aTePnraTa.
HaTnCHete UepHna 6yToH, HAMpaUc He Ha rnaBata C BnakHOTo, KATO B cUcTO BpeMe DbpNaTe BnakHOTO, 3a Da ro OTnyCHete pBuHO.
CneydbjxabaHe Ha HOBO peKeuO BnAknHO BNHaBn BpbuaTe MaunHata B HopMaHa 3a pa6oTa n03nur, npdN da Ra BKJIOHTe.
PEYINPYEM DNAMETbP HA P3AHE
Bnx qnr.8.
3aBbptete npedna3nte 3a pactehndo pa60hata My no3nua, 3a da n36erhe Tcpr3baHeto Ha cBETnnpactehnno norpeuka.
OTcpahe6aepnra.
PerynpaTe "nIb3raa no DnaMeTbpa Ha p3aHe" Bbpxy OTKNoHnte 3a TpeBa, 3a da perynpaTe DnaMeTbpa Ha pekeuata nnou. Ima onun 3a DnaMeTbpa: 30cm,25cm.
BbIrapckn
3a6eJekka: no-MaIKnT DnAmetbP Ha pexeUata nlou ue yBeNnBpeMeTo Ha pa6oTa nCKOpocTTa Ha p3aHe, a no-DbIyrnT ue nomrHe 3a no-5bp30To npNKIOUBAHe Ha 3aDaYata.
OCTPNE 3A NOOPR3BAHE HA PEXEJOTO BIAKHO
BnK 10.
To3n TpIMep e cHa6dHc ocTpne, npedHa3HaueHo 3a nOdpra3BaHe Ha pexeIto BnaKHO, Ha OTKnOHntEn Ha TpeBa. 3a da NoCTnHete Hau-Dobpn peyIaTn npn PRA3aHe, 3anoHete Da OTnyckate pexeoo BnaKHO, DOKATO OCTPneto ro Cpeke Ha npabunHaTa DblxHa. OTnyckaTe pexeio BnaKHO, KORato yyeTe DBnRaTeJn da pa60tn No-6bp3o OT obNKHObeHO nn Korato ce OTCNa6n eFeKTNBocTTa Ha pr3aHe. NTo To3n HaunCe rapaHTnpa Han-dO6pa npOnBODNTenHOCT, aDblXHHaTa Ha BnaKHOTO ue eoCTaTbUHa, 3a da MoKe To da HappeBa npabuHNO.
PPEyPEXDEHNE
IpnpeMOHTn3noJ3BaTe cAmo ndeHTnUHN pe3epBHN qactn. H3noJ3BaHTo Ha npyn qactn moKe da cb3dae onaCHOCTn nn da nobpeDn npOdykTa.
PNEyNPEXKDEHNE
3a da n36erHete cepno3nФn3nueckn HapaHraBaHna, BnHaRn n3BaXdaIte 6atepnaO tNCHtpymeHTa npn NOHCCTBaHe IIN N3BbPwBaHe Ha NoDnpbkka.
ObuaIIOIDPbXKA
IpeBn BCaKO n3non3BaHe npOBepTe cenna npOdyKT 3a nobpeDeH, nncBaun nn pa3xna6eHn qactn, KATO Hapnpimep BnHToBe, raKn, 6oTObE, kanaKu n dp. 3aterhe Te 3dpabo BCnuKN KpenexHN CpeCTBa n kanaKu He n3noJ3BaTe TO3n npOdyKT, DOkato BCnuKN nncBaun nn nobpeDeH qactn He 6bDat noDmeHn. N36raBaTe n3noJ3BaHeTo Ha pa3TBOpNTnn npn OouNCTBaHTo Ha nactMacobte qactn. NobeHTo nactmacn ca yvBCTBntENn KbM pa3nUHN BNDobe pa3TBOpNTnn mOKe da ce nobpejrt npn n3non3BaHTo Ha TAKNB. n3non3BaTe qnctn napau, 3a da npemaxheTe kan, npax, macno, rpec nT.H.
PNEyPEXDEHNE
B HnKaKbB CnyaH He No3BoJBaIte NlaCTMaCOBnte Yactn Da BnN3at B KOHTaKT Cbc Cnnpaun TeuHOCTn, HePTeHN npOdykTN, PpOHKnBaU Macna n T.H. XmHKaJIte MORaT da NOBpeJr, OTCna6r nn yHnIOXnat NlaCTMaCATA, KoEtO MoKe da DOBeDe Do cepNo3HN Fn3NuCeKN HapaHRBaHNA.
Camo qactnte, konto ca onncanB cnncbka, ca noxopraa 3a peMOHT n noMnHa ot KnneHt. BcnKn dpyn qactn cneBa da ce 3ameHrOT ynbHOMOeH cepBn3eH ueHTbp.
3APADHOYCTPOICTBOBATEPNA
29697/29807-24V 43Wh JntneBa 6aTePnA
29837-24V 86Wh JntneBa 6aTePnA
29817/29827-24V 3apAnHO yCTpOHTBO
N3BAKDAHE HA BATEPURA T NIOIOTBRAH 3A PEUKJIINA PAHE
CbpxKeTe ce c KIneHTcknca cepBn3 3a HaH-HOBntpeepBHN qactn npHaJnHexHOCTn.
PNEyPEXDEHNE
Ipn n3Baxdahe noKpHnTe KneMHTe Ha 6aTePnTa cbc 3dpabo Tnkco. He ce onntBaTte da yHnOxKHe nn pa3rno6te 6aTePnTa nn Da n3BaNTe HAKo OT HeHHnTe KOMHOHETN. NHTeBO-NOHHTe HNKeNOKaDMNEBtte 6aTePNTPra6Ba Da ce peuKNpAT nn Da ce n3XbPnT Ha NOxOJaU MeCTa. CbTO Taka HNKORA He DOKOCBAH Te DBete KNEMC MetaJIH NpeDMeTu W/ NN Yactn Ha TAnOTo, TbN KATO TOBA MoKe Da npuHN Do KbCO CbeDInHeHne. DpbXTe DeuaTa HAcTpahn. Hecbo6pa3RaHaHeTo C Te3n npEynpeXeHnna MoKe da DoBeDe Do NoXap N/nn cepNo3Ho HapaHbaHe.
CMRAHA MAKAPATA
BnK DnR. 12.
N3non3BaTe cAmO ycykaHo eHONuKOBo peKeUO BnaKHO C dNaMeTbP 1.5mm.
OTcpaHete6aTePnTa.
HaTnCHete uHΦTOBete OCTpaHn Ha kanaka Ha Makapata.
I DpbHHeTe FHKcatopa Ha MaKapata HArope, 3a da ro n3BaAnTe.
I3BaTe cTapaMaKapa.
BbIrapckn
3a da MOHTnpaTe HObTa MaKapa, ce yBepete, ye BnakHOT e 3axBaHaTO B XNe6a Ha HObTa MaKapa. YBepete ce, ye KpaT Ha BnakHOT e yDJIxKeH C npN6n3nteNo 6 NnHa n3BbH XNe6a.
MOnTnpaTe HObTa MaKapa, Taka Ye BnakHOTU XNe6bT Da ca N3paBHeH C OTbopa Ha rnaBata C BnakHOT. PpOBpe Te BnakHOT npE3 OTbopa.
DpbHete ydbJxHeHneTo Ha BnakHOTo OT rnaBata C BnakHOTo, Taka Ye BnakHOTo Da ce ocbo6On ot Xne6a BMakapata.
MoHTnpaIte OTHOBO ΦHKcaTopa Ha MaKapata, KaTO HATNCHETe UΦTOBete B XJIe6OBete N HA TNCHETe HAOny, DOKATO ΦHKcaTopbT Ha MaKapata He UpaKHe HA MRCTO.
CMRAHA HABJAKHOTO
Bux 13-14.
OTcTaPaHeTe 6aTepeHraTa.
I3BaTe MaKapata OT rnaBata C BnakHOTO.
3A6ENEKKA: PpeMaxHete octaHaNoTo B MaKapata CTapo BnaKHO.
I3pekete qact OT BnakHOTO, C bJnxHa np6n3ntenHO 9 cyta. N3non3baTe eHNCTBeHO MOHOaAMeHTHO BnakHO c dnaMeTbp 0.065 nHua.
BkapaTe BnakHOTOBtBOPABrOpHaTcHa MaKapata.HamotaTe BnakHOTOKONo rOpHataacTa HaMaKapataNoNocokaHaYacOBnKOBATAcpeIka, KaTOe NOKa3aHOOTCPeIKNTeHaMaKapata. NoCTabete BnakHOTBXJNe6BaBropnnaHeuHa MaKapata,KATO OCTaBHTe ydbJXKeHneOT OKoNo 6 HnHa N3BbHNJNe6a.He octabraTe npeKaJeHo MHoro BnakHO.CneKDATOHAMotaeteBnakHOTPrp6BaDa OCTaHaT NOHe1/4MHuaMeJyHamotaHOTOBnakHO N BbHnHnPBbHaMaKapata.
CmeHeMaKapataNkanakaBnKTe"CMHaHa MaKapata"no-ropeBTOBa pkoBoDCTBO.
CbXPAHRAHE HA TPIMEPA
I3BaTe 6aTeepnra oT TpImepa, npeDn da ro npn6peTe 3a cbxpaHHeHne.
Nouctete Tpmepa ot BCnKu yxKn uactn.
CbxpahraBaTe ro Ha MrcTo, Koeto e HeoocTbnHO 3a deua.
IpykTe ro daney ot pa3aKaun BeuecTba, kaTo Hnnpmep rpaHckn XumKann pa3mpa3Baoun CoN.
BaTepeHra Taee np6npa H 3apeKHa Ha XJaHO MxCTO. KHBOTbT Ha 6aTepeHra Taee cbKpaAba IIpH IIO-BHCOKN IIO-HNCN TcMnepaTyPn.
HnKora Hc np6npaHTe 6aTepeHra, ako e pa3peHa. Cnc pa6ota n3yaKaHTe 6aTepeHra da cc oxnaHn He3a6abHO 3apcIeTc.
CbxaHbAaTe 6aTeepnraHa MeCTa, KbDeTo TEMnepaypata e noD 27^ nncBa Bnara.
C TeueHHe Ha BpeMeTo BCnKHN 6aTeepHn HamaJIbBaT KaIIHTeTa CN Ha 3apeXHaHe. KOJIKOTo NO-BHCOKa e TemIepaTypaTa, ToIKOBA No-6bp3o 6aTeepHnTa rYbN KaIIHTeTa CN Ha 3apeXHaHe. Ako He N3IOJ3BaTe Xpactope3a 3a IIpoIbJIKNrTeH nepHO, 3apeXJaIte 6aTeepHnTa BCEKn Meecu IIN Ha JBA Meceua. TaKa Ie yIbIXHITe XHBOTA H.
BbIrapckn
OTCTPAHRABAHE HA IPOBJIEMN
| ПОНБЛЕМ | ВьзMOЖHA ПИЧИHA | PEШЕНЕ |
| ВлakнOTO Нема да се отпUCHE, korato ИЗПОЛЗВATE Глиа с abTomatунноюва. | ВлakнOTO ce e onлени B ce6e си. | Сможete сьс силконов срөг. |
| HЯма достычно влakно на мakapatura. | Инсталраite novechе влakно. Вижто сьOTВETня раддел 3a смяна на влakнOTO B TOBA рьководъBO. | |
| Опсано e пекалени кьсо влakно. | Дрьнене влakнOTO, дOKATO нахscate 6уToHa. | |
| ВлakнOTO ce e замотало в мakapatura. | Оддөнete влakнOTO ot мakapatura и пөнавиITE. Вижто сьOTВETня раддел 3a смяна на влakнOTO B TOBA рьководъBO. | |
| Около корпuya на за编辑вашия вал И Тримернatura Глиа ce e onлени Трев. | Рядане на виска трава OT ИСКо. | Рекete високата трава OT rope наюу, 3a Дa п徴OTВратиTe 3аПNTА. |
| МOTOPТ He моче дaстирра при нахсане на сиьсыka. | Батерияа He e зakpeneniha. | 3a Дa зakpenITE batepina, ce уberete, чe Фикcatopite OT BCЯк STрана на batepina Tцakbat на мяст. |
| Батерияа He e zapeendeha. | Зарждайte batepina B cSOTBETCTBVE C INHCTpyKuzinte, пindprжаваши BAшяma Робет. | |
| Прьтг He e CBbp3an дokрai. | Уberete ce, чe ИЗВИТЯТ ПрВТ e noctaben DOKpai B cSbeDInHTe Na rorpna рьт и зactonopete СбEDINITeЯ. |
Hg C u K u K u K u K u K u K u K u K u K u K u K u K u K u K u K u K u K u K u K u K u K u K u K u K u K u K u K u K u K u K u K u K u K u K u K u K u K u K u K u K u K u K u K u K u K u K u K u K u K u K u
1
A C
1 1
Cuiusie
8
e 1
1 11
L
UuuljUuuuusu uueauuuaa uuuuua uuuuua uuuuua uuuuua uuuuua uuuuua uuuuua uuuuua uuuuua uuuuua uuuuua uuuuua uuuuua uuuuua uuuuua uuuuua uuuuua uuuuua uuuuua uuuuua uuuuua uuuuua uuuuua uuuuua uuuuua uuuuUA
U 1 U
150 × 150
CIM BICME MAKINESINI DEPOLAMAK
n nn nnn nnn no nnn 1.65 n. nnn nnn nnn nnn nnn nnn nnn nnn nnn nnn
n nn no7n.
Tnqnn nwn nn TnO'no7.
nui7nn 101 no77 nyn nn
non no nno
nON o7 nTu, Tx unu nnnnn 150"na
n nn no nnn nn nn nn nn nn nn nn nn nn nn nn nn nn nn nn nn nn nn nn nn nn nn nn nn nn nn nn nn nn nn nn nn nn nn nn nn nn nn nn nn nn nn nn nn nn nn nn nn nn nn nn nn nn nn nn nn nn nn nn nn nn nn nn nn nn nn nn nn nn nn nn nn nn nn nn nn nn nn nn nn nn nn nn nn nn nn nn nn nn nn nn nn nn nn nn nn nn nn nn nn
n nn nnnn nn nnnn nn nnnn nn nnnn nn nnnn nn.
nntnntnnnoon no7y nynnnn nn nnnn nn nnnn nn noon noon noon noon
nnn ninn
12-13.
n nn no7n.
yann (nnn n)
non no7nuy nTID.
MANUáLA AUKLAS VIRZíSANA
Skatiet 7. att.
Iznemiet akumulatoru.
Nospiediet melno pogu uz auklas galvinas, vienlaikus velkot auklu, lai to virzitu manuali.
Pec jaunas trimera auklas noreguleesan vienmertatgrieziet iekartu normalaja darba pozicijā, pirms toiesledzat.
NOREGULEJAMS GRIESANAS DIAMETRS
Skatiet 9. att.
Augu aizsargu pagrieziet darba pozicijā, lai nejauši nenogrietztu pukes vai stadus.
Nonemiet akumulatoru.
Noregulejiet zales deflektora "griesanas diametra btdni", lai pielagotu griesanas cela diametu. Ir 2 diametra opcijas: 30cm, 25cm.
Piezime. Mazaka diametrs griesanas cels maksimali palielinas darbibas laiku un griesanas atrumu, bet lielaks griesanas cels paltdzes atrak pabeigt griesanas darbu.
TRIMERA AUKLAS NOGRIESANAS ASMENS UZ AIZSARGA
Skatiet 10. att.
Sis trimmeris ir aprikots ar auklas griesanas asmeni, kas atrodas uz zales deflektora. Vislabakagriesanas kvalitate iegustama, ja auklu izvelk, ldz to nogriez auklas griesanas asmens. Izbidiet aku, kad dzirdat dzineju darbojamies atrak ka parasti vai samazinas griesanas efektivitate. Ta tiks saglabats labakais sniegums un aukla bus pietiekami gara, lai to pareizi izbidiu.
BRIDINAJUMS
Ja nepiecesama detalu nomaia, tad sim nolukam drikst izmantot tikai originalas detalias. Citu rezerves dalu izmantoanas gadijuma var rasties briesmas un ir iespejami darbarika bojajumi.
BRIDINAJUMS
Lai izvairitos no nopietnam traumam, obligati atvienojiet akumulatoru no instrumenta, kad veicat tirisanas vai apkopes darbus.
VISP a REJa APKOPE
Greenworks Tools Warranty Policy for DIY machines
PERIOD OF WARRANTY
All new Greenworks Tools machinery is supplied with a 2 year parts and labour warranty from original date of purchase. A 30 day warranty is available for machines used professionally as Greenworks Tools are designed primarily to be used by DIY consumers. This warranty is non-transferable.
LIMITATIONS
This warranty applies only to defective parts/components and does not cover repairs due to:
- Normal wear and tear.
- Routine tune up or adjustment.
- Damage caused by improper handling/abuse/misuse or neglect.
- Overheating due to lack of maintenance
- Damage due to fittings/fasteners becoming loose/detached through lack of maintenance.
- Damage caused by cleaning with water.
- Machines serviced or repaired by non-authorised Greenworks Tools service centres.
- Machines incorrectly assembled or adjusted.
- Damage caused by improper use of the machine.
- Damage caused by improper winterisation (pressure washers)
-
Items considered as consumable parts are not normally covered by the warranty, including but not limited to:
-
Batteries
Electric cables - Blade and blade assemblies
- Belts
- Filters
-
Chucks and tool holders
-
Certain products may contain components such as engines, transmissions from an alternative manufacturer, these items will be subject to the appropriate manufacturer's warranty policy except where Greenworks Tools Europe GmbH agrees to underwrite any claims outside the said manufacturer's warranty period.
- Second hand goods are not covered under this warranty policy.
- The fitting of spares, replacements or extra components which are not supplied or approved by Greenworks Tools Europe GmbH.
Warranty
To claim a warranty on any product under this policy a proof of original purchase is required. Credit card statement do not qualify as sufficient proof of purchase. In the first instance of a warranty event occurring the consumer should return the product to the original place of purchase with their proof of purchase. The machine will be sent to our central service facility and an inspection made. If the machine be found to be at fault it will be repaired and sent back to the address of the consumer free of charge. Machines that retail for less than €100 euros including sales taxes will generally be replaced.
If the central service facility finds that machine is not found to be at fault then the consumer will be advised they will need to pay for the cost of the repair.
This warranty policy is subject to change from time to time to accommodate the needs of new products. A copy of the latest warranty policy will be available at www.greenworkstools.eu.

Poccy. MockBa, 2-ri PaayBPOHOBCKn Ipoe3d 48
TexHOceBpnc
Greenworks Tools garanti for hobbymaskiner
GARANTIPERIOD
TapaHOnHH npaBnHa Ha Greenworks Tools 3a camoJHn Maunnn
IEPNOD HA TAPAHUNRA
BcNKn MaunHn Ha Greenworks Tools ce npedoctabrt c 2-roDnHa rapaun3a cepBn3Ha deHoc n pe3epBN qactn, CHTnHO OT daTata Ha 3akynBaHe Ha npodykTa. PnpodctABrCe camo 30-dHeBnra rapaun3a npocecnoHAnHO n3noJ3BaHnTe MaunHn, 3auTo npodykTIne Ha Greenworks Tools ca npedHa3haueHn npedmH0 3a KIneHTn, paOteu cn cbCcamoepHnMaunHn
Hactoata rapaun He moke da ce npexBbprna.
OTPAHnueHn
Hactoata rapaunie e BaIuHa cAmO 3a DepekTHn Yactn/KOMnoHeHTn He nokpBa pemOHn, noPOeHN OT:
HopMaJIHO H3HOCBaHe n amOpTn3aUra.
PyTHHHH HAcTPOKNIJN DeHOCHT No perynpaHe.
Tobpei, npuHHeH O HnPaBnHO 6opBaHe/3JoynoTpe6a/rpeuHoON3BaHe IINI PpOBA Ha He6peKHOCT.
IperpraBaHe npaHn loa nOdpbXka.
TobpeH npaPn paXna6eHn/pa3kaeHn cHaKn nnckpenTeHH nEMHTN B CnECDTBHe Ha N0wa NoDpBkKa.
Tobpei, npuHHeB CJIeCTBHe Ha NOUcTBaHe C BODa.
MaunHn, 06cnyBaHn nI pEmoHTnpaHn OT cepBn3Hn ceHTpOBe, To He ca otOpN3npaHn OT Greenworks Tools.
MaunH, KOTo Ca crNo6eHN nn peYnpaHn HnpBaNHO.
IobpeHn, nopOeHn OT HenpaBnHbObpaBeHe C MaunHaTa.
PobpeNi, npoDoHn OTHenpaBUNHO 3aImBaHe (BOOcTpyn)
- EJEMENTN, KONTO CE CHTAT 3a KOHCymatNBH, HO O6NKHOBEHO He ce NOKPNAbT OT rapaHnraTA, BKJIQUHTeINHO (HO HE CAMO):
BaTePNN
EneKtpueecknKa6eenn
- OctPneta N KOMNNEKTH OCTPneta
Pembu
ΦHNTPN
- NaTpoHHnH n IbpxKaU 3a INHCTpyMeHTn
-
Haryon npodykTN Morat da cbdbpkat KOMNOHEHTN (Hapnpem DBIATEN, TpaHCNCN) OT dpYr npO3BOIDENTIN - 3a Te3n EIneMeHTN ca B Cnna rapaHIOHNHTE ycNOBn HA cBoTBeTHN pOOn3BOIDNTENOCBeH B cnuyante, Korato Greenworks Tools Europe GmbH ce cbrracn da NOKPne SiTe nte, KOnto He ce NOKpNBat OT rapaHIOHNHn nepnoD Ha To3n npO3BOIDNTen.
-
CToK Btopa ynotpe6a He ce nokpmbat OT hactoata rapaunra.
- MoHTnpaHeto Ha pe3epBHN qACTn, 3aMeCTBaUN nn DonbNHInTeHN
KOMNOHEHTN, KOIT He ca npedocTaBeHN nn OdopeHN ot Greenworks
Tools Europe GmbH.
TapaHua
3a npedraBaHe h rapaHnoHnck 3a dahen npdykT pr6Ba da ce npedoctabn Doka3ateJCTBO 3a nbpBOHaayHNO My 3akyuBaHe.
N3BneHnraTo OT KpeiHTnKaptn He npdctabnBaBnHDOka3ateJCTBO 3a kkyuBaHe. Ppi NpBPOTb B3HNKBaHe Ha ycNoBne,
N0BONBAIo npedraBaHe Ha rapaHnoHnCK,KnEHTb Tpr6Ba Da
3aHece npOyKaHa MAcTOHa HerOBOTO NpBoHaayHnO 3aKyuBaHe,
KbDETO Tp6Ba Da npedocTabn Doka3atEnCTBO 3a kkyuBaHTo.
MaunHata 6bDe n3npaTeHa No haunr rnaBe cepBn3e HcHTbp,
KbDETo 6bDe n3BbPseHa HnCnEQUA. AKe y CteTahOBnFa6pnueH
deFeKT no MaunHata, Ta 6bDe 6e3nnAHO pemOHtupaHa
m3nPaeHa 6oPAHo HA aDpeca Ha KNHeTA. MaunHInTe Ha na3apHa
CTOnHOCT NO 100 EBPO (BKN. dAnhBk npOdaX6a) oBNKHO BO He 6bDat
NDMeHnC HOBn.
Ako haunr rnaBcHepenHe yctahOBn pa6pnuHn depeKtn no MaunHata,KnneHbT ue 6Be yBedeomH,Ye Toi ue Tpr6Ba da 3aINaTu paXoDHTe No pMoHTHa npOyKta.
HactoIte rapaunohn npabina moat da 6bdat npomehnh nepnouho,3a da 6bdaT akTyanHO aadTnpaHI KbM HOBtpe npOyKTN. Konne Ha hai-aktyaHInTe rapaunOHn npabina e HainHo Ha aDpec www.greenworkstools.eu.
Nolitik yyyunonc oukeuwv maotopepaoc Greenworks Tools
NEPIOOZ ERTYHHE
Ola ta vea unxavnma tnc Greenworks Tools ouvoduovtai ato eyyunon 2 etw yia ta eapntnata kai ta epyatikauos, atno tv apxikn npopmnuva opadc. Eyyunon 30 npewv napexetai ia unxavnata Tnouxpoiotiouovtai EtayeeMaTk, kaohc Ta ttpoivnta Tnou Grewnorks Tools ateuobuvovta kupiw cEpaaitexvec katavaawtec pioivotuv maotopmuoc. H eyyunon elvai n m etabiaboium.
NEPIOPIEMOI
H TAPOUSA EYUNON IOXUEI MOVIOA EATWATKIA EApTnMATAEVOTNTC KAI DEV KAUTTEI ETIOKEUEC TOU OPEIAoVTaI OE:
duoioloyiknΦopá.
2.Συνθεις επιακημες n Προσαρμογες.
3. Znuiéc Tnou pokalovtai ato avapuoTo xeipioKataxpnon/ eoqalueyn xphon n qeAia.
4. Yπερθερμανολόγω ελλειης συντήρησης.
5. Znmuia loyw xaapwnc/antooaonc Eapntmuatwv/ouvdeoovxgianc eAAeysn ouvtnpns.
6. Znmu Tou PpokAnkE aTko Kaapioo vepo.
7. Mnxavnata Tnou UTOBaalovtai Oe eppic n Etnakeuesc e μη Εουσιδοπμενα Kevtpa σερβic ts Greenworks Tools.
8. Eσφαλμενn συναρολόγησι n Πτροσαρογή μηχανηματων.
9. Znuiec 和 lyw akataaanns xphons tou nxaivnatoc.
10. Znuiies loyw eopaaevnc evkataaons vi to xieuwa (poeles
11. TAOxieia TouewoqvTai avawai, dev kalutovTai ouvthc ato Tnv Eyyunon, oupteipalmaabavouevw EvEKIKtakwEhC:
- Mttatapie
-
UUUUUUUUUUUUUUUUUUUUUUUUUUUUUUUUUUUUUUUUUUUUUUUUUUUUUUUUUUUUUUUUUUUUUUUUUUUUUUUUUUUUUUUUUUUUUUUUUUUUUUUUUUUUUUUUUUUUUUUUUUUUUUUUUUUUUUUUUUUUUUUUUUUUUUUUUUUUUUUUUUUUUUUUUUUUUUUUUUUUuuuuuuuuuuuuuuuuuuuuuuuuuuuuuuuuuuuuuuuuuuuuuuuuuuuuuuuuuuuuuuuuuuuuuuuuuuuuuuuuuuuuuuuuuuuuuuuuuuuuuuuuuuuuuuuuuuuuuuuuuuuuuuuuuuuuuuuuuuuuuuuuuuuuuuuuuuuuuuuuuuuuuuuuuuuuuuuuuuuuuuuuuuuuuuuuuuuuuuuu uu
-
iJbUcpeuue uua Uca
-
UuurjUuuuue / uuuuuuuuuuuuuuuuuuuuuuuuuuuuuuuuuuuuuuuuuuuuuuuuuuuuuuuuuuuuuuuuuuuuuuuuuuuuuuuuuuuuuuuuuuuuuuuuuuuuuuuuuuuuuuuuuuuuuuuuuuuuuuuuuuuuuuuuuuuuuuuuuuuuuuuuuuuuuuuuuuuuuuuUU
10:UuUuuuue uuuuuuuuuuuuuuuuuuuuuuuuuuuuuuuuuuuuuuuuuuuuuuuuuuuuuuuuuuuuuuuuuuuuuuuuuuuuuuuuuuuuuuuuuuuuuuuuuuuuuuuuuuuuuuuuuuuuuuuuuuuuuuuuuuuuuuuuuuuuuuuuuuuUU
- 1u, u, u, u, u, u, u, u, u, u, u, u, u, u, u, u, u, u, u, u, u, u, u, u, u, u, u, u, u, u, u, u, u, u, u, u, u, u, u, u, u, u, u, u, u, u, u, u, u, u, u,
| x - 2| = | x - 4| = 1
1
·
(20
S OBC = S COD + S_ BOC
·山
Uus uusuususususususususususususususususususususususususususususususususususususususususususususususususususususususususususususususususus
1 1
U 1
www.greenworkstools.eu.
GARANTI SURESI
EC DECLARATION OF CONFORMITY FOR MACHINERY
Manufacturer: Changzhou Globe Co., Ltd.
Address: No.65 Xinggang Road Zhonglou Zone Changzhou, Jiangsu 213000
P.R.China
Name and address of the person authorised to compile the technical file:
Name: Gary Gao Naixin (Director of Outdoor Power Equipment)
Address: Greenworks Tools Europe GmbH
Wankelstrasse 40.
50996 Koln
Germany
Herewith we declare that the product
LINE TRIMMER
Model.
7
Serial number
See product rating label
Year of Construction
See product rating label
-
is in conformity with the relevant provisions of the Machinery Directive (2006/42/EC)
-
is in conformity with the provisions of the following other EC-Directive
2014/30/EU (EMC-Directive), and
2000/14/EC (Noise-Directive) incl. modifications (2005/88/EC)
And furthermore, we declare that
- the following (parts/clauses of) European harmonised standards have been used
EN60335-1, EN 50636-2-91, EN ISO 3744, ISO 11094, EN 55014-1, EN 55014-2
ITS Testing & Certification, Davy Avenue, Knowlhill, Milton Keynes, MK5 8NL
Measured sound power level 93.3 dB(A)
Guaranteed sound power level 96 dB(A)
Conformity assessment method to Annex VI/ Directive 2000/14/EC
The notified body: Intertek Testing & Certification Ltd.
Address: Davy Avenue, kwowchill, Milton Keynes, MK5 8NL
Place, date: Changzhou, 02/09/2016
Signature: Gary Gao Naixin (BEng, CEng,
MIET) Vice president of Engineering


ITS Testing & Certification, Davy Avenue, Knowlhill, Milton Keynes, MK5 8NL
Yadelmas,declaremosque
ITS Testing & Certification, Davy Avenue, Knowlhill, Milton Keynes, MK5 8NL
ITS Testing & Certification, Davy Avenue, Knowlhill, Milton Keynes, MK5 8NL
2000/14/CE (Directive Emissions Sonores) y-comprismodifications (2005/88/CE)
ITS Testing & Certification, Davy Avenue, Knowlhill, Milton Keynes, MK5 8NL
Endereço: No.65 Xinggang Road Zhonglou Zone Changzhou, Jiangsu 213000
China
ITS Testing & Certification, Davy Avenue, Knowlhill, Milton Keynes, MK5 8NL
Naam: Gary Gao Naixin (Director of Outdoor Power Equipment)
Adres: Greenworks Tools Europe GmbH
Wankelstrasse 40.
50996 Koln
Germany
ITS Testing & Certification, Davy Avenue, Knowlhill, Milton Keynes, MK5 8NL
Gemeten geluidsdrukniveau 93.3 dB(A)
Endereço: No.65 Xinggang Road Zhonglou Zone Changzhou, Jiangsu 213000
China
ITS Testing & Certification, Davy Avenue, Knowlhill, Milton Keynes, MK5 8NL
ITS Testing & Certification, Davy Avenue, Knowlhill, Milton Keynes, MK5 8NL
Mitattu aenenteho 93.3 dB(A)
Taattu aanenteho 96 dB(A)
Namn: Gary Gao Naixin (Chef for Outdoor Power Equipment)
Adress: Greenworks Tools Europe GmbH
Wankelstrasse 40.
50996 Koln
Germany
ITS Testing & Certification, Davy Avenue, Knowlhill, Milton Keynes, MK5 8NL
Uppmatt ljudeffekt
93.3 dB(A)
ITS Testing & Certification, Davy Avenue, Knowlhill, Milton Keynes, MK5 8NL
Malt lydeffektniva 93.3 dB(A)
ITS Testing & Certification, Davy Avenue, Knowlhill, Milton Keynes, MK5 8NL
Malt lydeffektniveau
93.3 dB(A)
Garanteret lydeffektniveau
96 dB(A)
Overensstemmelsesvurderingsmetode iht. Tillaeg VI / Direktiv 2000/14/EØF
Sted, date: Changzhou, 02/09/2016
nderskrift: Gary Gao Naixin (BEng, CEng)
MIET) Vicedirektor for maskinteknik


DEKLARACJA ZGODNOSCI WE DLA MASZYN
Producent: Changzhou Globe Co., Ltd.
Adres: No.65 Xinggang Road Zhonglou Zone Changzhou, Jiangsu 213000 P.R.
Chiny
ITS Testing & Certification, Davy Avenue, Knowlhill, Milton Keynes, MK5 8NL
Nivelul masurat al puteri acustice: 93.3 dB (A)
ITS Testing & Certification, Davy Avenue, Knowlhill, Milton Keynes, MK5 8NL
ZmefenahladinaakustickehoVykonu: 93.3dB(A)
ITS Testing & Certification, Davy Avenue, Knowihill, Milton Keynes, MK5 8NL
ITS Testing & Certification, Davy Avenue, Knowlhill, Milton Keynes, MK5 8NL
Izmerjena raven zvoene moci
Zajamcena raven zvoche moci
93.3 dB (A)
Način ugotavitjanja skladnosti z aneksom Vdirektive 2000/14/EC
Kraj, datum: Changzhou, 02/09/2016
Podpis: Gary Gao Naixin (BEng, CEng,
ITS Testing & Certification, Davy Avenue, Knowlhill, Milton Keynes, MK5 8NL
ITS Testing & Certification, Davy Avenue, Knowlhill, Milton Keynes, MK5 8NL
- este in conformitate cu preverteile urmatoarelor Directive CE in conformity with the provisions of the following other EC-Directive
(Directiva EMC) 2014/30/EU si
(Directiva privind emisia de zgomot) 2000/14/EC inclusiv modificarile (2005/88/EC) In plus, declaram ca:
ITS Testing & Certification, Davy Avenue, Knowlhill, Milton Keynes, MK5 8NL
Nivel māsurat de putere sonora
93.3 dB(A)
Nivel garantat de putere sonora
96 dB(A)
Metoda declaratie de conformitate la AnexaVI /Directiva 2000/14/EC
Locul, data: Changzhou, 02/09/2016
Semnatura: Gary Gao Naixin (BEng, CEng, MIET) Vice presedinte Department
Inginerie


EC DEKJIAPALIUR 3A CbOTBETCTBNE HA MAUINHATA
Ppoun3BouNTen:Changzhou Globe Co.,Ltd.
Adec: No.65 Xinggang Road Zhonglou Zone Changzhou, Jiangsu 213000, Kuitai
Ime n apec Ha Iuetao, ynbHOMOeHO da cbCTaBn TEXHueCKTe DOKymEHN:
IIME: Gary Gao Naixin (Ди配电Тор На отдана за влшю менизиранов,在606obpydaine)
Ampec: Greenworks Tools Europe GmbH
Wankelstrasse 40.
50996 Koln
Germany
C HactoioTo DeKnapnpame,Ye npodykTbT
Kateropn EneKtpuueckn TpMepc Bnaakho
Mogen 21227
CepneH HOMEP BIXTe eTNKTe a C HOMHaHHTe CTOHOCTH
TOnHa Ha npO3B0DCTBO BIXTe eTNKTe a C HOMHaHHTe CTOHOCTH
OTROBAPRAHcB0TBETHTPe pa3nope6n Ha DnpeKTHBaTa OTHOCHOaHHTe 2006/42/EC
OTROBAPaP3nope6nTeHaCneHnTeDpyn DpuekTnBuHaEO
2014/30/EU (ДиректINA 3a EMC) n
2000/14/EC (N3MbYBaH Wym OT Maunn H CbOpBXeHNA, KOnTo pa6oTt Ha OTKpuTO)
BKNIOHTeHNO npomeHnTe (2005/88/EC)
Ocbentoba deknapnpame,Ye
ca cna3eHn (aactn/klay3n 0T) cneHnTe oobnte eBponeckn ctaHdaptn
EN60335-1, EN 50636-2-91, EN ISO 3744, ISO 11094, EN 55014-1, EN 55014-2
ITS Testing & Certification, Davy Avenue, Knowlhill, Milton Keynes, MK5 8NL
H3MepeHo HnBO Ha Wym
93.3 dB(A)
TapaHTnpaHO HnBO Ha Wym
96 dB(A)
MetoHa OueHbAHe Ha cBoTBcTbMeTo Cbo6pa3Ho npnIOKeHne V1ot DnpEeKTHBa
2000/14/EC
MЯсто,data:Changzhou,02/09'2016Подпс:GaryGaoNaixin(BEng,CEng,MIET)
Bunenpe3nndent, MaunHoctpoeHe


△HAΩΣH ΣYMMOPΦΩΕK
Kataoekuaotn; Changzhou Globe Co., Ltd.
u Buvon: No.65 Xinggang Road Zhonglou Zone Changzhou,
Jiangsu 213000 P.R.China
Ovopa kai dieuBuvon anoou eouoiodotnveou va ouvtaei tov texviko pakea:
Ovoa: Gary Gao Naixin (Aeuuovntc uaiptoi npkpoivntou eonlioou)
Address: Greenworks Tools Europe GmbH
Wankelstrasse 40.
50996Koln
Germany
Aia Tou TApovto8nawouye ot to Poiov
Katyopla HAKTPIKO KOTIKO ypaun
Movélo 21227
Ap06 0eipas .BA. EiketaaBaoovonns Tpoiovto
EtoKataoKeu.. BA. Eiketaaovopnans Tpoiovtos
EivalouoepntosxetikcdiataeicnsOdyiaMxavnuw2006/42/EK
To npoiov elvai ouwvo e nipoutoeoei wv napakaw loiw Odyiw ts EK
2014/30/EE (Oδηγα EMC) κα
2000/14/EK (O8nyia 8opou) ouupiepiaaavovevw Tuv TpoTTOIOIeWv (2005/88/EK)
Kai emtmeov dawouoe on
Eepapuootkav ta akoloutheta Eupwaiika evapovioeva potua (tnmuata nptpec)
EN60335-1, EN 50636-2-91, EN ISO 3744, ISO 11094, EN 55014-1, EN 55014-2
ITS Testing & Certification, Davy Avenue, Knowlhill, Milton Keynes, MK5 8NL
Metpnuevo emineo evtaon hou
93.3 dB(A)
96 dB(A)
Eyyunmuvo emirego evtaangxou
ITS Testing & Certification, Davy Avenue, Knowlhill, Milton Keynes, MK5 8NL
93.3 9
96
ITS Testing & Certification, Davy Avenue, Knowlhill, Milton Keynes, MK5 8NL
Olcalen ses gucu seviyesi:
93.3 dB (A)
96 dB (A)
Imza: Gary Gao Naixin (BEng, CEng)
MIET) Muhendislik Departmani Baskan Yardimcişi


nnnnnnnnnnnnnnnnnnnnnnnnnnnnnnnnnnnnnnnnnnnnnnnnnnnnnnnnnnnnnnnnnnnnnnnnnnnnnnnnnnnnnnnnnnnnnnnnn
Changzhou Globe Co., Ltd.
Dian: No.65 Xinggang Road Zhonglou Zone Changzhou, Jiangsu 213000 P.R.China
:GaryGaoNaixin(wnnwnnnnni)
Address: Greenworks Tools Europe GmbH
Winkelstrasse 40.
50996 Koln
2
XAN
pann nnnn
Tao 21227
no'0n
yintanwn nnn nnnnn 2006/42/EC
yintanxuynnncnECniosin
2014/30/EU (nnn nn nn nn nn nn nn) 1
2000/14/EC (nnnnn nn) 2005/88/EC
109, 000
- 100000000000000000000000000000000000000
EN60335-1, EN 50636-2-91, EN ISO 3744, ISO 11094, EN 55014-1, EN 55014-2
ITS Testing & Certification, Davy Avenue, Knowlhill, Milton Keynes, MK5 8NL
ywn we wntn:
93.3 dB(A)
yannnnn
96 dB(A)
wnnnn nn nnnn 2000/14/EC
n10, n2y: y2x11, 102 092016
nnnn:GaryGaoNaixin
(BEng, CEng, IET) on"Mton


EKIRENGIMUATITIKTIESDEKLARACIJA
Gamintojas:Changzhou Globe Co.,Ltd."
Adresas: No. 65 Xinggang Road Zhonglou Zone Changzhou, Jiangsu 213000 P.R. Kinija
Asmens, jgaloti tvarkyi technine byla, vardas, pavarde ir adreas:
Vardas, pavarde: Gary GaBekdins jrangos darbui lauke direktorius)
Adresas: Greenworks Tools Europe GmbH
Wankelstrasse 40.
50996 Koln
Germany
ITS Testing & Certification, Davy Avenue, Knowlhill, Milton Keynes, MK5 8NL
Parasas: Gary Gao Naixin (BEng,
CEng,MIET) Viceprezidentas,InZinerijara


MASINU EK ATBILSTIBAS DEKLARACIJA
Razotajs: Manufacturer:Changzhou Globe Co., Ltd.
Adrese: No.65 Xinggang Road Zhonglou Zone Changzhou, Jiangsu 213000
P.R.China
Personas, kas pilvarota sastadit tehniskodokumentaciju, vards, uzvards un
adrese:
Vards, uzvards: Gary Gao Naixin (Lauka iekartu direktors)
Adrese: Greenworks Tools Europe GmbH
Wankelstrasse 40.
50996 Koln
Germany
ITS Testing & Certification, Davy Avenue, Knowlhill, Milton Keynes, MK5 8NL
Izmertais skanas jaudas limenis
Garantéais skanas jaudas limenis
Atbilstibas novertesana saskana ar pielikumuV/2000/14/EK direktiva
Vieta, datums: Changzhou, 02/09/2016
Paraksts: Gary Gao Naixin (BEng,
CEng,MIET) Masinbues das priekssedetaja vietnieks


MASINA EC VASTAVUSDEKLARATSI0ON
Tootja:Changzhou Globe Co., Ltd.
Aadress: No.65 Xinggang Road Zhonglou Zone Changzhou, Jiangsu 213000
P.R.China
ITS Testing & Certification, Davy Avenue, Knowlhill, Milton Keynes, MK5 8NL
Mödetud heliovömsuse tase 93.3 dB(A)
Garanteeritud heliovimsuse tase 96 dB(A)
Vastavushindamine vastavalt lisale VI direktivis 2000/14/EC
Aadress, kuupaev: Changzhou, 02/09 /2016 Allkiri: Gary Gao Naixin (BEng, CEng, MIET)
Asepresident tootmise alal