ROC1117GRU - Controller THOMSON - Free user manual and instructions
Find the device manual for free ROC1117GRU THOMSON in PDF.

| Product type | Universal replacement remote control |
| Brand | Thomson |
| Model | ROC1117GRU |
| Power supply | 2 LR03/AAA batteries (1.5 V each) |
| Battery type | Alkaline recommended |
| Dimensions (L x W x H) | Approximately 21 x 4 x 2 cm |
| Weight (with batteries) | Approximately 60 g |
| Infrared range | Up to 10 m |
| Number of keys | 31 function keys |
| Main functions | Learning, code search, SIMPLE Mode, teletext, menu, volume, channels, sources, media |
| Compatibility | Approx. 90% of Grundig devices (TV, LCD, LED, HDTV) |
| Material | ABS plastic |
| Color | Black |
| Code memory | Retains settings even after battery change |
| Operating temperature | 0 °C to 40 °C (estimation) |
| Maintenance and cleaning | Wipe with a dry, soft cloth, no abrasive products |
| Safety | Do not expose to moisture, heat, direct sunlight. Keep out of reach of children. |
| Spare parts and repairability | No user-serviceable parts. Batteries replaceable. |
| General information | Manual downloadable in PDF format at notice-facile.com |
Frequently Asked Questions - ROC1117GRU THOMSON
User questions about ROC1117GRU THOMSON
0 question about this device. Answer the ones you know or ask your own.
Ask a new question about this device
Download the instructions for your Controller in PDF format for free! Find your manual ROC1117GRU - THOMSON and take your electronic device back in hand. On this page are published all the documents necessary for the use of your device. ROC1117GRU by THOMSON.
USER MANUAL ROC1117GRU THOMSON
GB OperatingInstructions....02
Weight= 8 7gwithoutbatteries
Poids= 8 7gsanspiles
Thankyouforyourdecisionfora T homsonproduct. Takeyourtimeandreadthefollowinginstructions andinformationcompletely.Pleasekeepthese instructionsina safeplaceforfuturereference. Thisremotecontrolcanbydefaultcontrol90% modelsofGRUNDIGbrand,there'snoneedtosetit up.lftheremotedoesn'twork,pleasechooseone ofthesetupmethodsdescribedinchapter5.
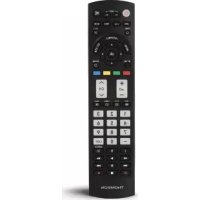
Thekeys
-
PowerTVON/OFF—L ED-Indicator
-
Numerickeysforchannelselection
3.FavoritList
- SelectOn-ScreenOptions
5.ExitMenu
6.Programminformation
7.EnterMenu
- SelectMenuOptions
9.TVsettings
- Volumesettings
11.TVMute
-
Previous(DVD, BlueRay...)
-
Next(DVD, BlueRay...)
-
Record ( DVD, BlueRay...)
15.Play(DVD,BlueRay...)
16.3DMode
- Share S creenOptions
18.MediaPlayerMenu
-
Languageselection
-
Languageselectionsubtitles
21.Pause(DVD,BlueRay...)
22.Stop(DVD,BlueRay...)
23.Fastbackward ( DVD,BlueRay...)
24.Fastforward ( DVD,BlueRay...)
25.ProgrammSelection
26.Sourceselction
-
Openelectronicprogramguide (ifsupportedbytheTV)
-
Confirma selection
29.Backkey
30.Streamingappmenu
31.TeletextON/OFF
1. Explanation of the Note and Warning symbol

Warning
This symbol is used to indicate safety instructions or to draw your attention to specific hazards and risks.

Note
This symbol is used to indicate additional information or important notes.
2.PackageContents
- ReplacementRemoteControl
- 2 x A AABatteries
• T hisoperatinginstructionsincl.CodeList
3. Safetynotes
- Do not usetheUniversalRemoteControlin moistorwetenvironmentsandavoidspray- watercontact.
- D o n otexposetheUniversalRemoteControl toheatsourcesordirectsunlight.
-
D o n otdroptheUniversalRemoteControl.
-
N everopentheUniversalRemoteControl. Itcontainsnouser-serviceableparts.
- As with all electrical devices, keep the UniversalRemoteControlawayfrom children.

Warning
- W heninsertingbatteries,notethe correctpolarity(+and-m arkings)and insertthebatteriesaccordingly. F ailureto dosocouldresultinthebatteriesleaking orexploding.
- Don otshort-circuitbatteries.
• D o n otchargebatteries. - Do not throw batteries in a fire.
- Keepbatteriesoutofthereachof children.
- D on otallowchildrentochangebatteries withoutsupervision.
- R emovethebatteriesfromproducts that are not being used for an extended period.
4. Gettingstarted—i nstallingtheBatteries

Note
• U se2 A AAbatteries
- R emovethebatterycoverfrombottom ofremote(Pic.A).
- Checkthe+/-polarityonthebatteries andinsidethecompartment.
- Insertthebatteries(Pic.B).
- S lidethebatteryholderbackintothe remoteuntiltheclipslocate(Pic.C).

Note—CodeMemory
Thisremotecontrolsavesthesettingsduring batterychange.
5. Setup
Thisremotecontrolcanbydefaultcontrol90% modelsofGRUNDIGbrand,there'snoneedto setup.lfitdoesn'twork,pleasechoose one ofthefollowingsetupmethods5.1or5.2.
5.1 DIRECTCODEENTRY
CODEList:
001,002,003,004,005,006,007,008, 009,010,011,012,013,014,015,016, 017,018,019,020,021,022,023,024, 025,026,027,028,029,030,031,032, 033,034,035,036,037,038,039,040, 041,042,043,044,045,046,047,048, 049,050,051,052,053,054
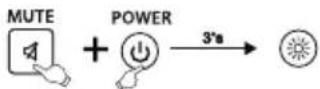
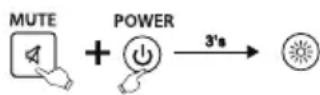
- Pressandholdthe[MUTE]& [ POWER] keysforapprox.3 secondsuntiltheLED willbelit.
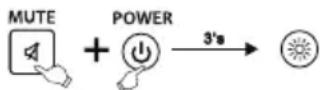
- Enter the corresponding 3-digit codes from codelist using the digit keys. The
LEDindicatorconfirmseachentereddigit by a short flash and turns off after 3 valid digits. Otherwise, the LEDwillflash
3 timesandthenr emainonforr e-entry.
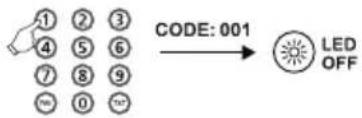
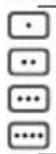
text_image
CODE: 001 LED OFF- Pleasetrytousetheremotecontrol. Ifitdoesn'tworkwell, pleasetryother codes:[002],[003],[004]...

Note
• N o entryforapprox.15secondswilltime outtheset-upmode.
- 1 f t hecodeisinvalid, theLEDflashes 3 timesandthenlightsuppermanently.
- To e xitthesetup, pleasepressthe [MUTE]key.
5.2 MANUALCODESEARCH
- Pressandhold[MUTE] and[POWER] keysforapprox.3 seconds until the LED will belit.
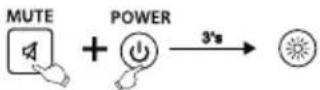
-
Pressandrelease[P+]or[P-]keytostart searchingthecode. Eachtimeyoupress, theremotewillchangetothenextcode.
-
Please test if the [POWER], [VOL+], [MENU], [0-9] keyworkwell. Ifok, please press the [MUTE] keytosavethe code and exit.
-
If it doesn't work well, repeat the fast search by pressing the [P+] or [P-] key.

Note
Attheset-upmode, onlythe[POWER], [VOL+], [MENU], [0-9]keysare working.
5.3CODEINQUIRY
Usethefollowingmethodtofindoutwhich codeiscurrentlyset:
- Pressandhold[MUTE] and[POWER] keysforapprox.3 seconds until the LED will belit.
2.Enterthecode[9][9]0withthe numberkeys.TheLEDwillflashtwice andgoesoff.
3.Pressthekey[1]forthe1stdigitofthe code.TheLEDwillstarttoflash. CounttheLEDflashes.Thenumberof flashesresemblethecode'sfirstdigit. Repeatthisprocedure f orthe2ndand 3rd d igitofthecode: 2nddigit->pressthekey[2]->count LEDflashes 3rd d igit->pressthekey[3]->count LEDflashes
Ifcodenumberis0 t heLEDwillnotflash. AftertheLEDhasindicatedthethird digit itwillturnoff.
5.4 Compatible Remote Control Model
DuetotoomanyRemoteControlmodels,we onlylistsomeofthembelow.Ifyourremote controlissimilartothedrawing,thereplacement remotecancontrolyourTV(Page74).
6.LEARNMODE
Thisremotecontrolisequippedwithalearning function. Thus, you could learn functions of your original remoteto this remote control.
6.1 BEFORE STARTING LEARN MODE
- Thebatteriesinthetworemotecontrols havetobeingoodcondition.Replacethem ifnecessary.
- P lacetheremotecontrolswiththeinfrared diodessothattheypointtowardseach other.
- W here n eccessaryadjusttheheightofboth remotessothatinfrareddiodesare p properly aligned.
• T hedistancebetweentheremotecontrols shouldbeabout3 c m.
ROC1117GRU


Note
• D o n otmovetheremotecontrolsduring thelearningprocedure.
- Ensure that the room is not lit by fluorescents tubes or low energy consumption lamps since such light sources could interfere with the copying.
- The 2 remote controls must be at least 1 meter away from any light source.
- D uringlearningmode,ifnokeyis selectedformore than15seconds,the learningmodewillexitautomaticallyor ifnootherremotesignalisreceived.
- E achfunctionkeywillholdonlyone command.A newcommandtobelearned willautomaticallyreplacethepreviousone.
6.2 ENTERLEARNMODE
- Pressandholdthe[MUTE] and [VOL+] keysforapprox.3 seconds until the LED will belit.
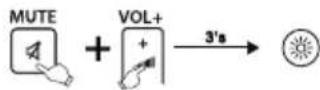
2.Enterthecode[9][8][0],theLEDwillflash 2 timesandthenremainon.
- Theremotecontrolisnowreadytolearn newcommands.
6.3LEARNINGOFKEYS
-
Pressandreleasethedesiredkeyonthe originalremotecontrolwhichyouwantthe commandtobelearned.TheLEDatyour replacementremotewillflashtoconfirm thattheinformationhasbeenreceived.
-
Then press and releas the target key on theremote control you want learned.
B
-
If the LED flashes 3 times and then remain on, the command has been learned successfully.
-
Repeat these step to learn other key functions.
-
Please press the [OK] keytosavethecode and exit learning mode.

Note
Whilereplacingthebatteries,theremotecontrol willkeepthefunctionsofthelearnedkeys.
6.4 CLEARINGOFLEARNEDKEYS
6.4.1 CLEARINGOFONELEARNEDKEY
- Pressandhold[MUTE] and [VOL+] keys for 3 seconds until the LED will belit.
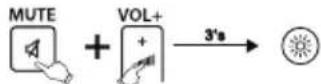
2.Enterthecode[9][8][1],theLEDwill flash2 timesandthenremainon.
- Pressandreleasethedesiredkeyatthe replacementremotecontrolwhichyou wanttoclearthelearnedcommand. IftheLEDflashes3 times,thelearned commandhasbeenclearedsuccessfully.
6.4.2 CLEARINGOFALLLEARNEDKEYS
- Pressandhold[MUTE] and [VOL+] keys for 3 seconds until the LED will belit.
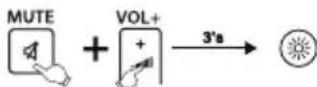
2.Enterthecode[9][8][2],theLEDwill flash2 timesandthenremainon
- Pressandreleasethe[OK]keyatthe replacementremotecontrol.IftheLED flashes3 times, allcommandshavebeen clearedsuccessfully.
7.SIMPLEMode
Thisremotecontrolisequippedwithan
SIMPLEMode. Thus you could reduce the functionality of theremote control to its basic functions. It avoid that the TV Settings are changed by mistake.
During the SIMPLE Mode you still could use following keys:

SwitchtheTVOnorOff

Changethevolume

MutetheTV

Changetheprogram
0-9 Numerickeysforprogramselection/directpageselectionTeletext
TXTTeletextON/OFF
SelectOn-ScreenOptions
EPGShowtheElectronicProgramGuide (ifsupportedbytheTV)

Selectsignalsource
EXITExitMenu
7.1 EnterSIMPLEMode
- Pressandhold[MUTE] and [SHARE SCREEN] keys for 3 seconds until the LED will belit.
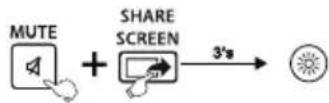
2.Enterthecode[9][7][0],theLEDwill flashtwotimesandthenremaino
- Pressandreleasethe[OK]key, if L EDflash 3 times, you have entered the SIMPLE Modesuccessfully
7.2ExitSIMPLEMode
- Pressandhold[MUTE] and [SHARE SCREEN] for 3 seconds until the LED will belit.
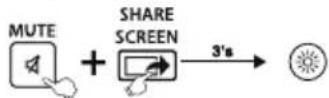
2.Enterthecode[9][7][0],theLEDwill flashtwotimesandthenremainon.
- Pressandreleasethe[EXIT]key, if L E D flash 3 times, you have exit the SIMPLE Mode.

Note
While the SIMPLE Mode is activated only the keys mentioned in chapter 7 will work. If one of these keys is pressed the LED will belit until the key is released. If one key is pressed during then normal mode, the LED will flash.
8.Maintenance
- Do not mix new and used batteries for powering the Universal Remote Control, as old batteriestend to leak and may cause powerdrain.
- Do not use corrosive or abrasive cleansers on your Universal Remote Control.
- KeeptheUniversalRemoteControldustfree bywipingitwitha s oft,drycloth.
9.Troubleshooting
Q.MyUniversalRemoteControldoesnot workatall!
A. Check your TV. If the TV mains switch is turned off, your Remotec cannot operate your TV.
A. Checkwhetheryourbatteriesareinserted properlyandareinthecorrect+/-position.
A. Checkwhetheryouhavepressedthe correspondingdevicemodekeyforyour device.
A. If the batteries are low, replace the batteries.
Q.MyTVrespondsonlytosomeofthe commands.
A. Tryothercodesuntilmostkeyswork properly.
Q. Some key so the Remote Controldonot work anymore?
A. Maybe the SIMPLE Mode had been activated. Deactivatethe SIMPLE Mode as explained in chapter 7.2.
10.WarrantyDisclaimer
Themanufacturerassumesnoliabilityand providesnowarrantyfordamageresulting fromimproperinstallation/mounting,improper useoftheproductorfromfailuretoobserve theoperatinginstructionsand/orsafetynotes.
11. Service and Support
PleasecontactHamaProductConsultingifyou haveanyquestionsaboutthisproduct. Hotline:+499091502-115(German/English) Furthersupportinformationcanbefoundhere: www.hama.com
12. Recycling Information
Noteonenvironmental protection:
Aftertheimplementationofthe EuropeanDirective2012/19/EUand 2006/66/EUinthenationallegal
system, the following applies: Electric and electronic devices as well as batteries must not be disposed of with household waste. Consumers are obliged by law to return electrical and electronic devices as well as batteries at the end of their servicelivest the public collecting points setup forth this purpose or point of sale. Detail to this are defined by thenation allawoftherespective country. This symbol on the product, the instruction manual or the package indicates that a product is subject to these regulations. By recycling, reusing thematerials or other forms of utilising old devices/Batteries, you are making an important contribution to protecting our environment.

017,018,019,020, 021,022,023, 024,
025,026,027,028, 029,030,031, 032,
033,034,035,036, 037,038,039, 040,
041,042,043,044, 045,046,047, 048,
049,050,051,052, 053,054
concernantl'assistance: w www.hama.com
12. Consignesderecyclage
Remarquesconcernantla protectiondel'environnement:
001,002,003,004,005,006,007,008, 009,010,011,012,013,014,015,016, 017,018,019,020,021,022,023,024, 025,026,027,028,029,030,031,032, 033,034,035,036,037,038,039,040, 041,042,043,044,045,046,047,048, 049,050,051,052,053,054
001,002,003,004,005,006,007,008, 009,010,011,012,013,014,015,016, 017,018,019,020,021,022,023,024, 025,026,027,028,029,030,031,032, 033,034,035,036,037,038,039,040, 041,042,043,044,045,046,047,048, 049,050,051,052,053,054
001,002,003,004,005,006,007,008, 009,010,011,012,013,014,015,016, 017,018,019,020,021,022,023,024, 025,026,027,028,029,030,031,032, 033,034,035,036,037,038,039,040, 041,042,043,044,045,046,047,048, 049,050,051,052,053,054
001,002,003,004,005,006,007,008, 009,010,011,012,013,014,015,016, 017,018,019,020,021,022,023,024, 025,026,027,028,029,030,031,032, 033,034,035,036,037,038,039,040, 041,042,043,044,045,046,047,048, 049,050,051,052,053,054
001,002,003,004,005,006,007,008,
009,010,011,012,013,014,015,016,
017,018,019,020,021,022,023,024,
025,026,027,028,029,030,031,032,
033,034,035,036,037,038,039,040,
041,042,043,044,045,046,047,048,
049,050,051,052,053,054
001,002,003,004,005,006,007,008,
009,010,011,012,013,014,015,016,
017,018,019,020,021,022,023,024,
025,026,027,028,029,030,031,032,
033,034,035,036,037,038,039,040,
041,042,043,044,045,046,047,048,
049,050,051,052,053,054
001,002,003,004,005,006,007,008, 009,010,011,012,013,014,015,016, 017,018,019,020,021,022,023,024, 025,026,027,028,029,030,031,032, 033,034,035,036,037,038,039,040, 041,042,043,044,045,046,047,048, 049,050,051,052,053,054
001,002,003,004,005,006,007,008, 009,010,011,012,013,014,015,016, 017,018,019,020,021,022,023,024, 025,026,027,028,029,030,031,032, 033,034,035,036,037,038,039,040, 041,042,043,044,045,046,047,048, 049,050,051,052,053,054
017,018,019,020,021,022,023,024,
025,026,027,028,029,030,031,032,
033,034,035,036,037,038,039,040,
041,042,043,044,045,046,047,048,
049,050,051,052,053,054
001,002,003,004,005,006,007,008,
009,010,011,012,013,014,015,016,
017,018,019,020,021,022,023,024,
025,026,027,028,029,030,031,032,
033,034,035,036,037,038,039,040,
041,042,043,044,045,046,047,048,
049,050,051,052,053,054
12. Pokynyk likvidaci
001,002,003,004,005,006,007,008, 009,010,011,012,013,014,015,016, 017,018,019,020,021,022,023,024, 025,026,027,028,029,030,031,032, 033,034,035,036,037,038,039,040, 041,042,043,044,045,046,047,048, 049,050,051,052,053,054
017,018,019,020,021,022,023,024,
025,026,027,028,029,030,031,032,
033,034,035,036,037,038,039,040,
041,042,043,044,045,046,047,048,
049,050,051,052,053,054
Hotline:+499091502-115(Alm/Ing)
001,002,003,004,005,006,007,008, 009,010,011,012,013,014,015,016, 017,018,019,020,021,022,023,024, 025,026,027,028,029,030,031,032, 033,034,035,036,037,038,039,040, 041,042,043,044,045,046,047,048, 049,050,051,052,053,054
- Tryckpäknapparna[MUTE]och[POWER] samtidigti c a 3 sekundertillsstatuslysdiodenlyserkonstant.
- Angedentresiffrigakodenfränkodlistan medhjälpavsifferknapparna. Statuslysdio-
Hotline:+499091502-115(ty/eng)
Duhittarmersupport-informationhär: www.hama.com
001,002,003,004,005,006,007,008, 009,010,011,012,013,014,015,016, 017,018,019,020,021,022,023,024, 025,026,027,028,029,030,031,032, 033,034,035,036,037,038,039,040, 041,042,043,044,045,046,047,048, 049,050,051,052,053,054
017,018,019,020,021,022,023,024,
025,026,027,028,029,030,031,032,
033,034,035,036,037,038,039,040,
041,042,043,044,045,046,047,048,
049,050,051,052,053,054
017,018,019,020,021,022,023,024,
025,026,027,028,029,030,031,032,
033,034,035,036,037,038,039,040,
041,042,043,044,045,046,047,048,
049,050,051,052,053,054