USER MANUAL KAX950ME KENWOOD
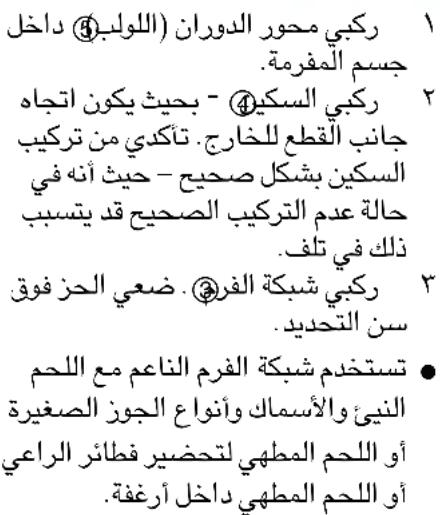
-
Read these instructions carefully and retain for future reference.
-
Before using for the first time, remove all packaging and any labels. Wash the parts: see 'Cleaning'.
-
Thaw frozen food thoroughly before processing through the attachment.
Always ensure bones and rind etc are removed from the meat before mincing.
before fitting or removing parts/attachments
after use
before cleaning.
Always use the pusher supplied. Never put your fingers or utensils in the feed tube.
- Warning - the cutting blade is sharp, handle with care both in use and cleaning.
- Ensure the attachment is secured in position before switching on.
- Never use a damaged attachment. Get it checked or repaired: see 'Service and customer care'.
- Never use an unauthorised attachment, or more than one attachment at once.
- Misuse of your attachment can result in injury.
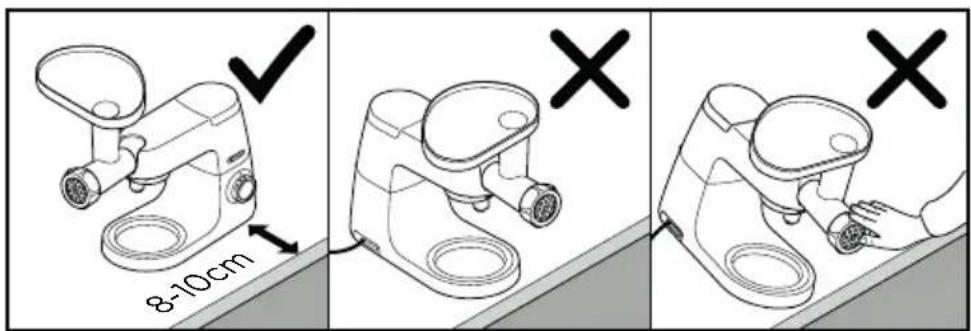
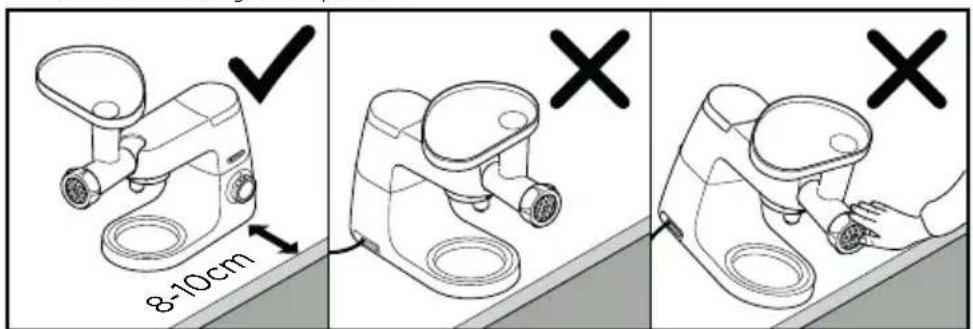
- Do not operate your appliance near the edge, or overhanging the work surface or apply force to the attachment when fitted, as this may cause the unit to become unstable and tip over, which may result in injury.
-
Do not move or raise the mixer head with an attachment fitted as the Stand Mixer could become unstable.
Children should be supervised to ensure that they do not play with the appliance.
-
Appliances can be used by persons with reduced physical, sensory or mental capabilities or lack of experience and knowledge if they have been given supervision or instruction concerning use of the appliance in a safe way and if they understand the hazards involved.
-
Only use the appliance for its intended domestic use. Kenwood will not accept any liability if the appliance is subject to improper use, or failure to comply with these instructions.
Refer to your main Stand Mixer instruction book for additional safety warnings.
Cleaning
- Wash all the parts in hot soapy water, then dry. Do not wash any part in the dishwasher. Never use a soda solution.
- Wipe the screens with vegetable oil, then wrap in greaseproof paper to prevent discolouring/rusting.
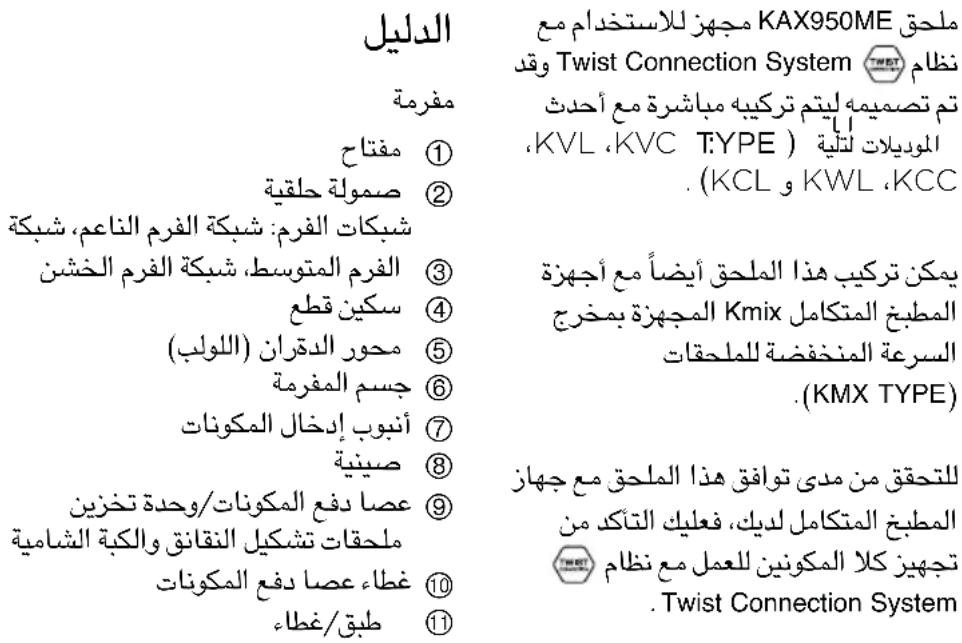
This KAX950ME attachment features the Twist Connection System and is designed to fit directly on the latest generation Kenwood Chef models (identified as TYPE KVC, KVL, KCC, KWL and KCL). This attachment can also fit Kmix Stand Mixers featuring a slow speed attachment outlet (TYPE KMX).
To check that this attachment is compatible with your Stand Mixer you will need to ensure both components feature the Twist Connection System
If your Stand Mixer features the Bar Connection System you will also need an adaptor before operation is possible. The reference code for the adaptor is KAT001ME. For more information and how to order the adaptor visit www.kenwoodworld.com.
Use the food mincer to process meat, poultry and fish. Use the inclusive attachments to shape sausages and kebbe.
Before using for the first time
- Wash the parts see 'Care and Cleaning'
Key
Food mincer
① Spanner
② Ring nut
③ Screens: fine, medium and coarse
④ Cutter
⑤ Scroll
⑥ Body
⑦ Feed tube
⑧ Tray
Pusher/storage unit for kebbe & sausage adaptors
Pusher lid
① Dish/cover
To Assemble the Food Mincer
Refer to Illustrations C - D
1 Fit the scroll ⑤ inside the mincer body.
2 Fit the cutter ④ - cutting side outermost. Ensure it's seated properly - otherwise you could damage your mincer.
3 Fit a screen ③ .Put the notch over the locating pin.
- Use the fine screen for raw meat; fish; small nuts; or cooked meat for shepherd's pie or meat loaves.
- Use the medium and coarse screens for raw meat; fish and nuts.
4 Loosely fit the ring nut.
To Use the Food Mincer
Refer to Illustrations E - I
1 Lift off the slow speed outlet cover.
2 With the attachment in the position shown, locate to the slow speed outlet and rotate to lock in place.
3 Tighten the ring nut firmly by hand.
- If you experience poor results when mincing meat, switch off and unplug the appliance. Dismantle and clean the attachment, then re-assemble the attachment and refit to the power unit. Tighten the ring nut using the spanner provided.
4 Fit the tray ⑧ .Put the dish/ cover under the mincer to catch food.
5 Thaw frozen food thoroughly before mincing. Cut meat into 2.5cm (1") -wide strips.
6 Switch on to speed 4. Using the pusher, gently push the food down the feed tube, one piece at a time. Don't push hard - you could damage your food mincer.
Sausage filler
Use pig/hog skins on the large nozzle and sheep/lamb skin on the small nozzle. Alternatively roll the sausage meat in breadcrumbs or seasoned flour before cooking.
12 small nozzle (for thin sausages)
13 large nozzle (for thick sausages)
14 base plate
To Use the Sausage Filler
Refer to Illustrations J - P
1 If you're using skin, soak it in cold water for 30 minutes first. Then open it up with a jet of water and place your chosen nozzle under a running tap and pull the skin onto the nozzle.
2 Fit the scroll inside the body.
3 Fit the base plate 4 - put the notch over the locating pin.
4 Hold the nozzle on the food mincer attachment and loosely screw the ring nut on.
5 Lift off the slow speed outlet cover.
6 With the attachment in the position shown, locate to the slow speed outlet and rotate to lock in place.
7 Tighten the ring nut firmly by hand.
8 Fit the tray.
9 Switch to speed 3 or 4 and using the pusher, push the food down the feed tube. Don't push hard - you could damage your mincer. Ease the skin off the nozzle as it fills. Don't overfill.
10 Twist the skin to form sausages.
Pork Sausage Recipe
100g (4oz) dry bread
600g (1½lb) pork, lean and fat, cut into strips
1 egg, beaten
5ml (1tsp) mixed herbs
salt and pepper
1 Soak the bread in water, then squeeze and discard the water.
2 Mince the pork into a bowl.
3 Add the remaining ingredients and mix well.
4 Make into sausages (see 'to use the sausage filler').
5 Fry, grill or bake until golden brown.
Kebbe maker
Kebbe is a traditional Middle Eastern dish: deep-fried lamb-and-bulgur-wheat parcels with a minced meat filling.
15 cone
16 shaper
To Use the Kebbe Maker
Refer to Illustrations Q - W
1 Fit the scroll inside the body.
2 Fit the shaper ⑥ - put the notch over the locating pin.
3 Fit the cone 15.
4 Loosely screw the ring nut on.
5 Lift off the slow speed outlet cover.
6 With the attachment in the position shown, locate to the slow speed outlet and rotate to lock in place.
7 Tighten the ring nut firmly by hand.
8 Fit the tray.
9 Switch to speed 1 and using the pusher, gently push your mixture through. Cut into lengths.
Stuffed Kebbe Recipe
Outer casing
500g (1lb 2oz) lamb or fat-free mutton, cut into strips
500g (1lb 2oz) bulgur wheat, washed and drained
1 small onion, finely chopped
Important
Always use the bulgur wheat straight away after draining. If it is allowed to dry out, it may increase the load on the mincer resulting in damage.
1 Using the fine screen, mince alternate batches of meat and wheat.
2 Mix. Then mince twice more.
3 Stir the onion into the mix.
4 Push through, using the kebbemaker.
Filling
400g (10oz) lamb, cut into strips 15ml (1tbsp) oil
2 medium onions, finely chopped
5-10ml (1-2 tsp) ground allspice
15ml (1 tbsp) plain flour
salt and pepper
1 Using the fine screen, mince the lamb.
2 Fry the onions until golden brown. Add the lamb.
3 Add the remaining ingredients and cook for 1-2 minutes.
4 Drain off any excess fat and allow to cool.
To finish
1 Push the casing mixture through, using the kebbemaker.
2 Cut into 8cm (3") lengths.
3 Pinch one end of the tube to seal it. Push some filling - not too much - into the other end, then seal.
4 Deep fry in hot (190^) oil for about 6 minutes or until golden brown.
Care and Cleaning
Refer to Illustration Y
Sausage Fillers/Kebbe Maker
Wash in hot soapy water and dry thoroughly.
1 Loosen the ring nut manually or with the spanner and dismantle.
2 Remove the lid of the pusher and store the sausage and kebbe attachments inside.
3 If you keep the attachment on your machine, put the dish/cover on the tray as a dust cover.
Service and Customer Care
UK only
If you need help with:
- Using your attachment
Servicing, spare parts or repairs (in or out of guarantee)
Call Kenwood Customer Care on 0345 222 0458. Have your model number (KAX950ME) and date code (e.g. 23B08)
ready. They are on the attachment outer carton.
spares and attachments
call 0844 557 3653.
other countries
- If you experience any problems with the operation of your attachment, before requesting assistance visit www.kenwoodworld.com.
- Please note that your product is covered by a warranty, which complies with all legal provisions concerning any existing warranty and consumer rights in the country where the product was purchased.
- If your Kenwood product malfunctions or you find any defects, please send it or bring it to an authorised KENWOOD Service Centre. To find up to date details of your nearest authorised KENWOOD Service centre visit www.kenwoodworld.com or the website specific to your Country.
- Designed and engineered by Kenwood in the UK.
Made in China.
Nederlands
Veiligheid
Consulte as Ilustracoes E - I
NcnoAbyTe Mrcopy6ky Anypepea6OTKn Mca,NTnUbi npb6bl.NcnoAbyTe HacaKINBXO4JNeB KOMnEKT,AA npnroTOBaEHnKoA6acOK NKe6a6OB.
IpepaepBbIM NCIOAb3ObaHnEM
- PpomOnTe AeTaAn MrcOpy6Kn (cM. pa3deA «YxOaN o6cayKINBaHne>.
OCHOBHbIE KOMNOHEHTbl
MЯсCopy6ka
① TaeuHbI KAIIOU
② KoIbueBaIraKa
③ PeWeTKn: AAn MeAkoN, cpeAHei KpynHoi py6Kn
④ HoX
⑤ 山HeK
⑥ Kopnyc
⑦ Ποδαιούςτρυδκα
⑧ AOtOK
⑨ ToAkaTeIb / 6AoK XpaHEnIaI HaCaIOK AIA npIroTOBaeHNr Kebe I KOAn6ac
10 Kpbioka-ToKaTeAe
① BAnOo/KpbIiKhA
AЯсбopa macy6kn
CM. nAIOCTpaun

1 YcTaHOBInTe 5BHeK⑤ BHyTpB KopnyCa Mrcopy6Kn.
2 YCTaHOBInTe HOX ④ peKyuIe cTOpOHn HApyKy. HenpaBnAbo yCTaHOBAAeHHbI HOX MOxET NOBpeAHTb McCOPY6Ky.
3 YctaHOBnte peWeTky ③. BbICTyI DOANKeH BOITN B na3.
- PeшETky Дд МЕКОн py6Kn
CаEуeT ИСПОВaТь Дд
py6Kn CBIpOTo MЯса, рБбbl,
МeAKINx opEXOBи ВapeHOrO
MЯса Дд NaCTUшьe
3aNEKaHKn ИAN MЯСHOrO
XaE6a.
PeWeKy dAЯ cpeAnei rpy6oyn py6kn cAedyeT nCnoAob3OBaTb dAЯ py6Kn cbIpOro Mca, pbl6bl, opexOB, oBOUeN, TBepDOrO cbipa, a TaKKe OUnIeHHbIX OT KOKyPbI IAN CyUeHbIX PpYKTOBdAЯ npnroTOBAEHnRA NyAnHROB mMapMeAada.
4 YcTaHOBnTe KoIbueByIO raIKy (He 3aTgBaIe).
IcnoB3ObaHne mrcopy6kn
CM. HAAIOCTpaun

1 NpHnMnte KpbIuKy H3KOCKOPoCTHOrO rHe3da.
2 Bo3bMnte HacaKy, KaK Noka3aHo Ha pncyHke, IN BkpyTnte ee B Hn3KOckOPOCTHoe OTBepCTne AO KOHua.
3ПLOTHO 3aTЯHNTe KOΛbUeByu RaIKy pyKoI.
E can npn n3MeIbueHmra Ca Bbl noLyaeTe HeyAOBAAETBOPNTAIBHbIe pe3yABTaTbI, BbIKAOHTe np6Op N BbITaUHTe 13 po3etKn. OTBepHnte IN ONUCTNTE HaCaADKy, 3aTEM 3aHOBO ee co6epNTe UYCTAHOBITE Ha MOTOPHbI
6aok. IaOTHO 3aTaNHTe KOaBcEByIO rAky, NcNoAb3yI npAraOuNcraeHbI KAIQU.
4 YctaHOBnTe AOTOK ⑧. YcTaHOBnTe 6AIOo/KpbIuKy NOA MRCOPY6Ky DAn npneMa npOaYKTOB.
5 Ppexde yem 06pa6aTbIBaTb 3AmOpoxeHHbIe NPOyKTbl B Mscopy6ke, Hx CaeAyeT NOAHOCtBIO pa3MOPo3NTb. IopexbTe MrcO Ha NooCKn WnpHOn 2,5 cm (1doum).
6 BKUOHTe cKOpocTb 4. C NOMOUI TOKATEA aKKypaTHo IPOTOAKHNTe npOdyKTbI NO NOaHOJIe Tpy6Ke, NO ODHOMy KycouKy. H3ANuHHe ycNAH MOrTy CTaTB pNpHHoN IOBpeXdEHnMaCOPy6Kn.
HacaKa dIaHa6nBkn KoI6ac
NcnoAb3yIte 06oOouKy n3 CBINOH KOKHa 6oABoW OBOHKe n n3 6apAHbei - Ha MaAeHbKO. B KaueCTBe aBTePHaTnBHO BapnaHTa Nepe, npiroTOBHeHem 6kataIte KoAbaChbI φapw B Cyxapax IAN B Myke C DObabHeHem CneuN.
12 MaanBOPOHKa(AaTOHKX KOIbac)
13 60aBwa BOpHka (Ara TOACTbIX KOaBac)
14 OCHOBaHHe
KaK NOAb3OBaTbCra HaCaADKOJ DAJ Ha6NBKN KOABac
CM. nAIOCTpaun J-P
1 EcAn Bbl NcNoB3yeTe 06oAouky,TO Chaayaa 3amOHTe ee B XOAnOH BOe Ha 30 MInHyT.3aTem packpOnTe ee C NOMObIO CTpyN BObl, YCTaHOBNTe
IPOCTpyHnyBOPOHky HHaTnHTe Ha BOPOHky 06oAouKy.
2 YcTaHOBnTe WHeK BHyTpN Kopnyca.
3 YcTaHOBnTe OCHOBaHHe 14 - BbICTyI DOANKeH BOITN B Na3.
4 YdepnBnB BOpHky Ha HacaKe Mrcopy6Kn, HecnbHO 3aKpyTnte KOaBcEByIO raiKy.
5 Nohmte KpbIuKy H3KOCKOPoCTHOrO rHe3a.
6 Bo3bMnTe HacaKy, KaK Noka3aHo Ha pncyHKe, IN BkpyTnte ee B HN3KOckOpocTHoe OTBepCTne DO KOHua.
7 ΠΑΟTHΟ 3aTЯHHTe KOΛbUeByIO raɪky pykɔŋ.
8 YcTaHOBnTe AOTOK.
9 BkauHTe ckopocTb 3 n4, n c nOMouBTO ToaKaTeA npoToaKNHTe npOdyKtbl no nOdaIOUe Tpy6ke.
N3ANHHe yCNAn - MOryT NOBpeAntbMscopy6ky. No Mepe HanoAHeHnO bOaOuKy NOCTeNEHNO CHImaIte ee c HaCaKn. He NaBauTe 0bOaOcKy CAnWKOM Tyro.
10 CkpyTnTe o6oAouky, npuDabEiΦopMy KoA6acbl.
PeueπT
ПригOTOBаеня CBINHOДKOΛбсbl
100 r cyxoro xAe6a
600 r cBnHnbl, HeKnpHo
n KnpHo, Hape3aHHo
noOCKam
1JnUO,B36nToe
5Ma(1yainHaAloxka) KxOHbIX TpaB COAb Npepu
1 3aMoUHTe XAe6 B BOe, 3aTe MTOXMMTE N BbIeNTE BOy.
2 Pponyctnte mco uepe3 mocopybky B aay.
3 O6aBbTe octaHbIe INHpeAneHTbI IN XopoWo nepemewaIte.
4 CΦopMnpynte Koλbacy (cM. «NcNoB3OBAHne HaCaaKN AAn Ha6NBKN KoλbAcbl').
5 O6kapbTe Ha cKOBOPoDe, rPnAe nn B AyXOBKe DO 30AOCTO-KOpuHHeBOrO UBeTa.
HacaKa dIpynroTOBaeHna «Ke6e»
«Ke6e» 3TO HaUHOHaBHOe
6AIOo, KOToPOe FOToB8rT
Ha CpeAHem BoCToke, OHO
PpeCTaBAreT n3 Ce6ra
O6KapEHHyIO BO φpntIope
O6OAnOyKy n3 MOAOoI
6apAHnHi BapeHoi,
BbICYuWeHHoN IWeHnUHOJ KpynbI
C NaunHKoN n3 McCHOrO fapwa.
15 KOHyC
16ΦopMOBOUHaAeTaAb
Kak noab30BaTbcra HacaKoI dIa PnroTOBaeHna «Ke6e»
CM. Hauoctpaun

1 YcTaHOBnTe UHeK BHyTpN Kopnyca.
2 YcTaHOBInTeΦOpMOBOUHyO DeTaIb 6 - BbICTyI D0AKeH BOITN B Na3.
3 YcTaHOBnTe KOHyc 15.
4 3akpyTnte KoIbIeByIO raIKy, HO He 3aTЯIbIaIte.
5 NOpHnMnte KpbIuKy HN3KOCKOPoCTHOrO rHe3a.
6 Bo3bMITE HacaKy, KaK noka3aHo Ha pucyHke, n BKpyTITe ee B Hn3KOckOpocTHoe OTBepCTne DO KOHca.
7 IaOTHO 3aTaNHTe KOAbCeByu raKy pyKoI.
8 YcTaHOBnTe AOTOK.
9 BkaUoynte ckopoctb 1 n C NOMOuToAkaTea aKKypaTHo npTOAKNHTe
cmecb. Pa3peXbTe nO hyxHoi Bam dIInHe.
PeueπT
HacaKa AAn npnroTOBaeHna K0A6ac nKe6e
BbIMoIe B ropaye MblbHOB BoDe n TuaTeAbeNo npocyuHTe.
O6cIyJxNBAHnne n 3a6oTa o NOKyNaTeAIX
EcnBpa6ote np6opa B03HnKn KaKe- An6o HeNoaAKn, nepeo6paueHnem B cayk6y noAepxkn 3aINTe Ha caT www.kenwoodworld.com.
- ПомнITE,чTo Ha npi6op
pacnpoctpaHreTcraPAHTNIA,OTBeuAIOUaBCEM 3aKoHHbIMNOAOJENM OTHOCNTeABoHCyueCTByIoUeI rapaHTNIINpab NOTpeBnteA B ToI cTpaHe,rgE npi6Op 6bl npno6peTeH.
- Пи ВОЗнКHOBEHIN
НЕССРАВноCTN B pa6OTe
прбopa Kenwood
ИПи Пи об hapжЕнIN
Кaknx-Иибо DeФeKTOB,
ПожауиСТа, OTпpaBbTe
ИПи ПинecNTe Ппбор
В aВTopиЗИрOBaHHы
сервись сеHTP
KENWOOD. Aktyаьньie
КоHTaKTHьie ДaHHьie
сервись сеHTpoB
KENWOOD Bbl
НайдeTe Ha caYte
www.kenwoodworld.com
ИПи На саite ДЯ Baшew
СтраНы.
CnpoeKtpoBaHo npa3pa6oTaHo KOMnHaNei Kenwood, CoeHHeHHoe KopoAeBCTBO.
CdaHOBKuTae.
Kazakka
Kayinci3iK
OcbIHyCKayAblkTapAbIMyKnT OKbIHb3XHe KeAleweKTe naaHaHyFa CaKTaHb3.
AFAW pet naaHaHap aAdbIHda 6apabIK kaTamaHbI
KHe Ke3 KeAReH KAncbipMaHbI aAbln TaCTaHbI3.
BeAweKTePdi Kyy:"Ta3aay" 6eImiH kapaHbI3.
KoHbipMa apkblbEhdeydeH 6ypbH, My3aTbIAAF TaFambl MyknrT epitih3.
Etih wery aAdbIHda 6apbIK cyneri MeH Ka6bIFbl, T.6. aAbyHfaHbH TeKcepH3.
XaHaKaTapDbI Wery Ke3iHDe 6ip yaKbTTa a3 FaHa caAbl, KocBIMwA KOCy aAdbIHDa WnBIPWbIKTaAByiHa pyKcat 6epiHi3.
- XbIaMdbiK peTteriwiH "O" (OUIPYAI) KyniHe 6ypan, po3eTKaDaah axbipatbIHbI3:
6eAWeKTepei/KOHDbipMaapabi OPhaTy Hemece aIy aAdbIHda
NaHaaHaHHaH KeiH
Ta3aay aAdbIHaa.
YHemi 6epiAren 6acy KypaBn H naAaHbIhbl3. CaycaKTapAbI HeMece KypaAapAbI eWkaWah 6epy TyTiriHe caMaHbl3.
EckepTy - KeckiMaAMac yWkip, naaHaHy XHe Ta3aay Ke3IHDe a6aH 60bHbI3.
Kocy aAdbHda canTama opHbHa 6ekitIareHH TeKcepH3.
3aKbIMdaAFAH canTamaHbI eWkaWah naaAHa6aHbI3. OHbI TeKcepH3 Hemece XeHDeH3: «KbI3MeT Kepcety XaHe TyTbHyBbifa KYTIM KepcTy» 6aImiH KapaHbI3.
PyKcat etiAmereH KOHbIPMaHbI Hemece 6ipAeH 6ipHeWe KOHbIPMaHbIMyADEM naHaAHyFa 6oMaNAbI.
CanTaMaHbI 6ypbc naiDaAaHy kapaKaTka eKeAlyi MymKIn.
KypbIaFbIHb JxMbIC icTeuTih 6eTTiH WeTiHde naaHaHa6aHbI He yCTiHeh TeHIn TypMaHbI3 He canTaMaHbI 6ekITKeH Ke3De apTbIK KYU CaMaHaB13, 6yA KypbIAFbIHbIH AYPbIC XyMbIC icTeMeyiHe XaHe ayApbln KeTyIHe, HtNHexciHde Xapakat aLyFa ce6en 6oAybl MyMKiH.
- ApaAacTbIPFbIiTbIH 6acbIH 6eKiTiAreH KOHdbipFbIMeH KO3FaI KeTepeMeHi3, ac MaunHa TypaKcbI3 6Olybl MYMKIH.
KypbIaFbIMeH OINHaMaybIH KaMTaMaCbI3 eTy yWih 6aAaapDbI KaDaFaAay KaKeT.
- Bya Kypaan OlapdbH KypaanbI Kayinci3 KoAdaHybl TpaBn Hcyckay 6epiace Hemece backa aamhbH 6akblaybHa 6oLca JHe OlapbH TybHdaybl MymkIn Kayin TypaBn TycHiri 6oLca, 6iAmi Hemece Taxipnbeci XeTKiikci3 Hemece fN3nKaBik, ce3y Hemece onlay Kaibeti Haap aadap KoAdaHyfa apHaFaH.
KypbIbIHbI TeK yH IapyacbHa 6aIaHbICTbl KOaAhbIb3. Erep KypbIbI e3 mHdTeHe cai MaKcatta KoAaHbIaMaca Hemece bepiAreh HycKaybIKtbl dypbc CaKTamaFaH JkaDaIda Kenwood KOMpaHnraCbl eWkaHdaJ kayapKepeiIKTi e3 MoHbHa aMaIbI.
KocbIMwa Kayinci3iK eCKepTyAepi MeH Ta6a KOaHaBbICbIH acyMaaHHacbl HcCKayAIfbIHaH KapaHbI3.
Ta3aay
Bapbik 6eAWeKTepei ca6biHdbI bICTbIK cyMeH Kybln, KeNTipiH3. bIbIC KyfbIu MaunHaDa 6eAWeKTepeIH eUkaicbcibH Kyyfa 6OAmai. EwkaaH coda epiTinCIN KOAAH6aHbI3.
TopapdbI eCIMdk MaibimeH cyptiHi3, codan Kein H TycHH e3repyiHe/ToT 6acybHa kOa 6epmey ywiH MaN eTKi36eHTIH KaFa3Fa opaHbI3.
BvKAX950ME canTaMaCbI
AHaMa 6aHbCbl KyHe eH
Xa6bIKTaFAH XHe eH
CoHbI Kenwood 6ac acna3
YrIePiHe TiKeIe Bekityre
Ko6aHaFAn (TYPE KVC, KVL,
KCC, KWL XHe KCL peTiHde
aHbIKTaFAH).
CoHbImeK KaTap, 6vCanTaMa
apKbIbI Kmix acy MaunHacBH
6aay XblAmkTBcIcTama
MbIfbcIMeN (TYPE KMX)
6eKiTyre 6oAaBl.
Ocbl canTaMaHbIH acyMmaHHacbIMeH yIaecimdiIirTeKcepy ywiH, eki KypamdaCTaAinHaMa 6aIIaHbIC kyneci 6oIybl Kepek
AcuMaHnacbIHdaXoAaKtbl
baaHbc KyeNCi
60ca,naaHaHy aAdbHdA
aAaTepKaKeT 6oAaBl.
AaTepaH aHbIKTaMaBk
KOaB - KATOOME.KocbIMwa
aKnapaATbI XHe aaTepre
Tancbipbc bepy KOaBH
www.kenwoodworld.com
caTbHaH KePiH3.
ETTI, KCTbl XHe 6aBbIKTbl
eHdey yWIn TaFam TapTKblWTbl
nainaaahbHbI3. WxkbK
neh Ke6beHi KaBbINTacTbIPy
yWIn, epeKeWe canTaMaapDbI
nainaaahbHbI3.
AraW pet naaAnhy aAdbIHda
- BeλωeKTeρДi Kyy, «KyTIm Kacay KαHe Ta3aλay» HγCKayΛbIFbIH KapaHbI3.
Пернe
Tafam TaptTkbiu
① COMBIH KIATI
② CaKHaIbIraIka
③ ΘκρaHΔap: ycaK, opTaWαJxHe ipi
④ Kecki
⑤ 山nbiipwblK
⑥ Kopnyc
⑦ Bepy tvTiri
⑧ Haya
Ke66e XKHe WYXbIK aanTepAepiHe apHaFaH 6acKbiw/caTay KypaBl
10 BaKbIu KaKaNpaBbl
①blabc/kaKaNaK
Tafam TapTKbIwTbIXHHaKTay
C-D cypetTepiH KapaHbI3
1 WnbipwblkTbi ⑤ TaPTKbIu KOpnycbi iwihe 6eKiTiHi3.
2 KeckiWiTi 4- Kecy XaFbI cbiptbHa 6ektiH3. Aypbic 6ekTIaReHH TeKcepH3, 6oAMaca TaptkbIwKa 3aKbIM Keayi MymKiH.
3 ΘκρaHʌbɪ ③ 6ekɪtiHɪ3.
TeɪkTI opHaʌactbɪpy icTiːrɪHe caʌbɪHbɪ3.
- Μικί et, 6a,bik, kiwkeHTaJ KaHfak HeMece WOnah Niporine He eTTi HaHa apHaFaH nickeH eT ywiH yCaK ḋpaHdbI NaAdaAahbHb3.
- Μικί eT, 6aʌbɪk ἀπε He ἀπαHfak yɪn opTaʊa ἀπe ipi ᵋKaPaHdap NaɪdaʌaHbɪhɒl3.
4 CaKHaIbI raiKaHbI 6oc 6eKiTiHi3.
Tafam TaPTKbIwTbI naaHaHy
E - CypetTepiH KapaHbl3
1 Bary KblAaMbIKTbl WblFbIC KaKNaBih KeTepin WblFaPbIHb3.
2 CanTama KepceTiIaReH opbIHda 6oIca, 6aMy XblAaMdbIKTbI 1bIFbICKa OPhAACTbIPbIN, OphbHa 6ypan KyAbiTahbI3.
3 CaKHaIbI raIkaMeH KOAmEH 6eKiTiHi3.
ETTI TapTy Ke3iHHe HaWap HAtnKe aAcaHbI3, KypbIAFbIHbI eWipin aKbIpaTbHbI3. CanTaMaHbI aBIn Ta3aAn, canTaMaHbI KaTta KInHaKTan, KyaT KypaAblHa KaTta 6eKiTiHi3.CakHaBlrAkaHbI 6epiAreh CombH KiATimeH 6eKiTiHi3.
4 HayaHbI 6ekiTiHi3. TaFamDbI YCTay YUIN, bIDbICTbl/ KaKNaKTbl TapTKblw actblHa CaAblHbI3.
5 TapTy aAAbHHa My3aTbIiFaH TaFamAbI AypblCTan epitHi3. ETTi 2,5 cm (1") etin TypaHbi3.
6 4-ksblaaaMdbIKKa aybictbipbHb3. BACKbiW Kemerimeh TaFAMhBn 6ip 6eirih 6ip yaKbTTa 6epy TyTiriHe caabHb3. KaTbI 6acyfa 6oMaai, ce6e6i TaFam TapTKbIwka 3aKbIM Keayi MymkIn.
LyykblkTOATbipfbll
WoKa TepicHe yKeH caHbIaYbI, aKoTepici YwIH KIwKeHTaN CaHbIaYbI naHaAHaBbIb3. BoMaCa, WyKbIK eTIN NICpy aAdbHa HaH KOkbIMbHa HEmeCe YHFa ayHaTbIHbI3.
12 kiUKeHTaI caHbIaay (XHHiUke UyKbIKap)
13 YAKeH caHbIaay (KaAblH WYKbIKTap)
Heri3 TaKTacbl
UyKbIK TOATbIPFbIu naaHaHy
J-PypyTepiH KapaHbI3
1 Tepi naIaIaHbIaFaH KaFdaIa OHbI CybIK CyFa 30 MInHyTka MaIbIHbI3. OdaH KeIN cy aFbIHbIH aWbIN, TaHaIaFaH caHbIAaydI aFbIH cy actbHa KOybIN, TepiHa caHbIAaydAn TapTbIN WbIFapbIHbI3.
2 Wnbipwblkblkopnyc iwiHe 6eKiTiHi3.
3 Heri3ri TaKaTaHbI 6ekitin, TeTikTi opHaAactbipy icTiriHe CaAblHbI3.
4 TaFam TapTKblu CaNTaMaCbIHdaFbl caHbIaayAbI yCTan, cAKHaAblraKaHbl 6oc 6ypaHbl3.
5 Baay XblAaMbIKTbi WbIfbc KaNaFbIH KeTepin WbIfapbIHbI3.
6 CanTama KepceTiAreH opbIHda 6oIca, 6aay XblAaMbIKtbl 1bIfbICKa opHaAactbipIn, opHbHa 6ypan KyAblTaNb3.
7 CaKHaIbI raNkAmeH KOAmeH 6ekTiHi3.
8 HayaHbI 6eKtiHi3
9 BaKbIw KEmerimeH 3-1i Hemece 4-11 KaAamFa aybICTbIPbIN, TaFAMbI 6epy TyTiriHe caAihbI3. KaTTbl 6acyFa 6oMaNAbI, ce6e6i TaFAM TApTKbIwKa 3aKbIM KeAyi MymKiH. CaHbIay ToAFAH Ke3De TepiHi OHaai aMbHbI3. ApTbIK TOATbIPyFa 6oMaNAbI.
10UyKbIkapXacay ywiH TepiHaHaAdbipbIHb3.
Wouka eti WyykblbIHbIH peCNTi
100 r KypfaK HaH
600 r WOwKa eTi, XiHiWKe XkHe MaIbI, TiIMApre TypaAFaH
1XyMbIPTKa, 5Ma (1 Wai KaCbIK) apaac Wen TY3bl MeH 6ypblw apaAactbIpblAFaH
1 HaHbI cyfa caAbln, cydbI CbIFbIn WbIfapBih3.
2 Wouka etIH Ta6afa TaPTbIHbI3.
3 KaFaan HnHpeDneHTTepi Kocbln, XaKcbIaI apaaactbipbIbI3.
4 WyKbI KapacHb3 (WyKbICy3rCIN naaHaHy) 6aIMiH kapaHb3).
5 AaTbIH-KoHbIP Tycke eHReHWe KyblpblHbl3.
Ke66e kacaftbi
Ke66e -AaCTypI Taay LbIFbc TaFambl: TapTbIFaH eTneH KaKcbI KyblpblFAH KOI eTI KHe 6yIpy.
15 KOHyc 16 niwuHaeriu
Ke66e kacaftbIHTbI naaHaHy
Q-WcypetTepiH KapaHbI3
1 甲bipwblkTbI Kopnyc iwiHe 6eKiTiH3.
2PiuiHderiW 6ekitin, TeTikTi opHaactbipy icTiriHe CaAblbI3.
3 KoHyctb1 6eKiTiH3.
4 CaknHaIraKaHb6oc 6paHb3.
5 Baay XbIaMbIKTbi WbIFbc KaKNaBih KTeepin WbIFapBih3.
6 CanTama KepeciIaReH opbIHda 6oIca, 6aay XbIaMbIKtbl WbIFbICKa OPHAacTbIPbIN,
OpHbHa 6ypan KYAbiTahBi3.
7 CaknHaBla raKamEn KoAmeh 6ekitih3.
8 HayaHb6eKiTiHi3.
9 1-ЖыДамбИКа aybICTbIPbIN, 6aCKblI KEMERIMeH KOCnAHbl 6ipKaAblTb 6acbIHb3. Y3bIHbIFbIH 6θAIH3.
TapTBlaFan Ke66e peenti
Cbiptkbl Kopnyc
500 r koi eti Hemece Maicb3
koi eti, tiimdepre Typay
500 r (6yIpyp, Kyblfahn KHe
aFbI3bIFAH
1 kiKeHTaIIra3, YcaK
TypaFaH
MaHb13Ab1
AfbI3FaHHaH KeiH 6yIpyDbI
6ipDeH naHaAahbIh3.KeTipy
MymKIn 6oAca, TapTkblw
XyKTeMeci apTbIn, 3aKbIM
KeATipy MymKIn.
1 YcaK ekpaH keMeIImeH eT KHe YH KocnacbIH TaPbIHbI3.
2 ApaAacTbIpbHb3. OaH KeiH eKi peT TapTbIHb3.
3 Nnra3abKocnaFa caAblbI3.
4 Ke66e XacaFbIw KEmerimeH KaKcbIaI 6acblHbI3.
ToATbIPy
400 r koi eTi, Tiimdepre Typay
15 Ma (1 wai KacbIK) Ma
2 opTawa nna3, yCaK TypaAFAH
5-10 Ma (1-2 wai KacbIK)
yHTaKTaTFAH KaAMnbp
15 Ma (1 wai KacbIK) yH
Ty3 XkHe 6ypbl
1 YcaK 3kpaH KEmerimeh KOI eTIH TapTbIHbI3.
2 Nnra3aI aATbIH-KOHbIP TycKe eHReHwE KybIPbIHbI3. Koi etIH KOCbIHbI3.
3 KaFaH INHrpeDneHHTePdi Kocbin, 1-2 MnHyT niCiPiHi3.
4 ApTbIK MaNabi Terin CyblTbIHbI3.
AraKtay
1 Ke66e kacaftbI W KEMerImeH Kopnyc Kocnacbl H caAblHb3.
2 8 cm (3") TiAImAepre TypaHbI3.
3 BekiTy ywiH TyTikTiH 6ip wetih TeciH3. BacaWtHe WamaAbl KypambH (KeI emc) 6acbin, OaH KeiH 6eKiTiH3.
4blctbIK(190°C)MaIaIaMAmEn6MNHyTHeMece aATbIH TYCKe eHReHWe KaKcbIaI KybIPbIHbI3.
Kytim kacay khe Ta3aay
Y cypeTiH KapaHbI3
1 CaKHaBla RaKaHb KoAMeH HeMeCe CombH KAtimeH 6ocatbn 6aWeKeTeh3.
2 KaɪTa JxɪNaHɑKaTahbɪʒ.
3 BaKbIi KaKaIaFbIH aAByI, iWHe WYKbIK KAne Ke66e caTAmaApbIH CaKaTahbl3.
Wyxbk TOATbipFbiwTap/Ke66e Xacaftbiw
blcTBik,ca6bHAbCydaXybin, Aypbictan KenTipiHi3.
KbI3MeT Kepcety XaHe TytbHyybIaPfakHeC
KypbIAFbIHbIH KymbICbIHda akayAblkTap TybiHdaca, KeMeK aIyFa Kyrin6ec 6ypbH, www.kenwoodworld.com caTbHa eTIHi3.
- ΘHiM eHIMdi caTbIn aAFAH eADeI TyTbIHyWbI KyKbIKTapbl MeH Ke3 KeAReH 6ap KeiADEMere KaTbICTbl 6apABIK 3aHApFa caiKeC KeiADEMEmeH 6epiAetihin eckepiH3.
Kenwood eHiMi dYpbic Kymbic icTeMece HeMece KaHdaa Da 6oAMacbIH KeMwIiKTEp Ta6blfAH 6oLca, OHbl eKiAeTTi KENWOOD KbI3MeT KepcTeOpTaIbIFbHa aKeAiH3 HeMece 6epin Xi6epiH3. EH XaKbIH opHaIaCKaH KENWOOD KbI3MeT KepcTeOpTaIbIFbIH H XaHaPbIaFAH DepekTePIH www.kenwoodworld.com Topa6bIHah HeMece eAIH3re TAn Be6-TopanTah KapaH3.
BipikKeH KopoAbIaKTeri Kenwood kOMnaHnrcbI Jko6aHaH JkHe Xacan WbIFapFaH.
KbTaAa KacaFaH.
Eλληνικά
Aσφáλεια
- Ditei cnid TpMaTn iHaRyADom I He DO3BOAraTN IM FpaTNC 3 PnAAaOM.
He pekomehdyetbcra KopnctybaTncra cHm npnaadom 0co6am i3 o6mexkeHmN f3nHmN a6o MeHTaBHMMOXANBOCTaMn a6o TUM, XTO Mae HeOCTaTHbO DOCBiPy B noRo eKcnayatau. BnueHa3BaHm Oco6am DO3BOBAETBCRA KOpNCtYBaTncra npnaadom TiIbKn NiCIA npoxoJKeHHr IHcTpky Ta nIa HaFARADOM DOCBiJeHOI AIOHN I kUO BOHn POzmyIOTb IOB'3aHI 3 CIMn Pn3NKn.
- Uen npnAa npn3naeHn BnKauHo ABA BnKOpuctaHH y no6yTi. KomnaHia Kenwood He HecB BiIOBIAaBHOCTi 3a HeBIIOBIAHe BnKOpuctaHH npnAady a60 npuyuHn npaBnEKCnayataii, BnKAAdeHx y uHHTpykui
AnB. noci6HnK 3 ekcnayatauii KyxOHHOI MaunHH, o6 O3HaNoMHTNc8 3 OoTaTKOBHMn nonpeaXeHHMa N oOo AOtpMaHHaTexhIKn 6e3neKn.
UH
BIMnTe Bci deTaI B rapaHm MnaBni BOdi,NOTIM BNCywiTb.3a6OpOHReTbcra Mtn 6yAb-aki qactHHn B nocydomnHi MaunHi.HikoH He BnKOpncToBynte COAOBNI PO3uH.
- PpOtpiB ekpaHn pocAHHHO OAIeH, a NOTIM 3aRopHiTb B JxNPOcTIkN nnip, Uo6 3an06irn 3He6apBaeHHo/ipXkaBHNO.
LЯнада КАX95OME MaHApI3Hy cIcTeMy KpINaENHa Ta npn3NaYeHa AAnBe3NocepeAHBorO BnKOpNCTaHHa 3 HOBM NOKoAHnMaMoDeAeN Kenwood Chef (cepI TYPE KVC, KVL, KCC, KWLa KCL).
LHa HacaKa TaKoK MoKe BnKOpNCTOByBaTncb Ha KyxOHnX MaunHax Kmix,Ha KOTpNX E Hn3bKOuBnAICHN OTBip (TYPE KMX).
Ioo nepeBipn cymicHicTb HacaKn 3 BaWIO KxOHHO MaunHO, BNeBHITbcr, 0o 0nBa KOMNoHEnT MaOTb Hapi3Hy cNCTemy KpInAeHHa
Kaio Bauy Kyxohny MaunHy OchaueHO 6aKoBOO CNTeMOIO KpINaeHHa, Bam 6yde noTpiben aanTep. Ko aanTepy KATO01ME. OdaTKOBY iHOpmaio DNIBITbca Ha caiT www. kenwoodworld.com/twist.
Bn mokeTe BnKOpncTObyBaTu M'rcopy6ky dAЯ obpo6kn M'raCa, nTnCi Ta pN6n. OdaTkoBi HacaKn, IIO HaDaIOTbcR, Notpi6Hi dAЯ Ha6NbBaHHa KOB6acn Ta nprirotyBaHHa «Ke6e»
IpeaepuBnKOpncTaHHaM
Bunnte BcI AeTaI,AnB. po3AIA AOrAra Ta YnueHHa
PokaJuk
M'acopy6ka
① 广KOBN KAIQU
② KiʌbεBa rǎɪka
③ PeiTkn M'acopy6kn: 3 MaAMn, cepaHIMTa BeAikmN BiBopamN
④ HiX
⑤ 山HeK
⑥ Kopnyc
⑦ HanpMa Tpy6ka
⑧ Taça
⑨ 36epirahnHaHacdoKdHa HabHHKaBacn Ta npiroToyBaHHKe6e
10 KpnuKa wTobXaHa
① BAOO/KpUWka
36npaHnM'acopy6kn
AIB. iAnoctpaui C - D
1 YctaHObiTb WHeK⑤ BCEpeAnHy KopnyCa M'rcopy6Kn.
2 2 YctaHOBtB HIX ④ pixkuym 6okom Ha3OBHi. IpekeoHaTecra, zo HIX 6yAo BCTaHOBLaHo npabnAbHo, 60 iHaKwe BIn MOKe NOnKOAnTH M'acopy6Ky.
3 BcTaHOBiTb pewiTkU ③. PnHBoUka MaE noTpapanu Tdo Uep6HH.
- Api6Ha pewiTka notpi6Ha nn
06pO6Kn cnporo M'ra, pn6n,
Api6Hnx ropixib a6o roTOBOrO
M'raa nactywoi 3anikAnKn
a6o m'acHoro xia6a.
- Cepen Ta rpy6a pewiTkn noTpi6hi AAn o6pO6Kn cnporo M'ra, p6n, ropixib, OBOUIB, TBepDO CUPy, a TaKoX OUnIeHnx BiA WkipKn a6o cyweHnx φpyKTIB AAn NyDInHrB a6o MapMeAaMy.
4 HecnIbHo 3aKpyTiTb KIbueBy raIky.
Як корецстся Я的成绩好
AIV. iAnoctpaui E - I
1PiHIMITb KpnuKy H3bKOWBnAkiCHOrO npNBOdy.
2 Bi3bmitb HacaKy,
rK NOKa3aHo Ha
MaHONky,PiAHeCiTb DO
HN3bKOWBnAkiCHOrO pNBOy
Ta BkpyTiB B HbOrO.
3MiUHO 3aTgHiTb KIAbueBy raIky pyko.
- 韓卍図韋韋蘂蘂蘂蘂蘂蘂蘂蘂蘂蘂蘂蘂蘂蘂蘂蘂蘂蘂蘂蘂蘂蘂蘂蘂蘂蘂蘂蘂蘂蘂蘂蘂蘂蘂蘂蘂蘂蘂蘂蘂蘂蘂蘂蘂蘂蘂蘂蘂蘂蘂蘇蘂蘂蘂蘂蘂蘂蘂蘂蘂蘂蘂蘂蘂蘂蘂蘂蘂蘂蘂蘂蘂蘂蘂蘂蘂蘂蘂蘂蘂蘂蘂蘂蘂蘂蘂蘂蘂蘂蘂蘂蘂蘂蘂蘂蘂蘂蘂蘂蘂蘡蘂蘡
DONOMOROIraIKOBOROKHOUa, LHOHaDaCTbCRA.
4 YctahOBiTB TaHIO ⑧. YcTaHOBITb NiA M'acopy6ky 6aIdo/KpNshKy dAra 36npaHHnpepeo6aehnx npOdykTIB.
5 3amopoxhehi npoaykncAiapeTeaBHO p03MOPo3nTnepeA py6aHHa. Po3piKTe M'aco Ha cmyKKN 3aBwupWK2,5cm(1IOHM).
6 BkauTb 4 WbNdkicTb. NocTynoBO noaBaIte npOdyKTn DO HanpMaHoi Tpy6Kn 3a OOnOMoroU wTOBXaHa. He AOKlaAaTe 3aBnx 3ycnAb, oCKiABKn ue MoXe NOwKOaNTn M'acopy6ky.
HacaKa dIaHa6nBaHHKOB6acN
BnKOpncToByTe BeAnky
npuHnHy HacAdKy dA
HaNBaHHcBnHraOi Shkipn,
aMaLy -Aa HaNBaH
Obeoyo Shkipn. KaNo Bn He
BnKOpncToByTe Shkipy, nepeA
TeNlOBOO o6p06KOo O6BaAryTe
KOB6acy y naHpyBaABynx
cyxapax Ta 60poShHi 3i
CneCiMy.
12 MaHa NopuiHa HacaKa (A TOHkoI KO6acn)
13 BeVnka NOpuiHa HacaKa (AABTOBCTOi KO6aCn)
14 OCHOBa
K KOpncTyBaTnca HacaKaIO DaI npiroTyBaHHa Ke6e
AIB. iAnoctpaui -W
1 YcTaHOBiTb UHeK BcepeAnHy Kopnyca.
2 YctaHObitbΦOpMyBaIbHy DeTaIb 16 TaK,IO6 PnHBOUka Notpanna DO uep6HH.
3 YcTaHOBiTb KOHYC 15.
4 HecnAbHo HaKpyTiTb KIAbueBy raiky.
5PiHimItb KpNkky Hn3bKOWBnAICiCHOro npNBOy.
6 Bi3bMItb HacaKy,
rk NOKa3aHO Ha
MaIOHky, NiDHeCiTb DO
HN3bKOWBnAkiCHOrO OTBOpY,
Ta BkpyTiTb B HbOrO.
7MiUHO 3aTARHITb KIAbueBy raIky pykoIO.
8 YcTaHOBiTb TaHIO.
9 BkIoUcIb 1 WbNAdKicTb.
NoaBaIte cymiu Do cnCTemn
3a OONOMOIO wTOBxa.
NopixTe Ha nopuii.
Peuent φapшиюbaHOro Ke6e
06oAoHka
500r. rHnTnHn a6o HeKnHpHoI
6apAHnHn, HApizaTn CmYkKaMn
500r. BapeHoro Ta BucySeHoro
PiHeHuHoro 6bOpOHa,
PpOMTuTO RaBIXaTOrO
1 HeVeAnka ZnbUy, Api6Ho
NouHHKOBaHa
ybara
IWeHnIO CIA3aBXKn
OoDaBaTN Opa3y NiCAY
BiXmAHN. RaQo BOHa
BCTnIHe BnCOxHyTN, Ye MoKe
PiABuNTn HabaHTaKeHHa
M'acopy6Ky Ta NOWKOAnTNI
1 BctaHObITb Api6Hy pewiTKy Ta npuyBaIte nonepemHHo M'aco Ta 60poUHo, a nepeD o6pO6koO ocTahHbOi nopui npOdyKTIB,doaTe ci6byIo.
2 NepemiwaIte. Notim npuybaIte ue Dbiu.
3 3MiWauTe U6yIIO 3 peWToIO iHrpeDiEHTiB.
4 PpoTobxHitb Kpi3b HacaKy AAn npnroTyBaHHKe6e.
HanOBHOBa
400r. rHnHH, npi3aTn CMyKKamN
15 MA. OAIi
2 cepaHi ci6yHnH,dp6Ho Hap3aTni
5-10Ma.MeAeHxCnei
15Ma. nWeHnUHO 60pOuHa, coai Ta nepuio
1 Nopy6aIte yarHATnHy 3a dONOMOIO Api6HoCITKN.
2PiCMAKTeU6yAUo DO NOABN 30AONTcTO-6pyHaTHORO KOABOpY. OdaIte RaHrTnHy.
3 DaaTe iHwi iHrpeiEHTNa BapItb npOTAROM 1-2 XBUNH.
4 BuaIb HaAnuWok Knpy Ta 3aunwTe OXoAoHyTN.
PnroTybaHn
1 O6po6iTb cymiu AAn o6oAoHKn 3a dOIpOMoTOIO HacaKn AAn npIroTyBaHHa Ke6e.
2 NopixTe Ha nopuii no 8 cm (3 HouMn).
3 CTnCHITb OAnH KHeuB Tpy6Kn, 0o6 3aneuataTn II. PpoWToBxHiTb φapw (He AyXke 6araTo) B 06oAoHky Ta 3aneuataTne ii 3 iHworo 6oky.
4PiCMAkMyTe y rapaui (190°C) oaii npotraom 6XBnH a6o do nOBn 3OAnTcTo-6pyHaTHOro KOAbOpy.
△OgAaTa YnueHn
AиВ. iAnocTpaцio Y
1 NocAa6Te KIAbueBy raKy pyKaMn a6o 3a DOnomorOraKOBOrO KaUOHa Ta po36epiTb HacaKy.
2 36epiTb HacaKy.
3 3HIMITb KpnuKy uToBxay a i 36epiraTe B Ioro BiDiIaehnHi HacaKn AAn HaNBaHHa KOB6acn Ta npiroToYBaHHa Ke6e.
HacaKn AAn Ha6NbaHHa KOB6acn/HacaKa AAn npurotybaHH Ke6e
PpomnTe Bci yactHnB MInbHi rapyui BOi i peTeIbHO npocuWitb.
O6cAу罗ByBaHHa Ta peMOHT
-Якwo3po6otoio daWoro npuaay BnHKaOTb 6yDb- rki np6aemn, nepu HIX 3BepHyTncrNo DOONOMOry, 3aBiTaIte Do caity www.kenwoodworld.com.
- Nam'raTae, 10 Ha npnaa, nouropoeBcra rapaHtir, 10 BiNoBiae BCIM 3aKOHnM IIOXKeHHm 1OIO icHyouoi rapaHTi Ta npab CnoxNbau B Ti KpaHi, Ae npnaad 6yB npndahn.
- Пи ВИннКHeHHI
HecnpaBHOCTi B pO6OTi
прИау Kenwood a60
прИВЯВALEHHi 6yDb-яКnx
deΦeKTIb, 6yDb IaCKa,
HaIiUaITb a60 пиHeciTb
прИаD B aBTOpN3OBaHni
cepBicHni ZeHTp
KENWOOD. AKTyAaBHi
KOHTaKTHi DaHI cepBicHx
ZeHTpiB KENWOOD
Bn 3HaIaTe Ha caTl
www.kenwoodworld.com
a60 Ha caTlДЯ BaWoI
kpaIIHn.
CnpoeKToBaHo Ta po3po6AeHo KOMnHaHeo Kenwood,Ob'EdHaHe KopoAIBCTBO.
3po6aHOBKuTai.

- jLw yjz 5 10
2
3
4
a
Y
1
1
1
1
1
1
1
a11 200/011 g 111
aLl
111 111 111 111 111
aolll 11
aall
0
10
pclipg
aaii
jz jz jz jz jz jz jz jz jz jz jz jz jz jz jz jz jz jz jz
yj j 111
l_2g.
S 16
a<11 20
S OBC = S COD + S_ BOC
1
W !Q
1
111 1
jll 10
② 1 ≤ m_0 < 32
2
1 2
≤ 2
· = 1
7
jauuuaa yaiyaaiai aayuuie
.
1 1
它恰好 x ≤ y.
jainl 4elg aiaial acyul
1 1
山
S OBC = S COD + S_ BOC
( 2) S^ ( r) = a_0 + 12( r - 1) + ·s + ( r - 2) = 12( r - 1) + 12( r - 2) ·s + 12( r - 1)
golal
2.1gKJLJUJLgKJL
aal 1 -aay lgl all
aai
1
.
jai jai jai jai g
令 1,2,3
1
afo
LuiiLi(sSdo)Joo
jolg 10
a
L
iilalai jaiyai
1
()
(duol)
0
1
jnnn nn nnnn nn nnnn
jglglllss
alall 1y
15c
pks1pse
14/12
aolal
1
E
1 1 1 1 1
g
jaiy 4eYg aieaiaell eay
.
-
-
-
-
-
-
-
-
-
-
-
-
-
-
-
-
- 1.
山
i
jll jao je yol jq
sui i 1
aoll 1 4uS 4uS 4uS
aI aIgolal bRy.()
a
( xt^2 + x) a + bt^2 = 0
iagjai liigai jai jai jai
()
LgjS Jlaa oagall gall
-,0Jb
a
plaiiy. 2 aial gl jll
Lgall 1 Lgall Lac
1
aolg aabg oaii, cllgall j
aall
.
gaii gao
jialaiiaegao jaiieao
jll/olilololololg
aayy y. ayyall gillll
jai 1
11 1 (jabll baa)
(pclll)a
()
[\text{a}\left( {1 + u}\right) + \cdots + \text{t}\left( {1 + u}\right) = {u}^{2}\text{在}]
(14)


101 1111111111111111111111111111111111111111
1 2
g j 12. gj all gkall g k l a 100