MG35 - Meat Grinder KENWOOD - Free user manual and instructions
Find the device manual for free MG35 KENWOOD in PDF.

User questions about MG35 KENWOOD
0 question about this device. Answer the ones you know or ask your own.
Ask a new question about this device
Download the instructions for your Meat Grinder in PDF format for free! Find your manual MG35 - KENWOOD and take your electronic device back in hand. On this page are published all the documents necessary for the use of your device. MG35 by KENWOOD.
USER MANUAL MG35 KENWOOD
natural_image
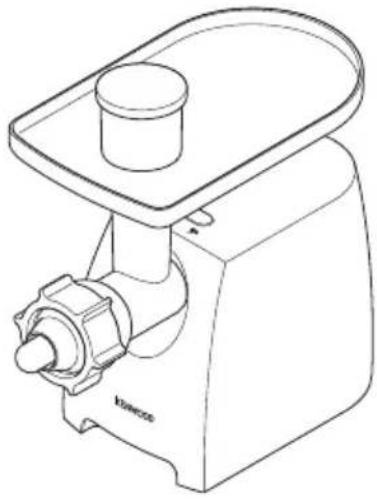
Line drawing of a KENWOOD kitchen tool with a circular component and meshed base (no text or symbols on the device itself)English 3 - 9
Nederlands 10 - 17
Français 18 - 25
Deutsch 26 - 33
Italiano 34 - 41
Português 42 - 49
Español 50 - 57
Dansk 58 - 65
Svenska 66 - 72
Norsk 73 - 79
Suomi 80 - 86
Türkçe 87 - 94
Česky95 - 102
Magyar103 - 110
Polski111 - 118
Ελληνικά119 - 127
Slovenčina 128 - 135
| Meatgrinder | ||
 |  |  |
| Sausage filler | Kebbe maker |
 |  |
 |  |
 |  |
| Burger press | |
   | |
safety
- Read these instructions carefully and retain for future reference.
- Remove all packaging and any labels.
- Always ensure bones and rind etc are removed from the meat before mincing.
- When mincing nuts only feed a few down at a time and allow the scroll to pick them up before adding any more.
-
Always unplug:
-
before fitting or removing parts
- after use
-
before cleaning.
-
Always use the pusher supplied. Never put your fingers or utensils in the feed tube.
- Warning - the cutting blade is sharp, handle with care both in use and cleaning.
- Ensure the attachment is secured in position before switching on.
- To avoid electric shocks, never let the power unit, cord or plug get wet.
- Never use a damaged appliance. Get it checked or repaired: see ‘service and customer care’.
- Never use an unauthorised attachment.
- Never let the cord hang down where a child could grab it.
-
Appliances can be used by persons with reduced physical, sensory or mental capabilities or lack of experience and knowledge if they have been given supervision or instruction concerning use of the appliance in a safe way and if they understand the hazards involved.
-
Children should be supervised to ensure that they do not play with the appliance.
- Misuse of your appliance can result in injury.
- This appliance shall not be used by children. Keep the appliance and its cord out of reach of children.
- Only use the appliance for its intended domestic use. Kenwood will not accept any liability if the appliance is subject to improper use, or failure to comply with these instructions.
Use the meat grinder to process meat, poultry and fish. Use the inclusive attachments to shape sausages, kebbe and form burgers.
before plugging in
- Make sure your electricity supply is the same as the one shown on the underside of your appliance.
- This appliance conforms to EC directive 2004/108/EC on Electromagnetic Compatibility and EC regulation no. 1935/2004 of 27/10/2004 on materials intended for contact with food.
before using for the first tim
1 Wash the parts see 'care and cleaning'
2 Wrap any excess cord around the bracket on the underside of the power unit④.
key
Meat grinder
① power unit
② release button
③ attachment outlet
④ cord storage
⑤ ON/OFF switch with reverse function
⑥ spanner
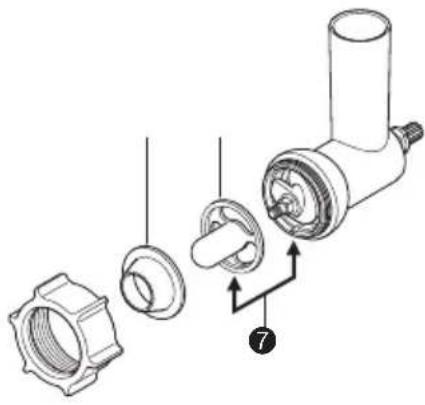
⑦ ring nut
⑧ screens: fine, medium and coarse
⑨ cutter
⑩ scroll
⑪ body
⑫ feed tube
⑬ tray
⑭ pusher/storage unit for kebbe & sausage adaptors
⑮ pusher lid
to assemble the meat grinder
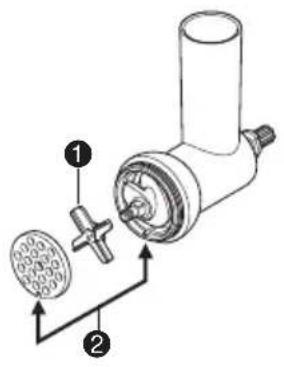
1 Fit the scroll⑩ inside the meat grinder.
2 Fit the cutter⑨ - cutting side outermost ①. Ensure it's seated properly - otherwise you could damage your meat grinder.
3 Fit a screen⑧. Put the notch over the locating tab②.
- Use the fine screen for raw meat; fish; small nuts; or cooked meat for shepherd's pie or meat loaves.
- Use the medium and coarse screens for raw meat; fish and nuts.
4 Loosely fit the ring nut.
to use the meat grinder
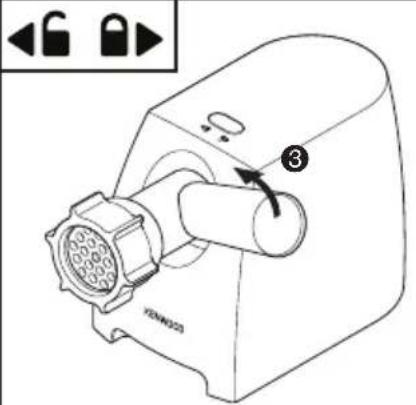
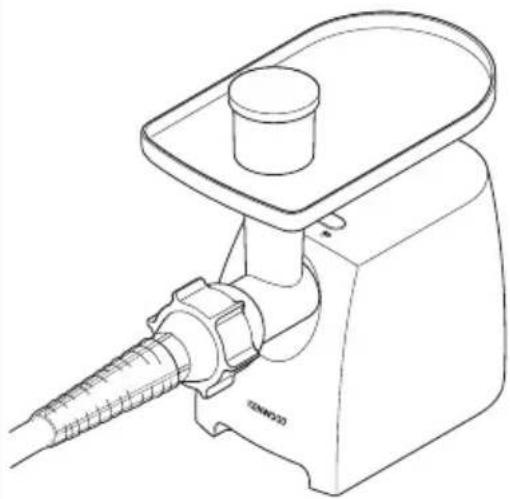
1 With the meat grinder attachment in the position shown③, locate in the outlet. Rotate the body so that the feed tube is upright.
2 Tighten the ring nut firmly by hand.
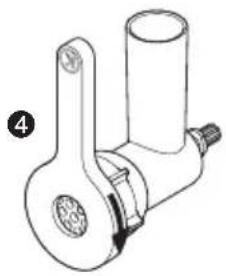
- If you experience poor results when mincing meat, switch off and unplug the appliance. Dismantle and clean the attachment, then re-assemble the attachment and refit to the power unit. Tighten the ring nut using the spanner provided ^4 .
3 Fit the tray ^⑬ .
4 Thaw frozen food thoroughly before mincing. Cut meat into 2.5cm (1") -wide strips.
5 Switch on ⑤. Using the pusher, gently push the food down the feed tube, one piece at a time. Don't push hard - you could dam your meat grinder.
- To prolong the life of your meat grinder, never operate the appliance for longer than 15 minutes, (allow a rest period of 10 minutes between batches).
- If the machine stalls or jams during use, switch off. Press the reverse (R) switch ⑤ for a few seconds to release the clogged food. Unplug and remove any clogged material.
- When selecting reverse, always wait until the appliance stops operating before turning the ON/OFF switch to the reverse (R) position.
6 Switch off and unplug after use.
7 Loosen the ring nut. If necessary use the spanner provided.
8 Hold the release button② down on top of the power unit as you rotate the feed tube towards the front of the power unit, then pull free.
sausage filler
Use pig/hog skins on the large nozzle and sheep/lamb skin on the small nozzle. Alternatively roll the sausage meat in breadcrumbs or seasoned flour before cooking.
⑯ small nozzle (for thin sausages)
⑰ large nozzle (for thick sausages)
⑱ base plate
to use the sausage filler
1 If you're using skin, soak it in cold water for 30 minutes first. Then open it up with a jet of water and place your chosen nozzle under a running tap and pull the skin onto the nozzle.
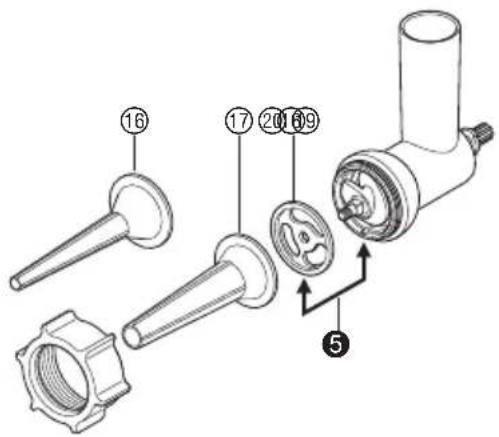
2 Fit the scroll inside the body.
3 Fit the base plate ^18 - put the notch over the locating tab ^5 .
4 Hold the nozzle on the meat grinder attachment and loosely screw the ring nut on.
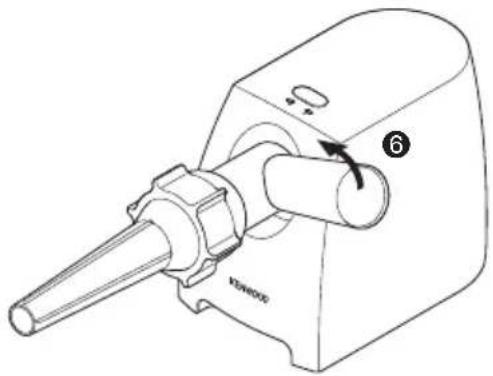
5 With the meat grinder attachment in the position shown⑥, locate in the outlet. Rotate the body so that the feed tube is upright.
age Tighten the ring nut firmly by hand.
7 Fit the tray.
8 Switch on and using the pusher, push the food down the feed tube.
Don't push hard - you could damage your meat grinder.
Ease the skin off the nozzle as it fills. Don't overfill.
9 Twist the skin to form sausages.
pork sausage recipe
100g (4oz) dry bread
600g (1½lb) pork, lean and fat, cut into strips
1 egg, beaten
5ml (1tsp) mixed herbs salt and pepper
1 Soak the bread in water, then squeeze and discard the water.
2 Mince the pork into a bowl.
3 Add the remaining ingredients and mix well.
4 Make into sausages (see 'to use the sausage filler').
5 Fry, grill or bake until golden brown.
kebbe maker
Kebbe is a traditional Middle Eastern dish: deep-fried lamb-and-bulgur-wheat parcels with a minced meat filling.
⑲ cone
⑳ shaper
to use the kebbe maker
1 Fit the scroll inside the body.
2 Fit the shaper ^20 – put the notch over the locating tak7.
3 Fit the cone ^19 .
4 Loosely screw the ring nut on.
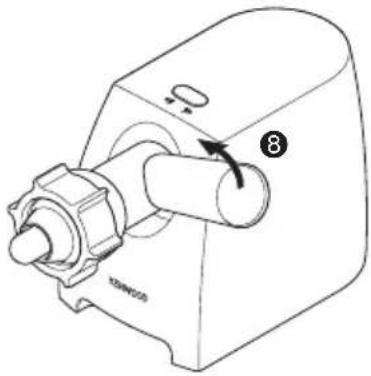
5 With the meat grinder in the position shown ⑧, locate in the outlet. Rotate the body so that the feed tube is upright.
6 Tighten the ring nut firmly by hand.
7 Fit the tray.
8 Switch on and using the pusher, gently push your mixture through. Cut into lengths.
stuffed kebbe recipe
outer casing
500g (1lb 2oz) lamb or fat-free mutton, cut into strips 500g (1lb 2oz) bulgur wheat, washed and drained 1 small onion, finely chopped
Important
Always use the bulgur wheat straight away after draining. If it is allowed to dry out, it may increase the load on the meat grinder resulting in damage.
1 Using the fine screen, mince alternate batches of meat and wheat.
2 Mix. Then mince twice more.
3 Stir the onion into the mix.
4 Push through, using the kebbe maker.
Filling
400g (10oz) lamb, cut into strips 15ml (1tbsp) oil 2 medium onions, finely chopped 5-10ml (1-2tsp) ground allspice 15ml (1tbsp) plain flour salt and pepper
1 Using the fine screen, mince the lamb.
2 Fry the onions until golden brown.
Add the lamb.
3 Add the remaining ingredients and cook for 1-2 minutes.
4 Drain off any excess fat and allow to cool.
To finish
1 Push the casing mixture through, using the kebbe maker.
2 Cut into 8cm (3") lengths.
3 Pinch one end of the tube to seal it. Push some filling – not too much – into the other end, then seal.
4 Deep fry in hot (190°C) oil for about 6 minutes or until golden brown.
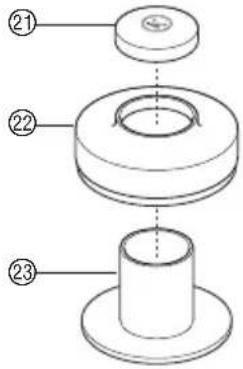
burger press attachment care and cleaning
②1 lid
②2 burger press main body
②3 plunger
to use your burger press
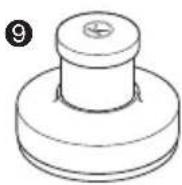
1 Assemble the burger press by fitting the main body ^22 over the plunger ^23 . Fit the lid ^21 and push down to lock on 9.
2 Make up the required burger mix (see recipe supplied).
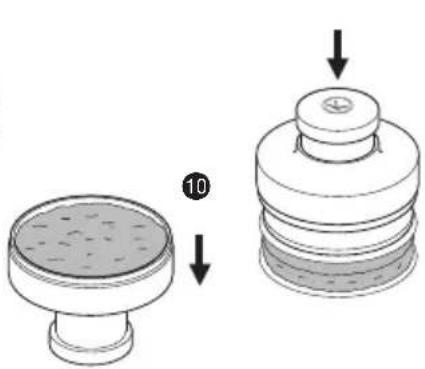
3 Turn the burger press upside down ⑩ and push the flat section down to lock in place. Place a disc of grease proof or waxed paper inside the main body.
4 Spoon in the burger mix (approx 120g/5oz) to just below the rim of the burger press and spread evenly. Place another disc of grease proof or waxed paper on top of the burger mix.
5 Release the burger mix by either pushing the main body down the plunger or turning the burger press over and push the plunger down to release the burger.
burger recipe
(Makes4burgers)
450g/1lb fine minced beef 1 onion – finely chopped Season as required
1 Mix the minced beef, onion and seasoning together in a bowl.
2 Divide the mix into 4 and then add to the burger press (see to use your burger press) to form the burgers.
3 Either brush with oil and place under a preheated grill for 4 - 5 minutes on each side, or shallow fry over a medium heat.
- Always switch off and unplug before cleaning.
power unit
- Wipe with a damp cloth, then dry.
- Never immerse in water or use abrasives.
meat grinder attachment
1 Loosen the ring nut manually or with the spanner ④ and dismantle. Wash all the parts in hot soapy water, then dry. Don't wash any part in tl dishwasher. Never use a soda solution.
2 Re-assemble.
3 Wipe the screens with vegetable oil, then wrap in greaseproof paper to prevent discolouring/rusting.
4 Remove the lid of the pusher and store the sausage and kebbe attachments inside 11.
burger press
1 Take the burger press apart by removing the lid② to release the main body② from the plunger.
2 Wash the parts and dry thoroughly.
sausage fillers/kebbe maker
Wash in hot soapy water and dry thoroughly.
service and customer care
- If the cord is damaged it must, for safety reasons, be replaced by KENWOOD or an authorised KENWOOD repairer.
If you need help with:
• using your appliance or
• servicing or repairs
Contact the shop where you bought your appliance.
- Designed and engineered by Kenwood in the UK.
- Made in China.

IMPORTANT INFORMATION FOR CORRECT DISPOSAL OF THE PRODUCT IN ACCORDANCE WITH EC DIRECTIVE 2002/96/EC.
At the end of its working life, the product must not be disposed of as urban waste.
It must be taken to a special local authority differentiated waste collection centre or to a dealer providing this service.
Disposing of a household appliance separately avoids possible negative consequences for the environment and health deriving from inappropriate disposal and enables the constituent materials to be recovered to obtain significant savings in energy and resources. As a reminder of the need to dispose of household appliances separately, the product is marked with a crossed-out wheeled dustbin.
troubleshooting guide
| Problem Cause Solution | ||
| Meat grinder does not No operate. plugged in. | power. Check meat | grinder isCheck the fuse/circuit breaker in your home.If none of the above see “service and customer care” section. |
| Meat Grinder stops or Stalls slows during operation. clogging. control to R(reverse) for a few seconds to release clogged food. | ||
| Poor minced results. Cutter | fitted the Check cutter fitted correctly wrong way round. with cutting side facing outermost. | |
| Clogging occurring behind the screen. | Switch off and unplug and dismantle the attachment.Clean and refit. | |
| Food forced down feed tube too quickly. | Gently guide the food down the feed tube using the pusher, one piece at a time.Allow the scroll to pick up each piece before adding the next piece. | |
| Ring nut difficult to remove after mincing process. | Overtightened when fitted. | Tighten the ring nut firmly by hand.Use the spanner supplied to undo after use. |
| Meat grinder attachment cannot be removed from power unit. | Meat grinder attachment not unlocked from as you rotate the feed tube towards the front of the meat grinder. | |
Nederlands
worstvillers/kebbemaker
⑲ kjeglespiss
⑳ former
bruk av kebbemaker
pølsehorn/kebbemaker
Vask i varmt såpevann og tørk grundig.
service og kundetjeneste
- Dersom ledningen er skadet, må den av sikkerhetsmessige grunner erstattes av KENWOOD eller en autorisert KENWOOD-reparator. Hvis du trenger hjelp med:
HEAD OFFICE: Kenwood Limited, 1-3 Kenwood Business Park, New Lane, Havant, Hampshire PO9 2NH
kenwoodworld.com