
MG476 - Meat Grinder KENWOOD - Free user manual and instructions
Find the device manual for free MG476 KENWOOD in PDF.
| Product Type | Electric Meat Grinder |
| Brand | Kenwood |
| Model | MG476 |
| Dimensions (approx.) | 30 x 20 x 25 cm |
| Weight (approx.) | 4 kg |
| Power Supply | 220-240 V, 50 Hz |
| Power (approx.) | 800 W |
| Bowl Capacity | Not specified |
| Number of Grinding Plates | 3 (fine, medium, coarse) |
| Included Accessories | Pusher, tray, sausage filler, kibbeh accessory, key |
| Main Functions | Grinding meat, fish, vegetables, dried fruits; filling sausages; preparing kibbeh |
| Reverse Function | Yes (dedicated button) |
| Housing Material | Plastic (motor block), metal (accessories) |
| Safety | Very sharp blade; use the pusher; unplug before cleaning or changing accessories |
| Maintenance | Hand wash accessories; do not put in dishwasher; oil the grinding plates after washing |
| Storage of Accessories | In the pusher (lid); grinding plates in the motor block |
| Repairability | Kenwood authorized after-sales service |
| General Information | Manual available in 80 pages (FR/CS/DA/DE/EN/ES/FI/HU/IT/NL/NO/PL/PT/RU/SV/TR) |
Frequently Asked Questions - MG476 KENWOOD
User questions about MG476 KENWOOD
0 question about this device. Answer the ones you know or ask your own.
Ask a new question about this device
Download the instructions for your Meat Grinder in PDF format for free! Find your manual MG476 - KENWOOD and take your electronic device back in hand. On this page are published all the documents necessary for the use of your device. MG476 by KENWOOD.
USER MANUAL MG476 KENWOOD
natural_image
Line drawing of a KENMO 3D manual kitchen tool (no text or symbols on the device itself)MG450/MG470
English 4 - 7
Nederlands 8 - 11
Français 12 - 15
Deutsch 16 - 19
Italiano 20 - 23
Português 24 - 27
Español 28 - 31
Dansk 32 - 34
Svenska 35 - 37
Norsk 38 - 40
Suomi 41 - 44
Türkçe 45 - 48
Česky 49 - 52
Magyar 53 - 56
Polski 57 - 60
Русский 61 - 64
Ελληνικά 65 - 68
عربي
1V-97
فارسی
OV - YV
safety
● Always ensure bones and rind etc are removed from the meat before mincing.
- When mincing nuts only feed a few down at a time and allow the scroll to pick them up before adding any more.
- Always unplug:
- before fitting or removing parts
- after use
- before cleaning.
● Always use the pusher supplied. Never put your fingers or utensils in the feed tube.
- Warning - the cutting blade is sharp, handle with care both in use and cleaning.
- Ensure the attachment is secured in position before switching on.
- To avoid electric shocks, never let the power unit, cord or plug get wet.
- Never use a damaged mincer. Get it checked or repaired: see 'Service'.
- Never use an unauthorised attachment.
- Never let the cord hang down where a child could grab it - wrap excess cord around the bracket at the back of the machine.
- This mincer is not intended for use by young children or infirm persons without supervision.
- Young children should be supervised to ensure they do not play with the appliance.
- Only use the machine for its intended domestic use.
before plugging in
- Make sure your electricity supply is the same as the one shown on the underside of your machine.
- This machine complies with European Economic Community Directive 89/336/EEC.
before using for the first time
1 Remove all packaging.
2 Wash the parts see 'care and cleaning'
3 W rap excess cord around the bracket at the back of the mincer.
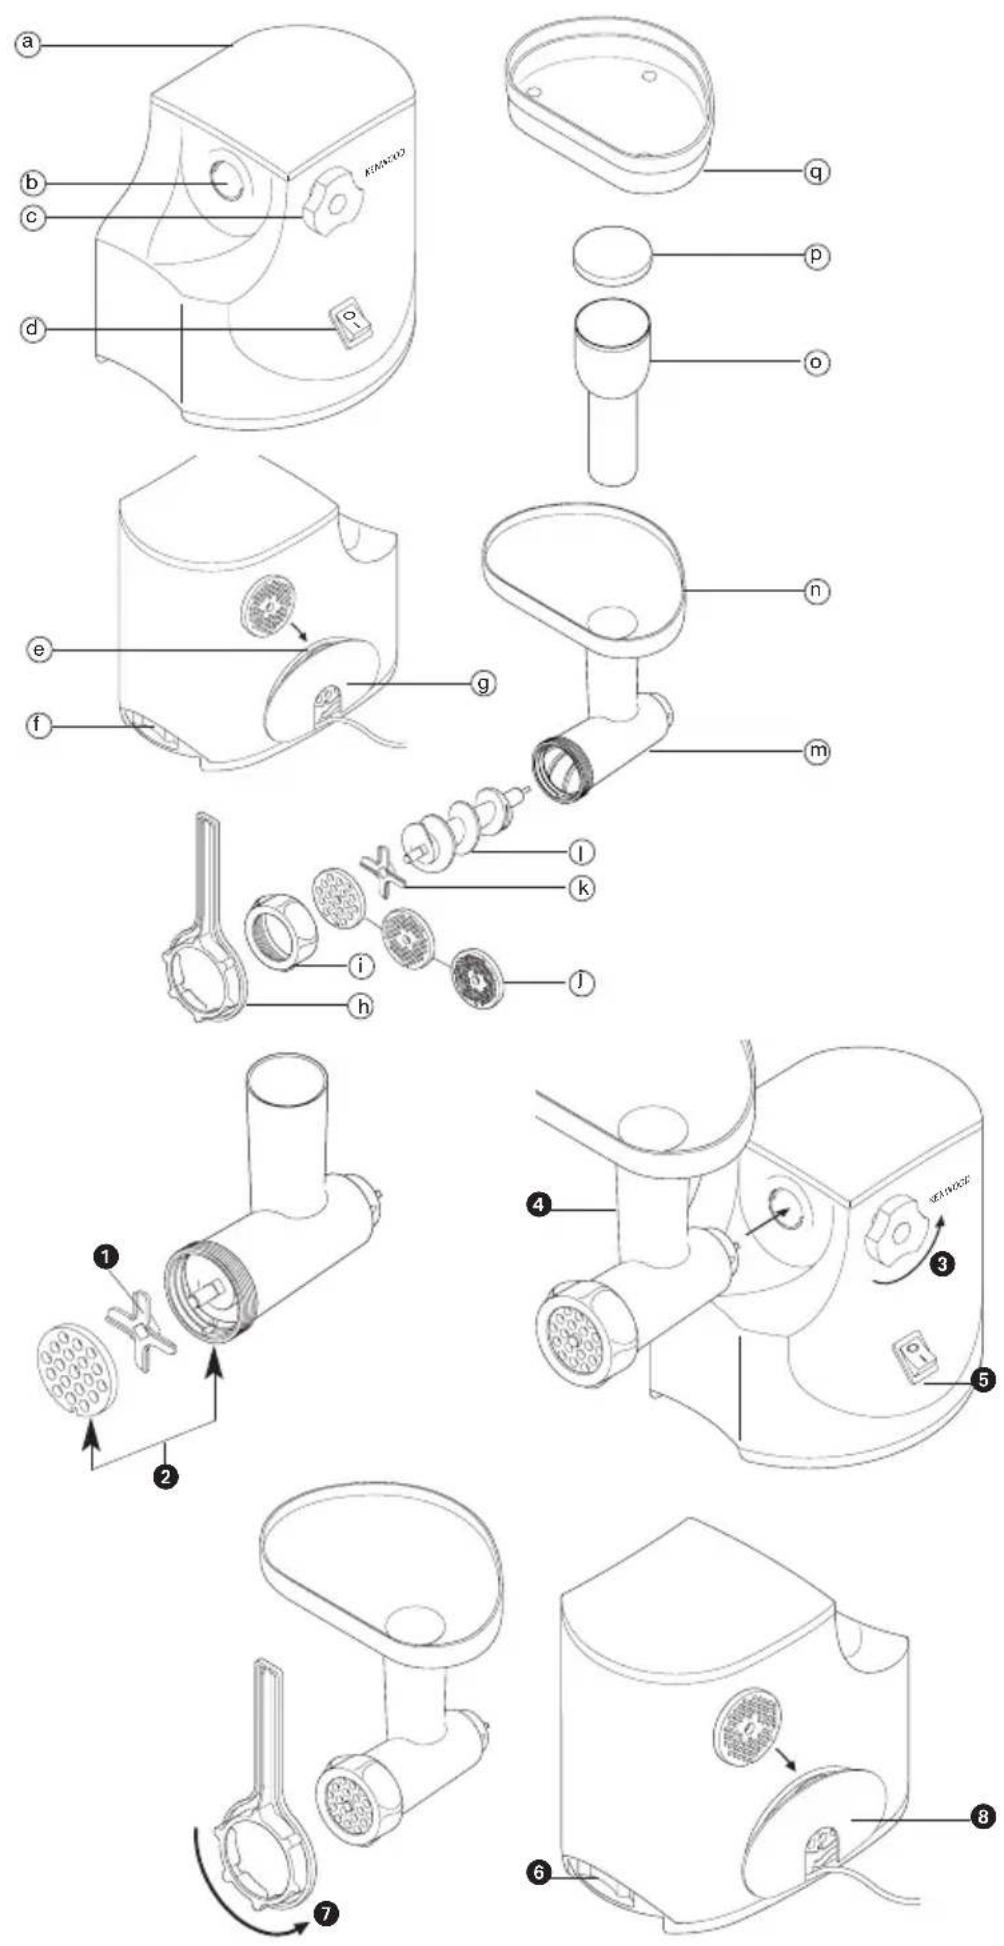
mincer
a power unit
b attachment outlet
© locking screw
d on/off switch
© screen storage
f reverse switch
⑨ bracket for excess cord
h spanner
① ring nut
① mincer screens: fine, medium, coarse
④ cutter
① scroll
m mincer body
n tray
① pusher
p pusher lid
⑨ dish/cover
to assemble
1 F it the scroll inside the mincer body.
2 Fit the cutter – cutting side outermost ①. Ensure it's seated properly – otherwise you could damage your mincer.
3 Fit a mincer screen ②. Put the notch over the pin.
- Use the fine screen for raw meat; fish; small nuts; or cooked meat for shepherd's pie or meat loaves.
- Use the medium and coarse screens for raw meat; fish; nuts; vegetables; hard cheese; or peel or dried fruit for puddings and marmalade.
4 Loosely fit the ring nut.
to use the mincer
1 Release the locking screw by turning anticlockwise ③, then slide the attachment into the outlet ④.
2 T urn it both ways until it locks into place. Then turn the locking screw clockwise to secure.
3 T ighten the ring nut manually.
4 Fit the tray. Put the dish/cover under the mincer to catch the food.
5 Thaw frozen food thoroughly before mincing. Cut meat into 2.5cm (1") -wide strips.
6 Switch on ⑤. Using the pusher, gently push the food through, one piece at a time. Don't push hard - you could damage your mincer.
- If the machine stalls or jams during use, switch off. Depress the reverse switch ⑥ for a few seconds to release the clogged food. Unplug and remove any clogged material.
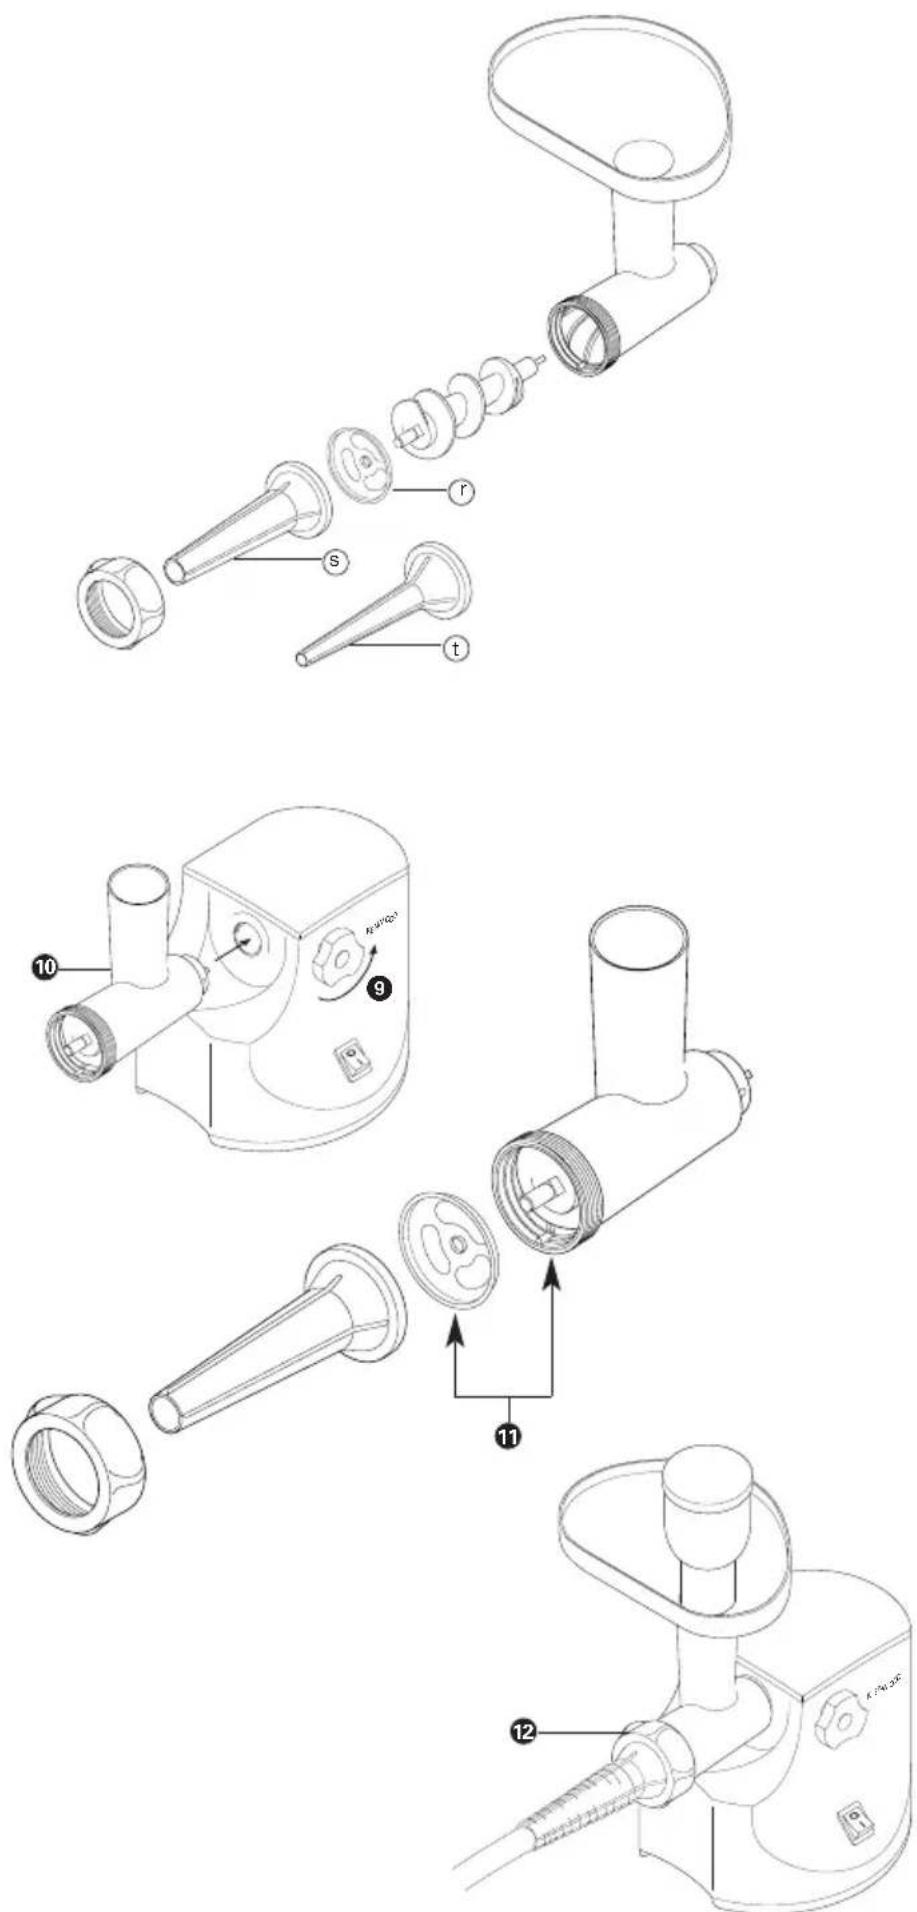
sausage filler
r base plate*
⑤ large nozzle* (for thick sausages)
① small nozzle* (for thin sausages)
* Stored in the pusher
Ask your butcher for sausage skin or mail order from the Natural Casing Company Ltd, PO Box 133, Farnham, Surrey GU10 5HT, England. Use pig/hog skin on the large nozzle and sheep/lamb skin on the small nozzle. Or, instead of using skin, roll in breadcrumbs or seasoned flour before cooking.
to use the sausage filler
1 If you're using skin, soak it in cold water for 30 minutes first.
2 Release the locking screw by turning anticlockwise ⑨, then slide the attachment into the outlet ⑩.
3 T urn it both ways until it locks into place. Then turn the locking screw clockwise to secure.
4 Fit the scroll inside the mincer body.
5 Fit the base plate ⑪ - put the notch over the pin.
6 If you're using skin, open it up with a jet of water. Then put your chosen nozzle under a running tap and pull the skin onto the nozzle.
7 Hold the nozzle on the mincer and screw the ring nut on 12.
8 Fit the tray.
9 Switch on. Using the pusher, push the food through. Don't push hard - you could damage your mincer. Ease the skin off the nozzle as it fills. Don't overfill.
10Twist the skin to form sausages.
pork sausage recipe
100g (4oz) dry bread
600g (1½lb) pork, lean and fat, cut into strips
1 egg, beaten
5ml (1tsp) mixed herbs salt and pepper
1 Soak the bread in water, then squeeze.
2 Mince the pork into a bowl.
3 Add the remaining ingredients and mix well.
4 Make into sausages (see above).
5 F ry, grill or bake until golden brown.
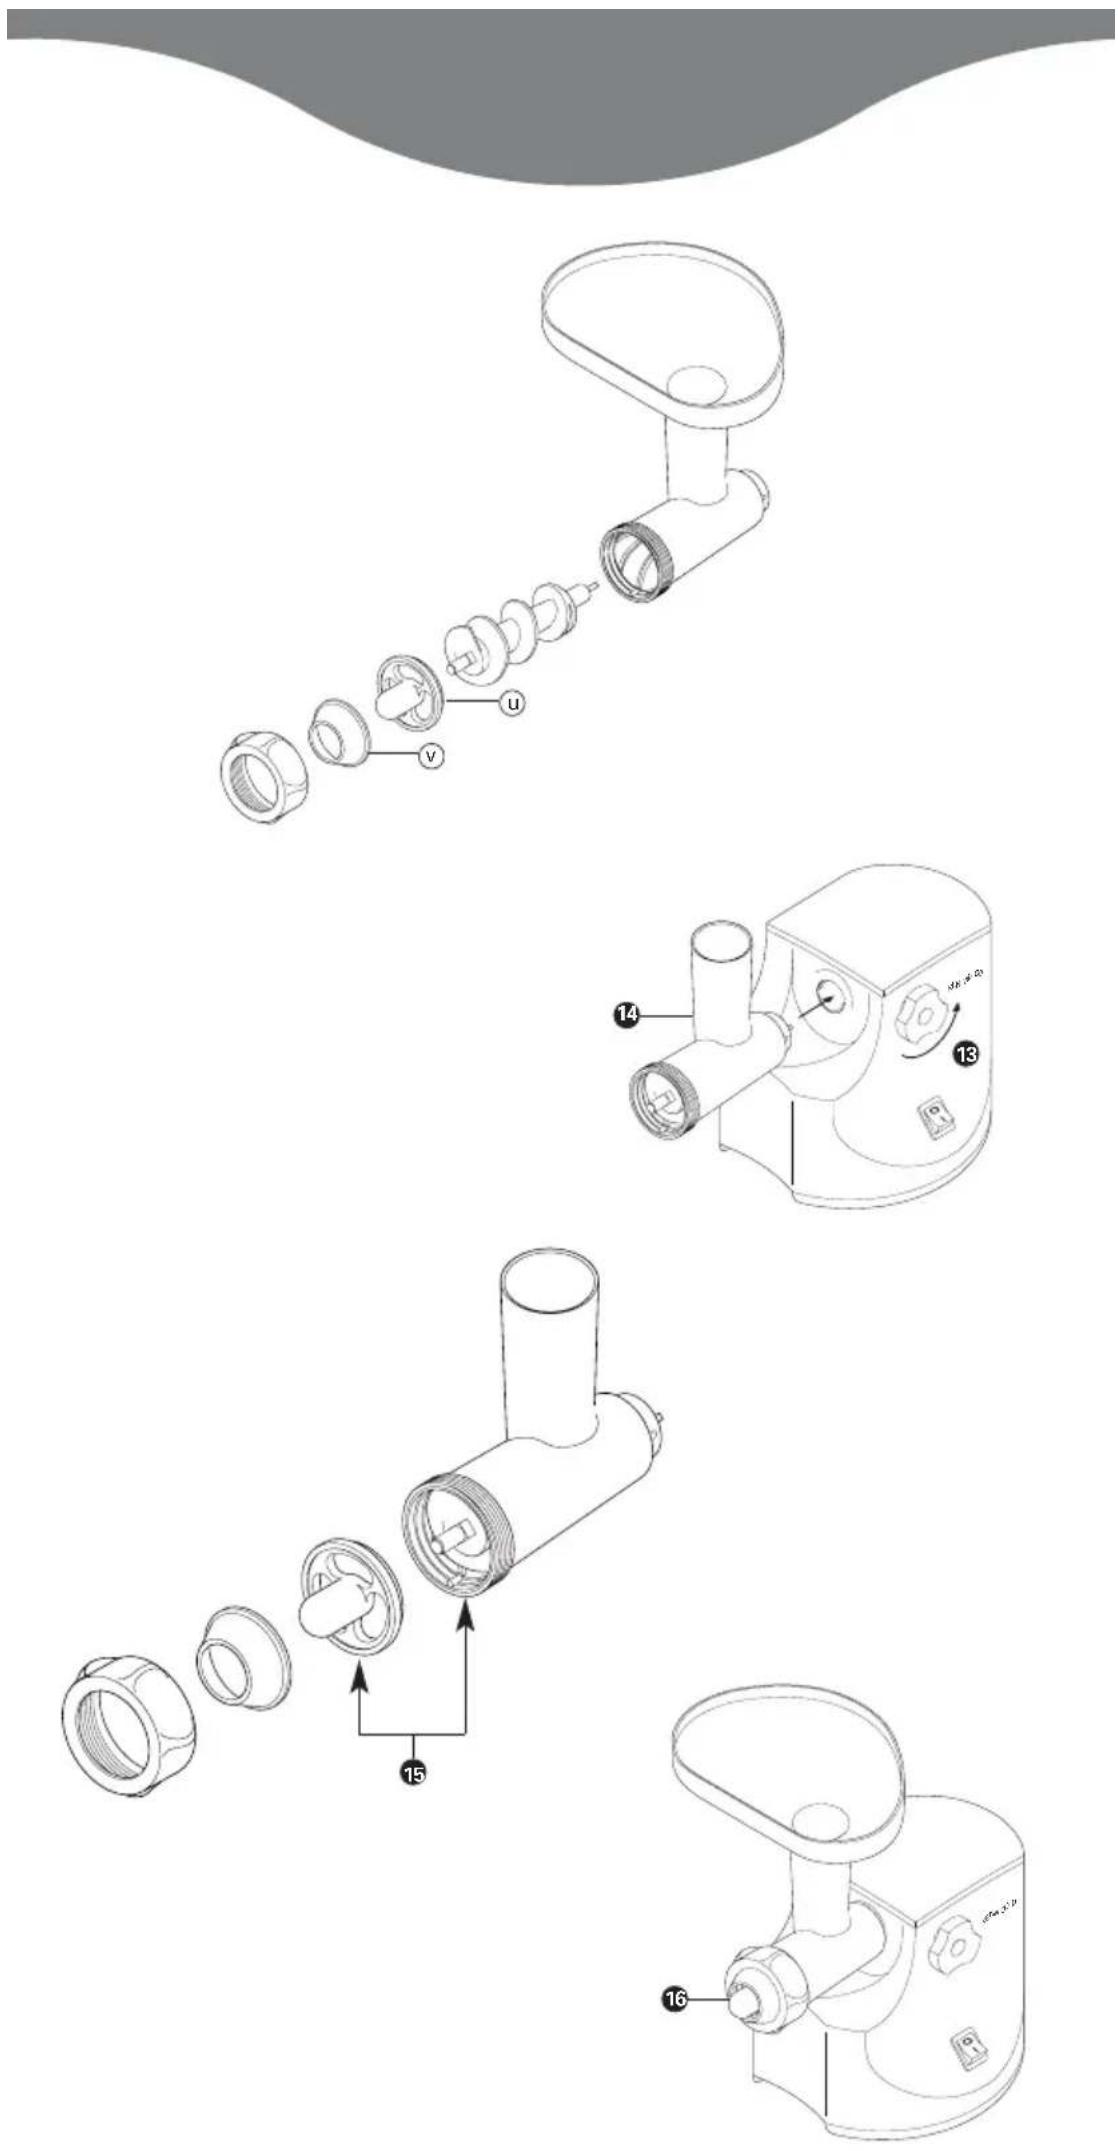
kebbe maker
u shaper*
(v) cone*
* Stored in the pusher
Kebbe is a traditional Middle Eastern dish: deep-fried lamb-and-bulgur-wheat parcels with a minced meat filling.
to use the kebbe maker
1 Release the locking screw by turning anticlockwise 13, then slide the attachment into the outlet 14.
2 T urn it both ways until it locks into place. Then turn the locking screw clockwise to secure.
3 Fit the scroll inside the mincer body.
4 Fit the shaper 15 - put the notch over the pin.
5 Fit the cone 16.
6 Screw the ring nut on.
7 Fit the tray.
8 Switch on. Using the pusher, gently push your mixture through. Cut into lengths.
stuffed kebbe recipe
outer casing
500g (1lb 2oz) lamb or fat-free mutton, cut into strips 500g (1lb 2oz) bulgur wheat, washed and drained 1 small onion
1 Using the fine screen, mince alternative batches of meat and wheat, adding the onion before the last batch.
2 Mix. Then mince twice more.
3 Push through, using the kebbe maker (see above).
Filling
400g (10oz) lamb, cut into strips 15ml (1tbsp) oil
2 medium onions, finely chopped 5-10ml (1-2tsp) ground allspice 15ml (1tbsp) plain flour salt and pepper
1 Using the fine screen, mince the lamb.
2 F ry the onions until golden brown.
Add the lamb.
3 Add the remaining ingredients and cook for 1-2 minutes.
4 Drain off any excess fat and allow to cool.
To finish
1 Push the casing mixture through, using the kebbe maker.
2 Cut into 8cm (3") lengths.
3 P inch one end of the tube to seal it. Push some filling – not too much – into the other end, then seal.
4 Deep fry in hot (190') oil for about 6 minutes or until golden brown.
care and cleaning
power unit
Wipe with a damp cloth, then dry.
mincer attachment
1 Loosen the ring nut manually or with the spanner ⑦ and dismantle. Wash all the parts in hot soapy water, then dry. Don't wash any part in the dishwasher. Never use a soda solution.
2 Re-assemble.
3 W ipe the screens with vegetable oil, then wrap in greaseproof paper to prevent discolouring/rusting. There is storage space for 2 screens on the power unit ⑧.
4 If you keep the mincer on the machine, put the dish/cover on the tray as a dust-cover.
5 Y ou can pull the lid off the pusher and store the sausage and kebbe attachments inside.
service and customer care
- If the cord is damaged it must, for safety reasons, be replaced by Kenwood or an authorised Kenwood repairer.
If you need help with:
• using your machine or
● servicing, spare parts or repairs
Contact the shop where you bought
your machine.


- safety
- before plugging in
- before using for the first time
- mincer
- to assemble
- to use the mincer
- sausage filler
- to use the sausage filler
- pork sausage recipe
- kebbe maker
- to use the kebbe maker
- stuffed kebbe recipe
- outer casing
- Filling
- To finish
- care and cleaning
- power unit
- mincer attachment
- service and customer care
Brand : KENWOOD
Model : MG476
Category : Meat Grinder