
CPAWS2001 - Audio System SHARP - Free user manual and instructions
Find the device manual for free CPAWS2001 SHARP in PDF.
| Product Type | Wireless surround speakers (pair) |
| Brand | Sharp |
| Model | CPAWS2001 (CP-AWS2001) |
| Compatibility | Sharp AQUOS Wireless Surround (AWS) TVs |
| Power Supply | 12 V DC / 1.5 A AC adapter (100-240 V AC, 50/60 Hz) |
| Wireless Connectivity | Wi-Fi 5 GHz / 2.4 GHz (100 mW max), Bluetooth (10 mW max) |
| Supported Audio Formats | Dolby Atmos, Dolby Digital, DTS, PCM |
| Main Features | Wireless surround sound, night mode, wireless optimization, OTA firmware update |
| Indicator Lights | LED: red (standby/disconnected), green (connected/pairing), blue (Bluetooth), yellow (update) |
| Buttons | PAIR (pairing), upgrade button |
| Ports | Micro USB (firmware update), DC IN jack |
| Mounting | On stand or wall (bracket included, screws not included) |
| Operating Temperature | Indoor use only, avoid heat sources |
| Protection Class | Double insulation (Class II) |
| Box Contents | 2 speakers, 2 AC adapters (type C and G), 2 wall mounts, documentation |
| Care and Cleaning | Unplug before cleaning, use a soft dry cloth, no chemicals |
| Repairability | No user-serviceable parts, contact authorized service |
| Energy Consumption | Adapter certified Level VI |
| Standards | Compliant with RED 2014/53/EU, UK radio regulations |
Frequently Asked Questions - CPAWS2001 SHARP
User questions about CPAWS2001 SHARP
0 question about this device. Answer the ones you know or ask your own.
Ask a new question about this device
Download the instructions for your Audio System in PDF format for free! Find your manual CPAWS2001 - SHARP and take your electronic device back in hand. On this page are published all the documents necessary for the use of your device. CPAWS2001 by SHARP.
USER MANUAL CPAWS2001 SHARP
Aquos Wireless Surround: Rear Surround Speakers
| EN | BG | CS | DA | DE | EL | ES | ET | FI |
| FRIT | HR | HU | LT | LV | NL | NO | PL | |
| PT | RO | SK | SL | SR | SV | UA |
Product images are for illustration purposes only. Actual product may vary.
Trademarks:

Bluetooth
The Bluetooth* word mark and logos are registered trademarks owned by Bluetooth SIG, Inc.

Dolby Atmos
Dolby, Dolby Atmos, and the double-D symbol are registered trademarks of Dolby Laboratories Licensing Corporation. Manufactured under license from Dolby Laboratories. Confidential unpublished works. Copyright 2012-2020 Dolby Laboratories. All rights reserved.

Enjoy cinema-style audio in the comfort of your own home with Aquos Wireless Surround.
For more information, please scan the QR code or visit www.sharpcomer.com/aws


ENGLISH
Important safety instructions
Please follow all safety instructions and heed all warnings. Keep this manual for future reference.

This symbol instructs the user to consult the user manual for further safety, operational and maintenance related information.

Refers to class II equipment.
This symbol indicates that this product has a double insulation system and does not require a safety connection to electrical earth (ground).

Refers to alternating current (AC).
This symbol indicates that the rated voltage marked with the symbol is AC voltage.

Refers to direct current (DC).
This symbol indicates that the rated voltage marked with the symbol is DC voltage.

For indoor use only

Energy efficiency marking with level VI

Polarity of d.c. power connector
Precautions
Damage
Please inspect the unit for damage after unpacking. If it is damaged in any way do not operate the unit and consult your dealer.


To prevent the risk of electric shock, do not remove back cover or open the power adaptor. No user serviceable parts inside; please refer servicing to qualified service personnel.
Power connection and accessibility
- Do not handle the power cord with wet hands. Switch off the unit completely before unplugging. Ensure that the power plug is always easily accessible.
Power source
- Ensure that the unit is plugged into an AC 100-240V 50/60Hz power outlet.
Power cord protection
- Do not damage the power cord. If the power cord is damaged, it must be replaced by the manufacturer, a service agent or similarly qualified persons.
Power Adapter
- If the unit will not be used for a period of time it is recommended to switch the unit off and remove the AC power adapter from the mains outlet.
- Only use the supplied mains adaptor as failure to do this may result in a safety risk and/or damage to the unit.
Child safety
- Always follow basic safety precautions when using this product,
especially when children are present.
Location
- When in use this product should be placed on a flat, stable surface with no part of the main unit overhanging an edge. Alternatively this product may be wall mounted as instructed in this user manual.
Ventilation
- Slots and openings in the cabinet are provided for ventilation. These openings must not be blocked or covered.
Heat and operating temperature
- Do not install near any heat sources. Avoid exposure to direct sunlight.
Naked flames
- To prevent the risk of fire, keep candles or open flames away from this product.
Water, moisture, and liquid entry
- To prevent the risk of fire or electric shock, do not expose this product to water or moisture.
Storms and lightning
- Storms are dangerous for all electric products. You should disconnect all the cables and connectors of the product before a storm.
Maintenance
- Unplug the power cable from the power source before cleaning the product. Use a soft and clean cloth to clean the outside of the unit.
- Never clean it with chemicals or detergent.
Service and repair
- This product does not contain any parts that are serviceable by the user. Exposing the internal parts inside the device may endanger your life. In case of a fault, contact the manufacturer or authorised service department. The manufacturers guarantee does not extend to faults caused by repairs carried out by unauthorised third parties.
Disposal of this equipment
Information for users on collection and disposal of old equipment.

This symbol on a product means that the product is covered by European Directive 2012/19/EU and must not be disposed of or dumped with your other household waste.

This symbol means that the product is designed and manufactured so that it can be recycled and reused.
These symbols on the products, packaging, and/or accompanying documents mean that used electrical and electronic products and batteries should not be mixed with general household waste. Household users should contact either the retailer where they purchased this product, or their local government office, for details of where and how they can take these items for environmentally safe recycling.
CE and UKCA statement:
Hereby, Sharp Consumer Electronics Poland sp. zo.o. declares that this audio device is in compliance with the essential requirements and other relevant provisions of RED Directive 2014/53/EU and UK Radio Equipment Regulations 2017.
- The full CE text and UKCA declaration of conformity are available at sharpconsumer.eu and then entering download section of your model and choosing "Declaration of Conformity".
Compatibility warning
TV compatibility
- These speakers work exclusively with AQUOS Wireless Surround (AWS) enabled SHARP TV's only. Please check you have the correct model of SHARP TV. To find compatible models, scan the QR code at the beginning of this user guide.
Wireless signal
- You will need to be connected to a 5GHz Wi-Fi network for the best wireless speaker performance. If a 5G Wi-Fi network is not available, a 2.4GHz network can be used. A 2.4GHz network is more prone to interference and may impact wireless speaker performance.
The 5 GHz WLAN function of this equipment may only be operated indoors.
WLAN max transmitter power:
100 mW at 2,400 GHz - 2,4835 GHz
100 mW at 5,150 GHz - 5,250 GHz
100 mW at 5,250 GHz - 5,350 GHz
100 mW at 5,470 GHz - 5,730 GHz
100 mW at 5,735 GHz - 5,835 GHz
BT max transmitter power: 10 mW at 2,402 GHz - 2,480 GHz.
What is included in the box:
- CP-AWS2001 rear surround speaker x2
Power adapter with type C (EU 2 pin) and G (UK 3 pin) inserts x2 - Wall-mount adapter x2 (brackets not inc.)
- User documentation
Inputs/outputs
(Refer to page 3).
1. LED Indicator
- Standby / Disconnected - Red
Firmware update failed - Red (flashing) - Pairing - Green (flashing)
- Connected - Green
Bluetooth Connected - Blue - Firmware update in progress - Yellow
2. PAIR Pair button
- Short press to enter pairing mode.
- Long press (>5 seconds) to reset
3. Upgrade Button
(For firmware upgrade use only)
4. Micro USB
(For firmware upgrade use only)
5. Power cable clip
6. DCIN socket
Socket for connecting power adapter (DC 12V/1.5A)
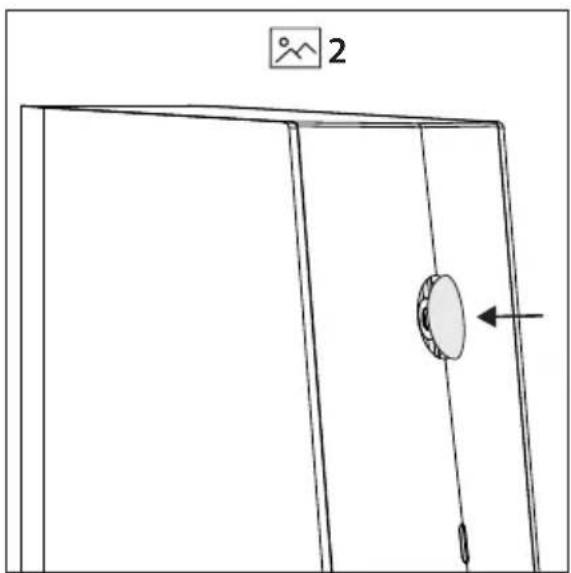
- Wall mount screw/screw hole cover location.
Initial set up
Placement and mounting
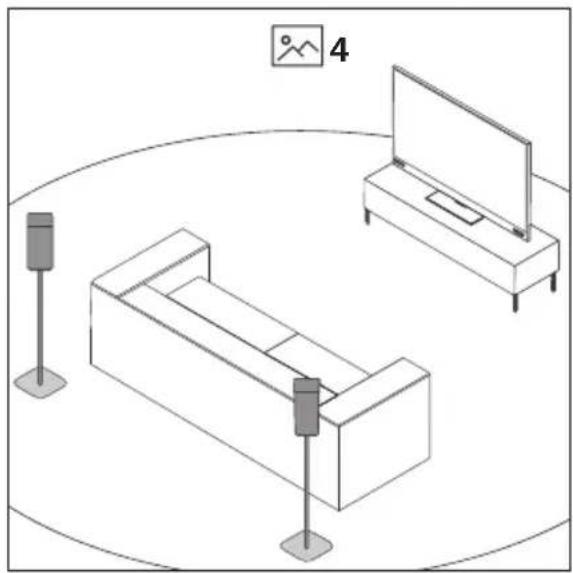
To enjoy immersive audio from your Sharp AWS enabled TV, place the rear surround speakers behind your preferred listening position, ideally at ear level. The speakers can be placed on speaker stands, furniture or you can mount the speakers to a suitable wall.
- Place the surround speakers upright on the speaker stands/furniture at ear level behind your preferred listening position (Refer to 4 on page 3). If you choose to place the surround speakers like this, ensure the rubber screw hole cover is in place (Refer to 2 on page 3).
- Place the surround speakers on the wall or speaker stands that allow mounting by screw with wall mount brackets. (Refer to 5 on page 3).
NOTE:
u Installation must be carried out by qualified personnel only. Incorrect assembly can result in severe personal injury and property damage (if you intend to install this product yourself, you must check for installations such as electrical wiring and plumbing that may be buried inside the wall). It is the installer's responsibility to verify that the wall will safely support the total load of the unit and wall brackets.
ü Additional tools (not included) are required for the installation.
ü Do not overtighten screws.
Keep this instruction manual for future reference.
Use an electronic stud finder to check the wall type before drilling and mounting.
Your wall mount type will determine the size of the screw you use to secure the speaker to the wall mount.
Refer to the table below and 3 on page 3. The table presumes use of the included wall mounting washer which is 9mm in depth.
| A:Depth of wall bracketplate (mm) | B:Length of screw requiredMIN~MAX (mm) |
| 2 14.81~16.7 | |
| 3 15.81~17.7 | |
| 3.5 18 | |
| 4 | 18 |
| 5 | 18 |
| 5.2 18 | |
| 6 18.81~20.7 |
NOTE:
The depth of the screw hole on the speaker is 7.5mm
ü The correct screw type to use is:
Imperial: 1/4-20inch
Metric: 6.35mm diameter, 1.27mm thread pitch
Connect to power
Risk of product damage! Ensure that the power supply voltage corresponds to the voltage printed on the back or the underside of the unit.
Connect the power adapter to the DC IN socket of the unit and then into a mains socket.
Connecting to your AQUOS Wireless Surround enabled SHARPTV
Before you can add the wireless surround speakers to your TV, your TV will need to be connected to online services via Wi-Fi or LAN/ethernet cable. To do this, follow the network instructions for your model of TV.
- To begin the pairing process, press on the TV remote control to open the settings menu. Navigate to
and then . - In the Wireless Speaker menu, turn <Wireless
Speaker> to "On". The TV will perform a network check.
NOTE: You will need to be connected to a 5GHz Wi-Fi network for the best wireless speaker performance. If a 5G Wi-Fi network is not available, a 2.4GHz network can be used. A
2.4GHz network is more prone to interference and may impact wireless speaker performance.
- You can start the pairing process with the left or right rear surround speaker.
- In the television's Wireless Speaker menu, select
. The TV will prompt you to confirm the speakers are connected to a power
supply and located in their final positions. Select
- Short press the PAIR button on the back of one of the speakers. The speaker will begin pairing with the TV. To confirm pairing mode, the LED on the rear of the speaker will flash green.
- On-screen prompts will appear one after the other on the TV which will require your input:
a. Invitation to connect.
Select Accept to proceed with the pairing. The TV will confirm pairing in the bottom right corner of the display.
Now press the PAIR button on the back of the other speaker. Select
NOTE: Once the speakers are paired to the TV, a firmware upgrade may be detected. If this occurs, please allow the speakers to upgrade.
b. Left and right speaker confirmation
You will hear a tone coming from a speaker.
- If the tone is coming from your left surround speaker, choose
. - If the tone is coming from your right surround speaker, choose
. - Select if no tone is audible.
NOTE: The left and right rear surround speaker position is determined by your left and right side as you face the TV.
c. Optimise wireless connection
Select
d. Adjust listening position
You will be invited to enter distance values between your listening position and elements of the sound system.
This balances each speaker's output to create the optimal sound stage.
After selecting the distance values, select
NOTE: This balance only affects the speakers whilst using the AWS system.
- Select
to complete the pairing process.
NOTE:
During the pairing process, the speakers may perform an over-the-air update. Please allow this process to finish.
Some of the functions and features described in this document may change. For the latest information, please refer to the online TV manual. You can find the online TV manual by selecting the SHARP app from the TV's home screen.
Setting speaker properties
Whilst in the Wireless Speaker menu, select Left rear surround speaker property> or Right rear surround speaker property>. Choose from:
Name
Allows you to change the name of the speaker.
Set Location
Edit the location of the speaker in relation to your television and your preferred listening position.
Remove
Disconnect the paired speaker from the TV.
Restart
Restarts the speaker.
Version
Displays the current firmware version of the speaker.
Using Dolby Atmos
To listen to Dolby Atmos audio through your AQUOS Wireless Surround system, you will need Dolby Atmos content delivered to your AWS SHARP TV and DAP (Dolby Audio Processing) set to ON in the TV sound menu. Dolby Atmos content is available via some broadcast services, streaming services or via external devices connected by HDMI e.g. a Dolby Atmos compatible games console or Blu-ray player.
For more information on Dolby Atmos content availability visit dolby.com.
AQUOS Wireless Surround will also offer an enhanced audio experience for other audio source types such as Dolby Digital, DTS and PCM. With DAP enabled, Dolby Audio Processing will render even 2.0 channel audio and utilise the available speakers connected.
Due to the way multi-channel signals are processed, the output volume of normal 2.0 channel signals through the rear surround speakers may appear low. This is not an issue with the speakers, but a characteristic of the way in which Dolby processes the source signal.
NOTE: A Dolby Atmos signal cannot be transmitted via an optical or analogue connection e.g. AUX, from an external device.
Night mode
Night mode allows low volume listening by muting the TV speakers and only using the connected rear speakers. The stereo profile is swapped, so left and right channels will remain faithful to the media being played.
To activate night mode:
- In the Wireless Speaker menu, turn
to "On". - Open the TV's sound settings menu and select
. - Open
and select Deactivate night mode by selecting another sound style.
NOTE:
u Night mode is only available with the Wireless Speakers set to "On".
If you have the CP-AWS0101 subwoofer, this will also be muted.
Firmware upgrade
Check if a firmware upgrade is available.
In the televisions Wireless Speaker menu, select
If the TV is connected to the internet, the speakers will perform an over-the-air update.
NOTE:
If the update process begins, do not disconnect power to the TV or turn the TV into standby mode.
Ensure your TV is connected to the internet during the update process.
ББЛΓAPСКИ
Baxkhnyka3aHnOTHOCHO
6e3onacHocCTTa
MOna, cna3BaIte HnctpyKunTe 3a 6e30-
nachoct INB3eMeTe NOBHHMaHHe BCNUKIN
npeynpexkdeHnaa3epebKOBOcTBOTo 3a
6bdeu cnpaBkn.

To3n CmMBOJ yka3Ba Ha noTpe6nteHa da n0Tbpnc B pBkoBOCTBOTO dONbHHTeHa HOpMaUHA, CBp3aHa c 6e3oNaCHocCTa, HaunHa ha pa6oTa n NoDpBkkata Ha ypeDa.

06opyBaHe KlaC II.
To3n CmB0n NOKa3Ba, Ye npOdyKbT pa3noIaracDBOHnCCTemaHa n3oJaN He e HEO6xOJMoDa 6bDe OcNpyeHO o6e3oNaceHo eneKtpueckoCBbp3BaHe (3aEMBAHe).

Помеонив ТOK (AC).
HomHaHTo HAnpeKeHne,MapKpaHo CTo3n CmB0J,epomEHNBO 3axpaHbAso HAppeKeHne.

TocrHHeTOK(DC).
HOMHaHTo HAnpExeHne,MapKnpaHO C To3CNMBON, e NoCToHHo 3axpaHbAio HAnpExeHne.

IpeHa3nauen EINHCTBEHO 3a ynoTpe6a Ha 3aKpITO

MapknopBka 3a eHepnHa eΦeKTHBHOCT HNO VI

Ioiapntet Ha 3axpaHbuaaKaHeKTop 3a NOCTOReH ToK
PpeDn3Hmepkn
Pobpeu
Cnei KaTo pa3oNaKoBaTe yCTpoInCTBTO, ro OrIeJaTte 3a BUnIMn nobpei. Ako 3a6BeJKeNTe dopu n dpeHn Hen3- npabHocTn, He ro BkInouBaJte. CbpxKeTe ce TbproBckn npedctabnte.
BHIMAHNE
PCHKOTOKOBVJADPAHECEOTBAPR

3a da npedotbpaTne OAnCHOCTTA OT Bb3HnKBAHe Ha TOKOB yap, HNKora He CbAJIte 3aDnI KANAK H He OTBaprIte aanTepe 3a 3axpaHBeA. BbB BbTpueHOCCTTa Ha ypeJa He ce cbbpkaT acTn, KOITNO pOJIeXaT Ha o6CnyBaHe ot notpe6nten. DeiCTBnTA no OTcpanHBAHe Ha nobPeDi Tp6Ba Da 6bDaT n3PbJIHBAHN eDINCTBEHO OT YnbHOMO- uen Niua.
Cbbp3BaHe KbmeKtpnueckata MpeKa n DOCTbHNOCT
He XbaaaiTe 3axpaHbauinKa6e n MOKpn pbc. N3- KIOUBAIte ypeHa HnBnHO npdei da I3BaIte uencela ot KOHTAKTa. YBepeTe ce, che eJeKtpruecknT KOHTAKT, B KOIToe BKNIOUeypeDbT, e neCHO DoCTbnen.
3axpaHbaHe
- YBepeTe ce, Ye ce 3nON3Ba npOMeHnIBOTOKOBO 3axpaHBAHe (AC) 100-240 V 50/60 Hz.
06e3oNaCBAHe Ha 3axpaHbauu Ka6e
- Na3ete 3axpaHbuaaia Ka6eO T nobpeu. B cnuya Ye 3axpaHbauaIaT Ka6e 6bJe NOBpeH, Cbuiyra Tpr6Ba da 6bJe 3aMeHeN O T Pnou3BODUteY, yNbHOMoueH cepBu3 nn Iiue C Heo6xOIMata KBAINΦKaua.
AanTeP 3a 3axpaHbHe
Bcnyauepe npdykTBHMa da 6bde n3non3baH 3a npodbljnteHepnO, e npenopbunTeHNO da ro N3KJIouHTe I da 3BaJNTe aanTepa 3a 3axpaHbaHe o T eektpuueckn KOHTKT.
Изпοлзваiteеинстевоадпета3a3ханbahe,празoctавенOTпponьогntел.ВпротибенСучайсьшесъвра рпскз6e3oanachoccttaHnNIN nobpehaHa cayнбapсntemata.
Be3onachocT 3a deca
- Pn n3non3BaHe Ha npOdykTa e Heo6xOIMo Da 6bDaT Cna3BaHn OCHOBn npABya 3a 6e3OnaCHOCT, Oc06eHO B pncbCTBneTo Ha Deua.
MectononoloxeHne
Korato npoodykTBc n3no13Ba, cneBda 6bde pa3noIIOxH Bpxy Cta6nHa paBna NOBbpxHOCT, KaTO HIKOaCT OT Hero He Tpa6Ba da npOBncBa OT p6bHa NaocTaKaT. OcbEN TOBA, MoXe Ta Ro MOHTnPATE Bpxy CteHa, KaKTo e NOCOeHO B HAcTOraIOTo PbKOBOdCTBO.
Bentlaa
- THe3dAtnI OTBOpuTe B Kopnyca Ca nppeHa3HaueHn 3a BeHTnlaun. BeHTnlaunOHnTe OTbOpn He Tp8Ba da 6bDat NOKPnBaHn.
M3toHnHa HtonnnHa nontmHa pa6oHa Tempeypa
He pa3noaraiTe To3n npOyKT B 6IIN3oCT Do n3ToCHNcHa TOnJIHnA. N36aRbaiTe N3laRaHe Ha npraKa CbHueBa CBETNIHa.
H3touHnua Ha oTKpuT orbH
Cζen npedotbpaTbaHe Ha onaCHOCTTa OT Bb3HnKbaHe Ha noXap, BnHaH nDpXte CBeUeN INIpyrN N3TOuHnU Ha OTKpn TOrh DaJeYOT To3n npOdyKT.
Boda, Blara u npoHnKbaHe Ha TeuHocTn
3a da orpaHnHTe pncKa OT noXap nIn TOKOB ynap, ce nOrpnnKeTe npOdyKbT Da He 6bDe n3naRaH Ha B0da nIn BNara.
PpMoTeBvHn 6ypn
- FrpbmoTeBnHHe 6bpynpedctablaBaT onaHocT 3a BCnK n eekTpoyei. PpeHn HAcTbNahe Ha 6bpy TpI6Ba da NkJIIOHTe BCNKn Kaebnn KOHEKTOpN OT npOdykTa.
PnDpBkKa
-Ппеси поисье ИЗКИЧБайтze зхранвашия Кбел OT eелктуческа明白ж. Ппс поисье на Вьншата ч act Ha aydno CNTeMaTa ИЗПОЛЗайтme MeKa Ичст KaBpna.
Hikora He ynoTe6BaBte pa3aJdaun xmmkaun nn a6pa3nBn npenapatn.
06cnykbahe npemOHTHneHIOCTN
To3n npOdyKT He CbDpbjx qactn, KOINTo 6nxMaMOrnn Da 6bDat O6cnyXbaHn OT Ntpe6nte. DOnnpBt Do onpeJeHn Yactn, HAmnpaun Ce BvB BbTpewHOCTTa Ha ayNo cNCTeMaTAMoKe Da 6bDe OnaceH 3a XNBota Bn.BcuyauHa NoBpea Ce CbBpKTe C npOn3BOuNTe nn CynbHOMOueH cepBn3eH ueTbp.FapaHuaRa Ha npOn3BOUInTe Ha e BaINHa B CnyaHa NOBpei BCNECTBnE Ha pEmOHn, INBbPWBaHn OT HeyIbHOMO- uen TpeTu CTpaHn.
I3BexkaheHa ypea oTeKcnpoatauia
Hhopmaa 3a nOte6nTeNTe OTHOcHo N3BexJaHeTo Ha CTapn HeynoTpe6BaHN ypeDN OT EKcnnoataun.

HaHnueHTo Ha To3n CmB0N Bbpy npOyKt O3NaHab, Ye CbUaT NOnaDa B 06XbTa Hc EbponeIcka DnpeKtnBa 2012/19/EC n He Tp86Ba Da 6bDe n3XbPnH 3aeHc c 6oUHTe 6ntOBn OTnaDbu.

To3n CmB0N noka3Ba, ye npOdyKTBe pa3pa6oTeH npOn3BeDeH NO NaHn, no3BOJBAu peuNKnIpaH e NOBTopHa ynotpe6a.
HaunneTo Ha Te3n CmB0n Bbpx npOdyKT, OnakOBKa n/ nn npDpykabaaN DOKyMeHTn O3NaHcaba, YeynoTpe6BaHnTe eNeKtpnueckn N eEeKTPoHHN KOMnoHeHTn 6aTepn He 6bna Da 6bDat CmecBaHN C 6ounte 6ntOBn OTnAbu. DomawHnTe Notpe6nten Tpr6Ba da Ce CBpXaT nn C TbpRoBeca,OT KOROTO ca 3aKyUnn npOdykTA,nn C MeCTHnTE BlaCTn 3a NoPpO6HoCTN OTHOCHO TOBA KbJe N KaK MoT a Da 3aHeCat Te3n npOdyKT 3a 6e3onacHo peuKnIpaHe.
Pa3MepbT Ha BnHTOBete, KOIO TO I3NON3BaTe, 3aBcN O TUNa CTHeH MOHTax.
Bx. Ta6nuaTno-dony n 3Ha cmp.3. NocoueHnte B Ta6nuaTpa3mepn ca c npesymnue, ye npedocTabehata B naKeTa ynpbTHnTeHa wai6a (c de6enna 9 mm) ue 6bnde BKIOUeHa npu MOHTaKa.
CneI Kato CTOnHOCTnTe Ha pa3CToHnE 6bDat n36paHN, HATNCHEt
3ABeJExKKA:Tou 6aIanC ce u3non38a om zoBOpumelume eduncmeeH npu cucmemama AWS.
7.Изберетe
3A6EJIEXKA:
ü Pó bpeme Ha npoueca Ha cdoBoahe, 2oBopumelume Mozam da u3nbHnA m akmyanuaaue nocepdecmBOM mexHoNoZma 3a 8b3dyuho npOpaumape. Mon, u3yakaume, dokamo npouecb m 6bde 3abbpweh.
U Hrkou om fynkuuume u xapaKmepucmuke, onucahu myk, Mozam da 6bdam npomeHu. 3a hau-akmyanHa umfOpmaue, 8k. OHnaun pbkoobocmo Ha nompebu me na KOHKpemHna Moden mebeu3op. Moxeme da Hamepume OHnauh pbkoobocho Ha nompebu me na U3bepeme npunoKeHue SHARP om hauanHra ekpan Ha mebeu3opa.
3aabaHe Ha xapaKTepncTnKn Ha roBOpNTeJIte
B MeHIO Be3KuHeN roBOpTuEN 36epeTe
Ume
Bb3MOXHOCT 3a IIPOMRAHa HA IMETO Ha ROBOPNTEnA.
3aDaBaHe Ha MecTONOJOXKeHne
KopekuaHa MeToOnoToXeHneTo Ha roBOpTeIa cnPMA TeEbn3opa n npedNoHTaHaTa no3uHa Ha cnUshaHe.
PpemaxBaHe
IpeKbCBAHe Ha CbP3BaHETo Ha cDBoEH ROBOpTeN C TeBeUN3Opa.
Tobtpho ctaptnapane
NobTopHO cTaptnpaHcHa TROBOpTeIa.
Bepcna
IokaBaHe Ha TeKyuata BepnHa _b pMyepaHa roBOpuTeIa.
Ynotpe6a Ha Dolby Atmos
3a Bb3npo3BvEkaHBeaynofoopMaT Dolby Atmos nocpeCTBOM CnCTeMaTa 3a 6e3KuueH cbpayHd AQUOS, e Heo6xOIMo CbIbpxKaHne BBfOpMaT Dolby Atmos da 6bJe IOCTaBeHO KbM TEbeN3Opa SHARP cbc cnCTema AWS u fynkua DAP (Dolby Audio o6pa6oTKa) da 6bJe aKtNBpapaHa B MeHIO 3ByK Ha TebeN3Opa.
CbDpKahne BvB FOpMaT Dolby Atmos e DocbHno ype3 HAKON ycIytn 3a n3NbYBaHe,notOHO npedAbaHe nn nocpeCTBOM BbHnH yctpoiCTBa,CbP3AHn ype3 HDMI, Hanp. irpaHn KOH0JI, CbBMecTmNc Dolby Atmos nn Blu-ray nnebp.
Повец Информая OTHOCHOДocьното Dolby Atmos CBdbrpkaHne moKte Да HamePHTe Ha dolby.com. CnCTemata 3a 6e3xuueh cbpayHd AQUOS npednara n noDobpeHo ayduNo yceuahe n 3a dpyru n3toHnCnHa ayduNo cInrHa, kaTo Dolby Digital, DTS u PCM. Ako fynkuiu DAP e akTbUpaHa, obpa6OtkaTa Ha Dolby Audio ue no3BOnn Bb3npoIN3BekDaHe n Ha ayduNo cInrHaB KaHaHa KOnfHypaun2.0, n3npoIN3BaNkn HauNHTe CBbp3Anu ROBOpTeNl. Iopadn NaHn, no KoITo Ce o6pa6OBtBat MHorokKaHaJIHnTe cInrHaN, n3XODHOTo HnBO Ha 3Byka Ha HopMaHN2.0 KaHaHNc rHaJn ppe 3aDnHTe cbpayHd roBOpTeNl MoKe da n3rIeJka Nscko. Toba He npo6Lem c roBOpTeNtte, a xapakTepructika Ha NaHnA, no KoITo Dolby obpa6OtBa n3XODHnCnHaI.
3A6EJIEXKA:Dolby Atmos cuzhan He moke da 6bde npedaaan nocpecmom onmuho unu anano2o0c6bp3ahe (Hanp.AUX) om bhuho ycmpoucmbo.
Pexmm Hoo
PnAkTNBupaHe Ha To3n peKIM 3BykBT OT ROBOpNTeINTE Ha TeneBn3opa Ce n3KnIOUba N OCTBa da Ce Bb3npOn3BExKa Da eHNCTBeHOOT Cbbp3aHInTe 3aHn CbpaHyd ROBOpTEnN. Ctepeo npOphiNt Ce 3aMeHra, Taka Ye NeBnT I DecnHT KaHaI npOdaJIkaBaT Da n3JIbYBaT TOueH CunHaI OT n3TOUYHnKa Ha B3npOn3BExKaDaHe.
AktubipaheHapejIMHou:
- B MeHIO Be3xuueH roBOpnte, n36peTe „BKn." 3a onuia
. - OTBOpTe MeHIOTo 3a HAcTpoiKn Ha 3ByKa Ha TeJIeBn3Opa n u36epTe
(HAcTpoiKn 3a Dolby Audio o6pa6oTKa). - OtBopete
(Ctun 3a aydno) n u36epete (Pekm Ho).
PexMM Hoou Moke da 6bde DeakTnBupan upe3 n36op Ha npyr CTIN 3a aydno Bb3npounBekdahe.
3AbeJIeKKA:
U Pexum How moke da 6bde u3noJ3aH eUHCm8eHO aKO 6e3xu4hme 2oBOpumenu ca 6knIOeHu.
Ako pa3nonaame c6c cb6yypep CP-AWS0101, he2o8aam 38yk c6yo ue 6bde u3knouen.
HaDCTroBHe HaΦbPMyepa
PpOBepeTe daIIMa HAIuHa onuHa 3a HaDCTpOIBaHe Ha _B pMyepa.
B MeHIO Be3Kuueh roOpnten Ha TeNeBu3opa n36peTe
Ako TeBn3OpbTe CbBp3aH KbM INHTepHeT,ROBOpNTeNTe 1ue N3NbHrT AKTyaIIN3aUINOCpeDCTBOM TEXHOJOrnTa 3a Bb3dUsho npoRpaMnpaHe.
3A5EJIEXKA:
U Ako npouecbmo akmyanuaaue e cmapupan, He npekbcauime zaxpanbaHemo Ha meeub3opa u He 20 nocmaabme b pekum Ha 2omobnocm.
U Tenebu3Opb mmp6ba da uma nocm0Hna 8p63ka C Hmephem,doKamo npouecb mo aKmyanuaua 6bde 3a8bpweH.
CESKY
(Móvo yu avaβaθμion firmware)
5. Suykpataon kaalwsiou puemuatoc
6. YnO8ox DCIN
Ytiooxyia ouvdeonetaoxnataiOT (DC 12V/1,5A)
Set location (Opiouoc tootheoiac):
Enepyaaia tnc theon tou nxieou o oxe an me nTv tnleopaan kai nTv npotiuwveh ean akpaoaocac.
Remove (Aφαρεση)
Anouvdeon Tou nxeiou ia to onioe xeoloknpothei ZeuEne tyn tnaleopaon.
Restart (Enavekekivn)
Enavekkive to nxEio.
Version (Ekdoon)
Euavici Tnvtpexouoakdoon firmware tou nxiou.
Xpólón Dolby Atmos
Tia va anoalaabveTe nxo Dolby Atmos meow tou
ouotnmuatoc AQUOS Wireless Surround, xpeiaZetai n
muetadoon nepiexoxevou Dolby Atmos otny tnAeopaon AWS
SHARP kai va teOei n enIooyn DAP (EnEepyaioia nxou Dolby
Dolby Audio Processing) otn tOeON oTo eou nxou tnC
tnAeopaanc.
AiatiEtalneipExoEvDolbyAtmos e e ikwv UInpeaiuv Eknountc,Unnpoiuv mTaadooc ponc n eow EeWtepiKwv ouakeuw nov exov ouvdethetaHDMI p.x. naivdounxavn noukeun avanapaywnc Blu-ray oubetaTnE Dolby Atmos.
Ia neipiaooTepec nAnpoopopieoc oxetik aE tn diaoaeiounta nepiexoxevou Dolby Atmos enokpTeite tov iototo dolby.com.
To ouotma AQUOS Wireless Surround npoaepe i enionc evioxmuevn nxtikn eumpiia yia aalouc tounoc ouakeuw nyou, own Dolby Digital, DTS kai PCM. Me eveyonoievn tvn eiloynpDAP, H eeneepyaaia nyou Dolby anoidei oioioppno hxo kavaiw 2.0 kai xpnaponoie ta diathetaia nxiaiou exouv ouvdei.
Aoyw Tou TpOou ENEEpyaiaacTwv noukavaikwv
onmuTsw, n Evtaon Tnc Efoobou Twv kavovikw onmuTsw 2.0
kavaiuw meow tw viow nepiabalovtw nxieiw mtopei
va paivetai xaunn. Auto dev eiva tbeu ma te na xeia,
aalxaopaakntpiotiko Tou TpOou MeTov oio n Dolby
eneEpyaZetai to npyaio anma.
EHMEIOEH:Ev a Oua Dolby Atmos dev npoei va eaoei eoaw ontiknc n avaloyikc oovdeon, n.x. AUX, ao eewepikn oukeun..
Nuxερινή λειτουργία
H vuxtepi nleitoupyia eniTpenei tnv akpoaon xanlou nxou npokaawvtac oiaoanota nxie tnc tnlexopaanc kai xpnoioiwvtac movo ta uovdebeva niow nxie. To oTepeopwvioknpoipAavtiotpepetai, onote to apiotepo kai to deki kavali napaeovuv niota oTo meoo nou avanapayetai.
Tia evpyooinon tnc vuxtepiic leitoupyiac:
- Στο μενου Wireless Speaker, θέστην επιαύγη
στην τιμή "On". - Avoiete to evoou puthetaoeovn xou tnc tnlaopaoc kai < DAP Settings> (PuthetaicDAP).
3.AvoietnEvioy(Tiaixou)kai EπiεE (Nxtepivnλeitoupyia)
AnepeyonoioTe n vxtepivn aeitoupyia eniayovtac ao oia hou.
EHMEIOH:
u H vuxerivn aeitoupyia eivai mvo diaoteiun me nv enluoyn Wireless Speakers (Aupmuata nxeia) otn thoan "On".
u Av éxéτo subwoofer CP-AWS0101, autó θa τεθεi σε έγαση.
Avαβαθμισn firmware
EaeyTe av unapxetiaogun avabqion firmware.
Olulised ohutusjuhised
Valitse television Langaton kaiutin -valikossa


- Trademarks:
- Bluetooth
- Dolby Atmos
- ENGLISH
- Important safety instructions
- Please follow all safety instructions and heed all warnings. Keep this manual for future reference.
- Precautions
- Damage
- Power connection and accessibility
- Power source
- Power cord protection
- Power Adapter
- Child safety
- Location
- Ventilation
- Heat and operating temperature
- Naked flames
- Water, moisture, and liquid entry
- Storms and lightning
- Maintenance
- Service and repair
- Disposal of this equipment
- CE and UKCA statement:
- Compatibility warning
- TV compatibility
- Wireless signal
- What is included in the box:
- Inputs/outputs
- LED Indicator
- PAIR Pair button
- Upgrade Button
- Micro USB
- Power cable clip
- DCIN socket
- Initial set up
- Placement and mounting
- NOTE:
- Connect to power
- Connecting to your AQUOS Wireless Surround enabled SHARPTV
- a. Invitation to connect.
- b. Left and right speaker confirmation
- c. Optimise wireless connection
- d. Adjust listening position
- Setting speaker properties
- Name
- Set Location
- Remove
- Restart
- Version
- Using Dolby Atmos
- Night mode
- To activate night mode:
- Firmware upgrade
- ББЛΓAPСКИ
- Baxkhnyka3aHnOTHOCHO
- 6e3onacHocCTTa
- MOna, cna3BaIte HnctpyKunTe 3a 6e30-
- nachoct INB3eMeTe NOBHHMaHHe BCNUKIN
- npeynpexkdeHnaa3epebKOBOcTBOTo 3a
- 6bdeu cnpaBkn.
- PpeDn3Hmepkn
- Pobpeu
- BHIMAHNE
- Cbbp3BaHe KbmeKtpnueckata MpeKa n DOCTbHNOCT
- 3axpaHbaHe
- 06e3oNaCBAHe Ha 3axpaHbauu Ka6e
- AanTeP 3a 3axpaHbHe
- Be3onachocT 3a deca
- MectononoloxeHne
- Bentlaa
- M3toHnHa HtonnnHa nontmHa pa6oHa Tempeypa
- H3touHnua Ha oTKpuT orbH
- Boda, Blara u npoHnKbaHe Ha TeuHocTn
- PpMoTeBvHn 6ypn
- PnDpBkKa
- 06cnykbahe npemOHTHneHIOCTN
- I3BexkaheHa ypea oTeKcnpoatauia
- 3A6EJIEXKA:
- 3aabaHe Ha xapaKTepncTnKn Ha roBOpNTeJIte
- Ume
- 3aDaBaHe Ha MecTONOJOXKeHne
- PpemaxBaHe
- Tobtpho ctaptnapane
- Bepcna
- Ynotpe6a Ha Dolby Atmos
- Pexmm Hoo
- AktubipaheHapejIMHou:
- PexMM Hoou Moke da 6bde DeakTnBupan upe3 n36op Ha npyr CTIN 3a aydno Bb3npounBekdahe.
- 3AbeJIeKKA:
- HaDCTroBHe HaΦbPMyepa
- 3A5EJIEXKA:
- CESKY
- Suykpataon kaalwsiou puemuatoc
- YnO8ox DCIN
- Set location (Opiouoc tootheoiac):
- Remove (Aφαρεση)
- Restart (Enavekekivn)
- Version (Ekdoon)
- Xpólón Dolby Atmos
- Nuxερινή λειτουργία
- Tia evpyooinon tnc vuxtepiic leitoupyiac:
- AnepeyonoioTe n vxtepivn aeitoupyia eniayovtac ao oia hou.
- EHMEIOH:
- Avαβαθμισn firmware
- Olulised ohutusjuhised
Brand : SHARP
Model : CPAWS2001
Category : Audio System