
XL-B514 - Audio System SHARP - Free user manual and instructions
Find the device manual for free XL-B514 SHARP in PDF.
| Product type | Micro hi-fi audio system |
| Brand | Sharp |
| Model | XL-B514 |
| Power supply | External mains adapter |
| Remote control batteries | 2 AAA batteries (included) |
| Main functions | FM radio, CD player, Bluetooth, USB, Aux input, alarm, sleep timer, equalizer |
| FM radio | FM band, 20 presets, RDS (RadioText, PTY) |
| Bluetooth | Range approx. 10 meters, device name: SHARP XL-B514 |
| Supported audio formats | Audio CD, MP3 (via USB) |
| Display | Backlit with brightness adjustment and timeout |
| Display languages | English, French, German, Italian, Spanish, Polish, Dutch |
| Connectors | 3.5mm headphone jack, USB input (FAT32 up to 64GB), 3.5mm Aux input, RCA speaker outputs, power input |
| Sleep function | Sleep timer (10, 15, 30, 45, 60 minutes) |
| Maintenance | Soft dry cloth, avoid chemicals and detergents |
| Safety | Double insulation (Class II), do not expose to water or moisture, do not open |
| Repairability | No user-serviceable parts - refer to qualified professional |
| Included accessories | Remote control (batteries included), FM antenna, mains adapter, documentation |
Frequently Asked Questions - XL-B514 SHARP
User questions about XL-B514 SHARP
0 question about this device. Answer the ones you know or ask your own.
Ask a new question about this device
Download the instructions for your Audio System in PDF format for free! Find your manual XL-B514 - SHARP and take your electronic device back in hand. On this page are published all the documents necessary for the use of your device. XL-B514 by SHARP.
USER MANUAL XL-B514 SHARP
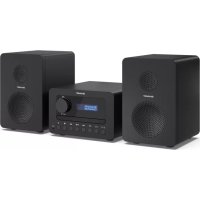
natural_image
Line drawing of three Sharp audio speakers with sound equipment and a digital display (no text or symbols visible)User manual
XL-B514
Tokyo FM Hi-Fi Micro System
ENPLESDERUFRITNL

1


2
Trademarks:

Bluetooth®
The Bluetooth ^® word mark and logos are registered trademarks owned by Bluetooth SIG, Inc. and any use of such marks by SHARP is under license. Other trademarks and trade names are those of their respective owners.
Important safety instructions
Please follow all safety instructions and heed all warnings. Keep this manual for future reference.

This symbol instructs the user to consult the user manual for further safety, operational and maintenance related information.

Refers to class II equipment.
This symbol indicates that this product has a double insulation system and does not require a safety connection to electrical earth (ground).

Refers to alternating current (AC).
This symbol indicates that the rated voltage marked with the symbol is AC voltage.

Refers to direct current (DC).
This symbol indicates that the rated voltage marked with the symbol is DC voltage.

For indoor use only

Energy efficiency marking with level VI

Polarity of d.c. power connector
Precautions
Child safety
- Always follow basic safety precautions when using this product, especially when children are present. Children should be supervised to ensure that they do not play with the product.
Location
- The product should be installed in a stable location and ensure the product and its parts are not overhanging.
Ventilation
- Slots and openings in the cabinet are provided for ventilation to ensure reliable operation of the product and to protect it from overheating; these openings must not be blocked or covered. Ensure a minimum distance of 5cm around the product for sufficient ventilation. Never let anyone push anything into holes, slots or any other openings in the product's casing as this could result in an electric shock.
Heat and operating temperature
- Do not install near any heat sources such as radiators, heat registers, stoves or other apparatus (including amplifiers) that produce heat. Avoid exposure to direct sunlight.
Naked flames
- To prevent the risk of fire, keep candles or open flames away from this product.
Water, moisture and liquid entry
- To prevent the risk of fire or electric shock, do not expose this product to rain, water or moisture. Do not place objects filled with liquids on or near this product.
Storms and lightning
- Storms are dangerous for all electric products. If the power or aerial wiring is struck by lightning the product might get damaged, even if it is turned off. You should disconnect all cables and connectors from the product before a storm.
Power cable
- Do not damage, stretch, bend or place heavy objects on the power cable.
Damage
- Please inspect the unit for damage after unpacking. If it is damaged in any way do not operate the unit and consult your dealer.
Maintenance
- Unplug the power cable from the power source before cleaning the product. Use a soft and clean cloth to clean the outside of the unit. Never clean it with chemicals or detergent.
Service and repair
- This product does not contain any parts that are serviceable by the user. Exposing the internal parts inside the device may endanger your life. In case of a fault, contact the manufacturer or authorised service department. The manufacturers guarantee does not extend to faults caused by repairs carried out by unauthorised third parties.
Power Adapter
- If the unit will not be used for a period of time it it recommended to switch the unit off and remove the AC power plug from the mains outlet.
- Only use the supplied mains adaptor as failure to do this may result in a safety risk and/or damage to the unit.
Batteries
Installation
- Do not use any batteries other than those specified. Observe the correct polarity when inserting the batteries. Never use different types of batteries together or mix new and old ones.
Use and maintenance
- Do not expose batteries to high temperatures, e.g. near fire or in direct sunshine. When the product is not to be used for a long time (more than a month), remove the batteries from the product to prevent them from leaking. If the batteries leak, wipe away the leakage inside the battery compartment and replace the batteries with new ones.
Children safety
• Always ensure battery compartment is closed and secured.
- Batteries are easily swallowed by young children and can cause severe internal burns and lead to death. Keep batteries away from children. Seek immediate medical advice if you believe a battery has been swallowed.
Environmental condition
- Keep batteries away from low air pressure or high temperatures as this may result in an explosion or the leakage of a flammable liquid or gas. Disposal
- Please dispose of batteries correctly by following the guidance in this manual (see section "Disposal of this equipment and batteries"). Do not throw them into fire, do not disassemble them and do not try to recharge non-rechargeable batteries. They could leak or explode.
Disposal of this equipment and batteries
Information for users on collection and disposal of old equipment and used batteries.
This symbol means that the product contains batteries covered by European Directive 2013/56/EU which cannot be disposed of with normal household waste. Cd, Hg and Pb underneath the wheelie bin symbol shows whether the battery contains, cadmium (Cd), mercury (Hg) or lead (Pb).

This symbol on a product means that the product is covered by European Directive 2012/19/EU and must not be disposed of or dumped with your other household waste.

This symbol means that the product is designed and manufactured so that it can be recycled and reused.
- These symbols on the products, packaging and/or accompanying documents mean that used electrical and electronic products should not be mixed with general household waste. Household users should contact either the retailer where they purchased this product, or their local government office, for details of where and how they can take these items for environmentally safe recycling.
CAUTION:
- Appliances with a built-in CD player are marked with this caution label.
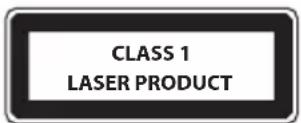
- This unit is a class 1 laser product. this unit uses a visible laser beam which could cause hazardous radiation exposure if directed. be sure to
operate the player correctly as instructed, when this unit is plugged into the wall outlet, do not place your eyes close to the openings to look inside this unit.
- Use of controls or adjustments or performance of procedures other than those specified herein may result in hazardous radiation exposure.
- Do not open up the unit and do not repair yourself. Refer servicing to qualified personnel.
CE and UKCA statement:
- Hereby, Sharp Consumer Electronics Poland sp. z o.o. declares that this audio device is in compliance with the essential requirements and other relevant provisions of RED Directive 2014/53/EU and UK Radio Equipment Regulations 2017.
- The full CE text and UKCA declaration of conformity are available at sharpconsumer.eu, enter the download section of your model and select "CE Statements".
Box contents
• XL-B514 Tokyo FM Hi-Fi Micro System
- Remote control (incl. batteries)
- Aerial
- Power adapter
- User documentation
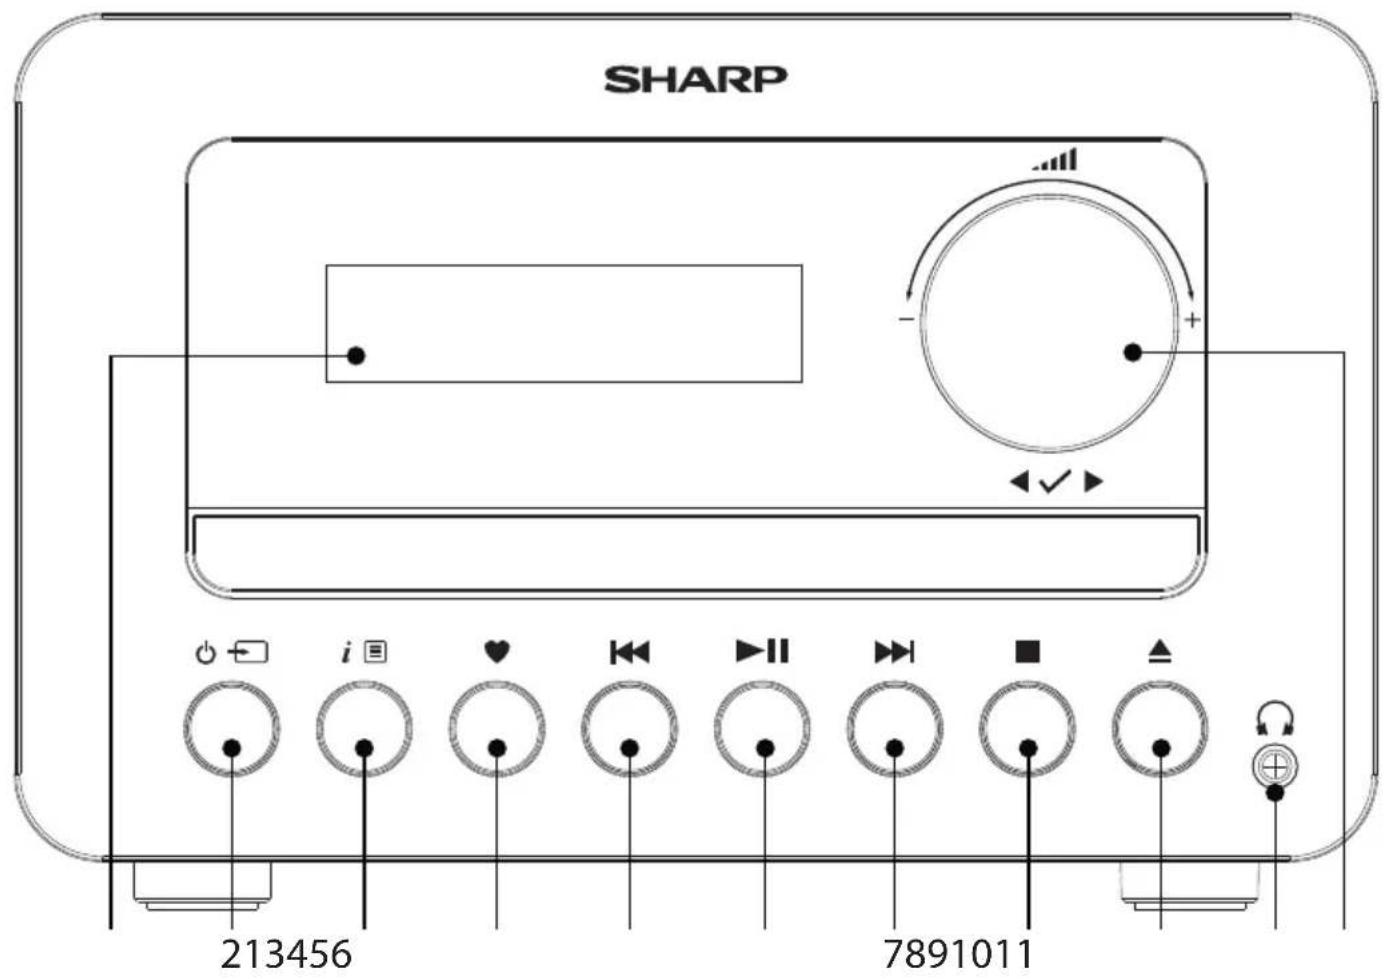
Controls
(Refer to 1 on page 1).
-
Backlit display
-
Power/Mode
-
Short press: Power on
- Short press: Change the mode
-
Long press: Standby
-
i Info/Menu
-
Short press: Station information
- Long press: Enter the menu options
In menu:
- Short press to go back to previous menu options.
-
Long press to exit the menu.
-
♥ Preset (20 FM)
In FM mode:
- Short press: Preset recall
- Long press: Preset store
In CD mode: Long press to enter programmed play mode (20 tracks)
5.
- Short press:
- In FM mode: Move down the frequency band by 0.05 MHz
- In Bluetooth, CD, and USB mode: Previous track
- In menu: Scroll left
- Long press:
- In FM mode: Scan down the frequency band
-
In CD/USB mode: Rewind within a track
-
▶||
• In Bluetooth/CD/USB mode:
- Short press to Play/Pause
• In Bluetooth mode:
- Long press for 2 seconds to unpair your current device and search for new devices.
7.
- Short press:
- In FM mode: Short press move up frequency up 0.05 MHz; long press search up frequency band
- Bluetooth/CD/USB mode: Next track
- In menu: Scroll right
- Long press:
- In FM mode: Scan up the frequency band
- In CD/USB mode: Fast forward within a track
8.
In CD/USB mode: Short press to stop.
In CD mode: Short press twice to cancel programmed play
9.
In CD/FM/USB/Aux-in mode:
- Short press to open the CD tray
-
Press again to close the CD tray
-
Headphone jack
-
Rotary Volume/Scroll/Select control:
-
Rotate: Adjust the volume
- Rotate in the menu or presets: Scroll through the available menu options or preset locations
- Short press: Select a displayed radio station/frequency, menu or preset option
- When alarm is sounding in standby, short press: activates 10-minute snooze.
- USB input
- Aerial input
- Aux in
- RCA phono speaker outputs
- Power input
Remote control
(Refer to 2 on page 2).
- ⏻ Press to power on or enter standby.
- Press to mute the sound. Press again to resume sound, or press +/- to resume sound.
-
♥ Presets (20 FM)
-
Short press: Preset recall.
- Long press: Preset store.
In FM mode:
4. ☐Menu: Press to enter the menu options.
5. i Info: Press to cycle through different types of information available.
6. FM Press to enter FM mode.
7. Short press to enter Bluetooth mode. Long press to disconnect from paired device.
8. Press to change audio source to CD.
9. AUX Press to change audio source to AUX. Press again to change audio source to USB.
10. EQ Equaliser: Press to cycle through EQ options.
11. LOUD Loudness compensation increases the low and high frequencies when listening at low volume.
12. DIMPress to cycle through display brightness settings: high, medium and low.
13. ■ ▲ In CD/USB mode: press to stop playback. Press again to open/close CD drawer.
14. ▲
- In FM mode: Move down the frequency band by 0.05 MHz.
- In Menu: Move up the menu options.
15. Select/Play/Pause. When alarm sounds, press to snooze.
In Bluetooth mode: Long press to disconnect current device and scan for new devices.
16. ▶▶▶ Short press for next track/station, long press for fast forward/search forward.
17. Short press for previous track/station, long press to rewind/search back.
18. ▼
- In Menu: Move down the menu options.
- In FM mode: Move up the frequency band by 0.05 MHz.
19. Repeat: In CD/USB mode: Cycle through repeat options: repeat current track, repeat all tracks, repeat off.
20. ✗ Shuffle: In CD/USB mode: Shuffle songs on/off.
21. PROG In CD mode: Press to program the playback order.
- INT80 mode: Press once to play the first 10 seconds of every track on a CD. Press again for the current track to play in full.
- Bass +/-: Press to adjust the bass.
- Volume +/-: Press to adjust the volume.
- Treble +/-: Press to adjust the treble.
- Numeric keypad (0-9): Used for song/preset selection, or to enter a frequency.
- Alarm: Press to set up Alarm 1/2. When in standby, press to switch on/off alarms.
- Sleep timer: Press to cycle through sleep timer options.
Fitting or replacing the remote control batteries
- To open the battery compartment, push your thumb down on to the circle on the battery compartment cover and slide it down.
- Fit two AAA batteries observing polarity +/- as shown. When replacing the batteries, use only the same type of battery supplied.
- Re-fit the battery cover and clip it in place.
Using your FM Hi-Fi micro system
Connection
NOTE: Your micro system has been supplied with a power adapter. Please check and ensure that you connect the correct 3 pin or 2 pin part to the power adapter that is appropriate for the country where the product will be used.
Connect the aerial to the back of the micro system to receive the best possible radio reception and signal quality.
Connect the right and left speaker cables to the RCA sockets on the back of the main unit.
Connect the power adapter lead to the power input on the back of the micro system and plug the power adapter into the wall socket and switch on. The micro system will power on and display
The display will read
NOTE: The processes described here use the controls on the main unit (unless specified). For controls using the remote control, please refer to the 'Remote control' section.
Initial set-up
Extend the aerial to ensure the maximum signal strength when you scan for radio stations.
Short press ⏻ to switch on your micro system.
Long press ◀◀ or ▶▶tton to scan up or down the frequency band. The radio will search for and stop at the next available station.
Short press ◀◀ or ▶▶fine-tune each frequency in 0.05MHz steps.
Time and date
To set the time and date, turn on the radio. Long press i to enter the menu options.
Use ◀✓▶ to select
year is confirmed and you will return to the
Change the mode
Short press to change between FM, Bluetooth, CD, USB and Aux In modes. The display screen will confirm the mode.
You can adjust the sound of the micro system using the equaliser presets. Press and hold i □. Use ◀✓▶ to scroll to
Using headphones
You can connect headphones with a 3.5mm jack (not included) to the headphone jack. When you have them connected, sound will be heard via the headphones only.
NOTE: Always keep the volume within reasonable limits.
FM Radio mode
To change to FM mode, short press until the micro system displays
Tune to an FM station
Long press << but in to scan up or down the frequency band. The radio will search for and stop at the next available station. Short press << or fine-tune each frequency in 0.05MHz steps.
NOTE: If the reception is poor, adjust the aerial or move the micro system to another location.
Change the scan setting
In FM mode:
Long press i ☐,
- The scan will only stop when a strong signal strength is received, resulting in better audio quality. It is possible that the station you are scanning for may be missed using this option.
The scan will stop at every station it receives, even if the signal strength is poor.
Use ◀ √ ▶ to choose and select from the options available.
NOTE: The current scan setting will have an asterisk (*) in the display.
Audio mode
The micro system will automatically switch between stereo and mono, depending on the quality of the signal being received but you can override this function and manually switch between them.
NOTE: You may wish to select 'Stereo' if you are listening to your micro system using headphones.
Press and hold i. Use the rotary control to scroll to
Choose between
Use ◀ √ ▶ to confirm
Long press i ☐ to exit the menu.
Storing an FM station preset
Your micro system can store up to 20 FM stations in its preset memories for instant access to your favourite stations.
Tune the micro system to the FM radio station that you wish to preset. Long press ♥ until <Preset Store <1:(Empty)>> is displayed. Use ◀✓▶ to move to and select the preset location that you would like to store the radio station to (1-20). The display will confirm
NOTE: If there is already an existing FM station stored under a preset, it will be overwritten when you store the new station.
Auto memory store (AMS)
Alternatively, you can use the Auto Memory Store (AMS) feature to store your FM radio station presets. In FM mode, long press i □. Use ◀ √▶ to scroll to and select
NOTE: You can manually overwrite your AMS stored presets by following the steps in 'Storing an FM station preset' above.
Tune to an FM preset station
In FM mode:
Short press ♥ <Preset Recall <1:>> is displayed together with the name or frequency of the station stored there, or
FM display information
When listening to an FM station you can change the information that appears on the second line of the display. Repeatedly short press i ≡ to cycle through the different information options:
- Radiotext (RT) - This is scrolling text information as supplied by the broadcaster. This could include artist names, song titles, contact details for the radio station, etc.
- Program Type (PTY) – e.g., 'Rock', 'Pop', 'Talk', or 'News'
- Station name or frequency – e.g., BBC R4, 93.30MHz
- Stereo or Mono radio signal
- Time
- Date
Bluetooth mode
Ensure your micro system is in Bluetooth mode by short pressing until the radio displays
NOTE: If necessary, refer to the instructions for your device to add or set up Bluetooth.
When found, your micro system will be displayed as 'SHARP XL-B514' on your device. Select this to begin pairing. Once done,
Paired devices will connect to the micro system when they are within range (within 10 metres in line of sight). Your device will remain paired with the radio unless you decide to disconnect it.
To disconnect from Bluetooth, long press ▶ II for 2 seconds to unpair your current device and search for new devices.
Wirelessly stream music via Bluetooth
In Bluetooth mode, you can wirelessly stream audio through the micro system. Use the controls on your paired Bluetooth device as well as those on your micro system. Controls available:
- Play/ Pause: Short press ▶II
• Previous track: Short press
- Next track: Short press
Volume can also be adjusted – either using your micro system and/or your connected device.
NOTE: If the micro system is inactive for 15 minutes, or no audio signal is being received, the micro system will automatically go into standby.
CD player
To change to the CD player, short press until the micro system displays
Play a CD
NOTE: It is not possible to play DVD or computer CDs.
Press ▲. The CD drawer will open and
CD controls:
The following controls are possible when playing a CD:
▶II Short press to play a CD. The track number and the elapsed time of the track will be displayed. Press again to pause the CD. The elapsed time will flash while music is paused.
▶▶ Short press to move to next track. Long press to forward within a track.
Press to move to previous track. Long press to rewind within a track.
■ Press to stop CD.
NOTE: If you stop or pause playing a CD for approximately 20 minutes, your micro system will go into standby mode automatically.
Programmed play
Using your remote control, you can program the play order of up to 20 tracks on your CD.
NOTE: To set up programmed play, the CD must be stopped in the CD compartment and must not be paused or playing.
While in CD mode:
In CD mode, with the CD you wish to programme in the CD compartment and stopped:
Press PROG to enter CD programmed play mode
Use or go to the track number that you would like to program to play first. Press PROG to confirm.
You will now be able to select the second track that you would like to program. Continue to select each track as above, up to a total of 20 tracks. Once you have added 20 tracks to the programmed play mode, the display will read
Pressing ◀◀ or ▶to move through the program.
Press ▶ II to play the programmed tracks.
To exit programmed play mode, press ■ twice.
Caring for compact discs
- Do NOT touch the playback side of the CD.
- Do NOT attach paper or tape or any other material to the disc.
- Fingerprints and dust on the disc will cause sound deterioration. Wipe the disc from the centre outwards with a soft cloth Always keep the disc clean.
- If dust or marks cannot be removed with a soft cloth, wipe the disc lightly with a slightly damp soft cloth and then wipe with a soft dry cloth.
- Do NOT use any type of solvent, commercially available cleaners or antistatic spray for vinyl as it may damage the disc.
- Do NOT store discs in a place subject to direct sunlight or near a heat source.
- Do NOT store discs in a place subject to moisture or dust, such as a bathroom or near a humidifier.
USB mode
Ensure your micro system is in USB mode by short pressing until the micro system displays
Insert the USB stick which has the MP3 files you wish to play into the USB input.
NOTE: If the USB does not insert easily, try rotating it by 180 degrees and try again. Never force the USB stick into the socket or try to insert it at an angle as this could damage the socket.
NOTE: USB drives up to 64GB FAT32 are supported.
The following controls are available when using a USB:
▶ || Short press to Play/Pause.
Short press to move to previous track. Long press to rewind within a track.
▶▶ Short press to move to next track. Long press to forward within a track.
■ Press to stop.
NOTE: To navigate the folders on the USB, use ▲ and ▼ in the remote control.
Aux in mode
To change to an Aux-input, short press until the micro system displays
Use a 3.5mm audio input connection cable (not included) for a quick and easy connection to an external audio source.
Connect one end of the 3.5mm audio connection cable to the headphone (or auxiliary out) socket of your secondary device, connect the other end to the Aux in socket on the rear of your micro System.
Press the Play button on your external device to start playback through the micro System speakers.
To gain optimal volume levels, adjust the output volume level on both the secondary device and on the micro System.
NOTE: It is recommended that you unplug the Audio cable from the Aux in socket after you have finished listening to your external device.
Alarm functionality
Set an alarm
NOTE: Check that the micro system is displaying the correct time and date before you set an alarm.

flowchart
graph LR
    FM["FM"] -->|Scan setting| Alarm["Alarm"]
    FM -->|Audio setting System| Alarm
    FM -->|AMS Sleep| Alarm
    FM -->|System| Alarm
    BT["System Time"] --> Alarm
    Alarm --> Equaliser["Equaliser"]
    Alarm --> Backlight["Backlight"]
    Alarm --> Language["Language"]
    Alarm --> Factory_reset["Factory reset"]
    Alarm --> Software_Version["Software Version"]

NOTE: If the time is not set or has failed to update from the radio signal,
Stop, snooze or switching the alarm off
To stop the alarm, short press
To snooze the alarm, press √.
To switch off the alarm, follow the steps for 'Set an alarm' and select
Sleep timer
You can set your micro system to switch to standby mode automatically using the sleep timer. You can choose from Sleep off, 10, 15, 30, 45 and 60 minutes. To do this, long press i □. Use ▶ scroll and select
Display backlight timeout
To adjust the display backlight timeout, long press i. ▶ to scroll to and select
Display language
To change the display language, long press i. Use to scroll ▶ and select
Software version
To check the software version of your micro system, long press i. Use ▶ to scroll and select
Factory reset
You can reset your micro system to restore it to the original factory settings.
NOTE: If you reset your micro system, your stored presets will be deleted and any connected Bluetooth device will be unpaired.
Long press i □. Use <to scroll and select
Troubleshooting
If there is no sound or power:
- Adjust the volume.
- Check that the power cable is connected and that the micro system is not in standby mode.
- If you have headphones connected, audio will play through them. Unplug your headphones to listen through the micro system speakers.
- Ensure you are in the correct mode, and using the correct control functions for that mode.
- If you are using a Bluetooth connected device or an external sound source via Aux-in, increase the volume on the secondary device and on the micro system.
If the radio reception is poor:
Make sure that you have fully extended the aerial.
Rescan for radio stations, see section 'Tune to an FM station'.
Try moving your micro system to another location to see if the reception improves.
Check that you do not have other electrical equipment close to your micro system. This may cause interference.
If a CD does not play:
- Check that you are in CD mode.
- Remove the CD and check that it is not scratched or damaged as this will not play.
- Please check that you are using an original audio CD and not a copy. If the CD is not an original, playback may not be supported (depending on the CD and audio file types being used).
If you are unable to pair with a Bluetooth device:
Check that you are in Bluetooth mode.
Ensure that you are within 10 metres of the micro system for Bluetooth functionality.
Move the micro system and Bluetooth device away from other Bluetooth devices/electrical equipment.
If possible, turn off other nearby Bluetooth devices or disable their Bluetooth functionality.
If the function buttons do not respond:
- Check that the mains power is connected at the back of your micro system. Short press the ⏻ (Power/Mode) button.
- Try to reset to factory default settings. See 'Factory reset' section.
NOTE: All of your settings, including the radio station list, connected Bluetooth devices and any presets will be deleted when you reset the micro system.
CLASS 1 LASER PRODUCT
Packungsinhalt
Gebruik ◆◆◆ of ◆◆◆◆◆◆◆◆◆◆◆◆◆◆◆◆◆◆◆◆◆◆◆◆◆◆◆◆◆◆◆◆◆◆◆◆◆◆◆◆◆◆◆◆◆◆◆◆◆◆◆◆◆◆◆◆◆◆◆◆◆◆◆◆◆◆◆◆◆◆◆◆◆◆◆◆◆◆◆◆◆◆◆◆◆◆◆◆◆◆◆◆◆◆◆◆◆◆◆◆◆ ◆◆◆◆◆◆◆◆◆◆◆◆◆◆◆◆◆◆◆◆◆◆◆◆◆◆◆◆◆◆◆◆◆◆◆◆◆◆◆◆◆◆◆◆◆◆◆◆◆◆◆◆◆◆◆◆◆◆◆◆◆◆◆◆◆◆◆◆◆◆◆◆◆◆◆◆◆◆◆◆◆◆◆◆◆◆◆◆◆◆◆◆◆◆◆◆◆◆ ◆● ◆● ◆● ◆● ◆● ◆● ◆● ◆● ◆● ◆● ◆● ◆● ◆● ◆● ◆● ◆● ◆● ◆● ◆● ◆● ◆● ◆● ◆● ◆● ◆● ◆● ◆● ◆● ◆● ◆● ◆● ◆● ◆● ◆●
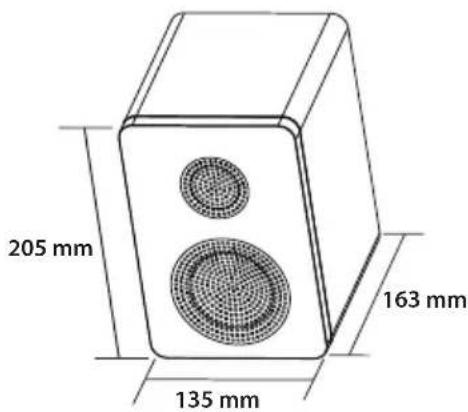
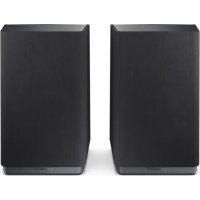
natural_image
Line drawing of a two-tiered speaker with two circular speakers (no text or symbols)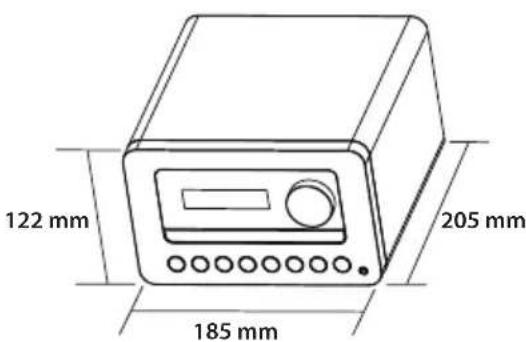


CE UK CA
Sharp Consumer Electronics Poland sp. z o.o.
Ostaszewo 57B, 87-148 Lysomice, Poland
Made in China
SAU/MAN/0190
www.sharpconsumer.eu
SHARP

- User manual
- Trademarks:
- Bluetooth®
- Important safety instructions
- Please follow all safety instructions and heed all warnings. Keep this manual for future reference.
- Precautions
- Child safety
- Location
- Ventilation
- Heat and operating temperature
- Naked flames
- Water, moisture and liquid entry
- Storms and lightning
- Power cable
- Damage
- Maintenance
- Service and repair
- Power Adapter
- Batteries
- Installation
- Use and maintenance
- Children safety
- Environmental condition
- Disposal of this equipment and batteries
- CAUTION:
- CE and UKCA statement:
- Box contents
- Controls
- Remote control
- Fitting or replacing the remote control batteries
- Using your FM Hi-Fi micro system
- Connection
- Initial set-up
- Time and date
- Change the mode
- Using headphones
- FM Radio mode
- Tune to an FM station
- Change the scan setting
- Audio mode
- Storing an FM station preset
- Auto memory store (AMS)
- Tune to an FM preset station
- In FM mode:
- FM display information
- Bluetooth mode
- Wirelessly stream music via Bluetooth
- CD player
- Play a CD
- CD controls:
- Programmed play
- While in CD mode:
- Caring for compact discs
- USB mode
- The following controls are available when using a USB:
- Aux in mode
- Alarm functionality
- Set an alarm
- Stop, snooze or switching the alarm off
- Sleep timer
- Display backlight timeout
- Display language
- Software version
- Factory reset
- Troubleshooting
- If there is no sound or power:
- If the radio reception is poor:
- If a CD does not play:
- If you are unable to pair with a Bluetooth device:
- If the function buttons do not respond:
- CLASS 1 LASER PRODUCT
- Packungsinhalt
Brand : SHARP
Model : XL-B514
Category : Audio System