ExactFit 3 - Blood pressure monitor BRAUN - Free user manual and instructions
Find the device manual for free ExactFit 3 BRAUN in PDF.
| Product type | Automatic upper arm blood pressure monitor |
| Compatible models | ExactFit 3 (BP6000, BP6100, BP6200) |
| Measurement method | Oscillometric |
| Blood pressure measurement range | 0 to 300 mmHg |
| Pulse measurement range | 40 to 199 beats/min |
| Blood pressure accuracy | ±3 mmHg |
| Pulse accuracy | ±5 % max. |
| Display | LCD with backlight (BP6200) |
| Memory capacity per user | 40 measurements (BP6000), 50 (BP6100), 60 (BP6200) |
| Cuff sizes included | Small/Medium (22-32 cm) and Large/XLarge (32-42 cm) |
| Power supply | 4 AA alkaline batteries (LR6) |
| Battery life | Approximately 300 measurements |
| Weight (without batteries) | Approximately 500 g |
| Operating temperature | +10 °C to +40 °C |
| Storage temperature | -20 °C to +60 °C |
| Max. humidity | 85 % RH |
| Atmospheric pressure | 860 to 1060 hPa |
| Automatic shut-off | After 1 minute of inactivity |
| Classification | IP22, type BF, internal power supply |
| Included accessories | 4 batteries, 2 cuffs, air tube, instruction manual, storage pouch, travel bag |
| Special features | Irregular heartbeat detector (BP6200), WHO/ESH indicator, daily and weekly average function |
| Cleaning | Dry or slightly damp cloth for the device; dry cleaning for the cuff |
| Warranty | See consumer card on the website |
Frequently Asked Questions - ExactFit 3 BRAUN
User questions about ExactFit 3 BRAUN
0 question about this device. Answer the ones you know or ask your own.
Ask a new question about this device
Download the instructions for your Blood pressure monitor in PDF format for free! Find your manual ExactFit 3 - BRAUN and take your electronic device back in hand. On this page are published all the documents necessary for the use of your device. ExactFit 3 by BRAUN.
USER MANUAL ExactFit 3 BRAUN
Braun upper arm blood pressure monitor has been developed for accurate and comfortable blood pressure measurements. The measuring accuracy of Braun's upper arm blood pressure monitor was tested at the time of manufacture and was proven by clinical research in accordance with ESH.
What you should know about blood pressure
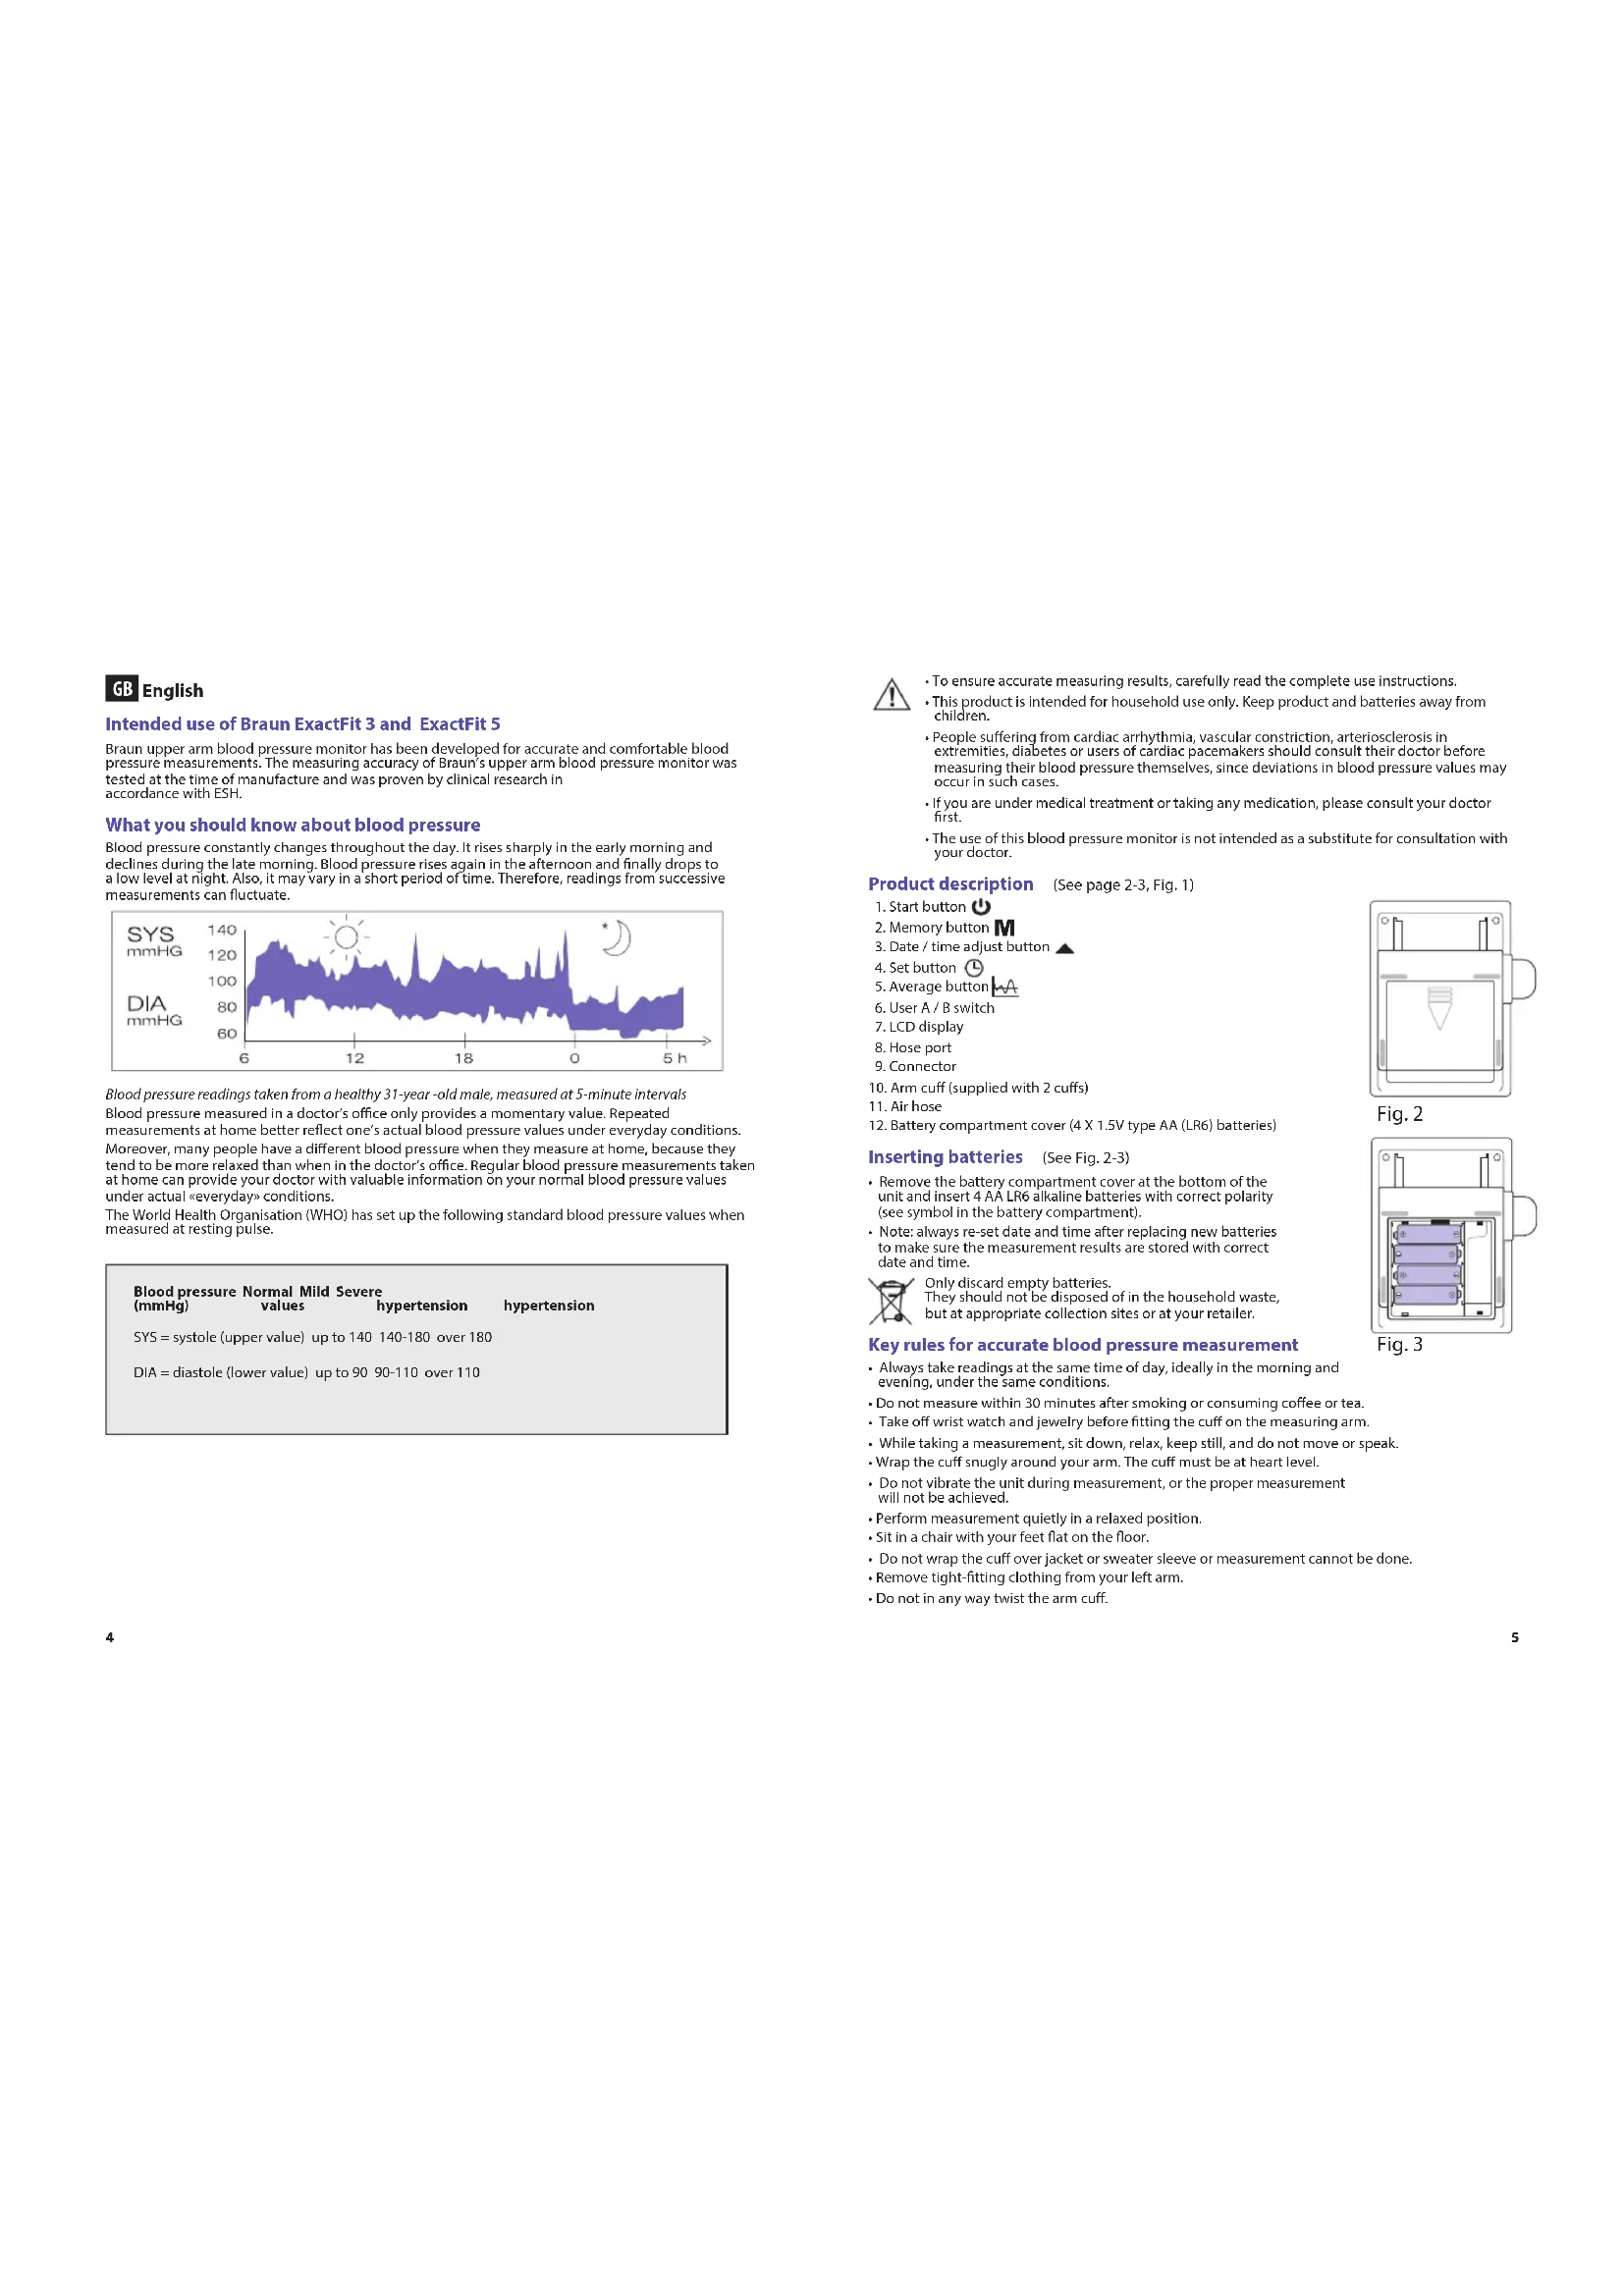
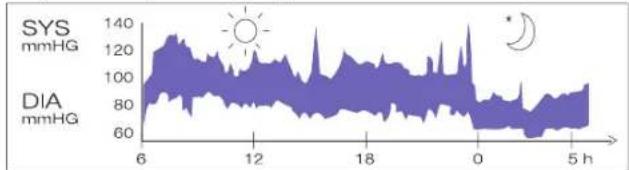
Blood pressure constantly changes throughout the day. It rises sharply in the early morning and declines during the late morning. Blood pressure rises again in the afternoon and finally drops to a low level at night. Also, it may vary in a short period of time. Therefore, readings from successive measurements can fluctuate.
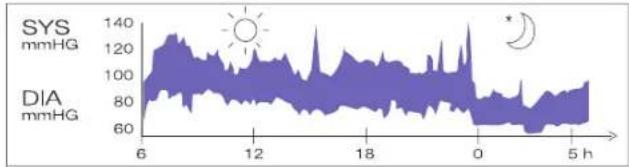
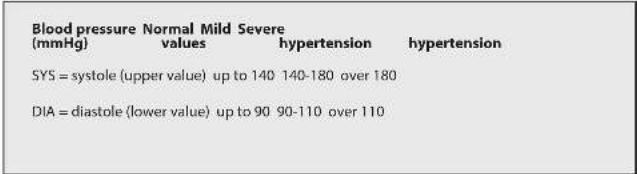
Blood pressure readings taken from a healthy 31-year-old male, measured at 5-minute intervals Blood pressure measured in a doctor's office only provides a momentary value. Repeated measurements at home better reflect one's actual blood pressure values under everyday conditions. Moreover, many people have a different blood pressure when they measure at home, because they tend to be more relaxed than when in the doctor's office. Regular blood pressure measurements taken at home can provide your doctor with valuable information on your normal blood pressure values under actual everyday conditions. The World Health Organisation (WHO) has set up the following standard blood pressure values when measured at resting pulse.
!
- To ensure accurate measuring results, carefully read the complete use instructions.
- This product is intended for household use only. Keep product and batteries away from children.
- People suffering from cardiac arrhythmia, vascular constriction, arteriosclerosis in extremities, diabetes or users of cardiac pacemakers should consult their doctor before measuring their blood pressure themselves, since deviations in blood pressure values may occur in such cases.
- If you are under medical treatment or taking any medication, please consult your doctor first.
- The use of this blood pressure monitor is not intended as a substitute for consultation with your doctor.
Product description (See page 2-3, Fig.1)
1.Start button
2. Memory button M
- Date /time adjust button
4. Set button
5. Average button
-
User A/B switch
-
LCD display
8.Hose port
-
Connector
-
Arm cuff (supplied with 2 cuffs)
-
Air hose
-
Battery compartment cover (4 X 1.5V type AA (LR6) batteries)
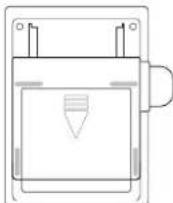
Inserting batteries (See Fig. 2-3)
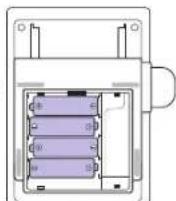
- Remove the battery compartment cover at the bottom of the unit and insert 4 AA LR6 alkaline batteries with correct polarity (see symbol in the battery compartment).
Note: always re-set date and time after replacing new batteries to make sure the measurement results are stored with correct date and time.

Only discard empty batteries. They should not be disposed of in the household waste, but at appropriate collection sites or at your retailer.
Key rules for accurate blood pressure measurement
- Always take readings at the same time of day, ideally in the morning and evening, under the same conditions.
- Do not measure within 30 minutes after smoking or consuming coffee or tea.
Take off wrist watch and jewelry before fitting the cuff on the measuring arm
While taking a measurement, sit down, relax, keep still, and do not move or speak. - Wrap the cuff snugly around your arm. The cuff must be at heart level.
- Do not vibrate the unit during measurement, or the proper measurement will not be achieved.
Perform measurement quietly in a relaxed position. - Sit in a chair with your feet flat on the floor
- Do not wrap the cuff over jacket or sweater sleeve or measurement cannot be done.
- Remove tight-fitting clothing from your left arm.
- Do not in any way twist the arm cuff.

Fig.2
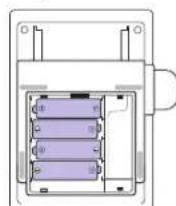
Fig.3
- Do not inflate the monitor's cuff when it is not wrapped around the arm.
- Do not attempt to disassemble or change any parts of the monitor including the cuff.
- Do not drop the product or put it through strong impact.
The device is not supposed to be used if your arm has any wound or injury.
Choosing the right cuff
For accurate measurement, it is important to choose the correct size cuff which best fits your upper arm. Choose the cuff size according to your arm circumference and make sure the bottom of the cuff is 2~3cm above your elbow.
- Small/Medium Cuff = 22-32cm arm circumference
Large/XLarge Cuff = 32~42cm arm circumference
Applying the arm cuff
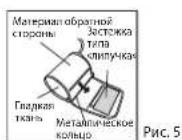
- Slide the end of arm cuff furthest from the tube through the metal ring to a loop. The smooth cloth should be on the inside of the cuff.
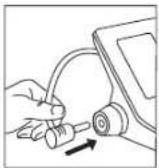
Fig.4
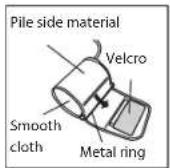
Fig.5
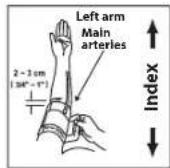
Fig. 6
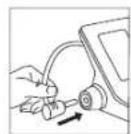
- Plug the air hose into the connector (Fig. 4).
- If the cuff is located correctly, the velcro will be on the outside of the cuff and the metal ring will not touch the skin (Fig. 5).
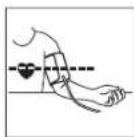
- Put your left arm through the cuff loop. The bottom of the cuff should be approximately (2 - 3cm) above elbow. The tube should lie over the brachial artery on the inside of the arm (Fig. 6).
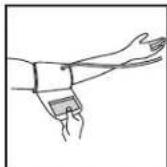
Fig.7
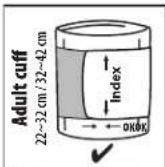
Fig.8
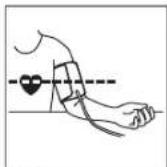
Fig.9
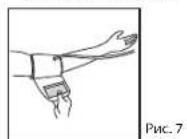
- Pull the cuff so that the top and bottom edges are tightly around your arm (Fig. 7).
- When the cuff is positioned properly, press the Velcro firmly against the pile side of the cuff.
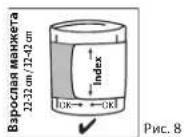
- This cuff is suitable for use if the <
> mark falls within the < > marked by two arrows when the cuff is tightened around your arm (Fig. 8). - Sit on a chair and place your arm on the table so that the cuff is at the same level as your heart (Fig. 9).
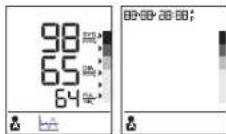
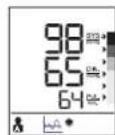
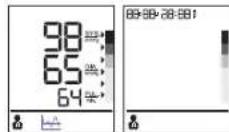
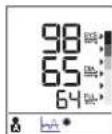
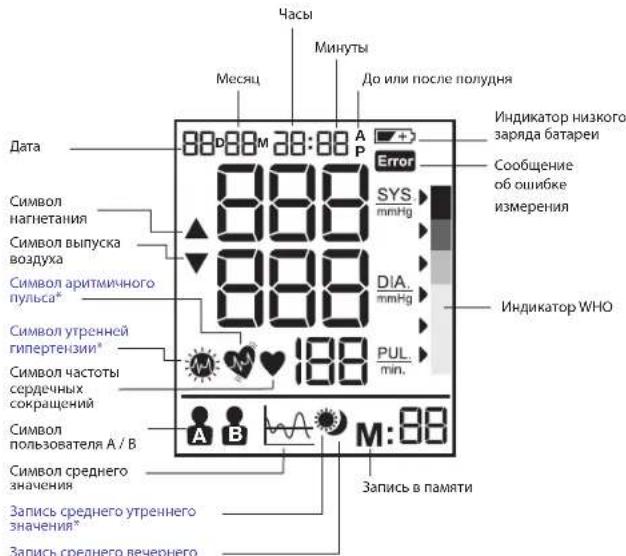
Display BP6000 / BP6100 and BP6200
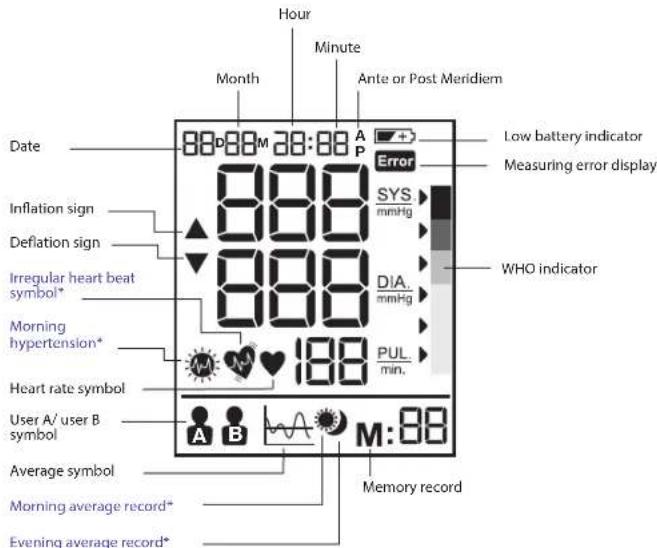
* For BP6200 only
Note: On Bp6200, the backlight goes on when the unit is turned on and it will remain on until the device will be switched off.
Select mode
How to select user A /user B
Make sure the Product is in power off mode.
- Slide the user switch to user A or user B, the current user mode will flash on the LCD display.
The WHO/ESH indicator to evaluate blood pressure data
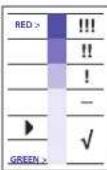
This device has a blood pressure level indicator established according to WHO and the European Hypertension Society Guidelines (ESH) in 2007. For every measurement displayed on the screen, the cursor will indicate the blood pressure level with the corresponding color code, from green to red. You can use this classification daily to guide you to understand your blood pressure level. If you are really concerned by the classification level, you should consult your doctor.
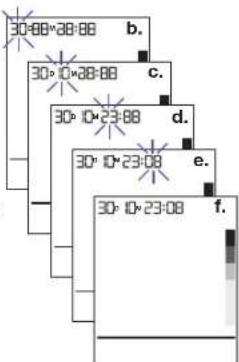
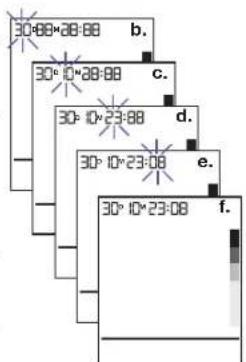
Setting month, date and time
a. Switch off the device for the date/time setting.
b. User press set button (4) to start the year setting, then the "year" will blink display, user can press adjust to adjust year by increase step 1.
c. User press set button (4) to start the month setting, then the 'month' will blink display, user can press adjust to adjust month by increase step "1".
d. User press set button (4) to start the day setting, then the "day" will blink display, user can press adjust to adjust day by increase step ^41 .
e. User press set button (4) to start the hour setting, then the "hour" will blink display, user can press adjust to adjust hour by increase step "1".
f. User press set button (4) to start the minute setting, then the "minute" will blink display, user can press adjust (8) to adjust minute by increase step "1".
g. User press set button (4) to end all the date/time setting, all the blink are stopped.
Note: Holding the adjust button will scroll the value.
Taking a measurement
Wrap the cuff around the arm (see "applying the arm cuff" section above).
- Sit upright on the chair to have a correct posture.
- Press and release start button (1), date/time and current user will be displayed.
- Set user A/B switch (6) to A for user A or B for user B, LCD display will show user A or B symbol.
- Press and release the start button (1), all icons on display will be shown for 2 seconds. The device will adjust to zero automatically. The measuring blood pressure symbol will then flash on the display and the air pressure will automatically pump up to certain pressure level and start measurement.
Do not move or talk in the midst of taking blood pressure measurement.
5. After the air pressure has increased, the pulse is detected, the heart rate symbol will start flashing.
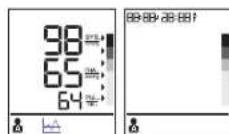
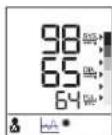
- LCD Display will show the results and WHO indicator arrow after measurement. After taking blood pressure measurement, turn off the device by pressing the start button (1) or automatically after 1 minute.
Memory function
Your blood pressure monitor can store the latest 40 readings for both users each for the BP6000, 50 readings for both users each for the BP6100 and 60 readings for both users each for the BP6200.
Storing measurement data
After each blood pressure measurement, the Systolic pressure, diastolic pressure, pulse rate and the time & date of specific day will be automatically stored. Memory #01 is always the most recent one. Once the memory is full, the oldest values will be overwritten.
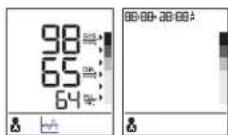
Press memory button M(2) to review the stored data. The last memory data (sys/dia/pu) with measurement date/time, IHB (for BP6200 only) and WHO indicator will show on LCD. Press memory button M(2) again to show the previous data. Be aware that the correct user A or B is chosen.
Average function for BP6000
Press the average button to show last 3 readings average on LCD. Press average button again to clear LCD for 0.5 seconds, then results will be shown again.
Average function for BP6100
Press the average button to show the full day average of past 7 days on LCD. Press average button again to clear LCD for 0.5 seconds, then results will be shown again.
Average function for BP6200
Press the average button to show the full day average of past 7 days on LCD. Press the average button second to show the morning average of past 7 days on LCD if the result is with morning hypertension, the morning hypertension icon will be shown. Press the average button third time to show the evening average of past 7 days on LCD. Press the average button fourth time to show the full day average of past 7 days again.

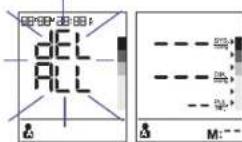
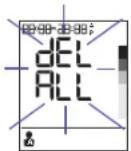
Erasing data
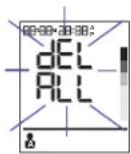
Press and hold memory button M(2) for more than 5 seconds, LCD will blink display "dDEL ALL"(if the "slide switch is in User A side, the user A icon will show.") or "dEL ALL"(if slide switch is in User B side, the user B icon will show).
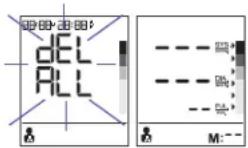
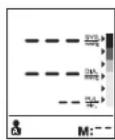
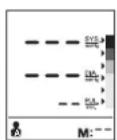
Press memory button M(2) again, LCD will display "---" to mean all the stored data of corresponding user have been deleted.
Irregular heart beat detector (for BP6200 only)
The appearance of this symbol signifies that a certain pulse irregularity was detected during the measurement. Talking, moving, shaking or an irregular pulse during the measurement can result in the appearance of this icon. Usually this is not a cause for concern, however if the symbol appears often, we recommend you seek medical advice. The device does not replace a cardiac examination, but serve to detect pulse irregularities at an early stage.
Low battery indicator
When the low battery indicator plots on the display, it means the battery is low and the four batteries need to be replaced with alkaline LR6 (AA) batteries.
**After replacing batteries, BPM will go into time-setting mode automatically and show the last measurement time on screen. Please set the current date / time before taking the next measurement to get correct average result.
Storage and cleaning
Always keep the unit in the carrying case after its use.
- Do not put the item directly under the sunlight, in high temperature or humid and dusty places.
- Do not store in extremely low (less than -20^ ) or high (more than 60^ ) temperature.
- Use a piece of cloth with water or mild cleansing agent to clean the case and then use a piece of dry cloth to wipe it dry. Use a piece of dry cloth to wipe the cuff when it is dirty.
- Do not use any strong cleansers to clean it.
- When the unit is not to be used for a long time, remove the batteries. (Batteries may leak or cause harm).
- Do not modify the device. NEVER open the device! This will make the manufacturer's warranty invalid.
Calibration
This product has been calibrated at the time of manufacture. If used according to the instructions for use, periodic recalibration is not required. If at any time you question the measuring accuracy, please contact our service representative (see last page for contact information) or visit www.hot-europe.com/support.
This device is not Intended as a substitute for regular check-ups by your doctor, please continue to visit your doctor on a regular basis for a professional reading.
Production date is given by the LOT located in the back of the device. The first 3 numeric digits after the LOT No represents the day of the year of manufacture. The next 2 numeric digits represent the last two numbers of the calendar year of manufacture and the letters at the end designate the manufacturer of the product. E.g. LOT 15614VTN this product was made on the day 156, year 2014 at manufacturer Identifier VTN.
What to do if ....
| Problem Reason | Solution | |
| Heart rate symbol | Appears in the measurement condition and flashes when pulse is detected. | • Measurement in progress, remain quiet. |
| Low battery indicator | Appears when the battery voltage is excessively low or the positions of the batteries are incorrect. | • Replace all four batteries with new ones. Insert the batteries in the correct positions. Be aware of +/- positions. |
| Measuring error | Appears when the accurate blood pressure and pulse could not be obtained. | • Press "start/stop" button again and remeasure. Check if cuff is wrapped according to instructions. Check that there are no kinks in tube. Check palm if exerting effort. Check if talking or moving during measurement. Check if posture is correct. |
| Error | E1 shows The cuff is not secure - Refasten the cuff and then measure again. | |
| E2 shows The cuff is very tight - Refasten the cuff and then measure again. | ||
| E 10 or E 11 shows | The monitor detected motion, talking or the pulse is too poor while measuring. | • Relax for a moment and then measure again. |
| E 20 shows The measurement process does not detect the pulse signal. | • Loosen the clothing on the arm and then measure again. | |
| E 21 shows Measure incorrectly - Relax for a moment and then measure again. | ||
| EE 3 - EE15 Error | while measuring - Retake the measurement. If the problem persists, contact the retailer or our customer service department for further assistance. Refer to the warranty for contact information and return instructions. | |
Specifications
Method of measurement Oscillometric
Model number BP6000, BP6100, BP6200
Range of measurement Pressure 0-300 mmHg
Pulse 40-199 beats/minute
Accuracy Pressure +/- 3 mmHg
Pulse +/- 5% Max.
Inflation Deluxe automatic
Display Liquid crystal display - systolic, diastolic, pulse rate
Backlight Display for BP6200
Sets of memory BP6000:40 sets per user
BP6100:50 sets per user
BP6200: 60 sets per user
Cuff size Small cuff = 22 - 32cm arm circumference
Large cuff = 32 - 42cm arm circumference
Operating temperature +10^ + + 40^, less than 85% R.H.
Storage temperature -20°C +60°C, less than 85% R.H.
Operating atmospheric pressure 860-1060 hPa
Unit weight Approximately 500gr (without batterles)
Power supply Alkaline battery: 4 x AA (LR6) 1.5V
Battery life 300 times measurement
Auto power off Whenever not used for 1 minute
4 batteries, 2 arm cuffs with tube, Instruction manual, pouch
travel by
Service life: 5 years.
IMPORTANT
Read the operating instructions.
If device is not used within specified temperature, humidity and atmospheric pressure
ranges, the technical accuracy of the measurement cannot be guaranteed.
Classification:
-Internally powered equipment
- Type BF equipment
- IP22: Protected against solid foreign objects of 12.5 mm diameter and greater.
Protected against vertically falling water drops when the device is tilted up to 15^
Not suitable for use in the presence of flammable anesthetic mixture with air, oxygen
or nitrous oxide
Continuous operation with short-time loading

Operating temperature
Storage temperature

Storage humidity
Subject to change without notice.
This product conforms to the provisions of the EC directive 93/42/EEC (Medical Device Directive). This device conforms to the following standards:
EN 60601-1:2006 + AC:2010:-General requirements for basic safety and essential
performance
EN 60601-1-2:2007 - Electromagnetic compatibility requirements and tests
EN 60601-1-11:2010 - Requirements for medical electrical equipment and medical electrical systems used in the home healthcare environment
- EN 1060-1:1995 + A2:2009 - Non-Invasive sphygmomanometers - general requirements
- EN 1060-3:1997 + A2:2009 - Non-invasive sphygmomanometers - Supplementary
requirements for electro-mechanical blood pressure measuring systems.
- EN 1060-4:2004 - Non-invasive sphygmomanometers - Test procedures to determine the overall system accuracy of automated non-invasive sphygmomanometers.
MEDICAL ELECTRICAL EQUIPMENT needs special precautions regarding EMC.
For detailed description of EMC requirements please contact an authorized local Service Centre (see guarantee).
Portable and mobile RF communications equipment can affect medical electrical equipment.

e do not dispose of the product in the household waste at the end of its useful life.
Disposal can take place at your local retailer or at appropriate collection points provided in your country.
Guarantee
Consumer Card available on our website at www.hot-europe.com/support
Please see last page of this manual to find the Support contact numbers in your country.
The LOT and SN of your device are printed on the rating label in the back of the product.
UK only:
This guarantee in no way affects your rights under statutory law.
| Guidance and manufacturer's declaration - electromagnetic emissions | ||
| The ME equipment is intended for use in the electromagnetic environment specified below. The customer or the user of the ME equipment should assure that it is used in such an environment. | ||
| Emissions Test Complience Electromagnetic environment - guidance | ||
| RF Emissions CISPR 11 | Group 1 | The ME equipment uses RF energy only for its internal function. Therefore, its RF emissions are very low and are not likely to cause any interference in nearby electronic equipment. |
| RF Emissions CISPR 11 | Class B Comples | |
| Harmonic emissions IEC 61000-3-2 | Not Applicable | The ME equipment is solely battery powered. |
| Voltage fluctuations/ flicker emissions | Not Applicable | |
| Non-Life Support Equipment Separation Distance Calculation(3Vrms / 3V/m compliance) | |||
| Rated maximum output power of transmitter (W) | Separation distance according to frequency of transmitter (m) | ||
| 150 kHz to 80 MHz in ISM bandsd = |3,5/V1|√P | 80 MHz to 800 MHzd = |3,5/E1|√P | 800 MHz to 2.5 GHzd = |7/E1|√P | |
| 0.01 0.12 0.12 0.23 | |||
| 0.1 0.37 0.37 0.74 | |||
| 1 1.17 1.17 2.33 | |||
| 10 3.69 3.69 7.38 | |||
| 100 11.67 11.67 23.33 | |||
| Guidance and manufacturer's declaration - electromagnetic immunity | |||
| The ME is intended for use in the electromagnetic environment specified below.The customer or the user of the ME should assure that it is used in such an environment. | |||
| Immunity test | IEC60601 test level | Compliance level | Electromagnetic environment- guidance |
| Electrostatic discharge (ESD)IEC 61000-4-2 | ±6kV Contact±8kV Air | Complies | Floors should be wood, concrete, or ceramic tile. If floors are covered with synthetic material, the relative humidity should be at least 30% |
| Radiated RFIEC 61000-4-3 | 3 V/m 80MHz to 2.5GHz | Complies | Field strengths outside the shielded location from fixed RF transmitters, as determined by an electromagnetic site survey, should be less than 3 V/m.Interference may occur in the vicinity of equipment marked with the following symbol:Separation distance calculation provided above. If a known transmitter is present the specific distance can be calculated using the equations. |
| Conducted RFIEC 61000-4-6 | 3Vrms 150kHz to 80MHz | Not Applicable(no electrical cabling) | |
| Electrical fast transientIEC 61000-4-4 | +2kV power line+1kV I/O lines | Not Applicable | The ME equipment is solely battery powered. |
| SurgeIEC 61000-4-5 | ±1kV differential±2kV common | Not Applicable | |
| Power frequency magnetic fieldIEC 61000-4-8 | 3 A/m Complies | Power frequency magnetic fields should be at levels characteristic of a typical location in a typical commercial or hospital environment. | |
| Voltage dips, short interruptions and voltage variations on power supply input linesIEC 61000-4-11 | >95% dip 0.5 cycle60% dip 5 cycles70% dip 25 cycles95% dip 5 sec. | Not Applicable | The ME equipment is solely battery powered. |
BG 6bIrapckn
PpeHa3NaueHHe Ha Braun ExactFit 3 n ExactFit 5
KOHPTONHINAPANAT3kPbBHOHNHARHe,NOCTABuCeBPOHPaCTHaPBtA,OTBAunE p4a6b0Te3aTOHOHcYIO6OHOIMBpeBAHKBpHOHOHOHbTPOHOHOHmEBPeBAHKOPTONHINAPANAT3kPbBHOHNHARHeOTRAUMcIANTAHIOHO BPOPEMaHnPAoBOPKTATAMy cDok3aHaC KINMHINHO Nc3nDeBaH BcToBTcETBe CESH.
KaKBO TpR6Ba Da 3Haete 3a KpbBHOto HAnraHe
KpBbHOTo HnHrAe NOtHOHReCe IPOmHEN pIeE JEN. RPAKe Ce NIOHs PAHO CPTIN H cTnA B KcBcTA CTPyH. KpBbHOTo HnHrAe OTHoEO Ce NIOHs CNEOeD N HAKPe Baepe Hnda H NHCIO HNO.To MoeDa aBaRpaIa H pAMKite HA KpATbK nepiOu OT BPEMe.CneobatoEN HOK3aHNAHTO TA NOcEOBATEHN MMEPRAH MOE Da BApRpaI.
Pnokanu 3a KpBHeHnnahe, omVmehu om 30paes 31-20duien MbK, uMpeau Ha 5-Munmu Umepeau
HMePHOTo B NekapKn KaHHT KpbBHO HnArae HneOCTABcMAOMoMometHa CTOHOCT. MHOTOKPAthn E MNEpAHy y Doma No-dOpBe OtpaRbAT deNCTBHTENHtce TOnHOCT Ha KpbBHO HnArae npn EkeDEHBNAYCNOBn.
OIO NOpoe MHOro Xpa nonyIaBt PAHnHO KpBbHO HApHRe, KOrato To MePrt BkU, 3aOto TAM CE cyBCTBaT NO-CNOKOHN, OTKONKO T B NEkapCN KaHHe, PeOBHnTE N3MepBaHnA HA KpbHbHO HApHRe, HApPABeHN yOMa, MOrAT Ja IpeIOCTABH N HAKePA BUNCHe NINHOPMaJHA aHOPMAHNTI CTOHOTn HA KpbBbHO Bn HAnRAHe NPn DECTBHTENH NcEeHDBeHN YCOHOH. CBToHnata 3apBaHn OprAHMaun (C3) oIpeJeNnne CNEHnTe CTnAPTHn CTNoHOTn HA KpbHO HApHRe, KOrato TE nmepeBn pnn Pn B NOK.
KpBbHO HnAraHe HopMaHn IeKa TeKkX (mmHg) CTouHO XnepTOHO XnepTOHO
SYS=CNCTONHO 140140-180 Hn180
(TOPHACTOHOC)
DIA=maactonno 90 90-110
(DONHACTOHOCT)
Hd 110

3a rapaHTapraHa ToHn HpeayTATOn To NmepBaHHrTA pnoHETe AHMAtenHO LaHATA hNtpyrca 3y aMytoP6a.
Toan pnpjky e npdaaaneh cmo 3a dommaa yonptpe6a. Iaeerte npdyka n gatepnte daene o Taea.
Xopata cbc sbpnehAa pIIMTHA,BAOOKCTPHKIA,ATEPOCKIEP03A B KAPMIHNTAE,DAEPTB INCBJCEHNE NEMeIKbPN CNEJa da CE KOHCYNTPaC T NEPa Da IMMEPAOT COBCTHOTo CN KpbBO HAnaReAte, Tb KaTO B TE SsNAM MoKE Da BbHHKHAT OKNOHEHAT OT CTOHOTHTA KeKbHnOto HANrHaTe.
A BO MOMETA NONYAATASE MENLIHCKO LEUHHE INI B3EMATE KAKBOTO Na e NEKAPCTBO, PINOKEO KOKYUNPAIE C NEKAPC H.
Tots KOHPTPOHEN APAN3A KpBbHO HANJRAHE He npEpaHaHauyeh Da Cnyk KaTO 3aEMCTHTEN HA KOCHYTAUNCA N cKaEBN
Onncahme Ha npoykta (Bnxtre Ctp.2-3,0r1.1)
1. byroH Crapr
- ByToH, Namet
- ByToH,HaCtpoKa Ha data/4ac
- Eutou Haxtojka
4.BytO,HaTnKoA
5.ByToH,OpCepHHBaH
6.Ппькювaten Мждnotpebnten A n B - LCD ducnnnei
- THe3do 3a Mapkyu
- KOHEKTOP
10.MaHwct(joCTaBcC2MaHwcta)
11.Bb3duywchMapkyi - Kanak Ha oteneHneTo 3a 6aTepeHH (4X 1,5V TnA (LR6) 6aTepeHH
NocTabaHHe Ha 6aTePmTE (BxKte Dn.2-3)
Cbaene Kaaka Ha OTenEnHMeTo 3a BatePMN OT OINHa TcPaHa Ha anapata
Noctabe 4 aAnkanHbatePMN AA LR6, Kato npabnHO opHenntpate
NONIOCTE [BX. CmBOMBA BOTENEnHMeTo 3a BatePMN]
BeneKb:BNHn npHeaCTpoBaTe datata n Haca Cne3AMHa HC HOBn Batepn, 3a daocpynte cIpaHEHMeTo Ha pesytnatme ot mepbaHnTa CnpabnHnTe dat a Hac.
NkHpIaIcAmaOIOJIeHNbATEPHNHeBHaJNaCEHXHbPHTC 6bTOBnOTnABHau, a CMO B cBOtBEHTMEcBbMPOTeHNuEHTPOBE HINnpdNCTPNbTyOPaBI.
Φn.r.2
Φnr.3
KIOUOBNIpaBnla3aTOHNOIN3MePBAHeHa KpbBHOTo HAJIraHe
BnHAIATOTNHTAHTe NOKAAHNA TNo CbIIO TO BPEMe Ha DeHRA, IUEAIAHO CYPTIN H BEpe, PpN EHN M CbSNIYCNOB.
-He 3MepBaIte BpaMKITe Ha 30 MHyTN cIe nn pueHe H KaFe nnn qai.
Czanele puynna NacOBMNI K BIKyTATA, npEJa da NoCTBATE MAnJIeTA Ha pTKaTA, HA KOYIO CE M3bPbua H3MEpBAHETO.
Korato IaBbpaBaTe IaMepeBaHe,ceDHTe,OTyHcTe ce,CTOte cNoKOHaHO, He ce DaBHXeTe HRe BOOPTe.
- yBnIeMaHweta nnbTHO OKONO pKaTcN. MaHwTebT Tpa6Ba da e HapabHO cbc cbpueto.
He KIATepe Anapata No BpEne HA 3MepBaHc, TbKATO BnpOTBeH Cnyu HMa da ce NOnyHn papanBIOHmCpaHc.
-3BbPwete N3MepBaHTo CnOKoHOBOTyCHaTO nOIOKeHHe.
- CéndheTe Ha cTOn cBc cTBnAnaTa Bn XOpN3OHTaHn Ha Noda.
He yaa Ta Mea Hb BpB pKa Hn Kn PhaHn, Tk KaTO B npOTBEH CnyH NmepBaHTo EHOKe A bDe XabPbHo.
Cbanete ntho npunenHanoto obnkno ot naBata cn pbka.
-He ycykbaaTe MaHwTeTa no HnKaKbHaHH.
He HadyBaIte MaHwEtA Ha KOHTpOINnAnapat, KOrato He cyBUT OKNO pBkTa Bn.
He ce onnTBAe Da p3rnoBate Nn da CmHRe TaCtHa KOHTponnAnapA, KIOUHTenHO MauHuaCTa.
-He n3nyckai Te npodykTa Hr ro noDnaraite Ha cnHn yapn.
- He 6nBa da n3non3BaTe ypeDa, aKO mATE paHa nn HapaHbAe Ha pbKaTa Cn.
U36op Ha npabunHmMaHneT
3a Tvoho k3mepeBaHe e KaHIO Ha 3eBepete npabuWnHbApaMehuET, KOIO Tnca Hau-HoBeHa rOpHata cuaT ha PbKaTa b. 36bePete paMeHa ha MauHeta cnpoe obKnolKkata Ha pbKaTa bN CE yBepeTe, e DoHHATA cHt HA MauHeta e 2-3 cm NaKbTB N.
- Manbk/cpehen MaHwET = 06nKoNka Ha pbkata or 22-32 cm
-ΓολΜ/MH.ΓολΜ MaHWEt = ΜυκONΚa Ha pБΚaTa oT 32~42 cm
NoctabRHe Ha MaHwEta
U3BbPwBaHe Ha n3MepeBaHe
YbIeMaHauTeO OKO bPkTa Cn (Bk. pazdE, NocTbaHe H MaHauTeNo-rope). 1.CedheNa tCtNa c3wPnabeRrpb6,zaCTe B npAwbHna n03a.
2. Hatnche n Otnyche 6ytoHa, Cnapt" (1). Dnncnent ue nookae datata/hae TekyuunnpoNtpeBnien.
3. Noctabete npneBKnovbteHa nOtopeBtienKe (8) 6 noJoxenHeA 3a noTope6ten A Wn B 3a noTope6ten B.LCD DNmnn ne oKoakc CmOnBa 3a noTope6ten A Wn B
4. 3eNCHETe OITNCHETe 6yTHoA, CnTarp1 (C).BNCMHIKOHNa HJCNPIEJe 6bIaHt I3o6pBa3eHn 3a 2cKHyDn. YCTPOINTO CE HyInpa AOTAMTNHIO.CnTe Toba CmBONBT
3a 1MNEBPAHb KApbBHTO HAnIHAReIe IpnnmHReHb HAnCnIeN H AROMTAIHOe bEgde BCMKHYbBdIXy DoJIOHaTHReHbAOnOpEnDEHOHbAReHbMeNpBcABHeTaONoHaJIa.
He ce DnKte Hr roBopTe,doKATO 3MepBaTe KpbBHOTo cHnHaRaHe.
5.CnK KATO BZAYUHIO HANAHRE CE yBENH, CE OKPINA NpCt. CMBONT3a CbppeHATA 电 TOTATAAHOBA da PIMNBA.
6. Cnep n3mepBaHTo LCD dncnneT ue noKaepeyntaTe n ctpekata Ha nHdkatopa no C3O.
CnKATO N3M9EYKT BHOHTO HANHARVE, N3KNOHYCTOPOCTBOTTO, KATO HATCHETE BYTOHA C. CTAPr' (1), INIO To octabete Da E zHKNOVAMOTAHUO CNEI 1 MNNYTA.
ФункциЯ,Памет"
KOHTPONHINBn apanat 3a KpbBHO HANRAHE MOKe Ta CbXpAHBa NOcnePHNtte 40 NOKa3AHn3a BCEKn nort6bnten 3a BP6000,50 nOKa3AHn3a BCEKn nortpebnten 3a BP6100 u 60 nOKa3AHn3a BCEKn nortpebnten 3a BP6200.
CbxpaHbAHe Ha daHHnTe OT m3MepBaHnTa
CnBcKIO hNMEbaHNe HKnPbHO HOI HAIrae He cNbHbHA BAtOMaTHUHc bXpaHEHe HcCtHOHO HAnHJIaRe, DnAChTOHO HOI HANrAgHe, NpNyCa, KAKo I Na DaTAta H KOHKpETHHJ Den. Memory #01 bNanH e na-HOBATA nMaTe. CnEi snnBaHae He nMaTTa e nBbPiBa npesNaHsKaHe bHpy XnH-ctaprrte StOHTOHc.
HATCHETE 670y3a naometra M(2), 3a ja pnernepeate cbxpaehene TaanHH. Jnncnentie nke nokakae nocenepnnte 3anaameteh nnahm (sys (cactnoHO) / dya (naactnoHO) / pu (nycN) c jatara u haca ha HmepaHeto, CmBONA 3a hepahomeoe CbpeH (IHB) (cama 3a BP6200) u HnndkaTopo na 3C0. HATCHETE 670y3a naometra M(2), 3a da ce nokakat npexdoHnnte daHH. Pnpopepe t aHn e npabpanpnnnHnntnnpnrpen (A INB).
Функця"OcpednBaHe"3aBP6000
HATCHETE BYTOHA 3A OCPEDHBNAHE 3a Da cncnKHe HAI DCINN CPOEPHATA HO NOCHEHTE 3 NOKA3AHIAHATCHETE OTOHO BSYO 3A OCPEDHBNAHE. DNNCNEIT HE WCHNTBA 3A05 CEKYHNI, CND KETO EPYNTATNTe OTHOBO CE NOKA3Bt
Функ,在"OcpeHbae"3aBP6100
HATCHHE6by0Ha 3a ocpeHNBaHe 3a da cnoKaxe HAnCnneren eonOeHNbHa cpeDHA cTOnHOCTN 3a NoocNEHNT7
HnA. HATCHETe OTOHO6 by0Ha 3a ocpeHNBaHe. Cnncnert ce nauChTa 3a 0,5 cekyHn, cneI KOeTO
peyNTATte OTHOBO cNoK3aBT.
Функця"OcpeHЯBaHe"3a BP6200
HATNCHE ToHYo 3a ocpeHHBaHe 3a,3a da ce NOKAe Ha DCNnner
enODHBHATA cpeHa TcnoHTC 3a noceDnHte 7 dHn. HATNCHE ToHYo 3a
ocpeHHBA He 3a TOPI mT,3a da ce NOKAe Ha DCNnner cyTpeHHata cpeHn
CTOHOHT 3a noceDnHte 7 dHn.AKO eYctAHOBe HA cyTpeHHa XnNEPTOHn,ue
6bde nok3aHa YKoHATA 3a cyTpeHHa XnNEPTOHn. HATNCHE ToHYo 3a
ocpeHHBA 3a TpTe mT,3a da ce NOKAe Ha DCNnner BueePHTa CpeHn
ctocnch3 n cncnnepe 7 hnnn nnnnene neonne nne nne nne nne nne nne nne nne nne nne nne nne nne nne nne nne nne nne nne nne nne nne nne nne nne nne nne nne nne nne nne nne nne nne nne nne nne nne nne nne nne nne nne nne nne nne nne nne nne nne
U3TpmbaHe Ha daHHN
HATCHETHE HADZPbTeBte 6yTOHa, PAMET M (2) 3a NOBEe OT 5 CEKYNH. DnHNCbT, dEL ALL"ue pnnmHHe HA DCNcnae (Ako nIbTaerHnptpeKnOHTaen B e NONOKeHne A, ce NOKa3aa IKOHATA aat noPb6tten A,a oke b RONQKeHne B-IKKOHATA aat noPb6tten B).
HATHCHEOTHO6byoHaPameT M2.DINCnENTIe NOKAKEX-,KOGTOOaOHAnaba,ueCa aanuChENBCNHN CbxaHPaENHHAHNa HcSOBTBNNNTNOPTBEBN
DaTunK 3a HepaBHOmepeh cbpdeueH nync (cmo 3a BP6200)
NORBATA HA TOI CMMBOH NAHUHA, He NO BPEME HA N3MpeBaHETO eYCTaHOBA ONPeDEHNA HEPEDHOBT A TINCA. ITOBOPCHETO, DIIKHECHO, KTHAEHOTMO HCPABHOOMHPTYJIC NO BPCME HA N3MepBaHETO MOKE DA BODEE DE NO BOPA HAT SA TIKHOKA. OOBHKHOBO TEO HE ePNHINA 3a BEZOKHOCTBO. AKO CIMBOBTOB OAO CE NOBBRA YECTO, PNPOpBbWAME BAI DA NOTBCITE MEIMUNHCKA NIOOMU. YCTPOBCTBO To HE ZAMECTBA INPERIEDA Ha CBpTeO, a CIyJHK 3a PAHHO YCTAOHBAABE HA NEEPDCHOTB B UNCA.
UHdkatop 3a n3toueHN 6atepuu
KoIATO INHINKATOpB 3a HsIOUeOHM BATEPO PRIMNHE HnA hINHINER CHN O3AHAYA, He BATEPOHcBa ITOHOOH NTRPbA 6e Za c HmEHTC n AOKANHE BATEPO LR6 (AA).
** CneI zAMHa H a BatePwHte anapatbT b AROMATWHO pEmeHHaB a PexMM H a HactPtoKHa H a caca Nok3Ba H a KepKa H a caca H a NoCNEHOTo MmEpeBAe. HactPtoTe TEKUYHTe dA/uc, npEn da 13b5bpuIne TcNEBaUToO MmEpeBAe, 3a NaONyHTe npABuIN eOpBENH pezHNH pezTNT.
CbXpaHeHne HnoucTbaHe
BunharncbxaehbaaTe anapataBkanbphi cneynoTpe6a.
He nlaaraje anaparaHa npraKa CbHueBa CBeTnHa NII BnCoka TemnepatyaI H e Ro IpaKte Ha bAnkXho II IN paAuaHO MRCTO.
- He CbpaHBAJIte pRn MHOrO HcCKM (No-HcCKM OT -20°C) ININ BvCKOM (No-BvCKOM OT 60°C) TEmpeHTyp.
PONHETTEKOPNYCAcnpaJIAN,NAHbANJHECN BODaIINCmEK NOHCTBAuNpeNAPAT, CNEI KOETO fo aabepwntc bcs cyu npaJIan. 3aBpCbaRteMnAteCu n cyu npaJIan, KORATO e aMbcpN.
-He ro chTe CbCnnH NouchTaun npenapaTn.
Korato anaparbT HMA da ce 3nnon38a da bIynt nepHO, 18a8aete GatepInne. (BatepInne Moar da npotekAT da nnPwHINN TOBpcra)
He MoHnAnPnAaYrctPoTbTO.HNKOFA He OToBaPaTe yCtpoTcBTO! ToBaIe anHynpaP aRaHnHaJIHa NpOsnBdOIIeTIe.
Kannupupahe
TOni npOydkTe kAnHbOpnBaNo pBMeHa hIa6bOkTaMy.AKc oIeN0n3Ba cnpoed yka3aHnAHTa 3a ynoTpeBa,He e HNOHOIMMoJa ce peKaIIINbPpHa nepoMIOHua. Ako NIO KOETo Hja e BpEme IMATE CBmHNE OTOHOCTO YoHOCTa Ha IMAePbAHE,MOJI, CbPjKeTe Ce HAIHINCEPbMEn HpeCTABNTEN (BIXTE NOcEPdHATA CTPAHnla 3a HINFOPMAs HAKTAKTI) INN NOCETETE www.hot-europe.com/support.
Toba yctpoiCTBO He e npdeHa3aueHO da cnky KaTO 3aMeCTIne H apeoBnHte pnernei npin BauHHK nape; npOblkawaeJa noceuBaatepeoBOH BAuHH Nekap 3a M3bPbHAe H aN3MepBAHe OT MEduHcHKn CNEUANJNT.
Datata h npno3BDCTBO e daHae B KODA LOT,HAMpaue CE ot 3aHATA cTPAHA hYcPTOBTO. PtBpne3 2nnpn ced kOa LOT npdecTbnaR peha onoPi03BDCTBO.CnepBaauRte 2 nppn oKaneHaonp03BDCTBO, a6kyBNTe B kpanobzabat npno3BDHTe HApnojyKa. Lot.15614VTN- tos npDykt e npno3BENH HAE 196,2014 NDHOn o npno3BDNTc u ENTHKnFkOpT VTN.
Kakbo ce npabu,ako ...
| Поблим Рп. | Иннua Peшениe | |
| Симьога за CBдегенha Чеб对象a | Поблиba ce в реким ha Измерва и падимьга рпс откrimбане ha плеса. | В поочec ha Измерва - пазete ТИSSHA. |
| Иndikatop za митосян Батери + | Поблиba ce, korato наржениeto ha bateprime e tvbpe dre Nsko иль bateprite he ca noctabehin правлино. | Заменete BCIMKITE cheчирьбетери с Нов разков. Поставete bateprite ha правлий песда. Имайто постдан opисотау. +/-. |
| Тушиka рпь Измерва Error | Поблиba ce, korato не може дca ce пolyu'to hohtovo крвно hyалганe и рус. | Наточete OTNBO 6byToHa start/stop" (стар/ STON) и nobToperete Измерва; - Пobopepete дani маншев te yevtit cnope уksazаня. - Пobopepete за несанчorne ha Извкин ha trьбда. - Пobopepete дani ta, akо полагате услдя. - Пobopepete, akо roboripte лиме с дыжichte по врeme ha Измерва; - Пobopepete дani stroykata e pnaibvlnha. |
| E1 noka38a Ma | Пшьт NT e zakpenen - 3aterhete манчera OTNBO, с徱 koetot nobToperete Измерва. Ma | пшerta OTNBO, с徱 koetot nobToperete Измерва. Ma |
| E2 noka38a Ma | Пшьт NT e mHOrO CTerHAT - 3aterhete манчera OTNBO, с徱 koetot nobToperete Измерва. Ma | пшerta OTNBO, с徱 koetot nobToperete Измерва. Ma |
| E10 Л尼 E 11 A | Iaparbayt e petrncmpdav Давожениte, goborene лимпс subt п орөме hyн IMмерва e tvbpe.dслб. | - OTNpyche tce za моремт, с徱 koetot nobToperete Измерва. Ma |
| E20 noka38a M | Мер�ател徴пrt proozс cre petrncmpdav сгнлд ha пьс. | - Paixxilabete рькава ha chotberhata рьka и nobToperete Измерва. Ma |
| E21 noka38a He | правлино Измерва - Otrnychete ce | sa моремт, с徱 koetot nobToperete Измерва. Ma |
| EE 3 - EE15 | Гөшka NO рөме hy Измерва-у. | Извршete OTNBO Измерва. Ако пoboleм'te Ne hy Исьэрse, obsprêtete ce Кым dokstavchenika лима нашь оддя за obcylkubes на КИЕNTN 3a doьнчнтENHa nOMOUI. Викты raganlurma за данни за对接гИУ күздаги за ыршante. |
CneuΦkaun
MetoHa n3MepBaHe OcunnOmeTpueH
Moden N° BP6000, BP6100, BP6200
Hana3OH Ha 3MepBaHe HanaRaHe 0-300 mmHg
Iync 40-199 yapa/MnHyra
ToHoc Hnrae+/-3mmHg
PmKc. + / - 5%
Hanybahe Deluxe aBtOMaTHUHO
DinCnnne TeHOKpCTanEn HcNnne - cTOnHO, dNactOnHO, nnc
PnCBeKaHaJncnner3aBP6200
Bpoi naemn BP6000:40 6p.3a notpe6nten
BP6100:50 6p.3a noTpe6uTeN
BP6200:60 6p.3a noTpe6nTen
Pa3Mep Ha MaHweta ManbKaMaHwet = 06nKoNka Ha pKaTa oT 22-32 cm
TOnmMaHwET=ObVKoKKaHa pbKaTa oT 32-42 cm
Pa6oTHa TEMnepatypa +10°C - +40°C, OTHOCHTENHBAaXHOCT NO-HNCKAOT 85%
TemnepaetaHa cxbpaheHne -20°C +60°C, oTHOCHTENHBAaXHOCT no-HNCKA or 85%
Pa60THo aTMocΦepHO HanaRaHe 860-1060 hPa
TeroHa anapata Pn6mntenHo 500g (6e36aTeepu)
3axpaHbHaHe
KUBOT Ha 6aTeepnTe
ABTOMATNUHO N3KNIOVAHe Korato He ce n3NON3Ba 3a 1 MNHYTa
Akkcecoap 46aTeepn,2MaHwetaCtpb6a,HNCTpykua3aynotpe6a
EcknnoatauHcHxHBOT: 5rOHH.
BAXHO
TppyETe HHTCPKIMTA 3aekcnnoatauun.
AkyctpoIcTbTO He ce H3N03Ba B 06xBaITne, NOOCHeH 3a TEMpepatypata, BnAAKHOCTa HAtmOcpeHPO HAIHTae, HE MOKe Ja bBde rapaHnnpaHaTexHNueckata ToHOCHT HaMNEpHaETO.
KnaCnΦnKaun:

-060pyBaHe C BbTpewHO 3axpaHbaHe
-06opydBaHe TIN BF
-IP22:3aunrTeH or yxynn TBbpAe Tena C nmaerbpo 12,5 MM mnn noBeeue.
YpeBbTe 3aunTeH OT BepTKKaIIHO npaaUN BOHN KAIKN, KOrato e HAKIOHEH He NOBEue
or 15
Herodno 3a ynoTpe6a npn HauuHTo Ha b3nnaMeHReMa aHeCTeTuHa Cmec OT
Bb3dyX, KICNoOpO n a3OTeH OKnC
- HenpebchaTa pa60Ta c KpaTKOBpeMeHHo HaTobapBaHe

Pa60tha temnepaTpa
TeMnepaTypaHa cxbxpaHcHne

HOCT nPM
cbxpaHeHne
IopnEcknHa npomHa 6e3 npednABeCte.
24
Cn npjdyk CbTbETCTBa H naaponeDbe TaHneKTHa H NaeKTHa 93/42 Ha CbETa OHIOHO 0297 MedmuaKHTte HnndJeN. Toba YcptroBCTo CbTbETCTBa H cnaJdHNTe CTahADPTt
EN60601-1:2006+AC:2010-O6uHn3NCKBaHHa 3aOCHOBHa 6e3OnacHOCT H
CbueCTBeHn XapakTepeNTuKU
EN60601-1-2:2007-IMCKBAHNAIIN3NITBAHNA3aENEKTPOMaTHHTA CbBmCTMHOCT
-
EN 60601-1-11:2010 -Изкаима за лесгковомедиондама наразу и сменоть, ИсторICAL B doomashyn yucobnaya
-
EN 1060:1-1995 + A2:2009 - HeNBaBnBHeMaHOMetpr3a 3a3MepBaHa Hc KpBbHO HannrAehe (CphiNMOhAmotPrn) - 06uHN3KBeAHn
-
EN 1060-3:1997 + A2:2009 - AnapaTn 3a N3MepBaHe Ha KpbBHO HAnraHe no
HEINHBA3BEN METOQ (CIFMMAOMAHOTPMN) - 070JTHENTNHN13KCBHAAH3a JEETKPOXMACHYHUMC CIXTSEMTA 3A KIMPMEHA HKA PKBHO HAIHAFAE.
- EN 1060-4-2004-HeHHa3BbHbMAHOmometpn 3aIImpeBaeHa KpBbHO Hnllrahe (cFHMOMAHOMETpn) - IpouleJypn 3aIImtBaHe 3aOpnpEJIHe Ha TOOHCTa Ha cNATA CTCEMa HA ABOTMATUH NHeHbA3BbHNcFMOMHAptn.
EJEKTPOME[JIHNCOTOPO5OPJ]BAHE m3NcKBA 3eMaAMHO H a cIeMauHH ppeIa3nH MEpkn NO OTHOUHEA HNE EKTPOMTAHHTA BcMECTMOCT (EMC).
3a noDp6HO OHONAHIE HA NsCKBAAHNTA 3a EMC ce o6bPHTe K-M MeCTHNA OTOPINAPAH cepBN3EH cHTBp (bk, rapAHNPTA).
POTATMIBHOTO M6OHNHO TO6OpyBaHE 3a paADIOeCToTHa KOMyHnKaIa MoKte Da NOBIIRe H a enEKTPOMeDNHcKOTo 06OpDyBaHe.

XbpynTe npOdykTa npu 6ntOBn OTnaBun B Kpa Hnne3HMy JNBOT.
NaxbpyrHETO MoE Da ce 3BzPbun pni MeCTHN Bn DcTpOyTOp Wm B CbOTBEHTNH C6bIPaTeHN HcETPORe, NaHmHN B bPkBaKaBA Tb.
Fapancn
Kapta ha notpe6nteHa haHauHa ha HauHa ye6caTl www.hot-europe.com/support
MONB, BnVNeTOCnEaHATAcTPOHAAHCTAOPOKOBQDCTBO, 3a DA HAMEPITE HOMEPATA 3a KONTAKTI 3a NOpObKaKb BBuAHTA cTpHa.
Homepara LOT N SN HA yctpOriCTRO RA CA OTNeuTATAHn HA etIKKETA C HOMMHNHNTe DAHHN O T3aHHTA TCRPAHa npoDyKTa.
25
| Указань и дevelopаIGNHa npOINbODInTeI - eNeKTPOMaRHTHn I N3JIbYBaHnI | ||
| ЕнектометдИнСКИН ANAPAT e npEDAHAZHAnE 3a yynotpe6aВОпIMANATA NO-DONY eNeKTPOMaRHTHnI cpeA. KIpyBaYbT HN INOTpe6BETIAY H aEnKTPOMaDIIHcNK HApApat TpIb6a DA rApAHnIpa,Чо ТОЕ с ИЗПОЛБА B TAKBA cpeA. | ||
| Инштвае 3a Ильчань | СъOTBeTCTBHe EneKTPOMaRHTHn cpeA - уksaHnIa | |
| РадиочecToTHI Ильчань no CISPR 11 | ГураI I | ЕнектометдИнСКИН ANAPAT ИЗПОЛБА В радиочecToTHI eNEPRTKAMCЯ DO 3a SbTpeHnITO CNYФункIHOnHapAe. Слбдателю радиочecToTHI MEИЗПОДИЗHЯ CA MHOFO NIKCKI, KATO e МANKO BEPOITHNO da npediэзBERKAT CMUZENIA B bIbIKKOSTERTIO eNeKTPONHOBOPyduaHie. |
| РадиочecToTHI Ильчань no CISPR 11 | КlacВ БсъТBE | СъТBA |
| ХарmonIHChIи Ильчань no IEC 61000-3-2 | HenprINOxMIMO | ЕнектометдИнСКИН ANAPAT ce IaxpaHbVA сmo cбATEPIN. |
| КonedбаянA NaIpoJOKeHnIeTO / Ильчань на TретпriшшуM | HenprINOxMIMO | |
| Изual宪hoe Na pa3deleniTeHTo pa3cTOnHHe OT obOpudBaHe, HenpeHaHa3NaHcHcO 3a нордьрха He KaNBoT (cbotBcTcBHe c 3 Vrms / 3V/m) | |||
| HominaHa MaKcMaaHb H3XoJa MoUHcCT Ha празавATEeW | Ра3deleniHо pa3cTOnHHe cnped cheTotata Na p3dabateln (m) | ||
| 150 kHz do 80 MHz v pa3doNeCtOTNHte JIenHn 3a ПROMINIeHn, Nauchn и МEdiZHcNKu ceHn d = [3.5/V1]√P | 80 MHz do 800 MHz d = [3.5/E1]√P | 80 MHz do 800 MHz d = [7/E1]√P | |
| 0,01 0,12 0,12 0,23 | |||
| 0,1 0,37 0,37 0,74 | |||
| 1,17 1,17 2,33 | |||
| 10 3,69 3,69 7,38 | |||
| 100 11,67 11,67 23,33 | |||
| Указаняи искларачи на поюз Bodітělen -[eнгелтORMaHHTHa uCTочИвоct] | |||
| ЕнгелтORMeДиИСКИТАПаРAT e[nретдзэнсэн ha ул'tорпеба в озигдата lo-nуLoE nengtPOMaRTHHa crepeDA. Кунуаыт ha nnoTpo6bETeIaH na nengtPOMeДиИСКИТЯ apарat Tp86ba da rapaHTIPA, ue toе ca mIoN3Ba b TakaKAc cepeDA. | |||
| Изпитваха зуctовиьост | Инbos Na Изпитваха по IEC 60601 | Инbos Na ChotВETcBme | ЕнгелтORMaRTHHa crepeDA -yuka3aHnA |
| Енгелстотаимен yaparad (ECP) noIEC 61000-4-2 | +6 KV priorKontAKT±8 KV no blydxa | СытВETcBA | Падогете ТрбБада са дьрев,在ьсьдьсььсььсььсььсььсььсььсььсььсььсььсььсььсььсььсььсььсььсььсььсььсььсььсььсььсььсььсььсььсььсььсььсььсьб cIstHTeNTeHmAteMgHAP, OTHOcTeHmHTaH aIapXHOTcTbHcTbHdA da bIeDIOHcIe 30%. |
| Изльberнадя рад氧чес�дддддддддддддддддддддддддддддддддддддддддддддддддддддддддддддддддддддддддддддддддддддддддддддддддддд徳 | 3 V/m 80MHZdo2.5GHz | СытВETcBA | Korato anapetbt e KIbSbHJACToTOTO, ekpanuHApOTo HteILOIMINHII pIpeDabTlHnH aIpaHODeOCTOH CTHHANH, CHTHANH no PTOI, oPteDedHnH pI prObeDEHOTo HnA MIOTo eKEnTPOVArHnTO npOpyUHBe, Tp86Ba da ca noD 3 V/m.СмчeINHЯ MOrIa da BbIbHKHAT B BIIb3OCT dooboyDaBaHcBc SbC nOeDHTaH MaPoiKpOBKa: |
| П罗бетеня рад氧чес�ддддддддддддддддддддддддддддддддддддддддддддддддддддддддддддддддддддддддддддддддддддддддддддd | 3 Vrms 150 kHzdo80 MHz | Hempnokmio (Hmua eKerTpIeckn Ka6eYi) | |
| IEC 61000-4-6 | |||
| Енгелчесн blyd prexoxedeniproceC noIEC 61000-4-4 | +2 KV za cunovIproboDyHNK±1 KV 3a bIXodHNo-HxOxOHyIproboDyHNe | Hempnokmio | |
| Оttсок noIEC 61000-4-5 | ±1 KV aIdupeOeHmAneHpeKIML±2 KV aO6bHcH | Hempnokmio | |
| Магштно none, prominheiro otЧEVToHn 3aXaPbHbAsditeHaprochENHINOIEC 61000-4-8 | 3 A/m CStbETcBA | MaTHHITne PtoTeA, prominheiro ot ChEVToHn HaKpAHAITEH aIpePekEeHInH, Tp86Ba da ca Ha HbB, XapaketHn 3a TImHNoHmIO CToTmHnH TaTROBcK NmIb6OIMHnBa cpeDA. | |
| Крахтограда сададанянha haprekeHnTo, крахтоградянIHpeKbCaHnI yIaMeVHnHIIhaprokEeHmTo bly bXaOxOdiyepeKpTa3aXpHbHbAsditeHaprochENHINOIIproboDyHnIInoIEC 61000-4-11 | >95% cIad3a0.5Umknka60% cIad3a5Umknka70% cIad3a25Umknka95% cIad3a 5 cck. | Hempnokmio | ЕнгелтORMaRTHHa crepeDA -yuka3aHnA |
Cszeky
Ucel pouziti pristrojub Braun ExactFit 3 a ExactFit 5
www.hot-europe.com/support
Telefonni cIsla zakaznickych linek ve vaSi zemi najdete na posledni strance tohoto navodu.
Cisla LOT a SN vaseho priestroje naleznete na vykonovem stitku na zadni strane priestroje.
Aetoupyia eou opou yia to BP6000
Piote to nIaKtpo meau oop yia va uapoviatoe i e aoc opoc twteutaiu 3etpaeuw otyn obovn LCD. Pteot naTo nIaKtpo meou oop ov 05 deutepoalekva kabapao tnc obovnLCD.tn ouvexia ta anateleqata Ba epavniato Eaivc.
Aetoupyia meoo opou yia to BP6100
Ieote to nAikpto eouo oop 1va va eapavotie o Iaonp neaoiaoc ooc ooc tov tealeutaiu7 nepov ony obov LCD. Teote naoi to nAikto po eouo oop y0,5 deutepoaenta yka kadoipogio nOcbovLCD. 2n ouveexia ta anoteaeopata Da eupaviotov EaVc
Aetoupyia eou opou yto BP6200
IeToTto mNkpO eouo apo yia va eupaviotoi aNpO npOIOc ooc taw TEAUATUW 7 nuepO atnV OovLCD. IteTo vaeutepo pOa to mNkpO eouo apo yia va eupaviotoi a npuovoc ooc opw TAEUTAUW 7 nuepO atnV OovLCD. Eav to amoteAua jiva me npovw upeptao,ba eupaviotai to ekovioo npnuovtneptaoi cie To attng oop to mNkpO eouo apo yia va eupaviotoi aBpaovoc ooc ooc opw TAEUTAUW 7 nuepO atnV OovCD. IteTo to mNkpO eouo apo yia teapantop ooc yia va eupaviotai na o npncnpoeipnooc ooc ovTuEVATUW 7 nuepO.
Diaypaipn 860eewv
O xphotnc niepeaataeva To nkiKpoo uynnc M (2) naw ao 5 eutepeoela. Tn v oevno LCD 0 avaoohyve nEvdo cN ALL (eov a diakontnc evnt ovri npuaou tXpnotn A, 0eupaiotei to EKoviioio Tou xpnotn A) nEvdoE N DE ALL) (eov a diakontnc evnt ovri npuaou tXpnotn B, 0eupaiotei to EKoviioio Tou xpnotn B).
PiTe nTn pKtpo mwnjc M2. TnV oBovn LC Bg Epuavoti eEvEiEeN tou nuajnti et ovkuybpaqei dta aOnOKeuVe 6eOeMaTv oavtiotxu xpnTn
Avxveuticavuapauokapdiakouxtunou (movo yia BP6200)
H eupan autou ou bokau aivei o anveuudke kaiota avuaia atov kapia kato apyuo kata tn petaon. H uaiu, tuxv kivcic auatapadie cnc uayuaia opuyuo kata tn petaon mpoel va npokalaoov tvn eupavian auot kioviodiu, suwihcu autt deev laita anyauiac, wotoo, ao to uboo eugavietai ouvya, ac ouviotoue va netae tiatpki noubouli. H ouokeun de vntkaiotar nvkapiaek EETAa, alla eumptei ia tvn avvuaen avuauiawuyou o pewio otado.
EvEaunncnataiac
Otav n EvSeiX jaiNcJmuatap cKooBojvri tOnovbOn, oJnuAeiv OToImuatApEe iEvAtanBki oI teoepicmuatapcne nevi oAvkntaataoBte y aeakaikecmuatpc LR (AA).
Mera tvravkataoan tnu mntapnro, to meoatpno 0a teleouotauo an oT aeutovpyia puoiucn oc npoc kai 0eapwotei otv oobny nup ayn teauao pnetnpn. Puoiye triy pexuaoxu npneopnuia wpa, npotrp ouxpnpoeon otnv etouen ymu npn yva laipede vns oana oontaeauia uoe opdo.
Onio86oWtn o6ovn yia to BP6200
- Small/Medium manchet = armomtrek 22-32 cm
Large/XLarge manchet = armomtrek 32-42 cm
www.hot-europe.com/support
BCTABKa 6atapei (m.pnc.2-3)
CHAMMTKbIbXb6aTapeHOrO tCeKaB HnHKeH qaTH npHbOp a BCTabBe 4 5eNoHbix 6aTapeN TmA AA LR6, co6nOan nnonpHocTB (cm. CMMONB B 6aTapeHOM oTeke).
PIMMEYAHNE: BcERd YA cTbAHAHBAIe TATEy INBPEM NOCE ZAMHeBb 6aTaPe, YTObI N3MepeHn COxpaHnNcB C npabINbHOI dToI N BPEMeHE.
He octabnirhe Bnpbopea ppaarimneecb4aparen. Hx he chedyert bBpaccbtaB bBTOAbe OTxObl, a Heo6OmmDcqaabaT b COOTBETCTBIUoiue NytKtB nPiMe AINB OprAnH3aIIO, OCJYIECTBNIUIIO POzHHNIIe PNDQAIJI.

Pnc.2

Pnc.3
OchOBhIe npabnla ToHoro n3MepeHHa rTepeNaIbHoro daBHeHHa
BcgeraIImeepnIte DaIeHne B OIOHO TO Ke BpMa,nyue bCero yTpoM uBepeom,B OIOHN X TEx Kye cYOULIOHN.
He bHIOHNIHTe I3MepeHHI B TceHHe 30 MmHT nOcNE KpyeHHa, yNtOpeJIeHHn KafoJn Yau.
IpejndHaeBaHemMaHxKetb CHIMMTEcAcbNIOBENIPHBeYkuaaHEnCpyn,NA KOTOPoOgDyTnpOBDOHnHsU3MeHHPOE.
- Pnp npoeHn n3MepeHn Bam cneyert cecb, paccna6ntbch, He pa3roBaPnBaTn He dBnraTbC.
O60paHbTaMaHKeTy BOKpyr pyKIn cneDyet nIoTHo.MaHKeT aOnKhna HaxoHnBcHa HyaOpBHe cepua.
- He Tpncnte npn6op BO BpeMa n3MepeHna, HnAue npaBnIbHoe 3HaueHne He 6ydt nonyuHIO.
- BbnonHnIte n3MepeHne cNOKoiHO, HaxoJcB paccna6NeHHOM noNoKeHHM.
CnDtebHaCTyneCnepyer,noCTabNBHornpoBHOHa non.
He Ocbapaua HmaKeyntopeBx pykaba KpyTkn nn Cbntepa,ImpeHne He MOKeT 6bTb BblIOJIHOHcEePz34Ae
- CHIMaTe c neboi pykn nnoTHo oBneraIOuIe qactn Odekbl.
He donyckaiTe nepekpyuHaHHMaHKeTbI.
He hakaunBaTe MaHKeTy ToHometpa, KOrda OHa He oBepHyTa BOKpy pyK.
He bttaiTecpa3o6parbnnn 3aMeHntbKaKne-nu6o Detanu TOHometpa, BKnIOyA MaHKeTy.
- He pohnye npnbop n He donyckaite cnblbix ydaob no Hemy.
PnBOp He cIeJyET NcIIb30aHb Pn HAIuW paHbN TpaBMHa pyke.
Bb16op npaBnIbHOro pa3Mepa MaHKeTbI
dHnTOHOrO HmEpeHHaBHO BbIpaBtpaBvBbNpaBmepMAHKTe, KOTOpHnHaBc0e e cooteBCTyET bBxBaTByBaIero npEtnPb. BbIpaIepTa paeMBeKHe, NcOxA3nH 03 xBxaTBypyKn, nY6BeTce, hTO HmKHeNaCTb MaHKTe bHaxoTcN Ha2-3CM Bblwe NOHTA.
- Manlehnky/crepdnyan pamsemp Mankehty = 06xbat pykyn 22-32 cm
- Solbuohny/ouehy Solbuohny pamsemp Mankehty = 06xbat pykyn 32-42 cm
HaedeBaHne MaXkeTbi
- PpOeHbTe KOHeu MaHKeTbI, HaxoJaunnCn DaJIbwe OT Py6Kn, YpeE3 MetaIIINueckoe KOnbQo, QOcB GoCoTaB nTeKIO. IInKaN TaKbH DoJKN HA XaOJNTBa H BHTpyHHei CTOpOHe MAHKeTbI.
PNC.4
1,2,3 1,3,4 2,3,4 3,4,5 4,5,6 5,6 6,7 7,8 .

③
2.BCTaBBTe WnAHr Bpa3bEm (pnc.4).
3. Ecm JAMHAKA pACONLOKHENA PABUNBHO,TO 3ACTEKHA TINI NIMUYUKA BYJET HANXOJIYB CHA H B HUCHNCH CSTOPHO MAHKHNYA, A METALYNWCKOE KOHILIO BY JET KACATBO KONG (PVC.5).
4. BCTABBe NByO pyKyB netno MaHKeTb.HHHHnA CTb MaHKeTb doNkHa HxOaDtcb npMepHO HA 2-3 CM bIwe NOKTH. Ty6Ka dOgHnA pNOxOaNTb HAD nIeHEOB apTepeMe HA BHTpeHHei cTOPOE pyK (Pc.6).
PNC.7
PNC.9
- NotarHnTe MaXKeTy, qTo6b BepxHm HxHm Kpaa 3aTahynnc Ha pyke (Pnc.7).
- PpabnIbHO paCNOJIOKIM MAHKeTy, NIOTHo npNkMITE 3aCTeKKy TINrA nnnyka.
- Manojekia pRnoiHaIa IIN cnoNtobAoi, EcnI pRn 3aTaNbAHnH NpaY oMeTknca >> nonadaT B dIanaOaON
,OTMECHNUIyMa TcPENKA (Pnc.8). - Cnble Ha CTy n IIOKOHTe pyky HA cTOn, NTO6b MAnKetca HAnOxDnIacb HApOBoE BauWero cepDla (Pnc.9).
Ducnne BP6000 /BP6100 u BP6200
TOnbKOnnMOnenBP6200
PnmeaHnue: Ma oenoyi BPS200 nOcbTeBA kBNHOAeTcra pRn bKNOUHN HnnpoB, hAkanatni KhoNOK m npr OTObPAkehnnpey3yIbtaTob nOCTaeR BKNIOUYHOn Do BkNOUHOHnnpoB.
BbI6Op pexIma
KaBb6paTb nonb3oBaTeA /nonb3oBaTeA B
-6eTecb,TO np6op Bkouen.
- Peremecite ne TnebnohatoB nnonb0baTeBen C nonb0b0aTeBn A h noBn0b0aTeBn B, H KaKK-dinnee 6ydtet Mmftab 3BaHHeMe TeKyuOero bNoBtobTeBn.
HnikkaTop WHO/ESH dno oueKne pe3yNbTaTOB n3MepeHna apTeepaNbHorO daBHeHHN
ПИббОСЧАЕНИДКATOPOMУРБАгОНБАТОВ OCHOBANHМСΚAнСΗΚΟΥРБАгОНБАТОВ NO 6066e C apTPEAнБHOrnRanPOTmEH (ESH) OTO70RA.ДЯ KAKDOKO NOK3AHAH, OTOPBAZAEMORA HxKaPHE, NOK3aBIAZTCyPOBEBH apTPEAнБHOrO DAJIENAH, IMEHOU MHTBOBE O6O3HAEHNE, O ZEIIHORE DO KPAcHOrO. 3Ia KIAcCnФКaHua NOMOKeT BAM EkeJdHeBHO KOHTPOnIOBAPbCB GxOyPBeH agPTMAnbHOrO DAJIENAH, B CNYae KIPITIMCKEO YPOBBA OOBAPITIECs K BYPry.
YctahOBka Meca, DaTbN BpeMeHn
a.ДЯуctAHOBKn DaTbI bBpeMeHN BbIKNouHTe yCTpOcTBO.
6. NOB3OBATEB HAKMAET KHONKY (4),OTb6B yCTAHOBHTOgH,HA JINCHNCE HAHTMIR AHJAHHECHO, NOB3OBATEB MOKET NOCB3OBATEBHO KHNMABTB KHONKY (3),OTb6B YCTAHOBHTHYHKOH AHJAHNC
NBOBtAEBHKAAMETKHONKY (4),TO6BcYCTAHOBHTB MECCHU, HAJIMCIEHNAHEMTMBAHSHENHEMEcHUMT BNOBtAEMOKETNCNEBOPARHO HKOANMABTB KHONKY 3)TO6BcYCTAHOBHTB HXYKHO SHAHNCHE
r. NOIbOaBertabn HxMAHxONKHO (4),YTOb6yCTAHOBHTb 一 Deh3, HAJNCNNE HaHETMHARzAHAHEHcE 一 Deh3, NOIbOaBertabn MOKET NOCENoBtABnHO HxAKMAtb HO KONHO 3, YTOb6yCTAHOBHTb HXHOHO AHHOHO
1. NOB3OBATEB HAKMAET KHONY (4),TOBNOYCTAHORIBT YACH, HA DINCNEE HAHMET MIRATBH AHAHEHNE YACH, NOB3OBATEB MOKET NOCDEBOPATBHO KANMATA B KHONY (3),TOBNOYCTAHORIBT HYHKHOAHEHNE.
e. IIOHOBATBEN HAKIMAEET KHONKY (4), UTOB6YTHAOHBTM 1MHTbY, HA JNCIIEHN HAHMET MTATBJHANHEWE MHOHTbY, IIOHOBATBEN MOKET NOCNEBOHAROHN HOA KHMABT BKHONKY (3)UTOB6YNCTAHOBATBHKOHQHAHCHMC
JIINI30ABATEb HAKIMAEKTHOKNY 4,HTO6b3AOKHNTyCTAHOBKY DaTM/BPEMeHN,NOCE 3TOFIOHNEHNEPKPATNTM.
PnmeHue: ydepnBaHne KhoNk HactpoKn (3) IO3BOJHeT IPOKpyHMdb 3HaCHNA.
BbInonHeHne n3MepeHH
ObepHnTe MaHKeTy BOKpyr pyKn (cM. pa3dEn HaneBaHne MaHKeTbI Bblwe).
1.ДЯ obecneueHn npabunbHOO OCAHK cNDHTe Ha CTyIe npAIMO
2. HaxMMTE O NTYCTNE KONKNY BKNCHENH 1) Na JINNCEE 6ydy TOT O6paKaTaTa DaHHe bO dAe/ BVPemEH NkUYeKIN NOb3OBATE.
212
- YehaohBite nepeKIOHATeNB noBbOaTeRAN B/6) HA 3nEHAeA I ANI bONbOaTeRAN A INI H 3nEHAeRBN B I DAI NOBbOaTeRAN B, HdNcNtce 6yEDOTo6PakTaBcCmOBN NOBbOaTeRAN A INI B
4.HaMHTNEI OTNXYTTEKHOKNKY BKNIOHNEU 11, BCE WKOHN HA DNCTNNE 6DyUT OTOBAPKABCTCB E TCENHNE 2 CekYN. Pn6Op 6yJET ABOTAMATINCKH YcAHOEN H NHyCBOE AHCHNE. 3aTEM H DnCTNHEHHT MNTBt CHMOB I3MEPHNIA KPOBHO RAO BANHENA, B MA HOKETY ATOMTAHHECN HAVHET HARHTATB CBO3DyX DOOCTKEHNO ONEPDEHNOY OPOBHNRA HAYANA I3MEPHNIA.
He duaimec b He 20opumbe 8pema u3mepeHn KpoaHOzo oaeHua. - Nocle TOTO, KAK DABHEBAO OYBHA B MAHKEDE NOBOCTC, ONPEDELEETCA PYNBc Hn Ha DCNNEE HAHNAIE MIRATb CINBONA VACTOBI CYCEPOHOTM
- 10nse bIbONHHeN HMaMepeHNHa IaCnIe OToBpaKaIOrTa peZyIstTaH MaMepeHN HcTepKa HINKATOPA WHO.
NocBIE BbIIOHNEIMMNEE KPOHHOHO DABHEBE BIKKIOHTPEI pRbOHP KaTHWEM KHOITKVA BIKHOENU 出 _ 1 , NIOHOeP3 I MNNHY PNPbOPB BIKBOHNOCTA CBOATMAHCTCKM.
Функци naMrtu
Bau ToHOpemr MPoKet XpAHInh PocnEHHne 40 pesyntbatoB hMpeHemn IIN KAKJIOI IN JROX NPOsboBaTeN BMOe MDOEN BP6000,50 pcsyntbatoB nKAKJIOI IN DBOX NPOsboBaTeN IIN MOeDN BP6100 IN 60 pesyntbatoB hMpeHemn IN KAKJIOI IN DBOX NPOsboBaTeN IIN MOeDN BP6200.
CoxpaHeHMe daHHbIX N3MepeHnI
Ncne h3mepeHHBnA BANTMAteCNK CooaHnTc3hauHHeN CNTOeCKeRTO daBHeHH, dAocToTbYpCbA, a Toke bPmE H aDt cooTBeTcByIOeOraH D. AueyKe narnnn N01 BCerda cOaHnTcBnC oocHeHn e3mepeHH. Pocne 3aoHHeHH naMaTHn HAnObeJe CTpaB He3mepeHHN HauNKAt Oepa3aBcBbTaBc.
HAMMITE KHOKNY NAMTNI (2), 0TObI npOCMOTpeB cxpAHCHNHE daHNHe. HkAkrAe 6yDyt OTObPAKATbC NOcNEHnDE BHCENHIE B NAMTNI DAHHE (sys/dia/pul) cyKa3aHHMe DAtb/BpeHHNPOBEDEHN KIMEPHH, CMBON APMTNHORO ynCSa (TObIK BOMD BPF6020) IN hINdAKTOP BO3. HAMMITE KHOKNY (2) eue pa, 0TObI npOCMOTpeB pnddyuHae DaHNHe. YbcJrTeCE, 10 BBpAbn Hxkynb nolz3oBATEB (A NII B).
Функцу усрдениу y ToHOMeTpBa BP6000
HakMnre KhoNkY (A) 5,0b6 Ha 3Kpae Hte OoPbaNocB cpeHne 4n 3noeeHH 3NaeHn. HakMnre KhoNkY (E) eue pa, 0tOuOcHtBuCInHa 0,5 CekyHdu, aate mpeyHbta CHOa OoPbaATCR Ha 2KpaHe
Функцуycpeну y toHometpa BP6100
HakMMTE KHOKNY (5), YTObSA Hk3PAAH OTObPAO TOBpAIOBC cpeDHE ZHAHEHNEI PAHMEPEHN 3a BECb DEh 3a NOcENNE DHEJ. HAKMMTE KHOKNY (5) eue pa3, YTObOA OHNCTNb DCNPTNe HA 0,5 cekyndu, 3ATEM PE3YNbTAb CHORA OTO6PABTn HA KOPAHe
ФункцуycpeнуTOHometpaBP6200
HAKMMEI KHONKY 5 (7) 0KbHa 1kAa HApOe OTOBpAaNIOc CpeHHe 3AHNeHMe pnn I mKepeHMe 3a BceB DeH 3a NoCnepHne 7 dHe. HAKMMEI 37y KNOHcy eae paa, TOpBu Ha kApae OTOBpAaNIOc CpeHoe 3AHNeHMe pnn YTOPOHmX hAmepeHn a 3oNocnepHne 7 dHe. Ecm b peynbte 6hOpHpaKaBaTcTaYTOHnRn HAKMMEI 37y KNOHcy hAkepe OTOBpAaTcCMBO TOpHEn RnTePENHn X. HAKMMEI 37y KNOHcy b TPCrTn pa3, TOpBu Ha kApae OTOBpAaNIOc CpeHoe 3AHNeHMe pnn BcePHE HAKMMEI 37y NocnpHne 7 dHe. HAKMMEI 37y KNOHcy b Vtepeptb Pa3, TOpBu Ha kApae He pa3 OTOBpAaNIOc CpeHoe 3AHNeHMe pnn I mKepeHMe 3a BceB DeH 3a NoCnepHne 7 dHe.
213
ydaeneHne daHHbIX
Nnbo8aetbehnaeMaertyepkaebtKhoNyamnM 2) Boee5 cekhy, Hd nncmte Byeet MntabnHaHnBc NDELL (ecnnnno3nykobbepeknckoateb HxaojOITCB Nnnonokennn A,B, yedet matarb NKOKHNaonbo8aetbnA)n nn nDL ALL (ecnnnno3nykobbepeknckoateb HxaojOTCB Nnnonokennn B,B, yedet matarb NKOKHNaonbo8aetbnB).
HaKMMTe KKHONky nAMHTM (2) eue pa3,Ha 3kpAne
bDyETOTOBpaKaTbCaHaAaNcB<-->,YTOO3Haaye,4TO B0E
coxpaHeHHbI daHHbI NO COOTBeTCTByIOUeMy nonb3oBaTeIIO bbln ydaNeHbI.
TeKTop apuTmNHyOr npNbca (ToIbKO nJa Moeenn BP6200)
NoBHeHNE 3T0 CMO BOM OHTN PNI H3MEPHENI 6bIa NoBapHcyKHe ONpeDeneHHA apITMN IybcA.NoBHeHNE 3T0 CMO MOKETbIb IBaBnApTaTOBOPM, DINIKHEMIM APITMNIMMbCO BO RBPMAH3MEPHEN. OBuHIO 3O He NPOKHO BbBbTA B6CNOKOHCTBAHO BcNyAAe TACOTo NOBHeHNE 3T0 CMO BOM MPEKOMEHYEM oPAPITbCRa KOHCYNbTAuMeR Kpauy. DAHNBI pnpOp He NpReTcAmeHOI KAPDIOONORYECKORO oCbeDoeBHAn a TOnbKO cnyHJT DnB OOBAPHcyHMe APITMN IMybcA hPaHne CTADNI.
HnDnKaTOp Hn3KOro 3apra6BaTapeN
NoBHeHHe Na EkpaHe MfKaHcOe HnMkAtopa Ito 3apJa 6atapen OaHaueT,TO 6atapen paaepKeHbI, Nce Tbe Tbe 6atapen HeoOxOmo 3aMeHHTb HOBBM UeONOHBM 6atapemR L6 (AA).
PnOe 3aMeHb 6aTepeh ToTOHemr APATOATUcKnepeIETB PekHM UCTAOHB KpEMHeu, a Hua NcHneJe OOBNTCA BpEmoNcHepno I M3MepeHy. YCTAOHBPe pAnBHyDQATy IN BPEM, npExze Me BmNIOHHTC bCdeUIOeE M3MepeHNe, TTObI NPOUYtbpAIBNbHBY peBvYbTAPn OPonEnDEJIe CnpHNx HAChEny.
XpaHeHne n uCTKa
Bcerda nocne mncnonbaohn ybnpaTe np6op8ytnp
- He cneuyet xpaHbTHpBnO6P B mctEx, OTKPBtBx IIN PnMbXb COHNeHbXI Nuey, PnBbCOKo TMENPATeN INI BAAKHOCT, A TAKKE B nBbHbMCTAE.
He cneyet xpaHnTb npn6Op npn OeHb Nn3Knx (MeHee -20 ^ C )nnOeHb Bbcokx (6oee 60 ^ C TtemepaTpyax.
ДИАСТКИ KОПNYA ICSNOLS3YITE TKAHbI N BOYI HIMMFRK HUCTSIHIN PACTBOPT,3Atem BHTPTE OEO CYXO TKAHbI. Пг 3агЗРЕМENHAKETBn POTPOTYE eC XUY TKAHbI.
-He nCnOlb3yIe dJe ee OHTKn CnBHoJeCTByIOJne UcTReJNe cpeDCTBa.
Ecnpbopheyntpnpnnpnnnbpnpnpnpnpnpnpnpnpnpnpnpnpnpnpnpnpnpnpnpnpnpnpnpnpnpnpnpnpnpnpnpnpnpnpnpnpnpnpnpnpnpnpnpnpnpnpnpnpnpnpnpnpnpnpnpnpnpnpnpnpnpnpnpnpnpnpnpnpnpnpnpnpnpnpnpnpnpnpnpnpnpnpnpnpnpnpnpnpnpnpnpnpnpnpnpnpnpnpnpnp
3aanepeaetchBROCHHTbMNEHENHBYRn6pOB.KATEFOPWNECKI aanepaetaeTcKcKpRHbATb np60Pb 3rnooBtE3coabHANHPNObAraHAPNTINrOTOBOTIN.
KaJIIM6pOBka
HnHHe 3nEne HbN OTKaNbBPOHO BO BPEM 3HTOBOTBEHN. PnI NcPbONbOAHm B COOTBCTAMN C HCTpyKUIMN NO KCNPLYATAUNPepNOIDNECKA KANlOBPOKa Hte TpeBcyTc. Ecnu y BAC Bo3NHHTCmEHnH B TOOHCTN MHEpEN, CBKNTECb C HAWMnpTeBCTABTNEM (KONTAKTHbe DAnHBe NpRBeDEhH Na NCNEHINCTPAHUE) NnNCOTME TAPCHNY www.hot-europe.com/support. 3T0 np6Op He MoKet 3AmEHnPBeyrNHPhe MeMNHNCKHC NCMTpBu. Itn pnoeeccmoHaJIbHO mMepehBaDaeHHN, NoKanyAnfct, peryNPHo nOeueaJIe CBOero Neauie EpaVa.
Data npno3OBCTDa yka3aHaNo nOe HnOme npnTn (LOT) HaJdpn KpIkwpe npnp6pa. IepBte TPOI npPbI npoc HnOme npnTn (LOT) O3HauAei DeB Ta npNO3BDCTBa.CneUyIOE 2 UINpBbO3HAVAOptoNocDeHne DBe IMppBk KanEHADHO rOda npNO3BDCTBa, a bYKbB a KOHue - npNO3BDHTen npnp6pa. HanpMpE, np1564VTN-danb npNO6bpBn npNO3BEdB 156- IN DeB 2014 roa npNO3BDHTENc E dJeHTmKnATopOM VTN.
TemnepaTypa xpaehna-20...+60°C,OTHOCTENbHAR BnAHHOCTb
He Bblwe 85%
Pa6oue aTMocphiepnoe daaeneHne 860-1060 rPa
Bec npnbopa Pnpmepeho 500 r (6e3 6aapei)
IcTouHrkntaHnueNoovHbceBaTaepen:4xAA(LR6)
46atapeH,2MaHexeTbCtpy6Ko,pYKOBOCTBO NO
Cpok kcnnyataa
3KcnnnyatauH, yexon, dopoxkha cymka
T6apHTbpepaMepb(6e3 cyTnpa), He 6onee, MM. 140 x 135 x 105 Bec, He 6onee, r. 320 (6e3
m - 1 0 ;
BAXHO!

PpOHTHe HNCTpyKuMn no 3KcNnyatauMn.
Pn3KcNpyatau np6opbaBhe yka3aHHbIX dnaana3oHOB TempepaTpybl, bnaHocntu
aTMOCΦePHOr DaBnEHHaTexHnueckKaToHOCb N3MepeHn He rapaHTnpyETc.
KnaccnΦkaua:

PnBOpCBHyTpEHNM NITaHHeM
Ttno60pydoBnB
IP22:3aunuehOT TBepdbx HOPoHbX TEINnAmETpOM 12,5 MM N6onee.
PnIbOpaaunuHcT oBcTmKablnHO nanaQauuHXKaIeIb BOIy, KORda otKNOHeHIOJ yrrnno 10 15a
He npe3haaehuey hnnnncb03baHb B npncytCBBnBocNMAHEHOBUEcMeCTA HAEETUPUOIEBOE BECTBcB CBOXDMYK, KICNOPODmNnI 3AKKBCIOA3O7
- Henpepbibhpanpa0Ta c KopoTkMM BpeMeHem 3aRpy3KN

Paboua TemnepaTpa
216

TemnepaypaxaHn

Bnaknoctb npx xpaheHH
Bo3MOKHO BHeCHeHne N3MeHEn H6e3 yBeDOMnEHN.

JaHAne Iiohue oOcbTeBcTBy TonoJekHmI dJeKtbNtBu EC 93/42/EEC (IaKeTbNtBu oMeHHnKCM o6ooyBoAHn). 3To tPnoBoc oObTeBcTBy cNeDyOHm CTanAdaptant.
- EN 60601-1:2006 + AC:2010 - Obuime Tpe6oBaanO OCHOBH Bc03aONCTH IN ΦΦeKTHNBOCTH INCPOBbOABAH
EN60601-1-2:2007-3neKtpomarHHTHAR COBmecTUMOCb-Tpe6oBaHnN MCnbTAHNA
EN60601-1-11:2010-Tpe6oBaHHK 3nEeKtpueeCKOMy MeuHcckOMy o6OpdyoBaHH
I3eKTPnueckm MeHnHCKM CNTeMaM, PnmuHeMbIM B DOMaHnx ycNoBHX
EN1060-1:1995+A2:2009-HenHb3a3BbHbHe cHfMOMaHOMeTpbl -o6uHne Tpe6oBaHH
EN1060-3:1997+A2:2009-HenHba3BHHHe cHmOMaHOMeTpbl-IOONHHTeHbHe
Tpe6oBaHnK 3eKtpomExaHueckm CNTeMaM N3MepeHn apTePnaIbHOr OabneHn.
EN1060-4:2004-HenHba3NBBhe cHfMOMaHometpI-POpRIOK pPOBEdHH
NCbTaHmIINOPDeneHnTOUHO
HENHBa3NBbIcΦHmOMaHOMeTPOB.
ME[II]UHNCKAI 3NEKTPOAITIAPATYPA Tpe6yetOc0bXbMep npdeTOCTOPXHOCTB8OTHOUEHHN 3NEKTPOMAHTIHTHO CBMeCTMOCTN.3aNoPpOBoHMIOmCAHNaeM Tpe6oBAHNI 3NEKTPOMAHTIHTHO CBMeCTMOCTN.06paaiTBeC BepCboHnCBt KAZ (cm,ycnOBnraPahTIH).
MoBnIbHbIe yCTpOuCTBa CBAI MOrY TBnAITb Ha pa6oTy MeDmUHcKo 3neKToaannapatypbl.

No OKOHAHIM cPOKA CNYbBdANHORIO NEDENNOXANJYCTHe BbOpaCBAIBte ero B 6bTOOBMycp. BbMOKTeCdaBcE OBOe MeTHOn OPAHRAAUIN,OCyIeCTNIOUe P0aHHIHype pOAnKa, ININ BCOOTETCTBOHOUI NYHK TIPnHaMe, PACIOLOKCHHN B BAeWcSTpAne.
TapaHTM
KIneHTCKaA KAPOTKA OTOCTYHNA HA Hauwem Web-caiTe: www.hot-europe.com/support Homepa TeneFOHOB cN6b6 bnoepkmb B aawes cTpehne npbeDeHa nocneHei CTpanHe dAnHOHOpykoBOCTBa.
Homep naptni (LOT) n cepinbny homep (SN) bawaero np6opa haeneatahba Ha nacnptho Tabnike HA zadehn nahepon np6oba.
IpnnoBdoHertien: KAZ Europe Sar, Bleucaerpaie Place Chauderon 18, CH-100 Lausanne, Switzerland OOpHIMnHbHM PnECTABTREHEM KAZ Europe Sar. BPOCSN HBRHTEA
OOO 1xN Nn3KuH
MntpOBCKoe WOCCE,OM N 51, Kopnyc 1, KOMHaTa 15
127 238, MockBa, Pocn
Ten.:+74822)630062
www.hot-europe.com/support
B Neporim naphtnHoroO cpoa nroTobotOBHtBcOyUeCTbBnMaTMeA hN3nennnn Hm BhuIeWJHO 3 TcPOMKnapHTyKuOeTO AJIeMeTHa. TaPapHTNHeB oCpKkNtayauan 24 MecaH aCo DHA KNYKUnn pRn CoNIOHNnNotpOBeHemNeBOKNkCNIpyAun, TnaHcONPnOBKnU xPAHENHIN.
NarotobotOBHtB He Hecet OTeBCTBEHOCTN B TEHEnHn PAPHTNHO CPOKa KkNtVAAuB C bYLIUX:
-MexaHuecknX NOBpeKdEHN H3denn npn TpaHCnOpTnpOBKe, XpaHeHm, 3KcNpyataun;
HENCPABHOBCTEY, Bb3BaBnBx KINIMATUeCKIMN BO3dEChTBaMM, HEOROBeHNbIM BPyKOBOCTBE NOIbIbOCTeLA;
-opa60TKN 3dennnoTpe6ntenEM (n3MeHn KOHCTpyKm)
217
+10°C - +40°C, %85™ten Düşuk®,®, nm.
Saklama sicakliq
www.hot-europe.com/support
y 1
jall jll gail gil gail gail gail gail gail gail SNLLLOT.LI
Cilwalgill
BP6200·BP6100·BP6000
S OBC = S COD + S BOC - S BOC
199-40
3a + b = - 1
( x - 1) · 2xy + 10y^2 = 0
Ss
jannnnnnaa aalaaai 2a
BP6200 jjaiyiaoi jie
40:BP6000
pistua 512 40 50BP6100
p# 60:BP6200
32-22jjbaa=pa
42-321j
85%85+0+0+10+
85 60+ 20
1.7.A2.
()500
(LR6)AA×4
= 23
sul, 1
J 21
,
p124
jai 1
yj
JSS
an + 1 = 2( an + 1)
1
A
()
jllcui jai jai
Jua 1y 1s 1ssal yall aiall, yjolil
L
BF 与 与 Cn
12.5 10000000000000000000000000000000000000000000000000
y j 1
sall s yaaaf aayll gaaall
j
y
T
V-60°C
...
| الحال | الإستعمال | الإستعمال |
| الترجمة الحرفية الحرفية. | الترجمة الحرفية الحرفية. | الترجمة الحرفية. الترجمة الحرفية |
| الترجمة الحرفية الحرفية الحرفية. الترجمة الحرفية الحرفية. الترجمة الحرفية الحرفية. -1+ مصاني بعس. | الترجمة الحرفية الحرفية. الترجمة الحرفية. الترجمة الحرفية. -1+ مصاني بعس. | الترجمة الحرفية. الترجمة الحرفية. -1+ مصاني bعس. |
| الترجمة("stop/start") "الترجمة" و رسمان. الترجمة الحرفية و رسمان. الترجمة الحرفية و رسمان. الترجمة الحرفية الحرفية و رسمان. - رسمان. الترجمة الحرفية الحرفية. - رسمان. - رسمان. - رسمان. - رسمان. - رسمان. - رسمان. - رسمان. - رسمان. - رسمان. - رسمان. - رسمان. - رسمان. - رسمان. - رسمان. - رسمان. - رسمان. - رسمان. - رسمان. - رسمان. - رسمان. - رسمanean. - رسمanean. - رسمanean. - رسمanean. - رسمanean. - رسمanean. - رسمanean. - رسمanean. - رسمanean. - رسمanean. - رسمanean. - رسمanean. - رسمanean. - رسمanean. - رسمanean. - رسمanean. - رسمanean. - رسمanean. - رسمanean. - رسمanean. - رسمanian. - رسمanean. - رسمanean. - رسمanean. - رسمanean. - رسمanean. - رسمanean. - رسمanean. - رسمanean. - رسمanean. - رسمanean. - رسمanean. - رسمanean. - رسمanean. - رسمanean. - رسمanean. - رسمanean. - رسمanean. - رسمanean. - رسمanean. - رسمان. - رسمanean. - رسمanean. - رسمanean. - رسمanean. - رسمanean. - رسمanean. - رسمanean. - رسمanean. - رسمanean. - رسمanean. - رسمanean. - رسمanean. - رسمanean. - رسمanean. - رسمanean. - رسمanean. - رسمanean. - رسمanean. - رسمanian. - رسمanian. - رسمanean. - رسمanean. - رسمanean. - رسمanean. - رسمanean. - رسمanean. - رسمanean. - رسمanean. - رسمanean. - رسمanean. - رسمanean. - رسمanean. - رسمanean. - رسمanean. - رسمanean. - رسمanean. - رسمanean. - رسمanean. - رسمanian. - رسمان. - رسمanean. - رسمanean. - رسمanean. - رسمanean. - رسمanean. - رسمanean. - رسمanean. - رسمanean. - رسمanean. - رسمanean. - رسمanean. - رسمanean. - رسمanean. - رسمanean. - رسمanean. - رسمanean. - رسمanean. - رسمanean. - رسمان. - رسمان. - رسمanean. - رسمanean. - رسمanean. - رسمanean. - رسمanean. - رسمanean. - رسمanean. - رسمanean. - رسمanean. - رسمanean. - رسمanean. - رسمanean. - رسمanean. - رسمanean. - رسمanean. - رسمanean. - رسمanean. - رسمان. - رسمanean. - رسمان. - رسمanean. - رسمanean. - رسمanean. - رسمanean. - رسمanean. - رسمanean. - رسمanean. - رسمanean. - رسمanean. - رسمanean. - رسمanean. - رسمanean. - رسمanean. - رسمanean. - رسمanean. - رسمanean. - رسمanean. - رسمان. - رسمان. - رسمان. - رسمanean. - رسمanean. - رسمanean. - رسمanean. - رسمanean. - رسمanean. - رسمanean. - رسمanean. - رسمanean. - رسمanean. - رسمanean. - رسمanean. - رسمanean. - رسمanean. - رسمanean. - رسمanean. - رسمان. - رسمanean. - رسمanean. - رسمان. - رسمanean. - رسمanean. - رسمanean. - رسمanean. - رسمanean. - رسمanean. - رسمanean. - رسمanean. - رسمanean. - رسمanean. - رسمanean. - رسمanean. - رسمanean. - رسمanean. - رسمanean. - رسمanean. - رسمان. - رسمanean. - رسمان. - رسمان. - رسمanean. - رسمanean. - رسمanean. - رسمanean. - رسمanean. - رسمanean. - رسمanean. - رسمanean. - رسمanean. - رسمanean. - رسمanean. - رسمanean. - رسمanean. - رسمanean. - رسمanean. - رسمanean. - رسمان. - رسمان. - رسمanean. - رسمان. - رسمanean. - رسمanean. - رسمanean. - رسمanean. - رسمanean. - رسمanean. - رسمanean. - رسمanean. - رسمanean. - رسمanean. - رسمanean. - رسمanean. - رسمanean. - رسمanean. - رسمanean. - رسمanean. - رسمان. - رسمان. - رسمان. - رسمان. - رسمanean. - رسمanean. - رسمanean. - رسمanean. - رسمanean. - رسمanean. - رسمanean. - رسمanean. - رسمanean. - رسمanean. - رسمanean. - رسمanean. - رسمanean. - رسمanean. - رسمanean. - رسمان. - رسمanean. - رسمanean. - رسمanean. - رسمان. - رسمanean. - رسمanean. - رسمanean. - رسمanean. - رسمanean. - رسمanean. - رسمanean. - رسمanean. - رسمanean. - رسمanean. - رسمanean. - رسمanean. - رسمanean. - رسمanean. - رسمanean. - رسمان. - رسمanean. - رسمanean. - رسمان. - رسمان. - رسمanean. - رسمanean. - رسمanean. - رسمanean. - رسمanean. - رسمanean. - رسمanean. - رسمanean. - رسمanean. - رسمanean. - رسمanean. - رسمanean. - رسمanean. - رسمanean. - رسمanean. - رسمان. - رسمanean. - رسمان. - رسمanean. - رسمان. - رسمanean. - رسمanean. - رسمanean. - رسمanean. - رسمanean. - رسمanean. - رسمanean. - رسمanean. - رسمanean. - رسمanean. - رسمanean. - رسمanean. - رسمanean. - رسمanean. - رسمanean. - رسمان. - رسمanean. - رسمان. - رسمان. - رسمان. - رسمanean. - رسمanean. - رسمanean. - رسمanean. - رسمanean. - رسمanean. - رسمanean. - رسمanean. - رسمanean. - رسمanean. - رسمanean. - رسمanean. - رسمanean. - رسمanean. - رسمanean. - رسمان. - رسمان. - رسمanean. - رسمanean. - رسمان. - رسمanean. - رسمanean. - رسمanean. - رسمanean. - رسمanean. - رسمanean. - رسمanean. - رسمanean. - رسمanean. - رسمanean. - رسمanean. - رسمanean. - رسمanean. - رسمanean. - رسمanean. - رسمان. - رسمان. - رسمanean. - رسمان. - رسمان. - رسمanean. - رسمanean. - رسمanean. - رسمanean. - رسمanean. - رسمanean. - رسمanean. - رسمanean. - رسمanean. - رسمanean. - رسمanean. - رسمanean. - رسمanean. - رسمanean. - رسمanean. - رسمان. - رسمان. - رسمان. - رسمanean. - رسمان. - رسمanean. - رسمanean. - رسمanean. - رسمanean. - رسمanean. - رسمanean. - رسمanean. - رسمanean. - رسمanean. - رسمanean. - رسمanean. - رسمanean. - رسمanean. - رسمanean. - رسمanean. - رسمان. - رسمان. - رسمان. - رسمان. - رسمان. - رسمanean. - رسمanean. - رسمanean. - رسمanean. - رسمanean. - رسمanean. - رسمanean. - رسمanean. - رسمanean. - رسمanean. - رسمanean. - رسمanean. - رسمanean. - رسمanean. - رسمان. - رسمanean. - رسمanean. - رسمanean. - رسمanean. - رسمان. - رسمanean. - رسمanean. - رسمanean. - رسمanean. - رسمanean. - رسمanean. - رسمanean. - رسمanean. - رسمanean. - رسمanean. - رسمanean. - رسمanean. - رسمanean. - رسمanean. - رسمان. - رسمanean. - رسمanean. - رسمanean. - رسمان. - رسمان. - رسمanean. - رسمanean. - رسمanean. - رسمanean. - رسمanean. - رسمanean. - رسمanean. - رسمanean. - رسمanean. - رسمanean. - رسمanean. - رسمanean. - رسمanean. - رسمanean. - رسمان. - رسمanean. - رسمanean. - رسمان. - رسمanean. - رسمان. - رسمanean. - رسمanean. - رسمanean. - رسمanean. - رسمanean. - رسمanean. - رسمanean. - رسمanean. - رسمanean. - رسمanean. - رسمanean. - رسمanean. - رسمanean. - رسمanean. - رسمان. - رسمanean. - رسمanean. - رسمان. - رسمان. - رسمان. - رسمanean. - رسمanean. - رسمanean. - رسمanean. - رسمanean. - رسمanean. - رسمanean. - رسمanean. - رسمanean. - رسمanean. - رسمanean. - رسمanean. - رسمanean. - رسمanean. - رسمان. - رسمanean. - رسمان. - رسمanean. - رسمanean. - رسمان. - رسمanean. - رسمanean. - رسمanean. - رسمanean. - رسمanean. - رسمanean. - رسمanean. - رسمanean. - رسمanean. - رسمanean. - رسمanean. - رسمanean. - رسمanean. - رسمanean. - رسمان. - رسمanean. - رسمان. - رسمanean. - رسمان. - رسمان. - رسمanean. - رسمanean. - رسمanean. - رسمanean. - رسمanean. - رسمanean. - رسمanean. - رسمanean. - رسمanean. - رسمanean. - رسمanean. - رسمanean - رسمanean - رسمanean - رسمanean - رسمanean - رسمanean - رسمanean - رسمanean - رسمanean - رسمanean - رسمanean - رسمanean - رسمanean - رسمanean - رسمanean - رسمanean - رسمanean - رسمanean - رسمanean - رسمanean - رسمanean. - رسمanean - رسمanean - رسمanean - رسمanean - رسمanean - رسمanean - رسمanean - رسمanean - رسمanean - رسمanean - رسمanean - رسمanean - رسمanean - رسمanean - رسمanean - رسمanean - رسمanean - رسمanean - رسمanean. - رسمanean. - رسمanean - رسمanean - رسمanean - رسمanean - رسمanean - رسمanean - رسمanean - رسمanean - رسمanean - رسمanean - رسمanean - رسمanean - رسمanean - رسمanean - رسمanean - رسمanean - رسمanean - رسمanean. - رسمanean - رسمanean. - رسمanean - رسمanean - رسمanean - رسمanean - رسمanean - رسمanean - رسمanean - رسمanean - رسمanean - رسمanean - رسمanean - رسمanean - رسمanean - رسمanean - رسمanean - رسمanean - رسمanean - رسمanean. - رسمanean. - رسمanean. - رسمanean - رسمanean - رسمanean - رسمanean - رسمanean - رسمanean - رسمanean - رسمanean - رسمanean - رسمanean - رسمanean - رسمanean - رسمanean - رسمanean - رسمanean - رسمanean - رسمanean. - رسمanean - رسمanean - رسمanean. - رسمanean - رسمanean - رسمanean - رسمanean - رسمanean - رسمanean - رسمanean - رسمanean - رسمanean - رسمanean - رسمanean - رسمanean - رسمanean - رسمanean - رسمanean - رسمanean - رسمanean. - رسمanean - رسمanean. - رسمanean. - رسمanean - رسمanean - رسمanean - رسمanean - رسمanean - رسمanean - رسمanean - رسمanean - رسمanean - رسمanean - رسمanean - رسمanean - رسمanean - رسمanean - رسمanean - رسمanean - رسمanean. - رسمanean. - رسمanean - رسمanean. - رسمanean - رسمanean - رسمanean - رسمanean - رسمanean - رسمanean - رسمanean - رسمanean - رسمanean - رسمanean - رسمanean - رسمanean - رسمanean - رسمanean - رسمanean - رسمanean - رسمanean. - رسمanean. - رسمanean. - رسمanean. - رسمanean - رسمanean - رسمanean - رسمanean - رسمanean - رسمanean - رسمanean - رسمanean - رسمanean - رسمanean - رسمanean - رسمanean - رسمanean - رسمanean - رسمanean - رسمanean. - رسمanean - رسمanean - رسمanean - رسمanean. - رسمanean - رسمanean - رسمanean - رسمanean - رسمanean - رسمanean - رسمanean - رسمanean - رسمanean - رسمanean - رسمanean - رسمanean - رسمanean - رسمanean - رسمanean - رسمanean. - رسمanean - رسمanean - رسمanean. - رسمanean. - رسمanean - رسمanean - رسمanean - رسمanean - رسمanean - رسمanean - رسمanean - رسمanean - رسمanean - رسمanean - رسمanean - رسمanean - رسمanean - رسمanean - رسمanean - رسمanean. - رسمanean - رسمanean. - رسمanean - رسمanean. - رسمanean - رسمanean - رسمanean - رسمanean - رسمanean - رسمanean - رسمanean - رسمanean - رسمanean - رسمanean - رسمanean - رسمanean - رسمanean - رسمanean - رسمanean - رسمanean. - رسمanean - رسمanean. - رسمanean. - رسمanean. - رسمanean - رسمanean - رسمanean - رسمanean - رسمanean - رسمanean - رسمanean - رسمanean - رسمanean - رسمanean - رسمanean - رسمanean - رسمanean - رسمanean - رسمanean - رسمanean. - رسمanean. - رسمanean - رسمanean - رسمanean. - رسمanean - رسمanean - رسمanean - رسمanean - رسمanean - رسمanean - رسمanean - رسمanean - رسمanean - رسمanean - رسمanean - رسمanean - رسمanean - رسمanean - رسمanean - رسمanean. - رسمanean. - رسمanean - رسمanean. - رسمanean. - رسمanean - رسمanean - رسمanean - رسمanean - رسمanean - رسمanean - رسمanean - رسمanean - رسمanean - رسمanean - رسمanean - رسمanean - رسمanean - رسمanean - رسمanean - رسمanean. - رسمanean. - رسمanean. - رسمanean - رسمanean. - رسمanean - رسمanean - رسمanean - رسمanean - رسمanean - رسمanean - رسمanean - رسمanean - رسمanean - رسمanean - رسمanean - رسمanean - رسمanean - رسمanean - رسمanean - رسمanean. - رسمanean. - رسمanean. - رسمanean. - رسمanean. - رسمanean - رسمanean - رسمanean - رسمanean - رسمanean - رسمanean - رسمanean - رسمanean - رسمanean - رسمanean - رسمanean - رسمanean - رسمanean - رسمanean - رسمanean. - رسمanean - رسمanean - رسمanean - رسمanean - رسمanean. - رسمanean - رسمanean - رسمanean - رسمanean - رسمanean - رسمanean - رسمanean - رسمanean - رسمanean - رسمanean - رسمanean - رسمanean - رسمanean - رسمanean - رسمanean. - رسمanean - رسمanean - رسمanean - رسمanean. - رسمanean. - رسمanean - رسمanean - رسمanean - رسمanean - رسمanean - رسمanean - رسمanean - رسمanean - رسمanean - رسمanean - رسمanean - رسمanean - رسمanean - رسمanean - رسمanean. - رسمanean - رسمanean - رسمanean. - رسمanean - رسمanean. - رسمanean - رسمanean - رسمanean - رسمanean - رسمanean - رسمanean - رسمanean - رسمanean - رسمanean - رسمanean - رسمanean - رسمanean - رسمanean - رسمanean - رسمanean. - رسمanean - رسمanean - رسمanean. - رسمanean. - رسمanean. - رسمanean - رسمanean - رسمanean - رسمanean - رسمanean - رسمanean - رسمanean - رسمanean - رسمanean - رسمanean - رسمanean - رسمanean - رسمanean - رسمanean - رسمanean. - رسمanean - رسمanean. - رسمanean - رسمanean - رسمanean. - رسمanean - رسمanean - رسمanean - رسمanean - رسمanean - رسمanean - رسمanean - رسمanean - رسمanean - رسمanean - رسمanean - رسمanean - رسمanean - رسمanean - رسمanean. - رسمanean - رسمanean. - رسمanean - رسمanean. - رسمanean. - رسمanean - رسمanean - رسمanean - رسمanean - رسمanean - رسمanean - رسمanean - رسمanean - رسمanean - رسمanean - رسمanean - رسمanean - رسمanean - رسمanean - رسمanean. - رسمanean - رسمanean. - رسمanean. - رسمanean - رسمanean. - رسمanean - رسمanean - رسمanean - رسمanean - رسمanean - رسمanean - رسمanean - رسمanean - رسمanean - رسمanean - رسمanean - رسمanean - رسمanean - رسمanean - رسمanean. - رسمanean - رسمanean. - رسمanean. - رسمanean. - رسمanean. - رسمanean - رسمanean - رسمanean - رسمanean - رسمanean - رسمanean - رسمanean - رسمanean - رسمanean - رسمanean - رسمanean - رسمanean - رسمanean - رسمanean - رسمanean. - رسمanean. - رسمanean - رسمanean - رسمanean - رسمanean. - رسمanean - رسمanean - رسمanean - رسمanean - رسمanean - رسمanean - رسمanean - رسمanean - رسمanean - رسمanean - رسمanean - رسمanean - رسمanean - رسمanean - رسمanean. - رسمanean. - رسمanean - رسمanean - رسمanean. - رسمanean. - رسمanean - رسمanean - رسمanean - رسمanean - رسمanean - رسمanean - رسمanean - رسمanean - رسمanean - رسمanean - رسمanean - رسمanean - رسمanean - رسمanean - رسمanean. - رسمanean. - رسمanean - رسمanean. - رسمanean - رسمanean. - رسمanean - رسمanean - رسمanean - رسمanean - رسمanean - رسمanean - رسمanean - رسمanean - رسمanean - رسمanean - رسمanean - رسمanean - رسمanean - رسمanean - رسمanean. - رسمanean. - رسمanean - رسمanean. - رسمanean. - رسمanean. - رسمanean - رسمanean - رسمanean - رسمanean - رسمanean - رسمanean - رسمanean - رسمanean - رسمanean - رسمanean - رسمanean - رسمanean - رسمanean - رسمanean - رسمanean. - رسمanean. - رسمanean. - رسمanean - رسمanean - رسمanean. - رسمanean - رسمanean - رسمanean - رسمanean - رسمanean - رسمanean - رسمanean - رسمanean - رسمanean - رسمanean - رسمanean - رسمanean - رسمanean - رسمanean - رسمanean. - رسمanean. - رسمanean. - رسمanean - رسمanean. - رسمanean. - رسمanean - رسمanean - رسمanean - رسمanean - رسمanean - رسمanean - رسمanean - رسمanean - رسمanean - رسمanean - رسمanean - رسمanean - رسمanean - رسمanean - رسمanean. - رسمanean. - رسمanean. - رسمanean. - رسمanean - رسمanean. - رسمanean - رسمanean - رسمanean - رسمanean - رسمanean - رسمanean - رسمanean - رسمanean - رسمanean - رسمanean - رسمanean - رسمanean - رسمanean - رسمanean - رسمanean. - رسمanean. - رسمanean. - رسمanean. - رسمanean. - رسمanean. - رسمanean - رسمanean - رسمanean - رسمanean - رسمanean - رسمanean - رسمanean - رسمanean - رسمanean - رسمanean - رسمanean - رسمanean - رسمanean - رسمanean. - رسمanean - رسمanean - رسمanean - رسمanean - رسمanean - رسمanean. - رسمanean - رسمanean - رسمanean - رسمanean - رسمanean - رسمanean - رسمanean - ر分鐘, - ر分鐘, - ر分鐘, - (2) - (3) - (4) - (5) - (6) - (7) - (8) - (9) - (10) - (11) - (12) - (13) - (14) - (15) - (16) - (17) - (18) - (19) - (20) - (21) - (22) - (23) - (24) - (25) - (26) - (27) - (28) - (29) - (30) - (31) - (32) - (33) - (34) - (35) - (36) - (37) - (38) - (39) - (40) - (41) - (42) - (43) - (44) - (45) - (46) - (47) - (48) - (49) - (50) - (51) - (52) - (53) - (54) - (55) - (56) - (57) - (58) - (59) - (60) - (61) - (62) - (63) - (64) - (65) - (66) - (67) - (68) - (69) - (70) - (71) - (72) - (73) - (74) - (75) - (76) - (77) - (78) - (79) - (80) - (81) - (82) - (83) - (84) - (85) - (86) - (87) - (88) - (89) - (90) - (91) - (92) - (93) - (94) - (95) - (96) - (97) - (98) - (99) - (100) - (101) - (102) - (103) - (104) - (105) - (106) - (107) - (108) - (109) - (110) - (111) - (112) - (113) - (114) - (115) - (116) - (117) - (118) - (119) - (120) - (121) - (122) - (123) - (124) - (125) - (126) - (127) - (128) - (129) - (130) - (131) - (132) - (133) - (134) - (135) - (136) - (137) - (138) - (139) - (140) - (141) - (142) - (143) - (144) - (145) - (146) - (147) - (148) - (149) - (150) - (151) - (152) - (153) - (154) - (155) - (156) - (157) - (158) - (159) - (160) - (161) - (162) - (163) - (164) - (165) - (166) - (167) - (168) - (169) - (170) - (171) - (172) - (173) - (174) - (175) - (176) - (177) - (178) - (179) - (180) - (181) - (182) - (183) - (184) - (185) - (186) - (187) - (188) - (189) - (190) - (191) - (192) - (193) - (194) - (195) - (196) - (197) - (198) - (199) - (200) - (201) - (202) - (203) - (204) - (205) - (206) - (207) - (208) - (209) - (210) - (211) - (212) - (213) - (214) - (215) - (216) - (217) - (218) - (219) - (220) - (221) - (222) - (223) - (224) - (225) - (226) - (227) - (228) - (229) - (230) - (231) - (232) - (233) - (234) - (235) - (236) - (237) - (238) - (239) - (240) - (241) - (242) - (243) - (244) - (245) - (246) - (247) - (248) - (249) - (250) - (251) - (252) - (253) - (254) - (255) - (256) - (257) - (258) - (259) - (260) - (261) - (262) - (263) - (264) - (265) - (266) - (267) - (268) - (269) - (270) - (271) - (272) - (273) - (274) - (275) - (276) - (277) - (278) - (279) - (280) - (281) - (282) - (283) - (284) - (285) - (286) - (287) - (288) - (289) - (290) - (291) - (292) - (293) - (294) - (295) - (296) - (297) - (298) - (299) - (300) - (301) - (302) - (303) - (304) - (305) - (306) - (307) - (308) - (309) - (310) - (311) - (312) - (313) - (314) - (315) - (316) - (317) - (318) - (319) - (320) - (321) - (322) - (323) - (324) - (325) - (326) - (327) - (328) - (329) - (330) - (331) - (332) - (333) - (334) - (335) - (336) - (337) - (338) - (339) - (340) - (341) - (342) - (343) - (344) - (345) - (346) - (347) - (348) - (349) - (350) - (351) - (352) - (353) - (354) - (355) - (356) - (357) - (358) - (359) - (360) - (361) - (362) - (363) - (364) - (365) - (366) - (367) - (368) - (369) - (370) - (371) - (372) - (373) - (374) - (375) - (376) - (377) - (378) - (379) - (380) - (381) - (382) - (383) - (384) - (385) - (386) - (387) - (388) - (389) - (390) - (391) - (392) - (393) - (394) - (395) - (396) - (397) - (398) - (399) - (400) - (401) - (402) - (403) - (404) - (405) - (406) - (407) - (408) - (409) - (410) - (411) - (412) - (413) - (414) - (415) - (416) - (417) - (418) - (419) - (420) - (421) - (422) - (423) - (424) - (425) - (426) - (427) - (428) - (429) - (430) - (431) - (432) - (433) - (434) - (435) - (436) - (437) - (438) - (439) - (440) - (441) - (442) - (443) - (444) - (445) - (446) - (447) - (448) - (449) - (450) - (451) - (452) - (453) - (454) - (455) - (456) - (457) - (458) - (459) - (460) - (461) - (462) - (463) - (464) - (465) - (466) - (467) - (468) - (469) - (470) - (471) - (472) - (473) - (474) - (475) - (476) - (477) - (478) - (479) - (480) - (481) - (482) - (483) - (484) - (485) - (486) - (487) - (488) - (489) - (490) - (491) - (492) - (493) - (494) - (495) - (496) - (497) - (498) - (499) - (500) - (501) - (502) - (503) - (504) - (505) - (506) - (507) - (508) - (509) - (510) - (511) - (512) - (513) - (514) - (515) - (516) - (517) - (518) - (519) - (520) - (521) - (522) - (523) - (524) - (525) - (526) - (527) - (528) - (529) - (530) - (531) - (532) - (533) - (534) - (535) - (536) - (537) - (538) - (539) - (540) - (541) - (542) - (543) - (544) - (545) - (546) - (547) - (548) - (549) - (550) - (551) - (552) - (553) - (554) - (555) - (556) - (557) - (558) - (559) - (560) - (561) - (562) - (563) - (564) - (565) - (566) - (567) - (568) - (569) - (570) - (571) - (572) - (573) - (574) - (575) - (576) - (577) - (578) - (579) - (580) - (581) - (582) - (583) - (584) - (585) - (586) - (587) - (588) - (589) - (590) - (591) - (592) - (593) - (594) - (595) - (596) - (597) - (598) - (599) - (600) - (601) - (602) - (603) - (604) - (605) - (606) - (607) - (608) - (609) - (610) - - (611) - - (612) - - (613) - - (614) - - (615) - - (616) - - (617) - - (618) - - (619) - - (620) - - (621) - - (622) - - (623) - - (624) - - (625) - - (626) - - (627) - - (628) - - (629) - - (630) - - (631) - - (632) - - (633) - - (634) - - (635) - - (636) - - (637) - - (638) - - (639) - - (640) - - (641) - - (642) - - (643) - - (644) - - (645) - - (646) - - (647) - - (648) - - (649) - - (650) - - (651) - - (652) - - (653) - - (654) - - (655) - - (656) - - (657) - - (658) - - (659) - - (660) - - (661) - - (662) - - (663) - - (664) - - (665) - - (666) - - (667) - - (668) - - (669) - - (670) - - (671) - - (672) - - (673) - - (674) - - (675) - - (676) - - (677) - - (678) - - (679) - - (680) - - (681) - - (682) - - (683) - - (684) - - (685) - - (686) - - (687) - - (688) - - (689) - - (690) - - (691) - - (692) - - (693) - - (694) - - (695) - - (696) - - (697) - - (698) - - (699) - - (700) - - (701) - - (702) - - (703) - - (704) - - (705) - - (706) - - (707) - - (708) - - (709) - - (710) - - (711) - - (712) - - (713) - - (714) - - (715) - - (716) - - (717) - - (718) - - (719) - - (720) - - (721) - - (722) - - (723) - - (724) - - (725) - - (726) - - (727) - - (728) - - (729) - - (730) - - (731) - - (732) - - (733) - - (734) - - (735) - - (736) - - (737) - - (738) - - (739) - - (740) - - (741) - - (742) - - (743) - - (744) - - (745) - - (746) - - (747) - - (748) - - (749) - - (750) - - (751) - - (752) - - (753) - - (754) - - (755) - - (756) - - (757) - - (758) - - (759) - - (760) - - (761) - - (762) - - (763) - - (764) - - (765) - - (766) - - (767) - - (768) - - (769) - - (770) - - (771) - - (772) - - (773) - - (774) - - (775) - - (776) - - (777) - - (778) - - (779) - - (780) - - (781) - - (782) - - (783) - - (784) - - (785) - - (786) - - (787) - - (788) - - (789) - - (790) - - (791) - - (792) - - (793) - - (794) - - (795) - - (796) - - (797) - - (798) - - (799) - - (800) - - (801) - - (802) - - (803) - - (804) - - (805) - - (806) - - (807) - - (808) - - (809) - - (810) - - (811) - - (812) - - (813) - - (814) - - (815) - - (816) - - (817) - - (818) - - (819) - - (820) - - (821) - - (822) - - (823) - - (824) - - (825) - - (826) - - (827) - - (828) - - (829) - - (830) - - (831) - - (832) - - (833) - - (834) - - (835) - - (836) - - (837) - - (838) - - (839) - - (840) - - (841) - - (842) - - (843) - - (844) - - (845) - - (846) - - (847) - - (848) - - (849) - - (850) - - (851) - - (852) - - (853) - - (854) - - (855) - - (856) - - (857) - - (858) - - (859) - - (860) - - (861) - - (862) - - (863) - - (864) - - (865) - - (866) - - (867) - - (868) - - (869) - - (870) - - (871) - - (872) - - (873) - - (874) - - (875) - - (876) - - (877) - - (878) - - (879) - - (880) - - (881) - - (882) - - (883) - - (884) - - (885) - - (886) - - (887) - - (888) - - (889) - - (890) - - (891) - - (892) - - (893) - - (894) - - (895) - - (896) - - (897) - - (898) - - (899) - - (900) - - (901) - - (902) - - (903) - - (904) - - (905) - - (906) - - (907) - - (908) - - (909) - - (910) - - (911) - - (912) - - (913) - - (914) - - (915) - - (916) - - (917) - - (918) - - (919) - - (920) - - (921) - - (922) - - (923) - - (924) - - (925) - - (926) - - (927) - - (928) - - (929) - - (930) - - (931) - - (932) - - (933) - - (934) - - (935) - - (936) - - (937) - - (938) - - (939) - - (940) - - (941) - - (942) - - (943) - - (944) - - (945) - - (946) - - (947) - - (948) - - (949) - - (950) - - (951) - - (952) - - (953) - - (954) - - (955) - - (956) - - (957) - - (958) - - (959) - - (960) - - (961) - - (962) - - (963) - - (964) - - (965) - - (966) - - (967) - - (968) - - (969) - - (970) - - (971) - - (972) - - (973) - - (974) - - (975) - - (976) - - (977) - - (978) - - (979) - - (980) - - (981) - - (982) - - (983) - - (984) - - (985) - - (986) - - (987) - - (988) - - (989) - - (990) - - (991) - - (992) - - (993) - - (994) - - (995) - - (996) - - (997) - - (998) - - (999) - - (1000) - - (1001) - - (1002) - - (1003) - - (1004) - - (1005) - - (1006) - - (1007) - - (1008) - - (1009) - - (1010) - - (1011) - - (1012) - - (1013) - - (1014) - - (1015) - - (1016) - - (1017) - - (1018) - - (1019) - - (1020) - - (1021) - - (1022) - - (1023) - - (1024) - - (1025) - - (1026) - - (1027) - - (1028) - - (1029) - - (1030) - - (1031) - - (1032) - - (1033) - - (1034) - - (1035) - - (1036) - - (1037) - - (1038) - - (1039) - - (1040) - - (1041) - - (1042) - - (1043) - - (1044) - - (1045) - - (1046) - - (1047) - - (1048) - - (1049) - - (1050) - - (1051) - - (1052) - - (1053) - - (1054) - - (1055) - - (1056) - - (1057) - - (1058) - - (1059) - - (1060) - - (1061) - - (1062) - - (1063) - - (1064) - - (1065) - - (1066) - - (1067) - - (1068) - - (1069) - - (1070) - - (1071) - - (1072) - - (1073) - - (1074) - - (1075) - - (1076) - - (1077) - - (1078) - - (1079) - - (1080) - - (1081) - - (1082) - - (1083) - - (1084) - - (1085) - - (1086) - - (1087) - - (1088) - - (1089) - - (1090) - - (1091) - - (1092) - - (1093) - - (1094) - - (1095) - - (1096) - - (1097) - - (1098) - - (1099) - - (1100) - - (1101) - - (1102) - - (1103) - - (1104) - - (1105) - - (1106) - - (1107) - - (1108) - - (1109) - - (1110) - - (1111) - - (1112) - - (1113) - - (1114) - - (1115) - - (1116) - - (1117) - - (1118) - - (1119) - - (1120) - - (1121) - - (1122) - - (1123) - - (1124) - - (1125) - - (1126) - - (1127) - - (1128) - - (1129) - - (1130) - - (1131) - - (1132) - - (1133) - - (1134) - - (1135) - - (1136) - - (1137) - - (1138) - - (1139) - - (1140) - - (1141) - - (1142) - - (1143) - - (1144) - - (1145) - - (1146) - - (1147) - - (1148) - - (1149) - - (1150) - - (1151) - - (1152) - - (1153) - - (1154) - - (1155) - - (1156) - - (1157) - - (1158) - - (1159) - - (1160) - - (1161) - - (1162) - - (1163) - - (1164) - - (1165) - - (1166) - - (1167) - - (1168) - - (1169) - - (1170) - - (1171) - - (1172) - - (1173) - - (1174) - - (1175) - - (1176) - - (1177) - - (1178) - - (1179) - - (1180) - - (1181) - - (1182) - - (1183) - - (1184) - - (1185) - - (1186) - - (1187) - - (1188) - - (1189) - - (1190) - - (1191) - - (1192) - - (1193) - - (1194) - - (1195) - - (1196) - - (1197) - - (1198) - - (1199) - - (1200) - - (1201) - - (1202) - - (1203) - - (1204) - - (1205) - - (1206) - - (1207) - - (1208) - - (1209) - - (1210) - - (1211) - - (1212) - - (1213) - - (1214) - - (1215) - - (1216) - - (1217) - - (1218) - - (1219) - - (1220) - - (1221) - - (1222) - - (1223) - - (1224) - - (1225) - - (1226) - - (1227) - - (1228) - - (1229) - - (1230) - - (1231) - - (1232) - - (1233) - - (1234) - - (1235) - - (1236) - - (1237) - - (1238) - - (1239) - - (1240) - - (1241) - - (1242) - - (1243) - - (1244) - - (1245) - - (1246) - - (1247) - - (1248) - - (1249) - - (1250) - - (1251) - - (1252) - - (1253) - - (1254) - - (1255) - - (1256) - - (1257) - - (1258) - - (1259) - - (1260) - - (1261) - - (1262) - - (1263) - - (1264) - - (1265) - - (1266) - - (1267) - - (1268) - - (1269) - - (1270) - - (1271) - - (1272) - - (1273) - - (1274) - - (1275) - - (1276) - - (1277) - - (1278) - - (1279) - - (1280) - - (1281) - - (1282) - - (1283) - - (1284) - - (1285) - - (1286) - - (1287) - - (1288) - - (1289) - - (1290) - - (1291) - - (1292) - - (1293) - - (1294) - - (1295) - - (1296) - - (1297) - - (1298) - - (1299) - - (1300) - - (1301) - - (1302) - - (1303) - - (1304) - - (1305) - - (1306) - - (1307) - - (1308) - - (1309) - - (1310) - - (1311) - - (1312) - - (1313) - - (1314) - - (1315) - - (1316) - - (1317) - - (1318) - - (1319) - - (1320) - - (1321) - - (1322) - - (1323) - - (1324) - - (1325) - - (1326) - - (1327) - - (1328) - - (1329) - - (1330) - - (1331) - - (1332) - - (1333) - - (1334) - - (1335) - - (1336) - - (1337) - - (1338) - - (1339) - - (1340) - - (1341) - - (1342) - - (1343) - - (1344) - - (1345) - - (1346) - - (1347) - - (1348) - - (1349) - - (1350) - - (1351) - - (1352) - - (1353) - - (1354) - - (1355) - - (1356) - - (1357) - - (1358) - - (1359) - - (1360) - - (1361) - - (1362) - - (1363) - - (1364) - - (1365) - - (1366) - - (1367) - - (1368) - - (1369) - - (1370) - - (1371) - - (1372) - - (1373) - - (1374) - - (1375) - - (1376) - - (1377) - - (1378) - - (1379) - - (1380) - - (1381) - - (1382) - - (1383) - - (1384) - - (1385) - - (1386) - - (1387) - - (1388) - - (1389) - - (1390) - - (1391) - - (1392) - - (1393) - - (1394) - - (1395) - - (1396) - - (1397) - - (1398) - - (1399) - - (1400) - - (1401) - - (1402) - |
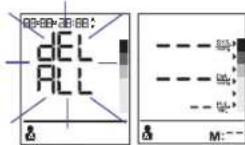
C
gdslll jssll lgl gnnj gnnj 1LCDJ 12000000000000000000000000000000000000000000000
144
(bp6200 jolal)
j kssll jy 1 y 1 1 1 1 1 1 1 1 1 1 1 1 1 1 1 1 1 1 1 1 1 1 1 1 1 1 1 1 1 1 1 1 1 1 1 1 1 1 1 1
yjnl jolil j
y
AA LR6 2y
a (BPM) 11
Jgall glll aie glll caglll kglal aln aale
aayaaal bawgail ayjii j
pssnnnnye aayaae yalld
60 120
( x - 2x) t - 1 = ( x - 2x) v_0t
aill aill nrae paaiai aiee eae iiee ae eae aee
i 1
y
y jll g jil ayjgd sall playuy aji dni y laie
()
Jai 5
= 1.5( 0,2)
15, 002
a
j 1
www.hot-europe.com/support
y
1000000000000000000000000000000000000000000
y 15614VTNLOT
VTN
Jaaal jai aai jai aai ai aai i aai aai (1) 0" aai jjj bai
jai jia jia jia jia jia jia jia
BP6100 jal b
411 7.10 100 100 100 100 100 100 100 100 100
y 0.5 1CD.12
S = 1
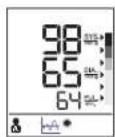
BP6200 jjbalgai
LCDll 111111111111111111111111111
a 1
e 1
1
1
S AOB = S COD + S_ OBC
B. p i s s i n e l l / A. p i s s i n e l l
1
LCD 100000000000000000000000000000000000000000
B. A. a LCD B. B. C. D. E. F. G. H. I. J. K. L. M. N. O. P. Q. R. S. T. U. V. W. W. W. W. W. W. W. W. W. W. W. W. W. W. W. W. W. W. W. W. W. W. W. W. W. W. W. W. W. W. W. W. W. W. W. W. W. W. W. W. W. W. W. W. W. W. W. W. W. W.
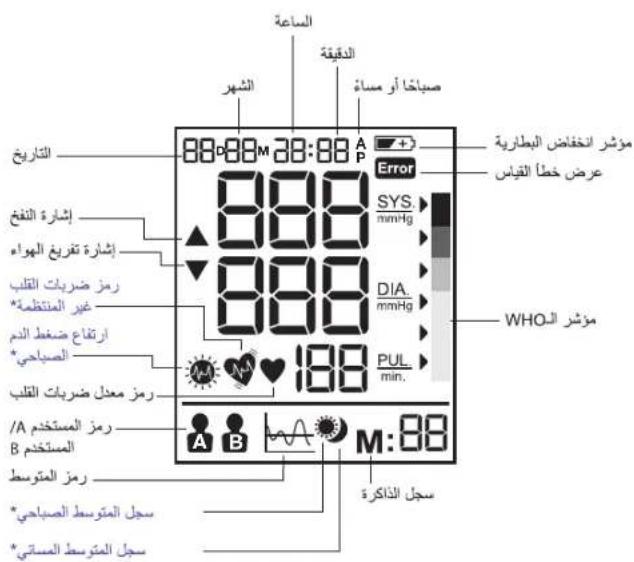
bai BP6200 jial
P 1000
1
jai 1
aai jai jai jai jai ai
Aulal 1 1 1 1 1 1 1 1 1 1 1 1 1
quailall jjail jjssii
a a a a a a a a a a a a a a a a a a a a a a
jaiy aellil jlll
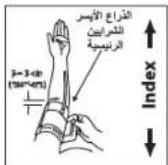
6
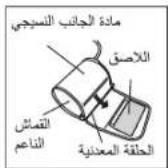
5
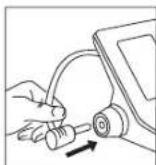
4
(4) (1) (2) (3) (4)
(5.21)
3-2) 1 j 1 j 1 j 1 j 1 j 1 j 1 j 1 j 4
(6J)
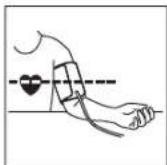
9
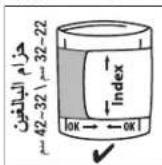
8
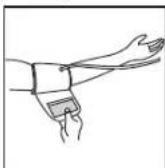
7.3.10
(7) (2015, 4)
Aaiy Aaiiie iiaii i aaiiie i aaiiie i aaiiie i aaiiie i aaiiie i aaiiie i aaiiie i aaiiie i aaiiie i aaiiie i aaiiie i aaiiie i aaiiie i aaiiie i aaiiie i aaiiie i aaiiie i aaiiie i aaiiie i aaiiie i aaiiies i aaiiie i aaiiies i aaiiies i aaiiies i aaiiies i aaiiies i aaiiies i aaiiies i aaiiies i aaiiies i aaiiies i aaiiies i aaiiies i aaiiies i aaiiies i aaiiies i aaiiies i aaiiies i aaiiies i aaiiies i aaiiies i aaiiie
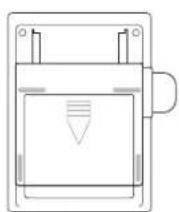
25 = 11
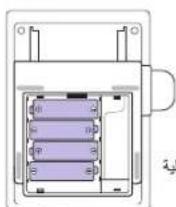
3
(1) 1,2,3,4,5,6 )
j1
M 85112,2
□
( 1) bi + 1 = bi - b_i - 1.
hA = ( v1 + v2) v1v2
B A pssuall 6
LCD 7
中
S OBC = S COD + S BOC - S BOC
1
Support contact numbers
Austria
+43(0)13602771225
Bahrain
+97317582250
Belgium/Luxemburg
+32(0)26200101
Bosnia
+387(33)636285
Bulgaria
+359(2)4024600
Croatia
+385 (01) 3444856
Cyprus
+35722575016
Cyprus Northern region
+03922272367
Czech Republic
+420(0)225439769
Denmark
+4535158040
Finland
+358(0)981710014
France
+33(0)185148095
Germany
+49(0)21173749003
Greece
+302111809456
Hungary
+36(06)14292216
Iceland
+3545553100
Israel
+1800250221
Italy
+390238591183
Jordan
+96265820112-3-4-5
Kuwait
+96524833274
Lebanon
+961 (01) 512002
Netherlands
+31 (0) 78 201 8001
Norway
+4723500120
Poland
+48225123902
Portugal
+351 21 060 8045
Qatar
+97444075048
+97444075000
Romania
+40214255566
Russia
+7(4822)630062
Saudi-Arabia
+96638692244
Western Region -Jeddah
+966(0)22565555
Central Region - Riyadh
+966(0)12886808
Eastern Region - Al-Khobar
+966(0)38940555
South Region - Abha
+966(0)72376062
Slovakia
+421250112115
Slovenia
+386(01)8888674
South Africa
+27(0)110891200
Spain
+34913754176
Sweden
+46(0)851993097
Switzerland
+41(0)225675200
Tunisia
+21671716880
Turkey
+902163372255
UAE
+97143534506
United Kingdom/Ireland
+44(0)1159657449
www.hot-europe.com
This product is manufactured under license to the Braun'trademark. Braun'is a registered trademark of Braun GmbH, Kronberg, Germany.

Made and printed in China
Helen of Troy
CREATIVE DEPARTMENT ARTWORK SPECIFICATIONS
Brand: Braun
Category: BPM
Model: BP6000 Series
Artwork Part #: A001077R0
Die Line Part #: N/A
Agile Desc: OWNER'S MANUAL, KAZ Artwork, Braun, BP6000 Series
Subject: Owner's Manual
Region: EMEA
Flat Size:MM:W228.6 x H158.75
Folded Size:MM:W114.3 x H158.75
Scale: 1/1
Material: 50# matte text (inside pages) Minimum 80# gloss or matte text (cover)
Page Count: 280
Revision: 2
Date: 10AUG16
Release Date: 09FEB15
Re-release Date: 28OCT15
Re-release Date: 26FEB16
Re-release Date:
Colors:
Dielines (Do not print) Spot Colors
Cyan 0%
Magenta 0%
yellow 0%
Black 100%
PMS GOE 63-1-4 C
PMS XXXX


Special Instructions:
Quality Requirement of Artwork and Quality Clarification Process of Artwork Printing:
Meet Eng-QS-06&02
Kaz USA, Inc., a Helen of Troy Company
Creative Services
Marlborough, MA 01752, USA
+15084907000