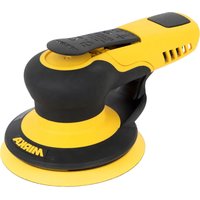
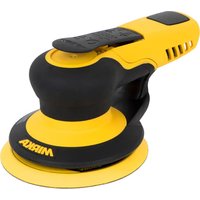
MR38CV - Sander Mirka - Free user manual and instructions
Find the device manual for free MR38CV Mirka in PDF.

| Product Type | Pneumatic Random Orbital Sander |
| Brand | Mirka |
| Model | MR38CV |
| Dimensions (L x H) | 248 x 118 mm |
| Net Weight | 0.96 kg (2.1 lb) |
| Pad Size | 70 x 198 mm (3 x 8 in) |
| Orbit Diameter | 3 mm (1/8 in) |
| Dust Extraction Type | Central (CV) |
| Power | 179 W (0.24 HP) |
| Air Consumption | 453 L/min (16 scfm) |
| Operating Pressure | 6.2 bars (90 PSI) |
| Recommended Air Hose Connection | 10 mm (3/8 in) |
| Max. Hose Length | 8 m (25 ft) |
| No-Load Speed | 10,000 opm |
| Sound Level | 75 dBA (EN ISO 15744) |
| Vibration Level | 3 m/s² (K=0.83 m/s²) |
| Required Safety Equipment | Safety glasses, respirator mask, gloves, hearing protection |
| Maintenance | Daily lubrication, cleaning of filters and silencer |
| Applications | Sanding of metals, wood, stone, plastic |
| Warranty | Included, repair by Mirka authorized service center |
Frequently Asked Questions - MR38CV Mirka
User questions about MR38CV Mirka
0 question about this device. Answer the ones you know or ask your own.
Ask a new question about this device
Download the instructions for your Sander in PDF format for free! Find your manual MR38CV - Mirka and take your electronic device back in hand. On this page are published all the documents necessary for the use of your device. MR38CV by Mirka.
USER MANUAL MR38CV Mirka
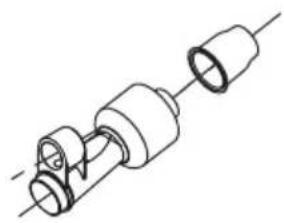
MIRKA® Orbital Sander
70 × 198 ~mm (3 x 8 in.)
en Operating Instructions 1-10
Original Instructions
Parts List
| Item P/N Description Qty. | |||
| 1 MPA0040 EXTERNAL RETAINING RING 1 | |||
| 2 MPA0021 BEARING - 2 SHIELDS 1 | |||
| 3 MPB0017 REAR ENDPLATE 1 | |||
| 4 MPA0005 CYLINDER ASSEMBLY 1 | |||
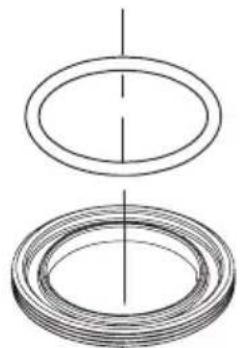
| 5 MPA0042 O-RING 1 | |||
| 6 MPB0005 ROTOR 1 | |||
| 7 MPA0010 VANE 5 | |||
| 8 MPA0041 WOODRUFF KEY 1 | |||
| 9 MPB0016 FRONT ENDPLATE 1 | |||
| 10 MPA0019 BEARING - 2 SHIELDS | 1 | ||
| 11 MPA0045 O-RING 1 | |||
| 12 MPA0001 LOCK RING | 1 | ||
| 13 MPB0531 SHAFT BALANCER 1 | |||
| 14 MPA0122 FILTER | 1 | ||
| 15 MPA0121 DUCKBILL CHECK VALVE | 1 | ||
| 16 MPA0120 VALVE RETainer | 1 | ||
| 17 MPA0090 RETAINING RING 1 | |||
| 18 MPA0938 DOUBLE ROW ANGULAR CONTACT BEARING - 1 SEAL | 1 | ||
| 19 MPA0016 SPACER 0.2 THK | 1 | ||
| 20 MPA0017 BELLEVILLE WASHER 1 | |||
| 21 MPA0018 RETAINING RING 1 | |||
| 22 MPA0113 SPINDLE ASSEMBLY | 1 | ||
| 23 MPA0079 SPACER 0.2 THK | 1 | ||
| 24 MPA0080 SPACER 0.4 THK | 1 | ||
| 25 MPA1697 THROTTLE LEVER | 1 | ||
| 26 MPA0031 LEVER SPRING PIN | 1 | ||
| 27 | MPA0288 GRIP, 2 1/2 in. | OPT | |
| MPA0289 GRIP, 2 3/4 in. | OPT | ||
| MPA0290 GRIP, 3 in. | 1 | ||
| 28 MPA0015 VALVE SLEEVE | 1 | ||
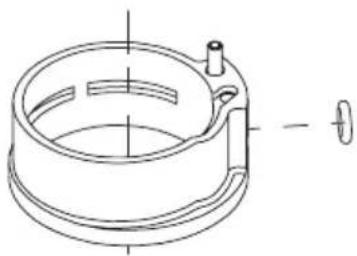
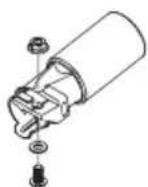
| 29 MPA0227 HOUSING | 1 | ||
| 30 | MPA0008 VALVE STEM ASSEMBLY | 1 | |
| 31 MPA0043 O-RING 1 | |||
| 32 MPB0014 SPEED CONTROL | 1 | ||
| 33 MPA0039 INTERNAL RETAINING RING | 1 | ||
| 34 MPA0768 SCREW | 4 | ||
| 35 MPA0076 WASHER 0.8 THK | 4 | ||
| 36 MPA0071 THREADED INSERT | 2 | ||
| 37 MPA0770 SCREW | 2 | ||
| 38 | MPD0051 NON-VACUUM SHROUD | 2 | |
| 39 MPA0169 SHROUD SEAL | 1 | ||
| 40 | MPD0052 CV/SGV SHROUD | 1 | |
| 41 | MPC0230 PAD SUPPORT | 2 | |
| 42 MPA0766 SCREW | 4 | ||
| 43 | MPB0534 PAD BACKING | 1 | |
| 44 MPA0767 SCREW | 4 | ||
| 45 MPA0078 SCREW | 1 | ||
| 46 | N/A SCREEN ABRASIVE MOLDED INSERT PAD LAYOUT | 1 | |
| 47 MPA0864 HEX WRENCH | 1 | ||
| 48 MPA0032 MUFFLER INSERT (for 10,000 RPM Machines) | 2 | ||
| 49 MPA0038 MUFFLER PLATE | 1 | ||
| 50 MPA0166 MUFFLER HOUSING | 1 | ||
| 51 MPA0009 VALVE SEAT | 1 | ||
| 52 | MPA0007 VALVE | 1 | |
| 53 MPA0014 VALVE SPRING | 1 | ||
| 54 MPA0013 INLET BUSHING ASSEMBLY | 1 | ||
| 55 MPA0044 O-RING 2 | |||
| 56 MPA0722 10,000 RPM SGV RETAINER | 1 | ||
| 57 | MPA0410 ASSEMBLY FOR 1 in./28 mm HOSE SuperVAC SGV SWIVEL EXHAUST FITTING | 1 | |
| 58 | MPA0409 ASSEMBLY FOR 3/4 in./19 mm HOSE SuperVAC SWIVEL EXHAUST FITTING | OPT | |
| 59 | MPA0778 1 in./28 mm HOSE SEAL | 1 | |
| 60 | MPA0854 3/4 in./19 mm HOSE SEAL | OPT | |
| 61 | MPA0931 MIRKA 1 in./28 mm HOSE SEAL TAG W/INSTRUCTION | 1 | |
| 62 | MPA0092 1 in./28 mm OS SuperVAC CV SWIVEL EXHAUST ASSEMBLY | OPT | |
| 63 | MPA0298 OS SuperVAC 3/4 in. CV SWIVEL EXHAUST ASSEMBLY | 1 | |
| 64 | MPA0048 FLANDED NUT | 1 | |
| 65 | MPA0047 WASHER | 1 | |
| 66 | MPA0769 SCREW | 1 | |
| 67 | MPA0300 Ø 3/4 in. VAC HOSE TO Ø 3/4 in. x 1 in./28 mm ADAPTER COUPLING AND AIRLINE ASSM | 1 | |
| 68 | MPA0412 Ø 1 in. VAC HOSE TO DOUBLE BAG FITTING AND AIRLINE ASSY | 1 | |
| MPA0411 Ø 3/4 in. VAC HOSE TO DOUBLE BAG FITTING AND AIRLINE ASSY | OPT | ||
| 69 | MPA0465 10 PACK OF VACUUM BAG INSERTS | 1 | |
| 70 | MPA0658 VACUUM BAG | 1 | |
| 71 | MPA2541 FRONT BEARING DUST SHIELD | 1 | |
| 72 | MPA2542 SPINDLE BEARING DUST SHIELD | 1 | |
MPA0805 10,000 OPM Muffler Kit Code:8993017211
B MPA0802 Spindle Bearing Kit Code: 8993019711
MPA0798 Air Inlet Kit Code: 8993018811
DMPA0932 SGV Swivel Fitting Kit Code:8993011311
EMPA0994 Cylinder & O-ring Kit Code:8993009211
FMPA0993 Lock Ring & O-ring Kit Code:8993007911
GMPA1239 CV Swivel Fitting Kit Code:8991600211
HMPA0799 Endplate Bearing Kit Code:8993019811

MPA0800 Speed Valve Kit Code: 8993019011
JMPA0801 Rotor, Vanes &Key Kit Code:8993017711
MPA1672 Screw Kit Code:8993015511
MIRKA
MIRKA 10,000 OPM 70 mm x 198 mm (3 in. x 8 in.) ORBITAL SANDERS
| Declaration of conformity KWH Mirka Ltd. 66850 Jeppo, Finland declare on our sole responsibility that the products 70 mm x 198 mm (3 in. x 8 in.) 10,000 OPM Orbital Sanders (See "Product Configuration/Specifications" Table for particular Model) to which this declaration relates is in conformity with the following standard(s) or other normative document(s) EN ISO 15744:2008. Following the provisions of 89/392/EEC as amended by 91/368/EEC, 93/44/EEC & 93/68/EEC Directives and consolidating Directive 2006/42/EC | |||
| Jeppo 16.01.2014 Place and date of issue Company MIRKA Stefan Sjöberg, Executive Vice President | |||
| Operator Instructions Includes - Warranty, Please Read and Comply, Proper Use of Tool, Work Stations, Putting the Tool Into Service, Operating Instructions, Product Configuration/Specifications Tables, Parts Page, Parts List, Sander Spare Parts Kits, Trouble Shooting Guide, Service Instructions | Important Read these instructions carefully before installing, operating, servicing or repairing this tool. Keep these instructions in a safe accessible location. | CE | |
| Manufacturer/Supplier KWH Mirka Ltd. 66850 Jeppo, Finland Tel: +358 20 760 2111 Fax: +358 20 760 2290 | Required Personal Safety Equipment Safety Glasses Breathing Masks Safety Gloves Ear Protection | ||
| Recommended Airline Size - Minimum 10 mm 3/8 in | Recommended Maximum Hose Length 8 meters 25 feet | Air Pressure Maximum Working Pressure 6.2 bar 90 psig Recommended Minimum NA NA | |
Please Read and Comply with
1) General Industry Safety & Health Regulations, Part 1910, OSHA 2206, available from: Superintendent of Documents; Government Printing Office; Washington DC 20402
2) Safety Code for Portable Air Tools, ANSI B186.1 available from: American National Standards Institute, Inc.; 1430 Broadway; New York, New York 10018
3) State and Local Regulations.
Proper Use of Tool
This sander is designed for sanding all types of materials i.e. metals, wood, stone, plastics, etc. using abrasive designed for this purpose. Do not use this sander for any other purpose than that specified without consulting the manufacturer or the manufacturer's authorized supplier. Do not use back-up pads that have a working speed less than 10,000 OPM free speed.
Work Stations
The tool is intended to be operated as a hand held tool. It is always recommended that the tool be used when standing on a solid floor. It can be in any position but before any such use, the operator must be in a secure position having a firm grip and footing and be aware that the sander can develop a torque reaction. See the section "Operating Instructions".
Putting the Tool into Service
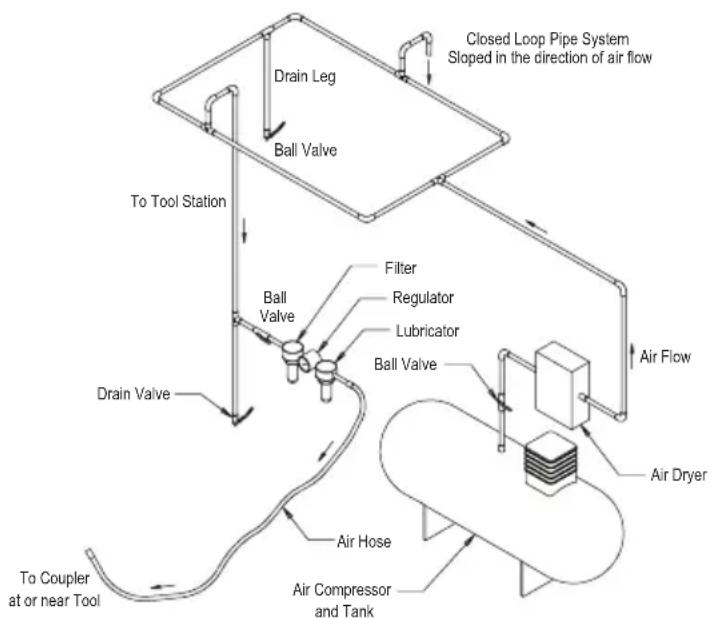
Use a clean lubricated air supply that will give a measured air pressure at the tool of 6.2 bar (90 psig) bar when the tool is running with the lever fully depressed. It is recommended to use an approved 10mm (3/8 in.) × 8m (25 ft) maximum length airline. It is recommended that the tool be connected to the air supply as shown in Figure 1.
Do not connect the tool to the airline system without incorporating an easy to reach and operate air shut off valve. The air supply should be lubricated. It is strongly recommended that an air filter, regulator and lubricator (FRL) be used as shown in Figure 1 as this will supply clean, lubricated air at the correct pressure to the tool. Details of such equipment can be obtained from your supplier. If such equipment is not used then the tool should be manually lubricated
To manually lubricate the tool, disconnect the airline and put 2 to 3 drops of suitable pneumatic motor lubricating oil such as Fuji Kosan FK-20, Mobil ALMO 525 or Shell TORCULA® 32 into the hose end (inlet) of the machine. Reconnect tool to the air supply and run tool slowly for a few seconds to allow air to circulate the oil. If the tool is used frequently, lubricate it on a daily basis or lubricate it if the tool starts to slow or lose power.
It is recommended that the air pressure at the tool is 6.2 bar (90 psig) while the tool is running. The tool can run at lower pressures but never higher than 6.2 bar (90 psig).
Operating Instructions
1) Read all instructions before using this tool. All operators must be fully trained in its use and aware of these safety rules. All service and repair must be carried out by trained personnel.
2) Make sure the tool is disconnected from the air supply. Select a suitable abrasive and secure it to the back-up pad. Be careful and center the abrasive on the back-up pad.
3) Always wear required safety equipment when using this tool.
4) When sanding always place the tool on the work then start the tool. Always remove the tool from the work before stopping. This will prevent gouging of the work due to excess speed of the abrasive.
5) Always remove the air supply to the sander before fitting, adjusting or removing the abrasive or back-up pad.
6) Always adopt a firm footing and/or position and be aware of torque reaction developed by the sander.
7) Use only correct spare parts.
8) Always ensure that the material to be sanded is firmly fixed to prevent its movement.
9) Check hose and fittings regularly for wear. Do not carry the tool by its hose; always be careful to prevent the tool from being started when carrying the tool with the air supply connected.
10) Dust can be highly combustible. Vacuum dust collection bag should be cleaned or replaced daily. Cleaning or replacing of bag also assures optimum performance.
11) Do not exceed maximum recommended air pressure. Use safety equipment as recommended.
12) The tool is not electrically insulated. Do not use where there is a possibility of coming into contact with live electricity, gas pipes, water pipes, etc. Check the area of operation before operation.
13) Take care to avoid entanglement with the moving parts of the tool with clothing, ties, hair, cleaning rags, etc. If entangled, it will cause the body to be pulled towards the work and moving parts of the machine and can be very dangerous.
14) Keep hands clear of the spinning pad during use.
15) If the tool appears to malfunction, remove from use immediately and arrange for service and repair.
16) Do not allow the tool to free speed without taking precautions to protect any persons or objects from the loss of the abrasive or pad.
Product Configuration/Specifications: 10,000 OPM Orbital Sander
| Product Configuration and Specifications: 10,000 OPM 70 mm x 198 mm (3 in. x 8 in.) Orbital Sander Note: All Self Generated Vacuum machines use Ø 28 mm (1 in.) Vacuum Hose Fittings Standard. Ø 19 mm (3/4 in.) is available. All Central Vacuum machines use Ø 19 mm (3/4 in.) Vacuum Hose Fittings Standard. Ø 28 mm (1 in.) is available. | |||||||||||
| Orbit Vac | Type | Pad Size mm (in.) | Model Number | Product Net Weight kg (pounds) | Height mm (inch) | Length mm (inch) | Power watts (HP) | Air Consumption LPM (scfm) | *Noise Level dBA | *Vibration Level m/s2 | *Uncertainty K m/s2 |
| 3 mm (1/8 in.) | Central Vacuum | 70 x 198 (3 x 8) | OS383CV 0 | 96 (2.1) | 118 (4.65) | 248 (9.76) | 179 (0.24) 4 | 53 (16) 75 3.3 0.83 | |||
| Self-Gen Vacuum | 70 x 198 (3 x 8) | OS383DB 0 | 97 (2.14) | 118 (4.65) | 261 (10.26) | 179 (0.24) 4 | 53 (16) 85 2.8 0.77 | ||||
| The noise test is carried out in accordance with EN ISO 15744:2008 - Hand-held non-electric power tools - Noise measurement code - Engineering method (grade 2). The vibration test is carried out in accordance with EN 28662-1. Hand-held portable power tools - Measurement of vibration at the handle. Part 1: General and ISO 28927-3:2009. Hand-held portable power tools - Measurement of vibration at the handle. Part 3: Polishers and rotary, orbital and random orbital sanders | |||||||||||
Specifications subject to change without prior notice.
*The values stated in the table are from laboratory testing in conformity with stated codes and standards and are not sufficient for risk evaluation. Values measured in a particular work place may be higher than the declared values. The actual exposure values and amount of risk or harm experienced to an individual is unique to each situation and depends upon the surrounding environment, the way in which the individual works, the particular material being worked, work station design as well as upon the exposure time and the physical condition of the user. KWH Mirka, Ltd. cannot be held responsible for the consequences of using declared values instead of actual exposure values for any individual risk assessment.
Further occupational health and safety information can be obtained from the following websites: http://europe.osha.eu.int (Europe)
http://www.osha.gov (USA)
Troubleshooting Guide
| Symptom Possible Cause Solution | ||
| Low Power and/or Low Free Speed | Insufficient Air Pressure Check air line pressure at the Inlet of the Sander while the tool is running at free speed. It must be 6.2 Bar (90 psig/620 kPa). | |
| Clogged Muffler(s) See the "Housing Disassembly" section for Muffler removal. Replace Item 48, Muffler Insert (See the "Housing Assembly" Section). | ||
| Plugged Inlet Screen Clean the Inlet Screen with a clean, suitable cleaning solution. If Screen does not come clean replace it. | ||
| One or more Worn or Broken Vanes Install a complete set of new Vanes (all vanes must be replaced for proper operation). Coat all vanes with quality pneumatic tool oil. See "Motor Disassembly" and "Motor Assembly". | ||
| Internal air leakage in the Motor Housing indicated by higher than normal air consumption and lower than normal speed. | Check for proper Motor alignment and Lock Ring engagement. Check for damaged O-Ring in Lock Ring groove. Remove Motor Assembly and Re-Install the Motor Assembly. See "Motor Disassembly" and "Motor Assembly". | |
| Motor Parts Worn Overhaul Motor. Contact authorized Mirka Service Center. | ||
| Worn or broken Spindle Bearings Replace the worn or broken Bearings. See "Shaft Balancer and Spindle Disassembly" and "Spindle Bearings, AirSHIELD™ and Shaft Balancer Assembly". | ||
| Air leakage through the Speed Control and/or Valve Stem. | Dirty, broken or bent Valve Spring, Valve or Valve Seat. | Disassemble, inspect and replace wore or damaged parts. See Steps 2 and 3 in "Housing Disassembly" and Steps 2 and 3 in "Housing Assembly". |
| Vibration/Rough Operation Incorrect Pad Only use Pad Sizes and Weights designed for the machine. | ||
| Addition of interface pad or other material | Only use abrasive and/or interface designed for the machine. Do not attach anything to the Sanders Pad face that was not specifically designed to be used with the Pad and Sander. | |
| Improper lubrication or buildup of foreign debris. | Disassemble the Sander and clean in a suitable cleaning solution. Assemble the Sander. (See "Service Manual") | |
| Worn or broken Rear or Front Motor Bearing(s) | Replace the worn or broken Bearings. See "Motor Disassembly" and "Motor Assembly". | |
| For central vacuum machines it is possible to have too much vacuum while sanding on a flat surface causing the pad to stick to the sanding surface. | For CV machines reduce vacuum through the vacuum system. | |
Note: All Sections referred to under "Solution" are located at the end of the manual in "Service Instructions"
NOTICE: To receive any expressed or implied warranty, tool must be repaired by an authorized Mirka Service Center. The following general service instructions provided are for use after completion of the warranty period.
DISASSEMBLY INSTRUCTIONS
Changing Grips:
- The (27) Grip has two "tabs" that wrap around the body of the sander under the inlet and exhaust. With a small screwdriver pick out one of the "tabs" of the Grip, and then continue to go underneath the grip with the screwdriver and pry the Grip off the sander. To install a new Grip, hold the Grip by the tabs making them face outward, align the Grip and slide it under the (25) Throttle Lever then press the Grip down until it seats onto the top of the sander. Make sure the two "tabs" seat under the inlet and exhaust.
Motor Disassembly:
- Using (47) 2.5mm Hex Wrench, remove (42) Screws. Slide the (46) Pad about 15mm (fore or aft) before removing the pad from the machine. Lightly secure tool in a vise using the (MPA0026) T-7 Soft Collar or padded vice jaws with the bottom of the (43) Pad backing facing upward. Remove the (45) Screw and four (44) Screws. Remove (44) Screws using 2.5mm Hex Wrench. Be careful to observe and collect the optional (23 or 24) Spacer(s) found between the (22) Spindle Assembly and the Pad Backing.
- Take the machine out of the vise and take off the Soft Collar. Remove the (39) Shroud Seal (if applicable). Remove the four (34) Screws with the (35) Washers using (47) 2.5mm Hex Wrench from the (29) Housing and remove the (41) Pad Supports. Lightly re-secure the tool in a vise using the (MPA0026) T-7 Soft Collar or padded jaws with the (12) Lock Ring facing upward.
- Unscrew the (12) Lock Ring with the (MPA0025) T-6 Motor Lock Ring Wrench/Spindle Puller Tool. The motor assembly can now be lifted out of the (29) Housing.
- Remove the (1) Retaining Ring from the groove in the (13) Shaft Balancer and the (4) O-Ring from the (5) Cylinder.
- Remove the (3) Rear Endplate. This may require setting the Rear Endplate on the (MPA0416) Bearing Separator and lightly pressing the shaft through the (2) Bearing and Rear Endplate. Remove the (5) Cylinder and the (6) Rotor with the five (7) Vanes from the (13) Shaft Balancer. Remove the (8) Key from the Shaft Balancer, then press off the (9) Front Endplate with the (10) Bearing. It may be necessary to remove the Bearing with a Bearing Separator if it came out of the Front Endplate and stuck to the shaft of the Shaft Balancer.
- Remove the Bearing(s) from the Endplates by using the (MPA0036) T-8 Bearing Removal Tool to press out the Bearingsings.
- Remove the (12) Lock Ring from the (13) Shaft Balancer. Remove the (11) O-Ring from the Lock Ring and set it aside
- Remove the (71) Dust Shield from the (13) Shaft Balancer.
Shaft Balancer and Spindle Disassembly:
- Grip the shaft end of the (13) Shaft Balancer in a padded vise. With a thin screwdriver pick out the slotted end of the (21) Retaining Ring and peel out.
- Screw the female end of the (MPA0102) T-12 5/16-24 to M6 x 1P Adapter into the male end of the (MPA0025) T-6 Motor Lock Ring Wrench/Spindle Puller Tool. Screw the Service Wrench Assembly into the (22) Spindle Assembly until hand tight. Apply a gentle heat from a propane torch or hot air gun to the large end of the (13) Balancer shaft until it is about
100^ (212^) to soften the adhesive. Do not over heat. Remove the Spindle Assembly by using the slider to give sharp outward blows to the Spindle. Allow the Spindle and Shaft Balancer to cool.
- Remove the (17) Retaining Ring from the (22) Spindle Assembly. Use the (MPA0416) Bearing Separator to remove the (18) Bearing, (19) Shim, (72) Dust Shield and the (20) Washer from the Spindle Assembly.
- The AirSHIELD™ components are held in place by the light press fit of the (16) Retainer. These components can be damaged during removal and may need to be replaced if removed. To remove the Retainer, use an o-ring pick or a #8 sheet metal screw to grip and pull out the Retainer. Remove the (15) Valve and (14) Filter from the bore in the (13) Shaft Balancer. If the Retainer and Valve were not damaged, they can be reused. However, the filter should be replaced on re-assembly.
Housing Disassembly:
- For Non-Vacuum (NV) and Central Vacuum (CV) machines follow steps A-C below (unless otherwise noted). For Self Generated Vacuum (SGV) machines disregard steps A-E and move onto F.
A. Unscrew the (50) Muffler Housing from the (29) Housing.
B. Remove the (48) Muffler from the cavity of the (50) Muffler Housing.
C. Remove the (49) Plate and second (48) Muffler from the exhaust port of the (29) Housing. For non-vacuum machines, move onto step 2. For central vacuum machines, move onto D-E.
For CV exhaust machines:
D. Remove the (66) Screw, (65) Washer and (64) Nut.
E. Press downward on the swivel end of the (62) 0 1 in./28 mm SuperVAC™ CV Swivel Exhaust Assembly or the (63) 0 % in./19 mm SuperVAC™ CV Swivel Exhaust Assembly releasing the tab on the end of the exhaust assembly from the (40) CV/SGV Shroud. Move on to Step 2.
For SGV exhaust machines:
F. Unscrew the (56) SGV Retainer with an (MPA0849) 8 mm Hex Key Wrench. Remove the two (55) O-Rings. Take off the (57) 0 1 in./28 mm SGV Swivel Exhaust Assembly or the (58) 0% in./19 mm Hose SGV Swivel Exhaust Assembly. Continue with Step 2.
2. Unscrew the two (37) Screws from the two (38) Shrouds or the (38) Shroud - (40) CV/SGV Shroud. Be sure that the (36) Threaded inserts do not fall out. Remove them from the (29) Housing.
3. Place the (32) Speed Control to the midway position and remove the (33) Retaining Ring. The Speed Control will now pull straight out. Remove the (31) O Ring from the Speed Control.
4. Unscrew the (54) Inlet Bushing Assembly from the (29) Housing. Remove the (53) Spring, (52) Valve, (51) Seat and (30) Valve Stem.
5. Press out the (26) Pin from the (29) Housing and remove the (25) Lever then press out the (28) Sleeve.
ASSEMBLY INSTRUCTIONS
Note: All assembly must be done with clean dry parts and all bearings are to be pressed in place by the correct tools and procedures as outlined by the bearing manufacturers. Housing Assembly:
- Install (28) Sleeve into housing. Install (25) Throttle Lever into (29) Housing with the (26) Pin.
- Lightly grease (31) O-Ring and place it on the (32) Speed Control. Install the (30) Valve Stem, O-Ring (cleaned and lightly greased) and insert the Speed Control into (29) Housing in the midway position. Install (33) Retaining Ring.
Caution: Make sure the (33) Retaining Ring is completely snapped into groove in the (29) Housing. - Install the (51) Seat, the (52) Valve and (53) Spring. Coat the threads of the (54) Bushing Assembly with 1 or 2 drops of Loctite® 222 or equivalent non-permanent pipe thread sealant. Screw the assembly into the (29) Housing. See "Parts Page" for torque settings. Place a clean (48) Muffler and (49) Plate into the exhaust port of the Housing. Be careful not to lose the Plate and Muffler out of the exhaust before it is secured in one of the following steps.
- Note: If the machine is a vacuum model proceed with the appropriate vacuum exhaust assembly instructions, otherwise please continue. Place a clean (48) Muffler in the (50) Muffler Housing and screw the (50) Muffler Housing into the exhaust port of the (29) Housing. See the "Parts Page" for torque settings.
For CV exhaust machines:
A. Take the (63) 0 34 in./19 mm SuperVAC™ CV Swivel Exhaust Assembly or the (62) 0 128 mm SuperVAC™ CV Swivel Exhaust Assembly and put the "tongue" on the male end of it into the female end of the (40) CV/SGV Shroud. With the swivel end of the SuperVac™ Exhaust angled towards the ground, work the "tongue" and male end into the female end of the CV/SGV Shroud by rotating the swivel end up and in at the same time until it seats.
B. Thread the (66) Screw and (65) Washer into the mounting hole of the (63) 3 / 4 in./19 mm SuperVAC™ CV Swivel Exhaust Assembly or the (62) 1 in./28 mm SuperVAC™ CV Swivel Exhaust Assembly and (29) Housing until the end of it is flush with the inside surface of the Housing. Place the (64) Nut into the cavity of the Housing and thread the Screw into them. See "Parts Page" for torque settings.
C. Place a clean (48) Muffler in the (50) Muffler Housing and screw the Muffler Housing into the exhaust port of the (29) Housing. See the "Parts Page" for torque settings.
For SGV exhaust machines:
D. Lightly grease two (55) O-Rings and place them over the two grooves in the (56) SGV Retainer. Slide the SGV Retainer Assembly into the bore of the (57) 01 in./28 mm SGV Swivel Exhaust Assembly or the (58) 034 in./19 mm Hose SGV Swivel Exhaust Assembly.
E. Verify that the (49) Plate and (48) Muffler are still in the exhaust port. Attach the SGV Swivel Exhaust Assembly to the exhaust port of the (29) Housing by means of the SGV Retainer and by taking the male end of the SGV Swivel Exhaust Assembly and placing it into the female end of the (40) CV/SGV Shroud. Screw the (56) SGV Retainer into the threaded exhaust port on the Housing with an (MPA0849) 8 mm Hex Key Wrench. See the "Part Page" for torque settings. Move onto the section "Spindle, AirSHIELD™ and Balancer Shaft Assembly".
Spindle, AirSHIELD™ and Balancer Shaft Assembly:
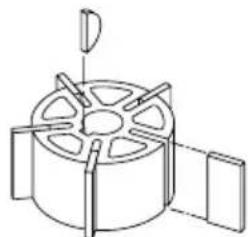
- Place the (MPA0203) T-3A Spindle Bearing Pressing Tool Base onto a flat, clean surface of a small hand press or equivalent with the spindle pocket facing upward. Place the (22) Spindle into the spindle pocket with the shaft facing upward. See Figure 3.
- Place the (20) Washer on the (22) Spindle shaft with the curve of washer facing out so that the outside diameter of the washer will contact the outer diameter of the (18) Bearing. Place the (72) Dust Shield on the Spindle Shaft. Note: Be certain that the (72) Dust Shield is past the shoulder when (19) shim is assembled. Lay the Shim on the shoulder of the Spindle. Place the Bearing (one seal) on the Spindle with the seal side toward the Washer. Note: Make sure that both the inner and outer races of the Bearings are supported by the Bearing Press Tool when pressing them into place. Press the Bearing onto the shoulder of Spindle using the (MPA0204) T-3B Spindle Bearing Pressing Tool Top as shown in Figure 3.
- Snap the (17) Retaining Ring onto the (22) Spindle Assembly making sure it is completely snapped into the groove.
- Take the (14) Filter and center it on the small bore of the (13) Shaft Balancer that the original Filter was in before removal. With a small diameter screwdriver or flat-ended rod, press the Filter into the bore until it is flat in the bottom of the bore. Place the (15) Valve into the bore so it is oriented correctly, then press the (16) Retainer into the bore until it is lightly seated against the Valve.
- Apply a pin head size drop of Loctite® #271 or equivalent to
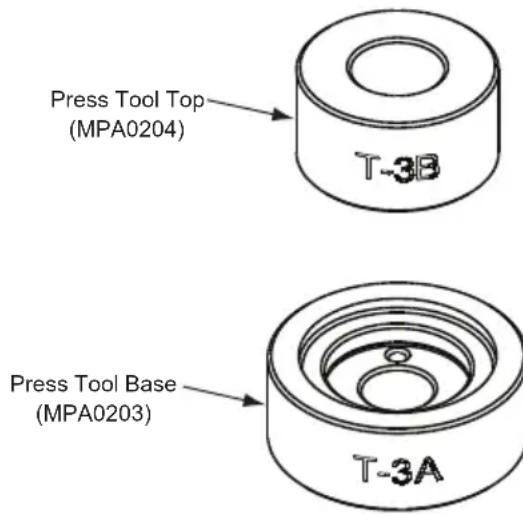
Figure 2
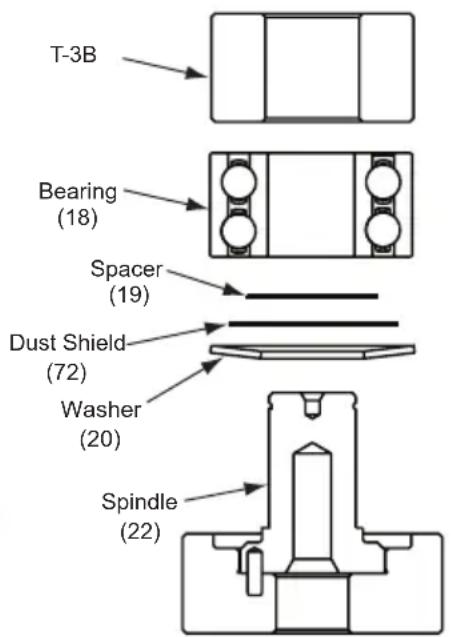
Figure 3
the outside diameter of each of the bearings on the Spindle Assembly. Spread the drop of bearing locker around both bearings until distributed evenly. Caution: Only a very small amount of bearing locker is needed to prevent rotation of the bearing OD. Any excess will make future removal difficult. Place the Spindle Assembly into the bore of the (13) Shaft Balancer and secure with the (24) Retaining Ring. Caution: Make sure that the Retaining Ring is completely snapped into the groove in the Balancer Shaft. Allow the adhesive to cure.
Motor Assembly:
- Place (71) Dust Shield onto (13) Shaft balancer.
- Lightly grease the (11) O-Ring with a light mineral grease and place it in the groove of the (12) Lock Ring, then place it on the (13) Shaft Balancer with the O-Ring facing towards the shaft of the balancer.
- Slide the (9) Front Endplate with the bearing pocket facing down onto the Shaft. Gently press the Front Endplate onto the (10) Bearing using the larger end of the (MPA0494) T-13 Bearing Press Sleeve until the Front Bearing is seated in the bearing pocket of the Endplate. CAUTION: Only press just enough to seat the bearing into the pocket. Over-pressing can damage the bearing.
- Place the (8) Key into the groove on the (13) Shaft Balancer. Place the (6) Rotor onto the shaft of the Shaft Balancer, making sure that it is a tight slip fit.
- Oil the five (7) Vanes with a quality pneumatic tool oil and place in the slots in the (6) Rotor. Place the (5) Cylinder Assembly over the Rotor with the shorter end of the Spring Pin engaging the blind hole in the (9) Front Endplate. Note: The Pin must project 1.5mm (.060 in.) above the flanged side of the Cylinder.
- Press fit the rear (2) Bearing (2 shields) into the (3) Rear Endplate with the (MPA0195) T-1B Bearing Press Tool (not shown). Make sure the (MPA0195) T. 1B Press Tool is centered on the O.D. of the outer race. Lightly press fit the Rear Endplate and Bearing over the (13) Shaft Balancer using the small end of the (MPA0494) T-13 Bearing Press Sleeve. The sleeve should press only the inner race of the bearing. Important: The Rear Endplate and Bearing is pressed correctly when the (5) Cylinder is squeezed just enough between the Endplates to stop it from moving freely under its own weight when the shaft is held horizontal, but be able to slide between the Endplates with a very light force. If the assembly is pressed to tightly the motor will not run freely. If the pressed assembly is to loose, the motor will not turn freely after assembly in the (29) Housing. Secure the assembly by placing the (1) Retaining Ring in the groove of the Shaft Balancer. CAUTION: The Retaining Ring must be placed so that the middle and two ends of the hoop touch the Bearing first. Both raised center portions must be securely "snapped" into the groove in the Shaft Balancer by pushing on the curved portions with a small screwdriver.
-
Lightly grease the (4) O-Ring with a light mineral grease and place in the air inlet of the (5) Cylinder Assembly.
-
Lightly grease or oil the inside diameter of the (29) Housing, line up the Pin with the marking on the Housing and slide the Motor Assembly into the Housing. Make sure the Spring Pin engages the pocket in Housing.
- Carefully screw the (12) Lock Ring with the (11) O-Ring facing the (9) Front Endplate into the (29) Housing with the (MPA0025) T-6 Motor Lock Ring Wrench/Spindle Puller Tool. See the "Parts Page" for torque settings. Note: A simple technique to assure first thread engagement is to turn the lock ring counter-clockwise with the service tool while applying light pressure. You will hear and feel a click when the lead thread of the lock ring drops into the lead thread of the housing, then turn clockwise to tighten. Place a (38 or 40) Shroud on the exhaust side of the Housing, using the ring of the Housing and groove in the Shroud to locate it. Add the second (38 or 40) Shroud and secure it with the two (37) Screws and the two (36) Threaded Inserts.
- Place one of the (41) Pad Support Assemblies into the (29) Housing with the 45 degree chamfer of the base facing inward toward the center of the machine. Screw tight with two (34) Screws and (35) Washers. See the "Parts Page" for torque settings. Repeat for second pad support using the other two Screws and Washers. Stretch the (39) Shroud Seal back onto the shroud if applicable.
- Using a straight edge placed across both bottom surfaces of the (41) Pad Support Assemblies, measure the distance from the surface of the (22) Spindle Assembly to the straight edge. There should be approximately 0.25mm (.010 in) of space, if not add supplied (23 or 24) Spacers in the combination that most closely results in 0.25mm (.010 in.) of spacing. Note: Spindle face must be slightly below Pad Supports for best function. Do not over shim. Apply a small amount of anti-seize compound in the 5 - 90^ counter sunk holes of the (41) Pad Backing before assembly. Place the Pad Backing by orientating the Spacer(s) with the screw hole and placing the pad backing down onto the Spindle Assembly making sure the Pin goes through the Pad Backing. Add the (45) Screw first and tighten firmly. In a circular rotation apply smaller (44) Screws into the Pad Backing and Pad Support Assemblies but leave them slightly loose until all are in place, and then tighten firmly. See the "Parts Page" for torque settings.
- Slide a new (46) Pad on the (41) Pad Backing and attach with the four (42) Screws. See the "Parts Page" for torque settings.
Testing:
Place 3 drops of quality pneumatic air tool oil directly into the motor inlet and connect it to a 6.2 Bar (90 psig) air supply. The tool should run between 9,500 and 10,500 Orbits per Minute when the air pressure is 6.2 Bar (90 psig) at the inlet of the tool while the tool is running at free speed.
- LOCTITE® is a registered trademark of the Loctite Corp.
MIRKA
MIRKA 10.000 O/MIN 70 mm x 198 mm (3" x 8") Exzenterschleifer
Stefan Sjoberg, Executive Vice President

Minimum recommende NA
90 psig
NA psi
Stefan Sjoberg, Executive Vice President

Stefan Sjoberg, Executive Vice President

Driftsinstruksjoner
Stefan Sjoberg, Executive Vice President

Brugervejledning
Stefan Sjoberg, Executive Vice President

Gebruiksanawijzing
The tool is intended to be operated as a hand held tool. It is always recommended that the tool be used when standing on a solid floor. It can be in any position but before any such use, the operator must be in a secure position having a firm grip and footing and be aware that the sander can develop a torque reaction. See the section "Operating Instructions".
Ingebruikname
IodroTOBka HnCTpyMeHTa K pa6Ote
NcnoB3yTe YnCTbI Cm3aHHb IIOBOD Bo3Dyxa, DaIOUIN
H3MepReMoE daBHeHne Ha INCtpyMeHTe, paBHOe 6,2 6ap
/90 psig, KOrDa INCtpyMeHT pa6OtaeT npn NOnHOCTbO
HaxaToH pyKe. PekOMeHNyETc npImeHb T npOBepeHHbE
BO3DyXONpOBoDbI dAmEtPOM 10 MM (3/8 IOIMa) npn
MAKcMaJIbHOI dInHe 8 M (25 FyTOB). PekOMeHNyETc
NoCDoeINHbI HcTpyMeHT K NOBDOy BO3Dyxa, KaK NOKa3aHO Ha
PncyHke 1.
He noDcoeHnHnIte HnCTpymEt K nHEBMaTnuecko CnCTeMe 6e3 NERKO DOcTyNHorO n NERKO ynpabLReMOro BEHTnra OTKIOUeHn BO3dyxa. IOnBOD BO3dyxa DOJxhen 6bITc Cma3aH. HAcTeTJIbHO peKOMeHnyETc npmEHa B03dyuHbI qunbTp, peryIaTOp n Cma3uNK (FRL), kak noka3aHo Ha PncyHke 1, TAK kak 3TO obecneHT Noauy K nHCTpymEt YnCTORO Cma3aHHoro BO3dyxa.
OnncHne Takoro 6opdyoBaHnMoKHO nOyUHTb OT BaWero NoctabuNka. EcnTakoe 6opdyoBaHnHe npImeHareTc, HCTpyMeHt HaO CMa3blBaTb BpyHyIO.
Дя рун смдки Инстугимп ATоCoeHINHTe BO3dYxONpOBOD ⅢakanaTBe BOTBepCTne (BXoHoe)шангmaшинь2-3 KaannnoDxOJaIeRoMaCnaДЯПHEBMATUeCKHX DBIRaTeNei, Hanpimep,Fuji Kosan FK-20,Mobil ALMO 525 nNn Shell TORCULA@32.CHOba noCoeHNHe INCHTpymENT K NOdBOy BO3dya N daTe INCHtpymENT npa6oTaTb HeckonbKO cekHyd Ha Manoi ckopocTnДЯцkyraMm Macna. EcIn INCHtpymENT nCOnb3yeTc Yacto,Cma3bBaIte erO exeJHBeHOb,IIIN ecIn INCHtpyMeHT NaHnHaet pa6oTaTb MeJnEHHee IIIN TepaTb MOUHOCtB.
PekomEnyetyeTcnoDepKnBaTbDaBHeHneHa pa6oTaHoIeM nHCTpyMeHT moKeT pa6oTaTb PnIMeHbWeM DaBHeHn,HO Hn B Koem CnyaHe He npBeBbIaIOUeM 6,2 6ap/90 psig.
HctpyKzna no 3Kcnnyataaun
1) PpOHTaIe BCE INHCTpyKuIN Npeed nCNOJIb3OBaHNEM 3TOO INHCTpyMeHtA. Bce OepaTOpBj DOJXHbI 6bITb NOJIHOCTbO 6OuyHeBpaBoTe C HIM IOCBeDOMneHbIO 63TxN pabUNax 6eONaCHOctn. JIO6oe 6cNyKbAHne IIN peMOHT DOJXHbI OcyUecTBJrTBcKBaINIqupOBaHHM nepcoHaIOM.
2) y6eintecb, cyto nHCTpyment OTcoeHNHeH OT noaHn BO3dyxa. Bb6epnte noxOraun abpa3nB n 3akpennte ero Ha nooouBe. BydbTe
BHHMaTeIbHbI 3aKpEnIyTe a6pa3IN NO cHTpy nOdoWBbl.
3)ПишлфованьсгдяnomeшаiteнHCTpymehTHa Meeto pa60tBu 3aTe m3anyckaite erO.BceTa OTBOJNTe HnCTpymehOT MeTa pa60tBu nepeo octahOBK.3To npedotBpaTHTobpaoBAHHe BbIeMOK Ha MecTe pa60tBu pe3yIbTaTe n3bItoUHOCKOpocTN abpa3nBa.
4)Bcerda oTocoeHnHrTe noDBoD Bo3dyXa oT uNInpOBAIbHoMaunHbI nepeYcTaHOBko,perynipOBKO uIN ydaJIeHNEmabpa3Ba uIN onOpbl.
5) Bcerda 3aHmMaTe yctOuHBoe noJoxKeHne c TBepdoI onopoI dIra HO n 6yDte roTOBbI K kpyTaeMy ycJIIO, pa3BaEMomy wNFOBaJIbHO MaHHO.
6) IcnoIb3yIte TOnbKO HAdnHexaune 3anacHble qactn.
7)Bcerda y6ekdaiTecb,TOIINuPEmbl MaTePnA1 TBepdo 3akpenneH He CdBnHeTcra.
8) PeryIaRHO npOBepaTe 7nHaHn n KpeIeHn Ha n3Hoc. He nepeHocnte HNCTpyMeHT, DePka ero 3a 7nHaT, Bcerda 6yDbTe octopoXhbl dna IpeDoTbpaueHn Nycka HNCTpyMeHTa npi nepeHocke HNCTpyMeHTa npn noKnHoueHHo nOdaue Bo3dyxa.
9) He npeBbIaIte peKoMeHDoBaHHoro MaKcMyma daBHeHn.
10) NbMb MoKet 6bTb B3pbBoOnaChoi. MeWOk dJa c6opapbnn Heo6xoDnMo YnCTNTb INMHeYrB exeJHeBHO. YnCTbINN HObIM MeWok 6ydt rapaHTnpoBaTa pa6Ory B ONTMaJIbHOM pekmme.
11) He npeBbIaIte peKOMeHIOBaHHOro MaKcIMyMa dAbJIeHn. IpnMeHrTe peKOMeHIOBaAHhIe cpeICTBa 3aIHTbl.
12) INCTpymEnr He aBnIeTc3JIeKtpuueckn 30JInpObaHHbIM. He npImeHaeTe erO B MeCtax, Ie ceTb Bo3MOxHOctb erO KOHTaTa C 3JIeKTPuueCTBOM, rA3OBbIMn Tpy6aMn, BOOnpoBOdHbIMn Tpy6aMn n T.D. PIOBepraTe pa6oyU 3OHy nepei Haayol mpa6oTbI.
13)PnHmMaIte MeBpI npOTnB nOaHaHnB B DnKUeNecraCTn HcTpyMeHTa OeJkbI,BOLOC,BTouHn T.D.B Cnyae nOaHaHn OH npTAY TeIO K MecTy paObTu I DBNkUeMcY cAChrMa MaunHb, YTO MoKeT 6bItb OeHb OnaCHO.
14) Bo bpe na6oTbI depKnte pyKn BdaIOn OT bpaauouecno douBbl.
15) Ecnn HCTpymEnK kaeTcH HeNcnpaBbIM, HemeJeHHo pekpTaTe ero nCNoJIb3OBAHne n opraHn3yTe 6cIyXNBaHne n peMOHT.
16) He donyckaTe pa60Tb IHCTpyMeHTa BXOJocTyU, ecn He npHrTa MepbI NO 3aunTe IIOeN IIN ppeMeTOB OT cpbBa a6pa3nBa nnno
KoHΦnrgypaun/CneuΦnkaun npOdykta: IIOscOuJIINΦOBaJIbHbIe MaunHbI 10000 onepaun/MnH
KoHfNpyaun HneuHnKnauHn npOyta: TPOCKoUHNFOBAnbHaMaUNHa 70 MM x 198 MM (3 x 8 dIOMoB) 10,000 onepaunMmH PtmeauHHeBaC6x MaunHex A bTOREHHb M BakyHMOM CTAHOTBHm ABYIOCTc PHHTHn BakyMHbX IuaHOB 28 MM (1dIOHM). IMeetc TaKke 19 MM (3/4 dIOHMa). Ha BceX MaunHex C cIeHTpA hBbM BakyHMbX tANHOB 28 MM (3/4 dIOHMa). IMeetc TaKke 28 MM (1dIOHM)
Local e data Company Stefan Sjoberg, Executive Vice President
1) General Industry Safety & Health Regulations, Part 1910, OSHA 2206, disponible de: Superintendent of Documents; Government Printing Office; Washington DC 20402
2) Safety Code for Portable Air Tools, ANSI B186.1 disponible de: American National Standards Institute, Inc.; 1430 Broadway; New York, New York 10018
3) Regulamentoções e legislações locais
Note: All Sections referred to under "Solution" are located at the end of the manual in "Service Instructions"
BENEXKA: 3a da ce Bb3no3BaTe ot ycNoBnTa Ha n3pNHa nI IN KocBeHa rapaHua, INCTpyMeHTbT Tpa6Ba da 6bJe peMoHTnpaH ot OToPn3npan cepBn3eH cENTbp Ha Mirka. IpeoctabeHnte no-dony INCTpyKuIm 3a o6Io o6cIyXbaHe ca npInIOxMn cIed kpar Ha rapaHouHHn cPOK.
HHTPYKUN 3A DEMOHTAX
CMHa Ha 3axBaTnte:
1.3axBaTbT (27) mma DBe "yun", KOIto ce OrBbAT OKOTo TnnoTo Ha IwnaФmauHnHaTa, NOB BXODHnI N3XoDeH OTBOp.C MaIka OTBepTKa N36byaHTe HABh EEDHOOT "yWnte"Ha 3axBaTa, cneI KOeTO npOdbJxKeTe DOKaTO C OTBepTKaTa NOD CAMN3aBXaTn I0 OTCTpaHete OT IwnaФmauHnHaTa. 3a Da MOHTnPaTe HOB 3axBaT, XBAHete Ro 3a yUnTe, IInCeBaTa YacT Ha KOnTO Da COUH HABh, NOpPaBHete Ro n IOnb3HeTe NOI pOceHNia NoCT (25), cneI KOeTO HATncHete 3axBaTa, DOKATO JIeHHe Do6pe BbpxfropHNkPai Ha IwnaФmauHnHaTa. YBepeTe Ce, Ye DBeTe "yUn" JIeKAT NOB BXOda n INXOda.
DemOHtAX Ha MOTopa:
- KaTo n3NoI3BaTe 2.5 MM ueCTOCTeHnIOU (47),OTcPaHeTe BnHToBeTe (42).PiB3HeTe nnoTa (46) Ha oKOIO 15 MM (HaPepi nn HaaD), npEtn Da ro n3BaDInte OT MaunHATA. JeKo ocNpyte INHCTpyMeHTa B MeHReMe KaTO n3NoI3BaTe (MPA0026) T-7 MEK MAuOH nn YenHOctn Ha MeHReMeTO C noNIOxKn, pN KoETO doJIHATA onOpHa Yact HA nIoTA (43) da coyn Harope. OTcPaHeTe BnHTa (45) n Dpyrnte Yetnpi (44) BNHTa. OTcPaHeTe (44) BnHToBeTe N3NCKBat 2.5 MM ueCTOCTeHnIOU. HApNIODaBAJte BHIMATEINO OINIOHaIIHHaDCTaHIOHep(n) (23 nIin 24) HAMpaI CE Mekdy WnnHDeJIHHBb3e (22) nOdoNoxkata Ha nIoTA, 3a Da He Ro n3rybte.
2.ИЗbaTeMaHHaTaOT MeHReMeTo n CbAte MeKnmaHIOH.OTcPaHete YIbTHHeHTo Ha rMyeHnKaKxyX(39)(aKOIMaTakOBA).OTcPaHete YeTpInTe BnHTa (34)C sAaNbTe IM (35) KATO n3No3BaTe 2.5 MM uecTOcteHEnKIOU (47) OT Kopnyca (29) nOTcPaHete OOnpTE Ha pa60THNIIOT (41).NeKo npnterHeTe NcHCTpyMeTA BMeHReMeTO kATO n3No3BaTe MEKnMAHooH (MPA0026) T-7 ININ MeHReMe C NOJNOxKn HaYeJIocTne, pRn KoetoCTOnOpHNII npbCTeH (12) Da coHy Harope.
-
Pa3BnTe cToOpHn npbCTeH (12) c nOmoUta Ha (MPA0025) T-6 KJIou 3a cToOpHn npbCTeHn Ha MoTOpn / HcTpymeHT 3a nBaxJaHe Ha WnHdEiN. Cera MoKxe Ta n3DbpNaTe c NobDnHaRe Bb3eHa Ha MoTopa O Kopnyca (29).
-
OTeTpaHeTeФKcnpaun npbcteH (1) ot XJle6a Ha balaHcbopa Ha BaIa (13) n O-tpbCTeHa (4) ot UINHbpa (5).
-
Otctpahe 3aHaTnNova (3). Toba Moze da HanoxN da noCTaBNTe 3aHaTaNooY bByPx cy KcObTa 3a n3BaXJaHe Ha naRepei (MPA0416) nNeKo HATncHete Bana npe3 naRepea (2) n 3aHaTnNoOy. OTCTpaHete cInnHbpa (5) n potopa (6) c neTe pa6OthN nonatKn (7) ot balaHcbopa Ha Bana (13). OtCTpaHete 1noHkata (8) ot balaHcbopa Ha Bana, cneJ Koeto HATncHete HABh NpeDHaTaNooy (9) c naRepea (10). Moze da ce HanoxN da OTCTpaHnte NaRepea cbc cKo6a 3a n3BaXdHaHe Ha naRepeu, aKO nIne3e OT peDHaTaNooY n 3aceHHe Ha Bana Ha balaHcbopa.
-
Otctpahe Te narepa(-nte) ot kpaHnTe nIOu KaTo n3no3BaTe (MPA0036) T-8 nHCTpyMeHTa 3a n3BaXdaHe Ha naRepIn 3a da n36yTaTe HABbH naRepInTe.
-
OtctpaHete CToOpHnI npbCTeH (12) ot 6anaHcbopa Ha Bala (13).OTcTaPHe O-npbCTeHa (11) ot CTOpHnI npbCTeH nO OCTaBe BCtpaHn
-
OtcpaheTe npaxo3aunTHata nnHaKa (71) ot 6anaHcbopa Ha BaJa (13).
Demontax Ha 6aHaHcbopa Ha Bana N WnHdeJa:
-
3axbaheTe BaIOBnK pKaHa 6banaHcbopa (13) B MeHreMe C NOIIOXKN Ha YeJIIOCTNTE. C TBHKa OTBepTKa N36yTaIte npopraHHa Kpa Ha φNKcnpaII Na npbcTeH (21) n ro n3BaJeTe.
-
3aBnTe Kpa C BbTpeHa pe36a Ha (MPA0102) T-12 5/16-24 Ha aanTepa M6 x 1P KbM Kpa C BbHnHa pe36a c nOmoTa Ha (MPA0025) T-6 KnIOy 3a CTOnOpHN pbcTeHH
Ha MToPn /INHCTpyMeHT 3a N3BaXJaHe Ha UINHDeJI.
PnterHete Ha pbKa Bb3eNa Ha cepBn3nra raeueH KInouc
KbM Bb3eNa Ha WnIHDeNa (22). HarpeIte NeKo C npOnaHOba
ropeNkA HnC nctOJeT 3a ropeU Bb3dYx Rolemna Kpaia
Ha 6anaHcbOpa Ha Bana (13) Do DocTraHe Ha NoTu 100°
C (212° F), 3a Da pa3MeKHe TneuNoTo. He DonyckaTe
npEprBaHe. OtctpAnHe Te B3eNa Ha WnIHDeNa KaTO
m3n3BaTe Pb3raua Ype3 pe3Kn yApn HacoYeH HABbN no
wnHdeNa. OctabeTe WnIHDeNa n 6anaHcbOpa Ha Bana da
ce OxJaT.
-
OTrpaHeTcMkCnpaUaNpIbCTeH(17)OT Bb3eNaHa ⅢnHdEa(22).H3nO3BaIte HnCTpyMeHTa 3a N3BaXKaHe Ha naRepu(MPA0416),3a Da n3BaAnTe NaRepa(18), nAaHKata(19), npaxo3aunTHata nAaHka(72) uAaHbata(20) OT Bb3eNaHa ⅢnHdEa.
-
Komnoentte Ha AirSHIELD™ ce Φικιρατ ha MrcTo ue3 lek hatnck Bbpxy (16) Φικcatopa. Te3ι KOMnoHHTN MORaT da ce NOBpeIANT NO BpeMe HA oTcTaPAHBAHeTO IM M MoKe Da ce HANOKn Da 6bDat NODmeHEN. 3a da OTCpaHNTe Φικcatopa, IN3NO3BaIte NHCtpymEHTa 3a BaIeHe Ha O-npBCTEH NIN BVNT # 8 3a JInCTOB MeTAL, 3a da 3axBaHete N I3DbPnATE Φικcatopa. OTcTaPae TKNanaha (15) n ΦIITbpa (14) OT OTBOPA B6anaHcbOpa HA Bana (13). Ako ΦικcatopBT N KIANAHBt HE ca NOBpeHNI, MORAT da CE IN3NON3BAT OTHOBO. Bbnpekn TOBA obaue, ΦIINTbpBT Tpr6Ba Da ce NODmeHNI pni ObpaTHNA MOHTAK.
DemOHtax Ha Kopnyca:
- PnMaunHb63BakyyM (NV) n TaKnBa C cHeTpaneh BakyM (CV) cneBaIte CTbnKnTe A-C no-dOly (ocBeH aKO He e yka3aHO npyro).PnMaunHc bC cObCTbeHa reHepaun Ha BakyM (SGV) npOnyChTe CTbnKnA-E n IpemHHe T Kbm F.
A. Pa3BnTe Koprnyca Ha 3aRnyuTena (50) ot Koprnyca (29).
B. Otrcpahe 3arnyuTeTnA (48) ot KyxHata B KOpnyca Ha 3arLyuTuTeTnA (50).
C. OTrpaHHeTe nHaHKata (49) n BToPn 3aRnyuHTen (48) ot n3xoDnHn npT Ha Kopnyca (29). Pnp MaunHn 6e3 BaKyM, npemHeTe KbM 2. Pnp MaunHn C ceHTpAnen BaKyM, npemHeTe KbM CTbKn D-E.
Pn CV MaunHc n3nyckaTeJ:
D. OTeTpaHete BnHTa (66), Wainbata (65) nraKaTa (64).
E. HaTnchTeHaNoy BbptTnna Ce KpaH a SuperVACTM CV Bb3eNa Ha shapnnpnna n3nyckateJ (62) c 0 1 nHua/28 MM nN SuperVACTM CV Bb3eNa Ha shapnnpnna n3nyckateJ (63) c 034 nHya/19 MM, KaTO OCBO6OAnTe yXOTo B kpa H b3eNa Ha n3nyckateJr OCV/SGV KOxya (40). PpOdbIKeTe KbM CTbIka 2.
Pn SGV MaunHc n3nyckateJ:
F. Pa3BnIte fNkCaTopa Ha SGV (56) c nOmoTHa (MPA0849) 8 MM wecTocteHEn raeHEn KIOU. OTcPaHeTe Dbata O-npbcTeHa (55). CBaIe Tse SGV Bb3eHa Ha WapHnPHn HnYckatEn (57) c 0 I INH/28 MM nIN Mapkya Ha SGV Bb3eHa Ha WapHnPHn HnYckatEn (58) c 0 % INH/19 MM. PpOdbNKeTe KbM CTbNka 2.
2. Pa3BnIte Dbata BnHTa (37) OT Dbata Koxyxa (38) nIIN OT Koxyxa (38) -CV/SGV Koxyx (40). BHMmaBaIte Na He n3NaIHaT u 3ry6nTe pe36oBaHIne BnOxKn (36).OTCTpaHeTe rN OT Kopnyca (29).
3.ПидьнжeteperylaTopaHaobopotn(32)ВсрднhaNo3uHnOCTpaHeteФKKcnpaUmaNpbcten(33).PerynaTopbTHaobopOTCeMoKeJaceN3dbpNaCBO6oHoHaBbH.OTCTpaHeteO npbCTeHa(31)OTperynatopaHaobopotn.
4. Pa3BnIte Bb3eHa Na BTyIkKaTa Ha BxOa (54) ot Kopnyca (29). OTeTpaHete npyKHaTa (53), KNaHa (52), ceDnTo (51) n CTe6IoTo Ha KNaHa (30).
5. N36yTaIe HABbH UINΦTa (26) OT KOpNyCa (29) NOTCPaHETe
IOCTa (25), CneI KOeTo I36yTaIte HABbH MyOaTa (28).
NHCTPYKUN 3A MOHTAK
3a6eJekka: LcIeIaT MoTak TpIbBa da ce I3BbpUc cNouIcTeHn cyxu qactn, a BCNU JaerepCneDbA da ce fKcnpaHa mAcTo C NOMOHTa Ha ToHNTe HNCTpyMeHTu cNopeI pOueDypNTe, ONICAH NT pON3BOIDTEJIte Ha Te3N JaerepN.
MOnTnpaHHe Ha Kopnyca:
- MoHTpaIte Myfata (28) B KOpnyca. MoHTpaIte IpoceHnna loct (25) B KOpnyca (29) c NOMOuTa Ha uNΦTa (26).
- NekcmakeTe (31) O-npbcteHa n ro nocTaBe Bbpy peryIaTopa Ha o6opOTte (32). MoTHpauTe cTe6nTo Ha KnaIaHa (30), O-npbCTeHa (noucTeH n Nekcma3aH) nocTabepepyIaTopa Ha o6opOTte Bkopnyca (29) do cpeHa no3u. MoTHpauTe fKcupaun npbcTeH (33).
BnHMaHHe:YBepeTeCe,YeΦnKcnpaunipbCTeH(33)e HAnbHNoUpaKaHAn B KJIe6a Ha Kopnyca (29). - MoNTnpaTe ceINoTo (51), KJIanaHa (52) n npyXnHaTa (53). HamaxKeTe pe36aTa Ha Bb3eHa Ha BTyPkTa (54) c 1 nn 2 KaKN Loctite 222 nn EKBBaIeHTe H-epMaHeHTen yNtBTHInTe 3a Tp6bHa pe36a. 3aBnIte Bb3eHa B KopNyCa (29). 3a HAcTpoiKaTa Ha CnIaTa Ha 3aTgAHe, BnKTe "CTpaHnCAte CaONCAHne Ha YactTe". NocTabeTe qnCT 3arLyuWntTe (48) n nnAHa (49) B n3xOJHn nopT Ha KopNyca. BnImBaIe Ta He n3naHat nnAhkTa n 3arNyUwntTe ot n3xOJHn nopT, nped n da cTe n ocNpynn qpe3 eHa OT cNeDBAuTIte CTbKn.
- Bénecka: Ako MaunHata e Bakyymen MoDen, cneBaiTe CbOTBeTHIte IHCTpyKUHN 3a MOHTax HA yCTPOINCTBOTo 3a BakyymHO OTBeXdAHe Ha BV3dyXa, B IpOTINBEH CnyaH, IpoDJIkTeC HACTOJNTe IHCTpyKUHN. IocTabeTe YnCT 3aRyUnTe (48) B KOpNyca Ha 3aRyUnTeJIA (50) N 3aBnInTe KOpNyca (50) B INxOdnHn IopT Ha KOpNyca Ha MaunHaTa (29). 3a HAcTpoiKaTa Ha CnNATA Ha 3aTgAHe, BNXTe "CTpaHnCaTa COnNCaHne Ha YacTInTe".
PnMaunHcCVn3nyckateJ:
A. B3eMeTe SuperVAC™ CV Bb3eNa Ha ⅢapHnHnna Ⅲnyckaten (63) c 0% 4% uHya/19 MM uHn SuperVAC™ CV Bb3eNa Ha ⅢapHnHnna Ⅲnyckaten (62) c 0% 1 uHya/28 MM uNoCTabete "e3iKA" Ha MbXkNMy KpAa BxKcHKn KpAa HA CV/ SGV KoKyxa (40). KaTo NoCTaBnTE BbPTrIa Nc KePnHa Ⅲnyckatena SuperVacTM nOd bTbn C nOda, npuDnBnKeTe "e3iKa" N MbXkNmy KpAa BxKcHKn KpAa HA CV/SGV KoKyxa KaTo 3aBbPntNe KpAe EHNBopeMeHHo HArope N HABbTpE, DOKaTO JneHe HA MRCOTOTCn.
B. 3aBnIe BnHTa (66) n BtynKaTa (65) B MoTakHnO TbOp Ha SuperVAC™ CV Bb3ena Ha wapHnPHn H3nyckatEn (63) c 3/4 nHa/19 MM SuperVAC™ CV nNn SuperVAC™ CV Bb3ena Ha wapHnPHn H3nyckatEn (62) c 0 1 nHa/28 MM n Kopnyca Ha MaunHata (29), DOKaTO KpaT My ce n3paBn C BBtpseHATA NOBbpxHOCT Ha Kopnyca. NocTabete raKata
(64) B K KyxuHATA Ha KOpIyCa N 3aBnIe BnHTa KbM HeR.3a HAcTpoKata Ha CnIaTa Ha 3aTgAHe, BnKTe "CTpaHnIaTa c OnncaHne Ha YacITe".
C. NocTaBete UcT 3aRnyuHTen (48) B Kopnyca Ha 3aRnyuHTen (50) H 3aBnTe KOpnyca (50) B INxOxDnH NoP T Ha Kopnyca Ha MaunHaTa (29). 3a HacTpOkaTa Ha CUnTa Ha 3aTaraHe, BnKTe "CTpaHnUaTa c OnncanHe Ha Yactnte".
PnMaunHcSGVn3nyckaTeJ:
D.CmaKeTe IeKo Dbata O-tpbcTeHa (55) nIINocTabete B Dbata Xnle6a Ha SGV fNkCaTopa (56).PiNb3HeTe Bb3eNa Ha SGV fNkCaTopa BBBbTpewHnO TOpBa HA SGV Bb3eNa Ha 1wapHnPHn HnPyckaten (57)c01nH/28MMnINBb3eNa Ha 1wapHnPHn HnPyckaten CMapkyu (58)c0%nHya/19 MM.
E. NpOBepTe daHn nnHaKaTa (49) n 3aRnyuHInTeTn (48) ca Bce Oue B n3NyckatEnnnopt. PnpKpeTe SGV b3eNa Ha shapnHnna H3NyckatEn KbM n3NyckatEnnnopt Ha Kopnyca (29) c nOmoTu Ha SGV fNkCaTopa n KaTO hAcOnHTe n noCTaBnTE MbKKn KpaH a SGV b3eNa Ha wapnHnna n3NyckatEn B XeHcKn KpaH a CV/SGV kOxyxa (40). 3abnte SGV fNkCatopaa (56) KbM n3NyckatEnnnopt C pe36a Ha Kopnyca c nOmoTu ha 8 MM Wectoctehen raehen KIOUy (MPA0849). 3a HactpoKata Ha CNATA Ha 3aTgAre, BnXte "CTpaHnQaTa c OnncAnHe Ha YacTIne". IpemHHete KbMa pa3denn MoTtAn Ha nnHdeNa, AirSHIELDTM n 6baanhcbopa Ha Bana".
MOHTAX Ha anHHena, AirSHIELD™ n 6aJahcbopa Ha bana:
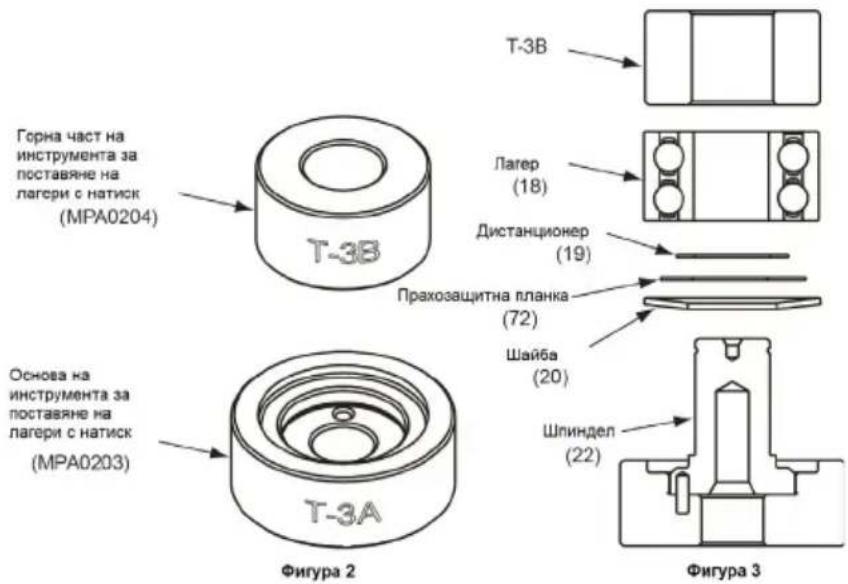
- NocTabeOcHOBaHa HnHCTpyMeHTa 3aФHKCuPaHe c HaTnCK Ha NaRepa Ha WnHDeJa T-3A (MPA0203) Bbpxy paBHa, NcTa NObBxHOCT Ha Manka PbYHa Ipeca nn EKBBaJIeHTHO O6OpYDaBe, KaTo WnHdEJIHHrT Dko6 CoH Harope. NocTabe WnHDeJa (22) B WnHdEJIHHrDko6, KaTo BaIbT CoH Harope. BnXTe Fmypa 3.
- NocTabete Waibata (20) Bbpxu winnHdennnBan (22), KaTo KpNBHaTa Ha waibata coyn HABh, TaKa Ye BbHsHnT DnAmetbp Ha waibata da ce donnpa KbM BbHsHnI RnAmetbp Ha naRepa (18). NocTabete npaxo3auTHATA nnAka (72) Bbpyx winnHeHHraBn. BeNekka: YBepeTe ce, Ye npaxo3auTHATA nnAka (72) e 3ad pamoto, KoraTo ce MOHTnpa noDIOKKata (19). NocTabete noDIOKKata Ha pAMOHa WnIHDeNa. NocTabete narepa (c eJHo yNtBHeHne) Bbpyx winnHeJa, KaTO yNtBHeHneTo CoN KBm Wai6bata. BeNekka: YBepeTe ce, Ye BtPeeHHnte IN BbHsHnIte NtB3raCh Ha naRepeTe Ce ONpAT B NHCTpymeHTA 3a FIKCcapae Ha naRepn, Korato rHa HATckate Da Bn3at. PnITNCheTe NaRepa KbM pAMO Ha WnIHdeNa KaTO nON3BaTe TropnK kpaHa T-3B INCTpymeHTA 3a FIKCcapae C HATnCK Ha naRepa Ha WnIHdeNa (MPA0204), KAkTo e NOKa3aHO Ha fNrgypa 3.
- Μιρακητε Φικκιραυπη πβοτης (17) κβм Вьзенина Ншимпдени (22), КATO CE YВЕРИTE, УЕ E HANБЛНО BЛЯЗВ JКЛБА.
4.Baemete fntbpa(14) n ro ceHTnpaIte B MaIKnna CnHnDpueH OTBOP Ha 6aHaHcbopa H Bana (13)-TAM, KDeTo n OpiHnHaHHNt FNTbp e 6n npEi Npei DEmoHTaKa. C NOMOHTa Ha OTBepTKa C MaJbK dNaMeTbP nn npbT c Pock Kpa, HaTNCHe FNTbPa B OTBOP, DOkato Ce I3paBHn CdbHOTo Ha CnINHdpuHn OTBOP. NcTabete KlanAna (15) B OTBop, Taka Ye da e opneHTpan npabInHo, cNeI KOeTO pntnche FHKCaTopa (16) B CnINHdpuHn OTBOP, DOkato NeHne PJIABHO Bbpxy KlanAna.
5. NocTaBete Kanka LoCite# #271 c pa3Mep Ha rnaBnUka Ha TOnnnIka IIN EKBnBaIeHTHO IeNINO Bbpy X BbHUNHa DnAmEtbp Ha BceKN OT IaerePte Ha Bb3eNa HA WnIHDeJa. Pa3TeNeTe KAnkata QKcnpuAa TeHocT 3a IaerePi No DBaT a naRepa,doKaTo ce paopeDen paBHOMepHo. BHIMAHne: HyXHO e cAmO MaIO KOInueCTBO OT TeHocTTa, 3a Da npedOTbpaTH BpTeHeTo IO BbHNHnA DaMeTbp Ha naRepa.AKO cNoKeNTe npeKoMEpHO KOnuueCTBO, 6bdeIoTO m3BaXdaHe Ha naRepa ue bdeM HorO TpydHO. NocTabeBb3eHa NAINHDena BcINHDPnuHnO TBOp HbalaHcbopa Ha Bana (13) n ro ocNpyte Ce fKcnpuAun npbcTeH (24). BHIMAHne: YBepeTe ce, ye qnknpauinr npbcTeH e HantbInHO UpaKaHaN BxJIe6a Ha baHaHcbopa Ha Bana. Octabete JenlnoTo da CE BTBbpDn.
MOHTIPAHe Ha MoTopa:
- NocTaBeTe npaxo3aunTHaTa nHaKa (71) Bbpxy banaHcbopa Ha BaJa (13).
- Cmackete Jeke O-npcteha (11) c jeka MInhepanha rpec n ro noctabete B kJe6a Ha cToOpnHra npcteh (12), cJeT TOBa ro noctabete Ha balaHcbopa Ha bala (13), Kato O-npcteha coyn KbMa BaHa ha 6aHa hcbopa.
3.ПьзhteNo BAana npedHaTа поа (9)с rhe3doTo 3a NaRepa coueso HaOny.Лeko HATnCHTe pIoouTa Bbpxy NaRepa (10) KaTO n3nON3BaTe no-rolEmna KpaI Ha npecMypata 3a NaRepe T-13 (MPA0494)doKaTo npedHata pIooua NerHe Do6pe B rHe3dOTo Ha naRepa Ha KpaHata pIooua. BHIMAHNE: Hatnche ta cMo ToKOBa, KOIKOTO NaRepbT da NerHe B rHe3dOTo cN. PpeKoMePHTo HATnCKaHe MoKe da nobpeNi NaRepa. - NocTabete 10noHKata (8) B Jne6a Ha 6anaHcbopa Ha Bana (13). NocTabete potopa (6) Bbpxy Bana Ha 6anaHcbopa, KaTo ce yBepTe, Ye npnIra nIbTHo npnIb3raHe.
5.CmaKeTe nete pa6oTHn nonaTK (7)cKaueCTBeHO MacNo 3aPiHEBMATNUHINHCTpyMeHTN INIOCTaBeTe Bnpope3NTe Ha poTopa (6).PiOCTaBeTe Bb3eNa HA cUNINDbpa (5)Bbpxy poTopa, KaTO KbCSrT KpA Na pPyKHHN HcΦT BnEe B cnENr OTbOP Ha npedHa TnOua (9).BeIexKa: UnΦTbT Tp8Ba Da ce noka3Ba 1.5 MM (.060 nHua) Na d PhaHcObaTa CtpaHa Ha cUNINDbpa. -
MoNTnpaIe c HATnCKaHe 3aHnnaJIarep (2) (c 2 npedn3n nnAnKn) KbM 3aHaTa nNoOa (3) c nomoTuHa (MPA0195) INCTpyMeHTa 3a MOHTpaHe Ha IaReep c HATnck T-1B (he e NOKa3aH). YBepeTe ce, ye INCTpyMeHTa 3a MOHTpaHe Ha IaReep c HATnck T 1B (MPA0195) e CEHTpnpaH KbM BbHnHnI dAmEtbp Ha BbHnHnI pNtBraq. JeKO HATnCHeTe, 3a da MOHTpate 3aHaT aPiOua nIaRepe BaPxy bAnaHcbOpa Ha BAIa (13) kato mno3BaTe MaKnK kpaH h npcec-Myfata 3a Naepu T-13 (MPA0494). Myfata Tpr6Ba Da HATncHe camo BbTpewHnI pNtBraq Ha IaRepe. BaxHo: 3aHaTaaPiOua nIaRepe ca npntNCAt npabINHO, KORATO CUNIHbPbT (5) e DocTaBtuO npNTChat Mekdy KpaHInTe nNoOn, 3a Da He Ce BbPTn CBO6OHO NOd CO6CTBeHOTo Cn TerIO, KORATO BAlbT 3acTaHe XOpN3OHaTIHO, Ho Da MOKe Da ce Pbl3ra MeJy KpaHInTe NIOOn C MHoro MaNko ycNne. Ako Bb3eBbT e npNTnCHAT NtBTHO, MOTOpBT HMA Da CE BbPTN CBO6OHO. Ako npecOBOTcEeINHEHe E TBpDe Xna6ABO, MOTOpBT HMA Da CE BbPTN CBO6OHO CNEd KaTO Bb3eLa ce NoCTabN B KopnyCa (29). Ocnypete Bb3eNa Kato NoCTabNTe FHKCuPAunr NpBCTeh (1) BXNe6a Ha BaNAhCbOpa Ha BAIa. BHIMAHNE: FHKCuPAunr NpBCTeh Tp8Ba Da e NoCTabEN TaKa, Ye CpedaTaNBA TpKaRa Ha O6pbUa My Da DOKOCBat NpBPBo NaRepe. INDbete NobDnRHaTHn Qactn Tp8Ba Da 6bDaT ocNpyen Yupe3 "UpaKBaHe" B XNe6a Ha BaNAhCbOpa Ha BAIa, Ype3 HATnCKaHe Bpxy N3BNTte Qactn C MaNka OTBeptKa.
-
CmaXeTe JIeO O-npbCTeHa (4) c IeKa MInHepaJIHa rpec n Iro NoCTabeTc BCMyKATEJIHHa OTBOp 3a Bb3dyx Ha Bb3eHa Ha cnIIINHbpa (5).
8.CmaKeTe IeKo C rpecnnMaCnIO BbTpEHHNJaNaMeTbp Ha Kopnyca (29),NoPpABHHeTe UuΦTa C MapKnPoBkata Ha Kopnyca NIIb3Hete Bb3eHa Ha MOTopa B Kopnyca. YBepeTe ce,Ye npyXHHNIAuΦTe BJIa3bl B CBOeTO THe3do B Kopnyca. - BHIMATEHNO 3aBnTe CTOnOpHN pbcTeH (12), KaTO O-tpbCTeHa (11) couN KbM PpeHATA NIOUa (9) Bkopnyca (29), c nOmoTuHa (MPA0025) T-6 KINoUc 3a CTOnOpHN npbCTeHn Ha MOTOpn /nHCTpyMeHT 3a N3BaXkaDaHe Ha IINHHdEi. 3a HAcTpoKata Ha CnIaTa Ha 3aTgAHe, BIXkTe "CTpAHuCaTc oNCAHne Ha YacTne". BeNEXKa: Jecha TexNHKA 3a Da ocNpytNe PbBOHauHNo 3axBaUaHe Ha pe3bata e da 3abPntte CTOnOpHN npbCTeh B NOcOKa 6bpaTHa Ha YacOBHKnOBaTa CTpeLka, C NOMOUsTa HA cepBN3HNI INCHTpymEt, KATO CbUeBpeMeHNo pnpilarate Jek HatNc. Ue yte N ycTe Nko UpaKbaHe, KORAto XOJa Ha pe3bata Ha CTOnOpHN npbCTeh NonaDHe BB XoJa Ha pe3bata Ha Kopnyca, cneI KOeTo 3aBbPteTe B NOcOKa Ha YacOBHKnOBaTa CTpeLka, 3a Da npnterHete. NocTabete Koxyxa (38 nn 40) Bbpxy N3NYCkATEHnTa CTpHa Ha Kopnyca, Kato N3NO3BaTe PpbCTeHa Ha Kopnyca u KJne6Ba B Koxyxa, 3a Da OTKPneTe TOHATA My N03uYia. DObabeTe BTOPN KoxyX (38 nn 40) n ro OcnypteC dBAta BnHTa (37) n DBeTe BLOKKn C pe36a (36).
- NocTabete eINH OT Bb3NITE Ha ONOPATA Ha NnOta (41) B KOpnyca (29), KaTO 45-tpaDycOBATA packa Ha OCHOBATA coHN HABbTpke KbM ueHTbpa HA MaunHata. 3aBnIte 3dpabo C DbTa BnHTA (34) IN Wai6n (35). 3a NaCTPOIKATA Ha CNlata HA 3aTgAre, BnKTe "CTpAnuata c OnncanHe Ha YactNTe". NObTopeTe onepaunrTa 3a BToPATA onopa Ha pa6oTHna PnOT KaTO nON3BaTe dpynte DBA BnHTa IN Wai6n. Pa3TeHete ynnbTHHeHNeTo Ha KOxyxa (39) 6paTHo Bbpxy KOxyxa, ako e npnIOxmo.
- KaTo n3no3BaTe npab bBnNoctabeH HnpeHo npe3 dBeTe DOHNIOBbpxHOCTHa ONOpHTe Ha NIOta (41), 13Mepete pa3cTOrHHeTo OT NOBbPxHOCTTa Ha 1nnHDeNnHb3eN (22) Do npabn BbI. Tp6Ba Da IMA npn6bn3ntEnHO 0.25 MM (.010 nnHpa) pa3cTOrHne, aKO He, do6abete DoCTabeHnte dnCTaHbOpn (23 nn 24) B Takaba KOM6nHaunr, KOrTO 6n BN daNa Bb3MoXHO Ha-6bl3bK Do 0.25 MM (.010 nnHya) pe3yNTAT 3a pa3cTOrHHeTo. BeIexKa: Yenoto Ha WnHdeLa Tp6Ba Da 6bJe CbBCem JeKO nOd ONOpHTe Ha NIOTA, 3a MAKCmMaHNO Do6po FynHKUOnHpAne. He cnaIate PpeKaneHO MHORo NDnOxKn. NoCTABete MaNK OPOtIBO3aDnPHa NaCTa B-90° fpe3EHKOBuTE OTBOPn HA ONOPATA Ha NIOta (41) PneDu MoTack. NoCTABete NODLOKKATA Ha NIOta KAto OPnENTnpaTe DnCTaHnOhepa(- ItE) KbM OTbopa 3a BNHTa N NOCTaBte ONOPaHa NIOta Bbpxy Bb3eJa Ha WnHnDEJa N Ce YBepITE, Ye 1nΦTbT npemHHaba PPE3 NOJNOxKATA Ha pa6OTHNn NIOt. Do6abete BNHTa (45) NpBPO N 3dpabo pNITerHete. B KpbroN pOraNk NOCTABaYte NO-MANKITE BVHTOb (44) NO NOJNOxKata Ha NIOta N Bb3NITE Ha ONOPaHa NIOTA, Ho IN OCTabeJeKO XnAbaBn, DOKATO BCNUKN He Ca NO MeCTa Tc, CneI KoETo r N pNITeHHe 3dPaBO. 3a HAcTpoiKaTa Ha CNlTa Ha 3aTARHe, BVKeTc "CTpaHnCuTa C ONICAHne Ha YactHTe".
12.Пьб3HeTe HOBnIлOT(46)ВbpyxNoIOnKkataHaIInoTa(41) Iro npIKpenete C YeTnpIte BnHTa(42).3a HacTpOiKaTa Ha cnIATA Ha 3aTЯHHe, BuxTe "CTpaHnIaTa c OINcAHe Na YactNTe".
N3NTBaHe:
KanheTe 3 KaNK KaueCTBeHO MacNo 3a NHeBMaTnHn
HNCTpyMeHTn HAnpaBO BbPxy BXoJa Ha MOTopa n rCbPjKeTe
c NHeBMaTHNHO 3axPaHbAe C HAnraHe 6.2 Bar (90 psig).
HNCTpyMeHTb TpR6Ba Da pa6OTo CbC cKOpocT O MeXdy 9,500
n 10,500 o6oPoTa B MInHyTa, KOraTO Bb3dUwHO To HAnraHe e 6.2
Bar (90 psig) npn BXoJa Ha NHCtpyMeHTa, DOKaTo TOn pa6OTo Ha
npa3eH xoJ.
- LOCTITE® e périmctpupaHa TbproBcKa Mapka Ha Loctite Corp.
A rezgesmesek az alabbi szabvanyak megfeleioen tortentek: EN 28662-1 - Hand-held portable power tools - Measurement of vibration at the handle, 1. resz: General and EN ISO 28927-3:2009 - Hand-held portable power tools -- Test methods for evaluation of vibration emission - 3. resz: Polishers and rotary, orbital and random orbital sanders.
Jaa aai y aaiy aaiy aaiy aaiy aaiy aaiy aaiy aaiy aaiy aaiy aaiy aaiy aaiy aaiy aaiy aaiy aaiy aaiy aaiy aaiy aaiy aaiy aaiy aaiy aaiy aaiy aaiy aaiy aaiy aaiy aaiy aaiy aaiy aaiy
aagaae aaeaae aeaae eaeaae
http://europe.osha.eu.int
(1) http://www.osha.gov
Aa
| العربية | ||
| \( محيى\)(69)_0142-11-11\( محيى\)(69)_0142-11-11\( محيى\)(69)_0142-11-11\( محيى\)(69)_0142-11-11\( محيى\)(69)_0142-11-11\( محيى\)(69)_0142-11-11\( محيى \)(69)_0142-11-11\( محيى \)(69)_0142-11-11\( محيى \)(69)_0142-11-11\( محيى \)(69)_0142-11-11\( محيى \)(69)_0142-11-11\( محيى \)(69)_620/العربية | \( محيى\)(69)_0142-11-11\( محيى\)(69)_0142-11-11\( محيى\)(69)_0142-11-11\( محيى \)(69)_0142-11-11\( محيى \)(69)_0142-11-11\( محيى\)(69)_0142-11-11\( محيى \)(69)_0142-11-11\( محيى \)(69)_0142-11-11\( محيى \)(69)_0142-11-11\( محيى \)(69)_620/العربية | \( محيى\)(69)_013-11-11\( محيى\)(69)_013-11-11\( محيى\)(69)_013-11-11\( محيى \)(69)_013-11-11\( محيى \)(69)_013-11-11\( محيى \)(69)_013-11-11\( محيى \)(69)_013-11-11\( محيى \)(69)_013-11-11\( محيى \)(69)_013-10-11\( محيى \)(69)_013-10-11\( محيى \)(69)_013-10-11\( محيى \)(69)_013-10-11\( محيى \)(69)_013-10-11\( محيى \)(69)_013-10-11\( محيى \)(59)_013-10-11\( محيى \)(59)_013-10-11\( محيى \)(59)_013-10-11\( محيى \)(59)_013-10-11\( محيى \)(59)_013-10-11\( محيى \)(59)_013-10-98/العربية |
| \( محيى\)(69)_013-11-11\( محيى\)(69)_013-11-11\( محيى\)(69)_013-11-11\( محيى\)(69)_013-11-11\( محيى\)(69)_013-11-11\( محيى\)(69)_013-11-11\( محيى\)(69)_620/العربية | \( محيى\)(69)_013-11-11\( محيى\)(69)_013-11-11\( محيى\)(69)_013-11-11\( محيى\)(69)_013-11-11\( محيى\)(69)_013-11-11\( محيى\)(69) | \( محيى\)(69)_013-11-11\( محيى\)(69)_013-11-11\( محيى\)(69)_013-11-11\( محيى\)(69)_013-11-11\( محيى\)(69)_013-11-11\( محيى\)(69) \( محيى\)(69)_013-11-11\( محيى\)(69)_013-11-11\( محيى\)(69)_013-11-11\( محيى\)(69)_013-11-11\( محيى\)(69)_013-11-11\( محيى\)(69)_98/العربية |
| \( محيى\)(69)_013-11-11\( محيى\)(69)_013-11-11\( محيى\)(69)_013-11-11\( محيى\)(69)_013-11-11\( محيى\)(69)_013-11-11 \( "محيى\)(69)_013-11-11" | \( محيى\)(69)_013-11-11\( محيى\)(69)_013-11-11" | \( محيى\)(69)_013-11-11\( محيى\)(69)_013-11-11" |
| \( محيى\)(69)_013-11-11\( محيى\)(69)_013-11-11" | \( محيى\)(69)_013-11-11\( محيى\)(69)_013-11-11" | \( محيى\)(69)_013-11-11\( محيى\)(69)_013-11-11" |
| \( محي胄\)(69)_013-11-11\( محي胄\)(69)_013-11-11" | \( محي胄\)(69)_013-11-11\( محي胄\)(69)_013-11-11" | \( محي胄\)(69)_013-11-11\( محي胄\)(69)_013-11-11" |
| \( محي胄\)(69)_013-11-11" | \( محي胄\)(69)_013-11-11" | \( محي胄\)(69)_013-11-11" |
| \( محي胄\)(69)_013-11-11" | \( محي胄\)(69)_013-11-11" | \( محي胄\)(69)_013-11-11" |
| \( محي胄\)(69)_013-11/2 | \( محي胄\)(69)_013-11/2 | \( محي胄\)(69)_013-11/2 |
aaii aai iiaai
8j 102y 8y j 8y j 8y j 8y j 8y j 8y j 8y j 8y j 8y j 8y j 8y j 8y j 8y j 8y j 8y j 8y j 8y j 8y j 8y j 8y j 8y j 8y j 8y j 8y j 8y j 8y
#
:
1 1 1 1 1 1 1 1 1 1 1 1 1 1 1 1 1 1 1 1 1 1 1 1 1 1 1 1 1 1 1 1 1 1 1
:
(46)247 1.
(MPA0026)T-7 45 45 45 45 45 45 45 45 45 45 45 45 45 45 45 45 45 45 45 45 45 45 45 45 45 45 45 45 45 45 45 45 45 45
2(1)jaiyaiyaiyaiyaiyaiyaiyaiyaiyaiyaiyaiyaiyaiyaiyaiyaiyaiyaiyaiyaiyaiyaiyaiyaiyaiyaiyaiyaiyaiyaiyaiyaiyaiyaiyaiyaiyaiyaiyaiyaiyaiyaiyaiyaiyaiyaiyaiyaiyaiyai
100
100
3.
1.)Baiy 1524 1524 1524 1524 1524 1524 1524 1524 1524 1524 1524 1524 1524 1524 1524 1524 1524 1524 1524 1524 152
:
Mirka Abrasives Inc.
USA
Tel. +1 330 963 6421
www.mirka-usa.com
Mirka Scandinavia AB
Sweden, Norway, Denmark
Tel. +46 54 690 950
sales.se@mirka.com
Mirka Abrasifs s.a.r.l.
France
Tel. +33 14305 4800
ventes.fr@mirka.com
Mirka Italia s.r.l.
Italy
Tel. +39 0733 207511
info@mirkaitalia.com
www.mirkaitalia.com
KWH Mirka Ibérica S.A.U.
Spain
Tel. +34 93 682 09 62
mirkaiberica@mirka.com
KWH Mirka Mexicana S.A. de C.V.
Mexico
Tel. +52 55 5148 3212
ventas.mx@mirka.com
www.mirka.com.mx
Mirka Brasil Ltda.
Brasil
Tel. +55 11 5543 3639
vendas.br@mirka.com
Mirka Asia Pacific Pte Ltd
Singapore
Tel. +65 6733 5422
sales.sg@mirka.com
Mirka Trading Shanghai Co., Ltd
China
Tel. +86 21 6390 0018
sales.cn@mirka.com
Mirka Rus LLC
Russia
Tel. +7 812 640 27 77
sales.ru@mirka.com
Mirka Abrasives Canada Inc.
Canada
Tel. +1 330 963 6421
sales.ca@mirka.com
Mirka India Pvt Ltd
India
Tel: +91 11 4949 3333
sales.in@mirka.com
www.mirka.com