
DCK5970HM - DCK5970HR - Basket AEG - Free user manual and instructions
Find the device manual for free DCK5970HM - DCK5970HR AEG in PDF.
| Product type | Decorative hood |
| Brand | AEG |
| Model | DCK5970HM / DCK5970HR |
| Number of speeds | 4 speeds + maximum speed (max 5 minutes) |
| Functions | Lighting, Hob²Hood, Remote control, Filter notification |
| Grease filter | Dishwasher safe (short cycle, low temperature) |
| Charcoal filter | Cleanable every 2 months; replace every 2 years if damaged |
| Lighting | LED, replacement only by a technician |
| Power supply | Electrical (220-240 V, confirm on rating plate) |
| Maintenance | Monthly cleaning of grease filters and interior |
| Safety | Refer to safety instructions in the installation manual |
| Repairability | Original spare parts available; LED lamps replaceable only by a technician |
| Warranty | Not specified, contact customer service |
Frequently Asked Questions - DCK5970HM - DCK5970HR AEG
User questions about DCK5970HM - DCK5970HR AEG
0 question about this device. Answer the ones you know or ask your own.
Ask a new question about this device
Download the instructions for your Basket in PDF format for free! Find your manual DCK5970HM - DCK5970HR - AEG and take your electronic device back in hand. On this page are published all the documents necessary for the use of your device. DCK5970HM - DCK5970HR by AEG.
USER MANUAL DCK5970HM - DCK5970HR AEG
OBCJNYKBAHE HA KJINEHTN
BnHa n3no3BaIte opunHAnHn pe3epBn qactn.
Korato ce cBbP3BaTe c Hauin OToPn3IpaH OTJeI,ObcnykBaHe",Tpr6Ba da Imate npD pKa cIeHaTa HOpMaun: MoJeI, PNC, cepneH Homep.
HΦopMaunra MoKe Da 6bJe OTKpuTa Ha Ta6JIkata C OCHOBn DaHHN
I IpeDynpexdEHNe/BHmHaHne-INHΦopMaζηa 3a6e3oNaCHOCT
① O67a INHΦopMaζηι έ CbBettι
IHHΦopMaçnla 3a OKOJHaTa cpeJa
3ana3bame cn npabOTo Ha n3MeHeHn.
1. ИнфОРМАЦЯ 3A БЕЗПACHОТИ MOHTAZK

BHIMAHNE!
BnKTe OTeJIHaTa 6poWya
CNHCTpyKcMn3a
INCTaJIpaHe 3a
HOpmaa3a
6e30nachOCT N MOHTaK.
PpoheTeBHHMaTeHNo
JIaBInTe 3a 6e3OnaCHOCT
PpeDn BcKa ynoTpe6a nn
IoIaJbXkaHa ypea.
2.ОПИСАНЕHAУРEDA
2.1 Перлед на Контropolnia наслу

3. BCEKNДHEBHA YNOTPEBA
3.1 Изпождваны a6cop6aTopa
PpOBepTe npenOpbUHTeHnHaTcCKoPoCT B cBtBETCTBnC TaBnucTaNo-dOJy.
AJaMaTaHaФnITbpaHAnOMH3a CmHaNINNoCHTbHeHaФnITbpaC aKtNBHeBbIJIe, KaKToI3aNoCHTbHe
HaФиЛТьра 3a Ma3HnH.ИнДиКаTOpВТ HaФиЛТьра Ce BкЛIOчВВ IpoДьЛжЕнe Ha 30 SEkyнД,В cLYчай YeФиЛТьрВТ 3a Ma3HnH ИмA HxJda OT NoUcNTBaHe.ИнДиKaTOpВТ HaФиЛТьр ПпeмИгВa B npOДьЛжЕнe Ha 30 CEkyнД,АКоФиЛТьрВТС aKTINBEH BbIJIeN TpЯ6Ва DA ce CMEнЯ ИИ NoUcNTBa.

HanpaBete cnpaKa 3a nouNCTbaHETO Ha qnIITbpa 3a Ma3HNH N B rnaBa "NouchTaBe H rpnka".

HanpaBete cnpaBka OTHOCHO NOUCTBaHETo IIN CMraHaTa Ha qnITbpa C aKTIBeH BtIeH B TlaBaTa ,PnIXN INoOHTBaHe".
3a da hynpate fynkunra, 3apbxte 6byoHa U3 3a 3cekyHn.
3a da akTbupate nIIN deakTbupate cyHKU:
- 3a da aKTbupate fYHKuJaTa, 3aDpBxTe 6yToHa 23a 3ceyHn. Ako fYHKuJaTa e aKTbupaHa, INDkaTOPbT MInra DaBa NtN.
- 3a da deaktnbnpate fynkunra, 3a npxte 6ytoHa 23a 3cekyHnA Ako fynkunrae e deaktnbnpaHa, INDkaTOPbT Mna BeHbX.
CbdomnHaTa Tp6Ba Da e HactpoeHa Ha HNcKa TeMnepatya N KpaTbK UKnbl. FmTTbpT 3a Ma3HnH MoKe Da 3aRy6u Cbeta CN, HO TOBA He BnIe Bbpxy pa6Ota Ta Ha ypeA.
- 3a MOHTnpaHHe Ha qInItpnte o6paTHo, n3nBnHete nbpBnTe DBe CTbNk B o6pateH pei.
IobtopeCTbKnTe 3a BCnKn fHnTpN, aKe e npNoXmo.
4.3ПоунstВаHeHaФиЛТьpa cakTNBeHвгЛeH
3a da n3BaDnTe φnTTbpa:
1.ИЗваде Te Филт pine 3a Ma3HnHn OToypeda.
BnKTe ,IOnuCTBaHe Ha qInTbpa 3a Ma3HnHn" B Ta3n IJaba.
2. OtrtpaheTe ckoBnTe, KOITOnPnpIbPkaT OCHOBaTa HaФИNTbPa(1), cIeД KoETo n Camata OCHOBa (2).
3.ИзмиTe JERnToHaФиЛТьрВа Вореца ВODa,6e3npenapat,IиИ nI3PON3BaIte CbДOMnYnHa.

HactpoTe CbDOMnJHaTa MaunHa 6e3 Da n3noJ3BaTe npenapat 3a n3nJaKbaHe nn DpyrN npenapatn. B CbDMnJHaTa He Tpr6Ba Da NMa YHHn.
- Octabete OCHOBaTa Ha ΦnITbpa Da n3cbxHe mnn n3nOJ3BaIe fypHa.

BHIMAHNE!
Onachoct ot n3rapnHa!
BnxTe rnaBata 3a
6e3oNaChocT B
pbKOBOCTBOTO 3a ynoTppe6a
Ha cyphata.
HactpoTe cyphata Ha 10 MNHyTu Ha makcmaJIHa TempepaTpa Do 60^
- 3a MOHTnpaHe Ha fHnTbpa H3IbHHeTe CbNknte B O6paTeH peI. FnITbPbT Tp8Ba Da e HAnbJHo N3CbXHaJI, 3a Da ce MOHTnpa O6paTHO B ypeJa.
CmeHnTe IeItoHaΦnITbpaHa BceKn 2 roDnHn nJn npn NobpeHa nJaTa.
4.4 CmHa Ha JIaMnTa
To3n ypeI ce doctabcLED lamna n OTdennha KOHTpOHa KUTna (3aDnKBaM mExAH3bMa Ha CBeTOnoJa).Te3n Yactn MORaT da Ce IOmEnrT cMo O T ExHKn. B cnyaH na HneN3npaBHOCT BVXkTe "ObcykBaHe" B rIba ,InHCTpyKuIN 3a 6e3onacHOCT".
5.ОПАЗВЕHA OKOLHATA CРEDA
PeunknapaTe MaTePnaJIte cbc
CIMBONA. NocTABRte ONaKOBKnTe B CbOTBEHTHnTE KOHTeHepn 3a peuKNIPAHeTO IM. NOMoTHeTe 3a ONa3BaHeTo Ha OKoJHaTa CpeDa n
OBoeWkoTo 3dpaBe, KaKTo n 3apeuKnIpaHeTo Ha OTnAbTuN OTe neEeKtpueckn n eEeKtpoHn ypei. He n3XBpIyTe ypeDInTe, 03NaueHn CbCcMBOJal , 3aeDHO C 6BtOBaTa cMeT.
BbPheTe ypeDa B MeCTHnI pyHKT 3a peuKInpaHe nIi Ce o6bPheTe KbM BaWata OoHnHcA cnYk6a.
OBSAH
- BEZPEČNOSTNI INFORMACE A INSTALACE 8
- POPIS SPOTREBICE 9
- DENNIPOUZIVANI 9
- CISTENI A UDRZBA 11
- POZNÁMKY K OCHRANE ZIVOTNIHO PROSTREDI 12
PRO DOKONALÉ VYSLEDKY
Thank you for choosing this AEG product. We have created it to give you impeccable performance for many years, with innovative technologies that help make life simpler – features you might not find on ordinary appliances. Please spend a few minutes reading to get the very best from it.
Visit our website to:

Get usage advice, brochures, trouble shooter, service and repair information: www.aeg.com/support

Register your product for better service: www.registeraeg.com

Buy Accessories, Consumables and Original spare parts for your appliance: www.aeg.com/shop
CUSTOMER CARE AND SERVICE
Always use original spare parts.
When contacting our Authorised Service Centre, ensure that you have the following data available: Model, PNC, Serial Number.
The information can be found on the rating plate.
Warning / Caution-Safety information
① General information and tips
Environmental information
Subject to change without notice.
1. SAFETY INFORMATION AND INSTALLATION

WARNING!
Refer to the separate Installation Instructions booklet for Safety Information and Installation. Read carefully the Safety chapters before any use or maintenance of the appliance.
2.PRODUCT DESCRIPTION
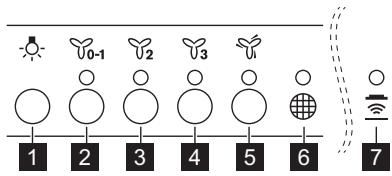
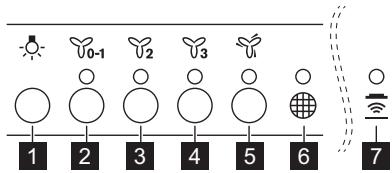
2.1 Control panel overview
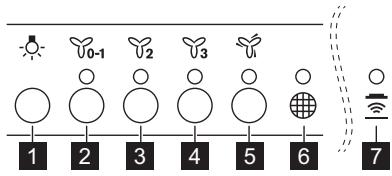
| Function | Description | |
| 1 | Lamp | Turns the lights on and off. |
| 2 | First speed / Off | The motor switches to first speed level. Second press turns off the appliance. |
| 3 | Second speed | The motor switches to second speed level. |
| 4 | Third speed | The motor switches to third speed level. |
| 5 | Maximum speed | The motor switches to maximum speed level. After 5 minutes appliance switches to third speed. |
| 6 | Filter notification | Reminds to change or clean the charcoal filter and clean the grease filter. |
| 7 | Hob²Hood | Indicator of the function to control hood from hob. For some models the symbol present on the control panel. |
3. DAILY USE
3.1 Using the hood
Check the recommended speed according to the table below.
| 0-1 | While heating up food, cooking with covered pots. |
| 2 | While cooking with covered pots on multiple cooking zones or burners, gentle frying. |
| 3 | While boiling and frying big quantities of food without a lid, cooking on multi-ple cooking zones or burners. |
| 4 | While boiling and frying big quantities of food without a lid, big humidity. |

It is recommended to leave the hood operating for approximately 15 minutes after cooking.
To operate the hood:
-
Press the first speed button to switch on the appliance.
-
If needed, change the speed by pressing the desired button.

The hoods light works independently to other hood functions. To illuminate the cooking surface press the light button
To turn off the appliance press the first speed button _0 - 1 again.
3.2 Hob²Hood function
It is an automatic function which connects the hob with a hood. Both the hob and the hood have an infrared signal communicator. Speed of the fan is defined automatically on basis of mode setting and temperature of the hottest cookware on the hob. You can also operate the fan using the hob manually. The function can be activated from panel of the hob.

For more information how to use the function refer to the hob user manual.
3.3 Filter notification
Filter alarm reminds to change or clean the charcoal filter and clean the grease filter. The filter indicator is turned on for 30 seconds if the grease filter must be cleaned. The filter indicator flashes for 30 seconds if the charcoal filter must be replaced or cleaned.

Refer to cleaning the grease filter in care and cleaning chapter.

Refer to cleaning the charcoal filter or replacing the charcoal filter in care and cleaning chapter.
To reset the function press the button 3 for 3 seconds.
To activate or deactivate function:
- To activate function press the button 2 for 3 seconds.
If the function is activated, the indicator flashes two times.
- To deactivate function press the button _2 for 3 seconds.
If the function is deactivated, the indicator flashes ones.
3.4 Remote-control
The appliance is supplied with a remote-control.
The connection is originally enabled.
To connect or disconnect remote-control:
- Switch off the appliance.
- Press the for 3 seconds.
The indicator on control panel flashes twice if function is enabled and once if disabled.
4. CARE AND CLEANING
4.1 Notes on cleaning
| Cleaning Agents | Do not use abrasive detergents and brushes. Clean the surface of the appliance with a soft cloth with warm water and a mild detergent. |
| After cooking some parts of appliance can get hot. To avoid stains appliance must be cooled down and dried with clean cloth or paper towels. | |
| Clean stains with a mild detergent. |

Keep the hood clean
Clean the appliance and grease filters each month. Clean the interior and grease filters carefully from fat. Fat accumulation or other residue may cause fire.
Follow the instructions for cleaning the accessories when filter notification is on. Refer to Filter notification in daily use chapter.
Grease filters can be washed in a dishwasher.
The dishwasher must be set to a low temperature and a short cycle.
The grease filter may discolour, it has no influence on the performance of the appliance.

Charcoal filter
The time of saturation of the charcoal filter varies depending on the type of cooking and the regularity of cleaning the grease filter. Charcoal filter is washable, clean or regenerate the filter after approximately every two months. Refer to leaflet included in the accessory.
4.2 Cleaning the grease filter
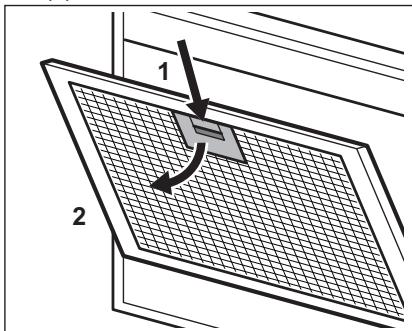
Filters are mounted with the use of clips and pins on the opposite side.
To clean the filter:
- Pull the cover to open it.
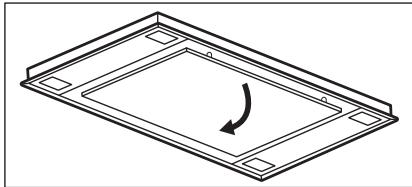
- Press the handle of the mounting clip on the filter panel underneath the hood (1).
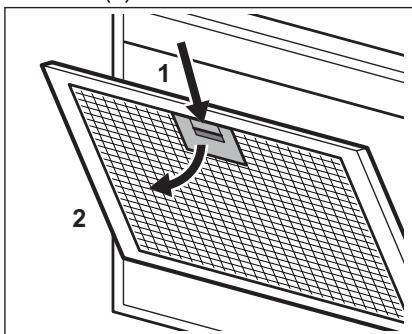
- Slightly tilt the front of the filter downwards (2), then pull.
Repeat the first two steps for all filters.
- Clean the filters using a sponge with non abrasive detergents or in a dishwasher.

The dishwasher must be set to a low temperature and a short cycle. The grease filter may discolour, it has no influence on the performance of the appliance.
- To mount the filters back follow the first two steps in reverse order.
Repeat the steps for all filters if applicable.
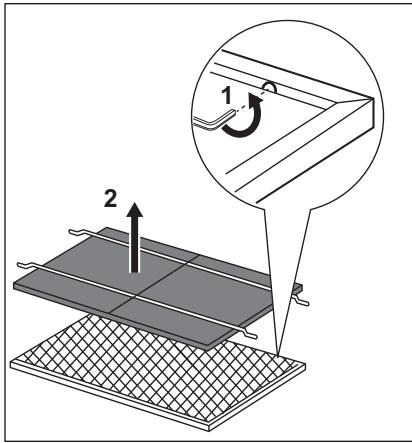
4.3 Cleaning the charcoal filter
To remove the filter:
- Remove the grease filters from the appliance.
Refer to "Cleaning the grease filter" in this chapter.
- Remove the clips holding the filter bed (1), then the filter bed (2).
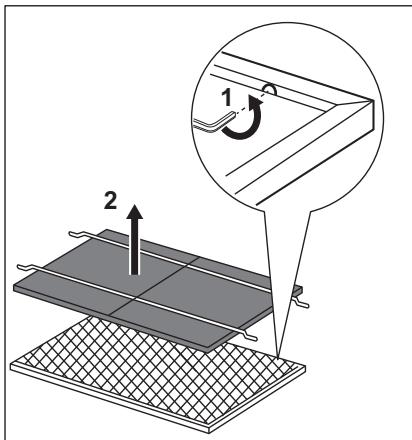
- Wash the filter bed in hot water without using detergent or use a dishwasher.

Set the dishwasher without using rinse aids or any other detergents. The dishwasher cannot be filled with dishes.
- Leave the filter bed to dry or use an oven.

WARNING!
Risk of burns! Refer to safety chapter in oven user manual.
Set the oven for 10 minutes in the maximum temperature of 60^ .
- To install the filter, perform the steps in reverse order. The filter has to be fully dried before installing it back into appliance.
Replace the filter bed every 2 years or when the cloth is damaged.
4.4 Replacing the lamp
This appliance is supplied with a LED lamp and separate control gear (LED driver). These parts can be replaced by a technician only. In case of any malfunction refer to "Service" in the "Safety Instructions" chapter.
5. ENVIRONMENTAL CONCERNS
Recycle materials with the symbol . Put the packaging in relevant containers to recycle it. Help protect the environment and human health by recycling waste of electrical and electronic appliances. Do not dispose of
appliances marked with the symbol with the household waste. Return the product to your local recycling facility or contact your municipal office.
CONTENIDO
- INDICACIONES DE SEGURIDAD E INSTALLACION 33
2.DESCRIPTION DEL PRODUCTO 34
3.USO DIARIO 34 - MANTENIMIENTO Y LIMPIEZA 36
- ASPECTOS MEDIOAMBIENTALES 37
Para guitar el filtro:
3. SVAKODNEVNA UPORABA
3.1 Uporaba nape
Provjerite preparučenu brzinu prema tablici u nastavku.
| ♀0-1 | Prilikom zagrijavanja hrane, kuhanja sPokrivenim posudama. |
| ♀2 | Prilikom kuhanja sPokrivenim posudama na više zona kuhanja ili plamenika, lagano prženje. |
| ♀3 | Prilikom ključanja i prženja velikih količina hrane bezPoklopca, kuhanja na više zona kuhanja ili plamenika. |
| ♂ | Prilikom ključanja i prženja velikih količine hrane bezPoklopca, visoka VLCz-nost. |

Preporuca se ostaviti napu da radioko 15 minuta nakon kuhanja.
Za upravljanje napom:
Kayinci3ikke XaHe opHaTyFa
KatbictblaknapaTka
aphanfah KITanwaadan
Kayinci3 opHaTy TpyaBlb
HYCKayNblkTbKapaHb3.
KypbIINfbIhbl naIaIaNHy
Hemece OFaH Kbl3MET
KepceTy anDbIHda
Kayinci3ik Typalbl
tapaynapdbI MkynT OKbIn
LbIFbHb3.
2.БУньIM CINATTAMACbl
2.1 Baçkapy nahanelihe sojy

| Функция | Сиалтамасы | |
| 1 | Шam | Шamдарды косу жени сөндір. |
| 2 | БириншixЖылдамдык/Thшір | КозfaNTьшixбіріншixЖылдамдык, Deнг'reиінe ayысады.Екінші ретбackанда курьлфы сөнedi. |
| 3 | ЕкіншixЖылдамдык | КозfaNTьшix ekіншixЖылдамдык, Deнг'reиінe ayысады. |
| 4 | УшіншixЖылдамдык | КозfaNTьшix ушіншixЖылдамдык, Deнг'reиінe ayысады. |
| 5 | ЕнжоferрьxЖылдамдык | КозfaNTьшix echжоferрьxЖылдамдык, Deнг'reиінe ayысады. 5 мнүтэн күүрьлфы ушіншiЖылдамдыкka ayысады. |
| 6 | Сузri тyperы eckeptу | Көмір сүзісін ayыс'tыріне тазалay жени майсү Ricін тазалay кажет ekehiн ecke салды. |
| 7 | Hob' Hood | Aya tarТьшx Куралын的新а.apkыnlbбас capуфунцясынihДикakTopы. Keьір улrinердінбас capу панелін'de символ бap. |
3. ΘРКУндIK KOДАНУ
3.1 Aya tapTkblk KypaIbI naIdaIaNy
TemeHderi kectere caikec ycbihbJfAH KbldAmdbkTbI TEKcepH3.
| Y0-1 | Тамаксы кылытkaнда, кakпak кабылfaн bдыICTы Колданыniciprenecke. |
| Y2 | Бірnevшіnicipy aiMaKтарында hemece OTыктарда кakпafы кабык bдыICTа ТамакNICIPREнde,балпен КьырFaHda. |
| Y3 | Көн мөлшер径іТагмдарыкakпakсыз кайНатkaнда жэHe КьырFaHda, бірnevшіnicipy aiMaFында hemece OTыктарда niciprenecke. |
| Y | Улkeн мөлшер径іТагмдарыкakпakсыз кайНатkaнда жэHe КьырFaHda, billyfaDLыlbyk Kən. |

Tafambl niiciprenHHeKeiH aya tapkblu KypaJIbI Iwamamen 15 MInHT KocBn KOHa FKeHeC 6epineDi.
aya TapTkbl KypaIbI naJaIaNHy ywiH:
- KypbIJIfBbI Kocy yuHin 6ipiHwi XblnDAMdbK TyMeci0 0-1 6acbHb3.
- Kepek 6oIca, kaxeTTI TYmMeuikTI 6acbl, XblIaMlbIKtI e3repTih3.

TyTIN WbIFapFbIITbIH WAmbl 6aCa TYTIH WbIFapFbIi WfHKUJnAPbIHah TsyEJIci3 XyMbIC iTeiDi. 3zipney 6eIH JApBkTaNbipy yuin WAM TYIMeciH BacbHb3
KypblfblbI cHdipy yuH 6ipihwi KbldaMdbIK TynMeWirIH 0-1 kaTba 6acblb3.
3.2 Hob²Hood ΦyHKπεκbǐ
Бул的新Tiaya tapTkbiw KypanFa
KaIFaIbIH aBTOMaTTbI cyHKUma. Nei
NeH aya tapTkbiW Kypan ekeyi de
HΦpaKaIbIcHnA
KOMMyHKaTOpbIMeH Ka6DbIKTaIHaH.
XeIeTeKlWiTH XbldAmdbIFbpeXIM
napametpi MeH neStiY cTtHderi eH
bICTbIK bIDbICThIH TeMnepaTypacbl
BoBbIHwa aBTOMaTTbI Typde
aHbIKTanaDb. CoHd-ak neWti KOJMeH 6ackapbIn aya tapKbIwTbI Koca anacbl3. Byf yHKunHbI neWtIH naHeni apKblnb icke Kocyfa 6oNaDbI.

Функцянblаидаануfa KaTbIcTbTOlbIK aKnapaTTbl neW yctiHn naDanaHnybl HcKayIbIFbIHah KapaHbI3.
3.3 Cy3ri TypaIbI xa6apnaHdbIpy
Cy3riHIn eckepTy cnHaJIb KEmip cy3riciH aybIcTbIpy He Ta3anay XaHe MaJ cy3riciH Ta3anay KaKET EKeHH Ece CanaBl. MaJ cy3riciH Ta3anay Kepek 60nca, cy3riHIn HndnKaTObp TycTePmeh 30 cekyHd 6oBbl XaHaBl. KEmip cy3riciH aybIcTbIpy He Ta3anay KaKet 60nca, cy3riHIn HndnKaTObp TycTePmeh 30 cekyHd 6oBbl XbIbblKTaHbl.

«Kytim Kepcety XeHeta3anay» TapaybIHdafbi
«MaCy3ricIH Ta3anay» TapMaFbIH KapaHbI3.

Kytim MeH Ta3anay TaaybHa KaMip Cy3rici H Ta3anay HeMece KEmip Cy3rici AbyICTbpy TypaBkapaHbI3.
Функцянbl KaannbHa KeNTipy yuHIn Y3 Tynmecin 3 cekyHd 60bI 6acbHbI3.
Функцяньбелсендipy hemecae xkbypaTy yiuh:
1.Функциньбенидиру ушin 2
6entricn3cekynd6oib6abihb3.
ErepФункциьбенидирс, INДИКATOPы Tycte ekipet
Жылblытайы.
2.ФyHKnHbI axbipaTy yuHIn 2 TYmecin3cekynd6oynb6acbl3.ErepfYHKnIaXbipatblnca, HNDAKATOpbl TycTe bipet XbIbIbIKTaNbl.
3.4 KaushbiktaH 6aackapy KypaJIbI
KypbIJIbI KaIbIKTaH 6ackpy KypaIbImeH Ka6DbIKTaJFaH.
念 dETTe KocblbIN TpyaBl.
KaibTah 6ackapy KpaIbH Kocy Hemece axbipaty yiw:
- KypbIJIfBtHbIeUwipiHi3.
- 6enriueecin3cekyndbacbIbI3. Backapy naheniHINnHnKaTOpbl cyHKnqKocybl6oNca eKi pet,ewipynl 6oNca bip pet KblbIKTaIbI.
4. KYTY MEHEH TA3AJAY
4.1 Ta3aJay typalbI eckepTneJep
| Жуrbіш 3aTTap | АбразВті жуrbіш 3aTTapды кәніе щeТКаларды naДананБапь.Зурьлгын 6étін жумсak ушеберкпен, кылы сунmen кәнжумсak жуrbіш 3aTTpeH ta3алалы.3. |
| эзірі汞 dendін кійн курьлгын ьн кійбір 6eЛіктepі КызУы мумкін.Дактарды 6oNsDIPmay yшін курьлгын ьсalkbiHdaTbI, ta3aшуберкпен Hemece kaFAЗ cUŋriJepmEN KурfaTy KepeK. | |
| Дактарды жумсak жуrbіш 3aTTpeH ta3алалы.3. | |
| ТугіншытрьшытBiТаЗа устань3 | Курьлгын ьeн eHe Май сузrie nepin ai caьин ta3anaны.3. Iuliendii eJxHeМай сузrie nepin dieri Майы мукігТ ta3anaны.3. XuHaNfAн Май Hemece baska kaLdik erpTe ekEnyi MUMkiN.Cy3ri TpyanlxbxabapnaHdbpy kocunlby ke3eakceccyaPapndbi Ta3anayTypanl bHyckaynapdBiOpBnDaHb3. «Khydienikti naДaNaHу»TapaybɪNdaFb «Cy3ri TpyanlxbxabapnaHdbpy» beJIMIn KapaHb3. |
| Май сузrie nepin bIDbic Jyy MaшинасьдЯ JyyfRa 6olaDbI.bIDbic Jyrbіш Maшинада Temen TempepaTpyanbI xeHe Klyicka zuKlpDiopHaty Kepek. Май сузriciHn Tyci eZrepyi MUMkiN, bYl KypbIbHbHJxMybIC icTeyiHe ocep etneyni. | |
| Көмір сузrici | Көмір сузriciHn TONY YAkBiTB TaFAM NicipydɪN Typi MeH Mай сузriciHn KaHsaibtBi JxNi Ta3anaHfAhsBaHbHa 6aIIaHbIcStb 6olaDbI. KəmіpсузriciJyyfRa 6olaDbI.Cy3rini ŠaʌmamEn eki ai caьин ta3anaHbIz HemecepereHepaциялambi. AkceccsyarMen bipre bepiJiren napaKaanbIkaPahbI3. |
4.2 Ma'c cy3ricin Ta3aJay
Cy3rIePepi opHaTy yuH KApama-Kapcbi KaTapbIHda KbICbIUtap MeH KaDaybIUtap naJaIaNbIJFaH.
Cy3riHra3aJay yuiH:
- Awy yuH kaknakTbI tapTbIHbI3.

- Aya tapTkblk KypaIbIH acTbIHdafbI cy3ri nahenihderi 6ekity KbickblbIHbIH yCTaFbIbIH 6acblb3 (1).
- Cy3riH iAnIbIHfbl Jxafbl TEmeH Kapai a3dAn eHKeiTiH3 (2), cOaH KeiH TapTbIHbI3.
BapnbC cy3rinep ysiH anFaKbI eki KaamdbkKaTanaHb3.
- Cy3rinepiXemipriuEmecXyfbl3aTtapdbI KOJdaHbIN XeKEmEHemece bIDBCXyfblMaunHaTa3aJnAb3.

blbic xyfbiM MaunHada
TMeH TeMnpaTypaHbI
KHe KbICKa zIKnDi opHaTy
Kepek.Ma cy3ricinH Tyci
e3repyi MymKiH,6yI
KpyblFbIHbHxMbIC
icteyihe acep etneiDi.
- Cy3riHi KaI Ta opHbHa KOO yUiH aIFaUkBi eKi KaIaMDbI KepicIHwe opbIHdaHbI3.
KaKet 6oJca, 6apIbIK cy3riIep yuH Kaamdapdbi KaItaIaHaB13.
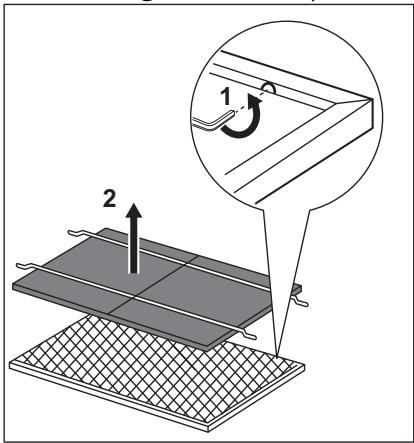
4.3 Kemip cy3ricin Ta3aJay
Cy3rHi wbfapbn any yuhi:
- Mai cy3rinepiH KypblfbldaH WbIfapbln aJIbHbI3.
OcbI tapaydafbI «MaJ cy3rinepiH Ta3anay» 6eNIMiH kappaHbI3. - Cy3ri TaFaHbIH (1) YcTaIbIH KblCKblITapDbI, CoaHa KeIH Cy3ri TaFaHbIH (2) WbIFapbIn aNbHbI3.

- Cy3ri TaFaHbIH Kxyfbl 3aTTbI KOJaHa6a bICtBik Cymeh HEmece bIDc-aIK Kxyfbl MaUNHa da Kxyblb13.

blblic kyyfblmamnHa da
waifblx jhe 6acka da
kYfbl3aTTapdbI
KoJdaH6aBtBnnapaMeTpdi
opHaTbHb3. bIbIC kyyfbl
MaunHaHbblbIc-
aKaTApMeH TOJTbIPyFa
60ImaDbI.
- Cy3ri taFahbH Ke6yre KaNdbIpbHbI3 Hemece neWti naJaDanaHbIHbI3.

ECKEPTY!
Kyin kany kayni 6ap! NeuTIn naIanaHny HcaynbIFbIHdaFbl Kayinc3dk TapaybH KapaHb3.
NeuTi 60^ Maksmamdbi TemnepaTypaFa 10 MNHyTk aOpHaTbIbI3.
- Cy3riHi opHaTy yuH KaaamdapdbI KepiciHHe opbHdaHbI3. Cy3riHi KypbIbIFa opHaTnac 6ypbIH TOJIbIFbIMe KeTIpy KepeK.
Cy3ri TaFaHbI 2XbJI caIbIH Hemece Wy6eperi 3aKbIMdaIFaH Ke3Je aybICTbIpbIHbI3.
4.4 Wamdblyaybictbipy
ByI KpybJfbl XUd IaMbImeH XHe 6eKe icke Kocy KypalbImeH (XUd
ДраиВері) Кабдыктанfaн.Бул Бөлшөртөді Тхнік KaHa aybɪстыpa алды. Akayлбік opbln anfah KaFdaɪda "Kayinciədik HycKaynapbɪ" taraybɪnDaflb "Kbɪsmet Kepcety" Бənlɪmɪн Karaɪbɪz.
5. KOPSHAFAH OPTAFA KATbICTbl JAFDAJILAP
BenlrcanbHfAH MaTePnAapblKaTAteHdeyH eTKi3yRe TaCbIpbHbI3. OpaMaTePnAaDapbl KaTAteHdeyH eTKi3y YuWIn TnICTKoHTeHepLepeCaIbHbI3. 3JekTpNIk XHe 3JIeKTPoHnKAblIK KpyblfblApDbH KaIdbIfbH KaTAteHdeyH eTKi3y apKbIbI, KopwAfah OpTaFaXHe aDAMhIH DeHCaylbIFbHa 3NbIH
KeTiptinKaFdaInapfKaon6epMeyre
e3 yneciH3di KocbIb3.Benri
caIbIHFaH KpyblIbIapDb TYPMcICTbIK
KandbIcTapMeH 6ipre TactaMaHb3.
OhIMdi XeprinikTi KaetaeHney
opTaNbIbHa eTKi3HHeMece XeprinikTi
MekeMe re xa6apnaCbHb3.
TURINYS
- SAUGOS INFORMACIJA IR IRENGIMAS 77
- GAMINIO APRAŠYMAS 78
- KASDIENIS NAUDOJIMAS 78
- VALYMAS IR PrieziURA 80
5.APLINKOS APSAUGA 81
PUIKIEMs REZULTATAMS
3.1 IcnoIb3OBaHne BbITaXKn
PekomEnDoBaHHbIe 3HaueHnA cKOpOCTn npBVeHeh b Ta6JIuCe HnKe.
KInpoyIaBnBaHOuIeΦnJIbTpblMOXHOMbITbB NocydomOeHOnMaHHe.
Iocydomoehya Maunha DoJnxHa 6bItb HacTpoeHa Ha Hn3KOTempeaTypyu MoKy u KopoTKn YIKpOuyabnBaIOUm fNtbp Moket N3MeHHTcBET;3TO He NOBnIeT Ha pOn13BOIDTeNbHOCTb np6opa.

YrOJIbHbIy cnJIbTp
BpemHaCbIeHnryOrbHOrofoNtpaBapbnpyetcBa3aBNCMocTn OT Bnla pInrOToBnEHHNpeRyPnHOCTNOUcNTKJInpoUaNBAuHOteRofoNtpa.YOrbHbIyfoNtbpMOxHOMbITb.OuNcTkynnPerenehaqiuOfoNtpa CJeDyET BbINOpHbTbpNpIMepHoKaXDbIe Dba Mecaqa.
Cm. 6pouHopy, npnnaeMyK 3TOMy akceccayp.
4.2 OuInctka KInpoUJaBnBaHouSeRoФильТра
KOPINCHNUCHA NOIDPISHA I CEPBNC
YBeK KopnCTnte opnHnHaJIne pe3epBHe DeIOBe.
Kaanda konthaktnape Obnaawehn cepBucn ceHTap,BoDnte pauyHa da Kaon c6eImaTe cneedehe noatake:Moden,6poj npOn3bOda,cepnjckn 6poj.
IopauMory da ce npohay Ha nlouNc caTexHnKIM KapaKTePncTnKaMa.
Uno3opehe/Oppe3- nHΦopMaunje o 6e36dnoctn
① OnuTe INHΦopMaζηje n cabetn
VnΦopMaüjeOxNBOThoJcpeiHn
3aDpkaHO npabo NImeHa.
1. INHΦOPMAUJIJE O BE3BEdHOCTN INHCTAJAUJN

YNO3OPEHbE!
Iorjedeajte3ace6Hy
6poUpy C ynyTCTBnma 3a
HNCtanaunjy 3a
HOpmaJne o
6e36eDnOCTn
HCTanaunj. TaKbBO
IpoJIaTe nOrnabBa o
6e36eHoctn npe 6nno
KakBor KopniShHeBa NII
OdpKabHa ypehaja.
2.ОПИС ПОНЗВОДА
2.1 Перлес Командег Табл e
| Функциja | Опис | |
| 1 | Лампца | Укъчуje и покъчуje с Bretл. |
| 2 | Прва 6рзина / Ис-Къчесо | Мотор ce празбачуje на прави НИВО 6рзиne. Другим рpitпасков уретaj ce racи. |
| 3 | Друга 6рзина | Мотор ce празбачуje на другни НИВО 6рзиne. |
| 4 | Треега 6рзина | Мотор ce празбачуje на треегни НИВО 6рзиne. |
| 5 | Мakсимална 6рзина | Мотор ce празбачуje на мakсимални НИВО 6рзиne. Нakoан 5 минута уретaj ce празбачуje у треу 6рзин. |
| 6 | Обавштоные о Phильтур | Позсега васда ще пOTРБно замен'tи ил очиртп утъени Фильтур и очиртп Фильтур за мас ho. |
| 7 | Hob' Hood | Инданатор phункциje за управьаге acinnapatopom празк пооче за кувае. За неке мodyся симбол с налазни на komандюг Табл. |
3. CBAKODHEBHA YIOTPEBA
3.1 Kopnshene acnpaTopa
PpOBeRnTe npenOpyuEny 6p3nHy y cKnady ca cneDeHOM Ta6eHOM.
4. HERA N YN WHTHeB E
4.1 Hanomehe y Be3n ca YniushenbeM
| Средства 3a чашende | He корис themselves abразимпve дetectiveness и четке. Повшины уроча ща ща оочис themselves меком крпом, толлом вором и балгим дetectiveness THEM. |
| Након Куба Nova, Нени.Deюви уроча ща ща могу SFИ Врали. Да сисс来不及 поаву Флеса, урочaj мора на ce oxлади и осUALS ChICSTOM Крпом пли папирни убрусима. | |
| Фleke оочис themselves SFЛАгим дetectiveness THEM. |
| Редовно чinctfte acni- patop | Свахог месец оочinctfte урени и Фшитente за мacr. Палъно оочinctfte унтурашьост и Фшитente за мacr od machоны. маслона пли други остаци могу пожуразковати пожар. ПрapatITE уптуства за чишени тосяв сад ce поави обаштоные о Фшитepy. Погледajte оденье „Оваштоные о Фшитepy" у полав- льу „Свахоневна уnotpe6a". |
| Фшитера за мacr могу за ce nepу у машени за праны посун; Машни за праны сydова мора бити подашени на посу: у и кратык чиknuc. Фшитeringа маслоны може за пROMЕни boу,.ai- то нема утца差别у ууннак урени. |
reparationsinformation:
www.aeg.com/support
registrar din produit for bättre service:
www.registeraeg.com


PekomeHnyeTbcra3aIINwaTn
BNTXKpynpaUOBATN
IpOToRm np6n3HO
15 XbInHn nicra roTyBaHHa.
J 1 Jg j a oJ b J
P 1 J a aJ a J

a 10 aJ all Jd 60 g
aJl Jglal.5
g jll J aill gall ydl 1000000000000000000000000000000000000000000000000000000000000000000
00 joo oo ooo
J 100000000000000000000000000000000000000000000000000000000000000000000000000

glallll alwlo 1000000000000000000000000000000000000000000000000000000000000000000
j 100000000000000000000000000000000000000000000000000000000000000000000

Jc jxlll aLbio 0jg2g iaiaiaoJrJz
J 1 J 1 J 1 J 1 J
Jg 5
. sol | jolal gau go | golal
a>all jil6 4.3
Jyj
jgl jn o gdo jy allj p .1
12 100
J 2
.(2) _n = 1^1n + 1_i = 1^n + 11i + 1_j = 1^n + 11j + 1_k = 1^n + 11k + 1_l = 1^n + 11l + 1_m = 1^n + 11m + 1_n = 1^n + 11n + 1_l = 1^n + 11l + 1_m = 1^n + 11m + 1_n = 1^n + 11n + 1_l = 1^n + 11l + 1_m = 1^1m + 1_n = 1^1n + 1_l = 1^1l + 1_m = 1^1m + 1_n = 1^1n + 1_l = 1^1l + 1_m = 1^1m + 1_n = 0^1n + 1_l = 0^1l + 1_m = 0^1m + 1_n = 0^1n + 1_l = 0^1l + 1_m = 0^1m + 1_n = 0^1n + 1
0nJw eol g jwjll aJ ucl .3
aJuue alucgl Jlalabio pJzwl
.og
Jd 4.2
yulu 1
alalallagll
j
.1

a>gl lcll l 2
.(1) a:laJl Jawl oJg>goJolJjIJI

Jawwll Jjwl jolal 00000000000000000000000000000000000000
. a_ (2)
JdJIgGg>0gnnnlllglz
aaiw aabp 1xuwjxlall aabii .4
g lue g 1 abwic aebio o3og
.og>all allw
gjxll jiluabw g>
Jz9 0211 Jd
a. a. a. a.

3 3 3 3 3 3 3 3 3 3 3 3 3 3 3 3 3 3 3 3 3 3 3 3 3 3 3 3 3 3 3 3 3 3 3 3 3
:abglbssgj
02 jll bc bai aagbgl 1
gall aag, abuaa aaabglll 1s
Y2jllbcb2ol,aaabgll bclly .2 3 0
jagol jaoogabuaaiae aabgll cils 1
20.15.
.0000000000000000000000000000
JUJUJUJUJUJUJU
:2g 00
.1
.2
joo joo ool a>gl c g>gall wallll. 100000000000000000000000000000000000000000000
Jcwhelbcllglao Jaa
aaiiia jao
all 2abw oclyy.
2laall jj lbaio
aejll j lbcaiol jaoi
001
Hob²Hood 3.2 a,bg
sIgall Jgai aiaia aiaiai abg li
oJwJy Jogo logg cIaJIg gagai a>do a>gall acw 22 .eJzll aewll
gj 0j> gjg jg jg jg jg jg jg jg jg jg jg jg jg jg jg jg jg jg jg jg jg jg jg jg jg jg jg jg jg jg jg jg jg jg
aaww saygagol no a>gral
a>gl no aagbll
aagcagaleallnojaiall
J 1 aabgll pds
.9gall 2xix

jlaJlaJ3.3
jil jis jis jil jil jil jil jil jil jil jil jil jil a b g a b g
j 30 oJgll
30 3aJUgUuUuUuUuUuUuUuUuUuUuUuUuUuUuUuUuUuUuUuUuUuUuUuUuUuUuUuUuUuUuUuUuUuUuUuUuUuUuUuUuUuUuUuUuUuUuUuUuUuUuU
aabg all Jldwol jlc lla
u@Jl jbi
aai g aiee

aIg aIeJ.4
J 4.1
aabaaolabio 2
jilwglallolllpdlxwllyaoclaeagabgogall
.

g
gall yj gai jgl .gall elj jn jn jn
aogawloglaabaaabaa
aabj jilw gail abi
aal .2
S > 2.1
o 1d l d j 1i a o .AEG 1d J
-1JgWgWgWgWgWgWgWgWgWgWgWgWgWgWgWgWgWgWgWgWgWgWgWgWgWgWgWgWgWgWgWgWgWgWgWgWgWgWgWgWgWgWgWgWgWgWgWgWgWgWg
g 100000000000000000000000000000000000000000
aio olaawl jg> S aclj
j>1 j0 gJyI liqg o JyI glaa
aagaaag aalwaaagaaag. gjjll aaiyglg jia jie jao
:2x, ylg aIaI I log12og
www.aeg.com/support
jie jiaoi aovc ie Jgaoall jw
www.registeraeg.com
jglal aolll jglg bgsaIgwall gallg caxlall
www.aeg.com/shop


aIg sLaell
aI 111111111111111111111111111
Jullll PNC
a>gl 1c logleall o i j k
a0dwl1og120-a/
aolo zilag og loglo ①
aLoge
jow jy aio
JrJgJnJnJnJnJnJnJnJnJnJnJnJnJnJnJnJnJnJnJnJnJnJnJnJnJnJnJnJnJnJnJnJnJnJnJnJnJnJnJnJnJnJnJnJnJnJnJnJnJnJnJ

J 1 J
JgJgJgJgJgJgJgJgJgJgJgJgJgJgJgJgJgJgJgJgJgJgJgJgJgJgJgJgJgJgJgJgJgJgJgJgJgJgJgJgJgJgJgJgJgJgJgJgJgJgJ g J g J g J g J g J g J g J g J g J g J g J g J g J g J g J g J g J g J g J g J g J g J g J g J g J g J g J g J g J g J g J g J g J g J g J g J g J g J g J g J g J g J g J g J g J g J g J g J g J g J g

C E