
APLOMB - APLOMB WH/A/60 - Kitchen hood ELICA - Free user manual and instructions
Find the device manual for free APLOMB - APLOMB WH/A/60 ELICA in PDF.
| Product type | Kitchen hood |
| Brand | ELICA |
| Model | APLOMB - APLOMB WH/A/60 |
| Width | 60 cm |
| Power supply | 220-240 V / 50-60 Hz |
| Motor power | Not specified in the manual |
| Number of speeds | 3 speeds + booster (model A) or 3 speeds (model B) |
| Lighting | LED (replacement by after-sales service) |
| Timer | Yes (20 min in speed 1, 15 min in speed 2, 10 min in speed 3) |
| Filter type | Metal grease filter + activated charcoal filter (optional for recirculation version) |
| Grease filter cleaning | Every month, in the dishwasher or by hand with neutral detergent |
| Charcoal filter replacement | Every 4 months maximum |
| Minimum safety distance | 45 cm for electric cooktop, 65 cm for gas or mixed cooktop |
| Use version | Extractor (external evacuation) or recirculation (recycling) |
| Air outlet diameter | Not specified in the manual (use a diameter suitable for the flange) |
| Weight | Not specified in the manual |
| Maximum number of burners | 6 burners |
| Energy consumption | Compliant with EN/IEC standards (energy class not specified) |
| Warranty | Not specified in the manual |
Frequently Asked Questions - APLOMB - APLOMB WH/A/60 ELICA
User questions about APLOMB - APLOMB WH/A/60 ELICA
0 question about this device. Answer the ones you know or ask your own.
Ask a new question about this device
Download the instructions for your Kitchen hood in PDF format for free! Find your manual APLOMB - APLOMB WH/A/60 - ELICA and take your electronic device back in hand. On this page are published all the documents necessary for the use of your device. APLOMB - APLOMB WH/A/60 by ELICA.
USER MANUAL APLOMB - APLOMB WH/A/60 ELICA
EN Instruction on mounting and use
Closely follow the instructions set out in this manual. All responsibility, for any eventual inconveniences, damages or fires caused by not complying with the instructions in this manual, is declined. This appliance is intended to be used in household and similar application such as: - staff kitchen areas in shop, offices and other working environments; - farm houses; - by clients in hotels, motels and other residential type environments; - bed and breakfast type environments.
The hood can look different to that illustrated in the drawings in this booklet. The instructions for use, maintenance and installation, however, remain the same.
It is important to conserve this booklet for consultation at any moment. In the case of sale, cession or move, make sure it is together with the product.
- Read the instructions carefully: there is important information about installation, use and safety.
- Do not carry out electrical or mechanical variations on the product or on the discharge conduits.
- Before proceeding with the installation of the appliance verify that there are no damaged all components. Otherwise contact your dealer and do not proceed with the installation.
Note: The parts marked with the symbol "(^)" are optional accessories supplied only with some models or otherwise not supplied, but available for purchase.

Caution

Electrical connection
The mains power supply must correspond to the rating indicated on the plate situated inside the hood. If provided with a plug connect the hood to a socket in compliance with current regulations and positioned in an accessible area, after installation. If it not fitted with a plug (direct mains connection) or if the plug is not located in an accessible area, after installation, apply a double pole switch in accordance with standards which assures the complete disconnection of the mains under conditions relating to over-current category III, in accordance with installation instructions.
WARNING! Before re-connecting the hood circuit to the mains supply and
checking the efficient function, always check that the mains cable is correctly assembled.
WARNING! If the supply cord is damaged, it must be replaced by the manufacturer, its service agent or similarly qualified persons in order to avoid hazard.
- The minimum distance between the supporting surface for the cooking equipment on the hob and the lowest part of the range hood must be not less than 45 ~cm from electric cookers and 65 ~cm from gas or mixed cookers.
If the instructions for installation for the gas hob specify a greater distance, this must be adhered to.
- Before any cleaning or maintenance operation, disconnect hood from the mains by removing the plug or disconnecting the mains electrical supply.
- Always wear work gloves for all installation and maintenance operations.
- This appliance can be used by children aged from 8 years and above and persons with reduced physical, sensory or mental capabilities or lack of experience and knowledge if they have been given supervision or instruction concerning use of the appliance in a safe way and understand the hazards involved.
- Children shall not be allowed to tamper with the controls or play with the appliance.
- Cleaning and user maintenance shall not be made by children without supervision.
- The premises where the appliance is installed must be sufficiently ventilated,
when the kitchen hood is used together with other gas combustion devices or other fuels.
- The hood must be regularly cleaned on both the inside and outside (AT LEAST ONCE A MONTH).
- This must be completed in accordance with the maintenance instructions provided. Failure to follow the instructions provided regarding the cleaning of the hood and filters will lead to the risk of fires.
- Do not flambe under the range hood.
- Do not remove filters during cooking.
- For lamp replacement use only lamp type indicated in the Maintenance/Replacing lamps section of this manual.
The use of exposed flames is detrimental to the filters and may cause a fire risk, and must therefore be avoided in all circumstances.
Any frying must be done with care in order to make sure that the oil does not overheat and ignite.
CAUTION: Accessible parts of the hood may become hot when used with cooking appliances.
- Do not connect the appliance to the mains until the installation is fully complete.
- With regards to the technical and safety measures to be adopted for fume discharging it is important to closely follow the regulations provided by the local authorities.
- The air must not be discharged into a flue that is used for exhausting fumes from appliance burning gas or other fuels.
WARNING! Failure to install the screws or fixing device in accordance with these instructions may result in electrical hazards.
- Do not use or leave the hood without the lamp correctly mounted due to the possible risk of electric shocks.
- Never use the hood without effectively mounted grids.
- The hood must NEVER be used as a support surface unless specifically indicated.
- Use only the fixing screws supplied with the product for installation or, if not supplied, purchase the correct screws type.
- Use the correct length for the screws which are identified in the Installation Guide.
- In case of doubt, consult an authorized service assistance center or similar qualified person.
WARNING! Do not use with a programmer, timer, separate remote control system or any other device that switches on automatically.
-
The range hood is intended to be installed over a hob having 6 heating elements.
-
This appliance is marked according to the European directive 2012/19/EC on Waste Electrical and Electronic Equipment (WEEE).
- By ensuring this product is disposed of correctly, you will help prevent potential negative consequences for the environment and human health, which could otherwise be caused by inappropriate waste handling of this product.

- The symbol on the product, or on the documents accompanying the product, indicates that this appliance may not be treated as household waste. Instead it should be taken to the appropriate collection point for the recycling of electrical and electronic equipment. Disposal must be carried out in accordance with local environmental regulations for waste disposal.
- For further detailed information regarding the process, collection and recycling of this product, please contact the appropriate department of your local authorities or the local department for household waste or the shop where you purchased this product.
Appliance designed, tested and manufactured according to:
- Safety: EN/IEC 60335-1; EN/IEC 60335-2-31, EN/IEC 62233.
Performance: EN/IEC 61591; ISO 5167-1; ISO 5167-3; ISO 5168; EN/IEC 60704-1; EN/IEC 60704-2-13; EN/IEC 60704-3; ISO 3741; EN 50564; IEC 62301. - EMC: EN 55014-1; CISPR 14-1; EN 55014-2; CISPR 14-2; EN/IEC 61000-3-2; EN/IEC 61000-3-3. Suggestions for a correct use in order to reduce the environmental impact: Switch ON the hood at minimum speed when you start cooking and kept it running for few minutes after cooking is finished. Increase the speed only in case of large amount of smoke and vapor and use boost speed(s) only in extreme situations. Replace the charcoal filter(s) when necessary to maintain a good odor reduction efficiency. Clean the grease filter(s) when necessary to maintain a good grease filter efficiency. Use the maximum diameter of the ducting system indicated in this manual to optimize efficiency and minimize noise.
Use
The hood is conceived for the suction of cooking fumes and steam and is destined only for domestic use.
The hood is designed to be used either for exhausting or filter version.

Extraction version
In this case the fumes are conveyed outside of the building by means of a special pipe connected with the connection ring located on top of the hood.

CAUTION!
The exhausting pipe is not supplied and must be purchased apart.
Diameter of the exhausting pipe must be equal to that of the connection ring.

CAUTION!
If the hood is supplied with active charcoal filter, then it must be removed.
Connect the hood and discharge holes on the walls with a diameter equivalent to the air outlet (connection flange).
Using the tubes and discharge holes on walls with smaller dimensions will cause a diminution of the suction performance and a drastic increase in noise.
Any responsibility in the matter is therefore declined.
Use a duct of the minimum indispensable length.
! Use a duct with as few elbows as possible (maximum elbow angle: 90^ ).
Avoid drastic changes in the duct cross-section.

Filtration version
The aspirated air will be degreased and deodorised before being fed back into the room.
In order to use the hood in this version, you have to install a system of additional filtering based on activated charcoal.
Installation
As described in the installation drawings perform 6 holes (8 mm diameter, 40 mm deep), in the positions shown in the drilling template, to fix the hood support bracket and the exhaust flue.
After installation, check that the hood and exhaust flue are perfectly aligned.
Mounting
Before beginning installation:
- Check that the product purchased is of a suitable size for the chosen installation area.
- Remove the charcoal (*) filter/s if supplied (see also relative paragraph). This/these is/are to be mounted only if you want to use the hood in the filtering version.
- Check (for transport reasons) that there is no other supplied material inside the hood (e.g. packets with screws (串) guarantees (串) etc.), eventually removing them and keeping them.
Expansion wall plugs are provided to secure the hood to most types of walls/ceilings. However, a qualified technician must verify suitability of the materials in accordance with the type of wall/ceiling. The wall/ceiling must be strong enough to take the weight of the hood.
Do not tile, grout or silicone this appliance to the wall. Surface mounting only.
Operation
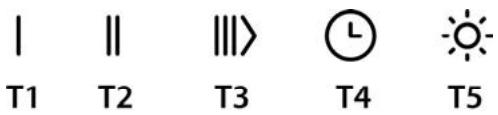
Model A
| I | II | III> | L | |
| T1 | T2 | T3 | T4 | T5 |
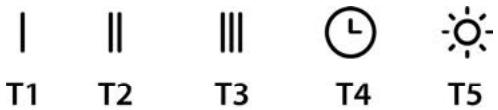
| Model B | ||||
| I | II | III | L | |
| T1 | T2 | T3 | T4 | T5 |
First speed (T1)
Press T1 to activate the first speed. When the function is activated, the LED turns on with a fixed light. Press T1 again to turn the hood off.
Second speed (T2)
Press T2 to activate the second speed. When the function is activated, the LED turns on with a fixed light. Press T2 again to turn the hood off.
Third speed and BOOSTER (T3) model A only
When the hood is off or with the first or second speed active, the third speed can be activated by pressing the button T3 and the LED will turn on with a fixed light.
If T3 is pressed again, the booster turns on. The booster can only be activated if the third speed is already active. When the booster is on, the LED T3 starts to flash. While the booster is working, it is possible to switch to the first or second speed by pressing the desired speed button T1 or T2, the booster will turn off and the selected speed will be activated.
When the booster is on, press T3 again to turn the hood off. After 5' the booster automatically turns off and the third speed is automatically activated.
Third speed (T3) model B only
Press T3 to activate the second speed. When the function is activated, the LED turns on with a fixed light. Press T3 again to turn the hood off.
Timer (T4)
The timer can be activated when the first, second or third speed is active. When the function is activated, both the LED of the Timer (T4) and that of the previously selected speed (T1/T2/T3) turn on with a fixed light.
The duration of the timer depends on the selected speed:
First speed T1 = duration 20'
Second speed T2 = duration 15' .
Third speed T3 = duration 10^ .
When a speed is timed, the timer can be deactivated by pressing T4, or one of the other two inactive speeds. To turn the hood off, press the speed again to which the timer had previously been linked.
NOTE: model A only
The timer cannot be activated when the booster is active. When the time expires, the hood turns off. When a speed is timed, it is possible to switch to other speeds by pressing the desired speed button, this operation will turn the timer off.
Light (T5)
The light can be activated at any time by pressing key T5. When the function is activated, the LED turns on with a fixed light.
Filter setting
Activation or deactivation of the filter indicators is only possible with the hood off.
To access the configuration menu, hold pressed T2+T3, once inside the menu T1 will start to flash.
The default setting is:
-
grease filter indicator (T2) on, therefore active;
-
odour filter indicator (T3) off, therefore not activated.
T2 activates/deactivates the grease filter indicator. T3 activates/deactivates the odour filter indicator. To exit the menu, hold pressed T1 or wait 10^
Filter reset
The hood signals the need for filter maintenance at regular intervals:
- grease filter every 40 hours;
- odour filter every 160 hours.
In this case, with the hood off, when the user touches any button the interface signals two types of needs for a period of 10^ :
-if T1+T2 flash: grease filter maintenance;
- if T1+T3 flash: odour filter maintenance.
During the 10^ it is possible to reset the grease filter by pressing T1+T2 and to reset the odour filter by pressing T1+T3. After the reset, the button combinations will flash rapidly twice. The interface will now work as normal.
Please note:
During the 10^ , the hood will work normally but without any visual feedback regarding the speed buttons. If during the 10^ no operations are carried out, the LEDs will stop flashing and the visual feedback will return to normal.
Maintenance
Cleaning
Clean using ONLY a cloth dampened with neutral liquid detergent. DO NOT CLEAN WITH TOOLS OR INSTRUMENTS. Do not use abrasive products. DO NOT USE ALCOHOL!
Grease filter
Fig. 18
Traps cooking grease particles.
The grease filter must be cleaned once a month using non aggressive detergents, either by hand or in the dishwasher, which must be set to a low temperature and a short cycle. When washed in a dishwasher, the grease filter may discolor slightly, but this does not affect its filtering capacity.
To remove the grease filter, pull the spring release handle.
Charcoal filter (filter version only)
Fig. 19
It absorbs unpleasant odors caused by cooking.
The saturation of the charcoal filter occurs after more or less prolonged use, depending on the type of cooking and the regularity of cleaning of the grease filter.
In any case it is necessary to replace the cartridge at least every four months.
The charcoal filter may NOT be washed or regenerated.
Circular charcoal filter
Apply one on each side as cover to both the shield grids of the motor impeller, then turn clockwise.
For the disassembly, turn counter-clockwise.
Replacing lamps
The hood is equipped with a lighting system based on LED technology.
The LEDs guarantee an optimum lighting, a duration up to 10 times longer than the traditional lamps and allow to save 90% electrical energy.
For replacement, contact the technical service.
WAARSCHUWING! Controller eerst of
Ppwn taXumra T1 = diapkeia 20
U P TQUTTgT2=biokεia15'.
Tpirn taXutma: T3 = bIaPkeia 10'.
Otaria tauxuneta exei xoviojou, mtopeite va atenevpyotoinoe To timneratuvac tte to T4, eite ia amo tic aalec suo un evpecs taunntec. Ia va obaane tov atoppopnnpa, tarnote gava tv taxutna otnv ontoia eixate epapoioei nponyouevwoc Toxoviojou.
- Fettfilter haver 40. time.
Luktfilter hver 160. time.
Pred zahajenim instalace:
Okruzno uhoñy filter
MEGJEGYZES:csakA model
PnroTbHeTo Ha PbXeHn XpaHn Tp6Ba Da Ce N3BbPwBa POnd Na6IIOJeHne, TbKaTO CROpeSeHOTO OJNO MOKe Da CE B3PNaMeHn.
BHIMAHHE: Korato roTbapcknT nIOT pa60t, DoCTbHnTe Yactn Ha
acnnpaTopaMoraT Da ce HaropeuT.
He Cbbp3BaIte ypeda KbM eJ. Mpekata DOKaTO He CTe npKJIIOUHIN OKOHaTEJHO C MOHTaKa.
-
Oce OTHACI Do TEXHnueCKInTe pa3Mepn I MEPKInTe 3a 6e3OnacHOCT, KOtO Tp86Ba Da npEiPnEmTe 3a OTBexJaHeTo Ha DImHInTe rAzOBe HABbH, Bn npEopbYBaMe Da ce npiDbPjAte CTpIKTHo KbM npaBnIata, npEiBnDeHN B perIaMeHTIne Ha KOMnTeHTHIne MeCTH N Blactn.
-
AcnpnpaHnT Bb3dyx He Tp86Ba da ce HacOyBa KbM Tprb6OpBOoDHTe, KOINTo Ce n3I0J3BaT 3a OTBexJaHe Ha dIMHHTe ra3OBe, OTdEJIaN CE pRi N3IOJ3BaHETo Ha ypeNi pa6OTeu C rA3 IIN Dpyr BnD rOpNUBO.
BHIMAHHE! HenctaInpaHTo Ha 6oJIbOBeTe I MExaHn3MITE 3a 0fKcIpaHe B CbOTBecTBne C HAcTOrIuNTe INHCTpyKcN MoXe Da IOBeDe Do pNCKOBe OT eJeKtpnuecko ECTCTBO.
- He n3noBaiTe n He octabraye acnupatopa 6e3 npabinHO MOHTnpaHn lamnnuKn nopadn eBeHTyaen pck ot TokOB ynap.
- Hikora He Изпога Вайе acnnpatopa 6e3 npabinno mOnTnpaHa peWetka!
- AcnnpaTopbT He Tpr6Ba HNKOTA da ce n3n03Ba KaTo OonopeH PnOT OCBeH aKo TOBa He e CneuHaNo yka3aHo.
-Пи мontха ИЗпалытсамо Фнкррашиte 60лтоBE, KОТTO ca дoctавен 3aedno Cуpeда ИИн пою НЯма тakиba, 3akynete noxdxodяшо 60лтоBE. - ɪnənərəbæte 6oŋtɒbe c nɒdʌɔpəraɪa dʒlʌŋɪha, kɑkTo e nɔcoʊeHo B hapbʌŋɪka 3a nHCTaɪmɪpaHe.
- Пи наличne на сьмненя, моля сьржete ce c otopизираня сериЗ зтухуншо obcIJyKbahe nIkn KBaJINФицран nepcoHaJ.
BHIMAHHE! He n3non3baite c nporpaMaTOp, TaMep,OTdEINHO INCTAHNIOHNO UYPaBJIeHne IIN KAKBTO Na d e Dpyro YcTPOCTBO, KOETe CAKTNbIPA aBTOMATNUHO.
- YpeIbTe npEHa3HaueH 3a HcTaNpaHe HaI rTOBapCKn NeuK C MaKcMym6 KOTNoHa.
To3n ypeD OTROBapra Ha n3NCKBaHnraTaHa:
- Ebponeckata dupekTnba 2012/19/EC
- Waste Electrical and Electronic Equipment (WEEE).
YBepaikn Ce, Ye To3n ypei 6bJe peuKnpan no nOoobabaunr 3a TOBa HauH, Bne DOnpnhacrte 3a
Ona3BaHeTo Ha OKoJHaTa Cpea N BaWeTo 3dpaBe.

CmBbIbT BbPx ypea nIN B npDpykBaAuaata ro DOKyMeHTaunia NocOuBa, ye To3n npOyKt He Tpr6Ba da 6bde CHTAH 3a DomAushen OtnaBk, a Tpr6Ba da 6bde npEpaedhen B CneuHAno PnpDna3HaueHnTe 3a To8a NyHKToBe 3a peUHKnPaHae Ha eJekTpncEca H eJekTKpoHnHa texHnka. PtindpPkaJIte Ce KbM MeCTHnTE HopMaTHnB 3a npepa60Ta Ka H oTnAbTu. 3a No-nOpRoHa INΦopMaUaN B bB pB3Ka c PnpEdaBaHTo, CbNpaHTo n PeUHKnPaHeto Ha To3n npOyKt BV cbBETBaMe Da ce 06bpHete KbM KOMPeTeHTHnTe MeCHn CnyKb, CnyXbnte 3a CbNpaHe Ha DomAushin OTNaDbTu mN Mara3nHbT, B KOITc 3akynnPiu To3n en. ypeJ.
YpeIe IpoeKtnpaH, TcTeBaH n npOu3BeJeH B CbOTBETCTBHe C:
- BezonaHocT: EN/IEC 60335-1; EN/IEC 60335-2-31, EN/IEC 62233.
- PaobTmX xapaKTepeNCTnKn: EN/IEC 61591; ISO 5167-1; ISO 5167-3; ISO 5168; EN/IEC 60704-1; EN/IEC 60704-2-13; EN/IEC 60704-3; ISO 3741; EN 50564; IEC 62301.
- EMC - EnektpomarHHTha CbBMecTmocT: EN 55014-1; CISPR 14-1; EN 55014-2; CISPR 14-2; EN/IEC 61000-3-2; EN/IEC 61000-3-3.
IpeJIOXeHn 3a npabHnHa yNtpe6a, 3a da ce HamaJIb B3dEICTBnETO Bbpyx OkolHata cpea: BkIoUcTe (ON) acnnpatopa Ha MNIMMaHnA CKOpOCT, KORATO 3anoHete da rotBnTE I RO OCTabeTc Da pa60TN HRAKoKo MmHTy n CIED pNkIIOBaHe HA ROTBEHTo. YBeINuYabaNTe CKOpOCTTa cAmO B CUYaHr HA TOJMAO KONUcHcTO DMM IN napn IN 3NOn3BaTte YBeJIuYenHtce CKOpOCTn cAMo B EKCTPemHN CNTyaunm. CMeHnIe FInTbpa/OFInTPnte C aKTbENB BByrH, KORATO e Heo6XoDIMO, 3a Da NpDlbPkaTe Do6pa eFKeTbHOCT Ha HamaJIraBaHe Ha MmP3MaTa. POnCtBaTe FInTbpa/OFInTPnte 3a Ma3HHN, KORATO e Heo6XoDIMO, 3a Da NpDlbPkaTe Do6pa eFKeTbHOCT Ha FInTbpa 3a Ma3HHNtHe. N3pON3BaTe MAKCImaHn JnAmEtbp Ha CNCTeMaTAta OTBExKaDaHe Ha B3dYxa, NocOeH B TOBa pKOBODCTBO 3a ONtMn3HpaHe Ha eFKeTbHOCTTa n 3a HamaJIraBaHe Ha Uyma.
YnoTpe6a
AcnipatobTe npoeKTnpaH 3a acnnpaphe Ha nIMa nnapata, KOINTO CE OTDeJIPT pRn rotBeHe, n e npedHa3Naueh cAmo 3a 6ntoBa yNtpe6a.
AcnipatopbT mHa cIeHOTOpnpedHa3NaueHHe:BCMkyBa n OTBeJda HABh INIINΦIIITpIPA Bb3dUxa, KaTO eNHOBpeMeHHOC TOBa rpozIKJIIPA.

Bercna c acnpaunia
Iapata ce OTBeJda HabbN NocpeDCTBOM Bb3dYxOBoHa Tpb6a CbBy3aHa CbC CbeHInHTENHnF pHaHe.

BHIMAHNE!
Bb3dyXOBODnHaTtpb6aHeeBkHIOUeHaKbMakCEcoapTeN Tp86BaDa b6de3aKypeHaOTdEJIHO.
B Te3n cIyua nPmuTa He noema HnKaKBa OTROBOPHOCT.
I3noJ3BaIe Tp6a C Heo6xOIMMaT a IbJnxHa.
!N3noJ3BaIe Tp6a C Bb3MOxHO HaM-MaIKO Tp6Hn KOJIeHa (CMAKCImaJIe HbJl HA N3BmBka:90°).
He npomehaaine p3ko ceeyneTo Ha tpb6nt!

Bercn c cnntpnpane
AcnpnpanHrB3dyx Ce npceCTBa nOCBejaba npdi da Bne 0THOB B o6bIeHMe B nOmeJeHMeTo. 3a Da n3no3BaTe acnpaTopa B To3n BapnAHT Ha paOta Tp6BaDa IHCTANPArpe DOnbIhNteIIHa FInTPnpaCa CStema Ha 6a3ata Ha fInTPn c AKTNBEH BByrHe.
MOHTIPAhe
Ipobnnte 6 OTbopa, KaKTo e NocOeHo Ha YeptexKeTne, (0 8 MM IdbIb6OnHn 40 MM), KATO 3a ZeTTa Ce PnIDbPkATE KbM o6o3NaueHnTa Bbpyx Sha6NoHa, 3a Da qHKcIpaTe acnnpatopa n OnopHata nnAka 3a KomHa. CNeI kato pRnkNHTpe, YBepTe Ce, Ye acnnpatopa n KomHa ca nepFekTHO n3paBHeHn NOMeKJy IM.
MOHTAX
Ppei Da npicTbntte KbM MONTaXa:
YbepTe ce, ye 3aKyIeHnT oBac npOdyKT oTROBaP no pa3MePN Ha n36paHOTo MCTO 3a HcTaNipAhe.
- OtctpaHete fIINbpa/IFInTPnTe c aKTHBEN bByIeN (pa3bnpa ce, ako n36bpAnrT ot Bac moJe p3nOra c TaBb). 3a da n3bPbWte TOBA npocLeTe onepaunITE B Cb0tBeTHnnaparpa. MoTHnPauTe fIINTPnTe oTHOBo CAMo B cnuyah, ye Xe KnaeTa Da m3nO13BaTe acnnpaTopa BbB BapnAHT Ha fIINTPnpaua BepCn.
- YBepete Ce, ye no Bpeme Ha TpaHcnpota BbB BbTpeHnata quch Na cNpTaOpa He ca nonaHn Jdp6Hn PnpMeTn, Kato HapPmep PInkCheta C BNHTObe, rapaHcOnHHKaptn N dp.; aKO HApEPrTe TaKINBa OTCpAHeTe r n n 3ana3eTe.
Pn BCE TOBA, Bn npenopbYBaMe Da ce NocBbETBaTe c KbaJIINΦmIpuH texHnK, 3a Da CTE cnTyprHn, Ye DoCTaBeHNte akCEcoapn Ca nOxOJaIz 3a CEJNTa. CTeHata, CbOTBeTHo TABAHbT, Tp86Ba Da 6bDat IOCTaTBuHO CTaBmHn 3a Da n3DbpxkTaHa HATOBAPBaHETO.
Haun Ha ynoptpe6a Moen A
| I | II | III> | L | |
| T1 | T2 | T3 | T4 | T5 |
Mogen B
| I | II | III | L | O |
| T1 | T2 | T3 | T4 | T5 |
TbPba ckopoct (T1)
HaTnCHete T1 3a da aKTnBnPate IpbPata cKopocCT. Korato cyHKnIaTa e aKTnBnPapa, LED nHnIkaTOpbT ce BkNIOBa C pIKCnPaHa CBETnHa. HaTnCHete OTHOBO T1 3a da nKIIHOHTe acnnpatopa.
Btopa ckopoct (T2)
HaTnCHete T2 3a da aKTnBnpate Btopata cKoPocCT. Korato cyHKnIaTa e aKTnBnpaHa, LED nHdNkatopbT ce BKIOuBa C pIKCnPaHa CBeTIInHa. HaTnCHete OTHOBO T2 3a da n3KJIHOHTe acnnpaTopa.
TpetackopocntuBOOSTER(ycnibateen)(T3)camo moen A
Korato acnnpatopbTe deakntBupan nn nbpbata nn Btopa cKoPcT ca akTNBpAHn, TpeTata ckOcT MoKe da 6bdeakTNBpHa, Ype3 6yToHa T3 n LED nHdkaTOpbT ce BKIOUcbΦNKCpHa CBeTIHa.
EINO NOBTOPOHO HATNCKAHE Bbpyx T3,ue CE BKNIOH booster. Booster MOXe da 6bJe aKTINBUPaH, eINHCTBeHO cneI kaTo TeTATA CKOcT, BEYe e aKTINBUPHa. Korato booster e BKNIOHema,LED INDIAKATOpT T3 ue 3anoHe da npncpa. Okato booster dyHKUHOHPa, e Bb3MOKHO da ce npemHe Ha NpBa Hn HA BTOPA CKOcT, Ype3 HATNCKAHe Ha JeenAHn ByToH hCKoPcT T1 nnn T2,booster ue Ce n3KIOHn I36paHata CKOcT ue 6bJe aKTINBUPaHa. Korato booster e BKNIOH, HATNCHete OTHOBO T3 aa da n3KIOHHTe acnnpaTOpt.
Cne5'booster ce nKIOyBa aBtOMaTHHO I TpeTaACKOPOCT ce aKTBNIPA aBtOMaTHHO.
Tpetackopocr(T3)camo moedB
HaTnCHete T3 3a da aKTnBnpate Btopata cKoPocCT. Korato cyHKnIyraTa e aKTnBnpaHa, LED nHdNkatopbT ce BKIOuBa C pIKCnPaHa CBETInHa. HaTnCHete OTHOBO T3 3a da nKIIHOHTe acnnpaTopa.
Taimep (T4)
TaimepbT MOKe da 6bJe aKTINBpuA, KOrato e aKTINBpuHa nbpBa nn Btopa nn TpeTa ckopocT. Korato fynKunya t aekTNBpuA, KaKTo LED nnDnKATOpbT Ha Taimepa (T4) taka
I TO3n Ha CkOPOCTTa, I36paHa npEaBapnteJIHo (T1/T2/T3) ce BKNIOuBaT C fMKcUpaHa CBETNIHa.
TaimepbT npOdbIJIkAba da e aKTHBEH, B 3aBcIMoCT OT 136paHata cKOpocT:
Pbpa ckopocT T1 = npoDbJxNtEnHoct 20'
Btopa ckopoct T2 = npodbIKNTeHnOCT 15'.
Tpetackopoc:T3=npoobnixteHnoct10
Korato eHaCKOcT cTeMnOp3aTOp, TaIMePbT MoKeJa b6Je DeakTNBpaH, Ype3 HaNTsKaHe Ha T4 mN eHa OT dpyrnte CKOpOCTn, KOrTo He e aKTbVipaHa. 3a Da n3KJIyUHTe acNIHpata, Ha NTCHeT OTHOB CKOpocTt, Ha KOrTo npEiTOBa E biN npNIoXeHem TmNOp3aTOp.
3A5EJIEXKA:camo moeJ A
TaimepbT He moKe da 6bDe aKtINBipan, KOrato booster e akTNBipan.CnEd n3TuHae Ha BpeMeTo, acNpuatopbT ce n3KnOBya. Korato eoHa ckOpocTe c Temnopnsatop, MoKe Da ce npemHe np3 dpyrn ckOpocTH, HATnCKaIKn ByToHa Ha Jeelanata CKOpocT, Ta3n Onpauny Ie N3KnIOuY Taimepa.
CBeTnHa (T5)
CBeTInHaTMOKeJa6bJeakTNBnPaHaBBBCEKeEiINH MOMeHT,ue3HaTNCaHeHa6yToHaT5.KoratoФункиЯTe aKtINBnPaHa,LEDmNdkaTopbTe cBkIIOvBa cФnkCnpaHa CBeTInHa.
HaetpoKaHaΦnTbp
AknBnPaHTo NmN DeakTnBpuHaTo Ha INhDnKaTOpnte Ha
fNtbpa MoXe Da Ce N3BbPbWA cAmo Pn IN3KJIOueH
acnnpaTOP.
3adoctbIIO MeHOTo 3a KOHcHpyaun,HaTnchTe npOdbJnxKtEnHO T2+T3,eINH nT,B MeH0 T1 ue 3anoHe da npncupa.
Hacrpoikata no npda3bnpahe e:
-Фиптbp cpeу Ma3HHH INdNKaTOP (T2) BKInOueH, CJIeNoBaTeIHO e aKtINBupaH;
- p npOtnB Mnp3Mn INdkaTOp (T3) nKIOueH, CJeIOBaTeIHO He e aKTbUpaH.
T2akTNbpa/deakTNbpa INHnKaTopa HaΦnTbpa 3a Ma3nHn. T3 akTNbpa/deakTNbpa INHnKaTopa HaΦnTbpa 3a MnpN3Mn. 3a n3n3aHe OT MeHOTo, HATNCHe Te npOdbJnxTeIHO T1 nIIN n3yakaJIte 10"
Bb3ctahOBBaHaΦnTbp
Acnipatopb tCnHaH3npa Ha peoBHN HntepBaN,Ye
fHnTpIte Tp6Ba Da 6bDat NoDIOXeHN Ha NoDIpBxka:
-ФиNTbP cpeу Ma3HnHn Ha BCEkn 40aca;
-ФЛТьр npOTnMmHа BCEKn 160 yaca.
BTo3n Cnyuay, KOrato acnpaTopbTe n3KnHouen, KOrato notpe6nteIaT DOKOche eINH npOn3BOeH 6byTO, INHepeFeIcBT Ue CInHaJIIm3Ipa 3a 10" Dba Tnna Heo6xOIMOCCT:
- ako T1+T2 nyncupa: noDnpbkka Ha φnntbpa cpeuy Ma3HHN;
- ako T1+T3 npncupa: noDpBkka Ha pntb npotNB Mnpn3Mn.
IIO Bpeme Ha 10" e Bb3MOXHO da Ce Bb3CTaHOBn QnITbPbT npOTB Ma3HNH, Ype3 HATnCKaHe Ha T1+T2 n Da CE Bb3CTaHOBn QnITbPa cpeu Myn3Mn, Ype3 HATnCKaHe Ha
T1+T3.CneI 3aBpUbaHe Ha Bb3ctaHOBAHETO, KOM6bHaCUNTEOT6yTOHNJe MURATbP3O DBA Tn.
VHTepcebcT cera paboTn, KaKTo 0bIKHOBeHO.
BHMaHHe:
No Bpeme Ha 10", acnnpatopb'f yHKUOHnpa HOpMaIHO, Ho Hma Da NIma BvyaHa o6patna Bp3ka 3a 6yToHnTe 3a ckooct. Ako No Bpeme Ha 10" He ce n3Bbpns HnTo eHa onepaJIA, LED INDnKATOPnte c npat Da npncnP a InByaHnata o6patna Bp3ka 3e Ce Bp3kM KbM HOpMaHnTO.
Ponppbkka
Почистван.
3a nouchCTBaHETO nnoJ3BaIte EINHCTBEHO Kbpna, HablaXHeN C HeYtpaIIH TeUHN nouchTBAuI npenapATn. HE I3NOJ3BAIte IHCTPymeHTN INIIN PIPBOPN 3A IIOUCHCTBAHE!
IV36BBAIte IpepaTn, KOITcBdIbPkAT a6pa3NBUH NACTNU. HE IN3POJ3BAIte CmPT!
ΦnTTbP 3a Ma3HHH
Фur.18
ФИNTbpyT 3aIbpxMa3HnTe YacTHuN,OTdJIaHn npri TOrTBHe.
IIOHCTBa Ce BeDhBx MeceHNo C HeYTpAInn PnpaPAn. Mme ce pBuHNO IN B CbDOMNIA Ha MaUHa Ha NsCKa TempePaTypa n KpAByK peXIM Ha H3MMBaHe.
PnMHeHaΦmTTbpa3aMa3HmN B CbDOMnHa MauHa e Bb3MOKHO ToJ Da Ce Oe3UBeTm, HO TOBa B HnKaBcIyAe He HaamraBa CnOco6HoCTTa My HaΦmTnpaHe.
3a da pa3rno6nte qnIbpa 3a Ma3HnHnTe, dpbnHeTe dpkKaTa C npyKHeH MekaHn3bM.
ФиNTbpcakTINBeH BbIeH (cAmO 3a ФиNTpnpaHaBepn)
ФИ.19
3aIbPxa HnepnAHTne Mnpn3Mn, KOnto ce otJeT npn PpXeHe.
ФИТьрсT cakTNbEN BByIeHce 3aNYuBa npi6BnI3NtEnHO cneI dIbIgпрNiOHa N3N0I3BaHe B 3aBcIMoCT OT HauHnHa H roTBeH e NT OToBA KJIKO YecTO NOChCTBaTeФИТьра.
BbB BcEkn Cnyaen e Heo6xOJIMMo Da nOJMeHRe Te pTTbpa cAkTmBeH BtIeN Ha BcEkn YeTnpi MeCEua IIN KOrato INHdkatOpbT 3a 3acnlaHe Na HcNTPnTe NOKa3Ba,Ye e Heo6xOJIMo.
He ce mne HnTo MoKe Da ce n3non3Ba noBTOpHo.
KpbblnΦnnTbp cAKTNBEH BbIJIeN
Iocabete no eINH fInTbp O BcKa cTpaHa, Taka ye da ce NOKPnAT DBeTe PpeDn3Hn peSeTkn Ha pa6oTHOTO KOeIHO HA MOTOPa, CneI KOeTO 3aBbTpTe NO NOCoka Ha yacOBHNKOBata CTpeJIka.
PnД demoHTaKa 3aBbptTe B Nocoka o6paTHa Na YacOBHnKOBaTaCTpeIka.
Подмая на[e].Кршки
AcnipatopbTa3noIarocCBeITeJIHa CnCTema Cbc
CBETOIOIOI.
CBETOIOIOITE rapaHTnpat ONTmAMnHOOCBtneHHe,do 10
ПБТИ ПО-СИПНО OT ТраДиц�нHHTe ЛAMПИ И ПОЗВЛЯВAT 90% ИКOHOMЯ NaЕLEKTPOEHEPгИ.
3aIIOJMaHaCeOsbPHeTeKbMcePBn3a3aTEXHHeCKo 06cnykBaHe.
a fost montat in mod corect.
UcTpoCTBO pa3pa6oTaHO,MCbIaHO uN3roTOBNeHO B COOTBTCTBmC:
IpeBCTaHOBneHe HanaWtBaHHaTke:
- JnpoynobIbIbHn IInTp iHnIkaTOp (T2) ropITb, to6To BKIOHcHnI;
-De3oOpuyuHnΦiIbTp iHdNkAtop (T3) He roPmTB, To6To HE BKTIQUcHEni.
T2 BKNHOAe /BIMMKAe IHNkATOp XmPOyOBNBOBaIbHoro φINbTy. T3 BKNHOAe /BIMMKAe IHNkATOp De3OOPyHOrO φINbTy. Дпг ВIXOу 3 MeHIO BIKOHaTe TpBAne HATnCKAHЯ Ha KhoIky T1 a60 noHeKaIte 10 cekHyd
BIDHOBENHcTatyCphiIbtpiB
Yepe3 neBHI iHTepBaHn BNTRkHm KOBnak CnHani3ye npo Heo6xHnicb Texo6cnyrobyaHHn pifnbTrib:
JxnpoynoBnIOBaIbHmΦiNbTpKoXHi 40rodH
-De3oDopuyocnHΦijbTpKoXHi 160roHN.
Y Taknx BnIaIkaX, npN BmKHeHOMy KObNaKy, B MOMENT DOTKy KOpriCTyBaHa 6yIb-RAKO KHONi, IHTpeFeic 6yIe CmHAn3yBatn npToTgrom 10 cekHy npo DBox TINax Heo6xIHnx Oepaui:
-ЯкштT1+T2nybCyHtB:Texo6cnyroByBaHHJ KInpoynOBnHOBaJIbHOrOФinIbtpy;
- T1+T3 nyIbCyIOb: texO6cnyrobyBaHH
de3oOpuyuOro fInbtpy.
IpoTROM 10 cekynd MoKHa cknHytn IHdkaIqio XnOyoJIbIOBaIIbHoro fIbTy HATNCHeHHM T1+T2iHdkaIqIO de3oOpoyOro fIbTy HATNCHeHHM T1+T3. IicJra BIKOHAAH NcBO rCKDaHHN, KOM6Haauu CJHX KHONK UBMDKO 6JIMMHyt bDbi. Tepe iHTepFeic FyHKUOHyBatmme, Jk 3aBXdN.
ybara:
IpoTROMUx 10 CeKHyD BnTRJHKn KOBnak 6yde npaIOBAtN HOpMaJIbHO, ane He 6yde Bi3yaJIbHOro 3BOpOTHOr 3B'3kYHa KHOIIKAX BKLIOHEnH JbUdIKoTeR. RaIcO B XoDi XuX 10 CeKHyH He 6yde BnKOHaHO JxODnIX Dii, CIINpePctaHyt b NylcByATn, i Bi3yaJIbHn 3BOpOTnH 3B'3OK IOBepHeTcRdo HOpMaJIbHOr pexIMy.
Dorna
UcTka
ДячскBNKOPICTOBYTEЛПUIE cneuaJIbHy cepBETky, HAMOChEN HeITpaJIbHIM pIDKIM MIOHOHM 3acOBom. HE BIKOPICTOBYTE 3ACOBIB A50 IHCTPYMEHTIB DЯ OUYUHEHH!
He BnKOpIcTOBByIte 3aoc6n IIO MaObTa 6pa3nBHi MaTeiApIi. HE BnKOpIcTOBByIte CInPT!
ΦiNbTp 3aTpMkn KxpiB
Man. 18
3aTpHmye XnpoBI cnoIyehn, 10 BuHHMaHOb nID Yac npriroTuBaHH iXi.
IIOBHeH NCTNTNCb OINH pa3 Ha MicrCb He CnJIbHOIIIOHMIMMIOHMN 3aocbAm, BpyHy a60 B IOcYdOMmHi MaUHHi PrnH3bKj TEMNEpatypi i3 KOPOTKIM LKTIOM.
Pn MNTI B NocydomHm MaMnHi MetaJIeBm fIpIbTp 3atpIMKn Jxmy MoKe BTPaTITN KOJiP, aJe Ioro XapakTePcTNIK 3 fIpIbTyBaHHa KODHM YHOM He 3MiHTbCra.
ДяЗИТТФIиТу 3aTpIMKINxIMpyNotIITbHa c6e npyHnHy pyKy BiDcHJIeHnHЯФiINbTy.
ByrilbHnI pijIbTp (tIlbKn B pexmIp eepKpylaii)
Man. 19
B6npae HenpncMHi 3anaXu kxhi.
IpeBipka ByinbHoro pfIbTpHa HacnHeHH npOoDHTBCa nicna 6blm MeHd DOBTO rnpioDy BmKOpNCTAHn B3aIeXhOcTi BiD TmY KxHi i peryiarpHOCTi OChTkn pfIbTpry XmPIB. Y6yDb-IAKOMy BInaDky Heo6xIDHO 3amHrtn PAnPOh MAcMNMy KOxHi QOTINPi MicrJI.
HE nijnrae MNTTIO YI NOHOBNEHHIO.
Kpyrnn Byrnilbni fipnb
PmKnactn pfIbTp nO o6nDbI cTOpONn IaNt NOKpTTra 3axMCHX pUitok potopa DBNyHa, nicJy OTO NOBepHytn pfIbTp 3a roHNHKOBOO CTPIKIO.
ДяЗHA附-NOBepHTNФINbTpnpOTnROINHHNKOBOCTPIK.
3amHa lam
BnTjXkA obIaHaHa CInCTeMOO OCBiTneHnHa OCHOBi TEXHOJOTII iOID(B(LED).
IIOIN 3a6e3neuyOTb OTNImaJIbHe OCBITIIeHn, TPNBaIcTb ix B 10 pa3iB BnUa BiD 3BnAHH NaMIOHOK Ta daIOt b 90% ekOHOMII enEKTPOeHeprii.
Iooio 3amHn 3beptaiTeec do Cnyxbo TexHiHoro 06cnyroByBaHHa.
JaBnIaaybI acnantbI naIanany 6apbcihda 6yn HcykaDBeNJIeHReK KOIaNHy 7apTtApBH CaKTamaFaHHbIH KecpiHEn 60fAH ONkblIK eP NT neH 3aKbIM yuiH Xayan 6epMeiDi. CopfblI TEK KaHa Ynde naIananaHf 6onatbIHdai etin JxObaanHFAH.
KaKnak ocbi kitanwada Kepcetinreh cypeTepen e3rewe 6oBIn Kepinyi Mymkin. DereHmeh, Kondahy, texnkaIbIK KbI3Met Kepcety XHe opHaty Hxckaynapbl 6ipDen 6oIaBl.
Ke3keIreH yaBbTTa 6yn HycKayMeH naJaHaHy yuIH aKtaFaH MaHbI3bl. BybIM catbJlFaH, TaCbIPFaH HeMece KOnBilFaH Ke3de ON OHBMe6ipre KaNfaHbHa Ke3 KeTki3iH3.
Hcyaydb MyKnT Okbl3: OHda 6yamdb KoHdbpy, naJaIaHy XHe Kaybinc3dk Xehinde MaHb3db MeJIMet 6ap.
БуIMHbIH 3NeKToHDbIK HeMece MExAHKnblk KOHCTpyKUryCbIHDa HeMece copfbiW BeHTINJYcIyBik KaHaJdapbIHda eKhHaDai Da e3repicTeP JxacamaHbI3.
OpHaTuDbI opbHdAmac 6pybH 6epiReH 6apNbIK KypamdaTcAtpB13 3aKbIMdaNMaFaHBiH TeKcepiH3 Hemece opHaTuDbI KaJfAcTbIPmac 6pybH DePdAnFxa6apnAcbHbI3.
Ecken: (^*) TaH6acbI 6ap 6JIikTeP TeK KeB6ip Ynirinepmen 6epinTei (6aca KaFdaJnapda 6epimTei), 6ipak catbIn anyf a0laTbIn KocbIMwa akceccyapnap 6Obn TaBJaDbI.

Hycaynap

3neKtp Kocynapbl
JKeiH KePHeyi acnantbIH iHnde opHaIacKaH TaKtaIwada 6enrIeHren TexNkaIbIK DepeKTepei KepHeyre cAKeC KeNyKepek. Erep copfbl WnKamEn JkaDbIKTaIraH BoIca, opHaTbIJaHHaH KeiH De icTeyre 6oIaBH, KOJ XeTeprIik Xepe 6Olybl Tnic, ICTen TypFaH epExeIepre CaiKec aImaJIbICaIMaJIbI uTeNCelbre CopfblTbIKocbl3. Erep copfbl WnKamEH Za6DbIKTaImaFaH 6oIca (XeJIre Typa Kocblny), HEmec e aImaJIb-CAImaJIbI
UTeNceJIbOpHaTbIINFaHHaHKeiH De KOJ XeTePNIk JepDe 6oJMaCa, OHJa OPhATy HUsCKaybHa CənKec 3-AdpeXeJedi acKbIH KepHeydi BoJbIPMaHTbIH XaHE JeJIiHi TOnbIK aShbIInyBH KaMTaMaCCbI3 eTeTI Nticti ekiNoJIocTik axbIpaTKbIITbI NaJaIaNbIHbI3.
ECKEPTY!
Kopek JKeIciHe COPfblUHTbIH 3JIeKTpIIK JyIeciH Kocy aIbIHda Kopek Ka6eni Dypbc MOHTaXdAJIFaHbIHa Ke3 JeTki3iHi3.

ECKEPTY! Həp ьepuyi MxkeJIiHi aBTopn3aunnaHfahKHNKaIbIK opTaIbIKTa HeMeceikTi MaMaH aybICTbIpy Kepek.
- CopfbltbiH TMeHri KbIpbl MeH bIbIC acTbIHdafbI TIpeyiWi Xa3blkTbIFbIHbIH apa KaUbIKTbIFbl əJIeKTp PnITacBi yuH 45cm, aI ra3 Hemece biPikTipiIreH nnTanap yuH 65cm DeH KEM 6oJImaybl Tnic.
Erep Hycayda ra3 nnITacbIH opHaTyfa apTbIFbIpaK apa KaWbIKTBiK 6eJrJIeHReH 6oJCa, OHBeCkepiHi3.
Ke3 KeIReH Ta3aJay HeMece TexHnKaJIbIK Kbl3MeT KOpceTy KymblCTapbIH opbIHdAmac 6ypbIH aHaHbI ShbFapy HeMece JeJIiIK KyaT Ke3IH axbIpaTy apKblbl CopfblHTbl əJeKTp JxJIciHeH axbIpaTbIHbI3.
OpHaTy XaHe TexHnKaIbIK Kbl3MeT Kepcety XyMbICTapbIH Xypri3reH Ke3de apdaibIM XyMbIC
Koɪfəb6bɪH Kniɪhɪz.
- ByI KypblfblHb 8 XactaftbI
XəHe OdaH yIkeH 6aIaIap, DeHe, ce3y HeMece aKbln-Oi KaIeTTepi 1wEKeTeyIi TyIraIap
Hemece Taxipnbeci Meh 6ilimi JOK TyIraIap OHbl Kayinci3
XoJIMeH NaIdaIaNHyFa KaTbICTbl HcCKay aJbIn, bIKTNMaI
Kayintepdi YfblHfAH JaFdaIda
XaHE 6aKblayda BoJFaHda
NaIdaIaNHa aJaDbI.
BaIaIapdbH 6ackapy
3JIeMeHTepiH e3reptYiHe XaHe KypblfblMeH OINHaybHa XOJI
6epMey KepeK.
Ta3aay XHe 36eTInHteXHNkaIbIK Kbl3MeT KepceTyKMybICTapbIH 6aKaBilaycbI3 Kypri3yiHe6oImaiDbI. - Acy copfblbbl 6acka ra3 xafy KypblfblnapbImeH Hemece 6acka OTbIHapMeH naJaHaNbIHaF Ke3de, Kypblfbl opHaTbIJaFbH 6enme XeTKiJIkTi Tpyde XeJnDeTInyi KaKxet.
Copfbltbl iHHeH de, cbIPTbHaH da Kynei Tpyde (KEM DEGEHNDE AINbHA BIP PET) Ta3aJlay Kepek, aPdaBIM TexHnKaJIbIK KbI3MeT KOpceTy HcCKayIbIFbIHDa 6epinreH HyckaynapdbI opbIHdAhl3.
CopfbIbTBiH Ta3aJAY CTaHdapTTapbIH XHe cy3rInepdi aAmactbipy XHe Ta3aJAY BoBbIHwa epExepepi - yctaH6ay HETNXeCiHne ept TybIHaaybl MymKIn. TaMaKTbl TikeJeCOPfblu aCTbIHda XaHdbIpyfa KaTaH TbIbIM caIbHaDbI.
-ШаMbblaybICTbipy wih TeK ocbI
HvCKayIbIKTbIH «TexHnKaJIbIK Kbl3MeT KepcTey/UaMdapdbI aybcITbipy》 6eImiHne KepcTeiJrE h IaM TpyiH NaJaHaHbIHbI3.
Ausbik KaIbIHdbI naIdaIaHy cy3riIep yuH 3nAH XHe eP T KayniH TybIHdaTybl MyMkiH, COHbIKtaH OfAH eWkaUHaH XoJI 6epeMey KepeK.
MaIbIH 7aMaHaTbIC Kbl3bIN HeMece KaHbIN KeTneyiH KaMTaMaCbI3 eTy yWih, TaMaKTbl a6aJnan KybIpyKaXeT.
CAK BOJbIHbI3: CopfblWtbiH KOJIkeTIMdi 6eJIkTepi TaMaK DaIbIHday KypblJFbIJaPbI NaIdaIaNbIINFaH Ke3De KbI3bIN KeTyi MymKiH.
- Ophaty TOnbIK aayKaTmaHbIHwa KpypbIfblHbI 3JIeKTp JxeliciHe KocnHaB13.
- BydBiH 乌bIfybuHa KapcbI KOJaHbIaTbIH TexHnKaIbIK XHeKayinci3dk UapapanabH eckepe OtbpIn, JepriNikTi 6nlik opraHapbl 6ekitkeh epexeJepdi MYKnT OpbIHay MaHbI3bl.
- OcbI KypblfblHbIH TYTik apKbIbIb
6aftbTTay KyyieciH ra3 Hemece
6bacKa OTbIHdbI XaFaTbIH
KypblfblnapdAn 8bIKKaH
6byapDbI 8bIFapy cNkTbI 6acka
da MaKCaTTapDa
PnaidanahblaTbIH Ke3 KeJIreH
KOJdaHbICTafbl XeJTeTy
KyyieciHe KaIfay KaKeT. ΘJeKTp
TOBbIHcoFy KayniHe
6aMnAhlbICTbl 7Ambl Dypbc
6ekitiImereH COPfblWTbl
Pnaidanah6aHbI3 XaHe
KaIdbIpMaHbI3.
ECKEPTY! BypaHdaIapDbI Hemece 6ekity Kypblfbcih OCbl
Hcaynapfa caikec opHaTnay 3neKtpnik kayinTepre aKeIyIMyMKiH.
TopnapbTnictTyprde6ekitJmereH copfbltbeEkaan naDanaHaB3.
AphaIb KepcetIIMMeIHHe, copfblTbELKAAUAH TIpeK 6eTI petiHne naJaIaN6aHbI3.
- Tek opnaty yuin eHimmen 6ipre 6epinren 6ekity 6paHda napbIn naiDaanahbIb3, erep 6epinmece, 6paHdaHbT niicti TypiH catbIn anbHbI3.
BypaHdaanapdbiH opHaTy HcyKayIbIbIHkaPecetinreH dypbic y3bIHbIFbIH naJdaNaHbIbI3.
KymHdHaCahb3, ekilTt Kbl3MeKepcTy 60bHwXepDem KepcTeOpTaIbIfbHa HemeC Tnici MaMaHaHaFah TyIraFa xa6aplaCbHb3.
ECKEPTY! BardapnaMaJayuBIme, TaMepMeH, 6eNek KaUbIaTah Backapy KyeecimeH HEmece ABToMaTbI TypDe KocbIaTbI Ke3 KeJIreB 6acaKypbJIbFIMeKoJaHa6aHbI3.
- Copfbii 6 Kb13bipy 3JemeHti 6ap neu yctihe ophatyfa aphanFaH.
3JNeKtpnIK JxHe 3JIeKtpOnHbIK acnTapbl KaTaNandaF acbpy XeHiNderi 2012/19/EC EbponaBHK DnpeKtNBke (WEEE) caiKeC 6epinreH eHIM TaH6anaHbl.
BepiIreH eHIMdi Iypbic KaI Ta naIdaFa acbpydbkamTaMaCCbI3 etYmuH, C3 KopIaFahOpTaFa KHeaam DeHCayIbIFbHa Kepi ecepH Tnri3y Di6oIbIpMayra KEmeKTececic3.

Acnantarbl HeMece Konldama Kykattarbl TaHbacb6epiReh acnantb KaTaNadara acbipyda 9eTTeri TpMbICTbK KaNbIK petIHne urepye 6oImaTbHIn Kepcetei. OhIn opNbHa 3NeKtpnik XaHe 3NeKtpoHdbIK acnantapbl KaTa naNdara acbpyfa apHaIfah KaBlnday NyHKTIhe Tancbpykepek.
By3yra tancbipy acnantb Kaia Ta naJaRa acbipy XeHInderi XepriNtI epexenepre caikec 1blrappblnybl Tnic.
BHydai eHIMdepi naIandahy, KaIta naIada ra acbipy epexenepi xeHInDe TOnbIK aKnapaTTbl Keprinikti ekimwiinok opbHdaPbHaH, KaIbTkapdbI kaTaNadara acbipy Kb3MetiHeH HeMece Bepinren eHmDi C3 catbn anfah dyKeHen ana anacb3.
KypbIbnfbl KeNecinepe caJ K06aHaHaH, cblHaHaH KHe Jkacan 1bIrapblnFaH:
Kayinci: EN/IEC 60335-1; EN/IEC 60335-2-31, EN/IEC 62233.
- ΘΗΠДιΙΚ: EN/IEC 61591; ISO 5167-1; ISO 5167-3; ISO 5168; EN/IEC 60704-1; EN/IEC 60704-2-13; EN/IEC 60704-3; ISO 3741; EN 50564; IEC
62301.
EMC: EN 55014-1; CISPR 14-1; EN 55014-2; CISPR 14-2; EN/IEC 61000-3-2; EN/IEC 61000-3-3.
KopwaFAn optara əcepdi a3aIy ywiH dypbc naIdaIaNHy TypaIbI HycKaynap:
3zipnydi 6actaHaJa KaKaNTbI eH a3
XbldAmdbkneh KocbHb3 XHe a3ipney
aaytaFaHHan KeIH bpa3 MNHT BoBI JyMbIC
icteIH3. XbldAmdbkTa Tek TYtHiN JxHe 6yDbH
yJKeH Meupei JkaDaBnHa apTbIbpHb3 xKeH
KyuweTy XbldAmdbfBn(HKTapbH) Tek IwKeTI
KafDnapda naJaIaNbHbI3. XKaCb JkaBIMCb3
nicTi a3aTY TmDinirih CaTay yWIn KaKet
6oBnFaHa kemip cy3rici(NepiH) aybCTbPbHbI3.
XKaCb Ma Nc3rici TmDinirih CaTay yWIn KaKet
6oBnFaHa Ma cy3rici(NepiH) aybCTbPbHbI3.
TmDinikti OHtaNaNbpy xeHe WPybBpHna
a3aY UwH OcBi HcckaybTKa KepcTeINRe HTk3y
KyueneHH eYnKeH DnAMeTpHn NaDaNaHBnIB3.
PaiDanaHy
Copfbii TamaK 3eipnerenHe naJaDa 6oNaTbH TYtH MeH 6yDbI copBn anyFa XaHE TEK TyPbICTbIK MaKcatta KOndaHyFa apHaHaF.
Copfblcblpkaaya6ypfblb6ap TaTpY JeIeTkiipetIHHe,HeMece iKia KaTa aHaNy cy3riwi petIHne naJaIaHaMya apHaIraH.

Copy Hyckacbl
By cbipKa biiktipuyi pfnaheKe KocblfHaH copfbll Ky6bIp apKblIbl WbIFapblnabl.

ECKEPTY!
Copfblu K6bipdbH dnaMeTp i6piKtpyui caKHaBHy dnaMeTpimHe TeHdec 6ony Kepek.

ECKEPTY!
Copfblk6bIpbcopfblxKHaKaTAmacBIme HKeTki3iImMeDi, OHb 6eNeK catbn any KepeK.
Copfbltbl Kabfpadaftb copfbk Kybipnapb Meh aya bIfapatbH TecikTepde, con dnaMeTpderi TecikTepre Kocblb3 (6ipktipyf pnaheu).
KabipraaBb copbIu Kx6bpnapbMeN KeMey
DnAmetpderi Teciknt naDanany, copy KyatbH HauapnatbIn,
rypindeyH KyweTei.
! Kaeketti MNHImaJIbI Y3bIHbIKTaFbI TYtikTI KOJdaHbIHbI3.
!BapbHwaKeiinimiBapTyrkTiKoJaHbIb3(nimHiMakcMaIaIb6pybIb:90°).
! TytkiTH KENDeHeH KIMacbHaTa TY6ereNti e3repictepdi 6oJIbIpMaHbI3.
On yuiship kEmip cyrici KaKet, OHbl eDetteri caTyubnapan anyfRa 6oanaBly.
Cy3ri 1bIbIapIbnAayhbl XoIaPflbI bIbIbc TOpbl apKbIbI b6eMere KaTataXibepy anbda ONb MaM MeH NICTepen Ta3aaptabl.
KoHdbIpy
KaKNaTbIh TipeyiU KPOHtEHH XHe MypXaHbI 6eKiTy yuH, 6yprblay ylriricInde 6enrInehRe H opbHapra CypTe KepeCtiIReHde 6 Tecik (DnAmetpi 8 MM, TepeHdiRi 40 MM) XacaHbI3. OphatKaHHa KeiH, KaKn PnH MypXa DJIMe- dIyTpanaHaBHaKe3 XeKtkiH3.
Bekitty
OpaTydbI 6actay aIdbHda:
- ΘΗΜΗΙΝ ΕΙΝΑΜΙ ΜρΗγΟρΗβι γιδην ἀνρυίς ἐκεθιν τέκεριής.
- BeIeHdi Kemip cy3ric(HepiH) (KaMTbIJFaH 60nca) (6aca kepi KaPaHbI3) anblHbI3. KaNakTbIH cy3ri HcKacsbH naJaHaHfbHbI3 KeIce, OHbl/olapDb any KepeK.
IwHne 6paHdnap, Keninik KapTacbl, T.6. cnKbIb cap cemKeIep cnKbI KaKnak iWInderi Kocankb Kypandapbl (coHa oHaJ TaBImaNday yuih opHaNaCTbIpbnFaH) TeKcepH3. Onapbl anbln, KayinciOpbHda caTaHb3.
Cy3ri KeNTereH Ka6bIPfa/Te6e TypIepiHe caiKec Kenetin H 6ekiTkiUtePmeH (fHKcATOpnapMeH) KaMTamacbl3dAnDhblpflnHa. AnaJa, MaTepeHnDap 6epInre H Ka6bIPfa/Te6e TypiHe caKeTecrIHe Ke3 XeKTIcy YuH 6iNkTi MAmahFxaKOJIbFlbHb3.Cy3ri CanMaBfH KTepe anatbIHda Ka6bIPfa/Te6e KeTkiNtMiMbIKbI 6OlybKepe.
PaiJaIaHy
Amojei
B mojeji
BipinjiXbIJaMdbk(T1)
BipiHx KblIaMdbkTbI icKe Kocy yuH T1 TuMecIH 6acblb3. FyHKUra icKe KocbIrfan Ke3e, XUJ
TpyakTbJ kanaHdbI. TyIH copfbuHTbI eWipy ywiH T1 Tymecin Taftb6acbHb3.
EkiHwi XbIaMdbI K (T2)
EkiHui XblIaMdbkTb icKe Kocy yuH T2 TuMeciH 6acblb3. FyHKun icKe Kocblfah Ke3de, KUd TpaKaTb JkaHaDb. TyIH copbltbeWipy yuH T2 TuMeciH TaBb6acblb3.
YiwihxjbldAmdbik xHe BOOSTER (TE3DETKIi) (T3) TeK AmodeninH
TyTIN copfblw eWippyi BonFaHda Hemece bipHui HE EkiHui XbJlDAMdbIK KocblnFAH Ke3de, YliHUI XblnDAmbkTb T3 TyMecin Bacy apKblc icKe Kocyfa 60aNb, coN Ke3e JXUd TypaKtB XKAHaDb.
ErepT3 tymeci kaTaan bacIJa, Te3dTeKlWi
icke Kocblnably. YdeTkiwiTEk yuHniX kblDAMdbIK
6ypbHHan Kocynbl 6oJrHan Ke3e faHa icke Kocyfa
bOlaDb. YdeTkiw icke KocblrHan Ke3e, XUJ T3
XblblkTai bactaIdb. YdeTkiW XMbIC icten
TyprAnKe3e, T1 HeMece T2 kblDAMdbIK
TymenepiHeN KaIarFaBhl3dbI bacy apkblnB
6ipHni HeMece eKihI XblDAMktbI icke Kocyra
bOlaDb, con Ke3e yDeTkiW eWedi de, TaHdaFahn
XblDAMdbIK icke KocblnabI.
YdTeKlW icKe KocblnFaH Ke3De TyTih CopfbIITbI eWipy yuH T3 TuMecin TaBla da bAcblb3. YdTeKlW 5' aBTOMaTTbI TypDe ukeH COH XHe yUHxJbIaMdbIK aBTOMaTTbI TypDe icKe KocblnFaH coH.
Ywihx kblambIK (T3) teB moeiniHde
EkiHui XblIaMdbkTb icKe Kocy yuH T3 TuMeciH 6acblb3. FyHKuIe icKe KocblfAe Ke3e, KUd TpaKtbl KaHaDbI. TyIH copbltb eWipy yuH T3 TuMeciH TaBbI 6acblb3.
Taimep (T4)
Bipinwi, ekihwi Hemece ywihwi XbIJaMdbIK icKe Kocblfah Ke3de, TaIMePdi icKe Kocyfa 6oJaDbI. CyHKunia icKe Kocblfah Ke3de, TaIMePdiH (T4) JkHe Ocbifan DeiHr TaHaJFaH XbIJaDMbIKbIH (T1/T2/T3) XUd Wambl TypaKtBi KaHaDbI.
TaMepDInY3aKtBfB TaHdAraH XblnDaMdbIKKa 6aINaHbICTb 60aDbI:
BipinchiXbIJaMaDbikT1=3aKtbHb20
EkiHxblJaMdbkT2=y3aKtbfb15'.
YsHJXKbIaMdbIK T3 = y3aKtbIfbl 10'.
KbIJaMdbIK pexIMHH yaKbITbI aKaTaNFaH Ke3De, TaMepdi T4 TyMecin Hemece baca eki beIcHdi emec KblJaAMdbIKbTH TYMecin Bacy apKbIbI eWipyre 6oJaDb. TyTH copfBHTbICke Kocy MaKcaTbIHda 6yFaH deiH TaMep
6aJIaHbIcTbIPbIJFaH XblIaMdbIKtB1 TaBla da 6acblb3.
ECKPTNE:tekAMoedeJIIne
YdTeKlI icke Kocblfah Ke3e, TaMep icke Kocblmambl. YaKbIT aAaTaNfAH coH, TyTH copblcneHi. XblnDAMbIK peXIMiHi yKaBtBu eTKeH coH, KaKETTI XblnDAMbIK TYMecin bacy apKbInbI bacaXblnDAMbIKa aybica anacbIs, 6yN apEket opblndanfah Ke3e TaMep eWede.
Llam (T5)
T5 Tynmecinbacyapkblibwamdbke3KeIreH yaKbTTaicke Kocyfa6oNaDBi.FyHKnIgicke KocblfAn Ke3de, KUdTypaKtblJkaHaDbI.
Cy3rihi ophaty
Cy3ri INIINKATOpIaBbIH TeK TyTIn Copfblw eIipyJI 6oIraH Ke3de fHa Icke KocyFa Hemece eIipyRe 6oIaBl.
KoHmrgpaMm3ipih aWuYwIH T2+T3 TuMecinBacbIITpybIH3,M3ip aWbIK 6oJFaH Ke3e T1XbIbJIbKTaBactaIbI.
日 日 日 日 npaMeTp:
- MaCy3rici INHdkaTopbl (T2) Kocybl, coHdbkTaH oJ 6eJeceHdi;
- niC cy3rici INHdNkKatOpbl (T3) eWipyni, coHdbikTaH on 6eIceHdi eMec.
T2 TYMeci MaC cy3ricIH INHdNkATOpbIH Kocadbl/ewipeDi. T3 TYMeci nC cy3ricIH INHdkaTOpbIH icKe Kocadbl/ewipeDi. M3ipDeH YbIy yuIN T1 HemeCe TYmeciB 6acBIn, 10 MNH. KyTIHi3
Cy3rihi KaiaTa opHaTy
TyTIN sbIFapfbiW TypaKTbI yaKbIT apaIbIKTapbIHc cy3IRE texHnKaJIbIK KbI3MeT KepCteTy KepeKTIrhEeKepty yuHIN dIb6ICTbCI CINHaN sbIFapaDbI:
- Maui cy3rici 40 carat caibH;
-nic cy3rici 160 carat caHbH.
Byn JkaFdaIa, TyTIn COpfbiU eWipin, Ke3 KeJrH TymMeHi TyptiH3. INHTepFeic 10 MmN.6oBb Eki KaKeTTiNik CnHaIbH 6epei:
- erep T1+T2ЖынblынblкТаса: Малузriche Текикалык КьИЗМет Керсety КжET;
- erep T1+T3 XblnbIbIKTaCa: nic cy3ricHeTexHnKaIbIK KbI3MeT KepcTeY KaXeT.
10 Mн. 6apbicbHda T1+T2 Tymecin bacy apKbIbI MaJ cy3rciH, an T1+T3 Tymecin bacy apKbIbI niC cy3riciH KaIa opHaTyra 6oNaIbI. KaIa opHaTuDAH KeiH TyMe KOM6HaZnIapbl eki pet Te3 JbIbIbIKTaIdbI. NHTeppeic eTeTteriJe JyMbIC icTeMeNi. MbHaHbI eckepiH3:
Tytih copfbiu 10 MN.6oBk KaIbITb Jxymblc icTeiDi,6ipak XblnDaMbIK TyMeIepiHe KaTbICTb Ie6bp KepHeki Xayan 6oMaIdb.I.Erep 10 MN. 6oBbl e6bp epeket opbHdAmaca,KUd XblNbIKaybH TOKTaTaDbI da,KepHeki Xayan KaIbITb KyIre opaIabI.
TexHnKaJIbIK KbI3MeT KOpcTeY
Ta3anay
Tasaay yuhi TEK 6eHTapan xyfbls 3atneh cylnahan apnaibI ybepekTI naJaIaNbIHbI3. KYPblIFbIHbI HEMECE TA3ALAY KYPALbIH PAJDAHAHbI3! A6pa3nJIbIK kocnacbl 6ap 3aTTbI naJaIaNbHaB13.CNPTTI PAJDAHAHbI3!
MaCy3rici
18 cypet
Ac daibinHdayaFbI mai 6eJweKeTpIn yctan KanaabI.
Фильтд ai caын arpeccnBti emeс Куьш 3aTTapmeh, KOLIMEN HEMece bIbICxKyblu MaunHada, TOMeH Temnepatypada, YHemdi Ta3anay Tepti6iHne Kyy Kepek. blbICxyblu MaunHada JyblnFaH mYcTaTbH PhinbTp Tycci3dmyMkiH, bipak OdaH OHbH cy3riW KaCenTi MYJNe e3repci3 Kanabl.
MaCyricin anbIn Tactay ywiH cepinneni 6ocaty tyTKacbln TaTbIb13
Kemip cy3riw (Tek cy3riw-copfbiw TypiHde) 19-cypert
Acnicipren Ke3e JkapamcbI3 nicti yctan KaIadbl.
Kemipni QnIbTpHIn KaHbIybl 3aK naIadanaHy Mep3imHiKbIcka HEMece 3aK eTyIe 6aIaNbHcIb 60anbl, on acYuHIN Tpyi MeH MaNbl YCTaIbTH 4nIbTpdi YCTaHbIraHep3imdik Ta3anaym anDbH ana aHbIKtanaBl. KaHdKaFdA Bonca Da, KaptpndkD KEM dereHeDe 4 aHa 6ip pet aybltbipHbI3.
Kemipni pfinbTpdi xyyf a 60lmai dbi XeHe de perehepeunra f kapaMcbI3.
Denrenek Kemip cy3rici
Ko3fantkbihH kanaKTb dHeReeriHiTopanbHa 6ipeyih opHatbIb3, cTeiT onapDa carfat tiniMe 6paHb3. Any ywiH onapDa caFAT tinihe Kepi 6paHb3.
Uam aybictbipy
Kopnyc JapbIK IIOID TexHONOrmaCbHa Heri3dEnrRe HJapbIK KyyieCImEH Jx6DbIKTaTaNfH.
KapbIK dIOITapbi OHaTIbI XapBIkTB, eETteri WAMdapdaH 10ece aPTbIK Y3aKTbIKB KaTMaCbIeTeDi JxHe 90% 3NeKtp 3eepnraCBi CaTayFa MymkiNik 6bepi.
Aybictby yuih Texnkaib Kbl3met Kepcety 6eimie xa6apnaib13.
Ohu valjatombega version
Birinci hiz T1 = sure 20'
Ikinci hiz T2 = sure 15'.
Ucuncu hiz: T3 = sure 10'.
aal l aal aal aal aal aal aal aal aal aal aal aal aal aal aal aal aal aal aal aal aal aal aal aal aal aal aal aal aal aal aal aal aal aal aal aal aal aal aal aal aal aal aal aal aal aal aal aal aal aal aal aAL
Jaiaiall jieSll gaoali jbi
11
A
J 1
a
aLaa aallll
S ( 0,12)
aall aalll gai all jSya aai al
a. = ,
jglgciagaiyoljglllip
y
y
6
2012/19/ 1
A 1
alil jlll 100
a
aalglge aagllg llaal gaae

aag aie galege gale gale gale gale gale gale gale gale gale gale gale gale gale gale gale gale gale gale gale gale gale gale gale gale gale gale gale gale gale gale gale gale gale gale gale gale gale gale gale gale gale gale gale gale gale gale gale gale gale gale galesgalegalegalegalegalegalegalegalegalegalegalegalegalegalegalegalegalegalegalegalegalegalegalegalegalegalegalegalegalegalegalegalegalegalegalegalegalegalegalegalegalegale
j1i 1
alalallg joliljoi jilai jaii jlll
:
EN/IEC 60335-2- EN/IEC 60335-1:
.EN/IEC62233,31
EN/IEC 61591; ISO 5167-1; ISO :
5167-3; ISO 5168; EN/IEC 60704-1; EN/IEC
60704-2-13; EN/IEC 60704-3; ISO 3741; EN
.50564; IEC 62301
EN 55014-1; CISPR 14-1; EN :
55014-2; CISPR 14-2; EN/IEC 61000-3-2; EN/IEC
J.61000-3-3
1
a