USER MANUAL LAGAN 306.273.64 IKEA
Cleaning and maintenance 12
What to do if ... 13
After-Sales Service 14
Technical Data 15
Environmental concerns 15
Installation 16
IKEA GUARANTEE 17
Before using the appliance, read these safety instructions. Keep them nearby for future reference.
These instructions and the appliance itself provide important safety warnings, to be observed at all times. The manufacturer declines any liability for failure to observe these safety instructions, for inappropriate use of the appliance or incorrect setting of controls.
Very young children (0-3 years) should be kept away from the appliance. Young children (3-8 years) should be kept away from the appliance unless continuously supervised. Children from 8 years old and above and persons with reduced physical, sensory or mental capabilities or lack of experience and knowledge can use this appliance only if they are supervised or have been given instructions on safe use and understand the hazards involved. Children must not play with the appliance. Cleaning and user maintenance must not be carried out by children without supervision.
PERMITTED USE
CAUTION: the appliance is not intended to be operated by means of an external switching device, such as a timer, or separate remote controlled system. This appliance is intended to be used in household and similar applications such as: staff kitchen areas in shops, offices and other working environments; farm houses; by clients in hotels, motels, bed & breakfast and other residential environments. This appliance is not for professional use. Do not use the appliance outdoors. The maximum number of place settings is shown in the product sheet. The door should not be left in the open position - risk of tripping. The open appliance door can only support the
weight of the loaded rack when pulled out. Do not rest objects on the door or sit or stand on it.
WARNING: Dishwasher detergents are strongly alkaline. They can be extremely dangerous if swallowed. Avoid contact with the skin and eyes and keep children away from the dishwasher when the door is open. Check that the detergent receptacle is empty after completion of the wash cycle. WARNING: Knives and other utensils with sharp points must be loaded in the basket with their points down or placed in a horizontal position - risk of cuts. Do not store explosive or flammable substances (e.g. gasoline or aerosol cans) inside or near the appliance - risk of fire. The appliance must be used only to wash domestic dishes in accordance with the instructions in this manual. The water in the appliance is not potable. Use only detergent and rinse additives designed for an automatic dishwasher. When adding a water softener (salt), run one cycle immediately with the machine empty, to avoid corrosion damage to internal parts. Store the detergent, rinse aid and salt out of reach of children. Shut off the water supply and unplug or disconnect the power before servicing and maintenance. Disconnect the water and electricity supply in the event of any malfunction.
INSTALLATION
The appliance must be handled and installed by two or more persons - risk of injury. Use protective gloves to unpack and install - risk of cuts. Installation, including water supply (if any), electrical connections and repairs must be carried out by a qualified technician. Do not repair or replace any part of the appliance unless specifically stated in the user manual. Keep children
away from the installation site. After unpacking the appliance, make sure that it has not been damaged during transport. In the event of problems, contact the dealer or your nearest After-sales Service. Once installed, packaging waste (plastic, styrofoam parts etc.) must be stored out of reach of children - risk of suffocation.
The appliance must be disconnected from the power supply before any installation operation - risk of electrical shock. During installation, make sure the appliance does not damage the power cable - risk of fire or electrical shock. Only activate the appliance when the installation has been completed. Connect the dishwasher to the water mains using only new hose sets. The old hose sets should not be reused. All hoses must be securely clamped to prevent them coming loose during operation.
All local waterboard regulations must be complied with.
Water supply pressure 0.05 - 1.0 MPa. The appliance must be placed against the wall or built into furniture to limit the access to its rear side.
For dishwashers having ventilation openings in the base, the openings must not be obstructed by a carpet.
If installing the dishwasher at the end of a row of units making the side panel accessible, the hinge area must be covered to avoid risk of injury.
The inlet water temperature depends on the dishwasher model. If the installed inlet hose is marked "25°C Max", the maximum allowed water temperature is 25°C. For all other models the maximum allowed water temperature is 60°C. Do not cut hoses and, in the case of appliances fitted with a waterstop system, do not immerse the plastic casing containing the inlet hose in water. If hoses are not long enough, contact your local dealer. Make sure the inlet and drain hoses are kink-free and are not crushed. Before using the appliance for the first time, check the water inlet and drain hose for leaks. Make sure that the four feet are stable and resting on the floor, adjusting them as required, and check that the dishwasher is perfectly levelled using a spirit level.
Use the appliance only when the covers shown on diagram 19 in the Assembly instruction are correctly assembled - risk of injury.
ELECTRICAL WARNINGS
The rating plate is on the edge of the dishwasher door (visible when the door is open).
It must be possible to disconnect the appliance from the power supply by unplugging it if plug is accessible, or by a multi-pole switch installed upstream of the socket in accordance with the wiring rules and the appliance must be earthed in conformity with national electrical safety standards.
Do not use extension leads, multiple sockets or adapters. The electrical components must not be accessible to the user after installation. Do not use the appliance when you are wet or barefoot. Do not operate this appliance if it has a damaged power cable or plug, if it is not working properly, or if it has been damaged or dropped.
If the supply cord is damaged, it must be replaced with an identical one by the manufacturer, its service agent or similarly qualified persons in order to avoid a hazard - risk of electrical shock.
If the fitted plug is not suitable for your socket outlet, contact a qualified technician. Do not pull the power supply cable. Do not immerse the mains cord or plug in water. Keep the cord away from hot surfaces.
ELECTRICAL CONNECTION FOR GREAT BRITAIN AND IRELAND ONLY
Fuse replacement.
If the mains lead of this appliance is fitted with a BS 1363A 13amp fused plug, to change a fuse in this type of plug use an A.S.T.A. approved fuse to BS1362 type and proceed as follows:
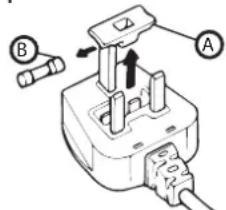
- Remove the fuse cover (A) and fuse (B).
- Fit replacement 13A fuse into fuse cover.
- Refit both into plug.
Important:
The fuse cover must be refitted when changing a fuse and if the fuse cover is lost the plug must not be used until a correct replacement is fitted.
Correct replacement are identified by the colour insert or the colour embossed in words on the base of the plug.
Replacement fuse covers are available from your local electrical store.
For the Republic of Ireland only
The information given in respect of Great Britain will frequently apply, but a third type of plug and socket is also used, the 2-pin, side earth type.
Socket outlet / plug (valid for both countries)
If the fitted plug is not suitable for your socket outlet, please contact After-sales Service for further instruction. Please do not attempt to change plug yourself. This procedure needs to be carried out by a qualified technician in compliance with the manufactures instructions and current standard safety regulations.
CLEANING AND MAINTENANCE
WARNING: Ensure that the appliance is switched off and disconnected from the power supply before performing any maintenance operation. To avoid risk of personal injury use protective gloves (risk of laceration) and safety shoes (risk of contusion); be sure to handle by two persons (reduce load); never use steam cleaning equipment (risk of electric shock). Non-professional repairs not authorized by the manufacturer could result in a risk to health and safety, for which the manufacturer cannot be held liable. Any defect or damage caused from nonprofessional repairs or maintenance will not be covered by the guarantee, the terms of which are outlined in the document delivered with the unit.
Product description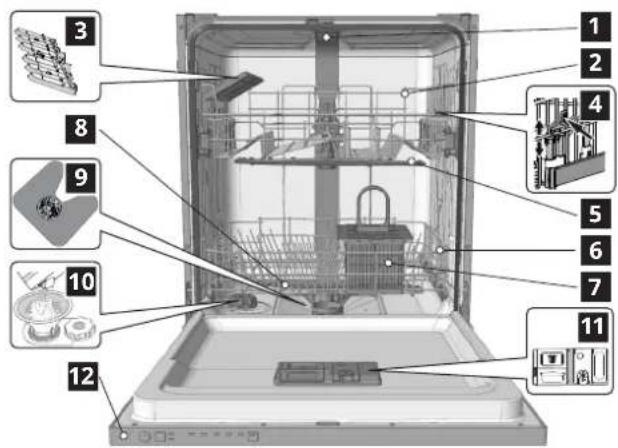
1 Shower spray 2 Upper rack 3 Foldable flaps 4 Upper rack height adjuster 5 Upper sprayer arm 6 Lower rack 7 Cutlery basket 8 Lower sprayer arm 9 Filter Assembly 10 Salt reservoir 11 Detergent and Rinse Aid dispensers 12 Control panel
Control panel
1 On-Off/Reset button with indicator light 2 Program selection button 3 Salt refill indicator light
4Rinse Aid refill indicator light 5 Program indicator lights 6 START/Pause button with indicator light
First Use
Advice regarding the first time use
Before installation and first usage of the appliance, please read carefully "SAFETY INSTRUCTION" and "ASSEMBLY INSTRUCTION" available in the product literature bag. Please remember to remove all transport protection parts from the dishwasher.
Filling the salt reservoir
The use of salt prevents the formation of LIMESCALE on the dishes and on the machine's functional components.
- It is mandatory that THE SALT RESERVOIR BE NEVER EMPTY.
- It is important to set the water hardness.
The salt reservoir is located in the lower part of the dishwasher (see PRODUCT DESCRIPTION) and should be filled when the SALT REFILL indicator light in the control panel is lit.
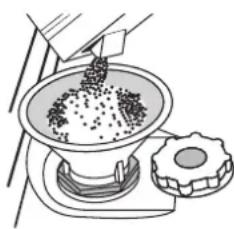
- Remove the lower rack and unscrew the reservoir cap (anticlockwise).
- Position the funnel (see figure) and fill the salt reservoir right up to its edge (approximately 1 kg); it is not unusual for a little water to leak out.
- Only the first time you do this: fill the salt reservoir with water.
- Remove the funnel and wipe any salt residue away from the opening.
Make sure the cap is screwed on tightly, so that no detergent can get into the container during the wash program (this could damage the water softener beyond repair).
As soon as this procedure is complete, run a program without loading. The "Pre-Wash" program alone is NOT sufficient. Residual saline solution or grains of salt can lead to corrosion, irreparably damaging the stainless steel components. The guarantee is not applicable if faults are caused by such circumstances.
Only use salt that has been specifically designed for dishwashers. If the salt container is not filled, the water softener and the heating element may be damaged as a result of limescale accumulation. Using salt is recommended with any type of dishwasher detergent. Whenever you need to add salt, it is mandatory to complete the procedure before the beginning of the washing cycle to avoid corrosion.
Setting the water hardness
To allow the water softener to work in a perfect way, it is essential that the water hardness setting is based on the actual water hardness in your house. This information can be obtained from your local water supplier. The factory sets the default value for the water hardness.
- Switch on the appliance by pressing the ON/OFF button.
- Switch off the appliance by pressing the ON/OFF button.
- Hold down button for 5 seconds, until you hear a beep.
- Switch on the appliance by pressing quickly the ON/OFF button.
- The program indicator light of the current set level flashes.
- Press button to select the desired hardness level (see WATER HARDNESS TABLE).
- Switch off the appliance by pressing the ON/OFF button. Setting is complete!
| Water Hardness Table |
| Level | °dH German degrees | °fH French degrees | °Clark English degrees |
| 1 | Soft 0 - 6 0 - 10 | 0 - 7 | | |
| 2 | Medium 7 - 11 | 11 - 20 8 - 14 | | |
| 3 | Average 12 - | 16 21 - 29 15 - 20 | | |
| 4 | Hard 17 - 34 3 | 0 - 60 21 - 42 | | |
| 5 | Very hard | 35 - 50 61 - 9 | 43 - 62 | |

Water Softening System
Water softener automatically reduces water hardness, consequently preventing scale buildup on heater, contributing also to better cleaning efficiency. This system regenerates itself with salt, therefore it is required to refill salt container when empty. Frequency of regeneration depends on water hardness level setting - regeneration takes place once per 6 Eco cycles with water hardness level set to 3.
Regeneration process starts in final rinse and finishes in drying phase, before cycle ends.
- Single regeneration consumes: ~3.5 L of water;
- Takes up to 5 additional minutes for the cycle; Consumes below 0.005 kWh of energy.
Filling the rinse aid dispenser
Rinse aid makes dish DRYING easier. The rinse aid dispenser A should be filled when the RINSE AID REFILL indicator light in the control panel is lit.
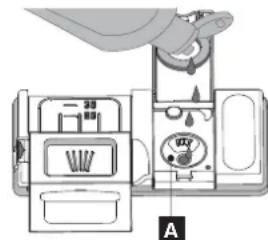
- Open the dispenser by pressing and pulling up the tab on the lid.
- Carefully introduce the rinse aid as far as the maximum (110 ml) reference notch of the filling space - avoid spilling it. If this happens, clean the spill immediately with a dry cloth.
- Press the lid down until you hear a click to close it. NEVER pour the rinse aid directly into the tub.
Adjusting the dosage of rinse aid
If you are not completely satisfied with the drying results, you can adjust the quantity of rinse aid used.
- Switch the dishwasher on using the ON/OFF button.
- Switch it off using the ON/OFF button.
- Press button three times - a beep will be heard.
- Switch it on using the ON/OFF button.
- The program indicator light of the current set level flashes.
- Press button to select the level of rinse aid quantity to be supplied.
- Switch it off using the ON/OFF button.
Setting is complete!
If the rinse aid level is set to 1 (BOO) rinse aid will be supplied. The LOW RINSE AID indicator light will not be lit if you run out of rinse aid. A maximum of 5 levels can be set according to the dishwasher model. The factory setting is specific to the model, please follow instruction above to check this for your machine.
- If you see bluish streaks on the dishes, set a low number (2-3).
- If there are drops of water or limescale marks on the dishes, set a high number (4-5).
Filling the detergent dispenser
Usage of detergent not designed for dishwashers may cause malfunction or damage to the appliance.
To achieve the best washing and drying results, the combined use of detergent, rinse aid liquid and refined salt is required. We recommend using detergents that do not contain phosphates or chlorine, as these products are harmful to the environment.
Good washing results also depend on the correct amount of detergent being used.
Exceeding the stated amount does not result in a more effective wash and increases environmental pollution.
The amount can be adjusted to the soil level. In the case of normally soiled items, use approximately either 35g (powder detergent) or 35ml (liquid detergent) and additional tea spoon of detergent directly inside the tub. If tablets are used, one tablet will be enough.
If the crockery is only lightly soiled or if it has been rinsed with water before being placed in the dishwasher, reduce the amount of detergent used accordingly (minimum 25 g/ml) e.g. skip the powder/gel putted inside the tub.
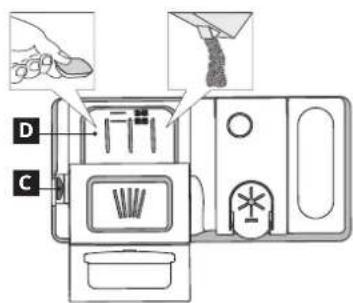
- When measuring out the detergent refer to the mentioned earlier information to add the proper quantity. Inside the dispenser D there are indications to help the detergent dosing.
- Remove detergent residues from the edges of the dispenser and close the cover until it clicks.
- Close the lid of the detergent dispenser by pulling it up until the closing device is secured in place.
The detergent dispenser automatically opens up at the right time according to the program.
Loading the racks
TIPS
Before loading the baskets, remove all food residues from the crockery and empty the glasses. You do not need to rinse beforehand under running water.
Arrange the crockery so that it is held in place firmly and does not tip over; and arrange the containers with the openings facing downwards and the concave/convex parts placed obliquely, thus allowing the water to reach every surface and flow freely.
Warning: lids, handles, trays and frying pans do not prevent the sprayer arms from rotating.
Place any small items in the cutlery basket. Very soiled dishes and pans should be placed in the lower basket because in this sector the water sprays are stronger and allow a higher washing performance.
After loading the appliance, make sure that the sprayer arms can rotate freely.
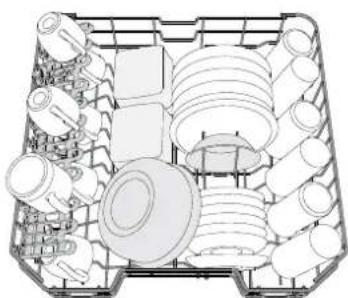
Upper rack
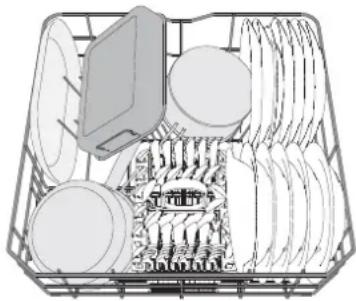
Load delicate and light dishes: glasses, cups, saucers, low salad bowls.
(loading example for the upper rack)
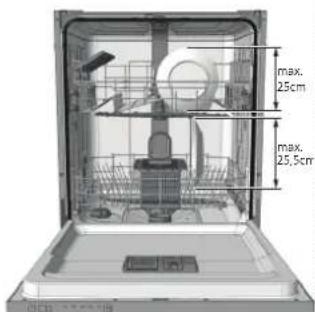
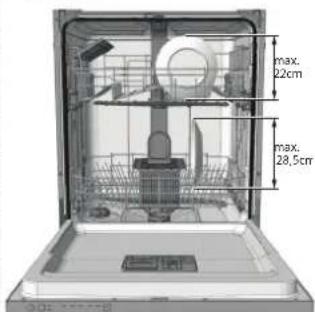
Adjusting the height of the upper rack
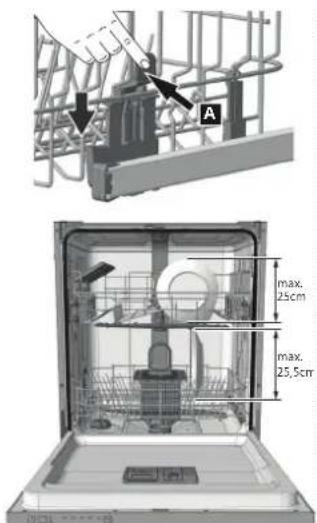
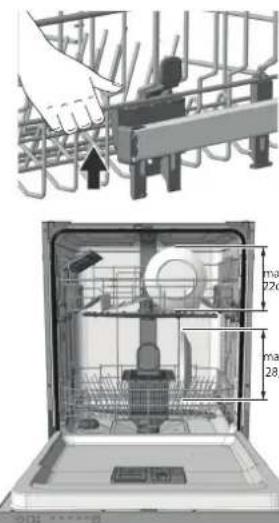
The height of the upper rack can be adjusted: high position to place bulky crockery in the lower basket and low position to make the most of the tip-up supports by creating more space upwards and avoid collision with the items loaded into lower rack.
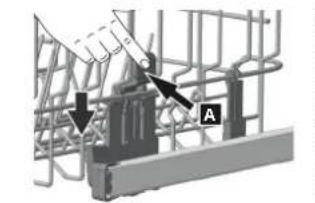
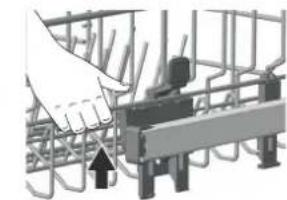
The upper rack is equipped with a Upper Rack height adjuster (see figure), without pressing the levers, lift it up by simply holding the rack sides, as soon as the rack is stable in its upper position.
To restore to the lower position, press the levers A at the sides of the rack and move the basket downwards.
We strongly recommend that you do not adjust the height of the rack when it is loaded.
NEVER raise or lower the basket on one side only.
Foldable flaps with adjustable position
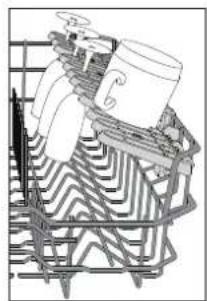
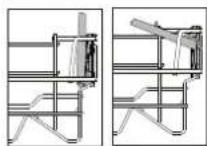
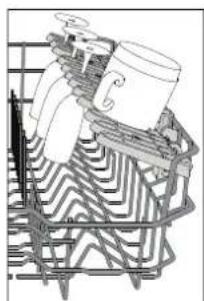
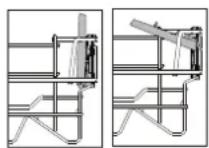
The side foldable flaps can be folded or unfolded to optimize the arrangement of crockery inside the rack. Wine glasses can be placed safely in the foldable flaps by inserting the stem of each glass into the corresponding slots. Depending on the model:
To unfold the flaps, slide them up and rotate, or release them from the snaps and pull them down. To fold the flaps, rotate them and slide them down, or pull them up and attach them to the snaps.
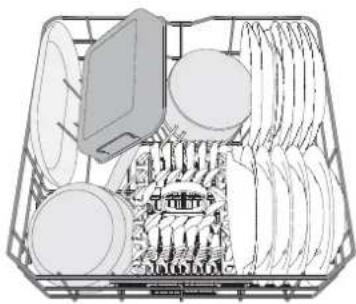
Lower rack
For pots, lids, plates, salad bowls, cutlery, etc. Large plates and lids should ideally be placed at the sides to avoid interference with the spray arm.
(Loading example for the lower rack)
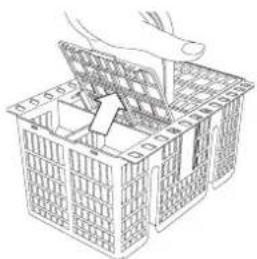
Cutlery basket
The basket is equipped with top grilles for improved cutlery arrangement. The cutlery basket should be positioned only at the front of the lower rack.
Knives and other utensils with sharp edges must be placed in the cutlery basket with the points facing downwards, or they must be positioned horizontally in the tip-up compartments on the upper rack.
Unsuitable crockery
- Wooden crockery and cutlery.
- Delicate decorated glasses, artistic handicraft, and antique crockery. Their decorations are not resistant.
- Parts in synthetic material which do not withstand high temperatures. Copper and tin crockery.
- Crockery soiled with ash, wax, lubricating grease or ink. The colours of glass decorations and aluminium/silver pieces can change and fade during the washing process. Some types of glass (e.g. crystal objects) can become opaque after a number of wash cycles too.
Damage to glass and crockery
- Only use glasses and porcelain guaranteed by the manufacturer as dishwasher safe.
- Use a delicate detergent suitable for crockery.
- Collect glasses and cutlery from the dishwasher as soon as the wash cycle is over.
Hygiene
To avoid odour and sediment which can be accumulated in the dishwasher please run a high temperature program at least once a month. Use a tea spoon of detergent and run it without the loading to clean your appliance.
TIPS ON ENERGY SAVING
- When the household dishwasher is used according to the manufacturer's instructions, washing tableware in a dishwasher usually consumes less energy and water than hand dishwashing.
- In order to maximize dishwasher efficiency it is recommended to initiate the wash cycle once dishwasher is fully loaded. Loading the household dishwasher up to the capacity indicated by the manufacturer will contribute to energy and water savings. Information on correct loading of tableware can be found in Loading chapter. Incorrect loading or overloading the dishwasher may increase resources usage (such as water, energy and time, as well as increase noise level), reducing cleaning and drying performance.
- Manual pre-rinsing of tableware items leads to increased water and energy consumption and is not recommended.
Daily Use
1. CHECK WATER CONNECTION
Check that the dishwasher is connected to the water supply and that the tap is open.
2. SWITCH ON THE DISHWASHER
Open the door and press the ON/OFF button. Within 4 seconds, the user interface turns on.
3. LOAD THE RACKS (see LOADING THE RACKS)
4. FILLING THE DETERGENT DISPENSER
(see FILLING THE DETERGENT DISPENSER).
5. CHOOSE THE PROGRAM AND CUSTOMISE THE CYCLE
Select the most appropriate program in accordance with the type of crockery and its soiling level (see PROGRAMS DESCRIPTION) by pressing the button.
6. START
Start the wash cycle by pressing the START/Pause button (the LED is lit) and closing the door within 4 seconds. When the program starts, you will hear a single beep. If the door was not closed within 4 seconds, an alarm sound will be played. In this case, open the door, press the START/Pause button, and close the door again within 4 seconds.
7. END OF WASH CYCLE
The end of the wash cycle is indicated by beeps and by the flashing of the indicator light of the selected program. Switch off the appliance by pressing the ON/OFF button. Wait for a few minutes before removing the crockery to avoid burns. Unload the racks, beginning with the lower one.
The machine will switch off automatically during certain extended periods of inactivity to minimise electricity consumption. If the crockery is only lightly soiled or if it has been rinsed with water before being placed in the dishwasher, reduce the amount of detergent used accordingly.
Modifying a running program
If a wrong program was selected, it is possible to change it, provided that it has only just begun: open the door, press and hold the ON/OFF button, and the machine will switch off. Switch the machine back on using the ON/OFF button and select the new wash cycle. Start the wash cycle by pressing the START/Pause button and closing the door within 4 seconds.
If it takes more than 4 seconds, the appliance automatically pauses and you must restart the appliance again by repeating the last operation.
Without switching off the machine, open the door (START/Pause LED starts blinking) (be aware of HOT steam!) and place the crockery inside the dishwasher. Press the START/Pause button and close the door within 4 sec., the cycle will resume from the point at which it was interrupted.
Accidental interruptions
If the door is opened during the wash cycle, or if there is a power cut, the cycle pauses. Press the START/Pause button and close the door within 4 sec., the cycle will resume from the point at which it was interrupted.
Programs table
| Program | Drying phase | Natural Dry | Duration of wash program (h:min)*) | Water consumption (litres/cycle) | Energy consumption (kWh/cycle) |
| 1 Eco 50° 4:50 9.5 0.5 ECO | ✓ | ✓ | | | |
| 2 Fast Wash 40° 45° - 40° | 40 9.0 0.70 | ✓ | | | |
| 3 Intensive 65° 2:50 17:0 1.50 | ✓ | ✓ | | | |
| 4 Fast Wash&Dry 50° | ✓ | 15/5 | 11.5 1.10 | | |
| 5 Glass 45° | ✓ | ✓ | 1:40 12.0 1.20 | | |
ECO program data is measured under laboratory conditions according to European Standard EN 60436:2020. Note for Test Laboratories: For information on comparative EN testing conditions, please send an email to the following address: dw_test_support@europeanappliances.com. Pre-treatment of the dishes is not needed before any of the programs. *) Values given for programmes other than the eco program are indicative only. The actual time may vary depending on many factors such as temperature and pressure of the incoming water, room temperature, amount of detergent, quantity and type of load, load balancing, additional selected options and sensor calibration. 1. ECO - Eco program is suitable to clean normally soiled tableware, that for this use, it is the most efficient program in terms of its combined energy and water consumption, and that it is used to assess compliance with the EU Ecodesign legislation. 2. FAST WASH 40' - Program for limited quantity of normally soiled crockery. Ensures optimal cleaning performance in shorter time. 3. INTENSIVE - Program recommended for heavily soiled crockery, especially suitable for pans and saucepans (not to be used for delicate items). 4. FAST WASH&DRY - Normally soiled crockery. Everyday cycle, that ensures optimal cleaning and drying performance in shorter time. 5. GLASS - Program for delicate items, which are more sensitive to high temperatures, for example glasses and cups.
NATURALDRY
Door opening system - NaturalDry is a convection drying system which automatically opens the door during/after drying phase to ensure exceptional drying performance every day. Door opens at the temperature that is safe to your kitchen furniture. As additional steam protection, special designed protection foil is added together with the dishwasher. To see how to mount protection foil please refer to (ASSEMBLY INSTRUCTION).
| DOOR OPENING |
| Eco 50° | 165 min |
| Fast Wash 40' 45° | end of cycle |
| Intensive 65° | 165 min |
| Fast Wash and Dry 50° | 80 min |
| Glass 45° | 95 min |
Cleaning and maintenance
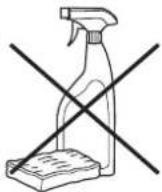
ATTENTION: Always unplug the appliance when cleaning it and when performing maintenance work. Do not use flammable liquids to clean the machine.
Cleaning the dishwasher
Any marks on the inside of the appliance may be removed using a cloth dampened with water and a little vinegar.
The external surfaces of the machine and the control panel can be cleaned using a non-abrasive cloth which has been dampened with water. Do not use solvents or abrasive products.
Preventing unpleasant odours
Always keep the door of the appliance ajar in order to avoid moisture from forming and being trapped inside the machine. Clean the seals around the door and detergent dispensers regularly using a damp sponge. This will avoid food becoming trapped in the seals, which is the main cause behind the formation of unpleasant odours.
Checking the water supply hose
Check the inlet hose regularly for brittleness and cracks. If damaged, replace it by a new hose available through our After-Sales Service or your specialist dealer.

If the inlet hose has a transparent coating, periodically check if the colour intensifies locally. If yes, the hose may have a leak and should be replaced.
Cleaning the water inlet hose
If the water hoses are new or have not been used for an extended period of time, let the water run to make sure it is clear and free of impurities before performing the necessary connections. If this precaution is not taken, the water inlet could become blocked and damage the dishwasher.
Cleaning the filter assembly
Regularly clean the filter assembly so that the filters do not clog and that the waste water flows away correctly. Using dishwasher with clogged filters or foreign objects inside filtration system or sprayarms may cause unit malfunction resulting in lose of performance, noisy work or higher resources usage. The filter assembly consists of three filters which remove food residues from the washing water and then recirculate the water.
The dishwasher must not be used without filters or if the filter is loose.
At least once per month or after each 30 cycles, check the filter assembly and if necessary clean it thoroughly under running water, using a non-metallic brush and following the instructions below:
- Turn the cylindrical filter A in an anti-clockwise direction and pull it out (Fig 1).
- Remove the cup filter B by exerting a slight pressure on the side flaps (Fig 2).
- Slide out the stainless-steel plate filter C (Fig 3).
- If you find foreign objects (such as broken glass, porcelain, bones, fruit seeds, etc.), remove them carefully.
- Inspect the trap and remove any food residues. NEVER REMOVE the wash-cycle pump protection (black detail) (Fig 4).
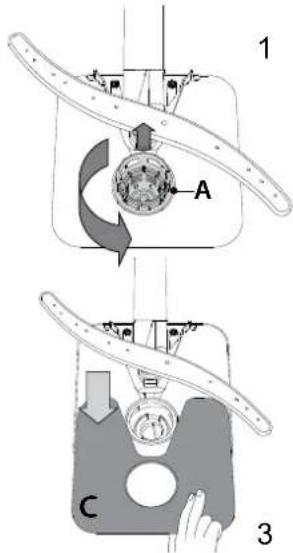

After cleaning the filters, replace the filter assembly and fix it in position correctly; this is essential for maintaining the efficient operation of the dishwasher.
Cleaning the spray arms
On occasions, food residue may become encrusted onto the
On occasions, food residue may become encrusted onto the spray arms and block the holes used to spray the water. It is therefore recommended that you check the arms from time to time and clean them with a small non-metallic brush.
To remove the upper spray arm, turn the plastic locking ring in a
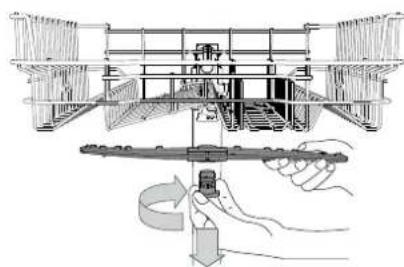
To remove the upper spray arm, turn the plastic locking ring in a clockwise direction. The upper spray arm should be replaced so that the side with the greater number of holes is facing upwards.
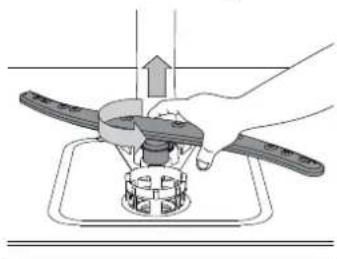
The lower spray arm may be removed by pulling it upwards and rotating it anti-clockwise.
What to do if ...
| In case your dishwasher doesn't work properly, check if the problem can be solved by going through the following list. For other errors or issues please contact authorized After-sales Service which contact details can be found in the guarantee booklet. Spare parts will be available for a period of either up to 7 or up to 10 years, according to the specific Regulation requirements.
The spare parts can be found: www.ikea.com |
| Problems... | Possible causes... Solutions... | |
| Salt indicator is lit | Salt reservoir is empty. (After refill the salt indicator may remain lit for several wash cycles). | Refill reservoir with salt (for more information - see page 8). Adjust water hardness - see table, page 8. |
| Rinse aid indicator is lit | Rinse aid dispenser is empty. (After refill the rinse aid indicator may remain lit for several wash cycles). | Refill dispenser with rinse aid (for more information - see page 8). |
| The dishwasher won't start or does not respond to commands. | The appliance has not been plugged in properly. | Insert the plug into the socket. |
| Power outage. | For safety reasons, dishwasher will not re-start automatically when power returns. Open dishwasher door, press START/Pause button and close the door within 4 seconds. |
| The dishwasher door is not closed. NATURALDRY pin is not pulled in. | Vigorously push the door until you hear the "click". |
| Cycle is interrupted by door opening for more than 4 seconds. | Press START/Pause and close the door within 4 seconds. |
| It does not respond to commands. | Switch off the appliance by pressing the ON/OFF button, switch it back on after approximately one minute and restart the program. If problem persists, unplug the appliance for 1 minute, then plug it back in. |
| The dishwasher won't drain. | The wash cycle has not finished yet. Wait until the wash cycle finishes. |
| The drain hose is bent. Check that the drain hose is not bent (see INSTALLATION). |
| The sink drain pipe is blocked. Clean the sink drain. |
| The filter is clogged up with food residues. Clean the filter (see CLEANING THE FILTER ASSEMBLY). |
| The dishwasher makes excessive noise. | The dishes are rattling against each Position the crockery correctly (see LOADING THE RACKS). |
| An excessive amount of foam has been produced. | The detergent has not been measured out correctly or it is not suitable for use in dishwashers (see FILLING THE DETERGENT DISPENSER). Restart the current cycle by switching OFF the dishwasher, then switch it on again, select a new program, press START/Pause and close the door within 4 seconds. Please do not add any detergent. |
| The dishes are not clean. | The crockery has not been arranged properly. Arrange the crockery correctly (see LOADING THE RACKS). |
| The spray arms cannot rotate freely, being hindered by the dishes. | Arrange the crockery correctly (see LOADING THE RACKS). |
| The wash cycle is too gentle and/or detergent efficiency is low. | Select an appropriate wash cycle (see PROGRAMS TABLE). |
| An excessive amount of foam has been produced. | The detergent has not been measured out correctly or it is not suitable for use in dishwashers (see FILLING THE DETERGENT DISPENSER). |
| The cap on the rinse aid compartment has not been shut correctly. | Make sure the cap of the rinse aid dispenser is closed. |
| The filter is soiled or clogged. Clean the filter assembly (see CLEANING AND MAINTENANCE). |
| There is no salt. Fill the salt reservoir (see FILLING THE SALT RESERVOIR). |
| Dishwasher finishes the cycle prematurely. | Drain hose positioned too low or siphoning into home sewage system. | Check if end of drain hose is placed at correct height (see INSTALLATION). Check for siphoning into home sewage system, install air admittance valve if necessary. |
| Air in water supply. Check water supply for leaks or other issues letting air inside. |
| The dishwasher does not fill the water. | No water in the water supply or the tap is closed. | Make sure there is water in the water supply or the tap running. |
| All LEDs are blinking rapidly. | The inlet hose is bent. | Make sure the inlet hose is not bent (see INSTALLATION) reprogram the dishwasher and reboot. |
| The sieve in the water inlet hose is clogged; it is necessary to clean it | After having carried out the verification and cleaning, turn off and turn on the dishwasher and restart a new program. |
| Problems... | Possible causes... Solutions... | |
| Dishes have not been dried. | Selected program has no drying phase. | Verify in the programs table if the selected program has drying phase. |
| Rinse aid has run out or the dosage is not adequate. | Add the rinse aid or adjust the dosage levels higher (see FILLING THE RINSE AID DISPENSER). |
| Dishes are made of non-stick or plastic. The presence of drops of water it is normal. |
| Dishes and glasses show limescale or a whitish film. | Salt level is too low. Fill the salt reservoir (see fill LILLING THE SALT RESERVOIR). |
| Adjustment of the water hardness is not adequate. | Increase the values (see WATER HARDNESS TABLE). |
| Cap of the salt reservoir is not properly closed. | Check the salt reservoir cap. |
| Rinse aid has run out or the dosage is insufficient. | Add the rinse aid or adjust the dosage levels higher. |
| Dishes and glasses have a bluish tinge or blue streakes. | Rinse aid dosage is excessive. Adjust the dosage | rates to lower values. |
After-Sales Service
If, after carrying out the above checks, the fault persists, disconnect the mains plug and turn off the water tap. Contact the After-sales Service (see guarantee).
Before contacting our After-Sales Service, take note of the following:
the description of the fault, - the appliance type and model,
- the service code (the number indicated on the adhesive rating plate) inside the door on the right-hand side:
SERVICE
0000 000 0000

Technical Data
| Product dimensions (mm) | Height mm 820 | | |
| Width mm 598 | | |
| Depth mm 555 | | |
| Performances | Voltage V 220/240 | | |
| Frequency Hz 50 | | |
| Energy efficiency class A | | |
| Cleaning performance index 1.121 | | |
| Drying performance index 1.061 | | |
| Water supply pressure, max | Bar | 10 |
| Water supply pressure, min | Bar | 0.5 |
| Energy consumption | kWh/100 cycles | 54 |
| Water supply, max inlet water temp. | °C | 60 |
| Number of place settings | | 14 |
| Power consumption in delay start | W | 4 |
| Power consumption in standby mode | W | 0.5 |
| Water consumption | I/cycle | 9.5 |
| Noise level | dB(A) re 1 pW | 42 |
| Noise class | | B |
Environmental concerns
Disposal of packaging materials
The packaging material is 100% recyclable and is marked with the recycle symbol. The various parts of the packaging must therefore be disposed of responsibly and in full compliance with local authority regulations governing waste disposal.
Disposal of household appliances
This appliance is manufactured with recyclable or reusable materials. Dispose of it in accordance with local waste disposal regulations. For further information on the treatment, recovery and recycling of household electrical appliances, contact your local authority, the collection service for household waste or the store where you purchased the appliance. This appliance is marked in compliance with European Directive 2012/19/EU, Waste Electrical and Electronic Equipment (WEEE) and with the Waste Electrical and Electronic Equipment regulations 2013 (as amended). By ensuring this product is disposed of correctly, you will help prevent negative consequences for the environment and human health.
The symbol on the product or on the accompanying documentation indicates that it should not be treated as domestic waste but must be taken to an appropriate collection center for the recycling of electrical and electronic equipment.
Energy saving tips
ECO programme is suitable to clean normally soiled tableware, that for this use, it is the most efficient programme in terms of its combined energy and water consumption, and that it is used to assess compliance with the EU Ecodesign legislation. Loading the household dishwasher up to the capacity indicated by the manufacturer will contribute to energy and water savings. The manual pre-rinsing of tableware items leads to increased water and energy consumption and is not recommended. Washing tableware in a household dishwasher usually consumes less energy and water in the use phase than hand dishwashing when the household dishwasher is used according to the manufacturer's instructions.
Installation
ATTENTION: If the appliance must be moved at any time, keep it in an upright position; if absolutely necessary, it may be tilted onto its back.
Connecting the water supply
Adaptation of the water supply for installation should only be performed by a qualified technician.
The water inlet and outlet hoses may be positioned towards the right or the left in order to achieve the best possible installation. Make sure the dishwasher does not bend or squash the hoses.
Connecting the water inlet hose
- Run the water until it is perfectly clear.
- Screw the inlet hose tightly into position and turn on the tap. If the inlet hose is not long enough, contact a specialist store or an authorised technician.
The water pressure must be within the values indicated in the Technical Data table - otherwise the dishwasher may not function properly.
Make sure the hose is not bent or compressed.
Specifications for the connection of the water supply hose:
| Water supply cold or hot (max. 60°C) |
| Water intake 3/4" | |
| Power of water pressure | 0.05 ÷ 1 MPa (0.5 ÷ 10 bar)
7.25 – 145 psi |
Connecting the water outlet hose
Connect the outlet hose to a drain duct with a minimum diameter of 2 cm A.
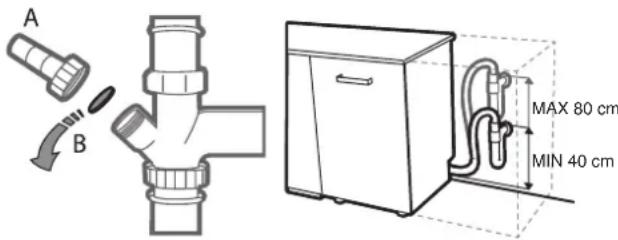
The outlet hose connection must be at a height ranging from 40 to 80 cm from the floor or surface where the dishwasher rests.
Before connecting the water outlet hose to the sink drain, remove the plastic plug B.
Electrical connection
WARNING: Under no circumstances should the water inlet hose be cut as it contains live electrical parts.
Before inserting the plug into the electrical socket, make sure that:
- The socket is earthed and complies with current regulations;
- The socket can withstand the maximum load of the appliance as shown on the data plate located on the inside of the door (see PRODUCT DESCRIPTION).
- The power supply voltage falls within the values indicated on the data plate on the inside of the door.
- The socket is compatible with the plug of the appliance.
If this is not the case, ask an authorized service only to replace the certified power cord with a correct plug dedicated for this appliance (see AFTER-SALES SERVICE). Do not use extension cables, multiple sockets, or unauthorized power cords with plugs. Once the appliance has been installed, the power supply cable and the electrical socket should be easily accessible.
The cable should not be bent or compressed.
If the power supply cable is damaged, have it replaced by the manufacturer or its authorized Technical Assistance Service in order to prevent all potential hazards.
The Company shall not be held responsible for any incidents if these regulations are not observed.
Positioning and levelling
- Position the dishwasher on a level, sturdy floor. If the floor is uneven, the front feet of the appliance may be adjusted until it reaches a horizontal position. If the appliance is levelled correctly, it will be more stable and much less likely to move or cause vibrations and noise while it is operating.
- Before recessing the dishwasher, stick the adhesive transparent strip under the wooden shelf in order to protect it from any condensation which may form.
- Place the dishwasher so that its sides or back panel are in contact with the adjacent cabinets or the wall. This appliance can also be recessed under a single worktop.
- To adjust the height of the rear foot, turn the red hexagonal bushing on the lower central part at the front of the dishwasher using a hexagonal spanner with an opening of 8 mm. Turn the spanner in a clockwise direction to increase the height and in an anticlockwise direction to decrease it.
DIMENSIONS AND CAPACITY:
| Width 598 mm | |
| Height 820 mm | |
| Depth 555 mm | |
| Capacity 14 standard place-settings |
IKEA GUARANTEE
How long is the IKEA guarantee valid?
The guarantee is valid for 2 years from the date of purchase, unless otherwise specified in national legislation. In Norway, Portugal, and Spain, the guarantee is valid for 3 years from the date of delivery to the customer, unless otherwise specified in national legislation. The original sales receipt is required as proof of purchase. If service work is carried out under the guarantee, this will not extend the guarantee period for the appliance.
Who will execute the service?
IKEA Service Provider will provide the service through its own service operations or an authorized service partner network.
What does this guarantee cover?
The guarantee covers faults of the appliance that have been caused by faulty construction or material faults from the date of purchase from IKEA. This guarantee applies to domestic use only. The exceptions are specified under the headline "What is not covered under this guarantee?" Within the guarantee period, the costs to remedy the fault (e.g., repairs, parts, labor, and travel) will be covered, provided that the appliance is accessible for repair without special expenditure. On these conditions, the EU guidelines (No. 99/44/EG) and the respective local regulations are applicable. Replaced parts become the property of IKEA.
What will IKEA do to correct the problem?
The IKEA appointed Service Provider will examine the product and decide, at its sole discretion, if it is covered under this guarantee. If considered covered, the IKEA Service Provider or its authorized service partner through its own service operations will then, at its sole discretion, either repair the defective product or replace it with the same or a comparable product.
What is not covered under this guarantee?
Normal wear and tear. - Deliberate or negligent damage, damage caused by failure to observe operating instructions, incorrect installation or by connection to the wrong voltage, damage caused by chemical or electrochemical reaction, rust, corrosion or water damage including but not limited to damage caused by excessive lime in the water supply, damage caused by abnormal environmental conditions. - Consumable parts including batteries and lamps. - Non-functional and decorative parts which do not affect normal use of the appliance, including any scratches and possible color differences. - Accidental damage caused by foreign objects or substances and cleaning or unblocking of filters, drainage systems or soap drawers. - Damage to the following parts: ceramic glass, accessories, crockery and cutlery baskets, feed and drainage pipes, seals, lamps and lamp covers, screens, knobs, casings and parts of casings. Unless such damages can be proved to have been caused by production faults. - Cases where no fault could be found during a technician's visit. - Repairs not carried out by our appointed service providers and/or an authorized service contractual partner or where non-original parts have been used. - Repairs caused by installation which is faulty or not according to specification. - The use of the appliance in a non-domestic environment i.e. professional use. - Transportation damages. If a customer transports the product to his home or another address, IKEA is not liable for any damage that may occur during transport. However, if IKEA delivers the product to the customer's delivery address, then damage to the product that occurs during this delivery will be covered by IKEA. Cost for carrying out the initial installation of the IKEA appliance. - However, if an IKEA appointed Service Provider or its authorized service partner repairs or replaces the appliance under the terms of this guarantee, the appointed Service
Provider or its authorized service partner will reinstall the repaired appliance or install the replacement, if necessary.
- This does not apply within Ireland, customer should contact the local IKEA dedicated after sales line or the appointed Service Provider for further information.
(just for GB)
These restrictions do not apply to fault-free work carried out by a qualified specialist using our original parts in order to adapt the appliance to the technical safety specifications of another EU country.
How country law applies
The IKEA guarantee gives you specific legal rights, which cover or exceed all the local legal demands. However these conditions do not limit in any way consumer rights described in the local legislation.
Area of validity
For appliances purchased in one EU country and taken to another EU country, services will be provided within the framework of the guarantee conditions normal in the new country. An obligation to carry out services under the guarantee exists only if the appliance complies with and is installed in accordance with:
- the technical specifications of the country in which the guarantee claim is made;
- the Assembly Instructions and User Manual Safety Information.
The dedicated AFTER SALES for IKEA appliances
Please don't hesitate to contact the IKEA appointed Authorized Service Centre to:
make a service request under this guarantee; - ask for clarifications on installation of the IKEA appliance in the dedicated IKEA kitchen furniture; - ask for clarification on functions of IKEA appliances.
To ensure that we provide you with the best assistance, please read carefully the Assembly Instructions and/or the User Manual before contacting us.
How to reach us if you need our service

Please refer to the last page of this manual for the full list of IKEA appointed After Sales Service Providers and relative national phone numbers.
In order to provide you with a quicker service, we recommend using the specific phone numbers listed in this manual. Always refer to the numbers listed in the booklet of the specific appliance you need assistance for. Please also always refer to the IKEA article number (8 digit code) and 12 digit service number placed on the rating plate of your appliance.
SAVE THE SALES RECEIPT!
It is your proof of purchase and required for the guarantee to apply. The sales receipt also reports the IKEA name and article number (8 digit code) for each of the appliances you have purchased.
For any additional questions not related to After Sales of your appliances, please contact your nearest IKEA store call centre. We recommend you read the appliance documentation carefully before contacting us.
Spare parts will be available for a period of either up to 7 or up to 10 years, according to the specific regulation requirements.
The spare parts can be found: www.ikea.com
Safety information 18
Description of the appliance 21
Control panel 21
First use 21
Setting the washing programme 23
Daily use 24
Programme table 25
Care and cleaning 26
What to do if... 27
After-sales service 28
Technical data 29
Environmental concerns 29
Installation 30
TAPAHU HA IKA 31
Safety data sheet
Before filling and using the device, read the safety instructions carefully. Keep them for future reference.
In these instructions, important safety warnings are presented on the device itself, which must be read and followed. The manufacturer declines all responsibility in case of failure to comply with these safety instructions, in case of improper use of the device, or incorrect adjustment of the control elements.
Children under 3 years of age must be kept away from the device. Children aged 3 to 8 years must be kept away from the device unless they are under constant supervision. This device may be used by children over 8 years of age, as well as by persons with reduced physical, sensory or mental capabilities, or with lack of experience and knowledge, only if they are under supervision or have been given instructions for safe use of the device and understand the possible dangers.
Children must not play with the device. Cleaning and maintenance by the user must not be performed by children without supervision.
INTENDED USE
WARNING: The device is
intended to be used with the supplied remote control system.
This device is intended for use in households and similar applications, such as: staff kitchens in shops, offices and other working environments; farms; by clients in hotels, motels, bed and breakfast establishments and other places of accommodation.
This device is not intended
for professional use. Do not use this device outdoors.
The maximum number of sets is indicated on the product data sheet.
The lid must not be left open - risk of tipping over. The open lid of the device can only support the weight of the removed bowl, including the contents. Do not use the lid as a support and do not sit or place anything on it.
WARNING: Keep the appliance and its cord away from children. They can be dangerous if used improperly. Avoid contact with the moving parts of the appliance when the lid is open. Check that the bowl is properly locked before starting the program.
PPEyPPEKDEHNE:HOxOBeTe INpyrTe npi6opn c ocTpn BbpxOBe Tp6Ba Da ce nocTabrB KouHncaTa C BbpxOBeTe HADONY Nn Da ce nocTabr B XOpN3OHTaHa N03nCn - ONaCHOCT OT Nopra3BaHn.
He cbxpaHbAitte n36yXnBn nn 3aapanm BceCTBa (HaNP. KyTN C 6eHN nn aepo30J) BbB nn B 6IIN3OCT do ypeDa - mAm oNacHOCT OT NOXap. UpeBt Tp86Ba da ce n3NoJ3Ba cAmo 3a MneHe Ha DOMAKHCKn CbdoBe B CbOTBETCTBnE C HHTpyKcUNTe, DaJeHN B TOBa pkoBOdCTBO. BoDATA B ypeDa e HerOHa 3a PnHe. N3noJ3BaIte camo npenapat 3a MneHe n Do6aBKn 3a n3PakBaHe, PpeHa3NaueHn 3a ABTomATnUHa CbDMnJHa MaunHa. Korato Do6abTte OMEKOTnte 3a BOda (con), CTapTnpaTte He3a6abHo HkaKaBA nporpama C npa3Ha MaunHa, 3a Da npedotBpataTE NOBpeDa Ha BbTpewHInTe qactn 3apaN KOp03n.
CbXpaHbAite MmJIHnI npenapaT,
N3PnAkaun npenapat n coTnHa MRCTO, HeocTBnHO 3a Deua. Ppei 06cLyXbaHe nn NpOdpbXka Ha ypeDa CnpTe NpdaBaHTo Ha BOda KbM Hero n rO n3KlUoYeTe OT eJeKTpuYeCKaTa MpeXa. N3KlUoYBaIte BoData N eJeKTpuYeCTBOTO B CnyaHa KaBATo n da 6nlo HEN3nPaBHOCT.
HCTAJINPAHE
BopabHeTo uHCTaInpaHeTo Ha ypeDa Tp86Ba Da ce H3BbPWBaT OdBe IINIOBEue Iuca -IMa ONaCHOCT OT HapaHЯBaHe. N3NoJ3BaIte ppeJa3Hn PbKaBnU 3a pa3OnaKOBaHeTo U INCTaInpaHeTo Ha ypeDa -IMa ONaCHOCT OT NOPa3BaHn.
HCTaIpaHeTo, BKIOuHTeIHO NoDaBaHeTo Ha BOba (ako e npINOxmo) n ELeKTPueCKOTo CBbp3BaHe n peMOHTHnTe DeHocTn Tp6Ba Da ce N3BbPWBat OT KBaIIuNcUpaH TexHnK. He nonpaBnTe n He 3aMeHnTe Yactn OT ypeDa, aKO ToBA He e N3pNUH NoOCoHeO B pBkoBOdCTBOTO Ha Notpe6nteJ. Pa3eTe DeCaTa DaJeu OT MAcTOTO, KbDeTO ce N3BbPwBa IHCTaIpaHaTe. CneJ KaTO pa3OnaKOBaTe yPeDa, npOBepTe daJIH He e NobpeDen NO BpeMe Ha TpaHCnOpTuPAHeTo.
Pn np6IeMn ce o6bpeHeTe KbM TbpROBcKna npeDCTaBnteN nn KbM Na- 6nn3kn a cepBn3 3a cneDnpoJaX6eHo 06CnyXbaHe.
CleHnHCTaIIpaHeTo BCnUKN OTnaIbCuN OT ONaKOBKInTe (PnlaCTMaCa, CTnpOnOp nDp.) Tpr6Ba Da ce CbXpaHЯBaT daJeu OT 06cera Ha Deca -CbueCTByBa OnaCHOCT OT 3aDuWabAHe.
UpeBbT Tp86Ba Da 6bJe N3KJIHoueH OT 3axpaHbaHeTo PpeN INCTaInpaHeTO - CbIeCTByBa ONaCHOcOT TOKOB ydap. Po BpeMe Ha INCTaInpaHeTO BHIMaBaIte UpeBbT Da He NOBpeDn 3axpaHBaIu Ka6eJ - IMa ONaCHOcOT TOKOB ydap. BKIOueTe UpeDa eBA cIed 3aBbPbWbAHe Ha INCTaInpaHeTo.
CbpxeTe cBdOMnJHaTa MaunHa KbM BOIOOdaBaHeTo, KaTO n3PON3BaTe caMO HOB N KOMNJIeKTH Mapkyu. Ctapnte KOMNJIeKTH Mapkyu He 6nBa da ce n3PON3BaT NOBtOpHo. BcnuKm Mapkyu Tp6Ba Da 6bDaT 3dpaBO fNKcnpaHe 3a n36raBaHe Ha pa3Xla6BaHepo NM pOBpeMe Ha pa60Ta.
Cn3BaIte HOpMITE, n3daJeHn O
MeCTHaTa BOIOOda6nTeJHa KOMnHaHnJa. HaIraHe Ha NpaBaHaTa Boda 0,05-1,0 MPa.
UpeIbT Tp8Ba Da ce nocTabn CpeuCy CTeHa IIN Da 6bDe BrpaDeH B HkaKaBa KOHCTpyKcNya,3a Da ce OrpaHnHy DOCTbNT OTkbM 3aHaTa My CtpaHa. 3a CbdomnAHH C BeHTnlaCIOHH OTBOPN B OCHOBaTa, Te3N OTBOpN He Tp8Ba Da ce 3aNyWBaT OT KInIM.
Ako cIbOMnHaTa ce nHCTaInpa B KpaHa peuua dpyu ypeuN I do He mMa DoCTbN OTKbM CtpaHnUHata N CTeHa, 30HaTa Ha NaHTte Tp6Ba Da ce O6nOBA CtpaHnUHO 3a n36yRbaHe Ha OnaCHOcOT HapaHraHna.
The water temperature of the washing machine depends on the model. If the water supply markings are marked "25°C Max", the maximum permissible water temperature is 25°C. For all other models, the maximum permissible water temperature is 60°C. Do not kink the hoses, and in case of connection to the water supply system, do not immerse the plastic connection box in water. If the hoses are not long enough, contact your local supplier. Make sure the water inlet and outlet hoses are not kinked or blocked. Before first use, check the tightness of the water inlet and outlet hoses. Make sure the four feet are stable and rest firmly on the floor, and if necessary, adjust them, after which use a spirit level to check that the appliance is perfectly leveled.
Use the appliance only when the hoses, shown in diagram 19 in the installation instructions, are correctly installed - risk of injury.
WARNING: ELECTRICAL CONNECTION
The data plate is located on the inside of the door of the washing machine (visible when the door is open).
The appliance must be possible to disconnect from the power supply by unplugging it, if fitted with a plug,
or via a multi-pole switch installed before the contact, and the appliance must be earthed in accordance with national electrical safety standards.
Do not use extension cords, multi-socket adapters, or adapters. After installation, electrical components must not be accessible to the user. Do not use the appliance if you have wet hands or bare feet.
Do not use this appliance if its power cord or plug is damaged, if it does not work properly, or if it has been damaged or dropped.
If the power cord is damaged, it must be replaced by the manufacturer, its service agent, or a similarly qualified person to avoid a hazardous situation.
If the supplied plug does not fit your socket, contact a qualified electrician.
Do not pull the power cord. Do not immerse the power cord or plug in water.
Keep the power cord away from hot surfaces.
CLEANING AND MAINTENANCE
WARNING: Make sure the appliance is disconnected from the power supply before performing any cleaning or maintenance. To avoid the risk of injury, use protective gloves (risk of cuts) and safety shoes (risk of contusions); the appliance must be protected from damp dust (for cleaning the drum); do not use steam cleaners (risk of electric shock).
Unprofessional repairs not approved by the manufacturer may lead to health and safety risks, for which the manufacturer cannot be held responsible. Any defects or damage caused by unprofessional repairs or maintenance will not be covered by the warranty, the terms of which are set out in the document supplied with the appliance.
Description of the device
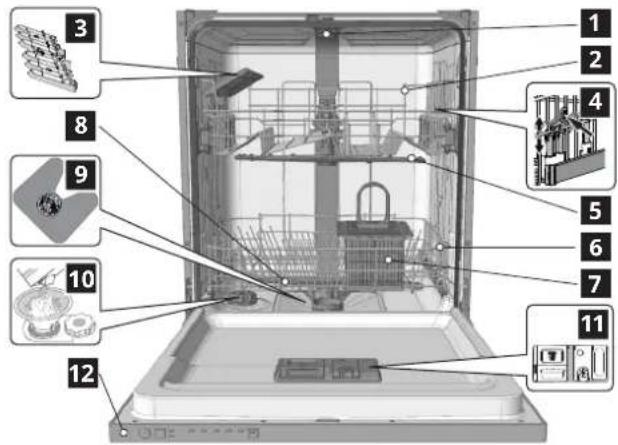
1 Upper cabinet 2 Water tank lid 3 Salt container lid 4 Height adjuster for the upper cabinet 5 Upper spray arm 6 Lower cabinet 7 Cutlery basket 8 Lower spray arm 9 Filter block 10 Salt reservoir 11 Dispensers for detergent and rinse aid 12 Control panel
Control panel

1 On/Off button with indicator light 2 Program selection button 3 Indicator light for salt refill
4 Indicator light for rinse aid refill 5 Program indicator lights 6 Start/Pause button with indicator light
First use
Instructions for first use
Before first use, read the safety instructions and installation instructions included with the product literature. You may remove all protective parts for transport from the appliance.
Filling the salt reservoir
Using salt prevents the formation of limescale on the heating element and on the machine components.
The salt reservoir should never be left empty. It is important to add soft water. The salt reservoir is located in the lower part of the machine (see DESCRIPTION OF THE DEVICE) and should be filled when the salt refill indicator light is on.
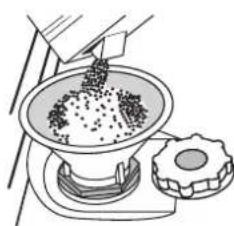
1. Remove the lower basket and unscrew the cap of the reservoir (turn it counterclockwise). 2. Place the funnel (see figure) and fill the salt reservoir up to the rim (about 1 kg); it is not necessary for water to overflow. 3. Do this only the first time: fill the salt reservoir with water. 4. Remove the funnel and wipe off any salt residue from the opening.
Make sure the cap is screwed on tightly, so that during the washing program the detergent cannot enter the reservoir (this could damage the water softener).
Immediately after the procedure, run the program without dishes. Only the "Pre-rinse" program is not sufficient.
Residual salt solution or granulated salt can cause corrosion, damaging the stainless steel components.
The appliance is not in a position to be repaired if the faults were caused by such circumstances.
Use only salt that is specifically intended for dishwashers. If the salt container is not filled, it is possible that the water softener or heating element may be damaged. The salt used must be of a type that dissolves quickly. When it is necessary to add salt, it is mandatory to do so before starting a washing cycle, in order to avoid corrosion.
Setting the water hardness
For the water softener to work ideally, it is especially important that the setting for water hardness is based on the actual hardness of the water in your home. You can obtain this information from your local water supplier. The factory default setting for water hardness is set.
Turn on the device by pressing the ON/OFF button. - Turn off the device by pressing the ON/OFF button. Press and hold the button for 5 seconds until you hear a sound signal. Turn on the device by quickly pressing the ON/OFF button. The LED indicator for the current setting will flash. - Press the button to select the desired level of water hardness (see TABLE OF WATER HARDNESS). - Turn off the device by pressing the ON/OFF button. The setting is complete!
| Ташица за Тьрдоста на Водату |
| НИВО | °dH
reprмански
градусn | °FH
фразнски
градусn | °CClark
английски
градусn |
| 1 Мека | 0-6 0-10 | 0-7 | |
| 2 Умeper�а | 7-11 11-2 | 08-14 | |
| 3 Среда | 12-16 21- | 29 15-20 | |
| 4 Тьрда | 17-34 30- | 60 21-42 | |
| 5 Мною Тьрда | 35-50 61- | 90 43-62 | |

Water softening system
The water softener automatically measures the hardness of the water, preventing the gradual scaling of the boiler and the heating element and improving efficiency. The system regenerates itself with salt, so it is necessary to refill the salt container when it is empty. The frequency of regeneration depends on the setting of the water hardness level - regeneration is performed every 6 cycles with the water hardness level set to 3.
The regeneration process starts in the last rinse and ends in the drying phase, so it must be allowed to finish.
- One regeneration uses: -3.5 liters of water; it takes about 5 additional minutes;
- It consumes less than 0.005 kWh of energy.
Filling the rinse aid dispenser
The use of rinse aid improves drying. The rinse aid dispenser must be filled when the indicator light FILL RINSE AID is on and the control light is flashing.
B

- Open the dispenser B by pressing and lifting the lid upward.
- Carefully add the rinse aid up to the maximum (110 ml) reference mark on the opening - avoid spilling. If this happens, wipe up the spill immediately with a dry cloth.
- Press the button to open the door, wait for it to close.
Do not use the appliance if the door is not closed.
Adjusting the rinse aid dosage
If you are not completely satisfied with the drying results, you can adjust the amount of rinse aid used.
Turn on the appliance with the ON/OFF button. - Press the ON/OFF button. - Press the button until you hear a sound signal. Turn on with the ON/OFF button. The indicator light for the program shows the current setting level. Press the button to select the desired level of rinse aid quantity. - Turn off with the ON/OFF button.
The setting is saved!
If the rinse aid level is set to 1 (ECO), rinse aid will be dispensed. The rinse aid indicator light will illuminate if the rinse aid is empty. Depending on the model of the machine, up to 5 levels can be set. The factory setting is specific to each model; follow the instructions above to check if the setting is correct for your machine.
- If you have soft water, set a low number (2-3). If your water has scale or limescale, set a high number (4-5).
Adding rinse aid
Using a rinse aid that is not intended for dishwashers may cause malfunctions or damage to the appliance.
For the best washing and drying results, it is necessary to use a rinse aid, a detergent, and a dishwasher salt in combination.
Avoid using products that do not contain phosphates, as these products are harmful to the environment.
The washing results always depend on the correct amount of detergent used.
Exceeding the recommended amount does not lead to more effective washing and increases the pollution of the environment.
The amount of detergent can be adjusted according to the degree of soiling. For normal soiling, use about 35 g (powder detergent) or 35 ml (liquid detergent). Additional laundry detergent can be added directly into the drum. If you use tablets, one is sufficient.
If the laundry is heavily soiled or stained, place the detergent in the dispenser drawer and add the appropriate amount of detergent (minimum 25 g/ml). Do not put powder/gel directly into the drum.
To open the detergent dispenser, press the button.
Place the detergent only in the dry dispenser drawer. Add the required amount of detergent for pre-wash directly into the drum.
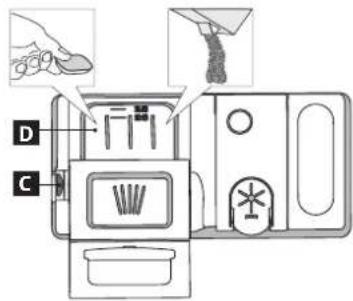
1. Measure the detergent. Follow the dosage instructions on the packaging. Add the appropriate amount to the dispenser. The dosage is reduced automatically.
- Remove any remaining detergent from the edges of the dispenser and close the lid until it clicks.
- Close the detergent dispenser lid by pressing it down until the locking mechanism engages.
The detergent dispenser is automatically rinsed at the correct time during the program.
Adjusting the height of the top cover
The height of the top cover can be adjusted: high position for placing bulky items, low position for full use of the drum. To adjust, press the release buttons on both sides and lift or lower the cover. The top cover is connected to the height adjuster (see figure); without pressing the buttons, lift it up by simply pulling.
The cover is removed by lifting it until it stops.
To restore a lower position, press the buttons on the cover and push the cover down.
Do not adjust the height of the cover while it is locked.
The appliance must be installed only by an authorized person.
Connecting the adjustable ducts
The connecting ducts can be connected or extended to optimize the performance of the appliance.
The hooks for the motor must be placed safely in the connecting ducts, with the stop on the bracket being pulled into the corresponding slot.
Depending on the model:
To disconnect the ducts, you need to pull them upwards and either press or release the latches and then pull them downwards. To connect the ducts, you need to push them upwards and pull the ducts downwards or push them upwards and then lock them with the latches.
One duct for the hood, duct, or pipe, pipe for the exhaust, etc. The pipes and ducts on the left and right must be positioned so as not to obstruct the radio.
3. CONNECTING THE DUCTS
(SEE CONNECTING THE DUCTS)
4. CONNECTING THE MOTOR FOR RECIRCULATION (SEE CONNECTING THE MOTOR FOR RECIRCULATION).
5. SELECTING THE PROGRAM AND PERSONALIZING THE PROGRAM
Select the appropriate program according to the washing cycle (see DESCRIPTION OF PROGRAMS) by pressing the button.
6. START
Start the washing cycle by pressing the START/Pause button (the indicator light lights up) and close the door within 4 seconds. When the program
starts, a brief signal sounds. If the door is not closed within 4 seconds, an audible alarm will sound. In this case, open the door, press the START/Pause button, and close the door again within 4 seconds.
7. END OF WASH CYCLE (END OF WASH CYCLE) The end of the wash cycle is indicated by a short sound signal and the flashing of the selected program indicator. Unload the appliance by pressing the ON/OFF button.
Remove the laundry promptly to avoid creasing. Take out the laundry starting from the bottom.
The machine switches off automatically after a certain period of inactivity to minimize energy consumption. If the laundry is only slightly dirty or if it has been rinsed with water before being placed in the washing machine, add the appropriate amount of detergent.
Program duration
If a wrong program has been selected, you can change it provided it has not started yet: open the door, press the ON/OFF button, the machine will switch off. Unload the machine by pressing the ON/OFF button. Select a new program for washing; start the program by pressing the START/PAUSE button, then close the door within 4 seconds. If this takes longer than 4 seconds, the appliance will automatically pause and you will need to start it again by repeating the last operation.
Adding laundry
Always switch off the machine, open the door (the START/PAUSE indicator starts flashing). (Be careful of hot water!) Place the laundry inside the washing machine. Press the START/PAUSE button, close the door within 4 seconds; the cycle resumes from the point where it was interrupted.
Pause function
If the door was opened during a washing or rinsing cycle, the program pauses. Press the START/PAUSE button and close the door within 4 seconds; the cycle resumes from the point where it was interrupted.
Program table
Preventing limescale buildup
Leave the door of the appliance slightly open to prevent the formation of mold and odors inside the machine.
Regularly clean the detergent drawer and the door gasket. This will prevent the buildup of food residues, which is the main cause of limescale formation.
MAINTENANCE AND CLEANING:
What to do if the appliance malfunctions?
2. TURN ON THE DISHWASHER
FILLING THE SALT RESERVOIR
The use of salt prevents the formation of limescale on the dishes and on the internal parts of the appliance. It is essential that the salt reservoir is NEVER EMPTY. It is important to check the hardness of the water. The salt reservoir is located at the bottom of the dishwasher (see PRODUCT DESCRIPTION) and must be filled when the SALT REFILL indicator light appears on the control panel.
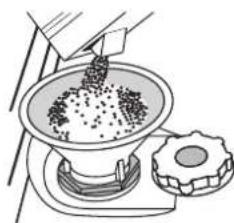
- Remove the lower basket and unscrew the cap of the salt reservoir (see figure).
- Place the funnel (see figure) and pour the salt into the reservoir up to the upper edge (about 1 kg). It is normal for a little water to overflow.
- Do this only the first time: fill the salt reservoir with water.
- Remove the funnel and clean any salt residues from the opening.
Make sure the cap is screwed on tightly, so that no detergent can enter the reservoir during the wash cycle (this could cause damage to the water softener and require necessary repairs). Once this procedure is completed, start the program without dishes. The "Rinse" program only is sufficient.
The salt residues can cause serious corrosion by damaging the internal parts of the appliance.
The warranty does not cover damages under these conditions.
Use only salt specifically for dishwashers. If the salt reservoir is not filled, it can cause damage to the water softener and to the heating element of the dishes. The use of salt is recommended with any type of dishwasher detergent.
FILLING THE RINSE AID
The rinse aid facilitates the DRYING. The rinse aid reservoir A must be filled when the RINSE AID REFILL indicator light appears on the control panel.
B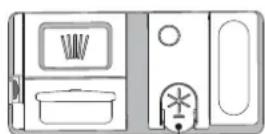
A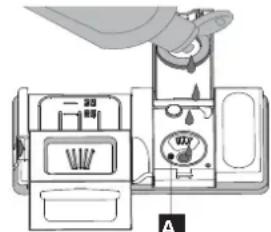
1. Remove the cap and pull it upwards to open the oil tank. 2. Insert the funnel as far as possible into the opening (110 ml) of the oil tank - if it overflows, wipe off the spilled liquid with a dry cloth. 3. Lower the tank until you hear the characteristic click of closure.
NOTE: Do not overfill the tank.
If the oil tank is not properly seated
The IKA warranty provides you with comprehensive legal rights, which cover or exceed the typical legal requirements. Therefore, these terms do not limit in any way the rights of the consumer under local law.
Warranty coverage
For appliances purchased in one EU country and transported to another EU country, the services will be provided according to the warranty conditions that apply in the new country. The warranty obligation is only fulfilled if the appliance is complete and installed in accordance with:
the technical specifications of the country in which the warranty claim is made, the operating instructions and safety information for the user manual.
AFTER-SALES SERVICE for IKEA appliances
Do not hesitate to contact the authorized IKA service center to:
- submit a claim under this warranty, request clarification regarding the installation of the IKA appliance in the special IKA kitchen units, request clarification regarding the functions of the IKA appliances. To ensure that we provide you with the best possible assistance, please read carefully the operating instructions and/or the user manual before contacting us.
If you contact the service

Refer to the last page of this manual for the full list of authorized IKA service centers and their corresponding national telephone numbers.
To provide you with faster service, we recommend that you use the specific telephone numbers listed in this manual. Always refer to the numbers listed in the leaflet of the specific appliance for which you need assistance. Always refer to the IKA service number (8-digit code) and the 12-digit number printed on the rating plate of your appliance.
First use 170
Racks 171
Daily use 172
Table of washing programs 173
2. SWITCHING ON THE DISHWASHER
Open the door and press the "On/Off" button within 4 seconds, and the user interface will light up.
- LOADING THE RACKS (see LOADING THE RACKS)
4. FILLING THE DETERGENT DISPENSER
Setup is complete!
CLEANING AND MAINTENANCE
DIMENSIONS AND CAPACITY:
To do, if... 311
Customer service 312
Technical data 313
Recommendations for environmental protection 313
Installation 314
WARRANTY 315
Safety lighting
Before using the device, read this safety instruction. Keep this instruction for future reference. This instruction and the device itself contain important safety warnings. They must be read and followed at all times. The manufacturer declines all liability for any consequences resulting from failure to comply with these safety instructions, improper use of the device, or incorrect settings on the control panel.
Do not allow small children (0-3 years) to approach the device. Children aged 3 to 8 may be near the device only under constant supervision by adults. Children from 8 years of age and persons with reduced physical, sensory or mental capabilities, as well as persons lacking sufficient knowledge and skills, may use the device only under supervision or after having received instructions on safe use and understanding the hazards involved. Do not let children play with the device.
Children may perform cleaning and maintenance of the device only under adult supervision.
INTENDED USE
CAUTION: the device is not
intended for use with an external timer or remote control system (e.g., timer or remote control).
This device is intended for use in household and
similar environments, such as: staff kitchens in shops, offices and other workplaces; on farms; by guests in hotels, motels, bed & breakfasts and other residential environments.
This device is not intended for professional use. Do not use the device outdoors.
The maximum number of place settings is indicated in the technical specifications.
Do not leave the door open, as you could accidentally trip over it. The open door of the device can only support the weight of the loaded basket. Do not use the door as a support, do not sit or stand on it.
CAUTION: Dishwasher detergents are dangerous. If swallowed, they can be a serious hazard. Avoid getting them on the skin or in the eyes. Keep children away from the dishwasher when its door is open. Make sure that the detergent compartment remains empty after the wash cycle has finished.
CAUTION: Knives and other
Cutlery with sharp edges must be placed in the cutlery basket with the sharp ends pointing down, or laid horizontally: there is a risk of cuts.
Do not store explosive or flammable substances (for example, petrol or aerosol cans) inside or near the appliance to avoid fire. The appliance must only be used for washing domestic dishes as described in
this manual. Water in the appliance is not suitable for drinking. Use detergents and rinse aids for automatic dishwashers. If the water softener (salt) is used, run a wash cycle with an empty machine immediately to avoid corrosion of its internal parts. Store detergent, rinse aid, and regenerating salt out of the reach of children. Before servicing, shut off the water supply and disconnect the power. Disconnecting from the power supply and water system must also be done in case of any malfunction of the appliance.
INSTALLATION
Comply with the applicable local water supply regulations. Inlet water pressure: 0.05-1.0 MPa.
The appliance must be placed against a wall or built into furniture to restrict access from the rear.
If the base of the dishwasher has ventilation openings, make sure they are not blocked by carpet.
If the dishwasher is installed under a worktop and access to its side panel is free, provide a barrier for the children's zone to eliminate the risk of injury. The temperature of the inlet water depends on the dishwasher model. If the installed inlet hose has the marking 25°C Max, the water temperature must not exceed 25°C. For all other models, the maximum allowed water temperature is 60°C. Do not cut the hose. If the machine is equipped with a device to stop water supply in case of leakage, do not immerse the plastic box that serves as the connection to the water pipe. If the hoses are too short, contact your dealer. Make sure the inlet and drain hoses are not kinked or pinched. Before first use of the machine, make sure there are no leaks from the inlet and drain hoses. Make sure the appliance is stable on the floor, resting on all four feet. If necessary, adjust the feet and check the levelness of the dishwasher using a spirit level.
Use the appliance only when the covers shown in
Diagram 19 in the installation manual are correctly fitted, otherwise there is a risk of injury.
ELECTRICAL SAFETY INSTRUCTIONS
The rating plate is located on the edge of the dishwasher door (visible when the door is open).
It is mandatory to provide the possibility of disconnecting the appliance from the power supply by unplugging it (if there is access to the socket) or by switching off a multi-pole switch installed in front of the socket. The appliance must be earthed in accordance with national electrical safety standards.
Do not use extension cords, adapters, or multiple socket outlets. After installation, electrical components must be inaccessible to the user. Do not touch the appliance with wet hands or if you are barefoot. Do not use the appliance if its power cord or plug is damaged, if it is not working properly, or if it has been damaged by a blow or fall.
To avoid dangerous situations, if the power cord is damaged, it must be replaced by the manufacturer, a service center employee, or a qualified specialist: there is a risk of electric shock. If the plug does not fit the socket, contact a qualified specialist. Do not pull the power cord. Do not immerse the power cord or plug in water. Keep the cord away from hot surfaces.
CLEANING AND MAINTENANCE
WARNING! Before performing technical maintenance of the appliance, make sure that it is switched off and disconnected from the power supply. To avoid injury, use protective gloves (risk of cuts) and protective footwear (risk of impacts); perform technical maintenance with someone else - this reduces the load; never use steam cleaners - there is a risk of electric shock.
Unprofessional repairs not authorized by the manufacturer may pose a threat to your health and safety; the manufacturer is not responsible for this. The warranty conditions set out in the document supplied with the device do not cover any defects or damage resulting from unprofessional repairs or maintenance.
Appliance description
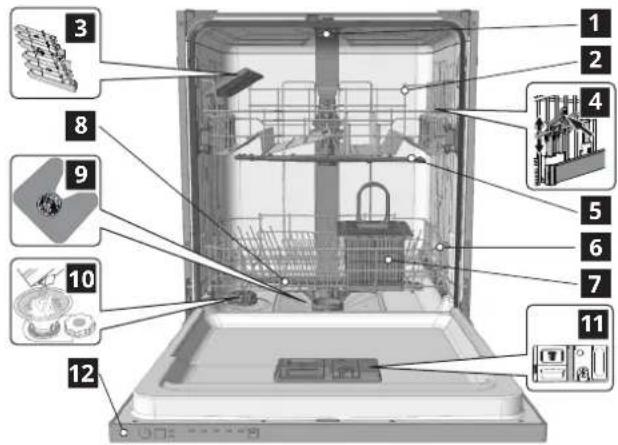
1 Upper spray arm 2 Upper basket 3 Cutlery basket 4 Height adjuster for upper basket 5 Upper spray arm 6 Lower basket 7 Basket for small appliances 8 Lower spray arm 9 Filter assembly 10 Water inlet hose 11 Detergent dispenser 12 Control panel
Control panel

1 Button "On/Off/Reset" with indicator 2 Program selection button 3 Indicator "No salt"
4 Indicator "No rinse aid" 5 Program indicator 6 Button "Start/Pause" with indicator
Residues of salt solution or salt crystals can cause corrosion, leading to irreparable damage to stainless steel parts. Failures caused by this circumstance are not covered by the warranty.
Use only special salt for dishwashers. The absence of salt in the tank may lead to damage to the softener and heating element due to the accumulation of limescale. It is recommended to use salt with a full type of detergent for the dishwasher. If you need to add salt, you must complete the procedure before starting the washing cycle to avoid corrosion.
Setting water hardness
To ensure proper operation of the softener, the water hardness parameter must correspond to the actual water hardness in your home. The corresponding information can be obtained from your local water supply organization. The default water hardness value is set at the factory.
Turn on the appliance by pressing the ON/OFF button. - Turn off the appliance by pressing the ON/OFF button. Press and hold the button for 5 seconds until a sound signal is heard. Turn on the appliance with a short press of the ON/OFF button. - The program indicator corresponding to the selected level lights up. Press the button to select the desired water hardness level (see the water hardness table). - Turn off the appliance by pressing the ON/OFF button. The setting is complete!
Never pour the rinse aid directly into the washing chamber.
Adjusting the rinse aid dosage
If the drying quality does not satisfy you, you can adjust the rinse aid dosage.
Turn on the dishwasher by pressing the ON/OFF button. - Turn off the appliance by pressing the ON/OFF button. Press the button three times until a sound signal is heard. Turn on the appliance by pressing the ON/OFF button. - The program indicator corresponding to the selected level lights up. Press the button to select the rinse aid dosage level. - Turn off the appliance by pressing the ON/OFF button. The setting is complete!
The rinse aid level can be set to 1 (ECO). In this case, the rinse aid is not used, and the indicator for the absence of rinse aid does not light up, even if the dispenser is present. Depending on the model of your dishwasher, up to 5 levels of adjustment are available. The factory settings are indicated on the model; to find out the settings for your machine, follow the instructions above.
- If water stains remain on the dishes, set a lower value (2-3).
- If the dishes remain wet or have streaks, set a higher value (4-5).
Loading detergent
Using detergents not intended for dishwashers may lead to malfunctions and damage to the appliance.
The best drying results are achieved only with the combined use of detergent, rinse aid, and regenerating salt.
We recommend using detergents that do not contain phosphates or chlorine, as these substances are harmful to the environment.
The quality of washing depends on the correct dosing of the detergent.
Excessive amounts of detergent do not increase the effectiveness of washing, but the powder contaminates the environment.
The dose can be changed depending on the degree and contamination of the dishes. For medium contamination, use approximately 35 g of powder or 35 ml of liquid detergent and add one tablespoon of detergent directly into the washing chamber. If tablets are used, a full tablet is sufficient.
If the dishes are heavily contaminated or were previously soaked in water, reduce the dose to a minimum (25 g or ml) and do not add powder/tablets to the pre-wash chamber.
Open the water flow for the detergent, press the button and load the detergent only into the dry dispenser. For pre-wash detergent, place it directly into the washing chamber.
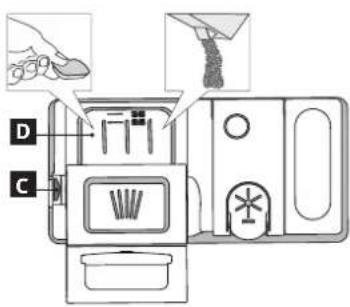
1. To determine the required amount of detergent, see the instructions above. On the inside of the dispenser cover, there are measuring marks that allow correct dosing of the detergent.
2. Remove detergent residues from the dispenser and close the cover completely.
3. Close the detergent dispenser cover by pulling it up until it clicks back into place.
The detergent dispenser opens automatically at the right moment according to the selected program.
Loading the baskets
Tips
Before loading the baskets, remove food residues from the dishes and empty the contents of the glasses. Rinsing the dishes with water is not necessary.
When loading the dishes, make sure they are held firmly in place and do not fall. Place the containers upside down and so that the convex/concave parts are inclined: this allows water to reach all parts of the dishes and drain freely downwards.
Warning: make sure that lids, handles, and pan handles do not block the rotation of the spray arms.
Place the cutlery basket for cutlery. Heavily soiled plates and pans are recommended to be placed in the lower basket, as the water jets in the lower zone are more powerful, providing a better wash.
After loading the appliance, make sure that the spray arms can rotate freely.
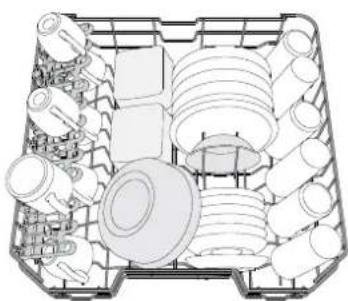
Upper basket
Lower basket
Designed for easily damaged and delicate items: glasses, cups, saucers, and small plates.
(Example of loading the upper basket)
Adjusting the height of the upper basket
The height of the upper basket can be adjusted: the upper position is for placing large dishes in the lower basket, the lower position is for using the fold-down racks to the full extent (to increase the free space above without creating obstacles for dishes loaded in the lower basket).
The upper basket is equipped with a height adjustment mechanism (see figure). To raise the upper basket, simply lift it up by the edge, without pressing the handles, until it clicks into the upper position.
To return the basket to the lower position, press the handles located on its sides and move the basket down.
Do not adjust the height of the upper basket when it is loaded with dishes.
Never raise or lower the basket by holding it only from one side.
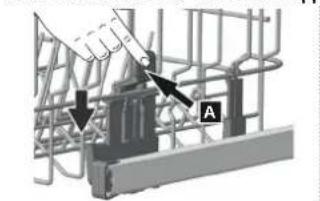
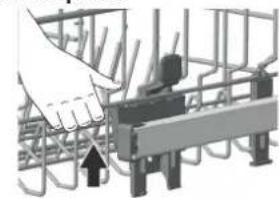
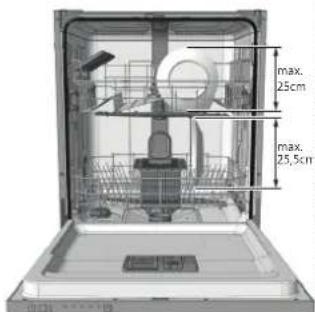
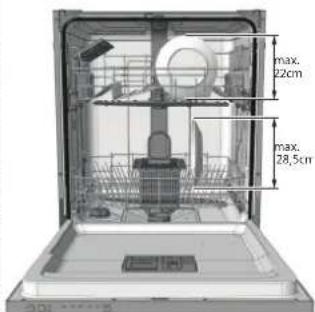
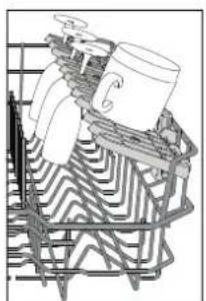
Fold-down racks with adjustable position
The fold-down racks can be folded down or up to optimally arrange dishes in the basket.
Wine glasses can be securely fastened in the fold-down racks by inserting the stems into the special slots.
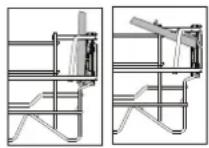
B 3aBnMocTOn OT MoJeN:
yTo6bI pa3IoKnTb DepxaTeiN, Heo6xOdIMo CdBHyTb INBBePx IN NOBepHyTb ININ INBLeueh IN3 3aUeLOK INOTaHyTaHN3. yTO6bI CLOKNTb DEpKaTeiN, Heo6xOIMMO NOBepHyTb INx IN CDBHHTb BHN3 ININ NOTAHytB BBepx IN pPKNpeNITb K 3aUeKam.

HxKJy KOp3nHa
3TaKop3nHa npedHa3HaueHa dIa KaCtprHb, KpbIWek, TapeNoK, calaTHuC, CTolOBbIX npi6OpOB n T. p. B0JIWe TapeIkn N KpbIeKN LyUwe pa3MeaTb No KpaM, YTObI OHN He MeMaII DINBeHIO IOnaCTn pa36pI3rNBAteIa.
YTuNn3aun6bITobBx npn6opOB
DAnHHn npN6op n3rOToBnEn n3 MaTePnaIaOB, dOnyckAioUnx nepepa60Ky nnn noBToHoe nCNoB3oBaHne. YtInn3npyIte np6Op B COOTBeTCTBnC mEcTHbIMn npABuIaMn yTInn3aUIN OTXoOB. DOnONHnTEbHyIO INΦOpMaUIO O npABvIax 6paueHnC 6b10BbIMn 3NeKTPoPn6OpAMn, nx yTInn3aUIN n nepepa60kMe MoxHO NOnyUHTB C BoOTBeTCTByOuIX rocYdApCTBeHHbIX opraHax, cnyK6e c6opa 6b10BbIX OTXoOB nII MaRa3HNe, rDe bI Ipno6pTeH np6Op. DaHHbI np6Op IMeET MapKnPOBky B COOTBeTCTBnC E BpOJeNcKoI DInpeKTbBO 2012/19/EC o6 OTXoAx 3NeKTPnueCKoro n 3NeKTPoHnO 6OpyDoBaHnA (WEEE) n PonoJKeHEm o6 OTXoAx 3NeKTPnueCKoro n 3NeKTPoHnHO 6OpOyDoBaHnA 2013 r. (B DeIcTBHyOeJ peDaKUIN). ObecneuBAJ npABuNbHyO ytInn3aUIO daHHOrO n3dEJIIN, Bbl MokKeTe pPeDToBpaITb HeraTbHBbie NOcIeCTBnI dIe OKpyKaIoUe CJpeDbI n 3DOPOBBa HeLOBeka.
CnMBOJ Ha cAmOM n3dJIIN NnB COnpOBoNTeHbHO JOKyMeHTaUN yKa3bIbAet, YTO npuYtNImaUN daHHORO n3dJIINr C Hm HEnb38 OpaTaBcR KAc CObhHBM6bITOBIMN OTXoAMn. BMeTo 3TOrO erO cNeDuET cDaTbHa nepepa6Otky B COOTBeCTByUOuN pyHKT pInema 3JeKTPnueckoro N 3JeKTPoHHoro 06OpyDoBaHn.
CobetbI NO 3KOHOMN 3Heprnn
Iporpamma ECO noDxOaNT IJI MaITbY UMepeHHO 3arpa3HeHHo NocdyI IN ABJAEcTc HAN60lee 3eFKeKTHBHO nporpaMMo No KOMbHNPOBaHHOMy paXody 3Heprn IN BOdy, YTO Tpe6yeTcI dJI COOTBeTCTBn 3aKOHOaTeJIbCTBy EC B cfepe 3KOIN3aHa. MakcImaJIbHaN (B PpeJeIax DoNyctUMoro) 3aRpy3ka NocyDoMoeyHOn MaUInHb 6yDet CNOcO6CTBOBaTb 3KOHOMn 3JeKTPo3Heprn IN BOdy, PpeDbapntelbHoe OONaACKNbAHne NocdyI He peKOMeHdyTc, NocKOBky yBEnuYNBaET notpe6JIeHne BOdy IN 3JeKTPo3Heprn. Ppi nCNoIb3OBAHn 6bITOBOn NocyDoMoeyHOn MaUInHb B COOTBeTCTBn C INHTpyKUne npOn3BOdnteJI NaTpe6JIeHne BOdy IN 3JeKTPo3Heprn, KaK pPaBnIO, MeHbIe, Yem npi MbITbe BpyHyIO.
YCTaHOBka
BHIMAHNE! B clyuae nepeezda nepeBO3nte MaunHy B BeptnKaIbHOM noJoxKeHHN. B clyuae kpaHne Heo6xOdmocTn MaunHy MoXHo yloXHTb 3aHne CTOpOHn BH3.
PoeHneHnK BoOpOBy
IodrotOBKa BODOpBOba K yctaHOBke np6opa DoJXHa BbINHnTbCkBAInnΦuNpObaHHbIM CneuaNtCTOM. 3aJIbHbOH n CnIBHO uHaHTn MOrYT 6bITb HAnpaBHeHb KaBnPaBO, TAK N BLeBO B 3aBNCMOCTN OT YcIOBn yCTaHOBKn. 86eINTcB, UTO WLaHn He CdaBHeHb N He 3aIOMaHbI Kopnycom NocydmoeHNO MaHNbI.
PoeHHeHne3aINBHoro 7nHaHra
- OTKpoTe KpaH IdoXInTecb, KOrga BODa Ha BbIXOe WJnHa 6yDet NdeaIbHO uCToI. HaTeKHO 3aTHeTe 3aJIbHOn 7JaHr Ha pe36e naTp6Ka nOTKpoTe KpaH.
If the power cord is damaged, contact a specialized store or an authorized specialist.
The pressure in the water supply must be within the limits specified in the technical data table, otherwise the dishwasher may not operate correctly. Make sure the hose is not kinked or crushed.
Water connection specifications:
Connect the inlet hose to a water tap with a diameter of at least 2 cm.
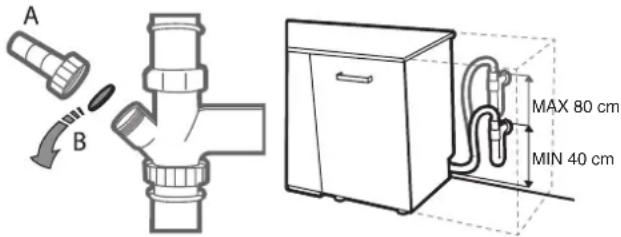
The connection point of the inlet hose should be at a height of 40 to 80 cm from the floor surface on which the dishwasher is installed. Secure the inlet hose to the sink with a plastic clamp.
Electrical connection
WARNING! It is strictly forbidden to cut the power cord, as it contains live parts.
Before inserting the plug into the electrical outlet, make sure that:
- the outlet is grounded and complies with current standards; the outlet is rated for the maximum power consumption of the appliance, as indicated on the rating plate located on the inside of the door (see "DESCRIPTION OF THE APPLIANCE"); the mains voltage matches the data on the rating plate located on the inside of the door;
- the outlet is compatible with the appliance's plug.
If you need to replace the power cord, use only a certified power cord with the appropriate plug, designed for this appliance, and contact official service (see section "SERVICE"). Do not use multiple sockets or uncertified cords with plugs. The appliance must be installed so that the power cord and outlet are easily accessible.
The power cord must not be kinked or crushed. If the power cord is damaged, contact the manufacturer or an authorized service center for replacement to avoid potential hazards. The manufacturer is not responsible for consequences of non-compliance with these requirements.
Placement and leveling
- Place the dishwasher on a flat, stable surface. If the floor is not level enough, adjust the height of the front feet so that the appliance is level. Proper leveling increases the stability of the appliance and reduces the risk of it moving, vibrating, and making noise during operation. 2. Before installing the dishwasher in a cabinet, attach the supplied anti-tip bracket to the lower part of the front panel to protect it from tipping.
- Position the dishwasher so that its back or side panels are close to adjacent cabinets or walls. The appliance can also be built under a countertop. 4. To adjust the height of the front feet, turn the red hexagonal bushing located at the bottom center of the front side of the dishwasher with a hexagonal wrench of 8 mm. Turning the wrench clockwise increases the height, counterclockwise decreases it.
DIMENSIONS AND CAPACITY:
7. END OF WASH CYCLE
The end of the wash cycle is indicated by a beep and the flashing of the control light for the selected program. Press the ON/OFF button to switch off the appliance.
The cable should not be bent or compressed.
If the power cord is damaged, have it replaced by the manufacturer or its authorized service center to avoid any potential hazard.
- (c) (a) (b) (c) (d)
j bs2 - j es2 = 1/2Sa
2! jleJl Juswyy aee 8. aIyss dclg
...
pIiJyUuJyUaJgUbJI UUc JUogj
a:ab|pa:awol o:lc|j:8.0a:z:abla a:ab
.aaalpblj
.
Jlalolllgfo 1glo golll
1,0-0,05 slll ldo bdo aol
JUULU
aab jbjgbljgljglg
A
aaiy aay yaaay
JcIaIeI I 1000
- 1,2,3 , 4,5,6 , 7,8
Therefore, the area of triangle OBC is 1/2 * CD * BC = CD.
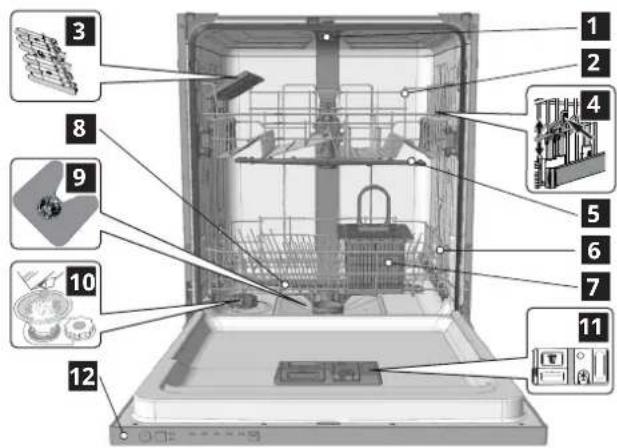
Therefore, the area of triangle OBC equals the area of triangle COD plus the area of triangle BOC.
Therefore, m : x = 1 or 3x + 4y + 1 = 0.
(1)
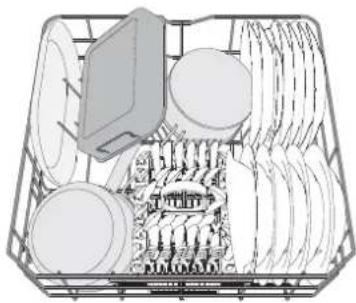
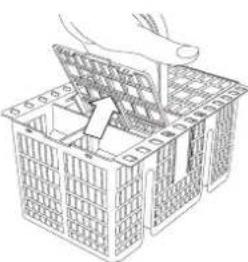
.
.
BELGIUM - BELGIQUE - BELGIEN
Opening hours: Monday - Friday 8.00am - 6.00pm
Saturday
Sunday
8.00am-6.00pm 8.30am-4.30pm
8.50am - 4:50pm 2:30 - 3:30
9.30am - 3.30pm