AD 6324 - Deep fryer ADLER - Free user manual and instructions
Find the device manual for free AD 6324 ADLER in PDF.

| Product type | Oil-free fryer (Air Fryer) with two baskets |
| Total capacity | 11 L (6,5 L + 4,5 L) |
| Power | 2700 W |
| Power supply | 220-240 V ~ 50/60 Hz |
| Standby consumption | 0.27 W |
| Material | Heat-resistant plastic, non-stick coating |
| Display | Digital with temperature and time display |
| Preset programs | 8 (Fries, Steak, Chicken, Chicken thighs, Fish, Shrimp, Pizza, Dried fruits) |
| Special functions | Synchronized finish, delayed start (30 min to 12 h), flip reminder, compartment lighting |
| Temperature control | 40 °C to 200 °C (depending on program) |
| Timer | Up to 6 h (Dried fruits program) |
| Safety | Automatic shut-off if drawer is removed, hot surfaces indicated, mandatory grounding |
| Maintenance | Clean grates and drawers by hand with hot water and dish soap (not dishwasher safe) |
| Included accessories | 2 grates, 2 drawers |
| Dimensions (estimated) | 42 x 38 x 35 cm |
| Weight (estimated) | 7.5 kg |
| Repairability | Refer to an authorized service center; do not repair yourself |
| Warranty | 2 years (standard, subject to seller) |
Frequently Asked Questions - AD 6324 ADLER
User questions about AD 6324 ADLER
0 question about this device. Answer the ones you know or ask your own.
Ask a new question about this device
Download the instructions for your Deep fryer in PDF format for free! Find your manual AD 6324 - ADLER and take your electronic device back in hand. On this page are published all the documents necessary for the use of your device. AD 6324 by ADLER.
USER MANUAL AD 6324 ADLER
natural_image
Line drawing of a portable food appliance with two side compartments and a front panel (no text or symbols)| AD 6324 | |||||
| EN | User Manual | 3 | PL | Instrukcja obsługi | 120 |
| DE | Bedienungsanleitung | 10 | IT | Manuale d'uso | 128 |
| FR | Mode d'emploi | 17 | SV | Bruksanvisning | 136 |
| ES | Manual de usuario | 25 | BG | Ръководство за употреба | 143 |
| PT | Manual de Instruções | 32 | DA | Brugsanvisning | 150 |
| LT | Naudojimo instrukcija | 40 | SK | Používatel'ská príručka | 157 |
| LV | Lietošanas instrukcija | 47 | BS | Korisnički priručnik | 165 |
| ET | Kasutusjuhend | 54 | MK | Упатство за употреба | 172 |
| HU | Használati útmutató | 61 | HR | Korisnički priručnik | 179 |
| RO | Manual de utilizare | 68 | UK | Керівництво користувача | 186 |
| CS | Návod k použití | 76 | SR | Упутство за употребу | 194 |
| RU | Руководство пользователя | 83 | AR | دليل المستخدم | 201 |
| EL | Еүхειρίδιο хрήσης | 91 | AZ | İstifadəçi tõlimatı | 207 |
| NL | Gebruikershandleiding | 99 | SQ | Manuali i përdorimit | 215 |
| SL | Navodila za uporabo | 107 | KA | Общёمّزجنس | 222 |
| FI | Käyttöohje | 114 | |||
D
User Manual (EN)
GENERAL SAFETY CONDITIONS IMPORTANT SAFETY INSTRUCTIONS FOR USE READ CAREFULLY AND KEEP FOR FUTURE REFERENCE
- Before using the device, read the instruction manual and follow the instructions contained therein. The manufacturer is not responsible for damages caused by using the device contrary to its intended use or improper operation.
- The device is for domestic use only. Do not use for other purposes, incompatible with its purpose.
- Connect the device only to a grounded outlet 220-240V \~ 50-60Hz. In order to increase the safety of use, multiple electrical appliances should not be plugged into a single circuit at the same time.
- Be especially careful when using the device when children are around. Do not allow children to play with the appliance do not allow children or people who are not familiar with the appliance to use it.
- WARNING: This equipment may be used by children over 8 years of age and persons with limited physical, sensory or mental ability, or persons without experience or familiarity with the equipment, if it is done under the supervision of a person responsible for their safety or they have been given instructions on the safe use of the equipment and are aware of the dangers associated with its use. Children should not play with the equipment. Cleaning and maintenance of the equipment should not be carried out by children, unless
unless they are over 8 years of age and the activities are performed under supervision. - WARNING: do not leave the device plugged into an outlet unattended.
- WARNING: never carry the device when it is on or when it is hot.
- WARNING: the temperature of the accessible surfaces of the operating equipment may be high when the equipment is operating.
- WARNING: keep the equipment and its cord out of the reach of children
under 8 years of age.
-
WARNING: Always remove the plug from the power outlet after use by holding the outlet with your hand. DO NOT pull on the power cord.
-
WARNING: Do not use the device near flammable materials.
-
WARNING: Do not place cardboard products, paper, plastics and other flammable and fusible items inside the unit.
-
Do not immerse the cable, plug and the entire device in water or other liquid. Do not expose the device to weather conditions (rain, sun, etc.) or use in high humidity conditions (bathrooms, humid camping houses).
-
Periodically check the condition of the power cord. If the power cord is damaged, the equipment must not be used. A damaged cord should be replaced by a specialized repair facility to avoid danger.
-
Do not use the equipment with a damaged power cord or if it has been dropped or damaged in any other way or is not working properly. Do not repair the device yourself, as there is a risk of electrocution. Return a damaged device to a competent service center for inspection or repair. All repairs may be made only by authorized service centers. Improper repair may cause serious danger to the user.
-
Place the appliance on a cool stable, level surface, away from hot kitchen appliances such as electric stove, gas burner, etc..
-
The power cord must not hang over the edge of the table or touch hot surfaces.
-
To provide additional protection, it is advisable to install in the electrical circuit, a residual current device (RCD) with a rated residual current of not more than 30 mA. In this regard, consult a specialist electrician.
-
If it is necessary to use an extension cord, then use a model only with a grounding pin suitable for a current of at least 10 A. Extension cords that do not meet this requirement may overheat. Arrange the cable so as to avoid accidental pulls or tripping over it.
-
Do not allow the motor part of the device to get wet.
-
Place the device on a level, heat-resistant surface, away from flammable materials (curtains, drapes, wallpaper, etc.). To ensure proper air circulation, keep at least 10 cm of free space on each side of the device
and at least 30 cm above it. Do not cover the ventilation holes of the device, as this may cause overheating and damage to the product.
- Do not touch hot surfaces
of the appliance(door, top or bottom wall, and side walls). Use protective gloves to remove or touch any hot parts.
-
The power cord should not be laid over the appliance, and should not touch or lie near hot surfaces. Do not place the unit under an electrical outlet.
-
Do not put portions occupying the entire volume of the appliance, as this may cause fire and damage to the product. 25. After finishing baking or before cleaning the appliance, unplug the power cord from the outlet and leave it to cool down. Be sure to wait long enough, as a heated appliance cools down very slowly.
-
Clean the device after each use.
-
Do not use aggressive detergents in the form of emulsions, lotions, pastes, etc. to clean the housing, as they may, among other things, remove applied informative graphic symbols such as graduations, markings, warning signs, etc.
-
Do not use metal wire cutters for cleaning. Broken fragments of wire cutters, may come into contact with electrical parts, posing a risk of electrical shock.
-
The equipment is not designed to operate with external timers or a separate remote control system.
-
Due to the high temperature, special care should be taken when removing baked food, removing hot fat or other hot liquids.
-
Do not place the appliance under cabinets kitchen cabinets, due to rising heat and steam.
-
Do not wash metal parts in dishwashers, as the aggressive agents used in these devices cause the above-mentioned parts to darken. It is recommended to wash them by hand, using traditional dishwashing liquids.
-
To avoid overheating of the device, do not cover the device.
-
Do not store anything in the device except accessories belonging to it.
-
Do not use the device with the container not closed.
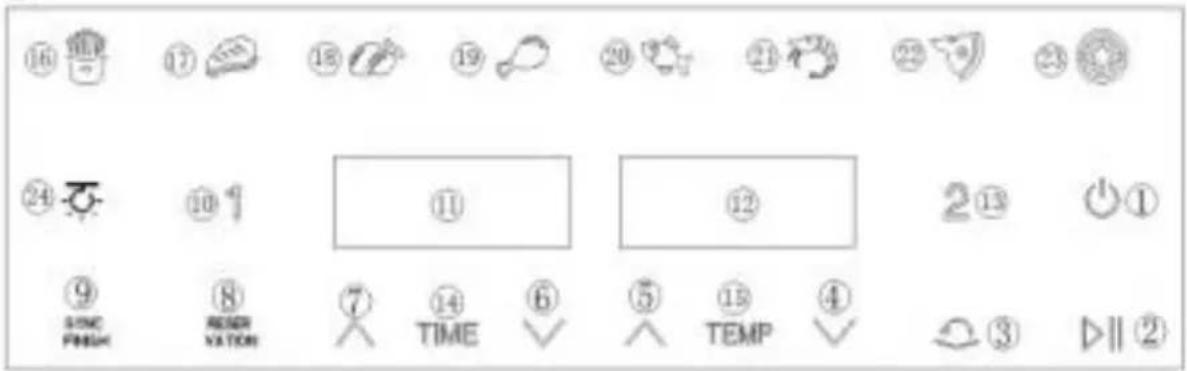
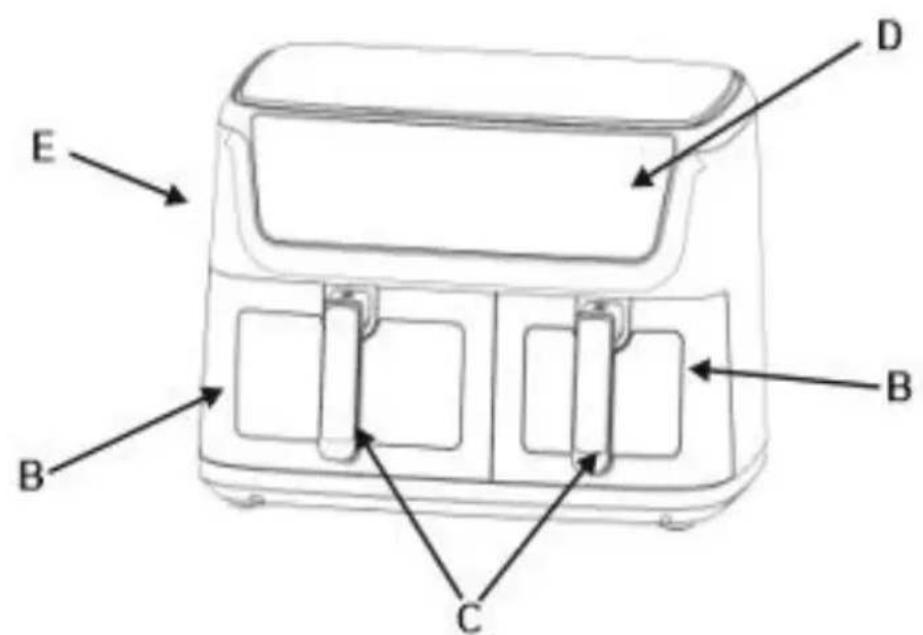
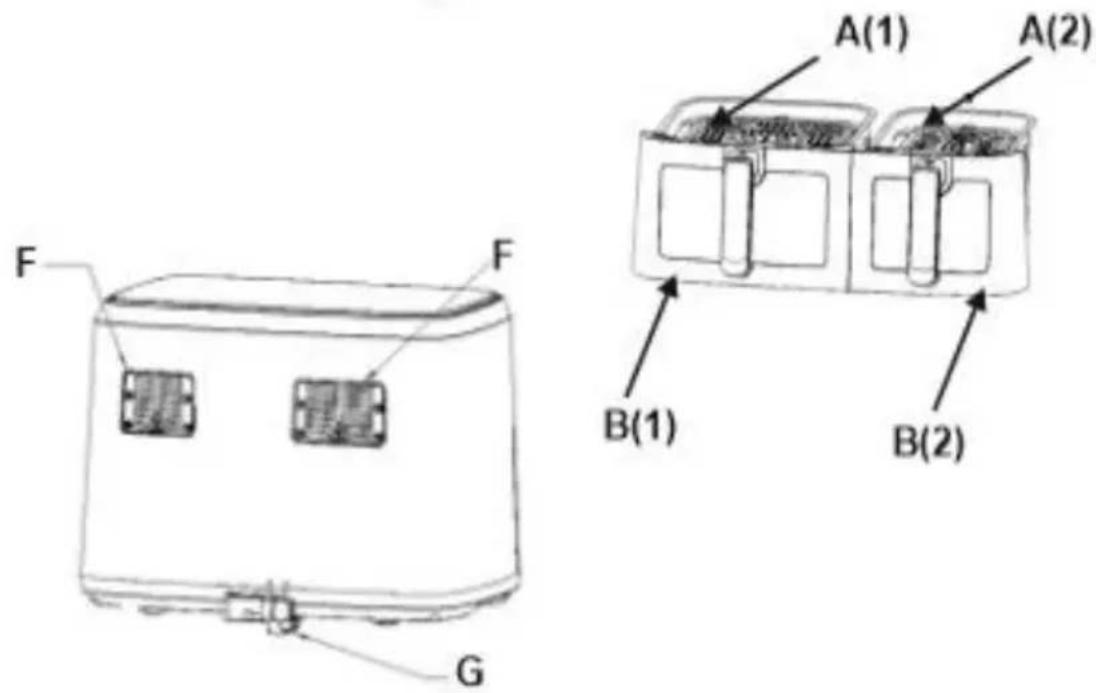
Device Description:
A(1)(2). Grate
B(1)(2). Drawer
C. Handle
D. Control panel
E. Body
F. Air outlet
G. Power cord
Control panel:
- On / Off power icon
- Start / Pause icon
- Flip reminder icon
4/5 Temperature adjustment icon (15)
6/7. Time adjustment icon (14)
-
Delayed start icon
-
Time synchronization icon of both chambers
-
Chamber number 1 selection icon
-
Time/temperature display of chamber number 1
-
Time/temperature display of chamber number 2
-
Chamber number 2 selection icon
Programs:
-
French fries 17. steak 18. chicken 19. chicken legs 20. fish 21. shrimp 22. pizza 23. dried fruit
-
Icon of switching on the lighting of both chambers
Before first use:
- Remove the packaging, all stickers and accessories on the outside and inside of the device.
- Thoroughly wash grates A(1), A(2) and drawers B(1), B(2) with hot water and a small amount of dishwashing liquid, using a soft sponge. Then dry them with a clean, soft cloth.
Do not use rough sponges or abrasives (such as scouring powders), as they may damage the smooth, non-stick surface of the grates and drawers.
- Place the appliance on a stable, level surface. Plug in the power cord and select any program for both drawers (see "Using the appliance" for details) to remove factory odors.
- When the program is complete, unplug the unit from the power supply. When it has cooled completely, repeat step 2 and clean it again.
Do not wash grates A(1), A(2) and drawers B(1), B(2) in the dishwasher.
Using the appliance
The device has two independent drawers. It can work with one or both at the same time.
Preparation of the device:
-
Holding the handle (C), slide the drawer (B) with the grate (A) out of the housing and place it on a stable surface.
-
The grate (A) can be removed from the drawer (B).
-
Place the previously prepared products on the grate (A) located in the drawer (B).
-
Put the drawer back into the housing. Plug the unit into a grounded outlet - the power icon (1) will light up.
Start the device single-drawer operation mode:
- Press the power icon (1) to activate standby mode.
- The chamber (B1) (10) and chamber (B2) (13) icons will light up.
- Select a chamber by pressing the corresponding icon (10 or 13), the function and menu lights will activate.
- By default, the Fries program icon (16) flashes, the other icons light up continuously.
- The temperature / time icons (11) or (12) will also flash showing alternating temperature and time.
- Touch one of the menu icons (16 to 23) to select a program. Once selected, you can adjust the temperature and time using the adjustment icons: Temperature (5/4) and Time (7/6).
For a cold unit, it is recommended to add 3 minutes to the recommended preparation time.
Getting Started:
- After setting the program, temperature and time - press the start/pause icon (2).
- The selected chamber will begin operation.
- A countdown will begin.
- The icon of the selected program will light up, the others will go out.
Change the temperature or time during operation:
Press the temperature (5/4) or time (7/6) adjustment icon to adjust the time or temperature
to your taste preferences. The change does not interrupt the operation of the machine.
Removing the drawer during operation:
When the drawer is ejected, the display will show "OPEN".
The operation of the machine will be stopped.
When the drawer is reinserted, the unit will automatically resume operation.
Turning off the device during operation:
Hold down the power icon (1) for 2 seconds.
The display will show "OFF" and the unit will beep.
Heating is stopped. The fan will still run for 20 seconds.
Program termination:
When the previously selected program ends, the display will show "OFF". 5 beeps will sound. The unit will go into standby mode.
The fan will still run for 20 seconds.
Two-chamber operation mode:
- Press the power icon (1) to activate the standby mode.
- The icons for chamber (B1) (10) and chamber (B2) (13) will light up.
- First select chamber (B1) by pressing the icon (10), set the program, temperature and time, analogous to single chamber operation.
- Then select chamber (B2) by pressing the icon (13), set the program, temperature and time, analogous to single chamber operation.
- Press the start/pause icon (2) to run both chambers simultaneously. You can also start one chamber and the other later.
Change the time/temperature while running two chambers:
-
Press the icon to select the corresponding chamber B1(10) or B2(13)
-
Press the temperature (5/4) or time (7/6) adjustment icon to subsidize the time or temperature
to your taste preference. The change does not interrupt the operation of the machine.
Change the program while two chambers are running:
Press the B1 (10) or B2 (13) chamber selection button
Press start/pause icon (2), make program change
Press the start/pause icon (2) to resume operation of the device.
Turn off one chamber:
Press the chamber selection button B1 (10) or B2 (13)
Hold down the power icon (1) for 2 seconds the display will show "OFF" the selected chamber will stop working.
Pulling out the basket:
If one drawer is removed during operation, "OPEN" will appear on the screen,
The operation of this compartment is stopped. After reinsertion - operation resumes.
The other compartment operates independently.
Pauses operation for two chambers
Press the start/pause icon (2), both chambers will pause operation.
Press the start/pause icon (2) again to resume operation.
Stopping the operation of both chambers:
Hold down the power icon (1) for 2 seconds.
Both chambers will turn off, the screens will show "OFF".
After 5 beeps, the screen will turn off.
Additional functions
Synchronized termination (simultaneous termination function):
- After setting different cooking times (programs), press the synchronization icon (9), the icon (9) will flash.
- The chamber with the longer time will start first.
- The second chamber will display "HOLD" until it starts its cycle.
- Changing the "HOLD" time to a longer time than that of the first chamber will cancel synchronization.
Reminder to turn the dish:
After selecting the desired program, press the icon (3) - the icon will start flashing.
Halfway through the set time, a reminder will sound, a beep.
If you do not remove the drawer - the device will emit a signal for 2 minutes, then automatically turn it off.
Backlight function:
When you start the device, the light turns on automatically and goes out after 1 minute.
Press the lamp icon (24) to turn on the light in both compartments.
Press again to turn them off.
Delayed start function:
After selecting the desired chamber and program, press the icon (8)
A timer will appear on the display. Use the 7 "+" and 6 "-" icons to set the desired delay time from 30 minutes to 12 hours.
After setting the time, press the start/pause icon (2), the clock on the display will start counting down the time until the appliance starts.
To stop the countdown, hold down the "start / cancel" icon (1) for 3 seconds.
CLEANING THE DEVICE
- Before cleaning the device, unplug it from the power outlet and wait for the device to cool down.
- Clean using a damp, then dry cloth (or a paper towel).
- Lubricate more difficult to remove residues with a small amount of edible oil and after a few minutes gently remove them with a wooden spatula.
- Do not clean with sharp, abrasive rags or sponges, or use scouring powders, as they can damage the smooth, non-stick coating of the basket and container.
- Do not immerse the unit in water.
Do not wash grates A(1), A(2) and drawers B(1), B(2) in the dishwasher
French fries (1): program used mainly for frozen French fries.
The unit will automatically heat at 200^ C and for 25 minutes
If the time or temperature is not enough, you can always change the time or temperature by pressing the time (14) / temperature (15) adjustment icon.
Steak (2): a program mainly used for thicker cuts of white or red meat.
The appliance will automatically heat at 180^ C and for 16 minutes
If the time or temperature is not enough, you can always change the time or temperature by pressing the time (14) / temperature (15) adjustment icon.
Chicken (3): program used to prepare raw chicken meat.
The appliance will automatically heat at 200°C and for 45 minutes
If the time or temperature is not enough, you can always change the time or temperature by pressing the time (14) / temperature (15) adjustment icon.
Chicken thighs (4): program used to prepare raw chicken meat.
The appliance will automatically heat at 200°C and for 25 minutes
If the time or temperature is not enough, you can always change the time or temperature by pressing the time (14) / temperature (15) adjustment icon.
Fish (5): the program most often used for frozen processed fish or fresh fish. The appliance will automatically heat at 180^ C and for 18 minutes
If the time or temperature is not enough, you can always change the time or temperature by pressing the time (14) / temperature (15) adjustment icon.
Shrimp (6): best for small seafood such as shrimp.
The unit will automatically heat at 180^ C and for 12 minutes
If the time or temperature is not enough, you can always change the time or temperature by pressing the time (14) / temperature (15) adjustment icon.
Pizza (7): The program most commonly used to heat frozen homemade pizza.
The appliance will automatically heat at 180^ C and for 15 minutes
If the time or temperature is not enough, you can always change the time or temperature by pressing the time (14) / temperature (15) adjustment icon.
Dried fruit (8): Program for drying fruits, vegetables, mushrooms.
The appliance will automatically heat at 40^ C and for 6 hours
If the time or temperature is not enough, you can always change the time or temperature by pressing the time (14) / temperature (15) adjustment icon.
Technical data:
Capacity: 11L (6.5L+4.5L)
Voltage: 220-240V \~50-60Hz
Power: 2700W
Standby power consumption: 0.27W
Note hot surface:
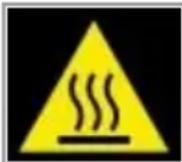
The temperature of the accessible surfaces of the operating device may be high. Do not touch the hot surfaces of the unit

For the sake of the environment. Information about waste electrical and electronic equipment In accordance with Article 13(1) and (2) of the Law of September 11, 2015 on waste electrical and electronic equipment, we inform you about the proper handling of waste electrical and electronic equipment:
-
It is forbidden to place waste electrical and electronic equipment together with other waste - this is confirmed by marking in the form of a "crossed out basket", ordering selective collection of this type of waste.
-
Electrical and electronic equipment may contain hazardous substances, mixtures and components that, when released into the environment, can cause serious danger to the health and life of humans and living organisms. They can lead to numerous health ailments, such as vision, hearing and speech disorders, and can also damage the kidneys, liver and heart, and cause skin diseases. Harmful substances, can also have adverse effects on the respiratory and reproductive systems and lead to cancerous changes. Consumption of plants growing on contaminated soils, and products made from them, can risk the aforementioned health effects.
-
Waste electrical and electronic equipment should be handed over only to authorized collection points, a list of which should be included on each Municipality's website.
-
The household plays an important role, in contributing to the reuse and recovery, including recycling, of waste equipment. It also plays a key role in the waste electrical and electronic equipment management system due to the possibility of direct delivery to authorized collection points and the elimination of undesirable social habits resulting in leaving waste equipment in places not intended for it.
In addition, Donate waste electrical and electronic equipment at the point of delivery. A distributor, when supplying equipment intended for households to a purchaser, is obliged to take back used household equipment free of charge at the place of delivery of such equipment, provided the used equipment is of the same type and performed the same functions as the supplied equipment.
Cardboard packaging and polyethylene (PE) bags should be placed in the appropriate containers for separate collection of municipal waste according to their description. If there are batteries in the equipment, remove them and separately dispose of them at a collection and storage facility.
Do not dispose of the device in the municipal waste container!!!
Service If you wish to purchase spare parts or report any complaints, please contact directly with the seller who issued the receipt.
Stop af drift for to kamre
RENG∅RING AF APPARATET
qssfomgom qoshygdol/3sugbol bsugmsu (2), m6039 3sdgm s dghmogds.
351586790200000000000000000000000000000000000000000000000000000000