AD 6318 - Deep fryer ADLER - Free user manual and instructions
Find the device manual for free AD 6318 ADLER in PDF.

| Brand | Adler |
| Model | AD 6318 |
| Product Type | Air Fryer |
| Capacity | 8 liters |
| Rated Power | 1800 W |
| Maximum Power | 2500 W |
| Supply Voltage | 220-240 V ~ 50/60 Hz |
| Standby Consumption | 0.29 W |
| Display | Digital (temperature and time) |
| Control Panel | Touch with on/off buttons, program selection, temperature/time setting, light, start/pause |
| Preset Programs | Chicken wings, steak, fish, shrimp, fries, muffins, pie, bacon + default program |
| Shake Function | Reminder to stir food halfway through cooking (depending on program) |
| Interior Light | Yes, can be activated by button (turns off after 30 s) |
| Adjustable Temperature Range | Not explicitly specified, but programs between 160°C and 200°C |
| Timer | Yes, adjustable via + and - buttons |
| Container Material | Steel with non-stick coating |
| Removable Grid | Yes |
| Cleaning of container and grid | Hand wash, not dishwasher safe |
| Exterior Cleaning | Damp cloth then dry |
| Safety | Automatic shut-off at end of program, cooling of radiator (20 s), program memory if container is removed |
| Color | Not specified (usually black or silver) |
| Weight | Not specified (estimated ~5-7 kg) |
| Included Accessories | Grid, container |
| Environmental Instructions | Do not dispose of with household waste, selective collection WEEE |
Frequently Asked Questions - AD 6318 ADLER
User questions about AD 6318 ADLER
0 question about this device. Answer the ones you know or ask your own.
Ask a new question about this device
Download the instructions for your Deep fryer in PDF format for free! Find your manual AD 6318 - ADLER and take your electronic device back in hand. On this page are published all the documents necessary for the use of your device. AD 6318 by ADLER.
USER MANUAL AD 6318 ADLER
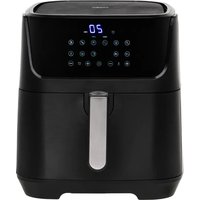
natural_image
Black square air fryer with control panel and digital display (no visible text or symbols)| AD 6318 | |||||
| EN | User Manual | 3 | PL | Instrukcja obsługi | 117 |
| DE | Bedienungsanleitung | 10 | IT | Manuale d'uso | 125 |
| FR | Mode d'emploi | 17 | SV | Bruksanvisning | 132 |
| ES | Manual de usuario | 25 | BG | Ръководство за употреба | 139 |
| PT | Manual de Instruções | 32 | DA | Brugsanvisning | 147 |
| LT | Naudojimo instrukcija | 40 | SK | Používatel'ská príručka | 154 |
| LV | Lietošanas instrukcija | 46 | BS | Korisnički priručnik | 160 |
| ET | Kasutusjuhend | 53 | MK | Упатство за употреба | 167 |
| HU | Használati útmutató | 60 | HR | Korisnički priručnik | 175 |
| RO | Manual de utilizare | 67 | UK | Керівництво користувача | 181 |
| CS | Návod k použití | 74 | SR | Упутство за употребу | 189 |
| RU | Руководство пользователя | 80 | AR | دليل المستخدم | 196 |
| EL | Еүхειρίδιο хрήσης | 89 | AZ | İstifadəçi təlimatı | 202 |
| NL | Gebruikershandleiding | 96 | SQ | Manuali i përdorimit | 209 |
| SL | Navodila za uporabo | 104 | KA | Общёمّزجنس | 216 |
| FI | Käyttöohje | 111 | |||
User Manual (EN)
GENERAL SAFETY CONDITIONS IMPORTANT SAFETY INSTRUCTIONS FOR USE READ CAREFULLY AND KEEP FOR FUTURE REFERENCE
- Before using the device, read the user manual and follow the instructions contained therein. The manufacturer is not responsible for damage caused by using the device contrary to its intended use or improper operation.
- The device is for home use only. Do not use for other purposes than its intended use.
- The device must only be connected to a grounded socket 220-240V \~ 50/60 Hz.
In order to increase operational safety, do not connect multiple electrical devices to one circuit at the same time.
-
Be especially careful when using the device when children are nearby. Do not allow children to play with the device. Do not allow children or people who are not familiar with the device to use it.
-
WARNING: This equipment may be used by children over 8 years of age and by persons with limited physical, sensory or mental capabilities, or persons who have no experience or knowledge of the equipment, if this is done under the supervision of a person responsible for their safety or if they have been given instructions on how to use the device safely and are aware of the dangers associated with its use.
Children should not play with the equipment. Cleaning and maintenance of the device should not be performed by children, unless they are over 8 years of age and these activities are performed under supervision.
- WARNING: Do not leave the appliance plugged in
unattended.
-
WARNING: Never move the appliance while it is switched on or when it is hot.
-
WARNING: The temperature of accessible surfaces of the operating device may be high when the equipment is operating.
-
WARNING: Keep the device and its cable out of the reach of children under 8 years of age.
-
WARNING: Always remove the plug from the power socket after use by holding the socket with your hand. DO NOT pull on the power cord.
-
WARNING: Do not use the device near flammable materials.
-
WARNING: Do not place cardboard, paper, plastic or other flammable or fusible items in the appliance.
-
Do not immerse the cable, plug or the entire device in water or any other liquid. Do not expose the device to weather conditions (rain, sun, etc.) or use in conditions of increased humidity (bathrooms, damp camping houses).
-
Periodically check the condition of the power cord. If the power cord is damaged, the equipment must not be used. A damaged cord should be replaced by a specialist repair shop in order to avoid a hazard.
-
Do not use the device with a damaged power cord or if it has been dropped or damaged in any other way or does not work properly. Do not repair the device yourself, as this may cause electric shock. Return the damaged device to an appropriate service center for examination or repair. All repairs may be performed only by authorized service centers. Improperly performed repairs may cause serious danger to the user.
-
Place the device on a cool, stable, even surface, away from hot kitchen appliances such as: electric stove, gas
burner, etc.
-
The power cord must not hang over the edge of a table or touch hot surfaces.
-
To provide additional protection, it is advisable to install a residual current device (RCD) in the electrical circuit with a rated residual current not exceeding 30 mA. In this regard, contact a specialist electrician.
-
If it is necessary to use an extension cord, use only a model with a grounding pin that is rated for at least 10 A. Extension cords that do not meet this requirement may overheat. The cord should be arranged so as to avoid accidental pulling or tripping over it.
-
Do not allow the motor part of the device to get wet.
-
The device should be placed on a flat, heat-resistant surface, away from flammable materials (curtains, drapes, wallpaper, etc.). To ensure proper air circulation, leave at least 10 cm of free space on all sides of the device and at least 30 cm above it. Do not cover the device's ventilation holes, as this may cause overheating and damage to the product.
-
Do not touch the hot surfaces of the appliance (door, top or bottom wall, and side walls). Use protective gloves when removing or touching any hot elements.
-
The power cord must not be placed above the device and must not touch or lie near hot surfaces. Do not place the device under an electrical socket.
-
Do not insert portions into the appliance that take up its entire volume, as this may cause fire and destruction of the product.
-
After baking or before cleaning the appliance, unplug the power cord from the socket and leave it to cool down. Wait a sufficient period of time, as the heated appliance cools down very slowly.
-
The device should be cleaned after each use.
- Do not use aggressive detergents in the form of emulsions, milks, pastes, etc. to clean the housing, because they may, among other things, remove any graphic information symbols such as scales, markings, warning signs, etc.
- Do not use metal scourers for cleaning. Broken pieces of scourers may come into contact with electrical parts, creating a risk of electric shock.
- The equipment is not intended to be operated using external time switches or a separate remote control system.
- Due to the high temperature, special care should be taken when removing baked foods, removing hot fat or other hot liquids.
- The appliance should not be placed under kitchen cabinets due to the rising heat and steam.
- Metal parts should not be washed in dishwashers, because the aggressive agents used in these devices cause the aforementioned parts to darken. It is recommended to wash them by hand, using traditional dishwashing liquids.
- To avoid overheating of the device, do not cover the device.
- Do not store anything in the device other than its accessories.
- Do not use the device with an open container.
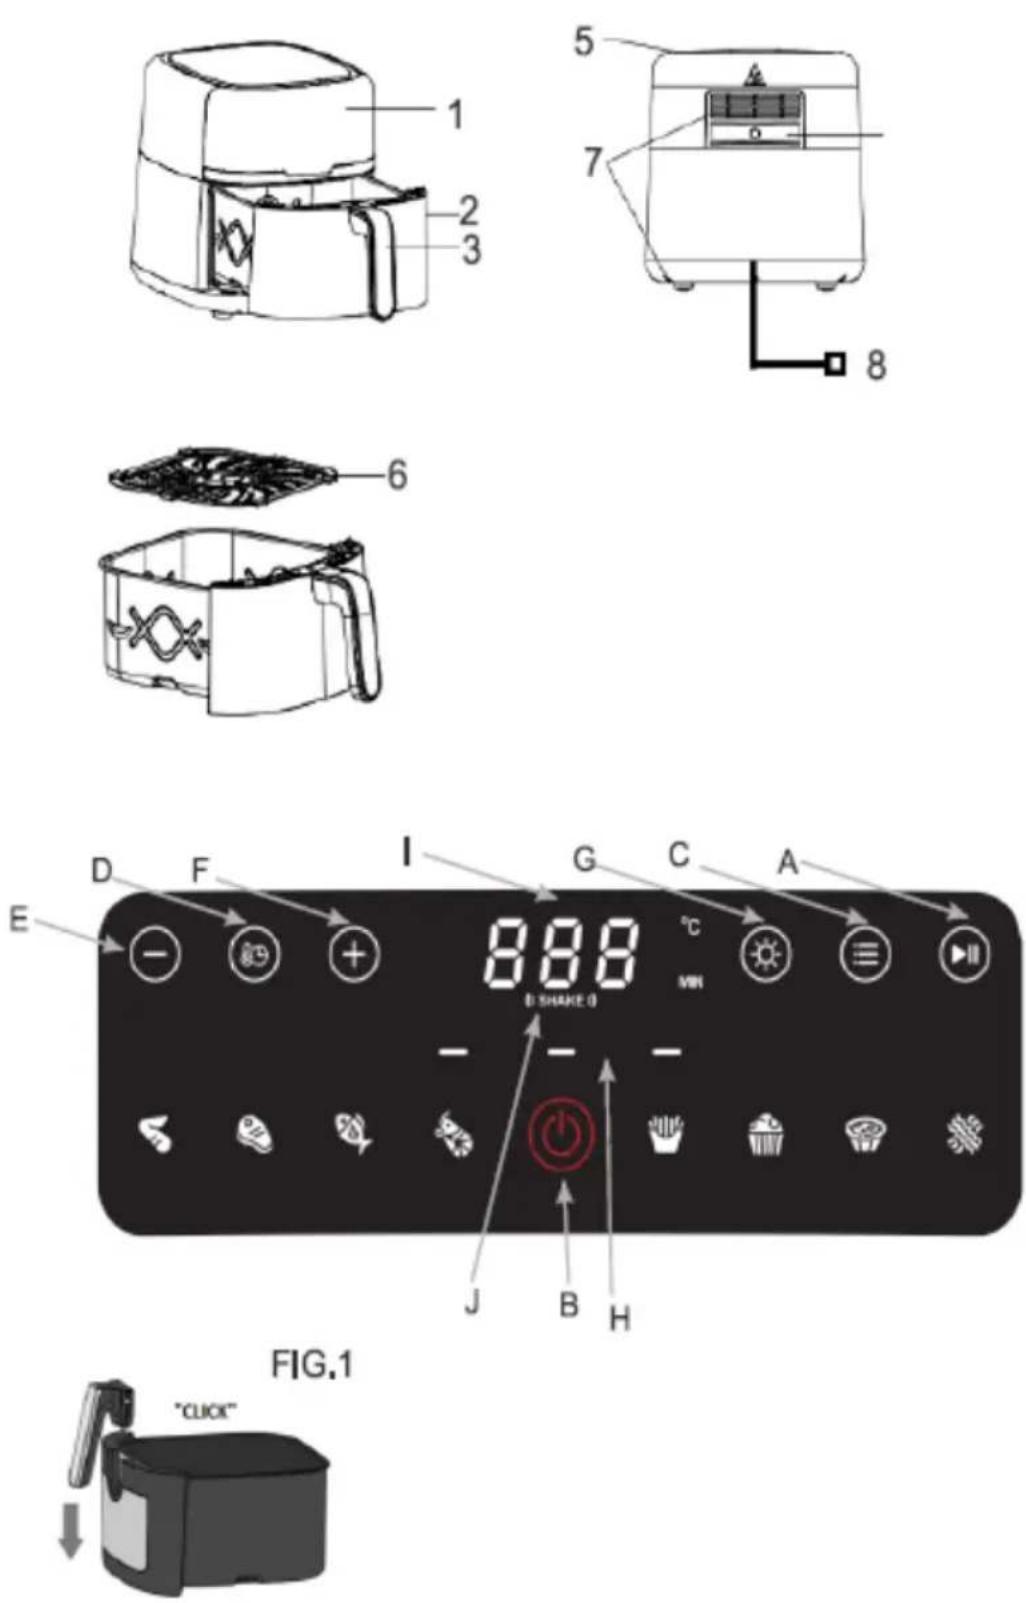
Device description:
- Control panel / display
- Container
- Handle
- Housing
- Grate
- Air outlet
- Power cord
- Window
Control panel:
A: Start/Pause button
B: On/Off button
C: Program selection button
D: Temperature/Time Adjustment Button
E: Temperature/time decrease button "-"
F: Temperature/Time Increase Button "+"
G: Button to turn on the light
H. Device operation indicator light
I. Temperature/Time Display
J. Control – (Shake)
Programs:
-
Default setting
-
Chicken wings
-
Steak
-
Fish
-
Shrimps
-
French fries
-
Muffins
-
tart
-
Bacon
Before first use.
-
Remove the packaging and any stickers and accessories from the outside and inside of the device.
-
The container holder can be dismantled, to mount it follow the instructions in Fig. 1
-
Clean the container (2) and the grate (6) thoroughly with hot water, a small amount of washing-up liquid and a sponge, then wipe them with a clean, soft cloth.
Do not clean the appliance with abrasive cloths or sponges or use cleaning powders as they may damage the smooth, non-stick surface of the container (2) and the grid (6).
-
Place the device on a stable, horizontal, temperature-resistant surface and connect the power cord (8).
-
To remove factory odors from the device, turn on the device by pressing the (B) button on the additional panel, then press the (A) button and the device will turn on the default program.
-
Once the program is complete, unplug the power cord and repeat step 2 to clean it again after it has cooled down completely.
Do not wash the container (2) and the grate (6) in a dishwasher.
Use of the device:
-
Hold the handle (3) and pull the container (2) together with the grate (6) out of the housing (5) and place it on a stable surface.
-
The grate (6) can be removed from the container (2)
-
Place the previously prepared products on the grid (6) located at the bottom of the container (2). Then insert the container (2) into the housing (5). When filling the container, do not exceed the MAX level located inside it.
-
Connect the closed device to a grounded mains socket.
-
The device will turn on and emit a sound signal and go into standby mode. To turn on the device, press the ON / OFF button (B).
-
Using the function selection button (C) "Function", select the desired program (see program description). After selecting the program, you can change the temperature and time by pressing the temperature/time control selection button (D) and then the F "+", E "-" buttons. It is recommended to add 3 minutes to the cooking time, in relation to the programmed menu, if the appliance is cold.
-
After selecting the appropriate program, press the (A) "start / pause" button. The (E) indicator light will flash and the display will alternately show the time and temperature.
-
The device is equipped with an internal light, which can be turned on by pressing the button (G), the light will turn off after 30 seconds.
-
The device has a function informing about the recommendation to stir the prepared food. In selected programs (see program description), after half of the programmed time has elapsed, a sound signal will sound and the display will show the information (SHAKE), then holding the handle (3), slide the container (2) together with the grate (6) out of the housing (5) and stir the food. Then insert the container back into
the device.
- After finishing work, the device will cool the heater for 20 seconds, after which it will beep 5 times.
- To end the operation of the device early, press the (B) "ON / OFF" button.
It is possible to turn on the device without selecting a program, to do this after turning on the device and pressing the (B) button on the additional panel, press the (A) button, the device will turn on with the default time and temperature parameters set.
Tips:
Arrange the food pieces so that hot air can flow freely between them.
The device has a program memory, after removing the container (6) during the program the device will stop, after replacing the container (6) it will continue working.
If the time or temperature is not sufficient, you can always adjust the time or temperature by pressing the time/temperature adjustment button (D) and then the F "+", E "-" button to finish cooking the food.
It is recommended to turn or stir the products at least once during the selected program.
!!WARNING!! The inside of the device is very hot
Description of programs:
Default program (1): The device will automatically heat at 180^ C for 15 minutes - (SHAKE) function
If the time or temperature is not sufficient, you can always change the time or temperature by pressing the time/temperature adjustment button (D) and then the F "+", E "-" button
Chicken Wings (2): Program used to prepare raw chicken wings.
The device will automatically heat at 180°C and for 19 minutes - (SHAKE) function
If the time or temperature is not sufficient, you can always change the time or temperature by pressing the time/temperature adjustment button (D) and then the F "+", E "-" button
Steak (3): This program is mainly used for thicker cuts of white or red meat.
The device will automatically heat at 200°C for 12 minutes - (SHAKE) function
If the time or temperature is not sufficient, you can always change the time or temperature by pressing the time/temperature adjustment button (D) and then the F "+" E "-" button
Fish (4): Program most often used for frozen processed fish or fresh fish.
The device will automatically heat at 195^ C for 10 minutes
If the time or temperature is not sufficient, you can always change the time or temperature by pressing the time/temperature adjustment button (D) and then the F "+", E "-" button
Shrimp (5): Best for small seafood like shrimp.
The device will automatically heat at 160°C and for 16 minutes - (SHAKE) function
If the time or temperature is not sufficient, you can always change the time or temperature by pressing the time/temperature adjustment button (D) and then the F "+" E "-" button
French Fries (6): Program used mainly for frozen French fries.
The device will automatically heat at 200°C and for 23 minutes - (SHAKE) function
If the time or temperature is not sufficient, you can always change the time or temperature by pressing the time/temperature adjustment button (D) and then the F "+", E "-" button
Muffins (7): Program used mainly for baking cakes and muffins
The device will automatically heat at 160^ C for 30 minutes
If the time or temperature is not sufficient, you can always change the time or temperature by pressing the time/temperature adjustment button (D) and then the F "+", E "-" button
Tart (8): A program mainly used for making mini tarts.
The device will automatically heat at 180^ C for 11 minutes - (SHAKE) function
If the time or temperature is not sufficient, you can always change the time or temperature by pressing the time/temperature adjustment button (D) and then the F "+", E "-" button
Bacon (9): Program mainly used for thin pieces of bacon.
The device will automatically heat at 180°C for 12 minutes - (SHAKE) function
If the time or temperature is not sufficient, you can always change the time or temperature by pressing the time/temperature adjustment button (D) and then the F "+", E "-" button
CLEANING THE DEVICE
- Before cleaning the appliance, unplug it from the wall outlet and wait until it cools down.
- Clean with a damp cloth and then a dry one (or paper towel).
- Apply a small amount of cooking oil to the more difficult residues and after a few minutes, gently remove them with a wooden spatula.
- Do not clean with harsh, abrasive cloths or sponges or use scouring powders as they can damage the smooth, non-stick coating of the basket and container.
- Do not immerse the device in water.
Technical data:
Capacity 8.0 L
Voltage: 220-240V \~50/60Hz
Nominal power: 1800W
Maximum power: 2500W
Power consumption in off state: 0.29W
Caution hot surface:
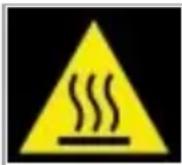
The temperature of accessible surfaces of the device may be high when it is in operation. Do not touch hot surfaces of the device.

In the interest of the environment. Information on used electrical and electronic equipment In accordance with art. 13 sec. 1 and sec. 2 of the Act of 11 September 2015 on used electrical and electronic equipment, we inform you about the correct handling of waste electrical and electronic equipment:
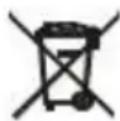
- It is prohibited to place used electrical and electronic equipment together with other waste – this is confirmed by the marking in the form of a "crossed-out bin", which requires selective collection of this type of waste.
- Electrical and electronic devices may contain hazardous substances, mixtures and components which, when released into the environment, may pose a serious threat to the health and life of humans and living organisms. They may lead to numerous health ailments, such as: vision, hearing and speech disorders, and may also damage the kidneys, liver and heart, and cause skin diseases. Harmful substances may also have an adverse effect on the respiratory and reproductive systems and lead to cancerous changes. Consumption of plants growing in contaminated soils, and products made from them, may pose a risk of the above health effects.
- Used electrical and electronic equipment should only be delivered to authorised collection points, a list of which should be available on the website of each Municipal Office.
- The household plays an important role in contributing to the reuse and recovery, including recycling, of used equipment. It also plays a key role in the waste management system for used electrical and electronic equipment due to the possibility of direct transfer to authorized collection points and the elimination of undesirable social habits resulting in leaving waste equipment in places not intended for this purpose.
In addition, Return used electrical and electronic equipment to the place of delivery. The distributor, when delivering equipment intended for households to the purchaser, is obliged to collect used equipment from households free of charge at the place of delivery of such equipment, provided that the used equipment is of the same type and performed the same functions as the equipment delivered.
Cardboard packaging and polyethylene (PE) bags should be disposed of in appropriate containers for selective collection of municipal waste according to their description. If there are batteries in the device, they should be removed and taken to a separate collection and storage point.
Do not throw the device into municipal waste!!
Service If you wish to purchase spare parts or make any complaints, please contact the seller who issued the receipt directly.
Ürtartalom 8,0 liter
J. Control – (Shake)
Programy:
J. Control – (Shake)
Programi:
- Zadana postavka
- Pileća krilca
- Odrezak
- Riba
- Škampi
- Pomfrit
- Muffini
- torta
- Slanina
Prije prve upotrebe.
- Uklonite ambalažu i sve naljepnice i pribor s vanjske i unutarnje strane uređaja.
- Držač posude se može rastaviti, za montažu slijedite upute na slici 1
- Temeljito očistite spremnik (2) i rešetku (6) vrućom vodom, malom količinom tekućine za pranje posuđa i spužvom, a zatim ih obrišite čistom, mekom krpom.
Ne čistite uređaj abrazivnim krpama ili spužvama niti koristite praškove za čišćenje jer mogu oštetiti glatku, neprianjajuću površinu posude (2) i rešetke (6). - Uređaj postavite na stabilnu, vodoravnu, temperaturno otpornu površinu i spojite kabel za napajanje (8).
- Za uklanjanje tvorničkih mirisa iz uređaja, uključite uređaj pritiskom na tipku (B) na dodatnoj ploči, zatim pritisnite tipku (A) i uređaj će se uključiti na zadani program.
- Nakon što je program završen, isključite kabel za napajanje i ponovite korak 2 da biste ga ponovno očistili nakon što se potpuno ohladio.
Ne perite posudu (2) i rešetku (6) u perilici posuđa.
Upotreba uređaja:
A: ωψήγγδού/3σηβού χομος30
B: hs603s/gsdm603ou 200530
C: 36mgfsdol agmbg30u moos30
D: Assamamam/qamamamamamamamamamamamamamamamamamamamamamamamamamamamamamamamamamamamamamamamamamamamamamamamamamamamamamamamamamamamamamamamamamamamamamamamamamamamamamamamamamum
E: ὅgādʒɡnsʒŋʃnʊl/ɕφόμοι მjādʒɒŋʃdɔː ləʊqnsʒo "-"
F: Assamamamamamamamamamamamamamamamamamamamamamamamamamamamamamamamamamamamamamamamamamamamamamamamamamamamamamamamamamamamamamamamamamamamamamamamamamamamamamamamamamamamamamamamumomomomomomomomomomomomomomomomomomomomomomomomomomomomomomomomomomomomomomomomomomomomomomomomomomomomomomomomomomomomomomomomomomomomomomomomomomomomomomomomomomomomomomomomomomomomomomomomomomomomomumonononononononononononononononononononononononononononononononononononononononononononononononononononononononononononononononononononononononononononononononononononononononononononononononononononon on on on on on on on on on on on on on on on on on on on on on on on on on on on on on on on on on on on on on on on on on on on on on on on on on on on on on on on on on on on on on on on on on on on on on on on on on on on on on on on on on on on on on on on on on on on on on on on on on on
G: ρομοςο σχρόνος χαλυσικού
H. მოწყობილობის მუშაობის ინდიკატორის მუქი
ως. ήρδηξησθησού/φόμού βεβδας
J. 3m606m200 - (∂g6x263s)
36m86s4g80:
- ʃənðəʊ ʒhɒŋðo
- სეეიკი
- 09360
- 360308080
- 35602000 860
- ∂σεοβδο
- 05600
-
δg3m60
-
658790064930 356549860
Зоюзголо аздмубудол боб.
JSODOL GMOGDO (2): 36MGHSDS, 6MDGMOG GSDMOGBGDS YDO JSODOL GMOGDOU DMUSDBSQPGDGMSQ.
∂mθμδοσμδs σzθmδsθμφσρ θσβθμφγδs 180°C-6g ωs 19 θγωσις θσβδσεμπδσο - (∂θχφμζος) θγβδσος