PLO-1350 - Cutting plotter MSW - Free user manual and instructions
Find the device manual for free PLO-1350 MSW in PDF.

| Product type | Cutting plotter |
| Brand | MSW |
| Model | PLO-1350 |
| Rated voltage | 230 V~ / 50 Hz |
| Rated power | 95 W |
| Current | 2 A |
| Protection class | I |
| Dimensions (L x W x H) | 1510 x 455 x 1000 mm |
| Weight | ~19 kg |
| Cutting speed | 0.8 m/s |
| Maximum cutting width | 1260 mm |
| Feeder width | 1350 mm |
| Adjustable cutting pressure | 20 to 500 g |
| Maximum cutting thickness | ≤ 1 mm |
| Repeatability | 0.1 mm |
| Connection interface | USB, COM |
| Display and control | LCD screen with control panel |
| Noise level | Not specified (professional use) |
| Included accessories | Stand, blades, USB cable, SignMaster software |
| Assembly required | Yes (stand and blade holder) |
| Blade replacement | Every 6 months or depending on wear |
| Safety instructions | Unplug before maintenance, do not touch the blade, wait 5 seconds before restarting |
| Disposal | Do not dispose of with household waste, WEEE recycling |
Frequently Asked Questions - PLO-1350 MSW
User questions about PLO-1350 MSW
0 question about this device. Answer the ones you know or ask your own.
Ask a new question about this device
Download the instructions for your Cutting plotter in PDF format for free! Find your manual PLO-1350 - MSW and take your electronic device back in hand. On this page are published all the documents necessary for the use of your device. PLO-1350 by MSW.
USER MANUAL PLO-1350 MSW
This User Manual has been translated for your convenience using machine translation. Reasonable efforts have been made to provide an accurate translation; however, no automated translation is perfect nor is it intended to replace human translators. The official User Manual is the English version. Any discrepancies or differences created in the translation are not binding and have no legal effect for compliance or enforcement purposes. If any questions arise related to the accuracy of the information contained in the User Manual, please refer to the English version of those contents which is the official version.
TECHNICAL DATA
| Parameter description Parameter value | |||
| Product name | Cutting plotter | ||
| Model | MSW-PLO-375 | MSW-PLO-1350 | MSW-PLO-720 |
| Rated voltage [V~] / frequency [Hz] | 230 / 50 | ||
| Rated power [W] | 90 | 95 | 95 |
| Current [A] | 2 | ||
| Protection class | I | ||
| Dimensions [width x depth x height; mm] | 530 x 235 x 210 | 1510 x 455 x 1000 | 880 x 450 x 1000 |
| Weight [kg] | ~6.45 | ~19 | ~15.4 |
| Cutting speed [m/s] | 0.8 | ||
| Cutting width [mm] | 285 | 1260 | 630 |
| Feeder width [mm] | 375 | 1350 | 720 |
| Cutting pressure [g] | 20-500 | ||
| Cutting thickness [mm] | ≤1 | ||
| Repeatability [mm] | 0.1 | ||
| Connection interface | USB, COM | ||
PRECAUTIONS
a) Protective material must be removed before turning on the cutting plotter.
b) Check the label on the back side of the plotter to confirm that the rated voltage required by the plotter matches the voltage of the power base.
c) Firstly make sure that the power switch is off, then plug the power supply into grounded power outlet.
d) Please do not touch the power cord with wet hands to avoid electric shock.
e) Please only use the power cord, data cable provided with this product, or manufacturer-approved replacements.
f) Please do not drop metal objects and liquids into the machine to avoid malfunction.
g) After shutting down, you must wait another 5 seconds to turn on the cutting plotter again, otherwise it will cause damage to the cutting plotter.
h) In thunderstorms, turn the power switch to OFF and unplug the power cord.
i) Please do not privately change the manufacturer's components.
j) Manufacturer reserves the right to change product specifications without prior notice.
k) The manufacturer only bears the legal obligations of the product itself sold to the users, and does not bear other losses caused by the malfunction of the products.
I) Without our company's permit, no part of this manual can be copied or transmitted in any name.
m) Do NOT drag the carriage by hand.
n) If there is an abnormal sound after powering on the machine, please turn off the power immediately and contact the after-sales department for feedback.

PRODUCT DESCRIPTION
- Rail guide cover
- Pinch roller kit
- Feeding paper roller
- Carriage
- Reset switch
- Display
- Control panel
- Right side cover
- Blade clamp
- Left side cover
- Power connection socket
- Fuse holder
- Power switch
- USB port
15.COMport - Stand
- Accessories
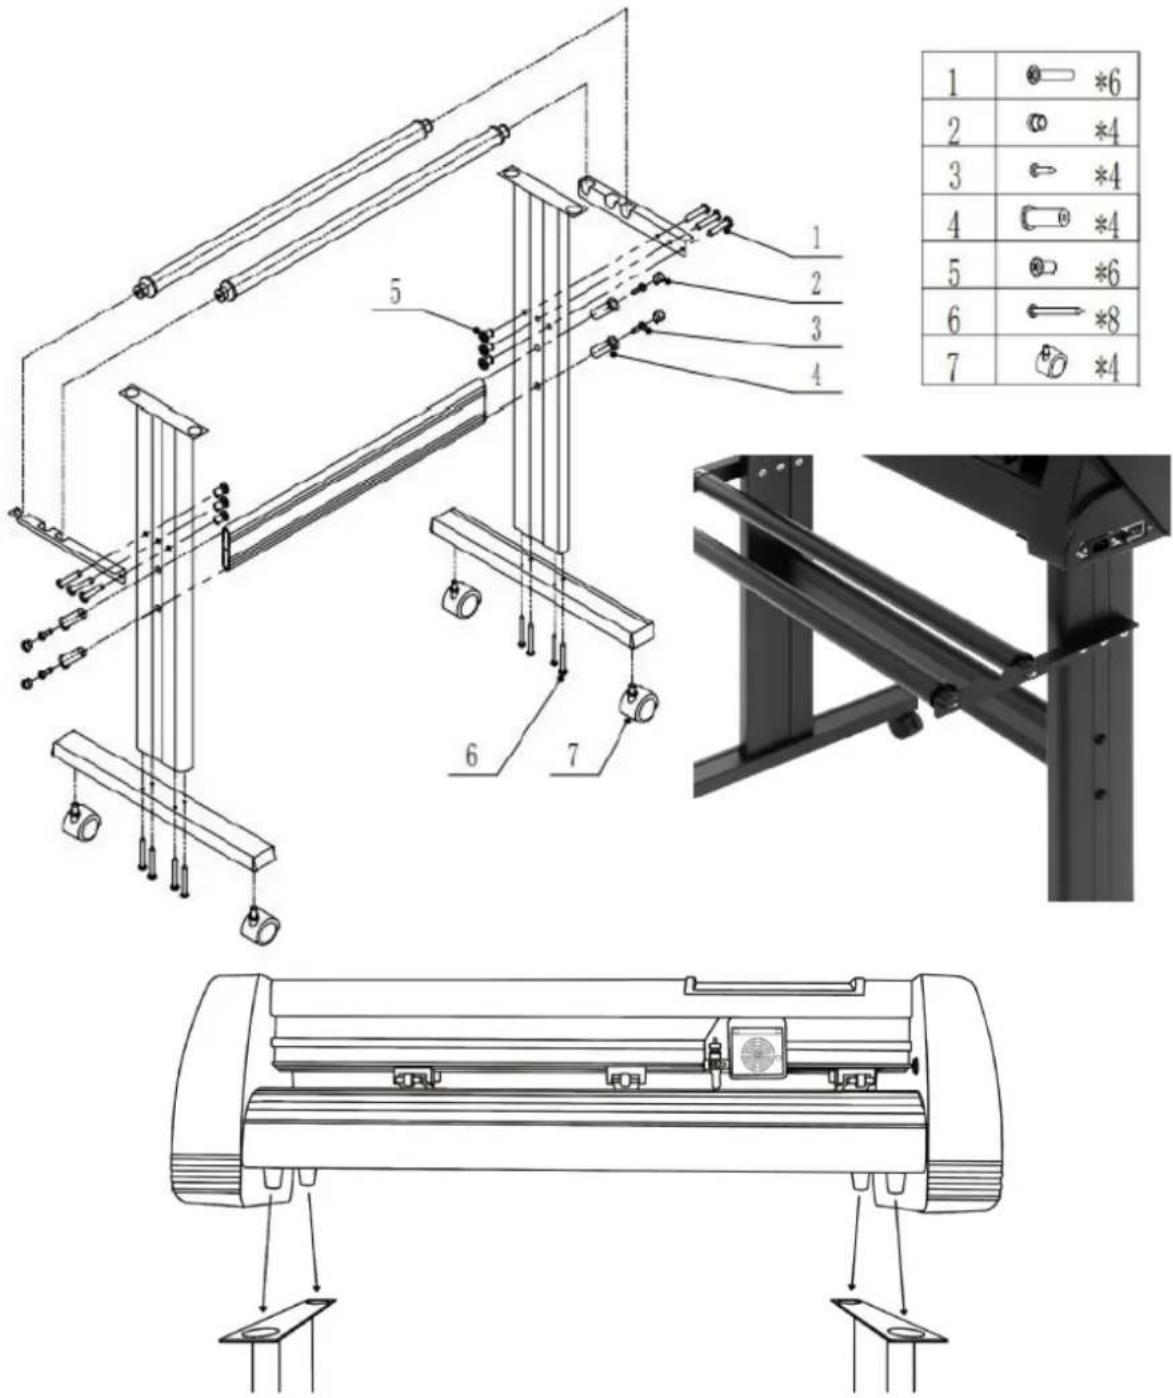
STAND ASSEMBLY
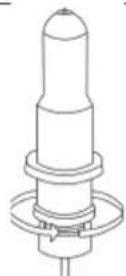
BLADE ASSEMBLY
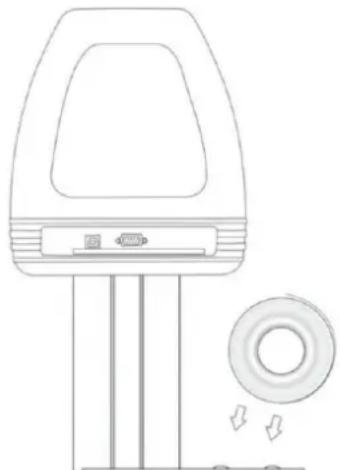
| 1. Unscrew the cap from the blade carriage. | |
| 2. Set the brass ring on blade carriage to the fully down position. | |
| 3. Remove the protective cover from a new blade. | |
| 4. Insert the blade into the top of the blade carriage. | |
| 5. Screw the cap back onto the blade carriage. | |
| 6. Adjust the carriage cap until the blade is protruding approximately 0.4 mm. |
- Adjust the brass ring until it fits snug against the cap. This will help keep the cap in place during operation.
NOTE: Blades should be replaced every 6 months. They might need to be replaced more often if cutting thicker material such as flock, glitter or reflective materials.
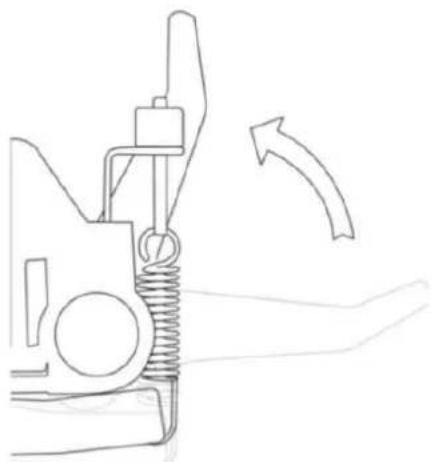
FIXING THE BLADE INTO THE HOLDER
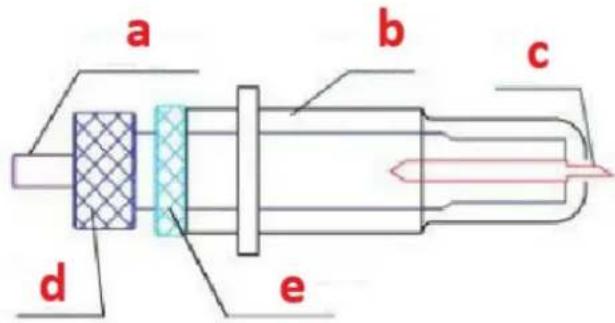
a) Pressing rod
b) Blade cover
c) Blade
d) Shank
e) Blade adjustment nut
- Loosen the blade adjustment nut and rotate the shank to adjust the length of the exposed blade tip. Determine the tip length according to the thickness of the material:
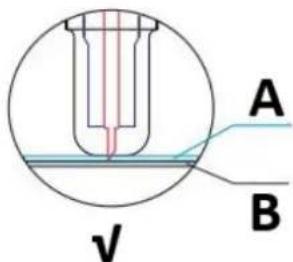
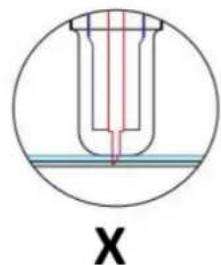
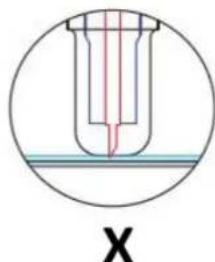
A) Material thickness
B) Base thickness
V) Correct cutting depth
X) Left -blade tip too long; Right -blade tip too short
- Press the pressing rod when you want to change blade. Take out the blade when it is exposed.
- NOTE: The blade tip is very sharp - do not touch it with the finger due to possible injury and blade blunting risk!
INSTALLING THE BLADE HOLDER IN THE CARRIAGE
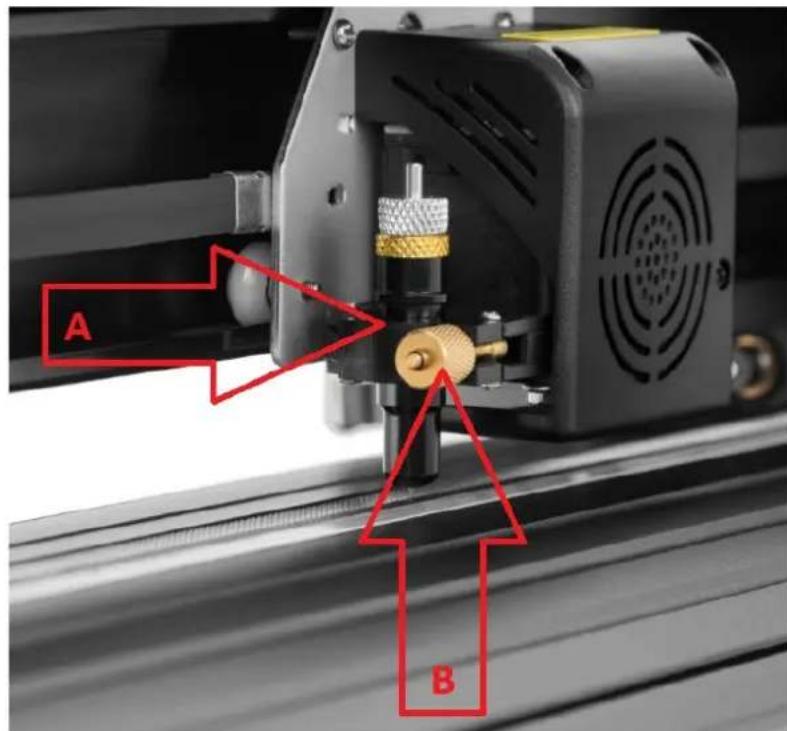
A) Carriage slot (holds the blade assembly in carriage arm)
B) Locking knob (allows access to the blade or pen carriage for accessory replacement)
| 1. Loosen the locking knob on the carriage arm. | |
| 2. Place blade carriage into the carriage arm slot. | |
| 3. Tighten the locking knob on the carriage arm. |
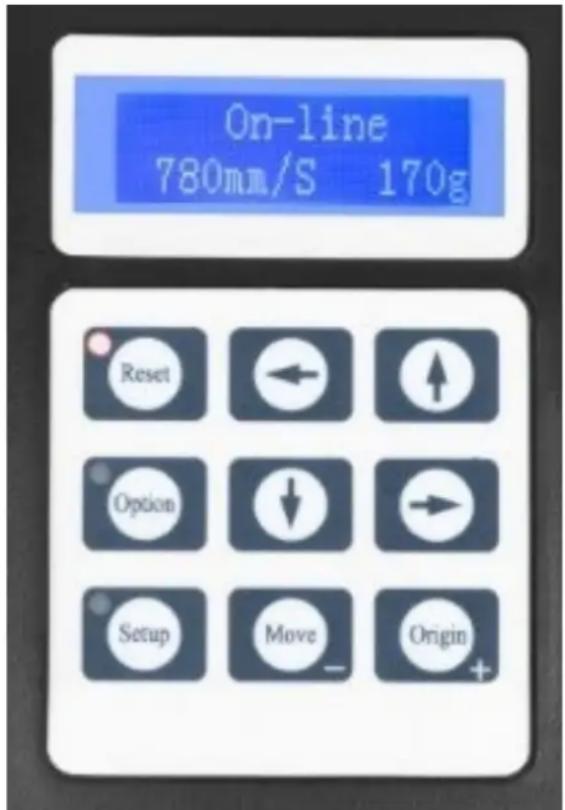
DISPLAY, CONTROL PANEL AND SETTINGS
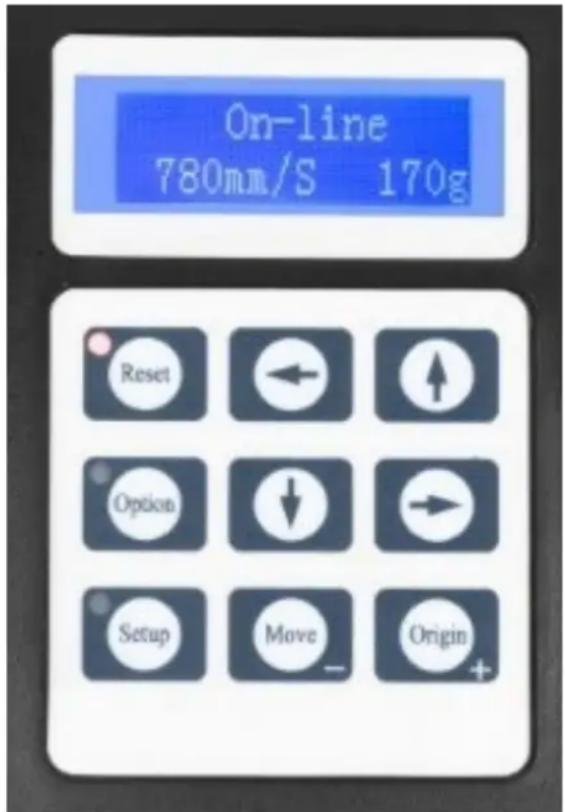
The main screen allows to set the main settings of the cutter like the cutting speed, cutting force and cut a test pattern or check the amount of force that is currently set. Main screen options:
| "Reset" | Reset the operation of the machine and set the carriage arm to its right most position. |
| "Option" | Enter the offline-/pause-mode. |
| "Setup" | Enter the setup mode. |
| "Move" | Cuts a small test shape for testing the current force and speed settings. Used to determine the proper cutting speed and force settings needed for different materials without wasting a bigger piece of them. |
| "Origin" | Used to test z-axis functionality (by dropping the blade down if the carriage is functioning properly) or to set a new origin point when the machine is in offline-mode. |
| ↓/↑ | Adjusts the cutting speed. A cutting speed of 300 mm/s is a (reasonable) default speed that can be used for most cuts. When working with smaller and more detailed images, a slower speed may be required. When working with larger and less detailed images, a higher speed can be set for shortening the operation time. |
| ←/→ | Adjusts the cutting force. A cutting force of 100g is a good general starting place to work from when trying to determine the force needed for a specific material. All cuttable materials will tear in the amount of force needed so proper testing should always be made to determine the right amount of used force. A proper amount of force is when the blade fully penetrates the material to be cut while not cutting through the backing material. |
Offline-mode is used to reposition the cutting material and blade so that a new starting position can be set for the next design. This mode can also be accessed while the machine is in operation and will pause the current cutting process. Although changes can be made to the material and blade positions if offline-/pause-mode is entered during cutting, but making changes to either setting is not normally recommended. Offline mode options:
| “Reset” | Reset the operation of the machine and set the carriage arm to its right most position. |
| “Option” | Ignores any changes that have been made to the material or blade positions and exits offline-/pause-mode, returning the machine to the main screen. Resumes any cutting that was taking place when offline-/pause-mode was entered. |
| “Setup” | Without function in this mode. |
| “Move” | Accepts any changes that have been made to the material or blade positions and exits offline-/pause-mode returning the cutter to the main screen. Resumes any cutting that was taking place when offline-/pause-mode was entered from the new blade/material positions. |
| “Origin” | Accepts any changes that have been made to the material or blade positions and exits offline-/pause mode returning the cutter to the main screen. Resumes any cutting that was taking place when Offline-/pause-mode was entered from the new blade/material positions. |
| ↓/↑ | Reposition the material by moving the feed rollers. After movements being made we can confirm the changes by pressing the “Move” or “Origin” buttons or cancel it by pressing the “Option” button. |
| ←/→ | Reposition the blade by moving the carriage arm. After movements being made we can confirm the changes by pressing the “Origin” buttons or cancel by pressing the “Option” button. |
OPERATION
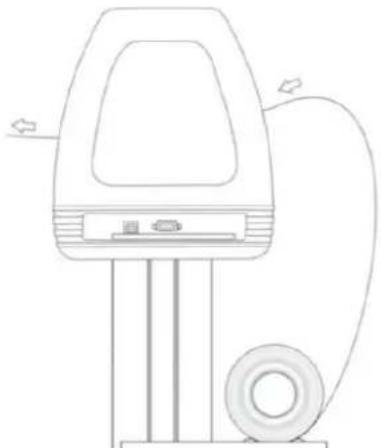
- Place the roll on top of the stand rollers. For heat press vinyl, please flip the roll:
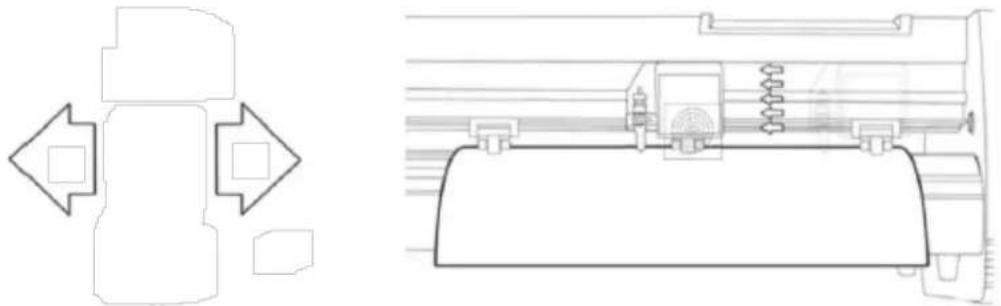
- Release the pinch rollers release levers:
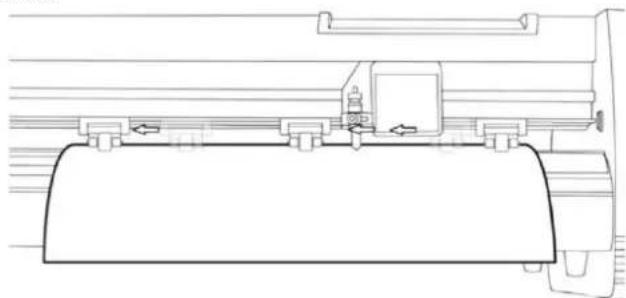
- Feed the vinyl underneath the pinch rollers (if working from a single sheet instead of a roll, the vinyl can also be feed from the front):
- Adjust the pinch rollers so there is one roller located on each side of the vinyl (and, on models with 3 or more rollers, one roller near the center). Avoid lowering a pinch roller to the gap between the two feed rollers:
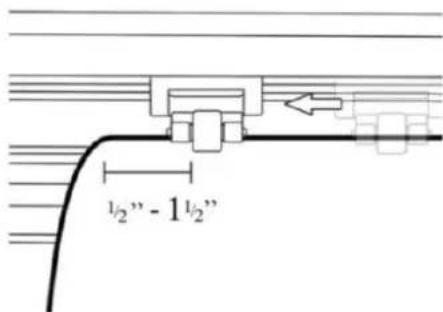
- Leave a gap of between 1.27 - 3.8mm (1 / 2^ - 1 1 / 2^ ) from the edge of the roller and the edge of the vinyl on both sides:
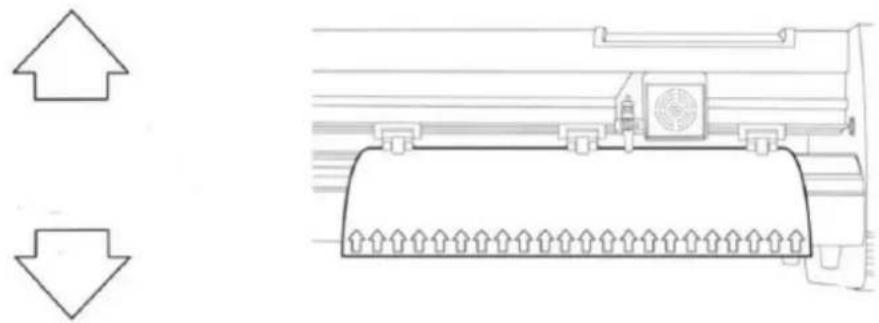
- Engage the pinch rollers by pushing down on the pinch roller release levers.
- Turn on the machine (if not been turned on yet).
Changing cutting position
- Press the "Option" button to enter the offline-mode.
- Adjust the vinyl to where you want to make your cut to start by using the up and down arrow buttons on the control panel:
- Now, adjust the blade to where you want your cut to start by using the left and right arrow buttons:
- Now press the "Origin" button to tell the cutter that this is the location where you would like the cut to begin.
- NOTE: When choosing a starting location for your design, remember that the process will start in the bottom right area of the design. Leave enough room to the left of and behind the starting location to finish the cut.
If you would like to make other adjustments to the pressure, speed or other settings you can do so now. If you are setting up for your first cut with the machine then the default values should be a good starting point.
If you make any adjustments to your cutter, make sure that you return to the main screen before you attempt to cut.
Software operation
- Attach the power cord to the cutter and then plug in the unit and turn on the power.
- If you are using a serial cable to connect the machine to a computer then no further setup is necessary. Simply connect one end of the cable to the machine and the other end to a computer and setup is complete. If you have more than one serial connection on your computer or you are experiencing communication issues between the machine and computer then you may to verify that the correct COM port is being used in your software setup, but for most users the COM port will be COM1.
- If using USB cable to connect the machine to a computer than installation software (SignMaster) needed - shown in further steps. The driver is automatically installed during software installation, no need to install the driver separately.
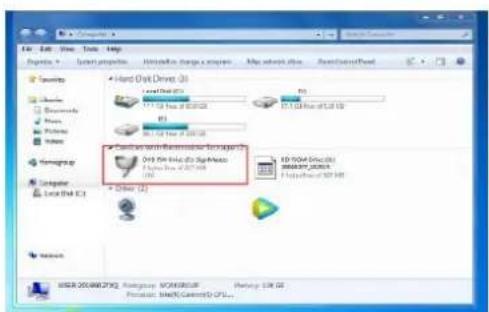
- Open the software box, take the disk and put it into CD optical drive or alternatively put the USB flash disc with software driver on it.
- [If the installation hasn't started automatically] Open the computer, double click or right click optical drive to install the software:
- Click on the icon in the red box and start installing the software and choose the installation language:
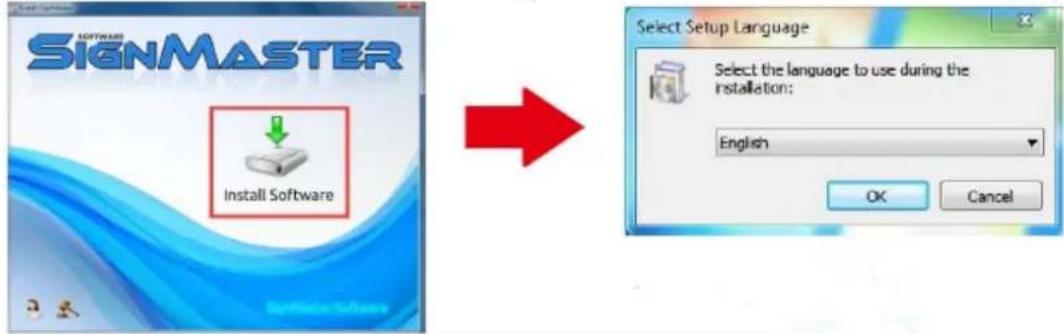
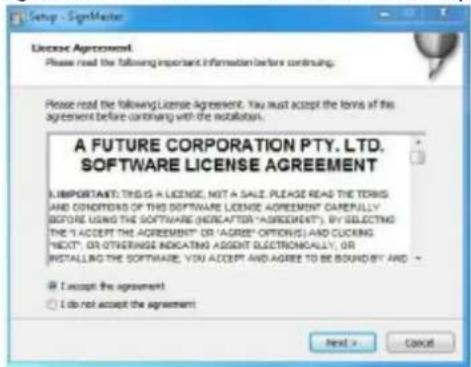
- Agree the software terms and click next to proceed:
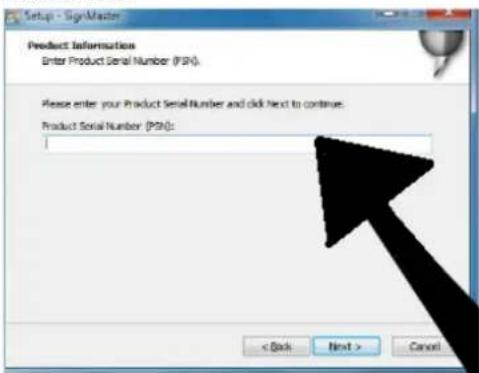
- Enter the product serial number (PSN) in the window - the PSN-code can be found at left side of opened softwarebox:
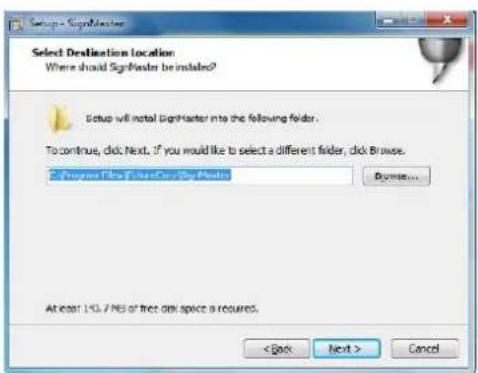
- Follow the default installation path - choose the installation folder and click next:
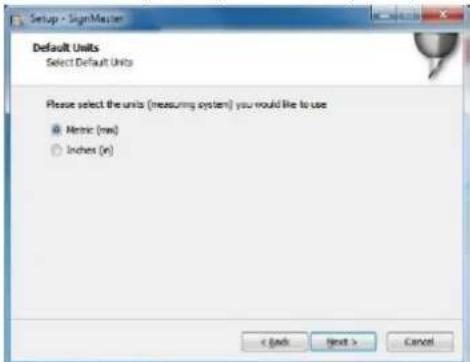
- Select units system (metric or imperial):
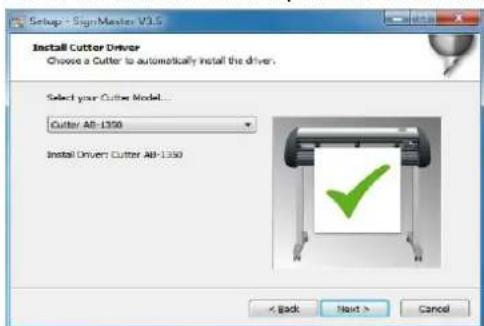
- Select the machine model (check it on the label on the machine body) and click next:
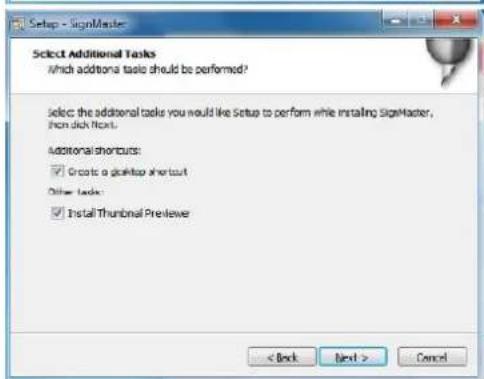
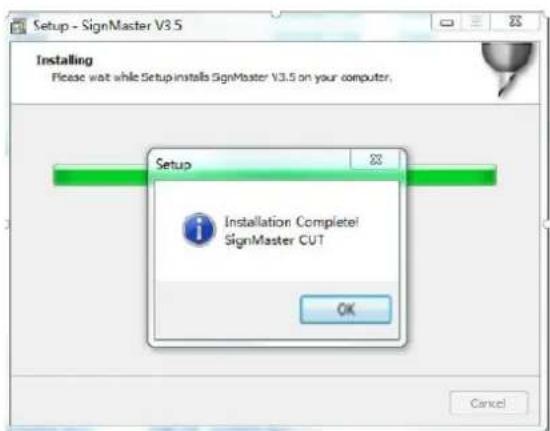
- The installation is complete if You see this window appears on the screen:
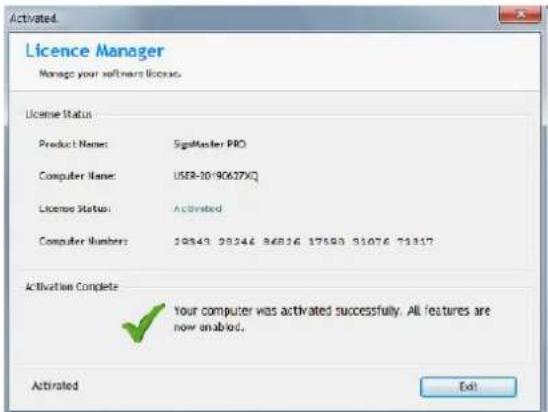
- When opening the software for the first time, the activation window appears:
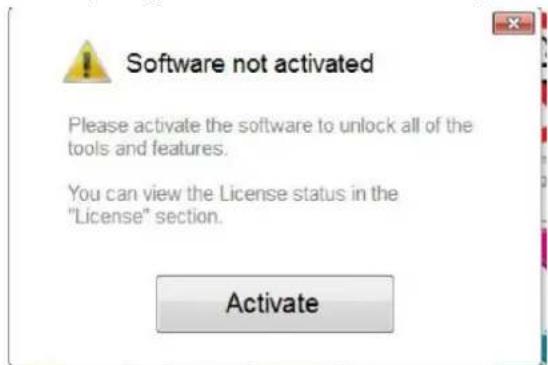
- Click "Activate" button and enter Your email:
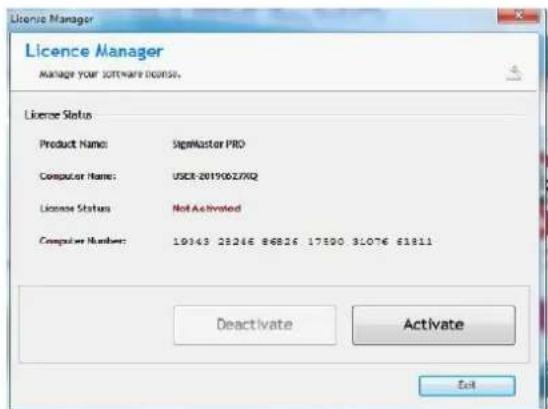
- After successfully activating the software, click "Exit" on the window:
Connection the software with the machine
- Open the software, select the desired content and click sent to the cutting plotter. Click the cutter icon marked below:
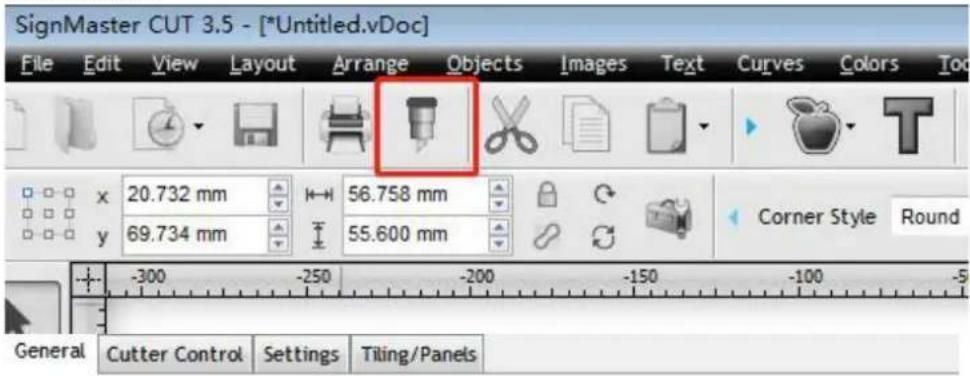

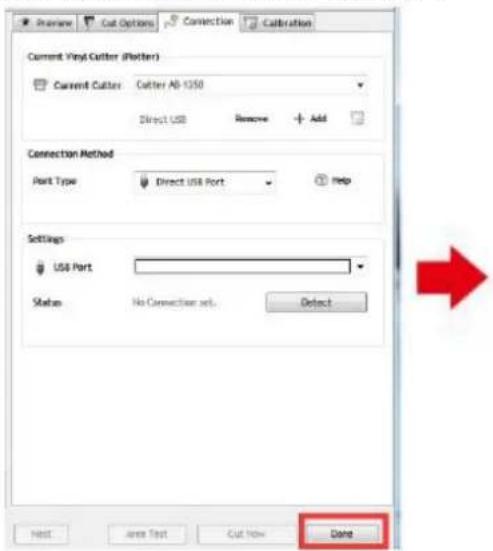
- Click "Properties" button:
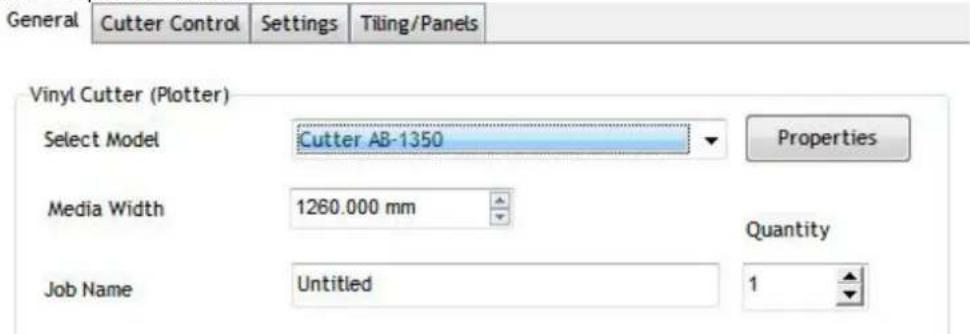
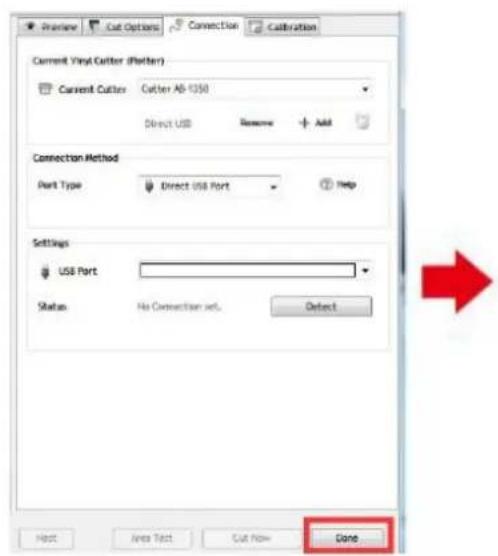
- Click "Connection" tab and select machine model:
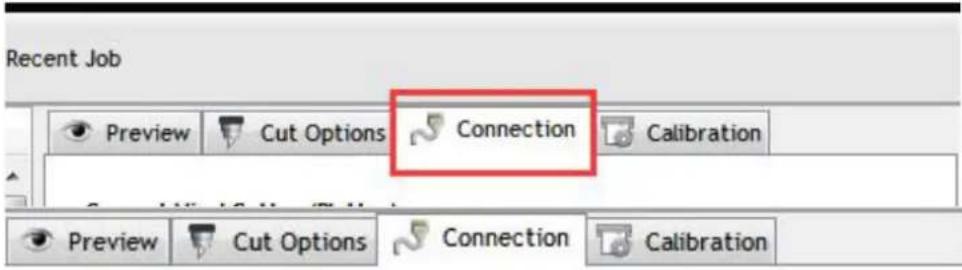
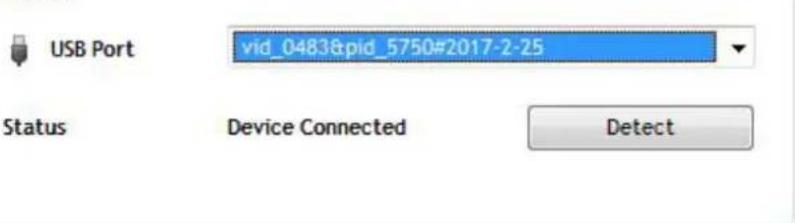
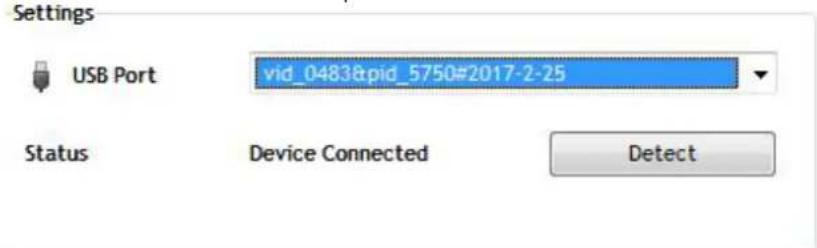
- Select direct USB port:

- Drop-down selected driver: Settings
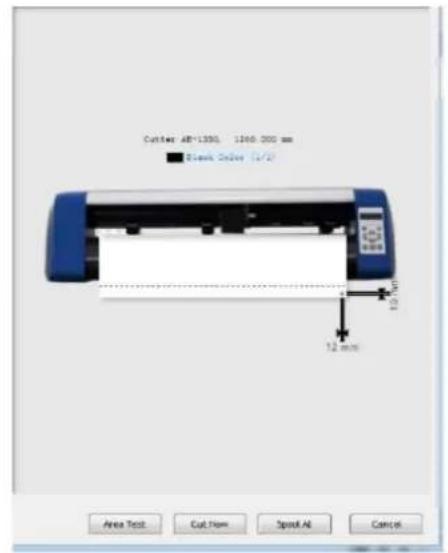
- Click "Finish: button and then "Cut Now":
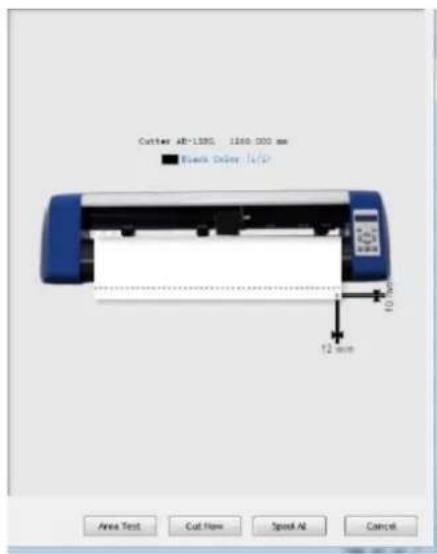
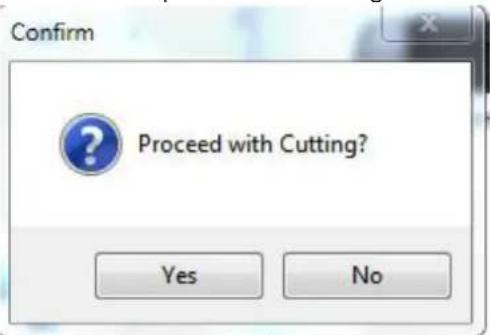
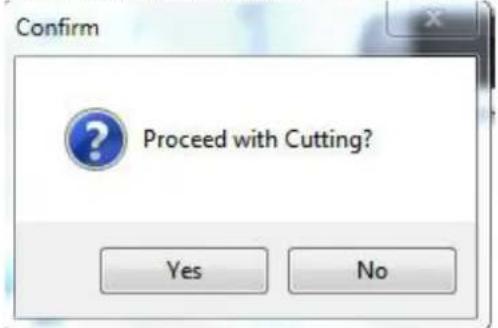
- Select "Yes" to proceed with cutting:
NOTE: Software installation video manual is also included on the USB flash drive.
TROUBLESHOOTING
| Problem | Solution |
| Machine cannot connect to software. | Software port settings, as shown below: |
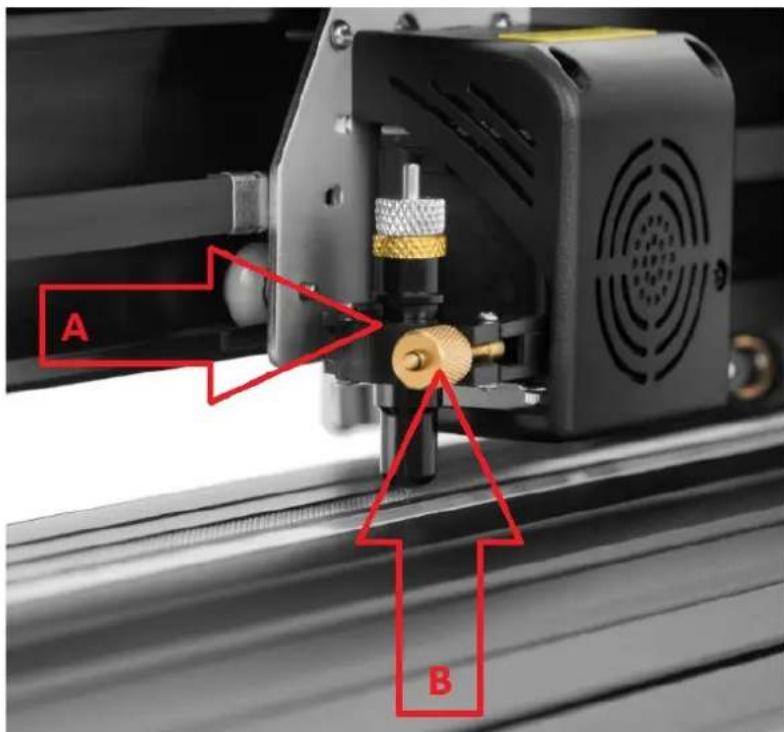
| Paper deviation occurred during cutting | Because the tension of paper press is inconsistent, rotate the two yellow brass nuts on each paper press to the same height, then the pressure is balanced, as shown below: |
| Rotate them to the same height. | |
| The effect of small graphics cutting is not ideal. | When the cutting height is 3-5 mm letters, the software compensation value is set to 0.45 and the speed is adjusted to 400 mm/s. When the cutting height is more than 5 mm letters, the software compensation value is set to 0.3 and the speed is adjusted to 600 mm/s or more: |
| Cutting height for 3-5 mm compensation Settings | |
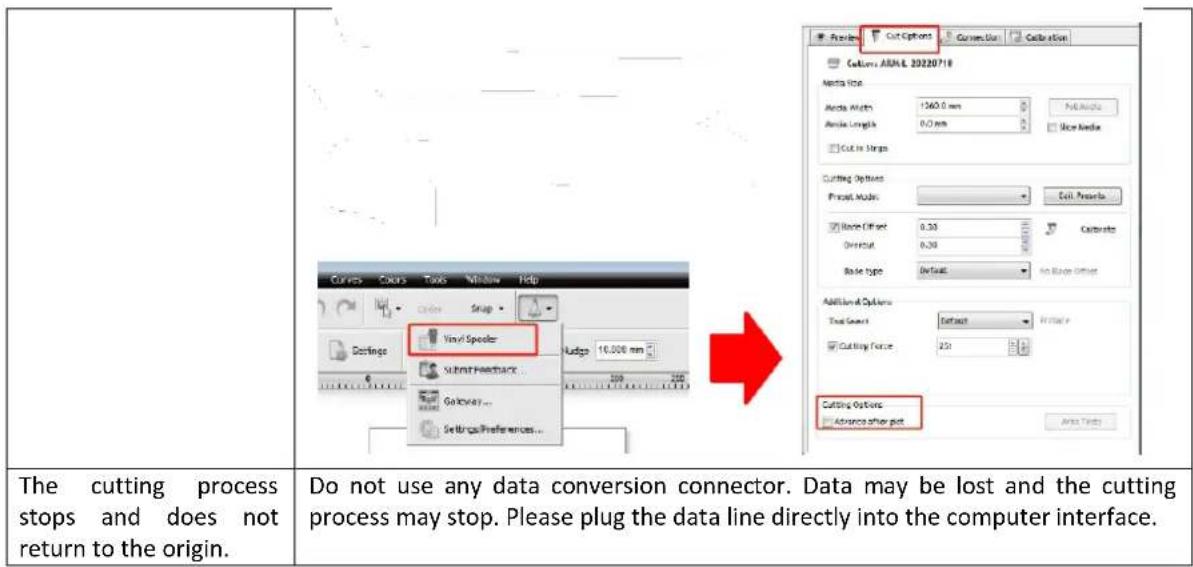
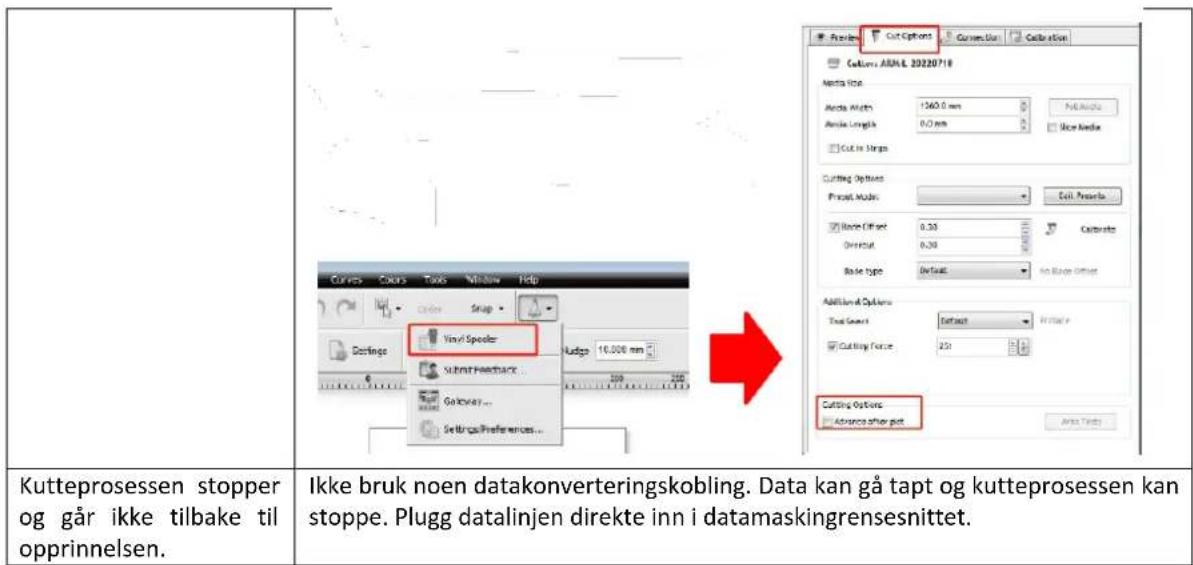
| Often repeated cutting, cutting before automatic paper and other problems. | Cancel the automatic paper feeding function after cutting in the software, as shown below: |
DISPOSING OF USED DEVICES
Do not dispose of this device in municipal waste systems. Hand it over to an electric and electrical device recycling and collection point. Check the symbol on the product, instruction manual and packaging. The plastics used to construct the device can be recycled in accordance with their markings. By choosing to recycle you are making a significant contribution to the protection of our environment.
Contact local authorities for information on your local recycling facility.

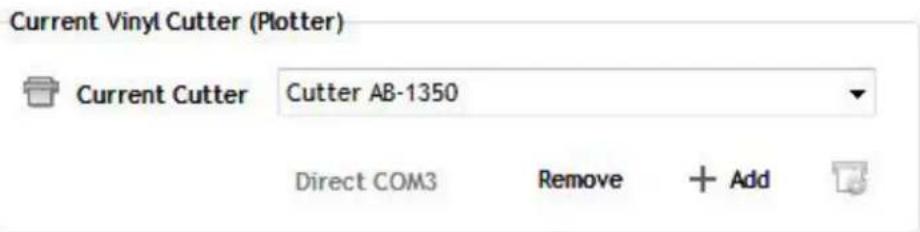
Current Vinyl Cutter (Plotter)

Current Cutter
Cutter AB-1350
Direct COM3
Remove


FESTING AV KNIVET I HOLDEREN
a) Pressstang
b) Bladdeksel
c) Blad
d) Shank
e) Bladjusteringsmutter
- Løsne bladjusteringsmutteren og roter skafet for a justere lenghten pa den eksponerte bladspissen. Bestem spisslengden i henhold til tykkelsen pa materialet:
A) Materialtykkelse
B) Base tykkelse
V) Riktig skjaeredybde
X) Venstre - bladspissen for lang; Høyre - knivspissen for kort
- Trykk pa pressestangen nar du vil bytte blad. Ta ut bladet nar det er synlig.
- MERK: Bladtuppen er veldig skarp –/DD beror den med fingeren p grunn av mulig skade og risiko for sloving av bladet!
INSTALLERE KNIVHOLDEREN I BAERELEN
| Problem | Løsning |
| Maskinen kan ikke koble til programvare. | Programvareportinnstlinger, som vist nedenfor: Cyttem 137.15 [Cyttem 137] Cyttem 137.15 [Cyttem 137] Cyttem 137.15 [Cyttem 137] Cyttem 137.15 [Cyttem 137] Cyttem 137.15 [Cyttem 137] Cyttem 137.15 [Cyttem 137] Cyttem 137.15 [Cyttem 137] Cyttem 137.15 [Cyttem 137] Cyttem 137.15 [Cyttem 137] Cyttem 137.15 [Cyttem 137] Cyttem 137.15 [Cyttem 137] |
| Papiravvik oppsted under kutting | Fordi spenningen til papirpressen er inkonsekvent, roterer du de to gule messingmutrene på haver papirresse til samme høyde, SSE er trykket balansert, som vist nedenfor: Roter dem til samme høyde. |
| Effekten av liters grafikkutting er ikke ideell. | När klippehøyden er 3-5 mm bokstaver, settes programvarekompensasjonsverdien til 0,45 og hastigheten justeres til 400 mm/s. När klippehøyden er mer enn 5 mm bokstaver, settes programvarekompensasjonsverdien til 0,3 og hastigheten justeres til 600 mm/s ell er mer: Cutting height for 3-5 mm compensation Settings Cutting height is more than 5mm compensation setting Cutting height is more than 5mm compensation setting Cutting height is more than 5mm compensation setting Cutting height is more than 5mm compensation setting Cutting height is more than 5mm compensation setting Cutting height is more than 5mm compensation setting Cutting height is more than 5mm compensation setting Cutting height is more than 5mm compensation setting Cutting height is more than 5mm compensation setting Cutting Height is more than 5mm compensation setting Cutting Height is more than 5mm compensation setting Cutting Height is more than 5mm compensation setting Cutting Height is more than 5mm compensation setting Cutting Height is more than 5mm compensation setting Cutting Height is more than 5mm compensation setting Cutting Height is more than 5mm compensation setting Cutting Height is more than 5mm compensation setting Cutting Height is more than5mm compensation setting Cutting Height is more than5mm compensation setting Cutting Height is more than5mm compensation setting Cutting Height is more than5mm compensation setting Cutting Height is more than5mm compensation setting Cutting Height is more than5mm compensation setting Cutting Height is more than5mm compensation setting Cutting Height is more than5mm compensation setting Cutting Height is more than5mm compensation setting Cutting Height is more than 5mm compensation setting Cutting Height is more than5mm compensation setting Cutting Height is more than5mm compensation setting Cutting Height is more than5mm compensation setting Cutting Height is more than5mm compensation setting Cutting Height is more than5mm compensation setting Cutting Height is more than5mm compensation setting Cutting Height is more than5mm compensation setting Cutting Height is more then5mm compensation setting Cutting Height is more than5mm compensation setting Cutting Height is more than5mm compensation setting Cutting Height is more than5mm compensation setting Cutting Height is more than5mm compensation setting Cutting Height is more than5mm compensation setting Cutting Height is more than5mm compensation setting Cutting Height is more than5mm compensation setting Cutting Height is more than5mm compensation setting Cutting Height is more than20mm/30mm Cutting Height is more than20mm/30mm Cutting Height is more than20mm/30mm Cutting Height is more than20mm/30mm Cutting Height is more than20mm/30mm Cutting Height is more than20mm/30mm Cutting Height is more than20mm/30mm Cutting Height is more than20mm/30mm Cyttem ABA1 2022/10 Cyttem ABA1 2022/10 Cyttem ABA1 2022/10 Cyttem ABA1 2022/10 Cyttem ABA1 2022/10 Cyttem ABA1 2022/10 Cyttem ABA1 2022/10 Cyttem ABA1 21/10 Cyttem ABA1 21/10 Cyttem ABA1 21/10 Cyttem ABA1 21/10 Cyttem ABA1 21/10 Cyttem ABA1 21/10 Cyttem ABA1 21/10 Cyttem ABA1 21/10 Cyttem A BA1 2022/10 Cyttem A BA1 2022/10 Cyttem A BA1 2022/10 Cyttem A BA1 2022/10 Cyttem A BA1 2022/10 Cyttem A BA1 2022/10 Cyttem A BA1 2022/10 Cyttem A BA 100.0 mm Cyttem A BA 100.0 mm Cyttem A BA 100.0 mm Cyttem A BA 100.0 mm Cyttem A BA 100.0 mm Cyttem A BA 100.0 mm Cyttem A BA 100.0 mm Cyttem A BA 100.0 mm Cyttem A BA 110.0 mm Cyttem A BA 110.0 mm Cyttem A BA 110.0 mm Cyttem A BA 110.0 mm Cyttem A BA 110.0 mm Cyttem A BA 110.0 mm Cyttem A BA 110.0 mm Cyttem A BA 110.0 mm Cyttem B type Default Hide Insect Cyttem B type Default Hide Insect Cyttem B type Default Hide Insect Cyttem B type Default Hide Insect Cyttem B type Default Hide Insect Cyttem B type Default Hide Insect Cyttem B type Default Hide Insect Cyttem B type Default Hide Insect Cyttem B type Default Hide Insect Cyttem B type Default Hide Insect |
| Ofte gjentatt skjæring, skjæring før automatisk papir og andre problemer. | Avbryt funksjonen for automatisk papirmating perpet kutting i programvaren, som vist nedenfor: |
KASSERING AV BRUKTE ENHETER
- Driver selection no menu suspensor:
- ⅢpaKHeTe Bbpxy 6yToHa, Kpa: "I cIeI ToBa Bbpxy, I3peKn cera":
7.ИЗберетe „Да",за пордлжпс рязанeto:
3A6EJIENKKA: BnIeO pBkoBoCTBO 3a INHcTaIInpaHe Ha coΦTyep cbIo e BkIIOyeHO B USB ΦnaW yCTpOJCTBOTO.
OTCTPAHRAHE HA HEN3INPABHOCTN
| пpo6лем | Решениe |
| Maшина та He може дa ce сбврже сбс coфтуер. | Настоюкн Ha coфтуерни пот, кakTo e nokazано ПО-ДОЛу: |
| 3aBbptete rH Na cBzata BvcounHa. | |
| EΦeKtbyT OT pR3aHe Ha MaIka rpaФиka He e iNeaJIeH. | Korato BvCoUHnAte Ha pr3aHe e 3-5 mm 6yKBn, StOioHocCTTa Ha coΦTyepHata KOMpeHcAuziae e 3aJaDeHa Ha 0,45 i SkopocCTTa ce perynlpa Ha 400 mm/s. Korato BvCoUHnAte Ha pr3aHe e nobuee ot 5 mm 6yKBn, StOioHocCTTa Ha coΦTyepHata KOMpeHcAuziae ce HacTroBa Ha 0,3 i SkopocCTTa ce perynlpa Ha 600 mm/s iIi nobuee:Cutting height for 3-5 mm compensation Settings Cutting height is more than Smm compensation setting |
| YecTo NOBtarpIaSo ce N3PraZBaHe, N3PraZBaHe IpeDi N ABTomatuHa XapTna I dpyr n Ipo6IeMn. | OTmehete ΦyHKzIaTa 3a ABTomatuHNo noDaBaHe Ha xapTna cIeD pr3aHe B coΦTyepa, KaKTo e NOKa3aH No-DoJy:Cutting Options: Prctual Mlad: Cil Prcs Culitot Aot: Crl Prctus Culitot Offet: Crl Caltrode Oreut: O20 Rae type: Dralal - Not Exer Crtur |
| IPOuCeBt Ha pr3aHe cInpRa I He Ce BrbIa B NauchIoTo. | He n3PoiIaBaIte KOHeKTop 3a Ipeo6pa3yBaHe Ha daHn. DaHnIte Moze Ja ce 3aRy6aT I IPOuCeBt Ha pr3aHe Moze Da cIpe. MoIa, BkIoueTe LInHnIa Tla DaHnI dIpeKTHO B KOMIOITbPrHn I NTepfpeic. |
13XBpJIrHE HA 13I0JI3BAHU YCTPOIcTBA
He n3xBpIyTe ToBA yCTpoIcTB O 6oUHcKIne CnCTeMn 3a OTnaDbuN. IpeaIte Ro B nyHKT 3a cbbnpaHe npOuKlnpaHe Ha eektpnueckn H eektpnueckn ypeDn. IpOBepete CmBOLA Bbpx npOdykTA, pbKOBOdCTBOTO 3a yNoTpe6a N onakOBkata. PnaCTMaCHTe, n3noJ3BaHn 3a KOHCTpyuHaTe Ho yCTpoIcTBOTo, Morat Da 6bDaT
peuKlnpaHn B cBtBcTcBHe C TexHIne MapKnpoBKn. N36Hpain Da peuKlnpate, Bne DOpnpHaCrtTe 3HaHTeJIHO 3a ONa3BaHETo Ha OKoJIHATA CpeJa.
CbpxKeTe ce c MeCTHnTE Bnactn 3a HOpMaun OTHOCHo MeCTHOTc bOpBxKeHne 3a peuKJlnpaHe.

AutoTo Exyeipidio xpnotn exei mtalphaotei yia tn dieukoluvon oac xnpoumonowvtac autouatm metaepaon. Exouv vivei euloyec npoaantheic vi a tvn npoxn akpouc metappaoc. Oto, kaiia autoatopoinuyn metaepaon dev ivau taleia oute npoipzetai va avtikataohtoeiou cavpwivouc metaepaotc. To enionmo eyxepidio xpnotn ivai n ayyakn ekdoon. Tuxov aoumphiwiec n diaphopcn nou dnmuopyovtaoi ntn metaeppaon dev evai deoutekac kal dev exouv voikn ioxviia okoouc oumuopfwoanc n eiuoloanc. EaV npokuov epwntheic oxetik aE tvn akpiieia twv npofoepiwv nou nepieoxvtaoi oTo Exyeipidio xpnoc, ovatpeTe otnv ayyakn ekdoon autw twv pexieoxevw novivn enionun ekdoon.
TEXNIKA ΣTOIXEIA
ZASLON, NADZORNA PLOŠCA IN NASTAVITVE
For the disposal of the device please consider and act according to the national and local rules and regulations.
CONTACT
expondo Polska sp. z o.o. sp. k.