AIW-02 - Screwdriver MSW - Free user manual and instructions
Find the device manual for free AIW-02 MSW in PDF.

| Product type | Pneumatic impact wrench |
| Brand | MSW |
| Model | AIW-02 |
| Dimensions (L x W x H) | 80 x 205 x 215 mm |
| Weight | 2.65 kg |
| Socket drive size | 1/2 inch |
| Air inlet type | Male 1/4" EU |
| Working pressure | 6.2 bar / 90 Psi |
| Average air consumption | 119 l/min |
| Maximum rotational speed | 7000 rpm |
| Maximum torque (tightening / loosening) | 881 Nm / 910 Nm |
| Sound power level (LwA) | 99 dB(A) – Uncertainty K=3 dB |
| Sound pressure level (LpA) | 88 dB(A) – Uncertainty K=3 dB |
| Vibration emission value (ah) | 3.93 m/s² – Uncertainty K=1.5 m/s² |
| Recommended oil type | Oil suitable for pneumatic tools |
| Power supply | Dry, clean, and lubricated compressed air |
| Main functions | Tightening and loosening bolts and nuts with high torque |
| Maintenance and cleaning | Clean with soft cloth; lubricate regularly via grease fitting; flush if dirty |
| Safety | Wear hearing protection, safety glasses, gloves; use in ventilated area; disconnect before adjustments |
| Spare parts and repairability | Repairs by manufacturer's after-sales service; use original parts |
| General information | Read the manual carefully before use; do not exceed maximum pressure |
Frequently Asked Questions - AIW-02 MSW
User questions about AIW-02 MSW
0 question about this device. Answer the ones you know or ask your own.
Ask a new question about this device
Download the instructions for your Screwdriver in PDF format for free! Find your manual AIW-02 - MSW and take your electronic device back in hand. On this page are published all the documents necessary for the use of your device. AIW-02 by MSW.
USER MANUAL AIW-02 MSW
1. General Description
The instruction manual is intended to assist in safe and reliable use. The product is designed and manufactured strictly according to technical specifications using the latest technology and components and maintaining the highest quality standards.
PLEASE CAREFULLY READ AND UNDERSTAND THIS INSTRUCTION MANUAL BEFORE OPERATION,
To ensure long and reliable operation of the unit, make sure to operate and maintain it properly in accordance with the guidelines in this instruction manual. The technical data and specifications contained in this instruction manual are up to date. The manufacturer reserves the right to make changes in order to improve the quality. Taking the technical progress and the possibility of reducing noise into account, the unit is designed and built in such a way so that risks resulting from noise emissions are reduced to the lowest possible level.
Explanation of symbols
| CE | The product complies with applicable safety standards. |
| Please read the instructions before use. | |
| Recyclable product. | |
| CAUTION! or WARNING! or REMINDER! describing a situation. (general warning sign). | |
| Wear ear protection. Exposure to noise may cause hearing loss. | |
| Wear protective goggles. | |
| Wear protective gloves. | |
| CAUTION! Warning against loud noise! |

CAUTION! The illustrations in this instruction manual are for reference only and may differ from the actual product in some details.
The original instruction manual is in the German language version. Other language versions are translations from German.
2. Safety of use
CAUTION! Read all safety warnings and all instructions. Failure to follow warnings and instructions could result in serious injury or even death.
The term "unit" or "product" in the warnings and in the description of the instructions refers to the AIR IMPACT WRENCH.
2.1. Safety in the workplace
a) Keep the work area tidy and well lit. Disorder or poor lighting can lead to accidents. Be foresighted, watch what you are doing and use common sense when using the unit.
b) Do not use the unit in an explosive area, for example in the presence of flammable liquids, gases or dust. The unit produces sparks that can ignite dust or fumes.
c) If you have any doubts as to whether the unit is working properly or if it is damaged, contact the manufacturer's service department.
d) Only the manufacturer's service department may repair the unit. Do not carry out repairs yourself!
e) No children or unauthorized persons are allowed in the work area. (Inattention may result in loss of control of the unit.)
f) Use the unit in a well-ventilated area.
g) Running the unit can generate dust and splitter, protect bystanders against any harm.
h) Connecting and disconnecting the pressure line should be done with the air valve closed.
i) Do not point the pressure hose toward yourself or other people or animals. Pressurized air can cause serious injury.
j) Do not cut off the compressed air supply by crushing or kinking the pressure hoses.
k) Check the condition of the safety stickers regularly. Replace them if they are illegible.
I) Keep these instructions for use for future reference. If the unit is to be passed on to a third party, the operating instructions must also be handed over together with the unit.
m) Keep the packaging and small assembly parts out of the reach of children.
n) Keep the unit away from children and animals.
o) When using this unit together with other units, also follow the other instructions for use.

Please note! Keep children and other bystanders safe while operating the unit.
2.2. Personal safety
a) Do not operate this unit if you are tired, ill or under the influence of alcohol, drugs or medication that could impair your ability to operate the unit.
b) The unit is not intended to be used by persons (including children) with reduced mental, sensory or intellectual functions or persons who lack experience and/or knowledge unless they are supervised or have been instructed by a person responsible for their safety on how to operate the unit.
c) The unit may be operated by persons who are physically fit, capable of operating it and appropriately trained, and who have read this instruction manual and have been trained in occupational safety and health.
d) Use caution and common sense when operating this unit. A moment's inattention during operation may result in serious personal injury.
e) Use personal protective equipment as required when operating the unit as specified in Section 1 of the explanation of symbols. The use of appropriate, approved personal protective equipment reduces the risk of injury.
f) Do not overestimate your capabilities. Maintain body balance and equilibrium at all times during operation. This allows for better control of the machine in unexpected situations.
g) Do not wear loose clothing or jewelry. Keep hair, clothing, and gloves away from moving parts. Loose clothing, jewelry, or long hair can be caught in moving parts.
h) Pressurized air can cause serious injuries.
i) The unit is not a toy. Children should be watched to ensure that they do not play with the unit.
j) Vibration is generated during operation - if you experience any pain, numbness or loss of feeling in your hand, stop work immediately and contact your supervisor or doctor.
2.3. Safe use of the unit
a) Do not overload the unit. Use tools that are suitable for the application. A correctly selected unit will do a better and safer job for which it was designed.
b) Disconnect the pressure hose before making adjustments, changing accessories, and after working with the equipment. This precaution reduces the risk of accidents.
c) Keep unused equipment out of the reach of children and out of the reach of anyone unfamiliar with the unit or this instruction manual. These units is dangerous in the hands of inexperienced users.
d) Keep the unit in good working condition. Check before each use for general damage or damage to moving parts (cracks in parts and components or any other condition that may affect the safe operation of the unit). If damaged, have the unit repaired before use.
e) Keep the unit out of the reach of children.
f) Repairs and maintenance should be carried out by qualified personnel using only original spare parts. This will ensure the safety of use.
g) To ensure the designed operational integrity of the unit, do not remove factory-installed covers or loosen screws.
h) When transporting or moving the unit from storage to the place of use, observe the health and safety rules for manual handling applicable in the country where the unit is used.
i) Avoid situations in which the machine stops under heavy loads during operation. This can cause overheating of the drive elements and consequent damage to the equipment.
j) Clean the unit regularly to prevent permanent dirt build-up.
k) The provided value of vibration emission is measured according to the standard measurement methods. The value of vibration emission may change if the unit is used under different environmental conditions.
Use air to power the unit, no other gases are allowed.
m) Use reinforced hoses for the compressed air connection in areas with a high risk of mechanical damage.
n) Before each use, make sure that the nozzle is properly mounted in the machine and that the hose is properly attached and undamaged.
o) The air supplied to the machine should be dehumidified, clean, and free of contaminants. Contaminants can clog hoses and cause damage to the machine and its components.
p) Do not carry or hang the device by the pressure hose.
q) Do not touch moving parts or accessories unless the unit has been disconnected from the compressed air supply.
If you notice any leakage from the unit or hoses, immediately disconnect the compressed air supply and correct the fault.
s) Do not exceed the recommended supply pressure as this may damage the unit.
t) Do not obstruct the air inlet or outlet.
u) The unit is not a toy. Cleaning and maintenance must not be performed by children without adult supervision.
v) Do not tamper with the unit to alter its performance or design.
w) Keep the unit away from sources of fire and heat.
x) Do not overload the unit.
v) Do not exceed the maximum permissible operating pressure of the unit!
z) Do not block the ventilation openings of the unit!
aa) Do not allow the machine to get wet.
bb) Do not carry the device by the pressure hose.

CAUTION! Although the product has been designed to be safe, with adequate safeguards, and despite the additional safety features provided to the user, there is still a slight risk of accident or injury when handling the unit. You are advised to use caution and common sense when using this product.
3. Rules of use
The device is designed for screwing and unscrewing bolts, nuts, etc., and is used especially where high force is required.
A compressed air supply is required to operate the product.
CAUTION: Do not use any adapters or extensions to change the original purpose of the device.
The user is responsible for any damage resulting from misuse.
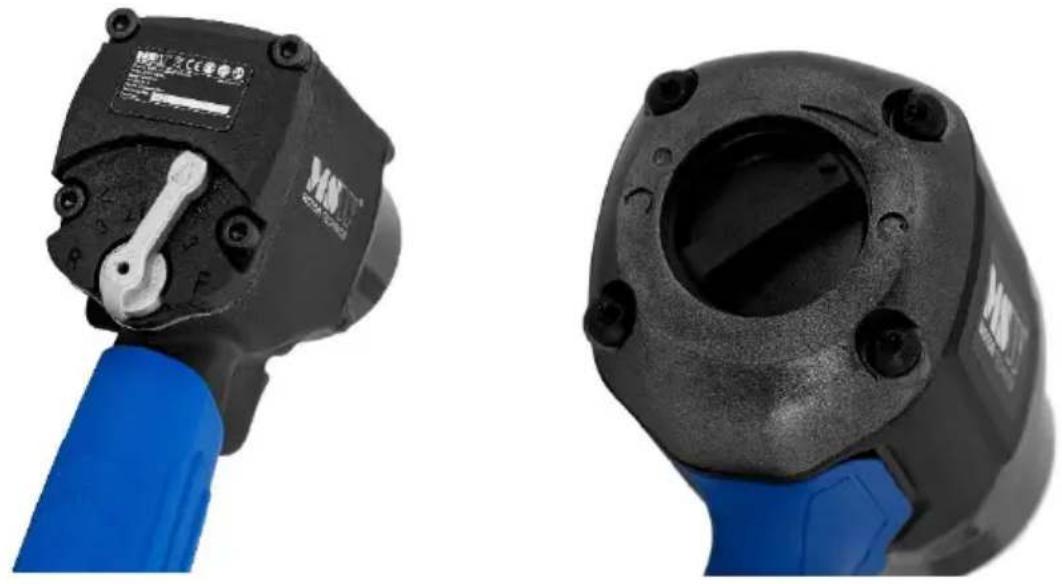
3.1. Description
MSW-AIW-04 - others similar:
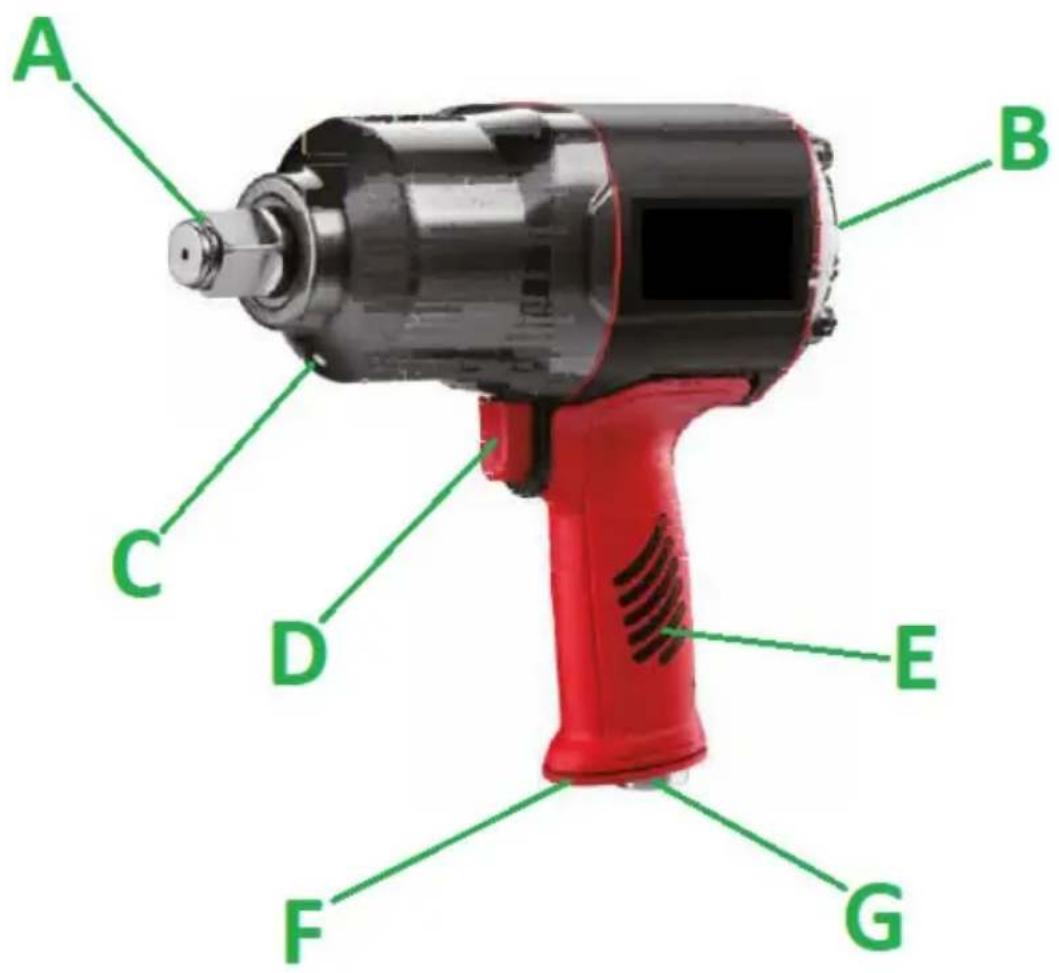
A. Socket bit
B. Rotation knob/switch (with torque control)*
C. Lubrication hole
D. Trigger
E. Handle
F. Air outlet
G. Supply air inlet (connection)
- Depending on the model, its location or solution may be slightly different
3.2. Preparation for operation POSITIONING OF THE UNIT
The ambient temperature must not exceed 45^ and ambient humidity should not exceed 85% . Use the unit in properly ventilated spaces. Do not block the air outlet of the unit. Keep the unit away from any hot surfaces. Always keep the unit out of reach of children and persons with reduced mental, sensory or intellectual functions. The work area should provide immediate access to the compressed air shut-off valve. Be sure that the air pressure supplying the unit does not exceed the recommended range, and the air itself should be cleaned, dehumidified, and with lubricant.
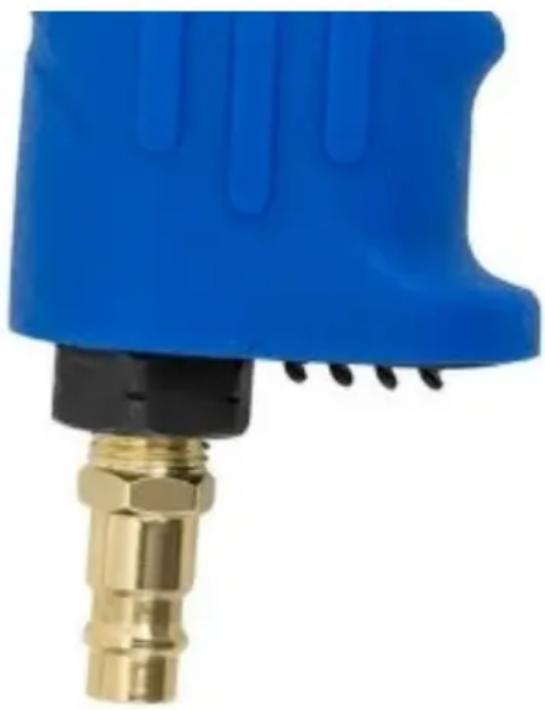
ASSEMBLY OF THE UNIT
Before first use, remove the protective cap (if fitted) from the underside of the unit's handle and replace it with the supplied male pneumatic connector so that the unit can be connected to a compressed air system. If necessary, a different size tip may be used (not included). The threads should be well sealed, e.g. with Teflon tape. Connect the device to/disconnect it from the compressed air system only when the air supply is turned off!
3.3. Working with the unit
After connecting the device to the compressed air system (it is necessary to have the so-called air preparation system, i.e. cleaning, dehydration and lubrication) first check the correct operation of the wrench without any load.
- Use only special adapters for impact wrenches!
The use of other tools may damage the tool, the workpiece, or the
attachments.
- The impact wrench must be held securely in your hand, with one hand on the handle and with the other on the housing, but away from the moving part of the tool!
It is not only important to have a firm grip on the tool but also to be in a stable position.
- Only change the socket or the direction of rotation or adjust the torque only when the tool is at rest, never during operation!
The force (torque) adjustment of the wrench is only possible in the tightening direction, i.e. clockwise (see following pictures).
To do this, set the knob/switch for the direction of rotation clockwise and then set the indicator on the knob to the range of the scale marked on the housing.
This is an indicative scale and there is no strictly defined torque value at a given position, so it is recommended to start from the lowest range.
If the device does not generate enough force to move the bolt/nut 5 seconds after starting, increase the torque value accordingly, until a satisfactory result is obtained.
IMPORTANT: Impact power should be matched to the application - do not use wrenches with less maximum torque than required by the application as this will drastically reduce the life of the tool.
3.4. Cleaning and maintenance
a) Disconnect the compressed air supply and cool the device completely before each cleaning, adjustment, replacement of accessories and when not in use.
b) Use only non-corrosive agents, e.g. benzine, for surface cleaning.
c) Store the unit in a dry and cool place protected from moisture and direct sunlight.
d) Do not spray the unit with a stream of water or immerse it in water.
e) Make sure that no water enters through the ventilation openings in the casing.
f) Clean the ventilation openings with a brush and compressed air.
g) If the unit's air system is clogged, flush it with a mixture of kerosene and a little air equipment oil. Any residual mixture will be ejected through the air outlet at the bottom of the handle under compressed air, so after flushing, place a cloth or paper towel there and run the unit briefly without load.
h) Use a soft cloth for cleaning.
i) Do not use sharp and/or metal objects (e.g. a wire brush or metal spatula) for cleaning, as these may damage the surface of the material from which the unit is made.
j) To lubricate and maintain the unit from the inside, use oil intended for pneumatic equipment - in the self-lubrication system and periodically through the lubrication hole. If you do not have a lubrication system, lubricate the unit before each use by adding some oil through the air connection hole (before connecting to the pneumatic system), bearing in mind that at the beginning of operation excess oil will be ejected through the outlet holes. It is also a good idea to regularly lubricate moving parts on the outside of the housing.
At the end of its useful life, this unit should not be disposed of with normal household waste but should be taken to a collection point for the recycling of electrical equipment. This is indicated by the symbol on the product, operating instructions or packaging. The materials used in this unit are recyclable according to their marking. You will be making an important contribution to protecting our environment by reusing, recycling or otherwise disposing of used units.
Your local administration will provide you with information about the appropriate disposal point for used units.
Assembly drawings:
MSW-AIW-01
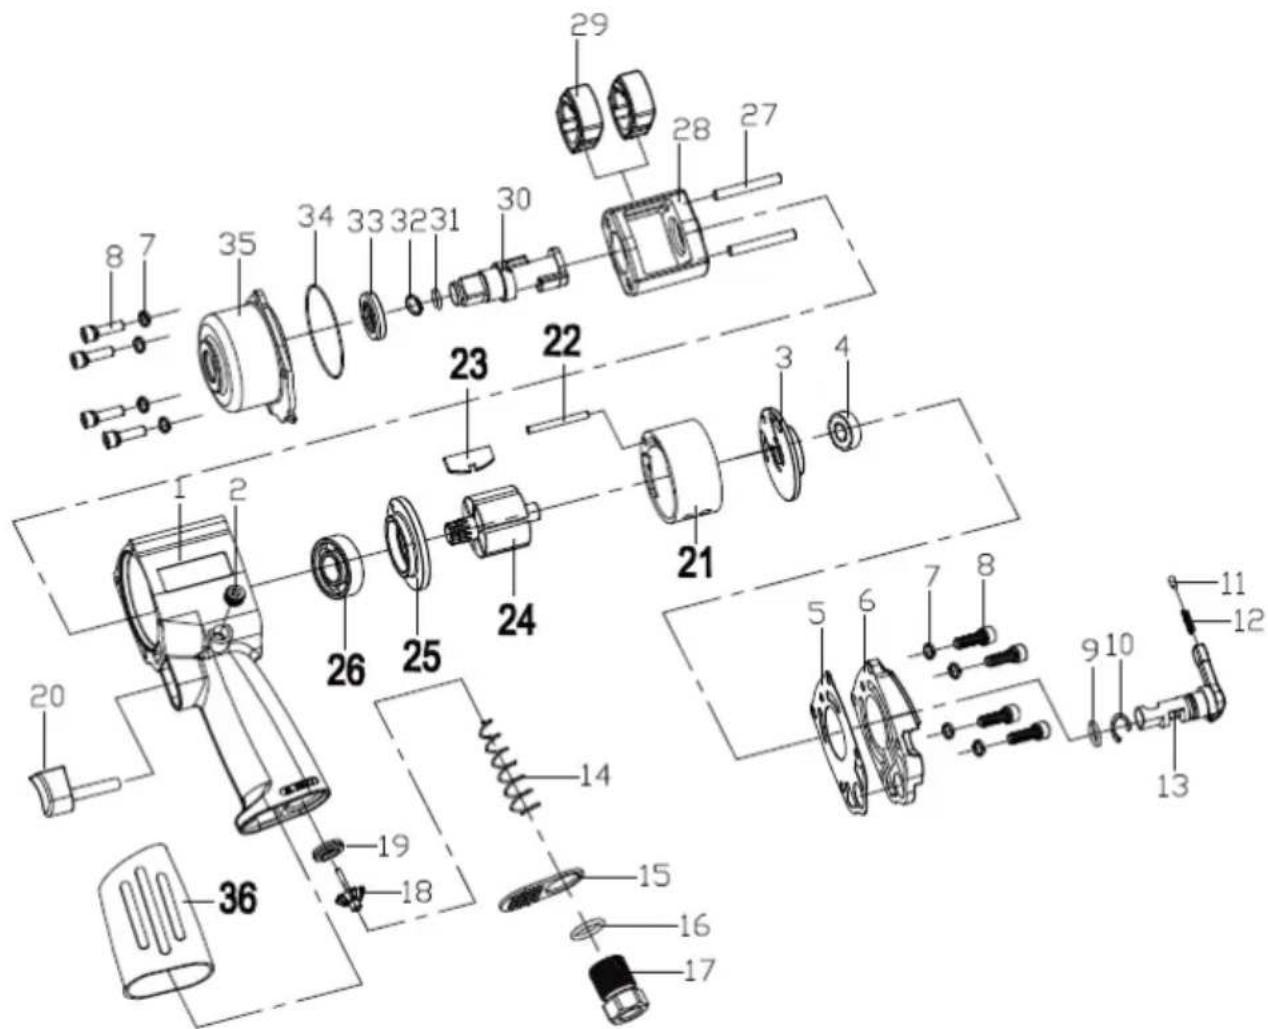
| Number | Description of the | Quantity |
| 1 | Casing | 1 |
| 2 | Cover screw (M10x10) | 1 |
| 3 | Back plate | 1 |
| 4 | Rear ball bearing (R6Z) | 1 |
| 5 | Rear gasket | 1 |
| 6 | Rear cover | 1 |
| 7 | Spring washer (d=5) | 8 |
| 8 | Screw (M5x18) | 8 |
| 9 | Sealing ring | 1 |
| 10 | Locking ring | 1 |
| 11 | Ratchet pin | 1 |
| 12 | Ratchet spring | 1 |
| 13 | Reverse gear pin | 1 |
| 14 | Spring-loaded valve | 1 |
| 15 | Muffler | 1 |
| 16 | Sealing ring inlet | 1 |
| 17 | Inlet sleeve | 1 |
| 18 | Throttle valve | 1 |
| 19 | Reinforced gasket | 1 |
| 20 | Trigger | 1 |
| 21 | Cylinder | 1 |
| 22 | Cylinder pin | 1 |
| 23 | Spade | 6 |
| 24 | Rotor | 1 |
| 25 | Front plate | 1 |
| 26 | Front bearing (R8) | 1 |
| 27 | Impactor Hammer Bolt | 2 |
| 28 | Hammer frame | 1 |
| 29 | Percussion hammer | 2 |
| 30 | Anvil | 1 |
| 31 | Anvil sealing ring | 1 |
| 32 | Locking ring seat | 1 |
| 33 | Sleeve | 1 |
| 34 | Sealing ring | 1 |
| 35 | Front housing | 1 |
| 36 | Handle | 1 |
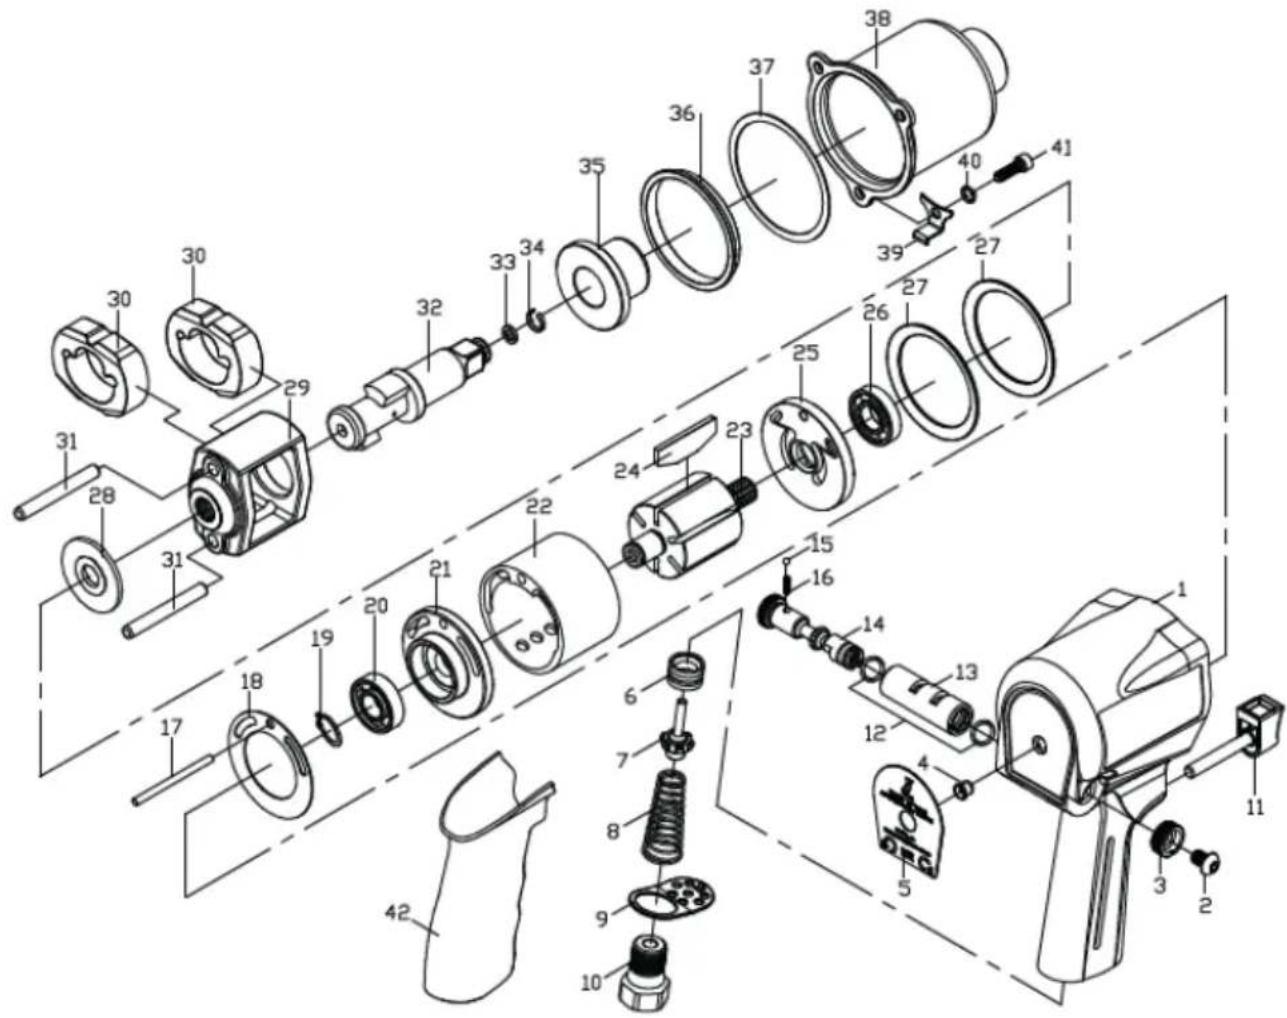
| Number | Description of the | Quantity |
| 1 | Casing | 1 |
| 2 | Screw | 1 |
| 3 | Air regulator | 1 |
| 4 | Service hole for lubrication | 1 |
| 5 | Rating plate | 1 |
| 6 | Reinforced gasket | 1 |
| 7 | Throttle valve | 1 |
| 8 | Spring-loaded valve | 1 |
| 9 | Muffler | 1 |
| 10 | Inlet sleeve | 1 |
| 11 | Trigger | 1 |
| 12 | Sealing ring | 2 |
| 13 | Speed control valve bushing | 1 |
| 14 | Speed control valve | 1 |
| 15 | Locking ball | 1 |
| 16 | Coupling ball spring | 1 |
| 17 | Cylinder pin | 1 |
| 18 | Rear gasket | 1 |
| 19 | Locking ring | 1 |
| 20 | Rear bearing 6001 | 1 |
| 21 | Back plate | 1 |
| 22 | Cylinder | 1 |
| 23 | Rotor | 1 |
| 24 | Spade | 6 |
| 25 | Front plate | 1 |
| 26 | Front bearing R8 | 1 |
| 27 | Motor terminal washer | 2 |
| 28 | Washer | 1 |
| 29 | Hammer frame | 1 |
| 30 | Percussion hammer | 2 |
| 31 | Stem | 2 |
| 32 | Anvil | 1 |
| 33 | Sealing ring | 1 |
| 34 | Locking ring seat | 1 |
| 35 | Sleeve | 1 |
| 36 | Bar | 1 |
| 37 | Front gasket | 1 |
| 38 | Front cover | 1 |
| 39 | Trigger handle | 1 |
| 40 | Spring washer | 3 |
| 41 | Screw M6x20 | 3 |
| 42 | Handle | 1 |
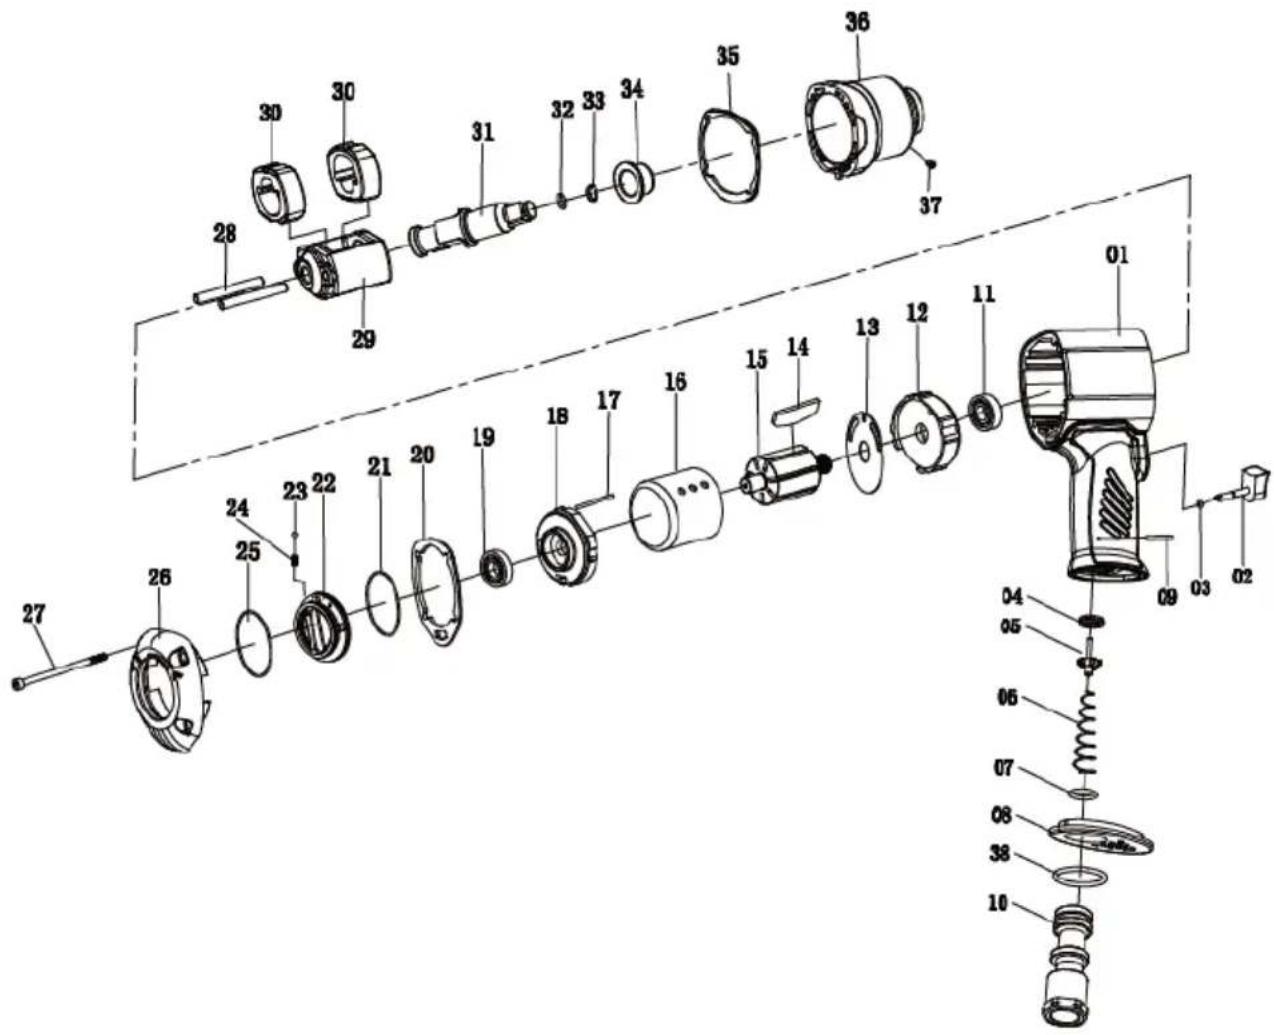
MSW-AIW-02
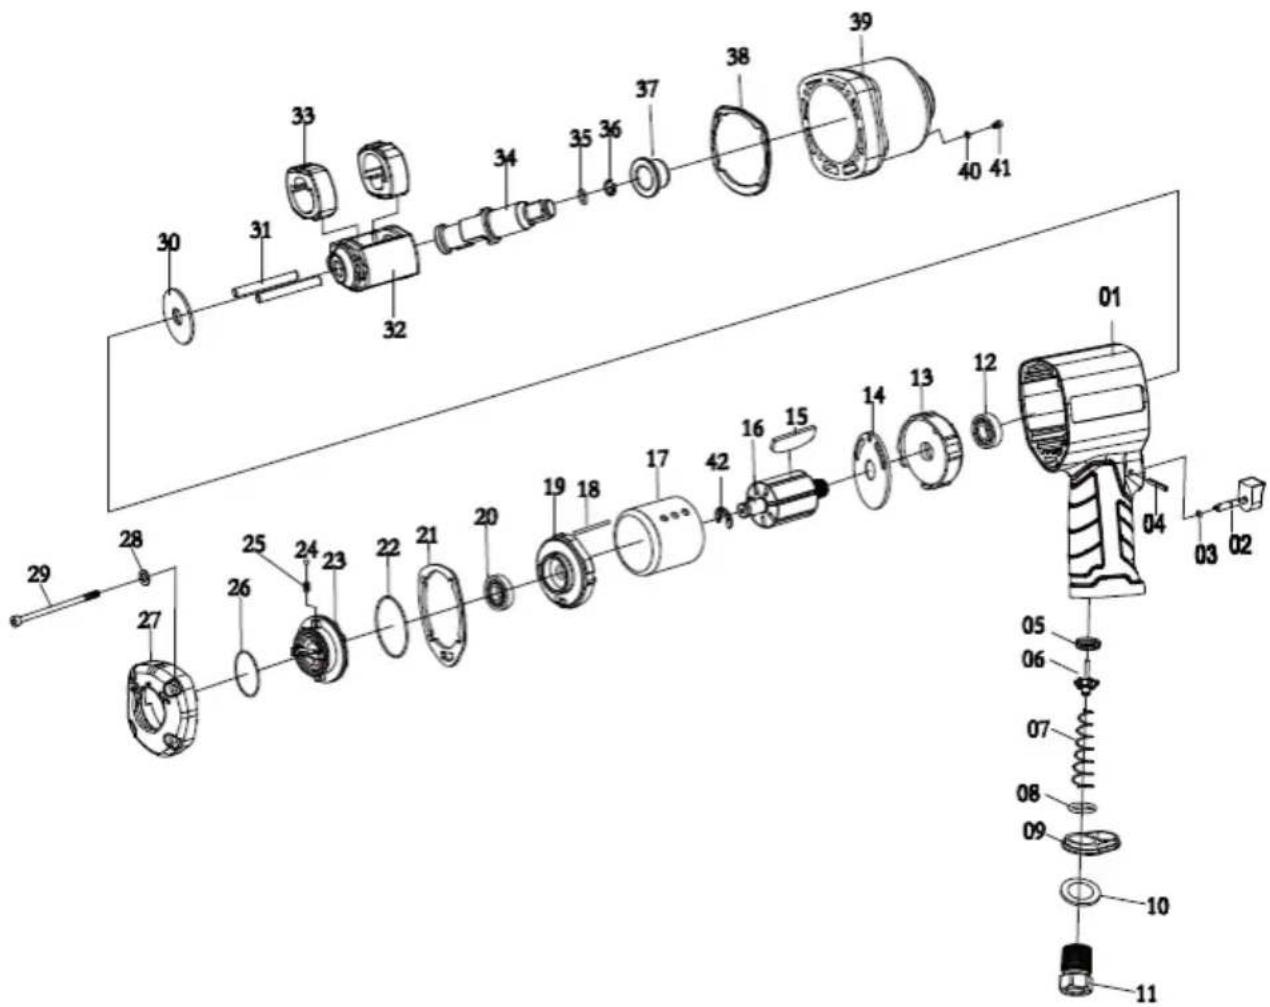
| Number | Description of the | Quantity |
| 1 | Casing | 1 |
| 2 | Trigger | 1 |
| 3 | Trigger sealing ring | 1 |
| 4 | Ratchet pin | 1 |
| 5 | Reinforced gasket | 1 |
| 6 | Throttle valve | 1 |
| 7 | Spring-loaded valve | 1 |
| 8 | Sealing ring | 1 |
| 9 | Muffler | 1 |
| 10 | Washer | 1 |
| 11 | Inlet sleeve | 1 |
| 12 | Front ball bearing 6002Z | 1 |
| 13 | Front plate | 1 |
| 14 | Front pad | 1 |
| 15 | Spade | 7 |
| 16 | Rotor | 1 |
| 17 | Cylinder | |
| 18 | Cylinder pin | 1 |
| 19 | Back plate | 1 |
| 20 | Rear ball bearing 6002Z | 1 |
| 21 | Rear gasket | 1 |
| 22 | Sealing ring II | 1 |
| 23 | Air regulator | 1 |
| 24 | Ratchet ball | 1 |
| 25 | Ratchet spring | 1 |
| 26 | Sealing ring I | 1 |
| 27 | Back cover | 1 |
| 28 | Spring washer d=5 | 4 |
| 29 | Screw | 4 |
| 30 | Washer | 1 |
| 31 | Impactor Hammer Bolt | 2 |
| 32 | Hammer frame | 1 |
| 33 | Impact hammer | 2 |
| 34 | Anvil | 1 |
| 35 | Anvil sealing ring | 1 |
| 36 | Locking ring seat | 1 |
| 37 | Sleeve | 1 |
| 38 | Front gasket | 1 |
| 39 | Front cover | 1 |
| 40 | Sealing ring | 1 |
| 41 | Screw M3x6 | 1 |
| 42 | Spring lock | 1 |
MSW-AIW-04
| Number | Description of the | Quantity |
| 1 | Casing | 1 |
| 2 | Trigger | 1 |
| 3 | Sealing ring | 1 |
| 4 | Reinforced gasket | 1 |
| 5 | Throttle valve | 1 |
| 6 | Spring-loaded valve | 1 |
| 7 | Sealing ring | 1 |
| 8 | Muffler | 1 |
| 9 | Stem | 1 |
| 10 | Air inlet | 1 |
| 11 | Ball bearing 6203-2Z/Z3 | 1 |
| 12 | Front plate | 1 |
| 13 | Gasket | 1 |
| 14 | Spade | 6 |
| 15 | Rotor | 1 |
| 16 | Cylinder | 1 |
| 17 | Ratchet spring | 1 |
| 18 | Back plate | 1 |
| 19 | Ball bearing 6202-2Z/Z3 | 1 |
| 20 | Rear gasket | 1 |
| 21 | Sealing ring II | 1 |
| 22 | Air regulator | 1 |
| 23 | Ratchet ball | 1 |
| 24 | Ratchet spring | 1 |
| 25 | Sealing ring I | 1 |
| 26 | Rear cover | 1 |
| 27 | Screw | 4 |
| 28 | Impactor Hammer Bolt | 2 |
| 29 | Hammer frame | 1 |
| 30 | Impact hammer | 2 |
| 31 | Anvil | 1 |
| 32 | Sealing ring | 1 |
| 33 | Locking ring seat | 1 |
| 34 | Sleeve | 1 |
| 35 | Front gasket | 1 |
| 36 | Front cover | 1 |
| 37 | Lubrication hole | 1 |
| 38 | Washer | 1 |
Dane techniczne
iADVERTENCIA! Apart from the equipment, there are also other things that can be used to help you in your home. For example, you can use a shower, a toilet, a shower seat, and a shower fan. You can also use a shower fan to help you get a bath.
APPARATETS PLACERING
OUR CUSTOMERS' SATISFACTION IS OUR MAIN GOAL!
PLEASE CONTACT US WITH QUESTIONS AT:
NASZYM GLOWNYM CELEM JEST SATYSFAKCJA KIENTOW W PRZYPADKU PYTAN PROSIMY OKONTAKT Z PRZEDSTAWICIELEM W DANYM KRAJU:
NASIM HLAVNIM CILEM JE SPOKOJENOST NASICH ZAKAZNIKU! V PRIPADE OTAZEK NAS PROSIM KONTAKTUJE NA:
NOTRE BUT PREMIER EST VOTRE SATISFACTION!
POUR TOUTE QUESTION, CONTACTEZ NOUS SUR:
NUESTRO OBJECTIVO PRINCIPAL ES LA SATISFACIOn DE NUESTROS CLIENTES! SI TIENE PREGUNTAS, POR FAVOR PONGANSE EN CONTACTO CON NOSTROS EN:
I NOSTRO PRINCIPALE OBIETTIVO É LA SODDISFAZIONE DEI NOSTRI CLIENTI!
PER EVENTUALI DOMANDE PER FAVORE, CI CONTATTINO SOTTO:
LEGFOBB CELUNK UGYFELEINK ELEGEDETTSEGE. KERDES ESETEN, KERJUK, VEGYE FEL A KAPCSOLATOT AZ ADOTT ORSZAGBAN MUKODO KERESDELMI KEPVISELETTEL:
KUNDETILFREDSHED ER VORES HOVEDMÄLSÄETNING.
VED SPORGSMAL KONTAKT VENLIGST DIN LOKALE DISTRIBUTOR:
CONTACT
expondo Polska sp. z o.o. sp. k.