PGI3800E - Measuring equipment MSW - Free user manual and instructions
Find the device manual for free PGI3800E MSW in PDF.

| Brand | MSW |
| Model | PGI3800E |
| Product Type | Generator |
| Rated Voltage | 230 V ~ 50 Hz |
| Rated Power (COP) | 3.5 kW |
| Maximum Power (S2) | 3.8 kW |
| Rated Current | 15.2 A |
| Power Factor | 1.0 |
| Fuel Type | Unleaded Petrol |
| Fuel Tank Capacity | 11 L |
| Engine Oil Tank Capacity | 0.6 L |
| Sound Level (Lwa) | 97 dB |
| Starting Battery | 12 V / 1.6 Ah |
| Maximum Ambient Temperature | 40 °C |
| Protection Class | IP23M |
| Dimensions (L x W x H) | 530 x 355 x 490 mm |
| Weight | 33.2 kg |
| Starting | Manual (recoil) and Electric |
| ECO Mode | Yes, reduces fuel consumption and noise |
| Overload Protection | With indicator light and Reset button |
| Grounding | Ground terminal on the control panel |
Frequently Asked Questions - PGI3800E MSW
User questions about PGI3800E MSW
0 question about this device. Answer the ones you know or ask your own.
Ask a new question about this device
Download the instructions for your Measuring equipment in PDF format for free! Find your manual PGI3800E - MSW and take your electronic device back in hand. On this page are published all the documents necessary for the use of your device. PGI3800E by MSW.
USER MANUAL PGI3800E MSW
DE
DE
natural_image
Technical line drawing of a mechanical fan or impeller assembly (no text or symbols)natural_image
Pure diagram of a mechanical component with no text, numbers, or symbols• Zündkerze
| Parameter description | Parameter value | |
| Product name | POWER GENERATOR | |
| Model | MSW-PGI3800 | MSW-PGI3800E |
| Rated voltage (V-1)/Frequency (Hz) | 230/50 | |
| Rated power (kW) | COP: 3.5 | |
| Maximum power | 52, 5min 3,8kW | |
| Rated DC voltage (V) | 3.8 | |
| Rated current : DC (A) | 12 | |
| DC rated output (W) | 8.3 | |
| Rated current (A) | 100 | |
| Power factor | 15.2 | |
| Engine operation type | 1.0 | |
| Performance class | S2.5 min | |
| Quality class | G2 | |
| Fuel type | Unleaded petrol | |
| Fuel tank capacity (L) | 11 | |
| Engine oil tank capacity (L) | 0.6 | |
| Lwa (dB) | 97 | |
| Battery | - | - |
| Maximum ambient temperature (°C) | 40 | |
| Protection rating IP | IP25M | |
| Dimensions (Width x Depth x Height; mm) | 530x355x490 | |
| Weight (kg) | 31.8 | 33.2 |
- GENERAL DESCRIPTION
The user manual is designed to assist in the safe and trouble free use of the device. The product is designed and manufactured in accordance with strict technical guidelines, using state of the art technologies and components. Additionally, it is produced in compliance with the most stringent quality standards.
DO NOT USE THE DEVICE UNLESS YOU HAVE THOROUGHLY READ AND UNDERSTOOD THIS USER MANUAL.
To increase the product life of the device and to ensure trouble-free operation, use it in accordance with this user manual and regularly perform maintenance tasks. The technical data and specifications in this user manual are up to date. The manufacturer reserves the right to make changes associated with quality improvement. The device is designed to reduce noise emission risks to a minimum, taking into account technological progress and noise reduction opportunities.
LEGEND
| CE | The product satisfies the relevant safety standards. |
| Read instructions before use. | |
| The product must be recycled. | |
| WARNING! or CAUTION! or REMEMBER! Applicable to the given situation, (general warning sign) | |
| Use car protection, Exposure to loud noise may result in hearing loss. | |
| ATTENTION! Electric shock warning! | |
| ATTENTION! Rotating parts, entanglement hazard! | |
| ATTENTION! Fire hazard - flammable materials! | |
| WARNING! Toxic substances, danger of poisoning! | |
| ATTENTION! Hot surface, risk of burns! | |
| Poisonous exhaust fumes warning . Do not use in unventilated space [risk of carbon monoxide (CO) poisoning] | |
| Do not smoke near the device. The device contains flammable substances. |
PLEASE NOTE! Drawings in this manual are for illustration purposes only and in some details may differ from the actual product.
The original operation manual is written in German. Other language versions are translations from the German.
- USAGE SAFETY
ATTENTION! Read all safety warnings and all instructions. Failure to follow the warnings and instructions may result in electric shock, fire and/or serious injury or oven death.
The terms "device" or "product" are used in the warnings and instructions to refer to POWER GENERATOR.
2.1 ELECTRICAL SAFETY
a) Avoid touching earthed elements such as pipes, heaters, boilers and refrigerators. There is an increased risk of electric shock if the earthed device is exposed to rain, comes into direct contact with a wet surface or is operating in a clamp environment. Water getting into the device increases the risk of damage to the device and of electric shock.
b) Do not touch the device with wet or damp hands. c) ATTENTION! DANGER TO LIFE! While cleaning, never immerse the device in water or other liquids.
d) Prevent the device from getting wet. Risk of electric shock!
a) Do not smoke near the device. The device contains flammable substances.
b) The engine gets very hot during operation. Do not touch the hot engine because it may cause urns.
c) Add oil till the full marking before start using the device.
d) Oil leaking from the machine should be reported to the appropriate services or comply with legal requirements applicable in the area of use.
e) Danger! Danger to health and the risk of explosion of the internal combustion engine.
f) Poisonous carbon monoxide is present in the engine exhaust. Remaining in a carbon monoxide environment may lead to losing consciousness or even death.
g): Protect the engine from heat, sparks and flame. Do not smoke in the vicinity of the chipper.
h) Before refuelling the engine should be turned off and cooled down.
i) Warning! Risk of engine damage due to wrong fuel. ii) Make sure that all users have read understood an
j. Make sure that all there have been, described and follow the manual.
k) Misuse or careless use of the device may cause serious injuries.
1) Before each cleaning, regulation, accessory change, or if the device is not in use, turn the engine off and completely cool the device.
m) Do not touch moving parts or accessories unless the engine is turned off and left to cool.
n): Stay away from moving and rotating parts as they may cause injury.
o) Do not use the machine if all protective covers are not installed.
p) Do not touch the silencer or other hot elements when the engine is hot it may cause serious burns.
q) Make sure that fuel is stored only in certified containers (e.g. canisleri).
r) Do not refuel near sparks, flames or lit cigarettes.
s) Stop the engine before refuelling. Never refuel while the engine is running or is still hot. Otherwise, spilled or evaporated fuel may catch fire from engine sparks or silencer heat.
t) Do not overfill fuel tank and avoid spilling fuel while refuelling. Spilled fuel or fuel fumes may catch fire. If fuel has been spilled, make sure that the area is dry before starting the engine.
u) After refuelling, make sure that the fuel tank cap is properly screwed on.
v) Do not operate the engine or refuel in enclosed areas without appropriate ventilation.
w) Avoid operating the machine in enclosed spaces, tunnels or other poorly ventilated places as the exhaust fumes contain lethal/harmful fumes and gases. If operating the machine in such conditions is unavoidable, provide adequate exhaust extraction.
x) To transport: Stop the engine. Close and secure the fuel tank cap. Switch the fuel valve to the "OFF-O" position. Drain the fuel tank before long-distance transportation or on bumpy roads.
y) Keep flammable materials (petrol, matches, straw, etc.) away from the exhaust.
2.3. SAFETY IN THE WORKPLACE
a) Make sure the workplace is clean and well lit. A messy or poorly lit workplace may lead to accidents. Try to think ahead, observe what is going on and use common sense when working with the device.
b) Do not use the device in a potentially explosive environment, for example in the presence of flammable liquids, gases or dust. The device generates sparks which may ignite dust or fumes.
c) If you discover damage or irregular operation, immediately switch the device off and report it to a supervisor without delay.
c) If there are any doubts as to the correct operation of the device, contact the manufacturer's support service.
e) Only the manufacturer's service point may repair the
1) In case of fire, use a powder or carbon dioxide (CO2) fire extinguisher (one intended for use on live electrical devices) to put it out
g1 Children or unauthorised persons are forbidden to enter a work station. (A distraction may result in loss of control over the device).
h) Use the device in a well-ventilated space.
i) Regularly inspect the condition of the safety labels. If the labels are illegible, they must be replaced.
j) Please keep this manual available for future reference. If this device is passed on to a third party, the manual must be passed on with it.
k) Keep packaging elements and small assembly parts in a place not available to children.
1) Keep the device away from children and animals.
m) If this device is used together with another equipment, the remaining instructions for use shall also be followed.
REMEMBER! When using the device, protect children and other bystanders.
2.4. PERSONAL SAFETY
a) Do not use the device when tired, ill or under the influence of alcohol, narcotics or medication which can significantly impair the ability to operate the device.
b) The machine may be operated by physically fit persons who are able to handle the machine, are properly trained, who have reviewed this operating manual and have received training in occupational health and safety.
c) The machine is not designed to be handled by persons (including children) with limited mental and sensory functions or persons lacking relevant experience and/or knowledge unless they are supervised by a person responsible for their safety or they have received instruction on how to operate the machine.
d) When working with the device, use common sense and stay alert. Temporary loss of concentration while using the device may lead to serious injuries.
e) Do not overestimate your abilities. When using the device, keep your balance and remain stable at all times. This will ensure better control over the device in unexpected situations.
f) The device is not a toy. Children must be supervised to ensure that they do not play with the device
2.5.SAFE DEVICE USE
a) Do not overload the device. Use the appropriate tools for the given task. A correctly-selected device will perform the task for which it was designed better and in a safer manner.
b) Do not use the device if the ON/OFF switch does not function properly (does not switch the device on and off). Devices which cannot be switched on and off using the ON/OFF switch are hazardous, should not be operated and must be repaired.
c) When not in use, store in a safe place, away from children and people not familiar with the device who have not read the user manual. The device may pose a hazard in the hands of inexperienced users.
d) Keep the device in perfect technical condition. Before each use check for general damage and especially check for cracked parts or elements and for any other conditions which may impact the safe operation of the device. If damage is discovered, hand over the device for repair before use.
e) Keep the device out of the reach of children.
f) Device repair or maintenance should be carried out by qualified persons, only using original spare parts. This will ensure safe use.
g) To ensure the operational integrity of the device, do not remove factory-fitted guards and do not loosen any screws.
h) Do not move, adjust or rotate the device in the course of work
i) Do not leave this appliance unattended while it is in USA
j) Clean the device regularly to prevent stubborn grime from accumulating.
k) The device is not a toy. Cleaning and maintenance may not be carried out by children without supervision by an adult person.
1) It is forbidden to interfere with the structure of the device in order to change its parameters or construction.
m) Keep the device away from sources of fire and heat. n) Do not cover the ventilation openings!
ATTENTION! Despite the safe design of the device and its protective features, and despite the use of additional elements protecting the operator, there is still a slight risk of accident or injury when using the device. Stay alert and use common sense when using the device.
- USE GUIDELINES
A power generator is a machine used to generate electricity. The user is liable for any damage resulting from unintended use of the device.
3.1. DEVICE DESCRIPTION

-
Muffler
-
Fuel filler cap
-
Fuel level indicator
-
Fuel tank
-
Control panel
-
Filter cover lock
-
Starter cord handle
-
Fuel valve switch
-
Air filter cover
-
Choke lever
-
Device frame
-
Offlier
-
Sparkpl
-
Spark plug
- Oil drain plug
- 2017年 ,
CONTROL PANEL

- Eco Mode On/Off Button
2 Load LED
-
Device overload LED
-
Power LED
-
Oil level
-
Display
-
RESET button
6 230V AC output socket fuse
-
230V AC output socket fuse
-
Ignition switch
-
DC socket fuse
-
Grounding clamp
-
12VDC output socket
-
230VAC output socket
3.2. PREPARING FOR USE
APPLIANCE LOCATION
The temperature of environment must not be higher than 40°C and the relative humidity should be less than 85%. Ensure good ventilation in the room in which the device is being used. There should be at least 10 cm distance between each side of the device and the wall or other objects. The device should always be used when positioned on an even, stable, clean, fireproof and dry surface, and be out of the reach of children and persons with limited mental and sensory functions.
3.3. DEVICE USE
3.3.1. PREPARING THE DEVICE FOR OPERATION
BEFORE EACH USE OF THE GENERATOR, IT IS NECESSARY TO:
- check the oil level, top up if necessary.
- check the fuel level, top up if necessary.
- ground the device
- check and, if necessary, remove any dirt from the muffler area and the starter cord.
Please note: A brand new device is not flooded with oil. Starting the engine without oil may damage the engine and void the warranty.
The device is protected against starting the engine when the oil level is too low. The protection is activated after an attempt to start the generator. In such a case, the oil level LED (5) comes on. It is possible to start the device and turn the alarm off after topping up the oil.
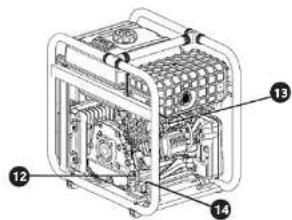
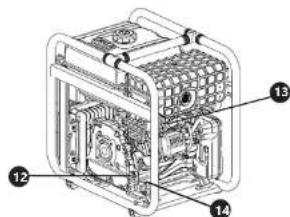
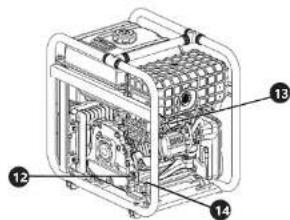
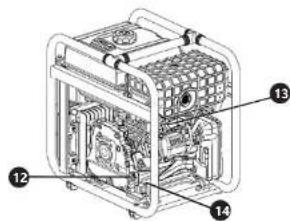
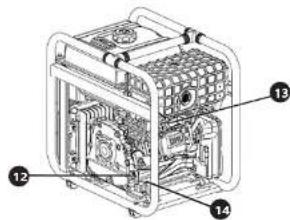
- Grounding
Connect the ground wire to the terminal (12). The ground wire cross-section should be min. 4mm2. The other end of the ground wire should be connected to a copper rod driven into the ground.
• Battery Connection (MSW-PGI3800E only)
Use an M6 nut to connect the battery ground wire to the cylinder head cover. Without the battery grounding connection, the device will not start.
natural_image
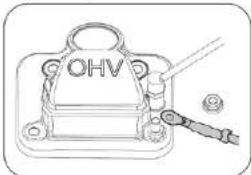
Technical line drawing of a mechanical component with labeled OHV and a tool (no text or symbols beyond labels)- Checking the oil level
To obtain a correct oil level measurement, place the device on a flat surface and wait until the level stabilizes.
Unscrew and pull out the oil filler plug (12) and the dipstick.
natural_image
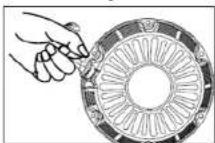
Technical line drawing of a mechanical component with no visible text or symbolsWipe the oil dipstick with the cloth and then put it back in the tank (Note: do not screw on!). After taking it out, check the tank oil level.
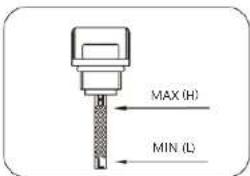
MAX - maximum level
MIN - minimum level
The correct engine oil level should be between "min" and "max". When the oil level drops below the minimum level, it should be topped up, but be careful not to exceed the max. graduation value. Check the engine oil level when the engine is cold or, if it is warm, at least a few minutes after it has stopped working.
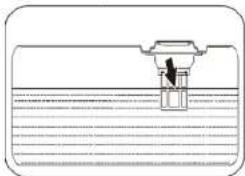
- Topping up the fuel tank
Always turn off the device before refuelling. Wait a while (about 2 minutes) until the pressure in the tank drops.
Slowly unscrew the fuel filler cap (2) anti-clockwise. Top up the fuel, remembering not to exceed the level indicated by the arrow in the figure below. Then, screw the cap back on.
natural_image
Simple line drawing of a mechanical component with a central shaft and base, no text or symbols present.*Use only fresh unleaded petrol. DO NOT use other
types of fuel or oil admixtures.
Please note: Avoid overfilling the fuel tank. It may damage the engine and void the warranty.
3.3.2. Using the generator
Please note. It is forbidden to start and stop the generator with connected receiver devices. Always disconnect external devices from the generator beforehand.
• Starting the generator
-
Before starting, disconnect external receiver devices from the generator. Reset the AC socket fuse (8.9) if it has tripped (if the cause of the fuse tripping has been removed).
-
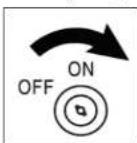
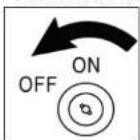
Set the fuel valve switch (8) to "ON"
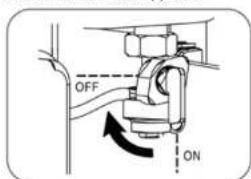
- Set the choke lever (10).
With a cold engine, move the choke lever to "ON" When the engine is warm, move it to the half-open position, if the engine does not start twice in a row, set the choke lever to "ON".
Please note: When operating the choke (10), always take into account the ambient temperature, engine temperature, etc.
-
Optionally, activate the ECO mode by pressing the (1) button (description of the ECO mode further in the manual).
-
Manual start up of the device
Turn the key in the ignition (10) to 'ON'.
Grasp the starter cord handle(7) and pull it slowly until you feel resistance. Then, pull on it energetically, holding the generator with your other hand to prevent it from moving, etc.
Please note: The starter cord being pulled back into the device very fast may pull the operator's hand towards the device faster than he releases it. Inadvertent starting may result in injury, e.g. fracture, bruising, etc.
of the engine does not start, stop pulling the cord and find the cause.
- If the engine does not start or is immediately stalled after 3 attempts, there may be not enough engine oil. - When you start the engine and its temperature rises, move the choke lever (10) to "OFF". If the engine is unstable (vibrations), set the lever (10) to the semi-open position, and when the engine stabilizes push he lever back to "OFF".
- Electric starter (MSW-PGI3800E only).
To start the generator, turn and hold the ignition key (10) in the starting position until the engine starts.
Please note: Do not hold the key in the starting position for more than 5 seconds, otherwise you may damage the engine!
If the engine does not start for the first time, a restart is possible after 10 seconds at the earliest. If the battery is not sufficiently charged, start the generator manually.
- Please note: After the generator is started and the connected devices are ready for use, the LED (4) will light up.
• ECO MODE
In the ECO mode, the device controls the engine speed, and thus optimizes the amount of energy produced in relation to the number of receiving devices connected to the generator. No electricity is produced when no loads are connected. As a result, both fuel consumption, and noise is reduced.
Turn on the mode by setting the button (1) to ON. Please note: Turn the ECO mode off by setting the button (1) to OFF if a receiving device requires a high inrush current
- Connecting the receiving devices
Make sure that the maximum power of the devices connected to the generator does not exceed the generator maximum power.
Before making the connection, check the technical condition of plugs and cables and the grounding connection.
Wait a few minutes after starting the generator. Always make sure the connected electrical devices are turned off. They can only be started when connected to a generator active output.
EN
EN
Always turn off the receiving devices before disconnecting them from the generator power outlet. If the receiving device overheats, disconnect it immediately.
- Overload protection
In the event that the generator is overloaded, the LED light (3) will turn red, while the LED light (4) will turn off. During this time, the device's motor will continue to run, although the power to the output sockets will be disconnected.
Follow these steps:
xReduce the total power of the load devices connected to the generator.
*Verify whether any receiving device or any of its power cords are not damaged.
×Check that the air vents are free from contamination and that the device itself shows no signs of failure. ×Reset the protection by pressing the RESET button (7)
- Turning the generator off
Do NOT turn off the generator with operating receiving devices connected to the output sockets. Always remove plugs from outlet sockets.
*Set the button (1) to ON, then let the engine run for a few minutes without any load.
×Set the switch (10) to OFF
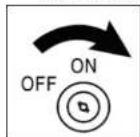
» turn the fuel valve switch (8) to "OFF"
3.3.3 ENGINE MAINTENANCE
- Oil top up/replacement Please note: use only oil intended for four-stroke petrol engines. It is recommended to use SAE 10W-30 viscosity oil. When the device operates at very low or high ambient temperature, follow the chart below for the selection of the oil.

bar
| Range | Value | |---|---| | 10W-40 | 100 | | 10W-30 | 80 | | 5W-30 | 20 |To top up the oil, follow the instructions below:
»Unscrew the oil filler cap and the dipstick, and pull it out.
natural_image
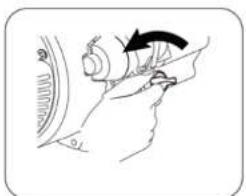
Line drawing of a hand holding a car tire with an arrow indicating rotation (no text or symbols)» Insert the funnel.
» Top the oil up to the correct level.
» After topping up, remove the funnel and turn the cap
Please note: The maximum oil level must never be exceeded.
To remove the oil from the device, follow the instructions below:
» Place the device on a flat surface.
» Clean dirt around the oil filler neck and the drain plug.
» Unscrew the oil filler dipstick and pull it out.
» Unscrew the oil drain plug and allow the oil to drain.
» Close the drain plug and oil filler.
Please note: It is advisable to drain the oil while the engine is still warm (but not hot!).
Please note: Used oil must be disposed of in accordance with local regulations.
• Air filter
Do NOT start the engine without the air filter in place.
- Filter cover lock
- Filter cover
- Filter
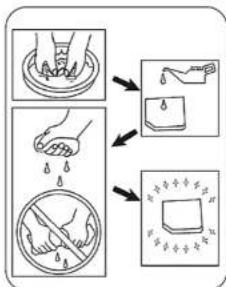
To clean the air filter:
» loosen the lock of the filter cover and remove the cover.
» remove the foam filter element, and wash it with detergent and warm water.
» soak the filter with clean engine oil and squeeze out the excess.
» Put the filter in its place and fix it. Then, put the cover back on.
flowchart
graph TD
    A["Hand washing in bowl"] --> B["Drain cleaning"]
    B --> C["Disinfection with water drop"]
    C --> D["Water displacement with surface finish"]
- Spark plug
Please note: disassembly, replacement and adjustment of the electrode gap should be done when the engine is cold (and the spark plug is cold)!
» To replace the spark plug, open the spark plug cover and then clean the socket of debris. - remove the spark plug boot, then use a socket wrench to unscrew the spark plug.
» Check the spark plug and spark plug washer for wear or damage. Replace if necessary. If the spark plug is to be reused, clean it with a wire brush.
» Check spark plug boot. Carefully bend the side electrode down, adjust the gap if necessary. The gap between the electrodes should be 0.6-0.8mm.
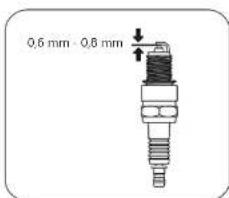
» Carefully insert the spark plug into the socket on the engine. Then tighten it, the tightening torque of the spark plug is 15-20 N.m.
Put the boot on the spark plug, close the plug cover.
3.4. CLEANING AND MAINTENANCE
a) Every time before you clean, adjust or replace the accessories, make sure that the generator engine is turned off.
b) Use only non-corrosive cleaners to clean the surface.
c) After cleaning the device, all parts should be dried completely before using it again.
d) Store the unit in a dry, cool place, free from moisture and direct exposure to sunlight.
c) Do not spray the device with a water jet or submerge it in water.
f) Do not allow water to get inside the device through vents in the housing of the device.
g) Clean the vents with a brush and compressed air.
The device must be regularly inspected to check its technical efficiency and spot any damage.
i) Use a soft, damp cloth for cleaning.
j) Do not use sharp and/or metal objects for cleaning (e.g. a wire brush or a metal spatula) because they may damage the surface material of the appliance.
k) Do not clean the device with an acidic substance, agents of medical purposes, thinners, fuel, oils or other chemical substances because it may damage the device.
To avoid discharging it, disconnect the battery during storage (MSW PGI3800E only). The generator should be started at least every 2 weeks and work for at least 20 minutes. When storing the device for an extended period of 2 months or longer, perform the following stops:
» wait for the device engine to cool down after work.
» clean the device in accordance with the above recommendations.
» empty the fuel tank, fuel lines and carburettor to protect rubber elements from damage,
- drain engine oil
- Remove the spark plug, pour about 15ml of oil into the cylinder. Gently and slowly pull the starter handle (7) to distribute the oil and lubricate the cylinder. Replace the spark plug.
MAINTENANCE CALENDAR
| Each time before use | ||||||
| The first month or 20h | Every 3 months or 50h | Every 6 months or 100h | ||||
| Replacement | ✓ | ✓ | ||||
| Air filter | Inspection | ✓ | ||||
| Cleaning* | ✓ | |||||
| Spark plug | Inspection and adjustment | ✓ | ||||
| Replacement | ✓ | |||||
| Idle speed | Inspection and adjustment ** | ✓ | ||||
| Valve clearance | Inspection and adjustment ** | ✓ | ||||
| Oil line | Inspection ** | |||||
When operating the device in a polluted, dusty environment, the inspections should be performed more frequently.
Activities should be performed by specialists at the manufacturer's authorized service point.
SAFE REMOVAL OF BATTERIES AND RECHARGEABLE BATTERIES.
Remove used batteries from the device.
Recycle batteries with the appropriate organisation or company.
DISPOSING OF USED DEVICES
Do not dispose of this device in municipal waste systems. Hand it over to an electric and electrical device recycling and collection point. Check the symbol on the product, instruction manual and packaging. The plastics used to construct the device can be recycled in accordance with their markings. By choosing to recycle you are making a significant contribution to the protection of our environment. Contact local authorities for information on your local recycling facility.
DANE TECHNICZNE


natural_image
Line drawing of a mechanical device with a handle and screwdriver (no text or symbols)natural_image
Technical line drawing of a mechanical fan or impeller assembly (no text or symbols)natural_image
Simple line drawing of a mechanical component with a central shaft and base, no text or symbols present.natural_image
Line drawing of a hand using a tool to adjust or install a mechanical component (no text or symbols present)- Blokada osłony filtra
- Oslona filtra
- Fitr
natural_image
Technical line drawing of a mechanical component with no visible text or symbolsnatural_image
Technical line drawing of a mechanical fan or impeller assembly (no text or symbols)natural_image
Simple line drawing of a person standing at a podium above water, enclosed in a rounded rectangular frame (no text or symbols)natural_image
Line drawing of a hand adjusting a mechanical component with an arrow indicating rotation (no text or symbols)flowchart
graph TD
    A["Water washing"] --> B["Cleaning"]
    B --> C["Disinfection with raindrops"]
    C --> D["Water disinfection with drops"]
• Zapalovací svíčka
FR
FR
natural_image
Line drawing of a vehicle battery pack with a handle and screwdriver (no text or symbols)natural_image
Technical line drawing of a mechanical fan or impeller assembly (no text or symbols)MAX - niveau maximum.
MIN - nivseu minimu
natural_image
Simple line drawing of a person standing at a podium on water, enclosed in a rounded rectangular frame (no text or symbols)natural_image
Line drawing of a hand using a tool to adjust or install a mechanical component (no text or symbols present)• Bougie d'allumage
natural_image
Line drawing of a mechanical device with a handle and screwdriver (no text or symbols)natural_image
Technical line drawing of a mechanical fan or impeller assembly (no text or symbols)natural_image
Simple line drawing of a person standing at a podium on a platform, with horizontal lines indicating horizontal positions (no text or symbols)bar
| Range | Value | |---|---| | 10W-40 | -20 | | 10W-30 | -10 | | 5W-30 | -20 | | 10W-40 (Right) | 100°F (Right) | | 10W-30 (Right) | 80°F (Right) | | 5W-30 (Left) | 60°F (Left) |natural_image
Line drawing of a hand holding a car tire with an arrow indicating direction (no text or symbols)«Inserire un imbuto. »Vierta aceite hasta llegar al nivel adecuado »Quando avete finito di rabboccare l'olio, togliete l'imbuto e tappate il collo di riempimento.
ES
ES
natural_image
Technical line drawing of a mechanical component with a wrench and screwdriver (no text or symbols)natural_image
Technical line drawing of a mechanical component with no visible text or symbolsMAX: nivel máximo
MIN: nivel mínimo
natural_image
Simple line drawing of a person sitting on a platform above water, enclosed in a rounded rectangle (no text or symbols)natural_image
Line drawing of a hand holding a car tire with an arrow indicating direction (no text or symbols)flowchart
graph TD
    A["Water being mixed"] --> B["Water drops"]
    B --> C["Water is dissolved"]
    C --> D["Water is removed"]
NAMEPLATE TRANSLATIONS
| MSW MOTOR TECHNOLOGY | CE | i | II | III | 4 | I | ! | expondo.com | |
| 1 | Product Name: | 7 | Max Power: | 5 | Power Factors: | ||||
| 2 | Modal: | 8 | Performance Class: | 6 | Weight: | ||||
| 3 | Voltage/Frequency: | 9 | Rated Current: | 7 | Production Year: | ||||
| 4 | Rated Power: | 10 | Quality Class: | 8 | Serial No: | ||||
| 5 | DC Voltage: | 11 | Protection Class: | 9 | e9*2016/1628*2017/656SHB3/P*1055*01 (V) | ||||
| 1 | 2 | 3 | 4 | 5 | |
| DE | Product Name | Model | Voltage /Frequency | Rated Output | DC Voltage |
| EN | Produktname | Modell Spannung/Frequenz Nennleistung | Nennspannung DC | ||
| PL | Nazwa produktu | Model | Napięcic/Częstotliwość | Znamionowa mocwyściowa | Napięcie znamionowoDC |
| CZ | Název výrobku | Model | Napětí/Frekvence | Jmenovitý výkon | Jmenovité napětí DC |
| FR | Nom du produit | Modèle | Tension/Fréquence | Puissance nominale | Tension nominale DC |
| IT | Nome del prodotto | Modello | Tensione/Frequenza | Potonza nominal | Tensione nominal DC |
| ES | Nombre del producto | Modelo | Voltaje/Frecuencia | Potencia nominal | Tension nominal CC |
| 6 | 7 | 8 | 9 | 10 | |
| DE | Manufacturer | Max. Power | Performance Class | Rated Current | Quality Class |
| EN | Hersteller | Maximale Leistung | Leistungsklasse | Nennstrom | Qualitätsklasse |
| PL | Producent | Moc maksymalna | Klasa wydajności | Prąd znamionowy | Klasa jakości |
| CZ | Výrobce | Maximalni výkon | Výkonnostní třída | Jmenovitý proud | Třída kvality |
| FR | Feoricant | Puissance maximale | Classe de performance | Courant nominal | Classe de qualité |
| II | Produktore | Potenza massima | Classe di efficienza | Corrente nominale | Classe di qualità |
| ES | Fabricante | Potencia máxima | Clase de eficiencia | Corrente nominal | Clase de calidad |
| 11 | 12 | 13 | 14 | 15 | |
| DE | IP Grade | Power Factor | Weight | Production Year | Serial No. |
| EN | Schutzklasse | Leistungsfaktor | Gewicht | Herstellungsjahr | Seriennummer |
| PL | Klasa ochronnosci | Współczynnik mocy | Waga | Rok produkcji | Numer serjyny |
| CZ | Ifida ochrany | Účinik | Hmotnost | Rok výroby | Sériové číslo |
| FR | Classe de protection | Facteur de puissance | Poids | Année de fabrication | Numero de série |
| IT | Classe di protezione | Fattore di potenza | Peso | Anno di produzione | Numero di serie |
| ES | Clase de aislamiento | Factor de potencia | Peso | Año de fabricación | Número de serie |
For the disposal of the device please consider and act according to the national and local rules and regulations.
CONTACT
expondo Polska sp. z o.o. sp. k.