OBD2 - Measuring equipment MSW - Free user manual and instructions
Find the device manual for free OBD2 MSW in PDF.

| Product type | OBD2 diagnostic code reader |
| Available models | MSW-OBD1, MSW-OBD2, MSW-OBD3 |
| Supply voltage | 8-25 V DC (OBD1/OBD2), 8-18 V DC (OBD3) |
| Dimensions (L x D x H) | 80 x 140 x 20 mm (OBD1), 80 x 130 x 20 mm (OBD2), 75 x 130 x 20 mm (OBD3) |
| Weight | 0.15 kg (OBD1/OBD2), 0.2 kg (OBD3) |
| Vehicle compatibility | 12V vehicles with OBD II/EOBD system and 16-pin connector |
| Main functions | Reading and erasing DTC codes, live data stream, freeze frame, I/M readiness, vehicle information (VIN, CID, CVN) |
| Additional functions (OBD2) | DTC lookup, start test, load test, FN shortcut key |
| Additional functions (OBD3) | Programmable FN key, beep adjustment, analysis tool mode and ready test mode |
| Display | Backlit screen with adjustable contrast (OBD1), navigation and confirmation keys |
| Power supply | Via vehicle OBD II socket, battery voltage ≥ 8 V |
| Operating temperature | 0 °C to 60 °C |
| Safety | Warnings: do not use in explosive environment, disconnect before cleaning, do not immerse, use only on stationary vehicle |
| Maintenance and cleaning | Soft slightly damp cloth, no solvents or water jets, store in a dry place |
| Spare parts and repairability | Repairs only by authorized service, no internal modifications |
| General information | CE compliant, end-of-life recycling, supplied with multilingual manual |
Frequently Asked Questions - OBD2 MSW
User questions about OBD2 MSW
0 question about this device. Answer the ones you know or ask your own.
Ask a new question about this device
Download the instructions for your Measuring equipment in PDF format for free! Find your manual OBD2 - MSW and take your electronic device back in hand. On this page are published all the documents necessary for the use of your device. OBD2 by MSW.
USER MANUAL OBD2 MSW


MSW-OBD3:
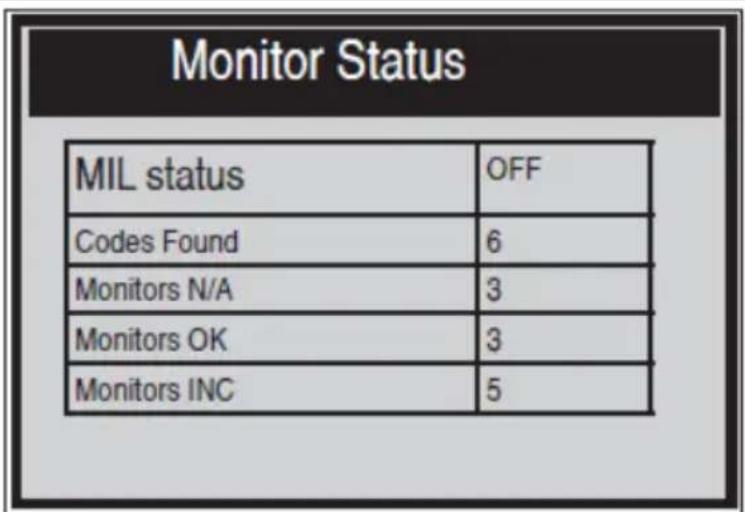
| Monitor Status | |
| MIL status | OFF |
| Codes Found | 6 |
| Monitors N/A | 3 |
| Monitors OK | 3 |
| Monitors INC | 5 |
Erase Failure. Turn Key on with Engine Off! Press any key to con.
(3) Datenstrom
| Since DTCs Cleared 1/6 | |
| MIL Status | OFF |
| Misfire Monitor | OK |
| Fuel System Mon | OK |
| Comp. Component | OK |
| Catalyst Mon | INC |
| Htd Catalyst | N/A |
| This Drive Cycle 1/6 | |
| MIL Status | OFF |
| Misfire Monitor | OK |
| Fuel System Mon | OK |
| Comp. Component | OK |
| Catalyst Mon | INC |
| Htd Catalyst | N/A |
Turn off all devices, increase RPM to 2500-3000r/min and keep 10 seconds Press ENTER continue
Turn on headlights and air conditioner to the maximum, keep RPM idle for 10 seconds Press ENTER continue
other
I/M Readiness | Code | Check | IGN | Spark | |---|---|---|---| | MIL | CHECK | | spark | | DTC | 0 | Pd DTC | 0 | | MIS | ☐ | EVAP | ☐ | | FUE | ☐ | AIR | ☐ | | CCM | ☐ | O2S | ☐ | | CAT | ☐ | HRT | ☐ | | HCAT | ☐ | EGR | ☐ |This User Manual has been translated for your convenience using machine translation. Reasonable efforts have been made to provide an accurate translation; however, no automated translation is perfect nor is it intended to replace human translators. The official User Manual is the English version. Any discrepancies or differences created in the translation are not binding and have no legal effect for compliance or enforcement purposes. If any questions arise related to the accuracy of the information contained in the User Manual, please refer to the English version of those contents which is the official version.
Technical data
| Parameter description | Parameter value | ||
| Product name | OBD2 code reader | ||
| Model | MSW-OBD1 | MSW-OBD2 | MSW-OBD3 |
| Rated voltage DC [V~] | 8-25 | 8-25 | 8-18 |
| Dimensions [Width x Depth x Height; mm] | 80 x 140 x 20 | 80 x 130 x 20 | 75 x 130 x 20 |
| Weight [kg] | 0.15 | 0.15 | 0.2 |
| Compliant | All vehicles with 12V electric system and equipped with OBD II/EOBD system | ||
1. General description
The user manual is designed to assist in the safe and trouble-free use of the device. The product is designed and manufactured in accordance with strict technical guidelines, using state-of-the-art technologies and components. Additionally, it is produced in compliance with the most stringent quality standards.
DO NOT USE THE DEVICE UNLESS YOU HAVE THOROUGHLY READ AND UNDERSTOOD THIS USER MANUAL.
To increase the product life of the device and to ensure trouble-free operation, use it in accordance with this user manual and regularly perform maintenance tasks. The technical data and specifications in this user manual are up to date. The manufacturer reserves the right to make changes associated with quality improvement. The device is
designed to reduce noise emission risks to a minimum, taking into account technological progress and noise reduction opportunities.
Legend
 | The product satisfies the relevant safety standards. |
 | Read instructions before use. |
 | The product must be recycled. |
 | WARNING! or CAUTION! or REMEMBER! Applicable to the given situation.(general warning sign) |

PLEASE NOTE! Drawings in this manual are for illustration purposes only and in some details may differ from the actual product.
2. Usage safety

ATTENTION! Read all safety warnings and all instructions. Failure to follow the warnings and instructions may result in electric shock, fire and/or serious injury or even death.
The terms "device" or "product" are used in the warnings and instructions to refer to the:
OBD2 code reader
a) The plug must fit the socket. Do not modify the plug in any way. Using original plugs and matching sockets reduces the risk of electric shock.
b) Avoid touching earthed elements such as pipes, heaters, boilers and refrigerators. There is an increased risk of electric shock if the earthed device is exposed to rain, comes into direct contact with a wet surface or is
operating in a damp environment. Water getting into the device increases the risk of damage to the device and of electric shock.
c) Use the cable only for its designated use. Never use it to carry the device or to pull the plug out of a socket. Keep the cable away from heat sources, oil, sharp edges or moving parts. Damaged or tangled cables increase the risk of electric shock.
d) Do not use the device if the power cord is damaged or shows obvious signs of wear. A damaged power cord should be replaced by a qualified electrician or the manufacturer's service centre.
e) ATTENTION! DANGER TO LIFE! While cleaning, never immerse the device in water or other liquids.
f) Make sure the workplace is clean and well lit. A messy or poorly lit workplace may lead to accidents. Try to think ahead, observe what is going on and use common sense when working with the device.
g) Do not use the device in a potentially explosive environment, for example in the presence of flammable liquids, gases or dust. The device generates sparks which may ignite dust or fumes.
h) If there are any doubts as to the correct operation of the device, contact the manufacturer's support service.
i) Only the manufacturer's service point may repair the device. Do not attempt any repairs independently!
j) In case of fire, use a powder or carbon dioxide (CO2) fire extinguisher (one intended for use on live electrical devices) to put it out.
k) Please keep this manual available for future reference. If this device is passed on to a third party, the manual must be passed on with it.
l) Keep packaging elements and small assembly parts in a place not available to children.
m) Keep the device away from children and animals.
n) If this device is used together with another equipment, the remaining instructions for use shall also be followed.
o) The device can be handled only by physically fit persons who are capable of handling it, properly trained, familiar with this manual and trained within the scope of occupational health and safety.
p) The device is not a toy. Children must be supervised to ensure that they do not play with the device.
q) Do not use the device if the ON/OFF switch does not function properly (does not switch the device on and off). Devices which cannot be switched on and off using the ON/OFF switch are hazardous, should not be operated and must be repaired.
r) When not in use, store in a safe place, away from children and people not familiar with the device who have not read the user manual. The device may pose a hazard in the hands of inexperienced users.
s) Keep the device in perfect technical condition. Before each use check for general damage and especially check for cracked parts or elements and for any other conditions which may impact the safe operation of the device. If damage is discovered, hand over the device for repair before use.
t) Keep the device out of the reach of children.
u) Device repair or maintenance should be carried out by qualified persons, only using original spare parts. This will ensure safe use.
v) To ensure the operational integrity of the device, do not remove factory-fitted guards and do not loosen any screws.
w) Do not leave this appliance unattended while it is in use.
x) It is forbidden to interfere with the structure of the device in order to change its parameters or construction.
y) Keep the device away from sources of fire and heat.
z) Do not overload the device.

ATTENTION! Despite the safe design of the device and its protective features, and despite the use of additional elements protecting the operator, there is still a slight risk of accident or injury when using the device. Stay alert and use common sense when using the device.
3. Use guidelines
The product is designed to read and diagnose vehicles OBD II/EOBD system that monitors emission control system and key drivetrain components of modern vehicles equipped with 12V electrical system and standardized 16-pin connector. The user is liable for any damage resulting from unintended use of the device.
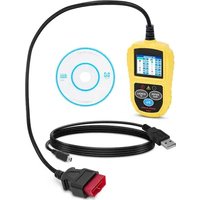
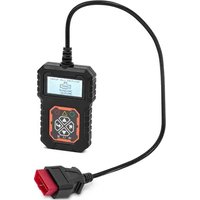
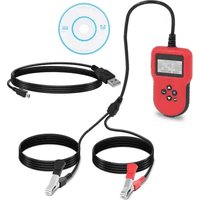
3.1. Device description
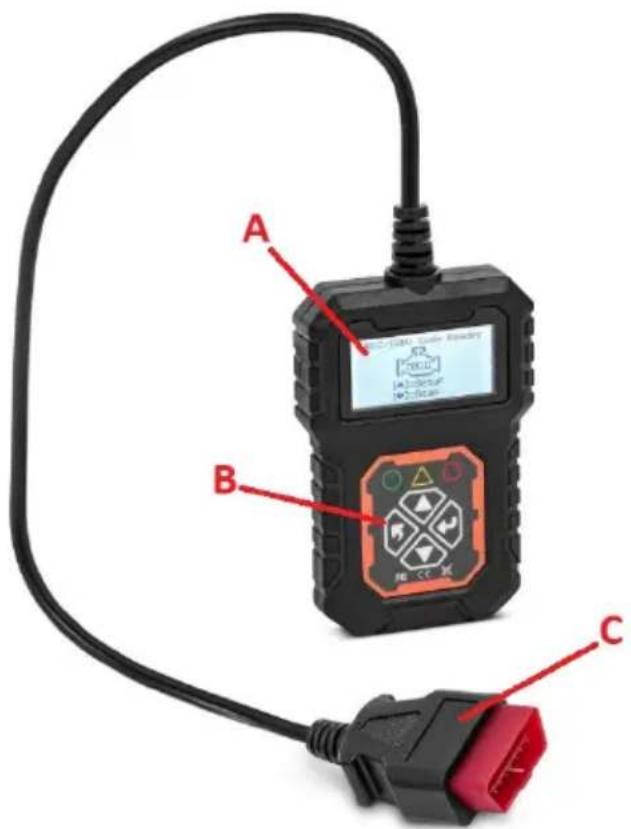
MSW-OBD1:
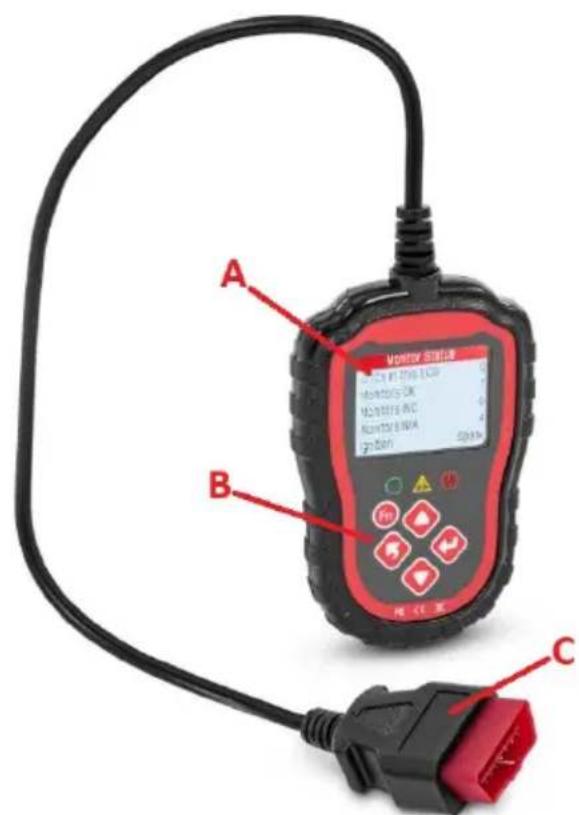
MSW-OBD2:
MSW-OBD3:
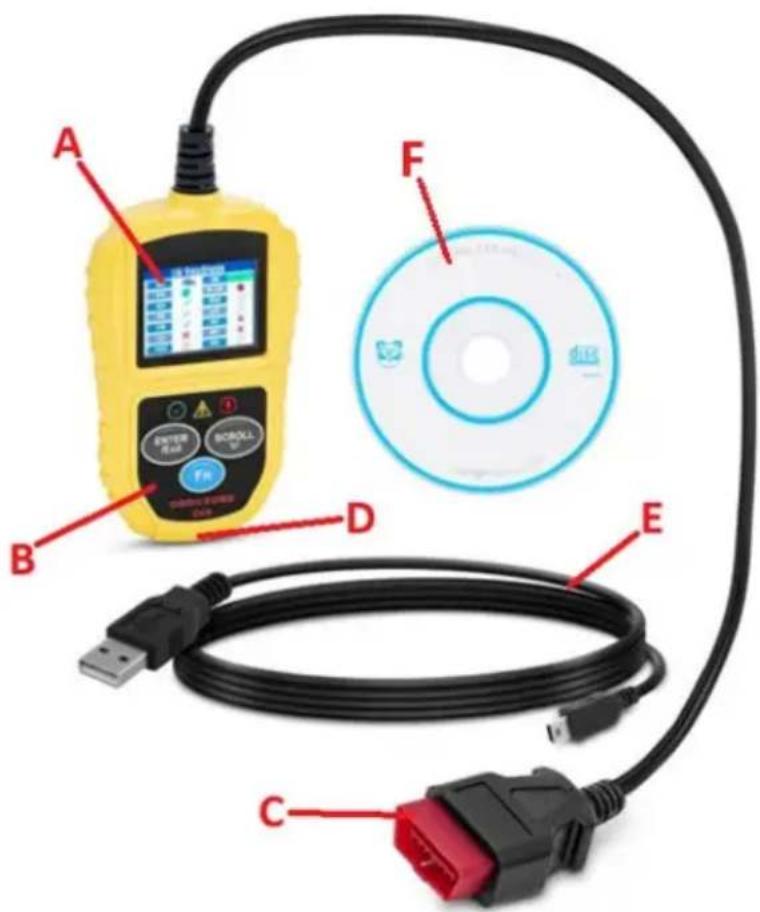
A. Display
B. Control panel
C. OBD II connector
D. USB socket
E. USB cable for data transfer
F. CD with PC-software
3.2. Preparing for use
The temperature of environment must not exceed the span 0 - 60°C. Make sure the vehicle is parked with turned off engine and the parking brake engaged. In vehicles with automatic transmission the gear lever should be positioned in “Park” (P) and cars with manuals transmission in neutral.
Locate the OBD II socket in the vehicle – most often under the dashboard on the driver side, somewhere near the steering column or pedals; could be also behind some plastic cover/plug or (on some Asian or European brand vehicles) ashtray. Position the device such that you always have access to the power plug. The power cord connected to the appliance must correspond to the technical details
on the product label. The product is powered via the OBD II interface connection from the tested vehicle – the vehicle's battery must have at least 8V voltage.
3.3. Device use
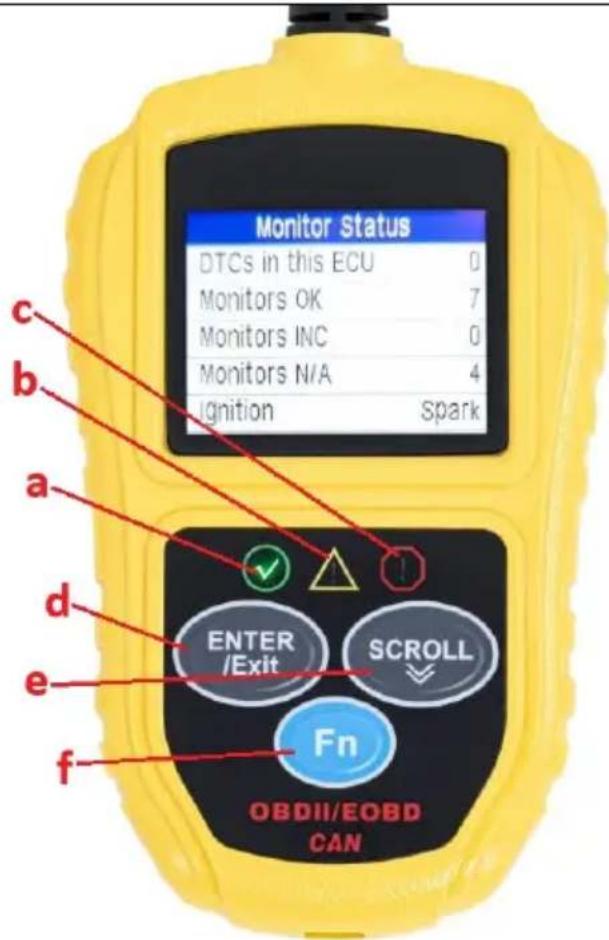
3.3.1 Control panel
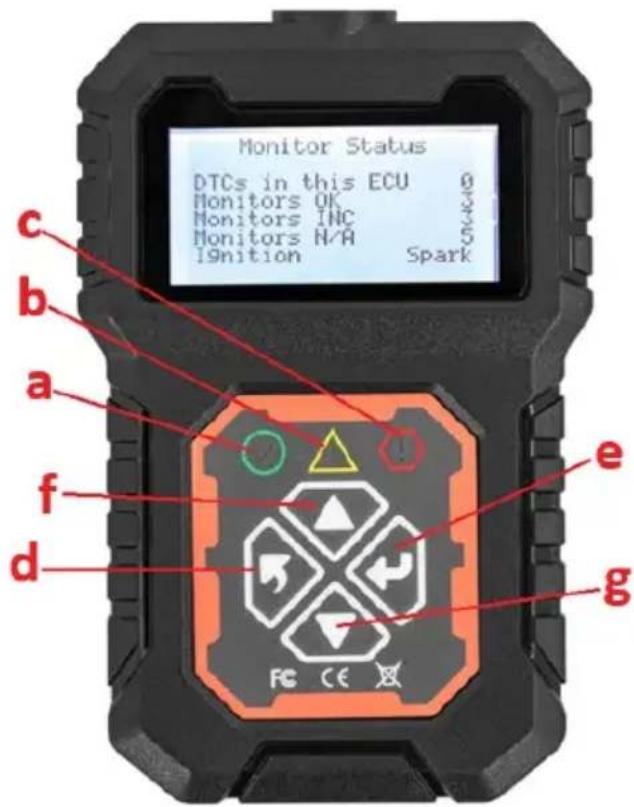
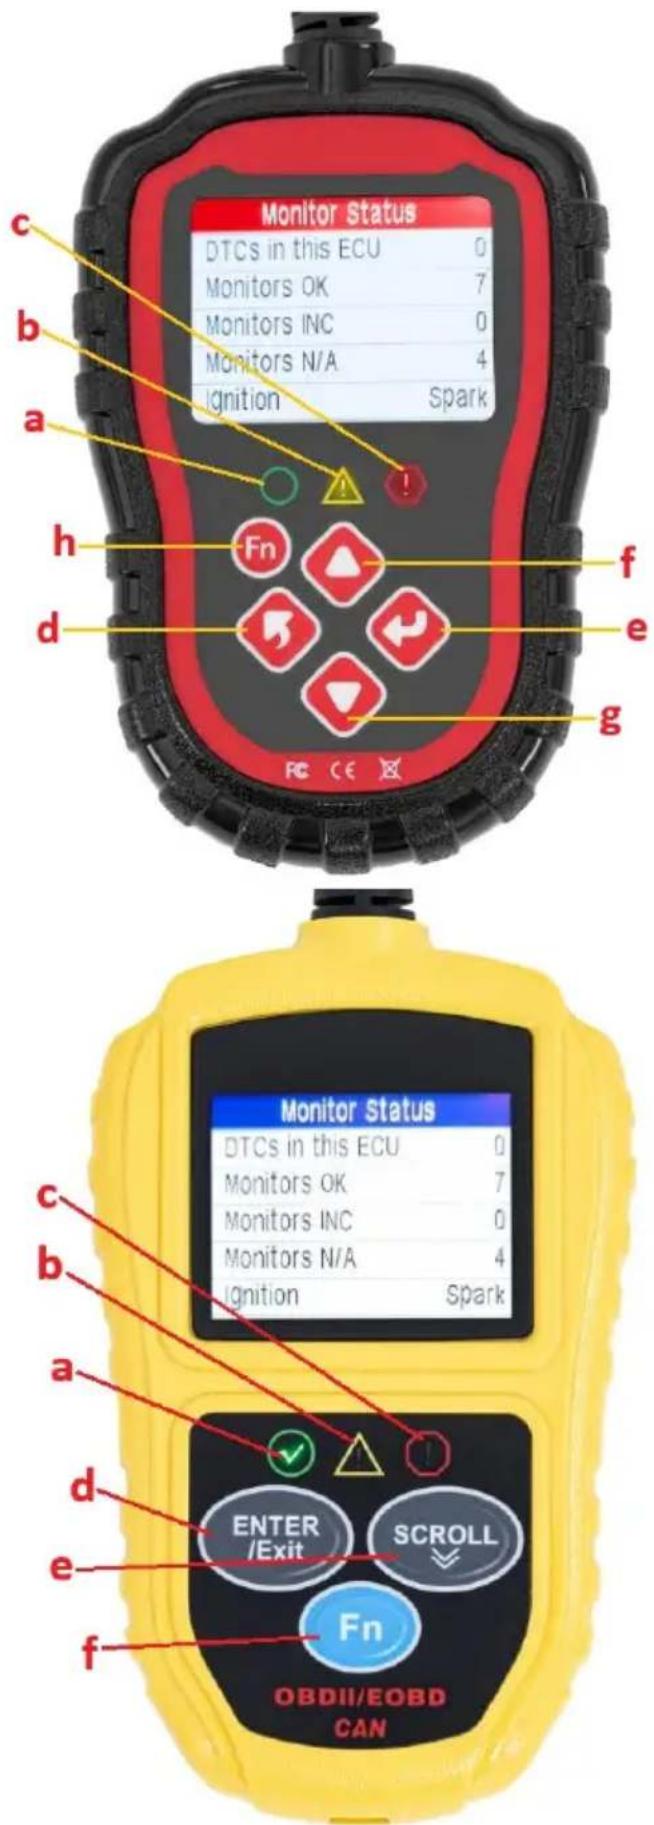
a) Green LED icon – indicates correct engine operation, no diagnostic trouble codes (DTC), all vehicle's sensors operating withing tolerance.
b) Yellow LED icon – indicates a possible problem. Some diagnostics could not be performed and/or DTC is pending.
c) Red LED indicator – indicates a problem with engine or drivetrain. The malfunction indicator light (MIL) also known as check engine icon or just “check engine” or “service engine soon” indicator might be illuminating on the vehicle’s instrument panel.
d) Back-button – go to the previous menu/exit.
e) Enter-button – go to/confirm chosen option.
f) Scroll up
g) Scroll down
h) Function quick access button (MSW-OBD2 only)
MSW-OBD3:
a) Green LED icon – indicates correct engine operation, no diagnostic trouble codes (DTC) all vehicle's sensors operating with allowed limit.
b) Yellow LED icon – indicates a possible problem. Some diagnostics could not be performed and/or DTC is pending.
c) Red LED indicator – indicates a problem with engine or drivetrain. The malfunction indicator light (MIL) also known as check engine icon or just “check engine” or “service engine soon” indicator might be illuminating on the vehicle’s instrument panel.
d) ENTER/Exit-button - confirms a selection (or action) from a menu or returns to previous menu.
e) SCROLL-button – scrolls through different menus.
f) FN-button – shortcut button for 4 quick including I/M readiness, diagnostic code read, usual data stream and all data stream.
3.3.2 Connecting to the vehicle's interface
- Start the vehicle's engine and plug the OBD II connector into the vehicle's OBDII interface.
- Enter the device's main interface and click ENTER-button to start scanning the vehicles (DLC) system – the software enters the engine system by default.
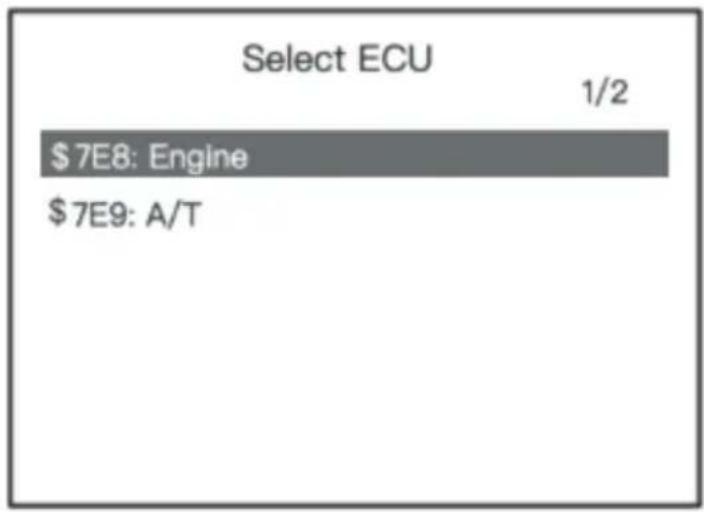
- If the vehicle is equipped with automatic transmission a dual system is detected, so the user can choose which system to enter:
\$7E8: Engine: engine management
Or
\$7E9: A/T Transmission system.
MSW-OBD3:
- Plug the device to the OBD II port.
- Turn the ignition on – engine can remain off or can be running.
- Use SCROLL-button to select Diagnostics (OBD/EOBD) from the interface main screen.
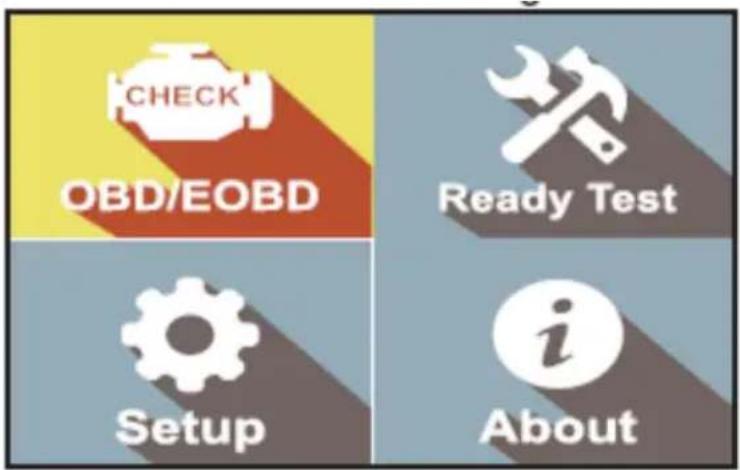
- Press ENTER-button and wait for the menu to appear. A sequence of messages displaying the OBDII protocols will be observed on the display until the vehicle protocol is detected.
NOTE: if the device fails to communicate with the vehicle's ECU more than 3 times, a "LINKING ERROR!" message will show up on the display.
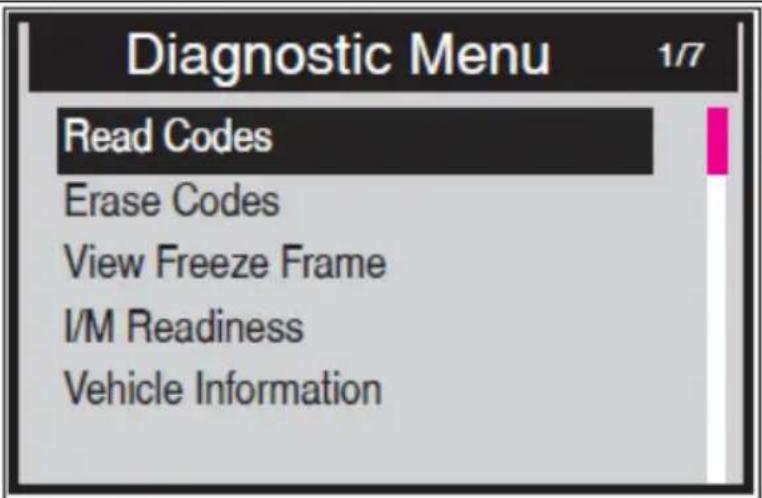
- View a summary of system status (MIL, DTC counts, Monitor status) on the screen. Wait a few seconds or press any key for Diagnostic Menu to come up:
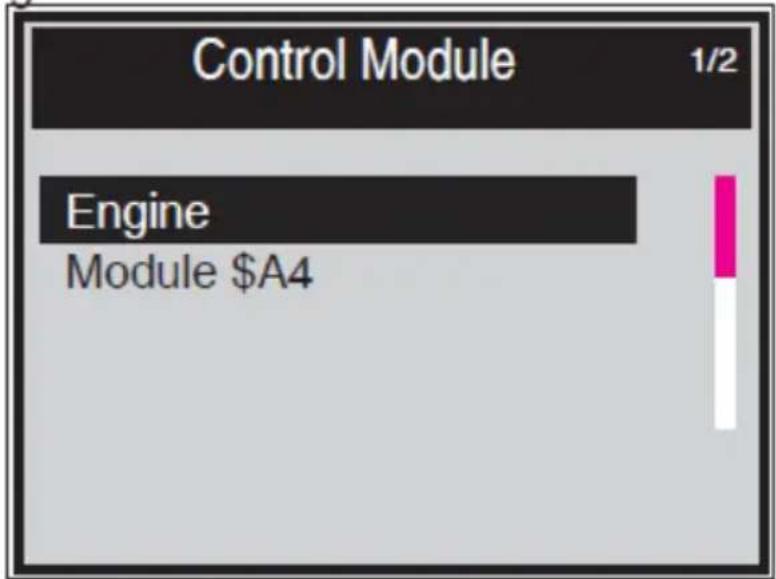
- If more than one module is detected, the user will be prompted to select a module before testing:
bar
| Category | Value | |---|---| | Control Module | 1/2 | | Engine | | | Module $A4 | |- Use SCROLL-button to select a module and press the ENTER-button to confirm choice.
3.3.3 Diagnostic menu MSW-OBD1/MSW-OBD2:

(1) Read Codes: read the diagnostic trouble code (DTC) in the engine or transmission system and display the standard definition.
(2) Erase Codes: Clear all DTC's in the system.
(3) Data Stream: Read and display all supported sensor data, up to 249 types of parameters.
(4) Freeze Frame: The freeze frame data records the vehicle operating status information (fault code, vehicle speed, engine rpm, coolant temperature etc.) at the moment when an emission-related fault occurs.
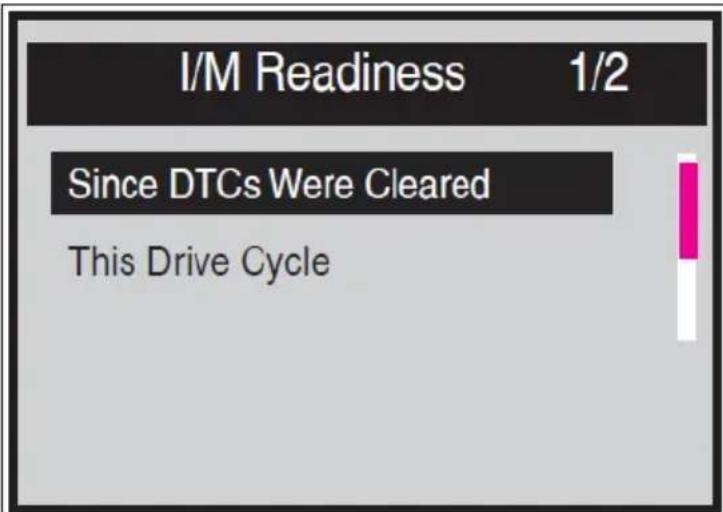
(5) I/M Readiness: I/M Readiness function is used to check the operation of the emission system on OBD II complaint vehicles.
Some latest vehicle models may support 2 types of I/M Readiness tests:
- Since DTC's Cleared – indicates status of the monitors since the DTC's are erased.
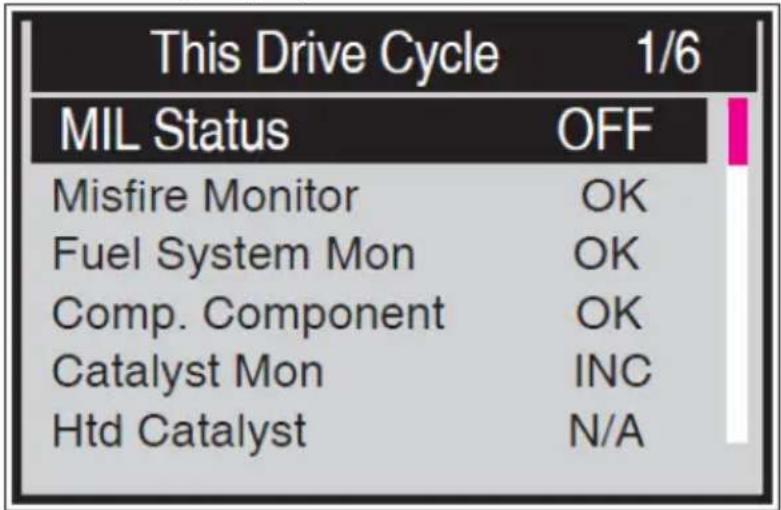
- This Drive Cycle – indicates status of monitors since the beginning of current drive cycle.
"OK": completed diagnostic testing
"INC": not completed diagnostic testing
"N/A": not supported
(6) Vehicle Information:
Review vehicle identification number (VIN), calibration identification number (IDs), calibration verification number (CVNs)
MSW-OBD3:
(1) Select "Read Codes" and press ENTER-button in "Diagnostic Menu". If there are some codes, the screen will display the codes as shown below:
Use the SCROLL-button to select "Stored Codes" or "Pending Codes" form the "Read Codes" menu and press ENTER-button:
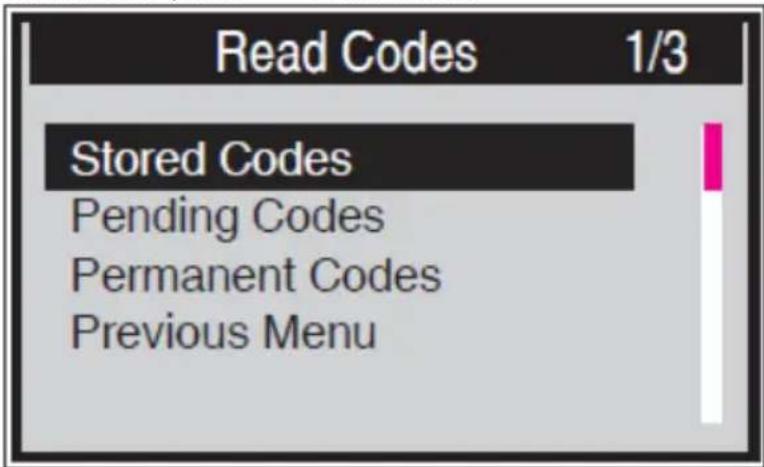
If there is none DTC, the display indicates "No (pending) codes stored in the module!" Wait a few seconds or press any key to return to previous screen.
NOTE: "Permanent Codes" function is available for merely vehicles supporting the CAN protocols.
View DTCs and their definitions on screen. Press ENTER-button to return to previous screen.
| Stored Codes | |
| P0143 | 1/3 |
| O2 Sensor Circuit Low Voltage Bank 1 Sensor 3 | |
(2) "Erase Codes"
This function is for deleting stored DTCs but does not permanently delete codes if the faulty hasn't been repaired or inspected by a mechanic. The previously stored DTC may return until the fault will be solved. This function will be performed only when the ignition is on but the engine is off – do not start the engine!
- Use the SCROLL-button to select "Erase Codes" in diagnostic menu and press the ENTER-button
• A message comes up asking for confirmation:
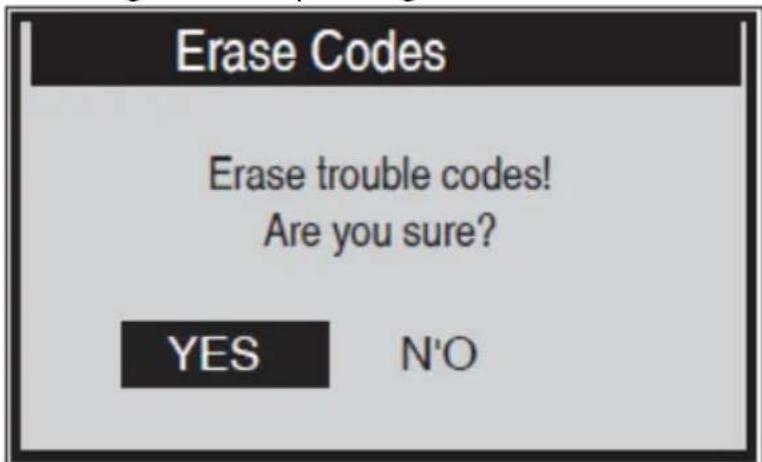
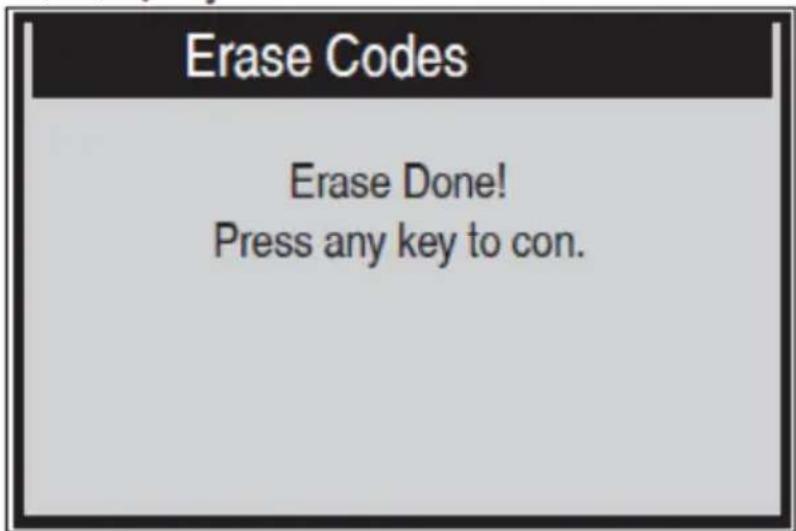
- Using SCROLL-button choose the desired action. By choosing "NO" a message "Command Cancelled!" will show up. Wait few seconds or press any key to return to "Diagnostic Menu". If You choose to erase DTCs and confirm by pressing ENTER-button when the codes cleared successfully an "Erase Done!" confirmation message will show on the display:
- If the codes are not cleared, then an "Erase Failure. Turn Key on with Engine off!" message appears:
Erase Codes
Erase Failure. Turn Key on with Engine Off! Press any key to con.
(3) Data Stream
The Data View function allows to check live or real time PID data of vehicle's computer module(s). In vehicles with more ECUs more live data can be found and displayed – on some latest cars up to about 300, however the quantity of live data depend on each car ECU.
- Use the SCROLL-button to select Data Stream from "Diagnostics Menu" and press the ENTER-button.
NOTE: if there is no freeze frame data available, an additional message "No Data Stream!" shows on the display.
| All Datastream | 1/17 | |
| Fuelsys1 | CL | |
| Fuelsys2 | ---- | |
| Load_PCT | 45.5% | |
| ECT | 98 | |
| Shrtfi1 | -64.8% | |
- Wait a few seconds while the device validates the PID MAP.
- If retrieved information covers more than one screen, use the SCROLL-button, if needed, until all the data have been seen.
- Press ENTER-button to return to previous screen.
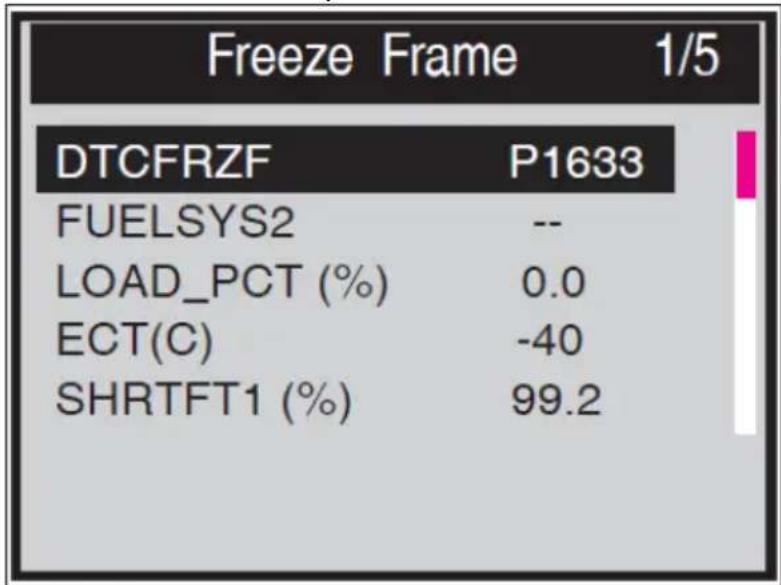
(4) View Freeze Frame Data
"Freeze Frame" data allows the technician to view vehicle's operating parameters at the moment a DTC is detected. For example, the parameters may include engine speed (RPM), engine coolant temperature (ECT), or vehicle speed sensor (VSS) etc.
- To view freeze frame data, use the SCROLL-button to select "View Freeze Frame" from "Diagnostic Menu" and press the ENTER-button.
- Wait a few seconds while the device validates the PID MAP.
- If retrieved information covers more than one screen, use the SCROLL-button, as necessary, until all the data have been shown up:
other
Freeze Frame 1/5 | Category | Value | |---|---| | DTCFRZF | P1633 | | FUELSYS2 | -- LOAD_PCT (%) | 0.0 | | ECT(C) | -40 | | SHRTFT1 (%) | 99.2 |NOTE: if there is no freeze frame data available, an advisory message "No freeze frame data stored!" shows on the display.
- Press ENTER-button to return to previous screen.
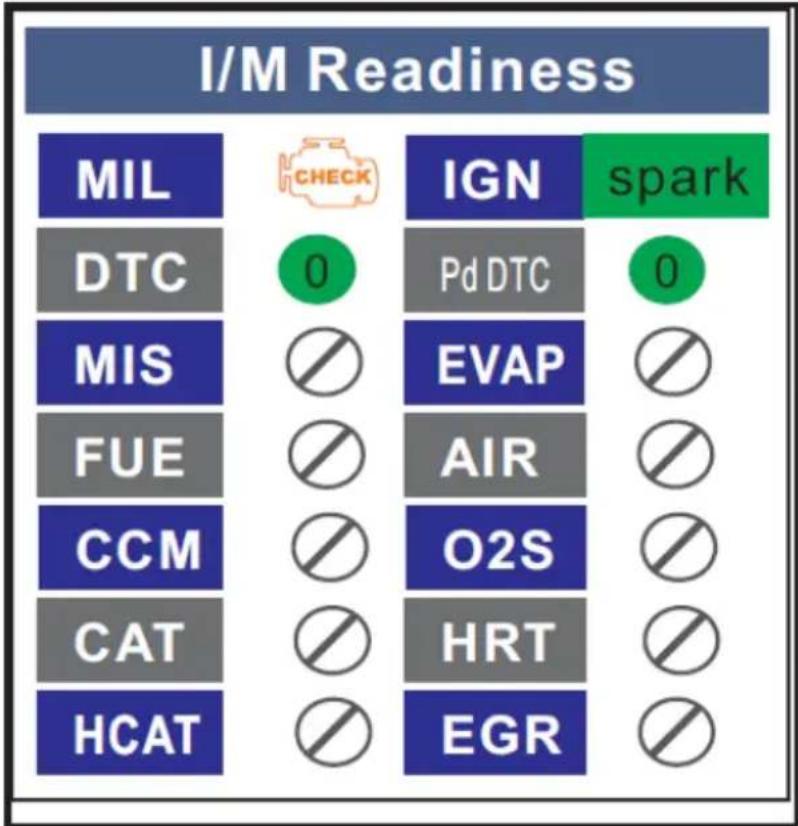
(5) I/M Readiness
This function is for checking the operation of the emission system on OBD II compliant vehicles.
CAUTION: by clearing trouble codes you also clear the readiness status for the individual emission system readiness tests. In order to reset these monitors, the vehicle must be driven through a complete drive cycle with no trouble codes in memory. Times for reset vary depending on the vehicle. Some latest vehicle models may support two types of I/M Readiness tests:
a) “Since DTCs Were Cleared” - indicates status of the monitors since the DTCs are erased.
b) “This Drive Cycle” – indicates status of monitors since the beginning of the current drive cycle.
"OK" - indicates that a particular monitor being checked has completed its diagnostic testing.
"INC" - indicates that a particular monitor being checked has not completed its diagnostic testing.
"N/A" - the monitor is not supported on this particular vehicle.
- Use the SCROLL-button to select "I/M Readiness" from "Diagnostic Menu" and press ENTER-button to confirm.
- Wait a few seconds while the device validates the PID MAP.
- If the vehicle supports both types of tests, then both types will be shown on the screen for selection:
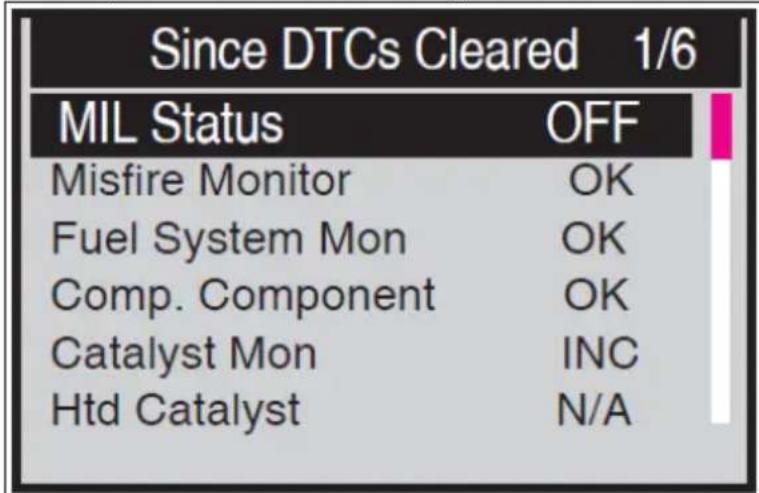
- Use the SCROLL-button, as necessary, to view the status of the MIL light ("ON" or "OFF") and the following monitors:
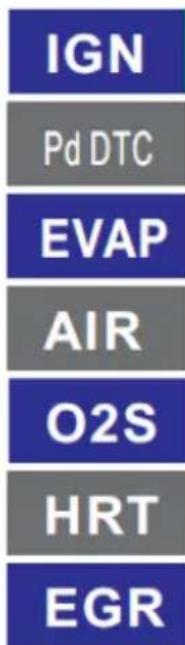
"Misfire monitor" – Engine misfire monitor "Fuel System Mon" - Fuel system monitor "Comp. Component" - Comprehensive components monitor "Catalyst Mon" – Catalyst monitor "Htd Catalyst" - Heated catalyst monitor "EVAP System Mon" - Evaporative system monitor "Sec Air System" - Secondary air pump monitor "A/C Refrig Mon" - A/C system monitor "Oxygen Sens Mon" – Oxygen sensor monitor "Oxygen Sens Htr" - Oxygen sensor heater Monitor "EGR System Mon" – Exhaust gas recirculation Monitor
- If the vehicle supports readiness test of “This Drive Cycle”, a screen of the following displays:
There are two modes to show I/M Readiness monitor status – user can configure modes in Setup menu:
"Scan Tool Mode" – default work mode. In this mode, after the vehicle monitors have run and completed their diagnosis and testing, the device will turn to OBDII diagnostic procedures.
NOTE: only in this mode the OBD II diagnostics can be performed.
"Ready Test Mode" - in this mode, after the vehicle's monitors have run and completed their diagnosis and testing, the device will return to the previous screen. So it is only used to check the emission-related monitors status.
NOTE: this function reads off the real time data of emission-related monitoring systems readiness status every two minutes. Once the device has finished other operations, for example, clearing trouble codes, and the real time data been changed, the I/M Readiness Status indication will be changed accordingly. In order to reset these monitors, the vehicle must be driven through a complete drive cycle. Times for reset vary depending on vehicle.
More about these 2 modes further in the text.
(6) Vehicle Info
The “Vehicle Info.” function enables retrieval of Vehicle Identification Number (VIN), Calibration ID Number (CINs), Calibration Verification Number (CVNs) and In-use Performance Tracking on 2000 and newer model year vehicles that support it.
- Use SCROLL-button to select "Vehicle Info." from the Diagnostic Menu and press ENTER-button.
- An advisory message comes up to remind you. Wait a few seconds or press any key to continue:
NOTE: if the vehicle does not support this mode, a message shows on the display warning that the mode is not supported.
- In "Vehicle Info." Menu, use the SCROLL-button to select an available item to view and press the ENTER-button.
• View retrieved vehicle information on screen:
(7) Exiting the OBDII Test
- To exit OBD II test, use SCROLL-button to select Previous Menu from Diagnostic Menu and press ENTER/EXIT-button.
- A warning message comes up asking your confirmation. Press ENTER-button to confirm exit.
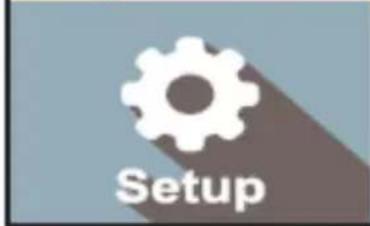
3.3.4 Tool setup
MSW-OBD1:
Go to the main interface; click the "UP" button to enter the Setup interface:
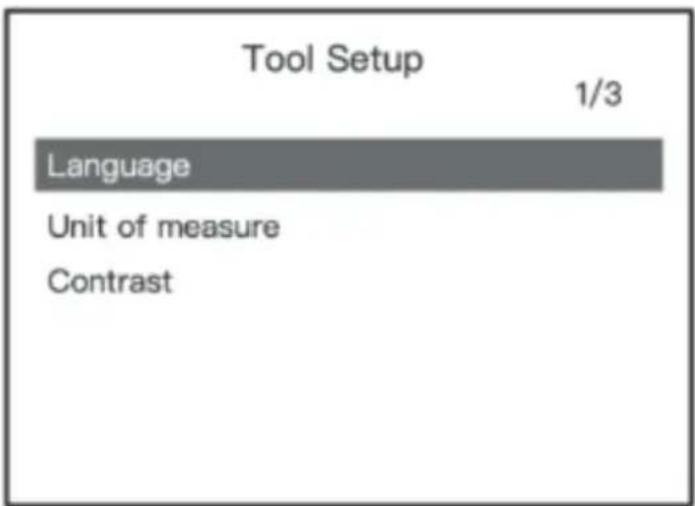
(1) Language: English is set by default, other can be manually chosen.
(2) Unit of Measure: Choose between metric and imperial units. Metric is set by default.
(3) Contrast: Backlight contrast set. 25% set by default.
MSW-OBD2:
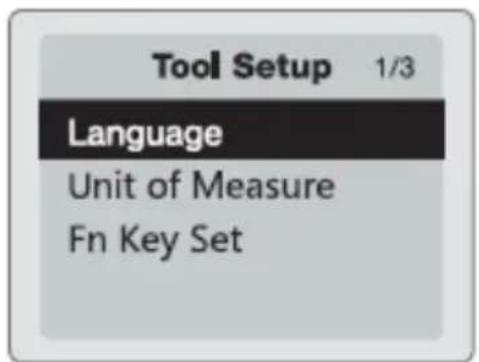
(1) Language: English is set by default, other can be manually chosen.
(2) Unit of Measure: Choose between metric and imperial units. Metric is set by default.
(3) Fn Key Set: set up FN-button as one press quick test among "Usual Datastream", "All Datastream", "I/M Readiness" (set by default) or "Read Codes".
MSW-OBD3:
In the device's main menu choose "Tool Setup" icon to make following adjustments and settings:
(1) Language: select the desired language form the available.
(2) Unit of measure: set the unit of measure to English (Imperial) or Metric.
(3) Key Beep Set: turns on or off the button-press beep tone.
(4) Status Beep Set: Turns on or off the I/M Readiness Status beep tone.
(5) Fn Key Set: Sets the One-click-quick Function Key including I/M readiness status, trouble code, default live data and all data stream.

All the set parameters remain saved until change will be made by the user. To change a specific parameter use SCROLL-button and press ENTER-button on the chosen parameter to go to unfold option and choose the desired value by pressing the ENTER-button again and after that it will return to the previous menu. To exit the setup menu use the SCROLL-button to select “Previous Menu” form the “Tool Setup” screen and press ENTER-button to return to the Main Screen.
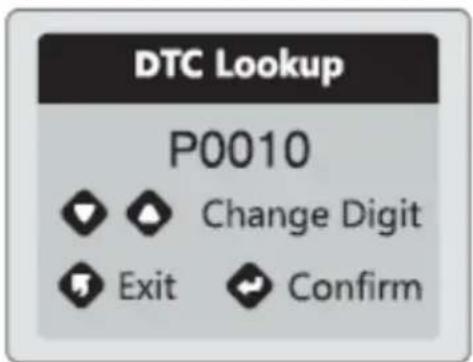
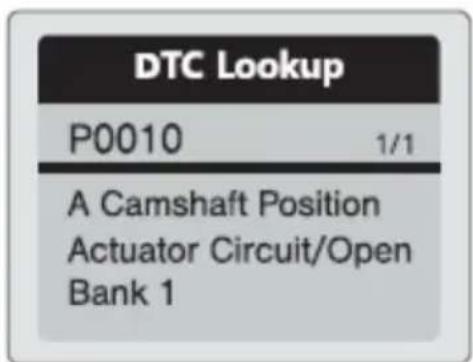
3.3.5 DTC Lockup (MSW-OBD2 only)
There are 16929 DTC definitions in the device's software database. Input specific DTC and press Enter-button. Displayed will be a detailed diagnostic fault code definition for maintenance reference:
3.3.6 Cranking system test (MSW-OBD2 only)
- Select "Cranking Test" and press Enter-button to start the test
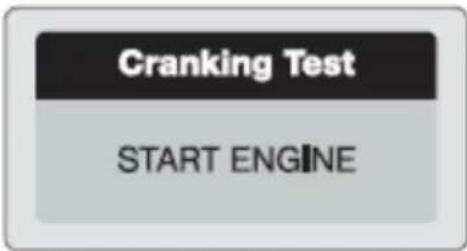
- Start the engine when prompted and the device will automatically complete the cranking test and display the result
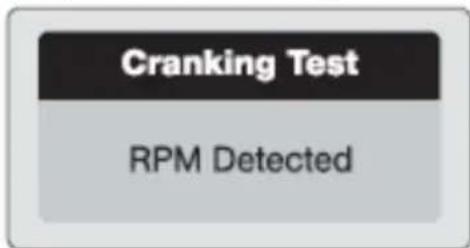
- When the engine rpm are detected this will display on the screen
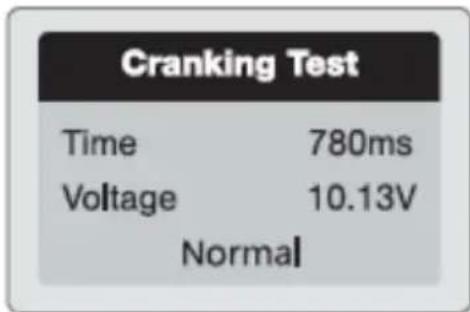
• Normally a cranking voltage lower than 9.6V is regarded abnormal.
• The test result will include actual cranking voltage and duration.
3.3.7 Charging system test
- Select "Charging Test" and press Enter-button to start the charging test.

- NOTE: do not shut down the engine during test. Follow the steps according to the on screen instructions.
Unloaded Test
Turn off all devices, increase RPM to 2500-3000r/min and keep 10 seconds Press ENTER continue
- After the test has finished, the tester displays the loaded and unloaded charging voltage and charging test result.
loaded Test
Turn on headlights and air conditioner to the maximum, keep RPM idle for 10 seconds Press ENTER continue
NOTE: "NO OUTPUT" means the charging system malfunction, so the vehicle will stop working when the battery is drained. Check the alternator immediately or let the car be inspected by a mechanic.
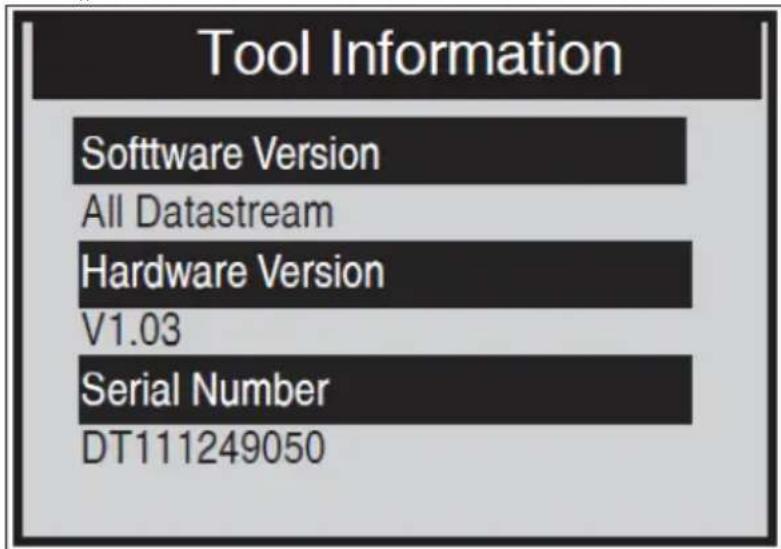
3.3.8 About
The “About” function allows viewing of some important information such as serial number and software version number of the device.
- On the "Main Menu" screen, use SCROLL-button to select "About" and press the ENTER-button:
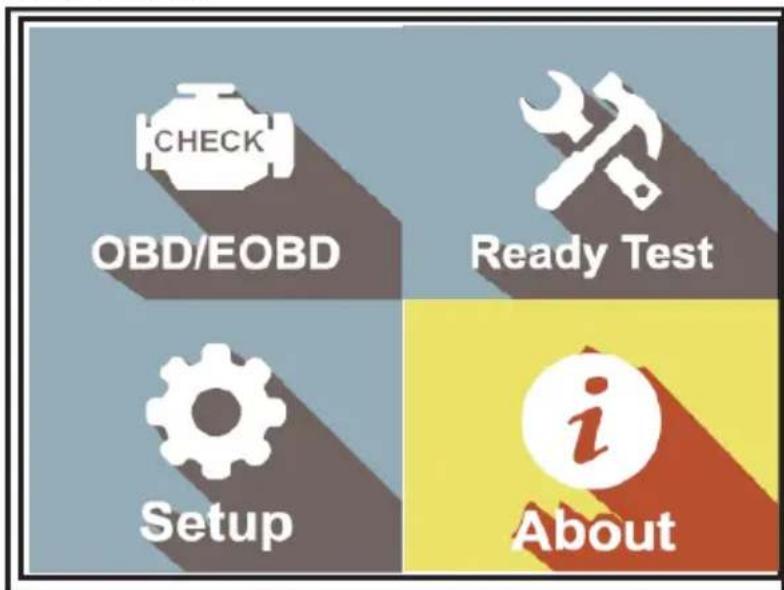
• View the "Tool Information" screen:
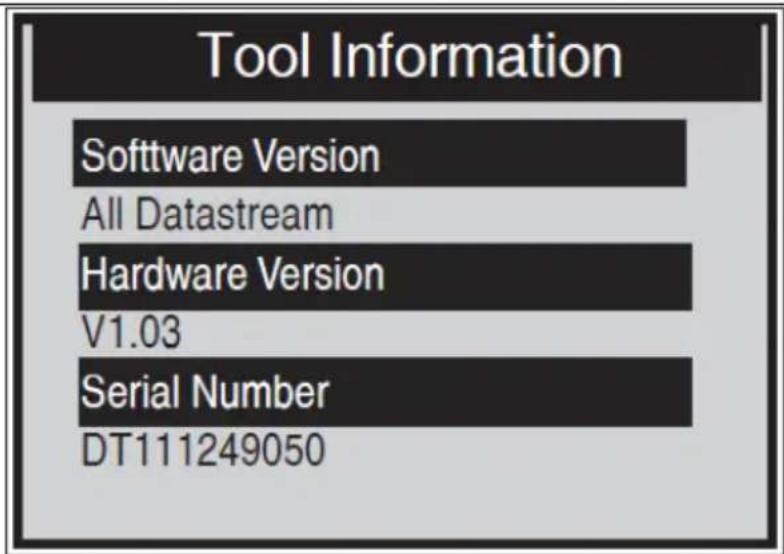
- Press any of the button to return to Main Menu.
3.3.9 Scan Tool Mode
To enter this mode, please follow the steps for "Retrieving I/M Readiness Status". The green, yellow and red LEDs provide a quick way to help the user determine if a vehicle is ready for an Emission Test. The LED and audio tone indications are as interpreted following:
1) Green LED – Indicates that engine systems are “OK” and operating normally (the number of Monitors supported by the vehicle which have run and performed their self-diagnostic testing is in the allowed limit. MIL is off. There are no stored and pending DTCs.
2) Yellow LED – With MIL off, there may be three possible conditions to cause the yellow LED to light.
- If a “Stored” DTC is causing the Yellow LED to light, it is still possible that the vehicle will be eligible to be tested for emissions.
- If a “Pending” DTC is causing the Yellow LED to light, it is still possible that the vehicle will be allowed to be tested for emissions.
- If the illumination of the Yellow LED is being caused by monitors that have not completed their diagnostic testing, then the issue of the vehicle being ready for an Emissions Test depends on the emissions regulations and local laws.
| I/M Readiness 1/6 | |
| MIL Status | OFF |
| Misfire Monitor | OK |
| Fuel System Mon | OK |
| Comp. Component | OK |
| Catalyst Mon | INC |
| Htd Catalyst | N/A |
3) Red LED – Indicates there is a problem with one or more of the vehicle's system. A vehicle displaying a red LED is definitely not ready for an emission test. The red LED is also an indication that there are DTCs present. The MIL lamp on the vehicle's instrument panel will light steady. The problem that is causing the red LED to light must be repaired before an emissions test can be performed. It is also suggested that the vehicle be inspected/ repaired before driving it further. If the red LED was obtained, there is a definite problem present in the system(s).
4) Audio tone Interpretation - could be configured according to the I/M Readiness Status. This function is very helpful when working in bright areas where LED illumination alone is not sufficient. It is recommended to set the audio tone to Beep "on". The following audio tone description only works in Scan Tool mode (different audio tone with different LED lights will indicate different I/M Readiness Status.):
| LED light | Audio tone | Beep interval |
| Green | Beep off | |
| Yellow | 2 short beeps | 0.5 seconds |
| Red | 2 short beeps | 0.5 seconds |
3.3.10 Ready Test Mode
Repairs to the emissions-control systems of a 1996 or newer model year vehicle cause the vehicle's computer (ECU) memory to be cleared. The vehicle must go through a drive cycle to allow the ECU to perform a series of tests to ensure that the repair was successful, and before a state mandated emissions test can be conducted. In the “Ready Test Mode”, you could easily check the I/M Readiness status to determine whether an OBD II vehicle is ready for an emission test.
- To enter this mode, simply press the One-Click Key at any time (if the one-click function key is set at "I/M Readiness".) or while the scan tool in "Ready Test Mode", select Diagnostics in the Main Screen.
- If the scan tool doesn't measure, it will show the result immediately. If it's working, it will wait till the current procedure finished.
- After viewing the status, press "I/M Readiness" trough FN-one-click button or ENTER-button to exit, which can take a few seconds to get the information screen:
other
I/M Readiness | Category | Value | |---|---| | MIL | CHECK | | DTC | 0 | | MIS | | | | FUE | | | | CCM | | | | CAT | | | | HCAT | | | IGN | spark | | Pd DTC | 0 | | EVAP | | | | AIR | | | | O2S | | | | HRT | | | | EGR | | |(1) Green LED – Indicates that engine systems are OK and operating normally (the number of monitors supported by the vehicle which have run and performed their self-diagnostic testing is in the allowed limit).
(2) RED LED – Indicates that the number of monitors supported by the vehicle which have run and performed their self-diagnostic testing is out of the allowed limit.
(3) Audio Tone Interpretation - could be configured according to the I/M Readiness Status. This function is very helpful when working in bright areas where LED illumination alone is not sufficient. It is recommended to set the audio tone to Beep "on":
| LED light | Audio tone | Beep interval |
| Green | Beep off | |
| Yellow | 2 short beeps | 0.5 seconds |
| Red | 2 short beeps | 0.5 seconds |
3.3.11 Vehicle Linking Error
A communication error occurs if the device fails to communicate with the vehicle's ECU (Engine Control Unit). In this case check following steps:
• Verify that the ignition is ON?
- Check if the device's OBD II connector is securely connected to the vehicle's DLC?
- Verify that the vehicle is OBD II compliant?
- Turn the ignition off and wait for about 10 seconds. Turn the ignition back to on and continue the testing.
- Verify the control module is not defective?
3.3.12 Device operation error
If the device freezes, then an exception occurs or the vehicle's ECU (Engine Control Unit) is too slow to respond to requests. You need to reset the device by doing the following steps:
- Reset the device
• Turn the ignition off and wait for about 10 seconds. - Turn the ignition back to on and continue the testing
3.3.13 Device doesn't get power
If the device won't power up or operates incorrectly in any other way, you need to do following to checks:
- Check if the device's OBD II connector is securely connected to the vehicle's DLC;
- Check if the DLC pins aren't bent or broken. Clean the DLC pins if necessary (e.g. by using an electric contact spray).
- Check vehicle battery to make sure it has at least 8.0 Volts.
- Verify if the control module is not defective.
3.4. Cleaning and maintenance
a) Always unplug the device before cleaning it.
b) Use only non-corrosive cleaners to clean the surface.
c) Store the unit in a dry, cool place, free from moisture and direct exposure to sunlight.
d) Do not spray the device with a water jet or submerge it in water.
e) Do not allow water to get inside the device through vents in the housing of the device.
f) Use a soft, damp cloth for cleaning.
g) Do not use sharp and/or metal objects for cleaning (e.g. a wire brush or a metal spatula) because they may damage the surface material of the appliance.
h) Do not clean the device with an acidic substance, agents of medical purposes, thinners, fuel, oils or other chemical substances because it may damage the device.
DISPOSING OF USED DEVICES
Do not dispose of this device in municipal waste systems. Hand it over to an electric and electrical device recycling and collection point. Check the symbol on the product, instruction manual and packaging. The plastics used to construct the device can be recycled in accordance with their markings. By choosing to recycle you are making a significant contribution to the protection of our environment.
Contact local authorities for information on your local recycling facility.


bar
Select ECU | Category | Price ($) | | :--- | :--- | | Select ECU | 1/2 | | $7E8: Engine | | | $7E9: A/T | |MSW-OBD3:
| Monitor Status | |
| MIL status | OFF |
| Codes Found | 6 |
| Monitors N/A | 3 |
| Monitors OK | 3 |
| Monitors INC | 5 |
(6) Vehicle Information:
Erase Done! Press any key to con.
Erase Failure. Turn Key on with Engine Off! Press any key to con.
(3) Data Stream
Turn off headlights and air conditioner, keep 10 seconds. Press ENTER continue
Turn off all devices, increase RPM to 2500-3000r/min and keep 10 seconds Press ENTER continue
Turn on headlights and air conditioner to the maximum, keep RPM idle for 10 seconds Press ENTER continue
- Wyświetl ekran „Tool Information“:
other
I/M Readiness | Category | Value | |---|---| | MIL | CHECK | | DTC | 0 | | MIS | | | | FUE | | | | CCM | | | | CAT | | | | HCAT | | | IGN | spark | | Pd DTC | 0 | | EVAP | | | | AIR | | | | O2S | | | | HRT | | | | EGR | | |
| Monitor Status | |
| MIL status | OFF |
| Codes Found | 6 |
| Monitors N/A | 3 |
| Monitors OK | 3 |
| Monitors INC | 5 |
Erase Done! Press any key to con.
Erase Failure. Turn Key on with Engine Off! Press any key to con.
(3) Datový tok
| This Drive Cycle 1/6 | |
| MIL Status | OFF |
| Misfire Monitor | OK |
| Fuel System Mon | OK |
| Comp. Component | OK |
| Catalyst Mon | INC |
| Htd Catalyst | N/A |
Turn off headlights and air conditioner, keep 10 seconds. Press ENTER continue
Turn off all devices, increase RPM to 2500-3000r/min and keep 10 seconds Press ENTER continue
Turn on headlights and air conditioner to the maximum, keep RPM idle for 10 seconds Press ENTER continue
other
I/M Readiness | Category | I/M Readiness Score | Checkmark | Significance | | :--- | :--- | :--- | :--- | | MIL | CHECK | 0 | 1 | | DTC | 0 | 1 | 1 | | MIS | 0 | 0 | 0 | | FUE | 0 | 0 | 0 | | CCM | 0 | 0 | 0 | | CAT | 0 | 0 | 0 | | HCAT | 0 | 0 | 0 | | IGN | spark | 1 | 1 | | Pd DTC | 0 | 1 | 1 | | EVAP | 0 | 0 | 0 | | AIR | 0 | 0 | 0 | | O2S | 0 | 0 | 0 | | HRT | 0 | 0 | 0 | | EGR | 0 | 0 | 0 | Spark

MSW-OBD1/MSW-OBD2 :
| Monitor Status | |
| MIL status | OFF |
| Codes Found | 6 |
| Monitors N/A | 3 |
| Monitors OK | 3 |
| Monitors INC | 5 |
Erase Done! Press any key to con.
Erase Failure. Turn Key on with Engine Off! Press any key to con.
(3) Flux de données
| This Drive Cycle 1/6 | |
| MIL Status | OFF |
| Misfire Monitor | OK |
| Fuel System Mon | OK |
| Comp. Component | OK |
| Catalyst Mon | INC |
| Htd Catalyst | N/A |
Turn off headlights and air conditioner, keep 10 seconds.
Press ENTER continue
Turn off all devices, increase RPM to 2500-3000r/min and keep 10 seconds
Press ENTER continue
Turn on headlights and air conditioner to the maximum, keep RPM idle for 10 seconds
Press ENTER continue
other
I/M Readiness | Code | I/M Readiness | Compliance Status | Significance | |---|---|---|---| | MIL | CHECK | Yes | Yes | | DTC | 0 | No | Yes | | MIS | ☐ | No | No | | FUE | ☐ | No | No | | CCM | ☐ | No | No | | CAT | ☐ | No | No | | HCAT | ☐ | No | No | | IGN | spark | Yes | Yes | | Pd DTC | 0 | No | Yes | | EVAP | ☐ | No | No | | AIR | ☐ | No | No | | O2S | ☐ | No | No | | HRT | ☐ | No | No | | EGR | ☐ | No | No |
| Monitor Status | |
| MIL status | OFF |
| Codes Found | 6 |
| Monitors N/A | 3 |
| Monitors OK | 3 |
| Monitors INC | 5 |
Erase Done! Press any key to con.
Erase Failure. Turn Key on with Engine Off! Press any key to con.
(3) Flusso di dati
| This Drive Cycle 1/6 | |
| MIL Status | OFF |
| Misfire Monitor | OK |
| Fuel System Mon | OK |
| Comp. Component | OK |
| Catalyst Mon | INC |
| Htd Catalyst | N/A |
Turn off headlights and air conditioner, keep 10 seconds. Press ENTER continue
Turn off all devices, increase RPM to 2500-3000r/min and keep 10 seconds Press ENTER continue
Turn on headlights and air conditioner to the maximum, keep RPM idle for 10 seconds Press ENTER continue
bar
I/M Readiness | Category | I/M Readiness Score (Score) | | :--- | :--- | | MIL | CHECK | | DTC | 0 | | MIS | | | | FUE | | | | CCM | | | | CAT | | | | HCAT | | | IGN | spark | | Pd DTC | 0 | | EVAP | | | | AIR | | | | O2S | | | | HRT | | | | EGR | | |

MSW-OBD1/MSW-OBD2:
MSW-OBD3:
- Conecte el dispositivo al puerto OBD II.
| Monitor Status | |
| MIL status | OFF |
| Codes Found | 6 |
| Monitors N/A | 3 |
| Monitors OK | 3 |
| Monitors INC | 5 |
Erase Done! Press any key to con.
Erase Failure. Turn Key on with Engine Off! Press any key to con.
(3) Flujo de datos
| This Drive Cycle 1/6 | |
| MIL Status | OFF |
| Misfire Monitor | OK |
| Fuel System Mon | OK |
| Comp. Component | OK |
| Catalyst Mon | INC |
| Htd Catalyst | N/A |
Turn off headlights and air conditioner, keep 10 seconds. Press ENTER continue
Turn off all devices, increase RPM to 2500-3000r/min and keep 10 seconds Press ENTER continue
Turn on headlights and air conditioner to the maximum, keep RPM idle for 10 seconds Press ENTER continue
other
I/M Readiness | Category | Value | |---|---| | MIL | CHECK | | DTC | 0 | | MIS | | | | FUE | | | | CCM | | | | CAT | | | | HCAT | | | IGN | spark | | Pd DTC | 0 | | EVAP | | | | AIR | | | | O2S | | | | HRT | | | | EGR | | |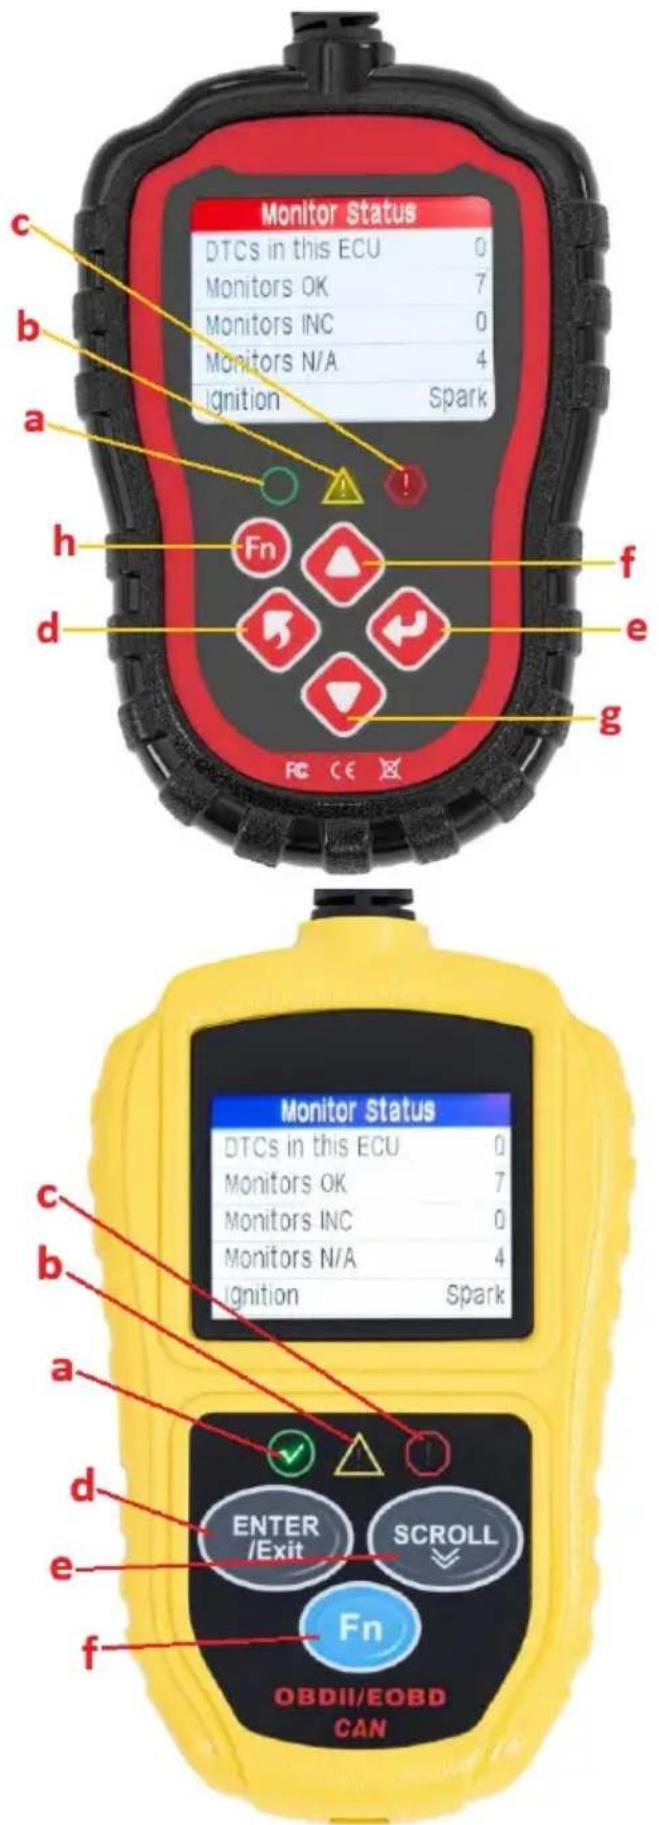
Erase Done! Press any key to con.
Erase Failure. Turn Key on with Engine Off! Press any key to con.
(3) Adatfolyam
| This Drive Cycle 1/6 | |
| MIL Status | OFF |
| Misfire Monitor | OK |
| Fuel System Mon | OK |
| Comp. Component | OK |
| Catalyst Mon | INC |
| Htd Catalyst | N/A |
Turn key on with engine off! Press any key to con.
Turn off headlights and air conditioner, keep 10 seconds. Press ENTER continue
Turn off all devices, increase RPM to 2500-3000r/min and keep 10 seconds Press ENTER continue
Turn on headlights and air conditioner to the maximum, keep RPM idle for 10 seconds Press ENTER continue
other
I/M Readiness | Category | MIL | CHECK | IGN | spark | |---|---|---|---|---| | | DTC | 0 | Pd DTC | 0 | | | MIS | ∅ | EVAP | ∅ | | | FUE | ∅ | AIR | ∅ | | | CCM | ∅ | O2S | ∅ | | | CAT | ∅ | HRT | ∅ | | | HCAT | ∅ | EGR | ∅ |


| Monitor Status | |
| MIL status | OFF |
| Codes Found | 6 |
| Monitors N/A | 3 |
| Monitors OK | 3 |
| Monitors INC | 5 |
Erase Done! Press any key to con.
Erase Failure. Turn Key on with Engine Off! Press any key to con.
(3) Datastrøm
"Catalyst Mon" - Katalysator-monitor
"Htd Catalyst" - Monitor for opvarmet katalysator
"EVAP System Mon" - overvågning af fordampningssystem
"Sec Air System" - Monitor for sekundær luftpumpe
"A/C Refrig Mon" - overvågning af airconditionsystemet
"Oxygen Sens Mon" - Oxygen sensor monitor
"Oxygen Sens Htr" - Oxygen sensor heater Monitor
| This Drive Cycle 1/6 | |
| MIL Status | OFF |
| Misfire Monitor | OK |
| Fuel System Mon | OK |
| Comp. Component | OK |
| Catalyst Mon | INC |
| Htd Catalyst | N/A |
Turn off headlights and air conditioner, keep 10 seconds.
Press ENTER continue
Turn off all devices, increase RPM to
2500-3000r/min and
keep 10 seconds
Press ENTER continue
Turn on headlights and air conditioner to the maximum, keep RPM idle for 10 seconds Press ENTER continue
bar
I/M Readiness | Category | MIL | CHECK | IGN | spark | |---|---|---|---|---| | | DTC | 0 | Pd DTC | 0 | | | MIS | ∅ | EVAP | ∅ | | | FUE | ∅ | AIR | ∅ | | | CCM | ∅ | O2S | ∅ | | | CAT | ∅ | HRT | ∅ | | | HCAT | ∅ | EGR | ∅ |
| Monitor Status | |
| MIL status | OFF |
| Codes Found | 6 |
| Monitors N/A | 3 |
| Monitors OK | 3 |
| Monitors INC | 5 |
Erase Done! Press any key to con.
Erase Failure. Turn Key on with Engine Off! Press any key to con.
(3) Datavirta
| This Drive Cycle 1/6 | |
| MIL Status | OFF |
| Misfire Monitor | OK |
| Fuel System Mon | OK |
| Comp. Component | OK |
| Catalyst Mon | INC |
| Htd Catalyst | N/A |
Turn off all devices, increase RPM to 2500-3000r/min and keep 10 seconds Press ENTER continue
Turn on headlights and air conditioner to the maximum, keep RPM idle for 10 seconds Press ENTER continue
other
I/M Readiness | Category | MIL | CHECK | IGN | spark | |---|---|---|---|---| | | DTC | 0 | Pd DTC | 0 | | | MIS | ∅ | EVAP | ∅ | | | FUE | ∅ | AIR | ∅ | | | CCM | ∅ | O2S | ∅ | | | CAT | ∅ | HRT | ∅ | | | HCAT | ∅ | EGR | ∅ |

| Monitor Status | |
| MIL status | OFF |
| Codes Found | 6 |
| Monitors N/A | 3 |
| Monitors OK | 3 |
| Monitors INC | 5 |
(3) Data stroom
"Catalyst Mon" – Katalysatormonitor
"Htd Catalyst" - Verwarmde katalysatormonitor
"EVAP System Mon" - Monitor verdampingssysteem
"Sec Air System" - Secundaire luchtpompmonitor
"Oxygen Sens Mon" – Zuurstofsensormonitor
"Oxygen Sens Htr" - Zuurstofsensor-verwarmingsmonitor
| This Drive Cycle 1/6 | |
| MIL Status | OFF |
| Misfire Monitor | OK |
| Fuel System Mon | OK |
| Comp. Component | OK |
| Catalyst Mon | INC |
| Htd Catalyst | N/A |
Turn off headlights and air conditioner, keep 10 seconds. Press ENTER continue
Turn off all devices, increase RPM to 2500-3000r/min and keep 10 seconds Press ENTER continue
Turn on headlights and air conditioner to the maximum, keep RPM idle for 10 seconds Press ENTER continue
bar
I/M Readiness | Category | MIL | CHECK | IGN | spark | |---|---|---|---|---| | | DTC | 0 | Pd DTC | 0 | | | MIS | ∅ | EVAP | ∅ | | | FUE | ∅ | AIR | ∅ | | | CCM | ∅ | O2S | ∅ | | | CAT | ∅ | HRT | ∅ | | | HCAT | ∅ | EGR | ∅ |
MSW-OBD3:
| Monitor Status | |
| MIL status | OFF |
| Codes Found | 6 |
| Monitors N/A | 3 |
| Monitors OK | 3 |
| Monitors INC | 5 |
Erase Done! Press any key to con.
Erase Failure. Turn Key on with Engine Off! Press any key to con.
(3) Data strøm
| Since DTCs Cleared 1/6 | |
| MIL Status | OFF |
| Misfire Monitor | OK |
| Fuel System Mon | OK |
| Comp. Component | OK |
| Catalyst Mon | INC |
| Htd Catalyst | N/A |
| This Drive Cycle 1/6 | |
| MIL Status | OFF |
| Misfire Monitor | OK |
| Fuel System Mon | OK |
| Comp. Component | OK |
| Catalyst Mon | INC |
| Htd Catalyst | N/A |
and air conditioner,
keep 10 seconds.
Press ENTER continue
Turn off all devices,
increase RPM to
2500-3000r/min and
keep 10 seconds
Press ENTER continue
Turn on headlights and air conditioner to the maximum, keep RPM idle for 10 seconds Press ENTER continue
other
I/M Readiness | Category | Value | |---|---| | MIL | CHECK | | DTC | 0 | | MIS | | | | FUE | | | | CCM | | | | CAT | | | | HCAT | | | IGN | spark | | Pd DTC | 0 | | EVAP | | | | AIR | | | | O2S | | | | HRT | | | | EGR | | |

MSW-OBD3:
Erase Done! Press any key to con.
Erase Failure. Turn Key on with Engine Off! Press any key to con.
(3) Dataström
| Since DTCs Cleared 1/6 | |
| MIL Status | OFF |
| Misfire Monitor | OK |
| Fuel System Mon | OK |
| Comp. Component | OK |
| Catalyst Mon | INC |
| Htd Catalyst | N/A |
| This Drive Cycle 1/6 | |
| MIL Status | OFF |
| Misfire Monitor | OK |
| Fuel System Mon | OK |
| Comp. Component | OK |
| Catalyst Mon | INC |
| Htd Catalyst | N/A |
Turn off headlights and air conditioner, keep 10 seconds.
Press ENTER continue
Turn off all devices, increase RPM to
2500-3000r/min and keep 10 seconds
Press ENTER continue
Turn on headlights and air conditioner to the maximum, keep RPM idle for 10 seconds Press ENTER continue
• Visa skärmen "Verktygsinformation":

bar
I/M Readiness | Category | Value | |---|---| | MIL | CHECK | | DTC | 0 | | MIS | | | | FUE | | | | CCM | | | | CAT | | | | HCAT | | | IGN | spark | | Pd DTC | 0 | | EVAP | | | | AIR | | | | O2S | | | | HRT | | | | EGR | | |MSW-OBD3:

PT
MSW-OBD3:


| Monitor Status | |
| MIL status | OFF |
| Codes Found | 6 |
| Monitors N/A | 3 |
| Monitors OK | 3 |
| Monitors INC | 5 |
Erase Done! Press any key to con.
Erase Failure. Turn Key on with Engine Off! Press any key to con.
(3) Fluxo de dados
"Catalyst Mon" – Monitor do catalisador
"Htd Catalyst" - Monitor de catalisador aquecido
| This Drive Cycle 1/6 | |
| MIL Status | OFF |
| Misfire Monitor | OK |
| Fuel System Mon | OK |
| Comp. Component | OK |
| Catalyst Mon | INC |
| Htd Catalyst | N/A |
Turn off headlights and air conditioner, keep 10 seconds. Press ENTER continue
Turn off all devices, increase RPM to 2500-3000r/min and keep 10 seconds Press ENTER continue
Turn on headlights and air conditioner to the maximum, keep RPM idle for 10 seconds Press ENTER continue

| Monitor Status | |
| MIL status | OFF |
| Codes Found | 6 |
| Monitors N/A | 3 |
| Monitors OK | 3 |
| Monitors INC | 5 |
Erase Done! Press any key to con.
Erase Failure. Turn Key on with Engine Off! Press any key to con.
(3) Dátový tok
| Since DTCs Cleared 1/6 | |
| MIL Status | OFF |
| Misfire Monitor | OK |
| Fuel System Mon | OK |
| Comp. Component | OK |
| Catalyst Mon | INC |
| Htd Catalyst | N/A |
| This Drive Cycle 1/6 | |
| MIL Status | OFF |
| Misfire Monitor | OK |
| Fuel System Mon | OK |
| Comp. Component | OK |
| Catalyst Mon | INC |
| Htd Catalyst | N/A |
Turn off headlights and air conditioner, keep 10 seconds.
Press ENTER continue
Turn off all devices, increase RPM to 2500-3000r/min and keep 10 seconds Press ENTER continue
Turn on headlights and air conditioner to the maximum, keep RPM idle for 10 seconds Press ENTER continue
For the disposal of the device please consider and act according to the national and local rules and regulations.
CONTACT
expondo Polska sp. z o.o. sp. k.