IVPM-9850 - Vacuum packaging machines MSW - Free user manual and instructions
Find the device manual for free IVPM-9850 MSW in PDF.

| Product type | Professional vacuum packaging machine, single chamber model |
| Brand and model | MSW IVPM-9850 |
| Dimensions (L x W x H) | 54 x 40 x 95 cm |
| Weight | 68.5 kg |
| Power supply | 230 V ~ / 50 Hz |
| Motor power | 900 W |
| Sealing power | 800 W |
| Vacuum chamber dimensions | 440 x 420 x 100 mm |
| Maximum bag width | 40 cm |
| Sealing line width | 400 mm |
| Adjustable vacuum time | 0–99 seconds |
| Adjustable sealing time | 0–9.9 seconds |
| Vacuum level | 1 bar (absolute pressure < 1 kPa) |
| Main functions | Vacuuming, heat sealing, printing (optional), gas flushing (optional) |
| Construction materials | Plexiglass lid, stainless steel chambers |
| Control panel | LCD display with time/vacuum/sealing/cooling settings, 6 memory presets |
| Safety | Emergency stop, auto-off after 5 min of inactivity, mandatory grounding |
| Maintenance and cleaning | Check and drain pump oil (level between 1/4 and 3/4), clean sealing cloth, replace exhaust filter every 6 months |
| Spare parts and repairability | Nickel-chrome heating element, sealing ring, pressure strip, solenoid valves |
| General information | Manual available in multiple languages, professional use, not suitable for flammable materials |
Frequently Asked Questions - IVPM-9850 MSW
User questions about IVPM-9850 MSW
0 question about this device. Answer the ones you know or ask your own.
Ask a new question about this device
Download the instructions for your Vacuum packaging machines in PDF format for free! Find your manual IVPM-9850 - MSW and take your electronic device back in hand. On this page are published all the documents necessary for the use of your device. IVPM-9850 by MSW.
USER MANUAL IVPM-9850 MSW
A - Vakuumverpackung
B - Beheizen
C - Pumpe
D - Vant
E - Aufblasen
F - Siegel
G - Pumpe
H - Wärme
I - Start
J - Airbag
K - Eine Kammer
L - B-Kammer
N - Vakuummeter

This User Manual has been translated for your convenience using machine translation. Reasonable efforts have been made to provide an accurate translation; however, no automated translation is perfect nor is it intended to replace human translators. The official User Manual is the English version. Any discrepancies or differences created in the translation are not binding and have no legal effect for compliance or enforcement purposes. If any questions arise related to the accuracy of the information contained in the User Manual, please refer to the English version of those contents which is the official version.
1. Technical data
| Parameter description | Parameter value |
| Product name | Vacuum packing machine |
| Model | MSW-IVPM-9850 |
| Rated voltage [V~] / frequency [Hz] | 230 / 50 |
| Rated motor power [W] | 900 |
| Rated sealing power [W] | 800 |
| Sealing time [sec] | 0-9.9 |
| Sealing line width [mm] | 400 |
| Chamber dimensions [mm] | 440 x 420 x 100 |
| Maximum bag width [cm] | 40 |
| Vacuum time [sec] | 0-99 |
| Vacuum degree [bar] | 1 |
| Dimensions (width x depth x height) [cm] | 54x40x95 |
| Weight [kg] | 68.5 |
Characteristics
Minimum absolute pressure of vacuum chamber <1kPa
2. Overview
This product is an advanced vacuum packaging machine designed to automatically seal packaging bags immediately after vacuuming. It achieves a high level of vacuum inside the bag, leaving minimal residual air. This process inhibits the growth of bacteria and other microorganisms, preventing oxidation, mold, and spoilage of the items. Additionally, for some soft products, the packaging volume is reduced after vacuuming, making transportation and storage more efficient.
3. Scop of use
This series of vacuum packaging machines uses composite film bags to heat-seal a variety of products, including solids, powders, pastes, and liquids. These can be food, local specialties, aquatic products, chemical raw materials, hardware, and electronic components. The vacuum packaging helps prevent spoilage caused by lipid oxidation and the growth of aerobic bacteria. It preserves the quality, taste, and color of the products, extends their shelf life, and makes them easier to transport and export.
This product is outside the scope of REGULATION (EU) 2017/745 for medical devices. It has not been designed as a medical device.
4. Features
- Single-chamber design: The single chamber has a transparent plexiglass cover, allowing users to easily observe the packaging process.
- Double-chamber design: The double chamber machine operates with two chambers working alternately, connecting the sealing and preparation processes. This significantly improves packaging efficiency.
- Durable materials: The upper and lower chambers are made from stainless steel, ensuring a durable, hygienic, and corrosion-resistant structure that meets food safety standards.
- Multiple functions: The machine performs vacuuming, sealing, and printing in a single operation. It comes with adjustable settings for vacuum level, heat sealing temperature, and sealing time, allowing users to optimize the process for different materials and packaging needs.
- Printing capability: The machine can be equipped with a printing device that allows for clear labeling of the product's shelf life, manufacturing date, and serial number directly on the sealing line. This complies with national food labeling regulations.
- Reliable and efficient: With advanced design and complete functionality, this vacuum packaging machine offers stable performance, strong sealing, and broad application capabilities. It is easy to use, maintain, and provides significant economic benefits.
5. Structure and principle
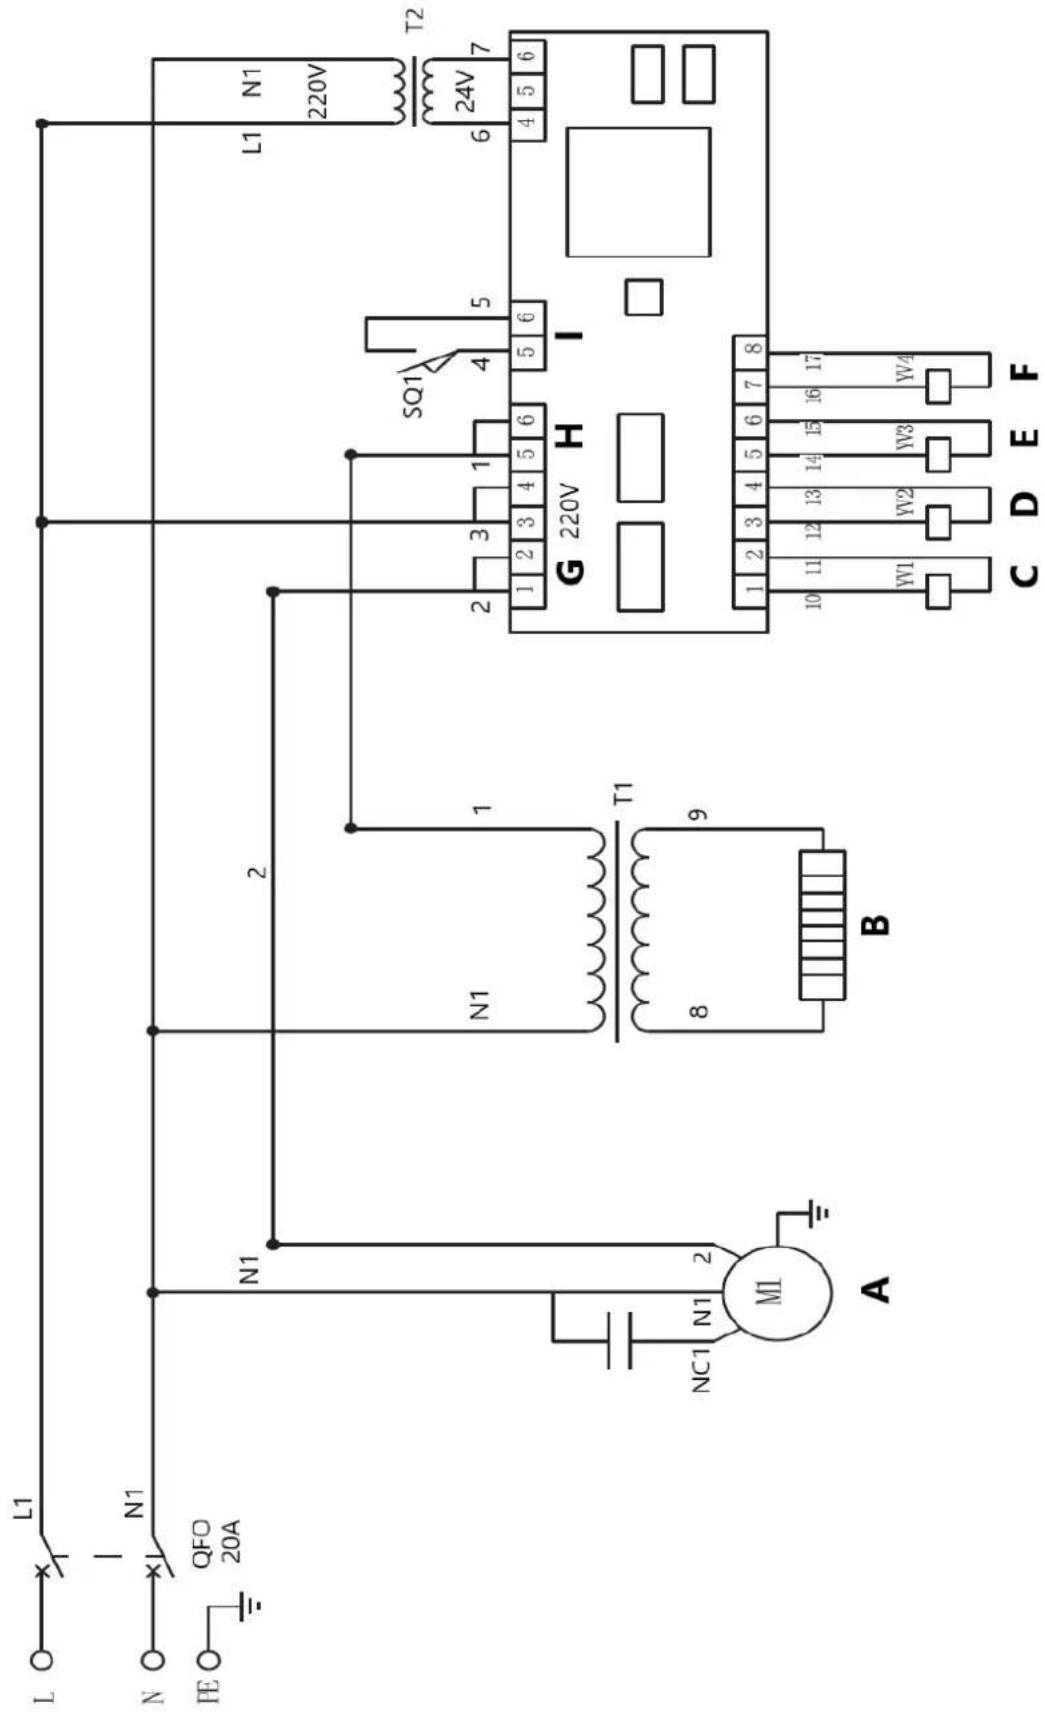
The vacuum packaging machine consists of five main components: the vacuum cover, vacuum chamber, machine body, electrical components, and vacuum system.
Inside the vacuum cover, there is a heating system that uses a nickel-chromium strip as the heating element, which is mounted on the heat sealing bracket. The heating element is completely insulated from the vacuum chamber. The heat sealing bracket is positioned close to an air bag.
Before the heat sealing process begins, the air bag is in a low vacuum state. When the heat sealing starts, the pressure difference causes the air bag to expand, which presses the iron head (nickel-chromium strip) downward to apply heat for sealing. Both the heating temperature and heating time are adjustable to suit different packaging requirements.
The vacuum chamber is also equipped with a heat press sealing device that works in tandem with the heat sealing bracket to complete the packaging process.
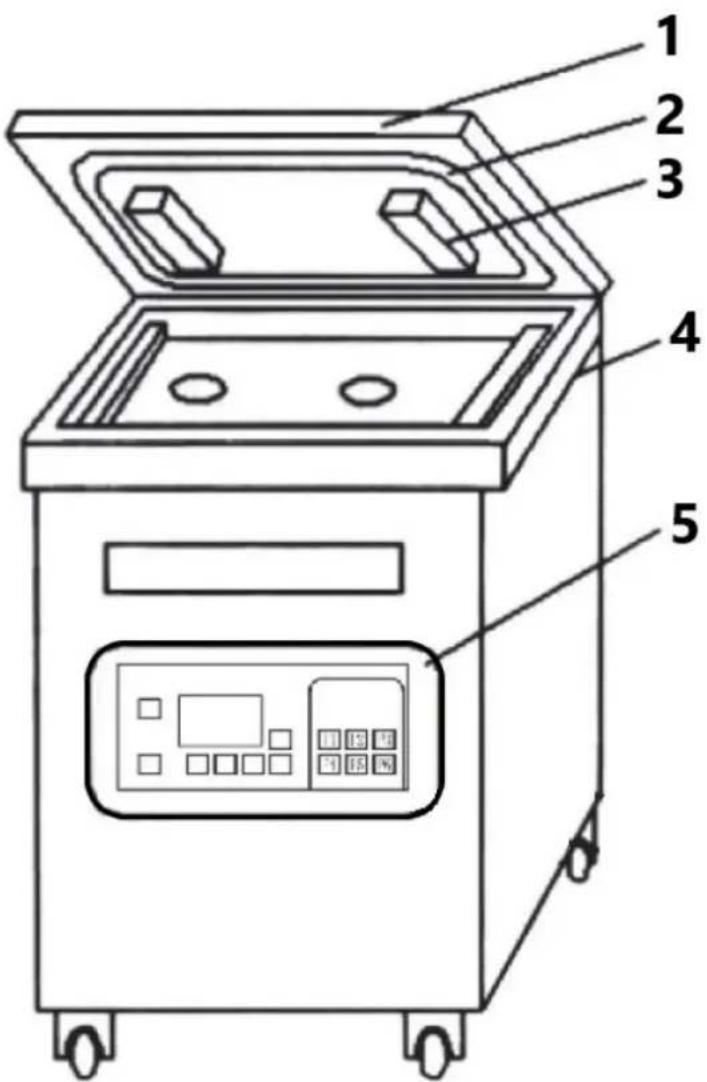
1 - Plexiglass cover
2 - Seal ring
3 - Pressing Strip
4 - Vacuum Chamber
5 - Control panel
Vacuum system
The vacuum packaging machine's vacuum system consists of two main components: the vacuum solenoid valve (YV1) and the vent solenoid valve (YV2).
For the inflatable vacuum packaging machine, the vacuum system includes three solenoid valves: the vacuum solenoid valve (YV1), the air bag filling solenoid valve (YV2), and the venting solenoid valve (YV3).
When the vacuum pump is activated, it begins extracting air from the vacuum chamber. Once the set vacuum level is reached, the vacuum pump stops, and the control system moves to the next step in the process. This machine uses a single-stage rotary vane vacuum pump for air extraction.
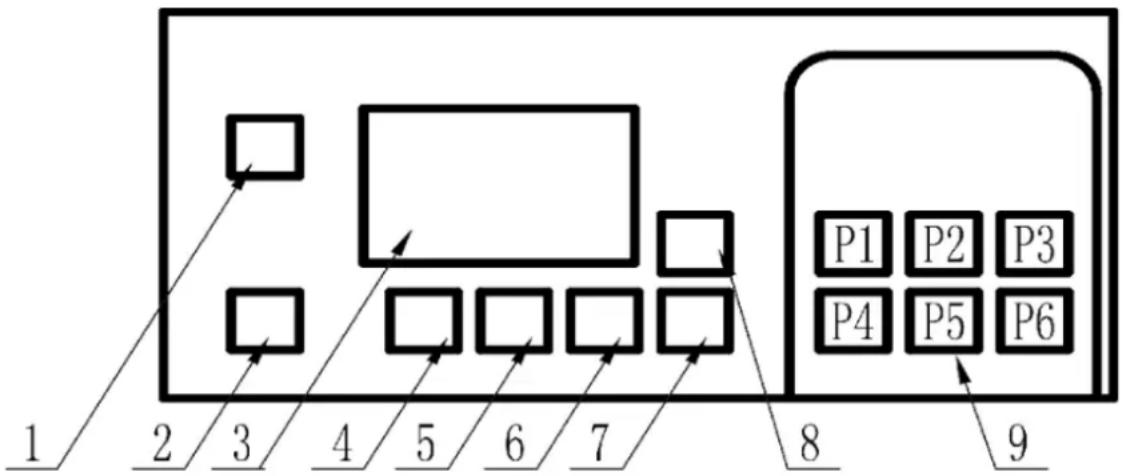
6. Panel operation instructions
flowchart
graph TD
    A["1"] --> B["2"]
    B --> C["3"]
    C --> D["4"]
    D --> E["5"]
    E --> F["6"]
    F --> G["7"]
    G --> H["8"]
    H --> I["9"]
    A --> J["Box 1"]
    B --> K["Box 2"]
    C --> L["Box 3"]
    D --> M["Box 4"]
    E --> N["Box 5"]
    F --> O["Box 6"]
    G --> P["Box 7"]
    H --> Q["Box 8"]
    I --> R["Box 9"]
    J --> S["Box 10"]
    K --> T["Box 11"]
    L --> U["Box 12"]
    M --> V["Box 13"]
    N --> W["Box 14"]
    O --> X["Box 15"]
1 - Switch: Turns the machine on and starts operation.
2 - Emergency stop: Press to immediately stop the machine and enter standby mode.
3 - LCD screen: Displays the vacuum degree, along with settings for “vacuum time,” “inflation time,” “sealing time,” and “cooling time.”
4 - Previous page: Scrolls up through the options “vacuum time,” “inflation time,” “sealing time,” and “cooling time.”
5 - Next page: Scrolls down through the options “vacuum time,” “inflation time,” “sealing time,” and “cooling time.”
6 - Increase: Increases the selected time setting.
7 - Decrease: Decreases the selected time setting.
8 - Set: Press to adjust the "vacuum time," "inflation time," "sealing time," and "cooling time."
9 - P1\~P6: Allows you to save and select up to 6 memory presets for different "vacuum time," "inflation time," "sealing time," and "cooling time" settings.
Technical indicators
1) Pumping time range: 0–99 seconds, error: < 0.1%
2) Heat sealing time range: 0–9.9 seconds, error: < 0.1%
3) Cooling time: Adjustable
Operating instructions
1) Vacuum time setting:
When the machine is turned on, the LCD screen lights up, indicating standby mode. Press the Set button once to enter the vacuum time setting. Use the Increase or Decrease buttons to adjust the time.
2) Inflation time setting:
Press the Next page button once to move to the inflation time setting. Use the Increase or Decrease buttons to adjust the time.
3) Sealing time setting:
Press the Next page button again to access the sealing time setting. Use the Increase or Decrease buttons to adjust the time.
4) Cooling time setting:
Press the Next page button once more to set the cooling time. Use the Increase or Decrease buttons to adjust as needed.
5) Working process
In standby mode, when the machine cover is closed, the program starts automatically:
a) Pumping: The LCD screen displays the vacuum degree, from 0 MPa to -0.1 MPa, and the vacuum time. Once the vacuum time is completed, the process moves to the next step.
b) Heat sealing: The LCD screen shows the heat sealing time. Once the sealing time ends, it moves to the cooling stage.
c) Cooling: The LCD screen shows the cooling time. After the cooling time ends, it moves to the venting stage.
d) Venting: Once venting is complete, the cover opens automatically.
e) For inflatable vacuum machines:
There is an additional step between pumping and heat sealing. After pumping, nitrogen or another gas is introduced into the packaging bag. Once the inflation time is complete, it proceeds to the heat sealing stage.
6) Emergency stop usage
If any abnormal situation occurs during operation, or if the process needs to be stopped early, press the Emergency Stop button. This action halts the process and returns the machine to standby mode.
7) Additional instructions
a) The machine will automatically shut down if it remains idle for more than 5 minutes.
b) After 20 seconds of deflation, if the cover has not been opened, the deflation process will automatically close.
c) To clear the pressure, hold down the Set key and P1 key for 5 seconds.
d) To switch between Chinese and English, hold down the Set key and P3 key for 10 seconds.
e) Data will be automatically saved within 2 seconds when using memory mode (P1–P6).
7. Inspection and adjustment
1) Initial inspection
After unpacking, use the packing list to ensure that all accessories are included and verify that no screws on the machine are loose. For single-chamber vacuum machines, check that the plexiglass cover moves up and down smoothly. For double-chamber (flat) vacuum machines, check if the vacuum cover moves freely from left to right.
2) Lubrication
Apply an appropriate amount of lubricating oil to all moving parts, oil holes, and nozzles. Follow the vacuum pump's instructions to add the correct amount of vacuum oil to the pump. Fill the oil to 3/4 of the height of the vacuum oil window through the oil filling port. During operation, ensure that the oil level does not drop below 1/4 of the window height, and the maximum oil level should not exceed 3/4 of the window height.
3) Adjustment
a) Vacuum degree adjustment
Adjust the vacuum degree according to the packaging material requirements. Choose the optimal pumping time to achieve the desired vacuum level. The longer the pumping time, the higher the vacuum degree.
b) Heat sealing time adjustment
Set the heat sealing time (0–9.9 seconds) on the panel according to the material of the packaging bags and the items being sealed. Start with a lower heat sealing time and gradually increase it until the desired sealing appearance and strength are achieved.
8. Operation process
1) Turn on the power
Switch on the machine by turning on the power switch. Set the following parameters according to your packaging needs:
o Pumping time
- Heat sealing time
○ Cooling time
○ Inflation time (if applicable)
2) Prepare the items for packaging
Place the items into the packaging bag (such as a plastic composite bag or aluminum foil composite bag). Insert the bag into one of the vacuum chambers. Lift the pressure strip, and carefully position the mouth of the bag evenly on the lower heat sealing frame. Lower the pressure strip to secure the bag in place.
3) Start the vacuum process
Press down the vacuum cover. Once the vacuum pump starts, the cover will be automatically sealed by the vacuum force. The vacuum time can be adjusted according to the packaging requirements.
4) Sealing process
When the set vacuum time is reached (achieving the desired vacuum degree), the pumping will stop, and the solenoid valve will engage to start the sealing process. Adjust the sealing time and temperature based on the material specifications of the packaging bag being used.
5) Cooling and venting
Once the set heat sealing time is completed, the cooling process will begin. After cooling, the vent solenoid valve will engage, allowing air to enter the vacuum chamber, and the vacuum cover will automatically lift. At this point, the vacuum packaging process is finished, and the machine is ready for the next packaging cycle.
6) For inflatable vacuum packaging machines
If using an inflatable vacuum packaging machine, after the air in the vacuum chamber is pumped out, the necessary gas (usually nitrogen) is introduced into the packaging bag. Then, the heat sealing process begins. After sealing, any remaining gas in the vacuum chamber is extracted. Finally, the vent solenoid valve is activated, completing the packaging process.
9. Common faults and troubleshooting
1) Vacuum issues (won't vacuum or low vacuum degree):
a) Verify if the vacuum pump is rotating in the correct direction, matching the motor's arrow. If not, adjust the phase immediately.
b) For a new machine, ensure the vacuum cover's sealing ring aligns properly with the chamber's surface. Apply slight pressure on the cover to ensure complete sealing.
c) Check if the microswitch of a single-chamber vacuum packaging machine is making good contact or if the limit switch of a double-chamber machine is in position. Adjust the microswitch or limit switch as needed.
d) Inspect the vent valve for tight closure. If the valve or solenoid is aged, dirty, or misaligned, it may cause leakage. Repair or replace the faulty parts if needed.
e) Examine all parts of the circuit for leaks or loose connections.
2) Poor heat seal quality:
a) Ensure the opening of the packaging bag is clean, with no dirt at the sealing point.
b) Check if the nickel-chromium heating element is functioning correctly, and inspect for short circuits or open circuits.
3) Main board faults:
a) Keep the main board circuit clean and dry, free of metal debris to prevent short circuits or program errors.
b) Ensure the switch base connections are secure, and replace damaged keys that may prevent vacuum or sealing actions.
c) If the display shows missing strokes or action indicators are absent, check for loose base connections or a partially damaged display screen.
10. Maintenance
1) Familiarize with the manual: Read the manual thoroughly before operating the machine, and understand the adjustment and usage methods.
2) Vacuum pump maintenance: Follow the vacuum pump's maintenance guidelines, including regular oil changes. Ensure the pump runs in the correct direction.
3) Oil level monitoring: Ensure the vacuum pump oil level is between 1/2 and 3/4 of the oil window height. Check oil levels and quality weekly. If the oil becomes contaminated, blackened, emulsified, or thickened, replace it immediately, and clean the pump before refilling with new oil.
4) Electrical safety: Check that the machine's grounding wire is properly connected to ensure electrical safety.
5) Sealing cloth check: Regularly inspect the sealing dye cloth (polytetrafluoroethylene) on the heat sealing support for foreign matter. Ensure the cloth is smooth to maintain sealing strength.
6) Handling faults: In case of a malfunction, turn off the power immediately. If necessary, press the emergency stop button. Once venting is complete, lift the cover, power off the machine, and inspect for the cause of the fault before troubleshooting.
11. Cautions
1) Vacuum pump motor direction: Ensure the vacuum pump motor is not running in reverse.
2) Pre-use oil fill: Before using the machine, open the tank cap and fill with 46 hydraulic oil or 100 vacuum oil.
3) Regular oil checks: Ensure the oil level is always above 1/4 and below 3/4 of the oil window height.
4) Oil contamination: Replace oil if water or impurities are detected.
5) Oil during transportation: Drain the oil before transporting the machine.
6) Exhaust filter replacement: Replace the exhaust filter every six months.
7) External air source pressure: Ensure the external air source pressure does not exceed 0.2 MPa when charging.
8) Emergency stop: The emergency stop switch releases air and halts the vacuum pump automatically.
9) Prohibited materials: Do not use the machine to package flammable or explosive materials.
12. Schematic diagram
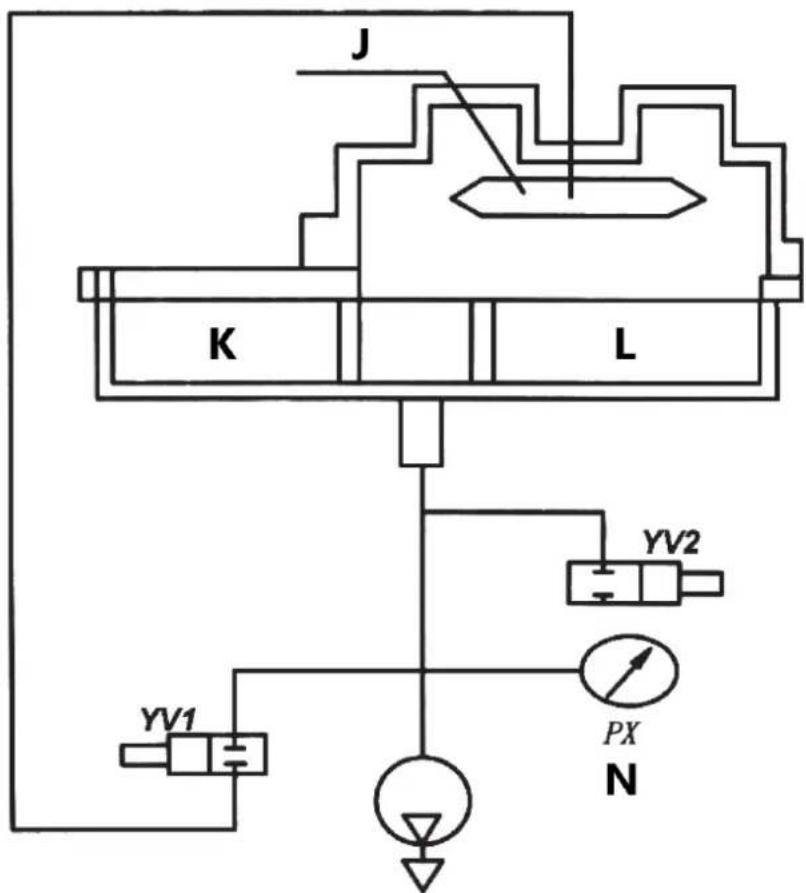
A - Vacuum packing
B - Heating
C - Pump
D - Vant
E - Inflate
F - Seal
G - Pump
H - Heat
I - Start
J - Air bag
K - A chamber
L - B chamber
N - Vacuum meter

A - Vakuové balení
B - Ohřev
C - Čerpadlo
D - Vant
E - Nahustit
F - Pečet
G - Čerpadlo
H - Teplo
I - Start
J - Airbag
K - Komora
L - B komora
N - Vakuoměr

A - Vakuumpakning
B - Opvarmning
C - Pumpe
D - Vant
E - Pust op
F - Tætning
G - Pumpe
H - Varme
I - Start
J - Airbag
K - Et kammer
L - B-kammer
N - Vakuummeter

A - Tyhjiöpakkaus
B - Lämmitys
C - Pumppu
D - Vant
E - Täytä
F - Tiiviste
G - Pumppu
H - Lämpö
I - Aloita
J - Turvatyyny
K - Kammio
L - B kammio
N - Tyhjiömittari

1 - Plexiglas deksel
2 - Afdichtring
3 - Persstrip
4 - Vacümkamer
5 - Besturingspaneel
Vacuümsysteem
A - Vacuüm verpakken
B - Verwarming
C - Pomp
D - Vant
E - Opblazen
F - Zegel
G - Pomp
H - Warmte
I - Begin
J - Airbag
K - Een kamer
L - B-kamer
N - Vacuümmeter

1 - Plexiglass deksel
2 - Tetningsring
3 - Trykking Strip
4 - Vakuumkammer
5 - Styrepanel
Vakuumsystem
Vakuumpakkemaskinens vakuumsystem består av to hovedkomponenter: vakuummagnetventilen (YV1) og ventilasjonsmagnetventilen (YV2).
For den oppblåsbare vakuumpakkemaskinen inkluderer vakuumsystemet tre magnetventiler: vakuummagnetventilen (YV1), magnetventilen for påfylling av kollisjonsputen (YV2) og utluftingsmagnetventilen (YV3).
2) Forbered varene for pakking
A - Vakuumpakking
B - Oppvarming
C - Pumpe
D - Vant
E - Pumpe
F - Forsegle
G - Pumpe
H - Varme
I - Start
J - Airbag
K - Et kammer
L - B kammer
N - Vakuummåler

1 - Poklopac od pleksiglasa
2 - Brtveni prsten
3 - Traka za prešanje
4 - Vakuumska komora
5 - Upravljačka ploča
Vakuumski sustav
Vakuumski sustav stroja za vakuumsko pakiranje sastoji se od dvije glavne komponente: vakuumskog solenoidnog ventila (YV1) i odzračnog solenoidnog ventila (YV2).
A - Vakuumsko pakiranje
B - Grijanje
C - Pumpa
D - Vant
E - Napuhati
F - Pečat
G - Pumpa
H - Vrućina
I - Start
J - Zračni jastuk
K - Komora
L - B komora
N - Vakuummetar

A - Vakuuminis pakavimas
B - Šildymas
C - Siurblys
D - Vant
E - Išpūsti
F - Antspaudas
G - Siurblys
H - Šiluma
I - Pradèti
J - Oro pagalvé
K - Kamera
L - B kamera
N - Vakuuminis matuoklis

1 - Capac din plexiglas
2 - Inel de etanşare
3 - Bandă de apăsare
4 - Camera de vid
5 - Panou de control
Sistem de vid
A - Ambalare în vid
B - Încălzire
C - Pompa
D - Vant
E - Umfla
F - Sigiliu
G - Pompa
H - Căldură
I - Început
J - Airbag
K - O cameră
L-camera B
N - Vacuometru

A - Vakuumsko pakiranje
B - Ogrevanje
C - Črpalka
D - Vant
E - Napihniti
F - Pečat
G - Črpalka
H - Toplota
I - Začetek
J - Zračna blazina
K - Komora
L - B komora
For the disposal of the device please consider and act according to the national and local rules and regulations.
CONTACT
expondo Polska sp. z o.o. sp. k.