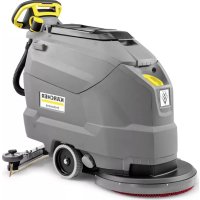
BR 85/100 W Classic Bp Pack - Scrubber Kärcher - Free user manual and instructions
Find the device manual for free BR 85/100 W Classic Bp Pack Kärcher in PDF.
| Product type | Professional scrubber dryer |
| Brand | Kärcher |
| Model | BR 85/100 W Classic Bp Pack |
| Usage | Professional and industrial cleaning of flat, moisture-resistant floors |
| Nominal voltage | 24 V |
| Recommended battery capacity | 170, 180, 240 or 285 Ah (5 h) |
| Traction motor power | 300 W |
| Suction turbine power | 500 W |
| Brush drive power | 2 x 750 W (total 1500 W) |
| Clean water tank volume | 100 L |
| Dirty water tank volume | 100 L |
| Max. water temperature | 50 °C |
| Working width (brush) | 850 mm |
| Brush rotation speed | 1200 rpm |
| Suction air flow | 24 L/s |
| Suction vacuum | 16 kPa (160 mbar) |
| Empty weight (transport weight) | 340 kg |
| Total permissible weight | 440 kg |
| Max. working slope | 2 % |
| Sound pressure level LpA | 65 dB(A) |
Frequently Asked Questions - BR 85/100 W Classic Bp Pack Kärcher
User questions about BR 85/100 W Classic Bp Pack Kärcher
0 question about this device. Answer the ones you know or ask your own.
Ask a new question about this device
Download the instructions for your Scrubber in PDF format for free! Find your manual BR 85/100 W Classic Bp Pack - Kärcher and take your electronic device back in hand. On this page are published all the documents necessary for the use of your device. BR 85/100 W Classic Bp Pack by Kärcher.
USER MANUAL BR 85/100 W Classic Bp Pack Kärcher
natural_image
Technical line drawing of two cleaning machines (no text or symbols present)Deutsch 6
English 15
Français 24
Italiano 33
Español 43
Português 52
Nederlands 62
Türkçe 71
Svenska 80
Suomi 88
Norsk 97
Dansk 106
Eesti 115
Latviešu 123
Lietuviškai 132
Polski 142
Magyar 151
Čeština 160
Slovenčina 169
Slovenščina 178
Românește 187
Hrvatski 196
Srpski 205
Ελληνικά 215
Русский 224
Українська 235
Български 244
中文 254
Indonesia 262
ไทย 272
日本語 280
العربيya 298
BD 70/75 W Classic Bp
BD 70/75 W Classic Bp Pack 170Ah
BD 70/75 W Classic Bp Pack 115Ah
BD 70/75 W Classic Bp*SAR
BD 80/100 W Classic Bp
BD 80/100 W Classic Bp Pack 285Ah
BD 80/100 W Classic Bp Pack 170Ah
BR 75/75 W Classic Bp
BR 75/75 W Classic Bp Pack 170Ah
BR 85/100 W Classic Bp
BR 85/100 W Classic Bp Pack 170Ah
BR 85/100 W Classic Bp Pack 285Ah
BD 70/75 W Classic Bp Retail
BD 70/75 W Classic Bp Pack 115Ah Retail
text_image
A 1 2 3 4 5 6 7 8 9 10 11 12 13
text_image
B 16 15 14 13 12 11 10 9 ① ② ③ ④ ⑤ ⑥ ⑦ ⑧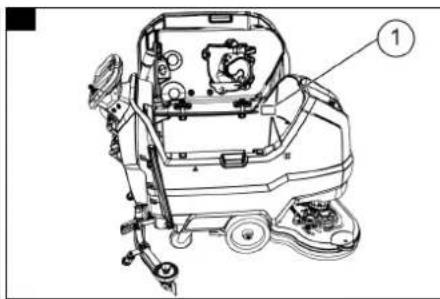
natural_image
Technical line drawing of a cleaning or repair machine with labeled component (no text or symbols present)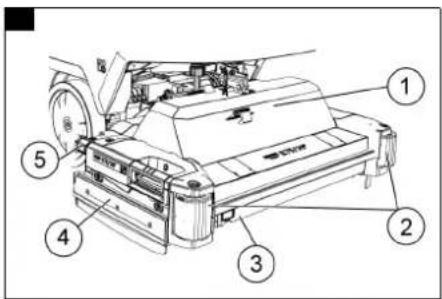
text_image
Technical diagram of a machine with numbered parts for identification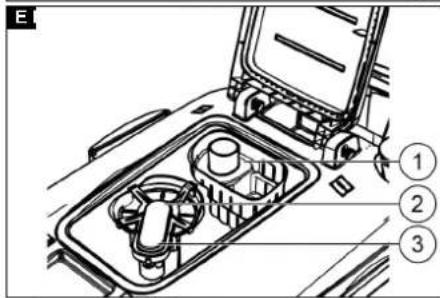
text_image
E ① ② ③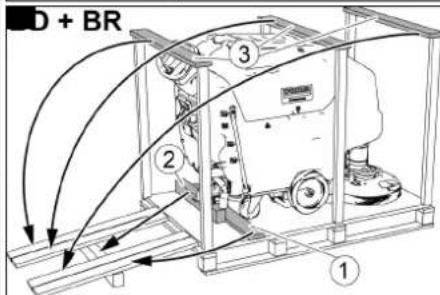
text_image
D + BR ① ② ③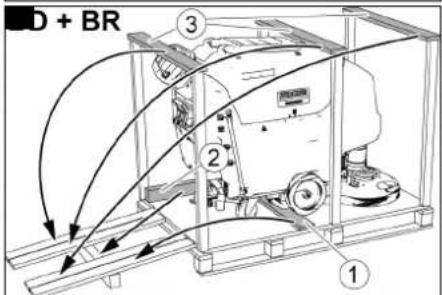
text_image
D + BR ① ② ③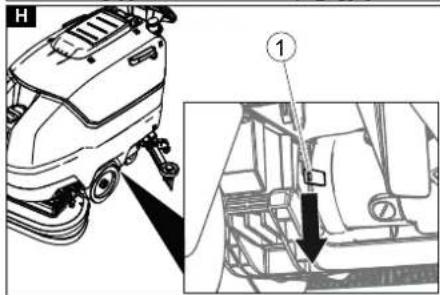
text_image
Technical diagram showing a vehicle interior with labeled parts and an inset detail view highlighting a specific component.
text_image
Technical diagram of a cleaning machine with labeled components and an inset view showing internal components.
natural_image
Mechanical assembly diagram showing a lever system with rotating components and connecting rods (no text or labels)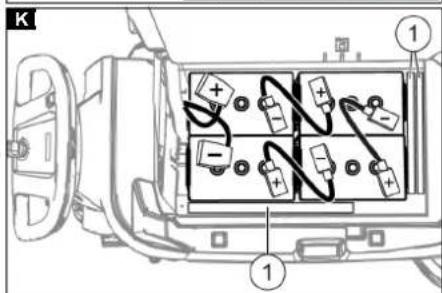
text_image
K 1 + - + + + 1 ①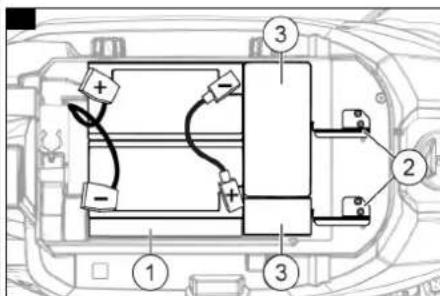
text_image
Diagram of a vehicle battery pack with labeled components and polarity indicators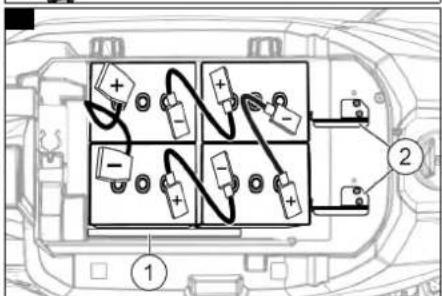
text_image
Diagram of an electrical panel with battery and switch connections, labeled with components 1 and 2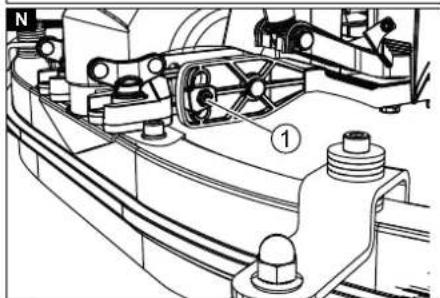
natural_image
Technical line drawing of a mechanical assembly with labeled components (no readable text or symbols)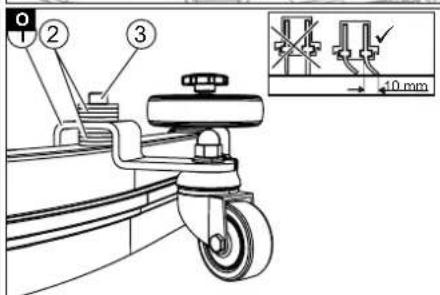
text_image
Technical diagram of a mechanical device with numbered components and an inset showing a 10 mm measurement detail.
natural_image
Diagram of a hand holding a flexible hose with a device, showing fluid flow direction (no text or symbols)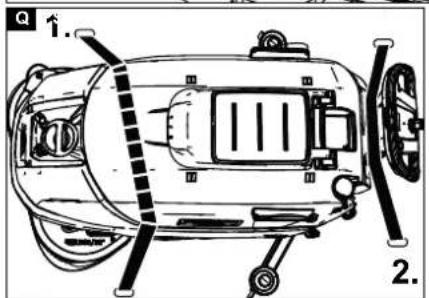
text_image
Q 2.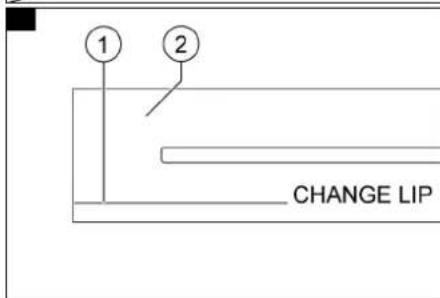
text_image
① ② CHANGE LIP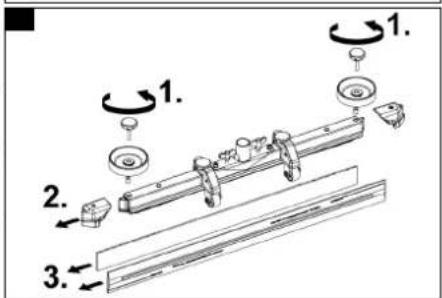
text_image
Technical diagram showing mechanical assembly steps with numbered components and rotation indicators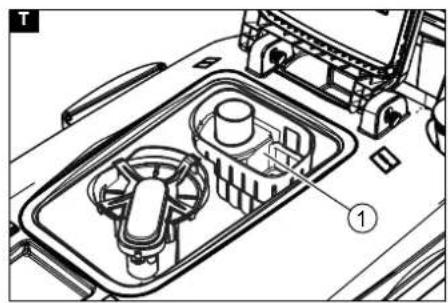
natural_image
Technical line drawing of a vehicle engine compartment with labeled parts (no text or symbols present)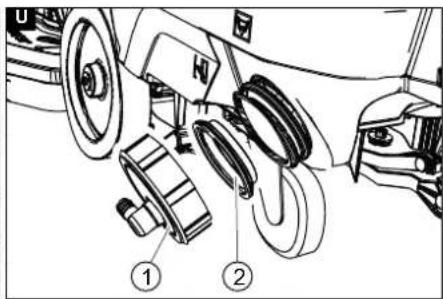
text_image
Technical diagram showing mechanical assembly with labeled parts, including rollers and a housing component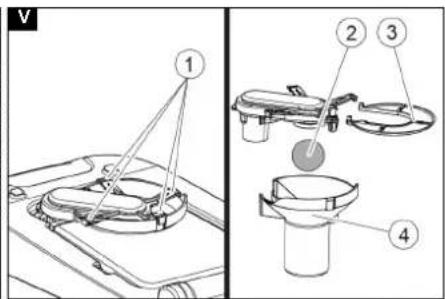
text_image
V ① ② ③ ④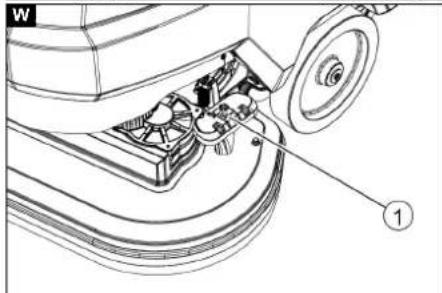
natural_image
Technical line drawing of a mechanical component with labeled parts (no text or symbols present)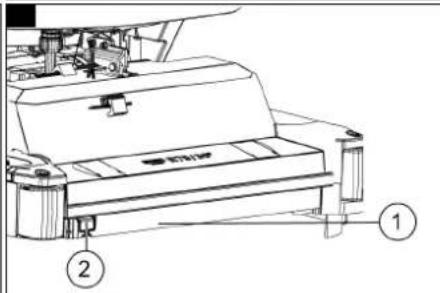
text_image
Technical diagram of a machine with numbered parts, likely part of a printing or manufacturing procedure.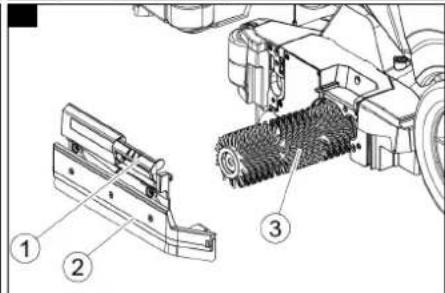
text_image
Technical diagram showing mechanical assembly with numbered components: part 1, part 2, and part 3.Inhalt
Typ: 1.127-xxx, 1.515-xxx
Chairman of the Board of Management

S. Reiser
Director Regulatory Affairs & Certification
71364 Winnenden (Germany)
Tel.: +49 7195 14-0
Fax: +49 7195 14-2212
Winnenden, 2021/02/01
Contents
General notes 15
Function 15
Intended use 15
Environmental protection 15
Warranty 15
Accessories and spare parts.... 15
Scope of delivery 15
Safety instructions 15
Description of the unit 16
Installation.... 17
Initial startup 18
Operation 18
Transport.... 19
Storage 20
Care and maintenance 20
Troubleshooting guide 21
Accessories BD variant.... 22
Accessories BR variant.... 22
Accessories BD and BR variants.... 22
Technical data.... 22
Declaration of Conformity 23
General notes

Read these original operating instructions and the enclosed safety instructions before using the device for the first time. Proceed accordingly.
Keep both books for future reference or for future owners.
Function
This scouring and vacuum machine is used for wet cleaning of level floors.
The device can be adjusted to suit the respective cleaning task by setting the water volume and detergent volume appropriately. The detergent dosing is adjusted via the amount added to the tank.
The working width and the capacity of the fresh and waste water tanks (see chapter "Technical data) enable effective cleaning with a long working time.
The device has a drive motor.
Note
The device can be equipped with various accessories to suit the respective cleaning task. Request a copy of our catalogue or visit our Internet website at www.kaercher.com.
Intended use
This device is suitable for commercial and industrial use, e.g. in hotels, schools, hospitals, factories, shops, offices, and rental companies. Use the device only in accordance with the information in these operating instructions.
- The device may only be used for cleaning smooth surfaces that are insensitive to water and polishing.
- The device is not suitable for cleaning frozen floors (e.g. in cold stores).
- The device is not suitable for use in potentially explosive environments.
- The device is approved for operation on surfaces with a maximum slope (see chapter Technical data).
Environmental protection

The packing materials can be recycled. Please dispose of packaging in accordance with the environmental regulations.

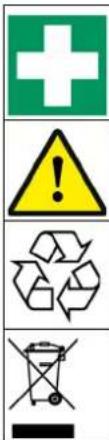
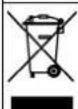
Electrical and electronic devices contain valuable, recyclable materials and often components such as batteries, rechargeable batteries or oil, which - if handled or disposed of
incorrectly - can pose a potential danger to human health and the environment. However, these components are required for the correct operation of the device. Devices marked by this symbol are not allowed to be disposed of together with the household rubbish.
Notes on the content materials (REACH)
Current information on content materials can be found at: www.kaercher.de/REACH
Warranty
The warranty conditions issued by our sales company responsible apply in all countries. We shall remedy possible malfunctions on your device within the warranty period free of cost, provided that a material or manufacturing defect is the cause. In a warranty case, please contact your dealer (with the purchase receipt) or the next authorised customer service site.
(See overleaf for the address)
Accessories and spare parts
Only use original accessories and original spare parts. They ensure that the appliance will run fault-free and safely.
Information on accessories and spare parts can be found at www.kaercher.com.
Scope of delivery
Check the contents for completeness when unpacking. If any accessories are missing or in the event of any shipping damage, please notify your dealer.
Safety instructions
Before using the device for the first time, read and observe these operating instructions and the accompanying brochure: Safety information for brush cleaning units spray retraction devices, No. 5.956-251.0.
The device is approved for operation on surfaces with a specified limited slope (see Chapter Technical data).
△WARNING
Risk of injury!
Device may tip over on sloping surfaces.
Do not operate the device on sloping surfaces.
The device may only be operated when the hood and all covers are closed.
Safety devices
△CAUTION
Missing or modified safety devices!
Safety devices are provided for your own protection.
Do not bypass, remove or render ineffective any safety devices.
Safety switch
The device switches off when the safety switch is released.
Key-operated switch
Pulling the key out of the key-operated switch secures the device against unauthorised use.
Warning symbols
Observe the following warnings when handling the batteries:

Observe notes in the instructions for the battery, on the battery and in these operating instructions.

Wear eye protection.

Keep acids and batteries away from children.
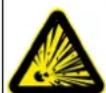
Risk of explosion
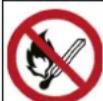
Fire, sparks, open flames and smoking are prohibited.
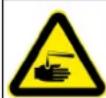
Risk of acid burns
text_image
Four compliance symbols: green cross, yellow warning triangle with exclamation mark, black recycling symbol, and black trash bin with crossed-out boxFirst aid.
Warning
Disposal
Do not throw batteries in the bin.
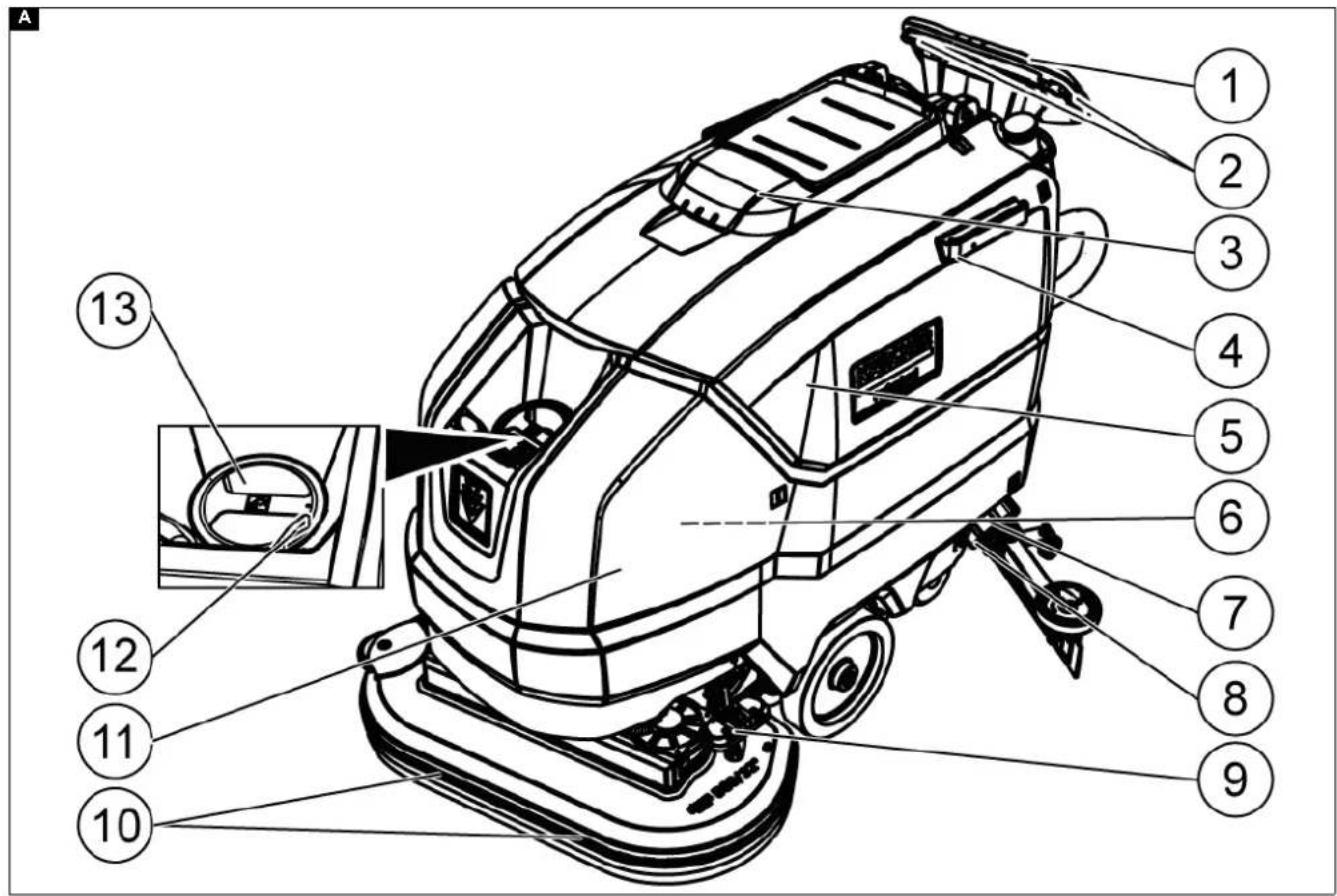
Description of the unit
Overview of front side
Illustration A
①Push handle
②Safety switch
③ Waste water tank cap
④Homebase retaining rail
⑤ Waste water tank
⑥** Battery
⑦Fresh water filter
⑧Fresh water tank lock
⑨Pedal for brush replacement
⑩Disc brush
⑪Fresh water tank
⑫Hose holder
⑬Fresh water tank filling hole
** Not in scope of delivery
Overview of rear
Illustration B
① Waste water drain hose with dosing unit
②Cleaning head
③Pedal for brush replacement
④Suction hose
⑤Suction bar inclination adjustment
⑥Wing nuts for fastening the suction bar
⑦Suction bar height adjustment
⑧Suction bar
⑨ Fresh water filling level indicator
Fresh water drain hose
⑩Cleaning head lever
⑪Water volume regulation knob
⑫Suction bar lever
⑬Battery plug connector
⑭Key-operated switch
⑮Display
⑯ Working speed rotary knob
⑰Driving direction switch
Overview of R head
Illustration D
①R head
②Scraper roll
③Water distribution strip
④Side skirt
⑤ Sweep bin
Overview of waste water tank
Illustration E
①Coarse dirt filter
②Fluff filter
③Float
Type plate
Illustration C
①Type plate
Colour coding
• Control elements for the cleaning process are yellow.
- Control elements for maintenance and servicing are light grey.
Symbols on the appliance

Fresh water tank drain opening

Waste water tank drain opening

Increased cleaning head contact pressure

Battery access

Fresh water tank filling level (50%)

Insert the charger plug here

Lashing point

* Mop holder

ATTENTION
Incorrect socket
Risk of damage
DO NOT insert the charger plug here

Normal cleaning head contact pressure

Raise the cleaning head

Pedal for raising/lowering the cleaning head

Brush replacement pedal
* optional
Installation
Unloading
- Remove the carton.
- Remove the straps.
- Remove the wooden blocks fastened to the pallet by screws.
- Using the 3 upper reinforcing boards of the carton packaging and the securing board screwed laterally on the pallet, place a ramp in front of the pallet and secure it using board pallet screws.
Illustration F
Illustration G
① Securing board
②Beam
③Reinforcing board
-
Push the beam which has been unscrewed from the pallet under the ramp for support and screw into place.
-
Press the cleaning head lever down and latch it in place.
-
Only for BD 80/100 and BR 85/100: Press the brake lever down.
Illustration H
①Brake lever
Note
For BD 70/75 and BR 75/75, there is no brake. Releasing the brake is not necessary with this device.
-
Pull the device backwards off the pallet.
-
Only for BD 80/100 and BR 85/100: Press the brake lever up.
Installing the suction bar
-
Insert the suction bar in the suction bar mount. Illustration J
-
Tighten the wing nuts.
-
Fit the suction hose.
Batteries
Recommended battery sets BD 70/75 and BR 75/75
| Description Order | no. Volume (m ^3 )* | Airflow (m ^3 /h)** |
| Only BD 70/75 W115 Ah - maintenance-free | 2.815-091.0 ^1) | 1.98 0.792 |
| 170 Ah - maintenance-free | 2.815-092.0 ^2) | 2.31 0.924 |
| 180 Ah - maintenance-free | 2.815-101.0 ^3) | 4.785 1.914 |
* Minimum volume of the battery charging room
** Minimum airflow between battery charging room and environment For initial installation, an additional battery installation kit is required:
1 2638-198.0
2 2638-162.0
3 2638-106.0
Recommended battery sets BD 80/100 and BR 85/100
| Description Order | no. Volume (m ^3 )* | Airflow (m ^3 /h)** |
| 170 Ah - maintenance-free | 2.815-092.0 ^1) | 2.31 0.924 |
| 180 Ah - maintenance-free | 2.815-101.0 ^2) | 4.785 1.914 |
| 240 Ah - maintenance-free | 2.815-102.0 ^2) | 6.27 2.508 |
| 285 Ah - maintenance-free | 2.815-095.0 ^3) | 11.88 4.752 |
* Minimum volume of the battery charging room
** Minimum airflow between battery charging room and environment
For initial installation, an additional battery installation kit is required:
1 2638-162.0
2 2638-106.0
3 2638-197.0
Low-maintenance batteries (wet batteries)
△DANGER
Danger of burns due to acid leakage!
Only fill the battery with water when it is discharged.
When handling battery acid, use safety goggles and immediately rinse out any acid splashes on the skin or clothing with water.
ATTENTION
Risk of damage to the batteries!
Using water with additives will void the battery's warranty.
Top up the batteries using only distilled or desalinated water (EN 50272-T3).
Do not use any foreign additives or touch-up agents.
- Add distilled water one hour before the charging process comes to an end. Observe the correct acid level according to the battery label.
All cells must produce gas at the end of the charging process.
Maintenance-free batteries (AGM and gel batteries)
ATTENTION
Risk of damage from AGM and gel batteries!
Opening or drilling the battery housing will damage an AGM or gel battery. It must then be replaced.
Do not open the battery housing and do not drill any holes.
Do not cover the pressure relief valve and do not change it.
- Only charge AGM and gel batteries using the specified chargers, see chapter: Charging the battery.
Installing and connecting batteries
△WARNING
Risk of injury due to the device tipping over!
Device may tip over when removing and installing batteries.
Ensure that the device is positioned stably when removing and installing the batteries.
ATTENTION
Risk of damage to the control electronics!
The control electronics can be destroyed by reversing the polarity of the battery connections.
Take care to ensure the correct polarity when connecting the batteries.
△WARNING
Danger to life from fire or explosion if batteries are deeply discharged!
Incorrect charging of deeply discharged batteries can cause a fire.
Do not start the device if the battery is deeply discharged.
Make sure that the battery is charged before starting the system.
-
Drain the waste water.
-
Pivot the waste water tank upwards.
-
Place the battery in the device as shown. Important: Push the batteries all the way back!
BD 80/100 and BR 85/100
Illustration K
170 Ah, 2.815-092.0
180 Ah, 2.815-101.0
240 Ah, 2.815-105.0
285 Ah, 2.815-095.0
① Spacers
Illustration L
BD 70/75 and BR 75/75
115 Ah, 2.815-091.0
170 Ah, 2.815-092.0
180 Ah, 2.815-101.0
① Spacers
②Battery holder
③Additional weights
- Insert a spacer between the right batteries and the fresh water tank, a for 115 Ah battery set: 1 piece lengthwise flat.
b for battery sets other than 115 Ah: 2 pieces lengthwise upright on top of each other.
-
For BD 70/75 with 115 Ah battery set: Insert the 4 additional weights.
-
Attach the battery fastener, to do so
a for BD 70/75: Install the 2 battery holders and for 115 Ah: Tighten at the left and middle threaded holes. For BR 75/75 and BD 70/75: 170 Ah / 180 Ah: Tighten at the right and middle threaded holes.
b For BD 80/100 and BR 85/100: Insert one or two spacers flat lengthwise or vertically between the front batteries and the fresh water tank so that the batteries cannot slip forward
-
Connect the poles to the connection cables from the battery installation kit.
-
Clamp the connecting cables on the (+) and (-) battery terminals that are still free.
-
Connect the device-side battery connector to the battery-side battery connector.
-
Pivot the waste water tank downwards.
Removing the batteries
⚠ WARNING
Risk of injury due to the device tipping over!
Device may tip over when removing and installing batteries.
Ensure that the device is positioned stably when removing and installing the batteries.
-
Turn the key-operated switch to "0" and remove the key.
-
Disconnect the battery plug.
-
Drain the waste water.
-
Pivot the waste water tank upwards.
-
Disconnect the device-end cable from the negative terminal of the battery.
-
Disconnect the remaining cables from the batteries.
-
For BD 80/100: Remove the spacer(s) between the front batteries and the fresh water tank.
-
For 115 Ah battery set: Take out the additional weights.
-
Remove the batteries.
-
Dispose of the used batteries in accordance with statutory provisions.
Initial startup
Charging the battery
DANGER
Risk of injury from charger!
Electric shock due to improper use of the charger!
Adhere to the mains voltage and fuse values specified on the device type plate.
Only use the charger in dry rooms with sufficient ventilation.
ATTENTION
Danger of explosion due to battery!
Gases accumulate under the tank during the charging process.
Pivot the waste water tank upwards before charging low-maintenance batteries.
ATTENTION
Risk of damage due to unsuitable charger!
Do not connect the charger to the device-side battery connector.
Use only a charger suitable for the type of battery installed.
Read the operating instructions of the charger manufacturer and observe the safety instructions in particular.
| Battery set Capacity Charger | ||
| 2.815-091.0 115 Ah | 654-367.0 | |
| 2815-092.0 170 Ah | 6654-436.0 | |
| 2815-101.0 180 Ah | 6654-434.0 | |
| 2815-105.0 240 Ah | 6654-437.0 | |
| 2815-095.0 285 Ah | 6654-419.0 | |
The average charging time is approx. 10-15 hours.
The device cannot be used during the charging process.
Note
The device has deep discharge protection, i.e. the brush motor and turbine are switched off automatically when the permitted minimum capacity level is reached.
-
Drive the device directly to the charger and do not drive on slopes.
-
Pull out the device-side battery connector.
Illustration I
①Battery plug, device side
②Battery plug, battery side
-
Connect the battery-side battery connector to the charger.
-
Plug the mains plug of the charger into the socket.
-
Carry out the charging process in accordance with the operating instructions for the charger.
-
Connect the device-side battery connector to the battery-side battery connector.
Operation
ATTENTION
Risks during operation
Danger of injury
Release the safety switch in the case of danger.
Filling with operating materials
Filling fresh water
-
Open the fresh water tank cap.
-
Fill fresh water (max. 50 °C) to the lower edge of the filling nozzle.
Note: The fresh water hose can be clamped with the hose holder during filling.
- Close the fresh water tank lock.
Notes on detergents
⚠ WARNING
Risk of damage to the device!
If unsuitable detergents are used, the device may get damaged. Use only recommended detergents. The operator carries all increased risks relating to operational safety and increased risk of accidents if using other detergents.
Use only detergents free of solvents, salt and hydrofluoric acid. Adhere to the safety instructions stated on the detergent packaging.
Note
Do not use heavily foaming detergent.
Recommended detergents
| Application | Detergent |
| Floor maintenance cleaner extra low foaming with EU Ecolabel | APPROX. 50 C |
| Highly wetting universal cleaner | RM 756 |
| Intensive alcohol cleaner for floors and surfaces. Well-suited for hard rock such as granite | RM 755 |
| Fine stone cleaner, surfactant-free | RM 753 |
| Universal decoater, suitable for linoleum | RM 754 |
| Acidic vending machine basic cleaner. Suitable for sanitary areas and construction cleaning | RM 751 |
| Industrial maintenance cleaner RM 69 | |
| Industrial basic cleaner and alkaline de-coater | RM 752 |
| Surface disinfectant cleaner | RM 732 |
Detergent
- Fill the detergent into the fresh water tank.
Note: The cap for the fresh water tank filling hole can be used for measuring the correct quantity of detergent. It has a measuring scale marked on the inner side.
Adjusting the water volume
- Adjust the water volume via the regulating knob to suit the degree of soiling of the floor covering.
Note
Perform initial cleaning tests with a low water volume. Increase the water volume step by step until achieving the desired cleaning result.
Note
The cleaning head continues operating without a liquid supply if the fresh water tank is empty.
Adjusting the suction bar
Adjusting the inclination
The inclination must be adjusted so that the suction lips of the suction bar make even contact with the floor over the entire length of the suction bar.
- Loosen the screw.
Illustration N
①Screw
-
Adjust the inclination of the suction bar.
-
Tighten the screw.
Adjusting the height
The height adjustment affects the bending of the suction lips on contact with the floor.
-
Push the device a small distance forwards.
-
Compare the bending of the suction lips with the figure below. Illustration O
① Spacer roller with holder
② Washer
③Screw
-
Unscrew the screw.
-
Insert a sufficient number of washers between the suction bar and spacer roller to create the correct bending of the suction lip.
-
Fit the remaining unused washers above the spacer roller.
-
Screw in and tighten the screw.
-
Repeat the entire procedure at the second spacer roller.
-
Push the device a small distance forwards.
-
Check the bending of the suction lips over the entire length.
-
Repeat the adjustment procedure if necessary.
Cleaning
Switching on the device
- Turn the key-operated switch to "1".
The display shows the following one after the other:
• Period of time until the next after-sales Customer Service
- Software version, control panel
- Charging state of the battery and number of operating hours
Driving
Note
The direction of travel can be changed during the cleaning operation. This way, a certain position can be intensively cleaned by driving back and forth several times.
- Set the driving direction switch to "forward".
Cleaning
Note
The inclination and height of the suction bar can be adjusted to improve the vacuuming results (see chapter Adjusting the suction bar).
Note
When the waste water tank is full, the float switch closes the suction opening and the suction turbine runs at a higher speed. In this case, raise the suction bar and drive to the location for emptying the waste water tank.
- Turn the working speed rotary knob to the desired value.
the speed is shown on the display during the adjustment. The play is shown in percentage of the maximum speed. -
Set the water volume at the regulating valve.
-
Press the suction bar lever downwards. The suction bar lowers. Vacuuming begins.
- Press the cleaning head lever downwards, unlatch it and allow it to move upwards.
- Pull the safety switch towards the push handle. The cleaning head starts up and the device moves at the set speed.
Increasing brush contact pressure (BD variant only)
- Let go of the safety switch.
- Lift the cleaning head lever up with your hand and latch it towards the right.
Finishing operation
Finishing cleaning
- Let go of the safety switch.
- Press the cleaning head lever down and latch it in place.
- Continue moving a short distance.
The residual water is vacuumed up.
- Lift the suction bar.
The suction continues to run for 10 seconds.
- Turn the key-operated switch to "0".
- Charge the battery if necessary.
Draining the waste water
⚠ WARNING
Environmental pollution!
Environmental pollution due to improper disposal in waste water. Observe the local waste water treatment regulations.
- Remove the drain hose from the support and lower it over a suitable collecting device.
- Press the dosing unit together or kink the hose.
- Open the dosing unit cover.
- Drain the waste water. Regulate the water volume by pressing or kinking.
- Rinse the waste water tank with clear water.
Illustration P
Draining fresh water
- Pull off the filling level indicator hose and swivel it down.
Quickly draining fresh water
- Unscrew the fresh water tank cap.
- Allow the fresh water to drain away.
- Fit the fresh water tank cap and screw into place.
Note: Take care to ensure that the hose connection in the fresh water tank cap is positioned at the lowest point in the tank after screwing the cap in place.
Transport
△DANGER
Driving on slopes
Risk of injury
Observe the maximum permissible inclination when driving the device on slopes for loading and unloading purposes (see chapter "Technical data").
Drive slowly.
△CAUTION
Failure to observe the weight
Risk of injury and damage
Be aware of the weight of the device during transport.
Only load the device with the assistance of another person or by using the drive.
- Press the cleaning head lever down and latch it in place.
- Raise the suction bar.
- Turn the key-operated switch to "1".
- Select the travel direction at the travel direction switch.
- Pull the safety switch towards the push handle.
- When transporting in vehicles, secure the device against slipping and tipping over according to the applicable guidelines.
Illustration Q
- First fit the strap under the waste water tank.
Storage
△CAUTION
Failure to observe the weight
Risk of injury and damage
Be aware of the weight of the device during storage.
ATTENTION
Frost
Destruction of the device through freezing water
Drain all water from the device.
Store the device in a frost-free location.
- This device may only be stored indoors.
- Fully charge the batteries before storing them for a long period.
- Fully charge the batteries at least every month during storage.
Care and maintenance
△DANGER
Risk of injury!
The device may start moving unexpectedly and cause injury.
Turn the key-operated switch to "0" and remove the key before performing any work on the device.
Pull out the charger mains plug.
- Drain and dispose of the waste water and fresh water.
Safety inspection/maintenance contract
You can agree on regular safety inspections or close a maintenance contract with your dealer. Please seek advice on this.
Maintenance intervals
Each time after use
ATTENTION
Risk of damage!
Risk of damage to the device due to improper cleaning.
Do not spray the device with water and do not use aggressive detergents.
A detailed description of the individual maintenance work is provided in Chapter Maintenance work.
- Drain the waste water.
● Rinse the waste water tank with clear water. - Clean the exterior of the device using a damp cloth, wetted with a mild washing lye.
- Check the fluff filter and clean if required.
● Clean the coarse dirt filter.
● Clean the coarse dirt filter. - Only BR variants: Remove and empty the coarse dirt receptacle.
- Only BR variants: Clean the water distribution channel.
- Clean the suction lips, check for wear and adjust the height or replace if necessary.
- Check the disc brushes for wear and replace if necessary.
- Charge the battery.
- If the charging state of the battery is below 50%, charge the battery fully and without interruption.
- If the charging state of the battery is above 50%, only recharge the battery if the entire operating duration will be required when next used.
Weekly
- When used regularly, charge the battery fully and without interruption at least once a week.
Monthly
A detailed description of the individual maintenance work is provided in Chapter Maintenance work.
- Drain the fresh water tank and flush out deposits.
- Clean the fresh water filter.
- Clean the float and fluff filter.
- Check battery poles for oxidation, brush off if necessary. Make sure the connection cables are firmly in place.
-
Clean the seals between the waste water tank and the cover, check for leaks and replace if necessary.
-
Check the acid density of the cells if the batteries are not maintenance-free.
- If the device is not used for a longer period of time, shut down the device when the batteries are fully charged. Fully charge the battery at least once a month.
Annually
● Have the prescribed inspection performed by Customer Service.
Maintenance work
Turn over or replace the worn suction lips
The suction lips must be turned over or replace when they have worn down to the wear mark.
Illustration R
①Wear mark
②Suction lip
- Remove the suction bar.
- Unscrew the star handles.
Illustration S
- Pull off the plastic parts.
- Pull off the suction lips.
- Push in the turned over or new suction lips.
- Push on the plastic parts.
- Screw in and tighten the star handles.
Cleaning the fresh water filter
- Drain the fresh water (see Chapter Draining fresh water).
- Unscrew the fresh water tank lock.
Illustration U
①Fresh water tank lock
②Fresh water filter
- Pull out the fresh water filter and rinse with clean water.
- Insert the fresh water filter.
- Fit the fresh water tank lock.
Note: Take care to ensure that the hose connection in the fresh water tank cap is positioned at the lowest point in the tank after screwing the cap in place.
Cleaning the coarse dirt filter
- Open the waste water tank cover.
Illustration T
①Coarse dirt filter
2. Pull the coarse dirt filter upwards and off.
3. Rinse off the coarse dirt filter under running water.
4. Reinsert the coarse dirt filter into the waste water tank.
Clean the float and fluff filter
- Open the waste water tank cover.
Illustration V
① Latching hooks
②Float
③Fluff filter
④Float housing
2. Release the latching hooks.
3. Pull the float housing downwards and off.
4. Remove the float from the float housing and clean it.
5. Remove the fluff filter and clean it.
6. Assemble all parts in the reverse order.
Replacing the disc brushes
- Raise the cleaning head.
- Press the brush replacement pedal down, beyond the zone of resistance.
Illustration W
①Brush replacement pedal
3. Pull the 1st disc brush sideways and out from underneath the cleaning head.
4. Hold the new disc brush under the cleaning head, then press upwards and latch it into position.
5. Repeat the procedure for the 2nd disc brush.
Replacing the roller brushes
- Raise the cleaning head.
- Pull out the brush replacement handle.
Illustration Y
①Brush replacement handle
② Bearing cover with squeegee blade
③Roller brush
- Remove the bearing cover including the squeegee blade.
- Pull out the roller brush.
- Fit the new roller brush and centre it on the driver.
- Install the bearing cover with the squeegee blade.
Note
Make sure the roller brush sits on the mounting mandrel and not underneath.
- Pivot the brush replacement handle upwards and latch it into place.
- Repeat the entire procedure at the other side.
Cleaning the water distribution strip
Illustration X
①Water distribution strip
② Unlocking button
- Press lock in the direction of the arrow and hold it there.
- Pivot water distribution strip forward
- Pull out water distribution strip lengthways.
- Clean the water distribution strip.
- Fit water distribution strip back into the cleaning head and snap the lock into place.
Troubleshooting guide
△DANGER
Risk of injury!
The device may start moving unexpectedly and cause injury.
Turn the key-operated switch to "0" and remove the key before performing any work on the device.
Pull out the charger mains plug.
● Drain and dispose of the waste water and fresh water.
- Contact Customer Service in the case of malfunctions that cannot be corrected using this table.
| Malfunction Rectification | |
| The device cannot be started | 1. Turn the key-operated switch to "1".2. Unlock the emergency stop button on the control panel by turning it. (Note: not all device versions are equipped with an emergency stop button)3. Actuate the safety switch.4. Insert the battery plug.5. Check the battery and charge if necessary.6. Check that the battery terminals are correctly connected. |
| The water volume is insufficient | 1. Check the fresh water filling level and fill the tank if necessary.2. Increase the water volume at the water volume regulating knob.3. Pull off the water distribution strip on the cleaning head and clean the water channel (BR variant only).4. Clean the fresh water filter.5. Check the hoses for clogging and clean if necessary. |
| The suction performance is too low | 1. Shut down the device and drain the waste water.2. Clean the seals between the waste water tank and the cover, check for leaks and replace if necessary.3. Check that the suction hose is correctly connected to the waste water tank.4. Check the fluff filter for soiling and clean if necessary.5. Clean the suction lips at the suction bar, turn over or replace if necessary.6. Check that the cap on the waste water drain hose is closed.7. Check the adjustment of the suction bar.8. Check the suction hose for clogging and clean if necessary. The white marking on the hose must lie at the retaining clip when the suction hose is re-inserted.9. Check the suction hose for leaks and replace if necessary. |
| The cleaning results are unsatisfactory | 1. Reduce the driving speed.2. Check the brushes for wear and replace if necessary.3. Check the suitability of the brush type and detergent used. |
| The suction turbine runs at an increased speed | 1. Drain the waste water.2. Clean the float.3. Check the fluff filter and clean if necessary.4. Check the suction hose for clogging and clean if necessary.5. Check the suction bar for clogging and remove any clogging if necessary |
| The brushes do not rotate | 1. Check if the brushes are blocked by a foreign body and remove the foreign body if necessary. |
| The device vibrates during cleaning | 1. Use a softer brush. |
Accessories BD variant
| Description BD 70/75 | part no. | BD 80/100 part no. | Description |
| Disc brush, white (soft) | 4.905-011.0 | 4905-030.0 | For cleaning lightly soiled or sensitive floors |
| Disc brush, natural colour (soft) | 4905-012.0 | 4905-031.0 | Made of natural fibres for cleaning and polishing |
| Disc brush, red (medium, standard) | 4905-010.0 | 4.905-000.0 | For use in all common cleaning tasks |
| Disc brush, black (hard) | 4905-013.0 | 4905-032.0 | For heavy soiling and basic cleaning, only for non-sensitive surfaces |
| Pad drive board | 4762-590.0 | 4762-447.0 | For cleaning with pads, with quick-change coupling and centre-lock |
| Pad, white – 6.371-331.0 For polishing floors | |||
| Pad, red (medium soft) 6.369-003.0 | 6371-147.0 | For cleaning all floors | |
| Pad, green (medium hard) | 6.369-002.0 | 6371-148.0 | For cleaning heavily soiled floors and for basic cleaning |
| Pad, black (hard) 6.369-001.0 6371-169.0 For stubborn soiling and for basic cleaning | |||
| Pad, brown (SPP) | 2.639-290.0 | 2639-288.0 | For protective film application on hard and elastic surfaces |
Accessories BR variant
| Description BR 75/75 | part no. | BR 85/100 part no. | Description |
| Roller brush, white | 6.907-771.0 | 6907-772.0 | For polishing and maintenance cleaning of sensitive floors. |
| Roller brush, red | 4.035-605.0 | 4.035-606-0 | For maintenance cleaning of heavily soiled floors. |
| Roller brush, orange | 6.907-730.0 | 6907-734.0 | For scrubbing structural floors (safety tiles, etc.). |
| Roller brush, green | 6.907-732.0 | 6907-735.0 | For basic cleaning of heavily soiled floors and for coating removal (e.g. waxes, acrylates). |
| Roller brush, black | 6.907-732.0 | 6907-736.0 | |
| Pad roller shaft | 4762-627.0 | 4762-628.0 For holding roller pads. | |
| Microfiber roller | 4114-007.0 | 4114-008.0 | For maintenance cleaning of smooth floors. |
Accessories BD and BR variants
| Description | BD 70/75 W Classic Bp Retail Part no. | BD 70/75 + BR 75/75 part no. | BD 80/100 + BR 85/100 part no. | Description |
| Suction bar, 950 mm, curved | 4.777-111.0 | - | - | For narrow passage widths |
| Suction bar, 1030 mm, curved | -4.777-108.0 | -Standard | ||
| Suction bar, 1160 mm, curved | --4.777-102.0 | Standard | ||
| Suction lip set, natural rubber | 4.037-174.0 | 4.037-144.0 | 4.037-138.0 | Standard |
| PU suction lip set | 4.037-173.0 | 4.037-145.0 | 4.037-140.0 | Oil-proof |
| Suction lip set, Linatex | 4.037-175.0 | 4.181-011.0 | 4.181-006.0 | Tear-proof |
Technical data
| BD 70/75 WClassic Bp | BR 75/75 WClassic Bp | BD 80/100 WClassic Bp | BR 85/100 WClassic Bp | ||
| Device performance data | |||||
| Nominal voltage | V | 24 | 24 | 24 | 24 |
| Battery capacity | Ah (5 h) | 115 / 170 / 180 | 170 / 180 | 170 / 180 / 240 / 285 | 170 / 180 / 240 / 285 |
| Mean power input | W | 1270 | 800 | 1320 | 1150 |
| Driving motor power | W | 250 | 250 | 300 | 300 |
| Suction turbine power | W | 500 | 500 | 500 | 500 |
| Brush drive power | W | 2 x 500 | 2 x 600 | 2 x 500 | 2 x 750 |
| Theoretical surface performance | m^2/h | 3500 | 3.750 | 4000 | 4.250 |
| Fresh water tank capacity | I | 75 | 75 | 100 | 100 |
| Waste water tank capacity | I | 75 | 75 | 100 | 100 |
| Water temperature max. | °C | 50 | 50 | 50 | 50 |
| Water pressure max. | bar | 0,06 | 0,06 | 0,06 | 0,06 |
| Aisle turning width | mm | 1550 | 1550 | 1650 | 1650 |
| Max. working area slope | % | 2 | 2 | 2 | 2 |
| Vacuuming | |||||
| Suction performance, air quantity | l/s | 24 | 24 | 24 | 24 |
| Suction performance, vacuum | kPa(mbar) | 16 (160) | 16 (160) | 16 (160) | 16 (160) |
| Cleaning brushes | |||||
| Working width | mm | 700 | 750 | 800 | 850 |
| Brush diameter | mm | 356 | 105 | 410 | 105 |
| Brush speed | 1/min | 140 | 1200 | 140 | 1200 |
| Brush contact pressure | N | 300 / 500 | 400 | 400 / 680 | 400 |
| Brush length | mm | 700 | 800 | ||
| BD 70/75 WClassic Bp | BR 75/75 WClassic Bp | BD 80/100 WClassic Bp | BR 85/100 WClassic Bp |
Dimensions and weights
Approved total weight kg 325 330 435 440
Net weight (transport weight) kg 251 225 325 340
Battery compartment dimensions mm 575 x 380 575 x 380 622 x 384 622 x 384
Determined values in acc. with EN 60335-2-72
| Overall vibration value m/s | ^2 | <2,5 | <2,5 | <2.5 | <2.5 | |
| Uncertainty K dB(A) 0,2 0,2 0,2 0,2 | ||||||
| Sound pressure level L_pA | d | B | ( | A | ) | |
| Uncertainty K_pA | dB(A) | 2 | 2 | 2 | 2 | 2 |
| Sound power level L_WA + uncertainty K_WA | d | B | ( | A | ) | |
Subject to technical modifications.
Declaration of Conformity
EU Declaration of Conformity
We hereby declare that the machine described below complies with the relevant basic safety and health requirements in the EU Directives, both in its basic design and construction as well as in the version placed in circulation by us. This declaration is invalidated by any changes made to the machine that are not approved by us.
Product: Floor cleaner
Type: 1.127-xxx, 1.515-xxx
Currently applicable EU Directives
2006/42/EC (+2009/127/EC)
2014/30/EU
2014/53/EU (TCU)
Harmonised standards used
EN 60335-1
EN 60335-2-72
EN 55012: 2007 + A1: 2009
EN 61000-6-2: 2005
EN 62233: 2008
TCU
EN 301 511 V12.5.1
EN 300 440 V2.1.1
EN 300 328 V2.2.2
EN 300 330 V2.1.1
National standards used
The signatories act on behalf of and with the authority of the company management.

H. Jenner
Chairman of the Board of Management

S. Reiser
Director Regulatory Affairs & Certification
Documentation supervisor:
S. Reiser
Alfred Kärcher SE & Co. KG
Alfred-Kärcher-Str. 28 - 40
71364 Winnenden (Germany)
Ph.: +49 7195 14-0
Fax: +49 7195 14-2212
Winnenden, 2021/02/01
Declaration of Conformity (UK)
We hereby declare that the product described below complies with the relevant provisions of the following UK Regulations, both in its basic design and construction as well as in the version put into circulation by us. This declaration shall cease to be valid if the product is modified without our prior approval.
Product: Floor cleaner
Type: 1.127-xxx, 1.515-xxx
Currently applicable UK Regulations
S.I. 2008/1597 (as amended)
S.I. 2016/1091 (as amended)
S.I. 2017/1206 (as amended) (TCU)
Designated standards used
EN 60335-1
EN 60335-2-72
EN 55012: 2007 + A1: 2009
EN 61000-6-2: 2005
EN 62233: 2008
TCU
EN 301 511 V12.5.1
EN 300 440 V2.1.1
EN 300 328 V2.2.2
EN 300 330 V2.1.1
National standards used
The signatories act on behalf of and with the authority of the company management.

H. Jenner
Chairman of the Board of Management

S. Reiser
Director Regulatory Affairs & Certification
Documentation supervisor:
S. Reiser
Alfred Kärcher SE & Co. KG
Alfred-Kärcher-Str. 28 - 40
71364 Winnenden (Germany)
Ph.: +49 7195 14-0
Fax: +49 7195 14-2212
Winnenden, 2021/02/01
Contenu
1 2638-198,0
2 2638-162,0
3 2638-106,0
1 2638-162,0
2 2638-106,0
3 2638-197,0
| Jeu de batteries Capacité Chargeur | |
| 2815-091,0 115 Ah 6654-367,0 | |
| 2815-092,0 170 Ah 6654-436,0 | |
| 2815-101,0 180 Ah 6654-434,0 | |
| 2815-105,0 240 Ah 6654-437,0 | |
| 2815-095,0 285 Ah 6654-419,0 |
Type : 1.127-xxx, 1.515-xxx
2006/42/CE (+2009/127/CE)
2014/30/UE
2014/53/EU (TCU)

Chairman of the Board of Management

S. Reiser
Director Regulatory Affairs & Certification
71364 Winnenden (Germany)
1 2.638-198.0
2 2.638-162.0
3 2638-106,0
1 2.638-162.0
2 2638-106,0
3 2638-197,0
| Pacco batteria Capacità Caricabatterie | |
| 2815-091,0 115 Ah 6654-367,0 | |
| 2815-092,0 170 Ah 6654-436,0 | |
| 2815-101,0 180 Ah 6654-434,0 | |
| 2815-105,0 240 Ah 6654-437,0 | |
| 2815-095,0 285 Ah 6654-419,0 |
La ricarica dura in media circa 10-15 ore.
Tipo: 1.127-xxx, 1.515-xxx

H. Jenner
Chairman of the Board of Management

S. Reiser
Director Regulatory Affairs & Certification
71364 Winnenden (Germany)
Tel.: +49 7195 14-0
Fax: +49 7195 14-2212
Winnenden, 01/02/2021
Tipo: 1.127-xxx, 1.515-xxx
Directivas UE aplicables
2006/42/CE (+2009/127/CE)
2014/30/UE
2014/53/UE (TCU)
Chairman of the Board of Management

S. Reiser
Director Regulatory Affairs & Certification
71364 Winnenden (Germany)
Tel.: +49 7195 14-0
Fax: +49 7195 14-2212
Winnenden, 01/02/2021
Índice
Desmontar as baterias
ATENÇÃO
Tipo: 1.127-xxx, 1.515-xxx
2006/42/CE (+2009/127/CE)
2014/30/UE
2014/53/UE (TCU)

Chairman of the Board of Management

S. Reiser
Director Regulatory Affairs & Certification
Winnenden, 01/02/2021
Inhoud
⑪ Schoonwaterreservoir
⑫Slanghouder
⑬Vulopening verswaterreservoir
** Niet meegeleverd
Aftapopening verswaterreservoir

Aftapopening vuilwaterreservoir

1 2638-198,0
2 2638-162,0
3 2638-106,0
Type: 1.127-xxx, 1.515-xxx

Chairman of the Board of Management

S. Reiser
Director Regulatory Affairs & Certification
71364 Winnenden (Germany)
Tel.: +49 7195 14-0
Fax: +49 7195 14-2212
Winnenden, 2021/02/01
İçindekiler
Genel uyarılar 71
Fonksiyon....71
1 2638-198,0
2 2638-162,0
3 2638-106,0
1 2638-162,0
2 2638-106,0
3 2638-197,0
| Akü seti Kapasite Şarj aleti | |
| 2815-091,0 115 Ah 6654-367,0 | |
| 2815-092,0 170 Ah 6654-436,0 | |
| 2815-101,0 180 Ah 6654-434,0 | |
| 2815-105,0 240 Ah 6654-437,0 | |
| 2815-095,0 285 Ah 6654-419,0 |
Tip: 1.127-xxx, 1.515-xxx
2006/42/AT (+2009/127/AT)
2014/30/AB
2014/53/EU (TCU)

H. Jenner
Chairman of the Board of Management

S. Reiser
Director Regulatory Affairs & Certification
Winnenden, 2021/02/01
Innehåll
Allmän information 80
Funktion 80
Typ: 1.127-xxx, 1.515-xxx
Chairman of the Board of Management

S. Reiser
Director Regulatory Affairs & Certification
D-71364 Winnenden (Germany)
Tfn: +49 7195 14-0
Fax: +49 7195 14-2212
Winnenden, 2021-02-01
Sisältö
Yleisiä ohjeita 88
Toiminta 88

Chairman of the Board of Management

S. Reiser
Director Regulatory Affairs & Certification
71364 Winnenden (Germany)
Puh.: +49 7195 14-0
④Holdeskinne for Homebase
⑤Spillvannstank
⑥**Batteri
⑦Filter rent vann
⑧Lokk rentvannstank
| Batterisett Kapasitet Lader | |
| 2.815-091.0 115 Ah 6654-367,0 | |
| 2815-092,0 170 Ah 6654-436,0 | |
| 2815-101,0 180 Ah 6654-434.0 | |
| 2815-105,0 240 Ah 6654-437,0 | |
| 2815-095,0 285 Ah 6654-419,0 |
Gjennomsnittlig ladetid er ca. 10-15 timer.
Type: 1.127-xxx, 1.515-xxx
Gjeldende EU-direktiver
2006/42/EF (+2009/127/EF)
2014/30/EU
2014/53/EU (TCU)
Anvendte harmoniserte standarder
EN 60335-1
EN 60335-2-72
EN 55012: 2007 + A1: 2009
EN 61000-6-2: 2005
EN 62233: 2008
TCU
EN 301 511 V12.5.1
EN 300 440 V2.1.1
EN 300 328 V2.2.2
EN 300 330 V2.1.1

H. Jenner
Chairman of the Board of Management

S. Reiser
Director Regulatory Affairs & Certification
71364 Winnenden (Germany)
Tlf.: +49 7195 14-0
Winnenden, 2021/02/01
Indhold
1 2638-198,0
2 2638-162,0
3 2638-106,0
1 2638-162,0
2 2638-106,0
3 2638-197,0
Vedligeholdelseslette batterier (vådbatterier)
⚠️FARE
Faresituation under driften
Type: 1.127-xxx, 1.515-xxx
2006/42/EF (+2009/127/EF)
2014/30/EU
2014/53/EU (TCU)

H. Jenner
Chairman of the Board of Management

S. Reiser
Director Regulatory Affairs & Certification
71364 Winnenden (Germany)
Tlf.: +49 7195 14-0
Fax: +49 7195 14-2212
Winnenden, 2021/02/01
Sisukord
Imitala monteerimine
2006/42/EÜ (+2009/127/EÜ)
2014/30/EL
2014/53/EL (TCU)

H. Jenner
Chairman of the Board of Management

S. Reiser
Director Regulatory Affairs & Certification
71364 Winnenden (Germany)
Tel: +49 7195 14-0
Winnenden, 2021/02/01
Saturs
Tips: 1.127-xxx, 1.515-xxx
Chairman of the Board of Management

S. Reiser
Director Regulatory Affairs & Certification
1 2638-198,0 2 2638-162,0 3 2638-106,0
1 2638-162,0 2 2638-106,0 3 2638-197,0
Tipas: 1.127-xxx, 1.515-xxx
Atitinkamos ES direktyvos
2006/42/EB (+2009/127/EB)
2014/30/ES
2014/53/ES (TCU)
Taikomi darnieji standartai
EN 60335-1
EN 60335-2-72
EN 55012: 2007 + A1: 2009
EN 61000-6-2: 2005
EN 62233: 2008
TCU
EN 301 511 V12.5.1
EN 300 440 V2.1.1
EN 300 328 V2.2.2
EN 300 330 V2.1.1

H. Jenner
Chairman of the Board of Management

S. Reiser
Director Regulatory Affairs & Certification
Typ: 1.127-xxx, 1.515-xxx
2006/42/WE (+2009/127/WE)
2014/30/UE
2014/53/EU (TCU)

Chairman of the Board of Management

S. Reiser
Director Regulatory Affairs & Certification
71364 Winnenden (Germany)
Tel.: +49 7195 14-0
1 2638-198,0
2 2638-162,0
3 2638-106,0
1 2638-162,0
2 2638-106,0
3 2638-197,0

Chairman of the Board of Management

S. Reiser
Director Regulatory Affairs & Certification
Winnenden, 2021/02/01
Obsah
1 2.638-198.0
2 2.638-162.0
3 2638-106,0
Doporučené sady baterií BD 80/100 a BR 85/100
| Sada baterií Kapacita Nabíječka | |
| 2815-091,0 115 Ah 6654-367,0 | |
| 2815-092,0 170 Ah 6654-436,0 | |
| 2815-101,0 180 Ah 6654-434,0 | |
| 2815-105,0 240 Ah 6654-437,0 | |
| 2815-095,0 285 Ah 6654-419,0 |
2006/42/ES (+2009/127/ES)
2014/30/EU
2014/53/EU (TCU)

Chairman of the Board of Management

S. Reiser
Director Regulatory Affairs & Certification
Winnenden, 2021/02/01
Obsah
Typ: 1.127-xxx, 1.515-xxx
2006/42/ES (+2009/127/ES)
2014/30/EÚ
2014/53/EÚ (TCU)

Chairman of the Board of Management

S. Reiser
Director Regulatory Affairs & Certification
71364 Winnenden (Germany)
Tel.: +49 7195 14-0
Fax: +49 7195 14-2212
Winnenden, 01.02.2021
Kazalo
BD 70/75 in BR 75/75
115 Ah, 2.815-091.0
170 Ah, 2.815-092.0
180 Ah, 2.815-101.0
①Distančniki
②Držalo za baterijo
③Dodatne uteži
- Distančnike vstavite med desne baterije in rezervoar za svežo vodo,
Tip: 1.127-xxx, 1.515-xxx
Zadevne EU-direktive
2006/42/ES (+2009/127/ES)
2014/30/EU
2014/53/EU (TCU)
Chairman of the Board of Management

S. Reiser
Director Regulatory Affairs & Certification
Winnenden, 1. 2. 2021
Cuprins
The Ground Truth image displays a single, solid horizontal line. According to Rule 2 (UNDERSCORE & LINE RULES), this is a stylistic or background line, not a placeholder underscore. Therefore, the OCR result must ignore it and output nothing or only meaningful text. The provided OCR content is "____", which consists of four underscores. This is an incorrect interpretation of the line as a placeholder, violating the rule that stylistic lines must be ignored. The OCR has hallucinated placeholder underscores where none exist in the GT, violating the rule to ignore such lines. Hence, the OCR result is inconsistent with the Ground Truth.
Eliminarea ca deșeu
Tip: 1.127-xxx, 1.515-xxx
Directive UE relevante
2006/42/UE (+2009/127/UE)
2014/30/UE
2014/53/UE (TCU)
Norme armonizate aplicate
EN 60335-1
EN 60335-2-72
EN 55012: 2007 + A1: 2009
EN 61000-6-2: 2005
EN 62233: 2008
TCU
EN 301 511 V12.5.1
EN 300 440 V2.1.1
EN 300 328 V2.2.2
EN 300 330 V2.1.1
Chairman of the Board of Management

S. Reiser
Director Regulatory Affairs & Certification
71364 Winnenden (Germania)
Tel.: +49 7195 14-0
Fax: +49 7195 14-2212
Winnenden, 2021/02/01
Sadržaj
Opće napomene 196
Funkcija.... 196
| Set akumulatora Kapacitet Punjač | |
| 2815-091,0 115 Ah 6654-367,0 | |
| 2.815-092.0 170 Ah 6654-436,0 | |
| 2.815-101.0 180 Ah 6654-434,0 | |
| 2.815-105.0 240 Ah 6654-437,0 | |
| 2.815-095.0 285 Ah 6654-419,0 |
Tip: 1.127-xxx, 1.515-xxx
2006/42/EZ (+2009/127/EZ)
2014/30/EU
2014/53/EU (TCU)

H. Jenner
Chairman of the Board of Management

S. Reiser
Director Regulatory Affairs & Certification
Opunomoćenik za dokumentaciju:
S. Reiser
Alfred Kärcher SE & Co. KG
Alfred-Kärcher-Str. 28 - 40
71364 Winnenden (Njemačka)
Tel.: +49 7195 14-0
Telefaks: +49 7195 14-2212
Winnenden, 01.02.2021.
Sadržaj
Opšte napomene 205
Funkcija.... 205
Namenska upotreba.... 206
Zaštita životne sredine.... 206
Garancija 206
Pribor i rezervni delovi 206
Obim isporuke 206
Sigurnosne napomene.... 206
Tip: 1.127-xxx, 1.515-xxx
Važeće direktive EU
2006/42/EZ (+2009/127/EZ)
2014/30/EU
2014/53/EU (TCU)
Primenjene harmonizovane norme
EN 60335-1
EN 60335-2-72
EN 55012: 2007 + A1: 2009
EN 61000-6-2: 2005
EN 62233: 2008
TCU
EN 301 511 V12.5.1
EN 300 440 V2.1.1
EN 300 328 V2.2.2
EN 300 330 V2.1.1
Primenjene nacionalne norme
Potpisnici deluju po nalogu i uz punomoć upravnog odbora.

H. Jenner
Chairman of the Board of Management

S. Reiser
Director Regulatory Affairs & Certification
Lice ovlašćeno za dokumentaciju:
S. Reiser
Alfred Kärcher SE & Co. KG
Alfred-Kärcher-Str. 28 - 40
71364 Winnenden (Germany)
Tel.: +49 7195 14-0
Winnenden, 2021/02/01
Περιεχόμενα
1 2638-198,0
2 2638-162,0
3 2638-106,0
1 2638-162,0
2 2638-106,0
3 2638-197,0
Chairman of the Board of Management

S. Reiser
Director Regulatory Affairs & Certification
71364 Winnenden (Germany)
Tηλ.: +49 7195 14-0
Φαξ: +49 7195 14-2212
Winnenden, 2021/02/01
Содержание
Тип: 1.127-xxx, 1.515-xxx
Chairman of the Board of Management

S. Reiser
Director Regulatory Affairs & Certification
71364 Winnenden (Germany)
Тел.: +49 7195 14-0
Факс: +49 7195 14-2212
Тип: 1.127-xxx, 1.515-xxx
Chairman of the Board of Management

S. Reiser
Director Regulatory Affairs & Certification
71364 Winnenden (Germany)
Тел.: +49 7195 14-0
Факс: +49 7195 14-2212
Тип: 1.127-xxx, 1.515-xxx
Chairman of the Board of Management

S. Reiser
Director Regulatory Affairs & Certification
71364 Winnenden (Germany)
Тел.: +49 7195 14-0
Факс: +49 7195 14-2212
Виненден, 2021/02/01
目录
www.kaercher.com/REACH
质量保证
Chairman of the Board of Management

S. Reiser
Director Regulatory Affairs & Certification
文档全权代表:
S. Reiser
Alfred Kärcher SE & Co. KG
Alfred-Kärcher-Str. 28 - 40
71364 Winnenden (德国)
电话:+49 7195 14-0
传真:+49 7195 14-2212
Winnenden, 2021/02/01
Daftar Isi
1 2.638-198,0
2 2.638-162,0
3 2.638-106,0


| Set baterai Kapasitas Pengisi daya | |
| 2.815-091,0 115 Ah 6.654-367,0 | |
| 2.815-092,0 170 Ah 6.654-436,0 | |
| 2.815-101,0 180 Ah 6.654-434,0 | |
| 2.815-105,0 240 Ah 6.654-437,0 | |
| 2.815-095,0 285 Ah 6.654-419,0 |
Tipe: 1.127-xxx, 1.515-xxx

Chairman of the Board of Management

S. Reiser
Director Regulatory Affairs & Certification
Penyusun dokumen yang berwenang:
S. Reiser
Alfred Kärcher SE & Co. KG
Alfred-Kärcher-Str. 28 - 40
71364 Winnenden (Jerman)
Tel.: +49 7195 14-0
Winnenden, 2021/02/01
TCU
EN 301 511 V12.5.1
EN 300 440 V2.1.1
EN 300 328 V2.2.2
เนื่อ Transport
ข้อแนะนําทั่วไป 272
ฟังก์ชั้น...... 272
text_image
Four compliance symbols: green cross, yellow warning triangle with exclamation mark, black recycling symbol, and black trash bin with waste symbol.การปฐมพยาบาล
สัญลักษณ์ค่าเตือน
การกำจัด
Chairman of the Board of Management

S. Reiser
Director Regulatory Affairs & Certification
เอกสารมอบอํานาจ:
S. Reiser
Alfred Kärcher SE & Co. KG
Alfred-Kärcher-Str. 28 - 40
71364 Winnenden (Germany)
โทร: +49 7195 14-0
Winnenden, 2021/02/01
目次
一般的な注意事項 280
機能 280
規定に沿った使用 281
環境保護 281
保証 281
アクセサリーとスペアパーツ 281
同梱品 281
安全注意事項 281
機器に関する説明 282
取り付け 282
セットアップ 283
運転 284
機器の連搬 285
保管 285
お手入れとメンテナンス 285
障害発生時のサポート 287
アクセサリー 287

Chairman of the Board of Management

S. Reiser
Director Regulatory Affairs & Certification
文書の全権委員:
S. Reiser
Alfred Kärcher SE & Co. KG
Alfred-Kärcher-Str. 28 - 40
71364 Winnenden (Germany)
電話番号:+49 7195 14-0
Chairman of the Board of Management

S. Reiser
Director Regulatory Affairs & Certification
وكيل التوثيق:
إس رايزر
Alfred Kärcher SE & Co. KG
Alfred-Kärcher-Str. 28 - 40
71364 Winnene
Winnenden, 2021/02/01
Defense adi on the pretreatment

رأس التنظيف مروفع

natural_image
Black and white line drawing of a hand giving a thumbs-up gesture (no text or symbols)THANK YOU!
Register your product and benefit from many advantages.
www.kaercher.com/welcome


Rate your product and tell us your opinion.
natural_image
Icon showing a gear and wrench inside a square frame (no text or symbols)www.kaercher.com/dealersearch
Alfred Kärcher SE & Co. KG
Alfred-Kärcher-Str. 28-40
71364 Winnenden (Germany)