GBLE 650 - Blower Gardol - Free user manual and instructions
Find the device manual for free GBLE 650 Gardol in PDF.
User questions about GBLE 650 Gardol
0 question about this device. Answer the ones you know or ask your own.
Ask a new question about this device
Download the instructions for your Blower in PDF format for free! Find your manual GBLE 650 - Gardol and take your electronic device back in hand. On this page are published all the documents necessary for the use of your device. GBLE 650 by Gardol.
USER MANUAL GBLE 650 Gardol
GBR Original operating instructions Petrol blower vac
natural_image
Close-up of a mechanical device with attached wires and connectors, no visible text or symbols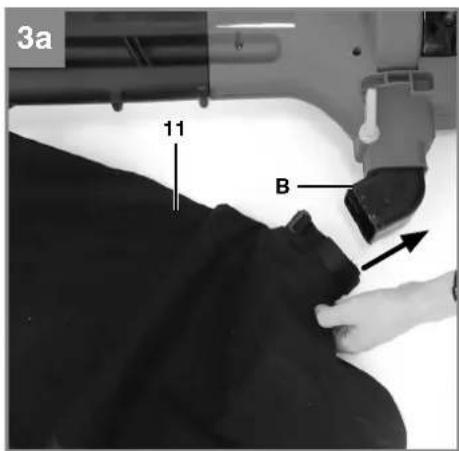
text_image
3a 11 B
text_image
3b 3c A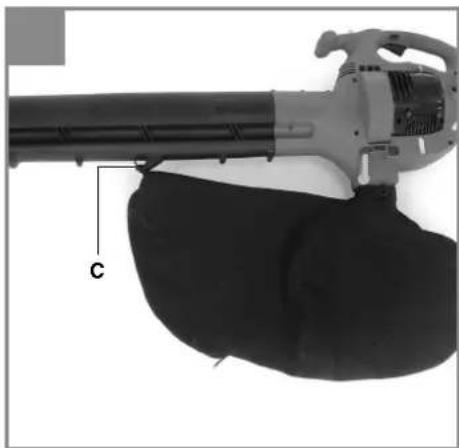
natural_image
Close-up of a mechanical device with a black cloth and labeled component 'C' (no text or symbols on the device itself)
text_image
4a 2 3 4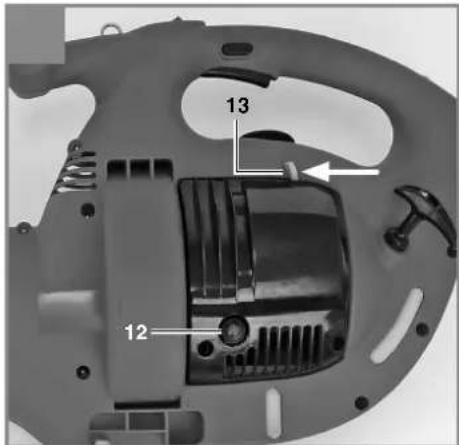
text_image
13 12


natural_image
Cross-sectional view of a mechanical device with internal components and a directional arrow (no text or symbols)
natural_image
Black-and-white photo of a pipe with thick white material flowing through a paved area, no visible text or symbols
natural_image
Person operating a handheld industrial machine with visible internal components (no text or symbols)
natural_image
Interior view of a mechanical device with internal components and mounting holes (no visible text or symbols)
natural_image
Close-up of a hand inserting wires into an electrical switch component (no visible text or symbols)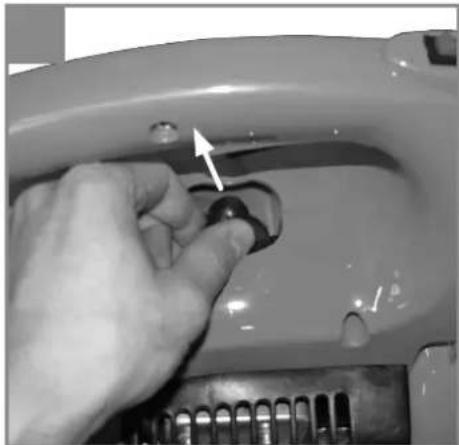
natural_image
Close-up of a hand pressing a button on a car interior (no visible text or symbols)

natural_image
Close-up of a finger pressing a screw on a mechanical component (no visible text or symbols)9
1

2

3


4


10 x
6

7

8

19
5
-5-
DEU
Inhaltsverzeichnis
- Safety regulations
- Layout and items supplied
- Proper use
- Technical data
- Before starting the equipment
- Operation
- Cleaning, maintenance, storage, transport and ordering of spare parts
- Disposal and recycling
- Troubleshooting guide
GBR
⚠️ Important!
When using the equipment, a few safety precautions must be observed to avoid injuries and damage. Please read the complete operating instructions and safety regulations with due care. Keep this manual in a safe place, so that the information is available at all times. If you give the equipment to any other person, hand over these operating instructions and safety regulations as well. We cannot accept any liability for damage or accidents which arise due to a failure to follow these instructions and the safety instructions.
1. Safety regulations
Caution!
Read all safety regulations and instructions.
Any errors made in following the safety regulations and instructions may result in an electric shock, fire and/or serious injury.
Keep all safety regulations and instructions in a safe place for future use.
- WEAR CLOSE FITTING, TOUGH WORK CLOTHING that will provide protection/without restricting your movements, such as long slacks or trousers, safety work shoes, heavy duty work gloves, hard hat, a safety face shield, or safety glasses for eye protection and a good grade of ear plugs or other sound barriers for hearing protection.
- REFUEL IN A SAFE PLACE. Open fuel cap slowly to release any pressure which may have formed in fuel tank. Always wipe unit of fuel or oil spills before starting. To prevent a fi re hazard, move at least 10 feet (3 meters) from fueling area before starting.
- TURN UNIT OFF before setting it down, and also before installing or removing attachments.
- KEEP ALL SCREWS AND FASTENERS TIGHT and the unit in good operating condition. Never operate this equipment if it is improperly adjusted or not completely and securely assembled.
- KEEP HANDLES DRY, clean and free of fuel mixture.
- STORE EQUIPMENT AWAY FROM POSSIBLE IGNITION SOURCES, such as gas-powered water heaters, clothes dryers, or oil-fi red furnaces, portable heaters, etc.
-
ALWAYS KEEP the engine free of debris build-up.
-
OPERATION OF EQUIPMENT should always be restricted to mature and properly instructed individuals.
- ALL PERSONS WITH RESPIRATORY PROBLEMS and persons operating blower in very dusty environments, should wear a dust particle mask at all times. Paper dust masks are available at most paint and hardware stores.
- Use the blower vac only at reasonable times of the day. Do not use early in the morning or late in the evening when people could feel disturbed. Pay attention to your local noise control regulations.
- Allow the machine to run at the lowest possible motor speed required to carry out the work.
- Before you start work, use a brush and scraper to remove all dirt from the blower vac.
- In case of dusty conditions, moisten the surface a little.
- Use the full-length blower nozzle extension so that the air current can work near to the ground.
- Watch out for children, pets, open windows etc. and blow the dirt safely away from them.
WHAT NOT TO DO
Warning: DO NOT USE ANY OTHER FUEL than that recommended in your manual. Always follow instructions in the Fuel and Lubrication section of this manual. Never use gasoline unless it is properly mixed with 2-cycle engine lubricant. Permanent damage to engine will result, voiding manufacturer's warranty.
- DO NOT SMOKE while refueling or operating equipment.
- DO NOT OPERATE UNIT WITHOUT A MUFFLER and properly installed muffler shield.
- DO NOT TOUCH or let your hands or body come in contact with a hot muffler or spark plug wire.
- DUE TO THE DANGER of exhaust fumes, never operate blower in a confined or poorly ventilated area.
- NEVER POINT BLOWER in the direction of people, animals, buildings, automobiles, or windows, etc.
- DO NOT operate unit without inlet cover installed to prevent contact with impeller.
- DO NOT set a hot engine down where fl am- mable material is present.
- DO NOT OPERATE UNIT FOR PROLON-GED PERIODS. Rest periodically.
- DO NOT OPERATE UNIT WHILE UNDER
GBR
THE INFLUENCE OF ALCOHOL OR DRUGS.
Warning: DO NOT ADD, REMOVE OR ALTER ANY COMPONENTS OF THIS PRODUCT. Doing so could cause personal injury and/or damage the unit voiding the manufacturer's warranty.
- DO NOT operate your unit near or around fl ammable liquids or gases whether in or out of doors. An explosion and/or fi re may result.
- DO NOT WEAR loose clothing, scarfs, neck chains, unconfi ned long hair, and the like. Doing so could cause injury associated with objects being drawn into the rotating parts. Tie up long hair and fasten it, for example with a head scarf, cap, helmet, etc.
- DO NOT refuel a running engine or an engine that is hot
- Never allow children to use the blower vac.
Explanation of the warning signs on the equipment (see Fig. 9)
1 Read the operating instructions before you use the blower vac.
2 Wear safety goggles to protect your eyes and ear plugs to protect yourself from the noise.
3 Warning! Hazard!
4 Keep other people away.
5 Warning! Hot surface
6 Fuel pump
7 Never work if people – especially children - or animals are in the danger area.
8 Never allow the blower to run without the blower tube.
9 Sound power level with EC Directive 2000/14/EC!
10 After the unit is switched off, the motor continues to run for a short while.
- Debris bag
- Fuel pump (primer)
- Start fl ap (choke)
- Blower/Suction tube
- Blower housing
- Suction extension
- Carrying strap
- Spark plug wrench
- Blower/Suction tube securing screw
- Petrol/oil mixing bottle
2.2 Items supplied
Please check that the article is complete as specified in the scope of delivery. If parts are missing, please contact our service center or the nearest branch of the DIY store where you made your purchase at the latest within 5 work days after purchasing the article and upon presentation of a valid bill of purchase. Also, refer to the warranty table in the warranty provisions at the end of the operating instructions.
- Open the packaging and take out the equipment with care.
- Remove the packaging material and any packaging and/or transportation braces (if available).
- Check to see if all items are supplied.
- Inspect the equipment and accessories for transport damage.
- If possible, please keep the packaging until the end of the guarantee period.
Important!
The equipment and packaging material are not toys. Do not let children play with plastic bags, foils or small parts. There is a danger of swallowing or suff oating!
• Original operating instructions
2. Layout and items supplied
2.1 Layout (Fig. 1)
- Front handle
- Ignition switch
- Throttle lock
- Throttle lever
- Spark plug boot
- Rear handle
- Air fi Iter housing
- Starter handle
- Tank cover
- Suction/Blower lever
3. Proper use
The garden blower vac is designed to handle only foliage and garden refuse such as grass and small branches. Any other use is prohibited.
The equipment is to be used only for its prescribed purpose. Any other use is deemed to be a case of misuse. The user / operator and not the manufacturer will be liable for any damage or injuries of any kind caused as a result of this.
GBR
Please note that our equipment has not been designed for use in commercial, trade or industrial applications. Our warranty will be voided if the machine is used in commercial, trade or industrial businesses or for equivalent purposes.
4. Technical data
Engine type ....2-stroke engine; air-cooled Engine power (max.) ....0.65 kW/0.9 hp Displacement ....25.4 ccm Max. engine speed ....8000 rpm Ignition: ....Electronic Weight (with empty tank) ....7.5 kg Tank capacity ....800 ml Spark plug ....RCJ6Y Maximum air speed ....210 km/h Maximum delivery rate ....650 m³/h Mulching ratio ....10:1 Debris bag volume ....55 l Vibration a hv ....21.27 m/s Sound pressure level, L pA ....97 dB(A) Sound power level, L _WA ....111 dB(A)
5. Before starting the equipment
5.1 Assembly
Blower tube assembly (Fig. 1a)
Push the blower tube (14) into the blower housing and secure the blower tube using the securing screw (19). Tighten the screws (19).
Suction extension assembly (Fig. 1b)
When in suction mode, the suction extension (16) can be assembled. For this, insert the suction extension (16) into the blow pipe (14).
Fitting the carrying strap (Fig. 2).
Attach the carrying strap clips to the eyelets on the handle provided for them.
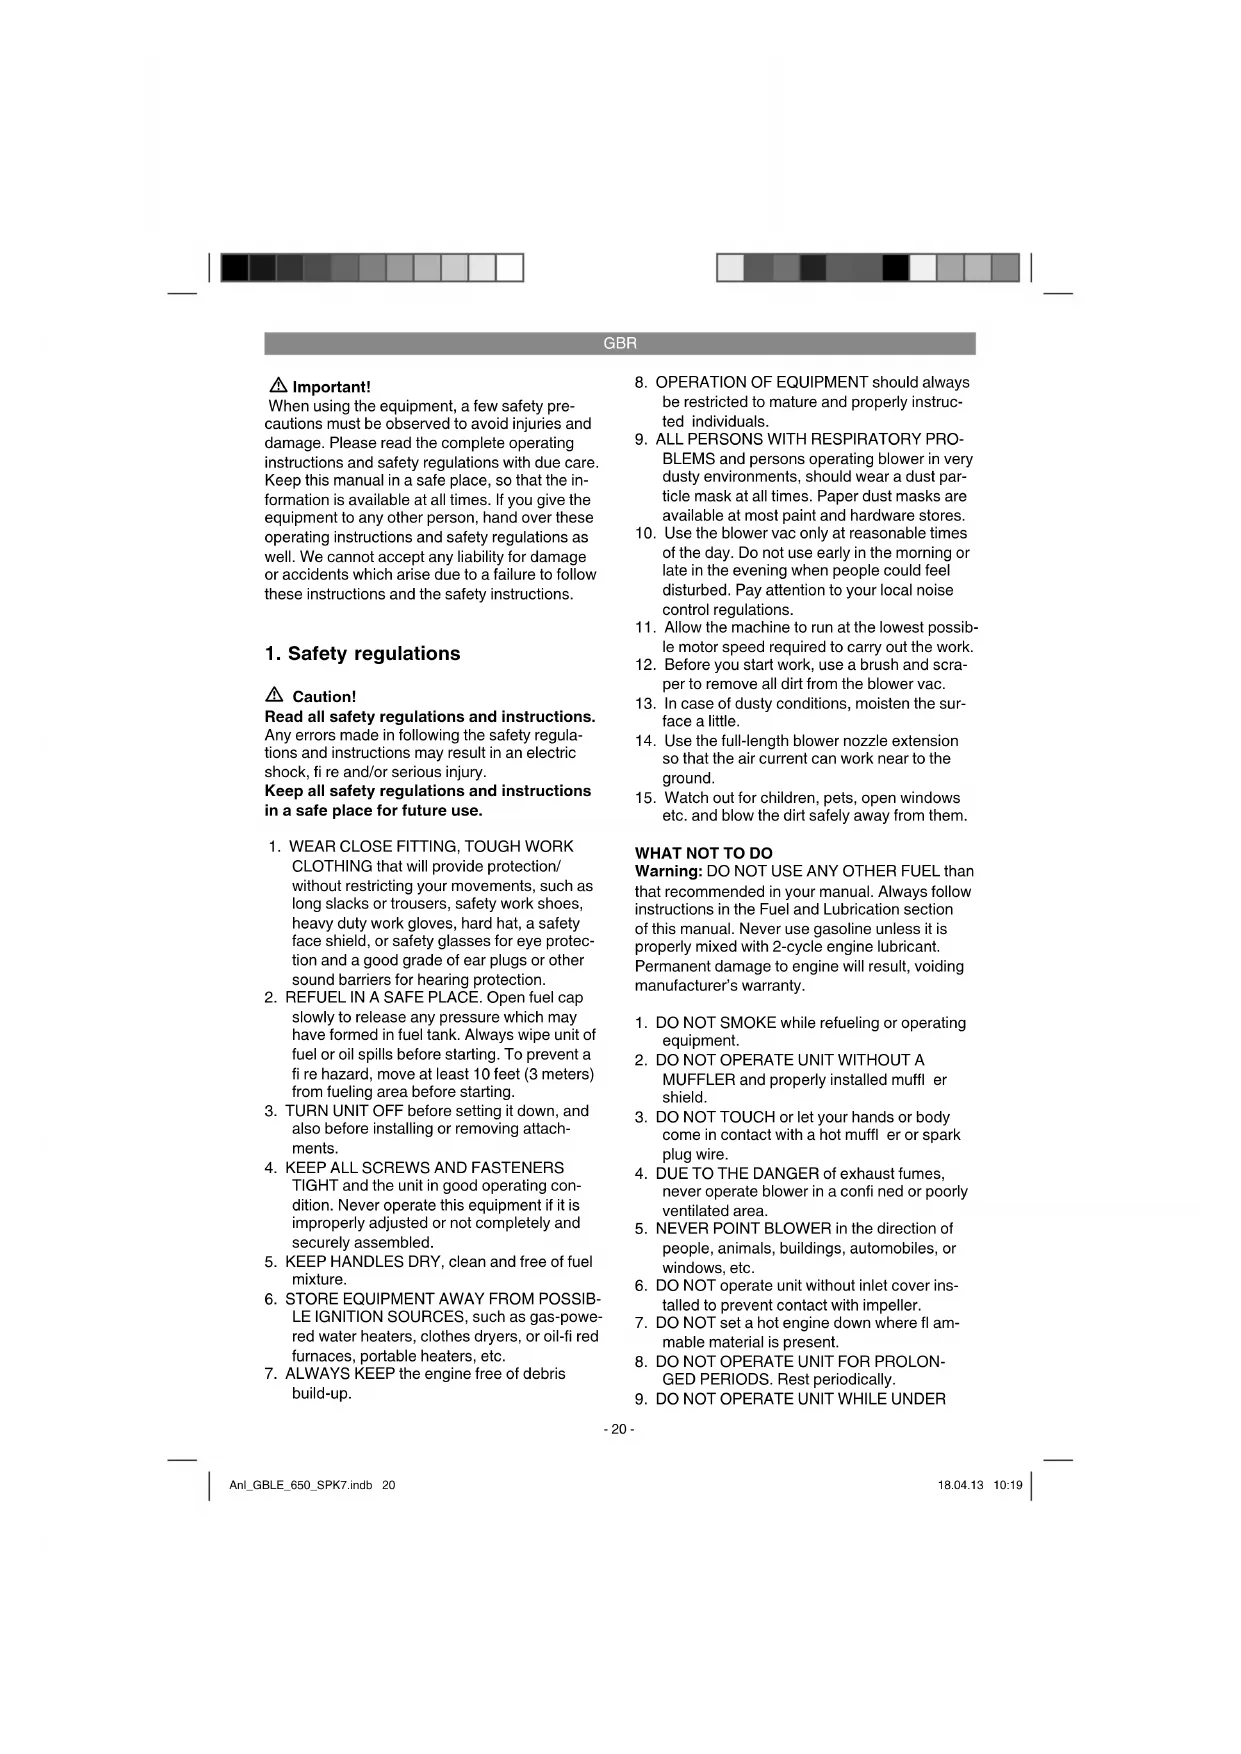
Fitting the debris bag (3a - 3c)
Push the debris bag (11) over the debris bag adapter and secure it with the Velcro fastening (A) above the ridge (B) on the suction tube. Attach the debris bag to the lug (C) on the blower/suction tube.
5.2 Fuel and oil
Recommended fuels
Use only a mixture of normal unleaded petrol and special 2-stroke engine oil. Mix the fuel mixture as indicated on the fuel mixing table.
Please note: Do not use a fuel mixture which has been kept for longer than 90 days.
Please note: Do not use 2-stroke oil with a recommended mixing ration of 100:1. If inadequate lubrication causes engine damage, the manufacturer's engine warranty will be voided. Please note: Only use containers designed and approved for the purpose to transport and store fuel.
Pour the correct quantities of petrol and 2-stroke oil into the mixing bottle (see scale printed on the bottle). Then shake the bottle well.
5.3 Fuel mixture table
Mixing procedure: 40 parts petrol to 1 part oil
| Petrol 2-stroke oil | |
| 1 liter 25 ml | |
| 5 liters 125 ml | |
6. Operation
Please note that the statutory regulations governing noise abatement may differ from town to town.
6.1 Cold start (4a-4c)
Fill the tank with the required amount of oil/petrol mix. See "Fuel and oil".
- Place the equipment safely and securely on the ground.
- Set the ON/OFF switch (2) to "I" (Fig. 4a)
- Press the throttle lever (4) until it locks (Fig. 4a)
- Press the fuel pump (12) (Fig. 4b) 10 times.
- Set the choke lever (13) to “”
- Hold the equipment firmly by the handle.
- Pull the starter cable out a short way until you feel resistance – it must be pulled evenly and quickly to start the engine. When the engine is running, set the choke lever to ⬆.
- Allow the engine to warm up for approx. 10 seconds.
- Press the throttle lever lock. The throttle lever will jump back into its idling position.
GBR
NOTE: If engine fails to start after repeated attempts, refer to Troubleshooting section.
NOTE: Always pull starter rope straight out. Pulling starter at an angle will cause rope to rub against the eyelet. This friction will cause the rope to fray and wear more quickly. Always hold starter handle when rope retracts. Never allow rope to snap back from extended position. This could cause rope to snag or fray and also damage the starter assembly.
6.2 STARTING A WARM ENGINE (Engine has been stopped for no more than 15-20 minutes)
- Pull starter rope again. Engine should start with ONE or TWO pulls. If engine fails to start after 6 pulls, repeat steps 2 through 6 (see Starting a cold engine).
- If engine does not start, or starts and then stops after 5 rope pulls, follow procedure "STARTING A COLD ENGINE".
6.3 STOPPING THE ENGINE
Emergency Stopping Procedure.
When it is necessary to stop blower engine immediately, DEPRESS the switch to stop.
Normal Stopping Method.
For normal stopping, push down the throttle lock, the throttle trigger will back to the nominal position and allow engine to return to idle speed. Then DE-PRESS and HOLD the "0" switch until the engine stops completely.
6.4 Switching between suction and blower mode (Fig. 1 / Item 10)
You can either blow or suck with this equipment.
• To activate blower mode slide the suction/blower lever (10) to the right
- To activate suction mode slide the suction/blower lever (10) to the front.
6.5 BLOWER OPERATIONS (Fig. 5)
Your blower is designed to easily remove debris from patios, walkways, lawns, bushes, etc., and many hard to reach areas where debris may accumulate.
DO NOT operate the blower with other people or animals in the immediate vicinity. Allow a minimum of 30 feet (9 meters) between operator and other people or animals.
We recommend that a face mask be worn when operating blower in dusty areas.
Stand away from the debris, at a distance that will easily allow you to control the direction of blown debris. Never blow debris in direction of bystanders.
To control velocity of airstream, blower can be operated at any speed between idle and full throttle. Experience with the unit will help you determine the amount of airflow necessary for each application.
Warning: Because of flying debris, always wear American National Standards Institute (A.N.S.I.) approved shielded safety glasses or face shield when operating blower.
Before using your blower, review Safety Precautions in your User Manual, and all regulations for operation of the unit. These precautions and regulations are for your protection.
Caution: Hold the blower so that hot exhaust does not damage clothing and is not inhaled by operator.
6.6 VACUUM OPERATIONS
Warning: NEVER OPERATE VACUUM WITHOUT VACUUM BAG PROPERLY ATTACHED, AS FLYING DEBRIS COULD CAUSE INJURY TO OPERATOR AND BYSTANDERS. ALWAYS MAKE SURE VACUUM BAG ZIPPER IS CLOSED BEFORE OPERATING UNIT.
Do not vacuum hot or burning materials (e.g. hot ash, glowin gcigarettes) from outdoor fi replaces or barbecue pits. always wait for these materials to be cool enough. Do not vacuum lighted smoking material such as discarded cigars or cigarettes. Do not operate unit near open flame.
Caution: This unit is designed to vacuum up debris such as leaves, small bits of paper, small twigs, weeds, grass clippings, etc. Do not use this unit for any other purpose.
Do not attempt to vacuum rocks, broken glass, bottles, tin cans or other such objects. Damage to impeller and unit as well as operator injury could result.
If vacuum tube is level with power unit horizontal, rocks or large objects may be drawn into tube, damaging the impeller.
GBR
To Operate Vacuum:
- Follow correct starting procedures as explained in this manual.
- Leave the motor running at idle speed. Attach the shoulder strap so that it lies over the left shoulder.
Caution: Do not allow shoulder harness to cover, block, or come in contact with exhaust outlet during operation. The muffler generates heat and could burn, melt, or damage harness strap.
- Hold the appliance with the right hand on the upper handle and with the left hand on the front handle (Fig. 6).
- For suction, swing the appliance from side to side.
Caution: To avoid clogging vacuum tube. DO NOT FORCE OR PLACE SUCTION TUBE INTO A PILE OF DEBRIS.
VACUUM TUBE CLOGGING
To Unclog Vacuum Tube:
Turn engine "OFF". Promptly compress vacuum bag while it is still inflated, expelling air out of the suction tube. This reverse airflow is usually sufficient to dislodge most obstructions. If the obstruction cannot be cleared by compressing vacuum bag, follow this procedure:
- Remove and inspect vacuum tubes.
• Carefully clean out nozzle.
• Reinstall vacuum tubes.
7. Cleaning, maintenance, storage, transport and ordering of spare parts
Always switch off the equipment and pull out the spark boot plug before carrying out any maintenance work.
7.1 Cleaning
- Keep all safety devices, air vents and the motor housing free of dirt and dust as far as possible. Wipe the equipment with a clean cloth or blow it with compressed air at low pressure.
• We recommend that you clean the device immediately each time you have finished using it. - Clean the equipment regularly with a moist cloth and some soft soap. Do not use cleaning agents or solvents; these could attack the plastic parts of the equipment. Ensure that no water can seep into the device. The
ingress of water into an electric tool increases the risk of an electric shock.
VACUUM BAG CLEANING
A dirty bag will obstruct airflow, thereby reducing vacuum efficiency.
To Clean Bag:
- Detach vacuum bag from unit.
- Open zipper and remove contents.
- Turn bag INSIDE OUT and shake vigorously. This procedure should be performed on a regular basis.
- Turn bag RIGHT SIDE OUT, close zipper and attach to unit.
NOTE: If vacuum bag is unusually dirty, it should be washed by hand in warm water with a mild detergent. Rinse thoroughly. Let dry before using.
7.2 Maintenance
Maintenance of the air fi Iter (Fig. 7a-7b)
Soiled air filters reduce the engine output by supply too little air to the carburetor.
Regular checks are therefore essential. The air fi Iter should be checked after every 25 hours of use and cleaned if necessary. If the air contains a lot of dust, the air fi Iter should be checked more frequently.
-
Remove the air fi Iter cover (Fig. 7a)
-
Remove the fi Iter element (Fig. 7b)
- Clean the filter element by tapping it or blowing it.
- Assemble in reverse order.
Please note: Never clean the air filter with petrol or infl ammable solvents.
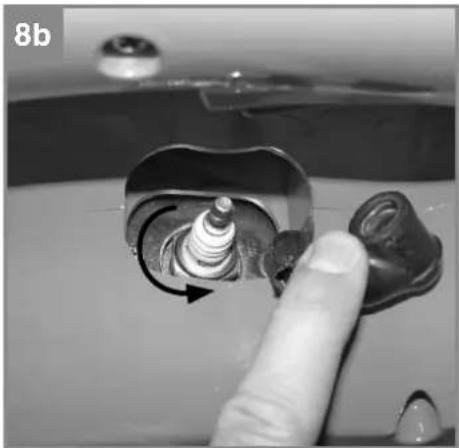
Maintenance of the spark plug (Fig. 8a-8b)
Spark plug gap = 0.6 mm. Tighten the spark plug with a torque of 12-15 Nm.
Check the spark plug for dirt and grime after 10 hours of operation and if necessary clean it with a copper wire brush. Thereafter service the spark plug after every 50 hours of operation.
- Pull off the spark plug boot (Fig. 8a) by twisting.
- Remove the spark plug (Fig. 8b) with the supplied spark plug wrench.
- Assemble in reverse order.
GBR
7.3 Storage
Please note: If you fail to follow these instructions correctly, deposits may form on the interior of the carburetor which may result in the engine being more difficult to start or the machine suffering permanent damage.
- Carry out all the maintenance work.
- Drain the fuel out of the tank (use a conventional plastic petrol pump from a DIY store for this purpose).
- When the fuel has been drained, start the engine.
- Allow the engine to run at idling speed until it stops. This will clean the remainder of the fuel out of the carburetor.
- Leave the machine to cool (approx. 5 minutes).
- Remove the spark plug.
- Place a teaspoon full of 2-stroke engine oil into the combustion chamber. Pull the starter cable several times carefully to wet the internal components with the oil. Fit the spark plug again.
- Clean the exterior housing of the machine.
- Store the machine in a cold, dry place where it is out of the reach of ignition sources and infl ammable substances. Fertilizers and other chemical garden products often contain substances that accelerate the rate of corrosion of metals. Do not store the machine on or near fertilizers or other chemicals.
7.4 Restarting
- Remove the spark plug.
- Pull the starter cable several times to clean the oil residue out of the combustion chamber.
- Clean the spark plug contacts or fit a new spark plug.
- Fill the tank. See the section entitled Fuel and oil.
- Complete steps 1-7 described under the point entitled "Starting the engine from cold".
7.5 Transport
To transport the machine, first empty the petrol tank as described in section 10 in the section entitled "Storage". Clean coarse dirt off the machine with a brush or hand brush. Dismantle the long handle.
7.6 Ordering replacement parts:
Please quote the following data when ordering replacement parts:
• Type of machine
• Article number of the machine
• Identification number of the machine
• Replacement part number of the part required
For our latest prices and information please go to www.isc-gmbh.info
8. Disposal and recycling
The equipment is supplied in packaging to prevent it from being damaged in transit. The raw materials in this packaging can be reused or recycled. The equipment and its accessories are made of various types of material, such as metal and plastic. Never place defective equipment in your household refuse. The equipment should be taken to a suitable collection center for proper disposal. If you do not know the whereabouts of such a collection point, you should ask in your local council offices.
GBR
9. Troubleshooting guide
The table below contains a list of fault symptoms and explains what you can do to remedy the problem if your equipment fails to work properly. If the problem still persists after working through the list, please contact your nearest service workshop.
| Fault Possible cause Remedy | ||
| The equipment does not start | - Correct starting procedure not followed- Sooted or damp spark plug- Incorrect carburetor setting | - Follow the instructions for starting- Clean the spark plug or replace it with a new one- Contact an authorized customer service outlet or send the equipment to ISC GmbH |
| The equipment starts but does not develop its full power | - Incorrect choke lever setting- Soiled air filter- Incorrect carburetor setting | - Set the choke lever to,√- Clean the air filter- Contact an authorized customer service outlet or send the equipment to ISC GmbH |
| The engine does not run smoothly | - Incorrect electrode gap on the spark plug- Incorrect carburetor setting | - Clean the spark plug and adjust the electrode gap, or fi t a new spark plug- Contact an authorized customer service outlet or send the equipment to ISC GmbH |
| Engine smokes excessively | - Incorrect fuel mix- Incorrect carburetor setting | - Use the correct fuel mix (see fuel mixing table)- Contact an authorized customer service outlet or send the equipment to ISC GmbH |


GBR
The reprinting or reproduction by any other means, in whole or in part, of documentation and papers accompanying products is permitted only with the express consent of the iSC GmbH.
Subject to technical changes
GBR
Warranty provisions
iSC GmbH or the DIY store where you made you purchase guarantees the repair of defects or replacement of the equipment in accordance with the overview below. Statutory guarantee claims are unaffected.
| Category Example Warranty | ||
| Defect with regard to material or construction | 24 months | |
| Wear parts* Spark plug, air fi Iter 6 months | ||
| Consumables* Warranty only in case of an im- | mediate defect (24 hours after purchase / date on the bill) | |
| Missing parts 5 work days |
* Not necessarily included in the scope of delivery!
For consumables, wear parts and missing parts iSC GmbH guarantees the correction of defects or a new delivery only if the defect is reported within 24 hours (consumables), 5 work days (missing parts) or 6 months (wear parts) after purchase and the purchase date is verified with the bill.
In case of defects concerning the material or construction, we kindly request you to submit the equipment together with the fully completed warranty card supplied with the equipment. It is important that you enter an exact description of the defect.
To do so, answer the following questions:
- Did the equipment work at all or was it defective from the beginning?
• Did you notice anything (symptom or defect) prior to the failure?
• What malfunction does the equipment have in your opinion (main symptom)?
Describe this malfunction.
GBR
Warranty certifi cate
Dear Customer,
In the unlikely event that your device develops a fault, we are truly sorry for this, and suggest that you please contact our service department at the address shown on this guarantee card, or contact the nearest authorised DIY store. Please note the following terms, under which guarantee claims can be made:
- These guarantee terms cover additional guarantee rights and do not affect your statutory warranty rights. We do not charge you for this guarantee.
- Our guarantee only covers problems caused by material or manufacturing defects, and it is restricted to the rectification of these defects or replacement of the device. Please note that our devices have not been designed for use in commercial, trade or industrial applications. Consequently, the guarantee is invalidated if the equipment is used in commercial, trade or industrial applications or for other equivalent activities. The following are also excluded from our guarantee: compensation for transport damage, damage caused by failure to comply with the installation/assembly instructions or damage caused by unprofessional installation, failure to comply with the operating instructions (e.g. connection to the wrong mains voltage or current type), misuse or inappropriate use (such as overloading of the device or use of non-approved tools or accessories), failure to comply with the maintenance and safety regulations, ingress of foreign bodies into the device (e.g. sand, stones or dust), effects of force or external influences (e.g. damage caused by the device being dropped) and normal wear resulting from proper operation of the device. This applies in particular to rechargeable batteries for which we nevertheless issue a guarantee period of 12 months. The guarantee is rendered null and void if any attempt is made to tamper with the device.
- The guarantee is valid for a period of 5 years starting from the purchase date of the device. Guarantee claims should be submitted before the end of the guarantee period within two weeks of the defect being noticed. No guarantee claims will be accepted after the end of the guarantee period. The original guarantee period remains applicable to the device even if repairs are carried out or parts are replaced. In such cases, the work performed or parts fitted will not result in an extension of the guarantee period, and no new guarantee will become active for the work performed or parts fitted. This also applies when an on-site service is used.
- In order to assert your guarantee claim, please send your defective device postage-free to the address shown below. Please enclose either the original or a copy of your sales receipt or another dated proof of purchase. Please keep your sales receipt in a safe place, as it is your proof of purchase. It would help us if you could describe the nature of the problem in as much detail as possible. If the defect is covered by our guarantee then your device will either be repaired immediately and returned to you, or we will send you a new device.
Also refer to the restrictions of this warranty concerning wear parts/consumables and missing parts as set forth in the warranty conditions in these operating instructions.
FRA
Sommaire
X 2000/14/EC\_2005/88/EC
X Annex V
Annex VI
Noise: measured L_pp = 107.6 dB (A); guaranteed L_wA = 111 dB (A)
P = 0.9 KW; L/∅ = cm
Notified Body:
X 2004/26/EC
Emission No.: e11*97/68SA*2004/26*0644*00
Standard references: EN ISO 14982; EN 15503
Subject to change without notice
Archive-File/Record: NAPR008132
Documents registrar: Markus Jehl
Wiesenweg 22, D-94405 Landau/Isar


EH 04/2013 (01)