Waterrefill 3548 - Automatic pump EHEIM - Free user manual and instructions
Find the device manual for free Waterrefill 3548 EHEIM in PDF.
| Product type | Automatic aquarium refill pump |
| Brand | EHEIM |
| Model | Waterrefill 3548 |
| Power supply | 100 - 240 V, 50/60 Hz |
| Total power consumption | 8 W |
| Max delivery head (pump) | 1.5 mWs |
| Max flow rate (pump) | 240 l/h |
| Main functions | Automatic refill of evaporated water, level detection by external sensor, standby mode, reset |
| Sensor | External sensor attached to the glass with adhesive, contactless detection with water |
| Displays | LED on controller (red/green) and on sensor (green/yellow) for operating status and errors |
| Safety | Protection class II, use with 30 mA residual current device recommended, moisture protection |
| Maintenance and cleaning | Impeller cleaning rarely (osmosis water), clean glass in front of sensor |
| Spare parts | Spare kits available: kit 1 (pump housing), kit 2 (rotor, shaft, washer), kit 3 (thrust washers) |
| Areas of use | Indoor aquarium, freshwater or seawater, water temperature ≤ 35°C |
| Package contents | Power supply unit, controller, pump, shut-off valve, sensor with adhesive tape, hose, flow elbow, bracket, retaining clip, adapter, manual |
Frequently Asked Questions - Waterrefill 3548 EHEIM
User questions about Waterrefill 3548 EHEIM
0 question about this device. Answer the ones you know or ask your own.
Ask a new question about this device
Download the instructions for your Automatic pump in PDF format for free! Find your manual Waterrefill 3548 - EHEIM and take your electronic device back in hand. On this page are published all the documents necessary for the use of your device. Waterrefill 3548 by EHEIM.
USER MANUAL Waterrefill 3548 EHEIM
natural_image
3D diagram of an electrical enclosure with connected components and wiring, no visible text or symbols3548
| de | Nachfüllautomatik |
| en | Automatic refilling device |
| fr | Système de remplissage automatique |
| nl | Automatisch bijvulsysteem |
| sv | Automatisk vattenpåfyllning |
| no | Automatisk påfylling |
| fi | Automaattinen täyttöjärjestelmä |
| da | Automatisk påfyldning |
| it | Sistema automatico di ricarica |
| es | Sistema automático de llenado |
| pt | Sistema de reenchimento automático |
| el | Σύστημα αυτόματης αναπλήρωσης |
| cs | Systém automatického doplňování |
| hu | Utántöltő automata |
| pl | Układ automatycznego uzupełniania |
| sl | Avtomatika za polnjenje vode |
| sk | Systém automatického doplňovania |
| rus | Автоматический насос |

text_image
Diagram of a fluid system with numbered components, showing connections between devices and a tank interior.Controller

natural_image
3D rendered mechanical component with metallic and black sections, no visible text or symbolsMontage des Sensors
text_image
1.2. EHEM
text_image
ENEW
text_image
3.4. ENFSM STOP
text_image
EPCM
text_image
5.6.
text_image
ENEMon your purchase of the new EHEIM refilling device. You have selected an intelligent and adaptive quality product of the EHEIM make. The EHEIM waterrefill automatic refilling device is a water level control for aquariums, which is used for refilling vaporised aquarium water automatically. This device not only adapts automatically to the size of your aquarium, but also to the seasonal changes on the site of installation.
The sensors used by EHEIM offer many advantages: Due to their position outside the aquarium, the sensors cannot become dirty and are not blocked by aquatic plants and / or creatu In addition, the sensors can be used at optional high and also at shallow water levels and in tremely soft up to very hard sweet as well as sea water.
Please read these instructions for use carefully before commissioning your EHEIM automatic refilling device or carrying out maintenance work.
Translation of the original operating manual EHEIM waterrefill 3548
General user instructions
Information on using the operating manual

▶ Before using the appliance for the first time, the operating manual must be read fully and understood.
- Consider the operating manual as part of the product and keep in a safe and accessible location.
▶ Enclose this operating manual if passing the appliance on to a third party.
Symbol explanation
The following symbols are used on the appliance:

The appliance must only be used indoors, and exclusively for aquariums.

The pump is of protection class II.

The device conforms to all currently valid EU standards.
The following symbols and signal words are used in this operating manual:
DANGER!
The symbol indicates imminent danger from electric shock that can result in death or serious injury.

DANGER!
The symbol indicates imminent danger that can result in death or serious injury.

WARNING!
The symbol indicates imminent danger that can result in moderate to minor injury or a health risk.

CAUTION!
The symbol indicates the danger of material damage.

Note with useful information and tips.
Typographical conventions:
☒ A Reference to a figure; in this case, reference to figure A.

You are prompted for an action.
Application
The appliance and all parts included in the scope of delivery are intended for private use and must only be used:
• for aquarium-related purposes
- indoors
• in compliance with the technical data
The following limitations apply to the appliance:
- do not use for commercial or industrial purposes
- the water temperature may not exceed 35^ C
VERY IMPORTANT SAFETY INSTRUCTIONS
WARNING- To guard against injury, basic safety precautions should be observed, including the following.
•FOR HOUSEHOLD USE ONLY · WARNING! RISK OF ELECTRIC SHOCK!
- This pump has not been investigated for use in swimming pools areas!
•DO NOT RUN DRY!
READ AND FOLLOW ALL SAFETY INSTRUCTIONS.
- DANGER. To avoid possible electric shock, special care should be taken since water is employed in the use of aquarium equipment. For each of the following situations, do not attempt repairs by yourself; return the appliance to an authorized service facility for service or discard the appliance.
- If the appliance shows any sign of abnormal water leakage, immediately unplug it from the power source.
- Carefully examine the appliance after installation. It should not be plugged in if there is water on parts not intended to be wet.
- Do not operate any appliance if it has a damaged cord or plug, or if it is malfunctioning or if it is dropped or damaged in any manner.
- To avoid the possibility of the appliance plug or receptacle getting wet, position aquarium stand and tank to one side of a wall mounted receptacle to prevent water from dripping onto the receptacle or plug. A "drip loop", shown in the figure, should be arranged by the user for each cord connecting the aquarium appliance to a receptacle. The "drip loop" is that part of the cord below the level of the
receptacle, to prevent water travelling along the cord and coming in contact with the receptacle. If the plug or receptacle does get wet, DON'T unplug the cord; disconnect the fuse or circuit breaker that supplies power to the appliance. Then unplug and examine for presence of water in the receptacle.
- Close supervision is necessary when any appliance is used by or near children.
- To avoid injury, do not contact moving parts.
- Always unplug an appliance from an outlet when not in use, before putting or taking off parts, and before cleaning. Never yank cord to pull plug from outlet. Grasp the plug and pull to disconnect.
- Do not use an appliance for other than intended use. The use of attachments not recommended or sold by the appliance manufacturer may cause an unsafe condition.
- Do not install or store the appliance where it will be exposed to the weather or to temperatures below freezing.
-
Make sure an appliance mounted on a tank is securely installed before operating it.
-
Read and observe all the important notices on the appliance and its cord.
- If an extension cord is necessary, a cord with a proper rating should be used. A cord rated for less amperes or watts than the appliance rating may overheat. Care should be taken to arrange the cord so that it will not be tripped over or pulled.
- Check that the voltage shown on the label of the unit corresponds to the voltage of the mains supply.
- Disconnect all electrical appliances from the mains before placing hands in the water.
- The line cord of this unit cannot be replaced or repaired. Should the line cord become damaged the appliance must be discarded.
KEEP THESE INSTRUCTIONS FOR FUTURE REFERENCE.
Safety instructions
Risks for persons and property can arise from this appliance if the appliance is improperly used or not used as intended or if the safety instructions are not heeded.
For your safety

- This appliance can be used by children from the age of 8 and by persons with reduced physical, sensory or mental capabilities or lack of experience and/or knowledge if they are supervised and have been instructed in the safe use of the appliance and have understood the resulting dangers. Children must not play with the appliance. Cleaning and user maintenance must not be carried out by children unless they are supervised.
- Before use, carry out a visual inspection to ensure that the appliance, especially the mains cable and plug, are undamaged.
• Repairs must only be carried out by an EHEIM service centre.
- When the line is damaged, the device must no longer be used.
- Only carry out the work described in these instructions.
- Only use original spare parts and accessories for the appliance.
- To protect against contact voltage being too high, the fixture must have a residual current device with a rated release fault current not exceeding 30 mA. Ask your electrician.
- In the event of water leakage or when the residual current protection device is triggered, immediately disconnect all devices in the aquarium from the power supply.
- If they are not being used, always disconnect all devices in the aquarium from the power supply before you install/remove any parts and before all cleaning and maintenance work.
- Protect the mains socket and mains plug against moisture. It is recommended to form a drip loop with the mains cable to prevent any water running along the cable to the mains socket.
- The electrical data of the pump must match the data of the power mains. This data is found on the type plate, the packaging and in these instructions.
EHEIM waterrefill automatic refilling device item no. 3548
Scope of delivery
① power supply unit ② controller ③ pump ④ shut-off valve ⑤ sensor with adhesive strips ⑥ hosepipe ⑦ drain elbow ⑧ mount for the drainage elbow ⑨ retaining clamp 1x plug adapter for the power supply unit, 1x operating instructions, 1x guarantee card All parts, the plug-in power supply unit, the controller, the sensor and the refilling pump are wire with one another. The plug-in power supply units permanently wired to the controller. From the controller,② one cable goes to the sensor and another cable to the refilling pump.
Installation of the sensor

Do not remove the adhesive strips yet!
The sensor ^⑤ is fixed to the outer side of the basin (aquarium, filter basin, sump) with an adhesive strip; the water level of this basin must be monitored. The corresponding basin must be prepared such that the sensor can be fitted properly. The fixing position must be a dry area with no risk of splashed water. The pump should not be in the water as yet. The adhesive surface on the outer side of the glass panel must be dry, clean and free from grease. Clean the adhesive surface using methylated spirit. All-purpose cleaners, bathroom cleaners or similar are not suitable for use on the aquarium.
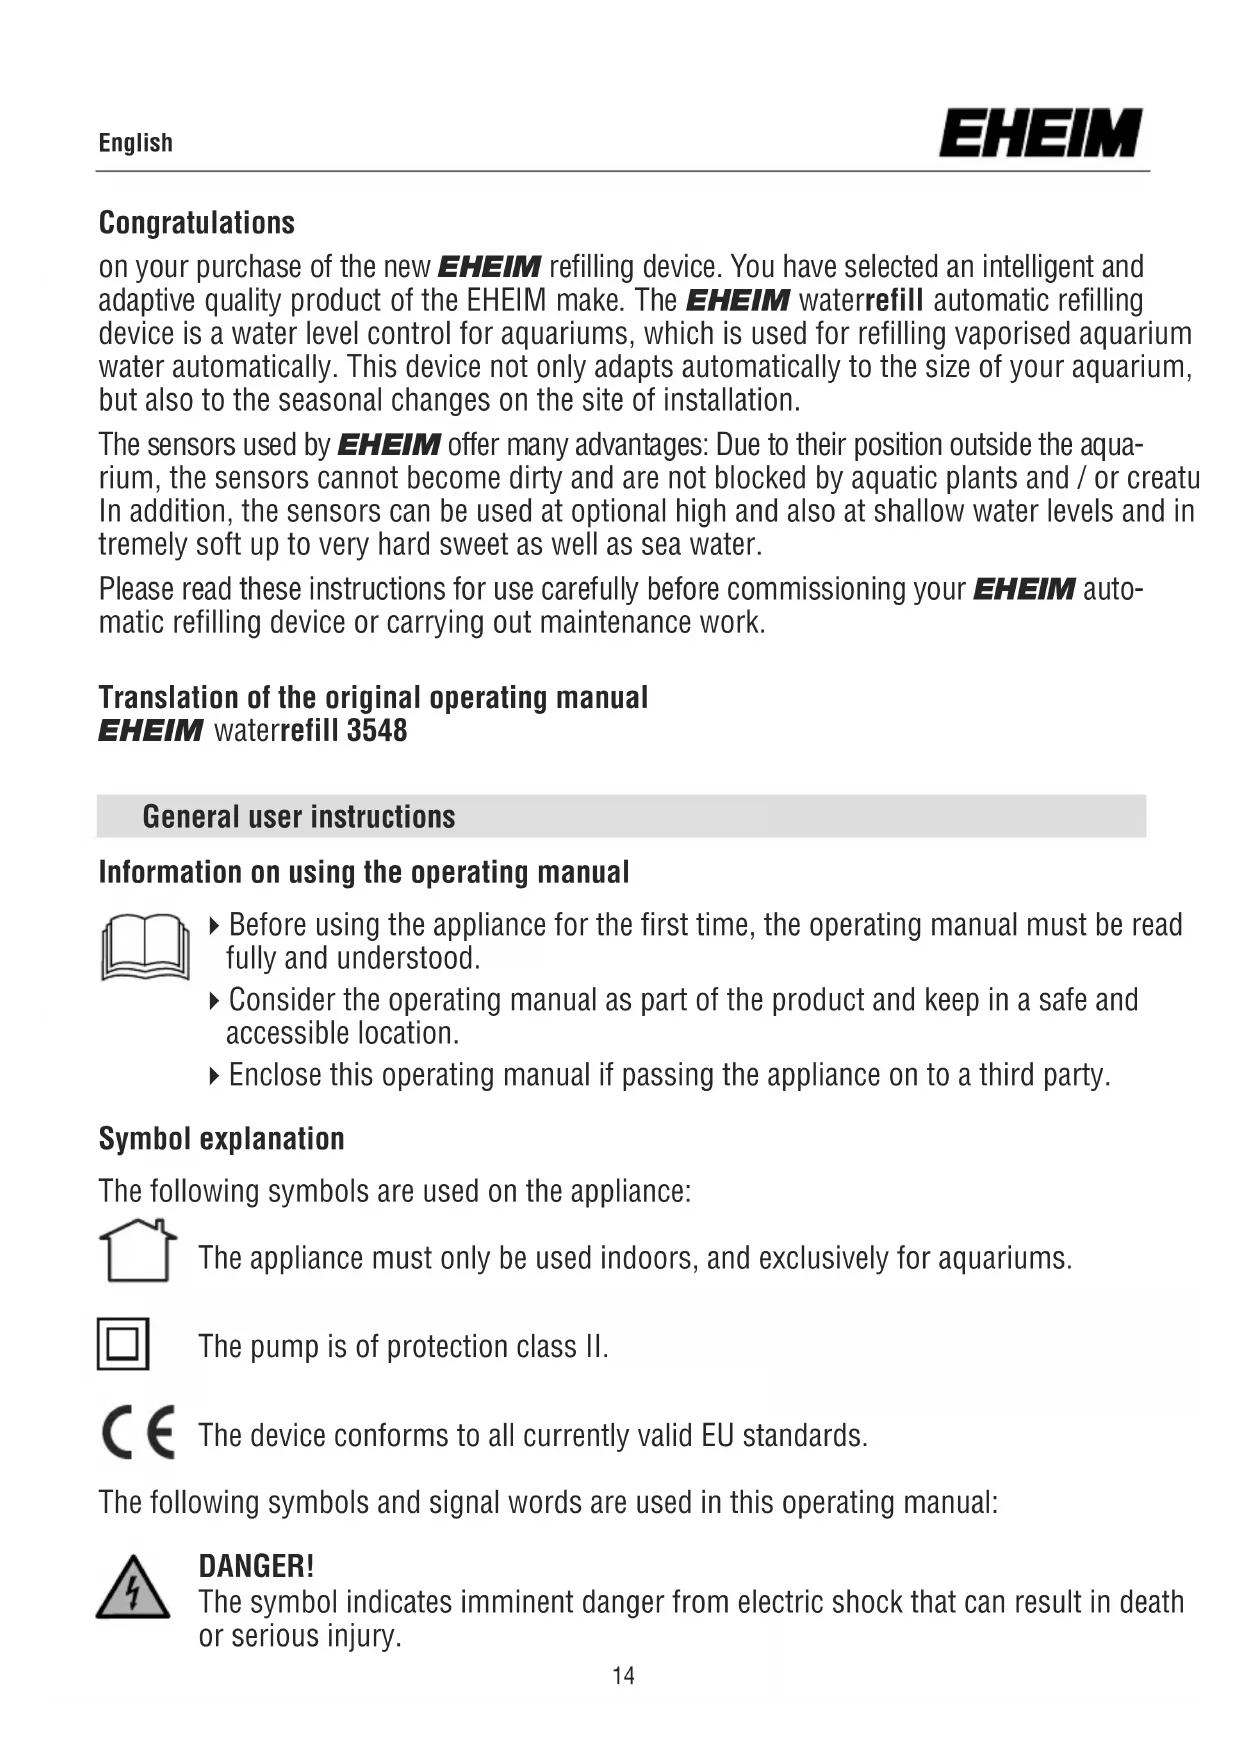
Now, connect the power supply unit to the socket; on doing this, the red LED ✗ C1) on the controller gets activated and glows constantly.
Then, place the sensor from outside on the glass panel of the basin above the water level in a horizontal position (both the LEDs ✉ S1 and ✉ S2 on the sensor glow) (☒ 1.).
Slowly move the sensor downwards (☒ 2.) until the yellow LED (☒ S2) goes out. Ensure that the sensor is in contact with the basin glass during this entire movement (☒ 3.).
On the basin, mark the position of the sensor, on which the yellow LED has gone out 4.). Only after this is done, pull out the protective foil of the adhesive strip (5.) and press the sensor forcefully on the glass in a horizontal position for 10 seconds (6.).

Caution: Do not bring the sensor and adhesive strip in contact with water / splashing water! Even very small quantities of water / water droplets between the glass pane of the basin and the sensor lead to malfunctioning!
Never place the sensor close to metallic objects or cables, these, too, lead to malfunctions!
Installation of the automatic refill device
Connect the hose ⑥ to the water outlet of the pump (☒P1). Then place the pump ③ in the water reservoir. Guide the hose ⑥ to the point on the aquarium at which the aquarium is to be filled with water and, where necessary, shorten the hose ⑥ to the required length. Insert the drain elbow ⑦ in the other end of the hose ⑥ and clip the mount (☒H2) to the elbow.
The outlet opening of the drain elbow ⑦ must always be installed above the water level. If the end of this tube is submerged in water, water from the filter basin or aquarium will flow in the reservoir or vice-versa, according to the principle of communicating pipes, until the water level in both the containers is the same.
In order to avoid wave movements in front of the sensor, the mount⑧ must be so fixed to the aquarium glass using the retaining clip (H1) that the water discharge is at least 5 cm away from the sensor. In addition, it is recommended, by means of the shut-off valve ④ to restrict the delivery rate of the pump ③ to the extent that the refilling operation takes at least 15 seconds.
Putting into operation
After the sensor is mounted on the basin glass, switch on the automatic refilling system by pressing the key on the controller. The indicator on the controller (LED ☒) changes colour from red to green. From this point, the EHEIM automatic water refill device monitors the water level of your aquarium.
In order to guarantee the detection of the water level, the inner sides of the aquarium must be regularly freed from contaminants such as limescale and salt crusts.

Attention: When changing the water or working in the aquarium, switch the automatic refill device into standby mode.
Operating the controller
Standby mode: To switch the automatic refill device to the standby mode, briefly press the button on the controller once. The standby mode is active when the LED on the controller rapidly flashes green.
Reset: To reset the controller, keep the button pressed for so long until the LED glows constantly red.
Switching on / activating: To take the automatic refill device out of standby mode or to reactivate after a reset, briefly press the button on the controller once.
Overview of the CONTROLLER display
| LED display ☒ C1 | status |
| Red | Reset and delivery status: System waits for a short activation of the key on the controller. |
| Green | System is ready for operation |
| Green flashing | Pump is refilling |
| No display | It is possible that the power supply unit has no power, Controller is switched off |
Overview of the SENSOR display
| LED display ➕ S1,S2 | status |
| Green | Sensor is ready for operation |
| Yellow | If the water level is below the desired level, the pump should start to refill after a few seconds |
| Green yellow flashing | Sensor is in the area with the moving water surface. |
| No display | It is possible that the power supply unit has no power Sensor may be faulty Sensor cable may be faulty |
Overview of the FAULT DISPLAY SYSTEM on the controller
The controller of the automatic refilling device identifies the faults during the operation and indicates these with a red flashing LED indicator.
| LED display ☒ C1 | Faults and possible causes |
| Rapid flashing red | The filling time clearly differs from the usual filling time.Could the refill reservoir be empty?Is the hose no longer connected to the pump?Is the drain elbow still in the correct position? |
| Flashing red | The time interval from the last filling operation clearly differs from the usual intervals.Is there considerably increased loss of water?Is the area in front of the sensor free?Has the aquarium been manually filled? |
| Alternate flashing red and green | The controller could be defective. |
Maintenance and cleaning
The cleaning of the pump rotor and the inside of the pump are dispensed with as, as a rule, the pump only comes into contact with ultrapure / osmosis water.
Technical Data of the Automatic Refill Device
| Country-specific variants EU GB | ||
| Part number 3548220 3548340 |
| Voltage 100 - 240 V | |
| Frequency 50/60 Hz | |
| Total power consumption 8 W | |
| Pump, Hmax 1,5 mWs | |
| Pump, Qmax 240 l/h |
Spare Part Sets
| Article / Part Number | |
| Spare part set 1 7426170 | |
| 1x pump housing (☒P6) | |
| 4x screws (☒P7) | |
| Spare part set 2 7426180 | |
| 1x rotor (☒P3) | |
| 1x axle (☒P4) | |
| 1x thrust washer (☒P5) | |
| Spare part set 3 7426190 | |
| 3x thrust washers (☒P5) |
Félicitations
Reproduction or copying – even parts thereof – only with the express permission of the producer.