P5607 - Thermostat Emos - Free user manual and instructions
Find the device manual for free P5607 Emos in PDF.

| Product type | Programmable room thermostat |
| Brand | Emos |
| Model | P5607 |
| Dimensions (L × H × D) | 120 × 78 × 26 mm |
| Weight | 126 g |
| Power supply | 2 AAA alkaline 1.5 V batteries (LR03) |
| Maximum switched load | 230 V AC, 8 A resistive / 2 A inductive |
| Temperature measurement range | 0 °C to 40 °C, resolution 0.1 °C |
| Measurement accuracy | ±1 °C at 20 °C |
| Temperature setting range | 5 °C to 35 °C in steps of 0.5 °C |
| Adjustable hysteresis | 0.2 °C to 2 °C in steps of 0.1 °C |
| Number of programs per day | 6 temperature changes |
| Operating modes | Heating (HEAT), Cooling (COOL), Frost protection (OFF) |
| Special functions | Weekly programming, HOLD mode, backlight, calibration |
| Low battery indicator | Yes, icon on screen |
| Backlight | 15 seconds after a button press |
| Connection terminals | NO, COM, NC (dry contact or live) |
| Maintenance | Clean with a slightly damp soft cloth; do not use solvents |
| Safety | Disconnect power before installation; use qualified personnel; do not open |
| Warranty | The manual does not specify a specific duration, but warranty is void if opened |
| Included accessories | 2 screws, 2 wall plugs |
Frequently Asked Questions - P5607 Emos
User questions about P5607 Emos
0 question about this device. Answer the ones you know or ask your own.
Ask a new question about this device
Download the instructions for your Thermostat in PDF format for free! Find your manual P5607 - Emos and take your electronic device back in hand. On this page are published all the documents necessary for the use of your device. P5607 by Emos.
USER MANUAL P5607 Emos
natural_image
Technical line drawing of a mechanical device with screwdrivers and adjustment knobs (no text or symbols)3
natural_image
Simple line drawing of two cylindrical batteries with coiled leads, no text or symbols present4
GB | Thermostat
The P5607 thermostat is designed for controlling heating and air-conditioning systems.
Important
- Before the first use, make sure to carefully read the operating manual for the thermostat, as well as the manual for the boiler or air-conditioning equipment.
- Turn off power before installing the thermostat!
• Installation should be carried out by a qualified professional! - Abide by prescribed standards during installation.
Technical specifications:
Switched load: max. 230 V AC; 8 A for resistive load; 2 A for inductive load
Temperature measurement: 0 °C to 40 °C with 0.1 °C resolution; accuracy ±1 °C at 20 °C
Temperature setting: 5 °C to 35 °C in 0.5 °C increments
Differential setting: 0.2 °C to 2 °C, in 0.1 °C increments
Power supply: 2× 1.5 V AAA batteries (LR03)
Accessories: 2 screws, 2 wall plugs
Dimensions and weight: 26 × 120 × 78 mm; 126 g
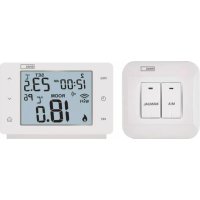
Description of Control Elements (fig. 1)
| 1 – select and edit programme | 3 – thermostat settings |
| 2 – adjust value | 4 – time and date settings |
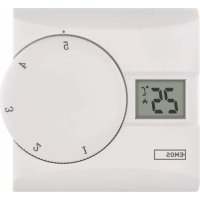
Screen Description (fig. 2)
| 1 – batteries low | 7 – cooling mode |
| 2 – operating mode | 8 – heating mode |
| 3 – selected programme | 9 – room temperature |
| 4 – time | 10 – HOLD mode |
| 5 – days | 11 – manual mode |
| 6 – set temperature |
INSTALLATION
Attention:
Before changing the thermostat, disconnect the heating/air-conditioning system from the main power in your flat. This will prevent potential injury by electric current.
Thermostat Placement
Thermostat placement significantly affects its functioning. Place it in a room where members of the family spend most of their time. Choose a spot preferably on an inside wall where air circulates freely and there is no
direct sunlight. Do not place the thermostat in the vicinity of heat sources (such as TV sets, radiators, fridges), or close to a door (due to frequent shocks or vibrations). If you do not comply with these recommendations, the thermostat will not maintain room temperature correctly.
Thermostat Installation
- Remove the rear cover of the thermostat.
- Mark positions for holes.
- Drill two holes, carefully insert the plastic wall plugs into them and use two screws to fasten the rear thermostat cover.
- Connect the wires to the labelled terminals according to the wiring diagram.
- Complete the installation by fitting the thermostat onto the mounted rear cover.
Note: The terminals are located underneath the cover. Gently press onto the right side of the cover and turn it to the left.
Wiring Diagram
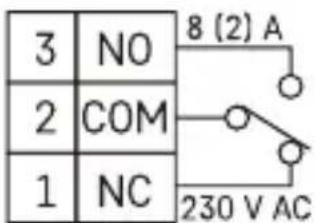
NO – normally open contact COM – contact for the switch NC – normally closed contact
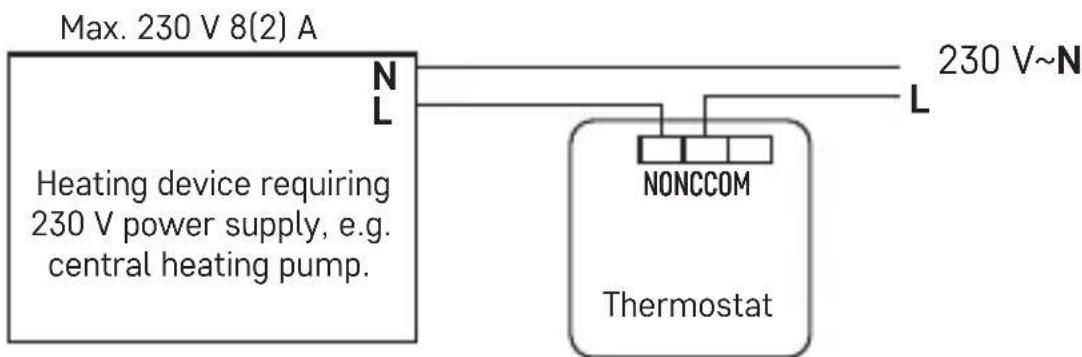
Voltage connection diagram for connecting thermostat P5607 to a boiler with „NO“ outlet:
flowchart
graph TD
    A["Max. 230 V 8(2) A"] --> B["Heating device requiring 230 V power supply, e.g. central heating pump."]
    B --> C["NL"]
    B --> D["L"]
    D --> E["230 V~N"]
    F["NONCCOM"] --> G["Thermostat"]
* When connecting a cooling device to the thermostat, connect the „L“ phase conductor to the „NC“ terminal.
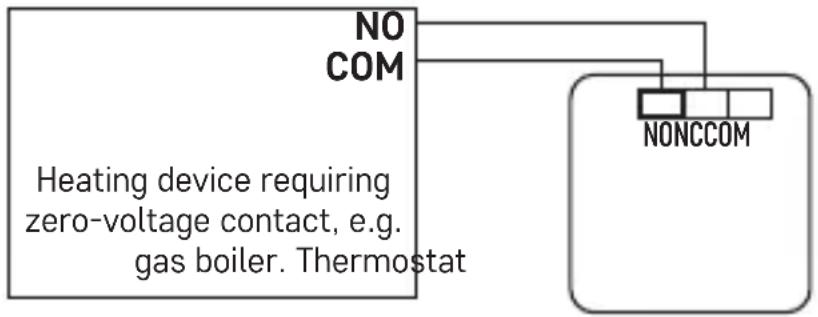
Zero-voltage connection diagram for connecting the P5607 thermostat to a boiler with an NO outlet:
Max. 230 V 8(2) A
flowchart
graph TD
    A["Heating device requiring zero-voltage contact, e.g. gas boiler. Thermostat"] --> B["NO COM"]
    A --> C["NONCCOM"]
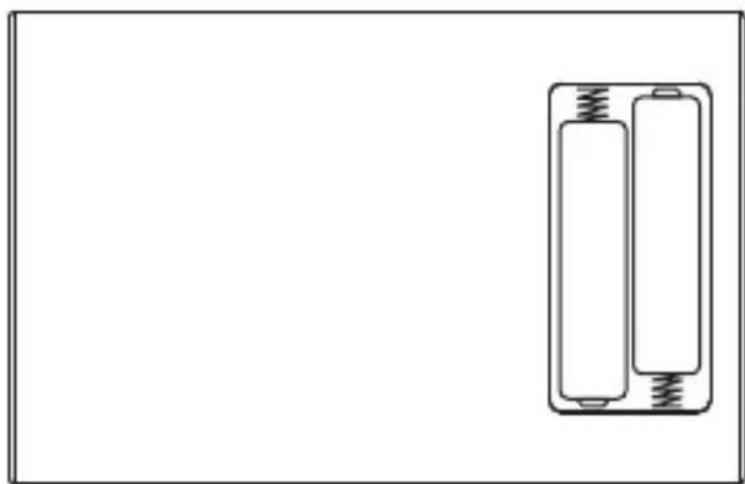
Commissioning (fig. 3 and 4)
Remove the front cover of the thermostat and insert 2× 1.5 V AAA batteries.
Do not use 1.2V rechargeable batteries.
Inserting the batteries starts the thermostat and activates the screen.
If the thermostat is not working properly, please check the polarity of the batteries and their state of charge.
Setting Day and Time
Press the 📄 button. The day number will start flashing (1 – Monday to 7 – Sunday).
Use the + and - buttons to set the number of the current day and press 📋/▶ Set the hour, then press 📋/▶ again and set the minutes.
Confirm by pressing □
Choosing Operating Mode (Heating, Cooling, Anti-Freeze Temperature)
- To access mode settings, press and hold for 5 seconds.
- Use the + and - buttons to select one of the following modes:
a. HEAT (heating system)
b. OFF (anti-freeze temperature: 7 °C)
c. COOL (cooling system)
- Press to confirm your selection.
Screen Illumination
Pressing any button activates screen illumination for 15 seconds.
Changing Batteries
If it appears on the screen, it means the batteries are low and need replacing.
Factory Preset Programmes
The programmable indoor thermostat was designed to be easy to use and require minimal user input. Its preset times and temperatures will suit the majority of users (see the table below).
Table of preset programmes (6 temperature changes a day)
| Time Temperature Time Temperature | ||||||
| Monday - Friday | PRG1 | 6:00 20 °C | Sunday | PRG1 7:30 20 °C | ||
| PRG2 | 8:00 15 °C | PRG2 9:30 20 °C | ||||
| PRG3 | 12:00 15 °C | PRG3 11:30 20 °C | ||||
| PRG4 | 14:00 15 °C | PRG4 13:30 20 °C | ||||
| PRG5 | 17:00 21 °C | PRG5 16:30 21 °C | ||||
| PRG6 | 22:00 15 °C | PRG6 22:30 15 °C | ||||
Programme Settings
If the factory preset programmes do not suit your needs, you can adjust their timing and temperatures.
The day is divided into 6 time periods = 6 temperature changes (the number of these periods cannot be changed).
- Press the PRG button; the day number will start flashing.
- Use the + and - buttons to select days: individual days in the week/workdays - 1, 2, 3, 4, 5/weekend - 6, 7/whole week - 1, 2, 3, 4, 5, 6, 7.
- Confirm by pressing PRG; the time value will start flashing and PRG1 will appear on the screen (indicating the 1st temperature change in the day).
- Use the + and - buttons to set a time (10 min resolution) where the 1st temperature change should start and confirm with the PRG button.
- The temperature value will start flashing; use the + and - buttons to set the temperature of choice and confirm with PRG.
- The time value will start flashing and PRG2 will appear on the screen (indicating the 2nd temperature change in the day).
- Use the + and - buttons to set a time (10 min resolution) where the 2nd temperature change should start and confirm with the PRG button.
- The temperature value will start flashing; use the + and - buttons to set the temperature of choice and confirm with PRG.
Repeat the process for the remaining temperature changes (PRG3/4/5/6) in the day.
Calibrating Room Temperature
The temperature sensor in the thermostat is calibrated from production, but additional calibration can be done to optimise the thermostat further, for instance by comparing the measured room temperature with a reference thermometer.
Press and hold the □ button for 5 seconds. The SYSTEM table will be displayed. Press ⏻/▶
CAL will appear on the screen and the temperature value will start flashing.
Use the + and - buttons to adjust the temperature value by -3 to +3 °C (0.5 °C resolution).
Confirm by pressing □.
Example: The thermostat shows room temperature of 22 °C ; setting calibration to +1 °C will cause the thermostat to display 23 °C instead.
Temperature Differential Setting
The temperature differential (hysteresis) is the difference in temperature required for switching the system on and off. If for example you set the temperature in heating mode to 20 °C and differential to 0.2 °C, the thermostat activates heating as soon as room temperature drops to 19.8 °C and switches heating off when temperature reaches 20.2 °C.
Press and hold the □ button for 5 seconds. The SYSTEM table will be displayed. Press twice.
diFF will appear on the screen and the temperature value will start flashing. Use the + and - buttons to adjust temperature differential to 0.2 to +2 °C (0.1 °C resolution).
Confirm by pressing □
Short-Term Manual Change of Temperature
When in standard operating mode, where temperature is controlled by the selected programme, it is possible to make a short-term change to the current temperature setting.
Use the + and - buttons to set the new temperature and confirm with □. The PRG icon will be replaced with a hand icon 📋 and the time remaining until the next scheduled temperature change will be flashing.
Upon the next scheduled temperature change, the hand icon will disappear and the temperature will change according to the programme.
The manual change can also be overridden and ended prematurely using the button.
Long-Term Manual Change of Temperature (HOLD Mode)
When in standard operating mode, where temperature is controlled by the selected programme, it is possible to make a long-term change to the current temperature setting.
Use the + and - buttons to set the new temperature and confirm with 📊/▶ The icon will be displayed and temperature will be flashing. You can again use the + and - buttons to change the temperature and confirm with □ The set temperature will be maintained until HOLD mode is cancelled.
Any programmed temperature change will not be carried out. In this mode, you can use the + and - buttons to set a new temperature and confirm with ☐
To end HOLD mode, press the □ button; the 📊 on will disappear.
Factory Reset
If the thermostat is not working properly, you can reset it to factory settings. Remove the front cover of the thermostat, long press the □ button and insert batteries. The screen will display all segments; release the □ button.
Upkeep and Maintenance
The product is designed to serve reliably for many years if used properly. Here are some tips for proper operation:
- Read the manual carefully before using this product.
- Do not expose the product to direct sunlight, extreme cold or humidity, and sudden changes in temperature. This would reduce measuring accuracy.
- Do not place the product in locations prone to vibrations and shocks – these may cause damage.
- Do not subject the product to excessive force, impacts, dust, high temperatures or humidity – doing so may cause malfunction, shorten battery life, damage the batteries or deform the plastic parts.
- Do not expose the product to rain or high humidity, dropping or splashing water.
- Do not place any open flame sources on the product, e.g. a lit candle, etc.
- Do not place the product in places with inadequate air flow.
- Do not insert any objects in the product's vents.
- Do not tamper with the internal electric circuits of the product – doing so may damage the product and will automatically void the warranty. The product should only be repaired by a qualified professional.
- To clean the product, use a slightly moistened soft cloth. Do not use solvents or cleaning agents – they could erode the plastic parts and cause corrosion of the electric circuits.
- Do not immerse the product in water or other liquids.
- In the event of damage or defect on the product, do not perform any repairs by yourself. Have it repaired in the shop where you bought it.
- This device is not intended for use by persons (including children) whose physical, sensory or mental disability or lack of experience and expertise prevents safe use, unless they are supervised or instructed in the use of the appliance by a person responsible for their safety. Children must always be supervised to ensure they do not play with the device.

Do not dispose with domestic waste. Use special collection points for sorted waste. Contact local authorities for information about collection points. If the electronic devices would be disposed on landfill, dangerous substances may reach groundwater and subsequently food chain, where it could affect human health.
WARNING: The contents of this manual may be changed without prior notice – due to printing limitations, the symbols shown may differ slightly from those on the display – the content of this manual may not be reproduced without the manufacturer's permission. Manual can be found at: http://www.emos.eu/download.