P5603R - Thermostat Emos - Free user manual and instructions
Find the device manual for free P5603R Emos in PDF.

| Brand | Emos |
| Model | P5603R |
| Product type | Thermostat |
| Dimensions | 40 × 93 × 86 mm |
| Weight | 135 g |
| Power supply | 2 AA (LR6) 1.5 V batteries |
| Max switching load | 230 V AC; 6 A (resistive) / 2 A (inductive) |
| Temperature measurement range | 0 °C to 40 °C |
| Measurement accuracy | ±0.5 °C |
| Measurement resolution | 1 °C |
| Temperature setting range | 5 °C to 30 °C (1 °C steps) |
| Hysteresis (parameter variation) | 0.4 °C |
| Functions | Heating / Cooling; CHRONO mode (TPI) with 3 or 6 cycles/hour; Time delay (2 or 4 min); °C/°F display |
| Included accessories | 2 screws, 2 wall plugs |
| Installation | On interior wall, away from sunlight and drafts. Connect to NO/NC/COM terminals. Cut off power before installation. |
| Maintenance and cleaning | Soft slightly damp cloth. Do not use solvents or abrasive cleaners. Do not immerse. |
| Safety | Installation by qualified personnel. Cut off power before servicing. Do not open the internal circuit. Keep out of reach of children. |
| Recycling instructions | Do not dispose of with household waste. Use collection points for electronic waste. |
Frequently Asked Questions - P5603R Emos
User questions about P5603R Emos
0 question about this device. Answer the ones you know or ask your own.
Ask a new question about this device
Download the instructions for your Thermostat in PDF format for free! Find your manual P5603R - Emos and take your electronic device back in hand. On this page are published all the documents necessary for the use of your device. P5603R by Emos.
USER MANUAL P5603R Emos
GB | Thermostat
The P5603R thermostat is designed for controlling heating and air-conditioning systems.
Important
- Before the first use, make sure to carefully read the instruction manual for the thermostat, as well as the manual for the boiler or air-conditioning equipment.
- Turn off power supply before installing the thermostat!
• Installation should be carried out by a qualified person! - Follow applicable standards during installation.
Technical specifications:
Switched load: max. 230 V AC; 6 A for resistive load; 2 A for inductive load
Temperature measurement: 0 °C to 40 °C with 1 °C resolution; accuracy ±0.5 °C
Temperature setting: 5 °C to 30 °C in 1 °C increments
Temperature differential setting: 0.4 °C
Power supply: 2× 1.5 V type AA (LR6) batteries
Accessories: 2 screws, 2 wall plugs
Dimensions and weight: 40 × 93 × 86 mm; 135 g
Description of the Thermostat (See Fig. 1)
1 - screen
2 - temperature setting wheel
3 - battery compartment
4 - fastening of the rear cover by screws
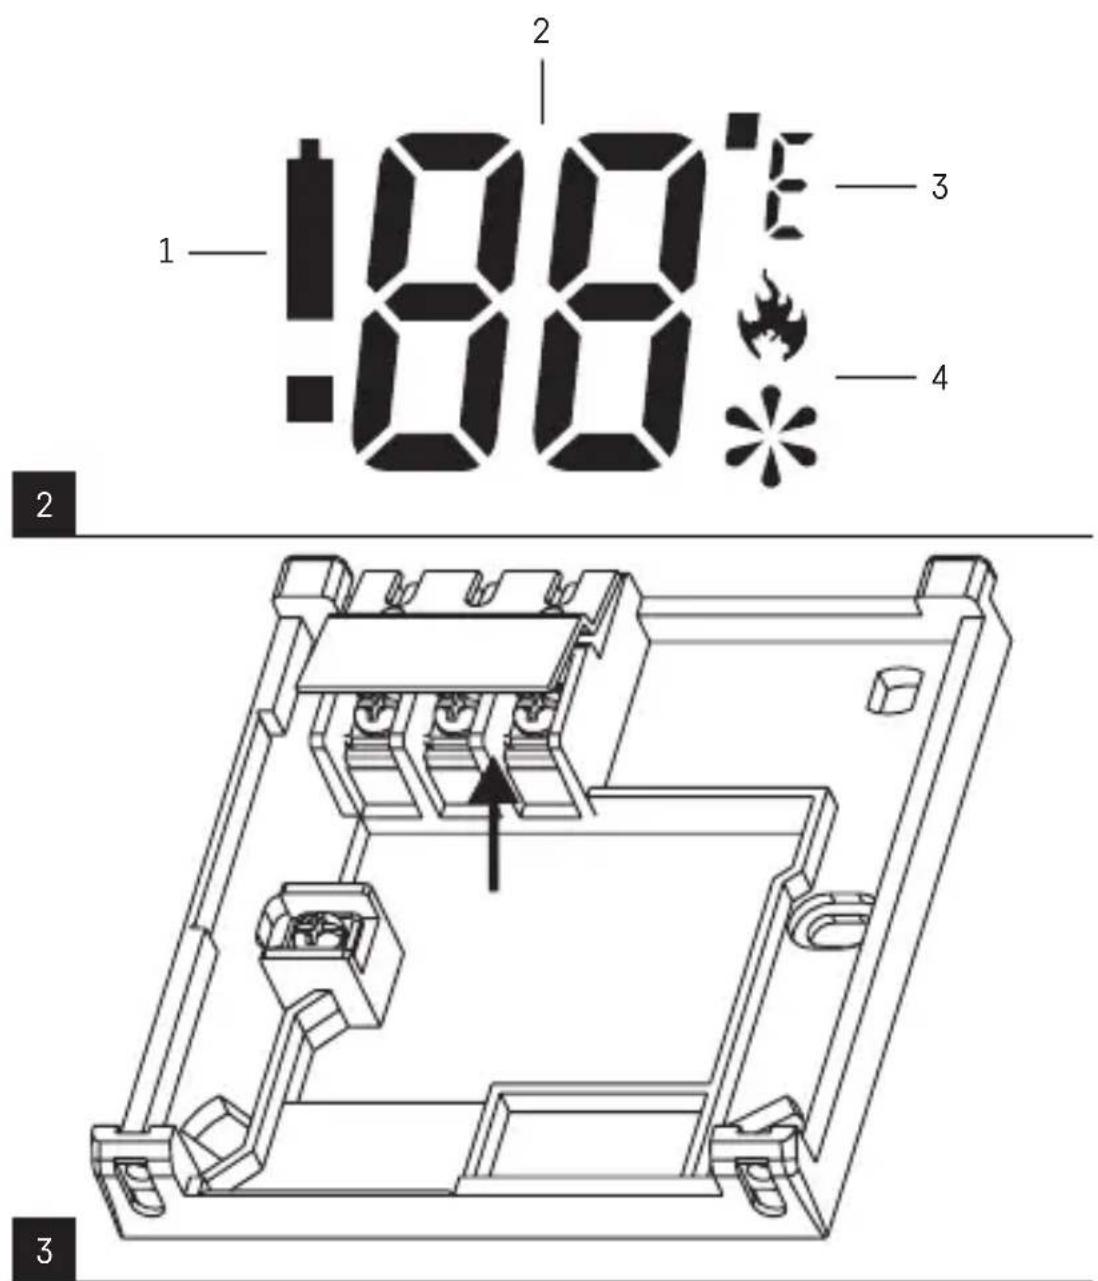
Screen Description (See Fig. 2)
1 - low battery indication
2 - temperature
3 - °C/°F temperature unit
4 – heating ✦ or cooling ✦ operating mode
Procedure for Removing the Front of the Thermostat (See Fig. 1)
INSTALLATION
Attention:
Before changing the thermostat, disconnect the heating/air-conditioning system from the mains power in your flat. This will prevent potential injury by electric current.
Read the thermostat manual carefully before using the device for the first time.
Turn off power supply before installing the thermostat!
Follow applicable standards during installation.
Placement of the Thermostat
The placement of the thermostat significantly affects its functioning. Choose a location where family members spend most of their time,
preferably on the inside wall where air circulates freely, with no direct sunlight. Do not place the thermostat
in the vicinity of heat sources (such as TV sets, radiators, fridges), or close to a door (due to frequent shocks or vibrations). If you do not follow these recommendations, the thermostat will not maintain room temperature correctly.
Installation of the Thermostat
The rear cover of the thermostat has 6 pre-made openings for mounting onto a wall.
Remove the rear cover and use the enclosed screws and wall plugs to mount the thermostat to a wall.
The connection terminals are protected by a plastic cover, see Fig. 3.
Connect the wires leading out of the junction box to the marked terminals on the thermostat in accordance with the wiring diagram.
Wiring Diagram
Voltage connection diagram for connecting thermostat P5603R to a boiler with an „NO“ contact:
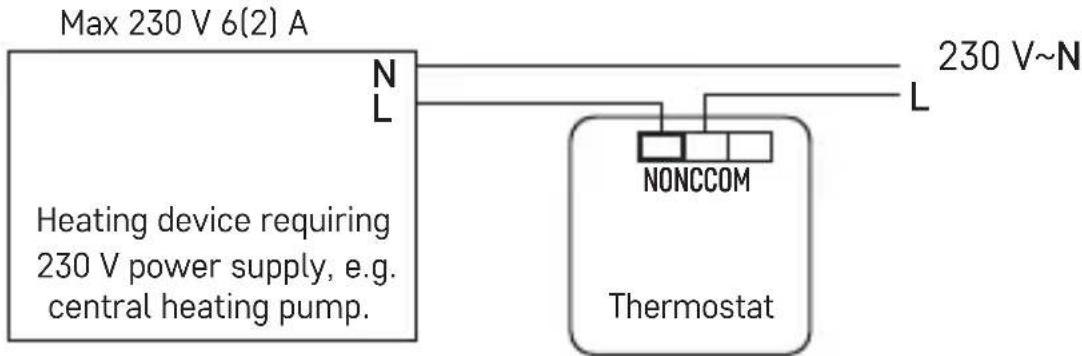
* When connecting a cooling device to the thermostat, connect the „L“ phase conductor to the „NC“ terminal.
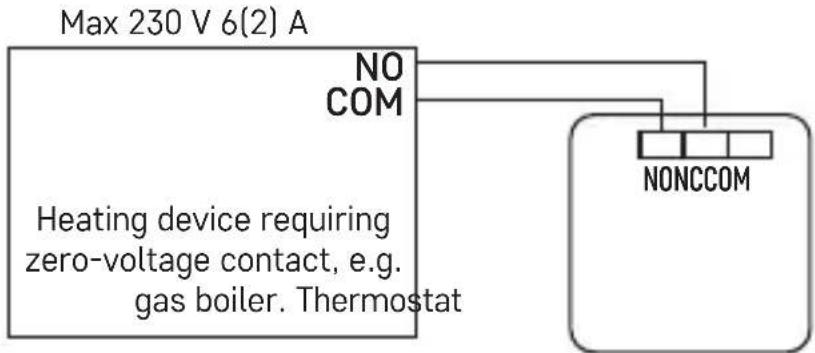
Zero-voltage connection diagram for connecting thermostat P5603R to a boiler with an „NO“ contact:
flowchart
graph TD
    A["Max 230 V 6(2) A"] --> B["NO COM"]
    B --> C["NONCCOM"]
    D["Heating device requiring zero-voltage contact, e.g. gas boiler. Thermostat"] --> C
Putting the Device into Operation
- Remove the back portion of the thermostat and insert 2× 1.5 V AA batteries. Only use 1.5 V alkaline batteries; do not use rechargeable 1.2 V batteries.
-
Replace the back of the thermostat.
-
The thermostat now has an active screen and is operational.
If the thermostat is not working properly, please check the polarity of the batteries and whether they are sufficiently charged, or reset the thermostat by removing and reinserting the batteries.
If it appears on the screen, replace the batteries in the thermostat.
Setting Temperature
To increase temperature, turn the wheel right.
To reduce temperature, turn the wheel left.
The set temperature will be shown on the screen for 5 seconds, then the room temperature will be shown instead.
Choosing Operating Mode
Unscrew the rear cover of the thermostat.
There is a DIP switch on the back of the thermostat which is used to set the following functions.
Available Functions in HEATING Mode
| cooling mode off 1 ON heating mode on | ||
| CHRONO mode off 2 CHRONO mode on | ||
| 6 cycles/h 3 3 cycles/h | ||
| °F unit of temperature 4 °C unit of temperature |
CHRONO (TPI) Mode
CHRONO mode, also known as TPI (Time Proportional and Integral) is an algorithm that has a simple memory capable of „learning“ how to reach and maintain room temperature. It has a basic calculating capability: It uses collected data and current temperatures and predicts how long heat needs to be generated (the boiler must remain on). It is a type of intelligent control, since heat delivery lasts until the desired value is reached, then the boiler is turned off to improve energy efficiency.
The mode runs in cycles, with their length measured as number of cycles per hour. During normal use, it is difficult to notice the difference in the way the heating system runs. However, it is noticeable that the thermostat runs for a shorter period of time when room temperature starts approaching the set temperature. Once the set temperature is reached, the operating cycles become shorter to maintain the temperature. TPI calculates the speed at which the room loses heat and prevents the room from getting colder by activating heating as needed.
Setting CHRONO (TPI) Cycles
In heating mode, the CHRONO function can be set to 3 or 6 cycles per hour.
3 cycles are recommended for controlling underfloor heating or controlling a heat pump.
6 cycles are recommended for controlling a gas boiler or a zone valve.
Temperature Differential Setting
If you turn off the CHRONO function, the thermostat will activate/deactivate based on the temperature differential.
The temperature differential (hysteresis) is the difference in temperature required for switching the system on and off.
The differential value is 0.4 °C.
If, for example, you set the temperature in heating mode to 20 °C , the thermostat activates heating as soon as room temperature drops to 19.6 °C and switches heating off when temperature reaches 20.4 °C .
Available Functions in COOLING Mode \*
| cooling mode on 1 ON heating mode off | 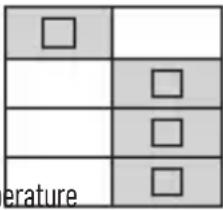 | |
| delay off 2 delay on | ||
| 4 minute delay 3 2 minute delay | ||
| °F unit of temperature 4 °C unit of temp |
Delay prevents the thermostat from switching because of short-term temperature changes – protects the boiler from frequently activating and deactivating.
Upkeep and Maintenance
The product is designed to serve reliably for many years if used properly. Here are some tips for proper operation:
- Read the manual carefully before using the product.
- Do not expose the product to direct sunlight, extreme cold, humidity and sudden changes in temperature. This would reduce measuring accuracy.
- Do not place the product in locations prone to vibration and shocks – may cause damage.
- Do not subject the product to excessive force, impacts, dust, high temperatures or humidity – doing so may cause malfunction, shorten battery life, damage batteries and deform plastic parts.
- Do not expose the product to rain or high humidity, dropping or splashing water.
- Do not place any open flame sources on the product, e.g. a lit candle, etc.
- Do not place the product to places with inadequate air flow.
- Do not insert any objects into the product's vents.
- Do not tamper with the internal electrical circuits of the product – doing so may damage the product and will automatically void the warranty. The product should only be repaired by a qualified professional.
- To clean the product, use a slightly moistened soft cloth. Do not use solvents or cleaning agents – they could erode the plastic parts and cause corrosion of the electric circuits.
- Do not immerse the product in water or other liquids.
- In the event of damage or defect of the product, do not perform any repairs by yourself. Have it repaired in the shop where you bought it.
- This device is not intended for use by persons (including children) whose physical, sensory or mental disability or whose lack of experience or knowledge prevents them from using it safely. Such persons should be instructed in how to use the device and should be supervised by a person responsible for their safety. Children must always be supervised to ensure they do not play with the device.
Do not dispose with domestic waste. Use special collection points for sorted waste. Contact local authorities for information about collection points. If the electronic devices would be disposed on landfill, dangerous substances may reach groundwater and subse-
quently food chain, where it could affect human health.