NikolaTesla ONE PRF0120977A - Cooker ELICA - Free user manual and instructions
Find the device manual for free NikolaTesla ONE PRF0120977A ELICA in PDF.
User questions about NikolaTesla ONE PRF0120977A ELICA
0 question about this device. Answer the ones you know or ask your own.
Ask a new question about this device
Download the instructions for your Cooker in PDF format for free! Find your manual NikolaTesla ONE PRF0120977A - ELICA and take your electronic device back in hand. On this page are published all the documents necessary for the use of your device. NikolaTesla ONE PRF0120977A by ELICA.
USER MANUAL NikolaTesla ONE PRF0120977A ELICA
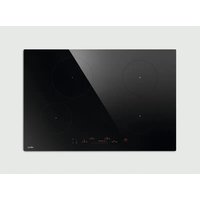
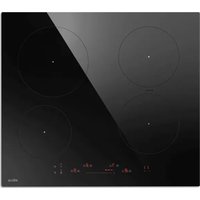
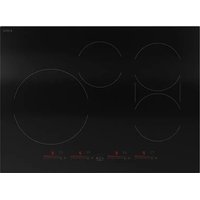
EN Instruction on mounting and use
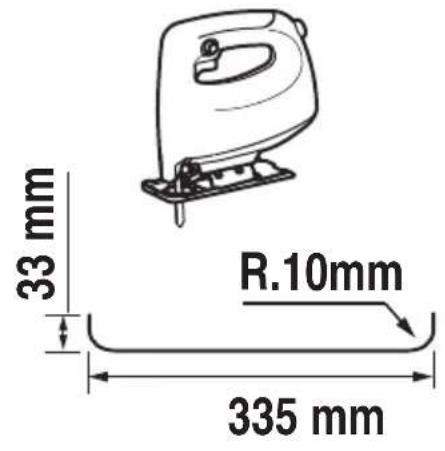
KIT0121000
0150x1000mm
KIT0121003
0158x59mm
KIT0121006
90^
KIT0120991
222x89x1000mm
KIT0121001
227x94x80mm
KIT0121004
90^227× 288× 94mm
KIT0121005
90^227× 94mm

KIT0121008
227x94 - 0153mm
KIT0121010
190x190 - 0147mm
KIT0121009
INT 216X82mm
EXT 290X160mm

www.elica.com
www.shop.elica.com
KIT0121002
15^ - 227x94mm

KIT0126810
227x94mm


9.1
9.2

KIT0121012
218X55X500mm
KIT0121013
218X55X1000mm
KIT0121015
218X55X70mm
KIT0121016
90^ 218X55mm

KIT0121017
218x55mm

KIT0126810
227x94mm
KIT0121002
15^ -227x94mm
KIT0121005
90^227× 94mm
KIT0130427

*

www.elica.com
www.shop.elica.com


12A
12B


12C
12.1


12.2


12.3


12.4
13
13.1

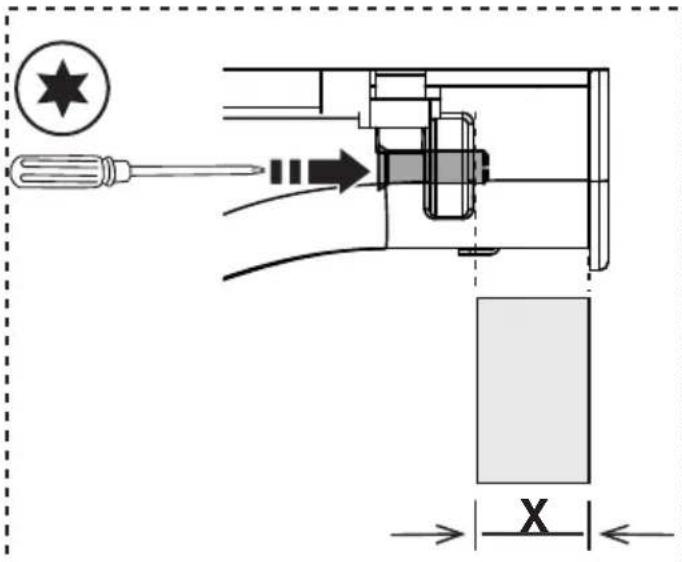
X≤18,5mm
13.2a

X ≥ 18,5 ~mm < 22,5 ~mm

2x

13.2b


.1
.2

.3


15

16


.1

.2

.3

17C


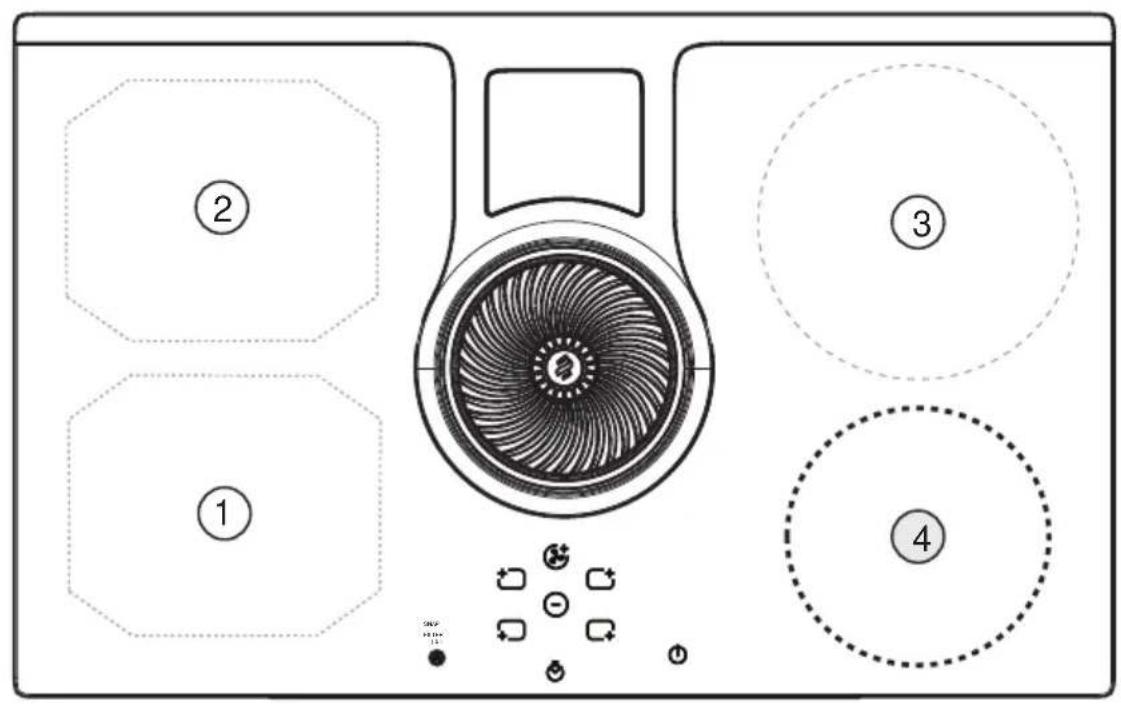
②
1
(1) -②
min. 230mm
(3)

(4)

Residual Heat Indicator
EN - Instruction on mounting and use
Strictly observe the instructions in this manual. All liability is declined for any problems, damage or fires caused by failure to comply with the instructions in this manual. The device is intended for domestic use only, to cook food and extract the fumes generated by cooking. No other use is allowed (e.g. heating rooms). The manufacturer declines any liability for inappropriate use or incorrect control settings. The device may have different aesthetic features with respect to the illustrations in this handbook, however the operating, maintenance and installation instructions remain the same.
Read the instructions carefully: they include important information about installation, use and safety.
① Do not make electrical changes to the device.
Before installing the device, make sure that none of the components are damaged. Otherwise, contact the dealer and do not continue with the installation.
Check that the device is intact before continuing with installation. Otherwise, contact the dealer and do not continue with the installation.
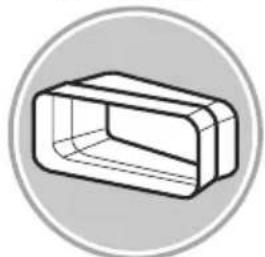
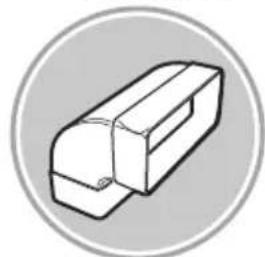
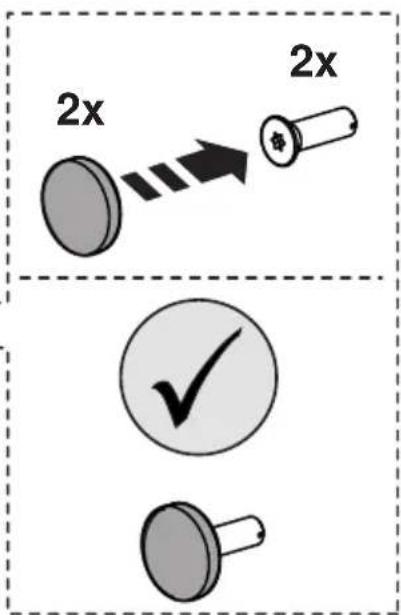
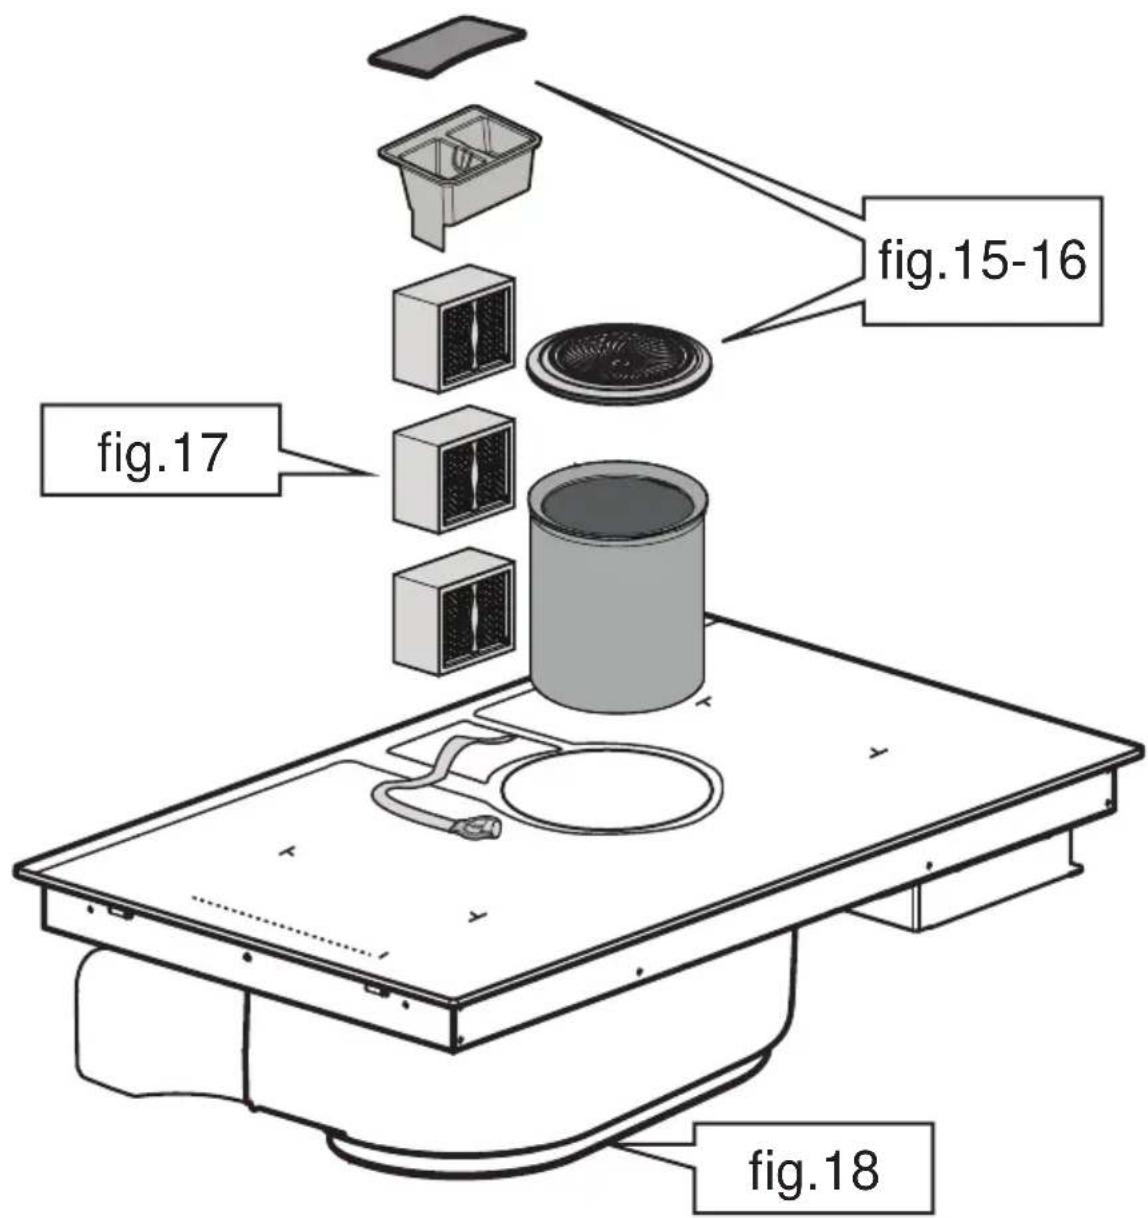
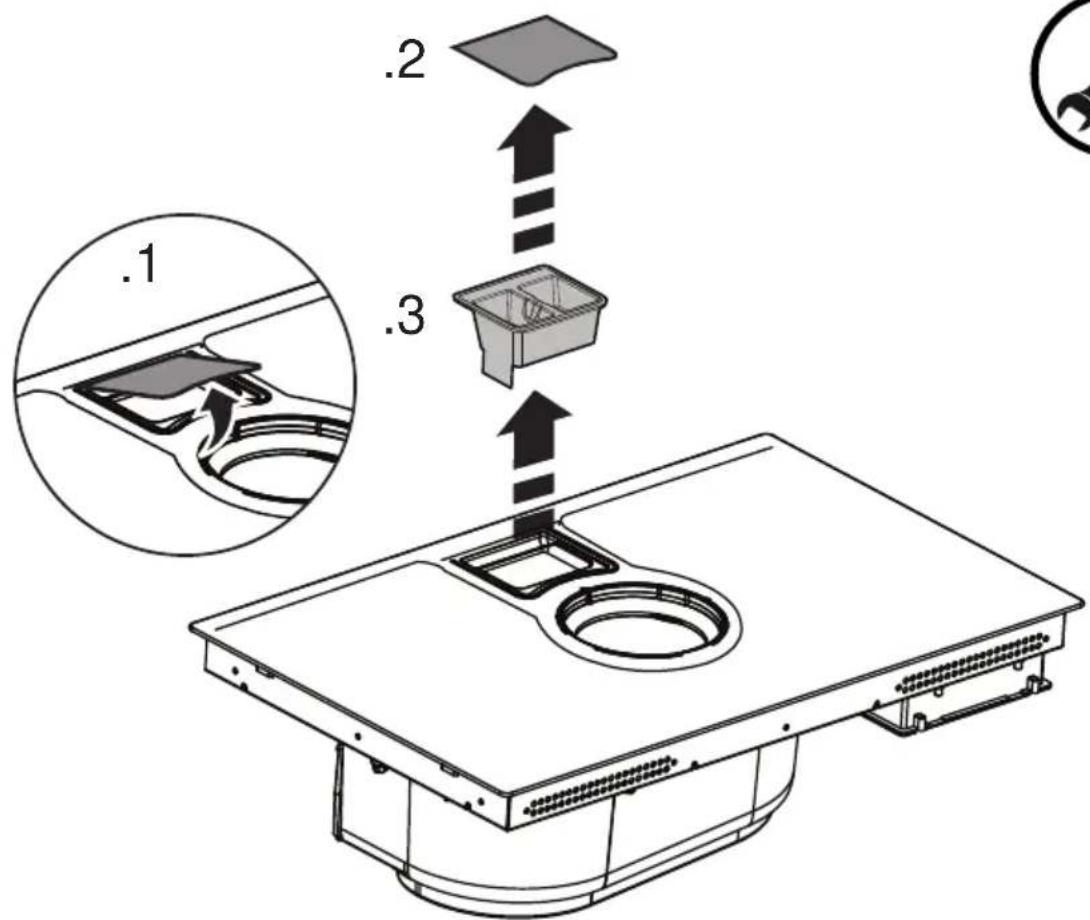
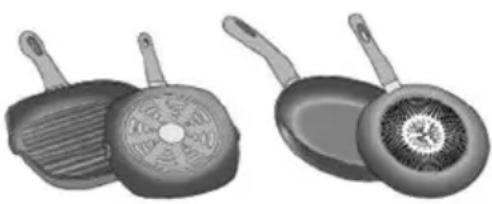
Note: The parts marked with the symbol (^*) are optional accessories supplied only with some models or otherwise not supplied, but available for purchase.
1.Warnings
Please note! Pay strict attention to the following instructions: The device must be disconnected from the electric power supply before carrying out any installation work. Installation or maintenance must be performed by a qualified technician, in compliance with the manufacturer's instructions and local safety regulations. Do not repair or replace any part of the device unless specifically stated in the operating manual. By law, the appliance must be earthed. The power cable must be long enough to allow the device built into the unit to be connected to the power supply. In order for the installation to comply with current safety regulations, an approved omnipolar circuit breaker is required that guarantees complete disconnection of the mains in overvoltage category III, in accordance with the installation rules. Do not use power strips or extension cords. Once installation is complete,
the electrical components must no longer be accessible by the user. The device and its accessible parts get hot during use. Be careful not to touch the heating elements. Ensure that children do not play with the device; keep children away and supervise them because the accessible parts may become very hot during use. For people with pacemakers and active implants, it is important to check, prior to using the induction hob, that their pacemaker is compatible with the device. Do not touch the heating elements of the device during and after use. Avoid contact with cloths or any other flammable material until all the hob components have cooled down sufficiently, risk of fire. Do not place flammable material on or near the device. Overheated fats and oils easily catch fire. Supervise the cooking of fatty or oily food. If the surface is cracked, switch the device off immediately to prevent the risk of an electric shock. The device is not intended to be operated with an external timer or a separate remote control system. Unattended cooking on a device with oil or fat can be dangerous and may cause a fire. The cooking process must be supervised. A short cooking process must be constantly monitored. NEVER attempt to put fires out using water. Instead, turn off the device and smother the flames, for example with a lid or a fire blanket. Fire hazard: do not place objects on the cooking surfaces. Do not use steam cleaners, risk of electric shock. Do not place metal objects, such as knives, forks, spoons or lids on the device because they could become hot. Before connecting the device to the electrical network: check the data plate
(on the bottom of the device) to ensure that the voltage and power correspond to the mains supply and that the power socket is suitable. If in doubt, consult a qualified electrician.
Important: After use, turn off the hob at the switch and do not rely on the pan detector. Prevent liquids from boiling over, so turn the heat down when boiling or heating liquids. Do not leave the heating elements turned on with empty pots and pans or with no pans. Switch off the relevant hot plate when you have finished cooking. Never use aluminium foil for cooking and never place products packaged in aluminium on the hob. The aluminium would melt and irreparably damage your device. Never heat a tin or can containing foods without opening it first: it might explode! This warning also applies to all other types of hobs. High power levels such as the Booster function should not be used to heat certain liquids, such as oil for frying. Excessive heat may be dangerous. In these cases, we recommend the use of a lower power level. Containers must be placed directly on the hob and in the centre. Under no circumstances may any other objects be placed between the pan and the hob. If the temperature becomes high, the device automatically decreases the power level of the cooking zones. Before doing any cleaning or maintenance work, disconnect the device from the mains power supply by removing the plug or turning off the mains switch. Wear protective gloves for all installation and maintenance operations. The device can be used by children over the age of eight and by people with impaired physical, sensory or mental abilities or lacking in experience or the necessary knowledge provided that they are supervised or after they have received instruction about how to
safely use the device and understand the inherent dangers. Children must be supervised to ensure they do not play with the device. Cleaning and maintenance must never be performed by children unless they are properly supervised. The room must be properly ventilated when the device is used at the same time as other gas-powered devices, or powered by other fuel. The device must be regularly cleaned both internally and externally (AT LEAST ONCE A MONTH), in strict accordance with the maintenance instructions. Failure to follow the rules for device cleaning and filter replacement and cleaning may result in a fire hazard. Food must never be cooked flambé. Using a naked flame may damage the filters and cause a fire hazard; it must, therefore, be avoided under all circumstances. Extra care must be taken when frying to prevent the oil from overheating and catching fire. PLEASE NOTE: The accessible parts of the device may become hot when the hob is switched on. Please note! Do not connect the device to the electric power supply until installation has been fully completed. The regulations laid down by local authorities must be strictly followed with regard to the technical and safety measures to adopt for fume extraction. The extracted air must not be conveyed through the same ducts used to extract the fumes generated by gas combustion or other types of combustion devices. Never use the device without the grille properly installed! Only use the fastening screws supplied with the device for installation, or if not supplied, purchase the correct type of screws. Use screws of the right length, as indicated in the installation guide. When the device is used together with other devices powered with non-electrical energy, the negative
pressure of the room must not exceed 4 Pa (4 x 10^ 5 bar). This manual must be stored for future consultation at any time. If sold, transferred or moved, it must remain with the device.
This device is marked in compliance with the European Directive 2012/19/EC - UK SI 2013 No3113, Waste Electrical and Electronic Equipment (WEEE). By ensuring that this device is disposed of correctly, the user will help prevent potential negative impacts on the environment and human health.

The symbol on the device or documentation provided indicates that this device must not be treated as domestic waste, but must be taken to a suitable waste collection site for the recycling of electrical and electronic appliances. Dispos of it in accordance with local regulations for waste disposal. For further information about the treatment, recovery and recycling of this device, please contact your local authority, the collection service for household waste or the shop from where the device was purchased.
Device designed, tested and developed in compliance with regulations on:
- Safety: EN/IEC 60335-1; EN/IEC 60335-2-6, EN/IEC 60335-2-31, EN/IEC 62233.
Performance: EN/IEC 61591; ISO 5167-1; ISO 5167-3; ISO 5168; EN/IEC 60704-1; EN/IEC 60704-2-13; EN/IEC 60704-3; ISO 3741; EN 50564; IEC 62301. EN 60350-2; - EMC: EN 55014-1; CISPR 14-1; EN 55014-2; CISPR 14-2; EN/IEC 61000-3-3; EN/IEC 61000-3-12. Recommendations for correct use in order to reduce the impact on the environment: When you start cooking, turn the device on at minimum speed, leaving it on for a few minutes when you have finished cooking. Increase the speed only if there is a large quantity of fumes and steam, using the Booster function only in extreme cases. To keep the odour reduction system running efficiently, replace the carbon filter/s when necessary. To ensure the high performance of the grease filter, clean it when necessary. To improve efficiency and minimise noise, use the maximum duct diameter indicated in this manual.
2. Use
Using the hob
The induction cooking system is based on the physical phenomenon of magnetic induction. The main characteristic of this system is the direct transfer of energy from the generator to the pot.
Advantages:
When compared to electric hobs, your induction hob is:
- Safer: lower temperature on the glass surface.
- Faster: shorter food heating times.
- More accurate: the hob immediately reacts to your commands
- More efficient: 90% of the absorbed energy is transformed into heat. Moreover, once the pot is removed from the hob,
heat transmission is immediately interrupted, avoiding unnecessary heat losses.
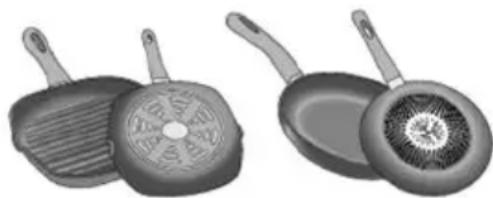
2.1 Cooking containers
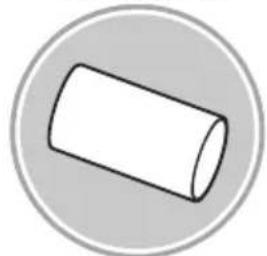
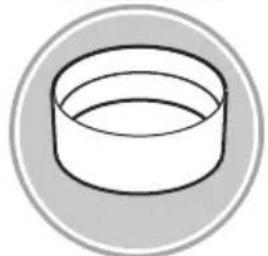
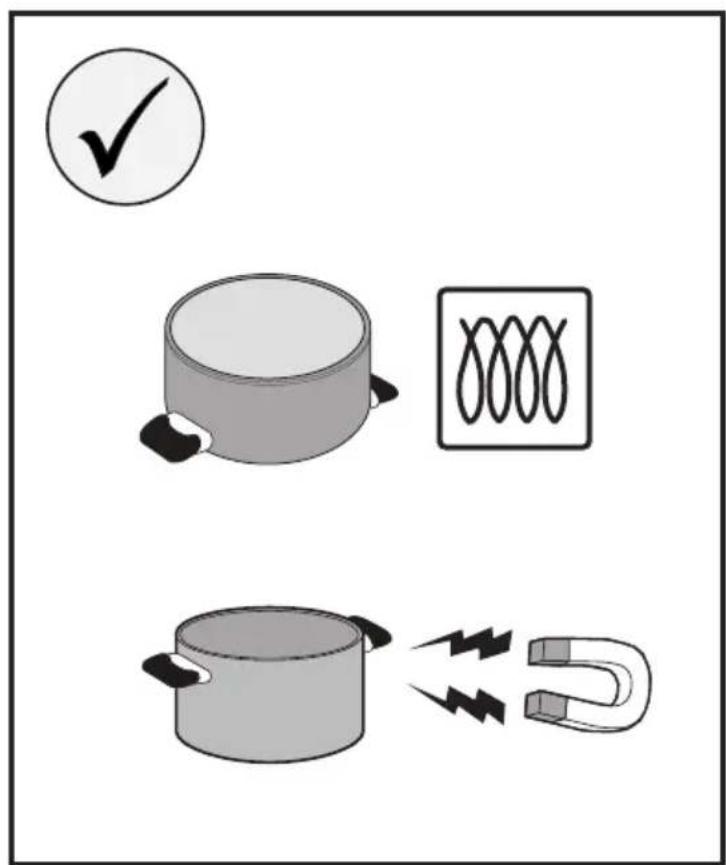
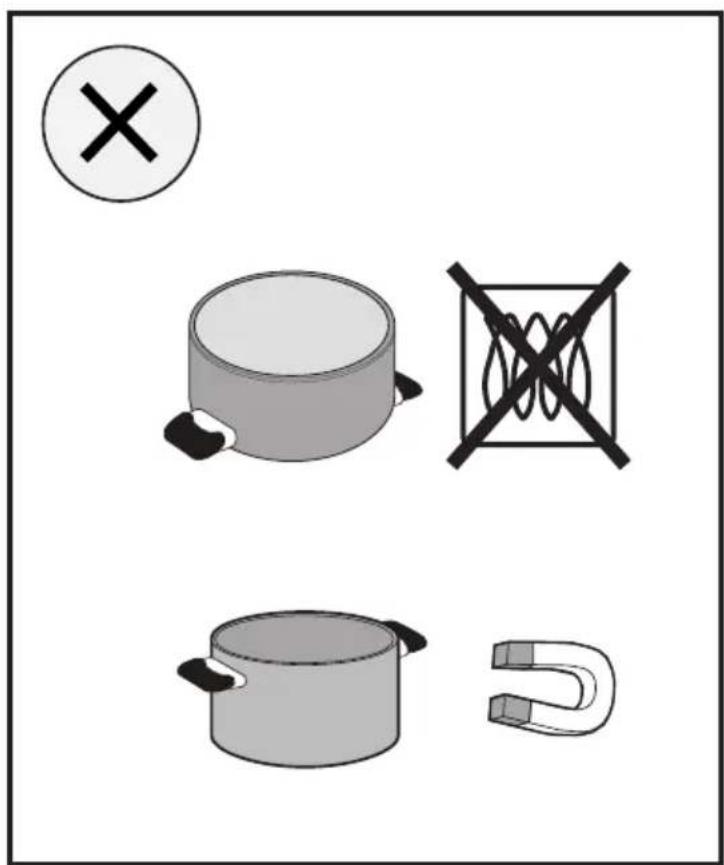
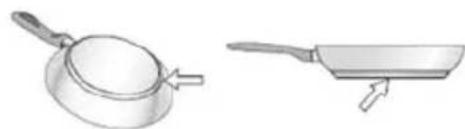
Only use pans that carry the symbol.
Important:
to avoid permanent damage to the hob surface, do not use:
- containers with a base that is not perfectly flat;
- metal containers with an enamelled base;
- containers with a rough base, to avoid scratching the hob surface;
- never place hot pots and pans on the surface of the hob's control panel.
Not all pans suitable for induction work in an efficient manner due to the base only partially consisting of ferromagnetic material! When purchasing pots or pans ensure that:
- that the base is made entirely from ferromagnetic material. If this is not the case, the efficacy of the transmission of heat is lessened and the uniformity of heat and the temperature of the pot/pan may not be suitable for cooking.

NO!
- The base does not contain aluminium: the crockery does not heat and may not be recognised by the inductors.
NO!
- Bases that are not flat or that have rough surfaces. These lower the contact surface area between the inductor and the pan, lowering efficiency and harming the cooking experience.
YES!
Important: never put hot pots or pans on the hob control panel surface.
2.1.1 Pre-existing containers
You can check if the pot material is magnetic simply by using a magnet. Pots are not suitable if they are not magnetically detectable. The indications from the previous paragraph also apply here.
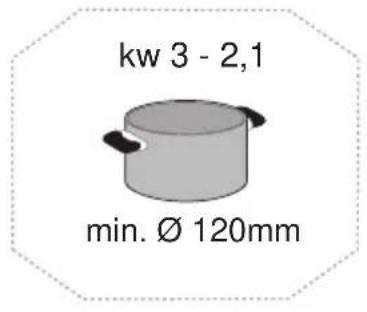
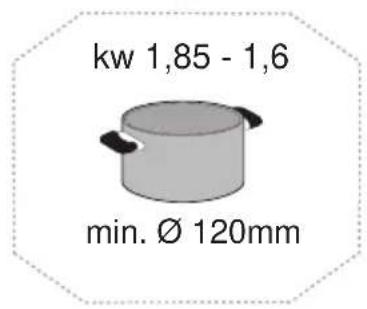
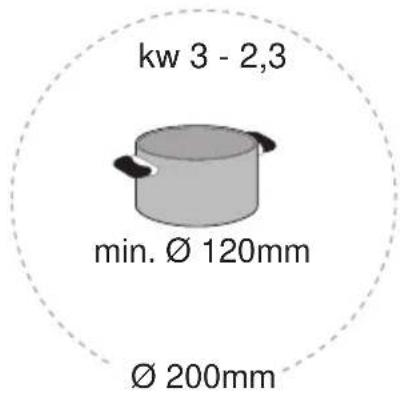
2.1.2 Recommended pan bottom diameters
IMPORTANT: if the pots are not of the correct size, the cooking zones will not switch on.
To see the minimum pot diameters for each individual zone, consult the illustrated section of this manual.
To obtain the best results we recommend:
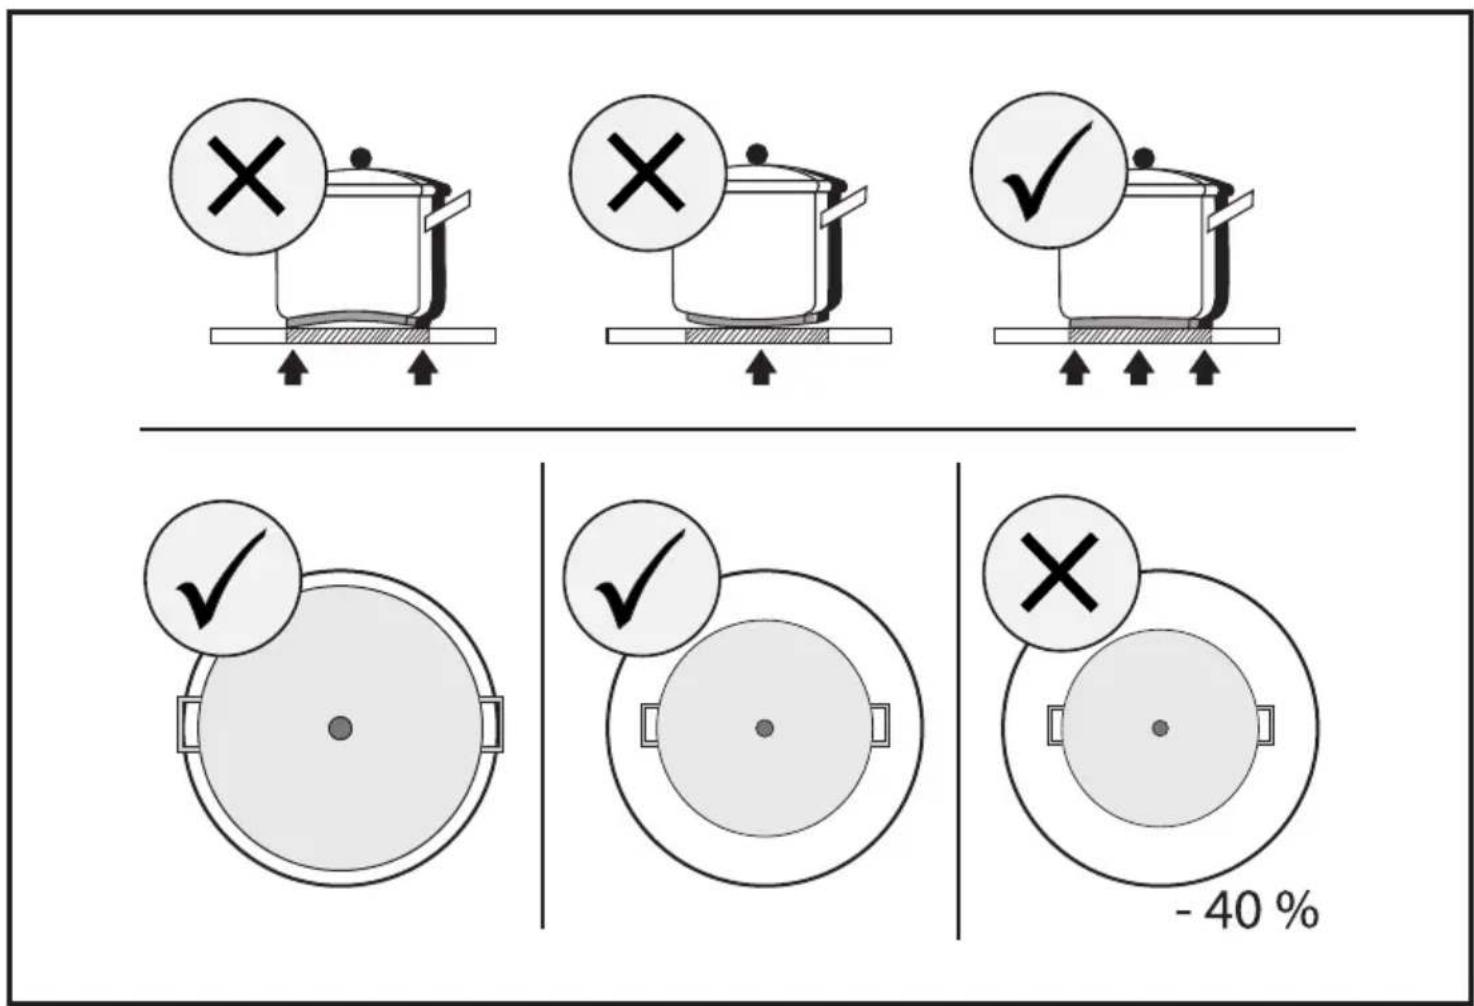
- Using pots and pans with a bottom diameter equal to that of the cooking zone.
- Where possible, keep the cover on the pan during cooking and in particular on pans with a height greater than 22cm .
- Position the pan in the centre of the cooking zone indicated on the hob.
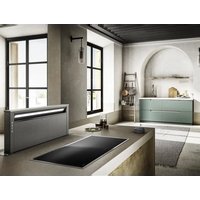
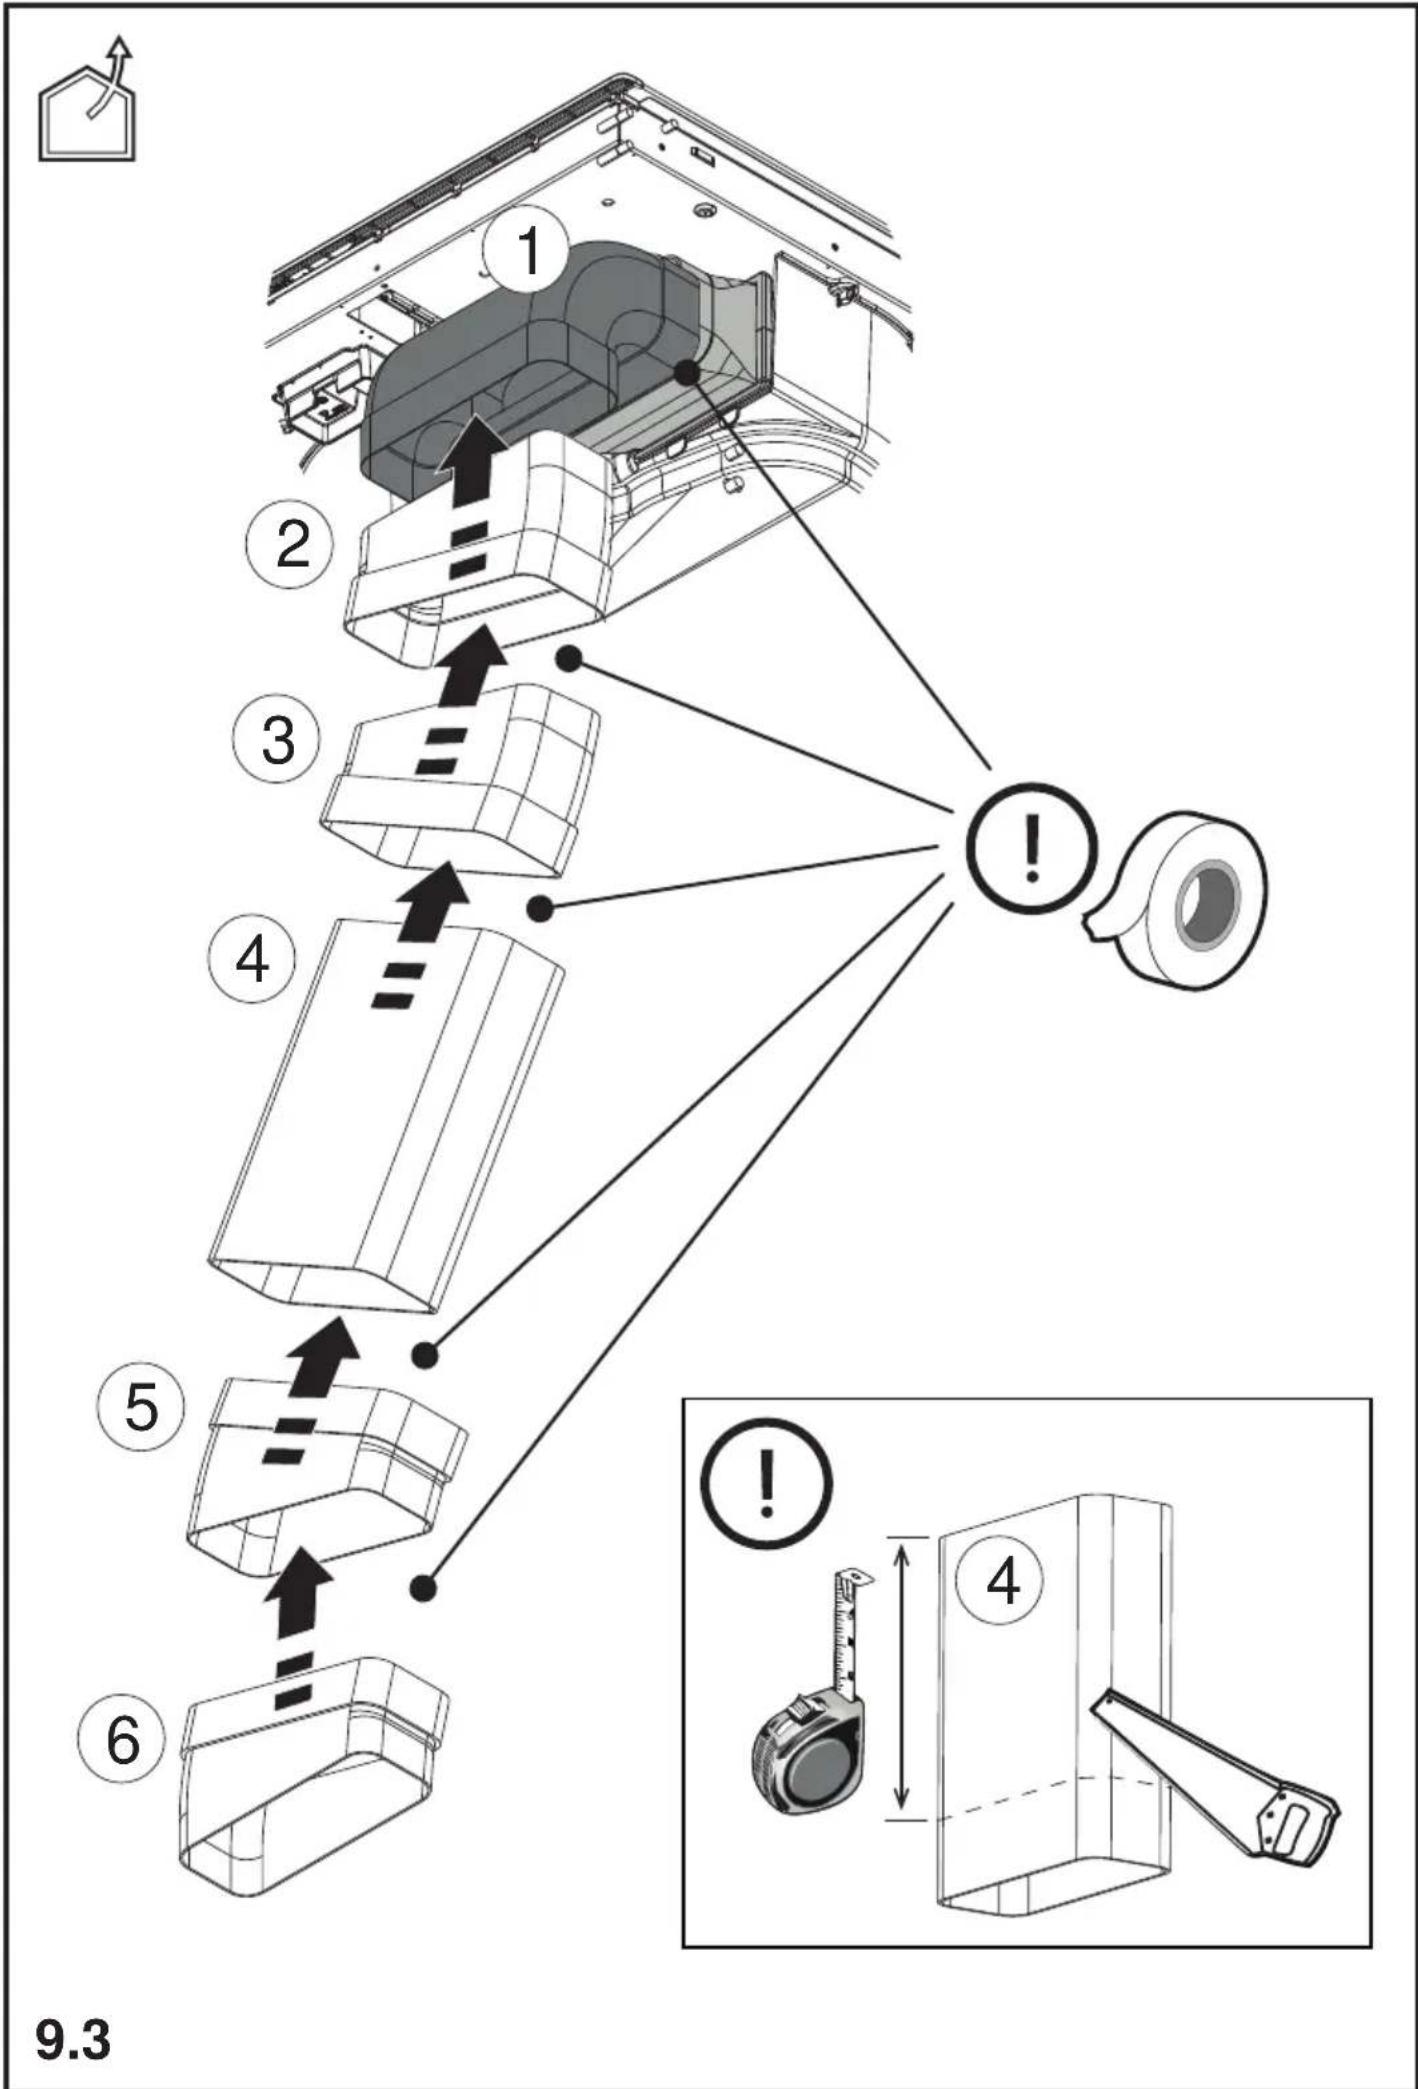
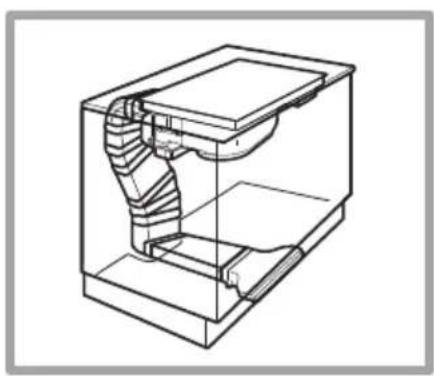
Using the extractor fan
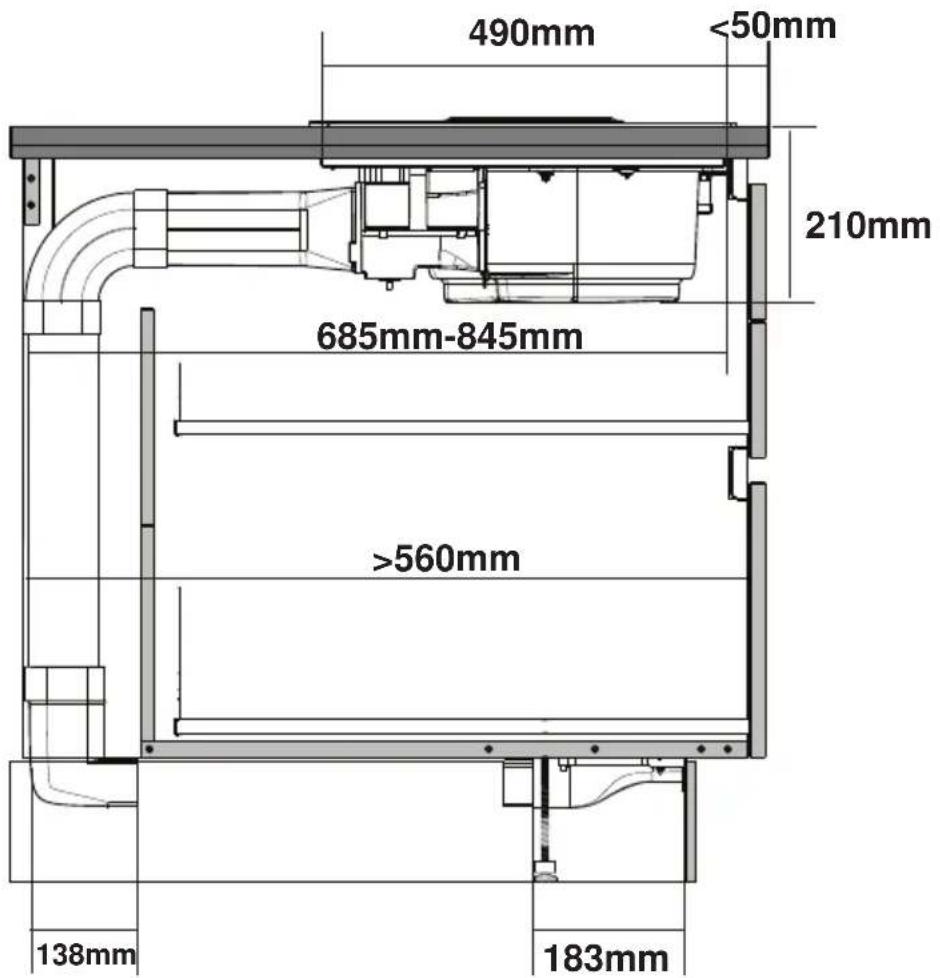
The extraction system can be used in two versions: external extraction and evacuation or as a filter with internal recirculation.

Extraction version
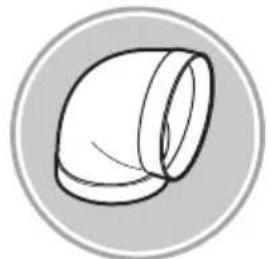
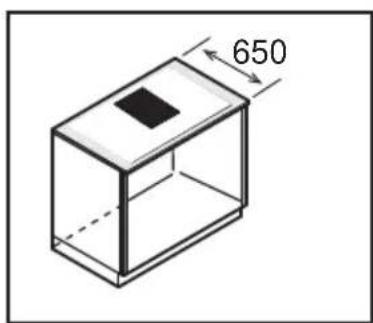
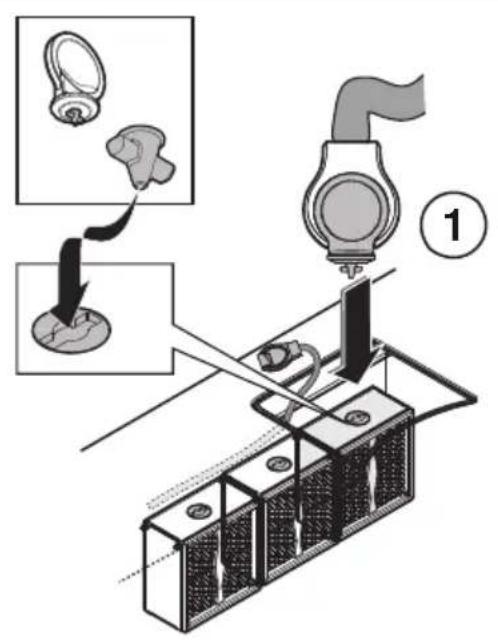
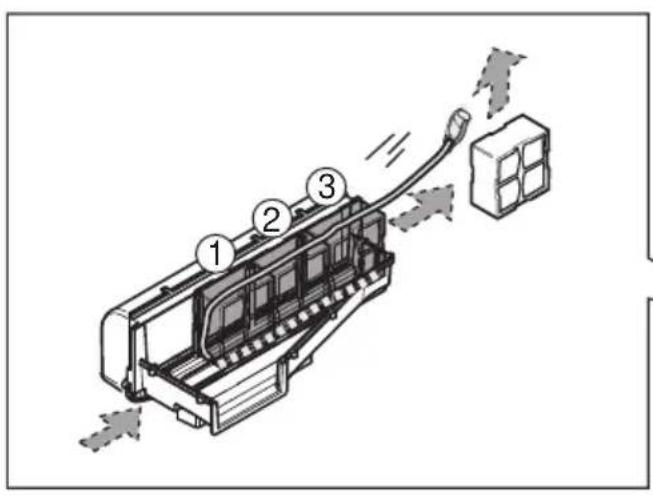
Fig.7
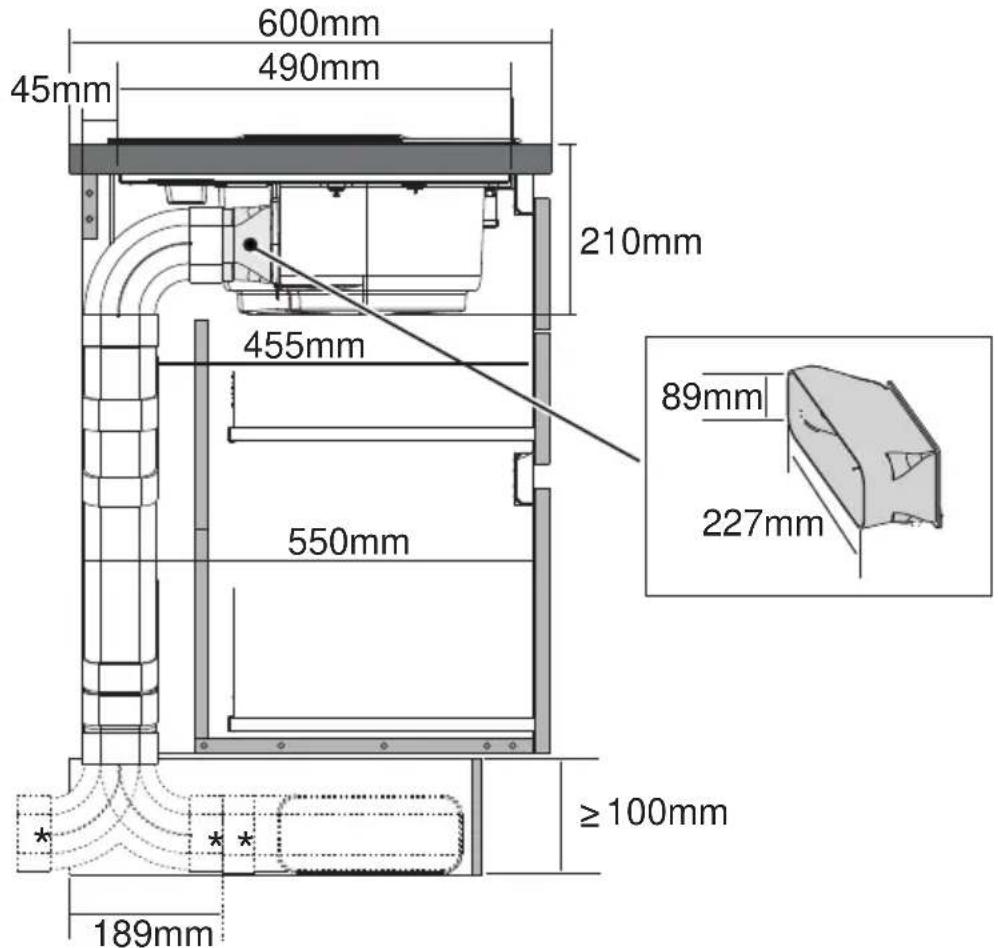
The fumes are evacuated towards the outside through a series of pipes (bought separately) fastened to the supplied connecting flange.
The diameter of the exhaust pipe must be equivalent to the diameter of the connecting ring:
- for rectangular outlets 222 × 89 mm
- for circular outlets 0.150 ~mm^*
For more information, see the page relative to the extraction version in the illustrated part of this manual. Connect the product to wall-mounted exhaust pipes and holes with a diameter equivalent to the air outlet (connecting flange).
Using wall-mounted exhaust pipes and holes with a smaller diameter may reduce the efficiency of extraction and drastically increase noise levels.
All responsibility in this regard is therefore denied.
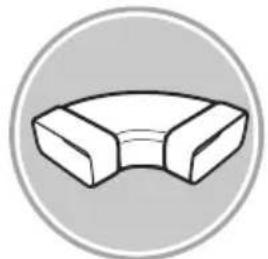
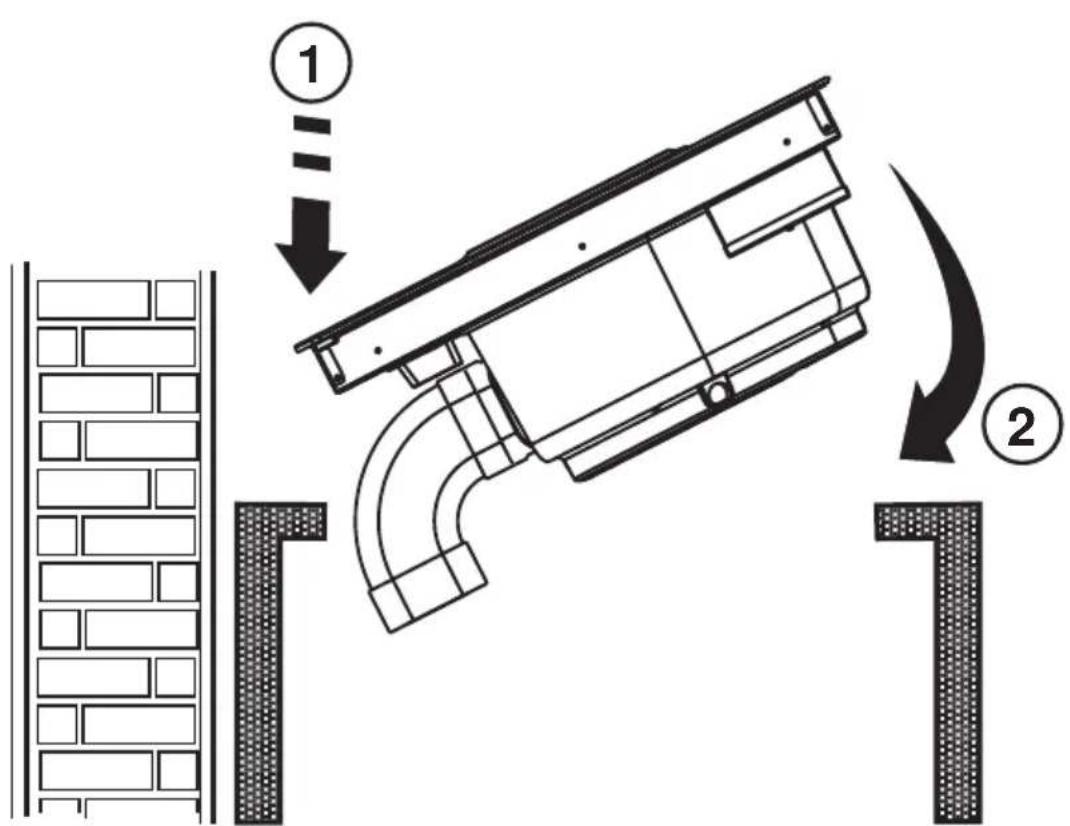
1 Keep duct as short as possible.
Use ducting with the least possible number of curves (maximum angle: 90^
① Avoid drastic changes in the ducting diameter.

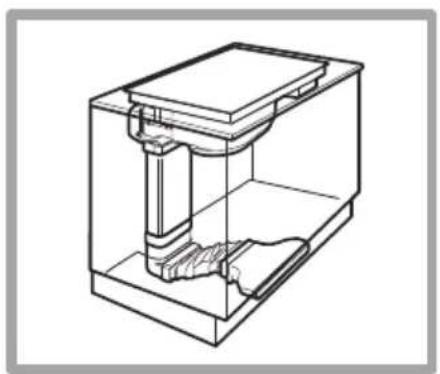
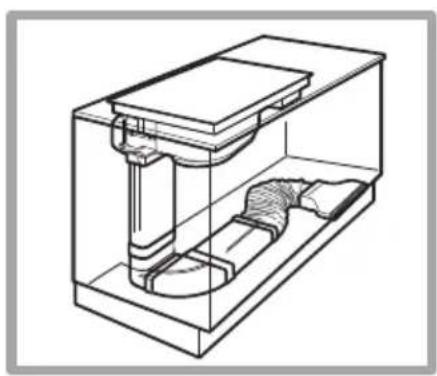
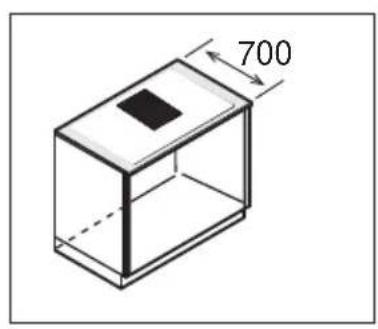
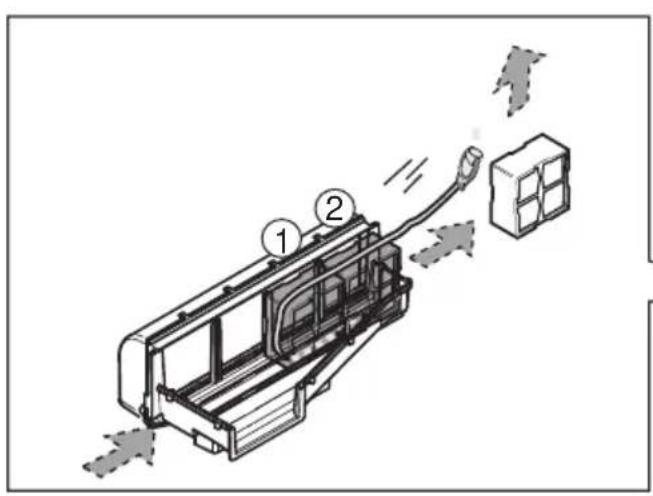
Filtration version
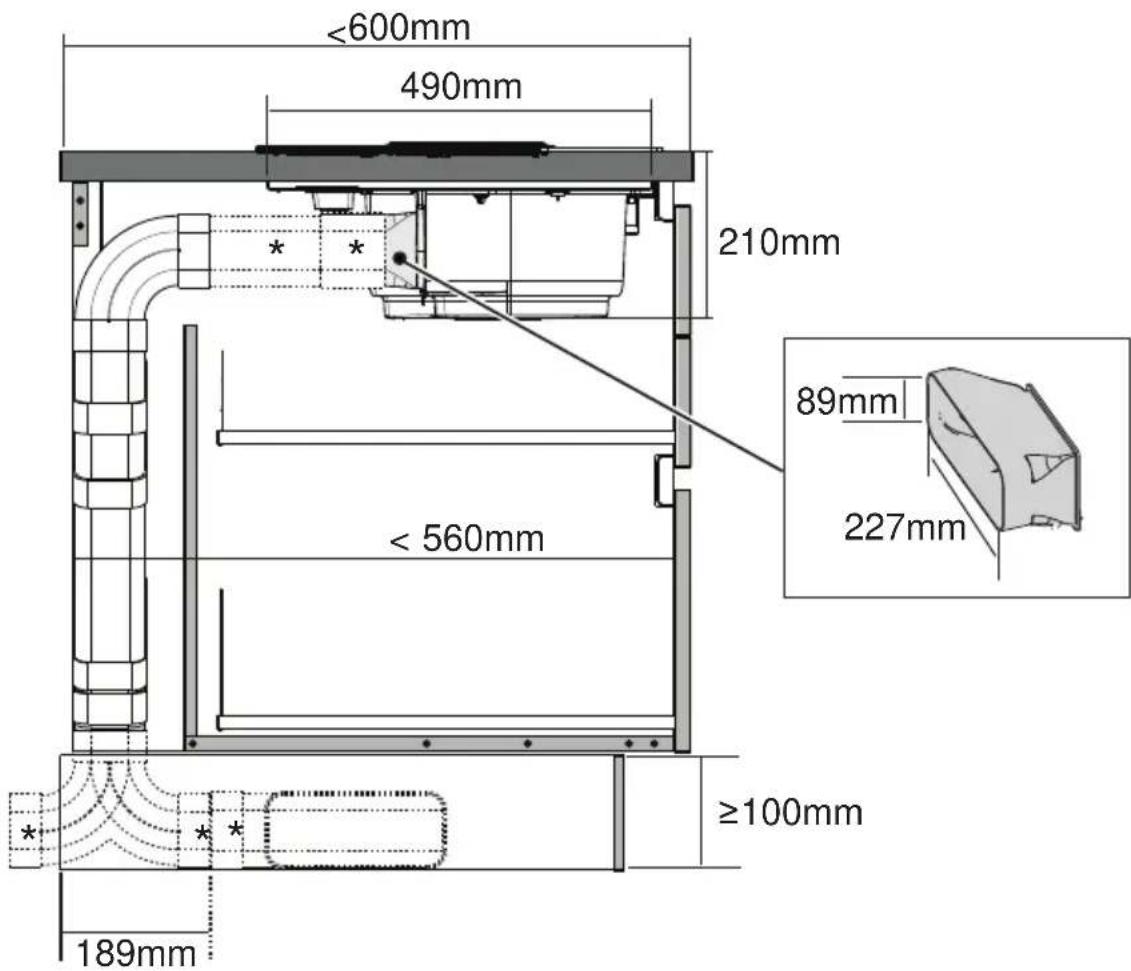
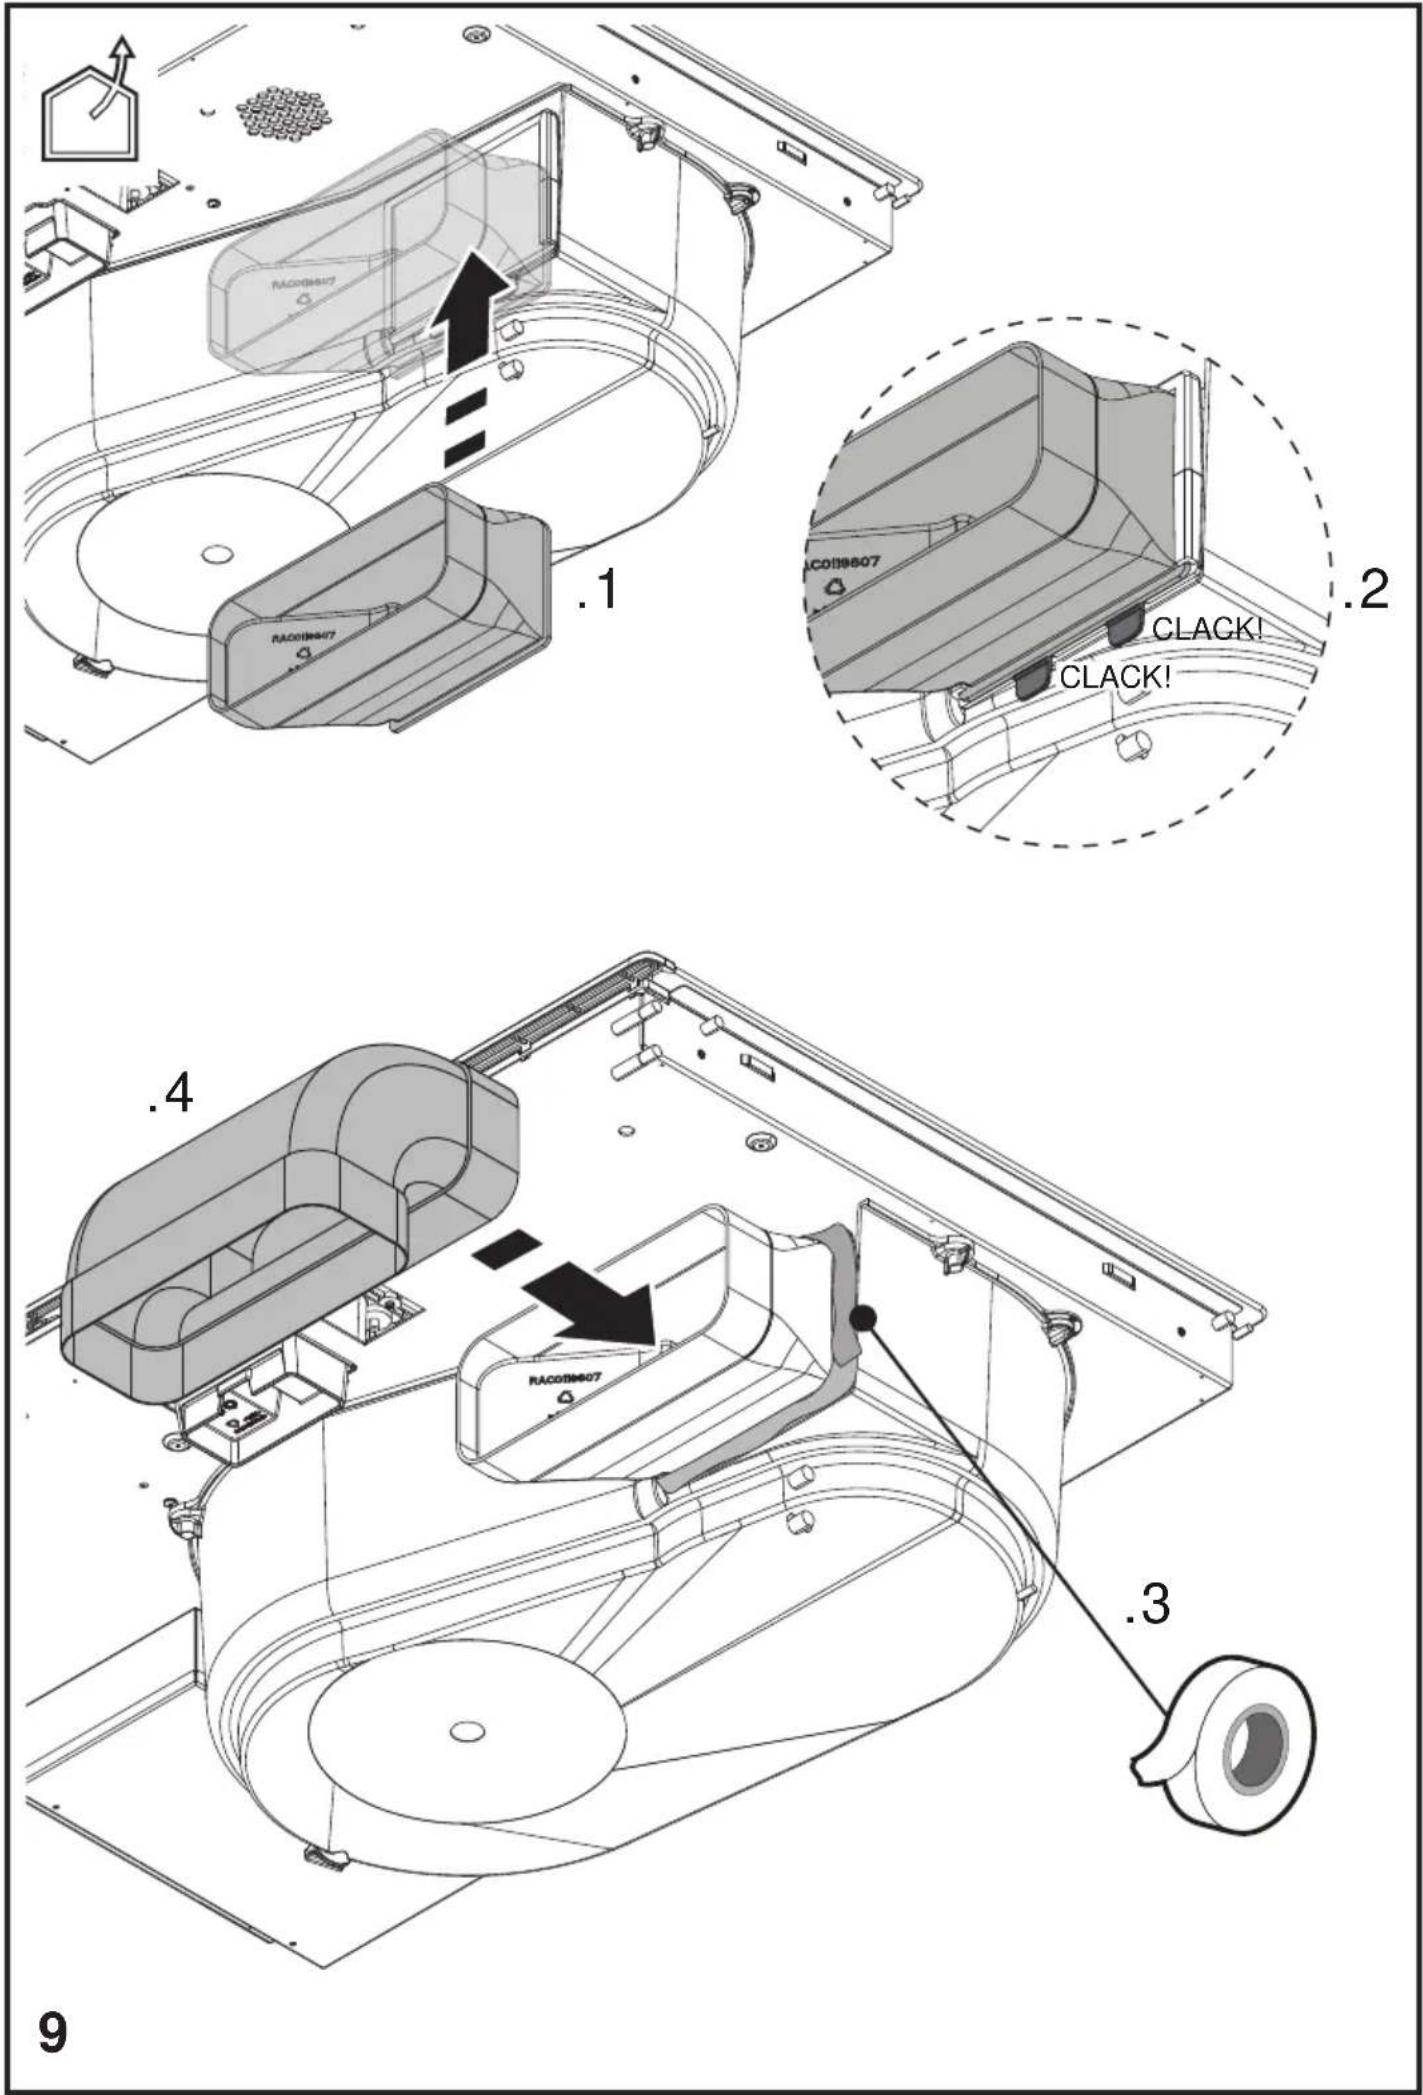
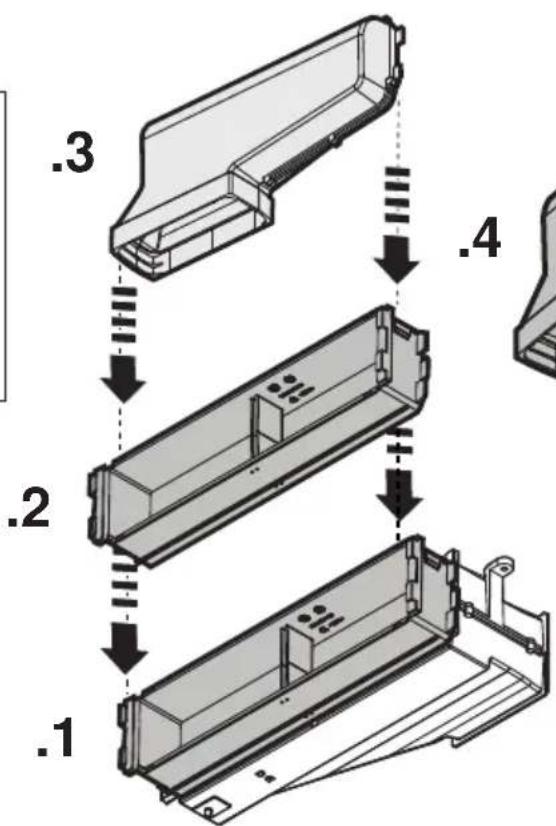
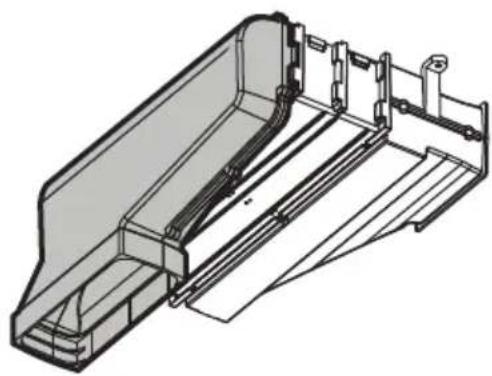
Fig. 10
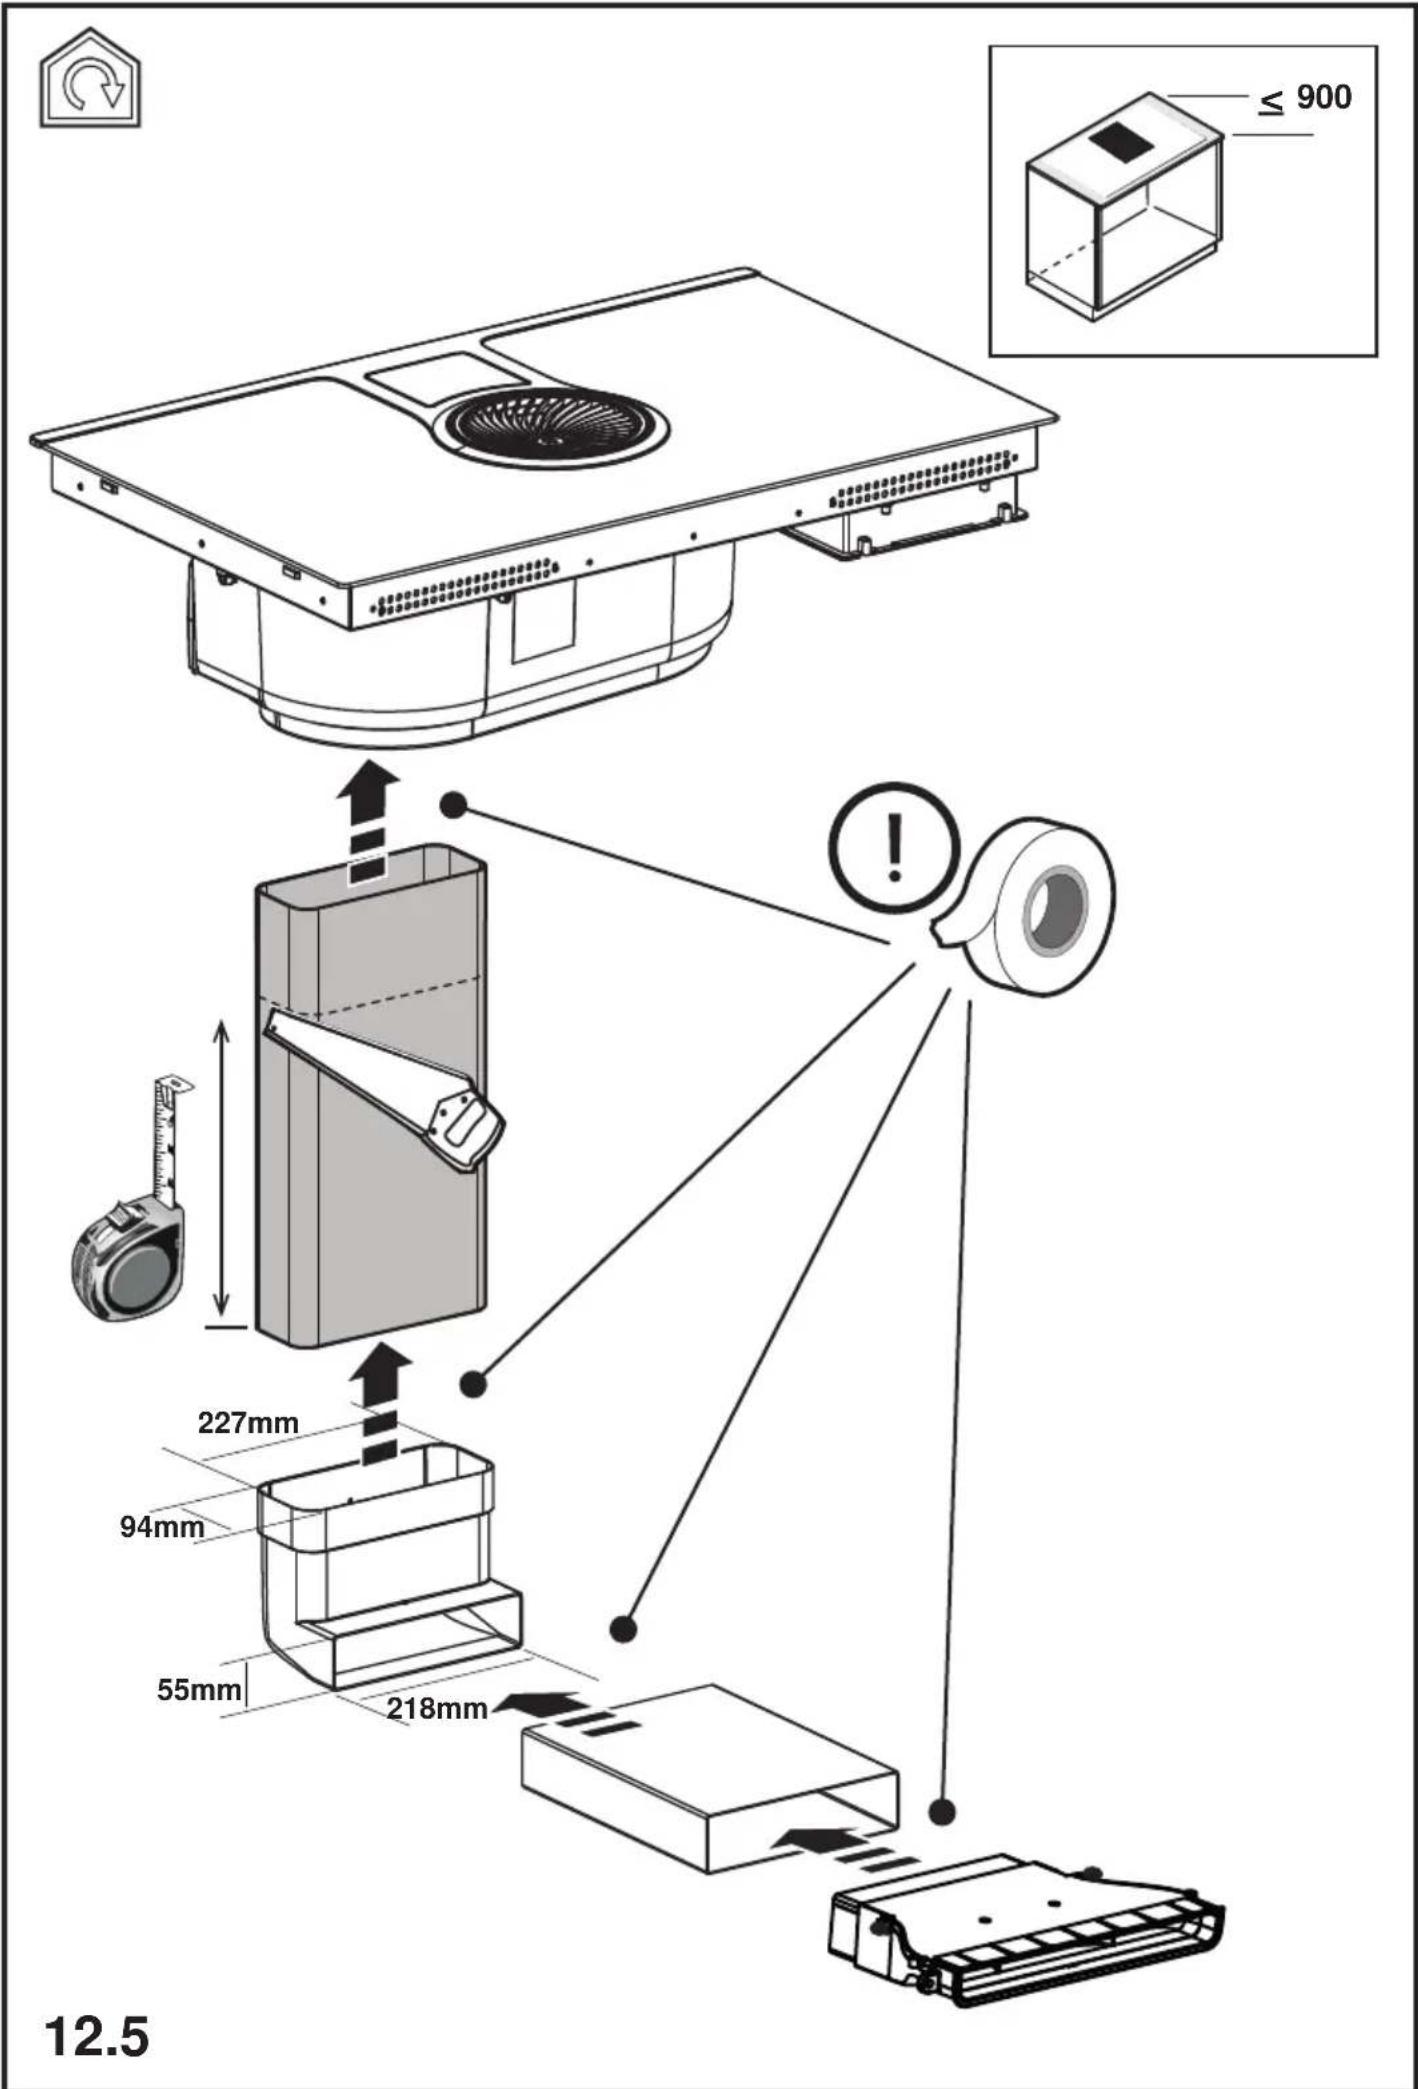
The extracted air will be filtered in special grease filters and odour filters before being sent back into the room. The product is supplied with all parts necessary for standard installation, with the air outlet positioned in the front part of the cabinet plinth. For more information, see the page relative to the filtration version (in the illustrated part of this manual).
Visit the websites www.elica.com and www.shop.elica.com to check the complete range of available kits for different types of filtration and extraction installations.
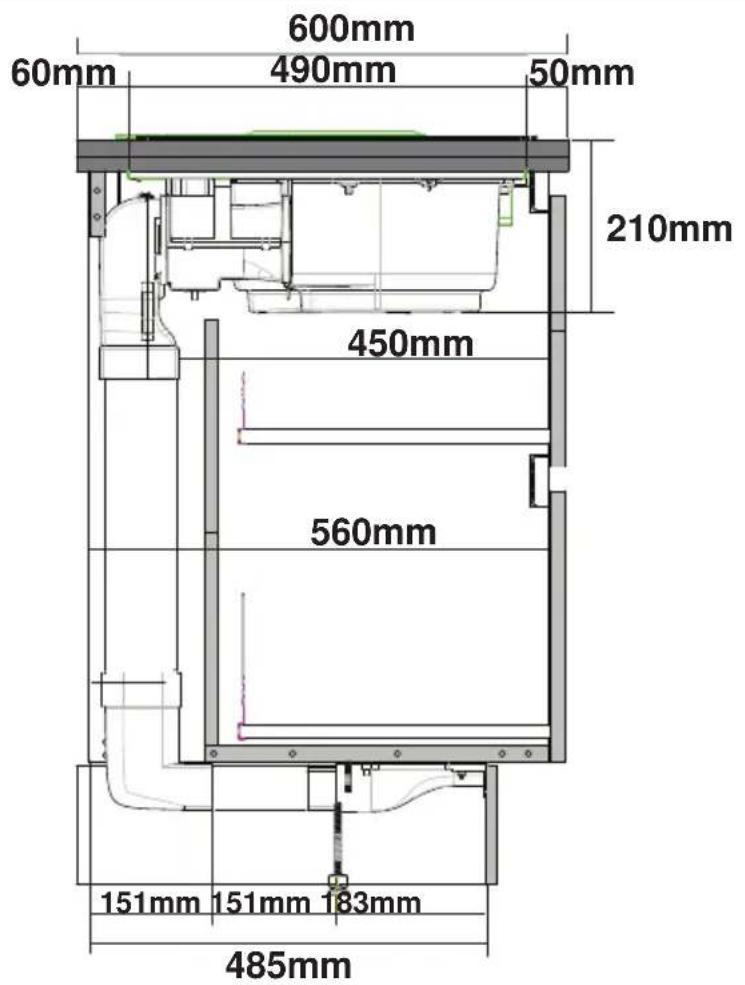
3. Installation
- Both electric and mechanical installation must be carried out by specialised personnel.
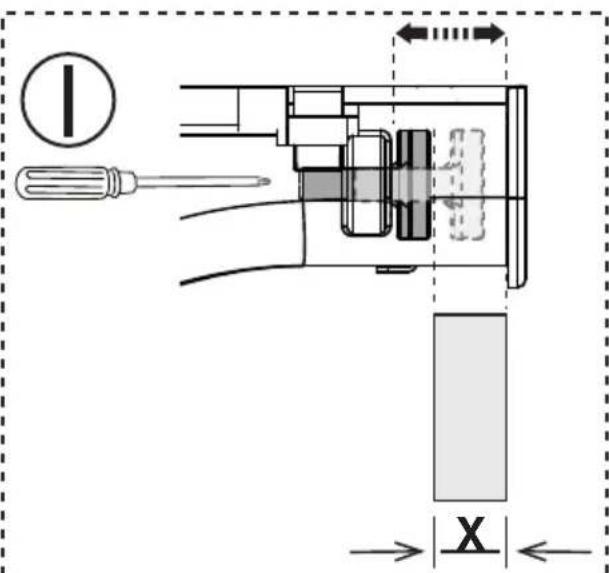
The electrical appliance is designed to be built into a work top with a thickness of 2-6 cm in the case of TOP installation; 2.5-6 cm in the case of FLUSH installation.
The minimum distance between the hob and the wall must be at least 5cm in front, at least 4cm on the sides and at least 50cm from overhead wall units.
NB = The recommended distances are given as examples: when planning the spaces, the indications of the kitchen manufacturer must be observed.

3.1 Electrical connection
Fig. 3
-
Disconnect the device from the electric power supply. - Installation must be carried out by professionally qualified personnel with knowledge of the regulations in force for installation and safety. - The manufacturer denies all liability to persons, animals or property if the guidelines provided in this chapter are not followed. - The power cable must be long enough to allow the hob to be removed from the worktop. - Make sure that the voltage on the serial number data plate on the bottom of the device corresponds to that of the domestic environment where it will be installed. - Do not use extension leads.
-
The earth power cable must be 2cm longer than the other cables. - If the electrical appliance is not supplied with a power cable, use one with a minimum conductor diameter of 2.5mm^2 for power up to 7200 Watt; for higher power levels, the diameter must be 4mm^2 . - The temperature must not reach 50^ above room temperature anywhere along the cable. - The appliance is intended for
permanent connection to the power supply.
- Please note! Before reconnecting the circuit to the mains power supply, make sure that it is working correctly, always check that the power cable is correctly installed. - Please note! The interconnection cable must be replaced by the authorised technical support service or by a person with similar qualifications.
Note: the product is equipped with a Power Limitator function, which allows a maximum power limit to be set. The limit must be set at the time of the product's connection to the electrical network or when the electrical network itself is reconnected (within the following 2 minutes). Size the electrical system protection according to the selected Power Limitation level. For the Power Limitation setting sequence, see the Operation section of this manual.
3.3 Mounting
Before starting the installation:
- After unpacking the product, check that it has not been damaged during transport and in the event of problem, please contact the reseller or the Customer support service before installing it.
- Check that the product is the right size for the installation area.
- Check for accessories (e.g. bags containing screws, warranty certificates, etc.) inside the packaging (placed there for transport reasons). Remove and keep them safe, if present.
- Also check that there is a power socket near the installation area.
Preparing the cabinet for installation:
- The product cannot be installed above cooling appliances, dishwashers, heaters, ovens, washing machines and dryers.
- Create the cut-outs in the cabinet before inserting the hob and carefully remove any shavings or sawdust.
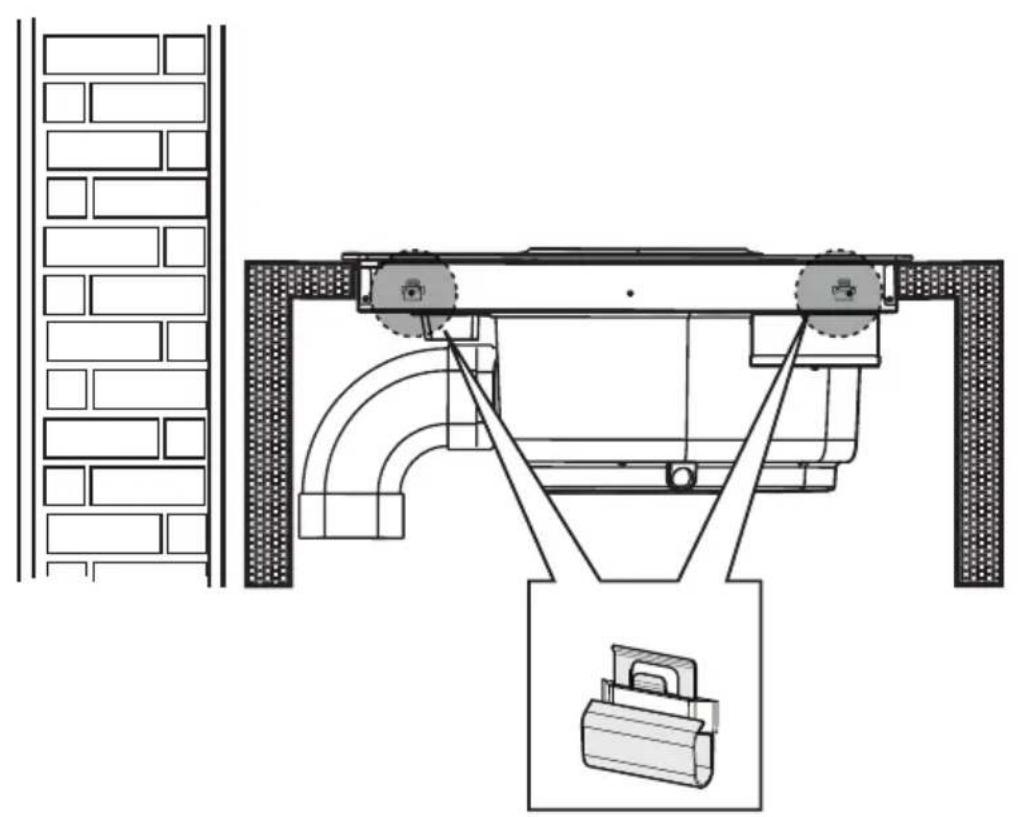
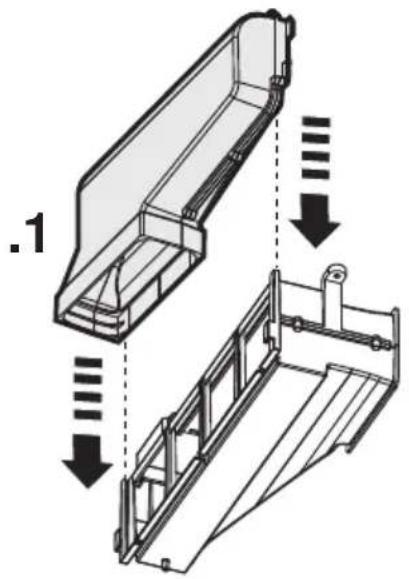
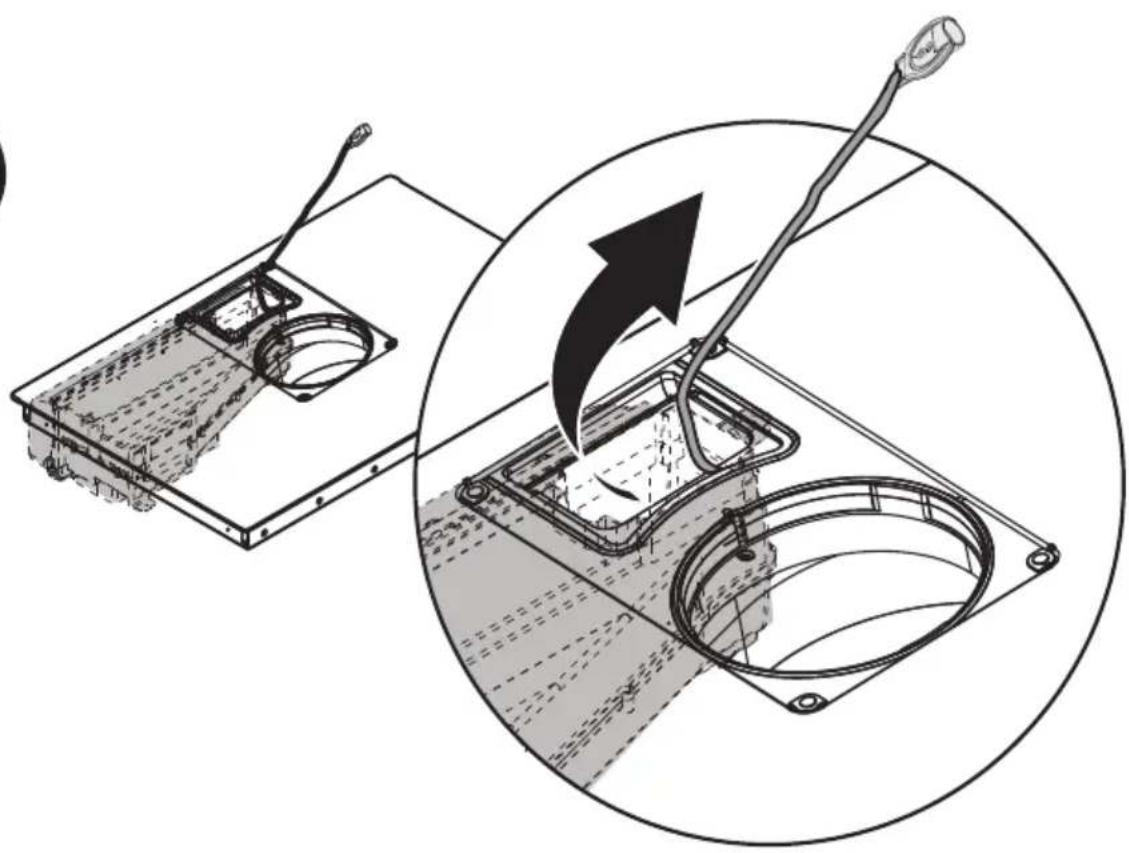
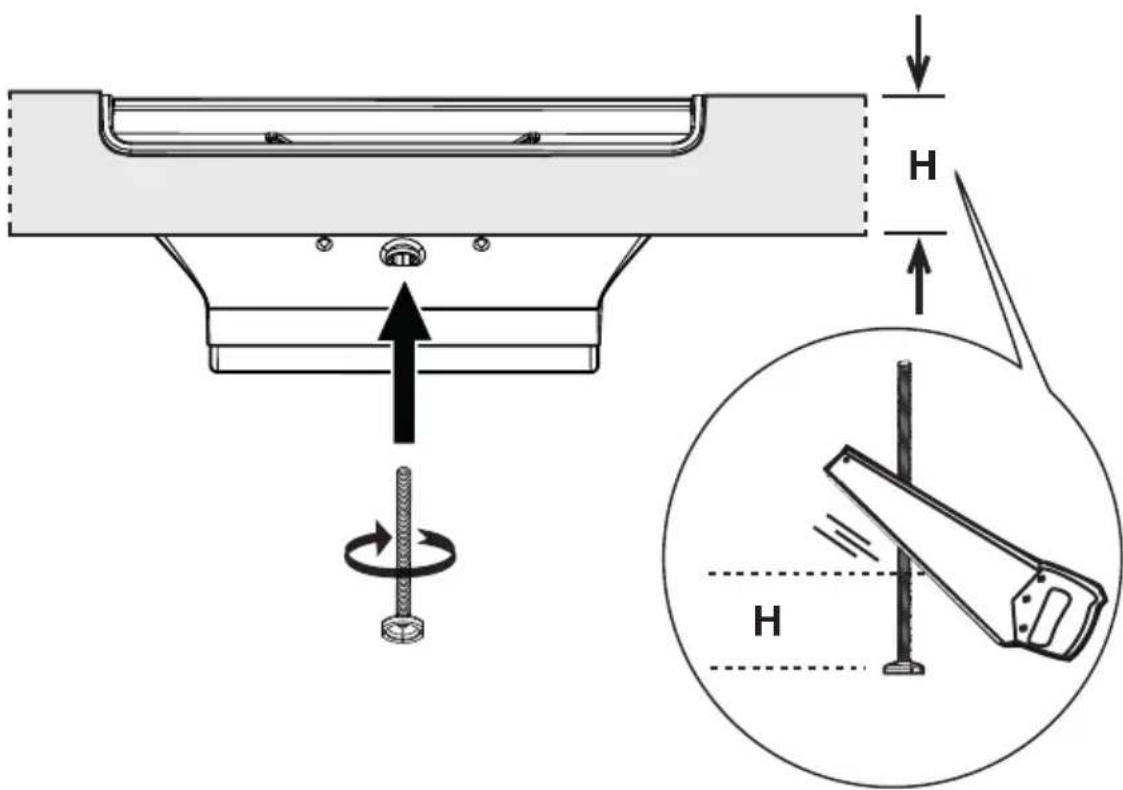
IMPORTANT: use a single-component adhesive sealant (S), which withstands temperatures up to 250^ ; before installation, thoroughly clean the surfaces to stick and eliminate any substance that may compromise adhesion, (e.g. release agents, preservatives, fats, oil, dust, traces of old adhesives, etc.); the adhesive should be uniformly spread all around the outside of the frame; after sticking, leave the adhesive to dry for about 24 hours.
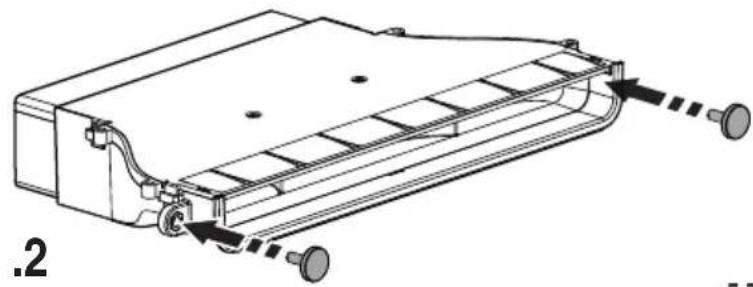
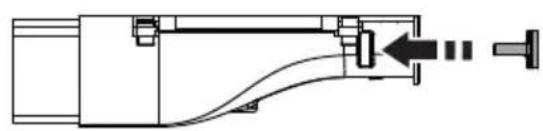
Fig.1B-2B
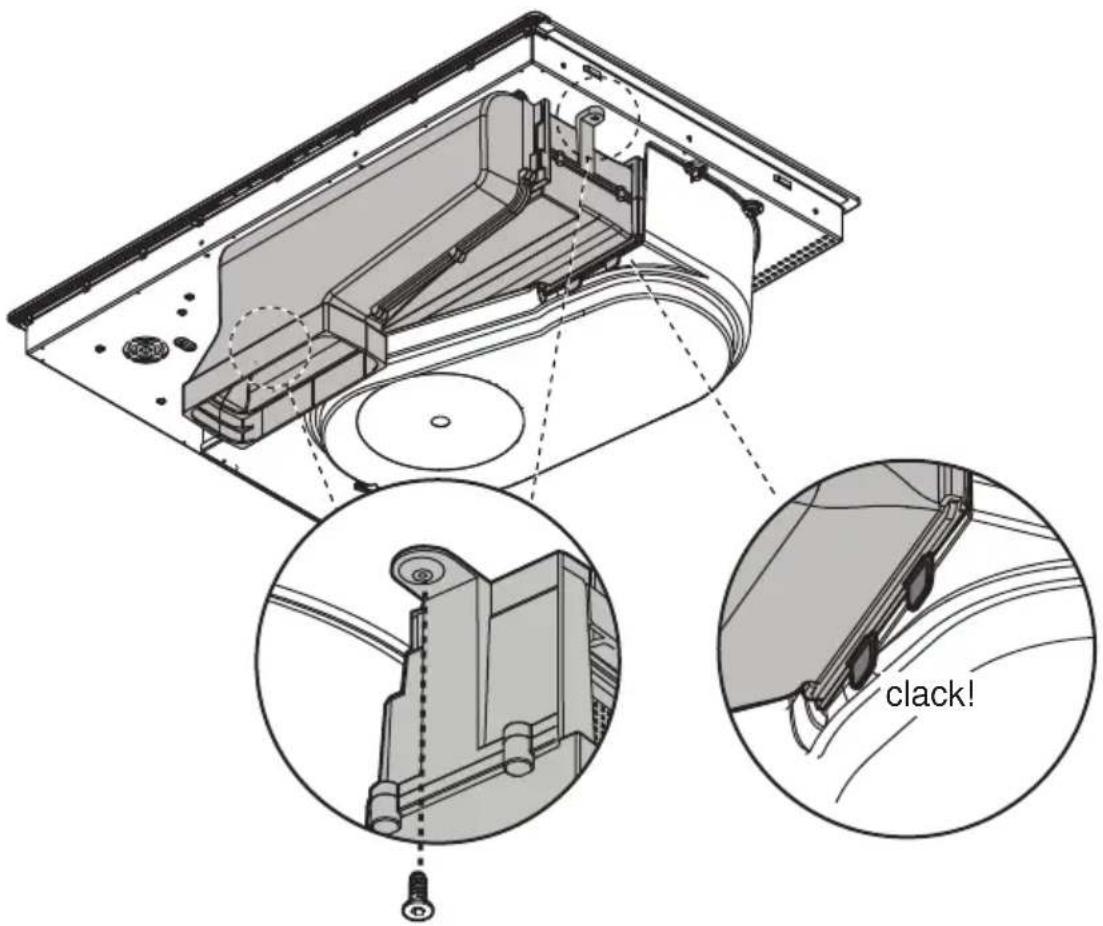
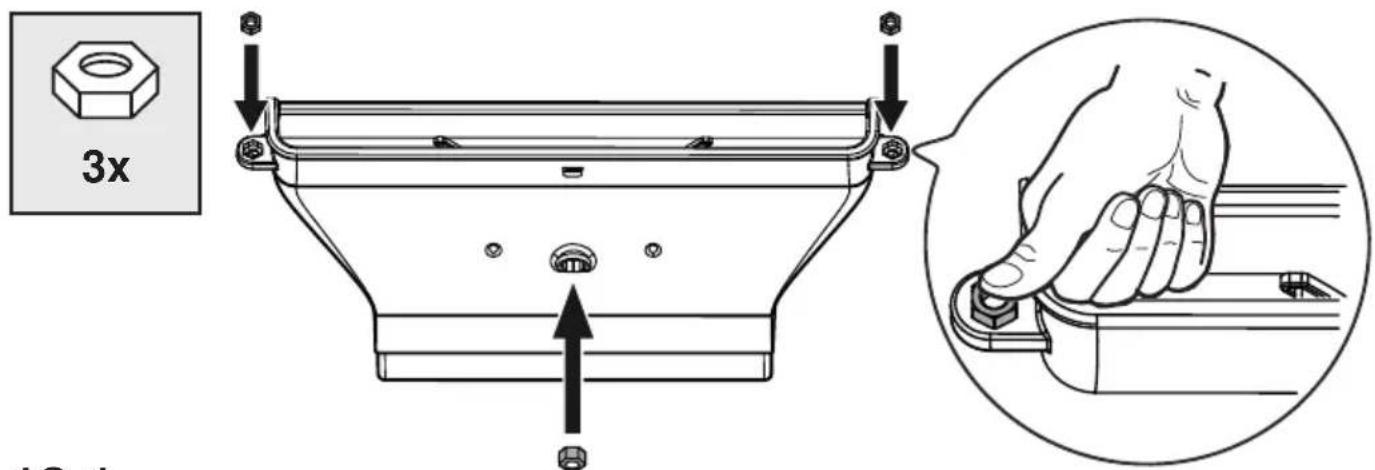
Caution! Failure to install screws and fasteners in accordance with these instructions may result in electrical hazards.
Note: to ensure the correct installation of the product, it is recommended to tape the pipes using an adhesive with the following characteristics:
- soft elastic PVC film, with an acrylic-based adhesive
- compliant with DIN EN 60454 regulations
-flame retardant - excellent resistance to wear
- resistant to temperature fluctuations
- can be used at low temperatures
4. Operation
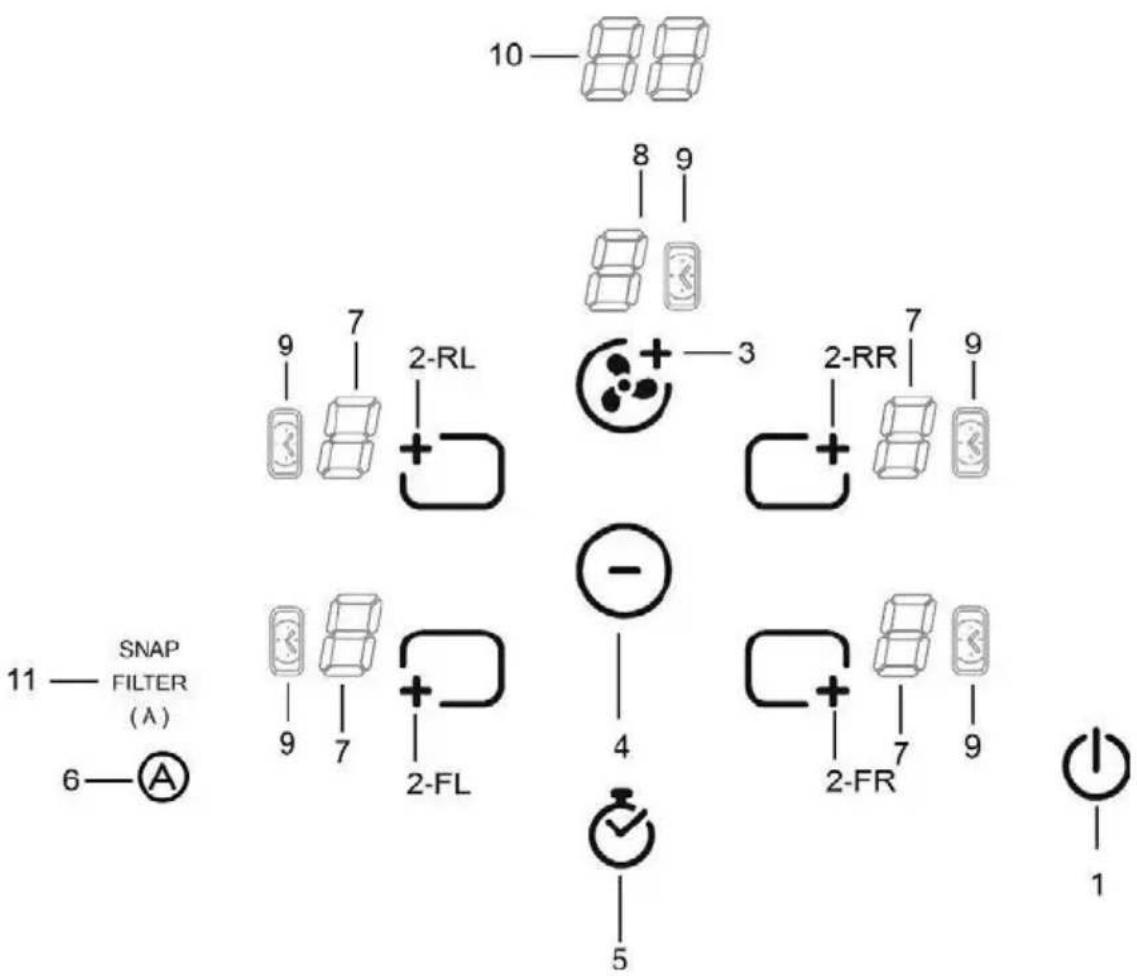
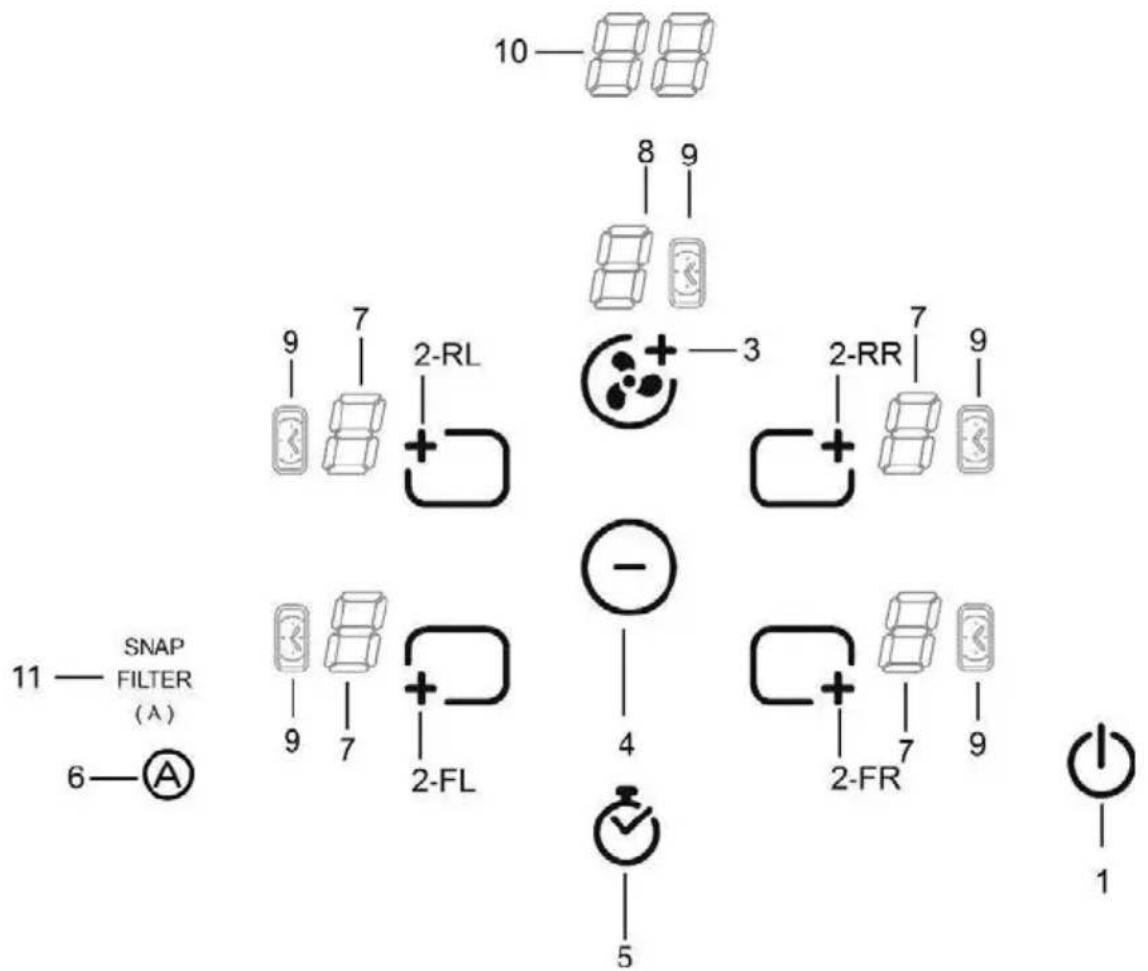
Control panel
Note: To select the commands, simply touch (press) the symbols representing them

Keys
- ON/OFF of the hob / extractor fan for hob
- Select cooking zone Increase Power Level
- Increase extraction speed (power)
- Decrease Power Level Decrease extraction speed (power) Decrease Timer value
- Activate Timer Increase Timer value
- Activate automatic functions Reset filter saturation
Display/LED
- View Power Level
- View extraction speed (power)
- Timer active indicator
- Timer value indicator
- Automatic extraction function indicator Filter assistance indicator SNAP operation indicator
USING THE HOB
Before you begin, it is important to know:
All functions of this hob are designed in order to comply with the most stringent safety regulations.
For this reason:
- Some functions will not be activated, or will be automatically deactivated, in the absence of pots on the burners or when they are poorly positioned.
- In other cases the activated functions will be automatically deactivated after a few seconds when the specific function requires a further setting that has not been selected (e.g.:
"Turn on hob" without "Select cooking zone" and "Operating temperature", or the "Lock Function" or "Timer").
Caution! In the case (for example) of prolonged use, the cooking zone may not immediately shut down because it is in the cooling phase; the H^ symbol will appear on the cooking zone display, to indicate the execution of this phase. Wait for the display to turn off before approaching the cooking zone.
Cooking zone display
the cooking area display indicates:
| Cooking zone on | 0 |
| Power Level | 1...9 P |
| Residual Heat Indicator | H |
| Pot Detector | - |
| Bridge Function active | 7 |
| Temperature Manager Function active | u |
| Child Lock Function active | L |
Hob characteristics
Safe Activation
The product is activated only in the presence of pots on the cooking zone: the heating process does not start or is interrupted if there are no pots, or if these are removed.
Pot Detector
The product automatically detects the presence of pots on the cooking zones.
Safety Shut Down
For safety reasons, each cooking zone has a maximum operating time, which depends on the maximum power level set.
Residual Heat Indicator
When one or more cooking zones shut down, the presence of residual heat is indicated by a visual signal on the corresponding zone display, by way of the H symbol.
Operation
Note: Before activating any functions, the desired zone must be activated
Power-on
Press (touch) ON/OFF hob/ extractor
The indicator light will turn on to indicate that the hob/extractor is ready for use
Press again to turn off
Note: This function has priority over the others.
- Selecting the cooking zone
Touch (press) the selector corresponding to the desired cooking zone.
9 Power Levels
The hob features 9 power levels Touch (press) the selector to increase the power level; Touch (press) the selector to decrease the power level; The power level is shown on the display of the selected zone :
Power Booster
The product has a high level of supplementary power (beyond level S ), which has a limited duration of 5 minutes, after which the power level returns to the previous level.
Touch (press) the selector to increase the power level (after level 9) and activate the Power Booster The Power Booster level is shown on the display of the selected zone with the symbol"P
NB: cooking zone (FIG.19), does not have a timer for the Power Booster;
to deactivate the Power Booster press
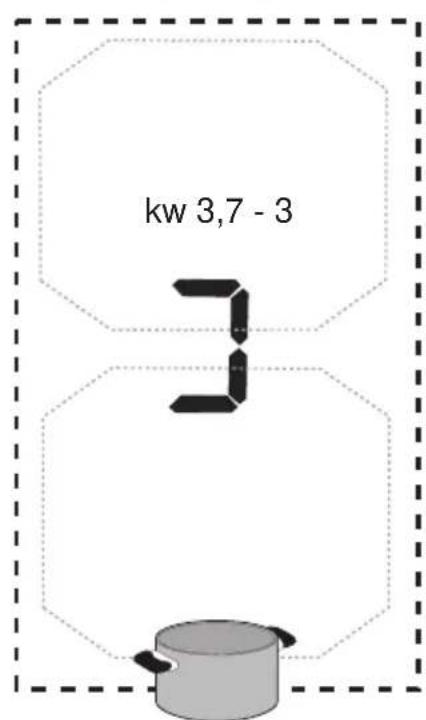
Bridge Zones
Thanks to the Bridge function, the cooking zones are able to work in a combined manner, creating a single zone with the same power level. This function allows evenly distributed cooking with large-sized pots and pans.
The front "Master" cooking zone can be used in combination with the corresponding "Secondary" zone at the back (to check which zones are equipped with this function, see the illustrated part of this manual).
To activate the Bridge Function:
-
select the "Master" cooking zone (which must be at power level 0)
-
hold + pressed until an acoustic signal sounds, which will be followed by the appearance of the flashing symbol "n" on display (7) of the "Secondary" cooking zone
-
select the "Secondary" cooking zone within 3 seconds
-
set the operating Level (Power) of the "Master" cooking zone, which will be shown on the relative display (7) Note: to deactivate the Bridge Function, simply bring the cooking zone to temperature 0.
- Temperature Manager
Temperature Manager is a control function that allows the heat to be maintained at a constant temperature at an optimal power level between 0 and 1; ideal for keeping ready foods warm.
The Temperature Manager function is activated at the first
press of the key
The "L" symbol appears on the display of the zone working in Temperature Manager mode.
Child Lock
The Child Lock makes it possible to prevent children from accidentally accessing the cooking zone and extraction zone, preventing the activation of any functions.
The Child Lock can only be activated when the product is on, but with the cooking zones (and extraction zone) off.
Activation:
- press and simultaneously hold + (FR) and
- then again and the selector + (2-FR); an acoustic signal indicates that the Child Lock is active and an "L" appears on the displays (7).
Deactivation:
-
press and simultaneously hold + (2-FR) and
-
then again an acoustic signal indicates that the Child Lock has been deactivated, and the L" disappears from the displays (7).
Temporary deactivation: it is possible to use a cooking zone, even with the Child Lock active.
Proceed as follows:
- press and hold + (2-FR) and You can now use the cooking zone normally, the Child Lock will be reactivated when the hob is turned off.
- Timer
The Timer function is a countdown, which can be set for each cooking zone (and extraction zone), even simultaneously. At the end of the set period, the cooking zone (or extraction zone) will automatically shut down and the user will be informed by way of an acoustic signal.
The Timer is activated by pressing the symbol as soon as the timer has completed the countdown an acoustic signal sounds (for 2 minutes, or stops by pressing any hob key), while the display (10) flashes with the symbol "00".
Regulation of hob Timer function
- Select the cooking zone.
- Press to access the regula
Regulate the duration of the Timer:
press the selector, to increase the automatic shutdown time
press the selector, to decrease the automatic shut-down time
If desired, repeat the operation for the other cooking zones. Note: Each cooking zone can have a different Timer set; on the display, (10), the countdown of the last selected hob will be shown for 10 seconds, after which the countdown with the least remaining time will be shown.
To switch off the Timer:
- set the value of the timer to "0" using
- turn off the hob, using
Note: the function remains active if no other key is pressed in the meantime.
Note: when the Timer is being used, the symbol appears at the side of the cooking zone

- Egg Timer
The Egg Timer function is a countdown independent of the cooking zones (and the extraction zone). At the end of the set time, the user is informed by way of an acoustic signal.
The Egg Timer is activated by pressing
Note: to regulate the Egg Timer function, follow the same procedure as for the Timer function.
Power Limitation
The Power Limitation function allows the product to be used while limiting its maximum absorption.
Note: the limit must be set when the hob is off, without pressing , within 2 minutes from when the hob is connected to the electrical network, or from when the electrical network itself is reconnected.
To set the Power Limitation:
-
press A
-
while holding down A press and release - a short acoustic signal will sound
- while holding down A press and release + (2-
-it is now possible to release A:
the FL zone display (7) shows the "C" and "0" symbols alternately to indicate that the limit can be set
the RL zone display (7) shows the current setting** 0 = 7,4KW 1 = 3,1KW 2 = 4,5KW
** by default, the limit is set to 7.4 KW
- to change the Power Limitation setting press + (2-FL)
- to save the selection, press for 2 seconds; a long acoustic signal will sound to confirm the setting.
- press, to exit the function
USING THE EXTRACTOR FAN
Power-on
Press (touch) ON/OFF hob/ extractor
The indicator light will turn on to indicate that the hob/extractor is ready for use
Press again to turn off
Note: This function has priority over the others.
- Switching on the extractor fan:
Touch (press) the selector to activate the extractor fan
- Extraction speed (power):
touch (press) the selector to increase the extraction speed (power) (0-10);
touch (press) the selector to decrease the extraction speed (power) (10-0);
- Timer
The Timer is activated at any speed by pressing the symbol

display (10) will show the countdown
display (9) will show the symbol
Extractor fan Timer regulation
The preset shut-down times can be modified. The variation must be made when the Timer is active.
- Press to increase the automatic shut-down time
- Press to decrease the automatic shut-down time
Filter saturation indicator
The hood indicates when filter maintenance is needed:
Grease filter
the "FILTER" (11) LED lights up
Activated carbon odour filter
the "FILTER" (11) LED flashes
Reset filter saturation
After carrying out maintenance on the filters (grease and/or
activated carbon) hold down the key; the "FILTER" LED tums off and the count restarts.
- Activation of activated carbon odour filter saturation indicator
This indicator is normally deactivated.
To activate it, proceed as follows:
- turn on the aspiration hob by pressing
- with the aspiration motor and cooking zones off, press and
- "Filter" on, then off to indicate successful activation.
- Deactivation of activated carbon odour filter saturation indicator
repeat the activation steps described above
"FILTER" flashes, then tums off to indicate successful deactivation.
Automatic mode
The hood will turn on at the most suitable speed, adapting the extraction capacity to the maximum cooking level used in the cooking zone.
Once the hob is turned off, the hood adapts its aspiration speed, gradually decreasing it, so as to eliminate residual vapours and odours
To activate this function:
Briefly press A, the LED (A) (11) will light up to indicate that the hood is working in this mode.
Automatic hood mode with SNAP®
For information on how to make the connection between the hood and SNAP^® , see the manual supplied with SNAP^® or visit www.elica.com.
Note: SNAP® is an auxiliary extraction unit able to operate at the same time as the hood.
To activate this function:
Briefly press A, the LED "(A) and the LED SNAP (11) will light up to indicate that the hood is working in this mode.
The device can also be used in combination with a Window sensor KIT (not supplied by the manufacturer).
If the Window sensor KIT is installed (only in the case of use in EXTRACTOR mode), air extraction will halt every time the window in the room, on which the KIT is applied, is closed.
- The KIT must be electrically connected to the device by qualified and specialised technical personnel.
- The KIT must be certified separately in accordance with the safety standards for the component and its use with the device. Installation must be carried out in accordance with current regulations for domestic systems.
PLEASE NOTE:
- the wiring of the KIT to be connected to the device must be part of a certified safety extra-low voltage (SELV) circuit.
- the manufacturer of this device declines all liability for any inconvenience, damage or fires caused by defects and/or problems associated with the malfunction and/or incorrect installation of the KIT.
4.1 Power tables
| Power level | Cooking type | Use of level (display combines the experience and cooking habits) | |
| Max power | Boost Heat quickly | Ideal to quickly increase the temperature of the food up to fast boiling in the case of water or quickly heat cooking liquids | |
| 8-9 Fry - boil | Ideal for browning, starting to cook, frying frozen products, boiling rapidly | ||
| High power | 7-8 | Brown - fry - boil - grill | Ideal for frying, keeping the boil, cooking and grilling (for short times, 5-10 minutes) |
| 6-7 | Brown - cook - stew - fry - grill | Ideal for frying, maintaining a simmer, cooking and grilling (for average times, 10-20 minutes), preheating accessories | |
| Medium power | 4-5 | Cook - stew - fry - grill | Ideal for stewing, maintaining a light boil, cooking (for longer times). Stir pasta |
| 3-4 | Cook - simmer - thicken - stir | Ideal for slow cooking (rice, sauscs, roasts, fish) in the presence of liquid (e.g. water, wine, broth, milk), stirring pasta | |
| 2-3 | Cook - simmer - thicken - stir | Ideal for slow cooking (volume less than one litre: rice, sauscs, roasts, fish) in the presence of liquid (e.g. water, wine, broth, milk) | |
| Low power | 1-2 | Melt - thaw - keep warm - stir | Ideal for softening butter, gently melting chocolate, thawing small products |
| 1 | Melt - thaw - keep warm - stir | Ideal for keeping small portions of freshly cooked food warm or keeping the temperature of serving dishes and stirring risotto | |
| OFF | Zero power | Support surface | Hob in stand-by or off (possible presence of residual heat from the end of cooking, signalled by H-L-O) |
4.2 Cooking tables
| Category of foods | Dishes or type of cooking | Power level and cooking pattern | |||
| First stage | Powers | Second stage | Powers | ||
| Pasta, rice | Fresh pasta | Heating water | Booster-9 | Cooking pasta and maintaining the boil | 7-8 |
| Fresh pasta | Heating water | Booster-9 | Cooking pasta and maintaining the boil | 7-8 | |
| Boiled rice | Heating water | Booster-9 | Cooking pasta and maintaining the boil | 5-6 | |
| Risotto | Frying and roasting | 7-8 | Cooking | 4-5 | |
| Vegetables, legumes | Boiled | Heating water | Booster-9 | Boiling | 6-7 |
| Fried | Heating oil | 9 | Frying | 8-9 | |
| Sauté | Heating accessory | 7-8 | Cooking | 6-7 | |
| Stewed | Heating accessory | 7-8 | Cooking | 3-4 | |
| Fried | Heating accessory | 7-8 | Browning fried | 7-8 | |
| Meats | Roast | Meat browning with oil (if with butter, power 6) | 7-8 Cooking 3-4 | ||
| Grilled | Pre-heating pan | 7-8 | Grilling on both sides | 7-8 | |
| Browning | Browning with oil (if with butter, power 6) | 7-8 Cooking 4-5 | |||
| Stew | Browning with oil (if with butter, power 6) | 7-8 Cooking 3-4 | |||
| Fish | Grilled | Pre-heating pan | 7-8 | Cooking | 7-8 |
| Stew | Browning with oil (if with butter, power 6) | 7-8 Cooking 3-4 | |||
| Fried | Heating oil or fat | 8-9 | Frying | 7-8 | |
| Eggs | Omelettes | Heating pan with butter or fat | 6 | Cooking | 6-7 |
| Omelettes | Heating pan with butter or fat | 6 | Cooking | 5-6 | |
| Soft boiled/boiled | Heating water | Booster-9 | Cooking | 5-6 | |
| Pancakes | Heating pan with butter | 6 | Cooking | 6-7 | |
| Sauces | Tomato | Browning with oil (if with butter, power 6) | 6-7 Cooking 3-4 | ||
| Meat sauce | Browning with oil (if with butter, power 6) | 6-7 Cooking 3-4 | |||
| Béchamel | Preparing the base (melt butter and flour) | 5-6 | Bring to simmering point | 3-4 | |
| Desserts, creams | Custard | Boil the milk | 4-5 | Keep simmering | 4-5 |
| Puddings | Boil the milk | 4-5 | Keep simmering | 2-3 | |
| Rice pudding | Heat the milk | 5-6 | Keep simmering | 2-3 | |
5. Maintenance
Hob maintenance
Caution! Before any cleaning or maintenance, make sure the cooking zones are switched off and the heat indicator has turned off.
5.1 Cleaning
The hob must be cleaned after each use.
Important:
Do not use abrasive sponges, scouring pads. Their use, over time, may ruin the glass.
Do not use chemical irritants, such as oven sprays or stain removers.
After each use, leave the hob to cool and clean it to remove deposits and stains caused by food residue.
Sugar or food with a high sugar content damages the hob and must be immediately removed.
Salt, sugar and sand may scratch the glass surface.
Use a soft cloth, paper towel or specific products to clean the hob (follow the Manufacturer's instructions).
DO NOT USE STEAM JET CLEANERS!!!
Important:
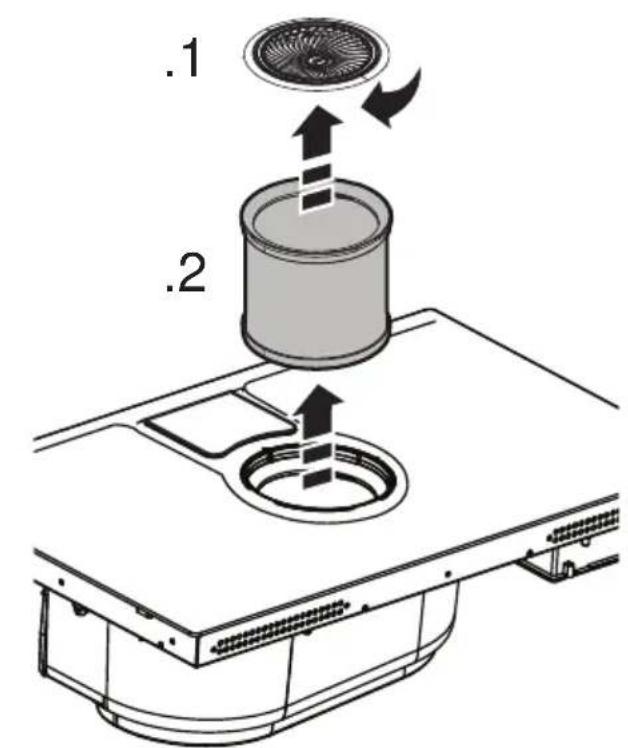
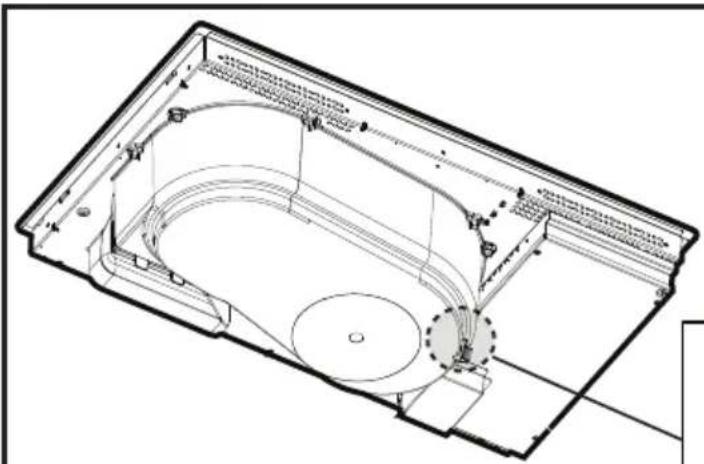
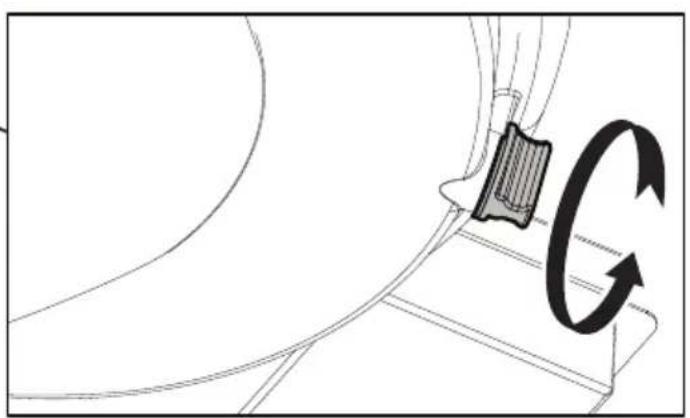
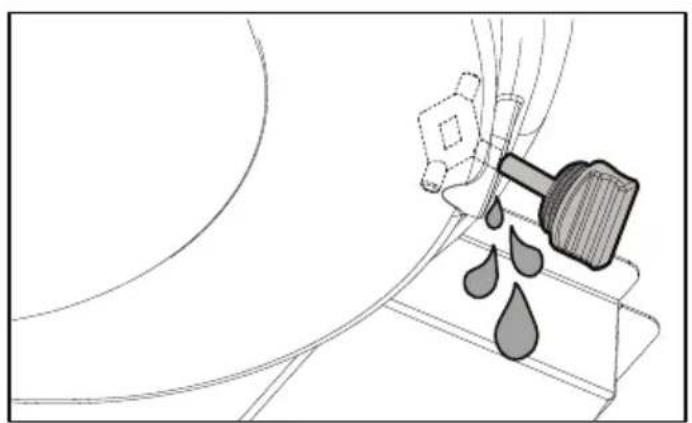
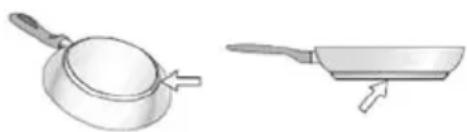
If liquids accidentally or excessively leak out of the pots, the drain valve located on the lower part of the product can be opened so as to remove any residue and be able to clean in conditions of maximum hygiene.
Fig. 18
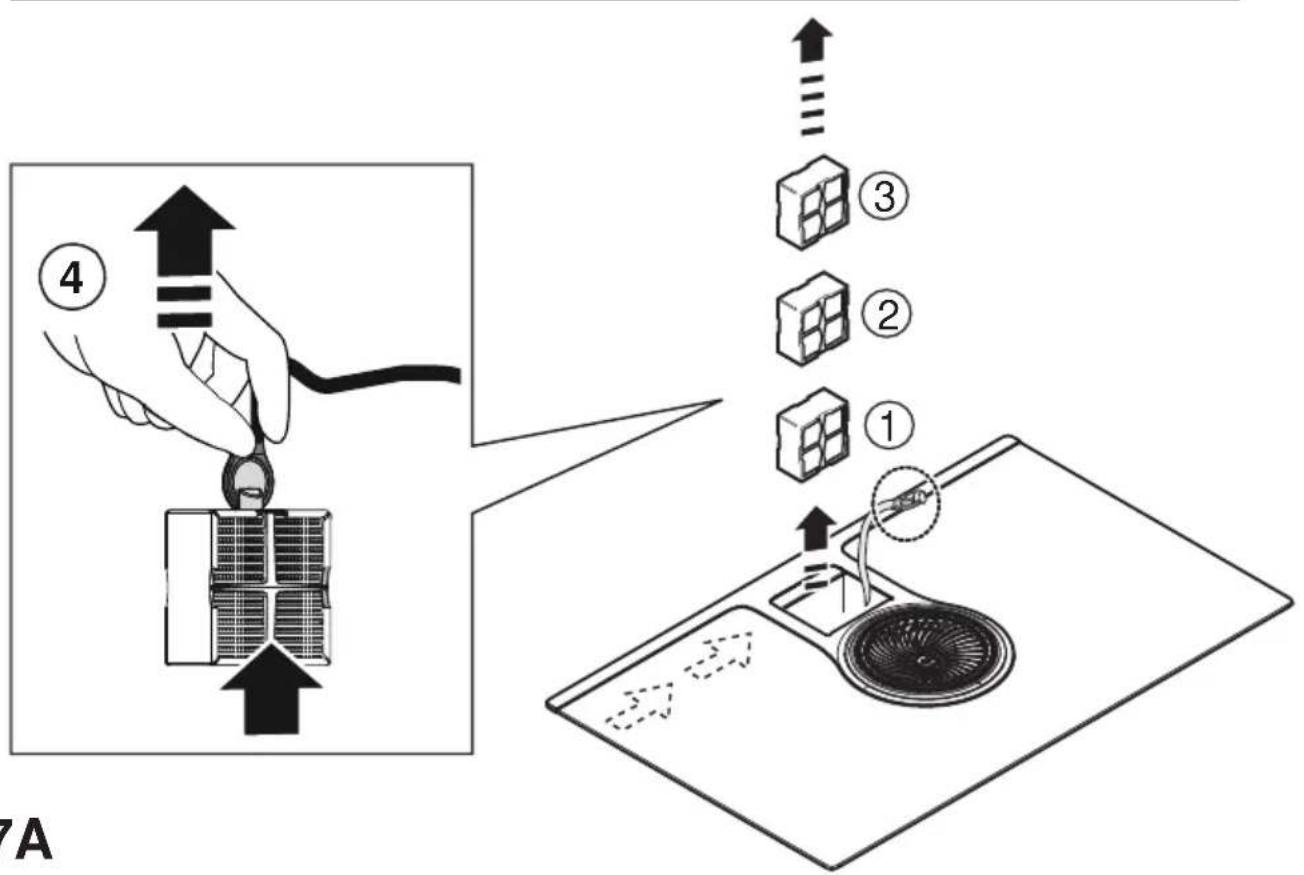
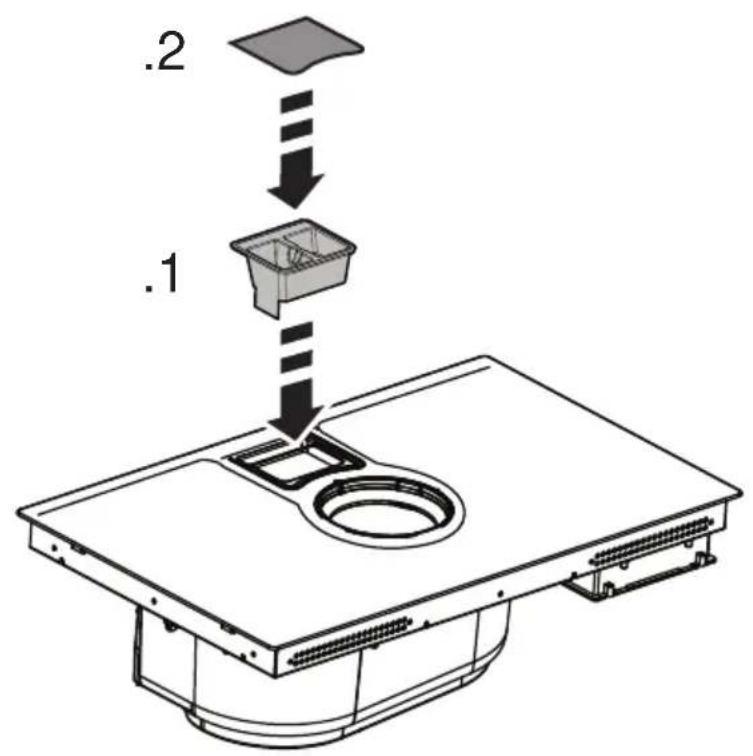
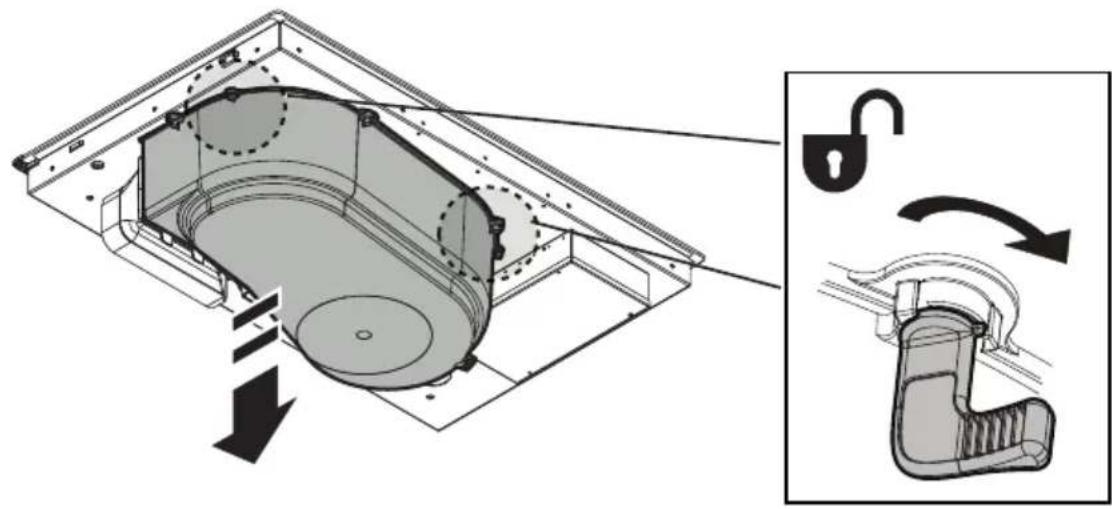
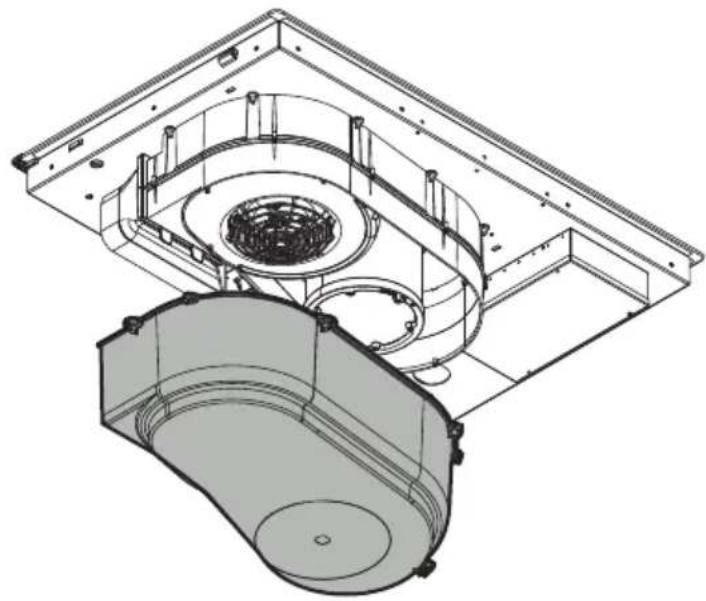
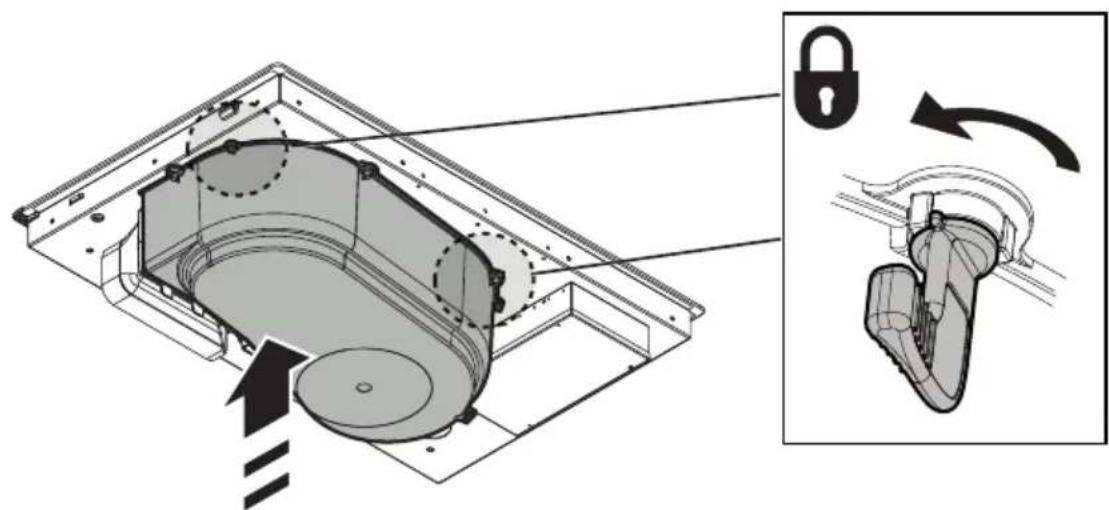
For a more complete and in-depth clean, the lower tray can be completely removed.
Fig. 19
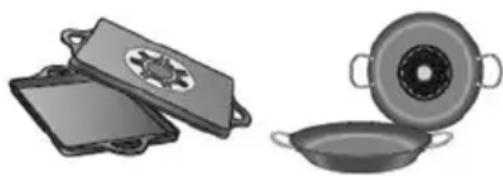
Cleaning the metal grille:
The grille must be washed by hand with hot water and neutral detergent, then dried thoroughly to prevent oxidation.
Extractor fan maintenance
Cleaning
For cleaning, use ONLY a cloth moistened with neutral liquid detergents. DO NOT USE CLEANING UTENSILS OR TOOLS!
Avoid the use of products containing abrasives.
DO NOT USE ALCOHOL!
Grease filter
Traps grease particles generated by cooking.
Must be cleaned once per month (or when the filter saturation indication system indicates this need), with non-aggressive detergents, either manually or in the dishwasher at a low temperature and in a short cycle.
When cleaned in the dishwasher, the metal grease filter may discolour, but its filtering characteristics remain unchanged.
Fig. 15
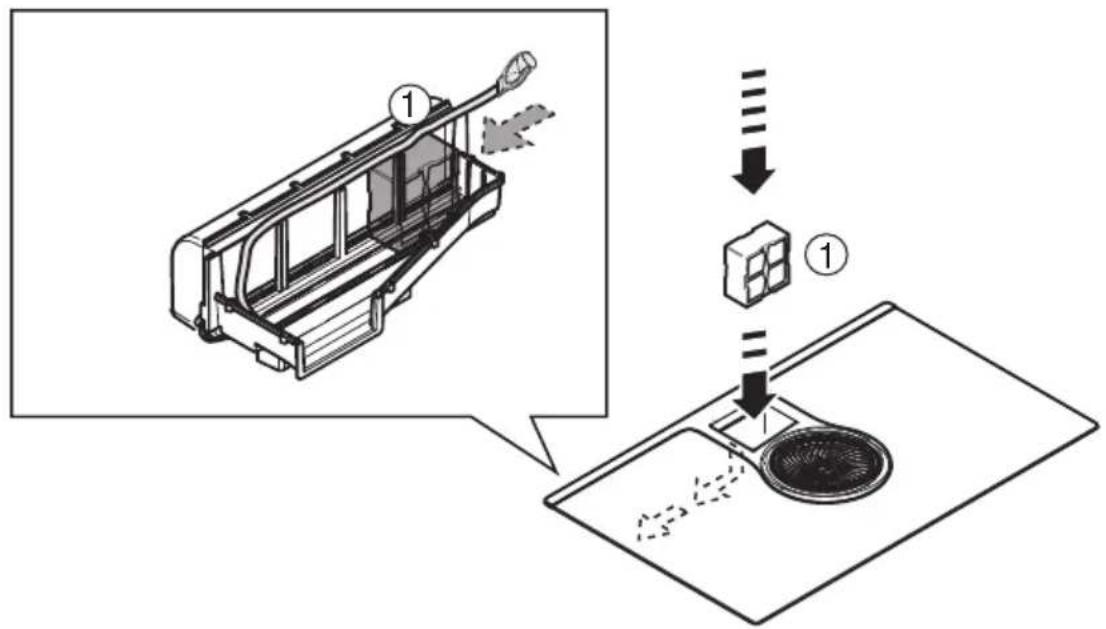
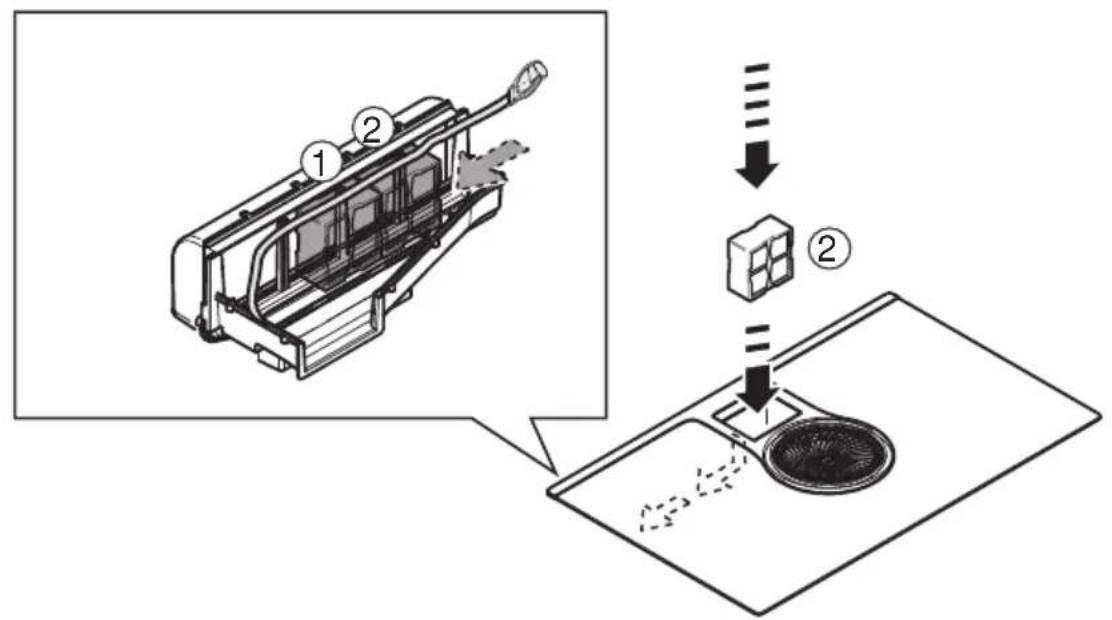
Activated Carbon Filter - Ceramic (Only for Filtration Version)
Traps unpleasant odours generated by cooking.
The product comes with a set of odour filters. The saturation of the odour filters can occur after somewhat prolonged use depending on the type of cooking and how regularly the grease filter is cleaned. The odour filters can be thermally regenerated every 2/3 months in an oven pre-heated to 200^ for 45 minutes. The correct regeneration of the filter ensures that it can constantly filter efficiently for 5 years.
Warning! Do not leave filters on the bottom of the oven, but place it on a baking tray and position it at a mid height..
Fig. 17-17a-17b-17c
5.2 Troubleshooting
| ERROR CODE | DESCRIPTION | POSSIBLE CAUSES | ERROR REMOVAL |
| E2 | The command zone switches off due to an excessively high temperature | The temperature inside the electronic parts is too high | Wait for the hob to cool before reusing it |
| E3 | Container unsuitable | Loss of magnetic properties | Remove the pot |
| E5 | Communication problems between the user interface and induction module | Electricity is not reaching the module; The power cable is incorrectly connected or faulty | Disconnect the hob from the electrical network and check the connection |
| For all other error signals (E...U...C...) | Call customer service and report the error code | ||
5.3 Customer service
Before contacting Customer Service
- Check that you cannot solve the problem yourself based on the points described in "Troubleshooting".
- Switch the device off and on again to see if the problem resolves itself.
If the fault persists after the above checks, contact the nearest Customer Service.
Residual Heat Indicator
5.3 Service assistance
Residual Heat Indicator
- Temperature Manager
Residual Heat Indicator
- Temperature Manager
Residual Heat Indicator
- Temperature Manager
PPOsOXH: n 4 (EIK.19), 6v diaTei xpvodiaKoTn [timer] ia to Power Booster.
yia va aTVEpyoTioHOTe to Power Booster TIEOTE
Bridge Zones [Zwvc Γεφupac]
Oeotieqayepaatoc-axn otn aeitoupyia Bridge [Eepua] -ivai eoan va aeitoupynoov ouvduataikda nmuoywvtac etoiia eotiae koivn evtaon ioxuc. H aeitoupyia autn EITIPETTEEv a oioiyevc ayepepa taiwv kai ayepikwv Okeuwv eyalwov diaotaoewv.
Mtopeite va xnpoioiOnoiTe ouvuaotika tvv eptpooia
eotia mayeipepaTOc "Master" [Kupia] Tnv
△eutepeuouoa
(via va evtonioiete Tc eotiecs yia tic otoie c npoBleTTaui autn n aeitoupyia, avatpecte otnv EIKOVoypaqnpuev n Evotnta Tou napovtoc exxepioidou).
Tia va evepytoioeTe Tny Aetoupyia Bridge [Tepupa]:
- Emiéξe tyn eotia paayepaatoC "Master" [Kupia].
![ELICA NikolaTesla ONE PRF0120977A - Tia va evepytoioeTe Tny Aetoupyia Bridge [Tepupa]: - 1](/content/2026/04/594798/images/ee5d6f2cbc72a7eceb91e325700dff673799c5a110a3dbb68c5d2f6e0cd99b90.jpg)
to LED "FILTER"(11) EvEpyoioiEiTai
ΦIATPO duapeoTw oouv Evpyou avpaka
to LED "FILTER" (11) αναβοσβήνει
Residual Heat Indicator
- Temperature Manager
Display for kokesoner
pá display for de ulike kokesonene vises:
| Kokesonnen er på | 0 |
| Power Level | 1...9 P |
| Residual Heat Indicator | H |
| Pot Detector | Ø |
| Bridge-funksjon aktiv | Ø |
| Temperature Manager aktiv | Ø |
| Child Lock aktiv | L |
Residual Heat Indicator
Residual Heat Indicator
for at deaktivere Power Boosteren, tryk pa

Bridge Zones
- (Temperature Manager)
Residual Heat Indicator
- Temperature Manager
Residual Heat Indicator
Residual Heat Indicator
Pri vypnuti jegnej alebo viacerych varn'ych zon je pritomnost zvyskoveho tepla signalizovaná prislu'snym znamenim viditel'nym na displeji zodpovedajucej zony pomocou symbol H
Prevádzka
- Temperature Manager
2.1 CbdoBe 3a roTbeHe
I3non3BaIte camo cbdoBe 3a roTBeHe, KOHTO ca

OT6eJRA3aH CbC CHMBOLA
BaxHo:
3a da n36eHHeTe nepMaHeHTn IeTn Bbpy IOBbpxHOCTTa Ha IIJOTA, He n3NON3BaIte HIKORA:
CbIOBE, YIeTO DbHO He e IeAIIHO rnaIKO;
- MeTaJIHn CbdoBe cIaKnpaHo DbHO;
cIbOBe C rpanaBa OCHOba, 3a Da N36erHeTe DpaKoTINH
NIO NBbpxHOCTTa Ha NIOta;
- HNKORA He NOCTABYIte TEHIXePHTe N TIRaHITe DOKaTO Ca OUcTe TOJIIN Bbpxy NOBbpxHOCTTa Ha KOHTPOJHnHaHeJn Ha IIIOTA.
He BCnUKN CbdoBe, NOxOJaun 3a INdyKunpa6oTepnKaCHO, Nopadn TOBa, Ye DbHata mC aactuHo n3pa6oTeHN OT JeJ3HO-MaHHTe MATEpua!! BvB pa3aHa 3akynBaHe Ha TeHJKepeN nn TuraHn, npOBepTe daHn:
-ДьНОЕиЗЯЛо OTжелязно-MaHHTEN MaTePnA.ВпрOTИВЕн сIучай ce HAMJIЯВAT KaKTO eФeKTINBHOCTTа HaToIIINHNO ПпедаBAHe, Taka n HeHOTO paBHomepHo pa3npdeJELHe, c TempepaTyprn Ha NOBbPxHOCTTa HaTeHIXePaT/TiHaHa, HeNoDxOJaU 3a rotBeHETO.
HE!
- DbHOTa He CbDbpKa aIyMnHi: CbBbT He ce HarpraBa n CbIO Taka MoKe Da He 6bDe pa3No3HaT OT INHyKTOpHTe.
HE!
He nIIOCKn DbHa nIIN c rpanaba NOBbpxHOCT.
I3BaJdAT KOHTaKTHa NOBbpxHocT MExdy INHyKTOp N cboBe 3a XpaHe, HamaJIraBauKN epeKTnBHOCTTa N BLOaBaIKN pe3yNTaTa Ha rotBeHe.

A!
Baxho: HNKORA He NOCTABYTE TeHJXePNTe TIRaHtE DOKATO Ca OSe TOPIBbpxy NOBbpxHOCTTa Ha KOHTPOHnnaHeI Ha IIOTA.
2.1.1 CbdoBe 3a roTBeHe c KOHTo Beye pa3nojarate
Moxete da npOBepTe daJIM MaTepnabTb OT KOITo ca n3pa6OteHcBIOBeTe CbIbPka KENr30 C NOMOuTa Ha Hau- 06NKHOBEH MaHNT. CbIOBeTe 3a rotBeHe, KOtO He Ca NOxODA, He npBnHaT MaHNTa. IN TO3n CnyaBaxat HHCTpyKUInTE OT pExDHN naparpaΦ.
YnOTope6a Ha acnnpaTopa
CnCTemata 3a acnpaun MOKe Da 6bJe N3N0J3BaHa BBBepcna C acnpaun C BbHnHa eBakyaun nnΦnItpnPapcnc BbTpewHa uRkynau.

Bercna c acnpaun
Φnr.7
Iapnte ce eBAkyupat HaBbH NocpeDCTBOM eHa rpyna Tpb6n (da ce 3akypT OTJeHH) KMcKcnpAH KbM FNaHeca 3a CBbp3BaHe, Beue BkIoUeH B KOMnJIeKtA.
DnAmEtbpbHa Tpb6aTa 3a pa3ToBapBaHe Tp6Ba Da OTROBapHa DnAmEtpaHa npbcTeHa 3a CbP3BaHe:
- npn YeTnpnbIbIeH n3XoD 222 x 89 mm
- npn KpbTbn n3xOa 0 150 mm (*)
3a DonbIHNHeHa HOpMaunBnK CtpaHnua, OTHacraa Ce Do akcecoapnte Ha BepCnraTa C acnpauu B NIOCTpnpaHata Yact Ha TOBa pBkoBOdCTBO. CBpKeTe npOyKa Tc Tpb6n n OTbOpn 3a pa3TOBapBaHe Ha CTeHaTc DnAmEtbp, paBnBaU, ce Ha Tpb6aTa 3a n3XoDa Ha Bb3dyx (PnaHeu 3a Cbbp3BaHe).
N3noJ3BaHeTo Ha Tpb6n OTOBOp 3a pa3TObApBaHeTo 3a CTeHa C NO-MaTbK DnAmEtbp BODn DO eHNO HAMJaBaHe Ha npOn3BOdntEnHOCTTa Ha acnnpaunra Ta n eHNO dpaCTNuHo yBeJIuYBaHe Ha Wyma.
CneobateHc ce OTXBbprn BcKaKBa OTROBOPHOCT OTHOCH TOBA.
1 N3noJ3BaIe KaHaJI, Bb3MOXHO Ha-KbCnR.
1 N3noJI3BaIte eHa Tp6a C Bb3MOxHO Ha-MaJIbK 6poJ 3aBOI (MaKcImaJIeH bIbI Ha 3aBOI: 90^
1 N36raBaiTe IpaCTnHn IpomEn Ha ceyeHneTo Ha KaHaHa.

BercncaΦnntpnpaHe
Фиг.10
3acmykaHnT Bb3dyx 1e 6bde fnnTpnpaH nocpeDCTBOM CneuHaHn fnntpn 3a Ma3HHn HfNtprcpeUy Mnp3Mn, npdi 6bde npehacouen B ctaTa. IpodykTbT ce doctabr C BCNUKO Heo6xOIMO 3a CTaNapTHO yHKUHOHPaHe C N3XOD Ha Bb3dyx B npdHaT aact Ha 0KbNa Ha uKaΦa. 3a DOnbHNITJHa INΦOpMaun BNX cTpaHncaTata, OTHACra ca Do akcecoapnte Ha BepCnTa C fnnTpnpaHe (B NIOCTpnpaHaT auct Ha TOBa pBkoBODCTBO).
KoHcyIHTpaIte ye6 cTpaHnIte www.elica.com n www.shop.elica.com 3a da npOBepTe nbLnHaTa rAma Ha HAnuH N KOMNKeTn, 3a da MoXeTe Da n3BbPunTe
pa3nHHTe BNDObE HnCTaHnpaHe, KaKTo npn BepcnTa C nIITpnpaHe, Ta n npu Ta3n c acnnpaun.
3. MoHTupaHe
- EneKtpnueckOTO mExaHnHOTOMOHTnpaHe Tp6Ba Da Ce N3BbPwBa OTcpeuaJn3npaH nepcoHaJ.
EneKtpoIOMaKNHcNt ypeIe c3daJeH 3a Bpaxdane B pa6ToH PnOT C De6eInHa 2-6 cm, B cnUaH a MoHTaX TOP; 2,5-6 cm B cnUaH a MoHTaX FLUSH.
MnHmajHaTa DnCTaHcna MExdy roTbapcknI pIoT n CTeHaTa Tp8Ba Da e noHe 5 cm fpoHTaIIHo, noHe 4 cm cTpaHnUHO n noHe 50 cm cnpmo rOpHnTe OKaueHn Me6eJI.
3a6eJekka = IpeOpbuaHnte DnCTaHcun ca npu6IIN3NTeHN: npn IpoEKTupaHTo Ha OTCTOHNrTa Tp8Ba Da ce Cna3BaT yKa3aHnraHa Ipn3BOIDHTeJHa KxHrTa.

3.1 En.Bpb3ka
Φn.r.3
- Изключete урEDA от eльктучесka tampeжа. - МоNTиранeto Tpr6Ba Да ce n3BbPи OT KBaIINФИцранперcoHaJI, KOИTO DA e 3aNo3HaT C DeiCTBaUaTa HOpMaTINBHa Upe6Ba 3a MOHTиpaHne N 6e3OanachocT. - Пpon3BOДnteJЯТ He HOCn HNKaKBA OTROBOPHOCT 3a eBEHTyaJIHn ΜeTn BbPxy Xopa,ЖIBOTHn IJIIMyUSeCTBO, Bb3HInKHaJIN B pe3YlTaT Ha HeCnA3BaHe Na HAcOKITE, IpeIoCTaBeHn B HAcTOnIaTa rnaBa. 3axpaHBaIuRt Ka6eI Tp46Ba Da 6bJe DOCTaTbUHO Dblr, 3a Da NO3BOJN OTcPaHЯBaHTo Ha TOrBapCKn OTe pa6OTHnЯ ПLOT. - YBepTe Ce, Que HAnpeXeHNeTO, POCOueHo Bbpxu NdeHTnФИKaIIOHHaT aTabeIka, pa3NoLOXeHa Bbpy DbHOTO Ha ypeDa, OTROBApЯ Ha 3axpaHBaIooTO HAnpeXeHne B JINIeTO, KbDeTo Ⅲe 6bJe
MOHTIpaH. He n3noJI3BaIte yIbJxIeJI. 3a3emntelHHrT eI. Ka6eI TpIbBA da c 2 cm no-DbIbIg OT oCTaHaJIte Ka6eJI. Ako eJeKTPoDOMaKNHcKnIypeI He pa3noIara cbc 3axpaHbAùk Ka6eI, I3NoJ3BaIte Ka6eI C MInHMaJIHO CeueHne Ha npOBODHnUITE O T 2,5 KB.MM npN MoUHocT Do 7200 W;doKaTO npN IO·ToJIEMN MOUHOCTN CeueHnETo TpIbBA da e 4 KB.MM). B HnTO eDHa ToUka Ha Ka6eJa Tempepatypata He TpIbBA da NaBnUba CtaIHATA Tempepatypa c nobuee ot 50^ . YpeIbTe npEdNa3HaueH 3a NoCTOarHHO CBbp3BaHe KbM eJEKtpnueckaTa MpeXa.
BHMaHne! Ppei Da CbpxeTe OTHOBO Kpbra KbM MPexKOBOTo 3axpaHbAHe i Da npOBepnte daJIu FyHKUHOHa IpaBnIHO, BnHaI npOBepBaIte DaJI N MPexKOBnT Ka6eI e MOHTnpaH npABnIHO. BHMaHne! IoMHaTa Ha CBp3Baunr Ka6eI Tp6Ba Da Ce n3BbpNt OT cepBn3a 3a TexHnuecka NOMOUs NIN OT JInCe Cbc CXoHa KBaJnФnKaZna.
3a6eJexka: npOdykTbT npITeXaBa Функця Power Limitation, kOЯTO ПОЗВОЛЯВа Дa ce 3aДаDE MaKcIMaJIeH пpar Ha KOHCyMaZnay kw HAcTpoIkata TpIbBA Da ce n3BbPSh N B MOMeNTa Ha CBbp3BaHeTo Ha npOdyKTa KbM eIeKtpUeCKaTa МрExa Илп пи NOBtOPHOTo CBbp3BaHe Ha CamaTa eIeKTPuYeCKa МрExa (пpe3 cIeIbAuzInTe 2 MInHyTN). Opa3MepTe 3aIHTaTa Ha eIeKTPuYeCKaTa INHCTaJIaZnR Bb3 OCHOBa Ha n36paHOTo HnBO Ha OtrpaHnYeHne Ha MoIshocT. OTHOcHo NOCJIeIOBATEJIHOCTTa Ha n3BbPшBaHe Ha HacTpoIkry Power Limitation HanpaBete CnpaBka B pa3dEJI PhyHKzIOHnPaHne Ha TOBa pBKOBoDCTBO.
3.3 MoHTax
PpeiDa npncTbnte KbM MOHTnpaHe:
CneI KaTo pa3oNaKOBate npOdyKaT, yBepTe ce,Ye He e NOBpeHn O No BpeMe Ha TpaHCnOpTnpaHeTO n B CnyaHn PpO6NeMn Ce CBbPKeTe C DnCTpn6yTopa NN Cbc cepBN3a 3a 06cNyXBaHe Ha KIneHTn, Ppei Da InpNCtbnTE KbM MOHTnpaHETo.
- Ybepete ce, ye 3aKynenHrT npOyKt e C noDxOrau pa3mepn 3a n36paHaTa 3oHa 3a MOHTnpaHe.
- IpoBepete daIIN NO BpeMe Ha TpaHCnOpTnpaHe BB BbTpEWHOCCTHa ONaKOBkata He ca N3paHAnu YactN OT OKOMJIeKTOBkata (HanpIMep PNIHKyETa C 60JTOBe, rapaHcIOHHa KapTa n T.H.) IN EBEHTyaJIHO n3BaJeTe n CbxpaHete.
- YBepete ce cbyo Taka, ye B 6n3ocT do 3ohata 3a MOHTnpaHe HMa eJ. KOHTAKT.
IoproToBka Ha Me6eNITE, B KOnTO ige 6bDe BrpaDeH ypeBt:
- PpOdyKTbT He MoKe Da 6bDe MOHTnpaH NaI yCTpoiCTBa 3a OxJaXdaHe, MnaHn MaunHn, neKn, fypHn, nepaHn MaunHn n cyunHn.
- N3BbPwTe BCnKn DeHocTn No p3aHe Ha ShkaΦa, npedn da nOCTaBNTe rotBapckn Inot, nOTcPaHete BHHMaTEJIHO CTbPROTNHTe N OCTaTbUHTe OT p3aHe.
BAXHO: n3no3BaTe eHOKOMHOHTHO 3aneaTbaao nenilo (S) c yctoynBOcT Ha TeMnepaTpya Do 250^ ; npedm MOHTnpaHTo Tp6Ba Da NoCHCTne aTeNHO NOBbpxHOCTNe 3a 3aJeNBAHe, KATO OTCpaHIne BCNUKBeueCTBa, KOtO 6nxMa MoJn Da BNoWAt aXe3nTa (HaNP.: npenapatn 3a OTJeNBAHe, KOHcePbAHn, Ma3HHn, Macna, npaxOBe, OCTaTBuN OT CTapn nenila N dp.); nenlnoto Tp6Ba Da ce pa3Hece paBHomepHo no ZeINr NapMeTbp Ha pAMkata; CneI 3aJeNBAHeTO octabete nenlnto Da cbxHe B npOdbJKeHne Ha OKONO 24 yaca.
Φnr. 1B-2B
BhimaHne! HenocTabaHeto Ha 6oIbOBeTe n cKpeNITeHNHTe eJeMeHTn B CbOTBETCTBHe C HAcTOruNTe INHCTpykUn MoKe Da DOBeDe Do PnCKOBe OT eJIeKTPnuecko eCTECTBO.
3a6eIeKka:3a npabINHO MOHTnpaHe Ha npOdykTa ce npenOpbUba Tpb6nte Da ce oBneTc JeHtac JeNlTo Cbc CJeHNTE XapakTePncTNK:
- eJactnHNo fOJIIO OT MeK PVC, c JIeINJIO Ha akPnHa OCHOBA
-koetootrobapncaHdaptDINEN60454
- C DeIeCTBHe 3a 3a6abAByHe Ha OYbHr
-OTJNUHa yCTOuHBOCT Ha CbCTapraBaHe
- yCTOuINBO Ha rONeMn TemnepaTyprHn IpomEHN
- INIIOJI3BaEMO IPIHNCKITEmpeaTpyN
4. Haydn Ha ynoTpe6a
KoHTpOEn nahen
3a6eKka: 3a da 3aadaTe Dahe KaMaHda e DocTaTbUHO da DOKOCHTe (HaTNCHe) CbOTBeTHITE CNMBON, Ype3 KOUTO ca H3o6pa3EH.
Бутон
- ON/OFF Ha nnoTa 3a roTBeHe/ acnnpaTopa 3a nNoTa 3a roTBeHe
2.ИЗБОР Ha 30Ha 3a rOТВе He YBeJIuYaBaHe Ha Power Level - YbelenuabaHe Ha ckopoCTTa (MOUHOCTTa) Ha acnnpaun
- HamaJIbaHe Ha Power Level HamaJIbaHe Ha ckOpocTTa (MOUHOCTTa) Ha acnnpaun HamaJIbaHe Ha BpeMeTo Ha Timer
5.AkTINBpaHe Ha Timer YBeJIuHaBaHe Ha BpeMeTo Ha Timer
6.AKINBIPAHe Ha aBTOMaTHHn FyHKU PeCet 3anyBaHe Ha qnItpn
DucnneI/LED
- Bnzayn3aunha Power Level
8.Bn3yann3npaHe Ha ckopoCTTa (MOUHOCTTa) Ha acnnpaun - AKTINBEH INHIMKATOp Ha timer
10.Индikatop 3a Врeme Timer
11.Индikatop Ha Функця Ha aBtOMaTHHa acnnpaIy Индikatop 3a пиca Ha Фиntprn Индikatop 3a Функционпаhe cbc SNAP
YNOTPE6A HA NJOTA 3A FOTBEHE
KaKBo e Heo6xOIMo Da 3HaTe npei Da 3anOuHeTe da n3nON3BaTe nIOTA:
BcHKn FyHKnHa roTbapcknI npoektnpaHn no NaHH, NO KOHT Da OTrobapr Ha Hn-CTpOHTe HOpMn 3a cnryphocT.
Iopadn Ta3n npuHna:
Hakon cyHKun He ce akTNBnpat nIe deakTNBnpat aBTOMaTHUHO npn IINca Ha cboBe 3a rotBeHe Bbpy roTbapckn ILOT INN KOraTO cbDoBeTe He ca npaBNHNO noCTaBeH.
BdpynCnyanakTNBpaHnTe FyHKuN CE deaKTNBpaAT ABTomauHO CneH HAKONKO cekHyDN, KOraTO JeHaHATA fYHKUncce Huykdae ot DonbJIHnTeJHa HAcTpoiKa, KoTo He e daHe (HaP::"BKnOuBaHe Ha nNoTa 3a rotBehe"6e3 "N36Op Ha 3oHata Ha rotBeHe" NnPa60Tha Tempepatya", Nn"FyHKnJLock" Nn"Timer").
BnMaHHe! BcnyaHnnpMep Ha npOdbJnxTeJIHO n3NoI3BaHe e Bb3MOxHO 30HaTa Ha rotBeHe Da He ce n3KnIOuN BeDHa, TbKaTO e B npOec Ha OXJaXdaHe; BbpXy DnCnJe Ha 30HaTa 3a rotBeHe Ce NpOBra CBMBOna H KOHTo 6o3NaUaBA n3BpWBaHn B MOMeTn npOec. N3qAkaTe DoKATO dncnPeTc E n3KnIOuN IpEi Da ce do6nKInTe Do 30HaTa 3a rotBeHe.
DncnneHa3oHata3a rotBeHe
Bbpxy dncnpe, KOTo ce OTHacr Do 3OHnte roTbeHe, e nocoueHo:
| Вълоча зona за говende | 0 |
| Power Level | 1...9 P |
| Residual Heat Indicator | H |
| Pot Detector | - |
| Функция Bridge akтувигана | 7 |
| Функция Temperature Managerakтувна | 6 |
| Функция Child Lock akтувигана | L |
XapakTepeNCTnKn Ha nIOTA
Safe Activation
PpOdykTbT ceakTNBnpa cAmo npnHaJIuNue Ha TeHJKepe Bbpxy 30HnTe 3a roTBeHe: PpOceCbT Ha HApRJaBaHe He Ce CTapTnpa IINI INI ppeKbCBA B CnyaH Ha JInnca IINOTCTpaHraBaHe Ha TeHJKepeTe.
Pot Detector
IpoDyKbT OTuHTa ABTomTuHo HAnuHHeTo Ha TeHxKePn Bbpxy 30HnTe 3a RotBeHe.
Safety Shut Down
IopaHn npuHH, Cbbp3aHn C 6e3onacHOCTTa, BcKa 3OHa 3a roTBeH NMa eHNO MaKcMmaHbPeme Ha cyHKUOHnpaHe, KOEtO 3aBNCN OT 3aDaJeHOTo HNBO Ha MOUHOCT.
Residual Heat Indicator
PnI N3KIIIOVAHTo Ha eHa IIN NOBHe 3OHN 3a rotBeHe, HAIINuHETo HA OCTaTbUHa TOnJIHa Ce CInrHaJIIN3Ipa CbC CNEuaJIe Hn3yauJe HcRHaJI Ha DnCnIe Ha CbOTBeTHaTa 3OHa, NocpeDCTBOM CmBOJlA H".
Haun Ha pa6oTa
3a6eKka: 3a da ce aKTbnpa BcKa eHa fYHKn, TbPBO e Heo6xOIMa da ce aKTbnpa KeJahata 30Ha
BkIIOyBaHe
HaTnchHeTe (DOKOCHeTe) ON/OFF nnot 3a roTBeHe/ acnnpaTop
CBeTINHHNt INDnKaTOp Ce BKnIOuBa 3a Da yKaxe, Ye nIOTbT 3a rotBeHe/ACnnpaTOpBt e rOToB 3a yNtpe6a HatncheTe OTHOB 3a Da N3KNIOHnTe
3a6eJekKa: Ta3nФункци Има npHopTeT cnPraMo BCuHKN OCTaHJIФунKcHn.
H36op Ha 30HN 3a rotBeHe
DOKOCHETe (HATNCHE) 6yToHa 3a n36Op, KEMTO CbOTBETCTBa Ha XeJahata 30Ha 3a rotBeHe.
9 Power Level
Плотьт e сабден c 9 Ива ha моцноct
DOKOCHETe (HaTnCHeTe) 6yToHa 3a n36Op +, 3a Da yBENuHTe HNBOTo Ha MOUHOCCT;
DOKOCHeTe (HaTnCHeTe) 6yToHa 3a N3bOp , 3a Da HAmJIte HnBOTO Ha MoUHOC;
HnBTo Ha MoHocT ce NocOyBa Ha DnCnpeHa H36paHaTa 30Ha:1...9
Power Booster
IpoDyKTbTe cHa6deH cEHO HNBO Ha dOnTbJIHHTeHnHaMOUHOCT (HaD HNBO 9), KOEt OCTaBa AKTNBHO 3a 5 MNHyTu, CJeI KoEt MOUHOCTTa Ce Bpbua Ha npeduHOTo HNBO.
Dokochete (HaTnchete) 6yToHa 3a n36op + , 3a da yBeHnHTe HnBOTO Ha MoUHOCr (HaNHBOTo) n akTbIbpaTe Power Booster
HnBTo Power Booster e yka3aHo Ha dncnpe Ha n36paHaTa 3OHa CbC CNMBOJa"
NB:30HaTa 3a roTBeHe 4 (ФИГ.19), He pa3noJa c TaHmep 3a Power Booster;
3a da deakntbnpate Power Booster hatnche
Bridge Zones
3OnHTe 3a rotBeHe,6laTaoapeHHe Ha fYHKnTa Bridge ca B CbCToAHHe Da pa6OTKOMbHnPaHO cb3DaBaIK eHa eINHCTBeHa 3OHa CbC cbTO HBO Ha MOuHoc. Ta3n FyHKnIPO3BOJRA eHNO paBHomepHo rotBeHe c Tabn I TeHNKePc Nb C3HaHTeJIHn pa3Mepn.
Bb3MOxHO e Da ce n3NoJI3Ba BV KOM6HauZnI npEHaTa 3OHa 3a rotBeHe "Master" Cbc CboTBeTHaTa 3ad Hea "Secondaria" (3a da npOBepTe Ha KOI e PpeDnDEHa Ta3n FyHKu, KOHCyTnpaIte NIOCTpnpaHaTa YacT Ha TOBa pKoBOOcTBo).
3a da akTbnpaTe FyHKnraBridge:
- n36epete 30HaTa 3a rotBeHe "Master" (Tp8Ba Da 6bDe Ha HnBO Ha MOuHocT O)
-3aDpBxTe HaTnchat +do n3daBaHeto Ha 3ByKOB CnHaI, KOITo Ie 6bJe IocJIeDbAH OT NOBaTa Ha CmBOna
Mrra,Ha dncnpe8 (7) Ha 30hata 3a rotBeHe "Secondaria"
-и36epeTe 3oHaTa 3a rotBeHe "Secondaria"do 3ceKHyHn
-3aainTe HnBoto (MoHocTta) Ha pa6ota +Ha 30HaTa 3a rotBeHe "Master", Koeto ue 6bJe Bn3yaJIn3npaHO Ha CbOTBETHI INCIIe (7)
3a6eIekka: 3a da ce DeaKTbIbpa FyHKunra Bridge e DOCTaTbUHO da ce DoBePe 3oHaTa 3a roTBeHe Do TEMnepaTypa O".
- Temperature Manager
Temperature Manager e edha fynkua 3a KOHTpO, KOTo NO3BOJRA bnoDbpxKaHeTo Ha TOnnHaTa Ha e dHa NocTOHHa TEMNepaTypa Ha eNo ONTMm3nPaHO HnBO Ha MOuHcT MExdy 0 n1; nDeanHO 3a da ce noDbpxKAT TOnn Beue nprirotBeHnte xpaHn.
ФункцяТа Temperature Manager ce aKTHBnpa npednHaTtCKaHTo Ha 6yToHa C+
Ha nucnna Ha 3oHaTa, KOrTo pa60Tu B Temperature Manager ce noBBA cunBOJa
Child Lock
Child Lock no3B0n8Ba da ce n36eHne, decaTa da noIyuaT cnyaeh DoctbN do BKIOUbaHeTo Ha 3OHnte 3a neuehe IIN 3OHaTa 3a acnnpaun, KaTO 3a6paHra BA AKTNBUPaHETo Ha BCsKa eHa fHyKuJ.
Child Lock Moke da ce akTbnpa cAmo C BkIoueH npOyKT, HO c N3KIOUeHn 30Hn 3a rotBeHe (N 3OHa 3a acnpaun).
AkmueupaHe:
HaTNCHTe 3aIpbXbTe HaTNCaTH eNHOBpeMeHc

(FR) n
CneT OTOB AOTHO B CTeKTopa (2-FR); eINH akyctuhen CmHan yka3Ba, Ye Child Lock BkIIOueH n Ce BN3yAJIIN3npa "Ha DnCnNeTe (7).
Aekmueupahe:
- HaTnCHeTe 3aIpbXkTe HaTnChaTn eDHObpeMeHHo

(2-FR) n
CNEI TOBA OTHOBO eINH aKcTnueH cRHaYka3Ba,ye Child Locke n3Klnuoyen, n3Ye3Ba "L" Ha dncnnente (7).
Bpemehno deakmubupaHe: Bb3MOxHO e n3NOJ3BaHETO Ha OTdJIHa 3OHa OT rotBapcknI PLOT, DOpN I npu cyHKmra Child Lock aKTHBupaHa.
H3nbHeme cneDhume npouedypu:
HaTnCHeTe N 3aDpBxTe HaTnCHaTn + (2-FR) m
Cera Buee e Bb3MOxHDo da N3IOJ3BaTe NO HopMaJIeH Haun H3OHATA 3a rotBeHe, Child Lock ue ce aKTHBnpa OTHOBO npN IN3KJIIOUBAHeTo Ha rotBapCKnILOT.
TaMep
ФункцяТa Timer e edho obpaTHO OTbpoBaHe, KoTo e Bb3MOxHO Da Ce HAcTpON, DOpN eHOBpeMeHHO, Ha BCraKa 3OHa 3a RotBeHe (u Ha 3OHaTa 3a acnnpaun).
Cnei n3TuHaHe Ha 3aadaeHnI nepoD 30HaTa 3a roTBeHe (nn 30HaTa 3a acnpauN) ce n3KIOuBAt ABTomATuHO I notpe6nteJrT ce npedynpexJaBA cbc CneuaJIeH 3ByKO B cnHAn.
Timer ce akTbnpa Upe3 HaTnckaHe Ha cMbOla BeHara TOM TaMepBt E 3abbpwnl O6paTHOTo OTbpoBaHe, ce n3daBa 3ByKOB CmHaI (3a 2 MNHyN, INn CnPa npn HaTnCKaHe Ha npOn3BOeH 6yToH Ha nNoTa), DOkato DncnJeT (10) Mira, cbc CmBOba "00".
HacpoKa Ha cyHKunraTa Timer 3a nIota 3a rotBeHe
-36epete 30hata 3a rotbeHe.
HaTnchete 3a da Bne3e Te BB FyHKpIra Ta 3a perynipane.
- HactpoIte BpeMeTo Ha npOdbJxHtEnHocT Ha Timer:
HaTnCHeTe CeIeKTopa 3a Da yBeIuHITe aBTOMaTHUHOTo BpeMe 3a N3KnIOvBaHe
HaTnCHeTe CeIeKTopa 3a Da HamaJIInTe abTomAtuHOTo BpeMe 3a N3KnUoyBaHe
Ako JeJaete, NOBTopeTe onepaunra 3a ocTaHaJIte 3OHn Ha rotBeHe.
3a6eKka: BcKa 3oHa 3a roTBeHe MoKe Da HMa NaCTpoEHN eIN pa3nueH Timer; Ha DnCnpei (10) ue Ce noBn 10 cekyHdn, o6paTHO O6pOraBaHe Ha nocNeHn rN3bpaH pIoT, cneD Koeto, ce BN3yaAn3npa O6paTHOTO O6pOraBaHc CNo-MaJIko BpeMe.
3a n3KnOuBaHe Ha TaMepa:
3aTe CToHOCCTHa TaMepa Ha "D" , NocpeIcTBOM

- INKIIIOUeTe IIOTa 3a ROTBeHe, NOCpeIcTBOM

3a6eIexKa: yHKnraTa npoBjNkaBa da pa60Tu, aKo MekdyBpeMeHHo He 6bDat HATNCaTHn dpyn 6yToHn.
3a6enexka:OTctpaHaTaHa 30HaTa 3a rotBeHe, C Timer B
ynoTpe6a,ce noBBA CmBOJbI

- Egg Timer
ФункцяТа Egg Timer e edHо He3aBucnmo yctpoiCtBO 3a obpaTHO OTo6pOBAHe OT 30HHTe 3a FOrTBHe (NOT 30HaTAt 3a acnpaIy). CneI n3TuHane Ha 3aJaDeHnepnoI npTe6bnteJIrT ce npedynpeKdAba cbc cneuaJen 3ByKOB cnHAn.
Egg Timer ce akTbnpa Upe3 HaTnckaHe 3a6eIeKka : 3a HacTroNka Ha yHKuYraEgg Timer cIeBaIte CbUata npOeDpya, KaTo 3a yHKuYraTa Timer.
Power Limitation
Функцят Power Limitation no3BOLЯBa Да 6ьдe HabTpoeho Функционира themselves to Ha npodykta, KaTo ce orpaHnUH MakcmaHnHO to abcopbupaHe.
3a6eIeKka:HactpoKaTa Tp8Ba Da ce N3BbPun npn 13KNIuOeH PLOT,6e3 Da ce HaTuCKa 6yToHa B M0MeHTa Ha Cbbp3BaHeTO Ha NIOta 3a RotBeHe KbM eNEKeTpueckata
Mpeka, ININ pNIOBTOPOTO CBbp3BaHe Ha cMaTa eNEKtpuecka Mpeka, DO CNeDBAuNTe 2 MNHyTu.
3a da ce hactpon Power Limitation :

- npOdbJNkaBaiKaI da 3aApbXTe HaTnCHaT HATnCHeTe I

- 6bIe n3daen eHN KpaTbK 3BykOB CnHAn
-
npodbIjKabMn da 3aIpbXTe HaTNCHAT A HATNCHEt OtnycheTe + (2-FL)
-
HaTo3n eTan e Bb3MOxHO da ce ocBo6oDi 6yToHa
-
DnCnJIeT (7) Ha 30Ha FL noka3Ba B peDyBaUa ce NocJeIOBaTeJHOCCT CmBOnIte “C” U “O”, 3a Da NOKaKe, Ye e Bb3MOXHO Da CE N3BbPUn HAcTpOuKaTa
- DnCnpeT (7) Ha 30Ha RL noKa3Ba TekyuTaHaCTpOuKa**
$$ \begin{array}{l} 0 = 7, 4 \mathrm {K W} \ 1 = 3, 1 \mathrm {K W} \ 2 = 4, 5 \mathrm {K W} \ \end{array} $$
** no noDpa3bnpaHe HacTpoiKaTa e 3aJaDeHa Ha 7,4 KW
- 3a da cMeHnte HactpoiKaTa Ha Power Limitation HaTnChete
-3a Da 3ana3nTe HnpaBeHnra N36op,HaTnCHeTe ,3a2 CEkyHn;Ie 6bJe n3daen H yBjKHe 3ByKOB CnHan 3a da Ce NOTBbpNn3BbpSeHaTa HAcTpoiKa.
-HaTnCHeTe 3a da n3Ie3eTe ot yHKuYraTa
YIOTPEBA HA ACINPATOPA
BkJIIOUBaHe
HaTnchete (DOKOCHete) ON/OFF nnot 3a rotBeHe/ acnnpaTop
CBeTINHHNt INDnKaTOP ce BKNIOUba 3a Da yKaxe, ye NnotbT 3a rotBeHe/acnnpaTopbTe e rotOB 3a ynoTpe6a
HaTnCHeTe OTHOBO 3a Da n3KJIouHTE
3a6eJexka: Ta3n Функця Има npnoPntet cnprMo BCNUKIOCTaHaJI NФункциN.
BkIIOUbaHe Ha acnnpaTopa:
Iokochete (HaTnchete) 6yToHa 3a n36op 3a Da aKTHBnpaTe acnnpaTopa
- CkopoCt (MoUHocT) Ha acnnpaun:

DOKOCHTe (HaTnCHeTe) 6byToHa 3a N3bOp 3a Da yBeJIuHrTe CKOpocTTa (MOUHOCTTa) Ha acnnpaun (0-10);

dOKOCHTe (HaTnCHTe) 6yToHa 3a n36Op 3a Da HamaJIIne CKOPoCTTa (MOUHOCTTa) Ha acnnpaun (10-0);

Taimep
Timer ce aKTHBnpa, npn BCaCKOpocT, qpe3
HaTnCKaHe Ha CmBBoJa

Ha nncnpe (10) ce Bn3yaJn3npa 6paTHOTo npe6pOBAHe,

HaDnCnIe8 (9) ce NOBBA CIMBONa
PerynnpaHe Ha Timer, 3a acnpaun
Bb3MOxHo e da ce n3BbPn HaMeca n da ce npomEn 3aJaDeHTo BpeMe 3a N3KIOUbaHe. PpomHaTa ce n3BbPWBa OT aKTINBpuHn Timer.
HaTnchTe 3a Da yBeJIuHrTe aBtOMaTHUHOTo BpeMe 3a N3KNIUOVAHe
HaTnchete 3a Da HamaJInte aBTOMaTHHOTOBpeMe3aN3KJIIOUBaHe
- HndkaTop 3a 3anyuBaHe Ha qnttpn
AcnnpaTopbT noka3Ba, KOrato e Heo6xOIMo, da ce N3BbpHn IooIpbXkKaTa Ha qnItpnte:
MacneH qnTbp
LED INHINKATOpbT "FILTER"(11) ce BKNIOUBA
ΦnJIbTp 3a MmPn3Mn C aKTINBeH BbIJIeH
HdkatopbLED"FILTER"(11)Mura
Pecet 3anyuBaHe Ha qHnTpN
Cnei n3BbPwBaHe Ha noDpBxKkata Ha φnItpnte (MacJIeHn wnn aKTINBEH BbIeH) HATNCHE Te npOdbNKeTEnHO 6yToHa A;
INHdkaTopbT LED“FILTER" IN3KJIIOUba ce, KaTO pectapTnpa OT6pOraBaHeTo Ha INHdkaTopa.
- AKTNBIPAHe Ha INHdNkAToPa 3a 3aApbCTBaHe Ha - ΦHNTbp 3a MmPn3Mn C aKTHBEH BbFJIeH
To3n HndNKaTOp 06nKHOBeHo e N3KnIOueH.
3a da ce akTbVpa, HanpaBeTe cneHTo:
3aIbpxHa HnnpnTHHte Mnpn3Mn, npOn3Xoxkdaun OT roTBeHeTo.
PpOdykTBe cHa6dHc KOMnJIeKfHnItpn 3a Mnpn3Mn.
3anyuBaHeTo Ha HnIITpTe 3a Mnpn3Mn HAcTbNba CneJ
edHa 3HaunTeHNO npoBnKInTeHnHa yNoTppe6a, Cnopei Tnna
KxHn IueCTOTATA Ha NoUcNtBaHe Ha HnITbpa 3a Ma3HNHn.
HnIITpTe 3a Mnpn3Mn, Moat Da 6bDat pereHepnPauHn
TepMNuHO Ha BCEKn 2/3 MeceCa B npeDbapntElnHO HarpTa
PhyHa Ha 200^ 3a 45 MNHyTN. PpaBnIHOTO pereHepnPaa He
rapaHTnpa eHa eFeKTNBHocT Ha HepeKbchato
HnIITpnpaHe 3a 5 rOHNH.
BHMaHHe! He noCTabYIte 9nITpIte Ha IbHOTo Ha cyphata, a rN NOCTabYIte B Taba, KATO nOCTaBITE Ha MekDHHHa BnCOUHa.
Φur.17-17a-17b-17c
5.2 YctaHOBBAHe Ha nobpeu
| КOD HA Г佩шКATA | ОПИСАHЕ | ВьзMOЖН ПИЧИН | OTCTPAHЯBAHE HA Г佩шКATA |
| E2 | Зоната с komанди се Излочва норади пекалени Висoka temпература | Вьтешната Temпература на е leктуоннite Компоненти в пекалени Висoka | Изчakайе плота за се oxлади пекдя по използвate OTHOBO |
| E3 | Сыдьт 3a Гове и неюхаяц | Линca на магинту Сбойства | Остpanе тсда за ГOTBEHe |
| E5 | Пробlemы в komункецята мени notre teileckия InteRPpeicn i ИндуКцIHня мodyл | He сиза[elektriческо Зхранвае до мodyл; Зхранвашит кабел не в свьрзан павлино ип в deфekteh | П配电�сete Зхранваену Кьм Плота и праверete ВрьзКatura |
| 3a BCNCHД ругни сигнадиазаши 3a Г佩шka (E...U...C...) | Сьржete сьс сервiza 3a Т电商ueckeю obSCnyBXaHe и ПOCOчete КODа на OTЧЕТа Г佩шka | ||
5.3 TexHnuecko 06cnykBaHe
Ipeu da ce CbpxKeTe Cbc cepBn3a 3a TexHnuecko o6cnykBaHe:
1.YBepTe ce, ye He CTE B CbCTOHNHe da pa3peWITE camn npo6Iema Ha 6a3aTa Ha INHΦOpMaunra, NomeCTeHa B pa3deNa ,YCTaHOBBaHe Ha NOBpei.
2.I3KnIOyTe IN BKNIOyTe OTHOBO ypeDa, 3a Da ce yBepNTe, Ye HEn3npaBHOCTTa e OTCTpaHeHa.
Ako cIeBbnpocnHte npOBepKHeu3npaBHocTt e Bce Oue HaNue, CBbpxKeTe ce C Hau-6nn3Knr cepBn3 3a TexHnuecko o6cnykBaHe.
RO - Instruetiuni de montaj.si/utilizare
PpMHeHrTe ToIbKO TaKyo Nocdy, Ha KOTopo HaHeceH

BaxHo:
BO 36exahan Heo6paTUMoro NOBpeKdHnBaPOHNOBepxHOCTn He nCNoJIb3yIte Nocdy:
C HEPOBHbIM DnHlueM;
-MetajnnueckyUc3MaJnpoBaHHbIMHNIeM;
C 七epoxoBaTbIM DnHtEeM - BO n36eKaHne capanH H BapOCHN PAHeIN;
HIKOrda He CTaBBTe TROPYHe KAcTPOJIN N CKOBOPOJKN Ha NaHeJIb UynpaBNeHnBaPouHNoNOBepXHOCTbIO.
He BCE KacTPOHNI, npiroDHBie DnI INHyKUHOHHbIX NaHeJIe, DOCTaTOUHO xopoIo pa6OtaIOT NO npuHHe TORO, UTo Ix DNHua He NOnHOCTbIO u3rOToBNeHbI N3 feppomarHHTbIX MaTePnaOB!! Pokynar nocydy, PpOKOHrPoJnpyIte, UTo6bl:
Диш e 6blno NOHOCbIO n3rotOBneHO n3 peppomarHHTbIX MaTePnaIOB. B npOTNBOM cnyae naaet 3ΦeKTHBHOCTb paBHOMepHOCTb TennonepeDaun, a TemnepaTypa nobepxHOCTn NOcydb Moket 6bl He noDxOJaIe IINr rTOBKn.

HET!
-Дише He codepkaNo aIOMnHn: nocya He 6ydet pa3orpeBaTbCS nHykToPamN, nIN OHN ee BOOSe He obHapyKAT.
HET!
Hnua He OKa3aJIncb HepOBHBIMN C IeipoXoBaToI NOBepxHOCTbIO.
YMeHbIaOT NOBepxHOCTb KOHTaKTaNHyKTopa C NocyDoN,NOHIXa 3ΦΦeKTHBHOCTb HArpeBa N yXyDua pe3yNbTaTbI rTOBKN.
A!
Baxho: HkOrda He cTaBbTe TOpRyHe KAcTpOJI NCKOBOPoKn Ha NaHelen ynpabIeHHa BapOCHIOBepxHOCTbIo.
2.1.1 CyuaceByIOUne EMKoCTn
Moxho npoBepntb, oIaJaet Jn MaTePnaJ KacTpOJI MaHHTbIMN CBOINCTBaMn Pn NOMOu INPOCTORo MaHNTa. KAcTpOJI HENPIROdHbI DnA IcNoJIb3OBAHnE, ECJI MArHIT He pearnpuyet Ha Hx. N B 3tOM cnyae IMeOT cNy yKa3AHn NaparpaFa.
2.1.2 PekomeHdyeMbIe DnAmETpbI DHa KacTpOJIb BAXHO: npHecooTBeTCTByIOuXx DnAmETpax NocyDbI BapouHbIe 3OHbI He BKIOUaIOTcR.
YTO6bI y3HaTb, KAKOB MNHIMMaJIbHbI dNaMeTp nocydbI Dnra rOTOBKn y KaJDoN OTdEJIbHOr 3OHbI, CM. ININIOCTpnpOBAHHyU qACTb DaHHORo pyKOBOcTBa.
ДяdoctиженHaHnyuXpe3yNbTaTOB peKOMeHdyTeC:
- IcnoIb3OBAtB CKBOpOdbI N KAcTpPOnN C DnAmETpOM dHa, paBHbIM DnAmETpy 3OHb BApKN.
- No BO3MOXHOCn HAppbBaTb NocyDy B XOe ROTOBK KpbIkwO, Oc06eHHo, ecnn ee Bicota npeBbiwaeT 22 cm.
Pa3MeuTaB nocydy B ueHTpe BapOyHO 30HbI, 6o3HaueHHo Ha BapOyHO naHeJI.
IcnoJb3OBAHne BbITaXKn
CnCTema BbITJAKKMOXET N3ROTABINBaTbCSB BBITJXHOI BepCN, C BbIBODOM napOB hapxu, uΦNtpyUoJe BepCN, C BHyTpENHe peunpkyJauyne.

IcnoJIb3OBaHHe cpeXnme OTbOda Bo3dyxa
Pnc.7
Iapbl BbIBOaTcHApKy no KaHaJAm (npno6peTaHOTcOtJeBHO), npKpePiEHHbIM K CoeHNHTeHOMy fNaHcy, BXoJaUeMy BV KOMnJIeKT NOCTaBKn.
Pa3Mep BbITRAKHO KAHana DOJXeH COOTBETCTBOBaTb pa3Mepy coeINHHTeBHoro KOIbua:
-При КВадраTHOM ceheHIN BblxOДHOrO OTBepCTn: 222x89 MM
- npn KpyTlOM ceyHnn BbIXoHOrO OTBepCTn: 0 150 MM (*)
IЯ NOJIyEHHI DOJIOJIHHTeJIbHOH INHΦOpMaUIN O6paaITeCb K CTpaHnue IINIOCTpnpOBaHHoY aCTn DaHHOpyKOBODCTBa,IOCBraIeHHoN IpiHaIeXHOCrM BbITxHOOBepCnn. PoDCoeDInHte N3dJIeN K BbITxKHBm Tpy6am NOTBepCTnM BCTHe, IMeHOuIM DnaMeTp, KOtOpbI paBeH dNaMeTpy BbIXoDHOrO OTBepCTnR (CoeDHHeJIbHOrO fHaHa).
IcnoJb3ObaHHe BbITaXbIX Tpy6 N OTBepCTn B CTeHe C MeHbIm DnAmETpOM npNBEdT K yxUdSeHnIO pa6oHnx XapaKTepNCtIK CnCTeMbI BbITaXKn I CyueCTBeHHOMy yBeJIuHEnHIO yPOBHa Shyma.
TOMy npoun3Bountenb CHmaet Cce6BcKyoOTBetCTBeHHOCTb,CBaHHyO C 3TNM aKTOM.
1CnOJb3yIteKaKMOXHO6OoneeKOPOtKIN KaHAn
1 NcnoIb3yIte KaHaJI C MInHIMaJIbHO BO3MOXHbIM KOJIueCTBOM H3r6OB (MaKcHMaJIbHbI yrOJI n3r6a: 90°).
He donyckaTe cyuectBeHHoro n3MeHnI ceHnKaHaHa.

IcnoJb30BaHne BpeXnme peuRpyJauCnna Txa
Pnc.10
BcacsBaemBo3dyxΦnIbtpyETcC nOMoHcneuaNbHbIX KInpo- n 3anaxoynaBnBaIOuXxΦnIbTPOB,a 3aTeM Bo3BpaaaetcB NomeeHne. H3deJIne KOMnIeKTyETCBcEM HeO6XoDmMbIM dNcSTaHdApTHoYCTAHOBKn C BbIXoDhblm OTBepCTHeM dNra BO3dyxaB TopceBOy qactn nnHTyCa Me6eHN. DnnoJyHeHHoN HΦopMaun ObaaTecb K cTpaHnce HIIIOCTpnpOBaHHo Yactn DaHHoro pyKOBOcTBa, IocBraueHHo PnHaIeXHOCTMΦnIbTpkyUeBepCN.
Pocetnte caTbI www.elica.com u www.shop.elica.com,
TO6bI O3HaKOMNTbC C NOJIHbIM accOpTmEHTOM KOMnIeKToB IJI pa3JIuHbIX BepcN yCTaHOBKn, KaK ΦnIbTpuyoSeI, TAK N BCacBiBaIOseI.
3. YcTaHOBka
- 3JIeKtpnueckn MEXaHnueckn MOHTaX DOJXHbI BbINOJHrTbCn CNeuJaN3nPoBaHHbIM NepcoHaJOM.
Iprn6op npedHa3NaueH dJa yctaHOBKn B CToJIeShNcUy TOnIuHNoi 2-6 CM B clyuae ycTaHOBKn CBEPXY n 2,5-6 CM B clyuae ycTaHOBKn 3AIOJINlO.
MnHmAlbHoe pacCToHne MeJy BapOuHOI NaHeJIbIO N CTeHOJ DOJIxHO COCTaBJIaTb He MeHee 5 CM C nepeJHcN CTOpOHbl, He MeHee 4 CM NO 6OKam I He MeHee 50 CM OT BepXHIX HaBeCHbIX ShKaΦOB.
PpmeaHne. PekomeHyembIe paCCTOHNRABJIOTcR
OpneHTnpoBOyHbIMN: npn pOeKtnpOBaHn PocTpaHCTB
Heo6xOaMo CneIOBaTb yKa3aHnA M npOn3BODNTeJI KyxOHNo Me6eJI.

3.1 Θлектprческoe coeДиненHe
Pnc.3
OTKIOUHTb np6op OT cETn. YCTaHOBka DOJXHa BbINOJIHrTbCS KBAINΦNtPOBaHHbIM NepcoHAnOM, 3HaIOUIM DeIcTByIOUne HOpMbI NO YCTaHOBKe I TexHnke 6e3OJaCHOCTH. . Ipon3BOInTeJIb CHImaET C Ce6a BCaKyIO TBETCTBEHOCTh 3a yUeP6 JIOdAm, XINBOTHBIM INI INMyUeCTBy, HaHeceHHbI B pe3yIbTaTE HeCO6JIoDEHnRA yKa3aHn, COePxaUxCBAHNOM pa3DeJe. Ka6eJIb NITAHnA DOJXeH 6bITb DOCTaTOUHO DInHHbIM, YTO6bl MOxHO 6blIO ChYb BApOChyIO NaHeJIb C pa6OeI CTOnEShnUcbl. Y6eDNTbcra, YTO HApRjXeHne, yKa3aHnHO Ha 3aBOIDCKO Ta6NIuKe, pacNOJoxEHnOH Ha dHISe pN60pa, COOTBeTCTBYET HApRjXeHIO B DOME, B KOTOPOM OH 6yDet YCTaHOBLeH. He NCNoJIb3OBaTb yDNInHTeJI. 3JIeKTPueckn Ka6JIb 3a3EmHeHnA DoJXeH 6blTb Ha 2 CM dINHHee dpyrnx Ka6eJe. EcII
6bITOBOINpN6OpHe cna6KeH Ka6eMeM NHTAHNA,NCNoJIb30BaTb Ka6eJIb C DnAmETpOM pPOBOOB MInHMym 2,5 MM2 Pn MOUHOCTn Do 7200 Bt,a npn BoIbWeIMoUHOCTn CeueHne DOJXHO COCTaBnA Tb 4 MM2. Hn BV ToueK Tempepatya Ka6eJIy He doJXHa npeBbIaTb BoJee Yem Ha 50^ TEMpepatpy B NOMeUeHN. UcPoIcTBo IpeDHa3HaueHo dJa NOCTOARHHOro IOdKlIOUeHry K 3JIeKTPocETn.
BHMaHne! PepeI NOBTOpHbIM NOKJIIOUeHHeM cENI K CETN NITAHnI DJI npOBepKn ee npabINbHOro 0yHKUHOHPOBAHnCJeDyET BcERda npOBeprT, YTObI CeTeBOI Ka6eJIb 6bl CMOHTuPOBaH nPaBUNbHO. BHMaHne! 3aMeHa COeHNHTbHbI Ka6eJIaOJXHa IPOIN3BOIDtbcA BTOPn3OBaHHo CnyXbOITexHnueCKo NOMOUI INI INIOM C aHaJIOuHOn KBaIIΦnKaUneI.
Примочи: npibop nmeet cyHKcHIO ORpaHnueHЯ MOUHOCTN Power Limitation, no3BOJIAOuYU 3aAdTb MaKcImaJIbHbI Iopor notpe6JIeHnRA KBr. HAcTpoJa DOJXHa BblNOJHrTbcB BMOMeHT NOkJIIOUeHnA N3DeJIIN K 3JIeKTPnueCKoC CETn INB MOMEHT IOBTOPHORO BKLIQUeHnA CAMOJ 3JIeKTPnueCKoC CETn (B TeUeHne NocJeDyUOxN 2 MNHyT). BbIbepnte XapaKTepnCTnK 3aUHTbI 3JIeKTPnueCKoC CNCTEmbI B 3aBNCIMOCTN OT Bbl6paHHoro UPOBHe ORpaHnueHЯ MOUHOCTN. IopraDOK HAcTPOJKn FOHNKcHn Power Limitation yka3aH B pa3dJe «ФункцIHOpOBaHnE» daHHoro pyKOBoDCTBa.
3.3 yctaHObKa
IpeedHaayanomyctaHOBKn:
Iocne pacnakOBKn H3eJIny Heo6xOuMo y6eHTbcra, YTO OHO He 6bINO NOBpeXdeHO BO BpeM TaHcnpTnpOBKn, N B Cnyuee OhapyKeHH np6Jem, npexDe qem npctTyNaTb K yCTaHOBe, HO NeAyt CB83atbC n pOpaBcuom nN c OTdEOM texHuecko NODepKKn KJIeHToB.
- Y6eIHTbCra, yTO6bl Iprno6peTeHHoe n3dJIne HMeIO pa3Mepbl, IOxOJaUne DnB BBbpaHcN 30HbI yCTaHOBKn.
- Y6eHbC8, yTO6bI BHyTpnu ynaKOBn He 6bINO (no COO6paXeHnM TpaHCnOpTnPOBKn) BXODaNIX B KOMJIeKT MaTePnaJIOB (HaNPmep, NaKeTNIKOB C BNHTAMn, rapaHTn n T.d.); npn HaJIuHm nx CneDyET N3BJIeYb n CoXpaHnTb.
- Поберпь такxe, чтобbl рядом с мecTom установки. нмелась лесгтуческа розетka.
Iodrotobka Me6eJbHoro 3nemehTa nBCTpaBaHHa:
- I3dene HeIb3a yCTaHABINBaTb Ha XOJIODINbHOe o6OpyIDOBAHne, NocyDOMOEuHbIe MaunHbI, Neu, dYXOBKn, CTpaJIbHbIe MaUNHbI n CyUINKn.
- BbINOHNHTB BCE pa60TbI no pe3Ke Me6eIIO yCTaHOBNBapOCHN nAHeIIN aKKypaTHo ydaIHTb cTpYKky IINONIIKN.
INPMEAHNE: INCNOJb3OBaTb ODHOKOMNoHEHTbI KNei-repMeTnK (S), ycToHnBbI K TempeaTypam Do 250°; nepeD yCTaHOBKO KNLENBaEMble NOBepXHOCTN Heo6xOIMo TtateJIbHO OHCTNTb, YdaJIbVB BCE BeueCTBa, KOtOpBe MOrY TpePraTCTBOBaTb Nx aIRe3Mn (HaNPmEp, aHTNaIRe3Nbbl, KOHCEPBAtbI, CMa3Kn, Macna, NopoWkn, OCTaTK cTapBX KneEB N T.I.); Knei Heo6xOIMo paBHomepHO pacnpedeNtB NO BCeMy nepIMeTpPy paMbI; NocLe CKNeIBAHNA DaTb KNeIO BbICOXHyTB TeYeHne INPImepHO 24 YacOB.
Pnc.1B-2B
BHHMaHHe! UcTaHOBka BnHTOB nФИKcIpyUOx npIcNOC6JIeHm 6e3 CO6JIIODeHnJaHHbIX INHCTpyKcIIMoKET IOBLeYb 3a CO60n HaIIuYe pNCKOB, CBraHHbIX C 3JIeKTPnueCTBOM.
PnmeHne: nI npaBnBHO yCTaHOBKn 3dEINPAKOMeHpyETcObepHyTb TpyboNPOBOdb KNeKOJIeHTOn CO CJeDyUOIMN XapaKTepNCkAMN:
- эл actиная ппенka ИЗ мягкоу NBX c клем Ha akрILA THOH OCHOBE
-coOTBETCTBnE cTAnDapTy DIN EN 60454
-aHTnInpeH
-OTINHAR yCTOuNBOCTb K CTapeHHO - yCTOuHBOcTB K npepaam TemnepaTpybl
- yCTOnuBocTb K Hn3KmTempepaTypaM
4.Функционрованne
Pahenb ynpabNeHn
PnmeuHne: IJIy BbIbopa FyHKnn DocTaTOUHO CInrKa KChyTcR (HaKAtb) COOTBeTCTByIOUe NIKTORpAMMbI.
Khonkn
1.BKII/BbIKI BapOCHIOBepxHOCTN/BBITRAKKIN BapOCHIOBepxHOCTN
2. NpeeknoateBbapOHyix30H YBeJIeHHeNyePObHr MOUHOCTN
3. YBENUHHeNcCKOpOCTn (MOUHOCTn) BCaCbIBAHNA
4.ymehbweHne ypoBnMoOHOCTn
ymehbweHne CKOPoCTN (MOUHOCTn) BCacbIBAHn
ymehbweHn BpeMeHn TaMepa
5.BKIOUeHne TaMepa YBeJIuYeHne BpeMeHn TaMepa
6.BKnHoueHne aBToMaTHuecknx FyHKuN C6poc 3acopeHHaHbTPOB
Dncnne/CBeTOBbIe HndkaTopbl
- OTo6paKeHHe yPoBnMa MoUHOCTN
- OTo6paKeHHe CKOpocTn (MOUHOCTn) BCaCbIBaHnI
9.ИндикатopВКЛЮЧЕНЯТаймера - OTo6paXeHHe BpeMeHn TaMepa
11.ИндikatopФунки n ABOMaTHueCKO BbITJxKn Индikatop Heo6xOДmOCTn 06cIyKuBaHЯФINbTpOB Индikatop pa6tbl c yctpoiCTBOM SNAP
NCIOJIb3OBAHNE BAPOUHOI NOBEPXHOCTN
BaxKaHAnHΦopMaζη
Bce cyHKuH 3ToB BapOCH NoBepxHOCTn CnpoeKTHPOBAHbI c co6JIIODeHHem CTpOINx HOpM 6e30NaCHOCTN.
POnTOMy:
- HeKOTOpbIe cyHKcHn He aKTbBnpyOTcR, nnn OTKIOUaOTcra ABTOMaTHueCKn, pnp OTCyTCTBn KAcTpIOJIb Ha NOBepXHOCTn Hn npn INx HEnpaBnblHom pa3MeueHN.
B HeKOTOpbIX cnyaX akTbHpOBaHHbIe FyHKUIN ABTomTuCeCKN OTKIOUaIOTcY ue3 HeCKOJIbKO ceKyHd, ecnI Ira Bb6paHHo FyHKUIN Heo6xOIMa DOnOJHITeJIbHa HacToPoiKa (HaNP::"BkIOuHTb BapOHyIO NOBepXHocTB" 6e3 FyHKUIN "Bb6paTb BapOHyIO 30Hy" N "Pa6OuaI TeMnepatypa", INI "FyHKUIN Lock", INI "TaImep".

BHHMaHHe! B cnyae (Ha npMep) dIInTeJbHorO
NCN0JIb3OBaHnB BbIKIIOUeHHe BapOCHoN 3OHbIMoXeT bIbHE MTHOBeHHbIM, NockoJIbKy OHa HaxoDITcB INpoCeCE OXJIaXJDeHnra; Ha DInCIIpee BapOCHbIX 3OH NOBHTcC NIMBOJI
“H”,yka3bBAIOUHnHaHANuHE daHHoIΦa3bl.
IonoKdnte, noka dinne BbIKIOHTc, nepeTem KaK nooTn K BapouHoi 3OHe.
DcnnenBapoHOn3OhbI
Ha nCnIeX, COOTBETCTByUxN X BAPOHyIM 3OHAM, OTo6paKaIoTc CNeDyUoUne CMBOJbI:
- INHdkatop octTaToCHoro TenJa
Iocne BbIKHueHn OdHOn Hn HeCKoNbKnx BapOuHbIX 3OH Ha HAnHnue OCTaTOHOrTo Tnla yKa3bBaET INDnKaTOp COOTBcTByIOSeI 3OHbl.
Pa6ota
PnmeaHne: nra aKtNbauu nnboi cyHKun Heo6xOIMO npedBapntbHo aKtNBupOBaTb Tpe6yEmyo 30Hy.
BkHoueHne
KochnTeCb (HaXMITE) NIKTORpAMMbI BapouHoi NOBepxHOCTN.

//BbIKJ
3aropntc CBeTOBOHnDnKaTOp, yka3bIBaHaTo, yTO BapOchna NOBepxHOCTb/BbITXkKa rOTOBa K NcNoJIb3OBAHnIO. HaxMnte NIKTORpAMMy eue pa3, YTO6bl BBIKNHOHTb ycTPOIcTB0.
PpmeaHHe:3TaФyHKuYRABnEeTcR npOpnteTHoHaBCEMNOCtaJIbHbIMN.
Bb16op BapOhybIX 30H
Kochntecb (HaXmTe) KHOPIKn Bbl6opa KoTpa COOTBETCTByet Tpe6yeMo3OHe BapKn.
9 Power Level (9 ypOBHeM MoHocTn)
Bapouha nOBepxHocTb IMeet 9 ypOBeH MoUHOCTH.
Kochntecb (HaXMite) KhoNKn BbIbopa +, nla yBeJIuHcHnA yPoBnMoUHOCTn.
KochnTeCb (HaXmnte) KONKn BblOpa ,ДЯуMeHbWeHry yPoBnMouHocTn.
YPOBHeMoUHOCTN OTo6paXaETcHa DInCnJIe BbI6paHHo30HbI:1...9
Power Booster (ycnHntelb moHoctn)
U3dene HMeet DOONHHTeNBbI yPOBeH MoHocTn (Bblwe yPOBHa), KOTOpbIO OCTaETcA kTNHBbIM B TeueHne 5 MNHyT, NocNe Yero MOuHOCb BO3BpaaTcA K PpeBldyseMy yPOBHO.
Kochnutecb (Haxmnte) KhoNkBbIbopa +,dnyBveuueHn yPOBn MOUHOCTn (Bblue yPOBnS) nAKTINBPynte FyHKnIO Power Booster. PexIM Power Booster oTo6paXaeTcHa DnCnnee BbIbpaHHo 3OHBIC NOMOUsIO NIKTORpAMMbIP
PpmeaHne: Bpa6oey 30He (Pnc.19), HET TaMepa DnA cyHKuIN Power Booster;
ДЯ OTKПОЧЕНИ Функции Power Booster naxmite
Bridge Zones (MocToBbIe 3OHbI)
Bapouhhe 30h6IaOdaepyHKuHn Bridge moryt pa6oTaB COBMeCTHO, co3dabra eHy 3OHy C OINHaKOBbIM yPOBHe M OUHOCIn. DAnHna FyHKUO ObecneuBaET paBHomepHoe npiroTOBHeHne C nCIOJIb3OBAHNEM CKOBOPOK n KAcTpOJIb 6OJIbXn pa3MepOB.
COBMECTHO MOXHO NcOJIb3OBaTb fpoHTaJIbHyIO BApOCHyIO 3OHY «OChOBHnA» I COOTBeTCTByIOUyIO 3OHY
«BcnomoratelbHa」, HAXOJIyIOC B 3aHHeu YactN (yTo6bl y3HaTb,ДЯ KAKINx 3OH npeDyCMOTpeHa daHHa
Функци,обpaauTeCb K UIIIOCTpnpoBaHNo YactN DaHHOrO pykoBoDCTBa).
ДяakTBAcznФункcznBridge:
- BbI6epnTe BapouHyIO 30Hy «OcHOBHa» C nOMoUbIO
(BKOTOPOJdoJIKeH6bITb yCTaHOBHeH yoBeHb MoUHocTn 0);
- ydepxnBaTe HaxaToN NKTOrpaMMy +do noDaun 3BvKOBOrO CnHaNa, NOcNe Yero NoRbTcra MrraUoH CmBOI
Ha dincnnee (7) Bapouhoi 30hI «BcnoMoraTeJIbHnA»; -BbI6epnte Bapouhyo 30Hy «BcnoMoraTeJIbHnA» B TeueHne 3 cekyHd;
-yctaHOBtE ypoBeHb MoUHocTn +,Kak B BapOuHOI 3OHe «OChOBHa》,KOTOpbIOTO6pa3ITcHa DmCnIe(7). IpImeuaHne:INRA OTKnIOUeHnIyHKuIN Bridge DOCTaTOUHO yCTaHOBtB Tempeatpy B BapOuHOI 3OHe Ha 3HaueHne
- Temperature Manager (ynpabJeHne TemnepaTpoi)
Temperature Manager npedctabJrEco6oФyHKuH O npabHe, KOtopa obecneuBaet noDepKahne NOCTOHHo TEMnepaTypbHa ONTUM3nPOBaHOM yPOBHe MOUHOcTN MeJxdy 0 n1; ndeJIbHa dIy noDepKaHry Uke npiroTOBHeHHbIX 6blD B HarpETOM COCTOHm. FyHKuH Temperature Manager AKTINBpyETc npi nepBOM Haxatnn NIKTORpaMMbl
Ha nncnnee BbipahHOn 30hbl, KOTopra pa6oTaet B peKmme Temperature Manager, noBntc CmBOr.
Child Lock (zaueta ot detei)
Функця Child Lock no3B0JЯET n36ExaTb cIyauHOrO BKNIOUeHn IeTbMn BapOuHbIX 3OH N 3OHbI BbITRAKKN, 6JOKnpyaKtINBaCNUIIOBOnФункци.
Функию Child Lock moxno aKtubnpoBaTb TOnbko npB KJIIOUeHHOM yCTpOINCTBE, HO npN BbIKIOUeHHbIX BApOHybIX 3OHax (a TaKe BCacbIbAUoSei 3OHe).
BknioyeHue:
-ODHOBpeMeHHo HaxMMTe u ydePknBaIte KhoNKn
(FR)
3aTeM HaxMMTe eue pa3 n Nocne 3Toro
nepeKIOUcATENB+(2-FR);
3ByKOBoCnHaN CoO6uNT O TOM, YTO fYHKnA Child
Lock aKTINBa, a Ha dncnnee (7) NOABUTcNIKTORpMaMa
BbIKIOueHue:
ODHOBpeMeHHo HaxMITE u ydepxnBaTe KhoNk (2-FR) ; 3aTEM CHOBA 3ByKOBoCnHaI COo6uNT O TOM, YTO cyHKmra Child Lock OTKnIOyeHa, a Ha dncnnee (7) nChesHET NIKTORpAMMa L.
BpeMeHHoe OTKIOueHne: OHy BapOCHyIO 3OHy MOxHO nCNoJIb3OBaTb DaKe Pn aKTHBHO fYHKuIN Child Lock. BbINOHNHe cNeDyUoune DeIcTBnA:
HaxMnte u depKnBaTe KhoNk (2-FR) n. NocIe 3TOrO MOxHO NCIOJIb3OBaTb BapOHyIO NOBepXHOCTb BO6bIyHOM peXIMe. OYHKUra Child Lock BHOBB aKTNBIPyETcA NOCJIe BbIKNoyeHna BApOHOI NOBepXHOCTN.
- Timer (taɪmep)
Функцу Timer no3BOJЯET yCTaHAbNBAt b 6paTHbI OTCHT BpeMeHn, B TOM YNCNE BpeMeHHO, B JIObOu BapOuHoi 3OHe (a TAKKe B 3OHe BBITrAKK).
No nCTeueHn yCTaHOBHeHHOr BpemeHn BapOuHa 30Ha (NIN 30Ha BbITXKK) ABTOMaTHueCKn BbIKIOHaeTcR, OcEM NOIb3OBaTeNb ONOBUaETc3ByKOBbIM CNrHaJOM.
Функця Timer akTNBPyetyra HaxaTneM KHONK KaT OJIbKO TaIMep 3aKOHHT o6paTHbI OTCyET, pO3ByuNT aKyCTnueckn CnHaJ (B TeueHne 2 MInyT, nNt OTKnIOHTcR, npHaxatnn JIO6oB KHOKN NOBepXHocT), a Ha DnCnnee (10) 3amiraet CmBOJ.
PerylnpOBka fynKcun Timer dna BapouHno NOBepxHoctn
- BbIbepnTe BapOHy30Hy

HaKMTe KHOKy ,TO6bI BOITN B peKIM HAcTPOIN yHKUIN.
- YctaHOBNTe Bpem,OTcHtBbAeMoE cyHKnei Timer:
HaxMMTe nepeKJIIOUaTeIb DnYyBeJIuYeHnB BpEmHn ABTomATNuECKOTo OTKJIOUeHn; HaxMMTe nepeKJIIOUaTeIb DnYyMeHbUeHn BpEmHn ABTomATNuECKOTo OTKJIOUeHn.
Pn Heo6xOaHMoCTn NOBtOpnte onepaunIO nIpynx BapOuHbIX 30H.
PnmeaHne:Ja KaKdo30Hb MoXHO yCTaHOBtB OTdJIbHbI TaMep. Ha dncnnee (10) noBtCra, Ha 10 cekyH, o6paTHbI OTCeT dnn PoCneDHe Bbl6paHHo NOBepxHOCTn, Pocne Yero OTo6pa3NTc8 O6paTHbI OTCeT C MeHbIM BpeMeHem.
Длвькючен�аMuMepa:
yCTaHOBNTe3HaueHHe TaMepa HaO, c NOMOuIbIO
KHONKN
BbIKHIOHTe BApOHyIO NOBepXHOCTb C NOMOLLIOK HONIKI

PnmeaHne: yHKnOCTaHcTcAkTNBHO,ecnYepe3 HeKoToPoE BpemHe 6yDHT HxKaTbI pyrIne KhoNKn.
PpIMeuaHHe: pAOM c DnCnIeem BApOuHoi 3OHbI, np

NCIOJIb3OBaHH TaMepa,IOBJIeTcI NIKTORpAMMa
- Egg Timer (raHmep dna BapKn nuc)
Функця Egg Timer npoIN3BOJNT obpaTHbI OTCyET BpemeHn He3aBnCmO OT BapOuHbIX 30H (a TaKke 3OHbI BbITraKKn).O6 OKOHaHHYcTAHOBJIeHHOrO INTEPBanI NOnb3OBaTb 6yDeT ONOBSeH C NOMOUsIO COOTBeTCTBYUeIero 3ByKOBOrO CNHaHa.

Функця Egg Timer akTNBpyetyc ydepxaHneM KhoNkn
PpmeaHne: nHaCTpOKn FyHKuMn Egg Timer
BbIIOJIHnTe Te Xe DeIcTBn, YTO n IaIyHKuIN Timer.
Power Limitation (orpaHnueHne MoHocTn)
Функця Power Limitation no3BONЯET yctaHOBTb orpaHnueHne Ha noTpe6JIeHne MaKcImaJIbHOJ MOUHOCTN npu paBoTe yCTpOiCTBa.
PnmeaHHe: HactpoKcIeDyET BbINONHrTb npi BbIKIOeHHoB BapOuHO NobepxHOCTN, He Haxmma KONky
O, B MOMENT NOДКПЮЧЕНИЯ ИЗDEЛЯ K 3NEKТРИСЕСКО CETN INI NIOCE NOBTOPHO NOДКПЮЧЕÑA K 3NEKTPOCETN (В TEчЕНЕ СLENYUQUHx 2 MInHyT)..
Днэнагштейкфункшн Power Limitation:
-
HaxMMTe KONky
-
npoiojka ydepxmbaT KHONKHaXMnTe n OTnycTne
- yCTPOICTBO IODACT KOPOTKIN 3BYKOBOI CNIHAI
- npoJokKa ydepkuBaTb KhoNky HaxMnte n OTnycTe KhoNky+ (2-FL)
- NOCLTE 3TORO MOXHO OTNHYCTNBKONKY
Ha dncnnee (7) 30hbl FL oTo6pa3rTc nonepeMeHHo CmBOnbI C n 0, YTO CBnTeJIbCTByeT O BO3MOxHOCTH N BblONHHTb HaCTpoiKy;
Ha DnCnnee (7) 30HbI RL oTo6paKaetcTekuza HAcTpOuKa**
$$ \begin{array}{l} 0 = 7, 4 \mathrm {K W} \ 1 = 3. 1 \mathrm {K W} \ 2 = 4. 5 \mathrm {K W} \ \end{array} $$
** no ymouhanu yctaHO He 3NaueHne 7,4 KBT
-ДяиИЗмehнЯнстpoКиФункшn Power Limitation
HaxMMTe KhoNky (2-FL);
-Для coхpaHeHЯ BbIbpaHHOrO 3HaueHЯ ydepKuBaITe
KHOKNy B TeueHne 2 cekHy; yCTpoNCTBO NOaCT DnHHbI 3ByKOBoCnHaI, NODTBepXdA BblONHeHHyo HAcTPONky;
- Haxmte KhoNky, TTo6bl BbIaHNo 13 daHHo FyHKcIM.
NCIOJIb3OBAHNE BbITJAKKNI
BkHIOHeHne
KoCHNTecb (HaxMMTE) NIKTOrpamMbI BapOuHOH NOBepxHOCTN.

BKn/BbIKn
3aropntcBcTeBOHnDnKaTOp, yKa3bIBaHa To, YTO BapOuHaI NOBepxHOCTb/BbITJgKa rOTOBa K NcIOJIb3OBAHnIO. HaxMnte NIKTORpAMMy eSe pa3, YTO6bl BBIKIOHTb yCTpoIcTB0.
PnmueyaHne:3TaФyHKuNЯBnAeTcnpOpntEOHaBCEMNUCTaJIbHbIMN.
BkTIOueHHe BbITRAKKI:
KoCHHTecb (HaKMITE) KHOPIK BbI6opa BbITAKK.

ДЛЯ ВКПЮЧЕНИЗ
PerynpoBkA ckopocTn (MOHOCTH) BCacbIBaHHa:
KoCHNTecb (HaxMMTe) KHOJKN Bbl6opa ,ДЯ yBeJIuWeHnckOpOCTn (MOUHOCTn) BCaCbBaHn(0-10);
KOCHTecb (HaxMMTe) KHOPIBbIbOpa -,ДЯуMeHBseHnckOpOCTn (MOUHOCTn) BCaCbIBaHnra (10-0).
- Timer (tauMep)
Функцу TimerakTINBUPyETc npnIIObOckopoctn
HaKaTHeM KHONK
Ha dncnnee (10) oTo6paKaetc8 o6paThbI OTChET;
Ha nncnnee (9) noBntc CnmboJ
YcTaHObKa TaMepa DnB BbITJAKK
YcTaHOBJIeHHoe BpeM OTKHoueHn MOXHO N3MeHHTb.
N3MeHeHne OcyueCTBJIeTc npu BKIOUeHHOM TaImepe.
HaxMMTe KhoNky DnIyBvEInuYeHnBpeMeHN aBTOMaTNUeCKOrO OTKNoUeHn;
HaxmTe KhoNky Dnay yMeHbSeHnBpeMeHn ABTomatueckoro OTKIOUeHn.
HnDnKaTOp 3acopeHna HbTpOB
BbITJka IOnaet CnHAn, ecN Heo6xOdmo BbIIOJIHTb Texo6cnyXnBaHne pntpOB:
KnpoynaBnBaOuOnnΦnIbTp
3aTropaeTcNHNikKaTOp "FILTER" (11)
3anaxoynaBnBaHoum n C aKTHBnPOBaHHbIM yrlem
Mnraet nHdkatop "FILTER"(11)
C6poc 3acopeneHnHnIbTpOB
Iocne BbIOJIHeHn TExo6cnyKINBaHn HJIbTpOB (XInpoynabNBAIOUero n cAKTNBnPOBaHHbIM yrJEm) HAXMNTe
ydepknBaTe KhoNky
CBETOBON HNDNKATOP“FILTER”norachet,noCne Yero BO306HOBNTcAOTcHETdo Cpa6aTbIBAHNIA HNDNKATOPa
AknBaun HnDnKaTopa 3acopeHn 3anaxoynaBnBaIOoero 0 npbtpa C aKTNBnPOBaHHbIM yIeM
DHHbI INHmKApToP O6bIuHO OTKJIIOueH.
InereroBkHoueHnBbINOHNHe CneDyUOuNe DeiCTBna:
-BKJIIOUHTe BApOHyIO NOBepXHOCTb C BbITJIKKON C NOMOJIbHO KHOJIKN
- npn BbIKHoueHHOM DmraTeNe N BapOHyBIX 3OHax HaxMMTe A;
“FILTER” 3aRopntcra, 3aTeM nOracheT, YTO CBnDeTeJIbCTByeT O BbINOJIHeHHoAkTNBaUIM.
OTKIIIOUeHne HNDIKAToPa 3acopeHn3anaxOyJIaBNIbBAIOoero FInIbTp aKTINBnPOBaHHbIM yIeM
ДяakTbauNi NOBToIe yka3aHHyIO BblIe onepaunIO.
"FILTER" NaHET MInaTb, 3aTeM NoracHET, YTO CBnDEteJIbCTByeT O BbINOJIHeHHOM OTKJIIOUeHIN.
Pa6oTa BbITJAKKNB aBTOMaTHueCKOM pexnme C yctpoiCTBOM SNAP
Для coeINHeHЯ BbITJgKn C cnCTeMoN SNAP,
obpaauTecb K pykoBODCTBy, NOCTaBLJeMOMy C cnCTeMoN
SNAP HIN IOcETHTe caNT www.elica.com.
PpmeaHne: SNAP® npedctabJareT co6oB BCnOMOraTeIbHbI BbITJXHO 6JOK, fYHKUHOHpyUOu COBMEcTHOC BbITJXKOJ.
ДяakTbauZnDaHHoIyHKUIN:
KpaTko HaxMnte KhoNky 3aogoprTcraHnDnKaTOp "A") INHnKaTOp SNAP (11),TO CBnTeBCTByeTo pa6Ote BbITJAKN B DaHHOM pexKMe.
DaHHbI 3NeKTPponp6op NOIROTOBHeH dIa COBMecTHoI pa6Oblc DATUKNOM OTKpbITnOkHa (He nocTaBnEtcn pON3BOAnTeJeM).
Pn yctaHOBKe DATUKA OTKpbTna OKHa (ToIbKO B clyuae pa60tBpeXmE BbITJxKNO3yXA) acnpaunr BO3dyxa 6ydt npkepaatbCkKaJbI pa3 npn 3akpbln OkHa NomeueHn, Ha KOTOpom yCTaHOBHe DaTHNK.
- Podknoyehne DATyKKA OTKpbTnO KHa DOJXHO OcyuecTBnTbcr KBaHnΦnUnpoBaHHbIM TexHNueckmN CneunaNCTamN.
- DATYIK DoJIKeH cePTnΦuNpuOBaTbC rOTeJIbHO B COOTBeTCTBnH C HOpMaMn 6e3OnaChOCTn, KacaHoUIMnCra 3TORO KOMNoHEHa Iero NcNoJb3OBaHnC pnp6Opom. MoHTax DoJIKeH BblINOJHrTbcR B COOTBeTCTBnH C
DeiCTByIOUIMN npEINCAHNAIMn dIaOMaHnx yCTaHOBOK.
BHIMAHVE:
- npoBoka DAATUKA, noCDcoeMHHOua erO K yctaHOBKe,doJxHa 6bITb qactbIO KOHTypa, ceTnΦuNPoBaHHoro dIg 6e3OnaCHoro CBepxH3KOro HapjXeHn (BCHH/SELV).
- PpON3BOOHTeJIb DaHHORO 3JKeKTpOpn60pa CHMaET Cce6BcAkyo OTBeTCTBEHHOCtB 3a BO3MOXHbIe C60N, yueP6 NIN NOxapbl, OByCIOBJeHHbIe DepeKtAmu N/NN HEnCnpaBHOCTAMN N/NN HePpaBUNbHBIM MOHTaxOM DATUKA.
4.1 Ta6nua MouHocTu
Cnyknt dna ydepkaHn HnprTHbIX 3anaXOB, o6pa3yOuXc npn npnroTOBHeHH nI.
DahHoe n3dennie obopyoBaHO Habopom De3oOpnpuyuuxn X HacbIeHne De3oOpnpuyuXn X PnIbTpOB npOxCODNT Nocne DnITeJIbHO IcNOJb30BAHN B 3aBNCIMOCNT OT Tnna KxHn I pEryIpaHOCtN OChCTKn XInpoynabINBaUoIero FmIbTa. De3oOpnpuyuue XnIbTpbl MoXHO perEHePpObaT b TepMnueckn CnOCobOM KaXdbie 2/3 Mecaa B npEdBapntelHo HarpeToN neyn npn 200^ B TeueHne 45 MInHy.T. PpaBnHrapeHepaunr rapaHTnpyET NOCTOAHHyO aFekTNBHOCTb FmIbTpOBaHN B TeueHne 5 JeT.
BHMaHHe! He KnaTe pInbTpbl Ha dHo dYXOBKn, a NOLOXKITE INx Hn IpOTNBHe, KOtOpBn HEo6XoDmO BCTaBNTb B CpeHem NOLOXKeHN.
Pnc. 17-17a-17b-17c
5.2 POnck HeucnpaBHOcTei
Hnla He BnBnncn HepiBnMn i 3 WOpCTKoIO NOBepxHeO.
3MeHuyoTb NOBepxHIO KOHTaKTy iNDyKTopa 3 Nocydom, 3HHxyOuH epeKTHNBHCb HarpBiY i NoripuyOuH pe3yIbTaTN rOTyBaHH.
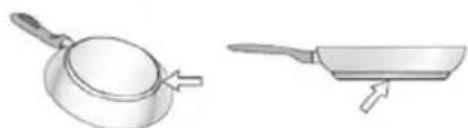
TAK!
Baxnbo: Hikoi He cTaBe rapei kActpyni i ckOBopiKn Ha naHeI ynpabInHn BapuNbHOIO NOBepxHeo.
2.1.1 Ichyoi cMKoCTi
Moxha nepeBipuTn, qn BOJODie MATEpIaN KactpyJI MaHITHMn BnactNUBOCTaMn 3a DOJOMOTO NPOCTOto MaHHTy. KAcTpyni, kni He MaTOb MaHETn3My, He npuaTHi DnBnKOpNCtAHn. I B cybomy BnnaDky MaOTb CnIy Bka3iBKn nonepedhbo ropapapa.
2.1.2ДiametprnДнakactpynljki pekomehnyIOTbcBAXJIINBO: kKIO kactpyni He HaneXHnx po3mipibBapnblHi 30HN He BMNAIOTbcR.
Uo6 B3HaTn, kMM c MinimabHni diameTp nocdy dny roTyBaHHB KOxHOI OKpEmOI 3OHN, DNB. IIOCTpoBaHy qactHy daHoro KepiBHTBa.
IiAmETp BnBIDHOI Tpy6N NOBHeH DOpIBHOBaTN iAmETpy 3'EDHyBaJIbHOrO KInbIa:
-
y pa3i npramokyTHoro BxOxy 222 x 89 MM
-
y pa3i kpyrnoro Bxoxooy 0 150 MM (*)
ДяОТРИМАнHAДODAТКOBOIiHΦOPMaUJIДNBIITcRCTOPIKHy, De OINCYIbCS AKeCECyApn Do BEpcii 3 BiDBeDEHHaM B iInOCTPobAHi YAcTmHi DaHOrO KePIBHnITBa.ПiDkIIOHTb npCtpiI Do Tpy6 Ta HAcTiHNx BvBIDHnx BxOXoJi 3 DiAMETpOM, ITO BiDNoBlae BVXOy NOBITpr (3'EDHyBaIbHnI ΦIaHeu).
BnKOpNCTaHH Tpy6 i HacTihHHx BnPyckHnx OTbOpiB MeHwOro diameTppa np3BeDe Do 3MeHwEHH NpOdykTNBHOci BCMOKTyBaHH i pi3Koro 36iJbWeHH pIBH wMy.
B Cbomy Bnapky Bnpo6HKe He Hece KoDHOI BiinobiDaIbHocTi.
① BnKOpNCToBvIte JkOMoRa KopoTmKaHaJ
① BnKOpncToBnyTe nobITponpOBI 3 kOMoA MeHIO KJIbKiCTIO BnHHIB (MaKcImaJIbHN KyT: 90^
① YHnKaIe pi3Knx 3MiH B nepepi3i Tpy6n.

Bapiant 3 pInbtpauieio
Man.10
Nobitpy, nepeTMM, JIKOTpanNT3HOBYdo npimiueneHH,
fInbtpyecBaCe3 BiINOBiDnHJXINOBHm fInbTp Ta fInbTp
3anaxy.PpnaIaNoCTaayctbcra 3ycIM Heo6xIDHM dnn
3diincheHHcTaNdapTHOI yCTAHOBKN 3BHXODOM NOBITP B
nepeDiH qACTHI Me6JIeBOrO nIHTyCa .I3NIKO-xIMHi
BnactuOCTIO3BOJnHOt BoC8rTN BnCOKoi eEeKTHBHOCTI
nOrnHaHH 3anaxIBnCOKoi MexAHUHOmiHOCTI.
BIDIaTe caTn www.elica.com i www.shop.elica.com, 03NaHOMNTc3 NOBHO rAMOIO DOCTyNHx H6opIB dJIy yCTaHOBKn k Bepci3 pInbTpauicIO, TaK i B Bepci BiDBeEHN NOBITpR.
3. Inctajia
-Як eнжтпчна,Тak iMexaHiuHa yctahOBka IOBHHa BIKOHyBaTnCRA KBaIiФikOBaHm NepcoHaJOM.
Прилад Кпзнayehи Дя BбудовываньВ CTINьнцIO 2-6 CM TOBшИHOIO, y BnpaДКу MOHTaЖу HA
IOBEPXHI; 2,5-6 cm y BnpaKy BBYIOBAHO MOHTaKy.
MihimalbHa BiDcTaHb MIX BapnIbHOIO NOBepxHeO Ta CTiHKoIO IOBUNHa 6yTN UOHaimeHwe 5 CM NOpEpy, UOHaimeHwe 4 CM NO CTOPOHax Ta UOHaimeHwe 50 CM Do BepxHix IOnuOK.
NB = PeKOMeIobaHi BiIcTaHI e opieHTOBHnMI: NiI qac npoeKTyBaHHra npMiuIeHb cIiD OITpIMyBaTncb Bka3IBOK BInpo6HnKa KyxHi.

3.1Пд'снаннDo eJekTpomepeksi
Man.3
Bid'ednTnpicpii BID eEkeKtpuHoi Mepexi. YctaHObKa NOBHHA BHKOHyBaTncb KBaJIphiKOBaHIM nepcoHaIOM, 6bi3HaHm npo npabnla 3 nHTanb yCTaHOBKn i 6e3neKn. BInpo6Hk BiXnIae 6yd-b-ky BiINOBiDaIbHicTb 3a 9KOdy, 3ABdAnHy IIOJAM, TBapNHAM a6o peyam, 9O BHNKJa B pe3yIbTaTi HeDOTpImaHnRA Bka3IBOK, HabeJeHx B daHOMy po3diNi. CInOBn Ka6JIb NOBHe H 6ytN DoCBtB MoBnM, 06 3a6e3neHTn BInbHe 3HATTBapNBHOI NaHeli i3 CTInbHuCi. PepeKoHaITeCra, 90 HAppya, Bka3aHa Ha TabnUcPi, PO3taWobAHi Ha 3BOpOTHi CTOPOni npnAdy, BiNobIdaE Hanpy3i B 6yDnHKy, De BIn 6yde BCTaHOBLeHn. He BVKOPNCTOByte NODOBKyBaui. EKeKTPnHni Ka6JIb 3a3eMHeHnRA NOBHeH 6yTuHa 2 CM DOBShm BiD IHnx Ka6JIb. Y pa3i, KOJI npICTpri He NOCTaBLAEbC3 Ka6elem XnBHeHn, BHKOPNCTOByte INsHNI Ka6JIb 3 MiHimaJIbHM nepepi3OM npoBIDnka 2,5 MM2 dJa NotyXHoCTi Do 7200 BT; a dJa 6IbIxx NotyXHoCTe Nepepi3 NOBeH cTAHOBNTn 4 MM2). Hi B ODNHY 3 Mic2 Ka6JIb He NOBHeH DocrAtn Tempeatypn Ha 50^ BVlSe
Tempepatny HaBKOJIuHbOro cepedobuza. Ppnilad npn3NaueHn Dnna nociHoro PiKlUoyeHHa Do eJektpuHoiMepexi.
- Ybara! Пе徴 ТИМ, як пID'EDHyBaTи КоHTypdo Мерекi i pepeBiprtu празвлбHicTь po6OTn, 3aBXdN пepeBipraye, у6 МерекeВи Ka6eIb 6yВ празвлбHо 3MOHTOBaHи. - Ybara! 3amHa 3'EDHyBaIbHOrO Ka6eIIO NOBInHa празвОДТИСАВТОЗВaHIM CepBICHIM цentpOM a60 Oco6oO 3 NOdi6HOU CneziJIaI3aUciEIO.
Ppimtka: npictpi OchaueHn fynkcioc Power Limitator, 0o do3Bolae BCTaHOBTM MaKcImaJIbHn NOPir nOrHHnKaBt HanaHTyBaHHn Notpi6Ho npOBecTu B MOMENT iDKNIOUeHHn PrncTPOU Do eIekTpOmepeXi a6o NOBTOPHoro iNkIIOUeHHn cAmOI eIekTpUHOI MepeXi (npotrrom HAcTyuHnx 2-x XBNINH). Bn6epitb xapaKtepcntkn 3axncty eIekTpUHOrO oIaNHaHHn B 3aJeXHOCti BID Bn6paHOro pIBn O6MeJHn HOTxHOCTI. 0do NocNiIOBHOCTi HanaSTyBaHHn Power Limitation npouHTaTe po3dIn EKcnlyatauciy y cybOMy nocihny.
3.3 Inctajcia
Ipeep NOyATKOM yCTaHOBKn:
Pnicra po3nakyBaHHB Bnp6y nepeBipTe Noro Ha HaraBHicTb noWKoJKeHb npu TpaHCnOpTyBaHHi i B pa3i BuHKHeHH np6JeM, 3BepHtbcr Do BaWoro dInepa a6o ceHTpy o6cnyroByBaHHK nIeHTIB, nepu HIX npNCtynTN do yCTaHOBKn.
- IpekeonaiTeCra, 10 npu6bHn Bupi6 BiNobiae po3mpam 6paHOrO Micz yCTaHOBKn.
- IpeBipTe, 30 BcepeDnHi ynaKOBKn (3 MeTOO TpaHcnpTyBaHH) He 3aNNnnnc KOMNKeTlyoHi MaTepiAn, (HaPnKnaIAD, KOHBPNT 3 rBnHTamn, rapaHTi i T.D.), kAIO Taki E, ix NotPi6HO dictatn Ta 36peptn.
Kpim TOro npeBipTe, 106 no6n3y Micz BCTaHOJIeHH 6yna eJektpuHa po3eKa
Po3miueHHMe5nIBIIMBAOMHTyBaHHa:
-Пилад He moKHa BCTaHOBIOBaTn HaOxOJIoJxIyBaayAMn, IocydommHIMMaIINHAMN, KxOHHMn PIIITAm, DyXOBkAm, npaJIbHMn i CyIINbHMn MaINHAMn.
- Повесни роботни пдзанг мблп repeустановковариьни поевхни ta obepexho BuaNTNCTpyxky abo 3aIIuKNe DepeBHOI Tnpn.
BAXJINBO: BnKOpNCToBvIe OJHOKOMNoEHTHm repMeTnK (S), knn CTiIKN Do BVcOKnx Tempeatyp, a came Do 250^ ; nepeo MOtaxem, NOBepxhi, 0oPiinraHOCTb CKJeOBaHHIO, cnD peTeJIbHO OHCTNTN, BVaIaNIOU6yDb- kpi peOBNH, kki MOKyTB 3HN3NTu adre3io (HaNP..aHTNaIRe3NBn, KOHCEpBAHTN, KInPn, Macna, npoosKn, 3aNNsKn cTaporo Kneio i T.D.); Knei po3noiINTu pIBHomipHO nO BCbOMy nepIMeTp y paM; nicraCKNeOBAHn 3aNNsHTN KneB BcCnXaTN np6bn3Ho Ha 24 roHNH.
Man. 1B-2B
Ybara! HenpaBnIbHa yCTaHOBka rBNHTi i KpiINbHnx BIno6iB, He y BiIDNoBIHDocTi Do uix IHcTpkykui, MoKe np3BeCTn Do He6e3neKn ypaXeHHra eJeKtpuHm CTPyMOM.
PnmuTka: nI npaBnIbHoro BCTaHOBneHHBaPo6y peKoMeHdyeTbcra 06B'3aTu Tpy6u KNeiKOIO CTpiKoIO, RaKa MaE Taki XapaKTepunctuK:
- M'ka enactnuHa nnibKa PBX 3 KneiKm Iapom Ha ochoBi akpuiaty
-BiDnobidae cTaHapTam DIN EN 60454 - BORHe3aTpImyUOuN
-BiDMinHa CTiKicTb Do 3HOuBaHHa - cTiKicTb Do npepaIb TempepaTyprn
-MOJE BUKOPUCTOBByBaTINc npHn3bKx TeMnepaTypax
4.ФункционуbaHHN
NaHEnb ynpabNHH
Ppimtka: IJra obaHHa KOMaHIOCTaTHbO JERKo DToTOpKHyTnC (HaTCHyT) CmBONI, 10 iX npedctabJIOTb

Khonkn
- ON/OFF BapnIbHOI NOBepxHi / BNTJkN IЯ pobooyi NOBepxHi
- 06paHHKoHΦopKn 36JIbueHH Power Level
- 36inbueHHIUBNIOKCTi (notyHOCTi) BCMOKTOBAHH
4.3MeHWeHHa Power Level 3MeHWeHHa WbNdkOCTi (NOTyKHOCTi) BCMOKTyBaHHa 3MeHWeHHa Yacy Timer
5.AkTbauJ Timer 36IbWeHHa cacy Timer
6.AkTnBauiyABTomATuHHx cyHkiReset hacuHnn HpIbTpib
DucnJIeI/LED
- Biayaniiau Power Level
8.Bi3yani3auii WbNIOKCTi (notyXHOCTi) BCMOKTyBaHHA - IHHKATOP TaIMepy aKTINBOBaHO
10.ИндікатуСуТimer - INdkatop ABtOMaTHOI cyHKci BCMOKtyBaHH IINkatop nITpIMKn pfIbTpib INdkatop cyHKioHyBaHH 3i SNAP
BVKOPNUCTAHNPOBOOoi NOBEPXHI
Ipeed noatkompo60tnnoTpi6Ho 3HaTu,io:
Bci yHKuii iiei BapunbHoi NOBepxHi p03po6neHi i3 DOTpMaHHa HauCyBopiux Hopm 6e3neKn.
3JIeI npHnHn:
- Dejki fuykui He aKTHByoTbcra, a6o aBTOMaTHUHO BmNKaOTbcra npu BiCyTHOCTI NOcydy Ha KOHΦOpKax, a6o KOn BOHN nOraHo po3TaWOBahi.
B IHINX BnIaKkax AKTNBOBaHI yHKii ABTomTuHOBiDKNIOaOTbcraYepe3 DeKINbKa cekyH, KOII O6paHa fyHKUIMARae NOaJIbWoR0 BBOdy napameTpib, a HAnaHTyBAHH He BiO6yBaETcbc (HanpNIkaI.. "YBIMKHiB BApINbHy NOBepxH0"6e3 "O6epITb KOHOpky" Ta "Po6oYa TemnepaTpya", YN "FHKuIg Lock" abo "Taimep").
Ybara! Y pazi (Hanpknad) TprBaIoro BnKOpncTaHH, BmKHeHHa KOHΦopKn He BiD6yBaεTbcra HeraHOb, TOMy 0 TprBaE etan OxONODKeHHa; Ha DnCnJIeI KOHΦopOK 3'ABnAeTbcra CmBbON "H", AKN Bka3ye Ha Te, 0o Hapa3i TprBauei etan.
3auekaTe,io6 dncnne BmKHyBcra, nepH HIX Ha6n3nTncra do KOHΦopKn.
Ducnnei KOHΦopok
HaDnCnpeAx,IOBIDHOcraTbca DO KOHΦOpOK,BkA3yETbc:
| Конфорka yвимкега | 0 |
| Power Level | 1...9 P |
| Residual Heat Indicator | H |
| Pot Detector | - |
| Фунreichая Bridge akтульваHA | 7 |
| Фунreichая Temperature Manager akтульваHA | U |
| Фунreichая Child Lock akтульваHA | L |
XapakTepcntnKpo6oOIO nobepxHi
Safe Activation
PnucpiBmkaTbca TInbKn 3a HaeBHocTi Kactpyni Ha KOHopkax: npouec HarpiBaHH He 3anyckaTbC a60 nepepBaTbca B pa3i BiDcyTHOci a60 BndaJIeHHI Nocdy.
Pot Detector
Pnncpii aBtOMaTHNO Bn3Haue HaABHicTb KactpyJI Ha KOHΦopKax.
Safety Shut Down
3 MipkyBaHb 6e3neKn, KOxHa KOHΦopKa MaC MaKcMaJIbHn Yac po6oTn, kN 3aJExKntb BiD BcTaHOBHeHOro pIBHr nOTyXHoCTi.
Residual Heat Indicator
PnBmKHeHHi OHiei a6o DeKInbKOx KOHΦopOK HaeBHicTh 3aJinuKOBOro TeJIa N03Haayctcra CneuaJIbHM BiyauhHM CnHaON y BiNobHHi ObnaCTi DnCnpeaCnMBONOM“H”
Ekcnnyataia
PnmuTka: DnAaKtBaui 6ydb-koI cyHKu, CnoaTky Heo6xjINO aKtBvBaTu nOTpiHy KOHOpky
YbIMKHeHHA
HaTnchHtB (TopKHiTbC) ON/OFF po6oOi NOBepxHI/BNTJXKN
IHdkaTOp 3aropReTbc, kN BkA3ye Ha Te, IIO BapnIbHa NOBepXH/BNTJxKa rTOBa Do BNKOpNCtAHH
HaTnCHiB LIO KHONKy ige pa3 dIy BmKHeHHa
PnmuTka: Lya yHKuiMae npiopntet Ha ycima iHWMN.
Bn6ip KOHΦopKn
HaTnCHiB (HaTnCHyTu) KhoNkU Bv6opy, 0o-1IOBiae Heo6xHni KOHOpui.
9 Power Level
IobepxHa o6laHaHa 9 pIBHAMn IOTyKHOCTi
HaTnchItb (TopKhitbcra) KhoNKn Bn6Opy + , 0o6 36iNbHHTPiBeHb NotyKHOCTi;
HaTnCHiTb (TopKHiTbcra) KhoNkn Bn6Opy 0, 0o6 3MeHUnTI pIbeH b NotyxKHOCTi;
Pibehb noTyXhOcTi BiOobpaXaCTbcra Ha dncnnei o6paHOI KOHΦopKn: 1...9
Power Booster
Bpi6 ochaueHn IdoaTkoBm piBhem notyKHOCTi (okpim pIBHa), aKn aKTbByeTbcra Ha 5 XBUnnH, nicra yoro notyXhICTb NOBepTaecBo DO nonpeHbOro PiBHa.
TopKhiTbCra (HaTnCHiTb) KhoNky Bn6Opy + , 0o6 36IbWHTn pIBeH nOtYxHocTi (Okpim pIBHr 9) Ta aKTnByBaTN Power Booster
Pibehb Power Booster Bka3yEcBaHa DnCnIeI o6paHoi KOHOPKIN CmBOJOM"
NB:BapnibHa 30Ha (MAI.19),He Maec TaIMepa nPra Power Booster;
Oob BmKHyTn Power Booster, HATNCHITb
Bridge Zones
KoHΦopKn, 3aBdAkn ΦyHKci,ii, Bridge 3daTHi npaioBaTN KOM6iHOBaHIM CnOCOBom, CTBOPIOUCh EINHm IpoCTip 3 OndaKOBm pIBhem NOTyXHOctI. L4 ΦyHKJia Do3BOJIae rOryBaTI ixy HabITb y kactpyJnx i CKOBopiKax BeJInKOro po3Mipy.
MoxHa BnKOpNCtOByBaTn KOM6iHaCii nepeDnIX KOHΦopOK "ToNobHa" 3 BiIDNoBIDHmN KOHΦopKamn No3aYy "BtopHHa" (ДЯТоR, U6b NepeBipTN, ДЯЯKnx KOHΦopOK nepeIb6aYeHa C4 ΦyHKcIy, DnB. iINOCtpoBaHy YacTHHy cboRo nociBnka).
ДлakТиBaцьфункцiBridge:
-
Bn6epitb KOHΦopky "TOnOBHa" (piBHeN bIOTyXHOCTI JKOIT NOBHeH CTaHOBT
-
HatnchItb Ta ytpmyTe + nOKn He noUyETe 3ByKOBn CnHaI, kN Bye de cynpoBdoxyBaTncr NOBIO CmBOJy "7" 706blImatime, Ha dinCnJIe (7) KOHOpKn "BtopnHHa"
-
o6epitb konfoopky "BtopnHa" npotraom 3 cekyHd
-
BCTaHObitb PibeHb (Iotyxhictb) po6OtN KOHOpKn "TOnOBHa", kN bye Be IIOobpaXaTncb Ha BiINOBiHOMy ducnnei (7)
Pnmitka: 06 BmKHyTN ΦyHKciio Bridge DOCTaTHbO DOBeCTN KOHΦopky Do TEMnepaTpyn O".
- Temperature Manager
Temperature Manager - ue phykuia ynpabnHHa Ka DO3BOJRE niTpmyBaTN TENNO Ha noCTiHIN TEMNepaTpyHa ONTUMAJIbHOMy pIBHi NOTyKHOCTI BID 0 Do 1; IeAnbHo NiXoNTB DnIg 36epiraHHraTOBOI iKi B Tennomy CTahi. Phykuia Temperature Manager AKTINByeTBc npn nepwOmy
HaHnckaHHI KHOHNKHa Hnncnnei KOHcOpKn, 0 npauoc B pexmI Temperature Manager,3'ABnEeTbcra CnMBOJ
Child Lock
Child Lock 3a0B0Ie 3anobirn BnnaKOBoro BKIOueHn BapnIbHOi NOBepxHi Ta BNTJXKn DiTbMn, nepeWKoDKaOuN aKtINBaui 6yDb-RAKOI FyHKUII.
Блokувань BiД DiTeM MoTe 6byTn aKTNUBOBaHe NIIe TOni, KOJI npIcTpI npaIOe, aIe KOHΦopKn (3OHa BCMOKTyBaHHa) -BIMKHeHi.
Akmueauia:
- HATNCHiB i yTpmyIte OndHocHo + (FR)i - NOTIM 3HOBy nepemukay + (2-FR); 3ByKOBn CnHaN BkAzYe Ha Te, IIO 3axnCT BiD nitee Child Lock 6yNo aKTINBOBaHo, a Ha DnCnPei BiO6paKaetbcra "L" (7).
BUMKHeHHa:
- HATNCHiB i yTpmyTe oDNochO + (2-FR)i -NOTIM 3HOBy ; 3BYKOBn CnHnB BKa3ye Ha Te, IIO Child Lock 6yIb OBMKHeHO, 3 DnCnPiE 3HnKae CmB0JI "L" (7).
Tumacoe bioknoueHHBIMOxTe BIKOPNCTOBYBATN
po6oy noBepxHIO TAKOX i3 yBIMKHeHIM Child Lock.
BuKaHaume hAcmynHi dii
HATNCHiBiyTpmyTe (2-FR)i
Tenep Bn MOKeTe BnKOpNCTOByBaTu BapNlBHy NOBepXHIO y 3BNUHOMy peXIMi, Child Lock aKTnByeTbcra 3HObY npu BnMKHeHHI NOBepxHi.
- Timer
Функця Таимета - ue 3BOPOTHII BiДЛК,ЯкNs MOxHa HanaTsyBaTu Na KOKHI KOHΦOUPU (BNTJXJI).
B KIni HanaTobaHoro Yacoboro npomixky KOHΦopKn (a60 BnTAAKK) BmIKaIbC8 aBTOMaTHUHO, i KOpNcTyBaU ONoBIaAcTBcR cneiaJIbHM CnHaNoM.
TaNMEp aKTHyBcTaHtNCKaHHaM Ha CnMBON
Rk TINbKN TaHmep 3aKiHHTb 3BOpOTHI BIDNIK, JIyHae 3ByKObN
CnHAn (npotrrom 2 XBnIH, a6o 3ynHReTbCra HATNCKaHHaM
6yDb-koI KNOnKn NOBepxHi), a DnCnIeN (10) 6nMaε, i3
CNMBJOM "00".
PeryIIOBaHH cyHKui Timer IaBapnIbHOi nobepxHi
Obepitb konhopky
HaTnCHiB, 06 ybiTn do fynkuiperyIIOBaHHa.
- HanaHTyIte Yacobn npomixok TaMepy:
HATNCHITb nepemukay, 36iNbHTn yac ABTOMaTHUHO BUMKHeHH
Kuho Heo6xio, noBtOpTu onepaio dna Hux KOHopok.
Pnmitka:HaKOxHy KOHΦopky MoXHa BCTaHOBtNi pi3Hni Yac TaImepy;Ha DnCnnei (10) Ha 10 cekyHd 3'ABNTbcr 3BOPOTHi BiDnik OCTaHHbOi ObpaHOI KOHΦopKn, nicra Yoro BiO6paxKaITMeTbcr 3BOPOTHi BiDnik HaimeHwOro npomixKy yacy.
Дя ВIMКHEнгТаМеру:
- HanaTnyTe 3HaueHH TaMepy Ha "O", 3a DOnOMORHO

BIMKHTbpo6oyu NOBepxHIO,3a DOnOMOROHO

PpMItka: yHKi3aJIuHaCTbC8aKTHBHO, KUo BN He HATNCKAcTe iHJ KHONKn.
Pnmuitka:Ha6iHi CTOpOH KOHΦopKn, npy yBIMKHeHIn
fHKii TaMepy,3'ABJIeTBcCIMBOI

Egg Timer
Функця Egg Timer - ue 3bopoTHi BiDnIK He3aIeKHO BiKoHΦopOK (ta BnTgXKn).B KInCu BCTaHOBNeHOro TepmiHy npnnaI IOBIOMJRE KOpNCTyBaHa CneCiJIaNbHM 3ByKObIM CNIHAnOM.
Egg Timer aKTHByeTbCn HATNCKaHHM
Ppumitka: pnynoBaHHyHkii Egg Timer BnKoHaTeTi cami d, oio iDna yHKuII Timer.
Power Limitation
Функья Power Limitationdo3BONJIe BCTaHOBNIpo6Oty npJiaNy,OBmexkyOuMaKcMmaJIbHeNOrJIINHaHH.
Pnmitka:HaanaTsyBaHHa NOBHHo Bi6yBaTncsHa
BIMKHeH pOboHi nOBepxHi, 6e3 HATnCKaHHa KHOPIK B MOMENT NiD'EDHaHHa BapInbHOI nobepxHi Do eNEkTpomepexi, a60 npn NOBtOpHOMy NiKnHouEH Hi cAmOI eNEkTpomepexi, IPOTAROM HAcTyNHx 2 XBUNH.
ДянайштУвань Power Limitation :
- npOIOBxkyUOn HATnCKaTN A HATnCHyTN Ta BiDnyCTNTN

-
npnla nopaK oporTKn 3BykOBn cnHnA
-
npOIOBxUOHN HATNCKaTN A HATNCHyTN Ta BiDnyCTNTu + (2-FL)
-Telep MoxHa BiDnyctuTN KHOKNKy
- DnCnIeN (7) KOHΦOpKn FL BiO6paXaE NOUePROBO CmBOnN “C” Ta “0”, ⅢO O3Haac MOxJIuBicTb BkOHaTu HanaHTyBaHHA
- DnCnnei (7) KOHΦopKn RL BiOobpaKae noToCHHaIaHTyBaHHa**0=7,4KW1=3,1KW2=4.5KW
**HanaTsyBaHHa 3a 3amOBuyBaHHM BCTaHOBNIoc7bcra Ha 7,4 KBT
-
3miHHTn HanaTsyBaHHr Power Limitation,HaTncHiB (2-FL)
-
36epertn 3p06neHn Bn6ip,HaTncHtB , npotrom 2 cekynd; npnaad noactb DOBm 3BykOBn CnHn, 10 niTBePxyBaTMe 3diCHeHi HanaWtyBaHH.
- HATNCHITb, 106 BnTn 3 fynkci
BVKOPNUCTAHHBAHTKKN
yBimKHeHHa
HaTnCHiB (TopKHiTbcra) ON/OFF po6ooyi NOBepXHI/BNTaXkN
IHNKATOP 3aropReTbcra, kRn BkAsYe Ha Te, 10BapnIbHa NOBepxHr/BNTJkKa rTOBa DO BnKOpNCTaHHa HatNCHTb 10 KONky ue pa3 Dn BmKHeHHa IpIMtka: La fynKqia ma npiopntet Had ycima iHsMM.
yBimKHeHH BHTaXKn:
TopKHiTbcra (HaTnCHiTb) KONKy Bn6Opy , 0o6 yBIMKHyTN Bn7kKy
WBnDkiCTb (NOTyXHicTb) BCMOKTyBaHHr
TopKhitcra (HaTnCHitb) KONky Bn6opy ,06 36iJbWntuBnDkictb (NOTyKhCtB) BCMOKtyBaHHR (0-10);
TopKHiTbCn (HaTncHtB) KHOIky Bn6Opy ,Uo6 3MeHUnTN WbNkicTb (NOTyXHcTb) BCMOKTyBaHHa (10-0);
Timer
TaimepakTbBytbcHa6ydb-kaHnWBnKoCTiHaNTCKaHHM
Ha dncnnei (10) BiOobpaKaeTbcra 3BOpOTHi BiNik,

PeryIIOBaHH TaMepy IJI BNTJKKN
MoxnBO BHeCTN 3MIHN DO NonepeHbO BCTaHOBNeHx YacOBHX IpomixKIB. 3MIHN BHOCaTbcR, KOJI Timer aKTNUBOaHNI.


1063iBunTuacABTomuHoro
BIMKHeHHH

- HatnchItb
3MeHHTNac
ABTOMATNUHOROBUMKHeHH
IHdNkaTOp HacnueHHaIbTpB
Ha BntjKu Bk3yTbcra, KOJIH Heo6xIDHO BnKoHaTH 06cnyroByBaHHaIbTpib:
XinpoBnΦjnbTp
IHdNkaTOp-LED“FILTER"(11)BMnKaεTbca
ΦiNbTp aHTn3anax 3 aKTHBOBaHM ByrInnam
INikkaTop LED "FILTER"(11) 6nmae
Reset hacuehna jinbtpib
IicraTexhiHoro 06cnyroByBaHHaipbtpib (JnpoBOrTa/afo3akTNBOAHMByrInJaT)TpBaNoHaTNCiHb KHONky

IHNKATOPLED“FILTER"BIMnKaεTbcra,BIDHOBIOUOuBIDNIK iHNKATopa.
Aktuiai HndkaTopa HacnueHHaJIbtpy aHTn3anax 3aKtNBoBaHmByIINJAM
3a3Bvua uei HndkaTOp BmKHeHn.
卍δakTNByBaTn NOrO, BnKoHaTn HAcTyHHe:
- yBIMKHIb BCMOKTyBaJIbHy NOBepXHIO 3a DOnOMOrOHO
-ПИВИМКHEHOMYДВИГИНВИТЯЖКТа ВIMKHEHINBAPINbHINX
KOHΦOpykax,HaTnCHiB Ta TpMaIe HaTnCHyTOH
. “FILTER” загоряеться,notim rache,шовkastry ha
BVKOHaHy aKTHBaLioΦyHKUII.
BumKHeHH iHnkaTopa HacnueHH qInbtpy aHTn3anax 3 aKTHBOBaHm ByrIJIaM
NOBTOPITb BnueBka3aHy Oepauio AknBaui
-“FILTER"6nMaC,notim rache,io Bka3yE Ha BVkoHaHe BIMKHeHHa cyHKuII.
ABTomatnHe cyHKioHyBaHHB BnTJkkn 3i SNAP
Ioo6 nID'edHaTN BnTjKky do SNAP® npoHTaTe iHCTpyKciIO,
Io noCTaayEbCra pa3OM 3i SNAP® a6o BiDiJaTe caNT www.elica.com.
PpMItka:SNAP-ue 6NOK DOnOMixHOBCMOKtyBaHHa3DaTHnIpaUOBaTN pa30m3BNTJXKOHO.
Lio6 aKTHyBaTu LIO cyHkIIO:
Kopotkoctpokobo Hatnchitb A, iHdkatop LED "A Ta iHdkatop LED SNAP (11) cBITbca, kki O3HaaHTb Te, 00 BNTJkka npaioe B cybomy pekmi.
Прилад розраховани Ha BнКОпсТаHHЯ pa3OM 3 KOMЛЕKTOM ДатчИкa Window (He NOCTaBЯТьс RA BИрбнКOM).
BCTaHOBbBn KOMJIeKT DaTcHka Window (NIIe y BUNaKy BUNOPcTaHH NaBepxHi B peKmI BCMOKTYBAHH). BCMOKTyBaHH NOBITpHe BiID6yBaTMetbC KOKHOrO pa3y, KOIN BIKHO B KIMHaTi, De BCTaHOBNeHo KOMJIeKT, 6yde 3aunHeHO.
- EneKtpnHe nikNoueHn KOMJIeKTA do npuadny NOBHHO 3iINCHIOBaTnC KBAJIiΦIKOBaHM Ta CneuiI3OBaHm TexHiHm nepcoHaON.
KOMPJIKET NOBHeH 6yTH OKePMo ceTnphiKOBaHn BiINOBiIDHO Do cTaHdApTIB 6e3neKn, 0c CTOCYOTbcr KOMNoHEHa, Ta NOrO BnKOpNCtAHN 3 npCtPoEM. YCTAHOBKa NOBHHA BnKOHyBaTHc BiINOBiHDo npaBnI, 0o DiOtB Dn I No6yTOBO R O BCTAHOBNeHHa. YBAFA: - ka6eni KOMPJIKTA, 0o nidcHHyOtbcra Do npnnay, MaHTb 6ytN qactnHO CXEMN, 0o ceTnphiKOBaHa Ra 6e3neuHa HADnH3bKa Hanpyra (SELV).
Bnpo6HnK Zboro npnaNy He Hece XoJHOI BiinobiDanbHocTi 3a 6yNb-ki np6nemn, NowKOxHeHH, noXeKi, BnKnKaHI HecnpaBHocTAM Ta/a6o 36OAMN B po60ti Ta/a6o HnpaBnIbHM BCTAHOBJIeHHM KOMnJIeKTy.
4.1 Ta6nucnnoTyxhNocti
| Píveньnotyxhoci | Tунология вариня | Викорисань рівень(Bka3iBkn no6dnyo7b C do6i do6c7id i npivnvyknpirotybaHHa) | |
| МakncnotyxhiciB | BoostШвпсо розirрівати | Ideaьно дlya піднітгla 3a корOTКИЧС TempepaTyprniixdi duшвдКОТУКINIIHry,у ВИпаду BODI abOшвдКОТРozirpівань pіднВapіня | Ideaьно дlya піднOTKOL notyBOHrydo 30LOTNCTORO KOLbopy,notuHATN BAPky,жарNTsЗamopoxeHi npodukTn,швдКО notyA |
| 8-9 | ЖарNTs - кіп'ЯтNTs | Ideaьно dlya піднOTKOL notyBOHry,підtrpIMyBaHry KINiHry,BarNTu, trpILb (ha kOROTKm quac) 5-10 xBvlniH | |
| ВисokanotyxhiciB | 7-8 | ПіджарюВати do 30LOTNCTOROКOLbOPу - піджарюВати - кіп'tn - trpILb | Ideaьно dlya піднOTKOL notyBOHry,підtrpIMyBaHry KINiHry,BarNTu, trpILb (ha kOROTKm quac) 5-10 xBvlniH |
| 6-7 | ПіджарюВати do 30LOTNCTOROКOLbOPу - BarNTu - TuyNTs -піджарюВати - trpILb | Ideaьно dlya піднOTKOL notyBOHry,ц6bпtrpIMyBaTи legkeKINiHry, BarNTu i trpILb (ha cepeDm quac, 10-20xBvlniH),підirpіbatn akcescyapri | |
| СередниnotyxhiciB | 4-5 | ВарNTs - TuyNTs -піджарюВати - trpILb | Ideaьно dlya tUshinna,підtrpIMaHry ЛergKOrO KINiHry,BarNTu (ha doBrgn quac).пэрміцуbatn ha cKOBoripiduziMaKarpoHn 3 coYcom |
| 3-4 | ВарNTs - кіп'ЯтNTs a nobiNbHOMy BORHI - 3ryuZbATn -пэрміцуbatn | Ideaьно dlya doBrgn priroTOyBaHry (pnc,coysn,харke,pmba) 3 priscyTHICrTO B CKLadl piDIn (BOda, BINO,6bIbIOn,Monoko),пэрміцуbatn ha cKOBoripiduziMaKarpoHn 3 coYcom | |
| 2-3 | ВарNTs - кіп'ЯтNTs a nobiNbHOMy BORHI - 3ryuZbATn -пэрміцуbatn | Ideaьно dlya doBrgn priroToyBaHry (ob'em MeHspeNITpy: pnc,coysn,харke,рmba) 3 priscyTHICrTO BCKLadl piDIn (BOda, BINO,6bIbIOn,Monoko) | |
| Hn3bkanotyxhiciB | 1-2 | РozToPllIOBATn -po3morpokzbyBATn -підtrpIMyBATnHa tenII -пэрміцуbatn | Ideaьно dlya po3M'ЯкшениMACna,po3TOnpIeHnHaOKoJadU,po3morpokhennI prodyKTIB MaIINx po3MpirB |
| 1 | PozToPllIOBATn -po3morpokzbyBATn -підtrpIMyBATnHa tenII -пэрміцуbatn | Ideaьно dlya підtrpIMaHry tenIIa B MaIINx noprizjx iДnTiIbKn zuO priroTOBLeNoI abO trpIMatn ha Tempepatyrip6blOda干嘛 podaqui I prermіцуbatn ha cKOBoripiduzipi3otto | |
| ВИКЛ | NotyxhiciBн启用 | Опорна поевхая | Поверхая варинь в popoziü stand-by abo ВИклочero(Mожимва різCyTHICrTeB залшковоTenla кИцяпrinotувань,Cиганлizobанoro H-L-O) |
4.2 Ta6nua BapHHa
He BnKOpNCTOByIte a6pa3nBHi 3aoc6n, MeTaNEBi ry6Kn. Ix BnKOpNCTaHHa 3 YacOM MoKe N0UkoDHTN CKNo.
He BnKOpNCToByTe NoOpa3HIOUci XiMiHi MmOci 3ac06n, HAnpIKJaC npEi DnA DyXOBok a6o 3ac06n DnA BnBeDeHHra PnIaM.
Iicna KoxHoro BnKOpNCTaHH, 3aIIuTe IOBepXHIO OxOIOJyBaTncr Ta IpoUcIb II, uOb BuaJIITn Haknn Ta IINM, UO 3'ABUNcR BiD 3aIIuKIB iKi.
Uykop Ta npOdykTN 3 BnCOKIM BMICTOM Lykypy NOWKOJxIOTb BapNlbHy NOBepXHIO, iX NoTpi6HO HeraiHO BnDaIaIaTI.
Cinb, uykop i nicok moKytb noopraatn cknny nobepxHIO.
BnKOpNCToByTe M'ky TkaHHy, NaepoBi pyuHNKn Iny KxHi a60 cneuiabHi 3acobI dny OuyueHHN NOBepxHi (DotpmyBaTnc Bkazibok Bnpo6HnKa).
HE BUKOPUCTOBYTE NAPOBI OUCHNIK !!!
Baxnbo:
Y pa3i BnnaKOBoro po3nHy BeNkoi KInbKocti piHN H 3 KaCTpyNb, MoXHa BnnpaBHTu Ce 3a DonOMoTO BnnyCKHOro Klaanany, po3TaUOBAHO B HnKHi YacTHNI npictpo, DnToro, u6b BndaNTu 3aNtIKn i BnKOHaTo OOnueHHra ByMOBaX MaKcImaJIbHOI ririeHIOI 6e3neKn.
Man. 18
Ia 6iBbIO pTeJIbHOrO OuNueHHBa MoXeTe IOBHCIO 3HrTn HxKHi pe3epByap
Man. 19
OuHHeHH MaTeIeBoI peWitKn:
IpaTn CnID MtNT ypyHy rapaOIO BOIOIO 3 HeNtpaBHM MIOUHm 3aco6oM i akypaTHO BNCySyBaTN Uo6 yHNKHyTN OKCneHHJ.
06cnyroByBaHHBNTJxKn
OuichiHn
Пд чс очшени ВИКОПСТОВУТЕ ВИКЛЮЧН BОЛORY TKAнHy 3 HeITpaJIbHIM MInOчIM 3acOБМ. HE BИКОПСТОВУITE IHCTPYMEHTN TA ПИЛади ПID YAC OчшENHЯ!
YHnKaIte BnKOpNCTaHHa6pa3nBnX 3ac06iB.
HE BUKOPUCTOBYTE CINPT!
ANTINKIPOBNIΦJIbTp
3atpmyc yactouk Knpy BiD npnrotyBaHn iKi.
Ioro notpioHO ouHsUyBaTH OIN Ha p3 Ha MicaYb (a6o KOni CnCTema iHdNkaui HacuyeHHa 1bTpIB Bka3ye Ha 10 Heo6xIdHicTB), 3a DOnomorO HearpeCNBHX MIOUHX 3aco6iB, BpyHy a6o B NocyDOMHm MaunHci 3a Hn3bKO iTemepatypn B pexnMI KOPOTKORO uKnny.
Pn MTTI B NOcydOMnHi MaunH, XnpOBn FInbTp MoKe 3He6apBNTncA aJe NOro FInbtpyBaJIbHI BNaCTNBOcTi 3aJIINaIObCn He3MIHHMM.
Man. 15
ΦiNbTp 3 AkTnBOBaHm ByrInnMa - KepaMiyn (Iinwe dna Bepci 3 φiNbTpauicio)
Bin norgnHac HnepmHi 3anax, BnklnKaHi npuroTyBaHHaM iXi.
DAnH Bnpi6 6bnHaHn Habopom De3oOpuyOxh xfIbtpiB.
HacnueHHaDe3oOpuyOxh xfIbtpiB Bi6yBaetbcn icnra
TpBnAorO BnKOpncTahHn 3anExHo BiD TnHy KuxHi i
peRyIpaHocTI OunuEHHN XkpOyNoBnOBaBnHO rOfPty.
De3oOpuyOuH xfIbTpNi MoXHa perEhepyBaTH nepMiuHM
cnocobm koxhi 2/3 Micra B 3a3daneB HarpiTi neyi npn
200°C npotrrom 45 XBnInn. PpaBnIbHa pereHepaia
rapaHTc e noCTiHy epeKTnBHiCt b xfIbtpyBaHHn npotraOM 5
pokiv.
Ybara! He klaitb pfIbtpn Ha dHO dYXOBKn, a po3miuynTe Ha deko Ha cepeHni Bucoti.
Man. 17-17a-17b-17c
5.2 NowyK HecnpaBHOCTe
5.3 TexhiHa cnjx6a donomorn
Ipeep TmM, k3BepHyTnCBA CnyKb TeXHiHOI donomn:
- IpekoHaTeC, 0Bn He moXeTe cAmocTiH O yCyHyT np6IeMy, CnpaOuHcB Ha Bka3iBKn, Onncahi B " POnyky HecpapBHOCTei
- BIMKHiTa Ta yBIMKHiTb npncpti, 106 nepekoHaTcra 10 npo5nema 6yna ycHyTa.
Kio nicn Bnue 3raaHnx nepeBipok npo6emy He BdaocyHyTu, 3BepHiTbcrdo Hau6nnKooi Cnykbo TexHIOI donomorn.
OcbI HcykaylbikTa 6epinreH yckaynapbKaTah KaaraHaHa3. OHipywi OCbl HYCKaybIKTaBHyCKaynapDbOpbIHdaMay caIaapbIHah TybiHaFAh akaynap, 3akbIMdAp Hemece ept yuiH eUbiop kayankepiJiKTI MoHHbHa anMaIbI. ByI KpybINfBi TK yj XaFdaBHnTa TAMAK nicipy yuH naDalaHyra apHaJIraH jKeHe TAMAK nicipy ke3iHde tyTihDi copbIn anaDbI. Backa MAKcattapda naDalaHyra bONMaIDbI (MbICbl, 6oImeHi XblTy uWIn). OHipywi OCbl OHIIdi Dypbc naDanaHbay Hemece dypbc 6anTamaydaH TybiHaTbIH kayankepiNikTi MOHHbHa aMmAdbl.
Ohim ocbI OKyIbIKTaftbI cypeTtepe6epinreHHen 03rewe 3CTeTKaJIbIK yHKunapFa ne 6onybl MyMKiH, aJaHa, XMybIC icTeeyi, TexHNKaJIbIK KbI3MeT KOpCetYxHe opHaTy 6ipDei 6oJaBl.
HcayIbIKbl MyKnT OKbl IbIFbIHb3: ON opHaTy, naDanahy XeHe Kayinci3dk TypaIb MaHb3bl aKnapaTTb KaMTNbbl.
① ΘΗΜΗΟ ὄπεκτρικ κχύηςιν Θερτηηίδ
KypbInfbHbOpHaTnac 6ypbH, OHbH eWbip 6enirHH 3aKbIMdaImaHaHa HKe3 XeTKi3iH3. BoJmaca dJnepre xa6apnacbl, OPhATyDbI TOKTaTBHb3.
Ophatydbj XaIrafTbIPMac 6ypbH KypbIFbIHbH 6ytinirHe Ke3 XeKti3iH3. BoJmaca dJnepre xa6apnacbin, opHaTydbtOKTaTbHb3.
Eckenptne: (^*) TaHbAcB 6ap 6eNikTep TeK Kei6ip yIriepMeH 6epinTeH (6acka KaIaNapda 6epinMeTIn), 6ipak catbn anyFa 6oNaTbIH KocbIMwa akceccyapnap 6onbl TablaaBl.
1. Eckeptylep
EckepiH3! KeNeci HycKaynapdbI KaTaH caKtahbI3: Ke3 KeIreH OPhATy KymbICTapbIH opbIHdAmac 6ypbIH, Kypblfbl Kyat Ke3iHeH axbipatbIybl KepeK. OPhATydbI Hemece XeHdeUdi eHdipyuhiH NyckaynapbHa XaHe XeprilikTi Kayinci3dk epexgelepiH caikec 6lkiTmamAH opbIHdaybl KepeK. PaIdaIahy HcyaylbIFbIHda apNaBbl KepCetJIMeiHwe, KypblfbIHbIH ew6ip 6oJIirH XeHdeUre He aybICbIPyfa 60MaIdbI. 3aH 60bIHwa, Kypblfbl Xepre Kocblnybl KepeK. Kyat Ka6eni KypblfblHybl Kyat Ke3iHe Kocyfa 6OJaTBiHdaI y3bIH 60Nybl KepeK. OPhATy
Kymbicapbl KOJdaHbICTaBkayinci3dk epexeJIepine Caikec KeJyI ywiH, MOHTaX epexeJIepine Caikec, Kephey lI caHaTTah acbin KeTKeH Ke3de 3neKtp KyatbIHbIH TOlbIK axbipatbIyBuHa KeiINik6befetih, KOJaHyfpaKcataeITInren KeN NOJARPbI aBTOMaTTbI axbipatkbIw OPhaTbIyby KaJxET. BipHeWe po3eTKaJIbIy y3apTKbIwTbI Hemece baca Da y3apTKbIHsbIMdApdbI KOJaHa6aHbI3. OPhATy aAKTaNFAHHaH KeinH, 3neKTPnIK 6eJWEKTEp OAn AHpi NaIdaHaHybIFa KOJxETIMdi 6oImaybl KepeK. PaJaHaNAHy Ke3iHDe Kypblfbi MeH OHbIH KOJxETIMdi 6eJIKTEpi KbIaDbI. Kbl3dbpyuBbI 3eJEMeHTTepdi YCTaMaHbI3. BaJaAPdbIH KypblfbiMeH OHNAMaybIH KaJaFalaHbI3; 6aJaAPdbI XaKbIHDaTNaHbI3 XeHe OJAPDAH Ke3 aImaHbI3, ce6eBi naJaAHAky Ke3iHde KOJxETIMdi 6eJIKTEp KaTbI bICbl NKeTy i MyMKiH. KapDIOCTMMyJTopnapbl MeH Kocylbl MMnlaHTTapbl 6ap aAdMaDap INHyKzUJIbIK PIIHTaHbI NaJaAHaHbAc 6ypblh KapDIOCTMMyJTopnapblHBiH KypblfbiMeH YJLeCIMdi EKeHiH TekcepYi KepeK. PaJaAHaNy Ke3iHde XeHe OAn H KeiH KypblfbiHBiH KbI3DbIPy 3aTTapdbIH Tnin KeTyIHe XoJ BepMeHiz, ce6eBi ePT ShbIFybl MymKiH. XaHfbIH 3aTTbI pNTta YCTiHe Hemece XaHbIH KaMHaHbI3. KaTbI KbI3FaH TOH
MaJnap MeH cyIbIK MaJnap Te3
XaHfbIb 6OlaDbI. MaJnbI
TafamdapdbI dai bIHday Ke3iHde
caK 6OJIbHbI3. Erep nIInta
6eTIhde JxapbIKTap naJa 6OlaCa,
TOK cOfy KAYNIH 6OJIbIPMac yWIn
KypblfBbHbI Depey Owipin3. KypblfBcIbPTKbI TaIMepMeH He
6eJIek KaIbIKTaH 6ackApy
KypalbImeH XyMbIC icTeMeNdi. PnITada MaJdbI YKbINCbI3
NaIdaIahNy KAYINTI 6OlybIMymKIn
XeHE oPT TydbpybI bIKTImaJI. TAmak Nicipy npouecin KaIaFAn
Typy KaKeT. Kbicka nicipy npoueci
YHemi 6aKbIaHybI KaKeT. OptTI ESWKAIAAH Cymen Owipy
ApekeTih Xacayfa 6OImaIdbI. OHbIH OPHbIH a KypblfBbIHbI
eWipin, oPTti KaKnak He WyBepeK
KJIeeHka CnRAKTBI HApceMeH
Xa6bIHbI3. Opt KAYni 6ap: nIInta
6etHe 6eTrde 3aTTapDbI
KOIMaHbI3. By
Ta3apTKbIbHTapDbI
naIdaIah6aHbI3, TOK cOfy Kayni
6ap. PbIshaKTap, ShaHbIHkbInap,
KacbIKTap Hemece KaKnakTAP
CnRAKTBI MeTAJI 3aTTapDbI neWke
KOIMaHbI3, ce6eBi Onap KbIBIN
KeTyi MyMKiH. KypblfBbIHbI
3JeKTP XeJIcIHe Kocnac 6UpbIH:
KepHey MeH KyaTTbIH 3JeKTP
XeJIcIHe CaNKEC KeJETIHdIRHe
XeHe PO3ETKaFA CsIKEC
KeJETIHdIRHe Ke3 XeTKi3y yWIn
MOnlImeTTep TaKTacBH (KypblfBbIHbIH TEmehri XaFBHnda)
TekcepH3. KymaHIi3 6oNca,
6iIKTi 3JeKTP MaMaHBIMeH
KeHeciHi3.
MaHbI3dbI: - PaIdaIaHaHHan KeiH, PIIHTaHbI KCKbIUtAH OwipiHi3 XHe Ta6aHbI aHbIKTaIbIH KypblfbiFa ceH6eHi3. CyMbIKTbIKtBiH TaCbIN KeTyIHe XoJ 6epMeHi3, COHDbIKTaH
cynbIKtbK KaHaFaHda Hemece Kbl3dbipFaHda OTbI eWipiH3. - Kbl3dbipy 3JIeMeHTepin 6oc KAcTppePmeH Hemece Tabanapmeh Hemece Olanpcb13 Kocybl Kynde KaNbipMaHb13. - Nicipy aAKtaTaNfAH Ke3de Tnicti bICTbIK NNtAHbI eWipiH3. - Tamak nicipy ywiH eWkaaH aIOMHN qoJbraHbI naJaIaHbAHybI3 XHe aIOMHNre opalfa TaFamdapdbI PNTaFA eWkaaH KOnMaHbI3. AInHomHn 6aIKbIn, KypblfBihbI 3aKbIMDaNdbI XHe Ohbl XeHDey MymKIN 6OImaDbI. - TaFamdp CAnbIHAFn KayaawakTAPdbI aShbIMaFAH KyiHne Kbl3dbIpYfa 6OImaDbI, Onap XapblNybl MyMKIN! ByI eCkepy 6aplbIK PnIta TypnePihe KaTbICMbI. - Te3dety (Booster) cyHKUncsbl CnAKTbI XOFapbl TOk DeHReIH TAmaKTbl KybIPyFA apHaflFaH MaN CnAKTbI CyblIKTBkTApDbI Kbl3dbpy YwiN naDanaHyFA 6OImaDbI. ShamaHaN TbIC Kb3y Kayinti 6Olybl MyMkiH. MyHDAJ XaFdaIaNapda Temen Kyat DeHReIH NaDalaNaHybIHb3DbI YCbIHAMbl3. - bIDCTap PnITaHbIH YCTiHe XHe dAnOpTaCbHa KoBlnybl Kepek. EwKaHaDn JxAfdaHa Ta6a MeH PnIta apacbIHda Baca 3aTTapDbI KOImaHbI3. - Erep Temnepatypa Kofapblnaca, Kypblfbl Nicipy 6oJIkTepiH Kyat DeHReIH ABTomATbI TyPe TEmeHdTei. Ke3 KeJIreH Ta3aIay Hemece TexHKnabIK Kb13Met Kepcety aIdbIHda Kypblfbl HbI po3eTKadaH cybIPbIHbI Hemece KockblWTbI OwipiH3. BaplkbOpHaTy XHe TexHknabIK Kb13Met Kepcety XyMbICTapbl YwiH KopFaHbIC KONFaTAPbIH KNIH3. KypblfblHbI ceri3 Xactah ackan 6Banap, cohdai-AK pfNikkanbIK, ce3y Hemece akbl-Oh Ka6JETepi WeKteyJI aAdamap Hemece Taxipnbeci Hemece kajettti 6bnimi JOK adamap adam 6AkblaybIHcbI3 Hemece KypblfblHB i Kayinci 7naDanahy XHe OHBH Kayintinirih Tyciny TpyaBIs HycKaynap
aImaBbHsa KOnDaH6aybl Kepek.
BaIaNapdbIH KypblfBImeOnHaMaYbIH
KaIaFaan OTBipbIb3. Ta3anay XHe
Kytim KepcTey KymblCTapbIH banaIap
TnicTi BaKbIaycbI3 OpbHdAmaynapbl
Kepek. TyTH CopFBtBtRa36eH HeMece
6acka OTbHMen Kymblc icTeiTIn 6acka
KypblfBIpamHen 6ip yaKbITTa
naiDalaHny Ke3iHne 6eJIme XaKcbI
XeIeTIinyi Kepek. TyTH copFBtBtIH iwi
de, CbIPbI Da TexHnKaIbIK KbI3MeT
KepeCy HycKayIaBHa CAnkec MInDeTTi
Type YHemi Ta3aIaHbI (KEMIHDE
AIBIHA BIP PET) Kepek. TyTH
CopFBtBtI Ta3aIay, CoHbIMe KaTAP
Cy3rIepeDi aybICTbpy XeHe Ta3apTy
epexeJepin CaKTaMAY OptKE eKeNyi
Mymkih. Adbk OTta eWkaaH TamaK
daBbHdAByFa 6oImaDbI. Adbk OTbI
naIaIaHcy3rIepeDi 3aKbIMdAbyi XeHe
OePT KayPiH TyDbipyMiymKiH, COHbIKTaH
Ohbl BapNbIK XafdaIa 6oNDbIPMay
Kepek. Man KaTbI Kb13bIN KeTIN,
OptehyIne XoJ BePmey YwIH Kybipy
Ke3iHde aca cak 6oNfaH XeH.
ECKEPHI3: TyTH COPFBtBtIH
KoJXeTImdi 6oJIkTepi PIIHTa KocUbI
Ke3De bICTbIK 6oJybl MyMKiH. ECKepiHi3!
Opnaty KymblCTapbl TOJIbIK
aayKaTaNfAHsA KypblfBihBi Kyat Ke3iHe
KocNaHbI. XeprilikTI 6uNik OpraHdApbl
BeKitKeH, TyTH WbIFapyfa 6aJIaHbICTbl
Kayinc3diK TexHnKaCbsi XeHe Kayinc3diK
Waapanapbl BoBbIHwa epexeJep KaTah,
CaKaTaNbI Kepek. WbIFapblfAn aya ra3
XaFaTBH KypblfBlnap He 6acKa da XaFy
KypblfBlnapbl TyDbipTaBH TYtHi JxOIO
YwIH NaIaIaNbIaNtBn H Ky6bpnap
apKbIbI Xi6epinyi Kepek. TyTH
CopFBtBtBI CBIM TOP Dypbc
OpHaTBImFaH Ke3de eWkaaH
naIdaIaN6aHbIs! KypblfBihBi OPhaty
YwIH TeK eHIMMeH biPRE 6epiReH
BypaHdaIapDbI fAna KOJaHaBbIHb3, aJl
6ipre 6epiImee, cAkec KeletiH
6ypaHaIapDbI catbIn aJIbIHb3. OPhaty
HyckayIbIFbIHda KepceTIirHei 3bIHdbIKTaftbI 6ypaHaIapDbI KOJaHbIHbI3. Ac 6eImeJIk TYtIH copfbls 3JIeKtp eMec Kyat Ke3i 6epinTeIH backa KypblFbInapMeH naJdaHaHbIJFaH Ke3de, 6eImeHIh Tepic KbICbIMbl 4 Pa (4 x 10⁻⁵ 6ap) DeHreInHeh acnaybl KepeK. AIdaFbl YaKaBITTa aHbIKTamaJIbIK petIHne Kapay ywiH 6yn HcKayJIbIKTbl CaKTan KOIO KepeK. CatblNaTbIH, TaCbIMaJdaHaTbIH He KewipineTih JafdaJaDa OHbl EHHIMMeH 6ipre YCTay KepeK.
Byn KypbInfbl 2012/19/EO - UK SI 2013 No3113, KaIdbIK 3JekTp JxHe 3JekTpoHdbIK Jxa6dbIKTap (K33K) eyponaibik DnpeKTINBaCbiHa cai TaH6baIahBi. Byn eHIMHi KOKbICKa dypbc TacTaIybiH KaMTaMaCbI3 eTeDi JxHe ci3 KopUaFaH optara JxHe aam DeHcaylbIbHa 6oNaTbIH XaFBIMcbI3 cAnapDbIH anDbIH anacbl3.
Θhimderi Hemece oraH koca bepiReh KyaKaTtAflbI
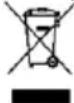
6enrici 0cbi eHIMHH TpyMbICbIK KObIC petinnde tacTaNmai, 3neKtpnik XeHe 3neKTPoHdbIK Kypblfblnapbl KaTt aHDeyre apHaIraH KObIC xHaahTbIH TnicTI opBHFA TactaYbI KepeKTiriH 6inDipei. OnbI KepriniKi KObIC Tactay epexenepihe caikec tacTaHbI3. Byn eHimdi naDanahy, kannbH KeNTipy XeHe KaNbHa KeNTipy TypaBIs KocBIMwa aknapat any yuHxepriNkTI yakiJeTT MeKemere, TyMbICTbIK KaDbIKTapbl XInHay KbImTeH HeMece eHIMdi catbIn anFaH dyKeHRe xaapnaCbHbI3. Kypbbl Keleci epexenepre caJ xacaIybl, cbHaNybl XeHe XacaKTaYbI Kepe: Kayinci3dk: EN/IEC 60335-1; EN/IEC 60335-2-6, EN/IEC 60335-2-31, EN/IEC 62233. OhimdiNiri: EN/IEC 61591; ISO 5167-1; ISO 5167-3; ISO 5168; EN/IEC 60704-1; EN/IEC 60704-2-13; EN/IEC 60704-3; ISO 3741; EN 50564; IEC 62301.EN 60350-2; 3MY: EN 55014-1; CISPR 14-1; EN 55014-2; CISPR 14-2; EN/IEC 61000-3-3; EN/IEC 61000-3-12. Kopwafan optara Keletih acepi a3aHTy uWIn Dypbc nainalaHy Hycaynapbl: Nicipdyi bactarAH Ke3de, TyTH CopfblTbE h a3 XbIaMdkNeH KocbHbI3, nicipy aAKtaFah coH, OHBI bipHeWe MInHTka KaIbIPbHbI3. XbIaMdkTbI TEK TYtH Men 6by Kcn Bonca rHa, Wfbl JkarDaanLapda rHa Te3dety (Booster) cyHKnrcbl apkbbl apTbipblbI3. Nicti a3aHTy xynecHH TImDi KymblcBn CaKtay ywiH, Kemip cy3ricn(lepH) Kaxet BOnFaHda aybCTbpBn TpybHbI3. MaJ cy3rici KAcKcbl Kymblc icteyi ywiH OHbl Kaxketihwe Ta3anan
TpybHb3. TImdiNikTi apTbipbn, WydbI a3aHTy ywiH, ocbI HcKaynbIKTa KepceTIJreH MaKcMmaIdbI Ky6bp dNaMeTpih naJaHaHbHbI3.
2.Паадалану
Плптаби naДанHy
Hnykunbik nicipy kyneci MaHNT HnykucbI cn3nkaBik ky6blbcbHa Heri3denei. Byn KyeHH Herizri Kacneti KyattbI rHepaTopdAn KcctpeTRE TkeJe Kibepy 60bn TabbnaBbl.
ApTbIKWbIbIKTapbl:
3NeKtp PnITaJapbIMeH caJIbICTbIpaTbIH 6oJcaK, INDyKUryJbIK PnITa:
- Kayinci3ipek: 6bHb6eKeHHderi TemepaTpa TEmen 60JaBbl.
- XbIaMbipak: TaMaKTbl KbICKa yaKbITTbl Kbl3dbipyfa 60anaDbI.
-Дэлipeк:плantaбергенпарMuHepredepey kayan bepedi - Tnimdipek: cihiipinreH KyaTTbIH 90%-bl Kbl3yfa aHaHaNbI. CohImeH Katap KeCTpeI nnTaHa anBihFaHHaH KeiH, Kbl3y Bekep NaJaHaanbIMaybl yWIn Kbl3yDbj Xbi6epy Depey TokTaBnAdbI.
2.1 TamaK nicipy KOHTeHepi
TeK 6enrici 6ap Ta6anapdbf FaHa
naIdaIaNbIbI3.
MaHb13Ab1:
nIHTa 6eTHe 3aKbIM KeNmeyi yuH, MbIHanapra TbIbIM caJIbHaBbI:
TV6i Teric emec bldictapkoI
TV6i 3MaJIbMeH KANTaJIFaH MTeJI bIDbICTapDbI KOHO
- nIInTa 6eTHe cbl3at Tycipmeyi yuH Ty6i KeDip-6yDbip bIDbICTaDbl KOIO:
bICTbIK KcctpOepei XHe Ta6aIapbl PNTaHbIH, B6akpy naHeJIHH beTIHe KOHa 60MaIbI. TyTepi TeK JApTBInaIe peppomarHHTIK MaTePnAIIapdaH TpyaBtHbIKTaH, INHyKUyIbIK KOnDaHbICKa 6apbIK Ta6anap Japamblb 6oJa 6epMei! KcctpeNep MeH Ta6anapblcTbIn anFaHnaMbHaHbI eckepH3:
bIbIcTbIH Ty6i TObnfBIMeH feppomarHnTTik MaTePnaIapdAn Tpybi KepeK. 3uTnece, Xblny bepy TImdiNiri TeMeHdeNd, an XblnydbH 6ipKeJIkiiri MeH KAcTpEnDiH/TabaHbIH Temnepatypacbl Tamak nicipye Caike CKeJmeYi MyMKiH.
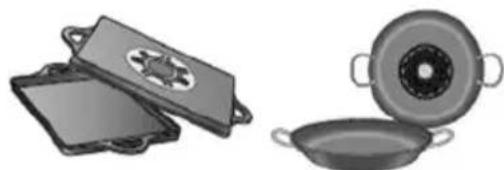
BOJIMAIbI!
TybHde aIOMHH 60nMaybKepek, eHTnece bIDbc Kbi36aai JxHe OHb HnykTopnap TaHbIMayb MyMKIH.
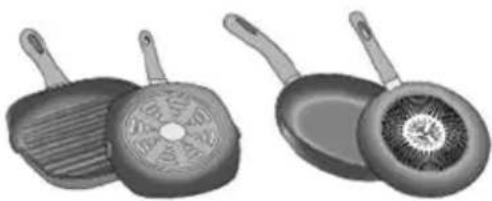
BOJMAIdbI!
Tybi teric emec hemece bipkeki emc bIdbc. Onap Hnyktop MeH Ta6aHbH apacbHaFb6aHbICTb TEmHeTin, Nicipy TImdIniri MeH canacBH HaapnataBbl.

BONADbl!
MaHbI3dbI: bICTbIK Ta6anap MeH KAcTppeepdi ewkaaHa neuTIH yCTiHe KOIMaHbI3.
2.1.1 AnDbIbI KOnTeHepNep
KoctpeiH Maepnab MarnHTti ekeHH TeKcepy yuiH XaHa MarHNTI naDanaHa anacbi3. KoctpeiDepre MarHNTXa6bcnaca, onap xapaMaNbI. AndbHfI tapaydaBkEPCETKiTEp OcbraH da KaTbCTbI eckepinvi Tnic.
2.1.2 YcbHbIaTbI KcCTpe Ty6i DnaMeTpnepi
MAHbI3DbI: erep KocTppeep Dypbc EJWeMde 6oMaCa, nicipy 6eNikTepi icke KocbImaBbl.
Op6ip JKeE 6eIKTH MHNMaIbI DnAmTePnepiH Ocb HcayIbIKTa 6epinre Tnicti CpeTTepDeH KapaHb3.
KaKcbI HETIXKERE KOJI KETKI3V UWHMbHaJAPDbI YCbIHAmbI3:
- DnAmetpi Nicipy aMaraHa cai Keletin KcctpeJep MeH Ta6anapdb naJaHaHbHb3.
Mymkh 60nca, nicipy Ke3iHne Ta6aHbIH KaKnaFbIH Xaybln KObHb3, 6yn ecipece DnAmETpi 22 cm-DeH acatbH Ta6anap yuH MaHb3nbl.
Ta6aHbI pTTaJa KepeTeiJreH nicipy 6eJIirIH opTacbHa KOblHb3.
Copfbw xendtkiu t naanahy
Copy kynecin eki Hycka naiaaHa hyra 6oana b: cbiptkbl copy xhe TaBImaIay HeMece iuKi peunpkynaucnb6ap cy3ri.

Copy Hyckacbl
7-cyp.
TyIHep 6epinre Xanray fnaheihe 6ekitiren Ky6bipnap (6eNEK caTbIn anbHaDb) apKbIbI cbIpTKa sbfapbina. Copfbl W K6bIPdbH DnAmETpi XanraftbW CaINHaBn H nnametpiHe cai KeNy iKepe:
- Tep6bybIUtbl bIbIbCTap yuiH: 222 x 89 MM
-WeH6ep WbIFbIcTap yuIH: 0 150 MM (*)
KocbIMsa aKnapat any ywiH ocbl HcyckaybIKta KepceTilreh copy HyckacbHa KaTbICTbl 6eTTi KapaHb3. Ohimdi DnAmetpi aya WbIFbcbHa (kaJrav fnaHeci) caI
KeJenIH Ka6bIpraFa opHaTbIinaH copFbIi
K6bIpnapra XHe caHbIaynapra XaIraHbI3.
DnAmetpi KiWipeK copFbIi K6bIpnap MeH
caHbIaynap Kymbc TImdiirih HaapNaTbIn, Wy
JeHrein H aTapNbIKTaI apTTbipybl MymKiH.
OcbfAH baiNaHbICTbl 6apNbIK
XayanKepeiikTepeH 6ac TapTbIaNbl.
① Aya oTKi3riM yMkiHdiirHwe kbicKa 6oTnTaHbXoH.
① Mymkih 6oIaTbH eH a3 niHdepi 6ap Ky6bIpdbi naIdaIaNbIbI3 (MaKcImaIbI 6ypblw:90°).
① Ky6bip DnAmetpiH KyPT e3repictepiHe kon 6epMeHi3.

Cy3y Hycacbl
10-cyper
CopbIHaH aya 6eImere kaTata 6i6epiIMec 6ypbH apHaBmai KHe Hc cy3rIepiH eTei. OHim cTaHapTTbOpHaTyFa KaKeT 6aplbK 6oJIkTepeMeh 6epiJIe, aya IIbIFbcbI KopNyc Heri3iHn aIIbIHbI KaFbHa opHaTbJaDb. KocbIMua aKnapaATtb cy3rI HycKaCbHa KaTbCTb 6eTTe (OcbI HxCKayJIbIKTBn CypeTTep 6oJIMHe) KapaHbI3. Typni cy3y Xhe copy JxyelepiH opHaTyFa apHaHraf HXbIHbTKapDbIH TOblk aykbIMbiH www.elica.com XeHe www.shop.elica.com Be6caHTapbIHan KePi3.
3. KoHbIpy
- 3neKtpnik JxHe MexaHkajbIK
6eJIkTePiN opHaTydbI TK 6iJIkTi
MamaHdap opbIHdaybI KepeK.
Byl 3neKtpnik Kypblfbl
7bIFbIHKbl OPHaTbIaTbIH
JkaFdaJa KaIbIHDbIFbl 2-6 cm
6oJaTBiH JxMbIC 6eTIHe opHaTyfa
apHaJIFaH; an BATbIPbIN
opHaTkaH Ke3De 2,5-6 cm
TepeHdiKke OPHaTbIybl KepeK.
PInTa MeH Ka6bIpfa apacBHaFbl
KaUbIKTbIK aIDbIHfbl JxafblHaH
KeMiHde 5 cm, 6yIipJIepiHeh
KeMiHde 4 cm XeHe JxOfapFbl
KeJeprIeH KEMIHDe 50 cm 6Olybl
KepeK.
EpeKwe Ha3ap aydapbl3:
YCbHbIJFaH KaUbIKTbIK MbICaJ
petiHde KeJIpiIreH: YJ
XaIInapDbI Xo6anay Ke3IHe acyI
KypblfblcIBHbIH OhdipyWicIHin
HvckaynapbI eckepinyi kepeK.
3.1 3.1eKtp KocyapbI 3-cypT
KypblfblbI 3JIeKTPnIK Kyat Ke3iHeH axbipaTbIHbI3. OpHaTy KymblCTapbl H KOJaHaNbICTaFbI Ophaty XHe Kayinc3dik epexeJepin 6iIetin, Kc6bn DaBbHdaJFaH KbI3MeTkepJep rHa Jy3ere acbipyI Kepek. Erep ocbl tapaydaftbI HycKaynap opbHdaJMaCa, eHdipuwi aadamdapfa, XaHyapnapfa Hemece MylIkKe Tureh 3apdaTap ywIn Ke3 KeIReH XayanKePwiIKTi 03 MoHbHa aImaDbI. Kyat Ka6eni PnITahbI XyMbIC 6eTIHeH ShbIFapbln aJFaHda bIHfainbI BoJtBnDa JxETKlIKTi Y3bIH 6Olybl Kepek. KypblfblHbIH actbHbI XaFbIHda OPhaLacKaH cepraNbIK HeMip TaKTaNacbIHda KepCetTilreH KepHey OJ OPhaTbIaTbIH ynderi Kepehyre CaiKec KeletiHdiRIN Tekcepini3. ¥3apTkbl W cbIMdApdbI naidaHaH6aHbI3. JKepre Kocy Kyat cblmbI backka Ka6elbdepre kapaHaHa2 2 CM-RE y3bIH 6Olybl Kepek. Erep 3JeKTPnIK Xa6dbIK Kyat cblbImeH Xa6dbIKTaJMaCa, 7200 BATT Kyat ywiH 2,5 MM2 MHHMaJDbI KOHdyKTop dIaAMetpiH naidaHaHbIHbI3; XoFapbpak Kyat DeHreJnepi YwiH dIaMeTpI 4 MM2 6Olybl Kepek. Ka6bel 6oBbIHdaFbI Tempepatypa 50^ -taH acnybl Kepek. Bynl Kypblfbl Kyat Ke3iHe TypaKTBi Kocblnyfa apHaJFaH.
Eckepihi3! 3neKtp XeIicHe Kaia T a Kocnac 6ypbH, OHbIH dypbc JyMbIC icTeuTihHe K3
KeTki3iH3,ApkaaH Kyat Ka6eJIHH DypbIC OPHAbIHaHbIH TeKcepH3. EckepiH3! ApaIbIK KajFay Ka6eHn aybICTbipydbI yakileTTi TexHnKaIbIK KOJdAy KbI3MeTI Hemece 6ilikTiniri oFaH caa aadam Ky3ere acbipybI KepeK. EckepTne: eHIM MaKcImaIdbI Kyat WeKteYih OPhATyfa MymkIndk BepetIH Kyat WeKteywi CyHKUINCBIMeH Za6DbIKAfAH Kypblfbl 3JeKtp JeLiciHe KocblfAH Ke3De Hemece axkbiparaH COH 3JeKTP JKeLiciHe KaIta KocblfAH Ke3De (KeNeci 2 MNHyT iWiHNe), 3JeKTP JyueciH KOpFaHbICbIH TaHdaIFAH KyaTTbI WeKtey DeHreInHe caikeC OPHAbIHbI3. WeKTeY KoBILnybl KepeK. Kyat WeKteY napametpi YwIH OcbI HyCKaylbIKTBiH XMybIC 6eJIIMiH kapaHbI3.
3.3 Bekty
Ophatydb6acTaMaC 6ypbH:
- ΘHIMDi KopaTaNbIbIFapFaHHaH KeiH, OHbIH TaBImaNay Ke3iHde 3aKbIMDaIIMaFahbHa K03 XeTKi3iH3, akaylbIKTap TybIHdaFah XaFdaJa, caTyWBIfa Hemece TytbIHywbInapra KbI3Met KOpCETy optaJIbIFbHa XabapNaHbI3.
- ΘHiMHiH, ΘIiWeMepi opHaTbIaTbIH opbIHf aCaiKeC KeIeTIiHe Ke3 KeTki3iH3.
KantamaHbH iuiHderi TacbImanay MaKcaTbHda caIbIHfAH KepeK-kaPaKTapDbH (MbICaNbI, 6paHdAnap caIbIHfAH KaItaUbIKTap, KenIIdk KyeNikTepi XHe T.6.) 6ap-KoFbHa Ke3 XeTki3H3. Erep 60nca, onapbl anbln TaTaHbI3 XOHe Kayinc3 Xepde CaTaHbI3.
OpHAty aImaFbIHda Kyat yrcb6ap eKeHH TeKcepHiz KopnyctbI opHatyFa daBbHday:
6yIbIMbI caIKbIHdATKbIH KypblfblnapdbH, bIDbc KyfbIHTapdbH, neTepH, kip KxyfbMmaunHa nap MeH Kip KeTIPRI KOHdbIpflnapdbH yCTiHe opnatyfa 60lmai.
-Плntанbl opHnatnac 6ypbH, ukaftb cekciHwe keciH3 XeHe XaHkajap MeH yinDjepdi abaJnan aJIbIb3.
MAHb13DbI:250° TemnepaTpyara 6ip KOMIOHEHTI JxabicKAp RepmetnkTi (S) KOJDAHbIHb13; opHaTmac 6ypbH, JxabicTbpIbTaBH 6eTTepDi MyKnT Ta3anaHbI 3xHe Jxabicyra Keepi JxacaiTBnB apNbIK HApceJIepDi XoBihb3 (MbICanbl, 6eNriu XaKaNaIap, 6etki YndIpIep, TOHmAlnap, CynbIK MaI, WAn, ecki JeImHH, i3depi XHe T.6.); Jxim XaKTaydbH 6apbIK CbIPTkbl XaFbHa 6ipKeIki XaFbInyIkepeK; Xa6bICKaHHaH KeinH, Jeimdi IwamMeH 24 carat KypraTbIHbI3.
1B-2B cypepi
EckepiH3! BypaHdaJap Meh bICbIPMaJapDbI OC HyCKayJapfa cai OPhaTnacahbI3, 3JIeKTp TOrbl Kayni opbIH anybl MymKiH.
EckepTne: 6yIbIMHbIH Dypbc OPhaTbIybyH KaMTamacbl3 ety ywiH KeNeci CnNaTTaMaJapbl 6ap Ky6bpnapbl XeJIIMMeH TbIFbI3day YcbHbIJaBl:
- akpnl Heri3iHderi keinimdi kymcak niiriip PBX yndip
-DIN EN 60454epexepeine cai
-OTKaTe3IMdi
-ecikpyre TeaimdiJiri kofapbl - TEmnepaIpya aybITKynapbHa Te3imdi
- TEmeH Tempeatypada KonJaHyfKaJaMdbI
4.Паадалану
Backapy TaKTacbl
Eckeptne: TepMeHepdi TaHday ywiH onapdbi biDipetIH TaH6anapdbi kaI rHa TpyTih3 (bacbiHb3)

PepHeJep
- KOCY/ΘWIpy: ΠΠιΤΚaΗβι / ΠΠιΤΚaΗΒΙΝ CΟρFBιW ЖeνДeТкιSi
- TamaK Nicipy aMaFbH TaHday KyaT deHrein apTTbipy
- Copy kbldAmdbfbih (KyaTbH) apTTbipy
4.KyaT DeHReiH TeMeHDeTy Copyy KblIaMdbIbIH (KyaTbIH)TeMeHDeTy TaMep MHeIH a3aHTy - TaMepDi icke Kocy TaMep mHiH apTTbpy
6.ABTOMaTTbI cyHKunnaJapDbI icke Kocy Cy3i KaHbIyBIn 6actankbMHe KaTapy
Ducnnne /CKI
- Kyat deHrein H Kepy
- CopFy KbIJaMdbIfBIn (KyaTbH) Kepy
- "Taimep Kocylb" INHdkaTopbl
- TaHMeP MAni HnDnKaTOpbl
11.ABTOMaTbI COPY cyHKcNcBihH INHdNKaTOPbCy3ri Kemeri INHdkaTOPbSNAP Kymblcbl INHdkaTOPb
ПЛNTAHы ПАДАЛАНY
Bactamac 6ypbih eckepihi3:
Byn nntaHbH 6apnbik cyHKunnapbl eH kaTaH kayinci3dk epexepeine caB 6oNaTbH etin kacanfaH.
Ocbifan 6aJHaHbICTbl:
KoctpePnepKaHApfbHbIn yCTIHe KOblIMaHaHda HeMece Dypbc emec KOblFaHda, Keibip yHKunnap icke KocblMaHbI Hemece aBTOMaTTbI Tpyde ewipinei.
- Baçaжаитайлардабелгілбip Функцу Танданмаган napamTpdi кожет eTKeH Ke3de, icke Кocулы Функцулар abTomattbI Typde ewipineDi (MbicaJIbI: "Плпаны Кocy"прмehi "TamaK nicipy amaftbIH TaHday"ЖэHe "Жymbic tempepatypacbl" Hemece "KynbIntay Функцусbl" Hemece "Taimep" ONUncrHcbl3).
! Cak 60nbHbI3! Y3aK yaKbIT naJaHaHbINFaH
kaFdaIda (MbicaJIb) TaMaK Nicipy aMafbl CybITy
pa3acblHa 6oNfArdkTah, Depey eWipinMeyi
ymkiH; 6yJ pa3aHbIH aKaTaNtBtHbH 6iNdpetIH
"H" TaHbAcbl TaMaK Nicipy aMafblHa 5bIfadbl.
TaMaK Nicipy aMafbln naJaHaH6ac 6ypbH,
IncnnneDIn HewipinyiH KyTHi3.
Tamaknicipy aMaftbI dncnnei
TamaKnicipy aMafbHbH dncnnei KepceTei:
| Тамak пicapу.aiМаftы Косулы | 0 |
| Куат.Deнгей | 1...9...P |
| Калдык Кызу ИndидаTopы | H |
| Кострел anыктабiш | ü |
| Көпир Функцясы косулы | π |
| Temператураны бackару функцясы косулы | ü |
| Балалардан кор广泛关注 функцясы | L |
ПлNTа синтамалары
Kayinci 3 icke kocy
ΘHIM TEK Kcctpən TaMaK Nicipy aMafbIHa 6oNfA H KaFdaJa Faha icKe KocbIaIbI: eWkaHdai KcCTpei 6oImaca HeMece Onap aIbIHca, KbI3bIpY npOueci icKe KocbIaMaiDbI He ToKTaTbIaIbI.
Kactpen aHbIKTaftbiu
ΘHIM TamaK Nicipy aMmaFbIHda KcctpeJdiH 6apbH aBTOMaTTbI TypDe aHbIKTaIbI.
Kayinci3 ewipty
Kayincizdk MaKCaTTapbIHda eepip TaMaK Nicipy aHaMbIHda MaKcImaIdbI KymbIC ICTey yaKbITbl 6eIriHeHdi, ON opHaTbINrHaMakcImaIdbI KyaT deHreInHe 6aJNaHbICTbl 6oJaBl.
KaIdbik KbI3v HndnKaTOpbl
Bip He 6ipHeWe TaMaK Nicipy aMaFbI eWipinreH Ke3e, KaNDbIK Kyat 6ap 6oNca, on H" TaH6acbIHbIN KOMerIMeH cEKeC aIMaK dIncnneiHderi Bn3yAnbl CnHaJMeH KepceTineDi.
Kymbic
EckepTne:Ke3 KeJIreH ΦyHKUnaIapDbI icKe Kocy aIbIHda KaKeTTi aMakTbI KOCy KepeK
Kyaattbl Kocy
O nJIHTaHbI/copfbluTbIKOCY/ElIPy nepHeciH
6acbihb3 (TpyiH3)
Pnnta/copfbu nnaiandaHyra daibin ekeHH 6iDipeTINHdNkAToPwaMbIxHaDbI
Uwipy yuih KaTaNacbHb3
Eckeptne: Byn pfynkunraHbIn 6ackaJapFa kapaHaHa 6acbIMdbIfbl Kofapbl.
Tamaknicipy aHaMaFbIH TaHday
KaKeTTi TaMaK nicipy aHaIha ca KeJIeTIH TaHnay KypaNbIH + TyptHi3 (6acbHbI3).
9kyat deHreini
Pnnta9 Kyaat DeHreinHe ne
KyaT deHreinapTTbipy yuH TaHay KypaJIbH
KyaT DeHReiTHemEnDeTy yuIH TaHay KypaIbH
KyaT deHreI TaHaJaFah aMakTbIH dncnJeiHe
P" TaH6acbImeH WbIfaDbl
Ha3ap aydapbIbI3: nicipy aMmaFbIHda 4 (19-
CYP.) Power Booster (KyaTbI KyWeuTy) pexnmihe apHaFaH TaMep KOK;
Power Booster (KyaTbI KUweiTy) peXmIn eWipy
yushi6acbHb3:
Kenip aMakTapbl
Kenip fyHKnraCbIHbH apKacbIHda JkaNicipy aMaKaTapbl 6ipDei Kyat DeHreimEn 6ip aMaKaTbI Xacaai OtbpIn, apanac pexmde Kymbic icTei aJaBb. ByJyHKnra YJIKeH KcCTpeIdep MeH Ta6aIap TamaKbI 6ipKeJIki nicyiHe MymKiHdIK 6epeDi.
AaHbIhbl "Herizri"nicipy aHaMaFBiH apTTaFbI cKeec KocbIMwa" aHaMaFBiMeH naJaNaHyf a6oJaB
ocbyfynkunmaH KaHdaa aMaKTap
Xa6dbIKTaIaNtBbIH Kepy ywiH OcbI HcKayJIbIKTBiH
cpeTTep 6enimin kapaHbi3).
Kπip ΦyHKuЯscbIH icke Kocv ywiH:
-Heri3ri"nicipy aMafbIH TaHdaHbI 1 (KeMHde O KyaT deHreinHe 6Onyi KepeK)
-
- nepheciH akyctHKaIbIK cnHaNbl Dbl6bIC 1bIfbn, "T TaHbAcbl XblnblkTan 1bIKKaHwa 6acbin Typblh3
("KocbIMwa"nicipy aMafbIbIH (7) dncnneHne
-"KocbIMwa"nicipy aMmaBbH 3 cekyHnta TaHaHaB13
-Heri3ri"nicipy aMarmHbIH KymbIc deHreinH
(KyaT) opHaTbIHbI3 +, on (7) KaTbICTbl DicnneiHde kepcetine di
EckenTne: Kenip cyHKnncbIH oWipy ywiH kai rHa TaMaK nicipy aMafbIH "0" TempepaTypacbHa XeTKi3iHi3.
TemnepaTpaHbI 6ackapy
TemnepaTpaHbI backapy Kb3yDbIH 0 MeH 1 apacbIHdaFbIOHTaINbI Kyat DeHReiHDe TpyaKTBtI TemnepaTpaHa 6OlybHa MymKInDik 6epetIH bacekapy fynkuncaBcI 6oNbI TaBlaDaI; daBH
TamaKtbl Kblbl KyiHde caKTay yuHnaiDanaHbIaBl.
TemnepatypaHbI backapy fynKcuncbl nepHeHi
aIraa 6ackan Ke3de icke KocbIaIbI
"U" TaH6acbl TemnepaTpaHbI backapy
peXIMIne XyMbIC icTeiTH ayMaKTbI DnCnneiHe
IbIfaBl.
BanapdAn Kopray
BaIaIapdaH KopFay baIaIapdbIH 6aIKaycbI3da TaMaK Nicipy aIMarblHa KHe copfbiU aIMaKa KaPyiH anDbH aBIn, KaHdA da 6ip fynKuHbIH icKe KocblByHa kOJ bepMeNi.
Banaapan Kopfay TK eHIM Kocynbl 60nb, an nicipy aMaKtapbl (XaHE copfbw aMaKtap) ewipyni 6oJFaHda icke KocblnabI.
Icke Kocy:
- (FR) nepheciH xHe nepheciH 6ip
Me3rInDe 6acbIn TpybHbI3
- OdaH KeiH XeHe TaHday KypaIbIH + (2-FR) KaTb 6acbIbI3;
KOC akyctnkaJIbIK CnHaI BanaIapdAn Kopray cyHKUcIbI KocyIbI eKeHIn 6iJdpEi JxHe "L" (7) dncnneJepre WbIrabl.
Theta:
- (2-FR) nephein kHe nephein 6ipre
6acbin TypbHbl3
- OdaH Kein nepHeciH KaI Ta 6acbIHb3; Koc aKyCTnKaIbIK CnHan BaIaNapdAn Kopray cyHKuIcbl eWipirReHH KepCteDi JxHe "L" DIncPneJnepre (7) WbIraBl.
Yakbimwa euwipy: BaJanaPdAn Kopfay cyHKUncBcI KOCyJIbI Ke3De TaMaK Nicipy aMafBH NaJdaNaHy bIKTmJaJ.
Kenecideu kanaFarmbipbHb3:
- (2-FR) nepheciH xhe nepheciH 6acbl3
TamaK nicipy aMarmbH eDetteriJe naDanaHa aIacbl, BanaIapdAn Kopray yHKuncbl Pnnta eWipyn Ke3De KaNTa KocblnabI.
TaMep
TaimepyHKcnaCbI eP TaMaK nicipy (xHe copy aMafbl) aMaFbl yHOpHaTbInaTbIH Kepi caHaK 60nbTb6bInaDbI.
OpHaTbIaTbIH Mep3IMHIn COhBnDa TaMaK nicipy aMafbl (HeMece copy aMafbl) aBTOMaTTbl Tpyde eWipinei JxHe naDanaHysbI akCyCTNkAIBK cnHaI apKbIbI xa6apNaHdbIpblAdbl.
Taimep TaH6aHbI 6ackaKe3de icke Kocblaabi

TaNMeP Kepi caHaKtbl aayKaTaHaN Ke3Je akyCTnKaJIbIK CnHAn Dbl6blcbluBfAdbl (2 MInHyT 6oBbl Hemece Ke3 KeJrReH PnIHTa nepHecih bacy apkblbToKtaHaHa), (10) dncnnei "O" TaHbAcblMeH KaHaDbI.
TnTaHbIH TaMep yHKnAcbH pettey
TamaKnicipy aMafbIH TaHaHbI3.
- PeTtey cyHKUcBiHa kipy yIiH 6aCbIHb3.
-TaHmep y3akTbIFbIH peTTeHi3: aBTOMaTTbl 0wipy yaKbITbIH apTTbIp yIiH
Tahay KypanbH
6acbHb3
abTOMaTTbI eWipy yaKbITbIH a3aHTy yUHH
nephecin 6acbHb3
KaXeT 6oJca, 6aCa TaMaK Nicipy aMakTapbI yuHOnepaunraHbI KaTaNahB13.
Eckptne: TaMep MOni ap6ip TAmak Nicipy aMaFbIHda ePTypni 60nybl MyMKIn; (10) dncnIeHnDE COHfbl TaHdAnFaH PnITaHbIn Kepi cHaftb1 10 ceKyHdka WbIfaBb, OdaH Kein H a3 KaNFAH yaKbIT Kepcetinei.
TaMepdi eWipy ywiH:
TaMep yaKbITbIH "0" eTIN KemerimEH OPHAbIHbI3
-ПлNTаны кemerimEn eшipiH3
EckepTne: eUkaHdai nepHe 6acblmaca, cyHKnIg Kocylb KaJaDbI.
Eckeptne: TaImeP naiDanaHbIaTbIn Ke3Je,

TaH6acbl TaMaK Nicipy aMafbIbIH 6yNipiHde faIbI
Kymbiptka Nicipy TaHmepi
Kmbiptka nicipy taMepi cyHKnncbI nicipy aMaKaTapbIHAn (xHe copy aMaRbIHAn) Teyenci3 kepi cHaK 60nbT Ta6blaDbI. OPhaTbInFaH yaKbTTbIH CObIHda, naJaIaNHyMbI aKyCTNkAJIbIK cnHAn xa6abpI 6epiJeDi.
Kymbiptka nicipy taimepi nephecin 6acbln Typy apkblbl icke kocblnaabl.
Eckeptne: Xymbiptka nicipy TaMepi Функцясьи icke kocy kepek boJca, TaMep ФункцясьiyuH de ocbldai npOceDypaHbI КаТалЯнБИЗ.
KyaTbIwekTey
KyaTbI IeKTey cyHKcIaCbI eHIMHiMaKcMmaJIbI copy IaMaCbIH IeKeTcN OTBpBIn naJaHaHyFa MymKiHdIK 6peDi.
Eckeptne: TYtIH TapTKbIw eWipyni 6oJraH Ke3de TYtIH TapTKbIw (TYmeciH 6acnai) TYtIH TapTKbIw 3JeKtp JeNiciHe KaJraHfAHHaH KeiH Hemece 3JeKtp Jekicih E3i KaT Ta KaJraHfAHHaH KeiH 2 MNHyT iwiHne eWedi.
Kyatwekteyih opHaTy ywiH:
-6acbHb3:


nephecin 6acbin typran Ke3ne nepheciH
6acbin xiibepe cabnb13

-akyctikabIK CnHAn KblcKa yaKbITKa WbIFAdbl

nephecin 6acbin Tpyran Ke3ne + (2-FL) necih 6acbin Xi6epe caIbHb3
nepHecin ki6epyre 6oJaIbI:
FL aMfbl (7) nucnnei "C" XeHe "O" TaH6aIapbIn WekTeydi opHaTyfa 6oNaTbIHbIN Kepcety ywiH Ke3ekneH 1bIfapaBl
RLaMaFbI(7)nucnneiaFBIMdaFbI npapaMeTpdi KepceTei**
$$ \begin{array}{l} 0 = 7, 4 \mathrm {K B T} \ 1 = 3, 1 K B T \ 2 = 4, 5 \mathrm {K B T} \ \end{array} $$
** eJenKicHwe, WekTey 7,4 KBT mHiHe KOJIaIaBl
- KyaTbI WeKTey npaMeTpih e3repty ywiH + (2-FL) nepHeciH 6acbIHb3
-TaHaybI caTay ywiH nepHeciN 2 cekyHd 6acbin typbHb3;napaMeTpdi opHaTyblpactay ysiH y3ak akyctkaJIbIK CnHAn WbifaB1.
-Функцяданшыrfу yшin 6acbHb3
COPfbIiXJEIeTkiIITI NAIdAIAH
Kyaattbl Kocy
O nntaHb/copfbiWtBi KOCy/0wIPY nepheciH 6acbl3 (TypTHi3)
PiTa/copfbn naDanaHyra daBbH eKeHH
6iJdpTeIH INdKaTOp WAmbI KaHaDbI
Owipy yuH KaTb 6acblb3
Eckeptne: ByI phyHKunHbH 6ackanapFa
KapaHaHa 6acbIMdbIfbIXorapbl.
Copfbw xenDeTkiWti kocy: Copfbw xenDeTkiWti icke kocy yuH TaHday
KypanbH TyptiHi3 (6acbHbI3)
Copy kbldaMdbfbk (kyaT):
copy kbldaMdbfbn (kyaTbI) apTbpy yuH
TaHday Kypanbih typti3 (6acbHb3) (0-10);
copy kbldaMdbfbn a3aHTy yuH TaHday KypanbiH - Typti3 (6acbHb3) (10-0);
Taimep
TaMep TaH6aHbI 6ackan Ke3de Ke3 KeIre H XblnamdbkneH icKe KocblnaDbI
(10) dinpnei kepi caHaKTbI KepceTei (9) dinpnei TaHbaHbI KepceTei
CopfbiuXeJndetKiuTaNMeepin peTey
AnbH ana opHaTbIHaH eWipy yaKbITapbH e3reptyre 6oNaDbI. On TaMep KocynbI Ke3nde e3reptiinyiKepek.
- ABTomAttbl eWipy yaKbItbIH apTTbpy yuH

Tymecin 6abHb3
- ABTomattbI eWipy yaKbITbIH a3aHTy yuH

Tymecin 6acbHb3
Cy3riHIn KaHbIybl HndkaTopbl TyTH TapTbIbTexHnKaIbIK KbI3MeT OpbHdaNybl KaKET Ke3di 03i KepcTeDi
MaCy3rici "FILTER"(11)KUdJkaHaDbI
Nicke Kocbi BeIeHApinreH Kemip cy3rici "FILTER"(11) CKJ XbInblbIKTaIdbI
Cy3ri KaHbIyBn 6aTaNkBi MHiHe KaTapy Cy3rJepre (MaJ KHe/Hemce 6eNceHdipinreH
Kemip)TexHnKaIbIK Kbl3MeT KepeTeIInreH COH, nepheci6acbnTypbIHb3; "FILTER"XuD ewin,caHay 6actanaDbI.
- Nicke KapcbI 6eHepinreH Kemip cy3ricHH TOy HndNKaTOPbIHbIH icKe Kocblnybl Byn nHdkatop aedTte eupyni 6oana. OhI icke kocy yuih 6arapnaamay yuih, MblanapdbOpbHdaHbI3:
-TyTIN TAPTKbIHTbI nepheciH 6acy apKbIbI icKe KOcblb3;
copy MOTOpbl MeH nicipy aMakTapbl eWipyni 6oJraH Ke3De, A nepheciH 6acbIn TypbHbI3;
"FILTER" icke kocbinaDa, KypblfblH icke KocbinaHbH KepeCy yuH oWeDi.
Nicke KapcbI 6eNceHdipinreH Kemip cy3ricHH TOny HndNKaTOpbInbH eWyi Xofapda CnnaTTanfah icKe Kocy KaamdapbH KaTanaHbI3
-Filter" KbIbIbIKTaIbI Da, KypblfblHbIH OwkeHH KepcetyuWih oWeDi.
SNAP® ΘHIMIMEH aBTOMaTTbI pHTa pEXUMI TyTH TApTKblI NeH SNAP® apacbHa 6aJIaNbIC opHATy KOJIbTypaBbAknapaTTbI SNAP® KypblfbcIMeH 6epinreH HcKaybIKTaH KepiH3 Hemece www.elica.com caTbHa KpiH3.
Eckeptne: SNAP® — TyTIN TapTKbIuNeH 6ip yaKbITTa Kymblc icTei anaTbIH KOCbIMua TYTIN COPfblkypblfnbl.
ByydyHKunHb icke Kocy ywiH:
A TYmecin 6acbHb3, "(A)" KUd Jxhe SNAP (11)KUd TYtIH TapTkblTbIH OcbI peXHMde Kymbc ICTen TpyFaHBIn KepeCy TuH XaHaDbI.
Byn KypblfnbHbI Tepe3e DaTnri XNblHTbIFbIMEH 6ipre naDanaHyra 6onaBb (Ohbi Ehdpuyi 6epMeNi).
Erep Tepe3e DaTunri 6ap KINHAK opHaTbIInca (TeK EXTRACTOR (TyTH copfbl) peXmI KOJaHbIInFaH XaFdaJa), DaTnK opHaTbIInFaH 6oJIMeDi er Tepe3e Ka6bIInFaH caBH aay copy TOKtaiDbI.
- XHAK nen Kypblfbl apacbHdafl 3neKtpnik 6aNaHbICTbl 6iIKTI XHe MaMaHaHdbIpblfAH TexHk opHaTybl KepeK.
- KINHAK Kypamda6oikke Xhe OHbl KypbIFbIMeH 6ipre naDanahyra pyKcat 6epetih Kayinci3dk cTaNapTtapbHa cAnkec 6OJIek ceptnfKnKaTTaIyB1 Kepek. Ophaty Kymbcbl TypmbICTbIK Kyneepre apHaNFAH aFBIMdaFbI epexenepre caOpbIHdanybl Tnic. ECKEPHI3:
XINHAKTbIH KypbIrfba Ra KaIraHaTbIH cbIMdapbl ceptnphiKaTTaIraH Kayinci3 KocBIMwa TemeHri KepHey (SELV) ti36erHH 6ip 6eNiri 6oNaTBHdae tIn KaIraHybI Tnic.
-6yI KypbIbIbIHbIe OHdipywici akaynapra XHe/Hemece XINHAKTbl dypbc opHaTnayfa 6aJIaNbICTbl TybIHdaIbTBi h aKaynapaH XHe/Hemece npo6IeMaIapDaH TybIHdaFaH KOJaCbI3DbIK, 3aKbIM Hemece oPt ywiH e6ip kayanKepiikTi MoHbHa aJMaIbI.
4.1 Kyat kectenepi
| Куат дени | Пису typi | Деньейді колдану (данnei nicipу төхэрбesci men nicipу эдтгери 6оре кamнды) | |
| Мakсимум kyat | Boost Te3 | Кыздыру | Су бүлэн жаftада тамактун Темпартураьсн Тсз кайнату дөнгийн Дeйн Jжылдам apTTыруfa щeне тамak Nicipу Сылдам Кыздыруfa оte БИнfvлы. |
| 8-9 | Кызру - кaноту | Тамакту Кыздуруfa,nicipуді bactayfa, Каырлдам Тамактарды Кыздуруfa щeнe Жылдам Кaнотуfa оte bINfvлы | |
| Жorapсы kyat | 7-8 | Кыздуру - Кызру - Кайнату - OTka КAKTay | Кыздуру, кайнату КOLORA,nicipу're щeнe OTka КAKTayfa (5-10 минуTTык Кысka yaKытар iшinde) оte bINfvлы |
| 6-7 | Кыздуру - Nicipу - Быкдуру - Кызру - OTka КAKTay | Кыздуру, кайнату КOLORA,nicipу're щeнe OTka КAKTayfa (10-20 минуTTык Кысka yaKытар iшinde),kepek-jakapKTarды andbln ana Кыздуруfa оte bINfvлы | |
| Орташ kyat | 4-5 | Пису - Быкдуру - Кызру - OTka КAKTay | Кaнотуfa,бая Кайнату КOLORA,nicipу're (узafырak уakытka) оte bINfvлы Пастаны apanactbyr |
| 3-4 | Пису - Кайнату - КOKолatу - apanactbyr | Сылдуру (MbICalb, cy,шалan, copna, cty) Косылган taram'dы (Kypiiu, coystap, Кчрakтай Кыздурун taram'dap, bailik) баяnicipy, постаны apanactbyrfa ote bINfvlы | |
| 2-3 | Пису - Кайнату - КOKолatу - apanactbyr | Сылдуру (MbICalb, cy,шалan, copna, cty) Косылган taram'dы (bip litprden a3 Кeнemdi eri: Kypiiu, coystap, Кчрakтай Кыздурун taram'dap, bailik)баяnicipy otte bINfvlы | |
| Төмehri kyat | 1-2 | Ерity - Хбіиту - Хьлы Кундс cal'tay - apanactbyr | Мai'dы жумсартуfa,шokona'dы кaiman Бankblyrufa,шafын тамактарды epityre ote bINfvlы |
| 1 | Ерity - Хбіиту - Хьлы Кундс cal'tay - apanactbyr | ЖацаданNICIPILRETN TamaKtBuH WAFBn норцяларын Xылы Кчide саTkayfa HeMece берлелтih TamaKtapdlnh TemnepaTPaCbH Чstan Typyfa XeHe Pn3OTTOHb apanactbyrfa otte bINfvlы | |
| ӨшіРУ | Hengl'dik kyat | Беткібелікke колдay Керсету | Пл'tа КУТу Hemece ошіру ресимінde Бога'dы (H-L-O apkblы синнан Беріnetɪn Тамак Nicipуden KeiH KaIybl MUMKIn KaIdBiK Кыз) |
4.2 TamaKnicipy keCTeNepi
| Тамактар санаты | Тамактар hemece nicipу typi | Куат денией мениcipу бенишец | |||
| Бірінші кесян | Куаттар | Екінші кесян | Куаттар | ||
| Паста, куши | Жа的答案н的答案 | Сydы Кыздуру ApTTbIPу | 9 | Паста nicipу жени Кайнатыkoю | 7-8 |
| Жа的答案н的答案 | Сydы Кыздуру ApTTbIPу | 9 | Паста nicipу жени Кайнатыkoю | 7-8 | |
| Кайнатылган куши | Сydы Кыздуру ApTTbIPу | 9 | Паста nicipу жени Кайнатыkoю | 5-6 | |
| Риотто | Куьу жени Курактай Куьу | 7-8 | Пису | 4-5 | |
| Көхэнstep, Бүшактар | Кайнатылган | Сydы Кыздуру | АрTTbIPу-9 | Кайнату | 6-7 |
| Куьулган | Мai'dы Кыздуру | 9 | Куьу | 8-9 | |
| Мai'reа 6укыру | Кыздуру керек-жары | 7-8 | Пису | 6-7 | |
| Букырлган | Кыздуру керек-жары | 7-8 | Пису | 3-4 | |
| Куьулган | Кыздуру керек-жары | 7-8 | Кызарын Куьурллган | 7-8 | |
| Етөр | Курахтай Куьу | ETTI мени Кызарын Куьу (сapы Мени Куьурлпca, 6-kyat) | 7-8 Пису | 3-4 | |
| Отka Кakталган | Табани ралдын рал Кыздуру 7-8 | Еki жаftын OTka Катay | 7-8 | ||
| Кызарту | Мai'reа Кызарын Куьу (сapы Мени Куьурлпca, 6-kyat) | 7-8 Пису | 4-5 | ||
| Букыру | Мai'reа Кызарын Куьу (сapы Мени Куьурлпca, 6-kyat) | 7-8 Пису | 3-4 | ||
| Балык | Отka Кakталган | Табани ралдын рал Кыздуру | 7-8 | Пису | 7-8 |
| Букыру | Мai'reа Кызарын Куьу (сapы Мени Куьурлпca, 6-kyat) | 7-8 Пису | 3-4 | ||
| Куьлган | Сydы Кыздур | 8-9 Куьу | 7-8 | ||
| Жуmbіртkanap | Омnetтетр | Табани capы мair NeToH mair can'tл Кыздуру | 6 Пису | 6-7 | |
| Омnetтетр | Табани capы мair NeToH mair can'tл Кыздуру | 6 Пису | 5-6 | ||
| Жумсан. Kaинатылган/Кайнатылган | Сydы Кыздур | АрTTbIPу-9 | Пису | ||
| Куямakтар | Табани capы мair can'tл Кыздуру | 6 Пису | 6-7 | ||
| Соустap | Кызанak | Сydы мairа Кызарын Куьу (сapы Мair Болca, 6-kyat) | 6-7 Пису | 3-4 | |
| Ет сoudы | Сydы мairа Кызарын Куьу (сapы Мair Болca, 6-kyat) | 6-7 Пису | 3-4 | ||
| Бeshamelcoysb | Herizdi дайдay (сapы мairды epitɪñɪz IXəн ун себиɪz) | 5-6 | Баяу кайнаганша Кыздурллган | 3-4 | |
| Дecentralstep, Кремер | Кайнатылган Крем | Сydті кайнау 4-5 | Баяу кайнатын Кою | 4-5 | |
| Бotkanalap | Сydті кайнау | 4-5 | Баяу кайнатын Kою | 2-3 | |
| Куриш botikacby | Сydті Кыздуру | 5-6 | Баяу кайнатын Kою | 2-3 | |
5. TexHnKaJIbIK Kbl3MeT KOpceTy
ПлntаТуТХнКалык КьI3МТ КерсETY
CaK 60JIbIbI3! KaHdA Ja 6ip Ta3aJAY He TexHNkaJIbIK KbI3MeT KepCey XyMbICTapbl anDbIHda TamaK Nicipy aMakTapbIHbIN eWipyni eKeHH XeHe KbI3y NHDNKaTOPbl CeHreHIn TeKcepHl3.
5.1 Ta3aJay
ПлNTkaHbI ep naДананFaH caBbH Ta3aAnKoIKepeK.
MaHbI3AbI:
A6pa3nBti ry6kanaPdbI, wao ry6kanaPbIH naDanaHyfa 6oImaHdbI. Onapbl naDanaHcHbI3, yaKbIT eTe KeNe WbHbI 3aKbIMdaHybIMyMkiH.
IiW 6ypiKiTepi He daK KetipriTep cnaKtbi XmnaBik TitipKeHdpriTepdi naDanaHb3.
Op naJaHraH caHy, TaMaK KaJbIKTapMeH DaKTapBn Ketipy yuH nnTaHbI CaNbH api Ta3a KyiHDe YCTaHbI3.
KaHT He KypamblHa KaHT Mmwepi KeT TamaK nnTaHb3aKbIMdaIdbI XHe Depek anbHybl KepeK.
Ty3. KaHT XeHe Kym WbHbI 6eTKei 3aKbIMdaybl MyMkiH.
Ohu valjatombega version
Joonis 7
Aur imetakse valja torussteemi abi (tuleb soetada eraldi), mis on kinnitatud komplektis oleva uhendustoru flantski kulge. Valjatombetur diameeter peab olema sama mis uhendusrongal:
-kandilise valjatombeava korral 222× 89mm
- ummarguse valjatombeava korral 0 150 mm ()
Seeparast vo'tke arvesse jargmist.
Keeduala sumbolite tahendused on jargmised.
| Keeduala on sisse lülitatud | 0 |
| Power level (voimsustase) | 1...9-P |
| Residual heat indicator | H |
| Pot detector | Ø |
| Funktsion bridge aktivne | Ø |
| Funktsion temperature manager aktivne | Ø |
| Funktsion child lock aktivne | L |
Plaadi omadused
- Safe activation (turvaline aktiveerumine)
Residual Heat Indicator
Ijsungus viena ar daugiau kaitinimo zonu, apie likusi karsti pranesama specialiu vaizdo signalu atitinkamos zonos ekrane rodant simboli.
Veikimas
- Temperature Manager
- po to is naujo rinkikli + (2-FR);
9 Power Level (nivo snage)
Ploca za kuvanje ima 9 nivoa snage
Pritisnite (dotaknite) tipku za izbor + , za povećavanje nivoa snage;
Pritisnite (dotaknite) tipku za izbor - , za smanjivanje nivoa snage;
Nivo snage se prikazuje na ekranu odabranog područja:
Power Booster (povecavanje snage)
Proizvod je opreumljen dodatnim nivoom snage (iznad nivoa 9), koji ostaje aktivan u toku od 5 minuta, posle Čega se snaga vraća na prethodni nivo.
Pritisnite (dotaknite) tipku za izbor ^+ ,za povecavanje nivoa snage (iznad nivoa) i aktivirajte Power Booster Nivo snage Power Booster je prikazan na ekranu zone sa simbolom " P"
NAPOMENA: zona kuvanja (SL.19), nema tajmer za Power Booster;
Za isključivanje Power Boostera pritisnite
Bridge Zones (most područja)
zone za kuvanje, Zahvaljući funkciji Bridge, mogu raditi u kombinovanom načinu, stvarajući jeginstvenu zonu kuvanja sa istim nivoom snage. Ta funkcija omogucuje ujednaceno kuvanje i sa posudama velikih dimenzija.
NEMOJTE KORISTITI ALKOHOL!
Filter za mast
Zadržava Čestice masti nastale kuvanjem.
Mora se Čistiti Jednom mesećno (ili kada to zahteva sistem indicatorata zasićena filtera), sa blagim deterdžentima, rućno ili u masini za sude, na niskim temperaturama i kratkom ciklusu.
Residual Heat Indicator
9 Power Level (razina snage)
Ploča za kuhanje ima 9 razina snage
Pritisnite (dotaknite) izbornik + , za povećanje razine snage;
Pritisnite (dotaknite) izbornik , za smanjenje razine snage;
NEMOJTE KORISTITI ALKOHOL!
Filtar za mast
Zadrzava cesticime masti nastale kuhanjem.
Mora se cristiti Jednom mjesećno (ili kada to zahtijeva sustavPokazatelja zasicena filtera), s blagim deterdžentima, ručno ili u perilici za posude, na niskim temperaturama i kratkom ciklusu.
Residual Heat Indicator
"FILTER" (11) LED lambasi yanar
Aktif karbon koku filtresi
"FILTER"(11) LED lambasi yanip söner
- Filtrelerin doygunjuk durumunun sifirlanmasi
Caihuiyilu jiu hui bui juaa hui yiu liu qiu liu qiu
y
Aa 1
yai jia jia jia jia jia jia jia jia jia jia jia jia jia jia jia jia jia jia jia jia jia jia jia jia jia jia jia jia jia jia jia jia jia jia jia jia jia jia jia jia jia jia jia jia jia jia jia
00
2.4
J) Window J
. (aiaaa aas
Jaiyil al jie bai) Window J
Jae aee jie bai jie aie Jaii (baill jall Jaiyli
Cuiyj yll, gell gell sall jle g yj 5g
Jiee aaiuall j uall pab
Jagl yauall j uall pab l jusgill jyj jyj .
Jaaiaing Ja jia jia lac abaluy
Lajia i kai jia jia jaiuall jyj jyj
Jaiy jay jay gai kai ayaiy aiaiy aiaiy aiaiy aiaiy aiaiy aiaiy aiaiy aiaiy aiaiy aiaiy aiaiy aiaiy aiaiy aiaiy aiaiy aiaiy aiaiy aiaiy aiaiy aiaiy aiaiy aiaiy aiaiy aiaiy aiaiy aiaiy aiaiy aiaiy aiaiy aiaiy aiaiy aiaiy aiaiy ai
Aa aalaa aalaa aalaa aalaa aalaa aalaa aalaa aalaa aalaa aalaa aalaa aalaa aalaa aalaa aalaa aalaa aalaa aalaa aalaa aalaa aalaa aalaa aalaa aalaa aalaa aalaa aalaa aalaa aalaa aalaa aalaa aalaa aalaa aalaa
gai

jolll bally jn 10
jll (10) jell aie
timer 1
suiy i jy jj j j j j j j j j j j j j j j j j j j j j j j j j j j j j j j j j j j j j j j j j j j j j j j j j j
(11)FFILER
e 1
(11)FFILTER
blll l 1
1 1 bai jbi jbi jbi jbi jbi jbi jbi jbi jbi jbi jbi jbi jbi jbi jbi jbi jbi jbi jbi jbi jbi jbi jbi jbi jbi jbi jbi jbi jbi jbi jbi jbi jbi jbi jbi jbi jbi jbi jbi jbi jbi jbi jbi jbi jbi jbi jbi jbi jbi jbi j bi
Buiill pai! 10y1 Jn jin y
e 1
ab + = 0
Jai jao dai aagaaai Jss
paai! 1s Jai jao aibiy piaa FILER
Jaii i
- jbiol A 1e biial y
A
FL 7
JSSaill Jn 1s sJ 1Jn 0 0000
BL 7
$$ 1 2 1 \text {与} 7 4 = 0 $$
$$ 1 3. 1 = 1 $$
$$ 1 2 1 \div 5 \leq 4. 5 = 2 $$
blg 7.4 12y1 buaa ylaol jal
binal Power Limitation 2d ddu du
$$ (2 - F L) + \supset $$
-
a
biil
J 1
1
120 1
ailll jll aiee 1234567890123456789012345678901234567890123456789012345678901234567890123456789012345678901234567890123456789
:blalj
blalil lyi jol no

Jy111
:bi()a
(10-0)()
(0-10)()
aaiia aiee
:Timer 1
y j 1
1
gblio gblg 2100000000000000000000000000000000000000000000000
ybiw ciisio Cg jie gab aibio 5 sllii jns y: abxla
gab aebio jy jilil 10 10 (10)
Ji 1
:Timer
-
1
laal cllio 1y pI aI aiaa aai oia gai :aiia x .s jj lcl
图
Egg Timer
Egg Timer 152e aegb
aannnnae aegaa o jy
Egg Timer
.Timer
(Power Limitation)
Jeee Jeeee ee Power Limitation 20000000000000000000000000000000000000000000
biinl 1glaia gall gai y bial aie:
1
:Power Limitation 1
A
(2-FR) 1 (Child Lock) jldj 7 (7)
:
+
(2-FR)
中
(Child Lock) 1 J J a s J (7) L
Jac lal li jabia puiu Jaiy (Child Lock) Jabi Jai Jaa
(2-FR) 1c biaial g jaiu w lbc
g 1000000000000000000000000000000000000000000000000000000000000000
Cgll 1
countdown) 152
(152) gall iia jia bia jie jia kai aia (bailia jil) gall iaia jia bu gai jia jia jia jia jia jia jia jia jia jia jia jia jia jia jia jia jia jia jia jia jia jia jia jia jia jia jia jia jia

jolde biwally gll 10
a 1000
gabll adal Timer cgll dale a
+
Power Booster jiai
()
J 100000000000000000000000000000000000000000000000000000000000000000000
4 100000000000000000000000000000000000000000
-
Bridge Zones
B (Bridge) y a bll gabgab gabla glblia
G y a bgl a bia g bia laa gaa k aag
A wilg a b a lac ay b a bial aal o a c a. n i will 0
y Bb A a C a C a C a a
(1) aol al y gabll abia nnnnnaa y brrnns
(2) gill ) clll g a llaa aiball eMaster
《Secondary》
aull aal all o jai dall no gabll gblia y la dnil)
(3) 114 g rssbgs
Bridge
Temperature Manager (Temperature Manager) Temperature Manager
- jle yabicai
auiyjLd jell yj yjia bially auii (jell uil (le
j (Temperature Manager) 4rll
gabll 1go Cioafo
Safe Activation
gbln 15 gall gilj g jal 123456789011234567890123456789012345678901234567890123456789012345678901234567890123456789012345678901234567890123456789
(Pot Detector)
e 1000000000000000000000000000000000000000000
Safety Shut Down
aiaaa aiaaa 15 Jaei gai iiaia xlll, jaoy iay
abuaaall jiaattt oj y jiau uacn nn nnnn nn nnnn
(Residual Heat Indicator)
aill 1 aie 1 1 1 1 1 1 1 1 1 1 1 1 1 1 1 1 1 1 1 1 1 1 1 1 1
山
aia 1000
J
1
Ie aal gall 1y j y Jgaiuagaiu uuiu uuaa uauu uuuu uuuu uuuu uuuu uuuu uuuu uuuu uuuu uuuu uuuu uuuu uuuu uuuu uuuu uuuu uuuu uuuu uuuu uuuu uuuu uuuu uuuu uuuu uuuu uuuu uuuu uuuu uuuu uuuu uuuu uuuu uuuu uuuu uuu uuuu uuuu uuuu uuuu uuuu uuuu uuuu uuuu uuuu uuuu uuuu uuuu uuuu uuuu uuuu uuuu uuuu uuuu uuuu uuuu uuuu uuuu uuuu uuuu uuuu uuuu uuuu uuuu uuuu uuuu uuuu uuuu uuuu
#
Power Level 9
9 100000000000000000000000000000000000000000000000000000
channll
pss
PVC 10000000000000000000000000000000
y
DIN EN 60454
-
p#
-
aaii aai iai
jglgglge gdo ylll wllll 1y
eyslls ygdgall yllg 11. allblcldssy . jzll
nbnj bnnnnsy lalnl
.2y 2y 1y
7200 2.5 7
42.5 2
L 2.5 2
y 2.5 2
y 2.5 2
(204 4 nyni
cltylll 50 no
在 Rt ABN 中:
Jll Jlgl 1s! Ja 1
Lac no 5ll Jg Wg Sll Jll A
no y gill IaI D B G
. .all kll a s j p d Jll J
p j b j Jgill Jls Jlae Jlae J
Jn o g all pc Jd n
Jaa Jc Jg
g (Power Limitation)
()
Jlll Jusgabal pnn jbnbunall aLac
aLs gds 1c g yRgSll Jlll aS
nagd nss (g) Lgaae RgSll
pblill ayas sds dyddy .(jlll l
siil al bll dysgs wgg yBry Sll
da bua ayacg yg wgy Bgl .jlr (Power Limitator)
J 1
10
J 10000000000000000000000000000000000000000000000000000000000000000000000000000000000
3
J 5 J
J 6-2 6-2.5 5 5
5 blll gall l 4 4
5 50 50
A y
y jil 1
j jll 1
j jll
1.3 !
J 1 J 1 1 1 1 1 1 1 1 1 1 1 1 1 1 1 1 1 1 1 1 1 1 1 1 1 1 1 1 1 1 1 1 1 1 1 1 1 1 1 1 1 1 1 1 1 1 1 1 1 1 0
aaii 1
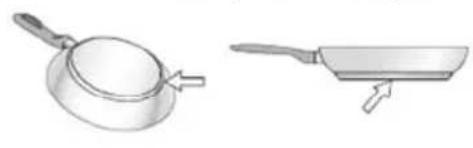
P 1
1.1.2
y 1 y 1 1 1 1 1 1 1 1 1 1 1 1 1 1 1 1 1 1 1 1
42gaiy1yj 2.1.2
abla jia 111 111 111 111 111 111 111 111 111 111 111 111 111 111 111 111 111 111 111 111 111 1
1 1
7
y 1
j 89x222 jbiwll jzall ()150 jjldl jzall
Jyolal yjelllll aalall aaiall jil llaal no jol
ciill Jsuji pe. jldll iia nssnly jol all o jali
elgljral jie jie cblalle e scls ci 1 (Jus